DMC:V2500-A0-72-41-1000-04B-710A-B|Issue No:002.00|Issue Date:2018-02-01
Export Control
EAR Export Classification: Not subject to the EAR per 15 C.F.R. Chapter 1, Part 734.3(b)(3), except for the following Service Bulletins which are currently published as EAR Export Classification 9E991:
SBE70-0992, SBE72-0483, SBE72-0580, SBE72-0588, SBE72-0640, SBE73-0209, SBE80-0024 and SBE80-0025.
Copyright
© IAE International Aero Engines AG (2001, 2014 - 2021)
The information contained in this document is the property of © IAE International Aero Engines AG and may not be copied or used for any purpose other than that for which it is supplied without the express written authority of © IAE International Aero Engines AG. (This does not preclude use by engine and aircraft operators for normal instructional, maintenance or overhaul purposes.).
Common Information
TASK 72-41-10-440-004-A00 HPC Rotor Assembly - Grind The Tips Of The HPC Blades, Assembly-004
General
This TASK gives the procedure to grind the HP compressor blade tips by plunge grinding.
Special torque data is identified with the symbol * after the torque value.
The grinding and machine data which follows is a guideline. Contact IAE for additional data.
The grinding machine used must meet the conditions which follow:
It must have a device to remove dust during grinding and dressing.
It must have a measuring device which can distinguish the number 1 blade on each stage and record the other blades in sequence from the number 1 blade. It must measure each blade tip during the grinding operation.
It must have a hardware limiting device to prevent the measuring device from touching the blade tips during rotor measurement.
The machine must have a device which can deburr the rotor blades from each side.
A protective guard is recommended to contain wind and noise and be a rotor containment safety device.
The machine must rotate the H.P. compressor rotor in a clockwise and counterclockwise direction. The machine must be capable of rotating the rotor at the speeds required in methods 1, 2 or 3. Refer to Step, Step, Step.
A machine warm up run is recommended before grinding operations start.
You must always obey the standard safety procedure.
The grinding procedure must be done dry and the grinding wheel plunged in to the blade and permitted to spark-out. Grinding burrs must be removed from the blade tips with an abrasive brush driven by an air motor.
One of the approved procedures must be adopted. Refer to methods 1, 2 and 3 in Step, Step, Step.
NOTE
To identify the consumable materials refer to the PCI.
NOTE
Special tools are identified in the procedure by the tool primary number.
Preliminary Requirements
Pre-Conditions
NONEConsumables, Materials and Expendables
Spares
NONESafety Requirements
NONEProcedure
SUBTASK 72-41-10-440-108 Install the HP Compressor Rotor Assembly in to the Grinding Machine
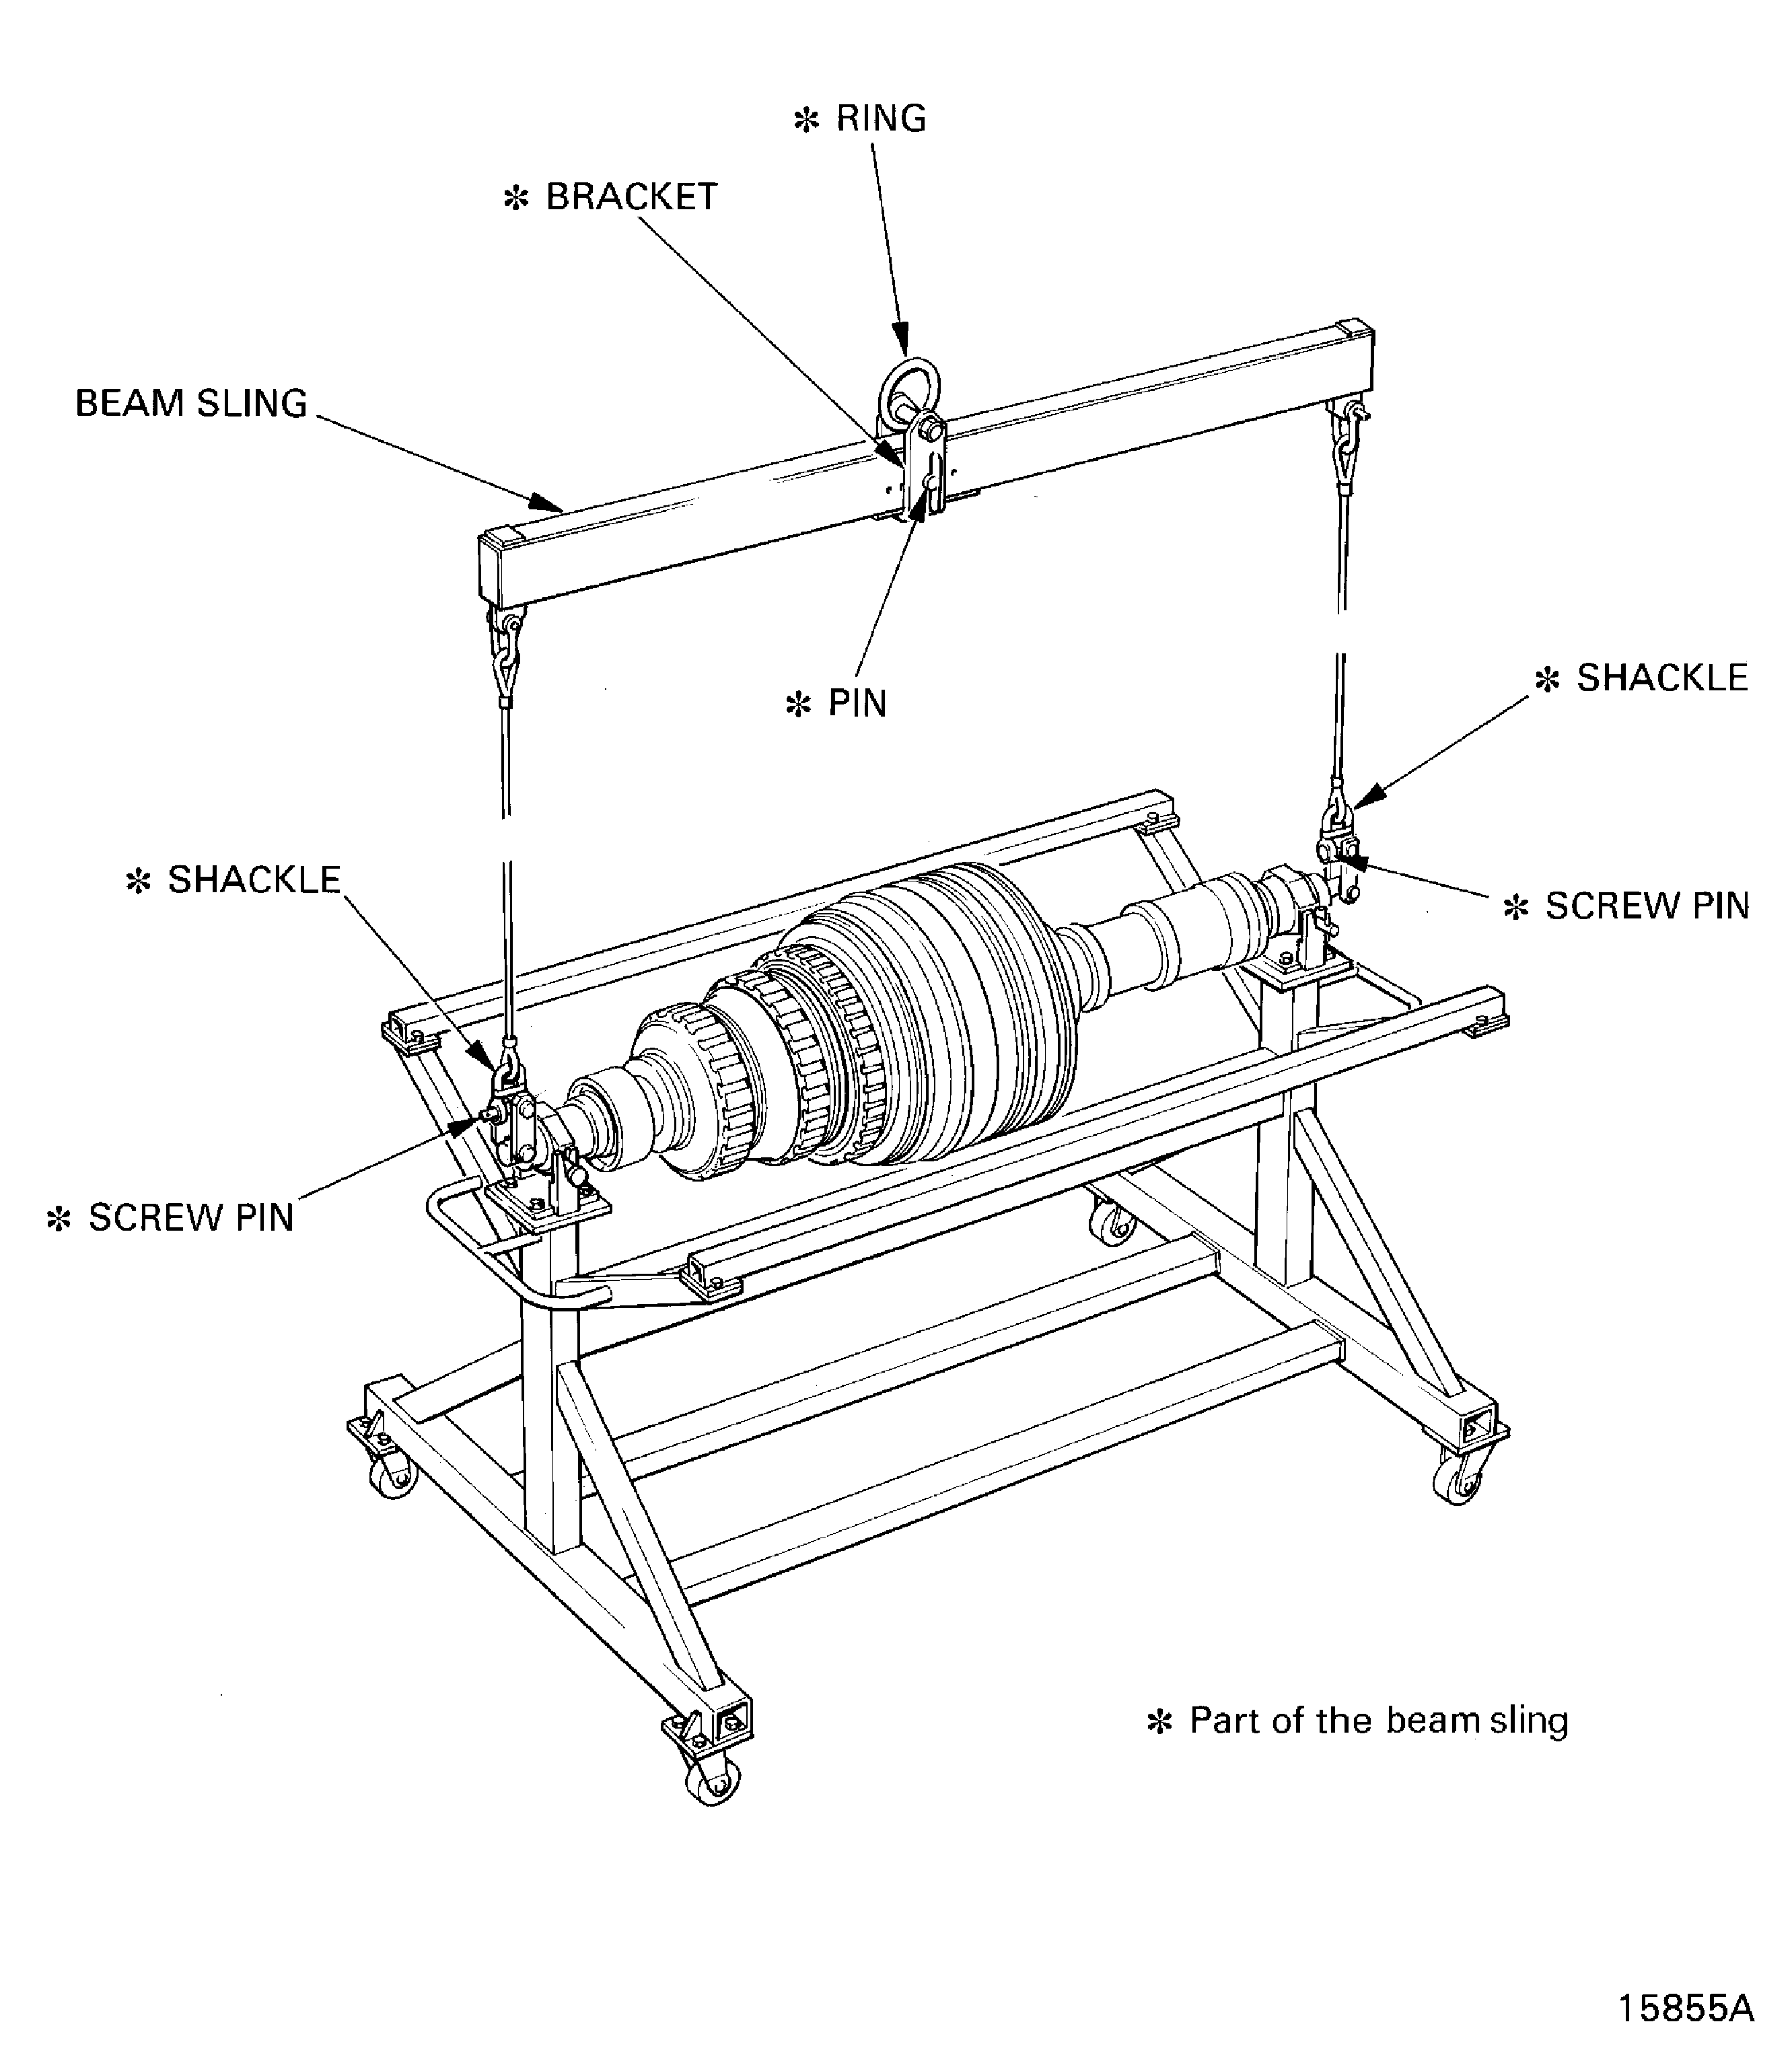
Make sure that the bracket is at the identified position for the center of gravity of the beam sling only.
Attach a hoist to the ring.
Lift the beam sling and put it above the rotor assembly.
Adjust the height of the beam sling until the shackles and screw pins can be attached to the universal sling adapter. Remove the screw pins.
Install the screw pins through the shackles and universal sling adapters; tighten the screw pins.
Set the beam sling to the identified position for the center of gravity of the beam sling and rotor assembly.
NOTE
The applicable stand is identified by machine type.
Carefully lift the HP compressor rotor assembly out of the trolley and install it on to an applicable stand which will permit the grinding machine tools to be installed.
Remove the beam sling from the HP compressor rotor assembly.
Set the beam sling to the identified position for the center of gravity of the beam sling only.
Remove the screw pins from the shackles and disengage the shackles from the universal sling adapters.
Install the screw pins in to the shackles and then lift the beam sling away from the rotor assembly. Put the beam sling on to an applicable surface and remove the hoist.
CAUTION
YOU MUST BE CAREFUL NOT TO DAMAGE THE CURVIC TEETH OF THE DUMMY STUBSHAFT AND THE STAGE 3 DISK, WHEN THE DUMMY STUBSHAFT IS REMOVED FROM THE HP COMPRESSOR ROTOR ASSEMBLY.
NOTE
The applicable grinding machine adapters are identified by machine type.
Install the applicable grinding machine adapters on to the HP compressor rotor assembly to prepare it for installation in to the grinding machine.
NOTE
The applicable tools are identified by machine type.
Install the applicable tools which are necessary to lift the HP compressor rotor assembly.
Carefully lift the HP compressor rotor assembly and install it in to the grinding machine.
Safety the headstock and tailstock adapters in position.
Remove the tools which were used to lift the HP compressor rotor assembly.
SUBTASK 72-41-10-220-073 Measure the Swash and Run-out of the HP Compressor Rotor Assembly
Measure the swash and run-out of the HP compressor rotor assembly on the applicable tool surfaces relative to the curvic pitch diameter and the rear shaft bearing surface.
Make sure the swash and run-out are not more than 0.0012 in. (0.03 mm).
SUBTASK 72-41-10-220-074-A00 DELETED
SUBTASK 72-41-10-220-074-B00 Measure the Length of the HP Compressor Rotor Blades (SBE 72-0370)
SBE 72-0370: HP compressor blades - introduction of increased stage 4 rotor blade tip clearance
WARNING
YOU MUST LOCK ALL MACHINE GUARDS IN THE SAFETY POSITION BEFORE MOTOR DRIVES ARE ENGAGED.
CAUTION
YOU MUST USE A HARDWARE LIMITING DEVICE TO PREVENT THE MEASURING DEVICE FROM TOUCHING THE BLADE TIPS DURING ROTOR MEASUREMENT.
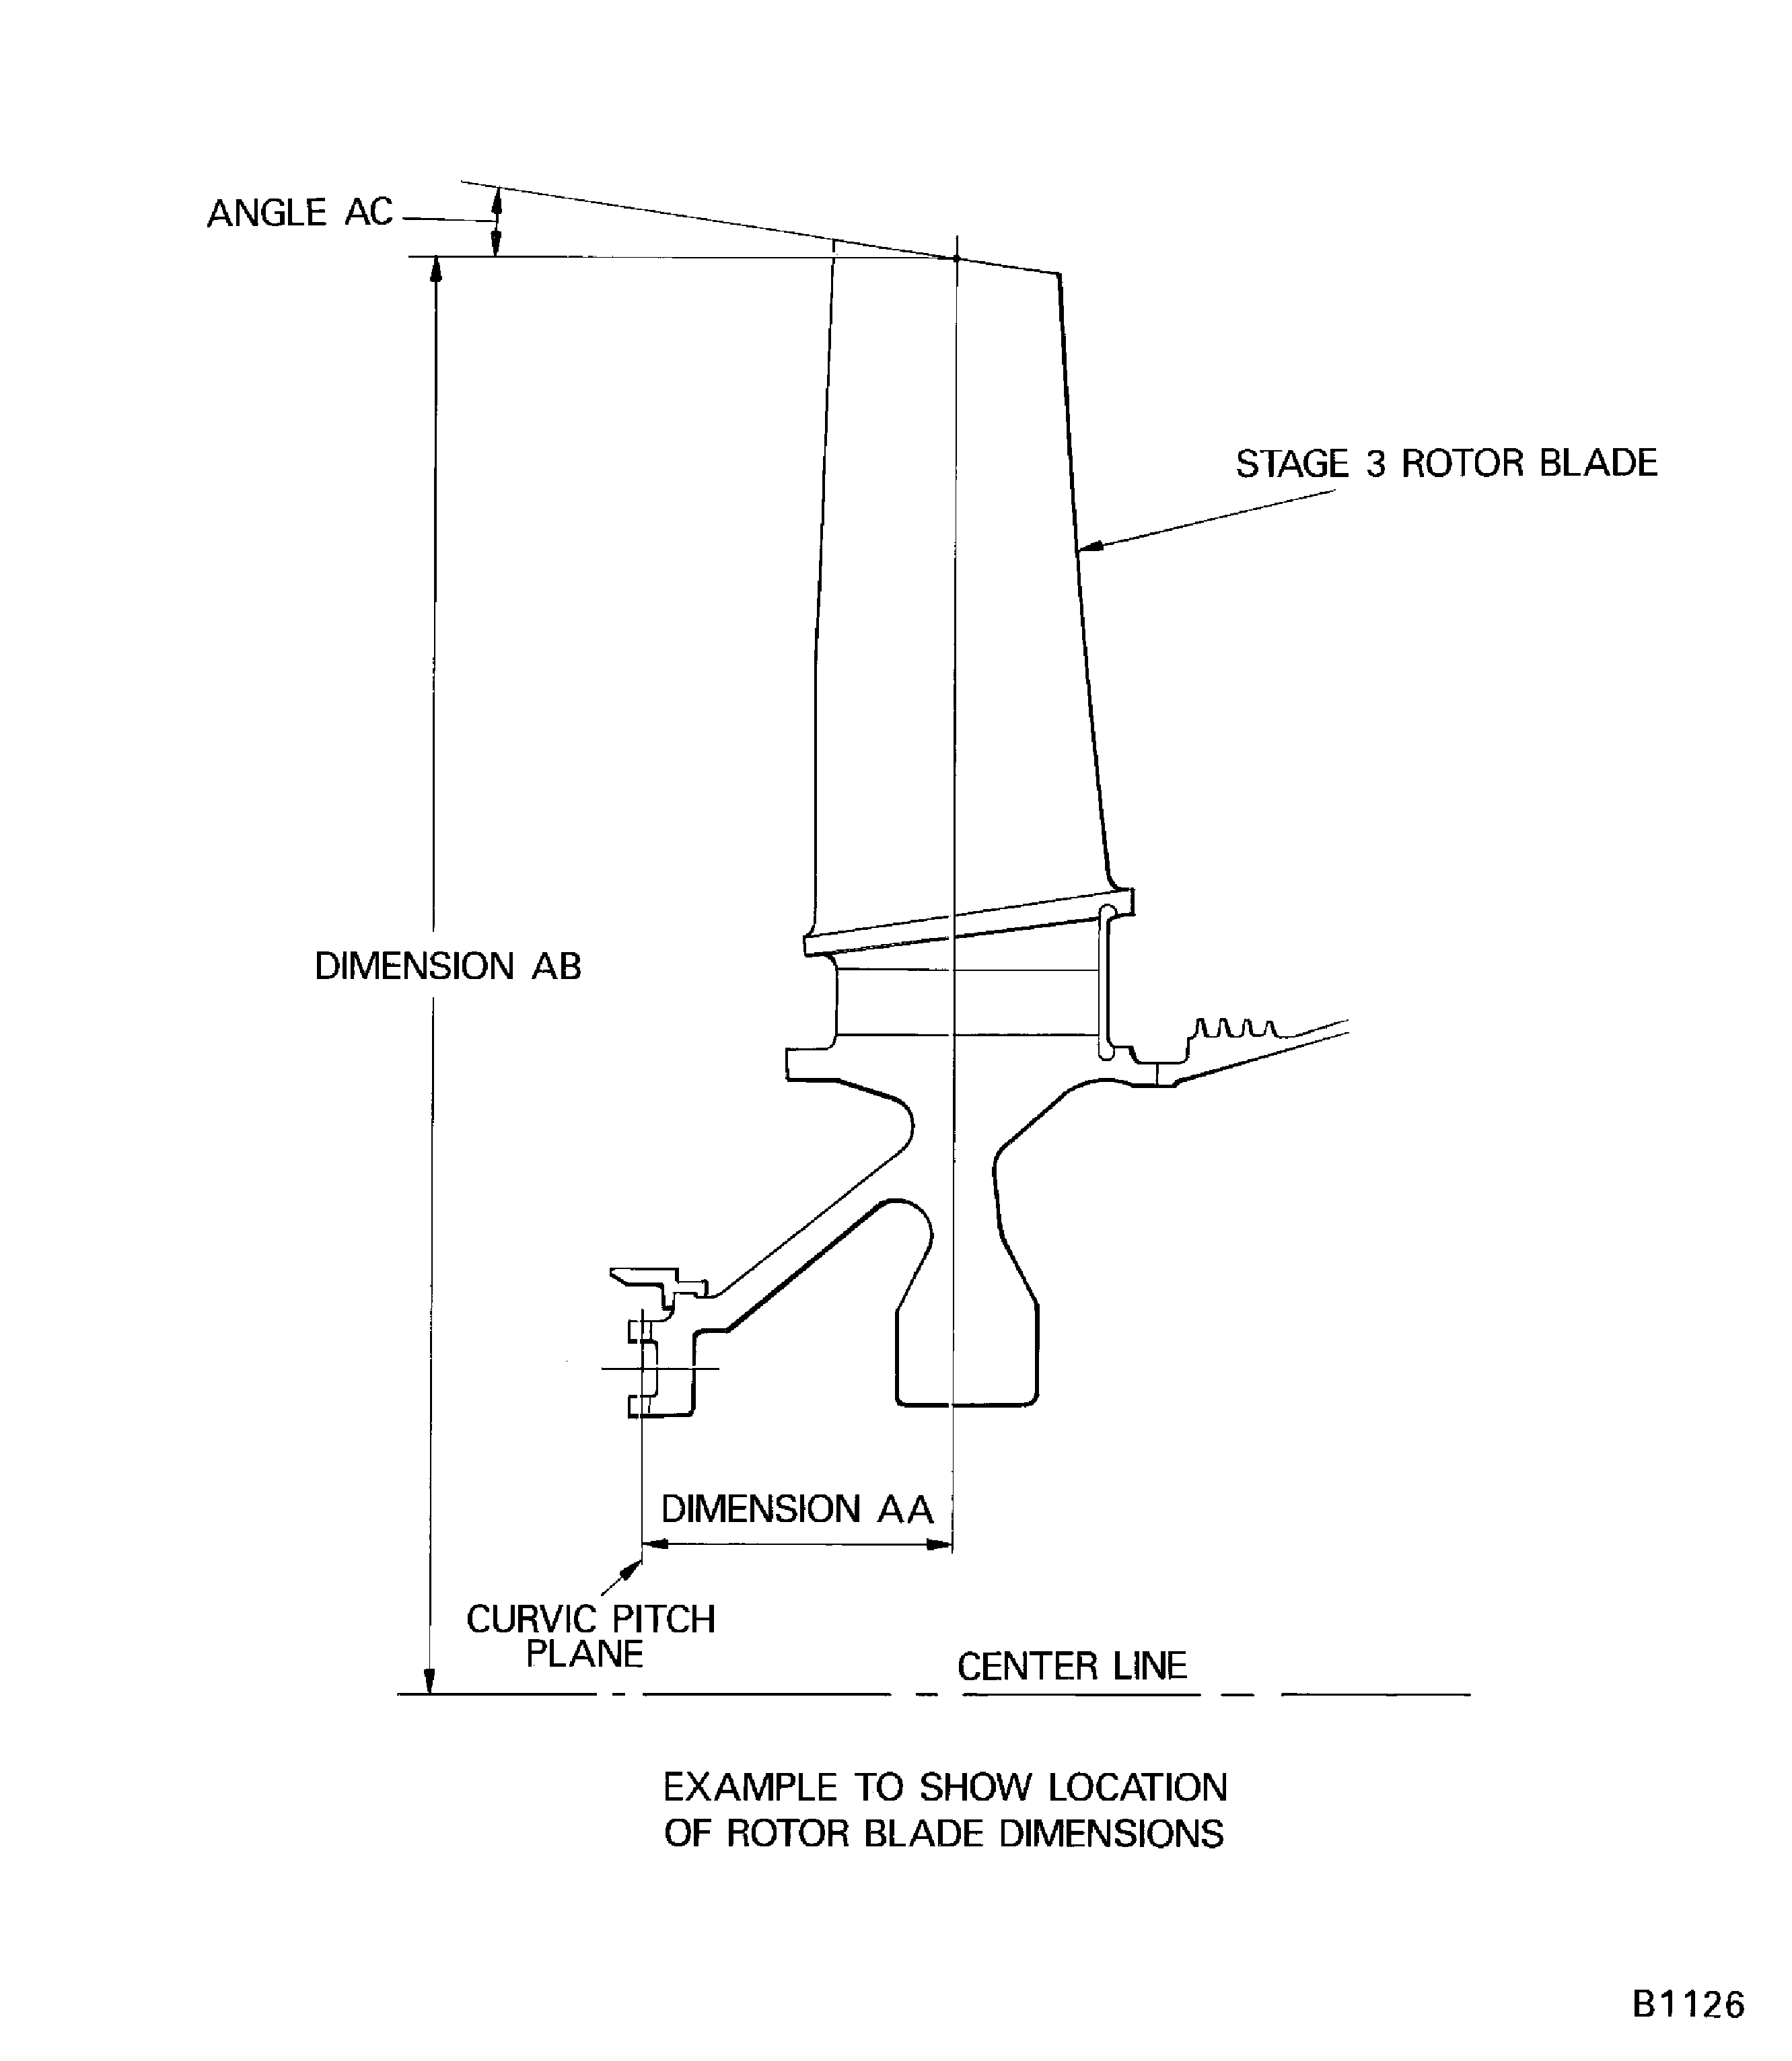
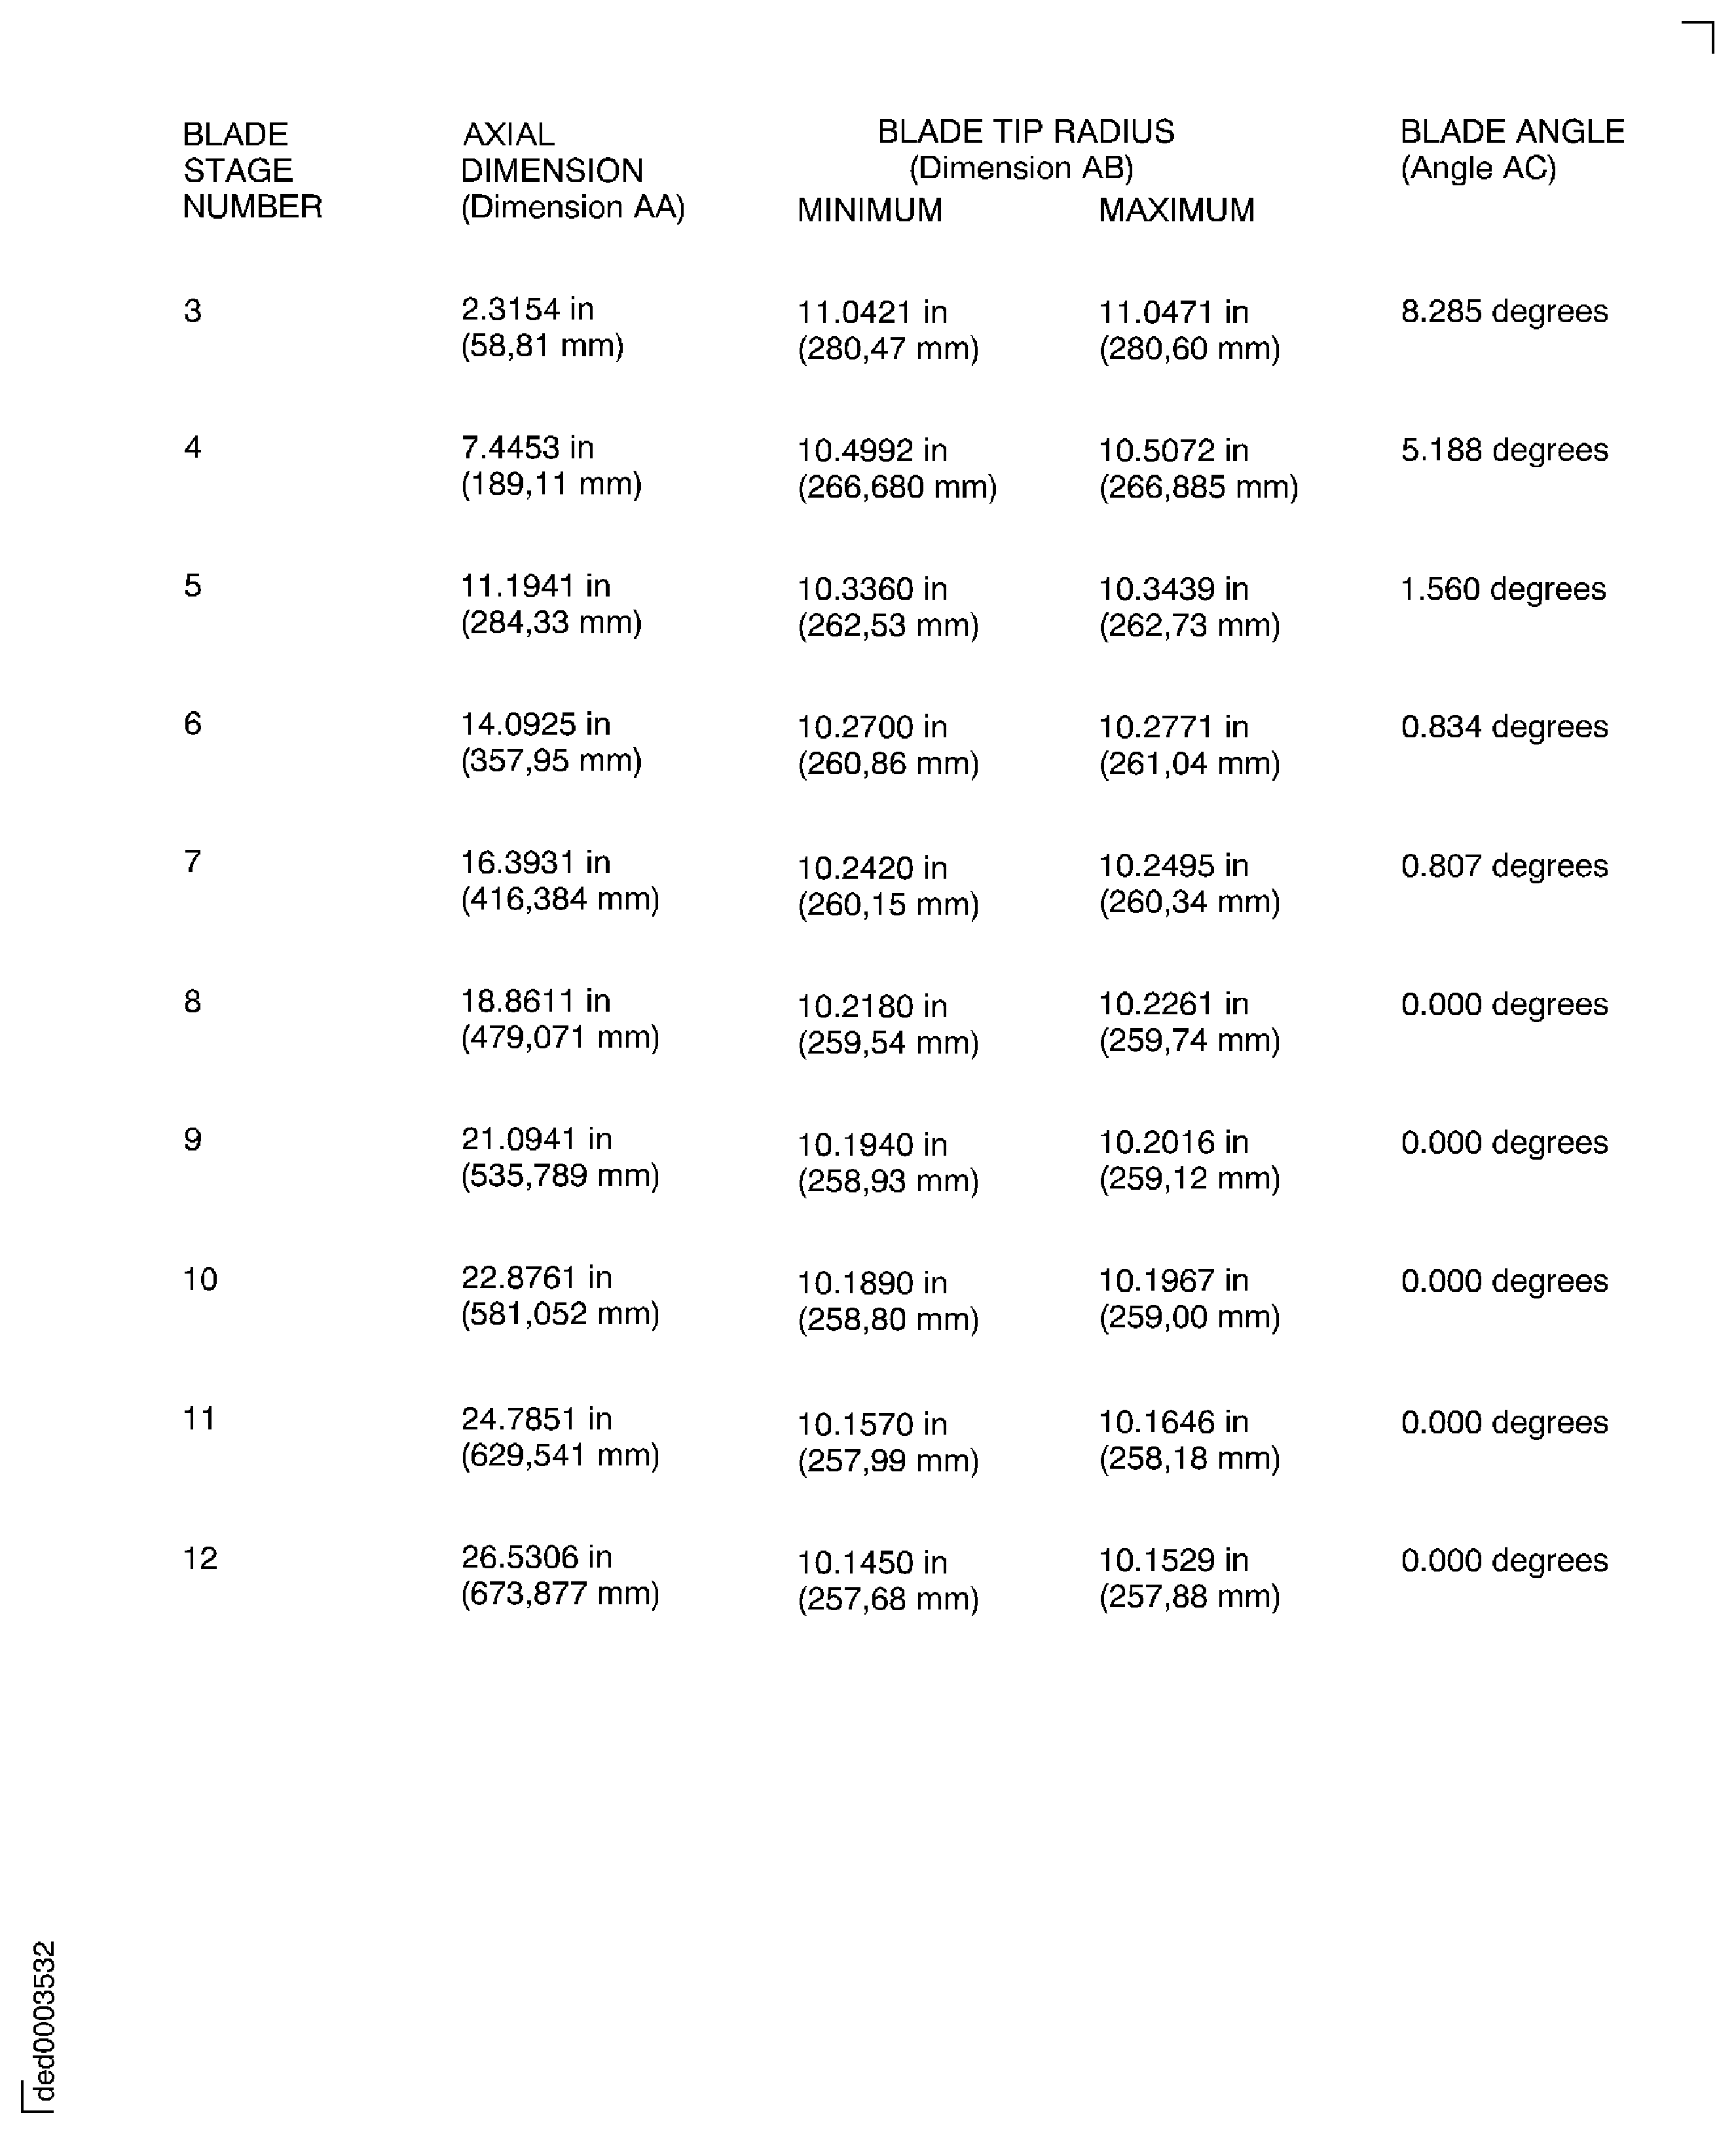
Move the measuring device axially to the correct position for the stage of blades which are to be measured. Refer to Figure for the applicable axial position (Dimension AA) measured from the curvic pitch plane.
Set the machine to turn the HP compressor rotor assembly at the speed and direction detailed in the preferred method 1, 2 or 3. Refer to Step, Step, Step.
Start the machine and record the HP compressor blade tip radii (Dimension AB). Refer to Figure for the limits.
Do Step to Step for the remaining stages of blades.
SUBTASK 72-41-10-324-053-B01 Grind the HP Compressor Rotor Blade Tips, Method 1 (SBE 72-0370)
WARNING
YOU MUST LOCK ALL MACHINE GUARDS IN THE SAFETY POSITION BEFORE MOTOR DRIVES ARE ENGAGED.
CAUTION
YOU MUST USE A HARDWARE LIMITING DEVICE TO PREVENT THE MEASURING DEVICE FROM TOUCHING THE BLADE TIPS DURING MEASUREMENT.
SBE 72-0370: HP compressor blades - introduction of increased stage 4 rotor blade tip clearance
For grinding all stages use a NORTON 32A 60 KVBEP grade wheel. The wheel must have a maximum diameter of 30.0 in. (762 mm) and a minimum diameter of 22.0 in. (560 mm).
Set the grinding machine to turn the grinding wheel at 850 rpm in a counter clockwise direction (direction and at a feed rate of 0.003 in/min (0.08 mm/min).
Set the grinding machine to turn the HP compressor rotor in a clockwise direction (direction of engine turn) when viewed from rear at the following speed (+/- 50 rpm).
Axially align the stage of rotor blades and grinding wheel. Refer to Figure and Figure for the correct axial position (dimension AA) measured from the curvic pitch plane.
Adjust the grinding wheel to the correct angle (angle AC) for the stage of blades. Refer to Figure and Figure.
Start the machine and grind the blades to within 0.0016 in (0.04 mm) of the maximum radii (dimension AB) given in Figure and Figure.
Stop the machine and retract the grinding wheel from the blades and dress the wheel.
Set the grinding machine to a feed rate of 0.0012 in/min (0.03 mm/min).
Start the machine and grind the blades down to finished size within the limits given in Figure. Allow the grinding wheel to spark out.
Measure the blade tip radii and make sure they are within the limits given in Figure. The rotor speed for measuring the blade radii must be 1200 to 2000 rpm (+/- 50 rpm). Refer to Step for the procedure to measure the radii.
Use a KORFILE 180 Grit deburr brush.
Set the brushes to the correct angle (angle AC) for the stage of blades. Refer to Figureand Figure.
Set the machine to turn the rotor assembly in a counter clockwise direction at 50 rpm and the deburr brush to turn in a clockwise direction at 1125 rpm.
Start the machine and touch the brushes on to the rotor blade tips and then feed the brush in 0.0060 in. (1.50 mm) and continue the deburring cycle for approximately 30 seconds, if burrs are still visible continue to deburr for 10 to 15 seconds, then stop the machine.
Set the machine to turn the rotor assembly in a clockwise direction at 50 rpm and the deburr brush to turn in a counter clockwise direction at 1125 rpm.
Start the machine and touch the brushes on to the rotor blade tips and then feed the brush in 0.0060 in. (1.50 mm) and continue the deburring cycle for approximately 30 seconds, if burrs are still visible continue to deburr for 10 to 15 seconds.
If burrs are still visible on the rotor blade tips use a silicon carbide stone (Indian wedge stone) to remove the burr.
Do Step thru Step for the remaining stages of blades.
SUBTASK 72-41-10-324-053-B02 Grind the HP Compressor Rotor Blade Tips, Method 2 (SBE 72-0370)
WARNING
YOU MUST LOCK ALL MACHINE GUARDS IN THE SAFETY POSITION BEFORE MOTOR DRIVES ARE ENGAGED.
CAUTION
YOU MUST USE A HARDWARE LIMITING DEVICE TO PREVENT THE MEASURING DEVICE FROM TOUCHING THE BLADE TIPS DURING MEASUREMENT.
SBE 72-0370: HP compressor blades - introduction of increased stage 4 rotor blade tip clearance
For grinding stage 3 to 7 use a CG60J11 VR grade wheel. For grinding stage 8 to 12 use an EA603J5 V10W grade wheel. The wheel must have a maximum diameter of 18.0 in. (457 mm) and a minimum diameter of 14.0 in. (356 mm).
Set the grinding machine to turn the grinding wheel at 1250 rpm in a clockwise direction at a feed rate of 0.005 in/min (0.127 mm/min).
Set the grinding machine to turn the HP compressor rotor in a clockwise direction (direction of engine turn) when viewed from rear at 1200 rpm (+/- 50 rpm).
Axially align the stage of rotor blades and grinding wheel. Refer to Figure and Figure for the correct axial position (dimension AA) measured form the curvic pitch plane.
Adjust the grinding wheel to the correct angle (angle AC) for the stage of blades. Refer to Figure and Figure.
Start the machine and grind the blades to within 0.005 in (0.127 mm) of the maximum radii (dimension AB) given in Figure and Figure. Allow the grinding wheel to spark out.
Stop the machine and retract the grinding wheel from the blades and dress the wheel.
Set the grinding machine to a feed rate of 0.002 in/min (0.051 mm/min).
Start the machine and grind the blades to within 0.005 in (0.127 mm) of the maximum radii (dimension AB) given in Figure and Figure. Allow the grinding wheel to spark out.
Stop the machine and retract the grinding wheel from the blades and dress the wheel.
Set the grinding machine to a feed rate of 0.001 in/min (0.025 mm/min).
Start the machine and grind the blades to finished size within the limits given in Figure. Allow the grinding wheel to spark out.
Measure the blade tip radii and make sure they are within the limits given in Figure. The rotor speed for measuring the blade radii must be 1200 rpm (+/- 50 rpm). Refer to Step for the procedure to measure the radii.
Use a KORFILE 180 Grit deburr brush.
Set the brushes to the correct angle (angle AC) for the stage of blades. Refer to Fig. 72-41-10-900-171and Figure.
Set the rotor assembly to turn in a counter clockwise direction at 150 rpm and set the deburr brush to turn in a clockwise direction at 500 rpm.
Start the machine and touch the brushes on to the rotor blade tips and then feed the brush in 0.0060 in. (1.50 mm) and continue the deburring cycle for approximately 30 seconds, if burrs are still visbile continue to deburr for 10 to 15 seconds, then stop the machine.
Set the rotor assembly to turn in a clockwise direction at 150 rpm and set the deburr brush to turn in a counter clockwise direction at 500 rpm.
Start the machine and touch the brushes on to the rotor blade tips and then feed the brush in 0.0060 in. (1.50 mm) and continue the deburring cycle for approximately 30 seconds, if burrs are still visible continue to deburr for 10 to 15 seconds.
If burrs are still visible on the rotor blade tips use a silicon carbide stone (Indian wedge stone) to remove the burr.
Do steps A thru O for the remaining stages of blades.
SUBTASK 72-41-10-324-053-B03 Grind the HP Compressor Rotor Blade Tips Method 3 (SBE 72-0370)
WARNING
YOU MUST LOCK ALL MACHINE GUARDS IN THE SAFETY POSITION BEFORE MOTOR DRIVES ARE ENGAGED.
CAUTION
YOU MUST USE A HARDWARE LIMITING DEVICE TO PREVENT THE MEASURING DEVICE FROM TOUCHING THE BLADE TIPS DURING MEASUREMENT.
SBE 72-0370: HP compressor blades - introduction of increased stage 4 rotor blade tip clearance
For grinding all stages use one of the following wheel grades.
The wheel must have a maximum diameter of 30.0 in. (762 mm) and a minimum diameter of 22.0 in. (560 mm).
Set the grinding machine to turn the grinding wheel to achieve a rotor and wheel effective surface speed of 4000 to 6000 feet per minute in a counter clockwise direction and at a feed rate of 0.003 in/min (0.08 mm/min).
Set the grinding machine to turn the HP compressor rotor in a clockwise direction (direction of engine turn) when viewed from rear, at the following speed (+/- 50 rpm).
These speeds are to be used when measuring and grinding at the same time. Rotor speed for measuring only must be 12000 to 2000 rpm.
Axially align the stage of rotor blades and grinding wheel. Refer to Figure and Figure for the correct axial position (dimension AA) measured from the curvic pitch plane.
Adjust the grinding wheel to the correct angle (angle AC) for the stage of blades. Refer to Figure and Figure.
Start the machine and grind the blades to within 0.002 in (0.051 mm) of the maximum radii (dimension AB) given in Figure and Figure. Allow the grinding wheel to spark out.
Stop the machine and retract the grinding wheel from the blades and dress the wheel.
Set the grinding machine to a feed rate of 0.001 in/min (0.025 mm/min).
Start the machine and grind the blades down to finished size within the limits given in Figure. Allow the grinding wheel to spark out.
Measure the blade tip radii and make sure they are within the limits given in Figure. The rotor speed for measuring only must be 1200 to 2000 rpm. Refer to Step for the procedure to measure the radii.
Use a KORFILE 180 Grit deburr brush.
Set the brushes to the correct angle (angle AC) for the stage of blades. Refer to Figure and Figure.
Set the machine to turn the rotor assembly in a counter clockwise direction at 50 to 150 rpm and the deburr brush to turn in a clockwise direction at 1000 rpm.
Start the machine and touch the brushes on the rotor blade tips and then feed the brush in 0.0060 in. (1.50 mm) and continue the deburring cycle for approximately 30 seconds, if there are still burrs visible continue to deburr for 10 to 15 seconds, then stop the machine.
Set the rotor assembly to turn in a clockwise direction at 50 to 150 rpm and set the deburr brush to turn in a clockwise direction at 1000 rpm.
Start the machine and touch the brushes on to the rotor blade tips and then feed the brush in 0.0060 in. (1.50 mm) and continue the deburring cycle for approximately 30 seconds, if burrs are still visible continue to deburr for 10 to 15 seconds.
If burrs are still visible on the rotor blade tips use a silicon carbide stone (Indian wedge stone) to remove the burr.
Do steps A thru L for the remaining stages of blades.
SUBTASK 72-41-10-160-051 Remove the dust material from the HP Compressor Rotor Blade Airfoils
Clean the dust from the blades with either a clean cloth or vacuum.
SUBTASK 72-41-10-440-109 Remove the HP Compressor Rotor Assembly from the Grinding Machine and Install it in to the Trolley
NOTE
The applicable tools are identified by machine type.
Install the tools which are necessary to lift the HP compressor rotor assembly out of the grinding machine.
Attach a hoist to the tools.
Remove the bolts which secure the HP compressor rotor assembly to the headstock and tailstock of the grinding machine.
NOTE
The applicable stand is identified by machine type.
Lift the HP compressor rotor assembly out of the grinding machine and put it on to an applicable stand.
Remove the hoist and tools which were installed on to the HP compressor rotor assembly for installation in to the grinding machine.
Lift pin E and put the adapter end of the tool in to the adapter. Turn the tool to engage the locations. Lower pin E.
Install the lifting end of the tool in to the adapter end. Install the trunnion pin through both parts of the tool and tighten it.
Tighten the locknut on to the lifting adapter.
Make sure IAE 1R18673 Dummy stub shaft 1 off is installed to the HP compressor rotor assembly. Do the steps which follow if the dummy stub shaft was removed for the installation of the grinding machine tools.
Examine the curvic teeth of the dummy stub shaft and the stage 3 disk for contamination and/or high metal. If there is contamination then the curvic teeth must be cleaned. If there is high metal, use a stone to make the surface smooth.
Align the four location dowels in the dummy stub shaft with the holes in the stage 3 disk curvic coupling.
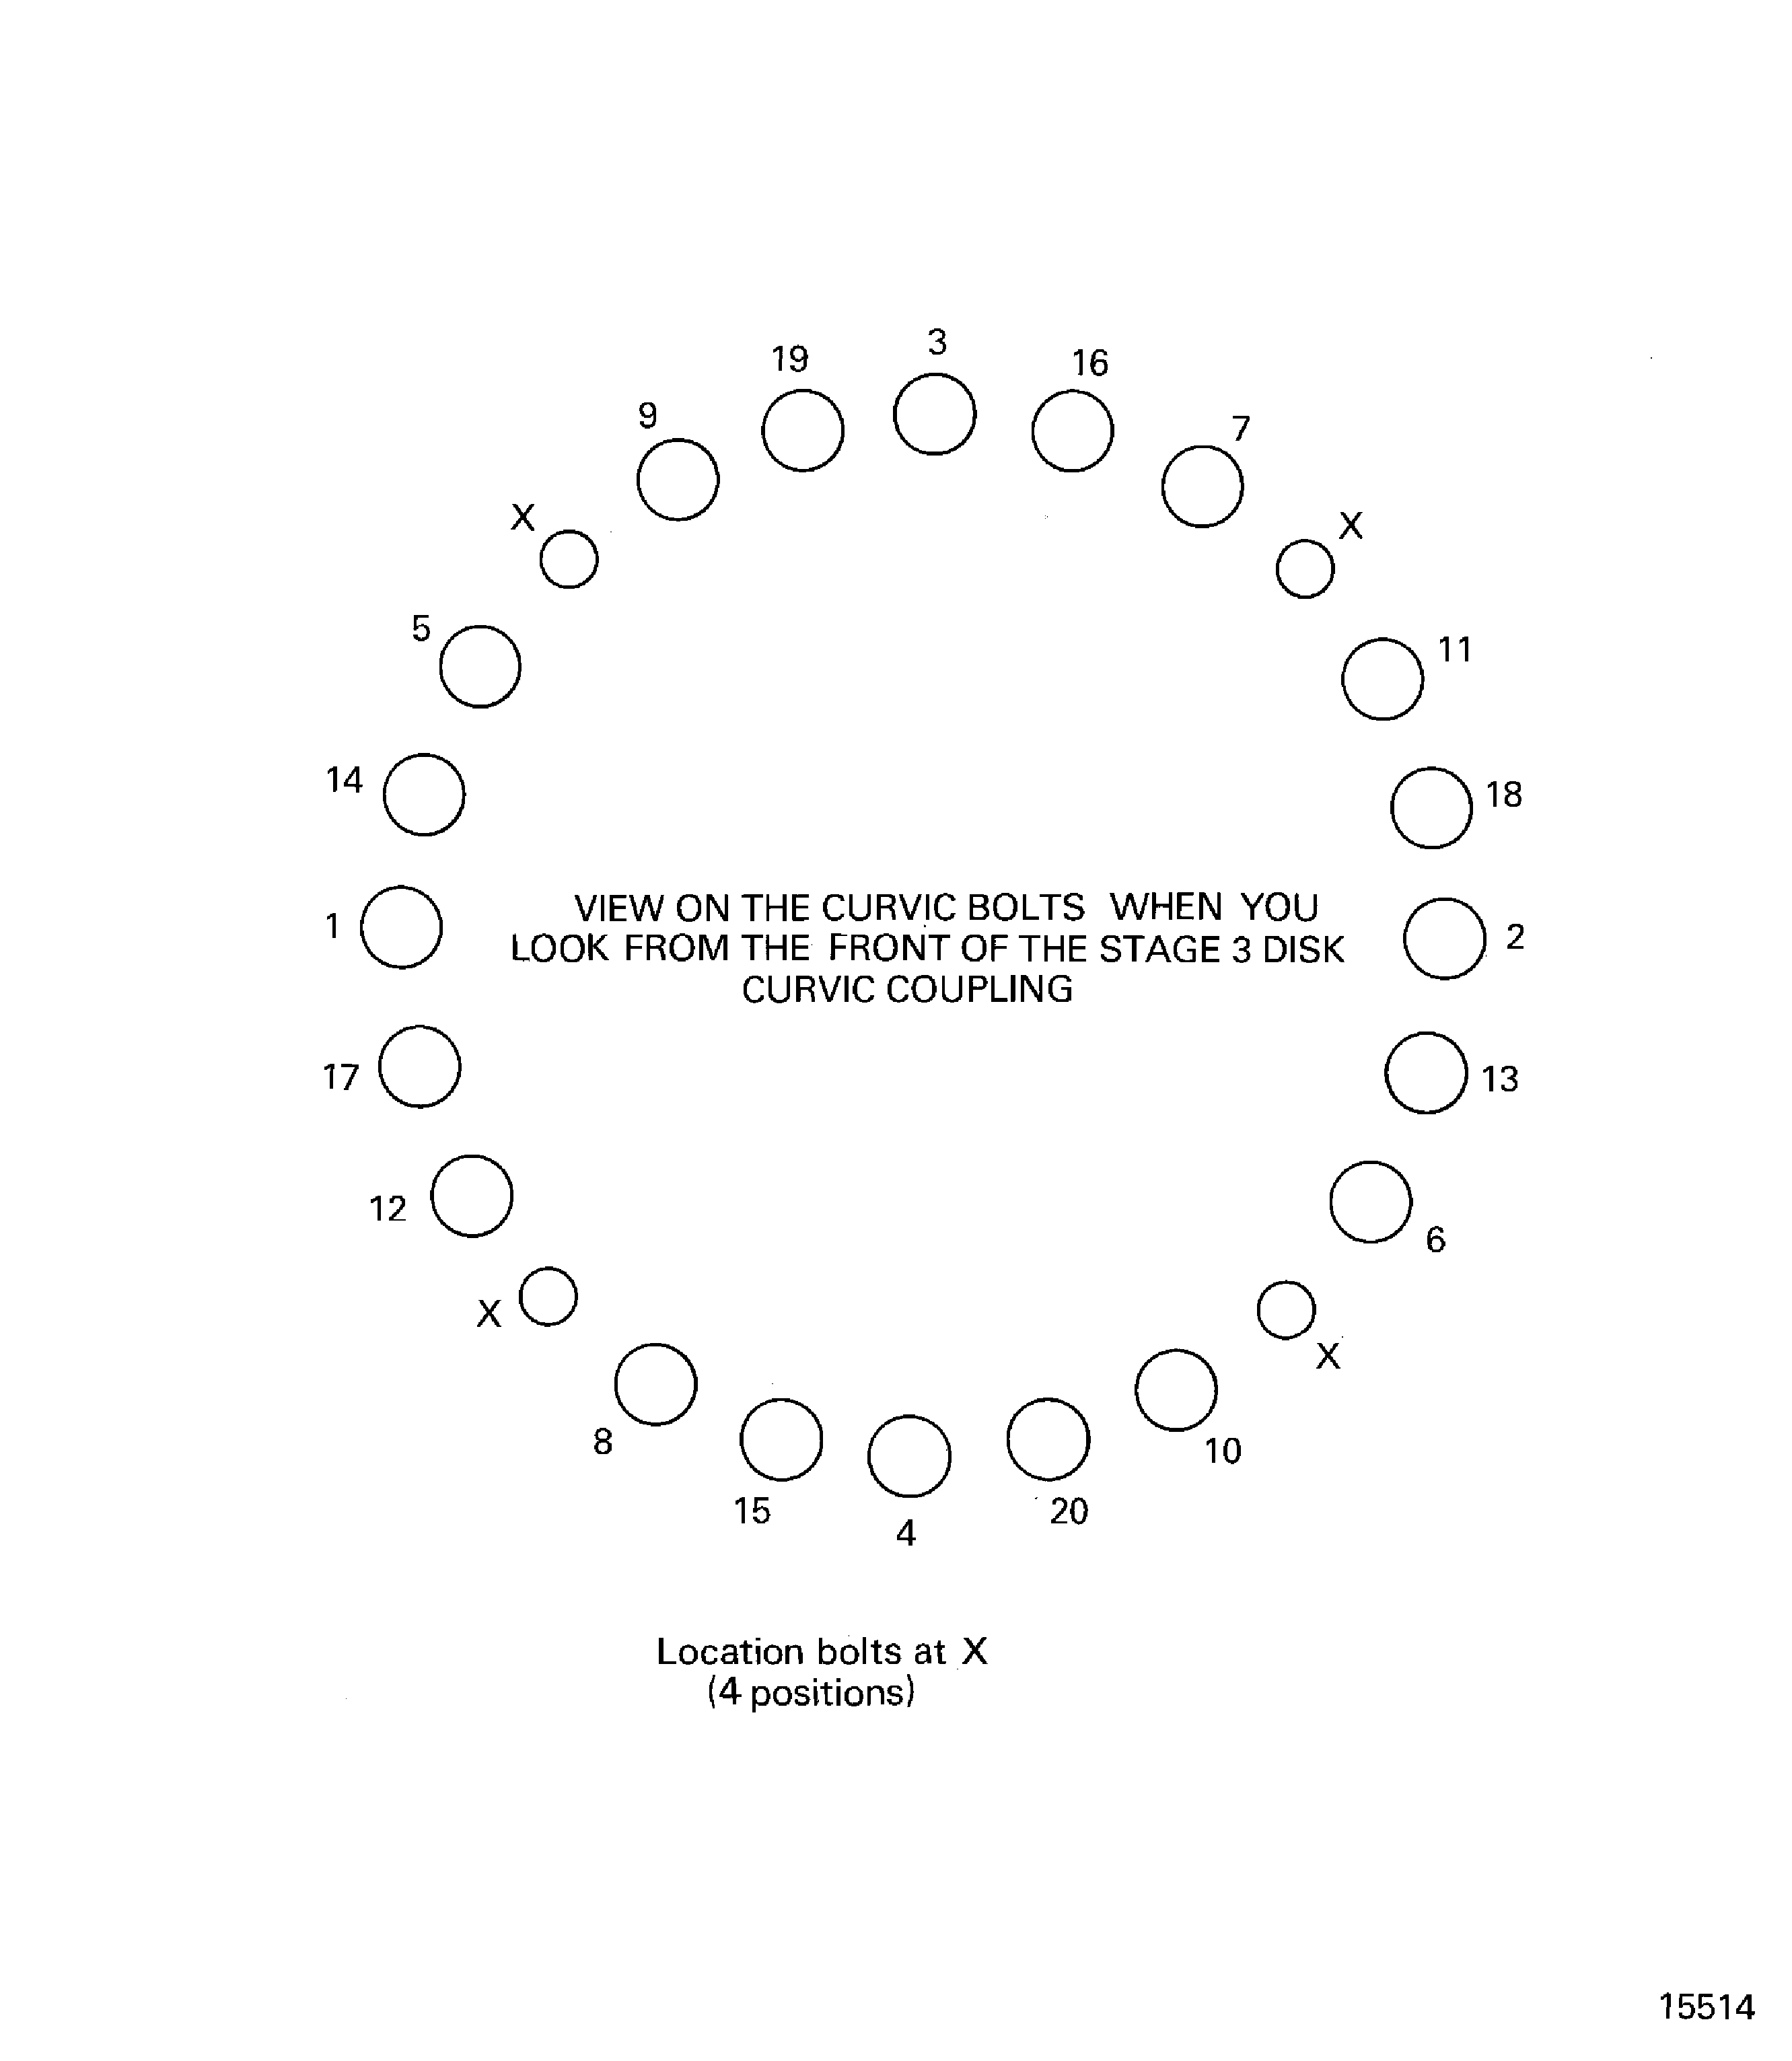
Install the dummy stub shaft on to the curvic coupling and engage the 20 bolts in the dummy stub shaft in to the holes in the stage 3 disk. Lightly tighten the bolts.
Torque all of the bolts. Do these three steps in the sequence shown. Refer to Figure.
Torque all of the bolts to 18 lbfin (2.034 Nm).
Torque all of the bolts to 35 lbfin (3.955 Nm).
Torque all of the bolts to 70 * lbfin (7.900 Nm).
Do steps H.(1) thru H.(3) again.
Lift the compressor rotor assembly and put it above the trolley. Make sure that the trunnions on the universal sling adapters are above the trunnion supports.
Carefully lower the compressor rotor assembly in to the trolley. Make sure that the trunnions on the universal sling adapters engage in the trunnion supports of the trolley.
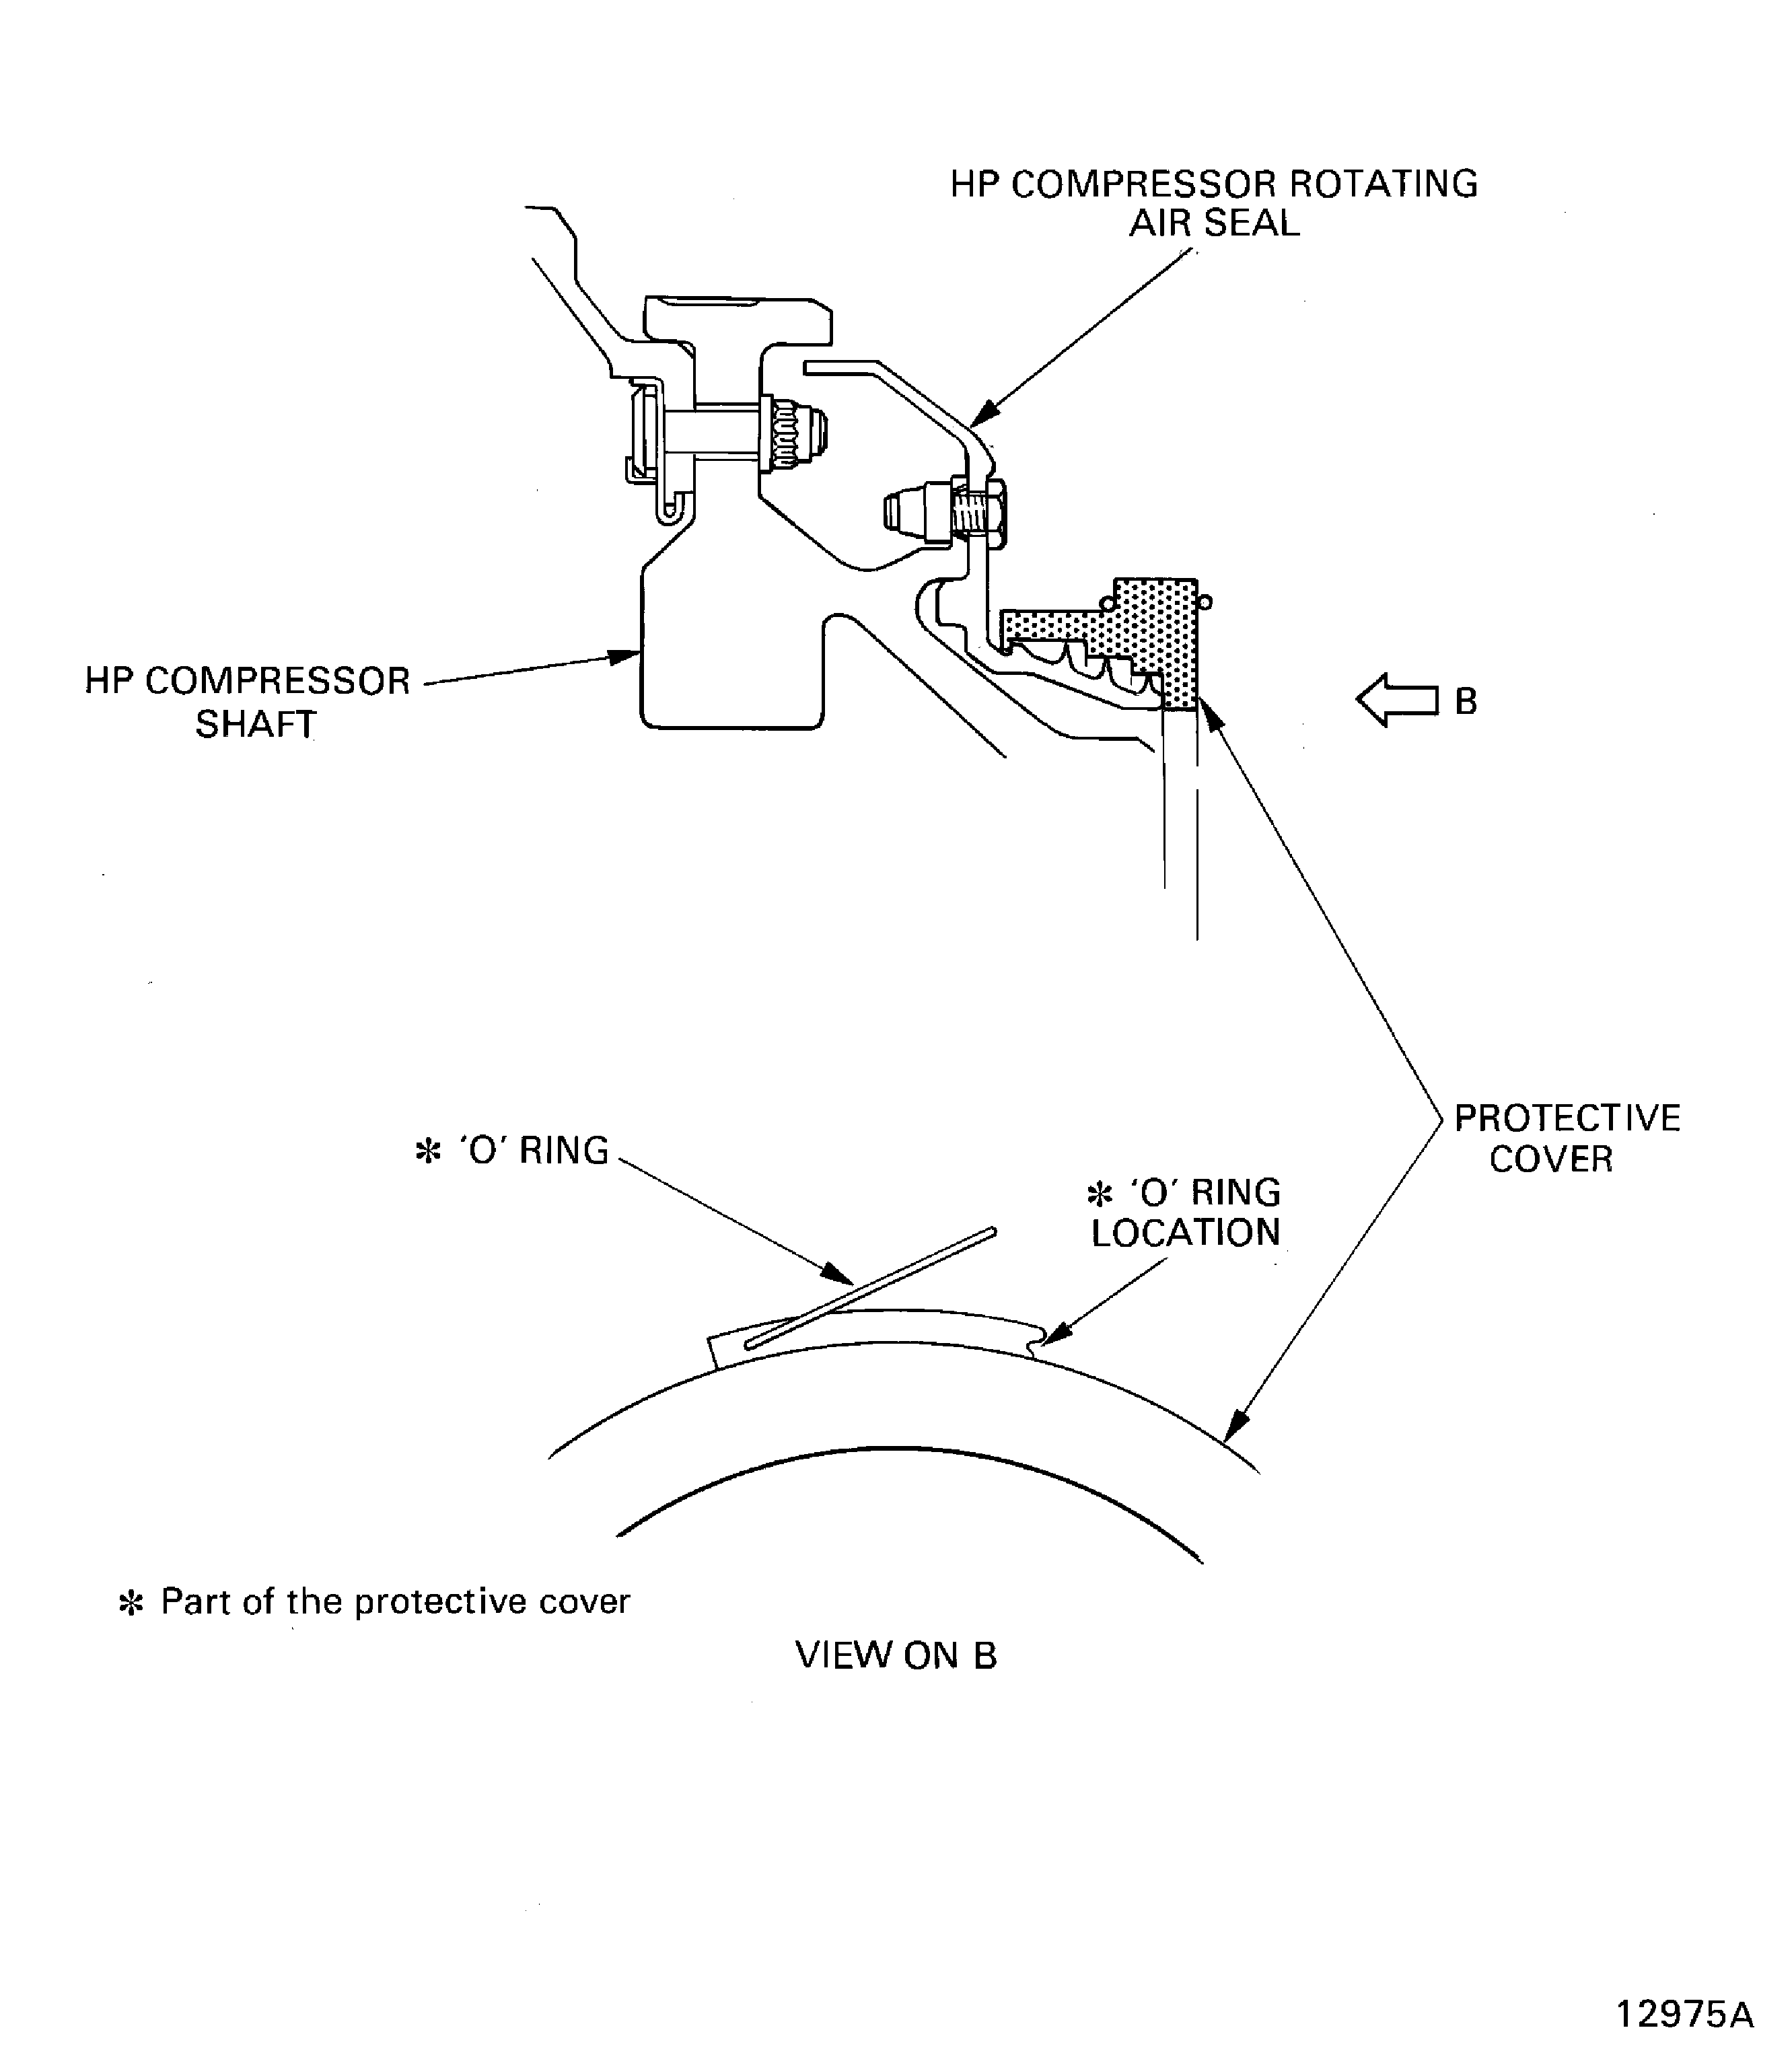
Engage the protective cover over the compressor rotating air seals. Make sure the protective cover is correctly installed on the seals.
Attach the O ring on to the O ring location to safety the protective cover.
Remove the beam sling from the compressor rotor assembly. Refer to Step.
Remove the eight bolts from the trolley rail locations.
Install the rails on to the trolley and safety with the eight bolts.
Requirements After Job Completion
Follow-On Conditions
NONE


