Export Control
EAR Export Classification: Not subject to the EAR per 15 C.F.R. Chapter 1, Part 734.3(b)(3), except for the following Service Bulletins which are currently published as EAR Export Classification 9E991: SBE70-0992, SBE72-0483, SBE72-0580, SBE72-0588, SBE72-0640, SBE73-0209, SBE80-0024 and SBE80-0025.Copyright
© IAE International Aero Engines AG (2001, 2014 - 2021) The information contained in this document is the property of © IAE International Aero Engines AG and may not be copied or used for any purpose other than that for which it is supplied without the express written authority of © IAE International Aero Engines AG. (This does not preclude use by engine and aircraft operators for normal instructional, maintenance or overhaul purposes.).Applicability
All
Common Information
TASK 72-41-12-300-019 HPC Stage 9 - 12 Drum Disk - Blend Repair To Restore The Surface Condition On The Dovetail Slots, Repair-019 (VRS9136)
Effectivity
FIG/ITEM | PART NO. | ASSEMBLY |
|---|---|---|
01-600 | 6A4131 | A |
01-600 | 6A4156 | B |
01-600 | 6A6546 | B |
01-600 | 6A7545 | A |
01-600 | 6A7546 | C |
01-600 | 6A7547 | B |
01-600 | 6A7574 | A |
Material of component
PART IDENT | SYMBOL | MATERIAL |
|---|---|---|
HP Compressor stage 9 to 12 disks shaft assembly | QZD | Inconel 718 |
General
This Repair must only be done when the instruction to do so is given in 72-41-12 Inspection.
This Repair permits the restoration of the surface condition on the dovetail slots in the areas identified AB and AC only by the application of shot-peen.
The shotpeened part of this repair requires to be source demonstrated and can only be done by approved vendors. The shotpeen areas of this repair are "Peening Critical" areas.
Each stage of the HP Compressor Stage 9 to 12 disks - shaft assembly - dovetail slots can only be shot-peened two times.
The practices and processes referred to in the procedures by the TASK/SUBTASK numbers, are in the SPM.
For Zone A, if the damage is galling only, with a maximum of 0.002 in. (0.051 mm), you must do Step.
Deleted.
NOTE
NOTE
Preliminary Requirements
Pre-Conditions
NONESupport Equipment
NONEConsumables, Materials and Expendables
NONESpares
NONESafety Requirements
CAUTION
Procedure
The designation by IAE of an Authorized Repair Vendor indicates that the Repair Vendor has demonstrated the necessary capability to enable it to carry out the listed repair work. However, IAE makes no warranties or representations concerning the qualifications or quality standards of the Repair Vendors to carry out the repair work, and accepts no responsibility whatsoever for any work that may be carried out by a Repair Vendor other than when IAE is listed as the Repair Vendor. Authorized Repair Vendors do not act as agents or representatives of IAE.
Authorized Repair Vendors for the shotpeening portion of VRS9136 are listed below:
METAL IMPROVEMENT COMPANY INC.
DERBY DIVISION (UK)
ASCOT DRIVE
DERBY DE2 8ST
ENGLAND
ATTN: DIVISION MANAGER
METAL IMPROVEMENT COMPANY INC.
145 ADDISON ROAD
WINDSOR
CONNECTICUT
CT06095
U.S.A.
ATTN: DIVISION MANAGER
MTU MAINTENANCE HANNOVER GMBH
MUNCHNER STRASSE 31
30855 LANGENHAGEN
GERMANY
ATTN. MANAGER, QUALITY ASSURANCE
ISHIKAWAJIMA-HARIMA HEAVY INDUSTRIES CO. LTD.
229 TONOGAYA, MIZUHO-MACHI
NISHITAMA-GUN
TOKYO 190-1292
JAPAN
Christchurch Engine Center (CHCEC)
115 Orchard Road
Christchurch International Airport
Christchurch 8051
New Zealand
Only the shot peening part of this Repair requires Source Demonstration. This means that any facility not authorized to shot peen, either utilize the Authorized Repair Vendors listed below or contact the IAE Repair Services Group to determine if a qualification program can be initiated at their facility.
IAE International Aero Engines AG
400 Main Street
M/S 121-10
East Hartford CT 06118
U.S.A.
Attn: Manager Technical Services
Repair Facilities
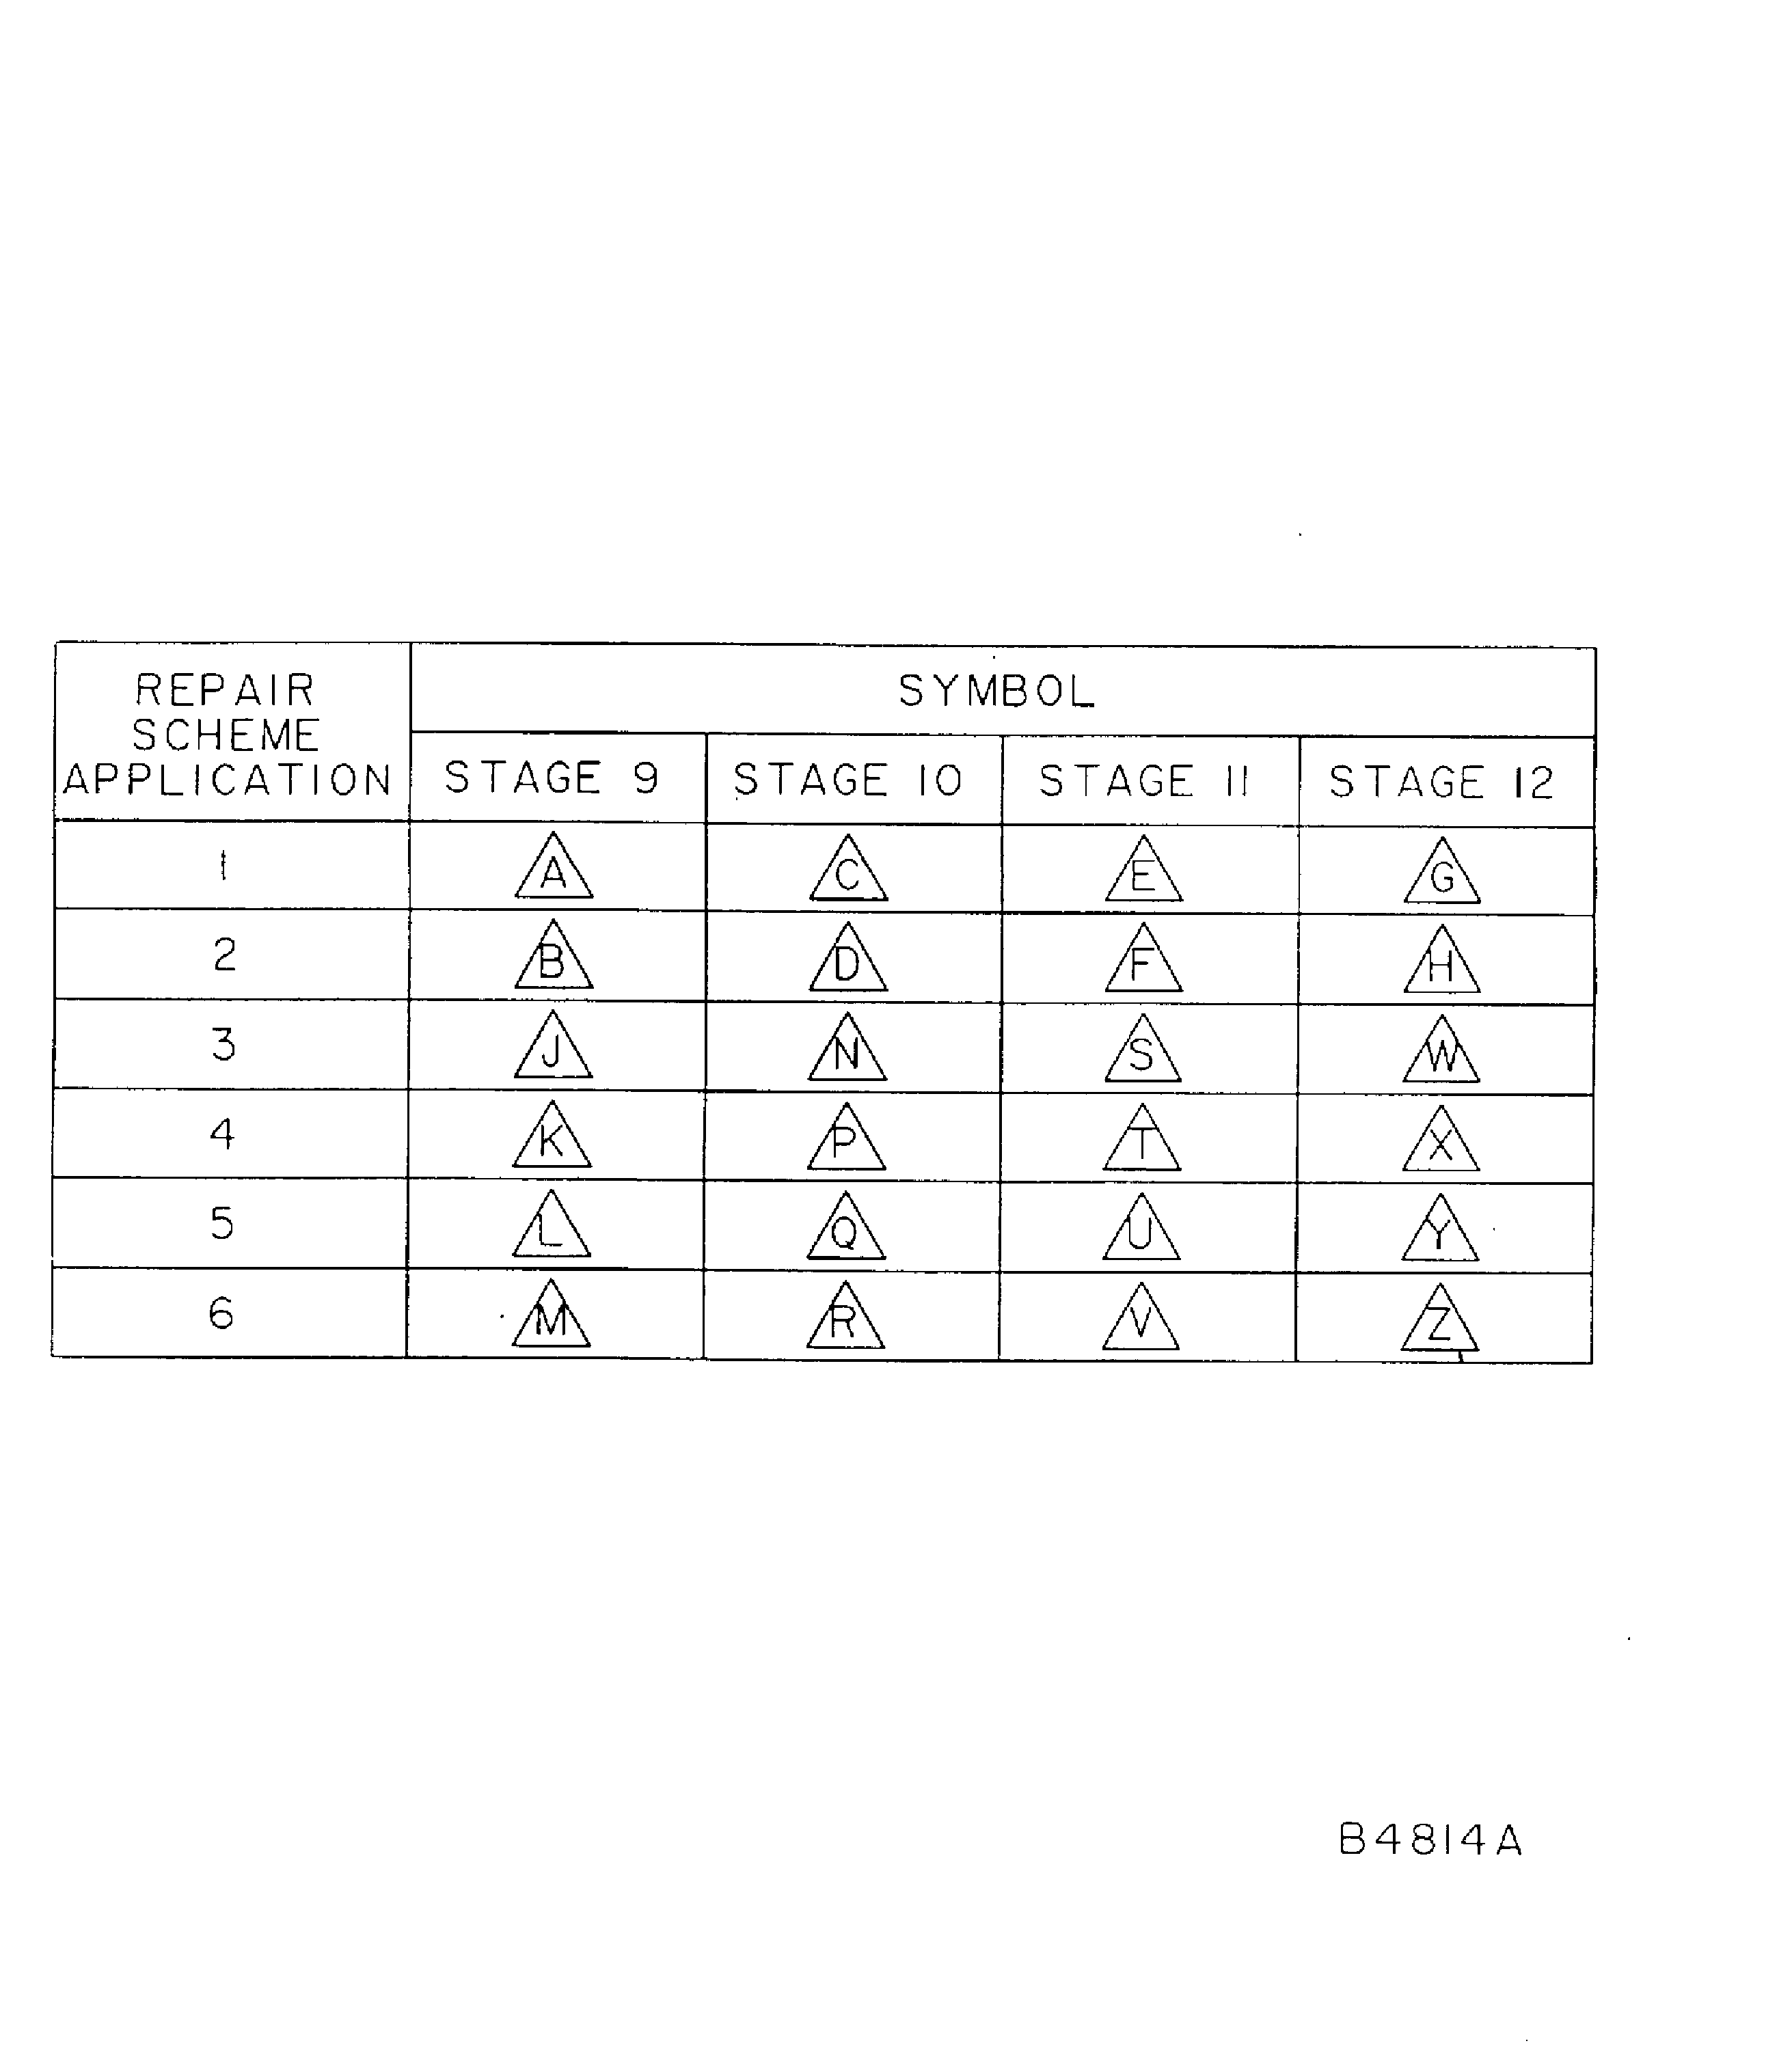
The stage 9 dovetail slot cannot be shot-peened again if you see a code symbol with the letter M. The stage 10 dovetail slot can not be shot-peened again if you see a code symbol with the letter R. The stage 11 dovetail slot can not be shot-peened again if you see a code symbol with the letter V. The stage 12 dovetail slot can not be shot-peened again if you see a code symbol with the letter Z.
Visually examine the HP Compressor stage 9 to 12 disks shaft assembly, to tell you if shot-peening has been done before in the stage 9, 10, 11 and 12 dovetail slots.
SUBTASK 72-41-12-220-094-A00 Examine the Assembly, Assembly A
The stage 9 dovetail slot can not be shot-peened again if you see a code symbol with the letter M. The stage 10 dovetail slot can not be shot-peened again if you see a code symbol with the letter R. The stage 11 dovetail slot can not be shot-peened again if you see a code symbol with the letter V. The stage 12 dovetail slot can not be shot-peened again if you see a code symbol with the letter Z.
Visually examine the HP Compressor stage 9 to 12 disks shaft assembly, to tell you if shot-peening has been done before in the stage 9, 10, 11 and 12 dovetail slots.
SUBTASK 72-41-12-220-094-B00 Examine the Assembly, Assembly B, and Assembly C
Refer to the SPM TASK 70-35-03-300-501.
You must restore corner radii.
Remove damaged material.
SUBTASK 72-41-12-350-082-A00 Remove Damaged Area(s), Assembly A, Zone B only
Refer to the SPM TASK 70-35-03-300-501.
You must restore corner radii.
NOTE
Material removal may overlap into other zones. If this occurs you must use the limits with the least material removal.Remove damaged material.
SUBTASK 72-41-12-350-082-B00 Remove Damaged Area(s), Assembly B, and Assembly C, Zone B only
Refer to the SPM TASK 70-35-03-300-501.
You must restore corner radii.
NOTE
Material removal may overlap into other zones. If this occurs you must use the limits with the least material removal.Remove damaged material.
SUBTASK 72-41-12-350-083-A00 Remove Damaged Area(s), Assembly A, Zone C only
Refer to the SPM TASK 70-35-03-300-501.
You must restore corner radii.
NOTE
Material removal may overlap into other zones. If this occurs you must use the limits with the least material removal.Remove damaged material.
SUBTASK 72-41-12-350-083-B00 Remove Damaged Area(s), Assembly B, Zone C only
Refer to the SPM TASK 70-35-03-300-501.
You must restore corner radii.
Remove damaged material.
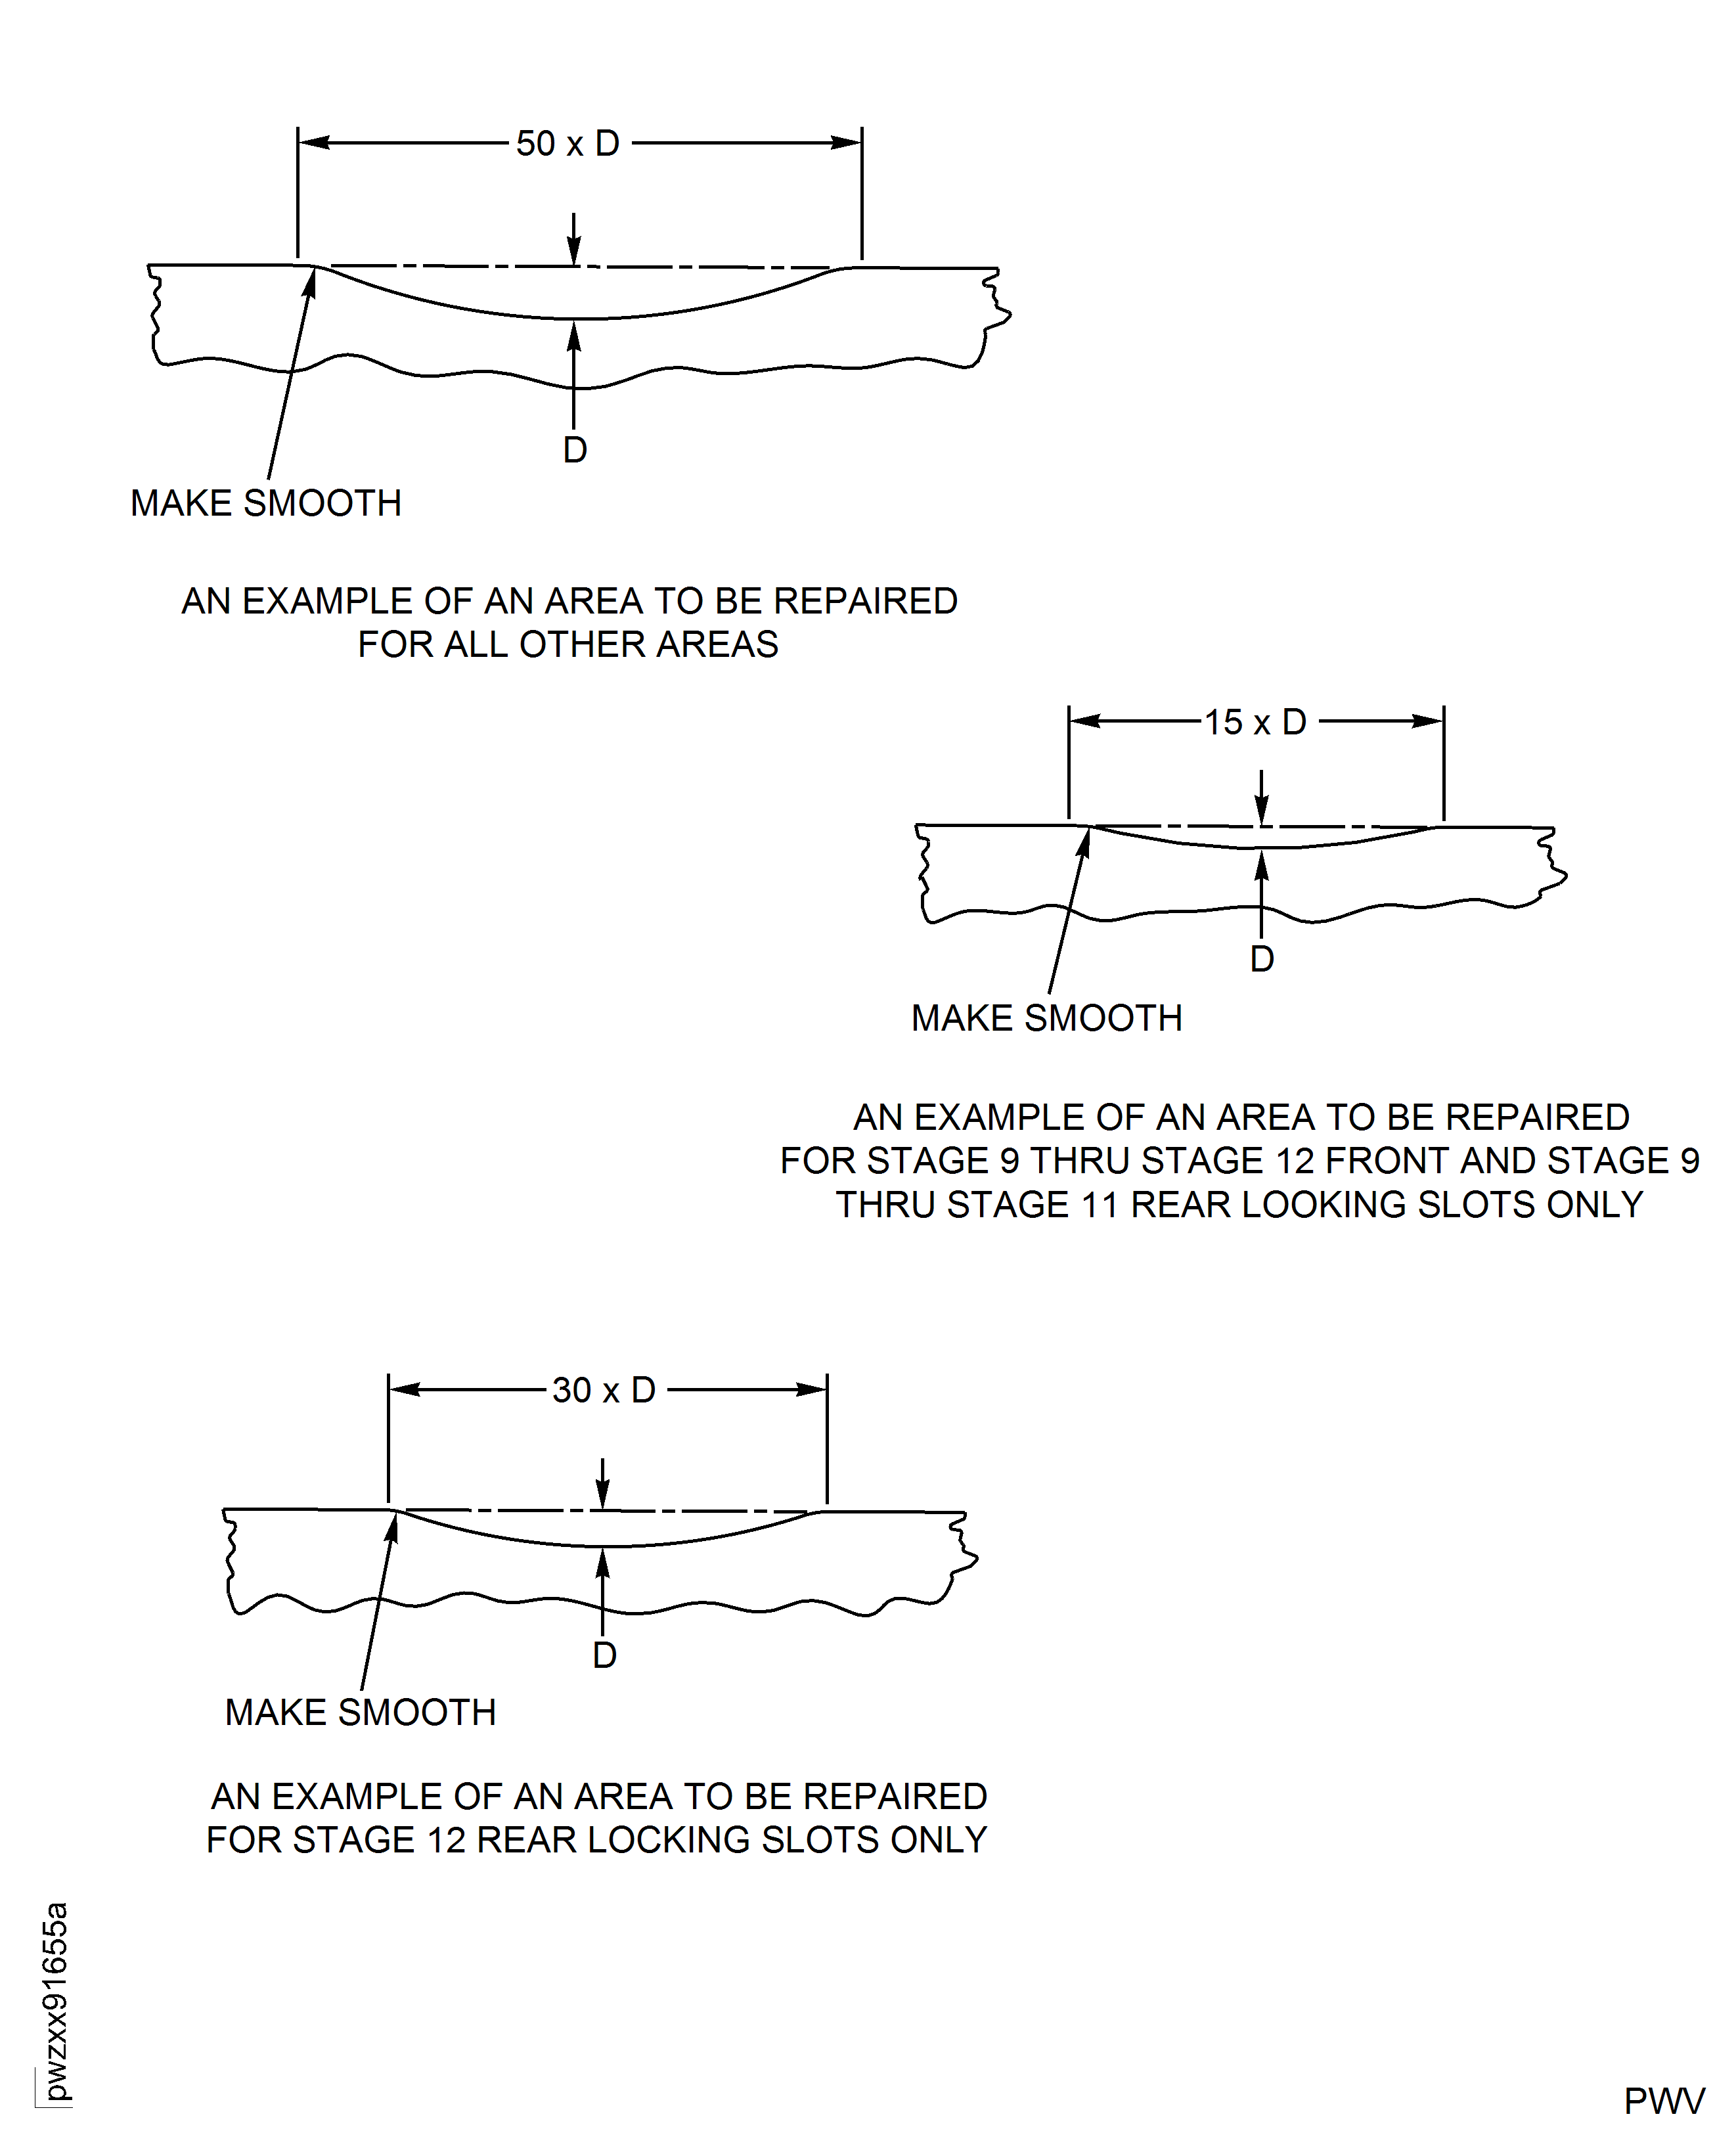
For stage 9 thru stage 12 front and rear loading slots only: If material damage is galling or frettage, you must dress to a depth to a maximum depth of 0.002 in. (0.051 mm).
For stage 9 thru stage 12 front and rear loading slots only: If material damage is nicks or scores, you must dress to 2 x depth to a maximum depth of 0.002 in. (0.051 mm).
Keep a minimum blend length to depth ratio of 15 to 1.
For stage 9 thru stage 12 front and stage 9 thru stage 11 rear locking slots only: If material damage is dents, nicks, scores, galling, or frettage, you must remove additional parent material of 0.002 in. - 0.003 in. (0.051 mm - 0.076 mm) more than the damage depth, to a maximum depth of 0.008 in. (0.203 mm).
Keep a minimum blend length to depth ratio of 30 to 1.
For stage 12 rear locking slots only: If material damage is dents, nicks, scores, galling, or frettage, you must remove additional parent material of 0.002 inch (0.051 mm) minimum more than the damage depth, to a maximum depth of 0.004 in. (0.102 mm).
SUBTASK 72-41-12-350-083-C00 Remove Damaged Area(s), Assembly C, Zone C only
Refer to the SPM TASK 70-35-03-300-501.
You must restore corner radii.
NOTE
Material removal may overlap into other zones. If this occurs you must use the limits with the least material removal.Remove damaged material.
SUBTASK 72-41-12-350-084-A00 Remove Damaged Area(s), Assembly A, Zone E only
Refer to the SPM TASK 70-35-03-300-501.
You must restore corner radii.
NOTE
Material removal may overlap into other zones. If this occurs you must use the limits with the least material removal.Remove damaged material.
SUBTASK 72-41-12-350-084-B00 Remove Damaged Area(s), Assembly B, and Assembly C, Zone E only
Refer to the SPM TASK 70-11-39-300-503.
Swab etch the repaired area(s).
SUBTASK 72-41-12-110-077 Cold Ferric Chloride Etch
Local fluorescent penetrant inspection by SPM TASK 70-23-05-230-501. Use ultra high sensitivity. Cracks are not permitted.
Fluorescent penetrant inspection by SPM TASK 70-23-04-230-501. Cracks are not permitted.
Do a penetrant crack test of the repaired area(s) by one of the following methods:
SUBTASK 72-41-12-230-073 Do a Crack Test
Refer to the SPM TASK 70-11-03-300-503.
SUBTASK 72-41-12-110-078 Chemically Clean
This is a Source Approved Repair. Send repairable parts to an approved Vendors in Repair Facilities, see Step.
Due to the critical nature of this repair, sources must demonstrate to Pratt & Whitney their capabilities to perform this repair and be licensed by Pratt & Whitney. Write to the address below for information about the qualification program to become an approved and licensed source.
Refer to the contact information provided in 70-40-00, General-01 (TASK 70-40-00-400-501), Figure 1 in the Standard Practices Manual, PN 585005.
SUBTASK 72-41-12-380-056-A00 Shotpeen the Dovetail Slot(s) Assembly A, Assembly B, and Assembly C
Refer to the SPM TASK 70-09-00-400-501.
NOTE
The letter inside the code symbol shows the number of times this area has been shotpeened.Mark a code symbol adjacent to the assembly number, use vibration peen method, to show which dovetail slot(s) on the stage 9, 10, 11, and/or 12 are shotpeened.
SUBTASK 72-41-12-350-071-A00 Identify the Repair, Assembly A
Refer to the SPM TASK 70-09-00-400-501.
NOTE
The letter inside the code symbol shows the number of times this area has been shotpeened.Mark a code symbol adjacent to the assembly number, use vibration peen method, to show which dovetail slot(s) on the stage 9, 10, 11, and/or 12 are shotpeened.
SUBTASK 72-41-12-350-071-B00 Identify the Repair, Assembly B, and Assembly C
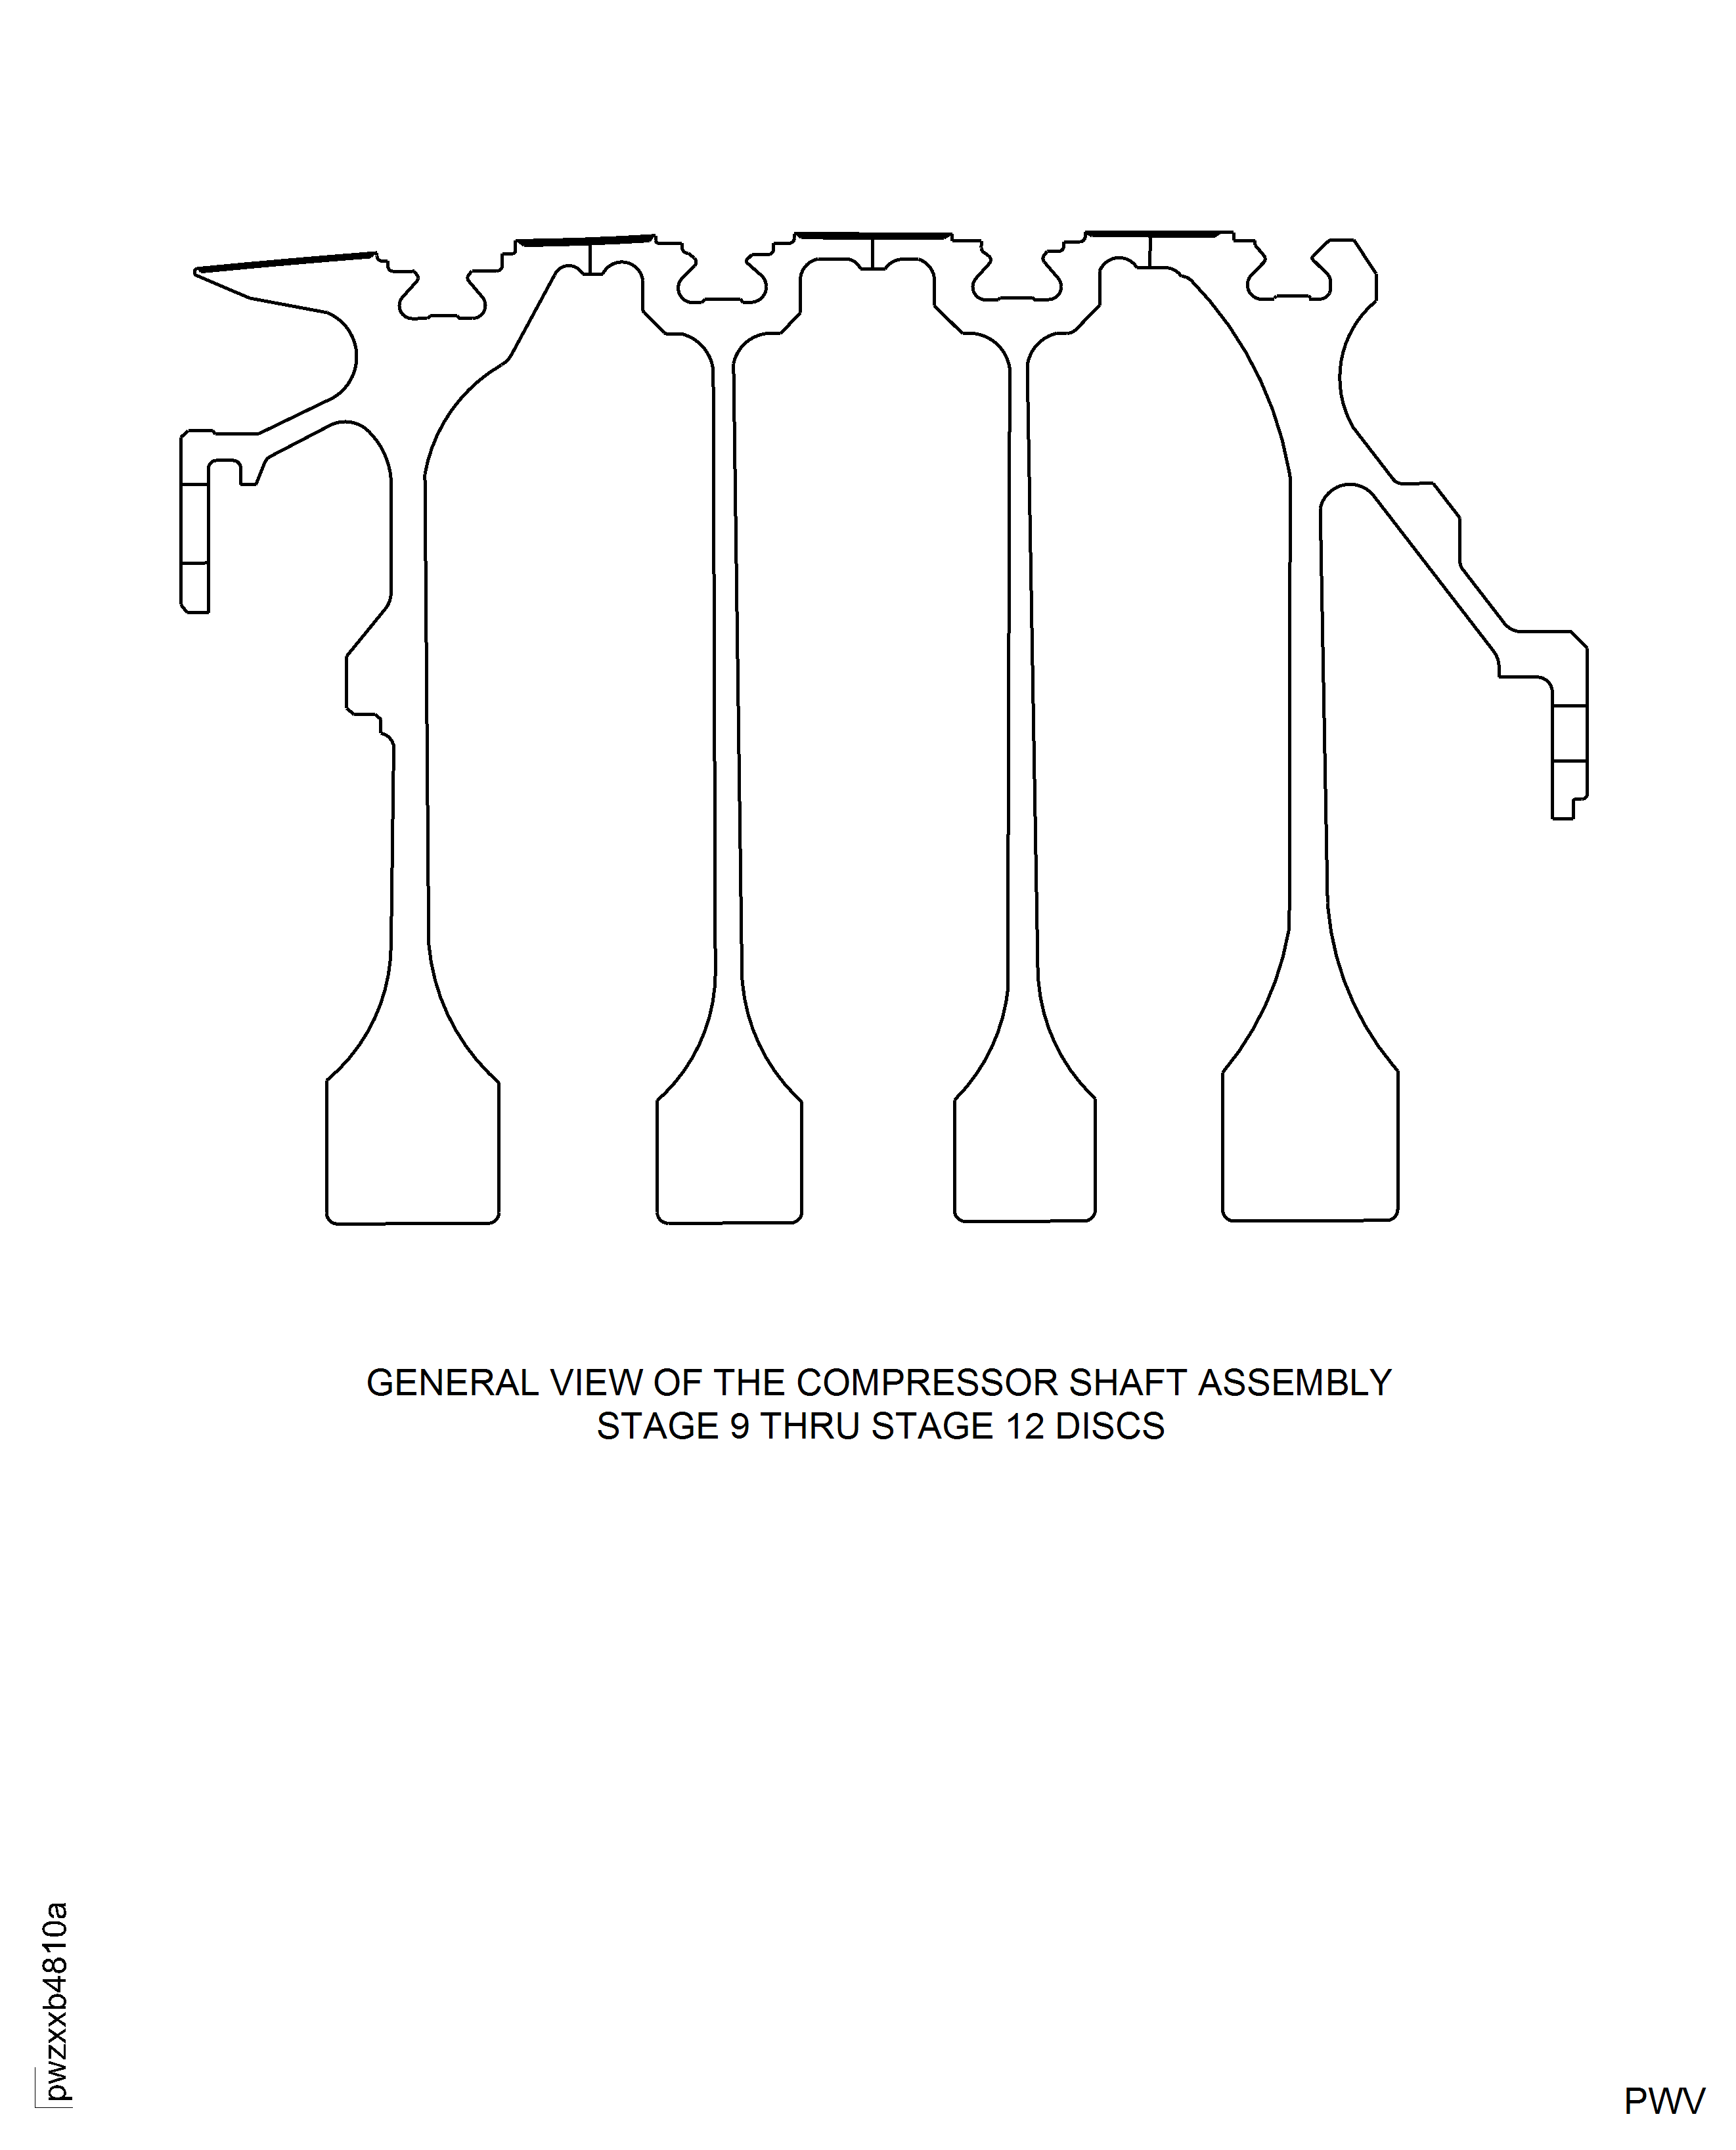
Figure: Repair Details And Dimensions - Assembly A
Repair Details And Dimensions - Assembly A

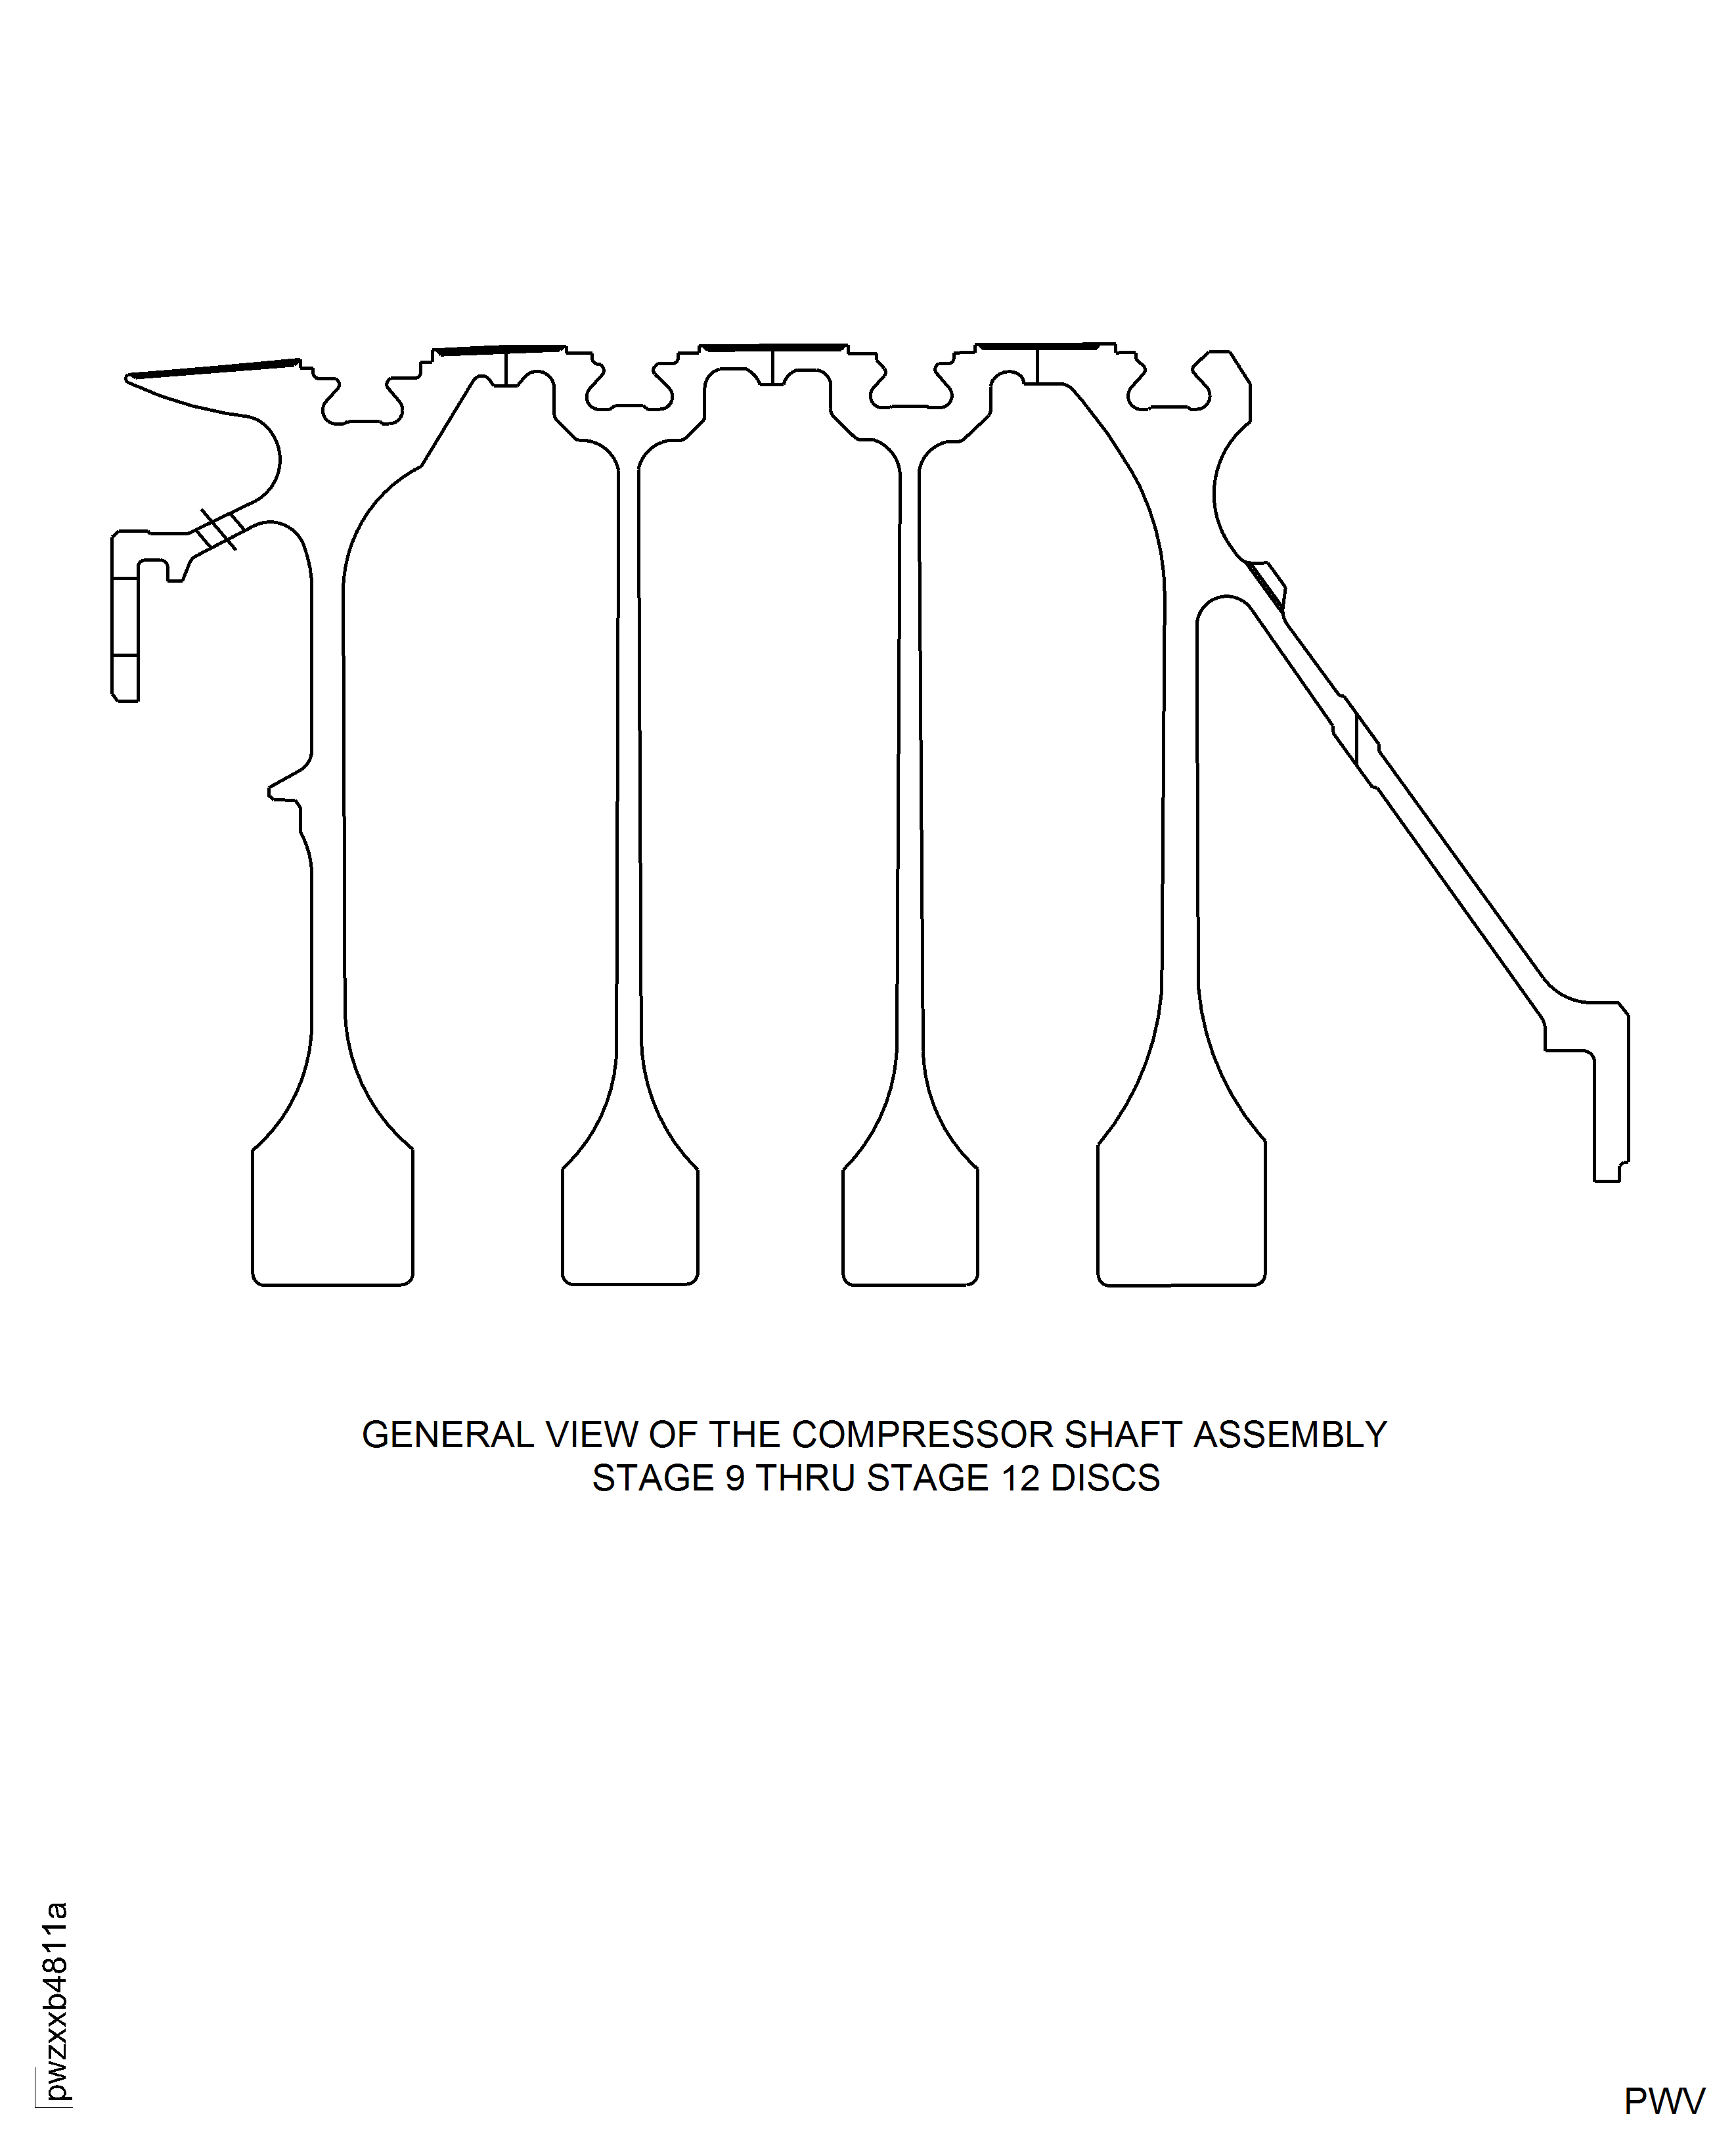
Figure: Repair Details And Dimensions - Assembly B And Assembly C
Repair Details And Dimensions - Assembly B And Assembly C

Figure: Repair Details And Dimensions - Assembly A, Assembly B, And Assembly C
Repair Details And Dimensions - Assembly A, Assembly B, And Assembly C

Figure: Repair details and dimensions - Assembly A and Assembly B
Repair details and dimensions - Assembly A and Assembly B

Figure: Repair Details And Dimensions - Assembly A And Assembly B
Repair Details And Dimensions - Assembly A And Assembly B

Figure: Repair Details And Dimensions - Assembly A, Assembly B, And Assembly C
Repair Details And Dimensions - Assembly A, Assembly B, And Assembly C

Figure: Repair Details And Dimensions - Assembly A, Assembly B, And Assembly C
Repair Details And Dimensions - Assembly A, Assembly B, And Assembly C

