Export Control
EAR Export Classification: Not subject to the EAR per 15 C.F.R. Chapter 1, Part 734.3(b)(3), except for the following Service Bulletins which are currently published as EAR Export Classification 9E991: SBE70-0992, SBE72-0483, SBE72-0580, SBE72-0588, SBE72-0640, SBE73-0209, SBE80-0024 and SBE80-0025.Copyright
© IAE International Aero Engines AG (2001, 2014 - 2021) The information contained in this document is the property of © IAE International Aero Engines AG and may not be copied or used for any purpose other than that for which it is supplied without the express written authority of © IAE International Aero Engines AG. (This does not preclude use by engine and aircraft operators for normal instructional, maintenance or overhaul purposes.).Applicability
All
Common Information
TASK 72-41-13-300-019 HPC Rear Shaft - Blend Repair, Repair-019 (VRS6088)
Effectivity
FIG/ITEM | PART NO. | ASSEMBLY |
|---|---|---|
01-900 | 6A4151 | A |
01-900 | 6A4158 | B |
01-900 | 6A5868 | B |
01-900 | 6A7708 | C |
01-900 | 6A7712 | D |
01-900 | 6A7714 | D |
General
This repair must only be done when the instruction to do so is given in TASK 72-41-13-200-000 (INSPECTION/CHECK-000).
This repair permits the removal of damaged material from the HP compressor rear shaft assembly. No material removal is permitted on holes, screw threads and splines during this repair.
To put back the surface condition, it is necessary to shot peen surfaces, where the damaged material is removed.
The shot peened part of this repair is necessary to be source demonstrated and can only be done by Approved Vendors.
This repair can only be done for a maximum of six times in each of the permitted shot peened area(s) identified on the HP compressor rear shaft assembly.
You must not use power tools or hand held power tools to repair the component.
Do not discard this component part, until contact is made with the Repair Services Manager at International Aero Engines.
Repair Facilities
Only the shot peen part of this repair is necessary for source demonstration. This means that the facilities which are not approved to shot peen, can use the Approved Repair Vendors listed below or contact the IAE Repair Services Group to find out if a qualification program can be initiated at their facility.
IAE - INTERNATIONAL AERO ENGINES AG
C/O ROLLS ROYCE PLC.
ESCHENWEG 11
DAHLEWITZ
15827 BLANKENFELDE-MAHLOW
GERMANY
ATTN: MANAGER TECHNICAL SERVICES
Approved Repair Vendors for the shot peen portion of VRS6088 are listed below:
METAL IMPROVEMENT COMPANY INC.
DERBY DIVISION (UK)
ASCOT DRIVE
DERBY DE2 8ST
ENGLAND
MTU MAINTENANCE HANNOVER GMBH
REPAIR ENGINEERING TR30
MUNCHNER STRASSE 31
30855 LANGENHAGEN
GERMANY
ATTN: MANAGER, QUALITY ASSURANCE
The designation by IAE of an Approved Repair Vendor shows that the Repair Vendor has demonstrated the necessary functions to make it possible to do the listed repair work. But, IAE makes no warranties or representations related to the qualifications or quality standards of the Repair Vendors to do the repair work, and accepts no responsibility whatsoever for works that can be done by a Repair Vendor other than when IAE is listed as the Repair Vendor. Approved Repair Vendors do not act as agents or representatives of IAE.
NOTE
It is possible that some materials in the Consumable Materials chart cannot be used for some or all of the necessary applications. Before you use the materials, make sure the types, quantities and applications of the materials necessary are legally permitted in your location. All persons must obey all applicable federal, state, local and provincial laws and regulations when it is necessary to work with these materials.
To identify the consumable materials, refer to the Overhaul Processes and Consumables Index (PCI).
Other necessary consumable materials are referred to in the SPM TASKs.
NOTE
NOTE
Preliminary Requirements
Pre-Conditions
NONESupport Equipment
| Name | Manufacturer | Part Number / Identification | Quantity | Remark |
|---|---|---|---|---|
| Chemical cleaning equipment | LOCAL | Chemical cleaning equipment | ||
| Controlled shot peening equipment | LOCAL | Controlled shot peening equipment | ||
| Glass bead peening equipment | LOCAL | Glass bead peening equipment | ||
| Hand tools | LOCAL | Hand tools | ||
| Penetrant Crack Test Equipment | LOCAL | Penetrant crack test equipment | ||
| Polythene bottle | LOCAL | Polythene bottle | ||
| Vibro-engraving equipment | LOCAL | Vibro-engraving equipment | ||
| Binoculars 10X | LOCAL | Binoculars 10X | ||
| IAE 3R19134 Almen test strip | 0AM53 | IAE 3R19134 | ||
| IAE 3R19165 Dummy Shaft | 0AM53 | IAE 3R19165 | ||
| IAE 3R19169 Fixture | 0AM53 | IAE 3R19169 | ||
| IAE 3R19183 Dummy Shaft | 0AM53 | IAE 3R19183 |
Consumables, Materials and Expendables
| Name | Manufacturer | Part Number / Identification | Quantity | Remark |
|---|---|---|---|---|
| CoMat 02-003 ADHESIVE TAPE BLACK WATERPROOF | LOCAL | CoMat 02-003 | ||
| CoMat 05-028 METALLIC SHOT (CAST STEEL), S230 | IE249 | CoMat 05-028 | ||
| CoMat 05-074 ALUMINIUM OXIDE ABRASIVE PAPER | 06565 | CoMat 05-074 | ||
| CoMat 05-106 ABRASIVE STONE | K6835 | CoMat 05-106 | ||
| CoMat 05-111 EMERY POLISHING PAPER | 06565 | CoMat 05-111 | ||
| CoMat 06-022 FLUORESCENT PENETRANT (POST-EMULSIFIED ULTRA HIGH SENSITIVITY) | LOCAL | CoMat 06-022 |
Spares
NONESafety Requirements
NONEProcedure
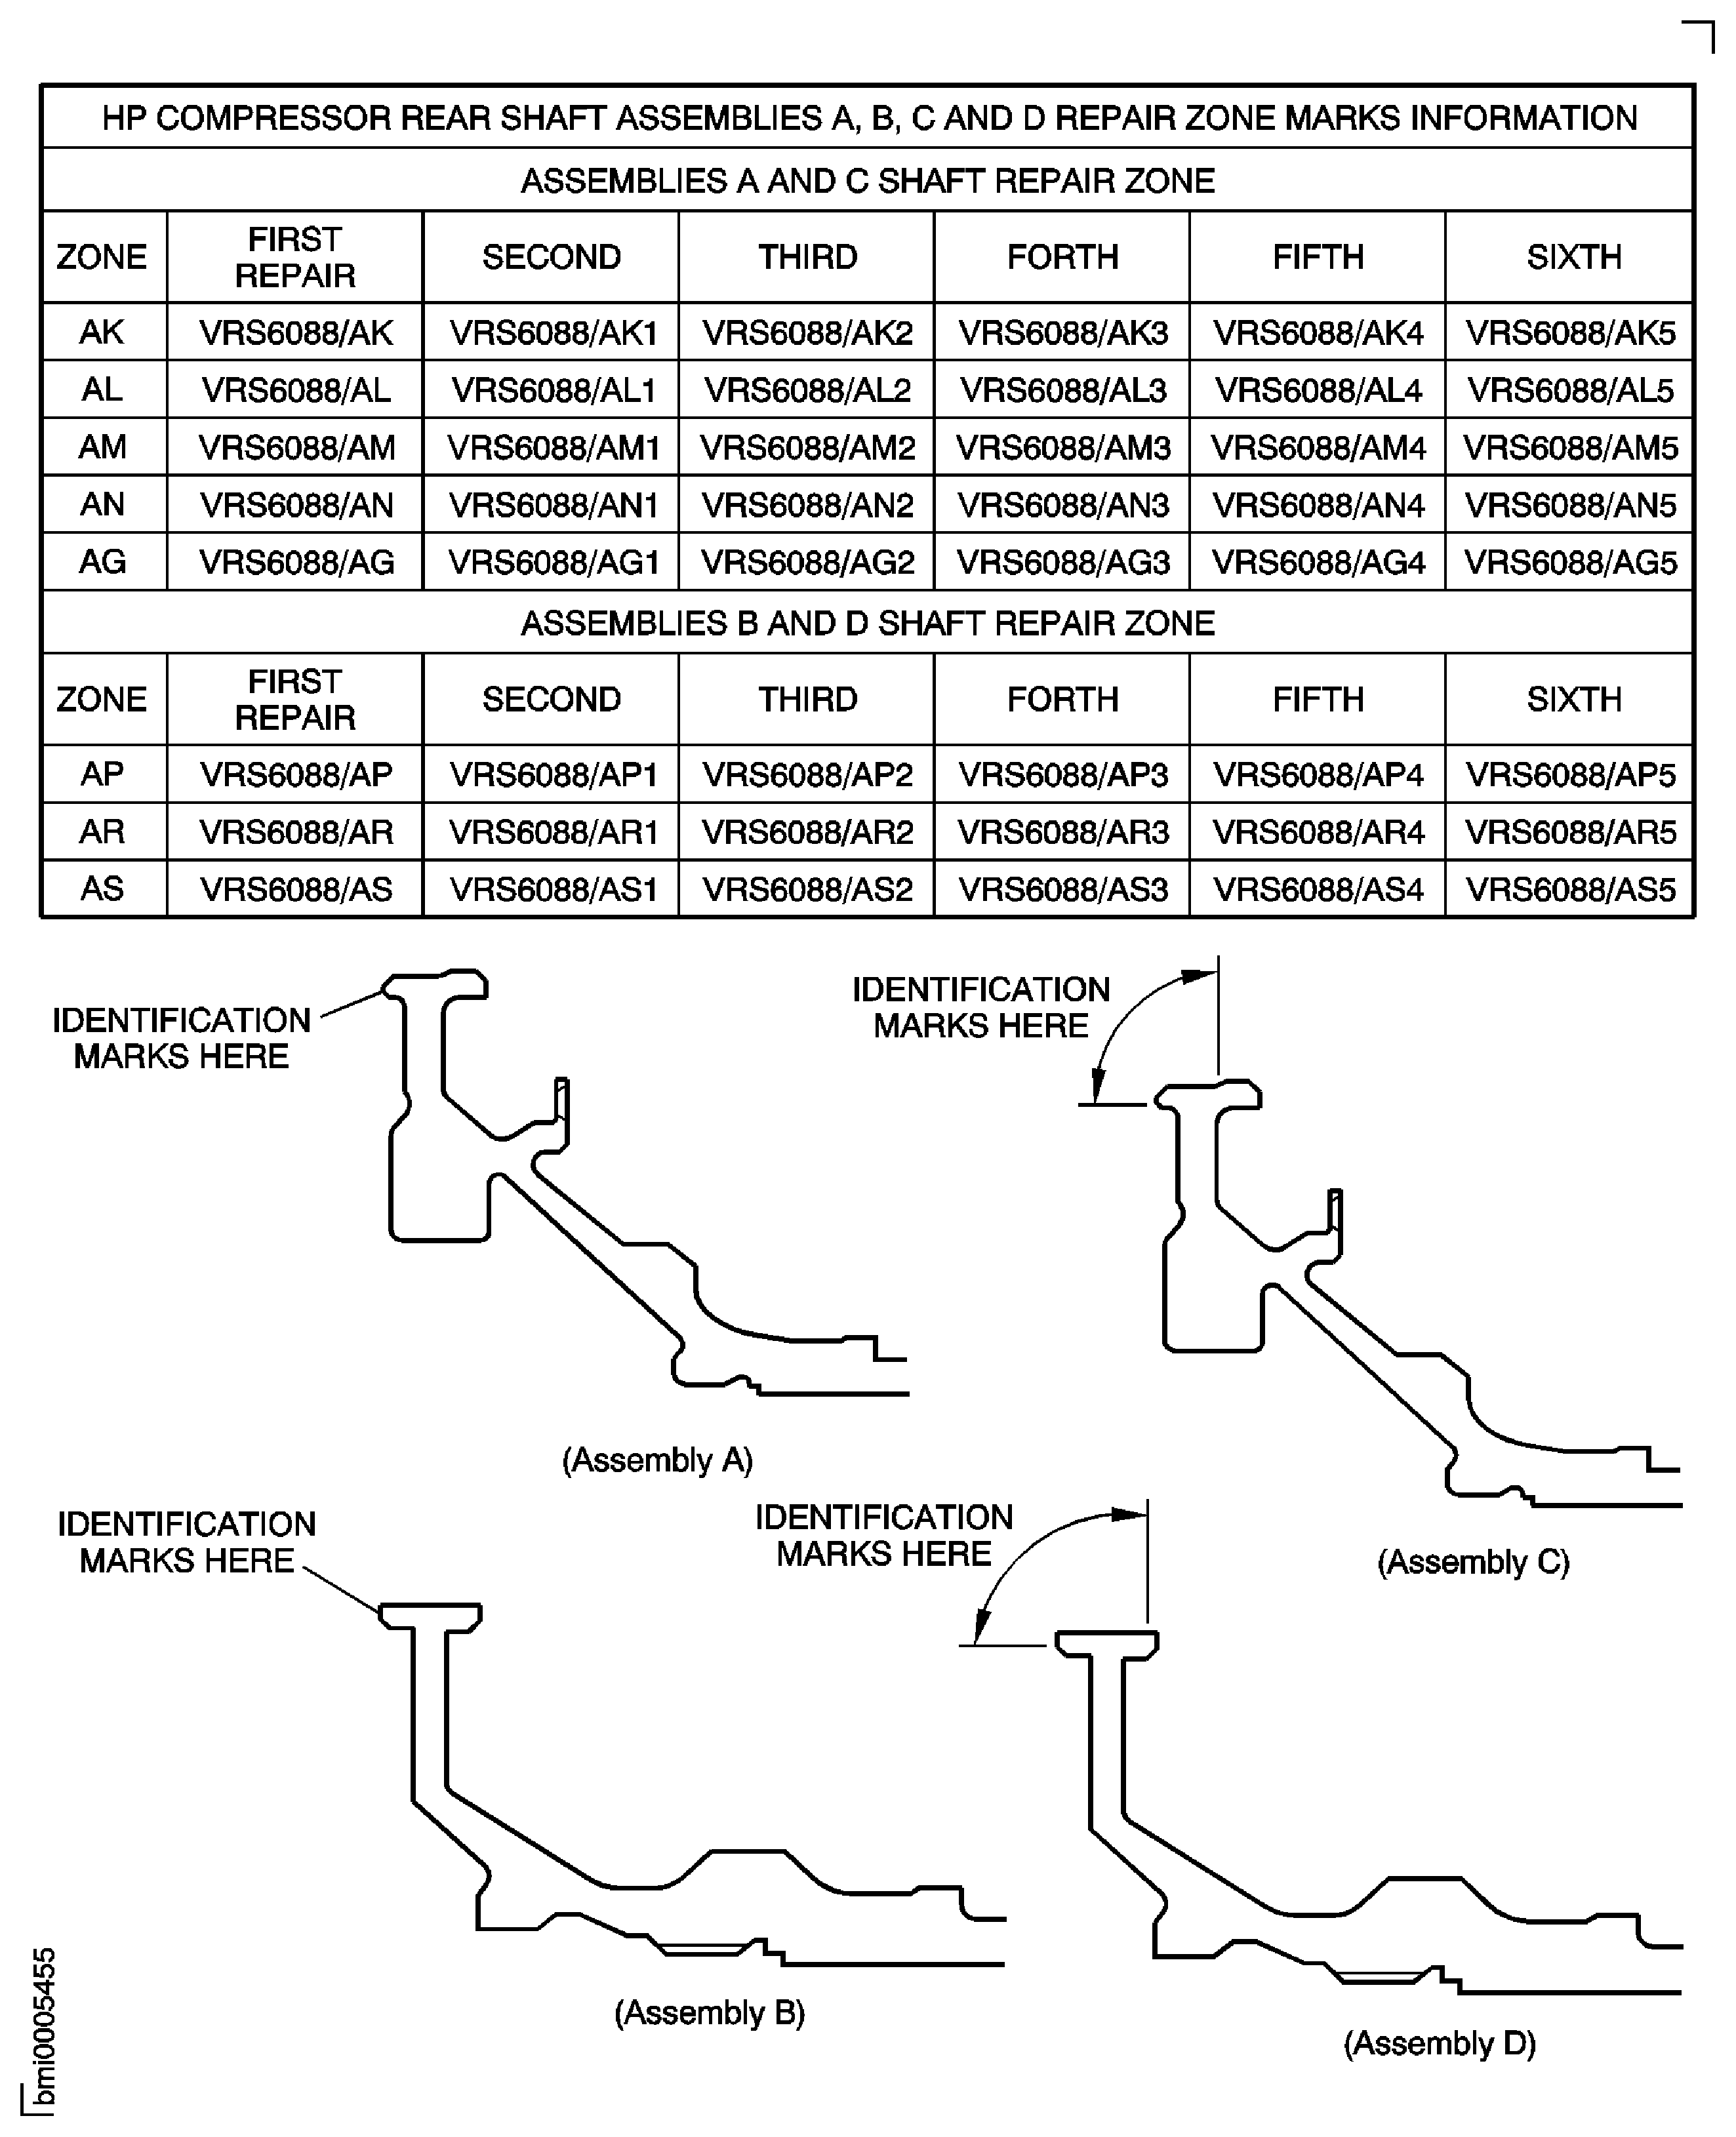
If the assembly is repaired and shot peened during repair, the assembly must be identified in accordance with the table in Figure.
You cannot repair the HP compressor rear shaft assembly again if the damaged area(s) is shot peened six times.
Visually examine the HP compressor rear shaft assembly, to tell you if shot peen is done before in the repair area(s).
SUBTASK 72-41-13-220-114 Make Sure the Part can be Repaired
Refer to the SPM TASK 70-23-05-230-501, SUBTASK 70-23-05-230-002.
Use CoMat 06-022 FLUORESCENT PENETRANT (POST-EMULSIFIED ULTRA HIGH SENSITIVITY), with penetrant crack test equipment.
If no cracks are found, continue with the repair.
If cracks are found, reject the part.
Do a local penetrant crack test of the damaged area(s).
SUBTASK 72-41-13-230-066 Do a Crack Test
Refer to the SPM TASK 70-35-03-300-501, SUBTASK 70-35-03-350-001.
Remove material to two times the depth (or height) of the damage.
Maximum permitted depth of dressed material is 0.0100 in. (0.254 mm) in all zones other than zone AV.
Use CoMat 05-106 ABRASIVE STONE and CoMat 05-111 EMERY POLISHING PAPER, as necessary.
When you remove material on a radius or chamfer, you must make sure that the radius or chamfer does not decrease in size after repair.
NOTE
Keep material removal to the larger limit of 0.750 in. (19.05 mm), or 100 x D in all zones other than zone AV. In zone AV, keep material removal to 50 x D.
Remove the damaged material from the repair area(s) on the HP compressor rear shaft assembly, as necessary. Do not remove more than is necessary.
SUBTASK 72-41-13-350-063 Remove the Damaged Area(s)

CAUTION
YOU MUST NOT USE POWER TOOLS OR HAND HELD POWER TOOLS TO REPAIR THE COMPONENT.
CAUTION
YOU MUST MAKE SURE THAT ALL BURRS CAUSED BY THE MATERIAL REMOVAL ARE REMOVED.Make sure the minimum radius and dimensions are maintained after material removal.
Make sure the surface finish compares with the adjacent surfaces.
If repaired area(s) are in the limits, continue with the repair.
If repaired area(s) are more than the limits, reject the part.
Use workshop inspection equipment.
Make a visual inspection of the repaired area(s) and measure the depth of the repaired area(s).
SUBTASK 72-41-13-220-115 Examine the Repaired Area(s)
Use X10 binoculars.
Indications of defects on the repaired surfaces are not permitted.
If indications of defect are found, do the repair from Step again.
If no defects are found, continue with the repair.
Make a visual inspection of the repaired area(s).
SUBTASK 72-41-13-220-116 Examine the Repaired Area(s)
Refer to the SPM TASK 70-23-05-230-501, SUBTASK 70-23-05-230-002.
Use CoMat 06-022 FLUORESCENT PENETRANT (POST-EMULSIFIED ULTRA HIGH SENSITIVITY), with penetrant crack test equipment.
If cracks are found, reject the part.
If no cracks are found, continue with the repair.
Do a local penetrant crack test of the repaired area(s).
SUBTASK 72-41-13-230-067 Do a Crack Test
Refer to the SPM TASK 70-09-00-400-501, SUBTASK 70-09-00-400-001.
Use vibro-engraving equipment.
NOTE
You cannot repair the HP compressor rear shaft again if the damaged zone(s) is shot peened six times.
NOTE
Ignore Step if material removal is from area(s) identified in notes AC and/or AD only.If the assembly is repaired and shot peened during repair, the assembly must be identified in accordance with the table in Figure.
SUBTASK 72-41-13-350-064 Identify the Repair
Refer to Step.
Find the repaired area(s) to be shot peened.
Use CoMat 02-003 ADHESIVE TAPE BLACK WATERPROOF or a mechanical seal.
Patch mask all identification marks and symbols.
Seal the full assembly other than the repaired area(s) which have to be shot peened.
Refer to the SPM TASK 70-38-04-300-503, SUBTASK 70-38-04-300-002.
Use IAE 3R19134 Almen test strip almen test strip 5 off,
IAE 3R19165 Dummy Shaft dummy shaft 1 off,
IAE 3R19169 Fixture fixture 1 off and/or Approved Vendors in Repair Facilities, para B.
Use CoMat 05-028 METALLIC SHOT (CAST STEEL), S230 to get an almen intensity of 0.006 in. to 0.009 in. (0.15 mm to 0.23 mm) on 'A' type test strip.
A coverage of 100 percent must be applied.
Use controlled shot peening equipment.
Shot - Peening Data
Machine type
Metal shot - peen
Process type/mode
Dry/auto
Shot type
Shot size
0.024 in. to 0.040 in. (0.60 mm to 1.00 mm)
Shot hardness
450 to 600 Hv
Coverage
100 percent
Almen intensity
0.006 in. to 0.009 in. (0.15 mm to 0.23 mm) using an 'A' type test strip
NOTE
For information, the cable speed, oscillation speed, height, type, air pressure, nozzle type/diameter and work distance can change if different equipment is used. You must get the full coverage and almen intensity.NOTE
Repaired surfaces AF must be locally shot peened to a maximum almen intensity of 0.009 in. (0.23 mm), where the minimum intensity is 100 percent.
Unwanted shot peen spray is permitted in area AJ and AH, to get a continuous fade-out surface condition away from the repaired zones AN, AM and area AG.
Shot peen the repaired area(s) AF and/or AG, as necessary.
Refer to Approved Vendors in Repair Facilities, para. B and/or refer to the SPM TASK 70-38-04-300-503, SUBTASK 70-38-04-300-002.
Use wet or dry glass beads, with glass bead peening equipment.
Remove iron contamination after you have shot peened, as necessary.
SUBTASK 72-41-13-380-052 Shot Peen the Repaired Area(s), Assemblies A and C

CAUTION
DO NOT SHOT PEEN ON AREA(S) IDENTIFIED IN NOTES AC, AD AND AE.
CAUTION
DO NOT SEAL THE AREA IDENTIFIED AJ.Refer to Step.
Find the repaired area(s) to be shot peened.
Use CoMat 02-003 ADHESIVE TAPE BLACK WATERPROOF or a mechanical seal.
Patch mask all identification marks and symbols.
Seal the full assembly other than the repaired area(s), as necessary, which have to be shot peened.
Refer to the SPM TASK 70-38-04-300-503, SUBTASK 70-38-04-300-002.
Use IAE 3R19134 Almen test strip almen test strip 4 off,
IAE 3R19169 Fixture fixture 1 off,
IAE 3R19183 Dummy Shaft dummy Shaft 1 off and/or Approved Vendors in Repair Facilities, para B.
Use CoMat 05-028 METALLIC SHOT (CAST STEEL), S230 to get an almen intensity of 0.006 in. to 0.009 in. (0.15 mm to 0.23 mm) on 'A' type test strip.
A coverage of 100 percent must be applied.
Use controlled shot peening equipment.
Shot - Peening Data
Machine type
Metal shot-peen
Process type/mode
Dry/auto
Shot type
Shot size
0.024 in to 0.040 in. (0.60 mm to 1.00 mm)
Shot hardness
450 to 600 Hv
Coverage
100 percent
Almen intensity
0.006 in. to 0.009 in. (0.15 mm to 0.23 mm) using an 'A' type test strip
NOTE
For information, the cable speed, oscillation speed, height, type, air pressure, nozzle type/diameter and work distance can change if different equipment is used. You must get the full coverage and almen intensity.NOTE
Repaired surfaces AF must be locally shot peened to a maximum almen intensity of 0.009 in. (0.23 mm), where the minimum intensity is 100 percent coverage.
Unwanted shot peen spray is permitted in areas AH, to get a continuous fade-out surface condition away from the repaired zone AR.
Shot peen the repaired area(s) AF, as necessary.
Refer to Approved Vendors in Repair Facilities, para. B and/or refer to the SPM TASK 70-38-04-300-503, SUBTASK 70-38-04-300-002.
Use wet or dry glass beads, with glass bead peening equipment.
Remove iron contamination after you have shot peened, as necessary.
SUBTASK 72-41-13-380-063 Shot Peen the Repaired Area(s), Assemblies B and D

CAUTION
DO NOT SHOT PEEN ON AREA(S) IDENTIFIED IN NOTE AC, AD AND AE.
Figure: Repair Details and Dimensions
Repair Details and Dimensions
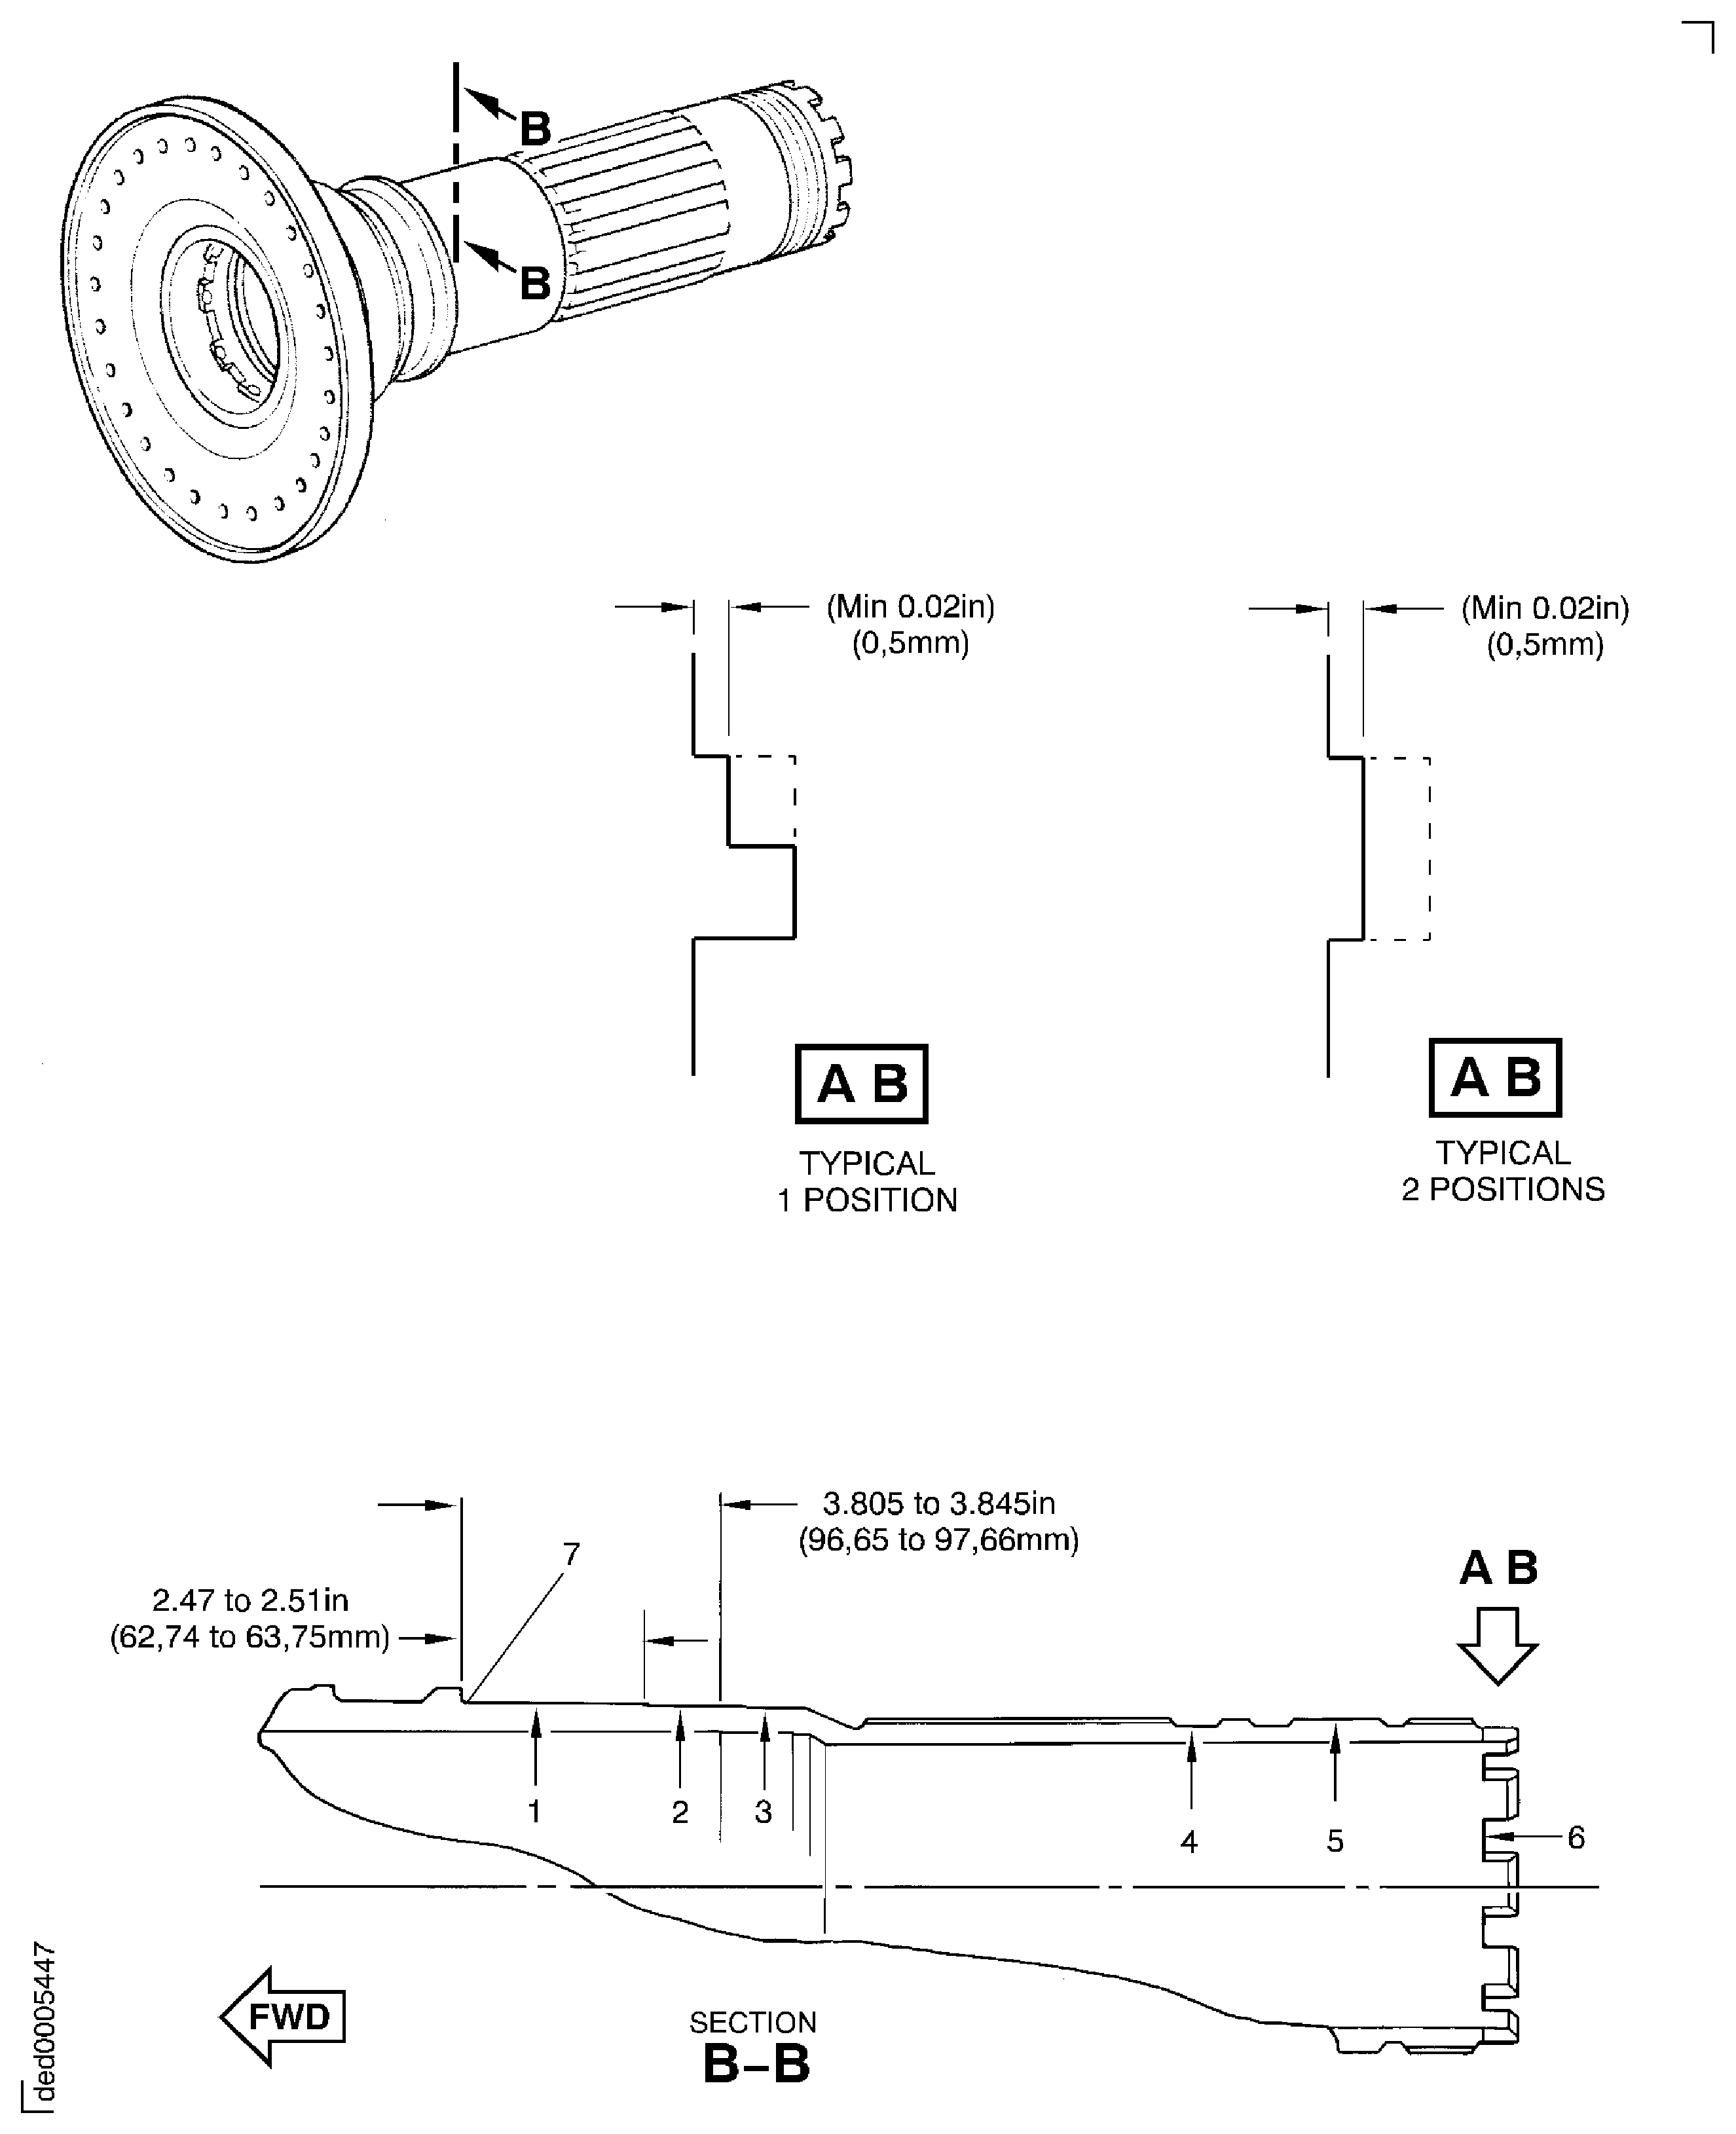
Figure: Repair Details and Dimensions - Assemblies A and C
Repair Details and Dimensions - Assemblies A and C
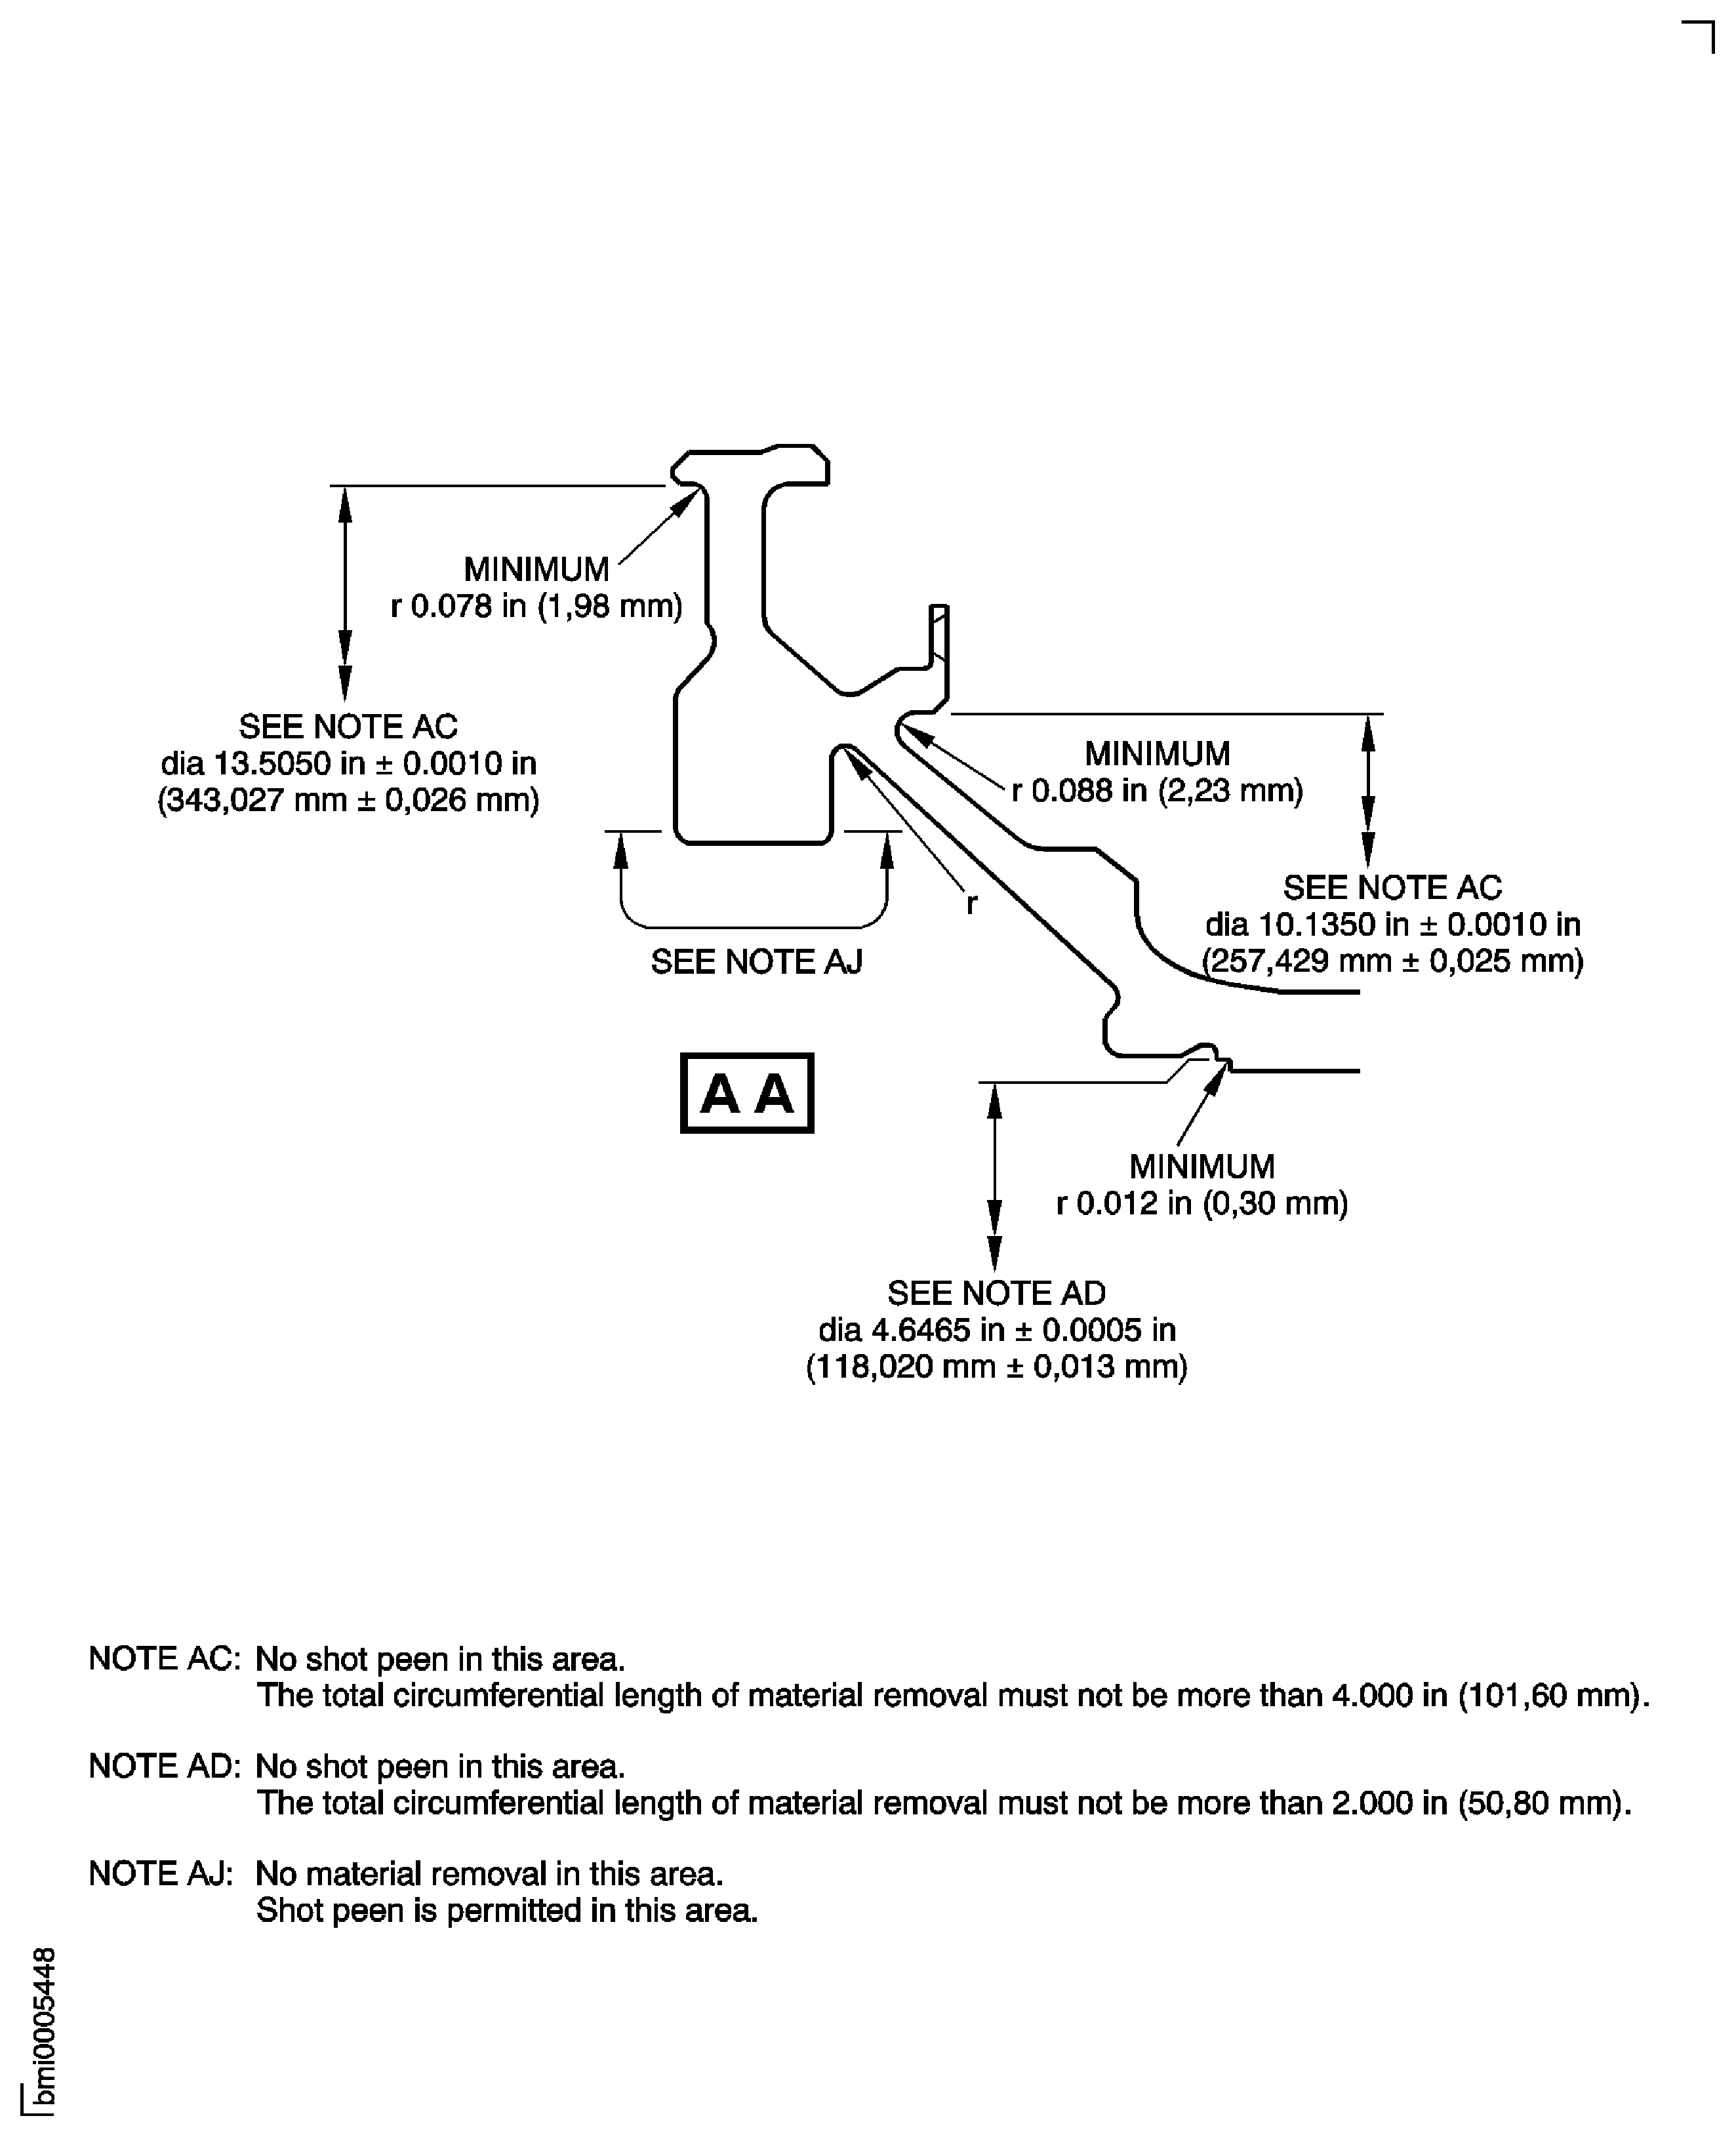
Figure: Repair Details and Dimensions - Assemblies A and C
Repair Details and Dimensions - Assemblies A and C
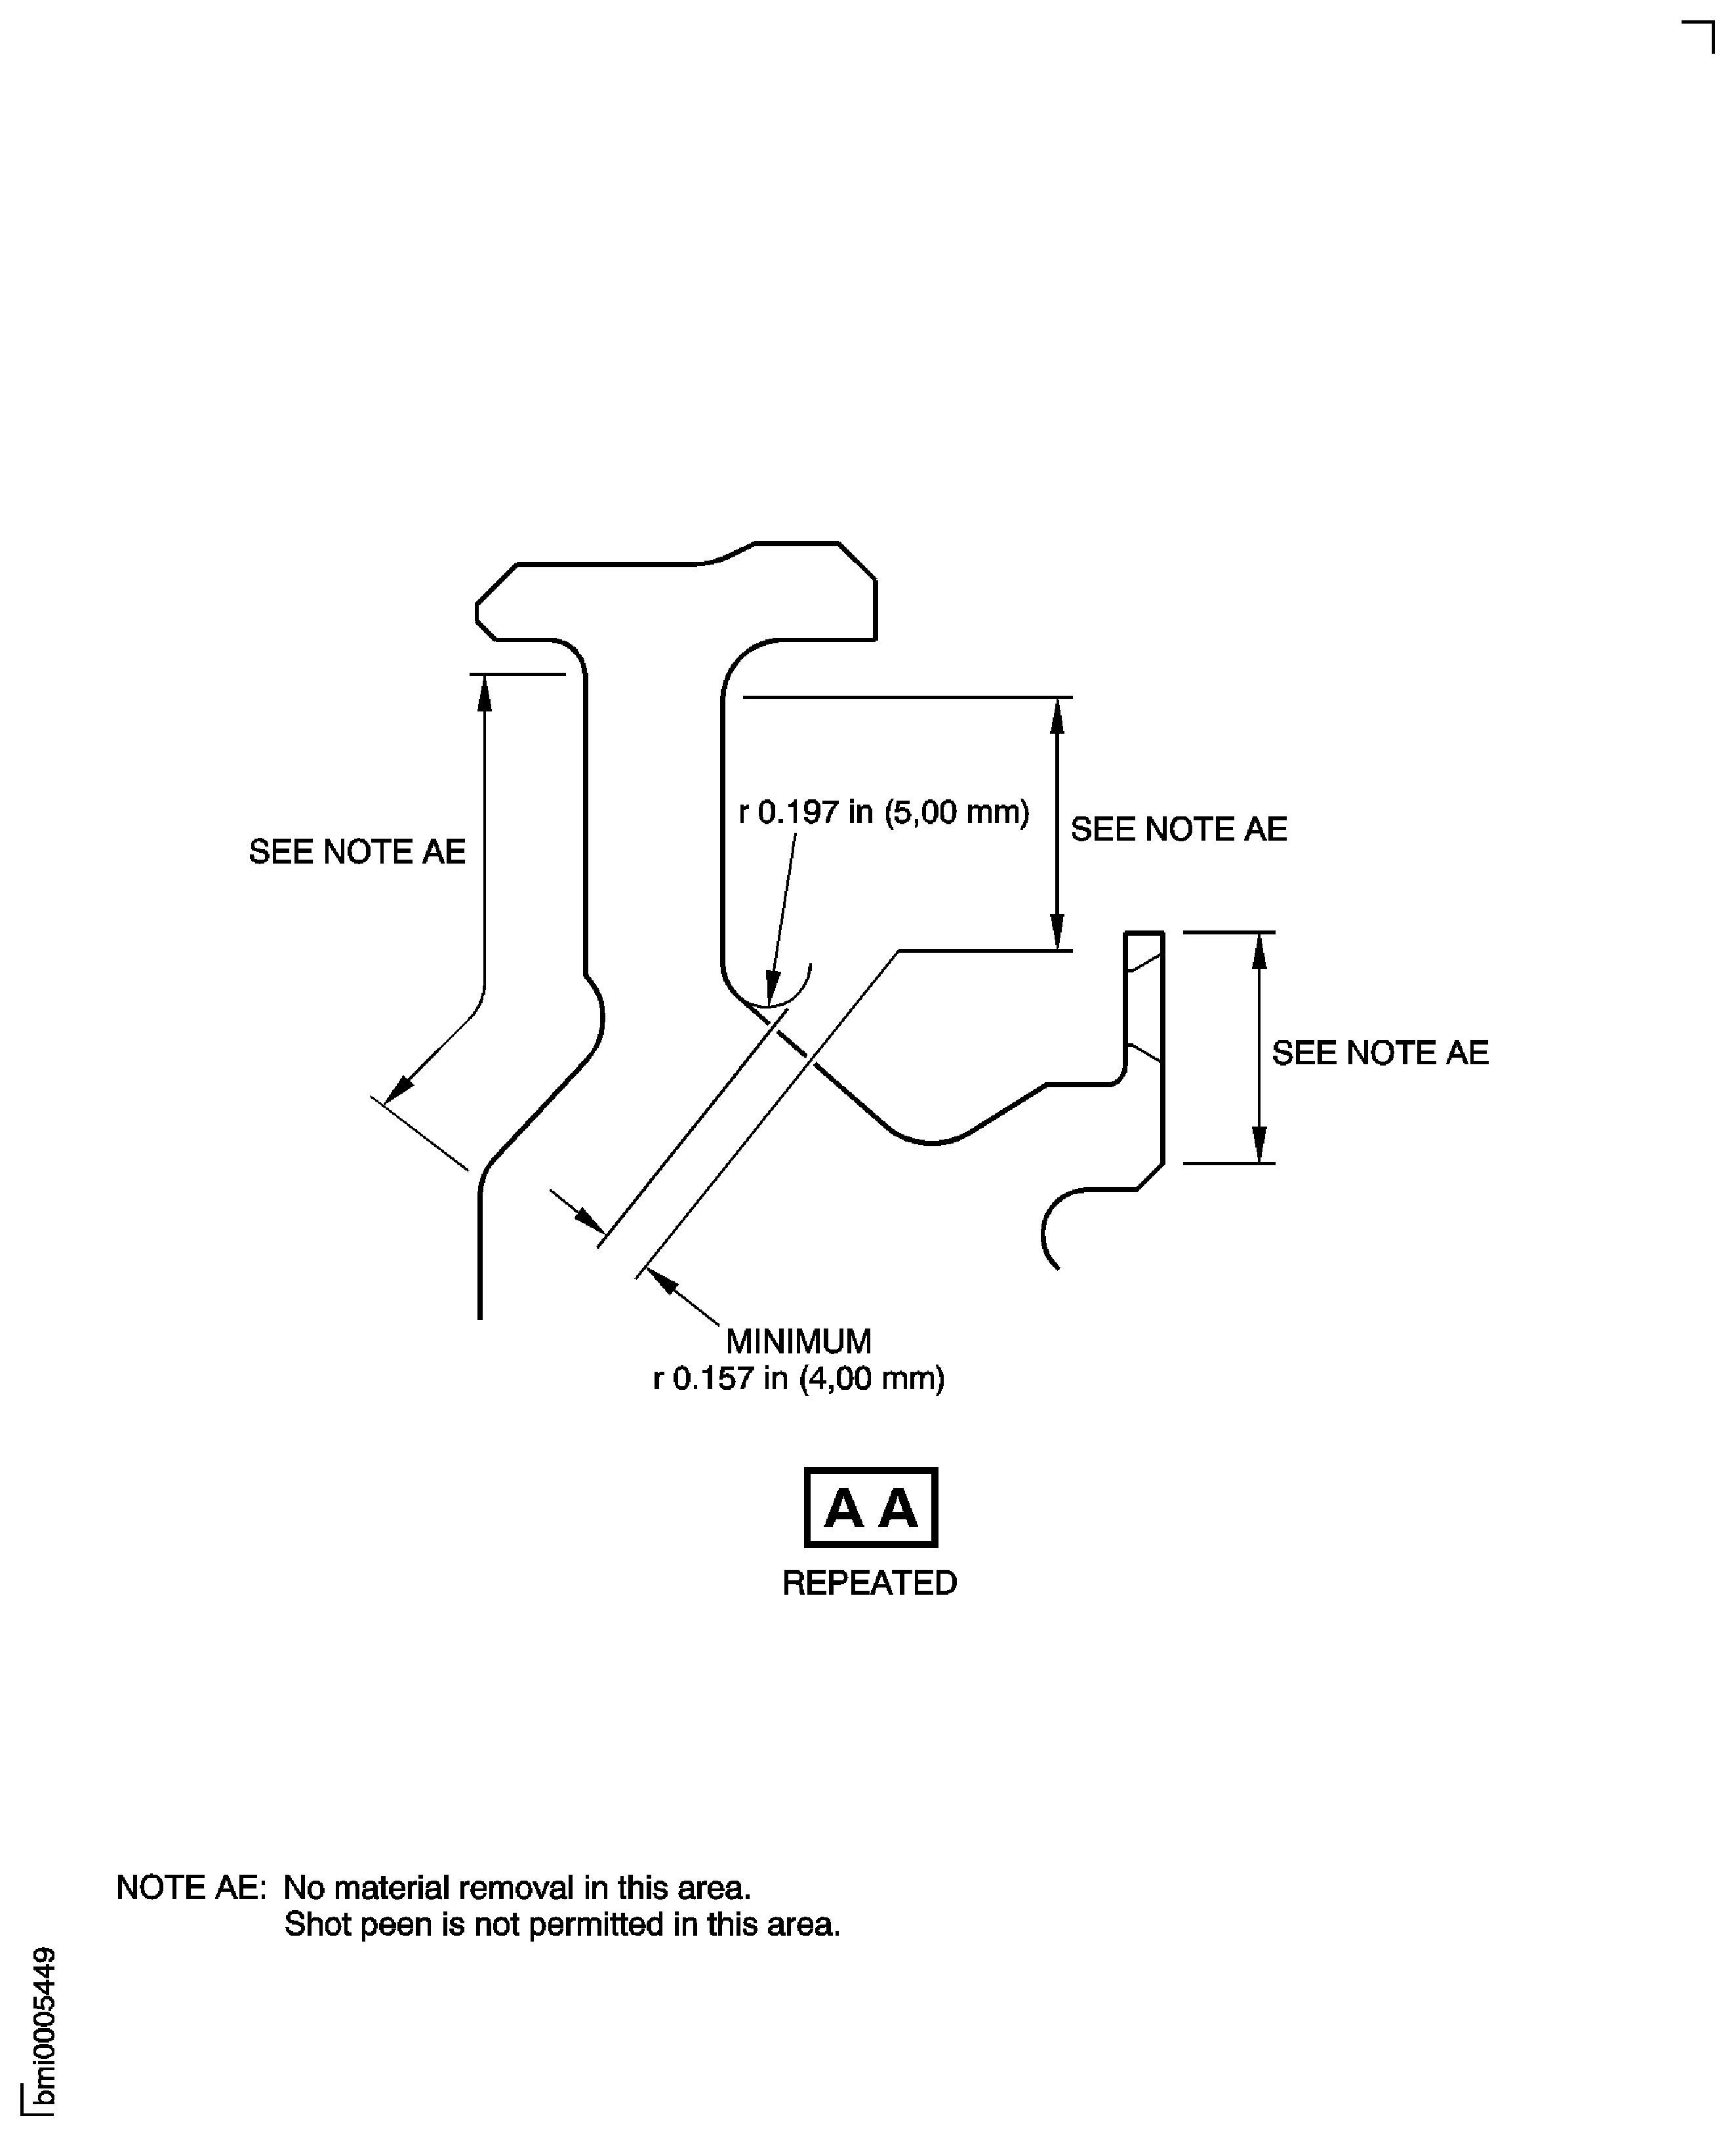
Figure: Repair Details and Dimensions - Assemblies B and D
Repair Details and Dimensions - Assemblies B and D
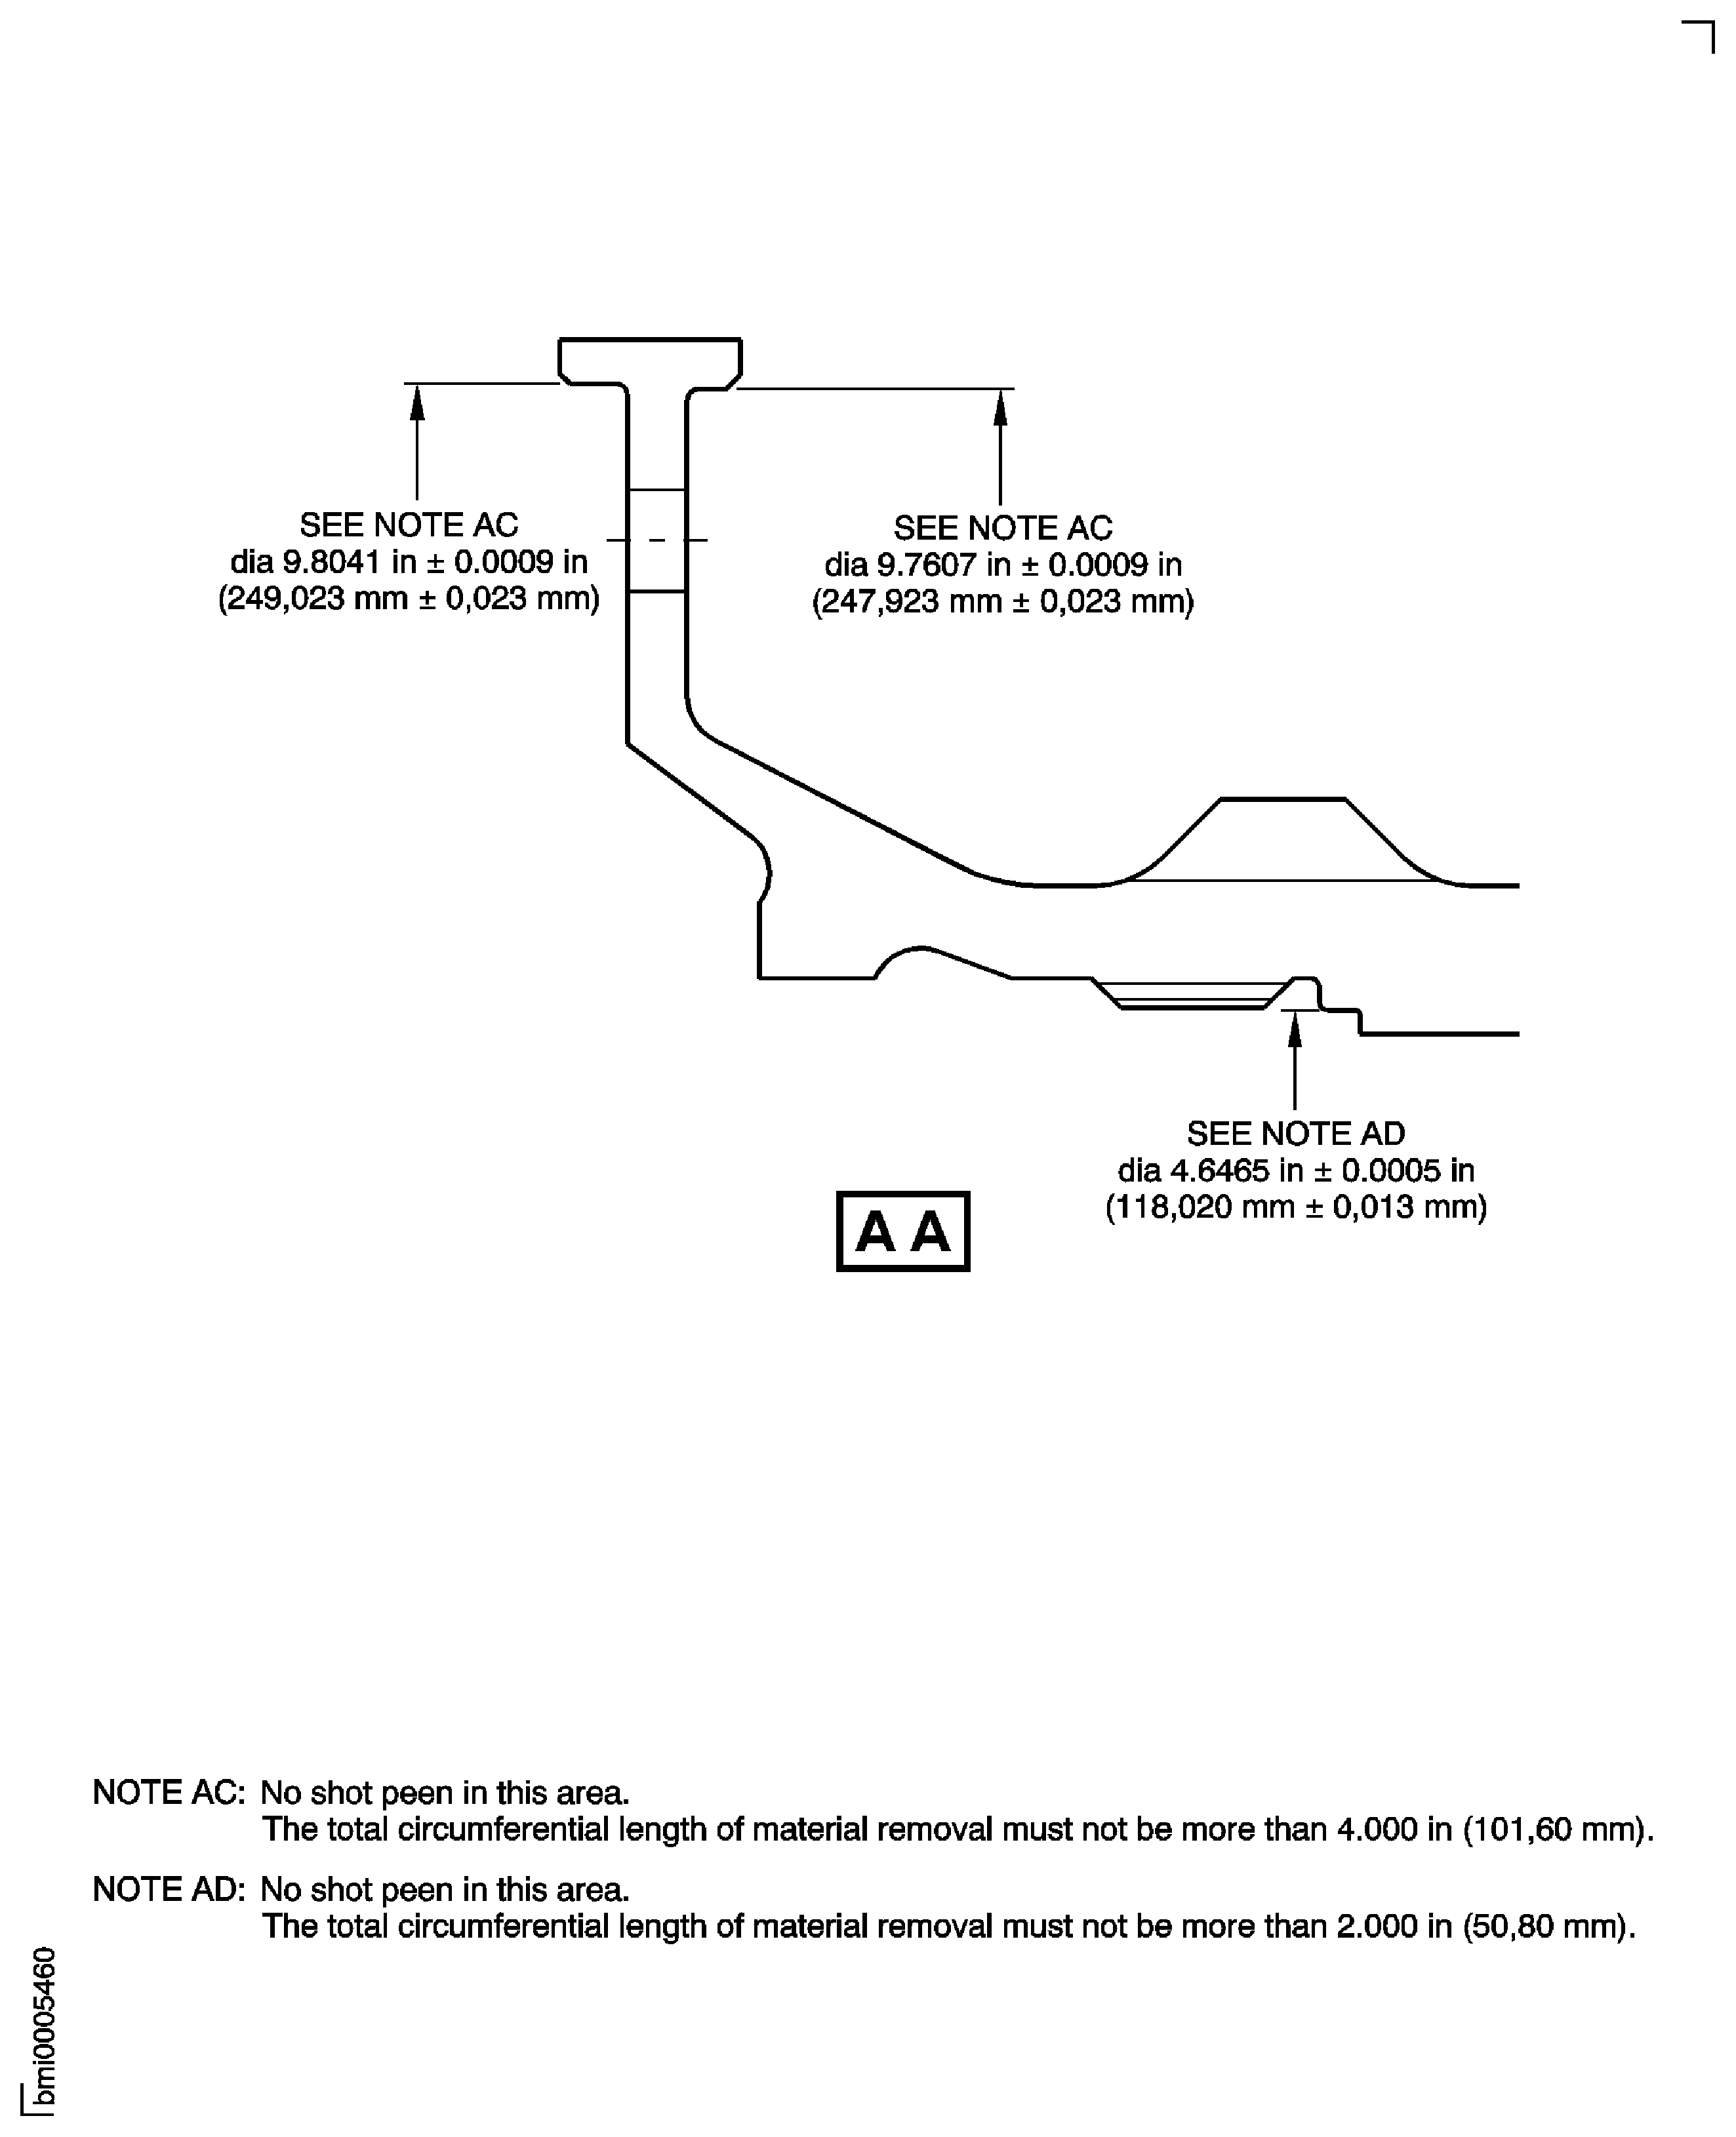
Figure: Repair Details and Dimensions - Assemblies B and D
Repair Details and Dimensions - Assemblies B and D
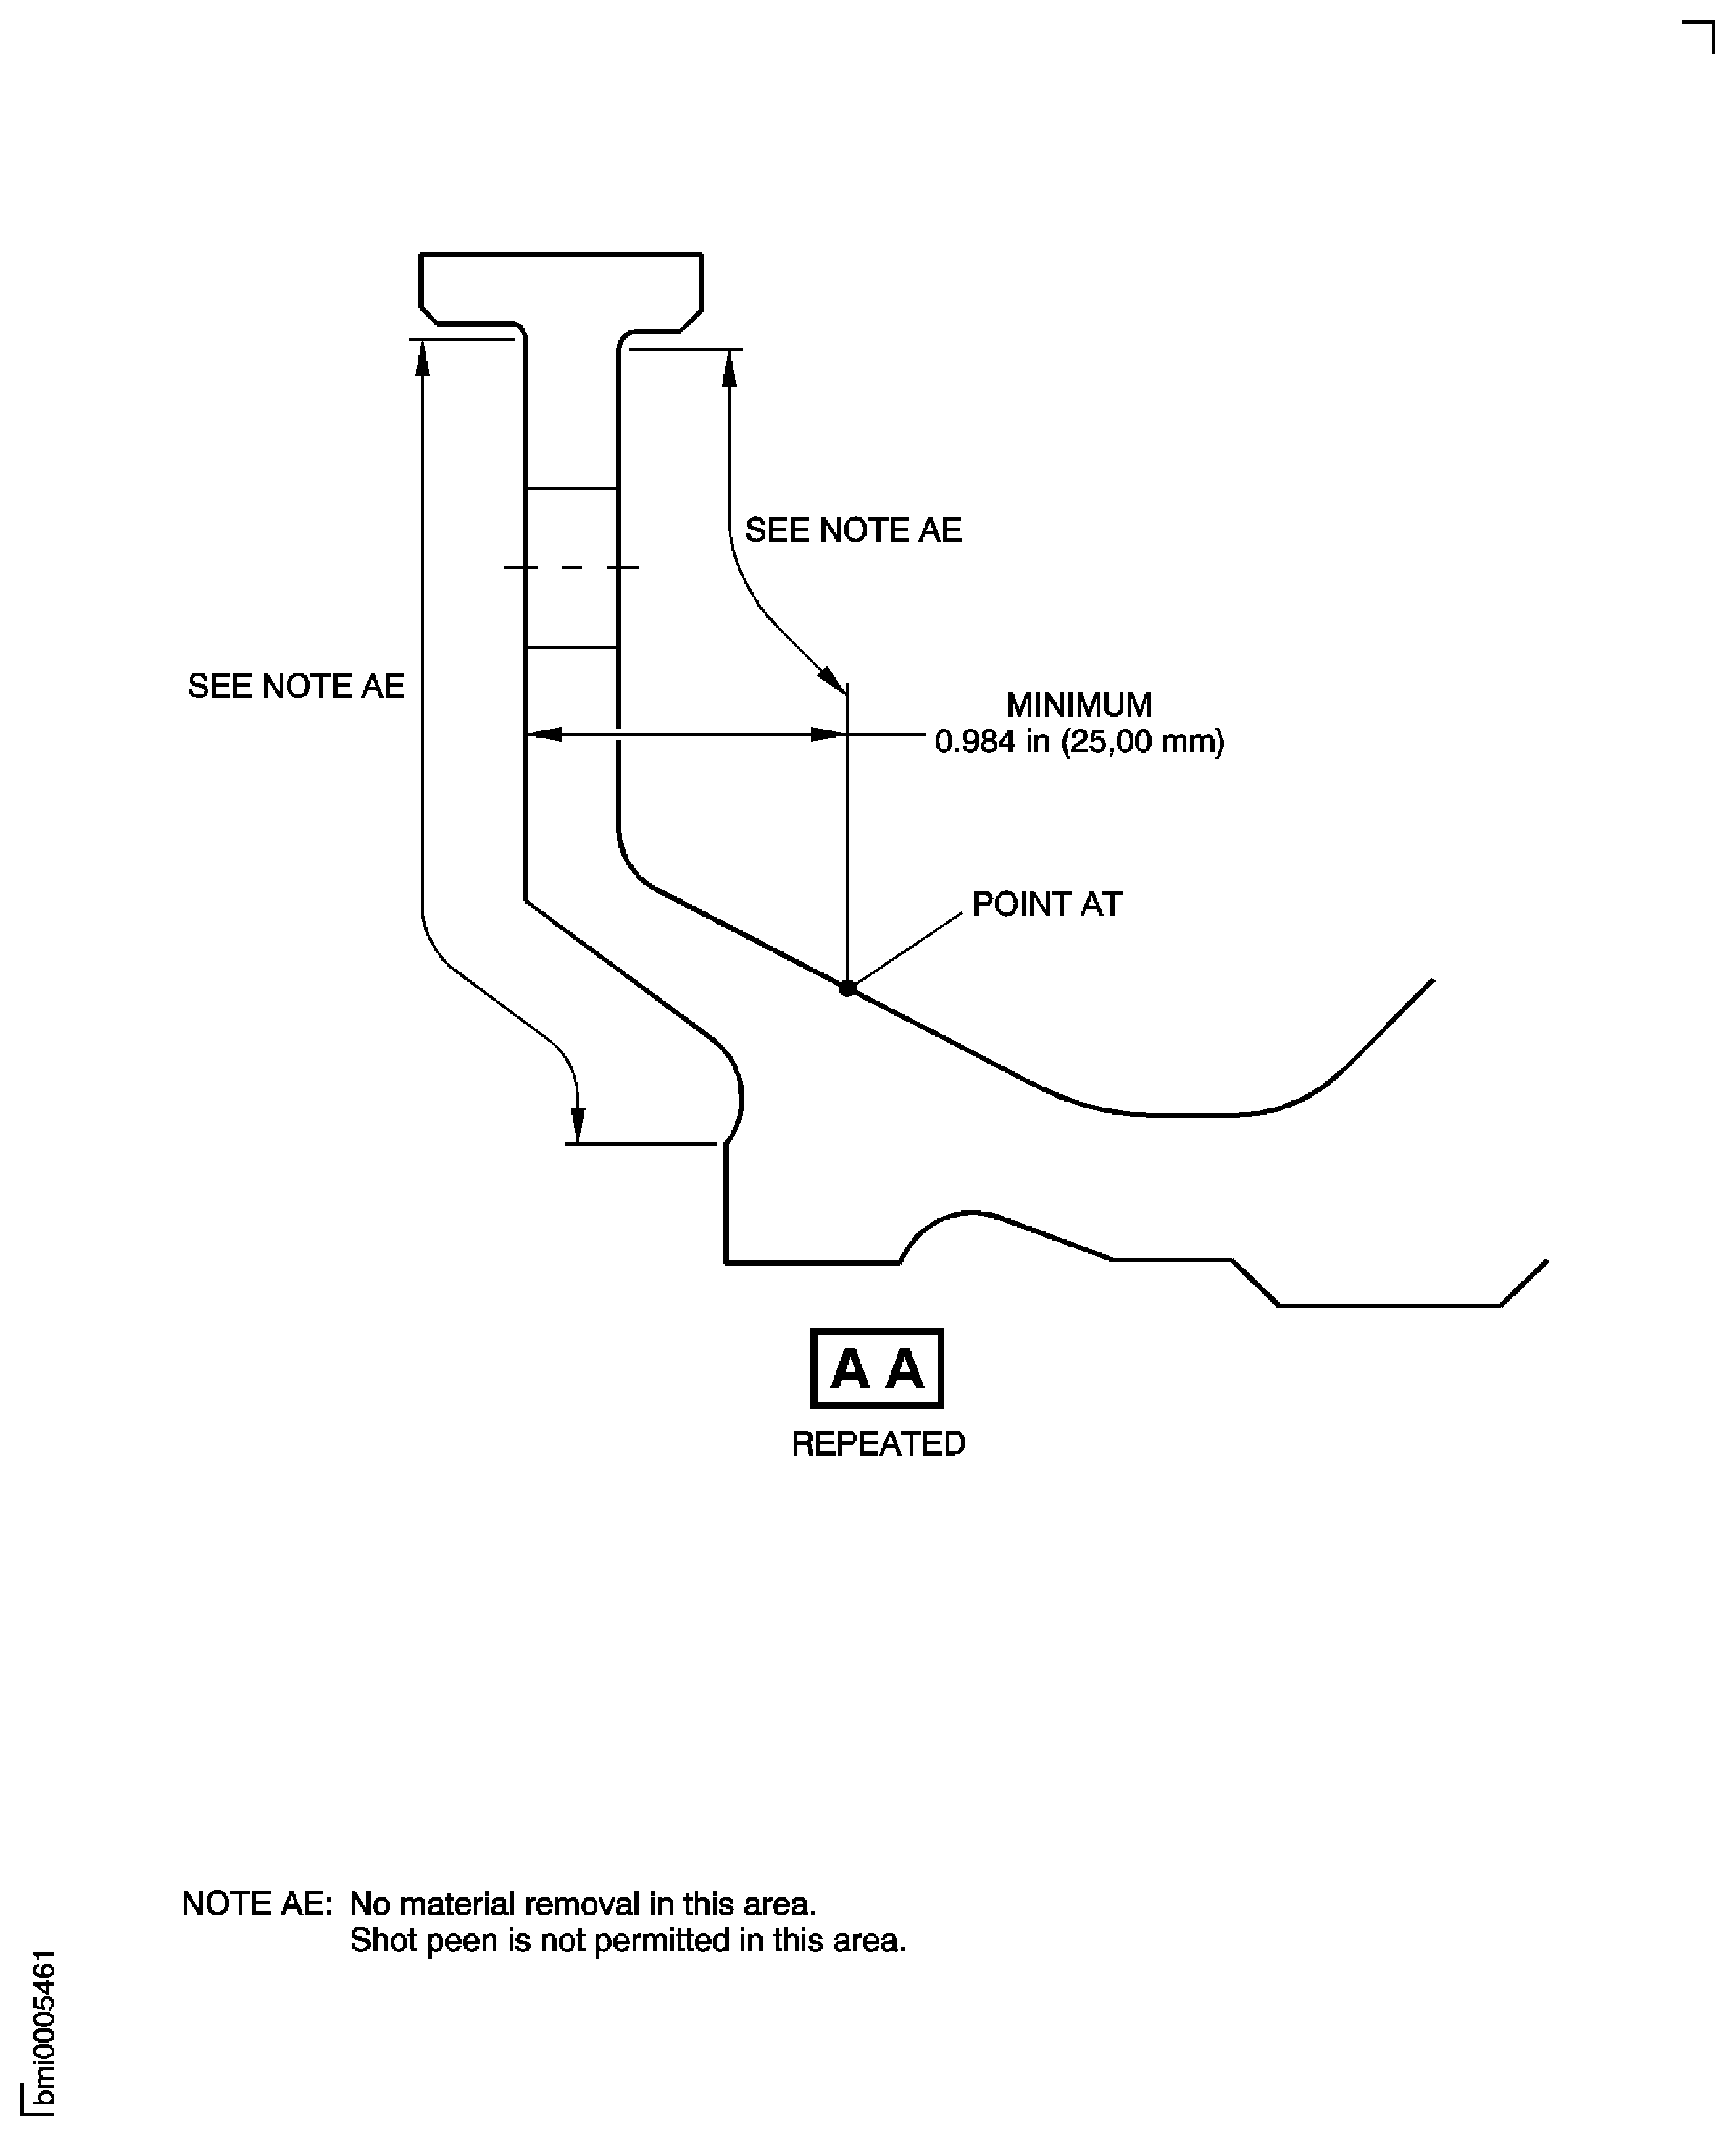
Figure: Repair Details and Dimensions - Assemblies A, B, C and D
Repair Details and Dimensions - Assemblies A, B, C and D
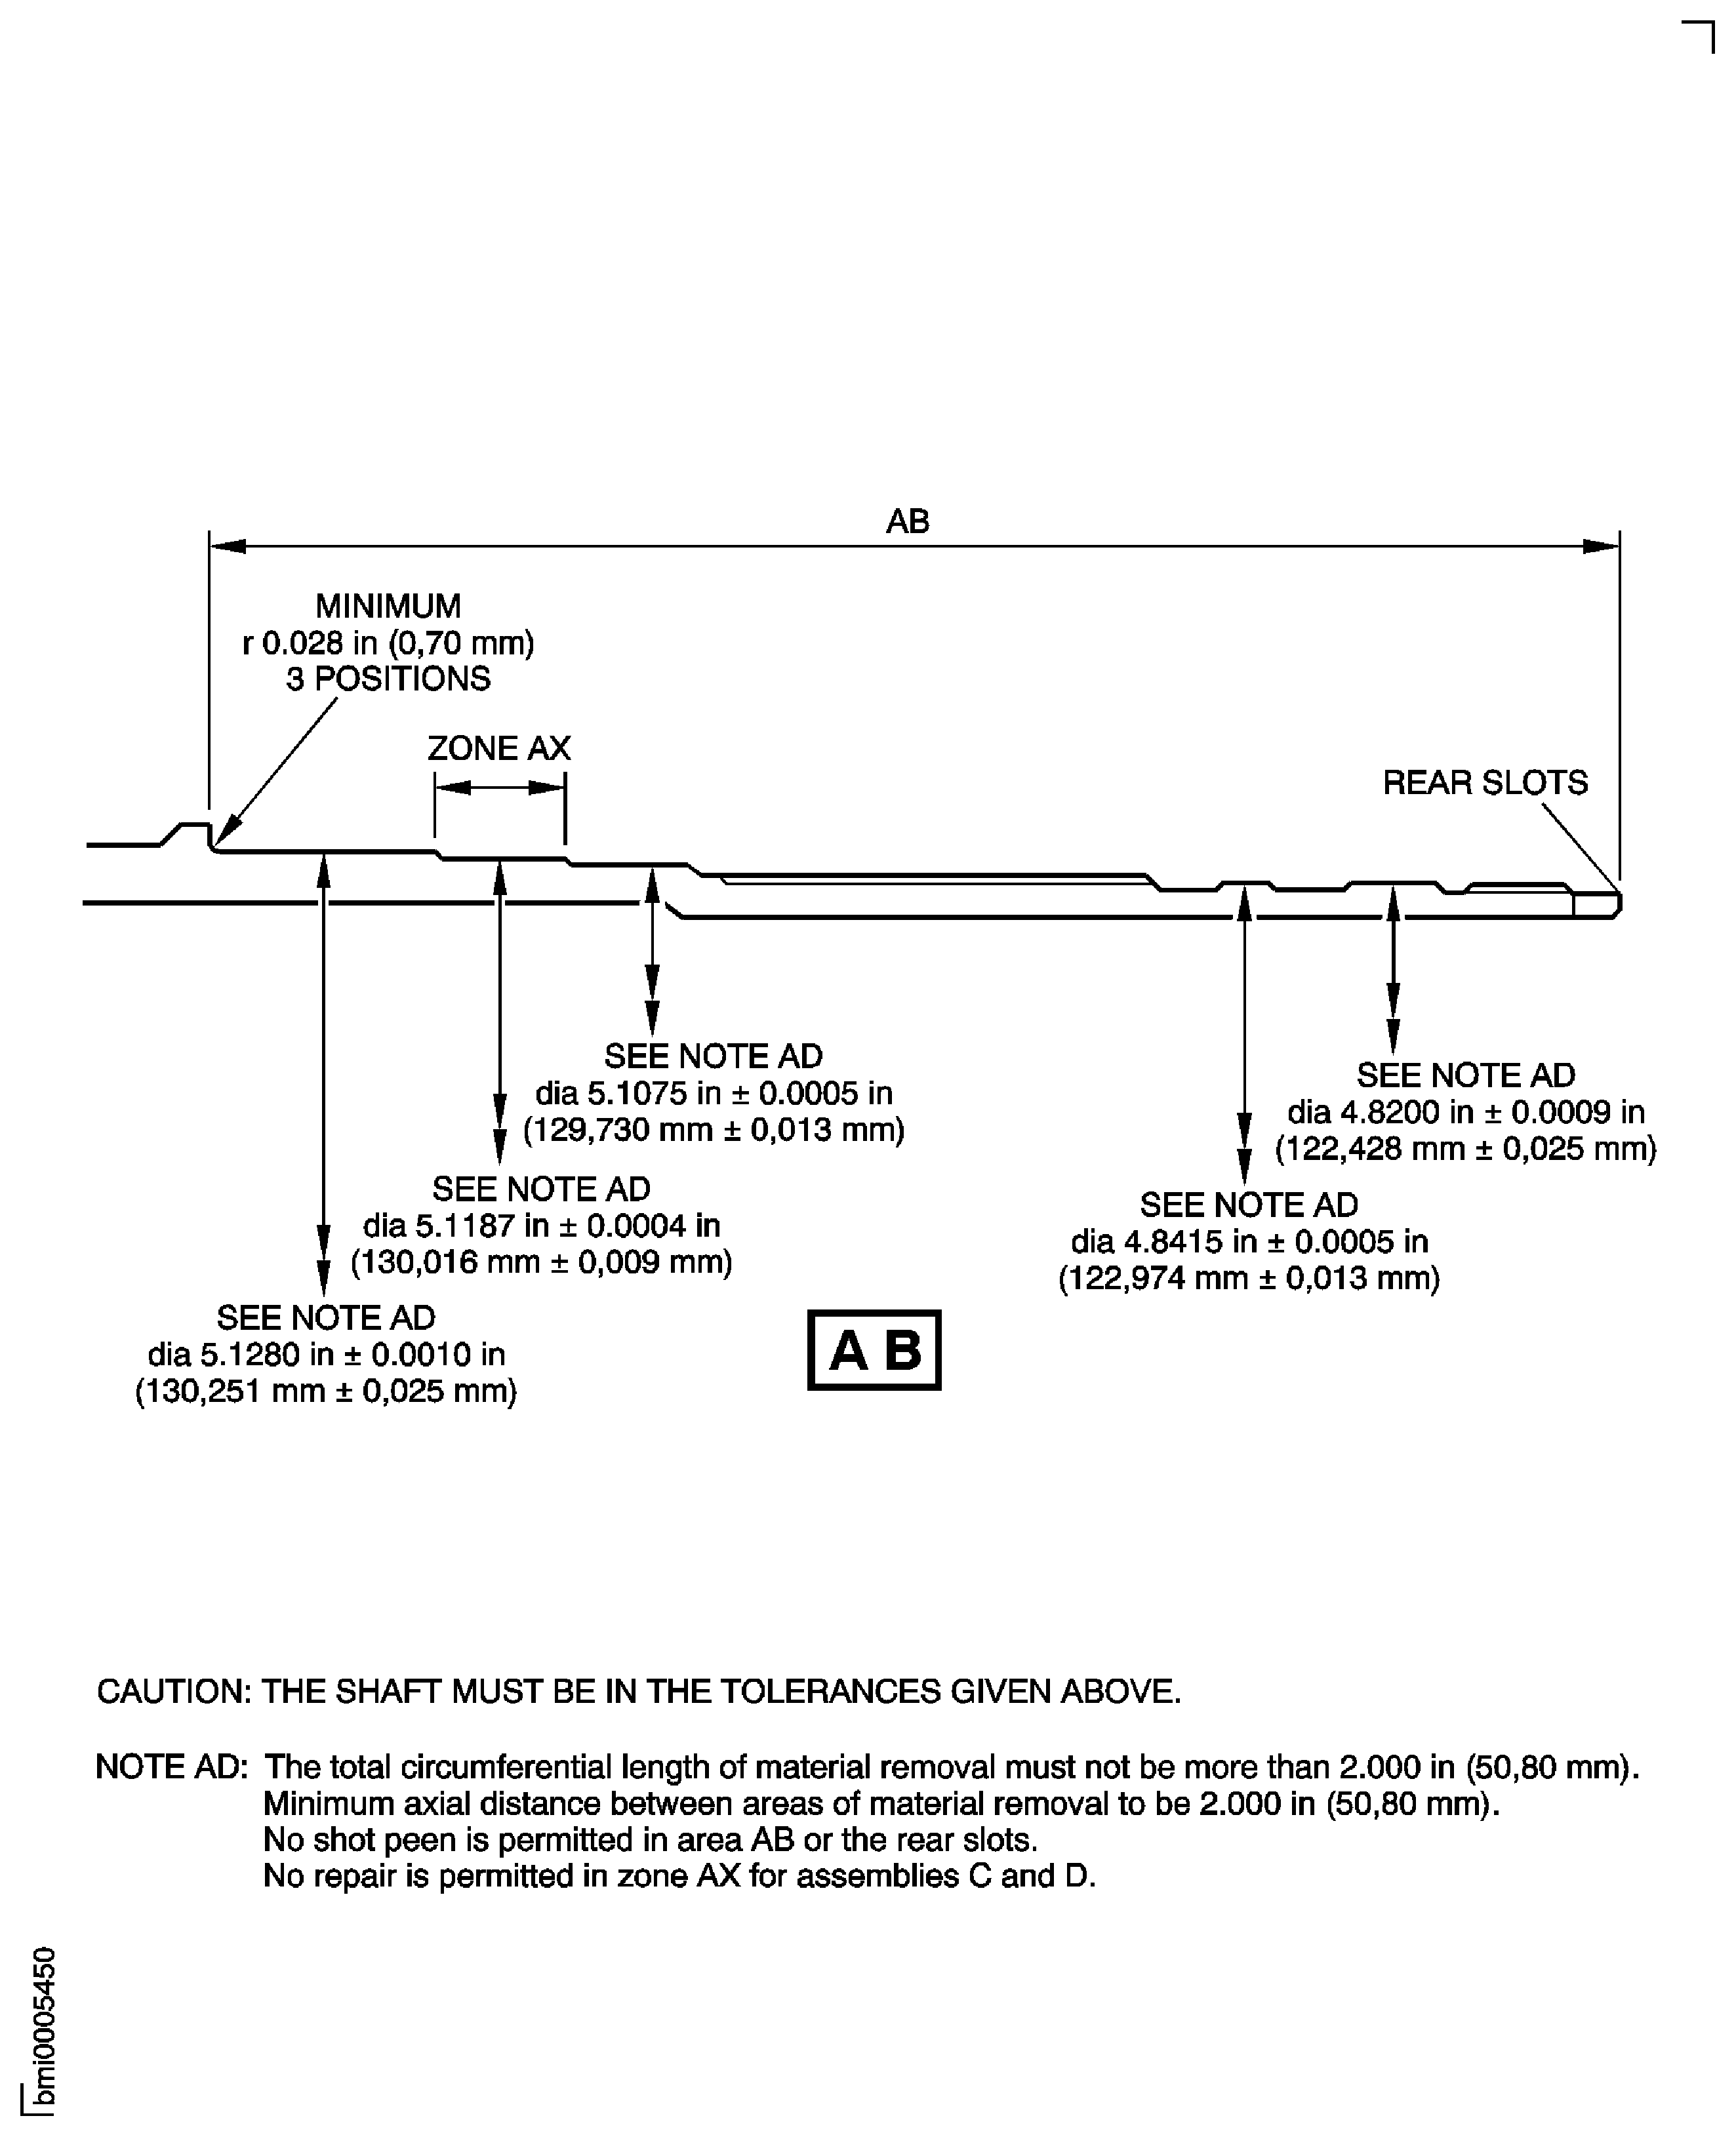
Figure: Repair Details and Dimensions - Assemblies A and C
Repair Details and Dimensions - Assemblies A and C
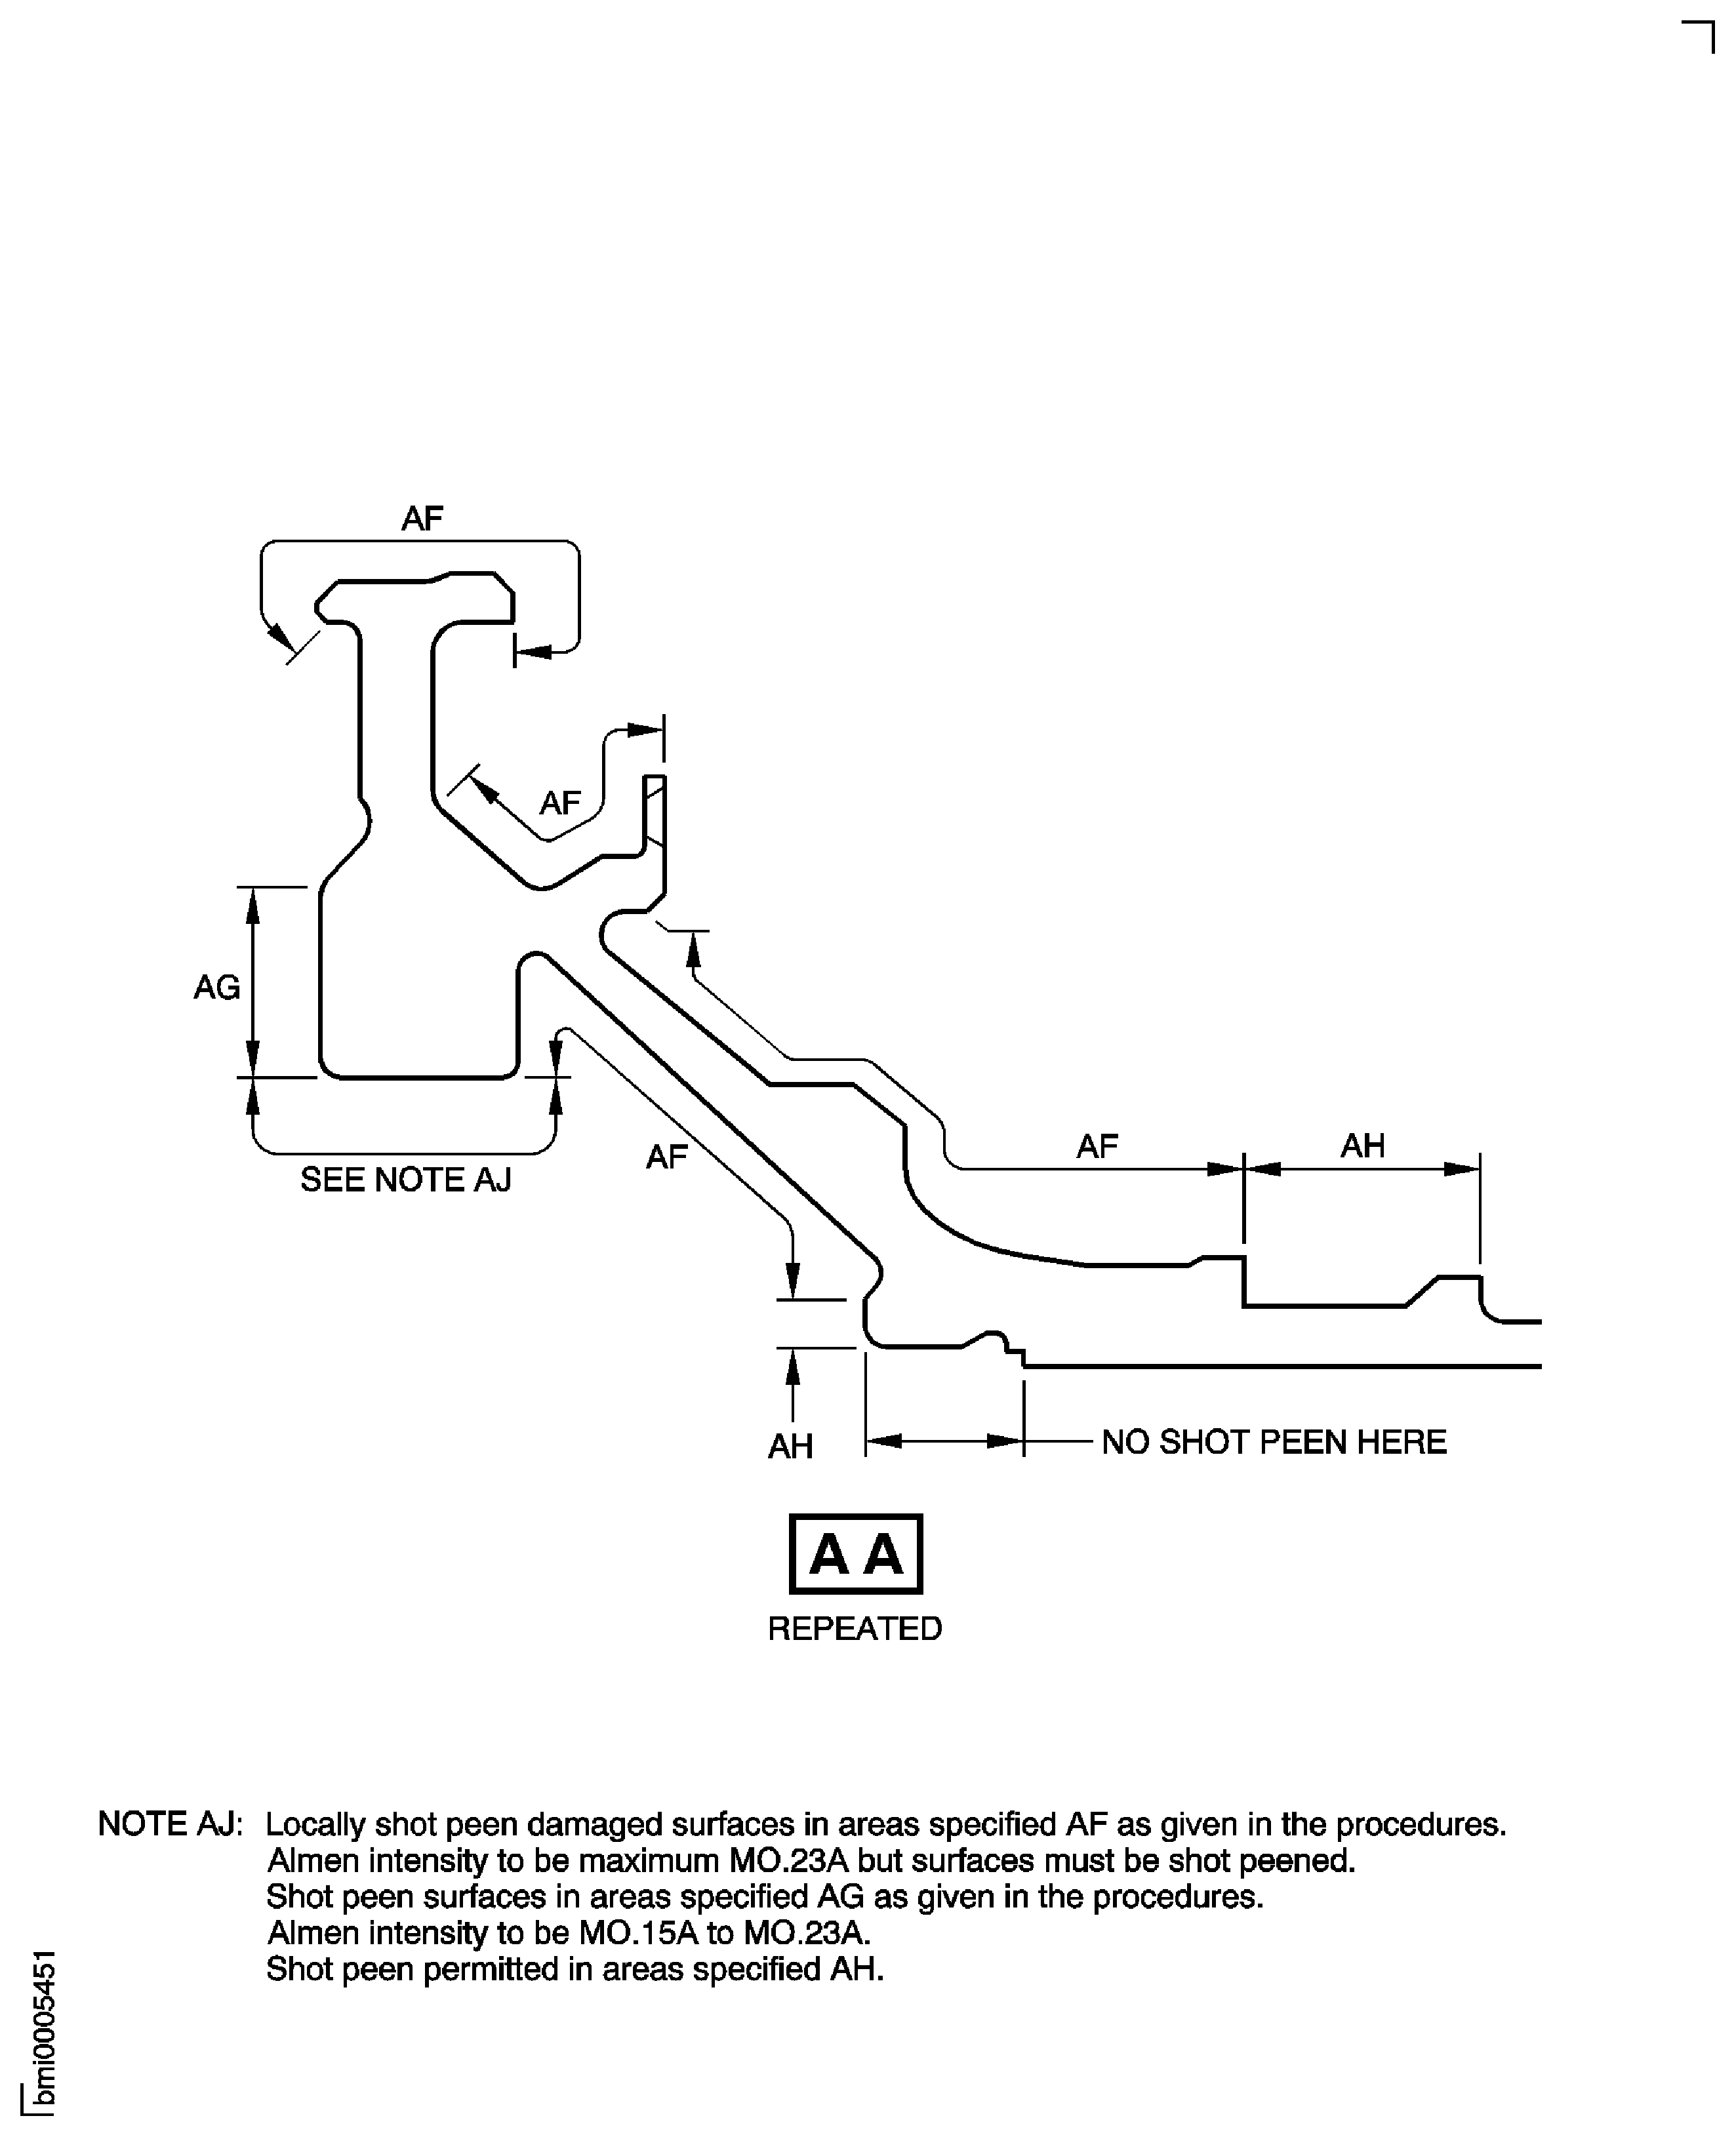
Figure: Repair Details and Dimensions - Assemblies B and D
Repair Details and Dimensions - Assemblies B and D
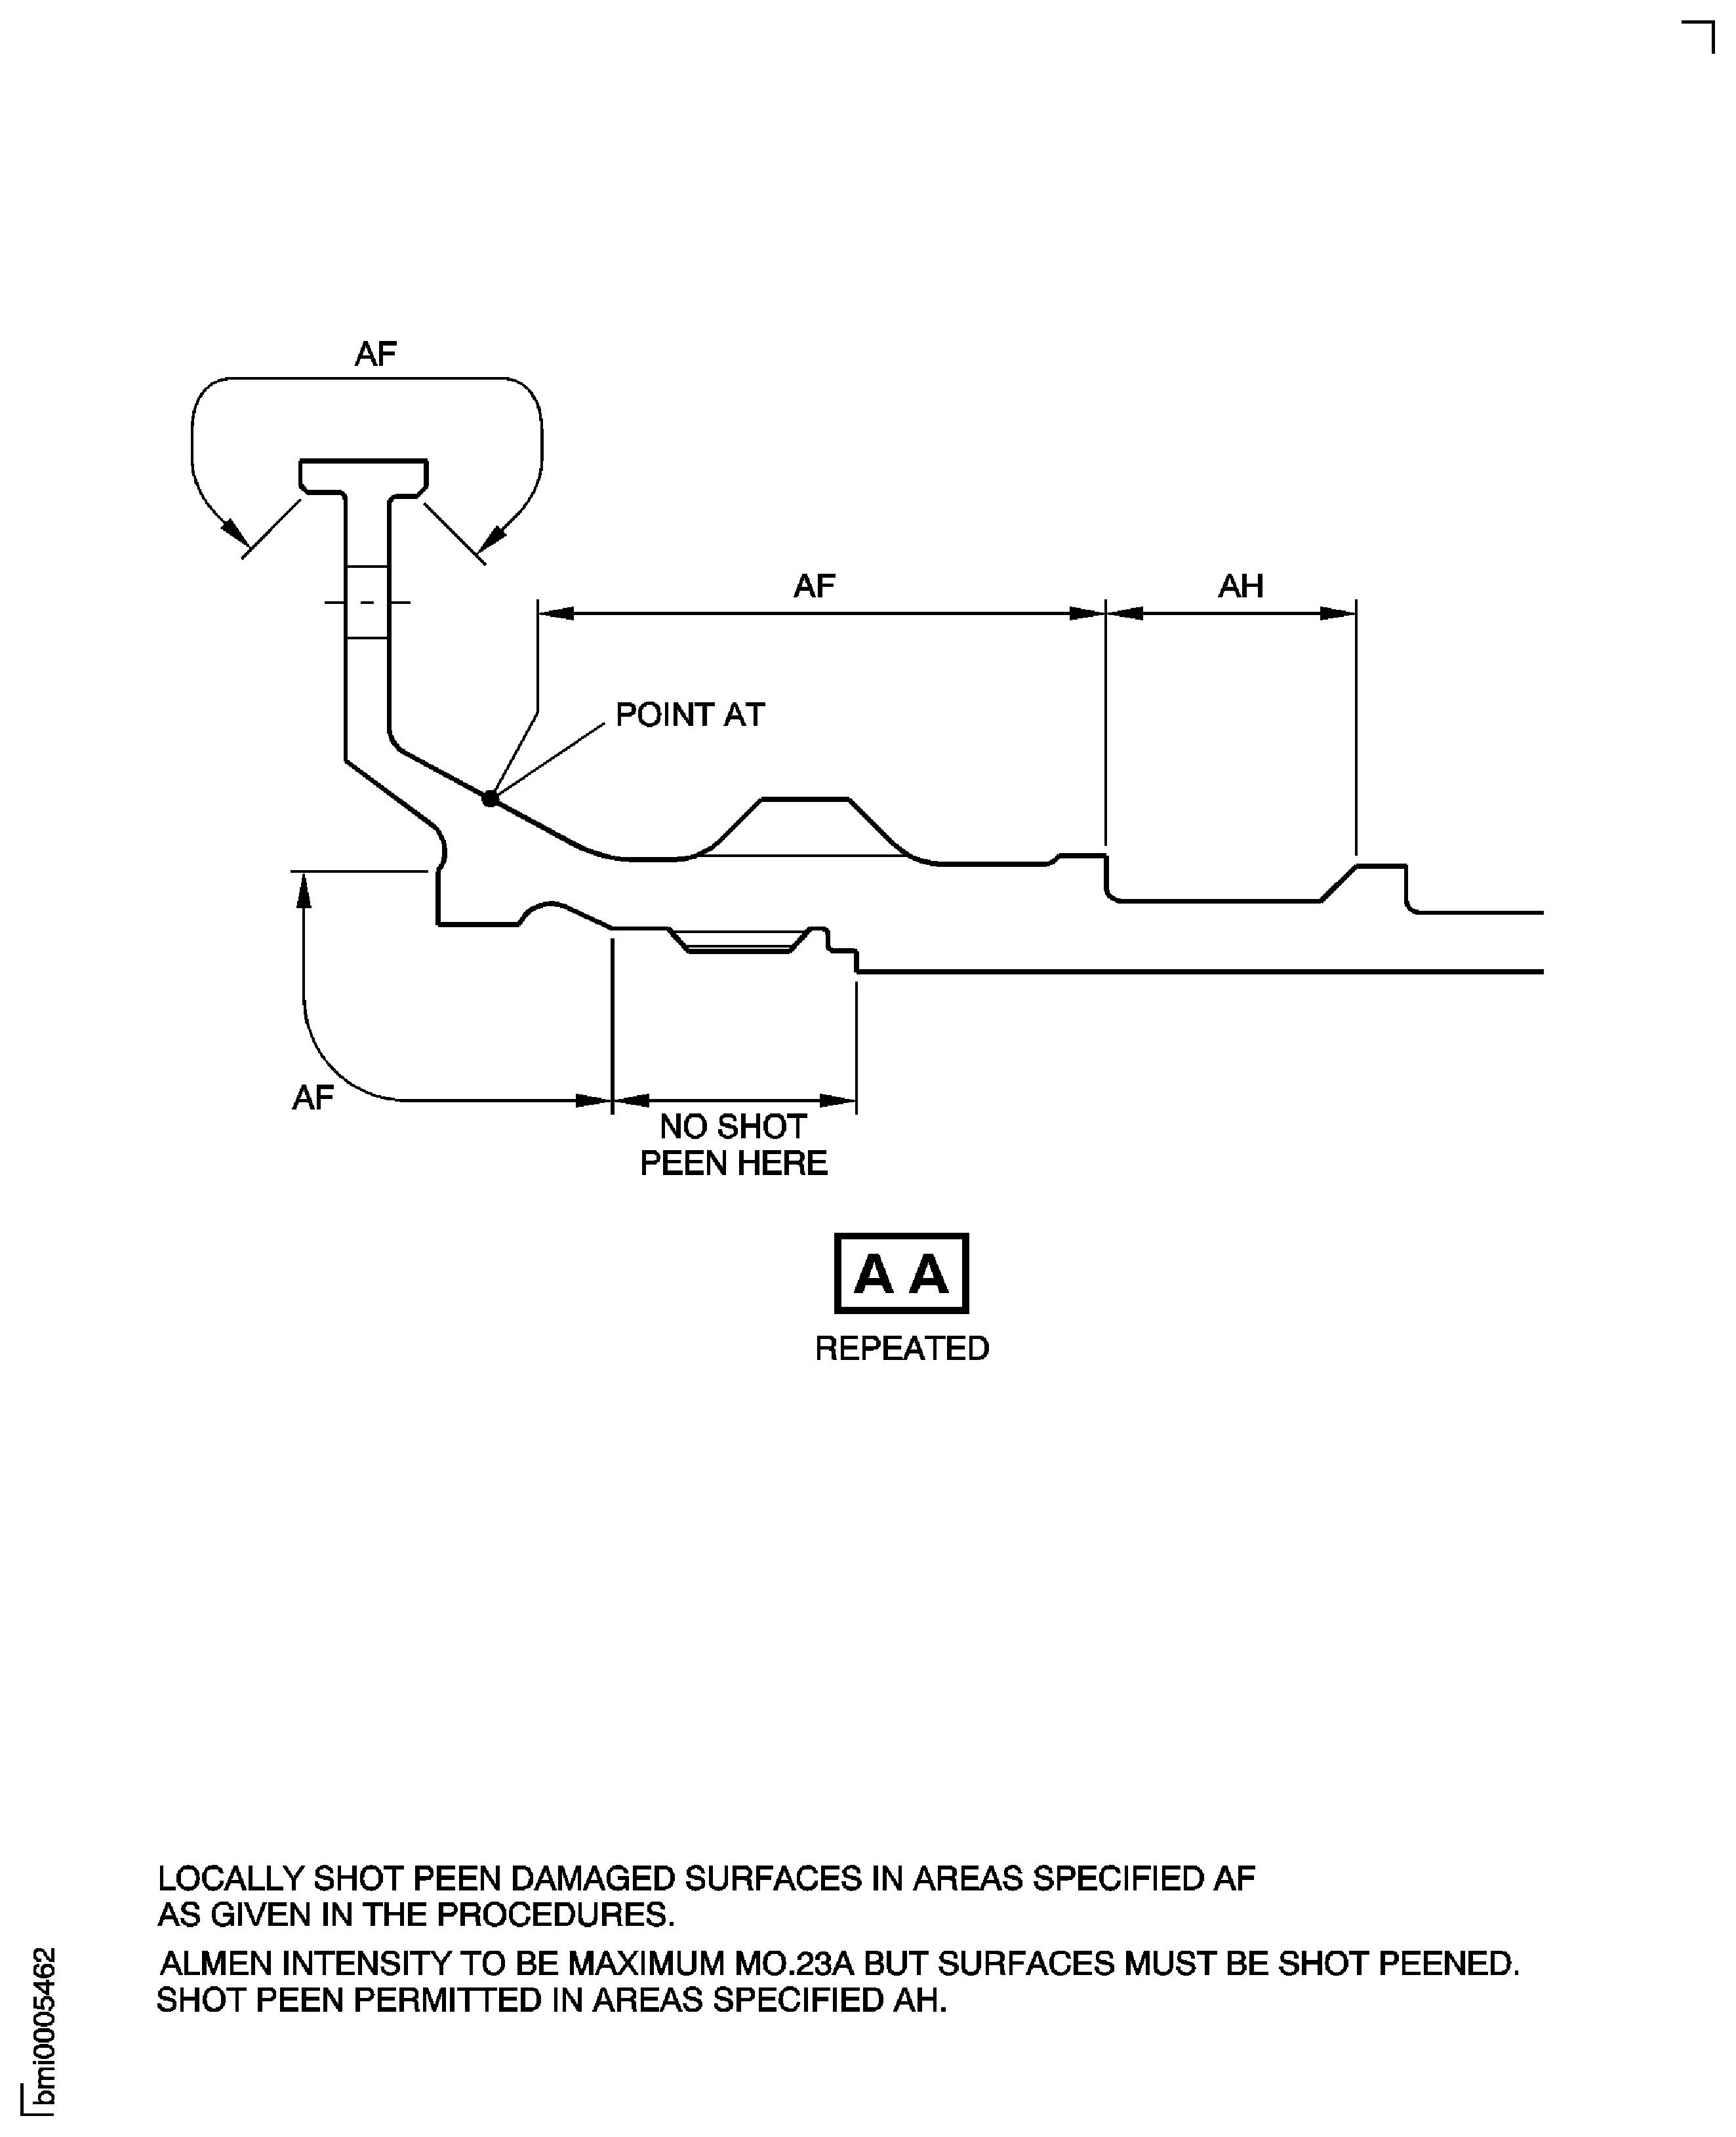
Figure: Repair Details and Dimensions - Assemblies A and C
Repair Details and Dimensions - Assemblies A and C
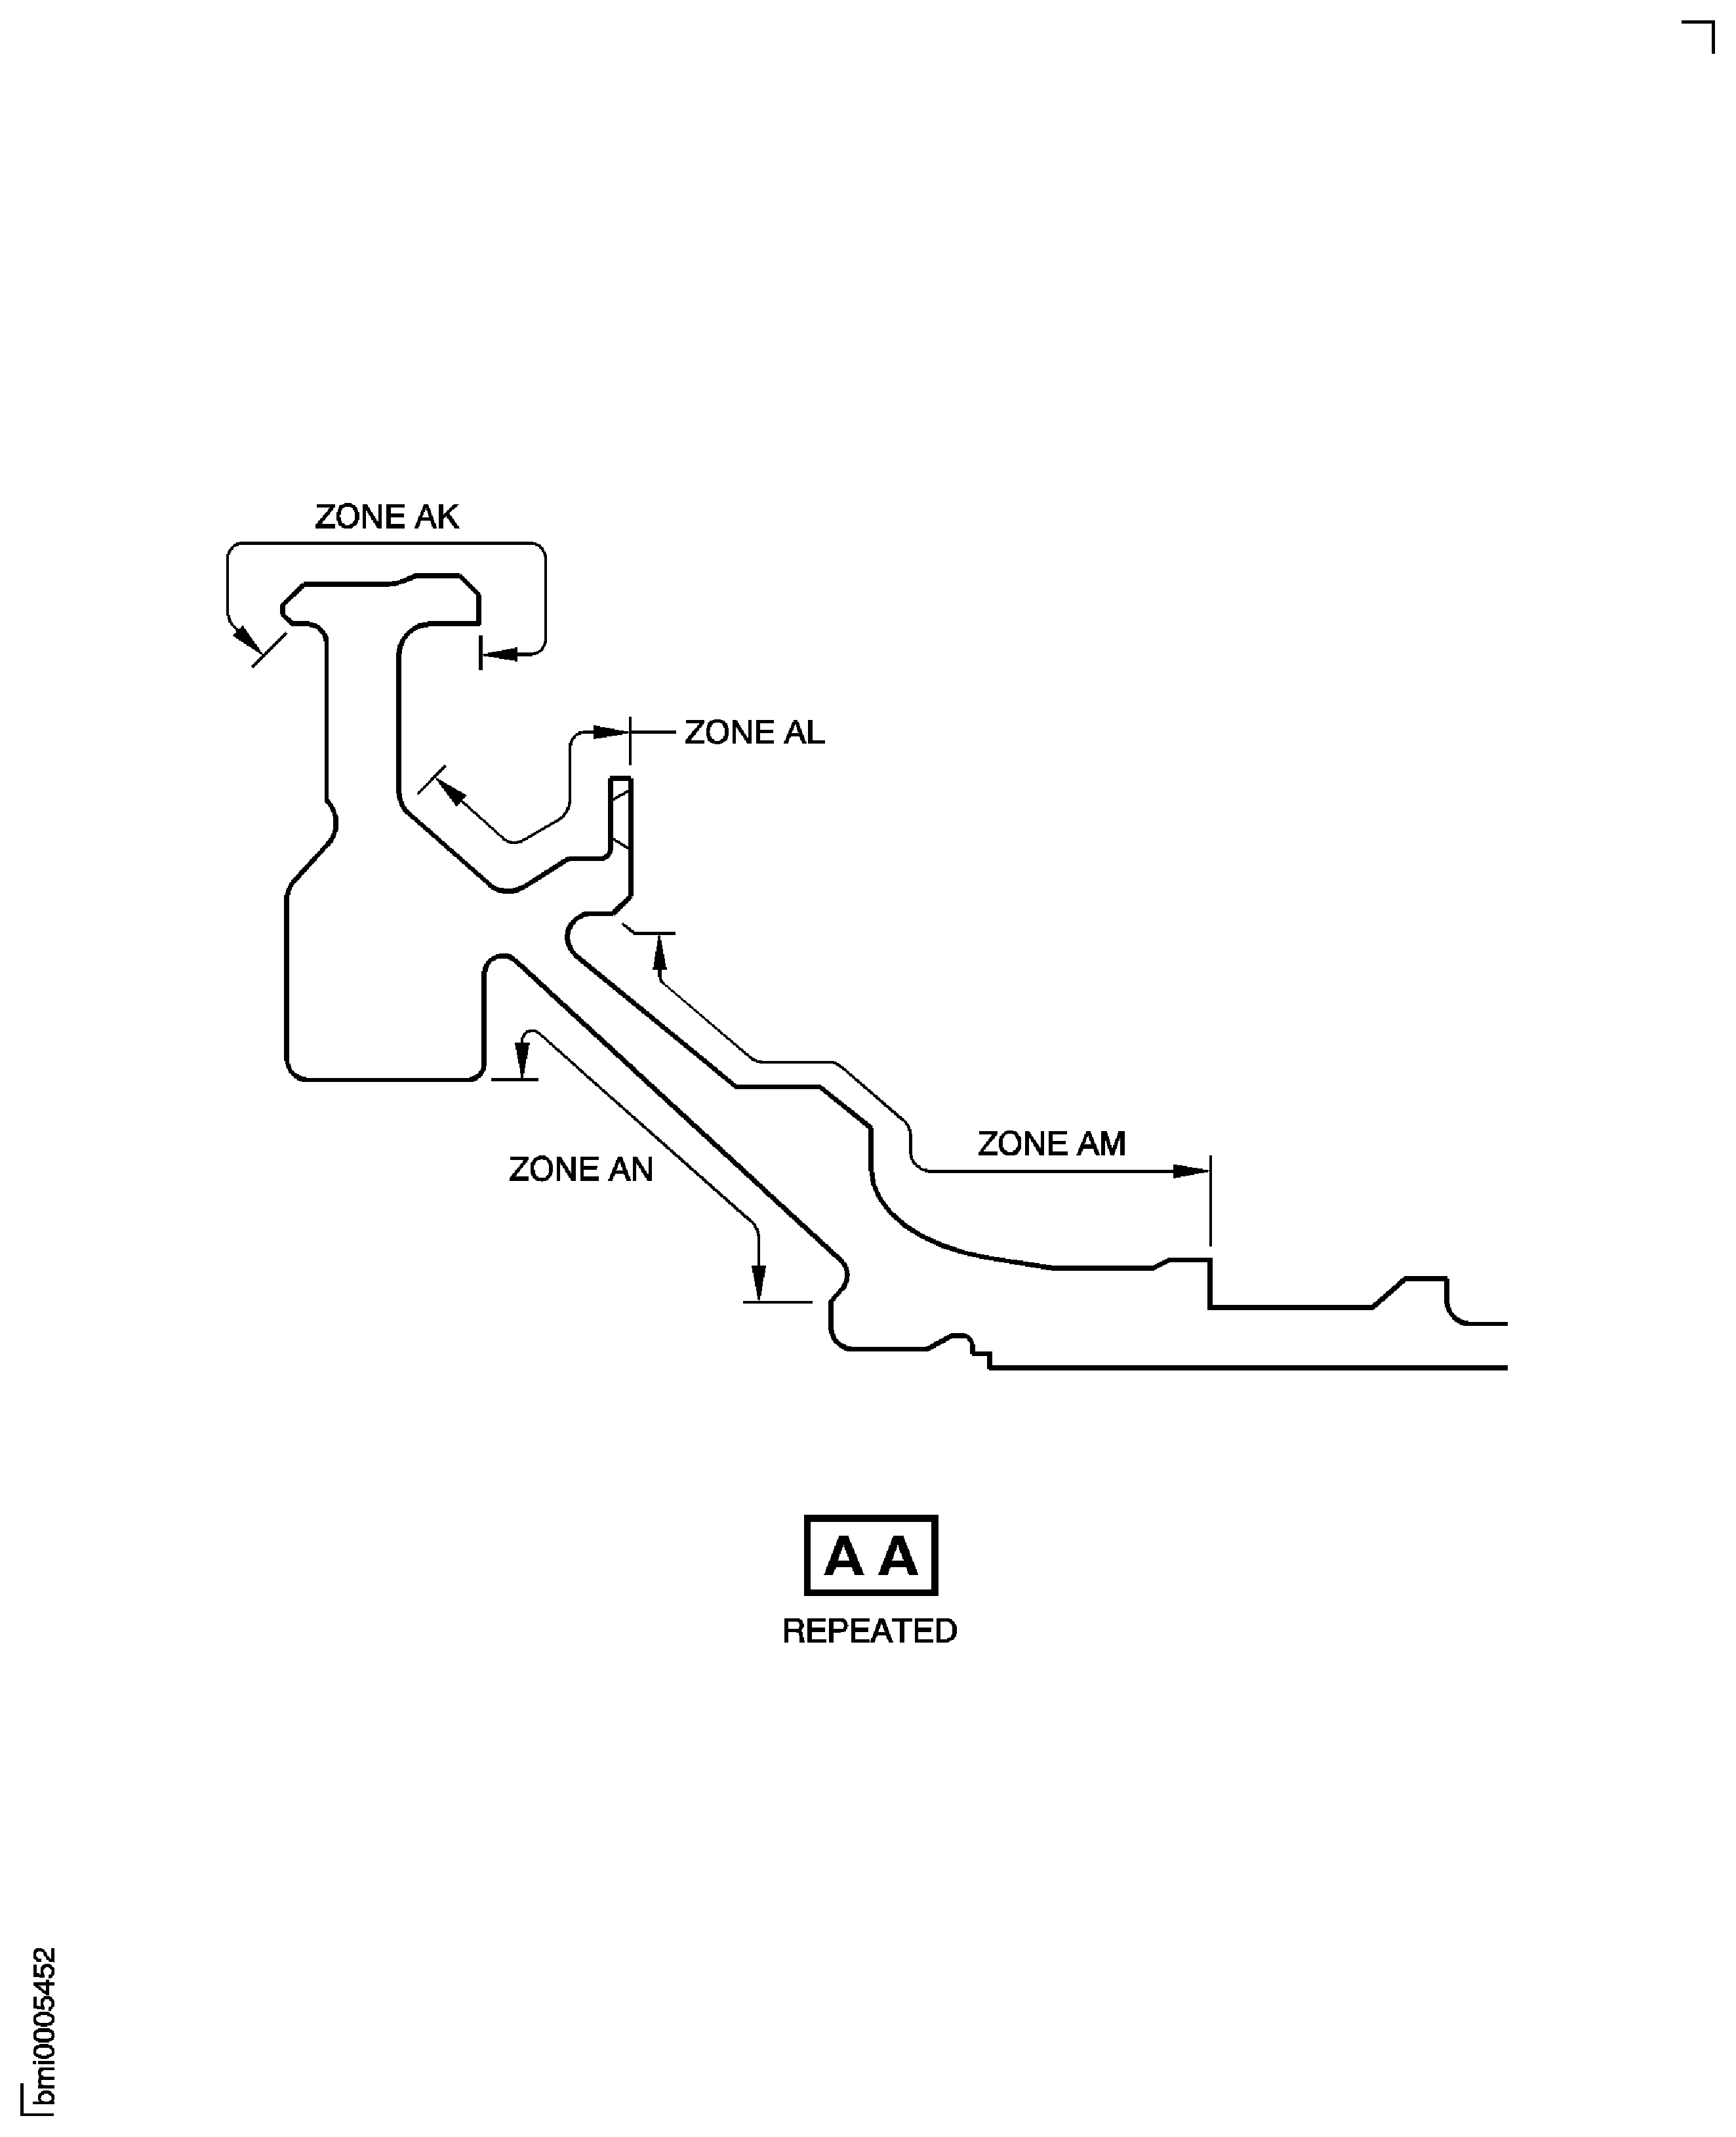
Figure: Repair Details and Dimensions - Assemblies B and D
Repair Details and Dimensions - Assemblies B and D
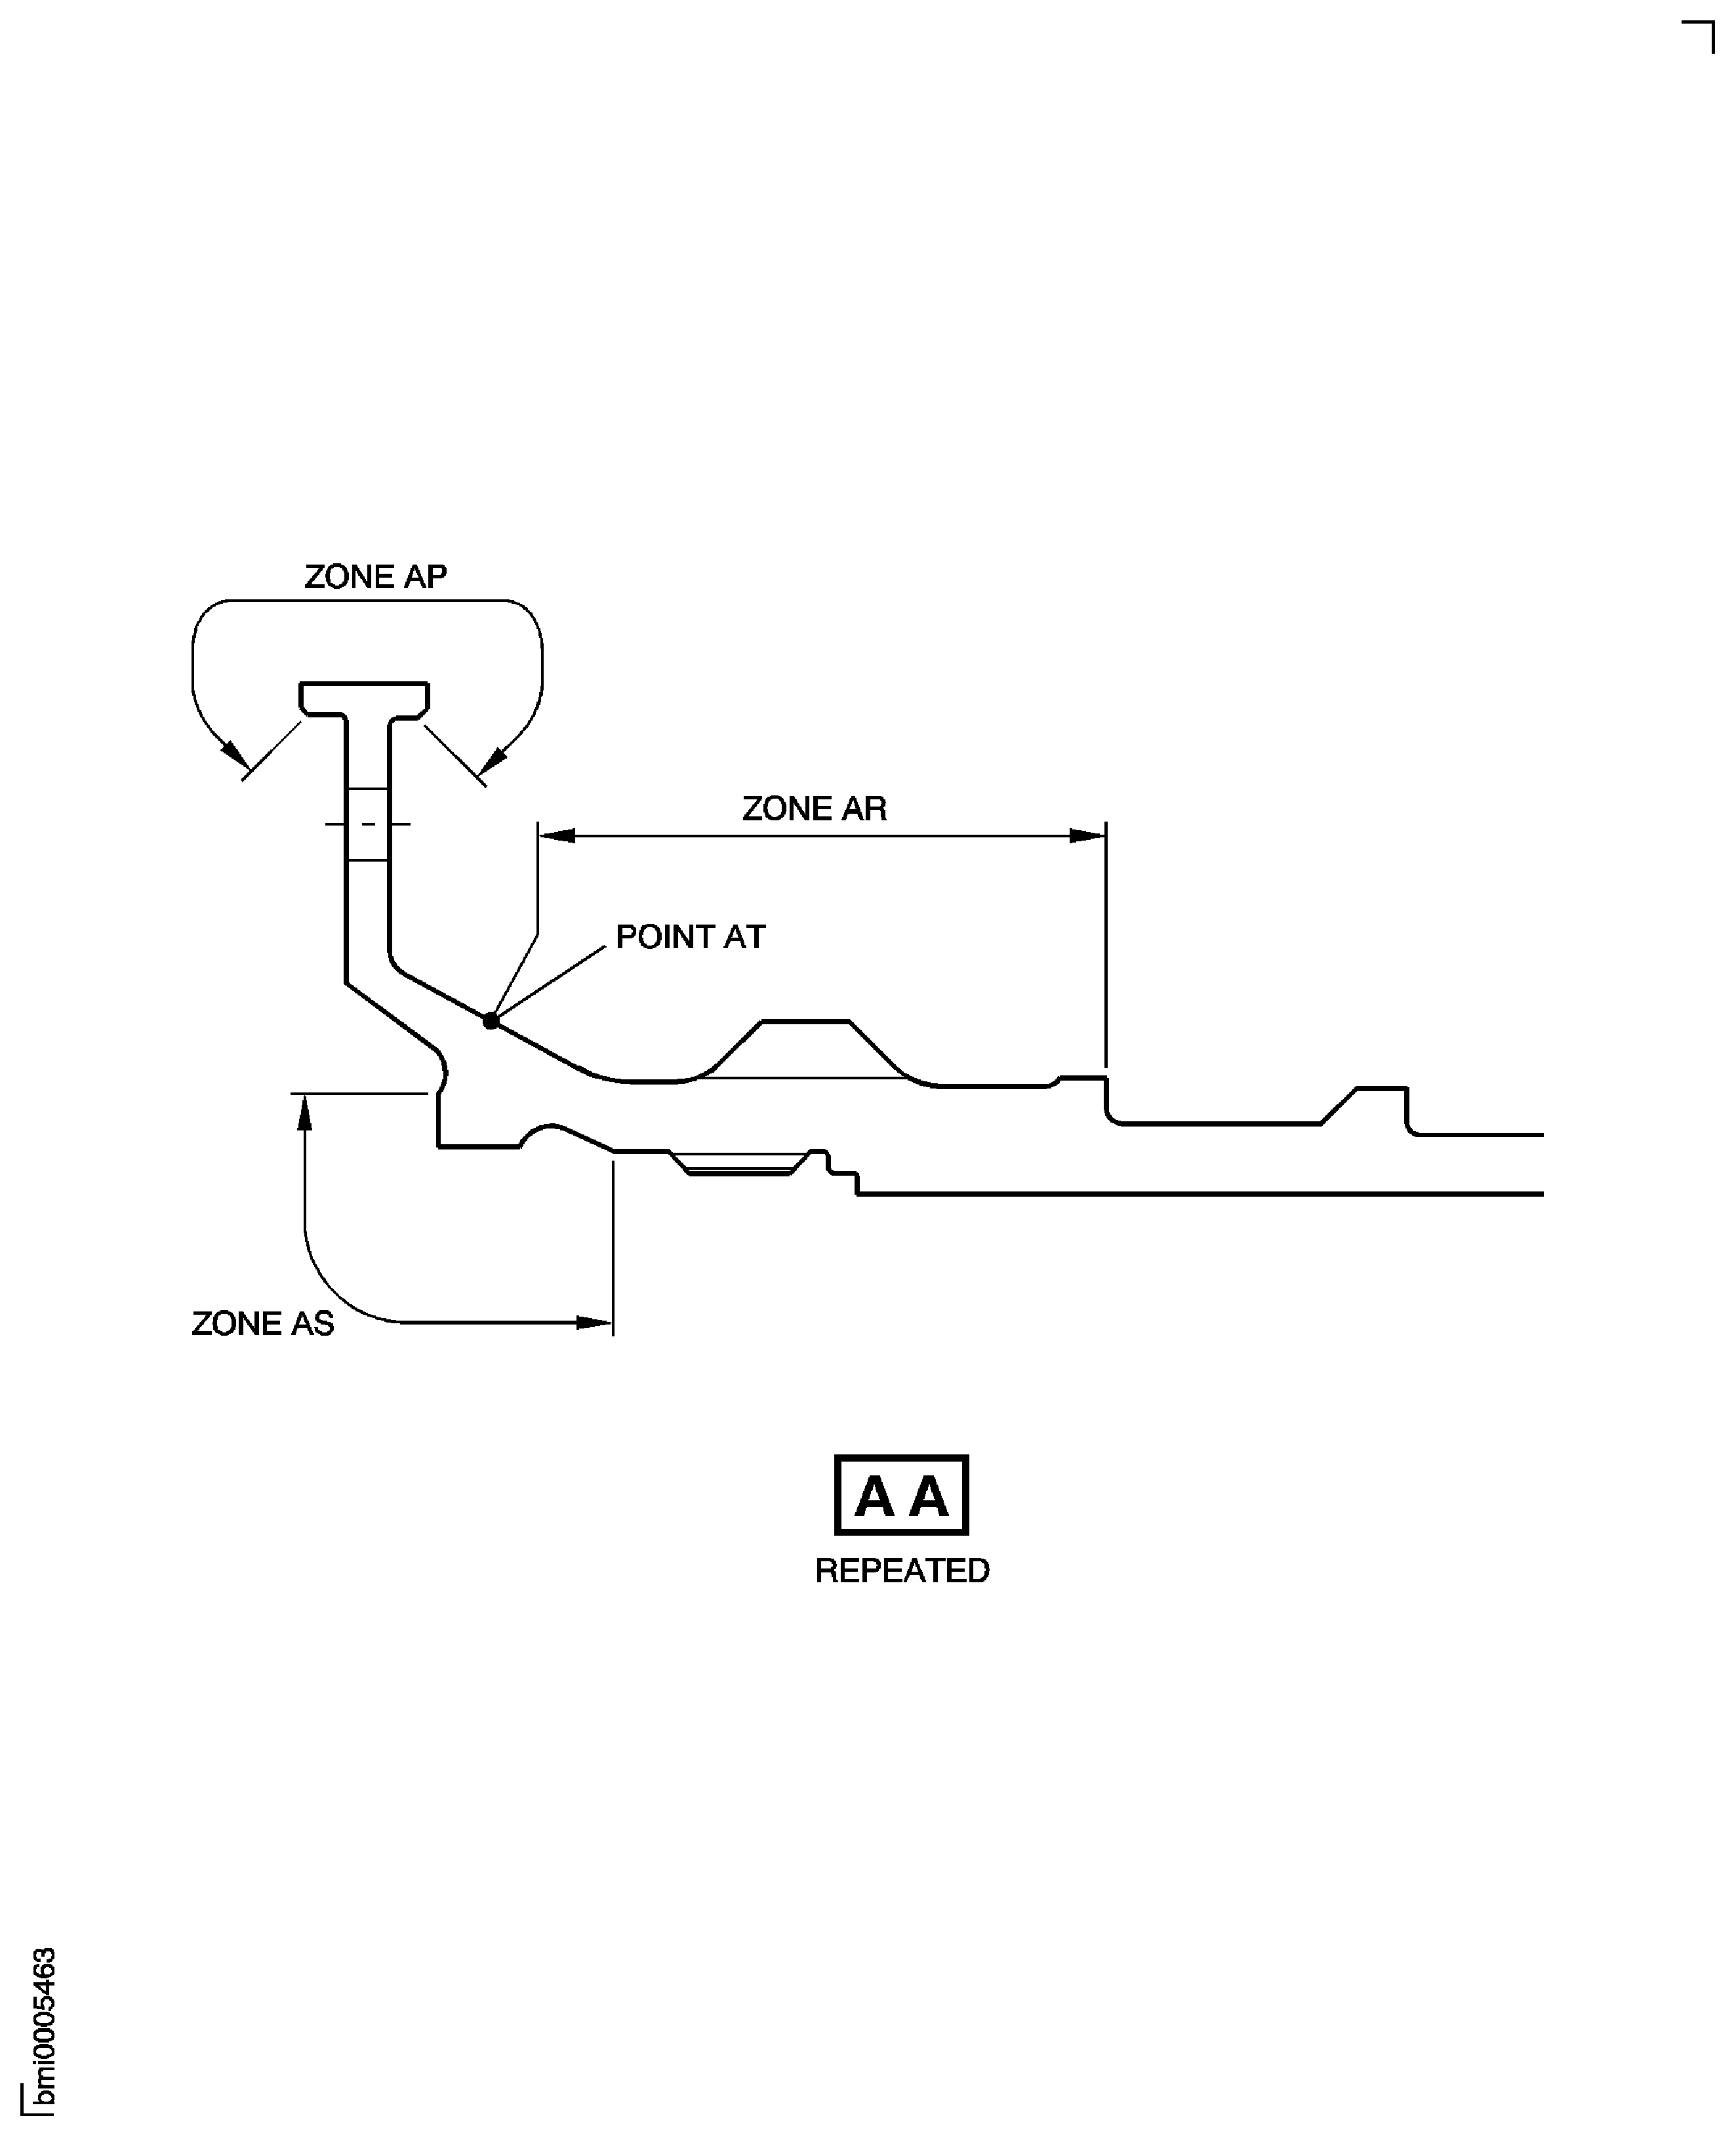
Figure: Repair Details and Dimensions - Assemblies A, B, C and D
Repair Details and Dimensions - Assemblies A, B, C and D
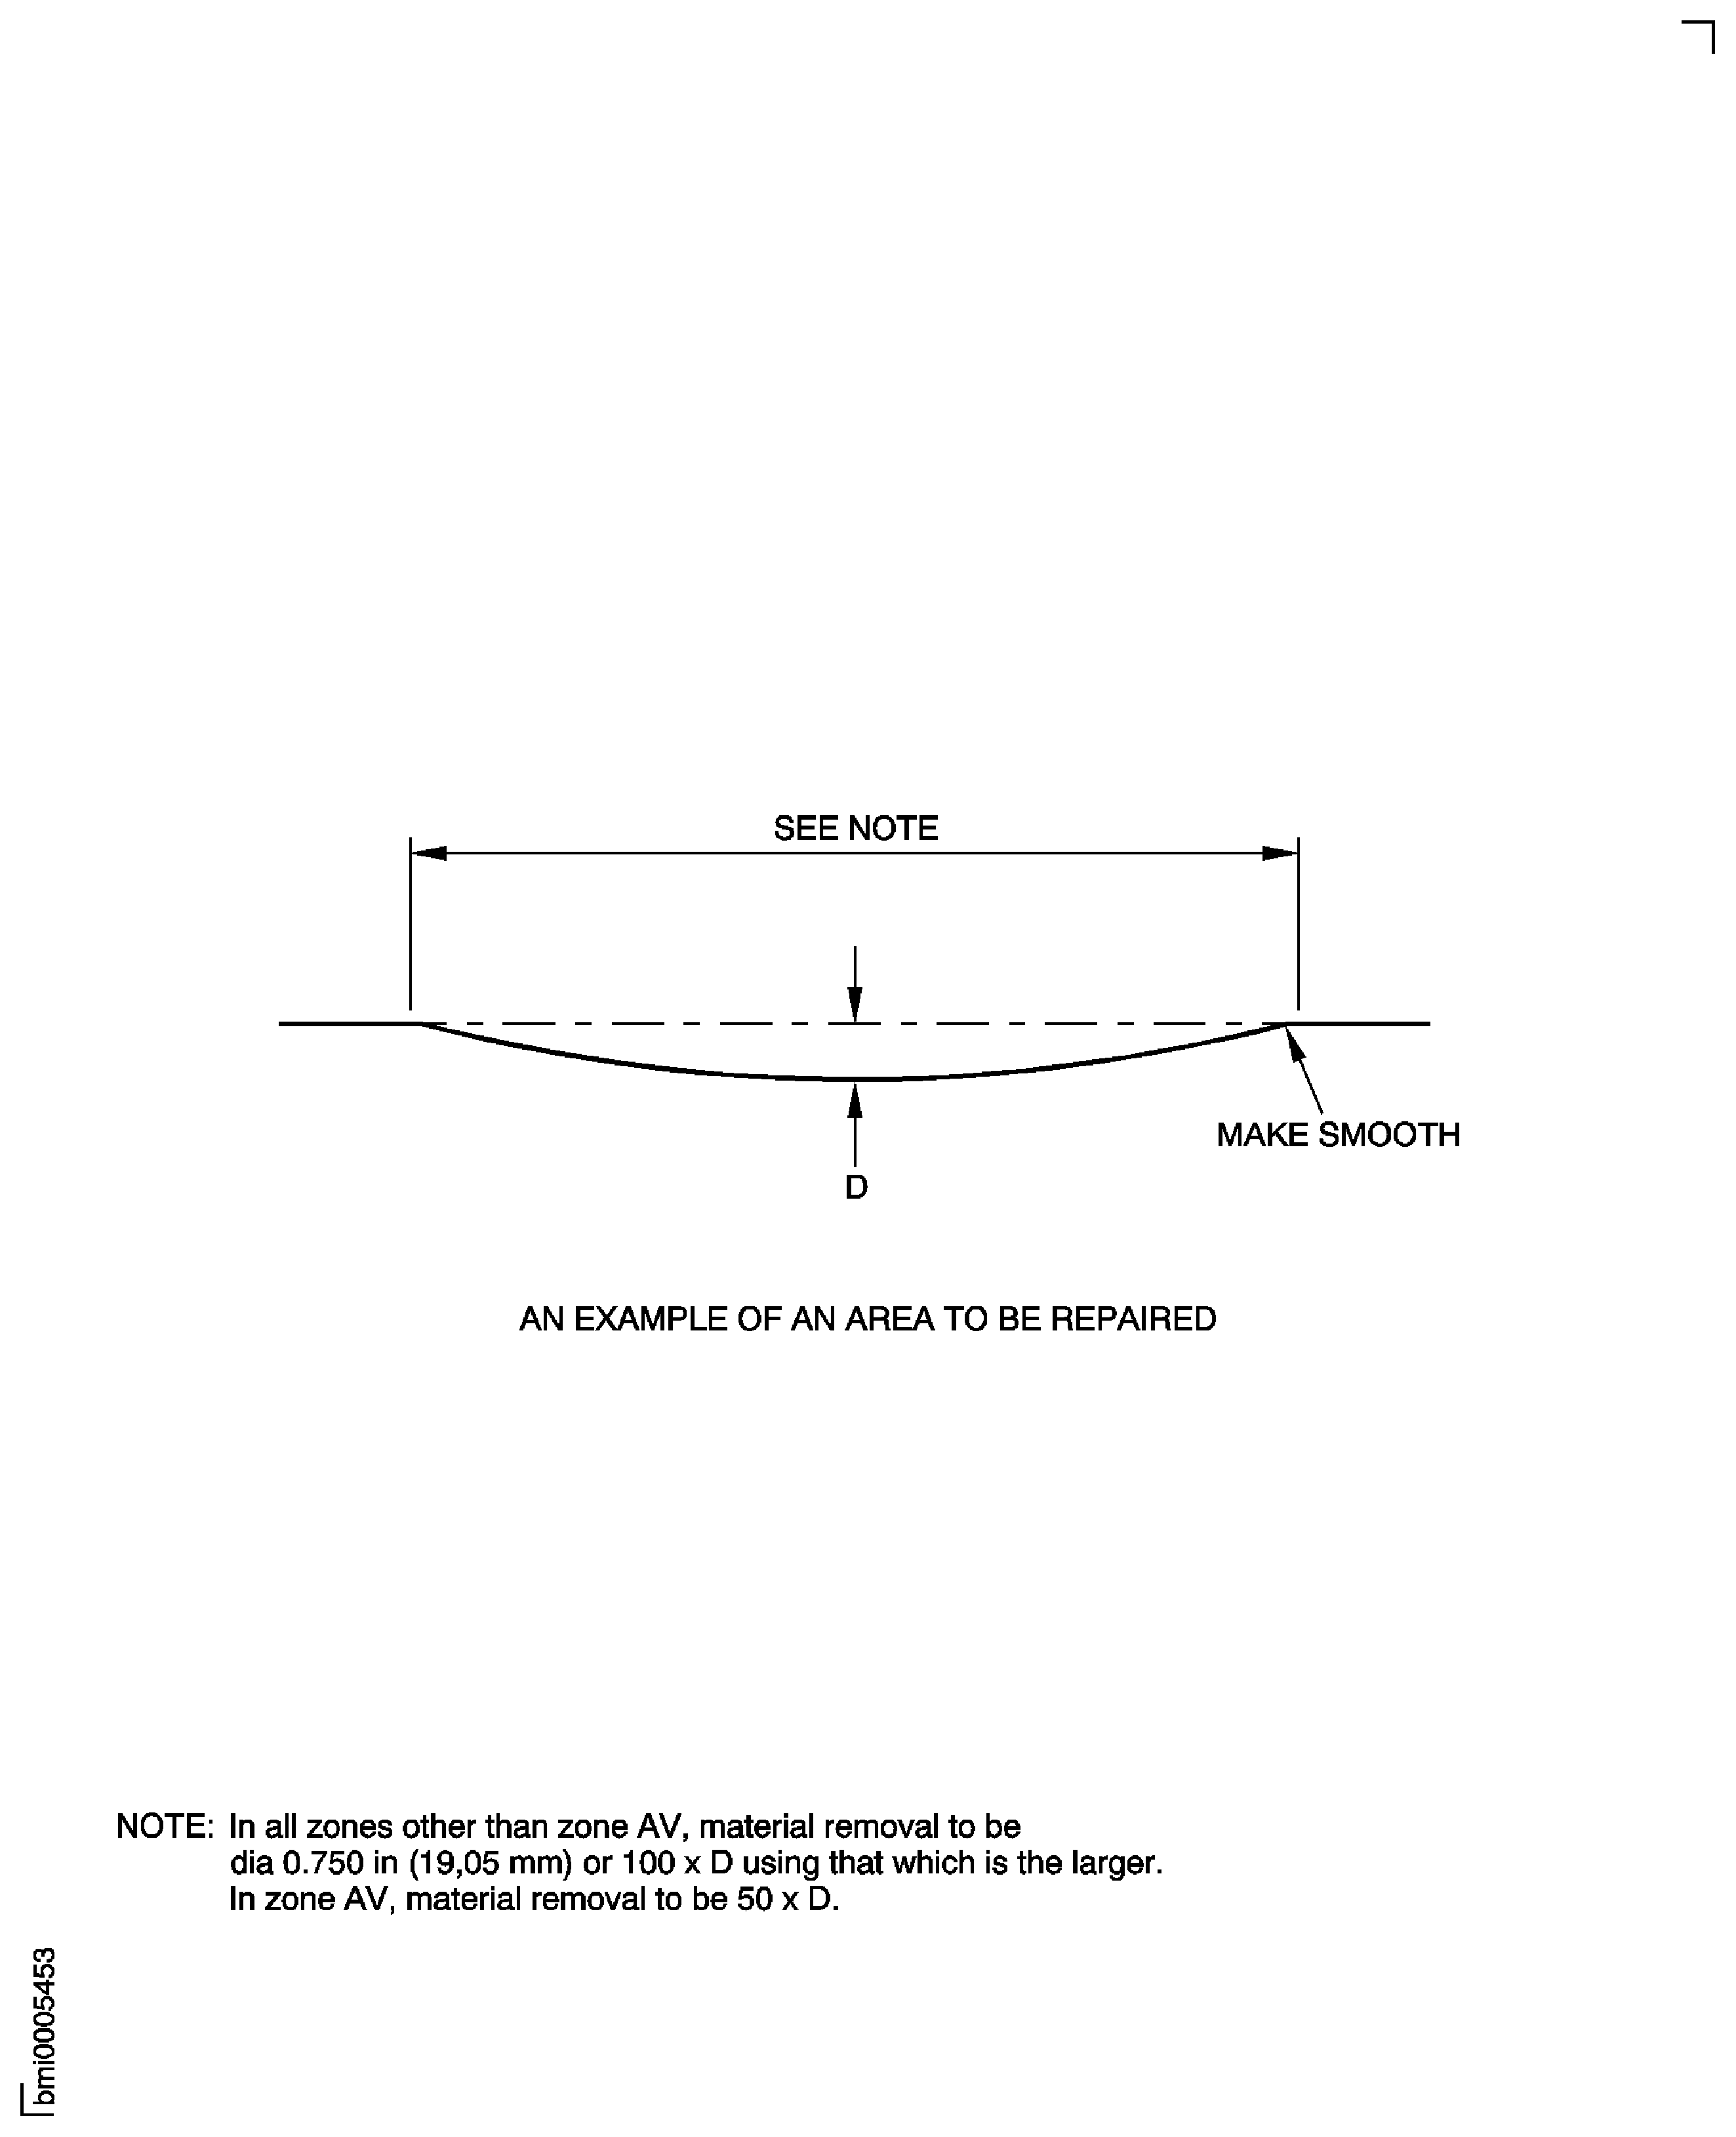
Figure: Repair Details and Dimensions - Assemblies B and D
Repair Details and Dimensions - Assemblies B and D
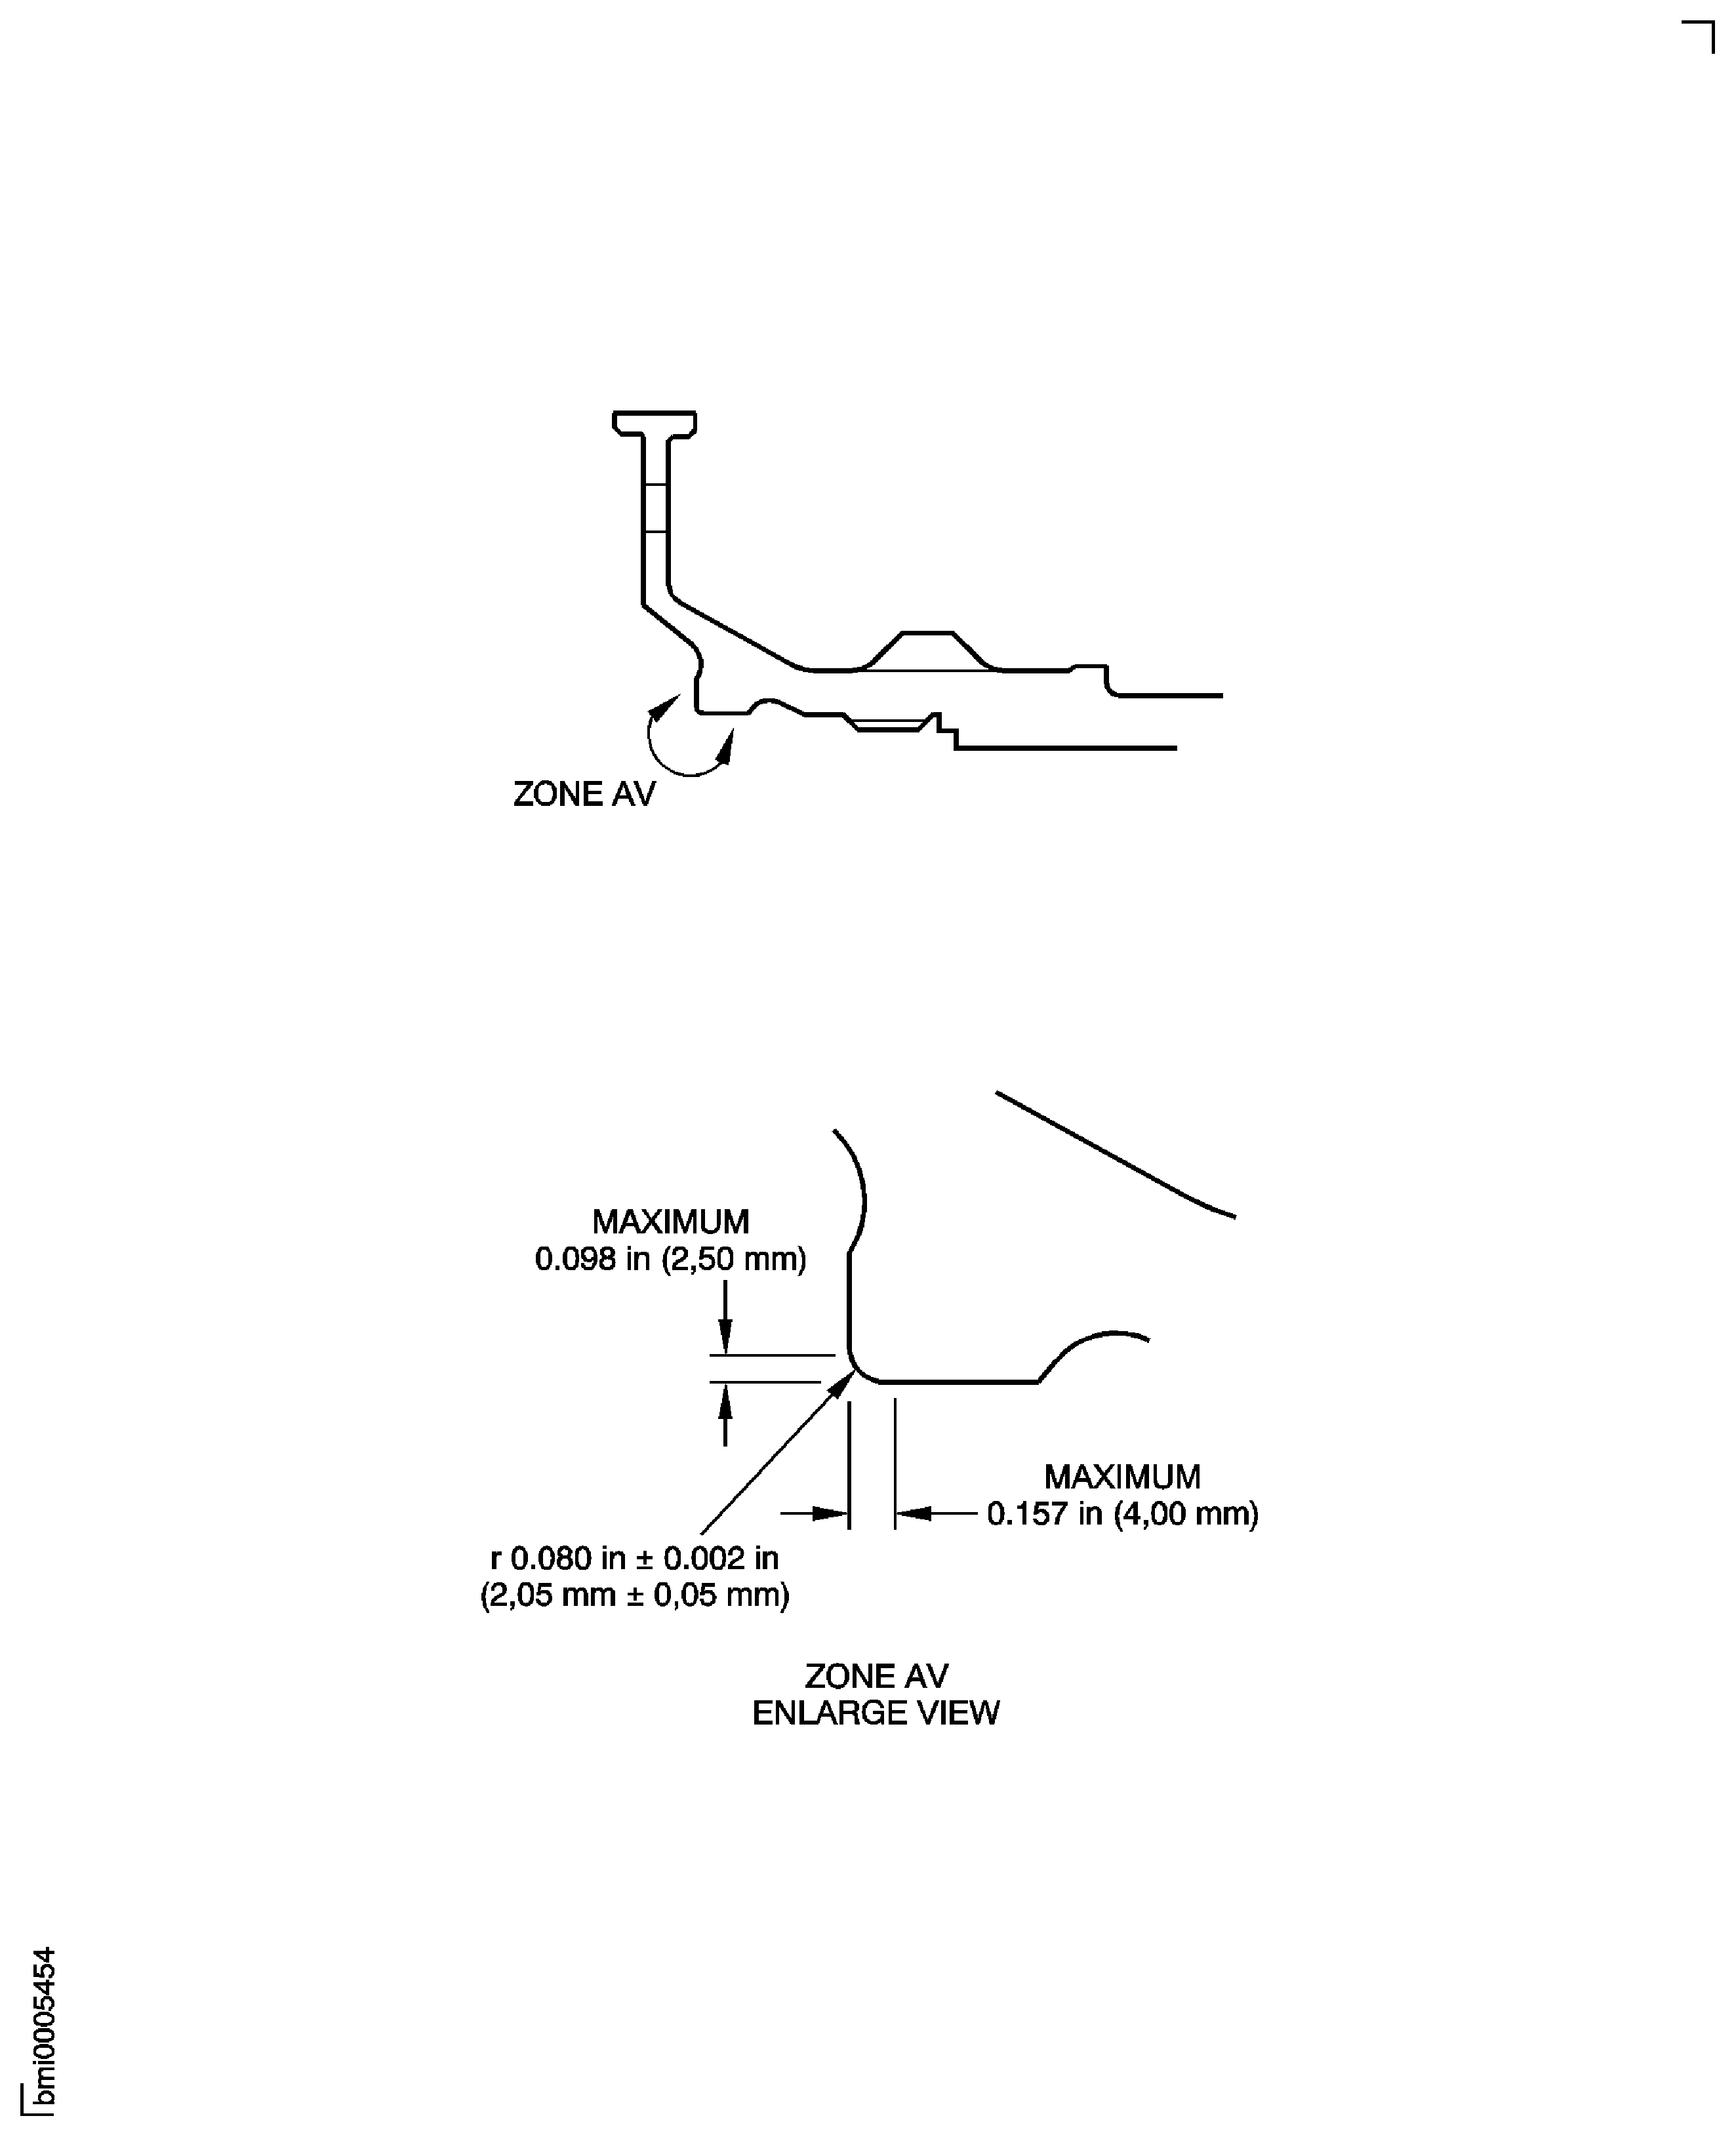
Figure: Repair Details and Dimensions - Assemblies A, B, C and D
Repair Details and Dimensions - Assemblies A, B, C and D
