Export Control
EAR Export Classification: Not subject to the EAR per 15 C.F.R. Chapter 1, Part 734.3(b)(3), except for the following Service Bulletins which are currently published as EAR Export Classification 9E991: SBE70-0992, SBE72-0483, SBE72-0580, SBE72-0588, SBE72-0640, SBE73-0209, SBE80-0024 and SBE80-0025.Copyright
© IAE International Aero Engines AG (2001, 2014 - 2021) The information contained in this document is the property of © IAE International Aero Engines AG and may not be copied or used for any purpose other than that for which it is supplied without the express written authority of © IAE International Aero Engines AG. (This does not preclude use by engine and aircraft operators for normal instructional, maintenance or overhaul purposes.).Applicability
All
Common Information
TASK 72-41-13-300-026 HP Compressor Rear Shaft - Repair Damaged Threads by Material Removal, Repair-026 (VRS6617)
Effectivity
FIG/ITEM | PART NO. | ASSEMBLY |
|---|---|---|
01-900 | 6A4151 | A |
01-900 | 6A7708 | B |
01-900 | 6A4158 | C |
01-900 | 6A5868 | C |
01-900 | 6A7712 | D |
01-900 | 6A7714 | D |
General
This TASK gives the procedure to repair damaged threads by material removal on the HP Compressor Rear Shaft.
This repair must only be done when the instruction to do so is given in the relevant Inspection/Check inspection procedures (identified by the applicable part number) located in section 72-41-13.
The repair scheme is broken into three parts, as follows:
Part 1: Dress to the depth of the defect (1X times the depth of the defect).
Part 2: Dress to twice the depth of the defect (2X times the depth of the defect).
Part 3: Dress to remove raised material, burrs and sharp edges.
The depth of the applied dressing must be in accordance with the instructions in the Inspection/Check, refer to TASK 72-41-13-200-001-C00 or TASK 72-41-13-200-001-D00 or TASK 72-41-13-200-001-E00 or TASK 72-41-13-200-001-F00.
There are two alternative procedures to remove the damage. One uses hand tools and the other uses machine tools. You must use the correct materials as shown in the applicable SUBTASK.
Where reference is made to a SUBTASK within a TASK in the form "TASK, SUBTASK" the operator must read and apply the complete TASK. The SUBTASK is listed only when the TASK gives options for the processing of the component. The specified SUBTASK instructs what option must be used during application of the TASK for the successful completion of the Repair Scheme VRS6617.
The practices and processes referred to in the procedure by the TASK/SUBTASK numbers are in the SPM.
Price and availability
Refer to International Aero Engines
Related repairs - none
NOTE
NOTE
NOTE
NOTE
Preliminary Requirements
Pre-Conditions
NONESupport Equipment
| Name | Manufacturer | Part Number / Identification | Quantity | Remark |
|---|---|---|---|---|
| Fluorescent Penetrant Inspection Equipment | LOCAL | Fluorescent penetrant inspection equipment | ||
| Standard workshop equipment | LOCAL | Standard workshop equipment | ||
| Vibro-peen equipment | LOCAL | Vibro-peen equipment | ||
| Dimensional inspection equipment | LOCAL | Dimensional inspection equipment |
Consumables, Materials and Expendables
| Name | Manufacturer | Part Number / Identification | Quantity | Remark |
|---|---|---|---|---|
| CoMat 05-112 EMERY POLISHING PAPER | LOCAL | CoMat 05-112 | ||
| CoMat 05-144 WHEEL, BEAR-TEX UNIFIED DEBURRING | 9K848 | CoMat 05-144 | ||
| CoMat 05-145 WHEEL, CLOTH BUFF | IAE65 | CoMat 05-145 | ||
| CoMat 05-147 WHEEL, RUBBER BONDED GRINDING | LOCAL | CoMat 05-147 | ||
| CoMat 05-149 COMPOUND, BUFFING AND POLISHING | IAE65 | CoMat 05-149 | ||
| CoMat 06-022 FLUORESCENT PENETRANT (POST-EMULSIFIED ULTRA HIGH SENSITIVITY) | LOCAL | CoMat 06-022 |
Spares
NONESafety Requirements
NONEProcedure
Reject.
If the depth of dressing will be greater than 0.04 in. (1.016 mm).
Reject.
If the distance between dressed areas will be less than 3.50 in. (90.00 mm).
Reject.
NOTE
All existing dress repairs to the threads should be included when calculating the total length of dressed thread.
If the total length of dressed thread will exceed 7.00 in. (177.80 mm).
Continue with the repair.
If the depth of dressing is less than 0.040 in. (1.016 mm), the distance between dressed areas is greater than 3.50 in. (90.00 mm) and the total length of dressed thread will not be in excess of 7.00 in (177.80 mm).
Dimensionally inspect the damage.
SUBTASK 72-41-13-220-001 Examine the Damaged Area

CAUTION
DRESSING IN ACCORDANCE WITH PART 1 OF VRS6617 MUST ONLY BE DONE WHEN THE INSTRUCTION TO DO SO IS GIVEN IN THE RELEVANT INSPECTION PROCEDURES (IDENTIFIED BY THE APPLICABLE PART NUMBER) LOCATED IN SECTION 72-41-13.PART 1: DRESS TO THE DEPTH OF THE DEFECT (1X TIMES THE DEPTH OF THE DEFECT)
Deleted.
SUBTASK 72-41-13-350-001 Remove the Damaged Material (Machine Tool Procedure)
Dress to 1X times the depth of the defect.
Where material is removed from a radius or chamfer make sure that the size of the radius or chamfer is not reduced.
It is not necessary to dress to the maximum depth 0.040 in. (1.016 mm) for every defect. Remove the minimum amount of material necessary to remove the defect.
The minimum blend ratio is 50 to 1. Larger blend ratios are acceptable but will reduce the number of defects that can be repaired.
The maximum circumferential length of a single dressed area must not exceed 2.00 in. (50.80 mm).
The combined dressed length of all defects must not exceed 7.00 in. (177.80 mm).
Blend the repair area(s) smooth with the surrounding material.
Use a suitable abrasive stone or paper to remove the damage.
Dress to remove the damage from the HP Compressor Rear Shaft threads.
SUBTASK 72-41-13-350-002 Remove Damaged Material (Hand Tool Procedure)
Repeat the repair from Step.
If any defects remain.
Continue with the repair.
If all defects have been removed.
Make sure that all defects have been removed.
Visually inspect the repaired area(s).
Reject.
If the dimensions of the repair area(s) are not within the limits given in the referenced figures.
Continue with the repair.
If the dimensions of the repair area(s) are not in excess of the limits in the referenced figures.
Dimensionally inspect the repair area(s).
SUBTASK 72-41-13-220-002 Visually and Dimensionally Inspect the Repair Area
Refer to SPM TASK 70-11-39-300-503.
Swab etch the repair area(s) on the HP Compressor Rear Shaft thread.
SUBTASK 72-41-13-110-001 Cold Ferric Chloride Etch
Refer to SPM TASK 70-23-04-230-501.
Reject.
If cracking is detected.
Continue with the repair.
If no cracking is detected.
Inspect for cracking at the repair area on the HP Compressor Rear Shaft using fluorescent penetrant inspection.
SUBTASK 72-41-13-230-001 Fluorescent Penetrant Inspect
Polish to achieve a surface texture of 126 microinches (3.2 micrometres).
Use a suitable abrasive paper to achieve the required surface finish.
Take care not to remove any more material from the HP Compressor Rear Shaft thread.
Polish the etched area(s).
SUBTASK 72-41-13-350-003 Polish the Repair Area

CAUTION
MAKE SURE THAT ALL OF THE BURRS CREATED BY THE REPAIR PROCESS ARE REMOVED.Refer to SPM TASK 70-09-00-400-501.
Use Vibro-peen equipment.
Vibro-peen VRS6617 at the indicated location(s) on the HP Compressor Rear Shaft.
Remove raised material, burrs and/or sharp edges at the vibro-peen marking area.
SUBTASK 72-41-13-350-004 Identify the Repair

CAUTION
DRESSING IN ACCORDANCE WITH PART 2 OF VRS6617 MUST ONLY BE DONE WHEN THE INSTRUCTION TO DO SO IS GIVEN IN THE RELEVANT INSPECTION PROCEDURES (IDENTIFIED BY THE APPLICABLE PART NUMBER) LOCATED IN SECTION 72-41-13.PART 2: DRESS TO TWICE THE DEPTH OF THE DEFECT (2X TIMES THE DEPTH OF THE DEFECT)
Dress to 2X times the depth of the defect.
Where material is removed from a radius or chamfer make sure that the size of the radius or chamfer is not reduced.
It is not necessary to dress to the maximum depth 0.040 in. (1.016 mm) for every defect. Remove the minimum amount of material necessary to remove the defect.
The minimum blend ratio is 50 to 1. Larger blend ratios are acceptable but will reduce the number of defects that can be repaired.
The maximum circumferential length of a single dressed area must not exceed 2.00 in. (50.80 mm).
The combined dressed length of all defects must not exceed 7.00 in. (177.80 mm).
Blend the repair area(s) smooth with the surrounding material.
Use a suitable abrasive medium to remove the damage.
Dress to remove the damage from the HP Compressor Rear Shaft threads.
SUBTASK 72-41-13-350-005 Remove Damaged Material (Hand Tool Procedure)

CAUTION
POWER TOOLS AND HAND HELD POWER TOOLS MUST NOT BE USED TO DRESS THE HP COMPRESSOR REAR SHAFT.Repeat the repair from Step.
If any defects remain.
Continue with the repair.
If all defects have been removed.
Make sure that all defects have been removed.
Visually inspect the repaired area(s).
Reject.
If the dimensions of the repair area(s) are not within the limits given in the references figures.
Continue with the repair.
If the dimensions of the repair area(s) are not in excess of the limits in the referenced figures.
Dimensionally inspect the repair area(s).
SUBTASK 72-41-13-220-003 Visually and Dimensionally Inspect the Repair Area
Refer to SPM TASK 70-11-39-300-503.
Cold ferric chloride swab etch the repair area on the HP Compressor Rear Shaft thread.
SUBTASK 72-41-13-110-002 Swab Etch the Repair Area
Refer to SPM TASK 70-23-04-230-501.
Reject.
If cracking is detected.
Continue with the repair.
If no cracking is detected.
Inspect for cracking at the repair area on the HP Compressor Rear Shaft using fluorescent penetrant inspection.
SUBTASK 72-41-13-230-002 Fluorescent Penetrant Inspect
Polish to achieve a surface texture of 126 microinches (3.2 micrometres).
Use a suitable abrasive paper to achieve the required surface finish.
Take care not to remove any more material from the HP Compressor Rear Shaft thread.
Lightly polish the etched area(s).
SUBTASK 72-41-13-350-006 Polish the Repair Area

CAUTION
MAKE SURE THAT ALL OF THE BURRS CREATED BY THE REPAIR PROCESS ARE REMOVED.Refer to SPM TASK 70-09-00-400-501.
Use Vibro-peen equipment.
Vibro-peen VRS6617 at the indicated location(s) on the HP Compressor Rear Shaft.
Remove raised material, burrs and/or sharp edges at the vibro-peen marking area.
SUBTASK 72-41-13-350-007 Identify the Repair

CAUTION
DRESSING IN ACCORDANCE WITH PART 3 OF VRS6617 MUST ONLY BE DONE WHEN THE INSTRUCTION TO DO SO IS GIVEN IN THE RELEVANT INSPECTION PROCEDURES (IDENTIFIED BY THE APPLICABLE PART NUMBER) LOCATED IN SECTION 72-41-13.PART 3: DRESS TO REMOVE RAISED MATERIAL, BURRS AND SHARP EDGES
Dress to remove raised material, burrs and sharp edges only.
Do not remove any parent material from the HP Compressor Rear Shaft thread.
Use a suitable abrasive medium to remove the damage.
Dress to remove the damage from the HP Compressor Rear Shaft threads.
SUBTASK 72-41-13-350-008 Remove Raised Material, Burrs and/or Sharp Edges (Hand Tool Procedure)

CAUTION
POWER TOOLS AND HAND HELD POWER TOOLS MUST NOT BE USED TO DRESS THE HP COMPRESSOR REAR SHAFT.Repeat the repair from Step.
If any defects remain.
Continue with the repair.
If all defects have been removed.
Make sure that all defects have been removed.
Visually inspect the repaired area(s).
SUBTASK 72-41-13-220-003 Visually and Dimensionally Inspect the Repair Area
Refer to SPM TASK 70-11-39-300-503.
Cold ferric chloride swab etch the repair area on the HP Compressor Rear Shaft thread.
SUBTASK 72-41-13-110-003 Swab Etch the Repair Area
Refer to SPM TASK 70-23-04-230-501.
Reject.
If cracking is detected.
Continue with the repair.
If no cracking is detected.
Inspect for cracking at the repair area on the HP Compressor Rear Shaft using fluorescent penetrant inspection.
SUBTASK 72-41-13-230-003 Fluorescent Penetrant Inspect
Polish the repair area(s) to achieve a surface texture of 126 microinches (3.2 micrometres).
Use a suitable abrasive paper to achieve the required surface finish.
Take care not to remove any more material from the HP Compressor Rear Shaft thread.
Lightly polish the etched area(s).
SUBTASK 72-41-13-350-009 Polish the Repair Area
Refer to SPM TASK 70-09-00-400-501.
Use Vibro-peen equipment.
Vibro-peen VRS6617 at the indicated location(s) on the HP Compressor Rear Shaft.
Remove raised material, burrs and/or sharp edges at the vibro-peen marking area.
SUBTASK 72-41-13-350-010 Identify the Repair
Figure: HP Compressor Rear Shaft Thread - Component Section - Assembly A, Assembly B, Assembly C and Assembly D
HP Compressor Rear Shaft Thread - Component Section - Assembly A, Assembly B, Assembly C and Assembly D
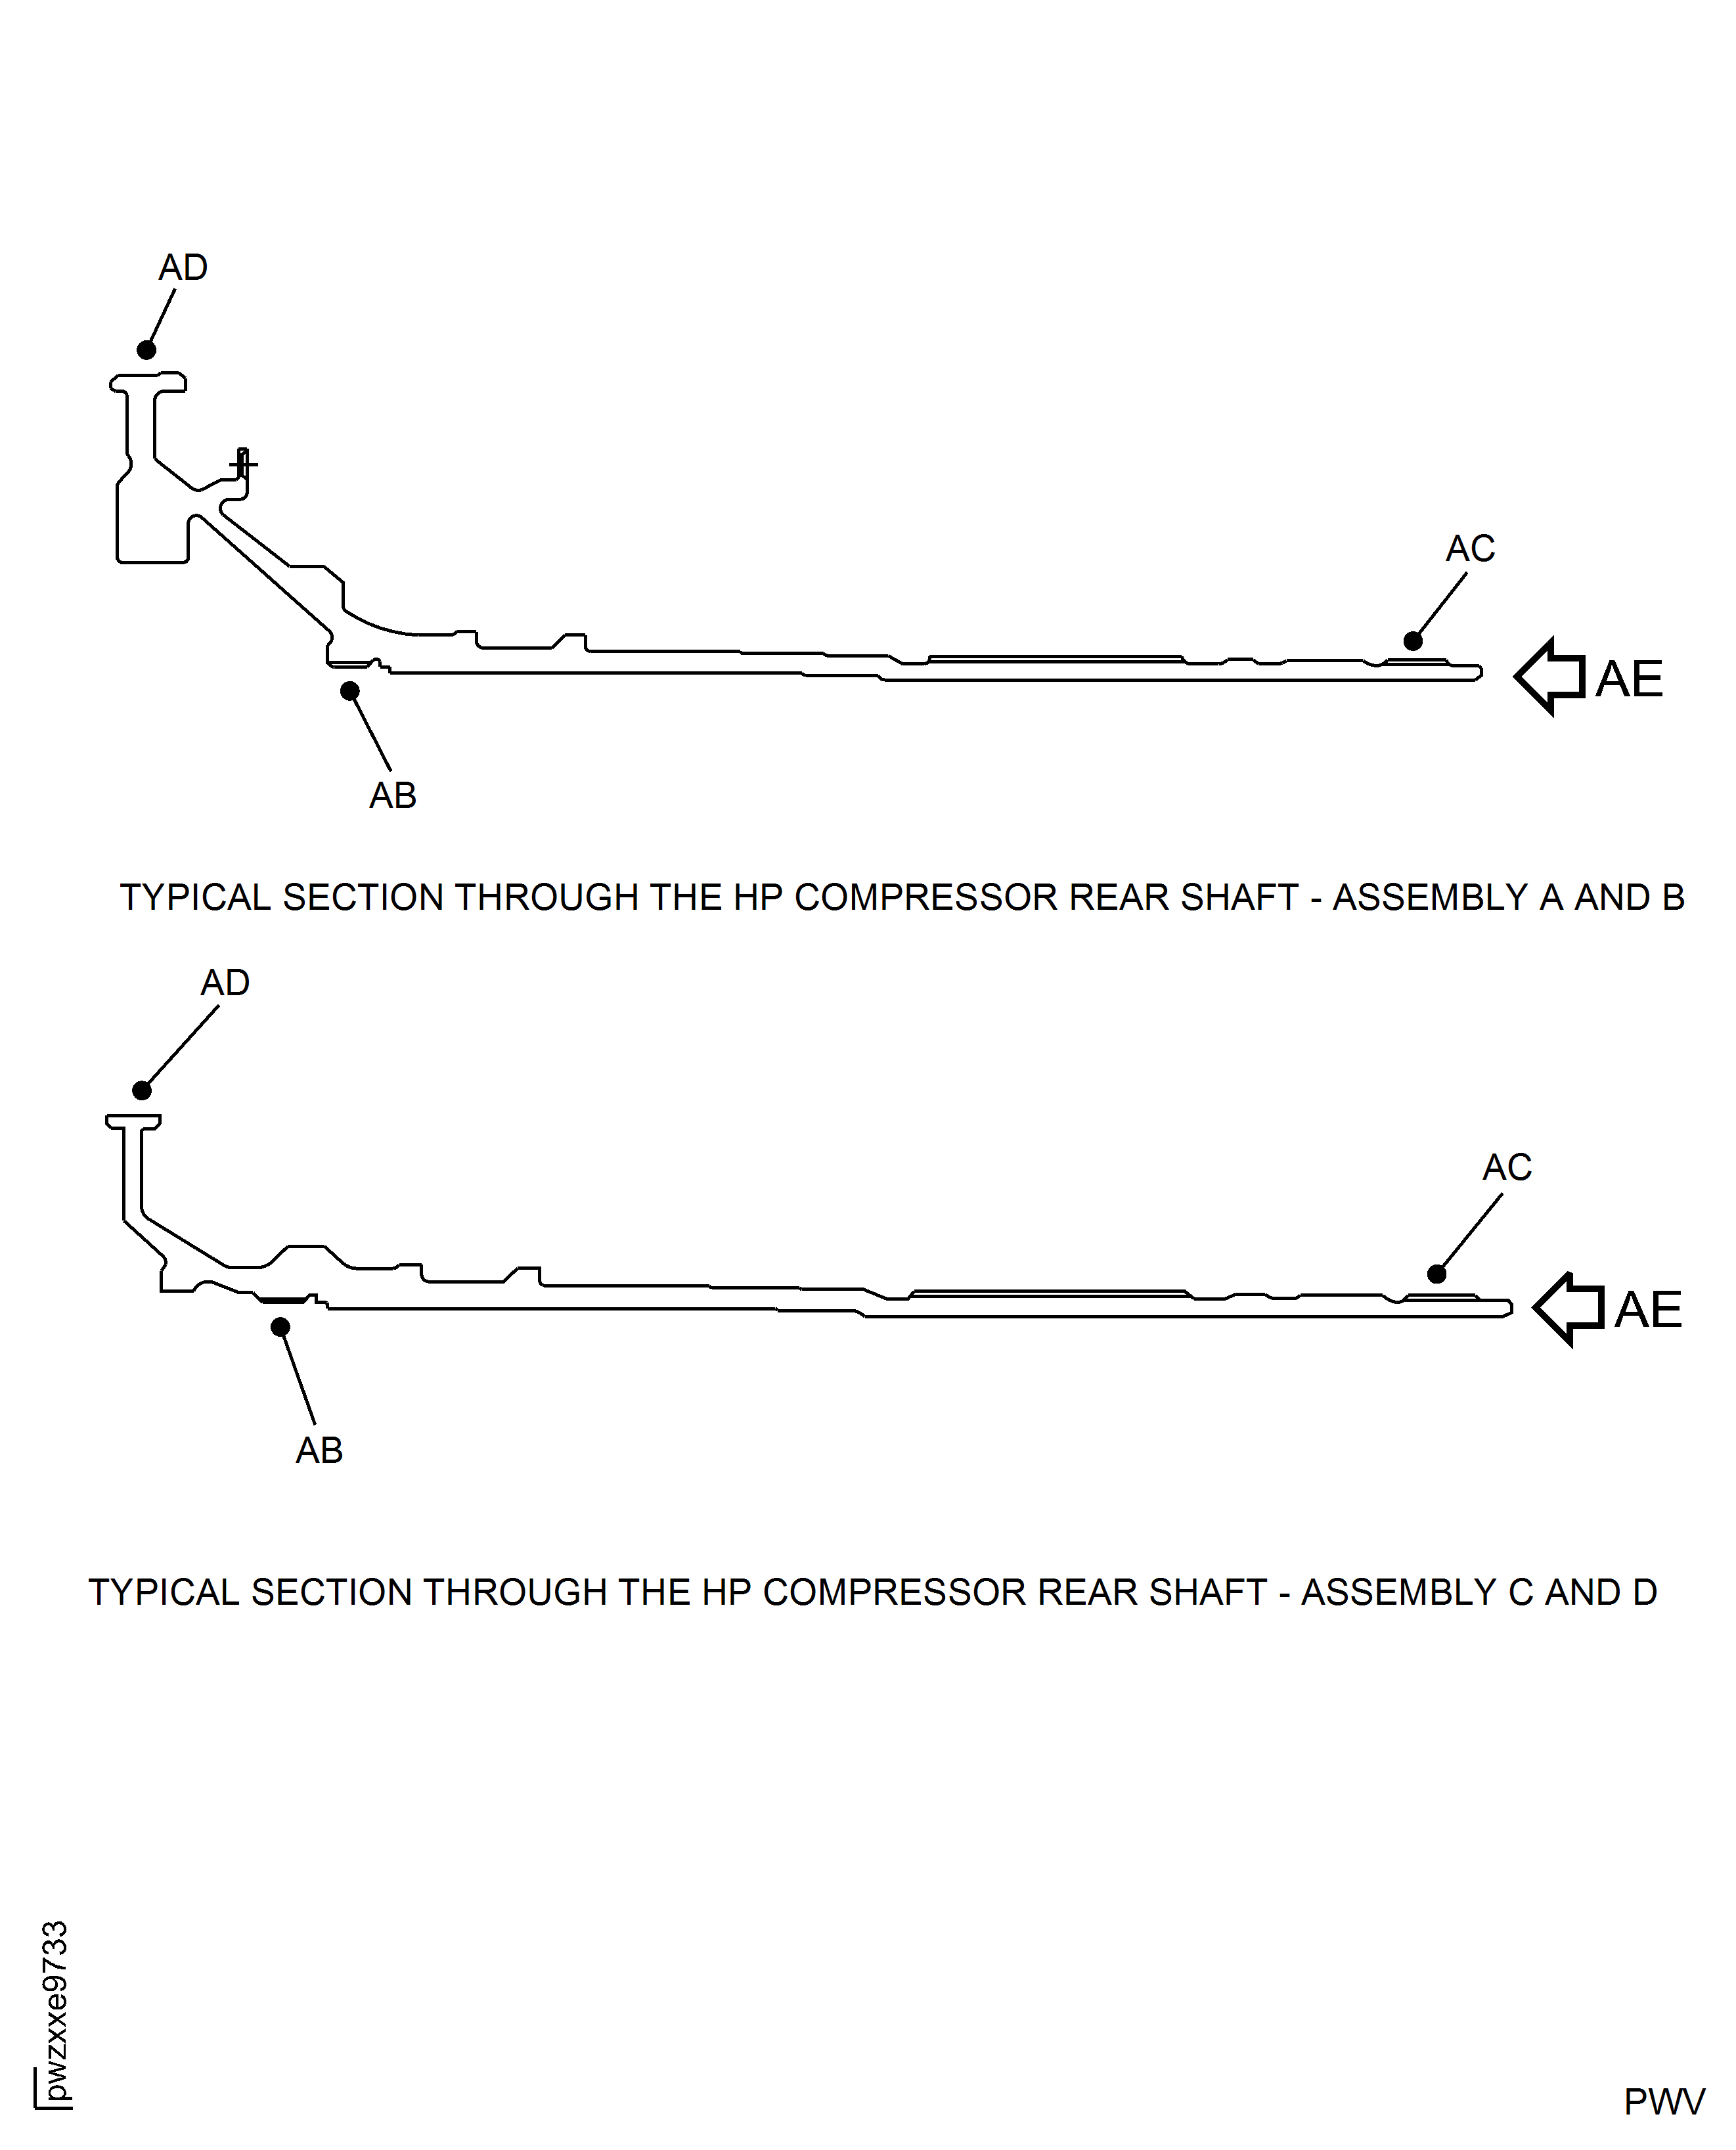
Figure: HP Compressor Rear Shaft Thread - Repair Location and Dimensions - Assembly A, Assembly B, Assembly C and Assembly D
HP Compressor Rear Shaft Thread - Repair Location and Dimensions - Assembly A, Assembly B, Assembly C and Assembly D
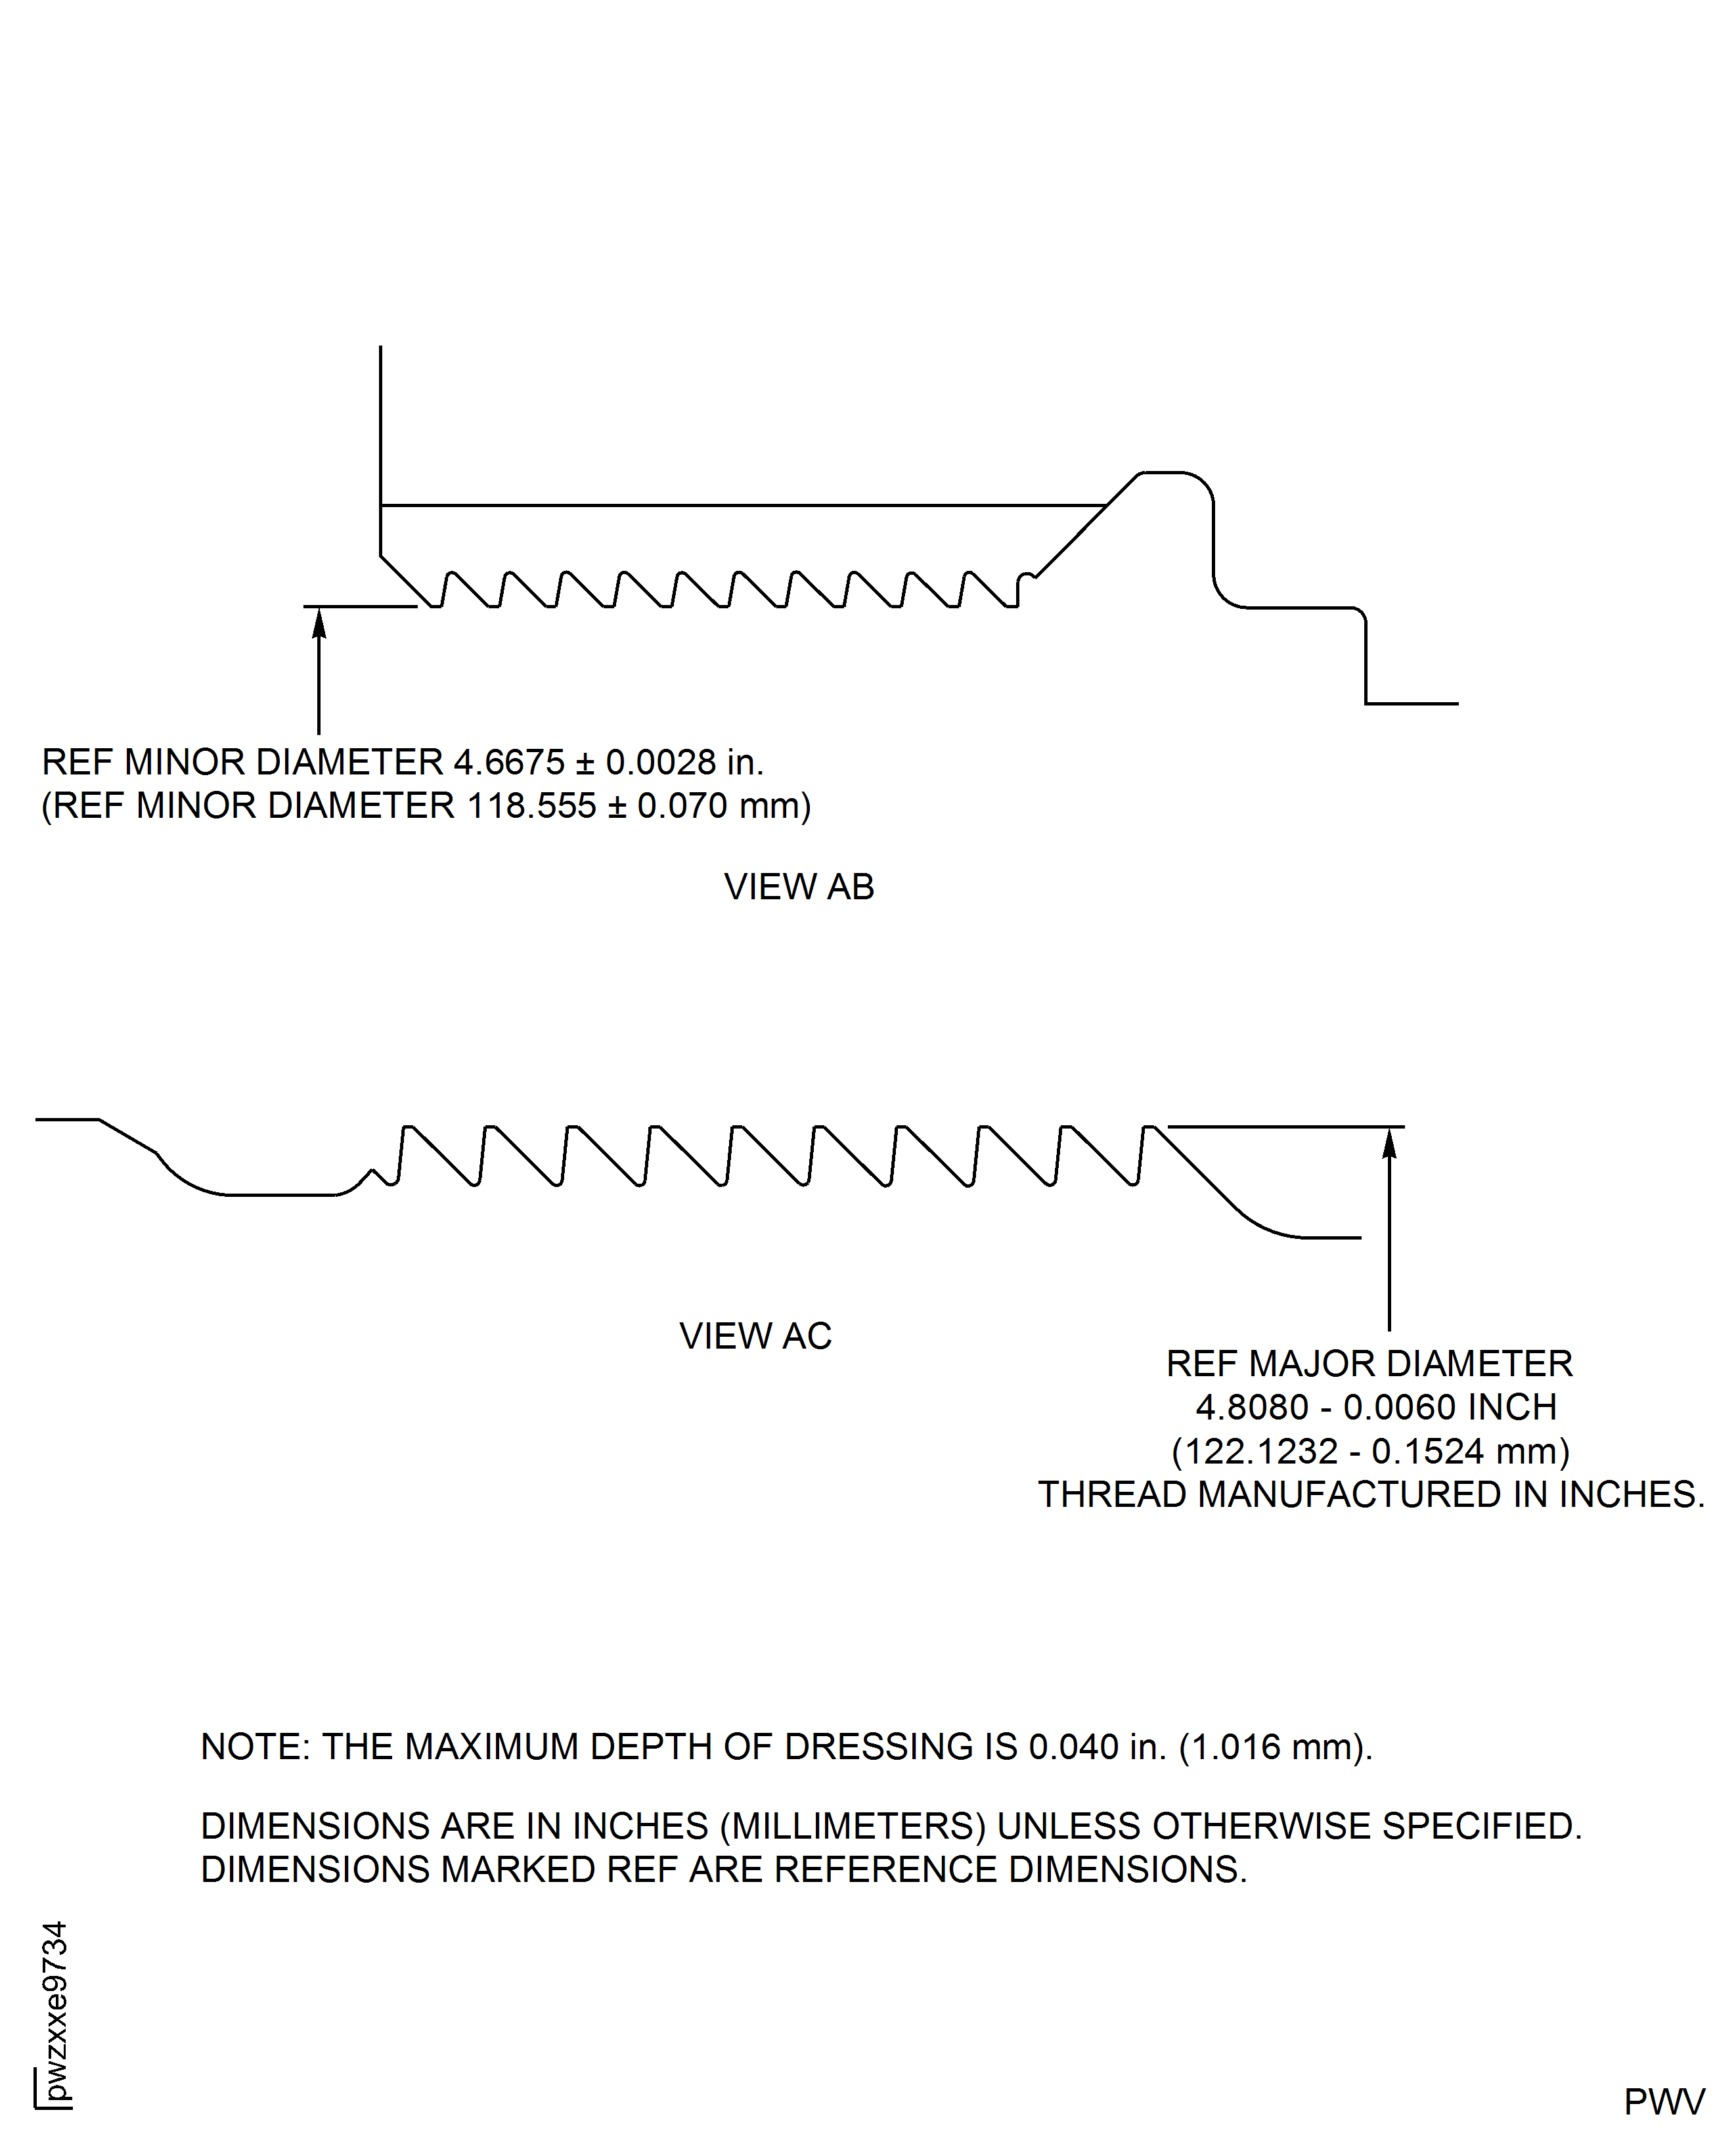
Figure: HP Compressor Rear Shaft Thread - Repair Details - Assembly A, Assembly B, Assembly C and Assembly D
HP Compressor Rear Shaft Thread - Repair Details - Assembly A, Assembly B, Assembly C and Assembly D
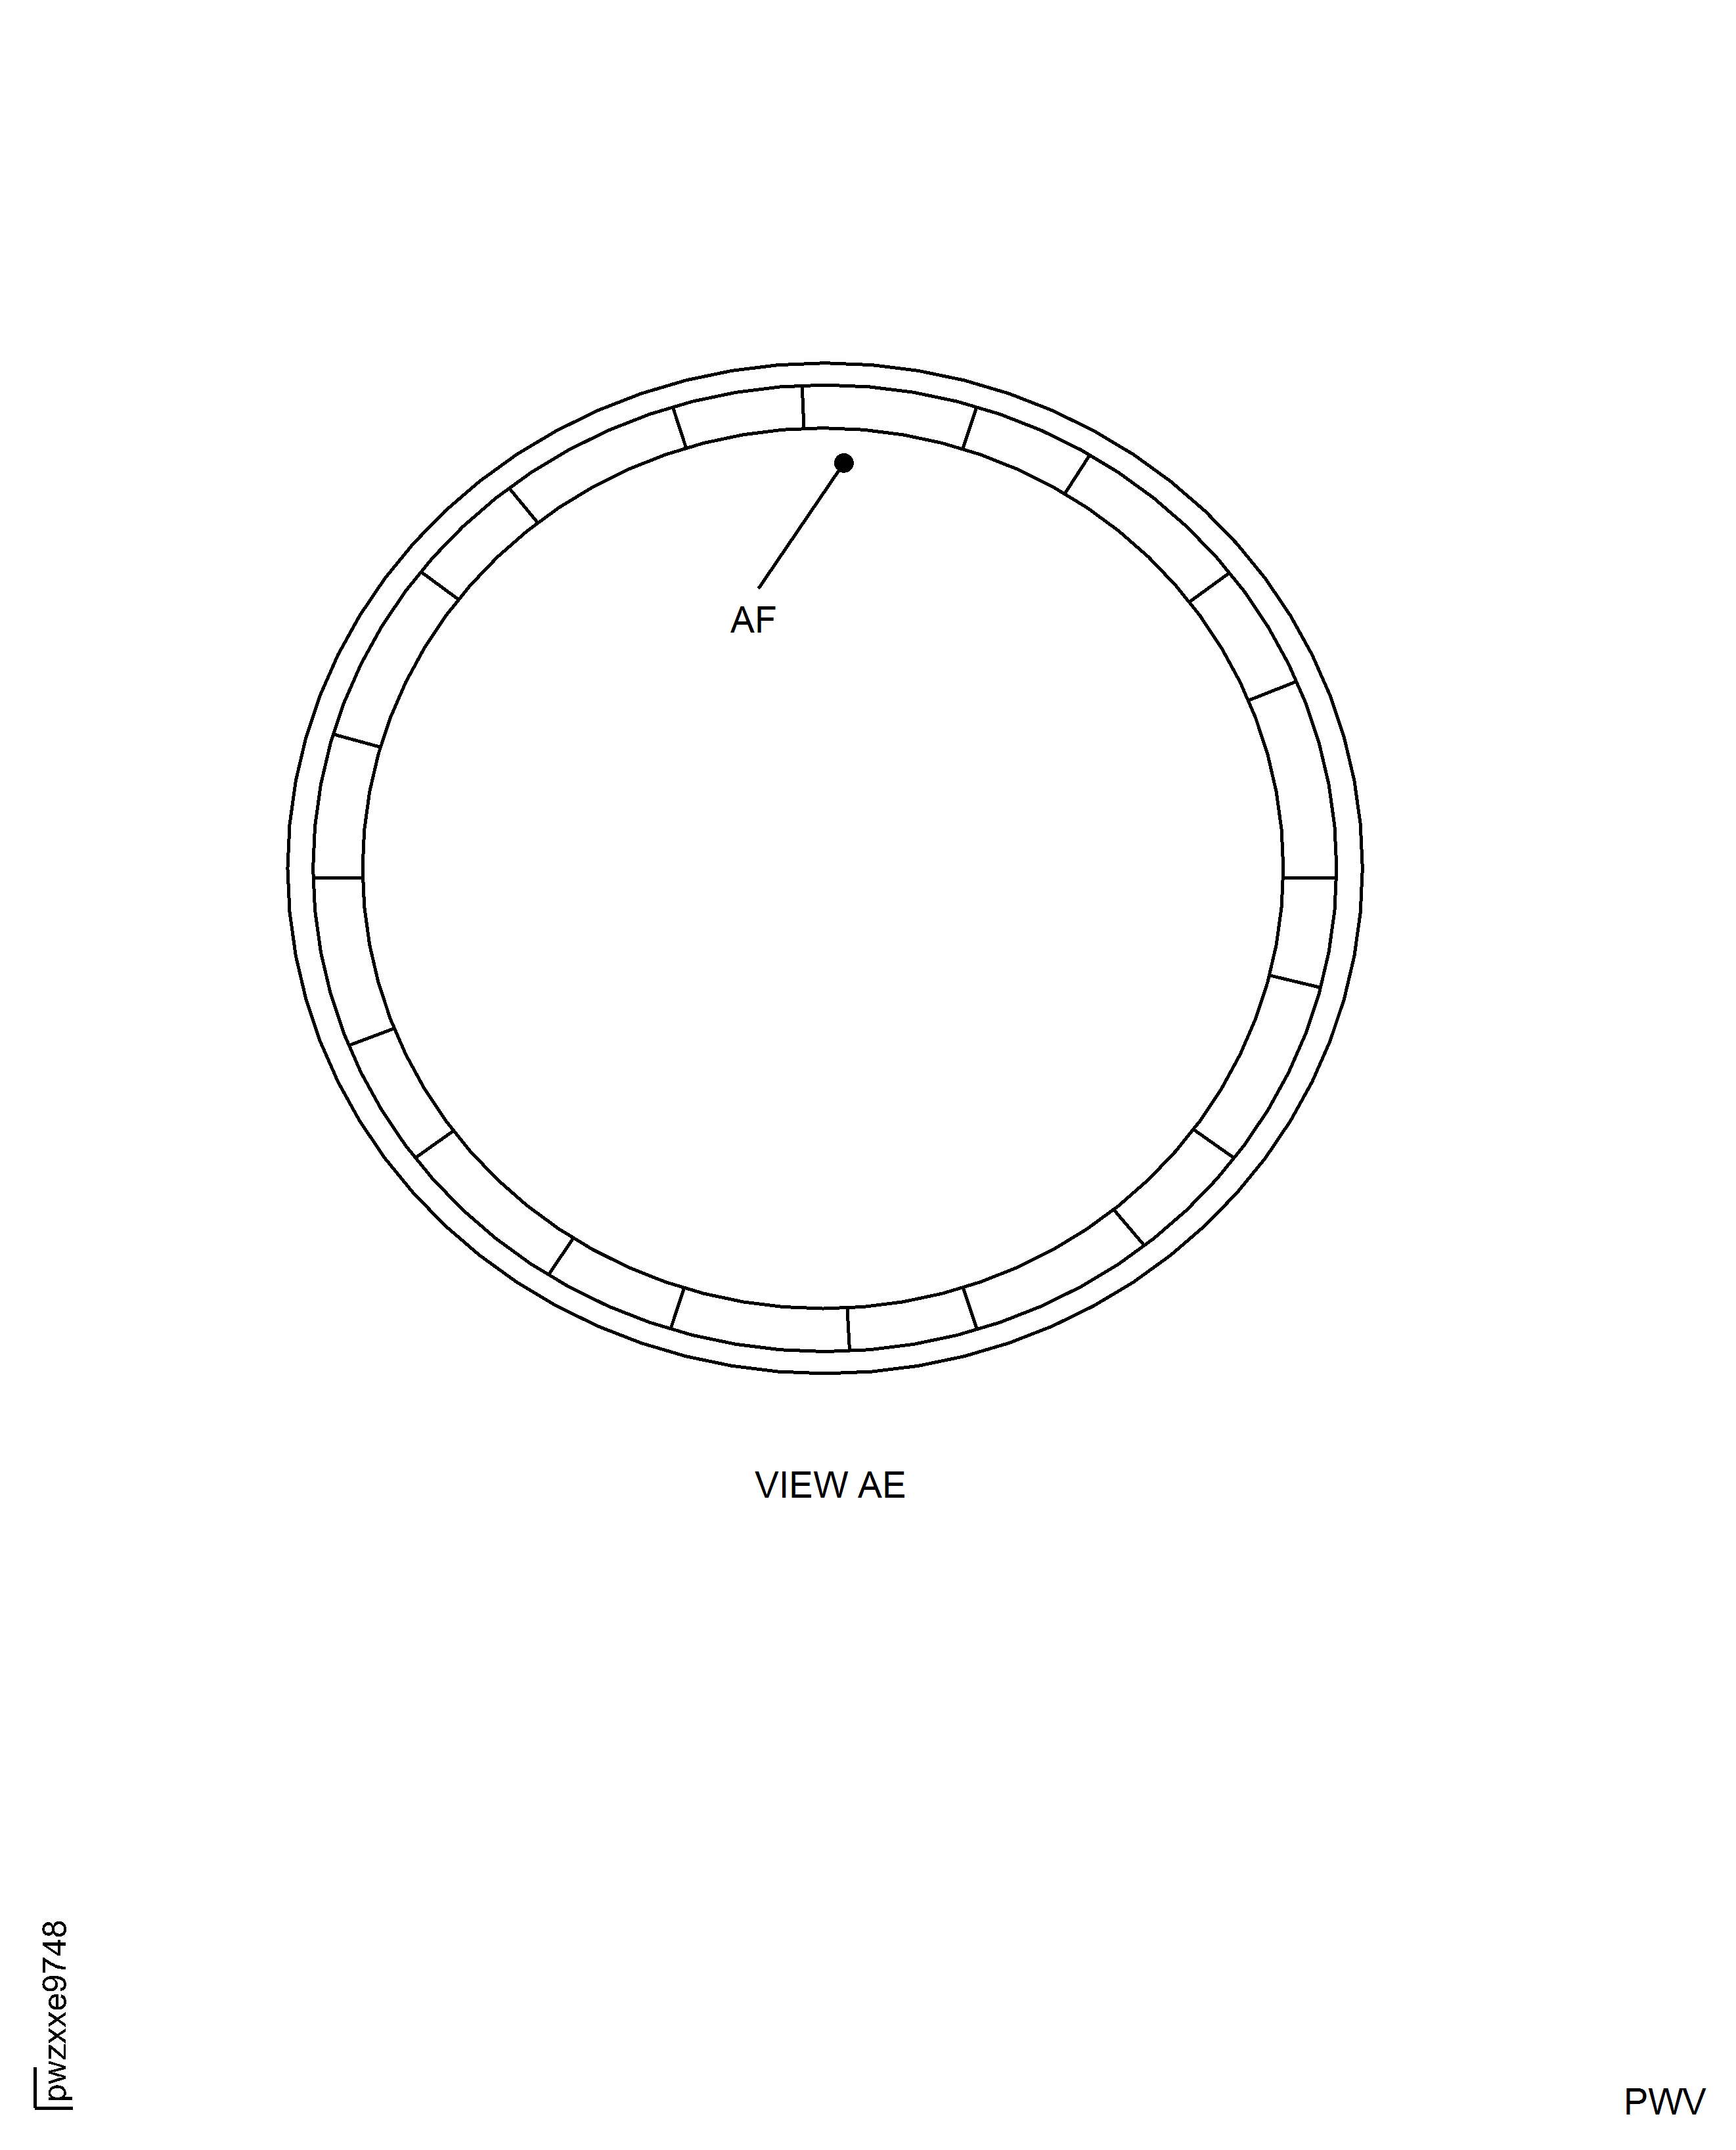
Figure: HP Compressor Rear Shaft Thread - Repair Details and Dimensions - Assembly A, Assembly B, Assembly C and Assembly D
HP Compressor Rear Shaft Thread - Repair Details and Dimensions - Assembly A, Assembly B, Assembly C and Assembly D
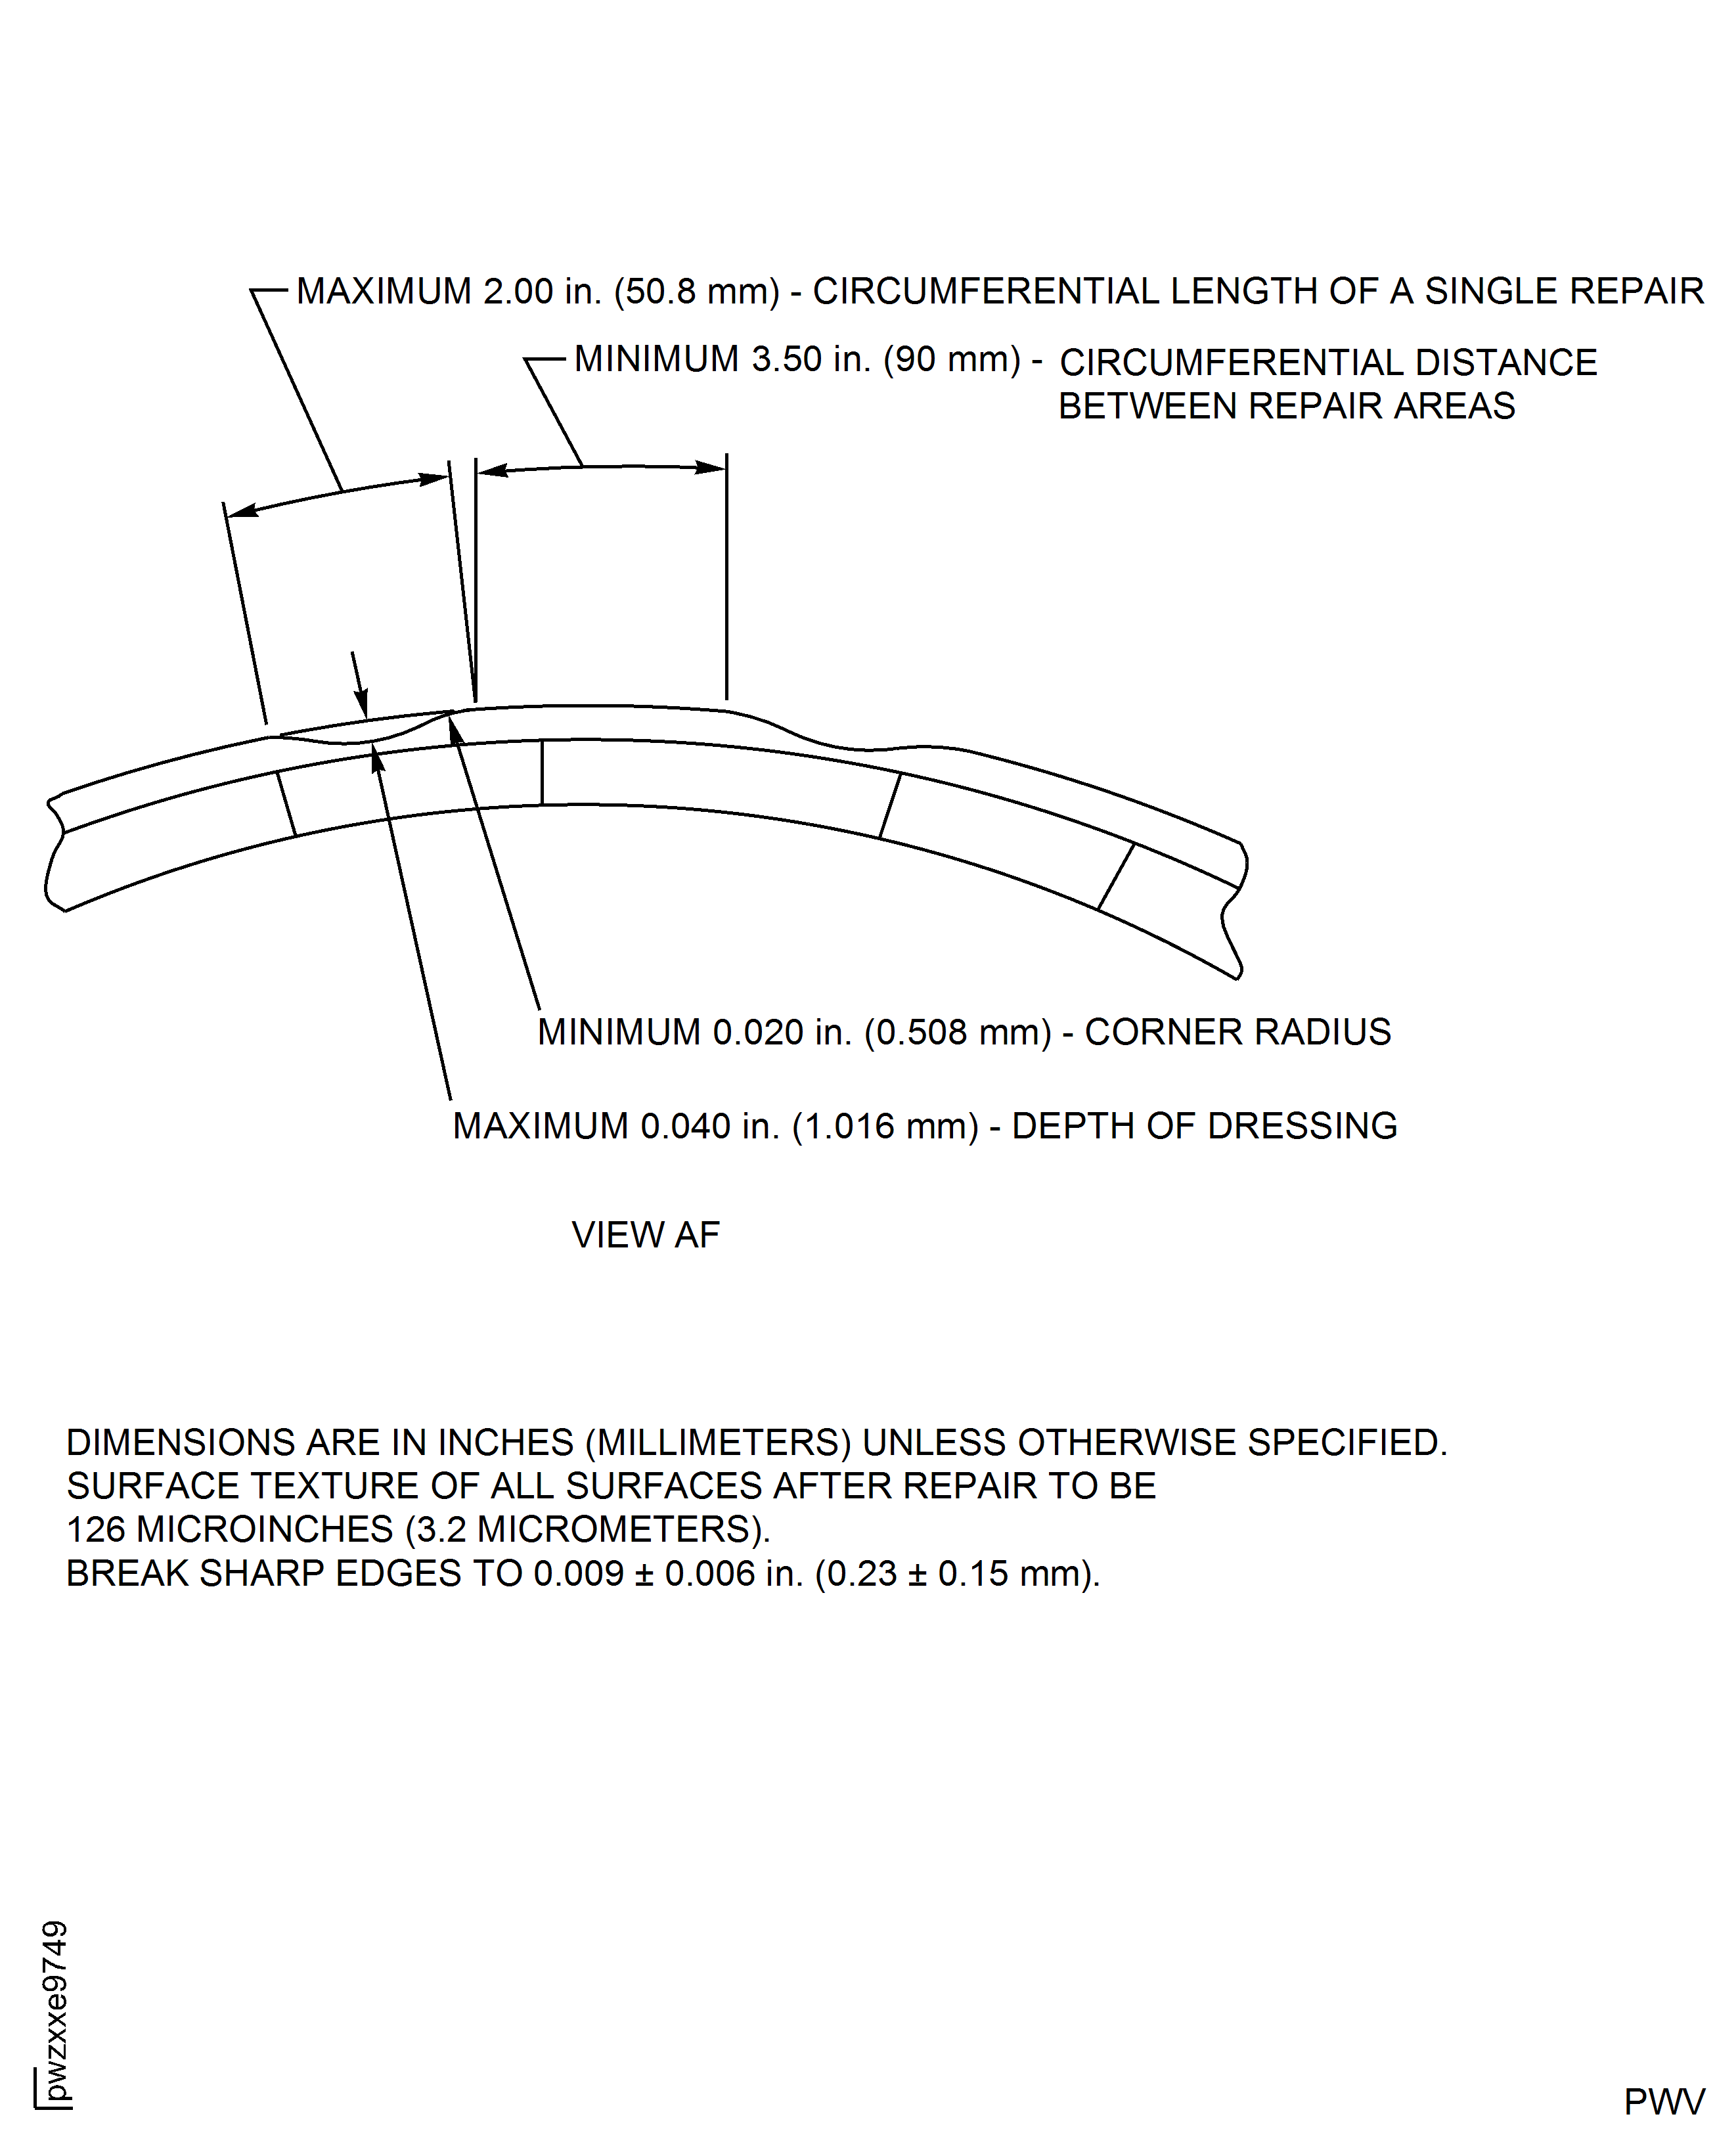
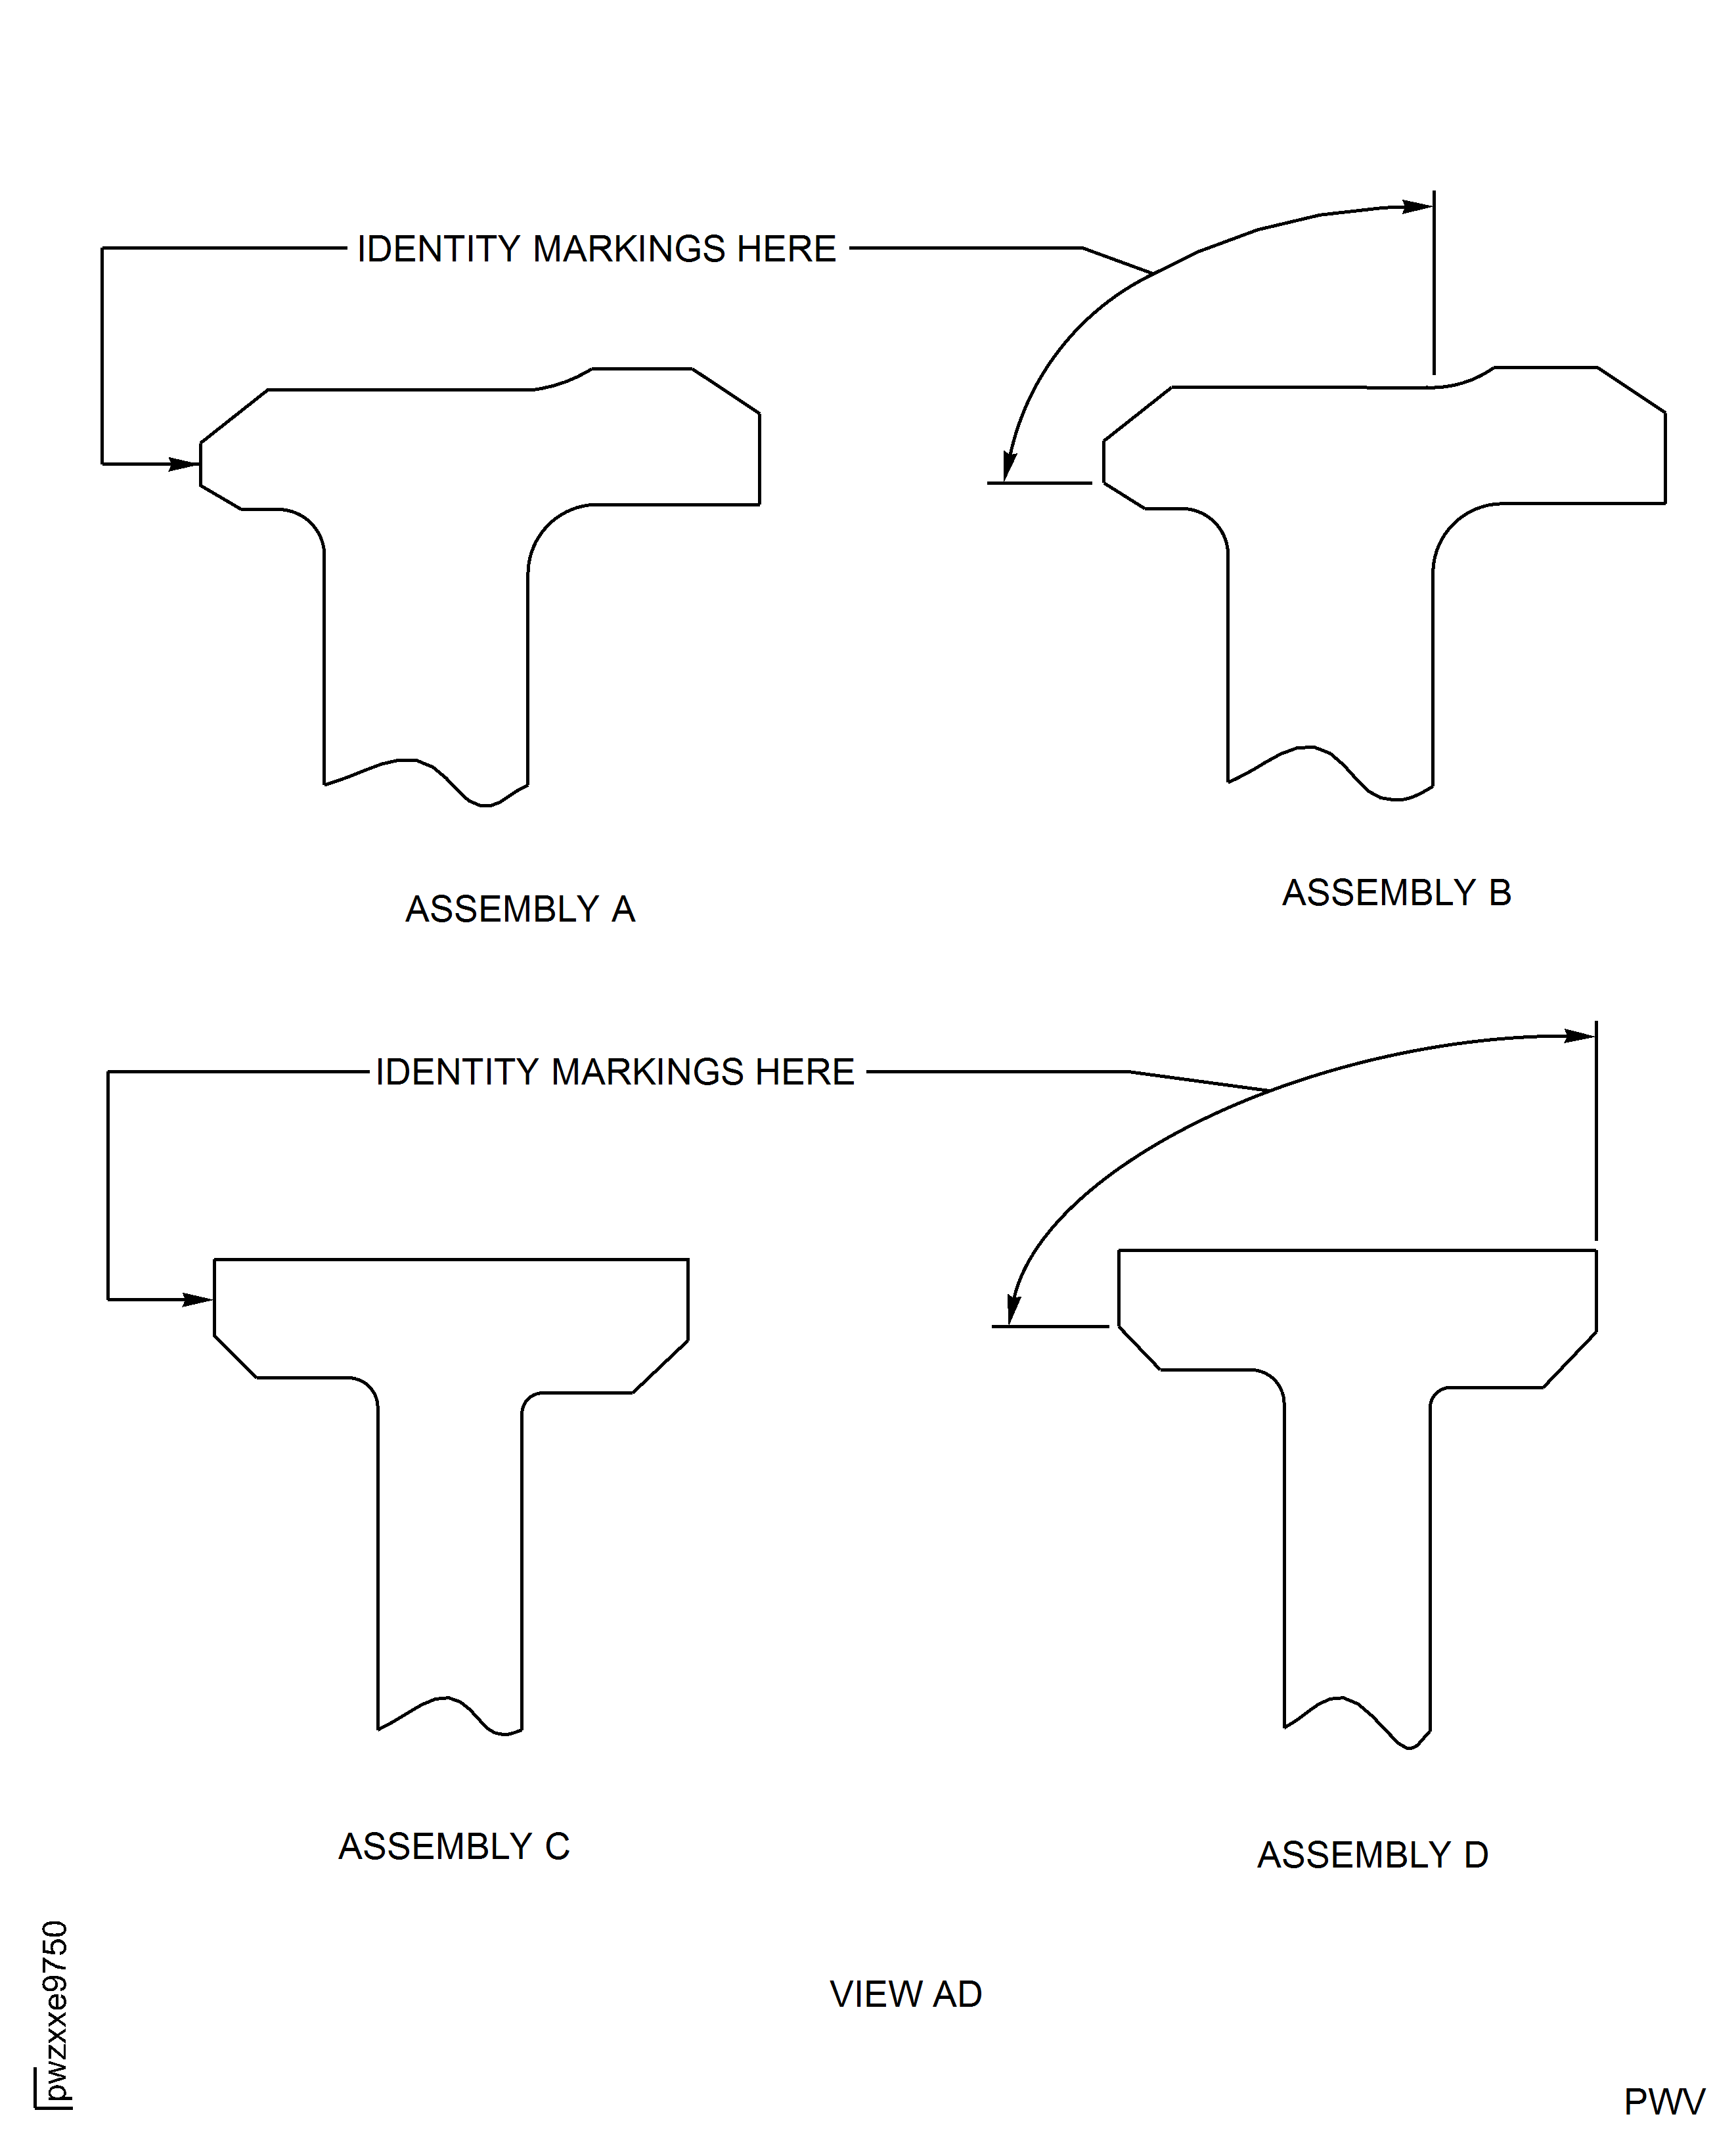
Figure: HP Compressor Rear Shaft Thread - Identity Marking Locations - Assembly A, Assembly B, Assembly C and Assembly D
HP Compressor Rear Shaft Thread - Identity Marking Locations - Assembly A, Assembly B, Assembly C and Assembly D
