Export Control
EAR Export Classification: Not subject to the EAR per 15 C.F.R. Chapter 1, Part 734.3(b)(3), except for the following Service Bulletins which are currently published as EAR Export Classification 9E991: SBE70-0992, SBE72-0483, SBE72-0580, SBE72-0588, SBE72-0640, SBE73-0209, SBE80-0024 and SBE80-0025.Copyright
© IAE International Aero Engines AG (2001, 2014 - 2021) The information contained in this document is the property of © IAE International Aero Engines AG and may not be copied or used for any purpose other than that for which it is supplied without the express written authority of © IAE International Aero Engines AG. (This does not preclude use by engine and aircraft operators for normal instructional, maintenance or overhaul purposes.).Applicability
All
Common Information
TASK 72-41-13-200-001-F00 HPC Rear Shaft - Examine, Inspection-001
General
This TASK gives the procedure for the inspection of the HPC Shaft Assembly. For all other parts of the HP compressor shaft refer to TASK 72-41-13-200-000 (INSPECTION/CHECK-000).
Fig./item numbers in parentheses in the procedure agree with those used in the IPC. Only the primary Fig./item numbers are used. For the service bulletin alpha variants refer to the IPC.
The policy that is necessary for inspection is given in the SPM TASK 70-20-01-200-501.
All the parts must be cleaned before any part is examined. Refer to the SPM TASK 70-10-00-100-501.
All parts must be visually examined for damage, corrosion and wear. Any defects that are not identified in the procedure must be referred to IAE.
The procedure for those parts which have a crack test is given in Step. Do the crack test before the part is visually examined.
Do not discard any part until you are sure there are no repairs available. Refer to the instructions in repair before a discarded part is used again or oversize parts are installed.
Parts which should be discarded can be held although no repair is available. The repair of a discarded part could be shown to be necessary at a later date.
All parts must be examined to make sure that all the repairs have been completed satisfactorily.
The practices and processes referred to in the procedure by the TASK/SUBTASK numbers are in the SPM.
References
Refer to the SPM for data on these items:
Definition of Damage, SPM TASK 70-02-02-350-501,
Recording and Control of Component Lives, SPM TASK 70-05-00-220-501,
Surface Texture, SPM TASK 70-35-09-350-501,
Inspection of Parts, SPM TASK 70-20-01-200-501.
Some data on these items are contained in this TASK. For more data on these items refer to the SPM:
Method of Testing for Crack Indications,
Chemical Processes,
Surface Protection.
NOTE
Preliminary Requirements
Pre-Conditions
NONESupport Equipment
NONEConsumables, Materials and Expendables
NONESpares
NONESafety Requirements
CAUTION
Procedure
Clean the Part. Refer to the TASK 72-41-13-100-000 (CLEANING-000).
SUBTASK 72-41-13-230-092 Examine the HPC Shaft for Cracks
Do a focus inspection of the HPC Shaft assembly according to TASK 72-41-13-200-009, Subtask 72-41-13-230-097.
SUBTASK 72-41-13-230-107 Focused Inspection of the HPC Shaft Assembly for Cracks
Refer to Figure.
Repair, VRS6617 TASK 72-41-13-300-026 (REPAIR-026).
Up to 0.030 in. (0.75 mm) in depth.
Reject.
Greater than in Step.
Nicks.
Repair, VRS6617 TASK 72-41-13-300-026 (REPAIR-026).
High metal or burrs.
Examine the shaft at location 2 for damage, burrs and high metal on the threads.
Repair, VRS6617 TASK 72-41-13-300-026 (REPAIR-026).
Up to 0.014 in. (0.36 mm) in depth.
Reject.
Greater than in Step.
Nicks.
Repair, VRS6617 TASK 72-41-13-300-026 (REPAIR-026).
High metal or burrs.
Examine the shaft at location 5 for damage, burrs and high material on the threads.
SUBTASK 72-41-13-200-005 Examine the HPC Shaft for Damage, Burrs and High Metal on all Threads
Repair, VRS6516 Part 1 TASK 72-41-13-300-031 (REPAIR-031).
Not more than 0.003 in. (0.08 mm) in depth and/or circumference.
Reject.
Greater than Step.
Pitting or corrosion.
Repair, VRS6516 Part 2 TASK 72-41-13-300-031 (REPAIR-031).
Not more than 0.0016 in. (0.04 mm) in depth and not more than 0.039 in. (1.00 mm) in width.
Reject.
Greater than Step.
Nicks, dents, scratches or scoring.
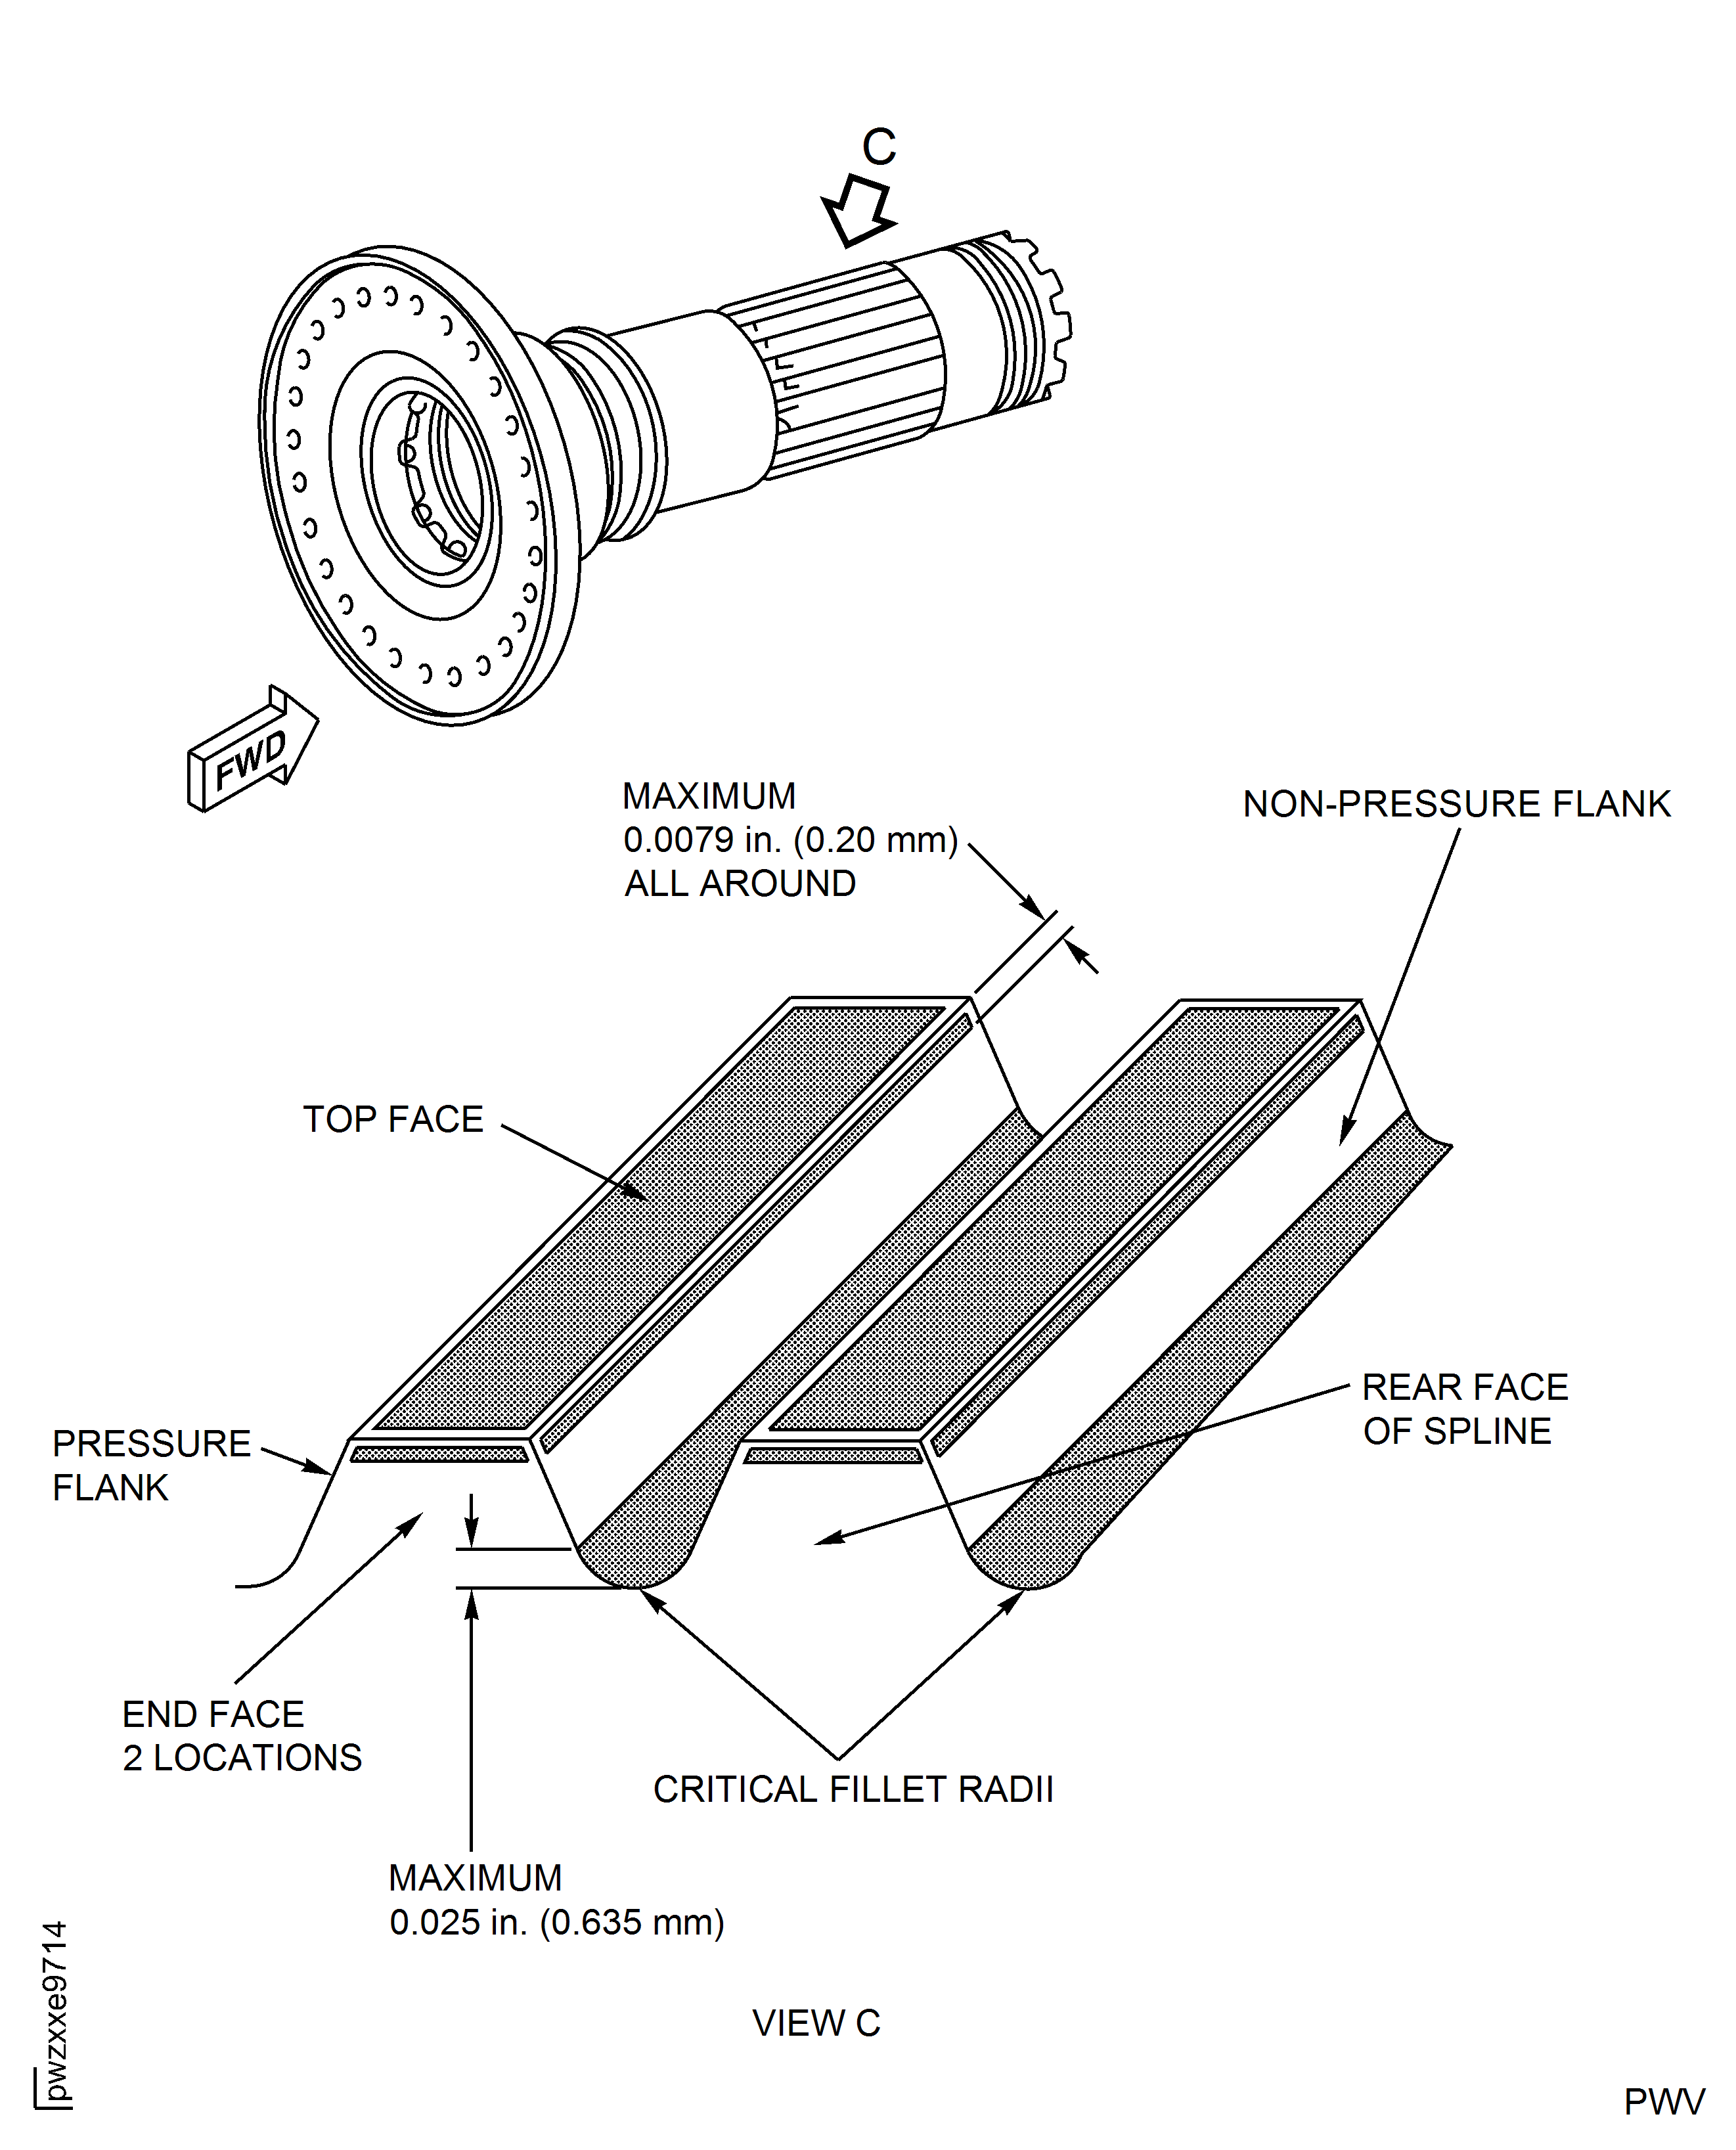
Examine the non-pressure faces of the splines at location 1.
Repair, VRS6516 Part 1 TASK 72-41-13-300-031 (REPAIR-031).
Not more than 0.0079 in. (0.20 mm) in depth and/or circumference.
Reject.
Greater than Step.
Pitting, corrosion or fretting.
Repair, VRS6516 Part 2 TASK 72-41-13-300-031 (REPAIR-031).
Not more than 0.004 in. (0.10 mm) in depth and not more than 0.039 in. (1.00 mm) in width.
Reject.
Greater than Step.
Nicks, dents, scratches or scoring.
Examine the top face or end face of the splines at location 1.
Repair, VRS6516 Part 3 TASK 72-41-13-300-031 (REPAIR-031).
Not more than 0.001 in. (0.03 mm) in depth and/or circumference.
Reject.
Greater than Step.
Pitting or corrosion.
Repair, VRS6516 Part 3 TASK 72-41-13-300-031 (REPAIR-031).
Not more than 0.001 in. (0.03 mm) in depth and not more than 0.079 in. (2.00 mm) in width.
Reject.
Greater than Step.
Nicks, dents, scratches, scoring, galling or fretting.
Examine the pressure face of the spline at location 1.
SUBTASK 72-41-13-220-184 Examine the HPC Shaft Splines
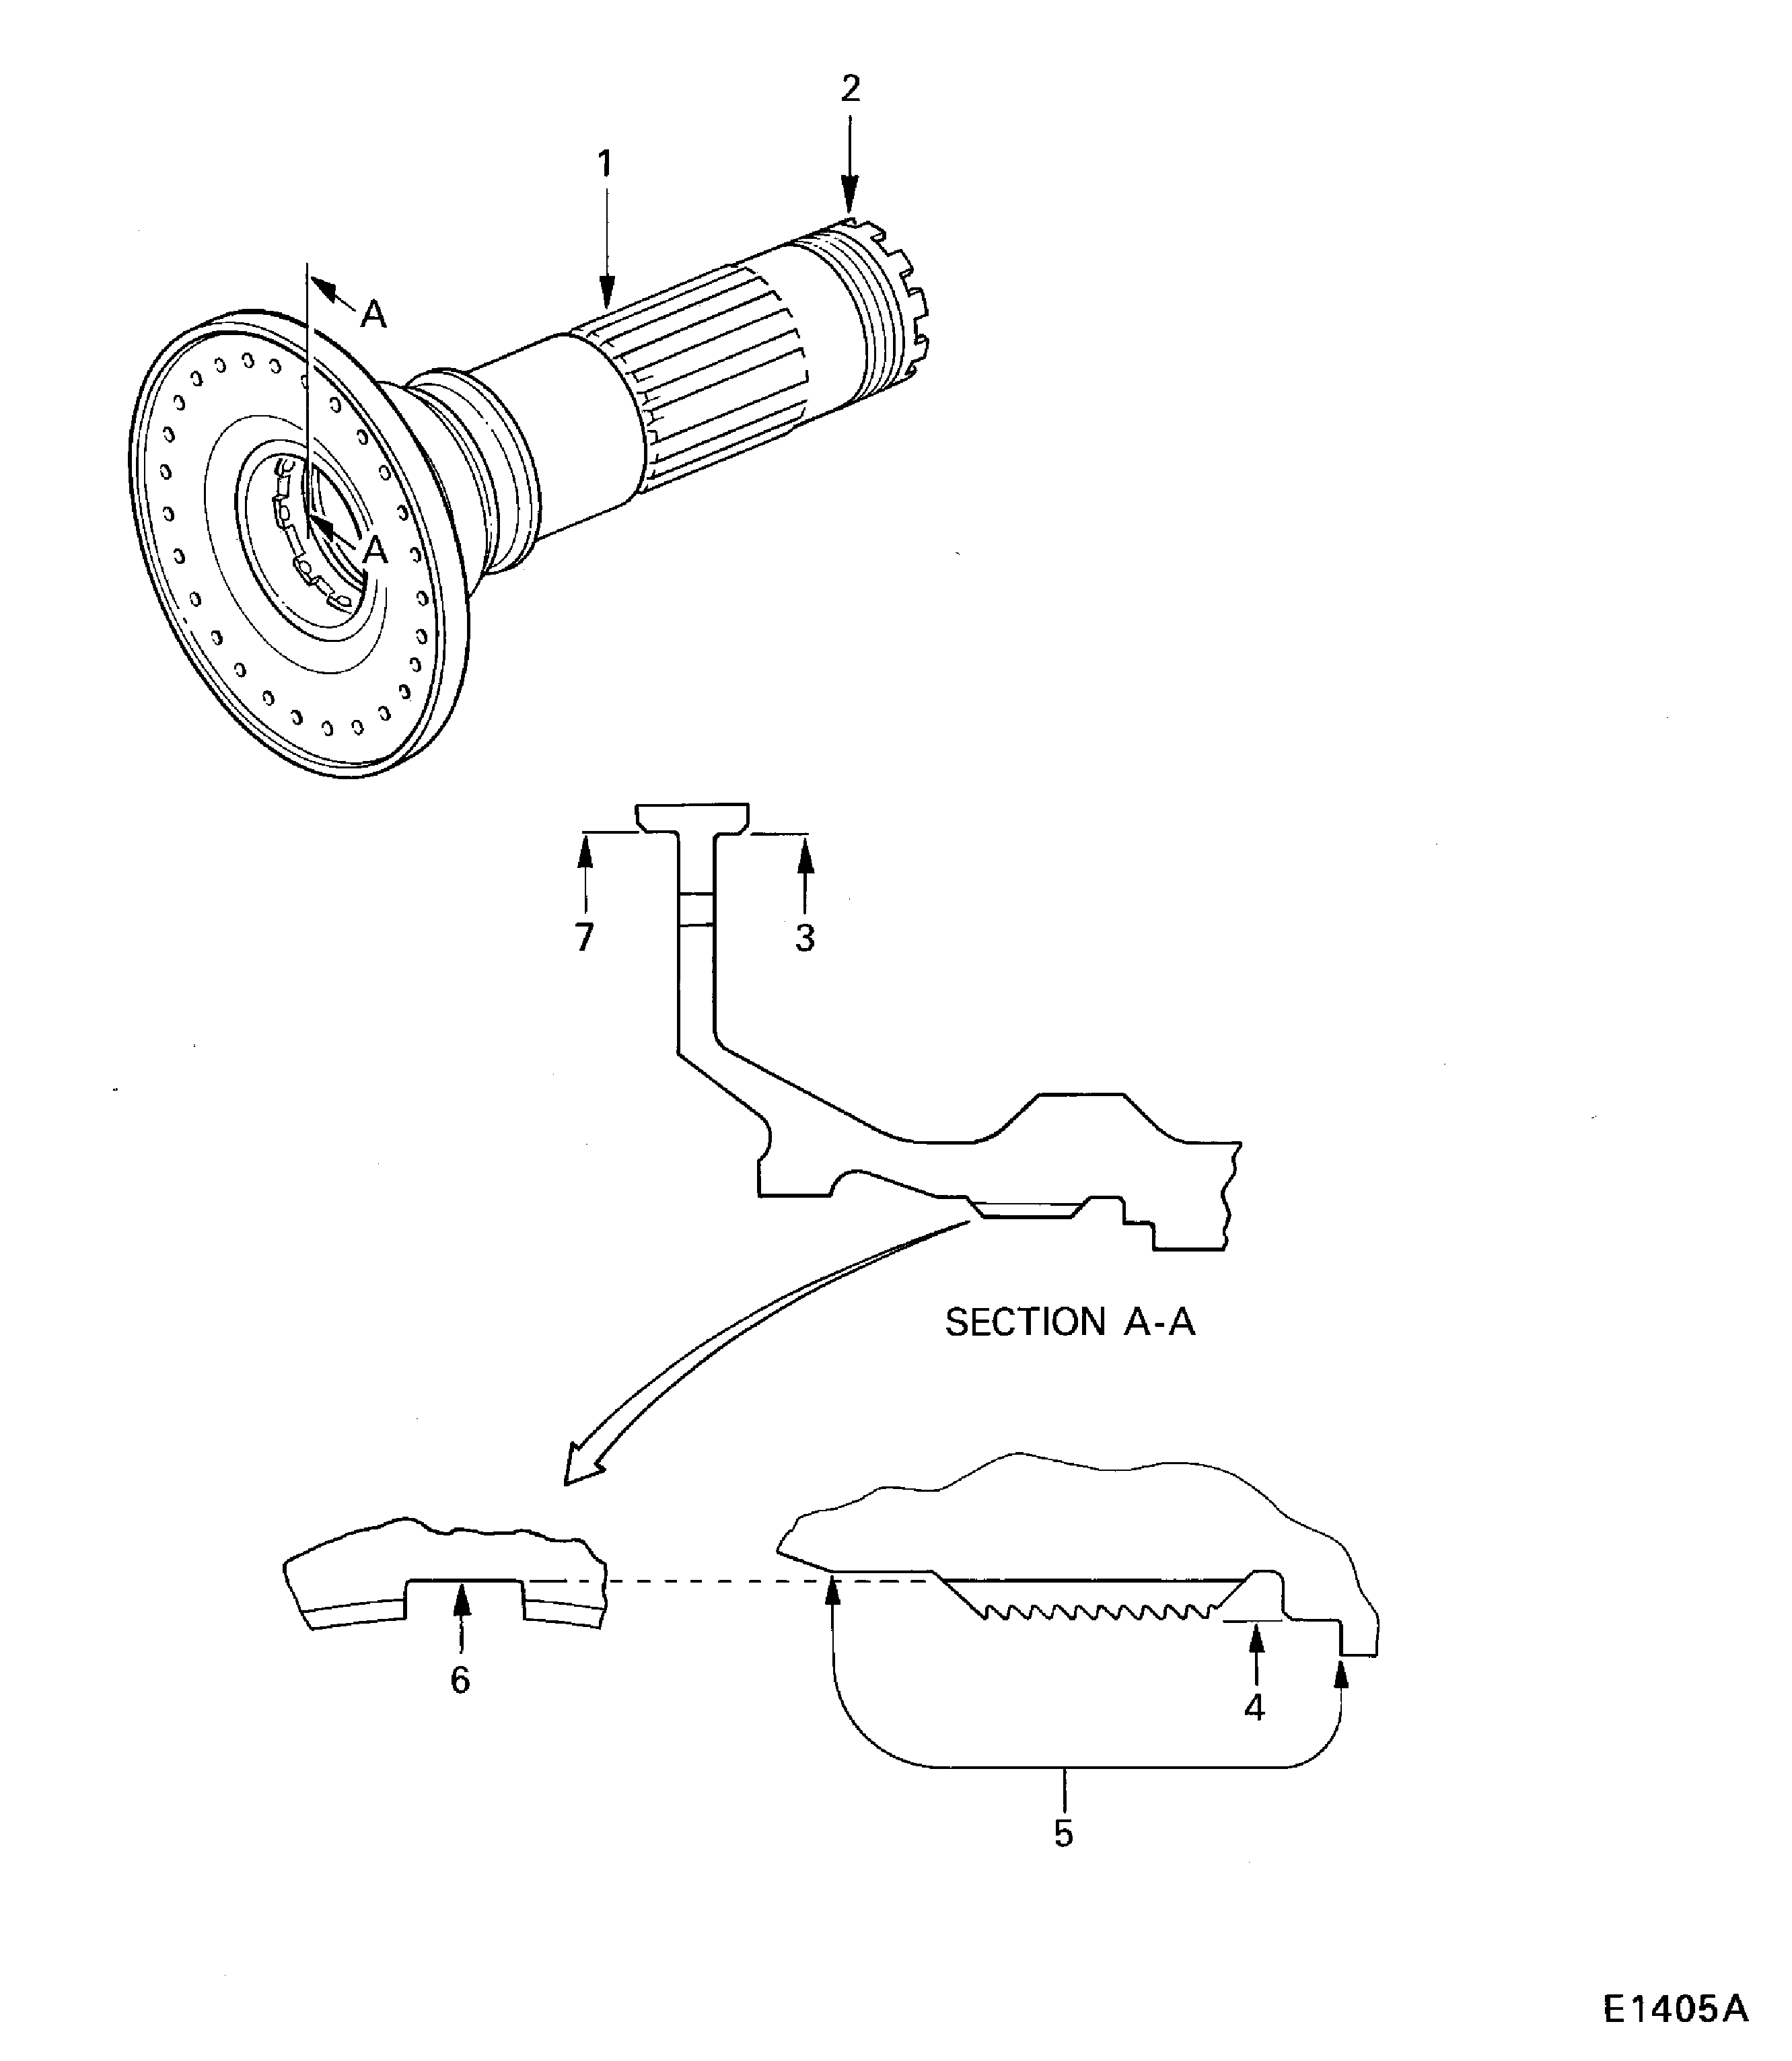
Refer to Figure.
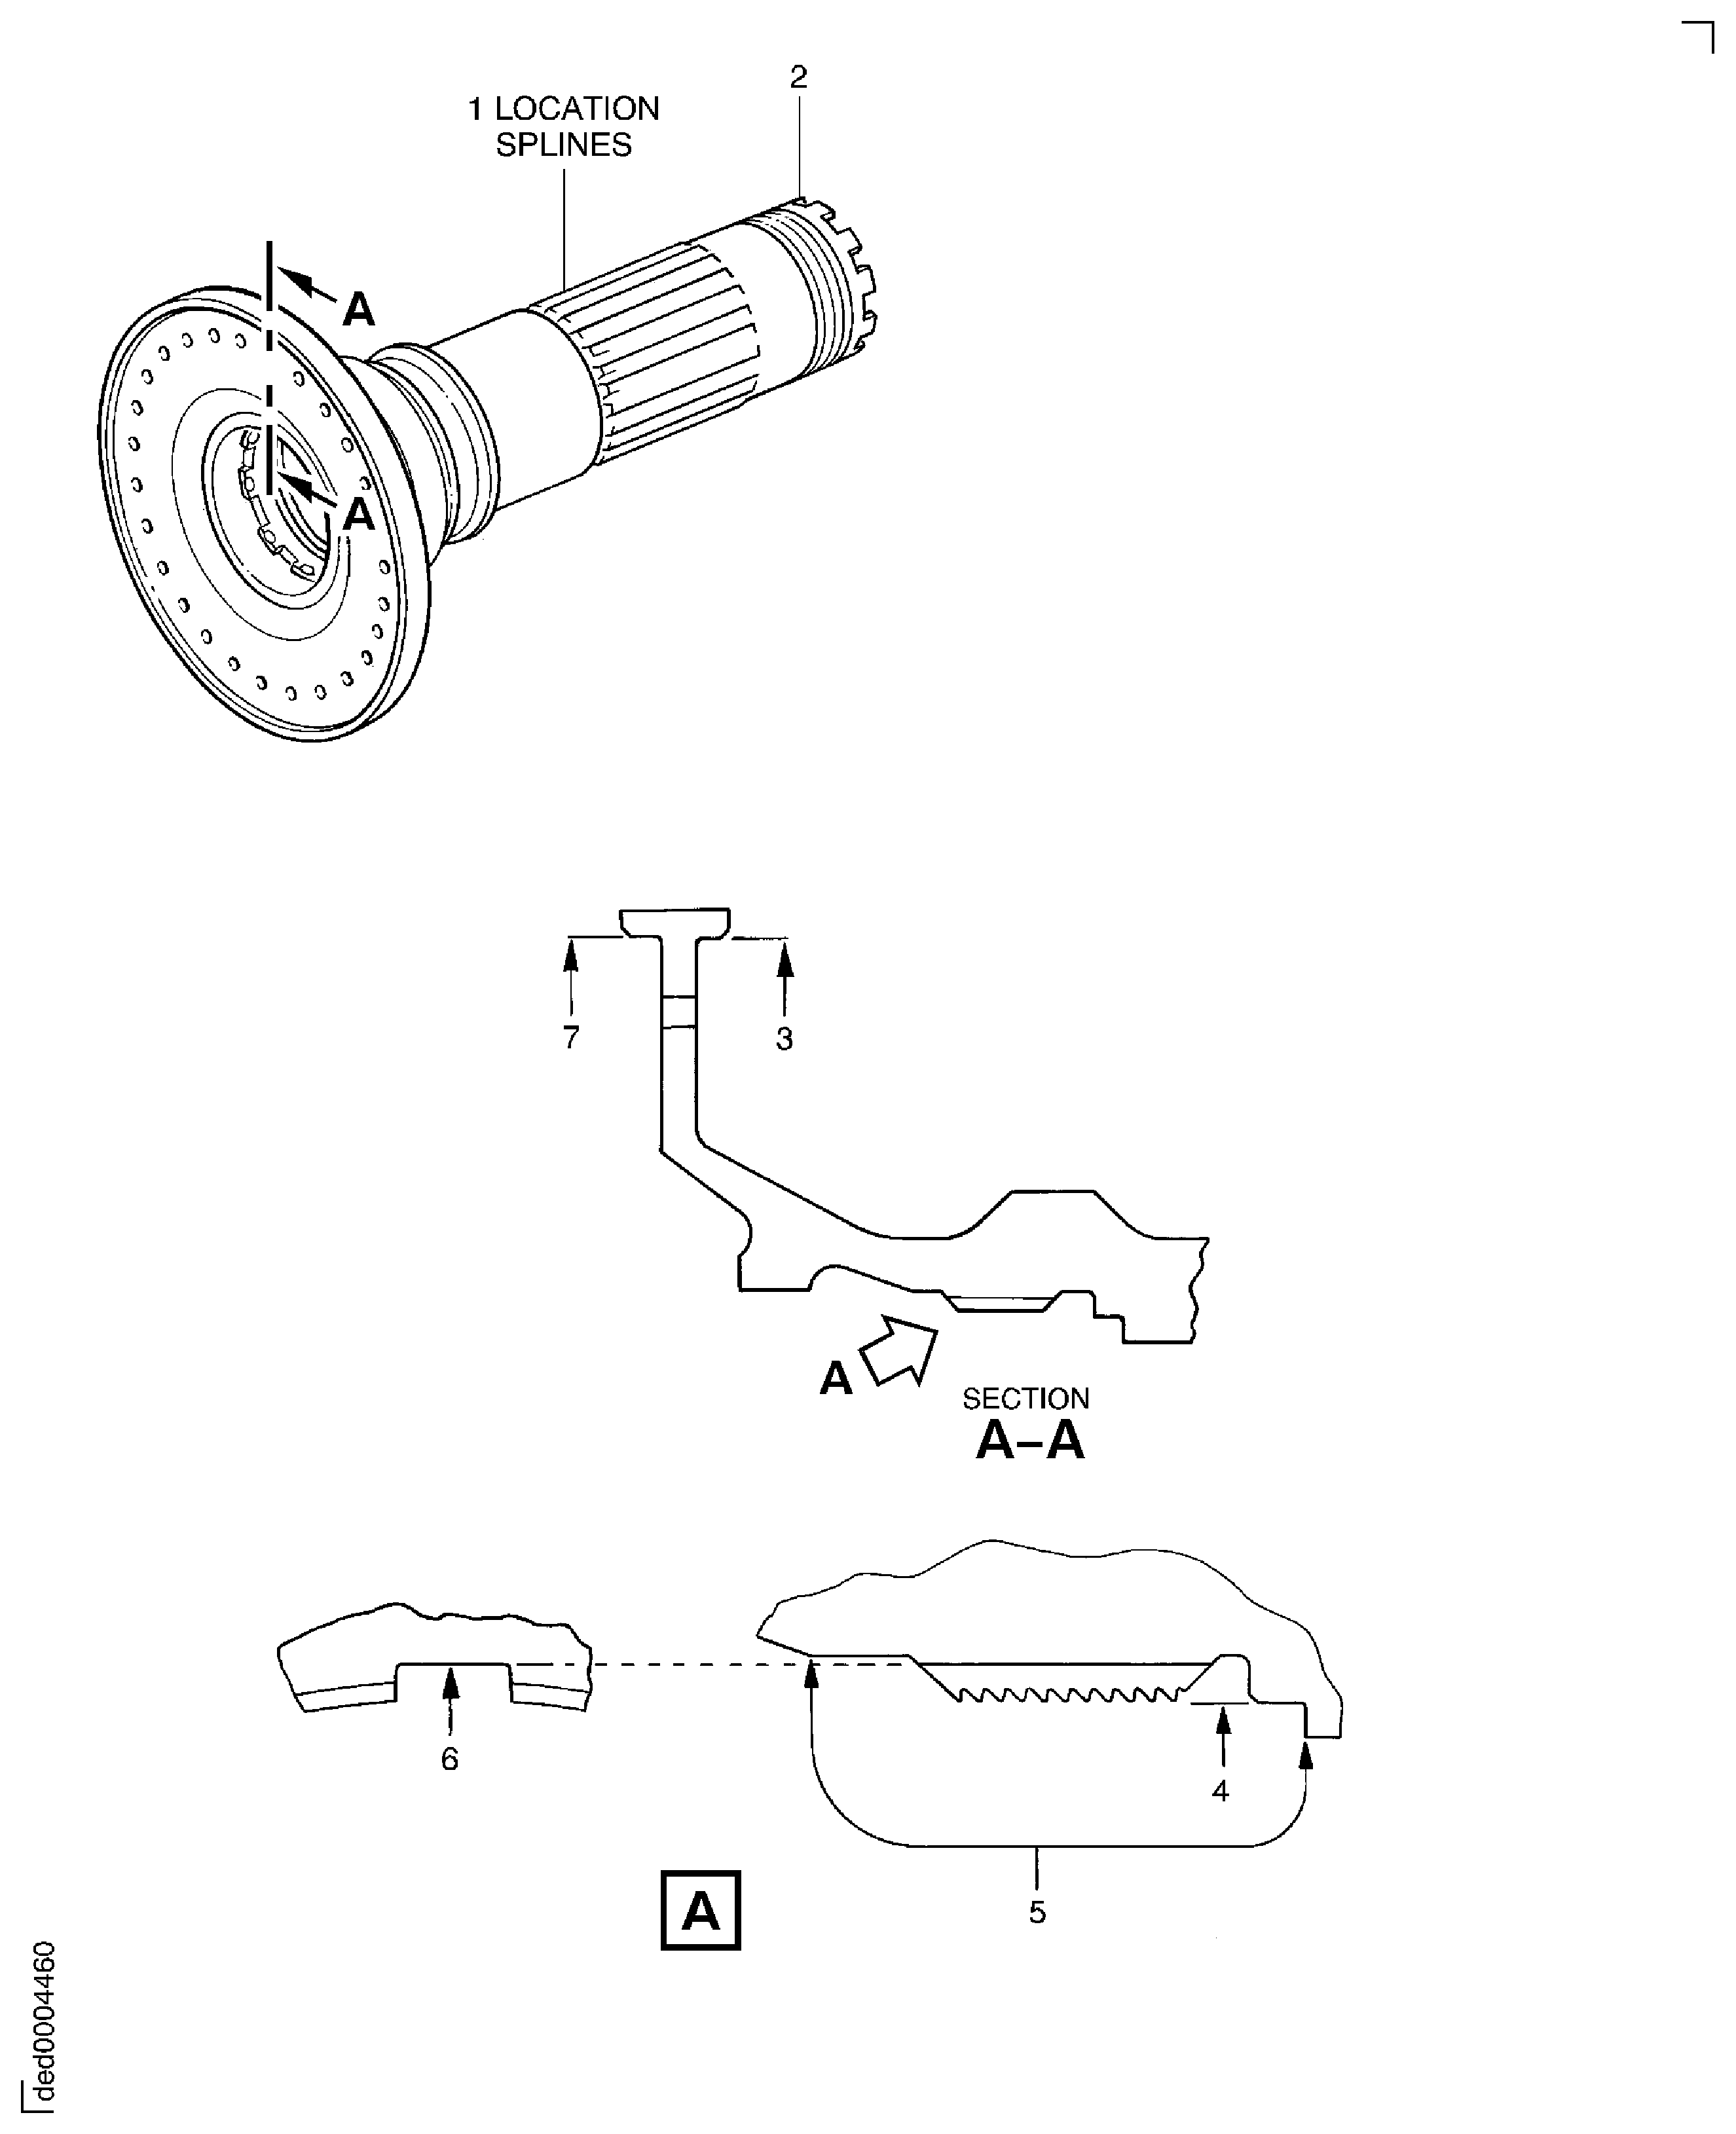
SUBTASK 72-41-13-220-185 Examine the HPC Shaft for Scoring, Scratches and Galling at the Location of the Heatshield on the Shaft Inner Diameter
Refer to Figure.
SUBTASK 72-41-13-220-186 Examine the HPC Shaft for Wear and Damage in the Front Slots
Refer to Figure.
NOTE
It is permitted for 2 tangs to be fully machined off and/or 1 tang to be half machined off at new production.Repair VRS6088, TASK 72-41-13-300-019 (REPAIR-019)
High metal in the slot or on the slot edge
Wear and damage.
Examine the shaft at location 6 for wear and damage in the rear slots (10 positions).
SUBTASK 72-41-13-220-187 Examine the HPC Shaft for Wear and Damage on the Rear Slots
Refer to Figure.
Repair VRS6088, TASK 72-41-13-300-019 (REPAIR-019)
Other than (1) and (2)
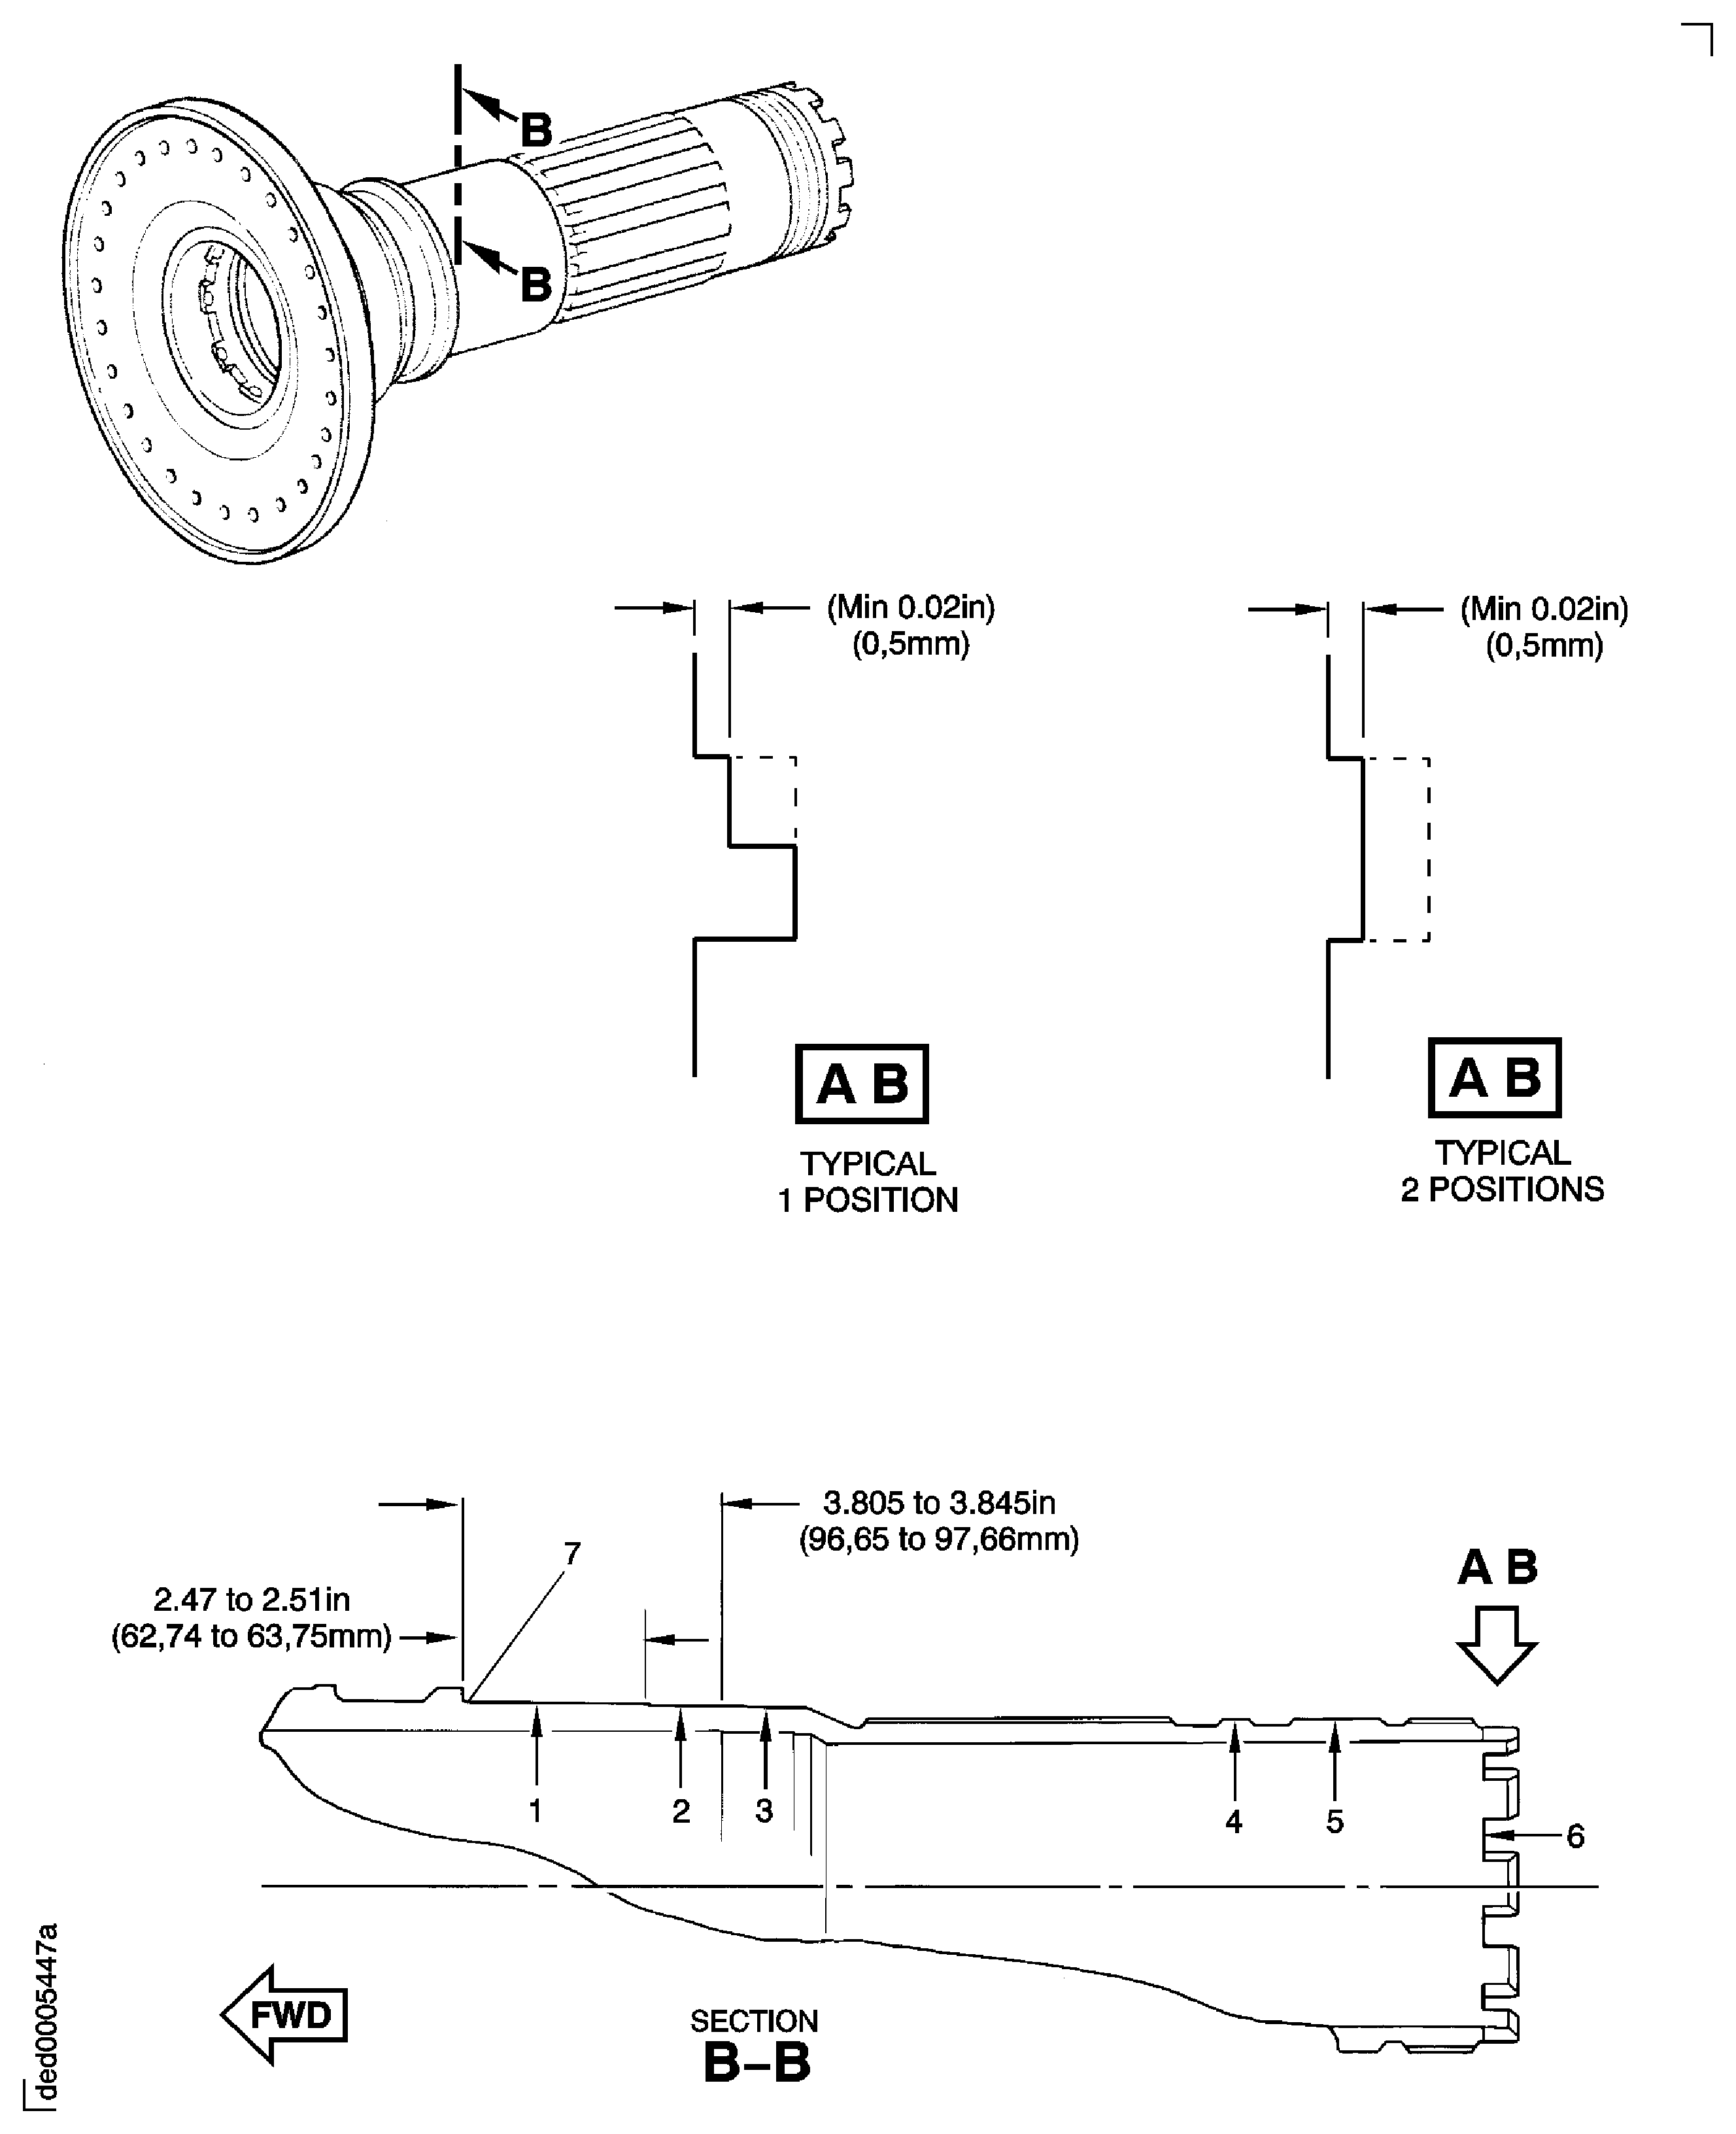
Examine the shaft at location 1 for scoring scratches and galling on the shaft outer diameter.
SUBTASK 72-41-13-220-188 Examine the HPC Shaft for Scoring, Scratches and Galling at the Location of the Carbon Seal Plate and Oil Slinger Ring on the Shaft Outer Diameter
Refer to Figure.
Repair VRS6088, TASK 72-41-13-300-019 (REPAIR-019)
Other than (1) and (2)
Examine the shaft at location 3 for galling, scoring and scratches at the rear carbon seal plate, gage spacer and the Stage 1 turbine hub diameter locations on the shaft outer diameter.
Repair VRS6088, TASK 72-41-13-300-019 (REPAIR-019)
Other than (1)
Examine the shaft at location 4 for scoring and scratches at the stage 2 turbine hub diameter location on the shaft outer diameter.
SUBTASK 72-41-13-220-189 Examine the HPC Shaft for Galling, Scoring and Scratches on the Shaft Outer Diameters
Refer to Figure.
Repair VRS6088, TASK 72-41-13-300-019 (REPAIR-019)
Other than (1)
Examine the shaft at location 5 for scoring and scratches on the outer diameter.
SUBTASK 72-41-13-220-190 Examine the HPC Shaft for Scoring and Scratches at the HPT Nut Pilot Diameter Location on the Shaft Outer Diameter
Refer to Figure.
Repair VRS6088, TASK 72-41-13-300-019 (REPAIR-019)
Surface damage that is not repaired
Examine the shaft at locations 4, 6 and 10 for surface damage.
Repair VRS6088, TASK 72-41-13-300-019 (REPAIR-019)
Other than (1)
Examine the shaft at locations 1, 3, 7, 8, 9, 11 and 14 for surface damage.
Repair VRS6088, TASK 72-41-13-300-019 (REAPIR-019)
Other than (1)
Examine the shaft at location 13 for surface damage.
SUBTASK 72-41-13-220-191 Examine the HPC Shaft for all Other Surface Damage
Refer to Figure.
Accept the part for select fit only.
NOTE
This part can be used only if the mating part has a diameter that will result in fit of reference No. 1007. Refer to TASK 72-41-10-440-002-B00.
If the dimension is between 9.8020 and 9.8050 in. (248.971 and 249.047 mm)
Examine the shaft at location 7 for the inner diameter.
Accept for service run part only
NOTE
This part can be used only if the Heatshield conforms with the dimensions as referenced in TASK 72-41-13-200-002, SUBTASK 72-41-13-220-051.
If the dimension is between 4.6440 and 4.6470 in. (117.958 and 118.033 mm)
Repair VRS6510, TASK 72-41-13-300-025 (REPAIR-025)
Other than (2)
Examine the shaft at location 4 for the inner diameter.
Accept the part for select fit only
NOTE
This part can be used only if the mating part has a diameter that will result in fit of reference No. 1008. Refer to TASK 72-41-10-440-002-B00.
If the dimension is between 9.7580 and 9.7627 in. (247.853 and 247.973 mm)
Examine the shaft at location 3 for the inner diameter.
SUBTASK 72-41-13-220-192 Examine the HPC Shaft for the Inner Diameters
Refer to Figure.
SUBTASK 72-41-13-220-193 Examine the HPC Shaft at Location 2, the No. 4 Bearing Location Coating
Refer to Figure.
Repair VRS6509, TASK 72-41-13-300-024 (REPAIR-024)
Other than (1)
Examine the shaft at location 1 for the outer diameter.
Repair VRS6509, TASK 72-41-13-300-024 (REPAIR-024)
Other than (1)
Examine the shaft at location 3 for the outer diameter.
Repair VRS6509, TASK 72-41-13-300-024 (REPAIR-024)
Other than (1)
Examine the shaft at location 4 for the outer diameter.
Repair VRS6662, TASK 72-41-13-300-029 (REPAIR-029)
Other than (1)
Examine the shaft assembly at location 7 for axial location.
SUBTASK 72-41-13-220-194 Examine the HPC Shaft for the Outer Diameters
Figure: HPC Shaft Assembly Inspection Locations
HPC Shaft Assembly Inspection Locations

Figure: HPC Shaft Assembly Inspection Locations
HPC Shaft Assembly Inspection Locations

Figure: HPC Shaft Assembly Inspection Locations
HPC Shaft Assembly Inspection Locations

Figure: Focused Inspection - Bolt Holes
Focused Inspection - Bolt Holes

Figure: Focused Inspection - Location Splines
Focused Inspection - Location Splines

Figure: HP Compressor Rear Shaft Spline Inspection Locations
HP Compressor Rear Shaft Spline Inspection Locations

