Export Control
EAR Export Classification: Not subject to the EAR per 15 C.F.R. Chapter 1, Part 734.3(b)(3), except for the following Service Bulletins which are currently published as EAR Export Classification 9E991: SBE70-0992, SBE72-0483, SBE72-0580, SBE72-0588, SBE72-0640, SBE73-0209, SBE80-0024 and SBE80-0025.Copyright
© IAE International Aero Engines AG (2001, 2014 - 2021) The information contained in this document is the property of © IAE International Aero Engines AG and may not be copied or used for any purpose other than that for which it is supplied without the express written authority of © IAE International Aero Engines AG. (This does not preclude use by engine and aircraft operators for normal instructional, maintenance or overhaul purposes.).Applicability
All
Common Information
TASK 72-41-15-300-035 HPC Stage 3 Rotor Blade - Replace The Clapper Coating, Repair-035 (VRS6236)
Effectivity
FIG/ITEM | PART NO. | ASSEMBLY |
|---|---|---|
01-200 | 6A3513 | A |
01-200 | 6A3938 | A |
Deleted | Deleted | Deleted |
Deleted | Deleted | Deleted |
Deleted | Deleted | Deleted |
01-200 | 6A8353 | D |
Deleted | Deleted | Deleted |
01-200 | 6A8688 | D |
NOTE
General
This repair must only be done when the instruction to do so is given in TASK 72-41-15-200-000 (INSPECTION-000).
This repair replaces the coating on the clapper abutment faces of the stage 3 compressor blades. The tungsten carbide 15 percent cobalt metal spray coating is applied by the flame detonation deposition process.
The practices and processes referred to in the procedure by the TASK/SUBTASK numbers are in the SPM.
The Pre-flame deposition abrasive blast and flame deposition section of this repair is source controlled, which can only be done by approved vendors.
The vendor is self provisioning for the coating material.
Price and Availability
Refer to International Aero Engines.
Related Repairs
HP Compressor Rotor Blade - Stage 3 - Repair Damaged or Worn Clapper Abutment Face by Weld, refer to TASK 72-41-15-300-052 (VRS6616).
Repair Facilities
The proprietary nature of this repair requires that any facility not authorized to accomplish this repair either, utilize the Authorized Repair Vendors listed below or contact the IAE Repair Development Services to determine if a qualification program can be initiated at their facility.
IAE - INTERNATIONAL AERO ENGINES AG
C/O ROLLS-ROYCE DEUTSCHLAND Ltd and Co KG
ESCHENWEG 11
DAHLEWITZ
D-15827 BLANKENFELDE-MAHLOW
GERMANY
ATTN: Manager Technical Services
Authorized repair vendors for the pre-flame deposition abrasive blast and flame deposition section of Repair VRS6236 are listed below:
PRAXAIR SURFACE TECHNOLOGIES LTD.
Southam Industrial Estate
Westfields Road
Southam
Leamington Spa
Warwickshire
CV33 0JH
PRAXAIR SURFACE TECHNOLOGIES K.K.
Okegawa Plant
1944-3 Shimoishido-Kami
Kitamoto-Shi
Saitama
Pref 364-0022
Japan
ASIAN SURFACE TECHNOLOGIES Pte Ltd
55 Loyang Drive
Singapore
508967
The designation by IAE of an Authorized Repair Vendor indicates that the Repair Vendor has demonstrated the capability to enable it to carry out the listed repair work. However, IAE makes no warranties or representations concerning the qualifications or quality standards of the Repair Vendors to carry out the repair work, and accepts no responsibility whatsoever for any work that may be carried out by a Repair Vendor other than when IAE is listed as the Repair Vendor. Authorized Repair Vendors do not act as agents or representatives of IAE.
NOTE
NOTE
NOTE
Preliminary Requirements
Pre-Conditions
| Action/Condition | Data Module/Technical Publication |
|---|---|
| Make sure that all the necessary cleaning and inspection procedures are done before this repair. |
Support Equipment
| Name | Manufacturer | Part Number / Identification | Quantity | Remark |
|---|---|---|---|---|
| Abrasive Blast Equipment | LOCAL | Abrasive Blast Equipment | ||
| Co-ordinate measurement machine | LOCAL | Co-ordinate measurement machine | ||
| Degreasing equipment | LOCAL | Degreasing equipment | ||
| Detonation flame deposition equipment | LOCAL | Detonation flame deposition equipment | ||
| Penetrant Crack Test Equipment | LOCAL | Penetrant crack test equipment | ||
| Rochelle carbonate tank | LOCAL | Rochelle carbonate tank | ||
| Vibrating Marking Pencil | LOCAL | Vibrating Marking Pencil | ||
| IAE 3R19363 Inspection fixture | 0AM53 | IAE 3R19363 | 1 | |
| IAE 3R19366 Inspection Block | 0AM53 | IAE 3R19366 | 1 | |
| IAE 3R19367 Inspection block | 0AM53 | IAE 3R19367 | 1 | |
| IAE 3R19372 Stop block | 0AM53 | IAE 3R19372 | 1 | |
| IAE 3R19815 Clapper width checking fixture | 0AM53 | IAE 3R19815 | 1 | |
| IAE 3R19816 Inspection jaws | 0AM53 | IAE 3R19816 | 1 | |
| IAE 3R19817 Master blade | 0AM53 | IAE 3R19817 | 1 |
Consumables, Materials and Expendables
| Name | Manufacturer | Part Number / Identification | Quantity | Remark |
|---|---|---|---|---|
| CoMat 02-006 ADHESIVE TAPE ALUMINIUM FOIL | K6835 | CoMat 02-006 | ||
| CoMat 02-017 WAX | LOCAL | CoMat 02-017 | ||
| CoMat 02-198 ADHESIVE TAPE (MASKING METAL SPRAY) | 07512 | CoMat 02-198 | ||
| CoMat 05-002 ABRASIVE MEDIUM, ALUMINUM OXIDE | LOCAL | CoMat 05-002 | ||
| CoMat 05-003 ABRASIVE MEDIUM ALUMINUM OXIDE, 120/220 GRADE | X222X | CoMat 05-003 |
Spares
NONESafety Requirements
NONEProcedure
Refer to the SPM TASK 70-11-03-300-503.
Use degreasing equipment.
Remove the grease.
SUBTASK 72-41-15-110-083 Clean the Blade
Use CoMat 02-017 WAX.
Put the blade fully into hot wax.
SUBTASK 72-41-15-330-051 Mask the Blade
Refer to the SPM TASK 70-23-04-230-501.
Cracks are not permitted.
Use penetrant crack test equipment.
Do a penetrant crack test on clapper abutment faces.
SUBTASK 72-41-15-230-071 Do a Crack Test
Refer to the SPM TASK 70-12-02-120-501.
Use CoMat 05-003 ABRASIVE MEDIUM ALUMINUM OXIDE, 120/220 GRADE with abrasive blast equipment.
Lightly abrasive blast struts and airfoil to remove staining.
SUBTASK 72-41-15-120-054 Abrasive Blast
Use IAE 3R19363 Inspection fixture 1 off, IAE 3R19366 Inspection Block 1 off, IAE 3R19367 Inspection block 1 off and IAE 3R19372 Stop block 2 off.
For blades that are not within repair limits refer to TASK 72-41-15-300-052 (VRS6616).
SUBTASK 72-41-15-220-194-A00 Examine the Repair, Assembly A
For the blades that are not within repair limits refer to TASK 72-41-15-300-052 (VRS6616).
SUBTASK 71-41-15-220-194-C00 Examine the Repair, Assembly D
Refer to the SPM TASK 70-11-03-300-503.
Use degreasing equipment.
Remove the grease.
SUBTASK 72-41-15-110-086 Clean the Blade
Refer to the SPM TASK 70-12-02-120-501.
Make sure that a minimum quantity of material is removed.
Use CoMat 05-002 ABRASIVE MEDIUM, ALUMINUM OXIDE with abrasive blast equipment.
Abrasive blast the clapper abutment faces.
SUBTASK 72-41-15-120-055 Abrasive Blast
Apply required thickness of coating identified in Step
Use LWIN40 coating and detonation flame deposition equipment to vendor technique.
SUBTASK 72-41-15-340-052 Apply the Flame Deposition Material, Assembly A
Apply required thickness of coating identified in Step.
Use LWIN40 coating and detonation flame deposition equipment to vendor technique.
SUBTASK 72-41-15-340-061 Apply the Flame Deposition Material, Assembly D
Clapper faces with coating defects are not permitted.
Use IAE 3R19363 Inspection fixture 1 off, IAE 3R19366 Inspection Block 1 off, IAE 3R19367 Inspection block 1 off and IAE 3R19372 Stop block 2 off.
SUBTASK 72-41-15-220-195-A00 Examine the Repair, Assembly A
Alternatively use a co-ordinate measurement machine.
Clapper faces with coating defects are not permitted.
Use IAE 3R19815 Clapper width checking fixture 1 off, IAE 3R19816 Inspection jaws 1 off, IAE 3R19817 Master blade 1 off.
SUBTASK 72-41-15-220-195-C00 Examine the Repair, Assembly D
Refer to the SPM TASK 70-09-00-400-501, SUBTASK 70-09-00-400-001.
Vibro engrave VRS6236 adjacent to existing part number.
SUBTASK 72-41-15-350-093 Identify the Repair
Figure: Repair Details And Dimensions - Assembly A
Repair Details And Dimensions - Assembly A
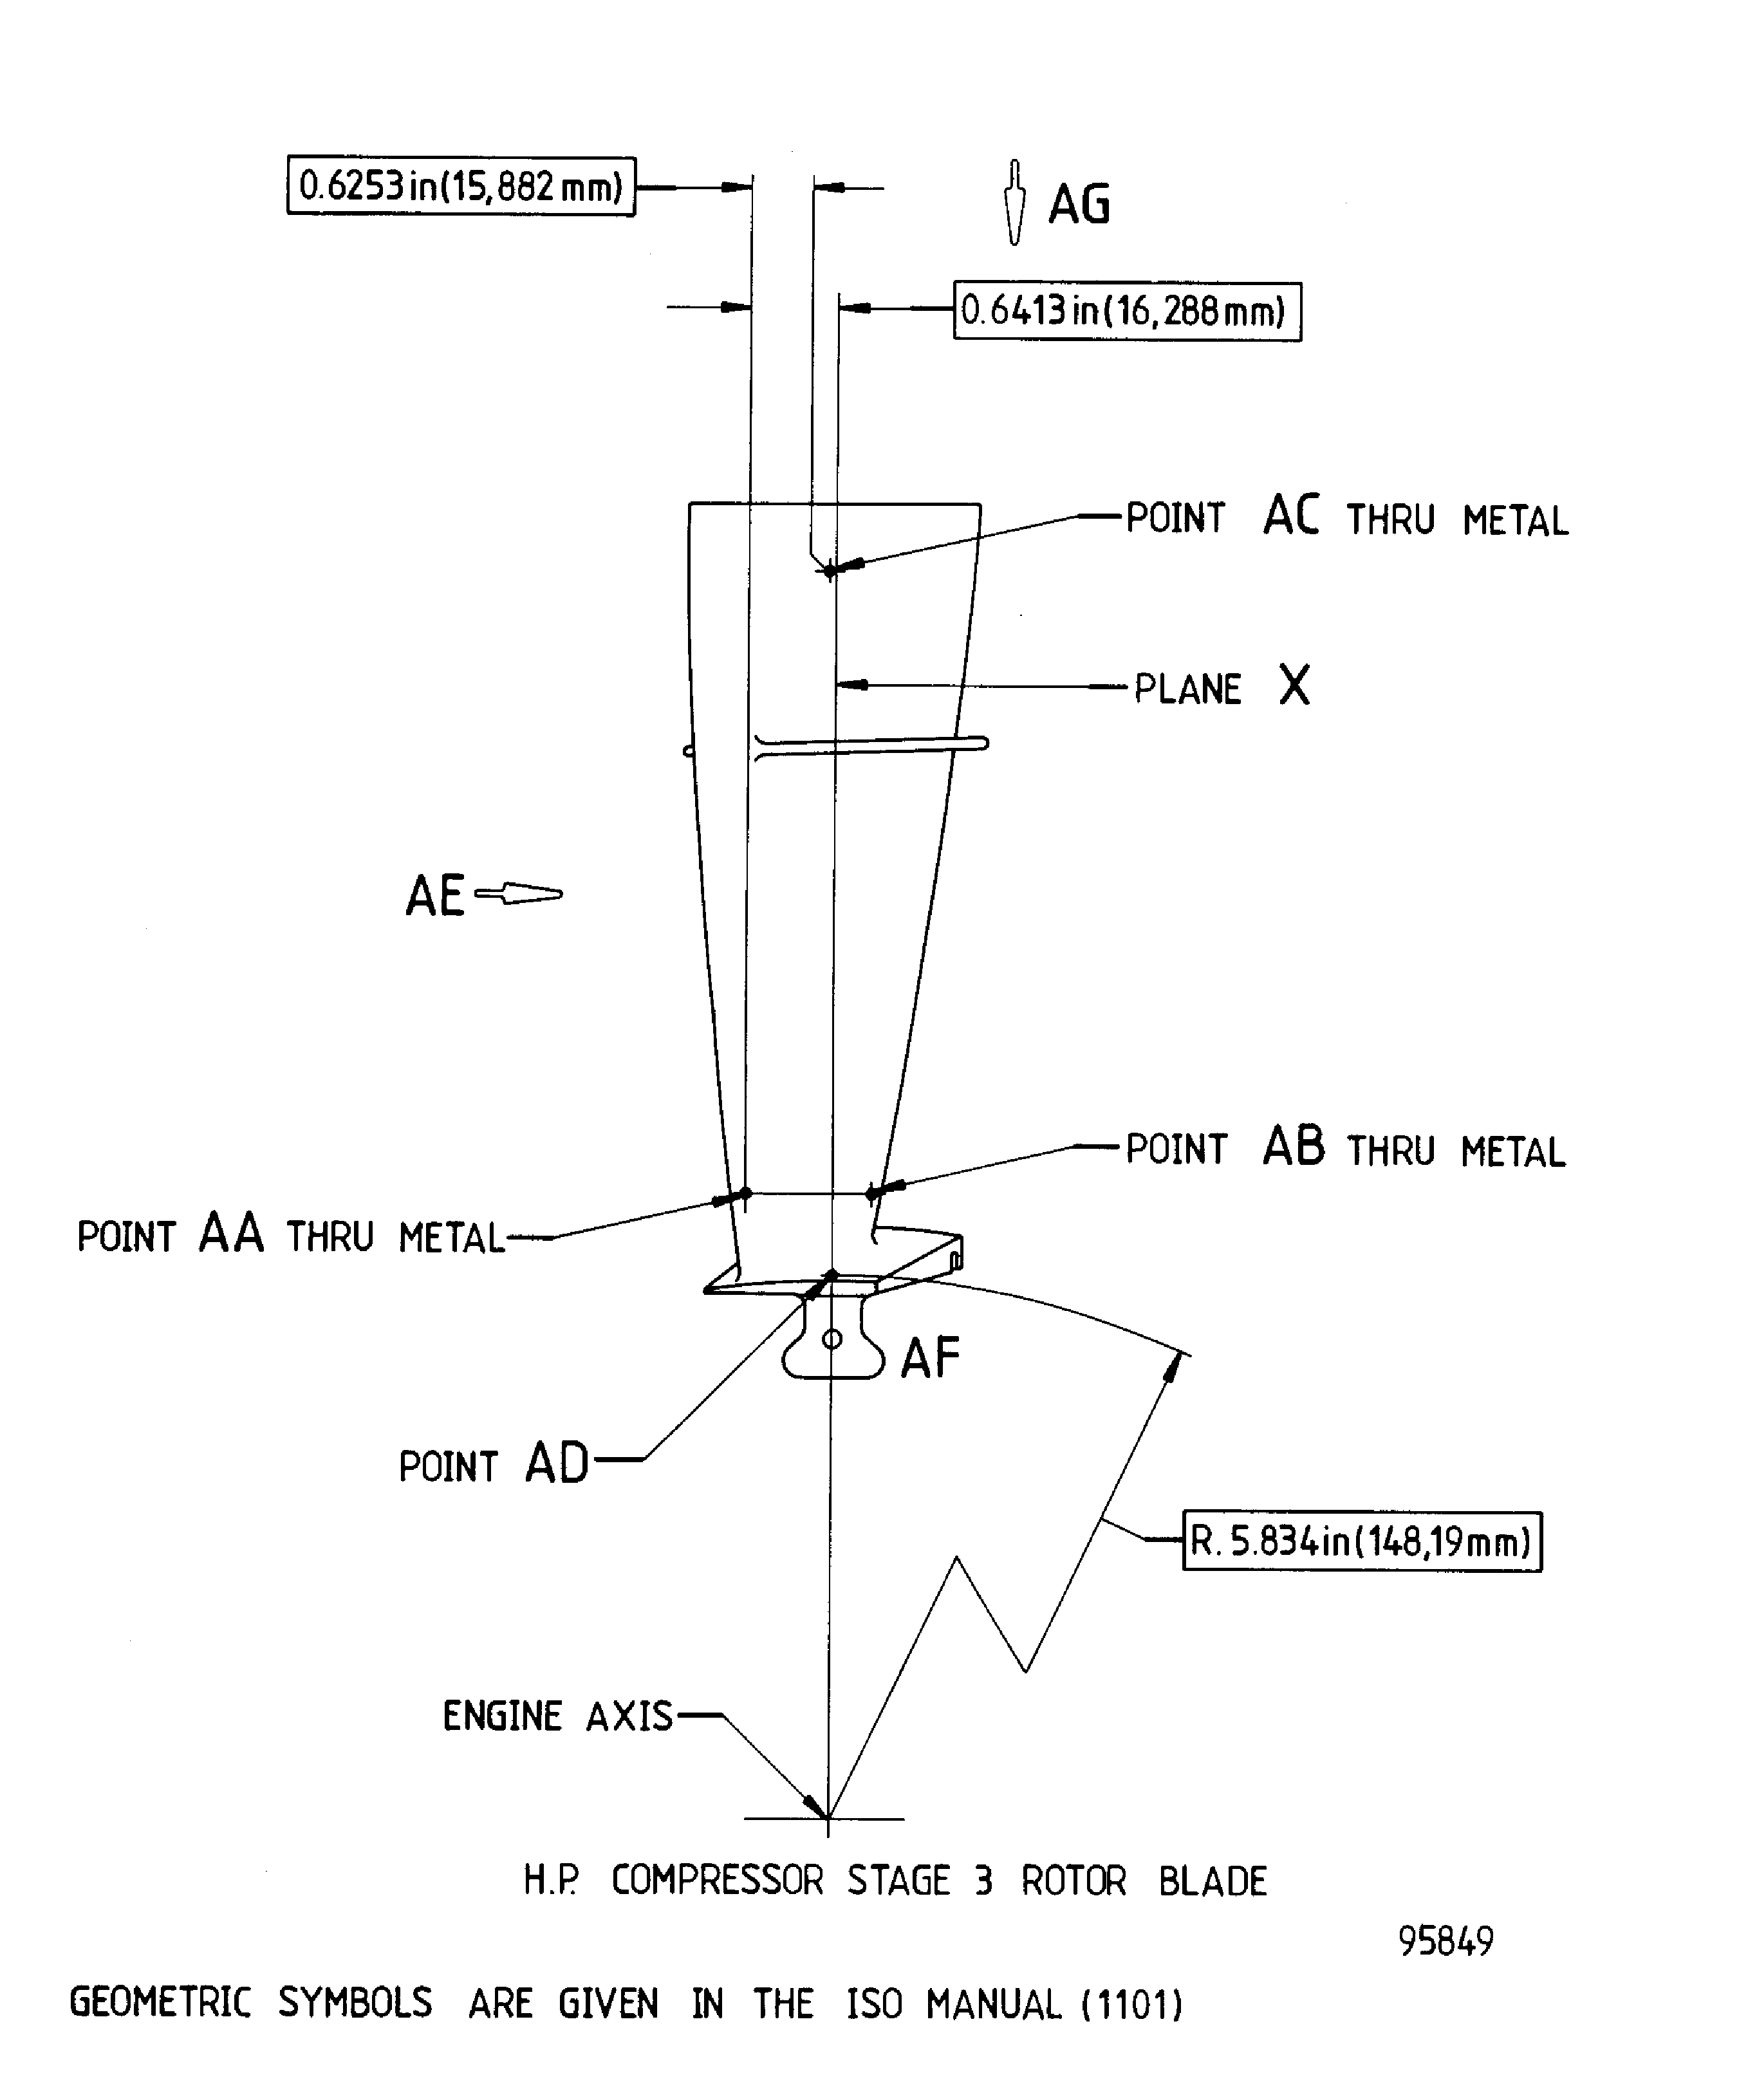
Figure: Repair Details And Dimensions - Assembly D
Repair Details And Dimensions - Assembly D
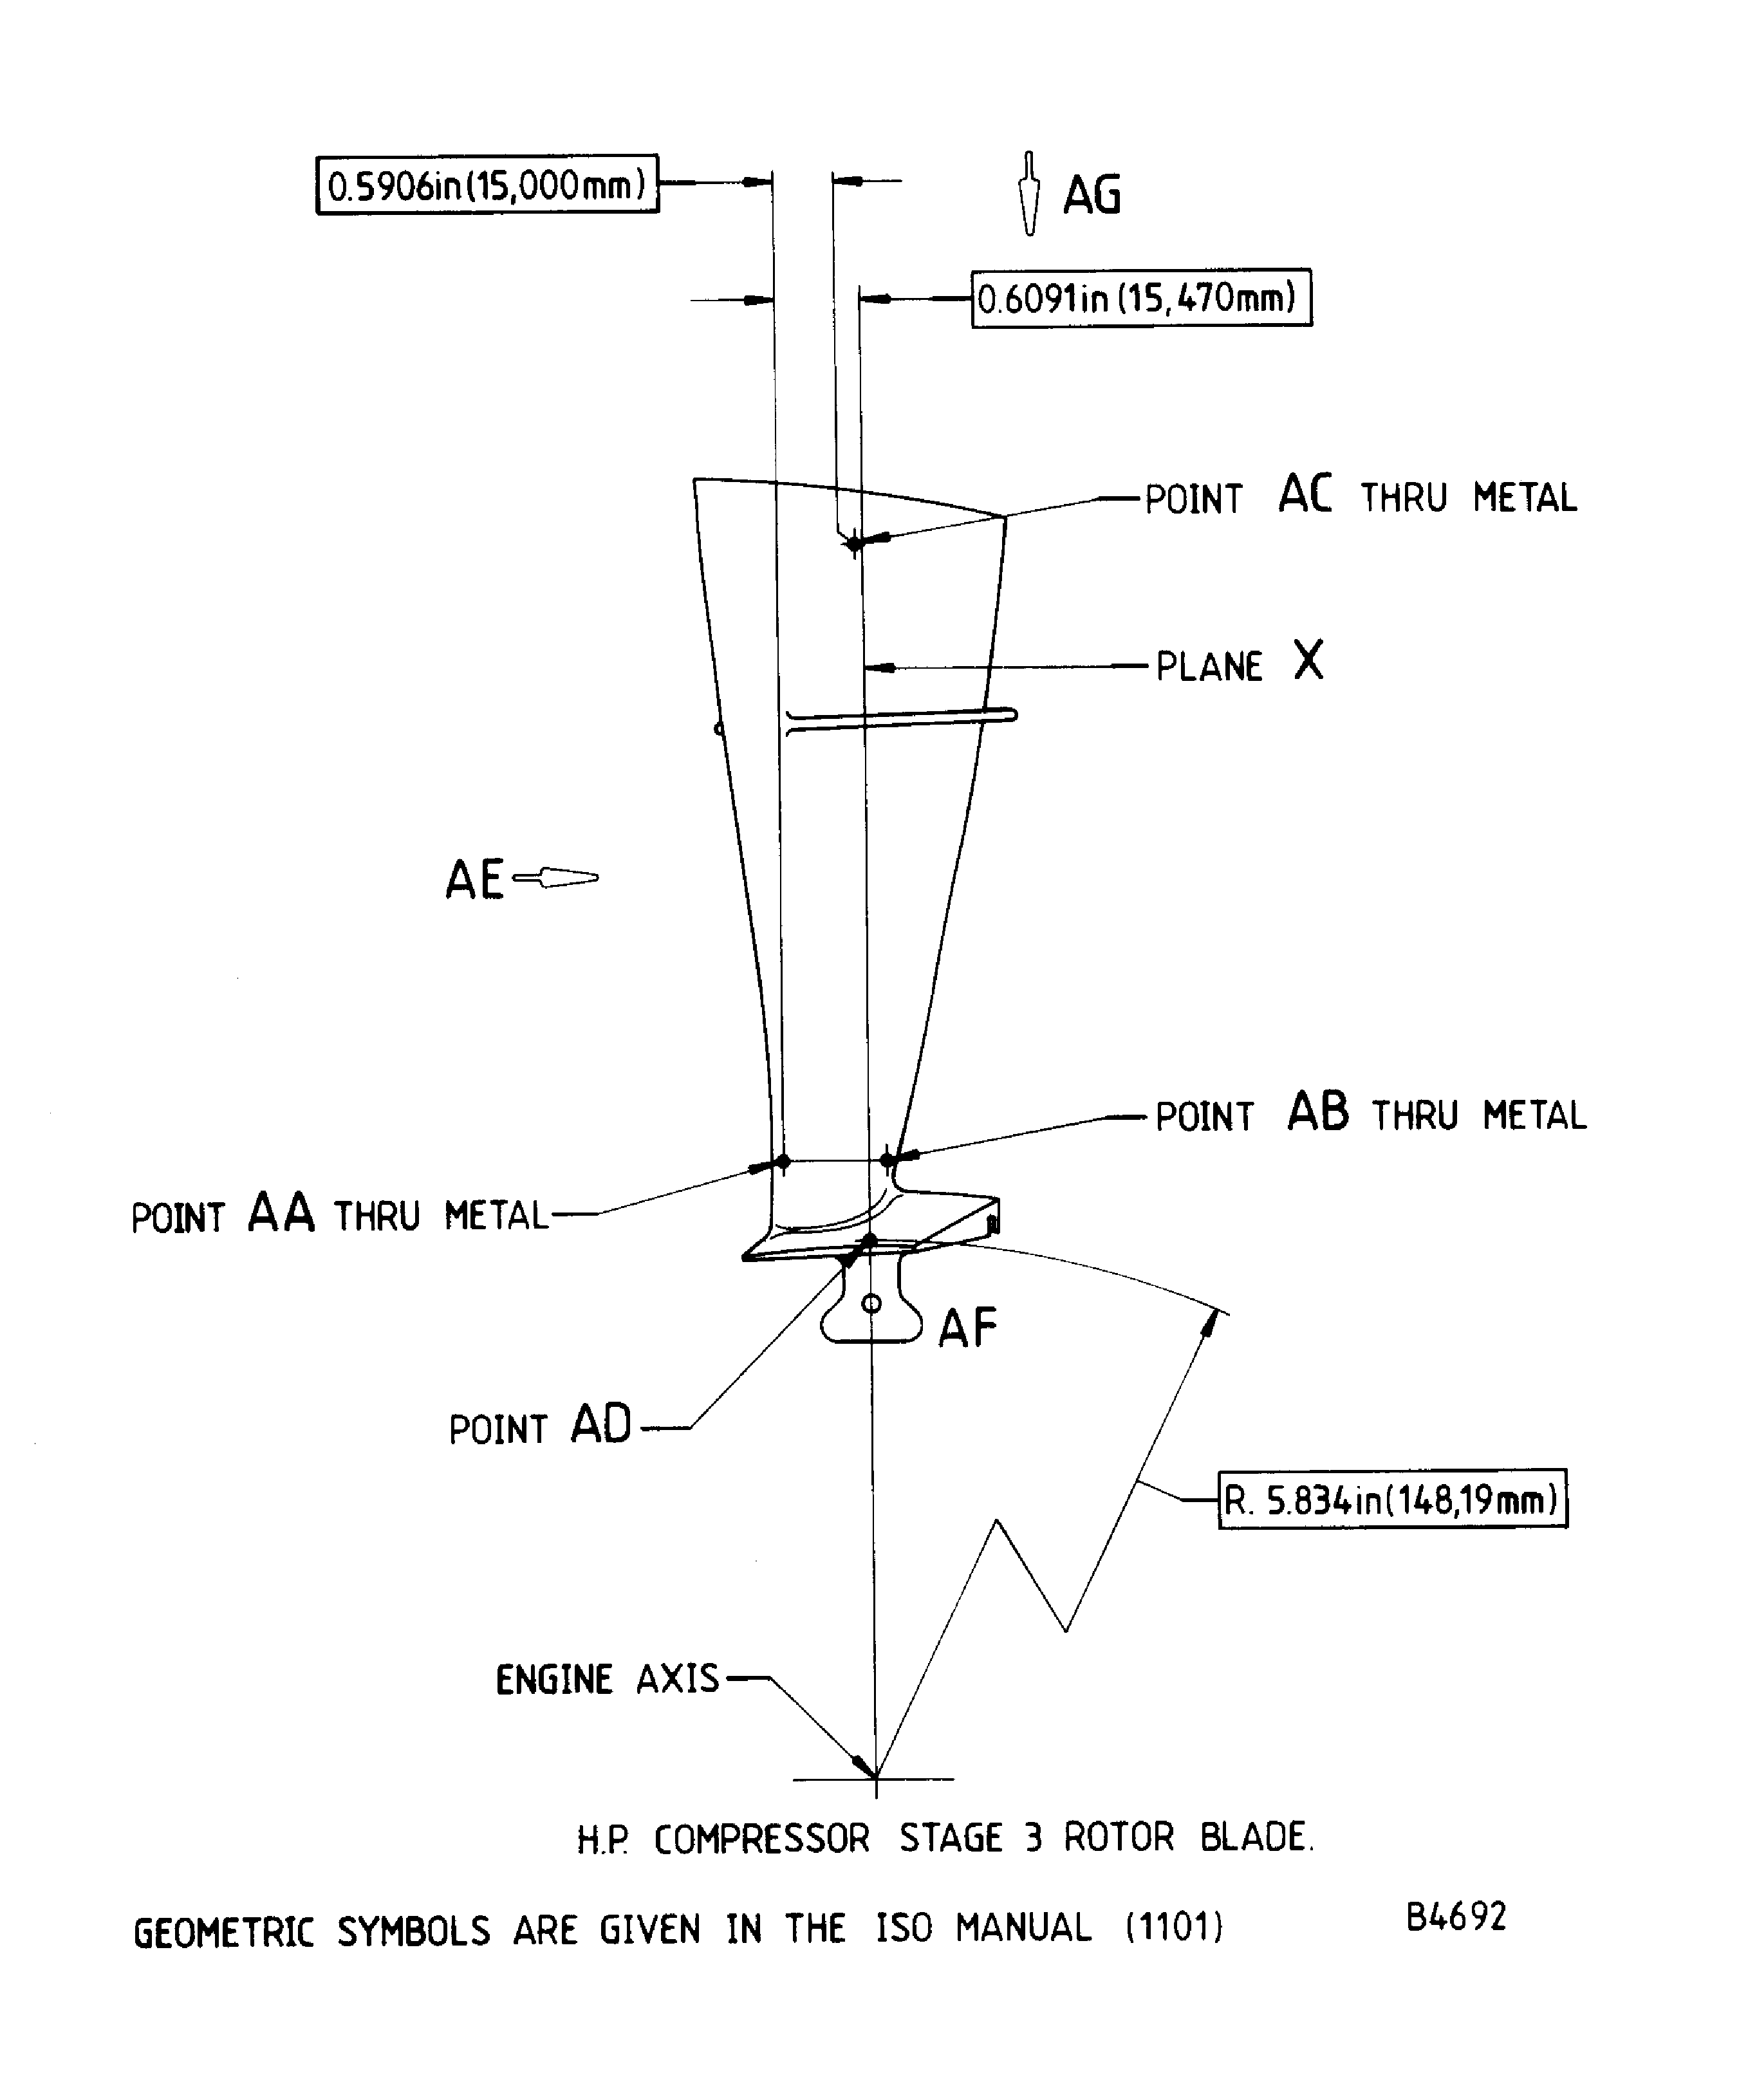
Figure: Repair Details And Dimensions - Assembly A
Repair Details And Dimensions - Assembly A
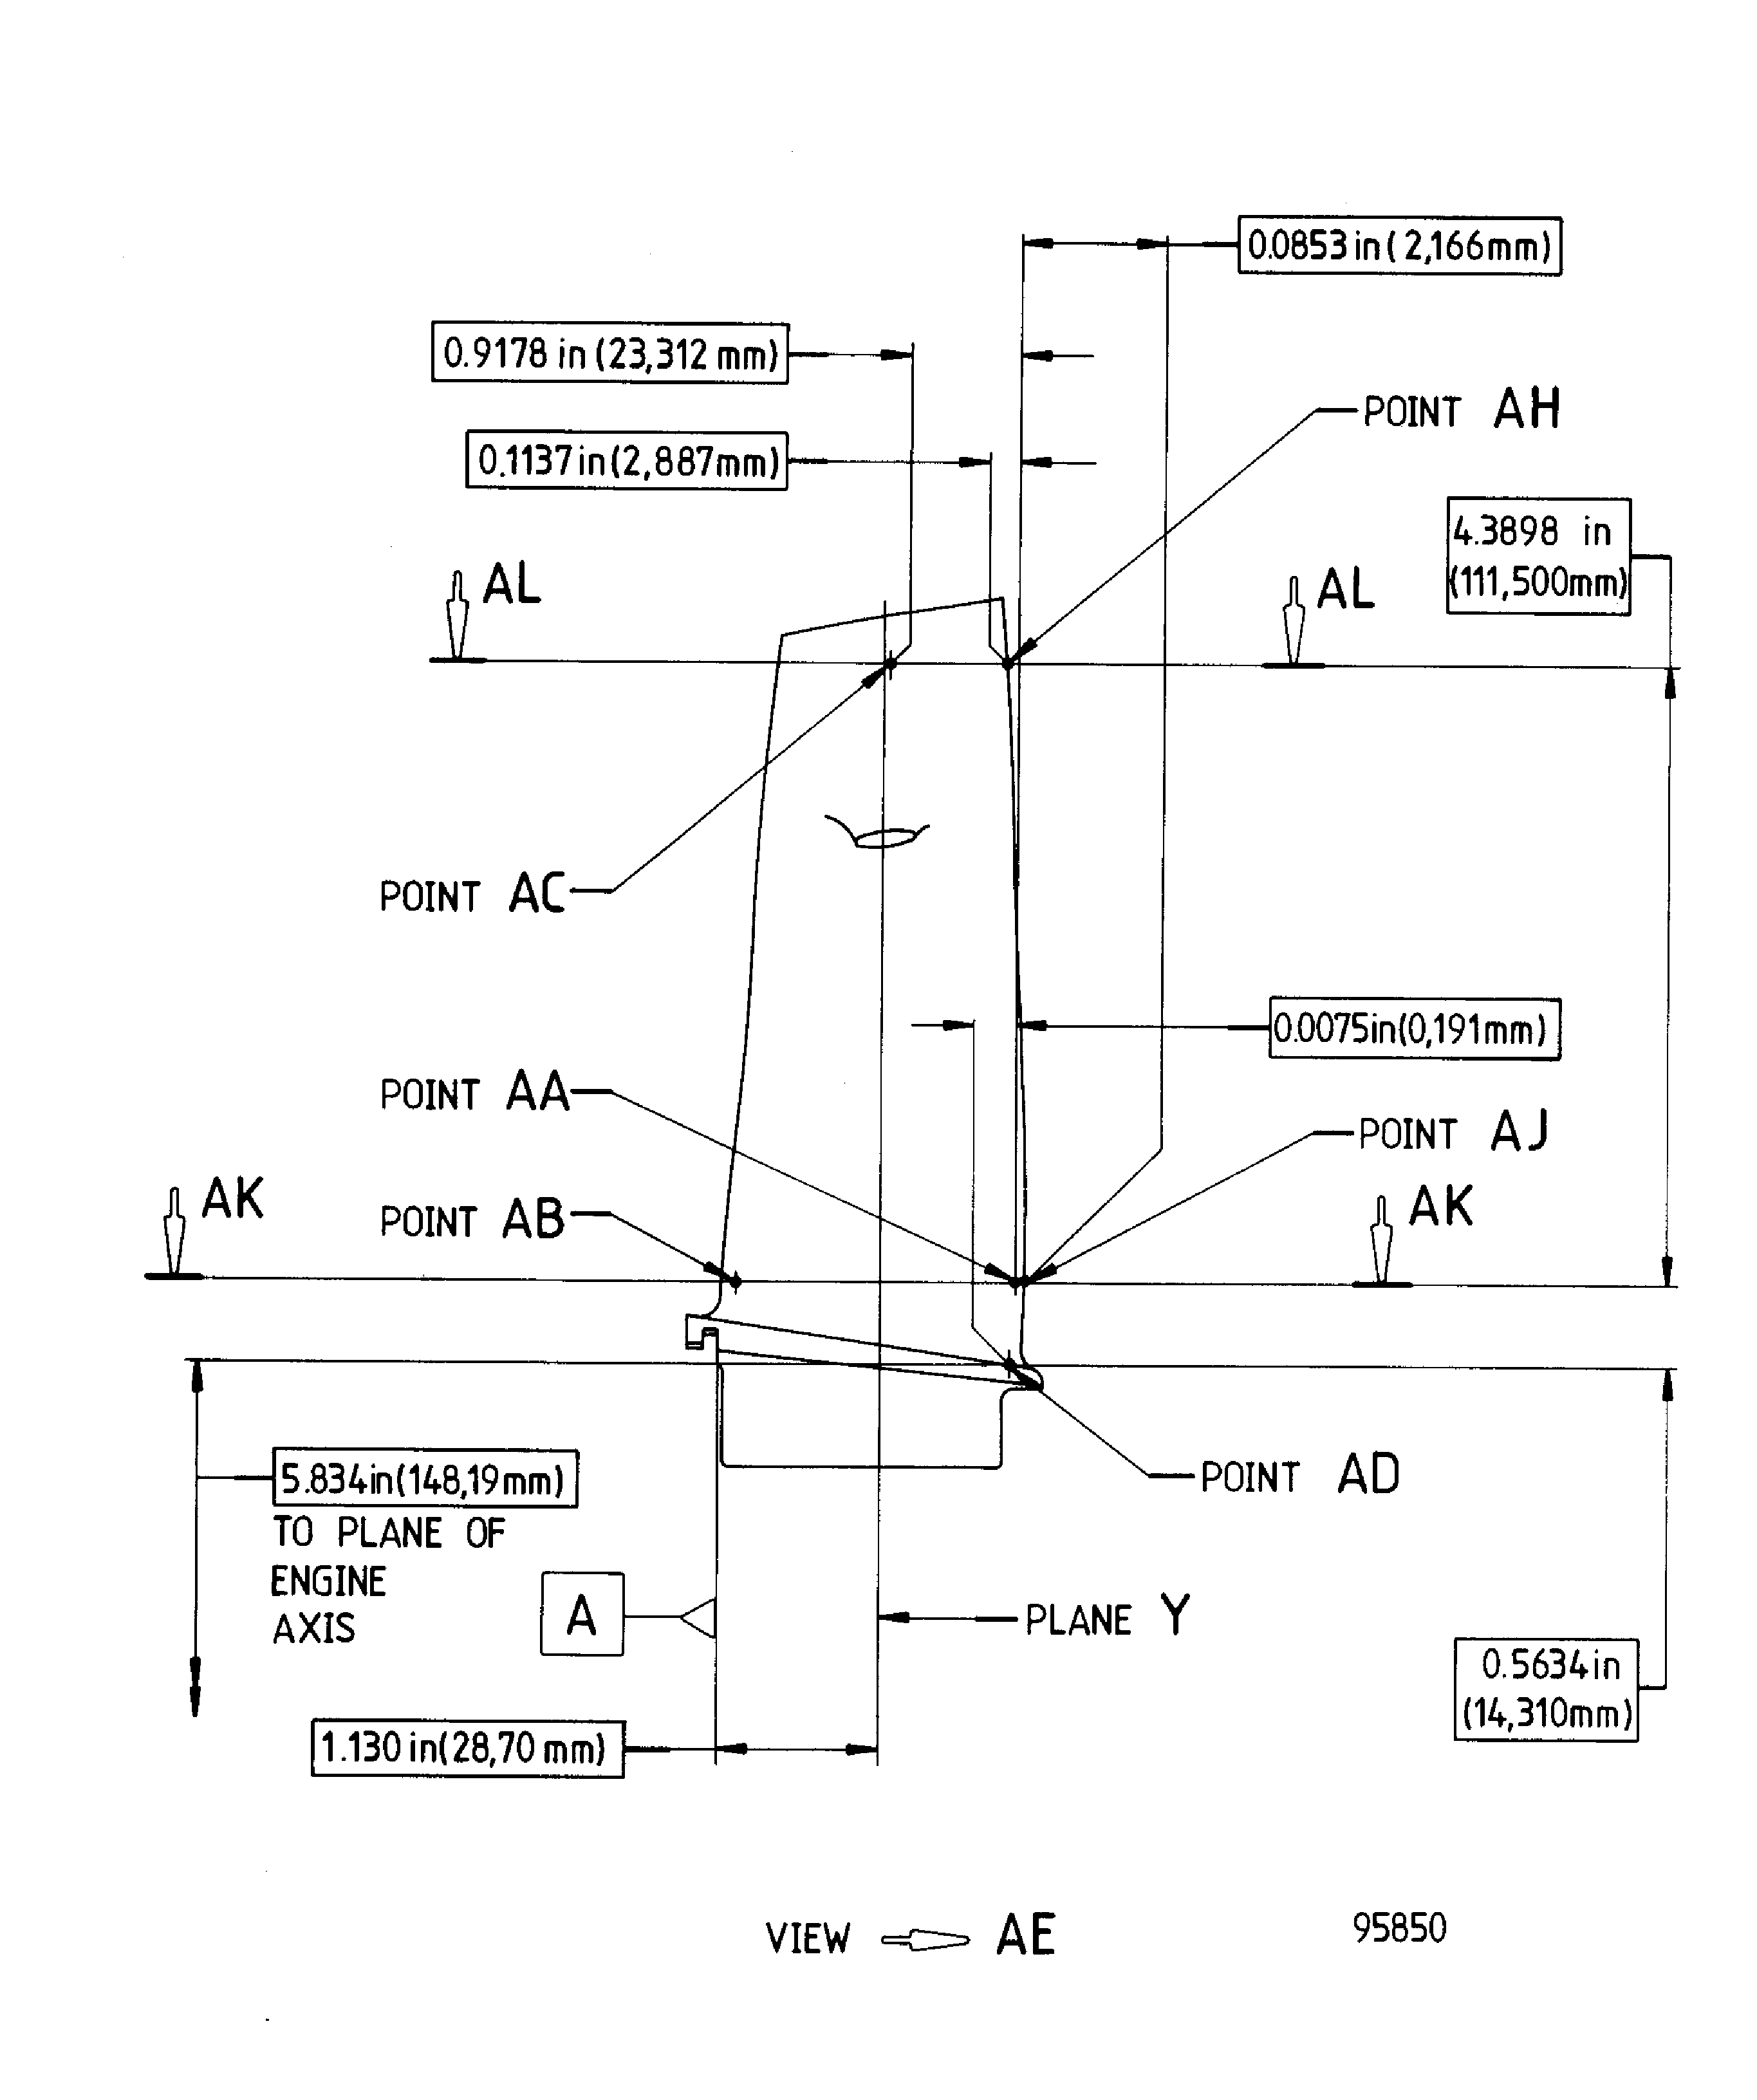
Figure: Repair Details And Dimensions - Assembly D
Repair Details And Dimensions - Assembly D
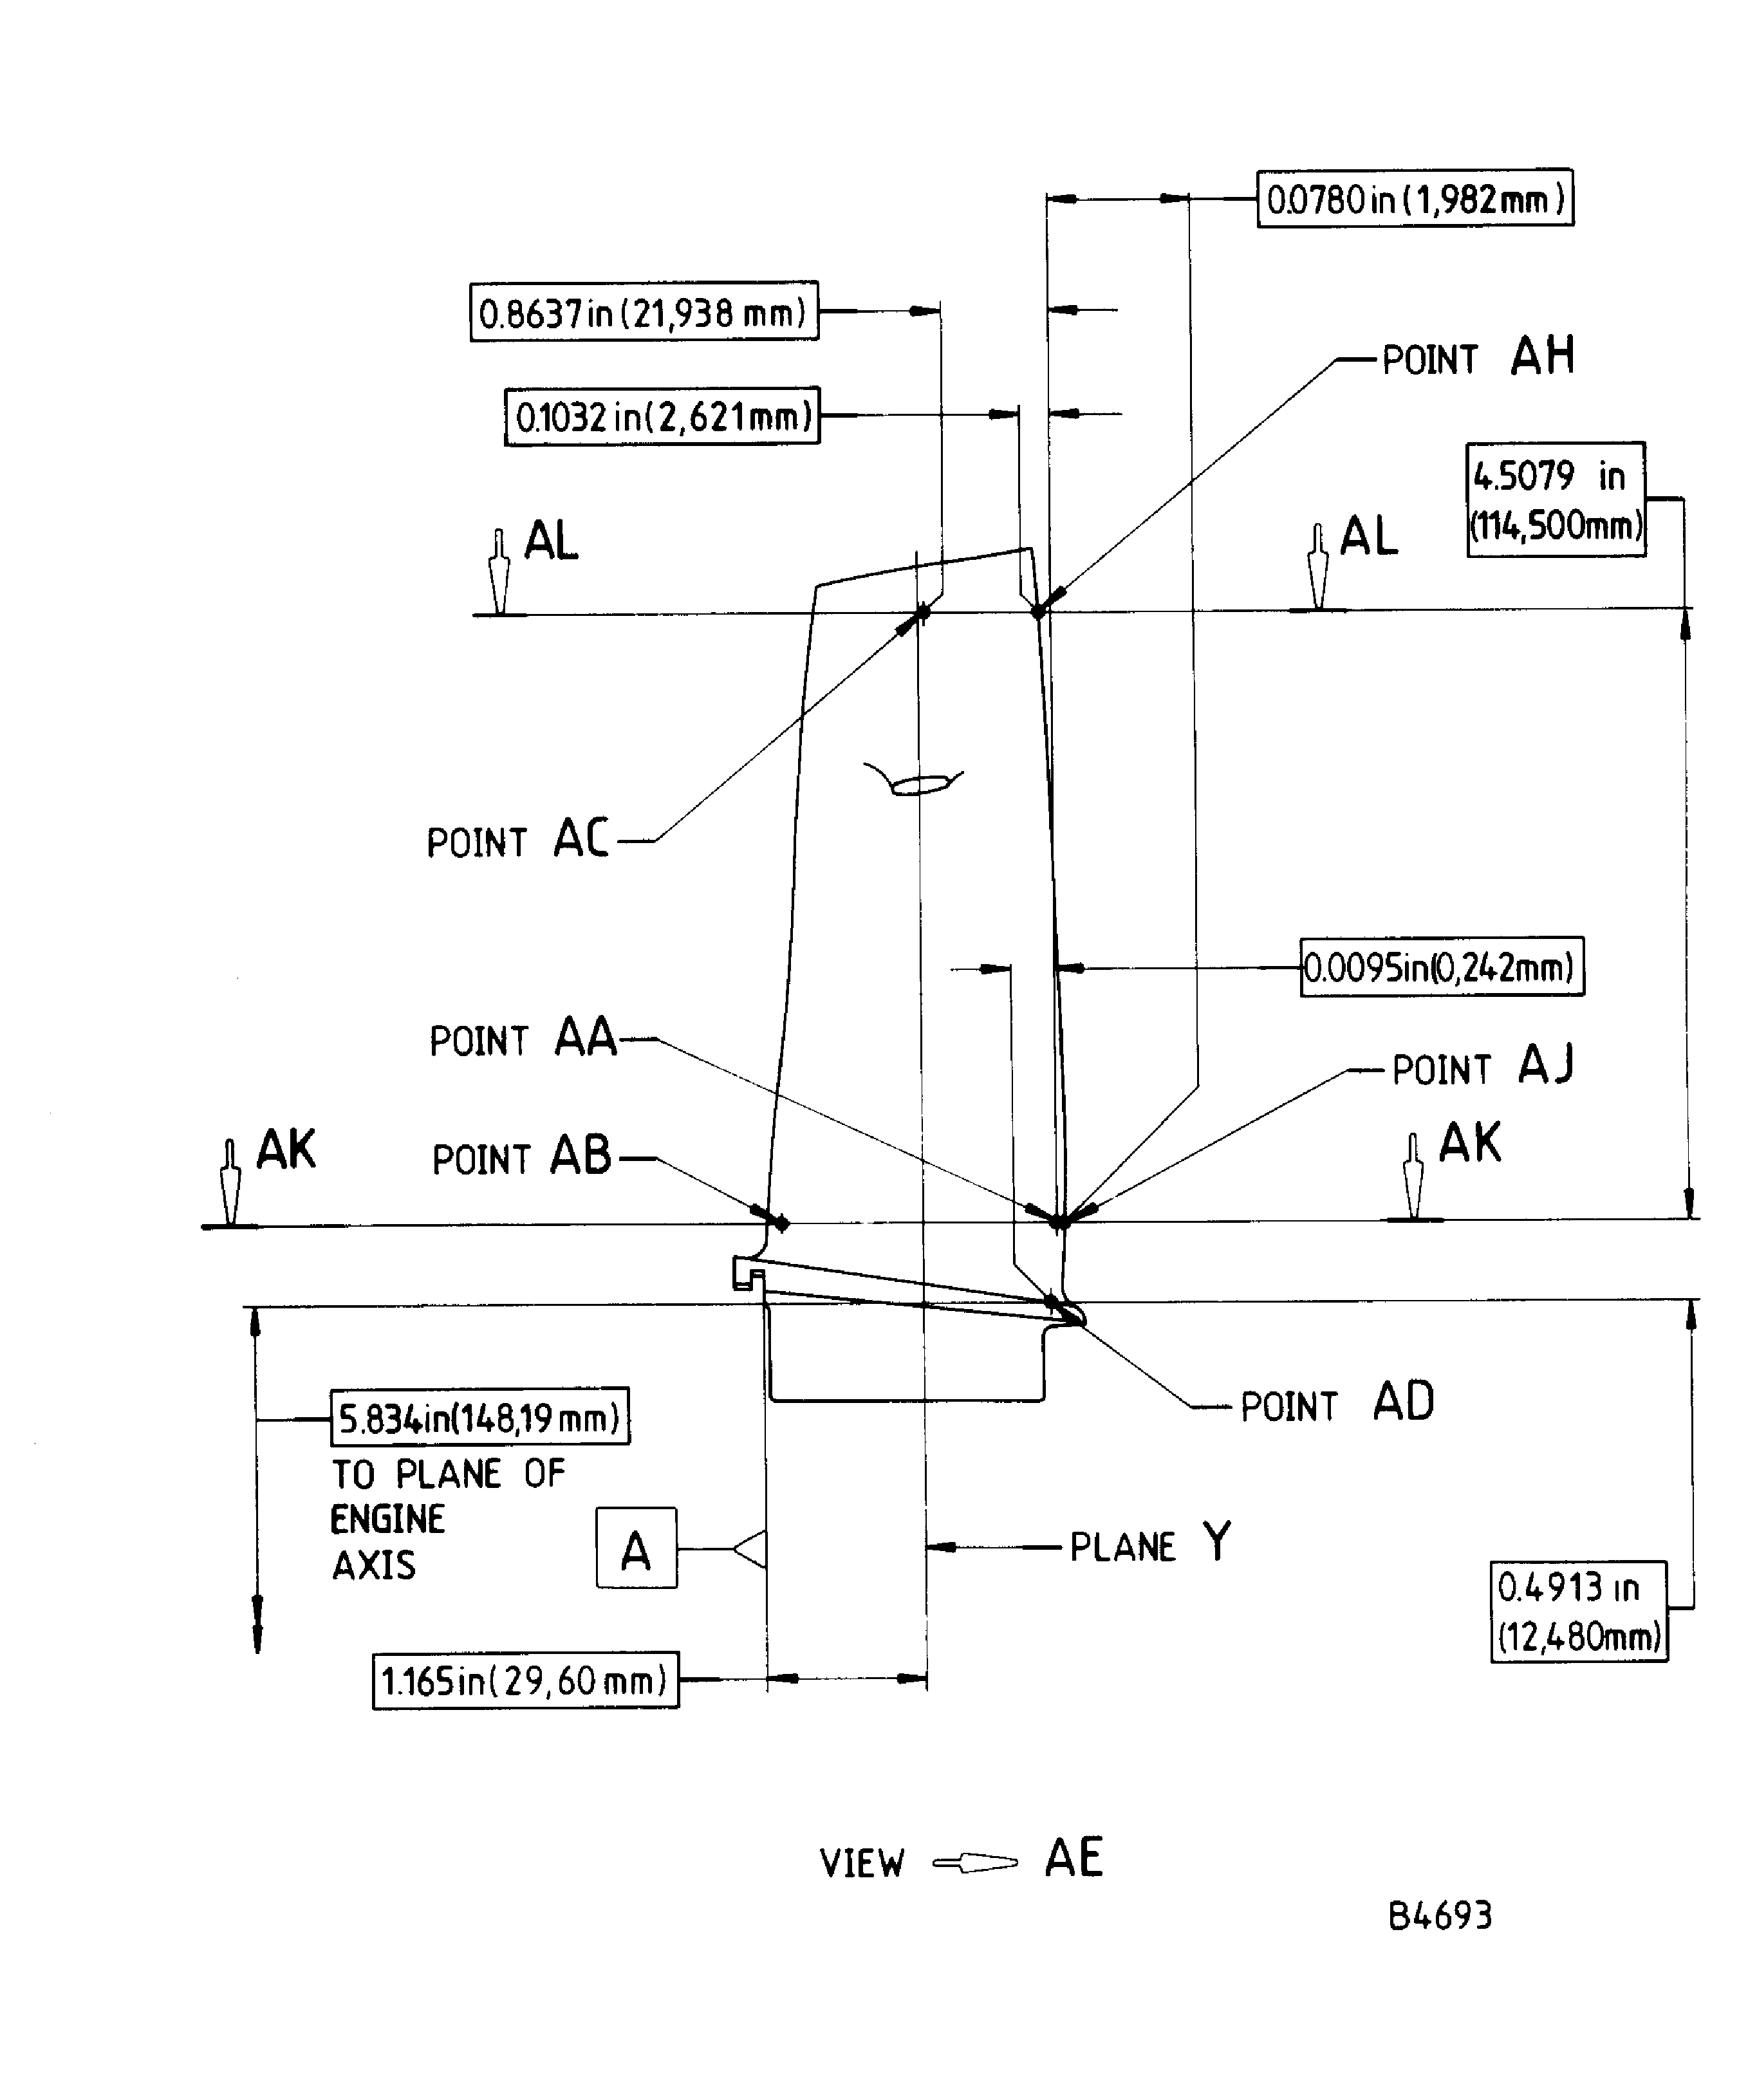
Figure: Repair Details And Dimensions - Assembly A
Repair Details And Dimensions - Assembly A
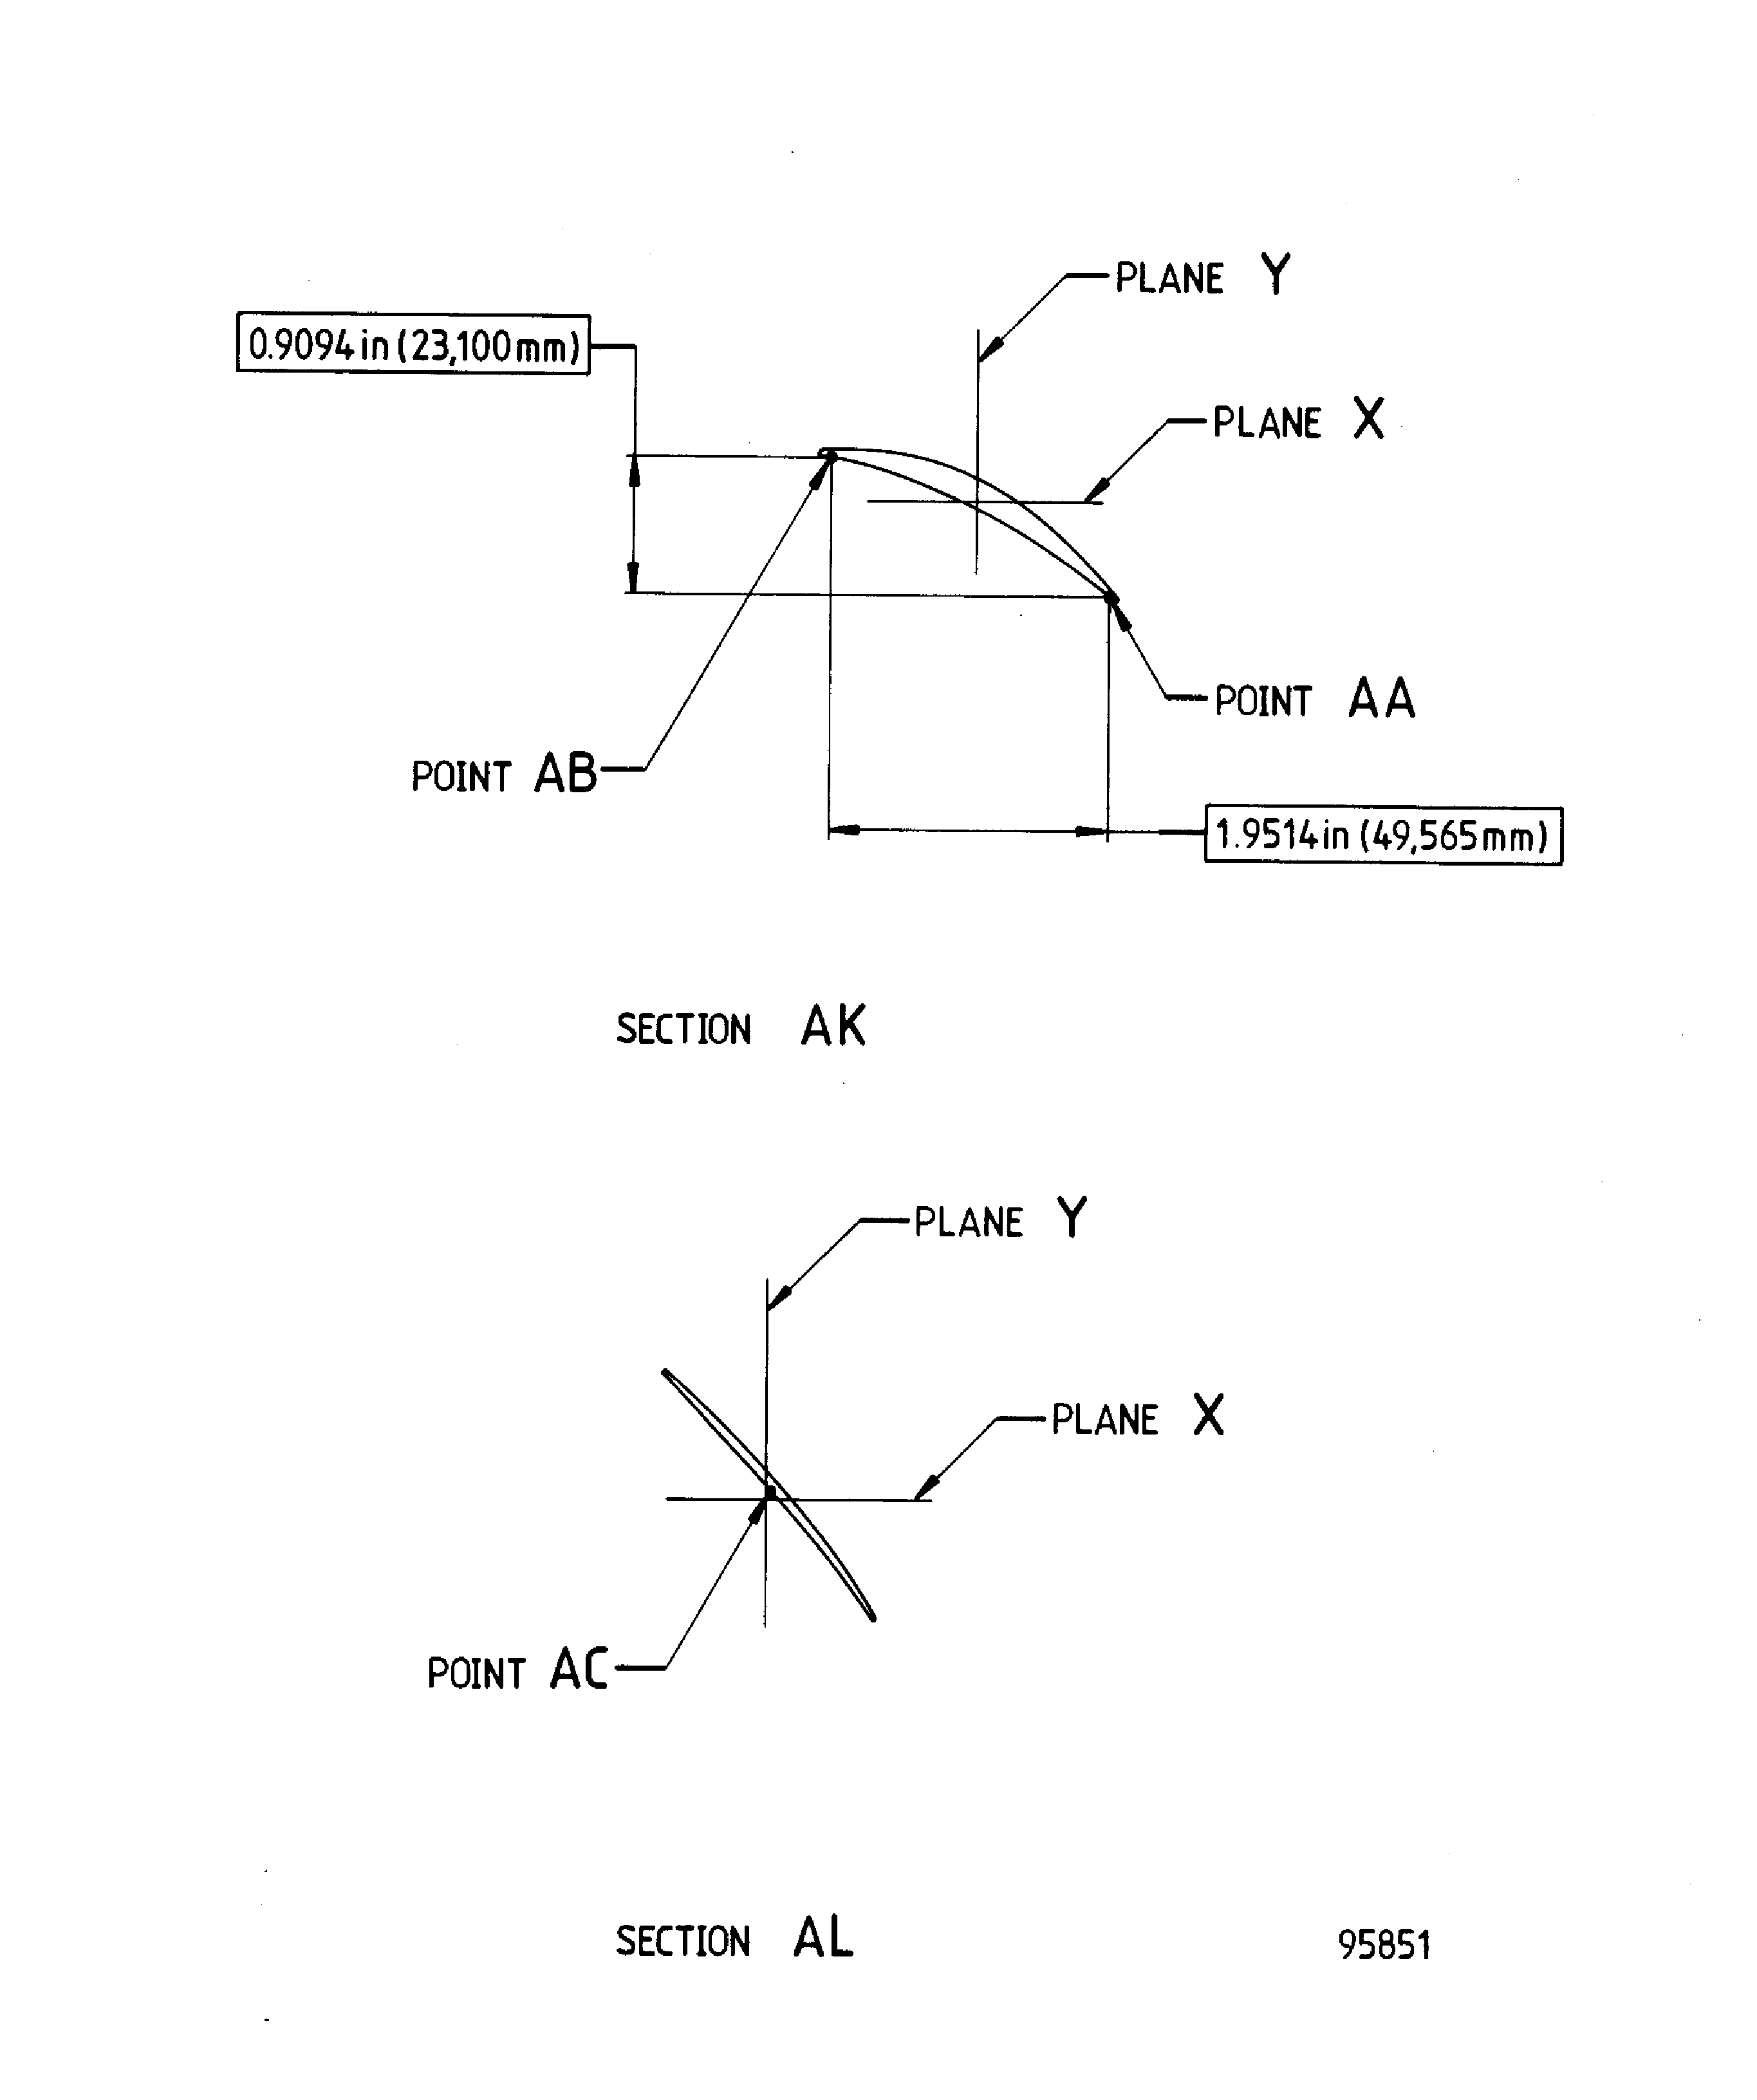
Figure: Repair Details And Dimensions - Assembly D
Repair Details And Dimensions - Assembly D
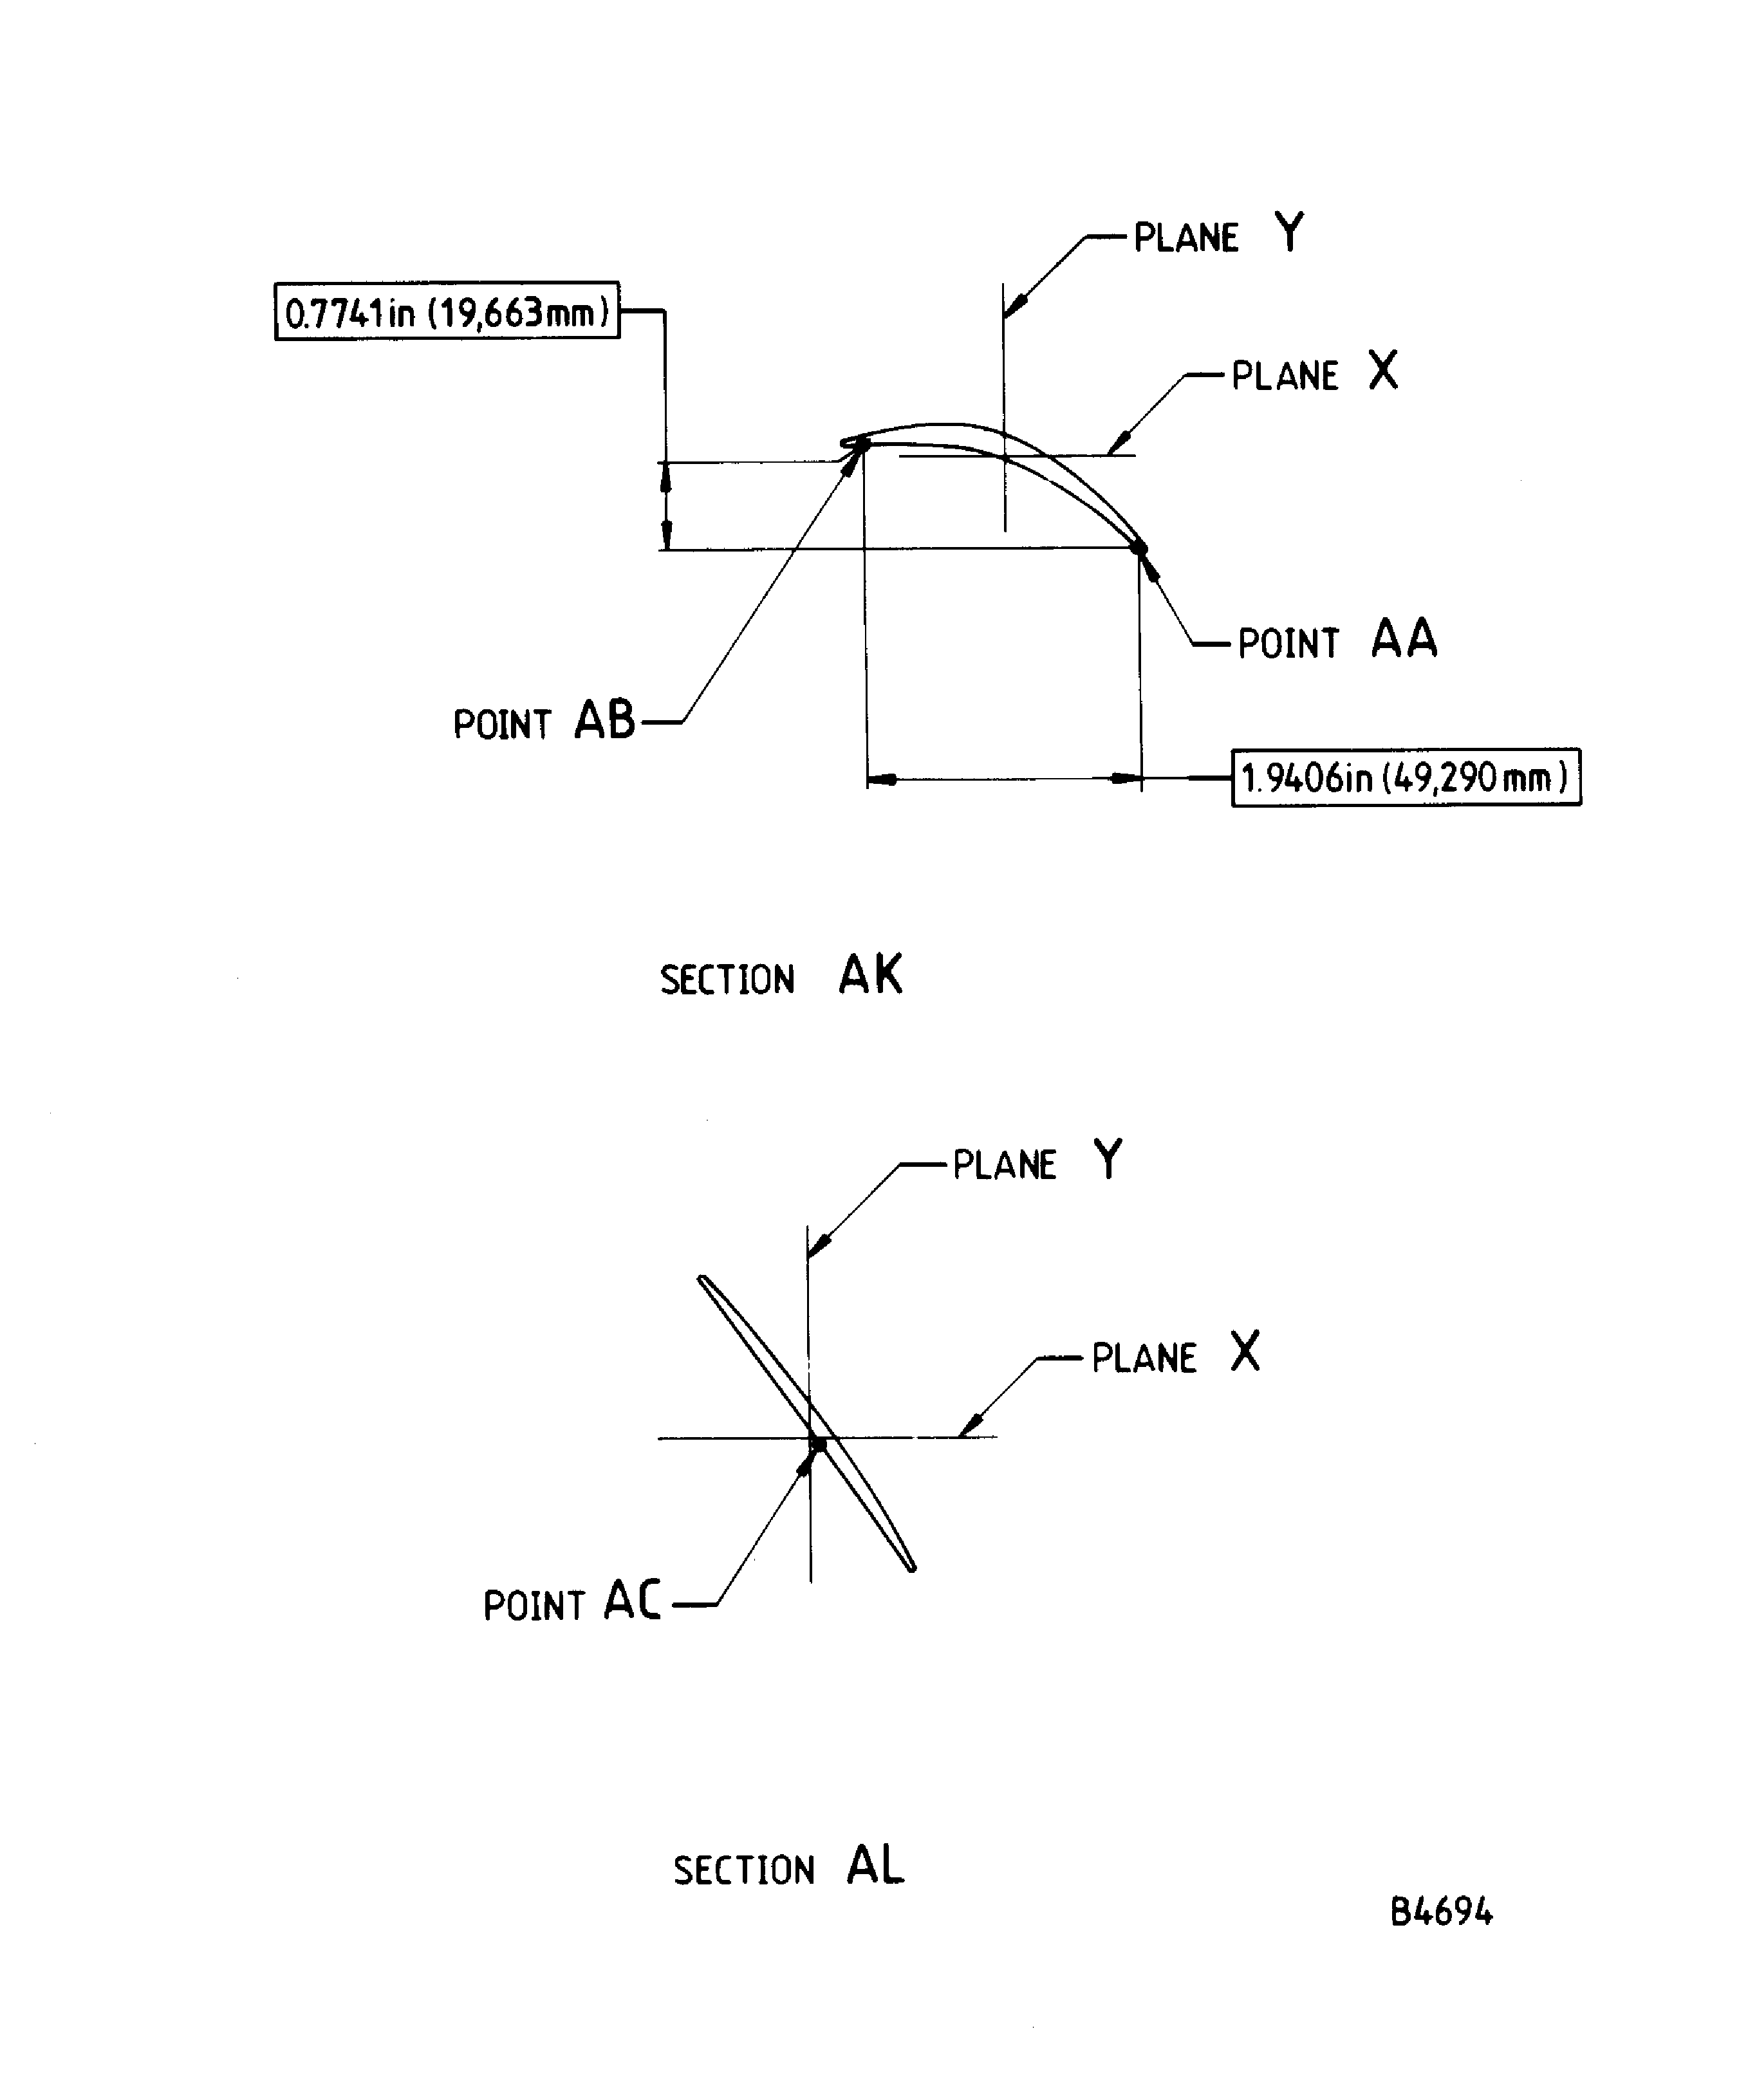
Figure: Repair Details And Dimensions - Assembly A And Assembly D
Repair Details And Dimensions - Assembly A And Assembly D
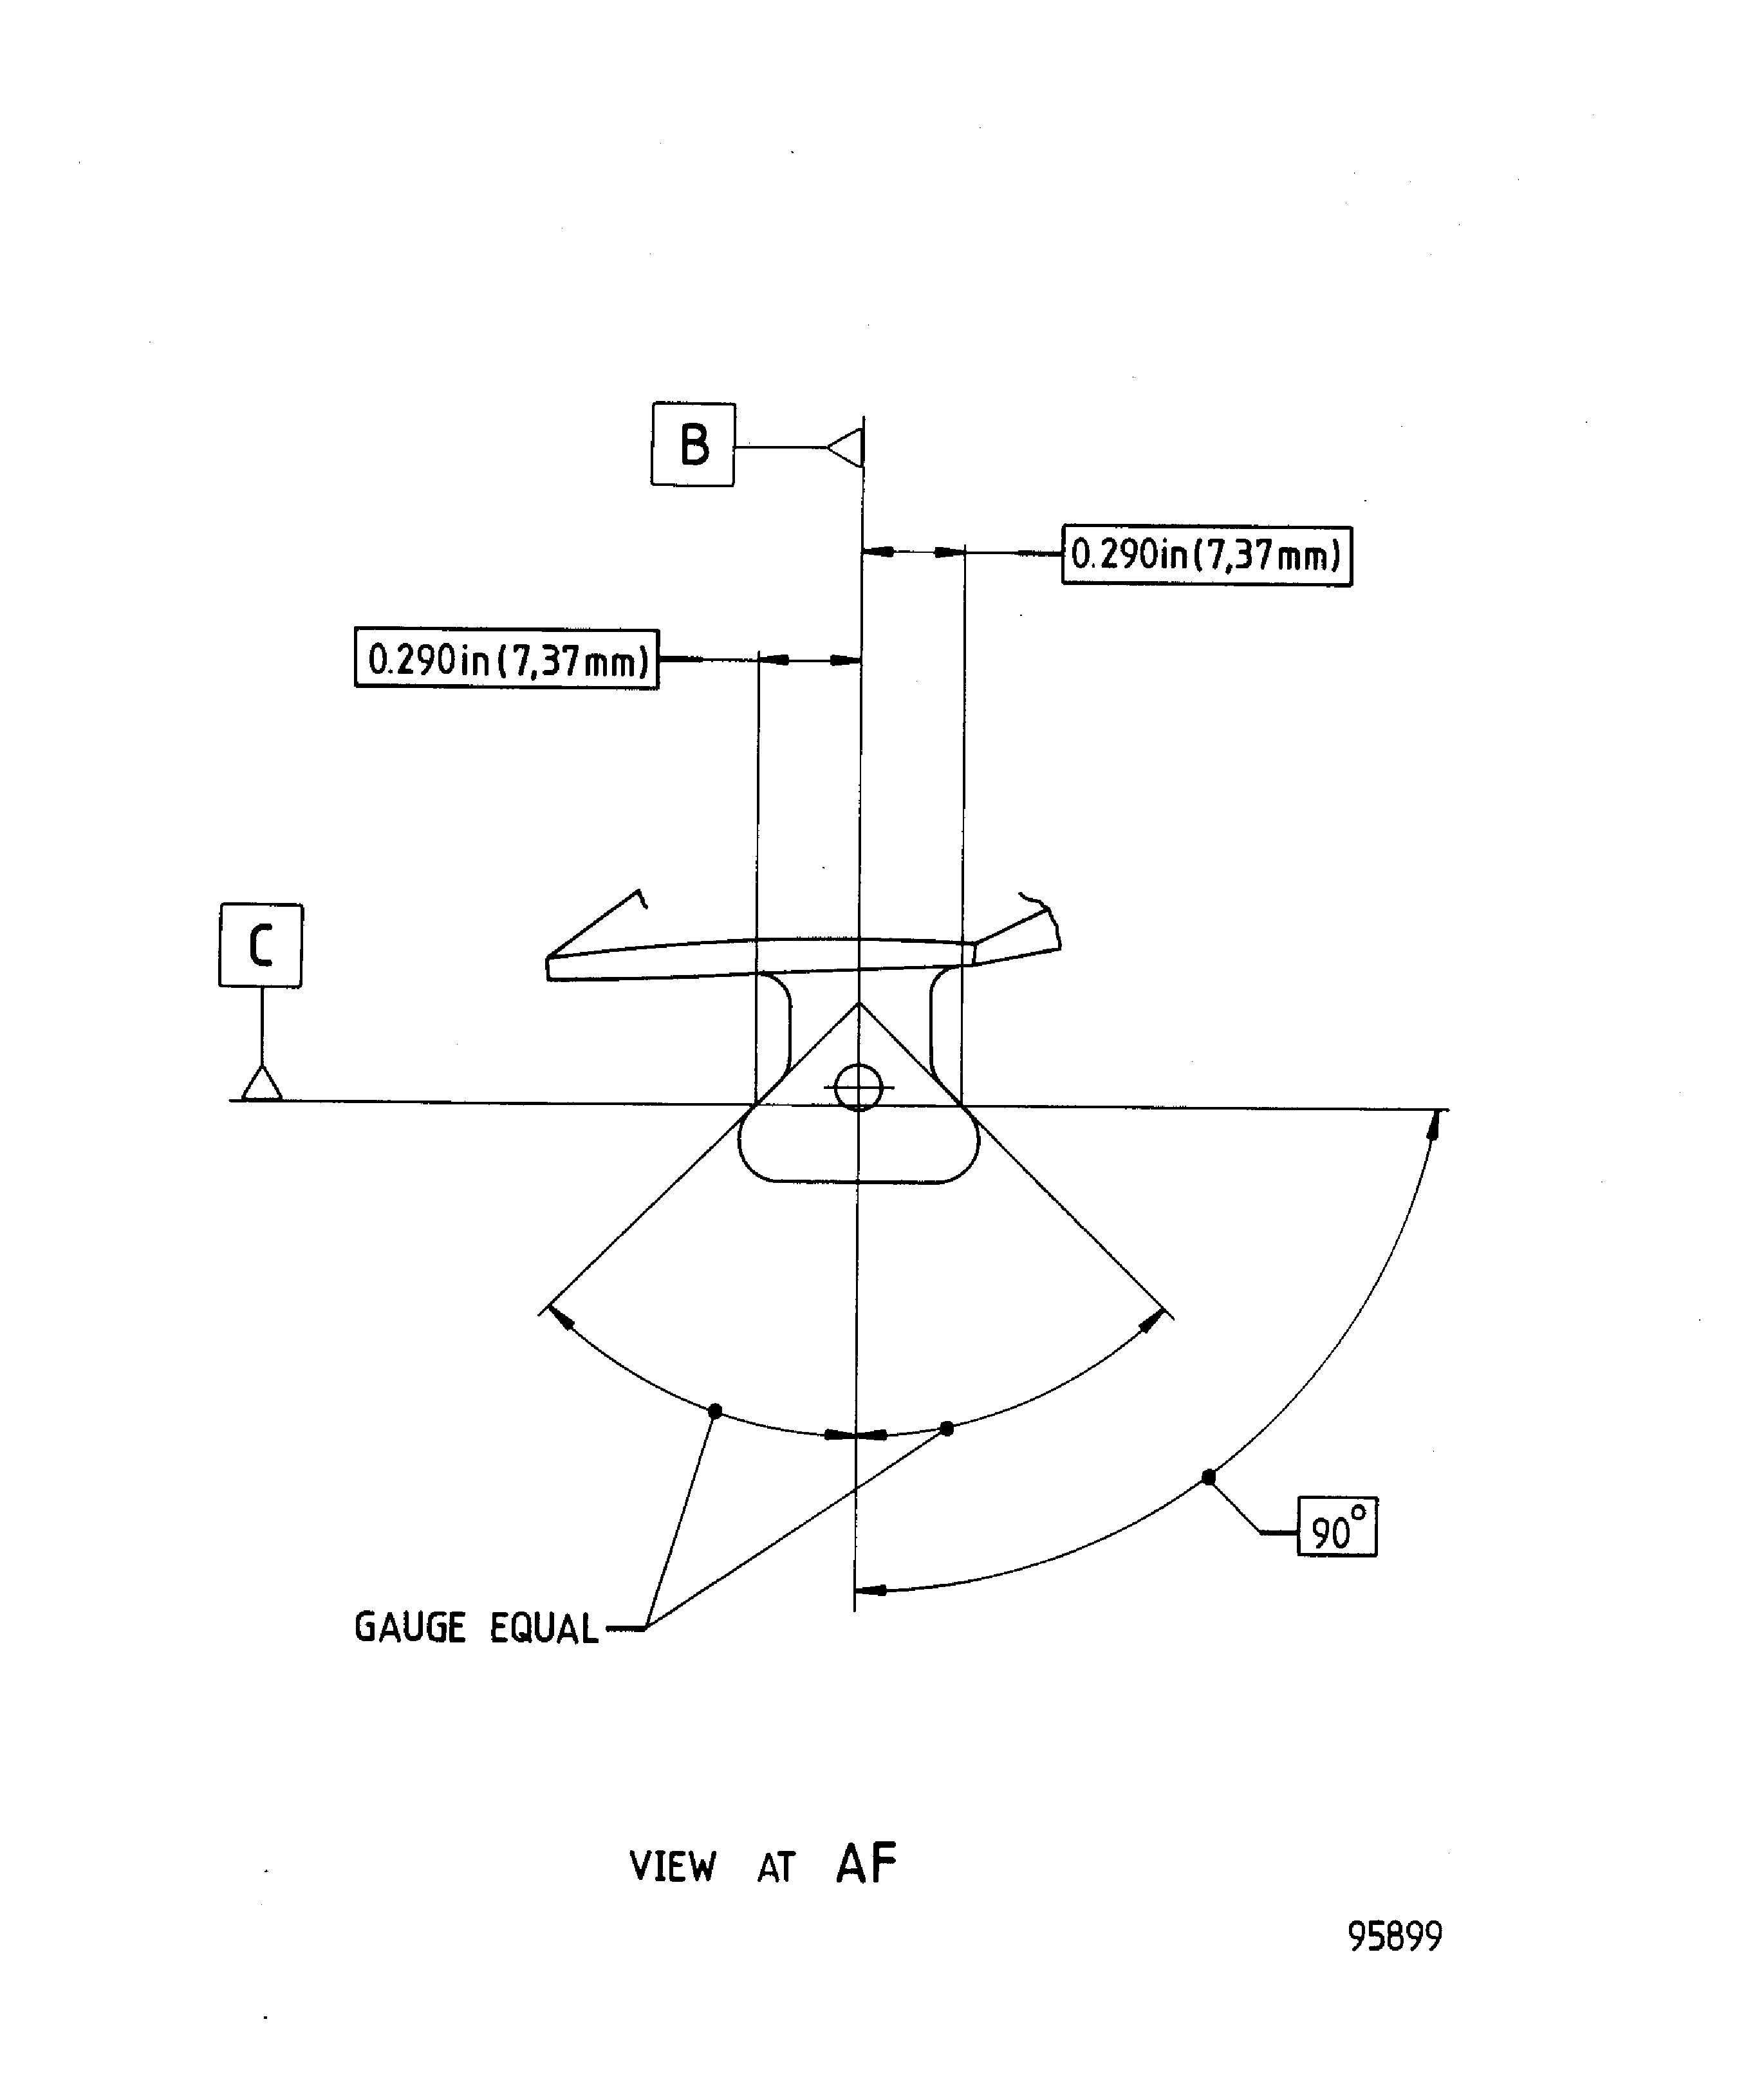
Figure: Repair Details And Dimensions - Assembly A
Repair Details And Dimensions - Assembly A
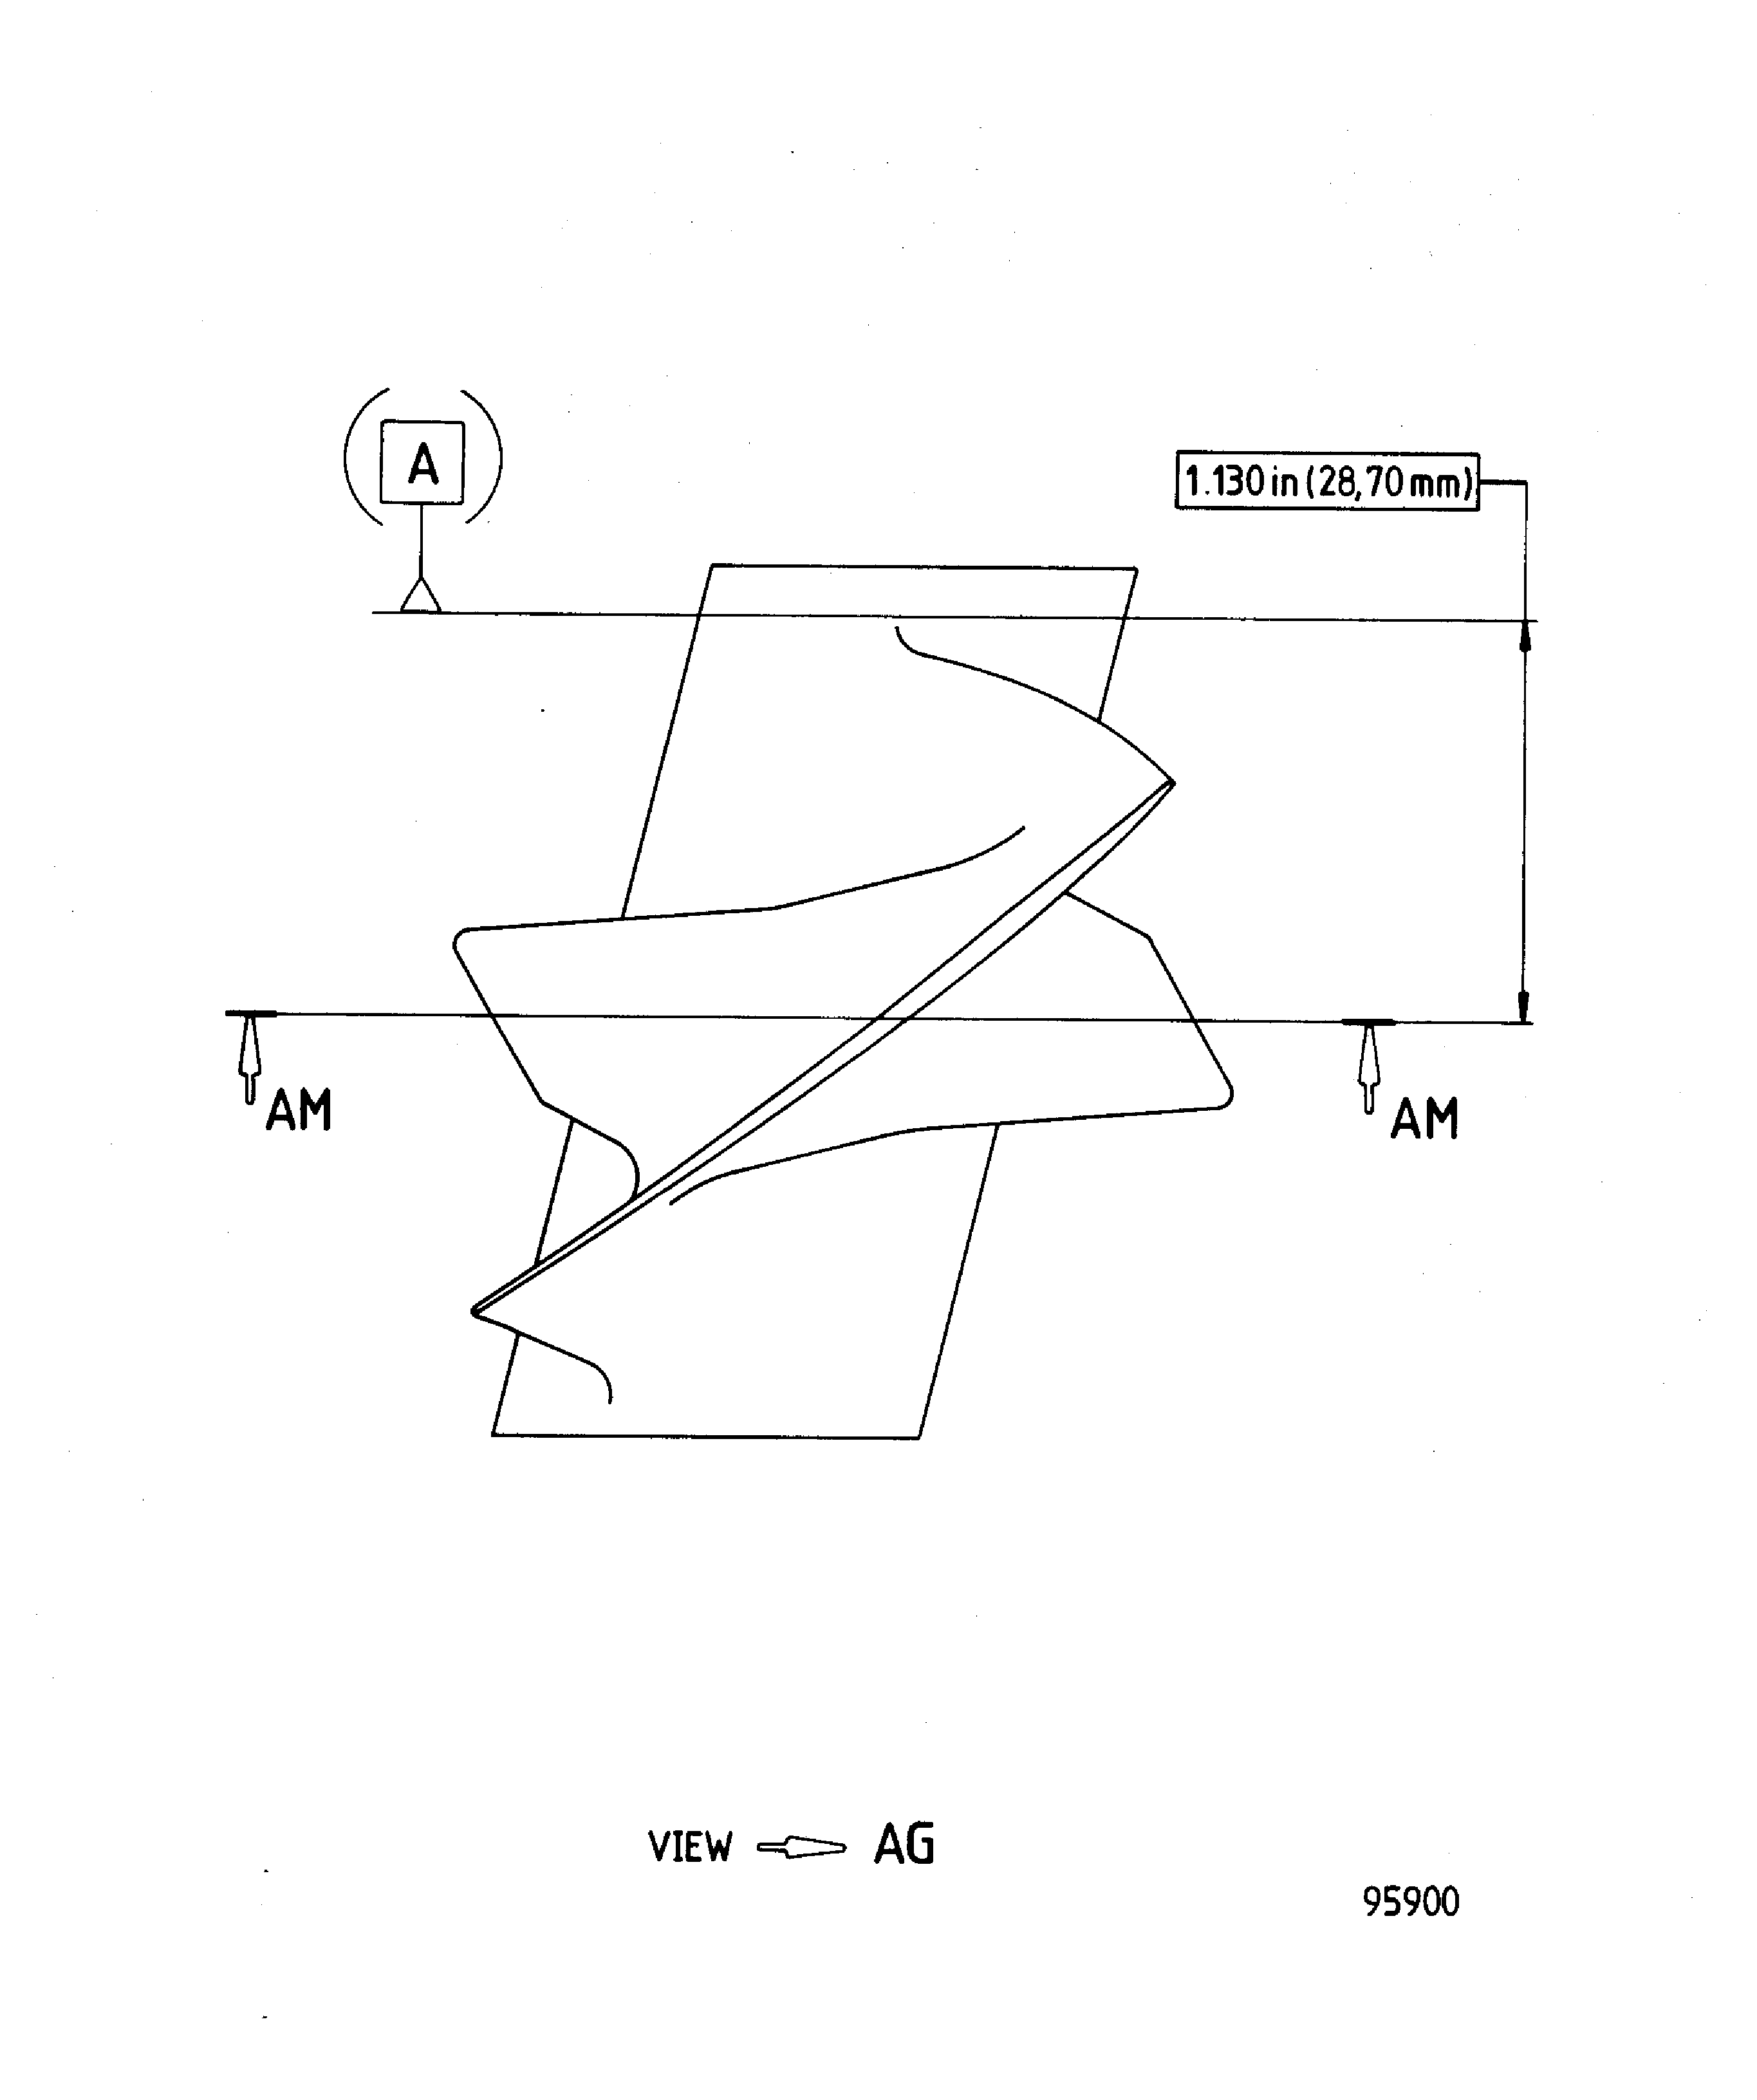
Figure: Repair Details And Dimensions - Assembly D
Repair Details And Dimensions - Assembly D
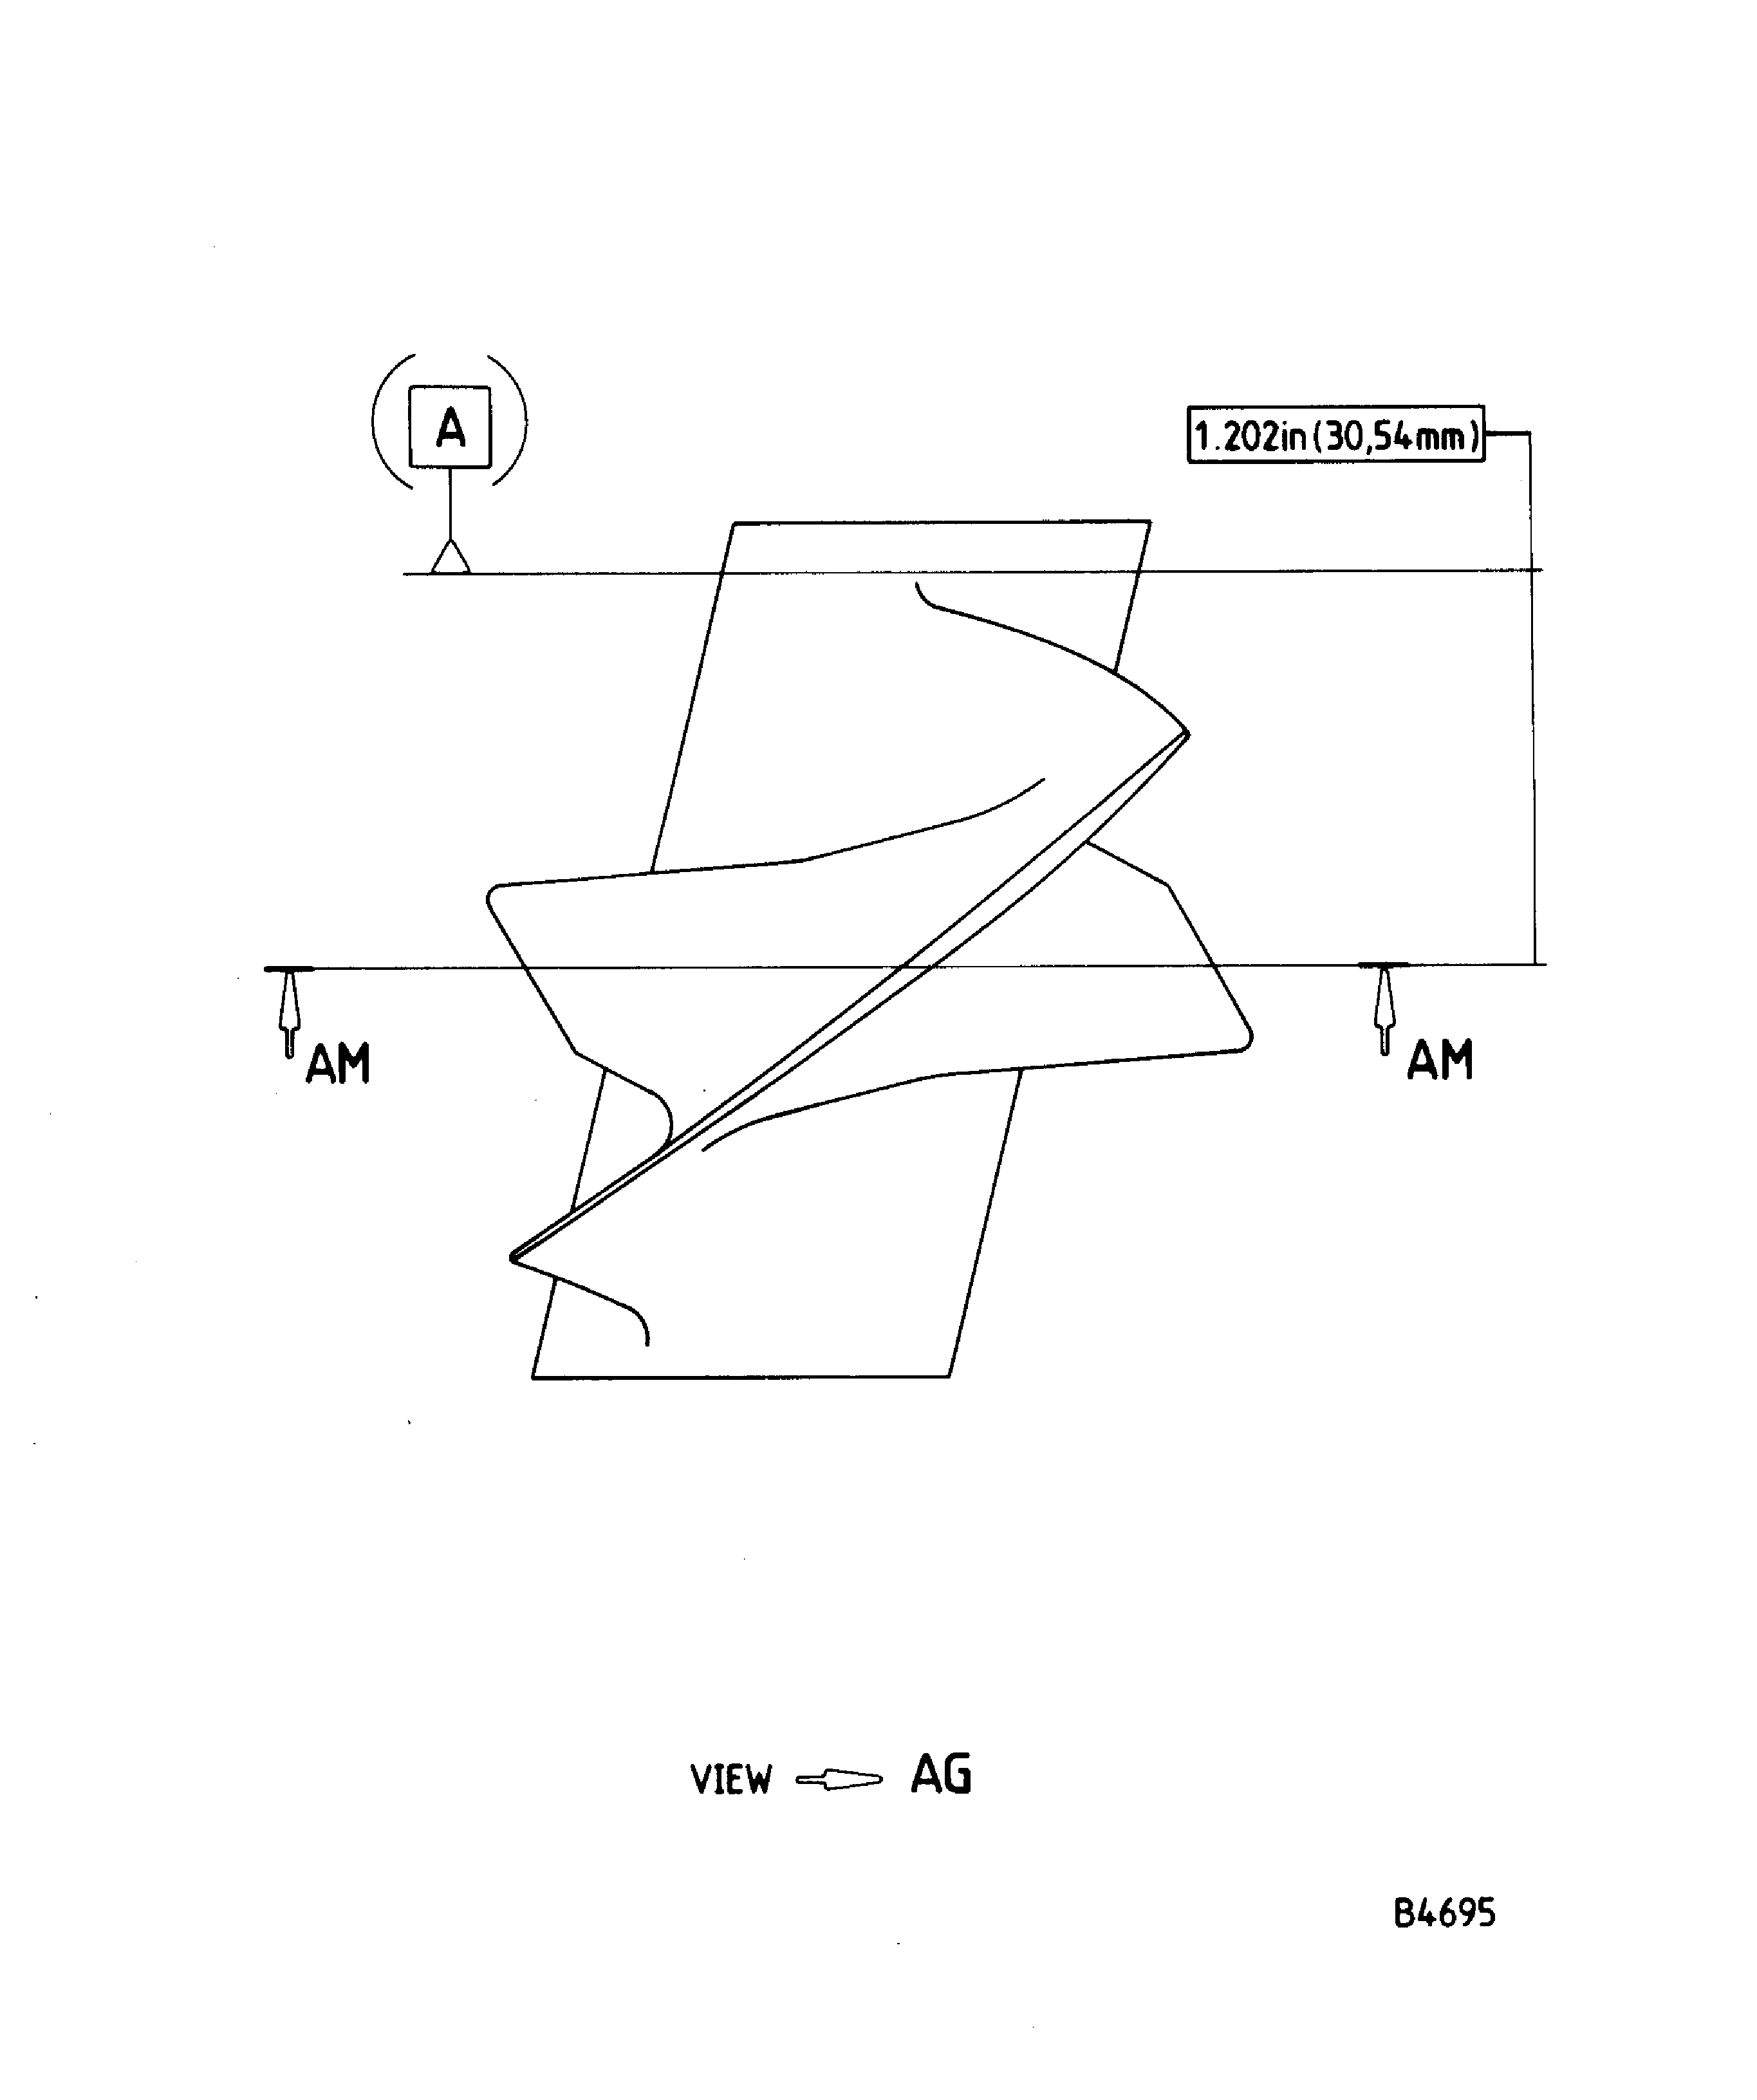
Figure: Repair Details And Dimensions - Assembly A
Repair Details And Dimensions - Assembly A
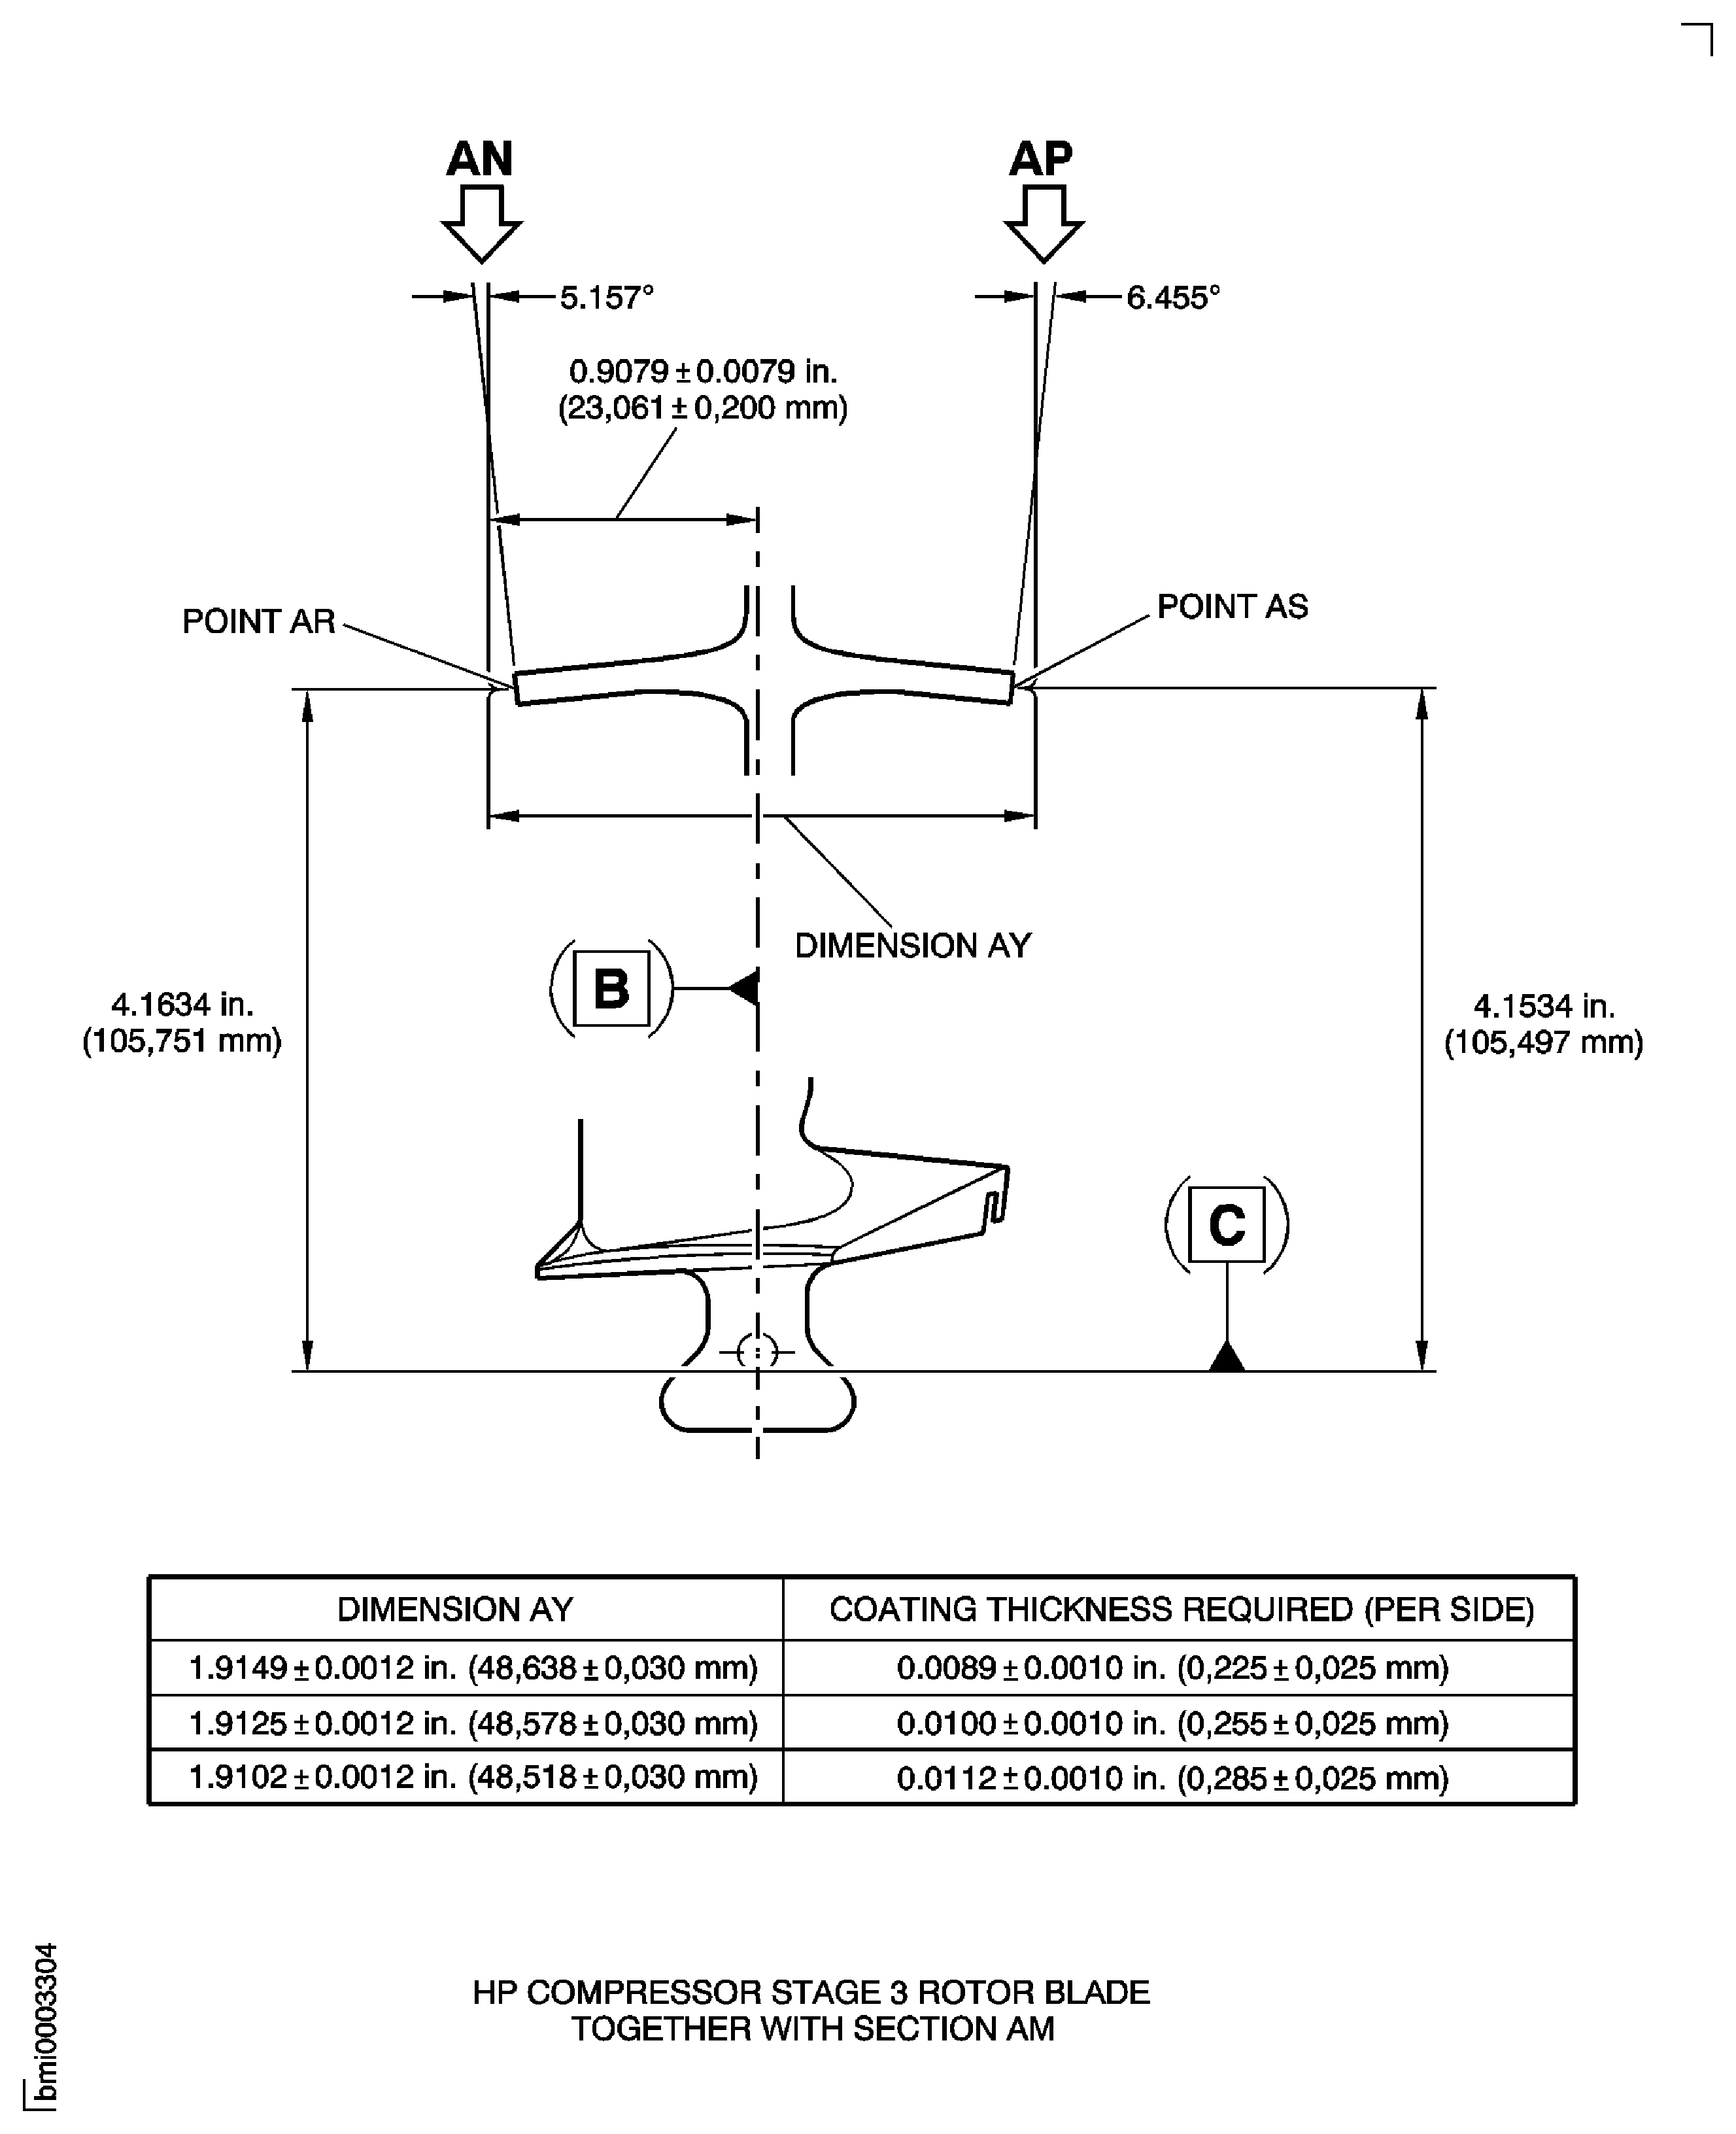
Figure: Repair Details And Dimensions - Assembly B And Assembly C (Deleted)
Repair Details And Dimensions - Assembly B And Assembly C (Deleted)

Figure: Repair Details And Dimensions - Assembly D
Repair Details And Dimensions - Assembly D
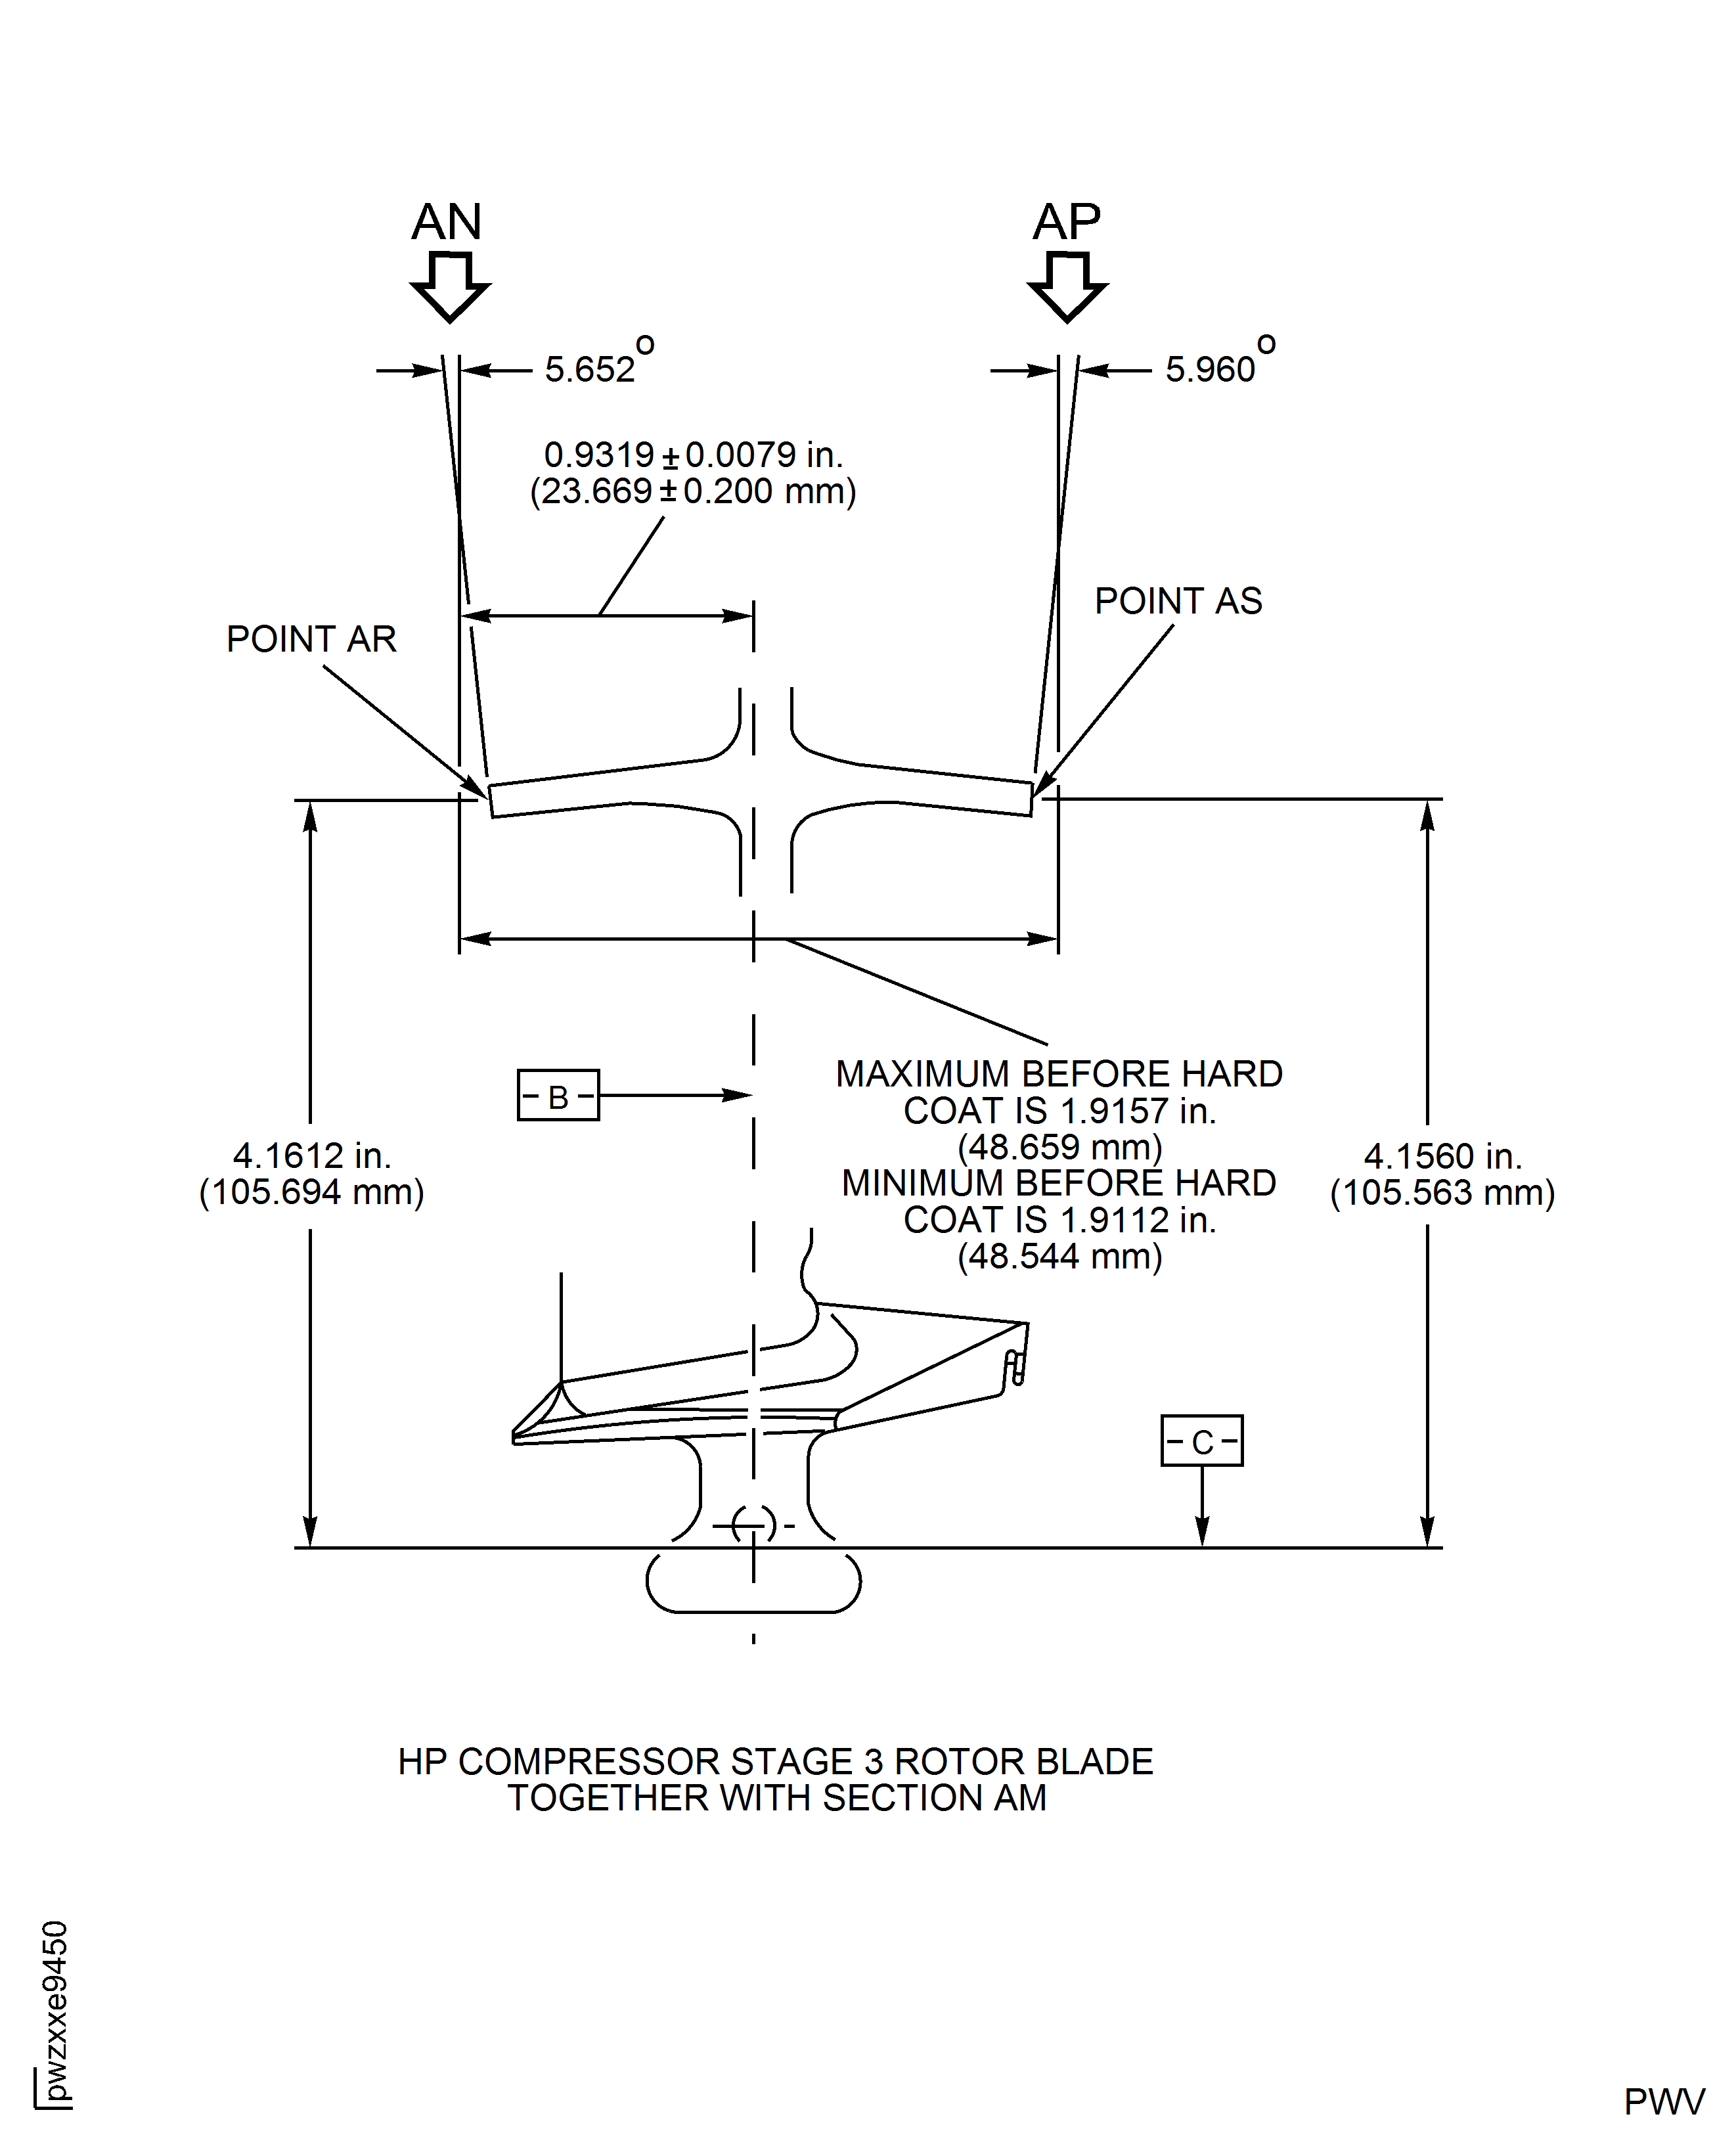
Figure: Repair Details And Dimensions - Assembly A And Assembly D
Repair Details And Dimensions - Assembly A And Assembly D
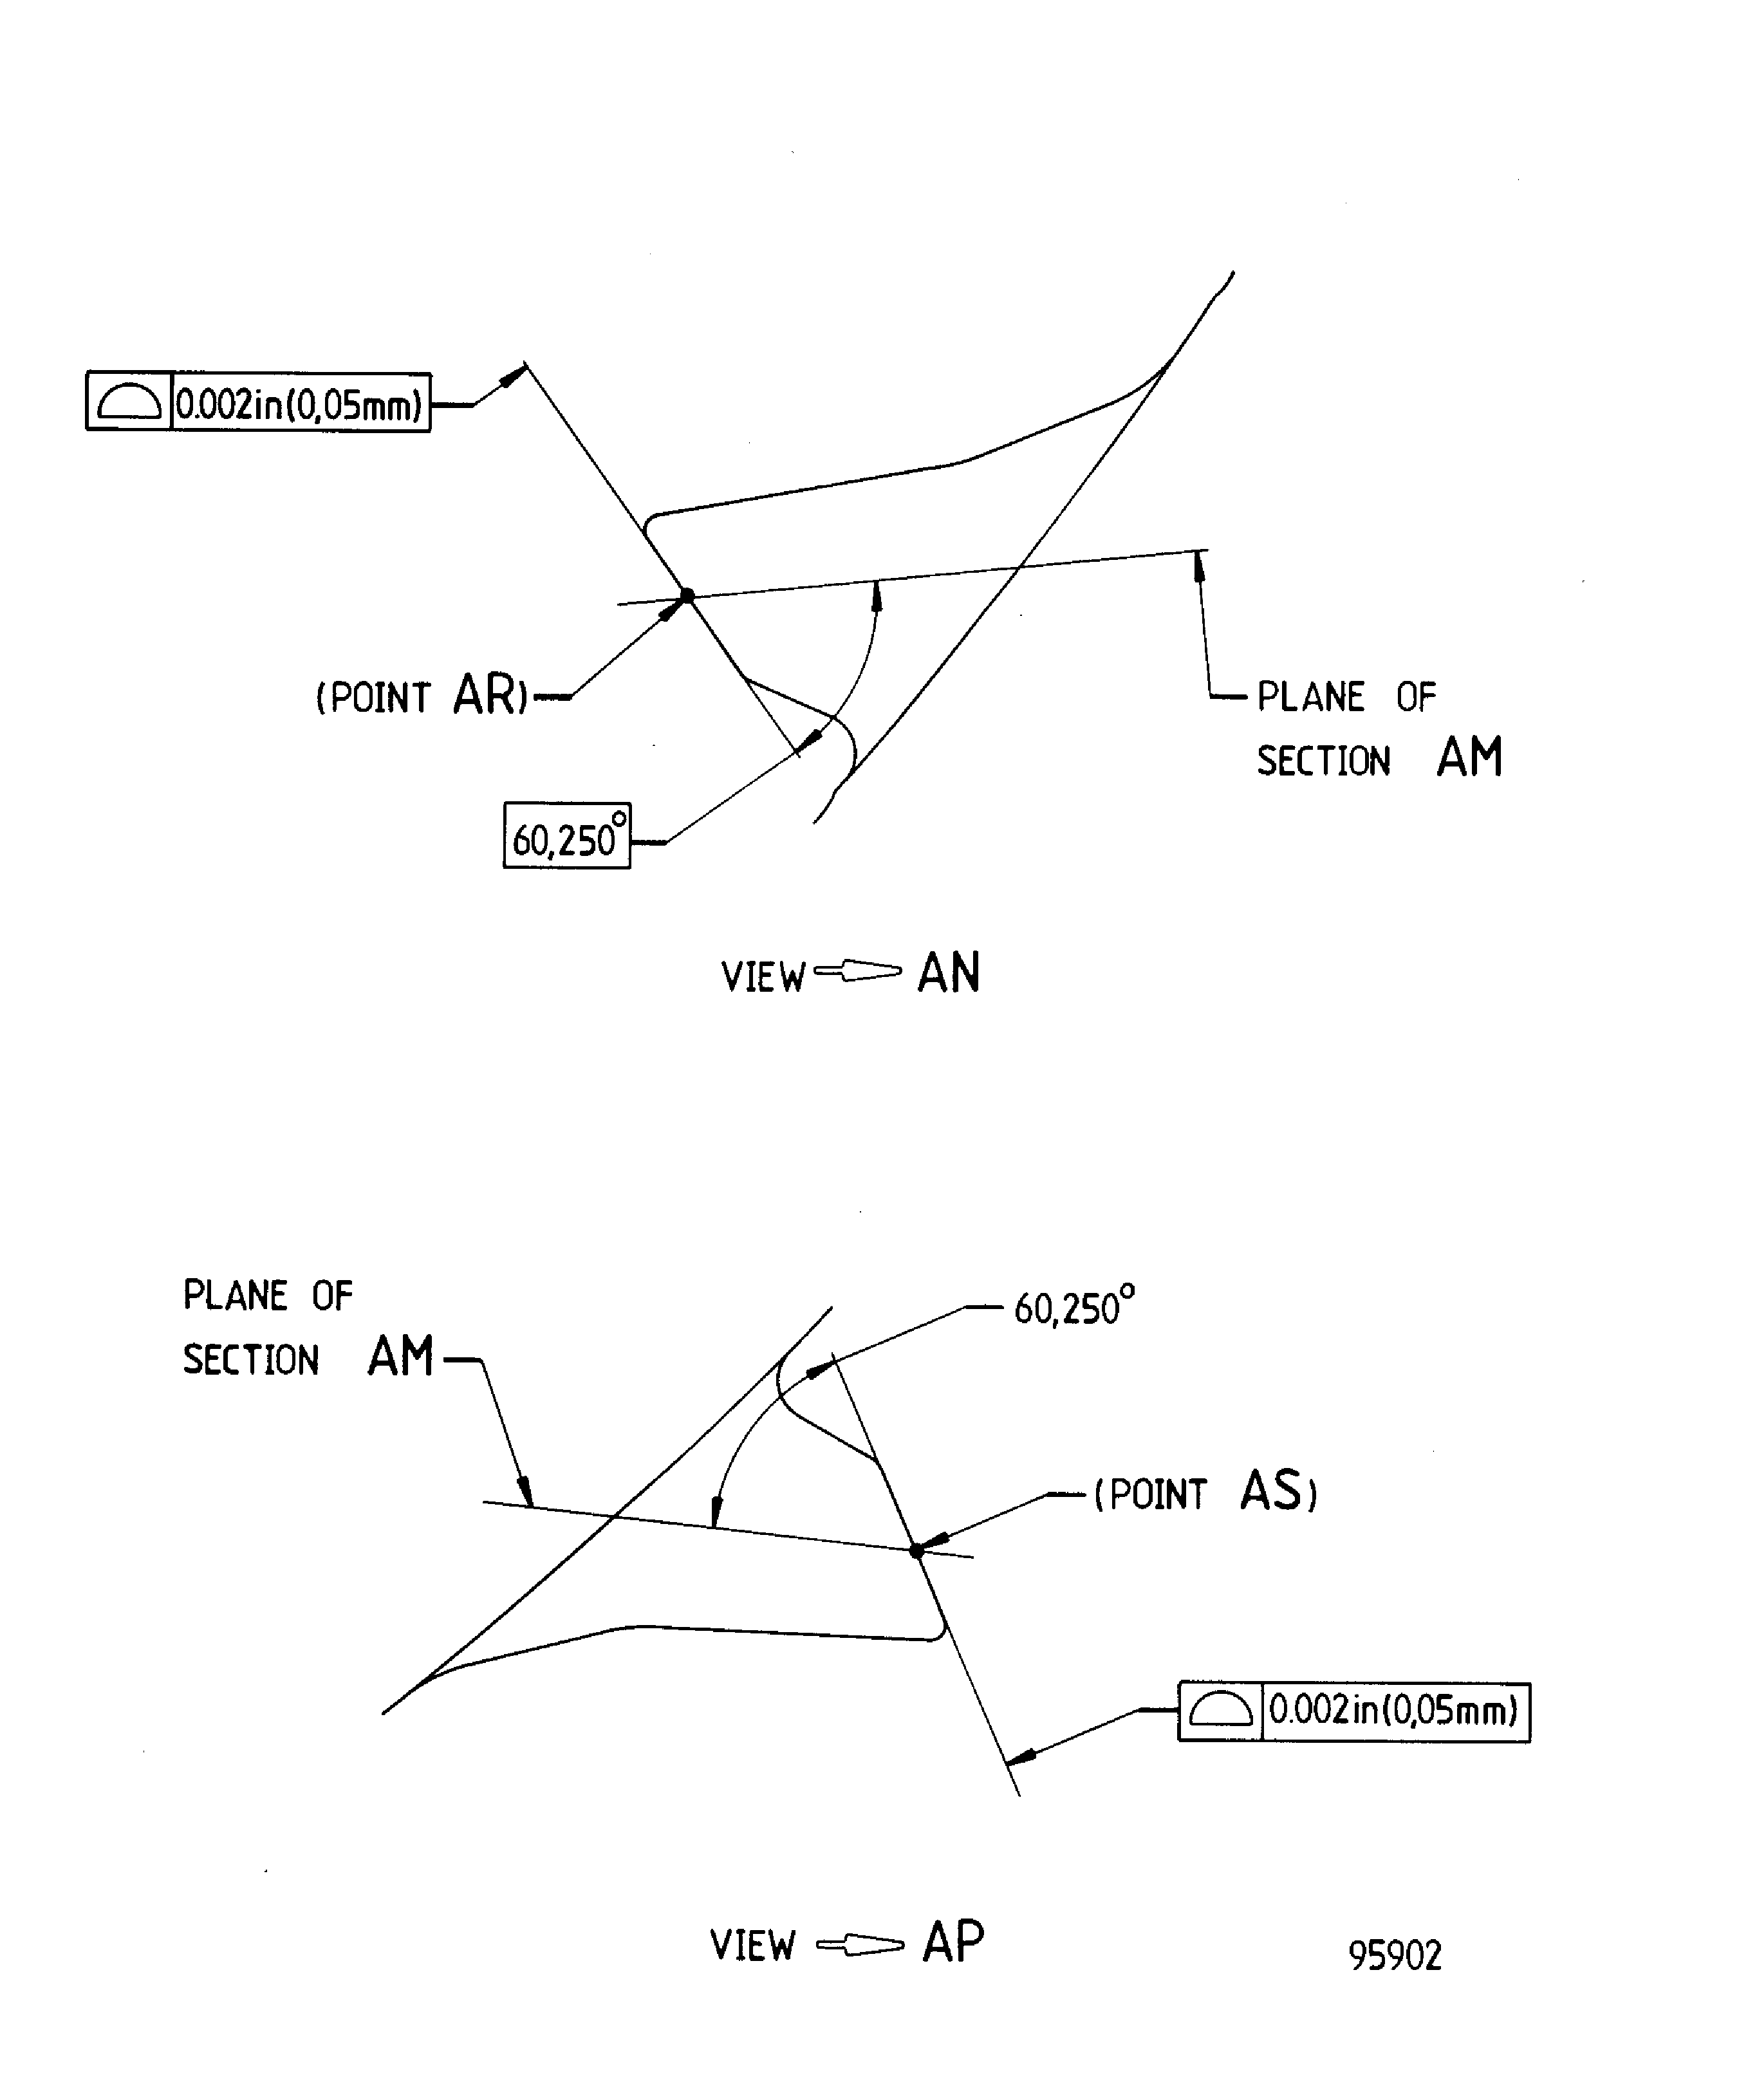
Figure: Repair Details And Dimensions - Assembly A
Repair Details And Dimensions - Assembly A

Figure: Repair Details And Dimensions - Assembly C (Deleted)
Repair Details And Dimensions - Assembly C (Deleted)

Figure: Repair Details And Dimensions - Assembly D
Repair Details And Dimensions - Assembly D
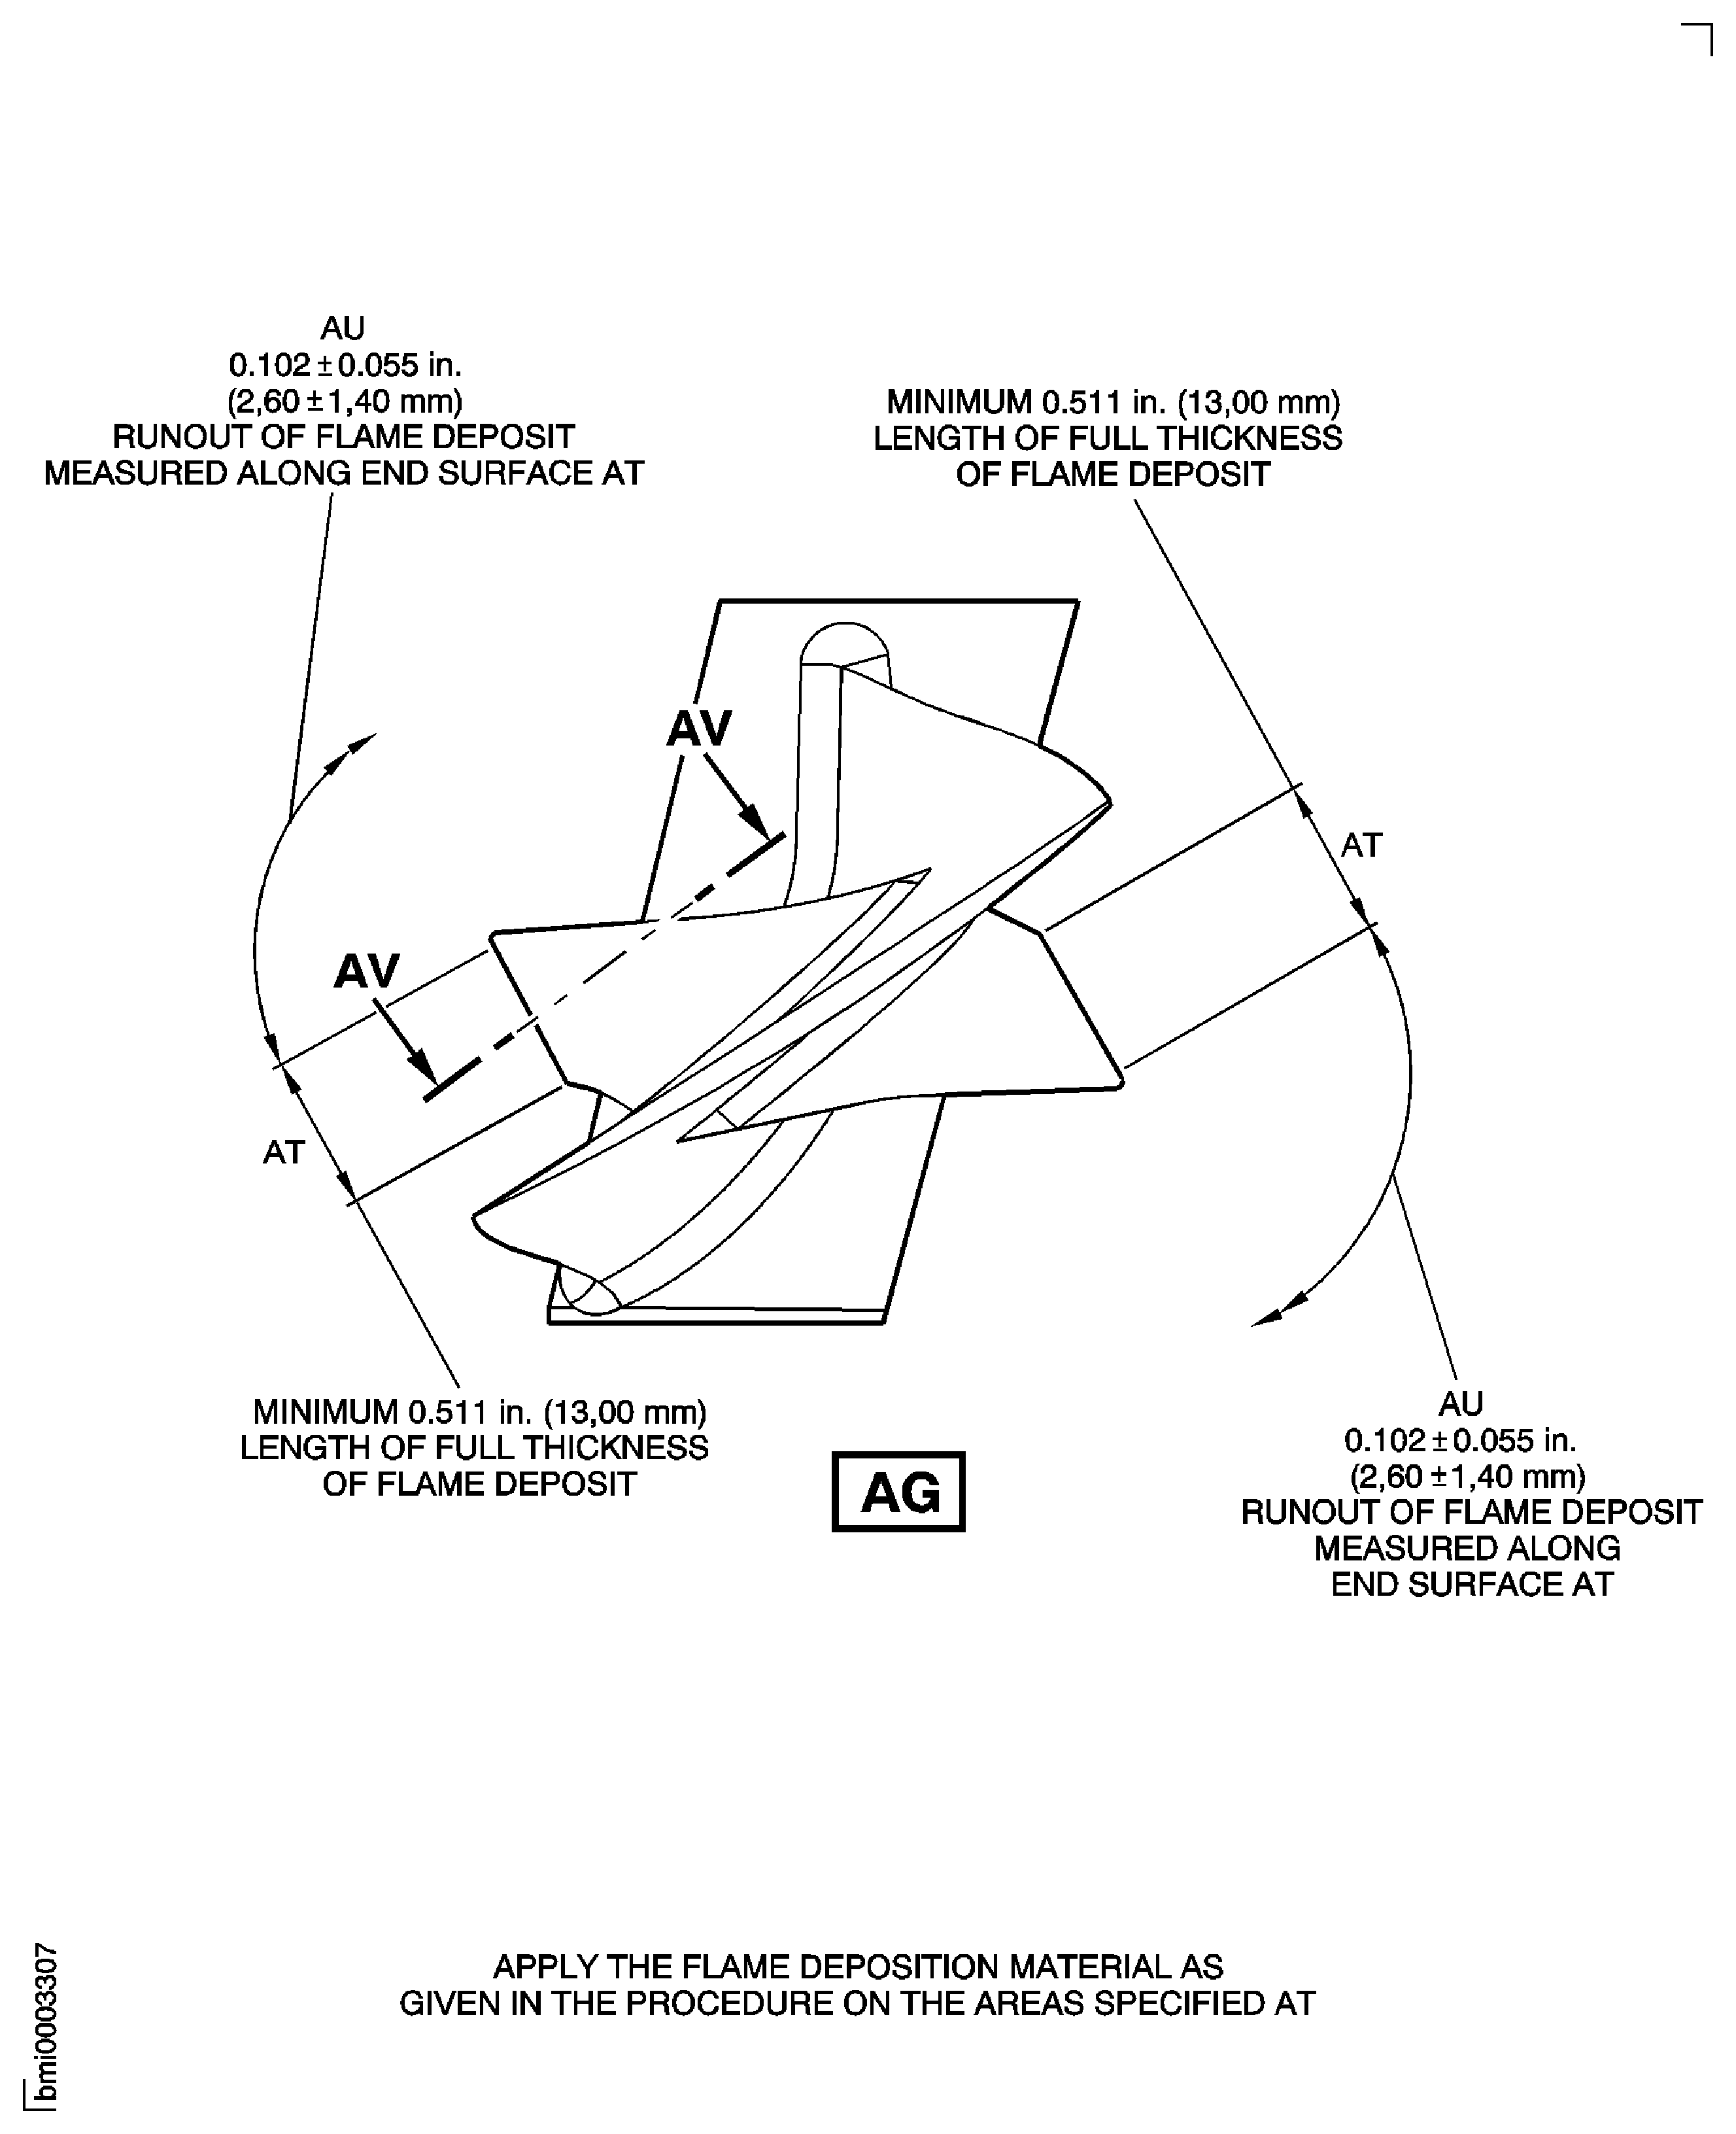
Figure: Repair Details And Dimensions - Assembly A And Assembly D
Repair Details And Dimensions - Assembly A And Assembly D
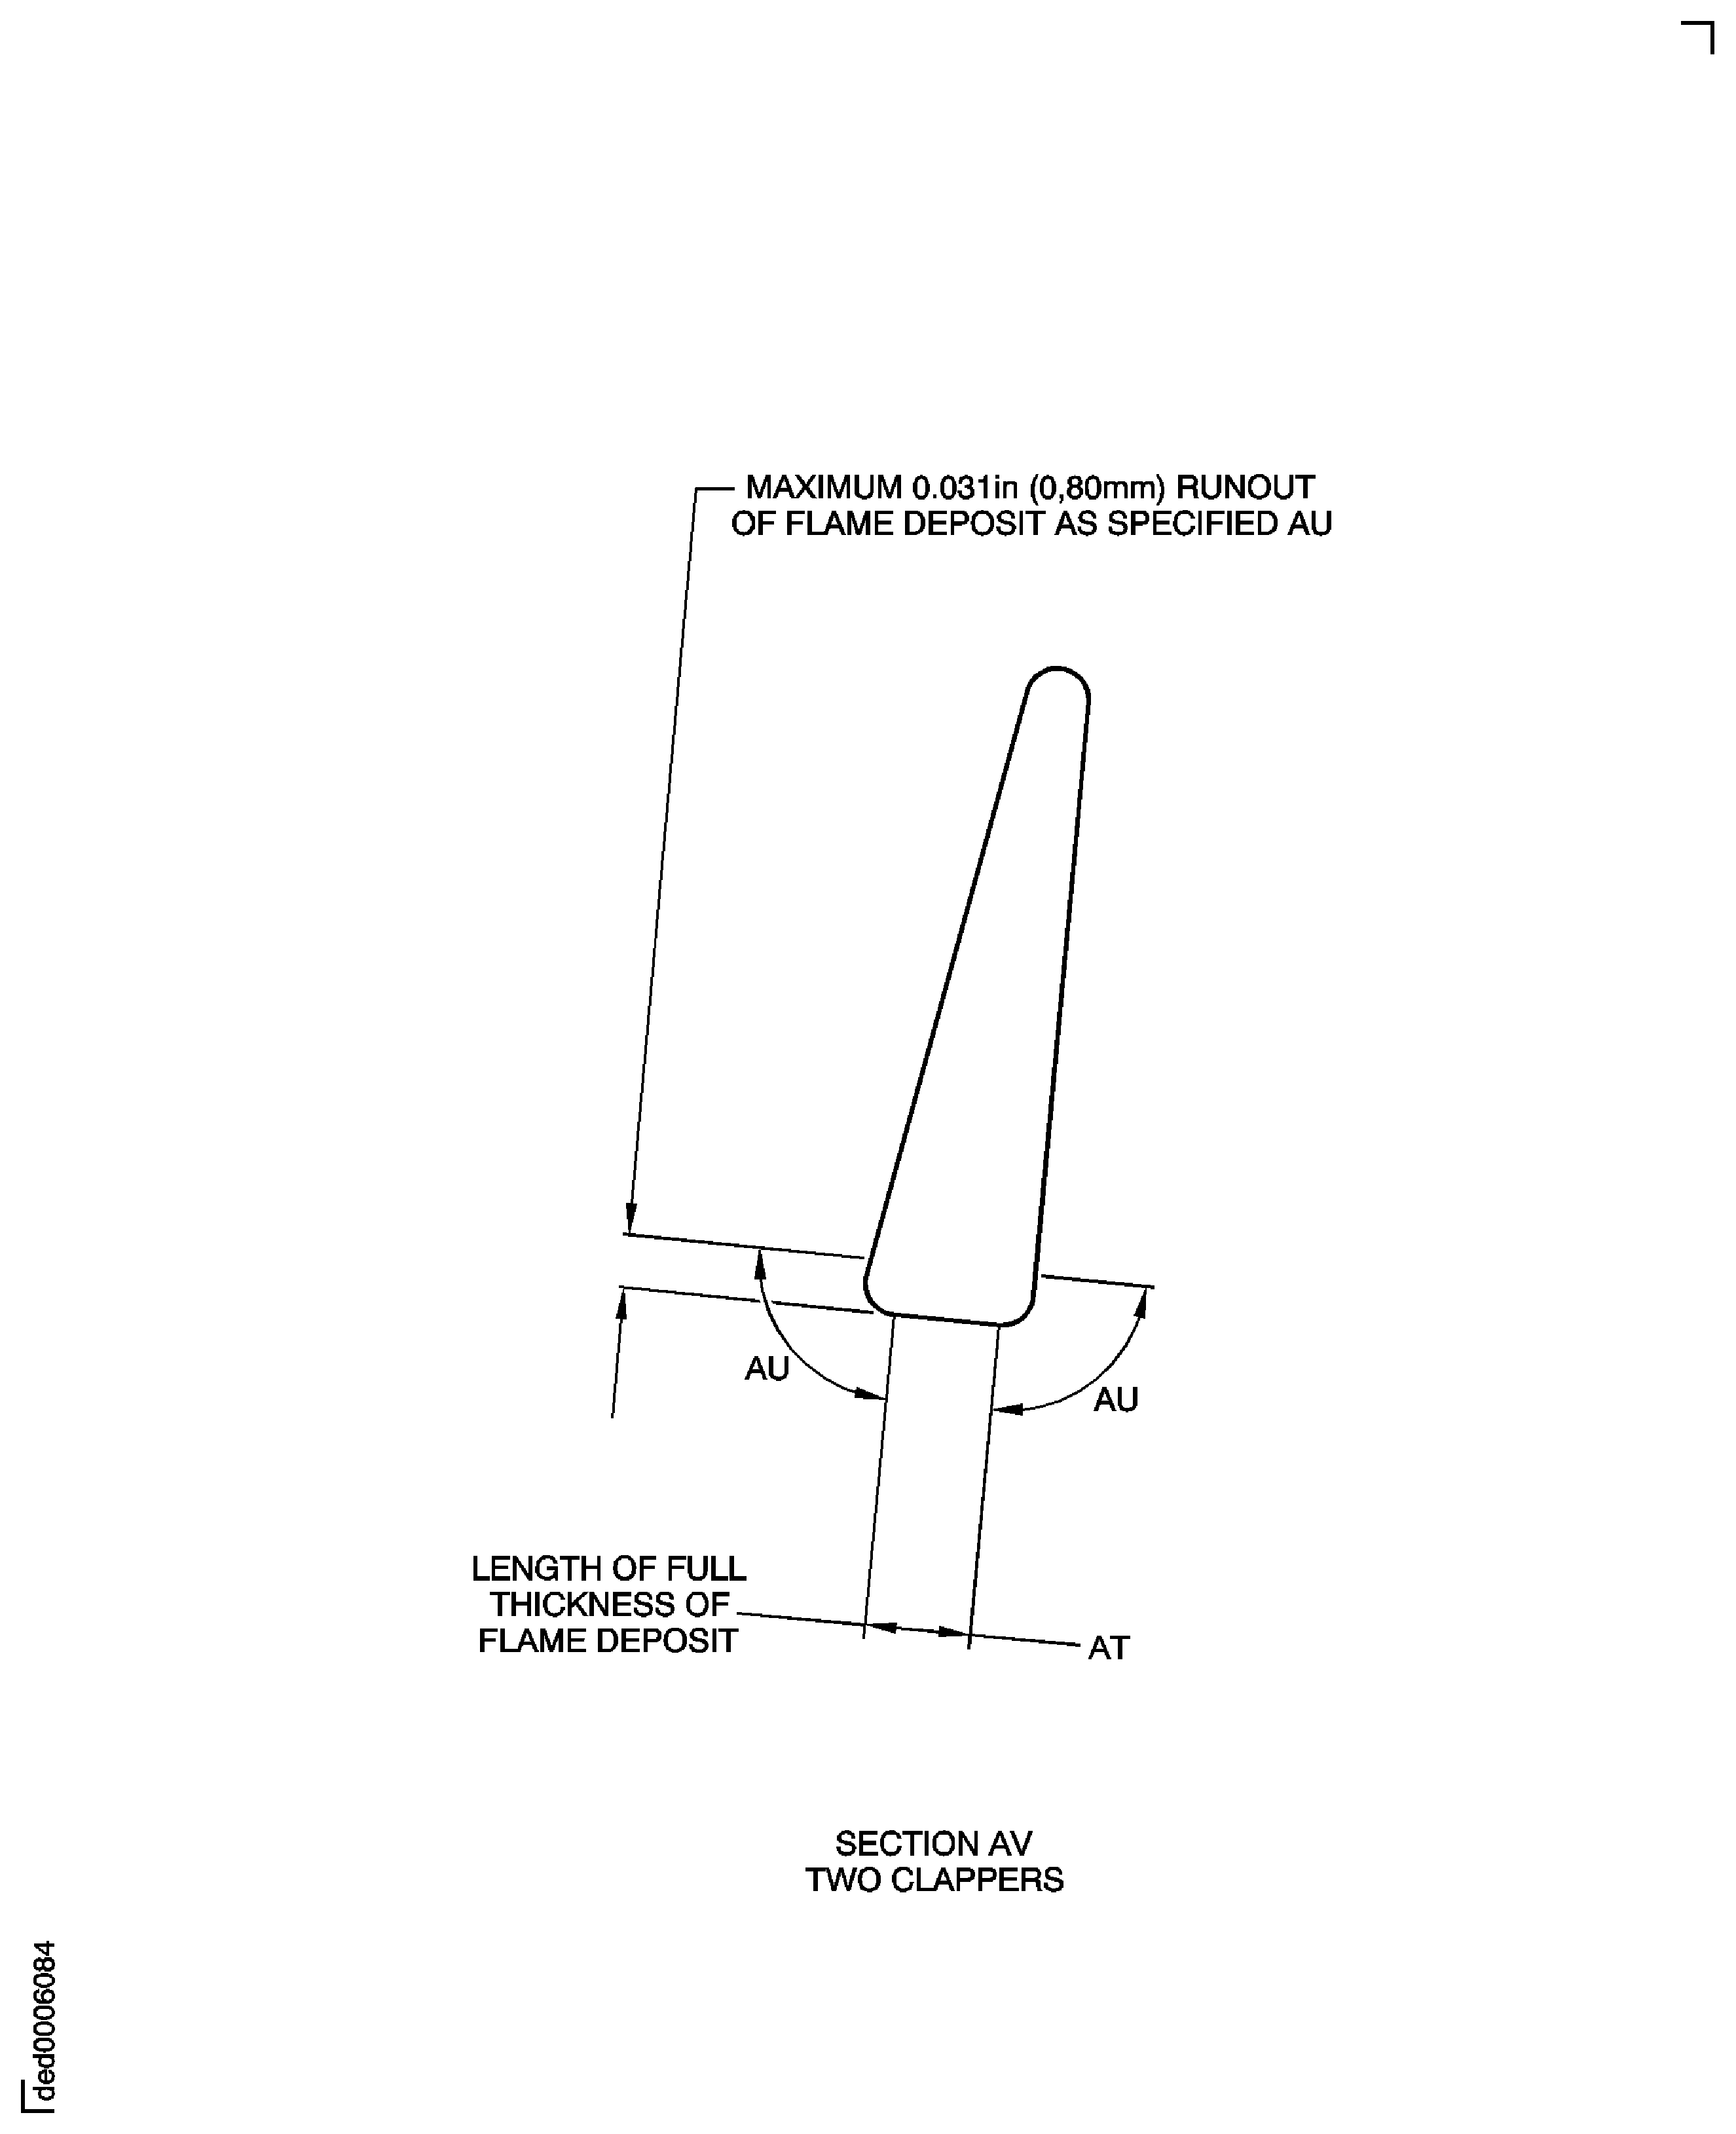
Figure: Repair Details And Dimensions - Assembly A
Repair Details And Dimensions - Assembly A
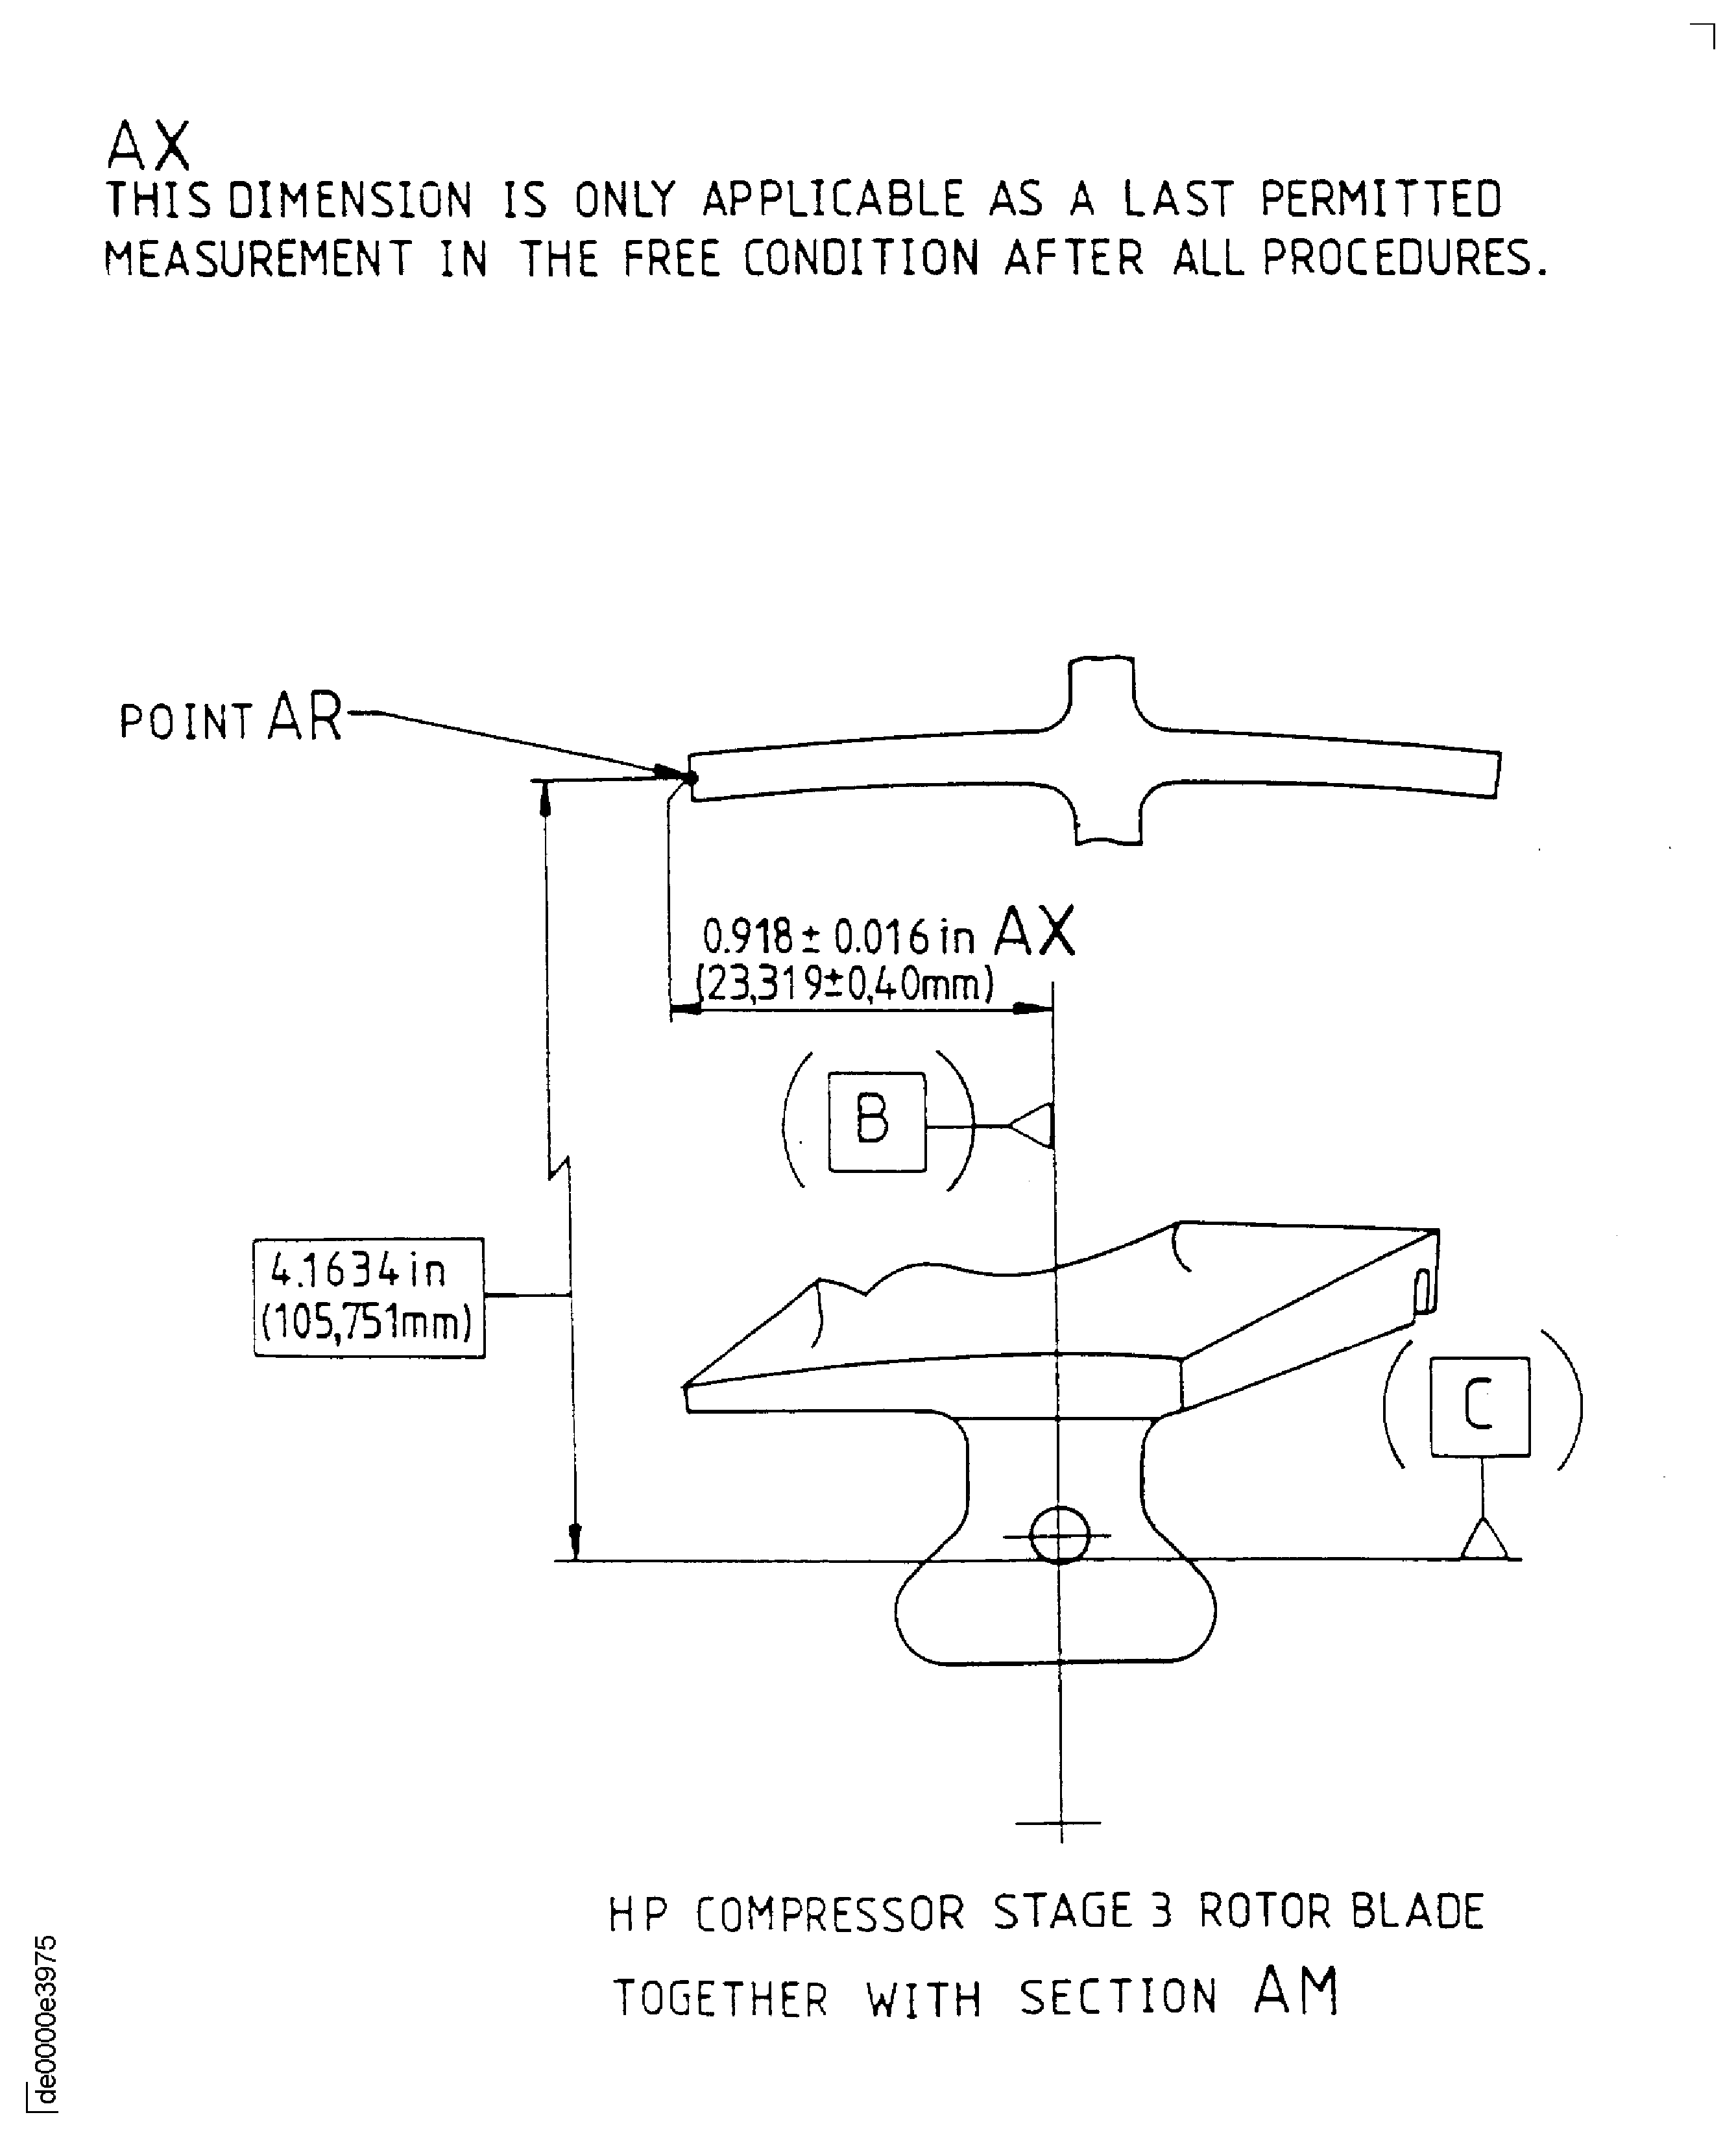
Figure: Repair Details And Dimensions - Assembly B And Assembly C (Deleted)
Repair Details And Dimensions - Assembly B And Assembly C (Deleted)

Figure: Repair Details And Dimensions - Assembly D
Repair Details And Dimensions - Assembly D

Figure: Overspray Requirements
Overspray Requirements

