Export Control
EAR Export Classification: Not subject to the EAR per 15 C.F.R. Chapter 1, Part 734.3(b)(3), except for the following Service Bulletins which are currently published as EAR Export Classification 9E991: SBE70-0992, SBE72-0483, SBE72-0580, SBE72-0588, SBE72-0640, SBE73-0209, SBE80-0024 and SBE80-0025.Copyright
© IAE International Aero Engines AG (2001, 2014 - 2021) The information contained in this document is the property of © IAE International Aero Engines AG and may not be copied or used for any purpose other than that for which it is supplied without the express written authority of © IAE International Aero Engines AG. (This does not preclude use by engine and aircraft operators for normal instructional, maintenance or overhaul purposes.).Applicability
All
Common Information
TASK 72-41-15-300-052 HPC Stage 3 Rotor Blade - Repair Damaged or Worn Clapper Abutment Faces By Weld, Repair-052 (VRS6616)
Effectivity
FIG/ITEM | PART NO. | SERVICE BULLETIN | ASSY |
|---|---|---|---|
01-200 | 6A3513 | EIS | A |
01-200 | 6A3938 | 72-0035 | B |
Deleted | Deleted | Deleted | Deleted |
Deleted | Deleted | Deleted | Deleted |
Deleted | Deleted | Deleted | Deleted |
01-200 | 6A8353 | 72-0487 | E |
Deleted | Deleted | Deleted | Deleted |
01-200 | 6A8688 | 72-0561 | F |
NOTE
General
This TASK gives the procedure to repair damage or worn clapper abutment faces by welding on the HP Compressor Stage 3 Rotor Blade.
This repair must only be done when the instruction to do so is given in the relevant TASK (72-41-15) Inspection/Check.
To keep the HP compressor efficiency, rotor blades are repaired as near to the new blade condition as possible.
Rotor blades must be repaired as soon as damage or wear is monitored, to get back HP compressor efficiency and extend the rotor blade life.
This repair can be done again to the welded rotor blades if:
The minimum airfoil dimensions are as given in TASK 72-41-15, Inspection/Check.
The airfoil surface has been polished up to two times, refer to the repair VRS6150, TASK 72-41-15-300-040 (REPAIR-040).
The dovetail root has been shot peened up to four times, refer to the repair VRS6151, TASK 72-41-15-300-041 (REPAIR-041).
Discard the blades if, during the weld procedure, arcing has occurred on any part of the blades.
Where reference is made to a SUBTASK within a TASK in the form "TASK, SUBTASK" the operator must read and apply the complete TASK. The SUBTASK is listed only when the TASK gives options for the processing of the component. The specified SUBTASK instructs what option must be used during application of the TASK for the successful completion of the Repair Scheme VRS6616.
NOTE
NOTE
NOTE
Preliminary Requirements
Pre-Conditions
| Action/Condition | Data Module/Technical Publication |
|---|---|
| Make sure that all the necessary cleaning and inspection procedures are done before this repair. |
Support Equipment
| Name | Manufacturer | Part Number / Identification | Quantity | Remark |
|---|---|---|---|---|
| Chemical cleaning equipment | LOCAL | Chemical cleaning equipment | ||
| Fluorescent Penetrant Inspection Equipment | LOCAL | Fluorescent penetrant inspection equipment | ||
| Abrasive Blast Equipment | LOCAL | Abrasive Blast Equipment | ||
| Co-ordinate Measuring Machine | LOCAL | Co-ordinate Measuring Machine | ||
| Argonarc Welding Equipment | LOCAL | Argonarc Welding Equipment | ||
| Heat Treatment Equipment | LOCAL | Heat Treatment Equipment | ||
| Vickers hardness tester | LOCAL | Vickers hardness tester | ||
| Grinding Machine | LOCAL | Grinding Machine | ||
| Standard Workshop Equipment | LOCAL | Standard Workshop Equipment | ||
| Radiographic inspection equipment | LOCAL | Radiographic inspection equipment | ||
| Vibro-peen equipment | LOCAL | Vibro-peen equipment | ||
| Binocular inspection equipment | LOCAL | Binocular inspection equipment | ||
| Dimensional inspection equipment | LOCAL | Dimensional inspection equipment | ||
| IAE 3R19363 Inspection fixture | 0AM53 | IAE 3R19363 | 1 | |
| IAE 3R19366 Inspection Block | 0AM53 | IAE 3R19366 | 1 | |
| IAE 3R19367 Inspection block | 0AM53 | IAE 3R19367 | 1 | |
| IAE 3R19370 Machine Fixture | 0AM53 | IAE 3R19370 | 1 | |
| IAE 3R19372 Stop block | 0AM53 | IAE 3R19372 | 2 | |
| IAE 3R19375 Machining Block | 0AM53 | IAE 3R19375 | 1 | |
| IAE 3R19376 Machining Block | 0AM53 | IAE 3R19376 | 1 | |
| IAE 3R19379 Support Block | 0AM53 | IAE 3R19379 | 1 | |
| IAE 3R19380 Support Block | 0AM53 | IAE 3R19380 | 1 | |
| IAE 3R19381 Clock Holder | 0AM53 | IAE 3R19381 | 1 | |
| IAE 3R19765 Master Blade | 0AM53 | IAE 3R19765 | ||
| IAE 3R19817 Master blade | 0AM53 | IAE 3R19817 |
Consumables, Materials and Expendables
| Name | Manufacturer | Part Number / Identification | Quantity | Remark |
|---|---|---|---|---|
| CoMat 02-001 ADHESIVE TAPE (MASKING) | LOCAL | CoMat 02-001 | ||
| CoMat 03-195 WELDING WIRE TITANIUM | LOCAL | CoMat 03-195 | ||
| CoMat 05-003 ABRASIVE MEDIUM ALUMINUM OXIDE, 120/220 GRADE | X222X | CoMat 05-003 | ||
| CoMat 05-141 ABRASIVE STONE SILICON CARBIDE | LOCAL | CoMat 05-141 |
Spares
NONESafety Requirements
NONEProcedure
Measure the dimensions of the clapper abutment faces to make sure that the blades can be repaired
No more than 0.060 in. (1.524 mm) of material can be removed from the clapper abutment faces, to remove damage or wear.
For Assembly A and B, use IAE 3R19363 Inspection fixture, IAE 3R19366 Inspection Block, IAE 3R19367 Inspection block, IAE 3R19372 Stop block and IAE 3R19765 Master Blade.
Deleted.
For Assembly E and F, use Co-ordinate Measuring Machine with IAE 3R19817 Master blade and vendor defined fixtures.
Dimensionally examine the repaired HP Compressor Stage 3 Rotor Blade.
Continue with the repair.
If the HP Compressor Stage 3 Rotor Blade is within the limits:
Reject.
If the HP Compressor Stage 3 Rotor Blade is not within the limits:
SUBTASK 72-41-15-220-298 Dimensional Inspection

CAUTION
TITANIUM COMPONENT - YOU MUST USE SILICON CARBIDE TYPE ABRASIVE WHEELS, STONES AND PAPERS TO DRESS, BLEND AND POLISH THIS COMPONENT.
CAUTION
TITANIUM COMPONENT - DO NOT USE FORCE WITH MECHANICAL CUTTERS OR THE MATERIAL WILL BECOME TOO HOT.
CAUTION
TITANIUM COMPONENT - IF THE MATERIAL SHOWS A CHANGE IN COLOR, TO DARKER THAN A LIGHT STRAW COLOR, THE COMPONENT IS TO BE REJECTED.Deleted.
For Assembly E and F, use vendor defined fixtures.
Machine the clapper abutment faces sufficient to get clean parent material.
SUBTASK 72-41-15-324-051 Remove damage
Refer to the SPM TASK 70-11-08-300-503, SUBTASK 70-11-08-300-002.
Swab etch the repair area on the HP Compressor Stage 3 Rotor Blade.
SUBTASK 72-41-15-110-149 Swab Etch the Repair Area
Refer to the SPM TASK 70-23-04-230-501.
Inspect for cracks at the repair area on the HP Compressor Stage 3 Rotor Blade using fluorescent penetrant inspection.
Continue with the repair.
If no cracking is detected:
Reject.
If cracking is detected:
SUBTASK 72-41-15-230-109 Fluorescent Penetrant Inspect
Refer to the SPM TASK 70-12-01-120-501.
Use CoMat 02-001 ADHESIVE TAPE (MASKING) to seal all the areas that are not to be blasted.
Vapor blast the repair area on the HP Compressor Stage 3 Rotor Blade.
SUBTASK 72-41-15-120-070 Vapor Blast the Repair Area

CAUTION
ABRASIVE BLASTING IS A PROCESS OF EROSION THAT CAN DAMAGE ENGINE PARTS. YOU MUST TAKE CARE NOT TO CAUSE DAMAGE TO THE ENGINE PARTS.Refer to the SPM TASK 70-11-01-300-503.
NOTE
The blades must be fully cleaned before you do Step.
Clean the HP Compressor Stage 3 Rotor Blade by vapor degreasing.
SUBTASK 72-41-15-110-150 Clean by Vapor Degreasing
Refer to the SPM TASK 70-31-02-310-501-001.
Make sure that sufficient weld filler is built up to permit machining to the given dimensions.
Make sure there is full argon coverage around the weld area.
Identify a sample HP Compressor Stage 3 Rotor Blade and repair along with each batch.
NOTE
An increase in clapper abutment face height of up to a maximum of 0.060 in. (1.524 mm) is permitted by this repair.

CAUTION
YOU MUST PREVENT ARCING ON THE BLADE DURING THE WELD PROCEDURE.Weld repair the HP Compressor Stage 3 Rotor Blade at the clapper abutment faces.
Refer to the SPM TASK 70-31-02-310-501-001.
Heat to a temperature of 1283 to 1301 deg.F. (695 to 705 deg.C) for two hours.
Cool to room temperature in Argon.
Heat treat the HP Compressor Stage 3 Rotor Blade in a vacuum or a controlled atmosphere.
SUBTASK 72-41-15-310-061 Argonarc Weld Repair
The hardness variation should be no more than 30 HV across the weld material, heat affected zone and parent material.
Use a Vickers hardness tester.
This is a guide for quality control and is not an absolute limit.
NOTE
If the sample is more than the hardness variation limit, you must look at additional sample blades, if more than 10 percent have a variation in hardness more than 30 HV, then you must investigate the cause.
Do a hardness check on a longitudinal cross section of a sample blade.
SUBTASK 72-41-15-220-299 Do a Hardness Check

CAUTION
TITANIUM COMPONENT - YOU MUST USE SILICON CARBIDE TYPE ABRASIVE WHEELS, STONES AND PAPERS TO DRESS, BLEND AND POLISH THIS COMPONENT.
CAUTION
TITANIUM COMPONENT - DO NOT USE FORCE WITH MECHANICAL CUTTERS OR THE MATERIAL WILL BECOME TOO HOT.
CAUTION
TITANIUM COMPONENT - IF THE MATERIAL SHOWS A CHANGE IN COLOR, TO DARKER THAN A LIGHT STRAW COLOR, THE COMPONENT IS TO BE REJECTED.For Assembly A and B, use IAE 3R19370 Machine Fixture, IAE 3R19372 Stop block, IAE 3R19375 Machining Block, IAE 3R19376 Machining Block, IAE 3R19379 Support Block, IAE 3R19380 Support Block and IAE 3R19381 Clock Holder. Alternatively, use vendor defined fixtures.
Deleted.
For Assembly E and F, use vendor defined fixtures.
Use a Grinding Machine.
Machine the clapper abutment faces to the given dimensions.
SUBTASK 72-41-15-324-052 Machine the Repair Area
Measure the dimensions, position and the runout of the clapper abutment faces and clapper profile.
For Assembly A and B, use IAE 3R19363 Inspection fixture, IAE 3R19366 Inspection Block, IAE 3R19367 Inspection block and IAE 3R19372 Stop block.
Deleted.
For Assembly E and F, use Co-ordinate Measuring Machine and Vendor defined fixtures.
Dimensionally examine the HP Compressor Stage 3 Rotor Blade.
Continue with the repair.
If the HP Compressor Stage 3 Rotor Blade is in the given dimensions:
Reject.
If the HP Compressor Stage 3 Rotor Blade is not in the given dimensions:
SUBTASK 72-41-15-220-300 Visual and Dimensional Inspection
Refer to the SPM TASK 70-11-08-300-503, SUBTASK 70-11-08-300-002.
Swab etch the repair area on the HP Compressor Stage 3 Rotor Blade.
SUBTASK 72-41-15-110-151 Swab Etch the Repair Area
Refer to the SPM TASK 70-23-04-230-501.
Examine for cracks at the repair area on the HP Compressor Stage 3 Rotor Blade using fluorescent penetrant inspection.
Continue with the repair.
If no crack is detected:
Reject.
If crack is detected:
SUBTASK 72-41-15-230-110 Fluorescent Penetrant Inspection
Continue with the repair.
If the component has no cracks, no unwanted material, no pores larger than 0.006 in. (0.152 mm) diameter, no pores with a distance of less than 0.200 in. (5.080 mm) between them, no surfaces broken by pores and no pores less than 0.040 in. (1.016 mm) from the edges of the clapper abutment faces:
Reject.
If the component has cracks, unwanted material, pores larger than 0.006 in. (0.152 mm) diameter, pores with a distance of less than 0.200 in. (5.080 mm) between them, surfaces broken by pores or pores less than 0.040 in. (1.016 mm) from the edges of the clapper abutment faces:
SUBTASK 72-41-15-260-082 Radiographically Examine the Repair Area
Refer to the repair VRS6150, TASK 72-41-15-300-040 (REPAIR-040).
Restore the airfoil surface finish.
SUBTASK 72-41-15-380-125 Restore the Airfoil Surface Finish
Refer to the repair VRS6151, TASK 72-41-15-300-041 (REPAIR-041).
Shotpeen the dovetail roots.
SUBTASK 72-41-15-380-147 Shotpeen the Dovetail Root
Refer to the Repair, VRS6236 TASK 72-41-15-300-035 (REPAIR-035) or Repair, VRS9297 TASK 72-41-15-300-058 (REPAIR-058).
Apply the clapper coating.
SUBTASK 72-41-15-340-056 Apply the Clapper Coating
Refer to the repair VRS6486, TASK 72-41-15-300-046 (REPAIR-046).
Apply the dry film lubricant to the blade root.
SUBTASK 72-41-15-380-126 Apply the Dry Film Lubricant

CAUTION
DO NOT VIBRO-ENGRAVE ON THE BLADE AIRFOIL OR LOCATION FACES.NOTE
If the HP Compressor Stage 3 Rotor Blade is already identified with the repair scheme number VRS6616 from a previous repair application, further identification is not necessary.Refer to Figure.
Refer to the SPM TASK 70-09-00-400-501, SUBTASK 70-09-00-400-001.
Use Vibro-peen equipment.
Virbo-peen VRS6616 adjacent to the part number on the HP Compressor Stage 3 Rotor Blade.
Remove raised material, burrs and sharp edges at the vibro-peen marking area.
SUBTASK 72-41-15-350-134 Identify the Repair
Figure: Repair Details And Dimensions - Assembly A And B
Repair Details And Dimensions - Assembly A And B
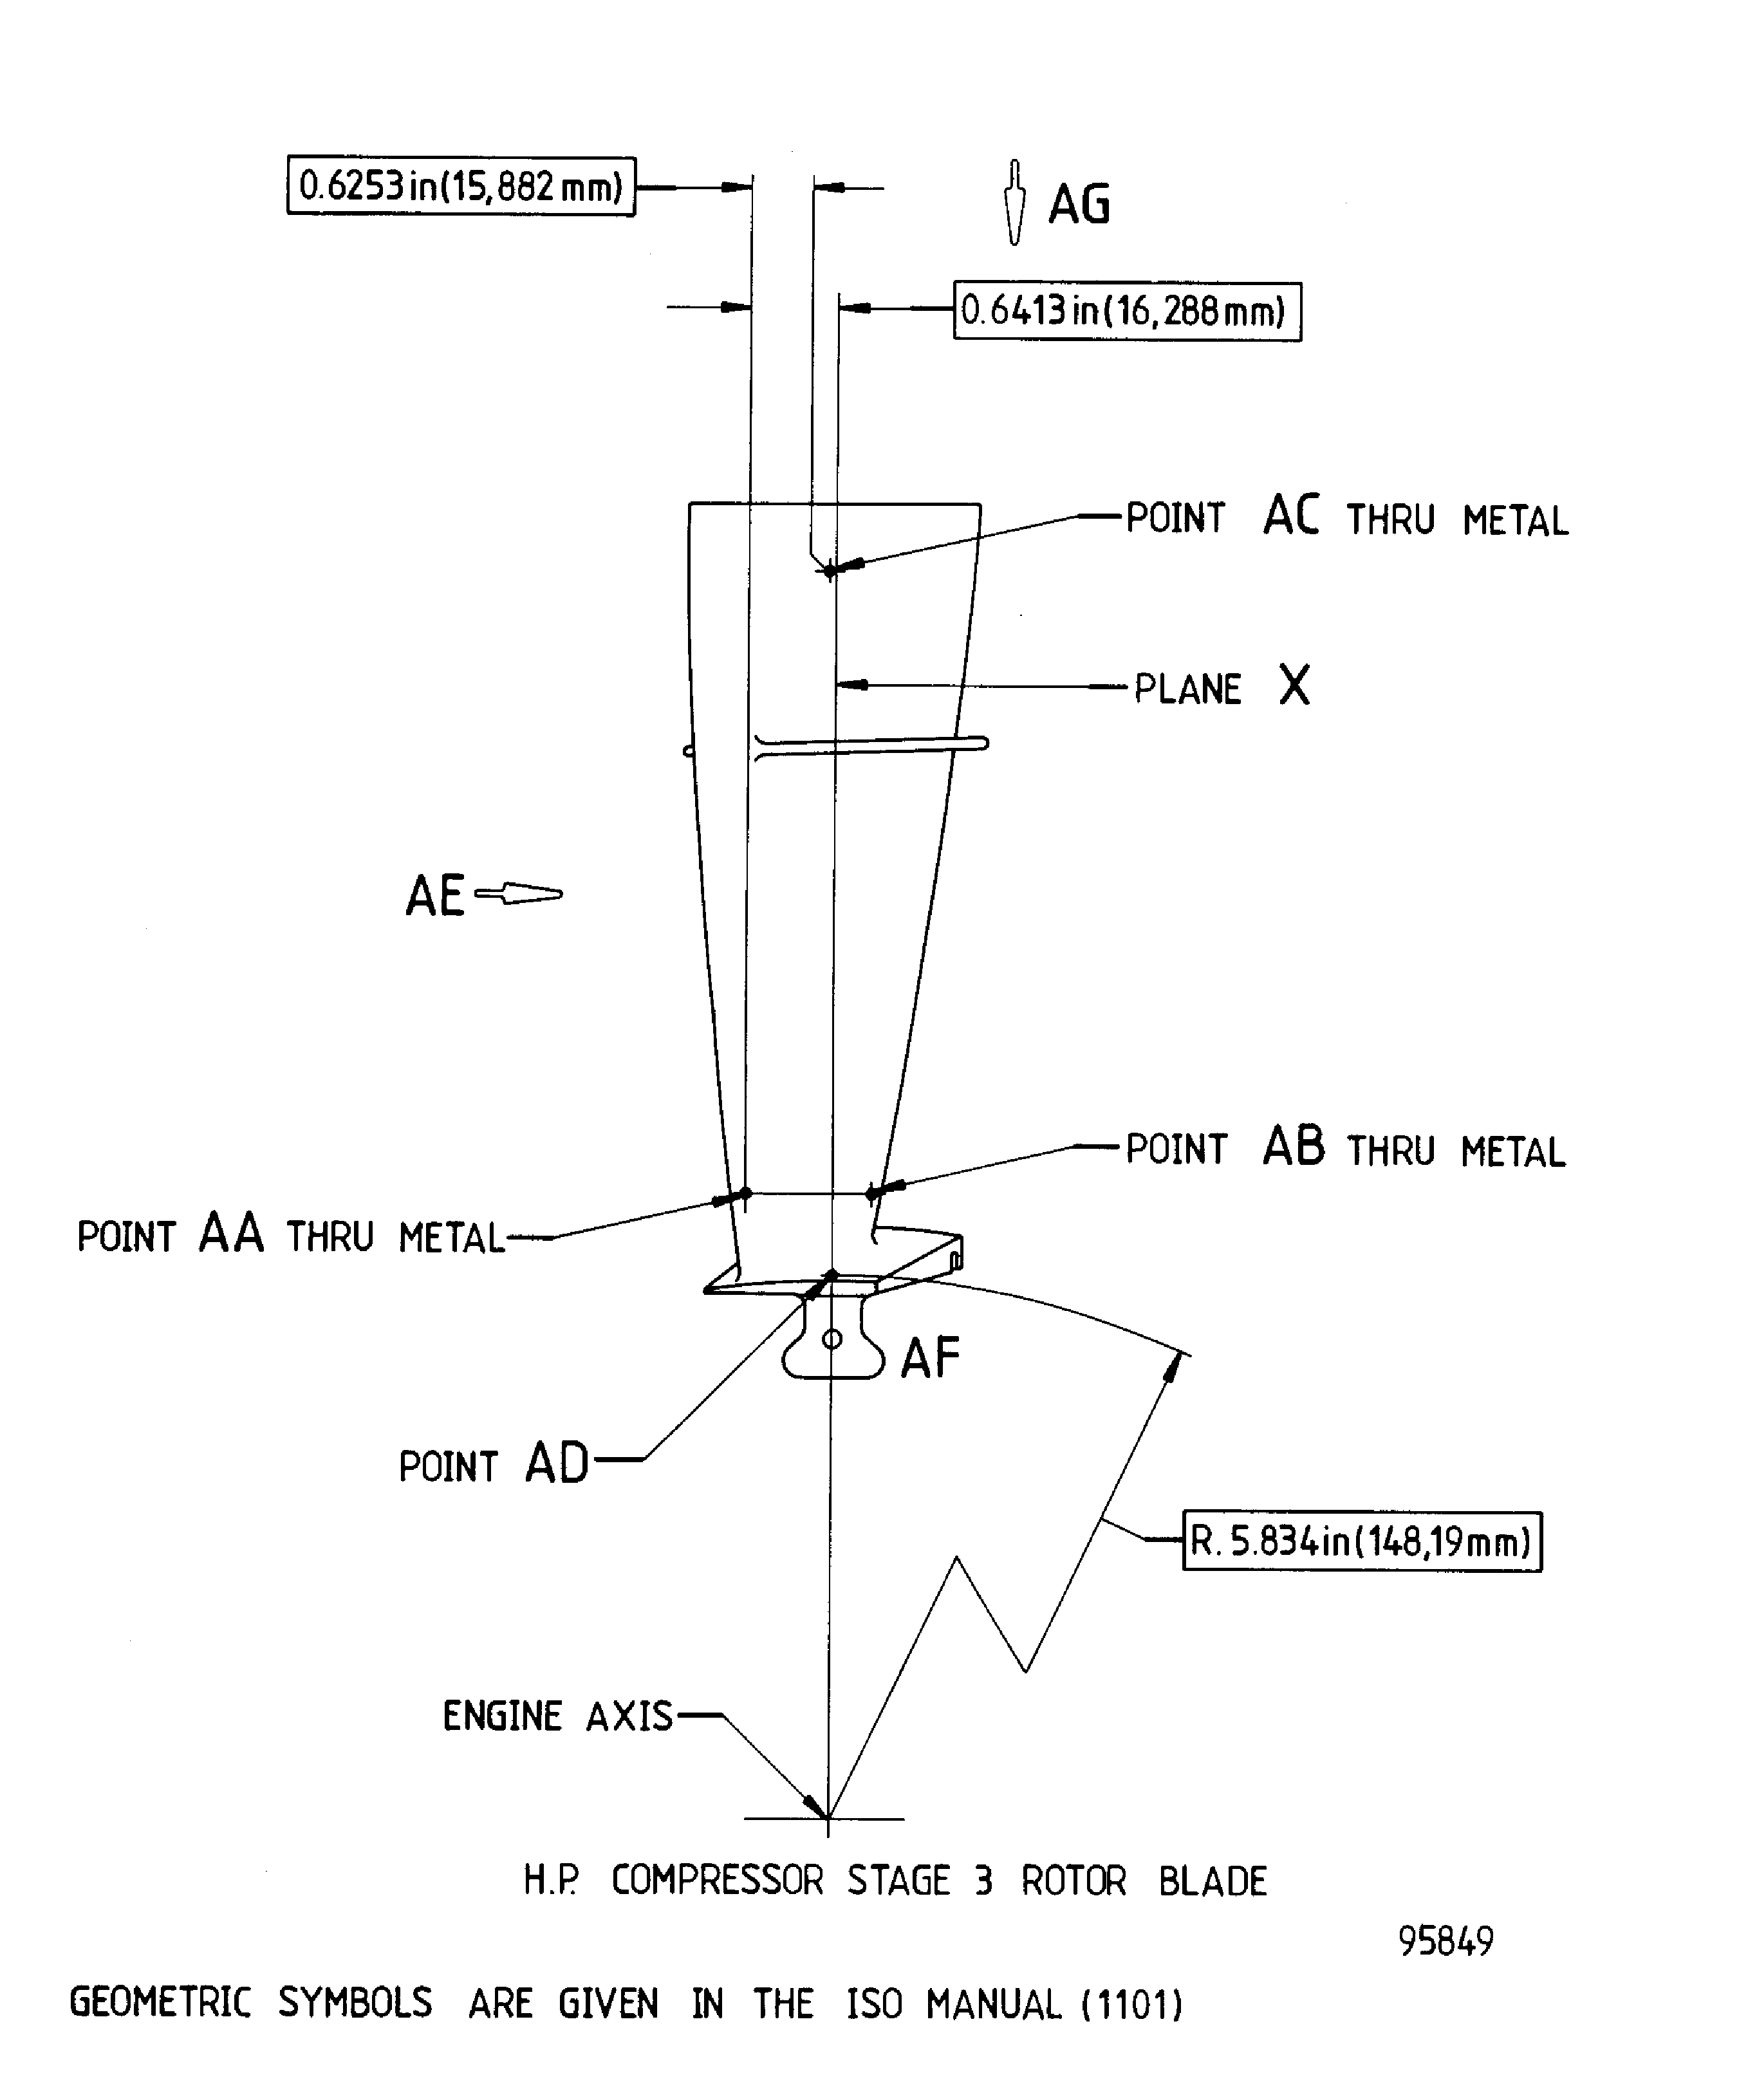
Figure: Repair Details And Dimensions - Assembly E
Repair Details And Dimensions - Assembly E
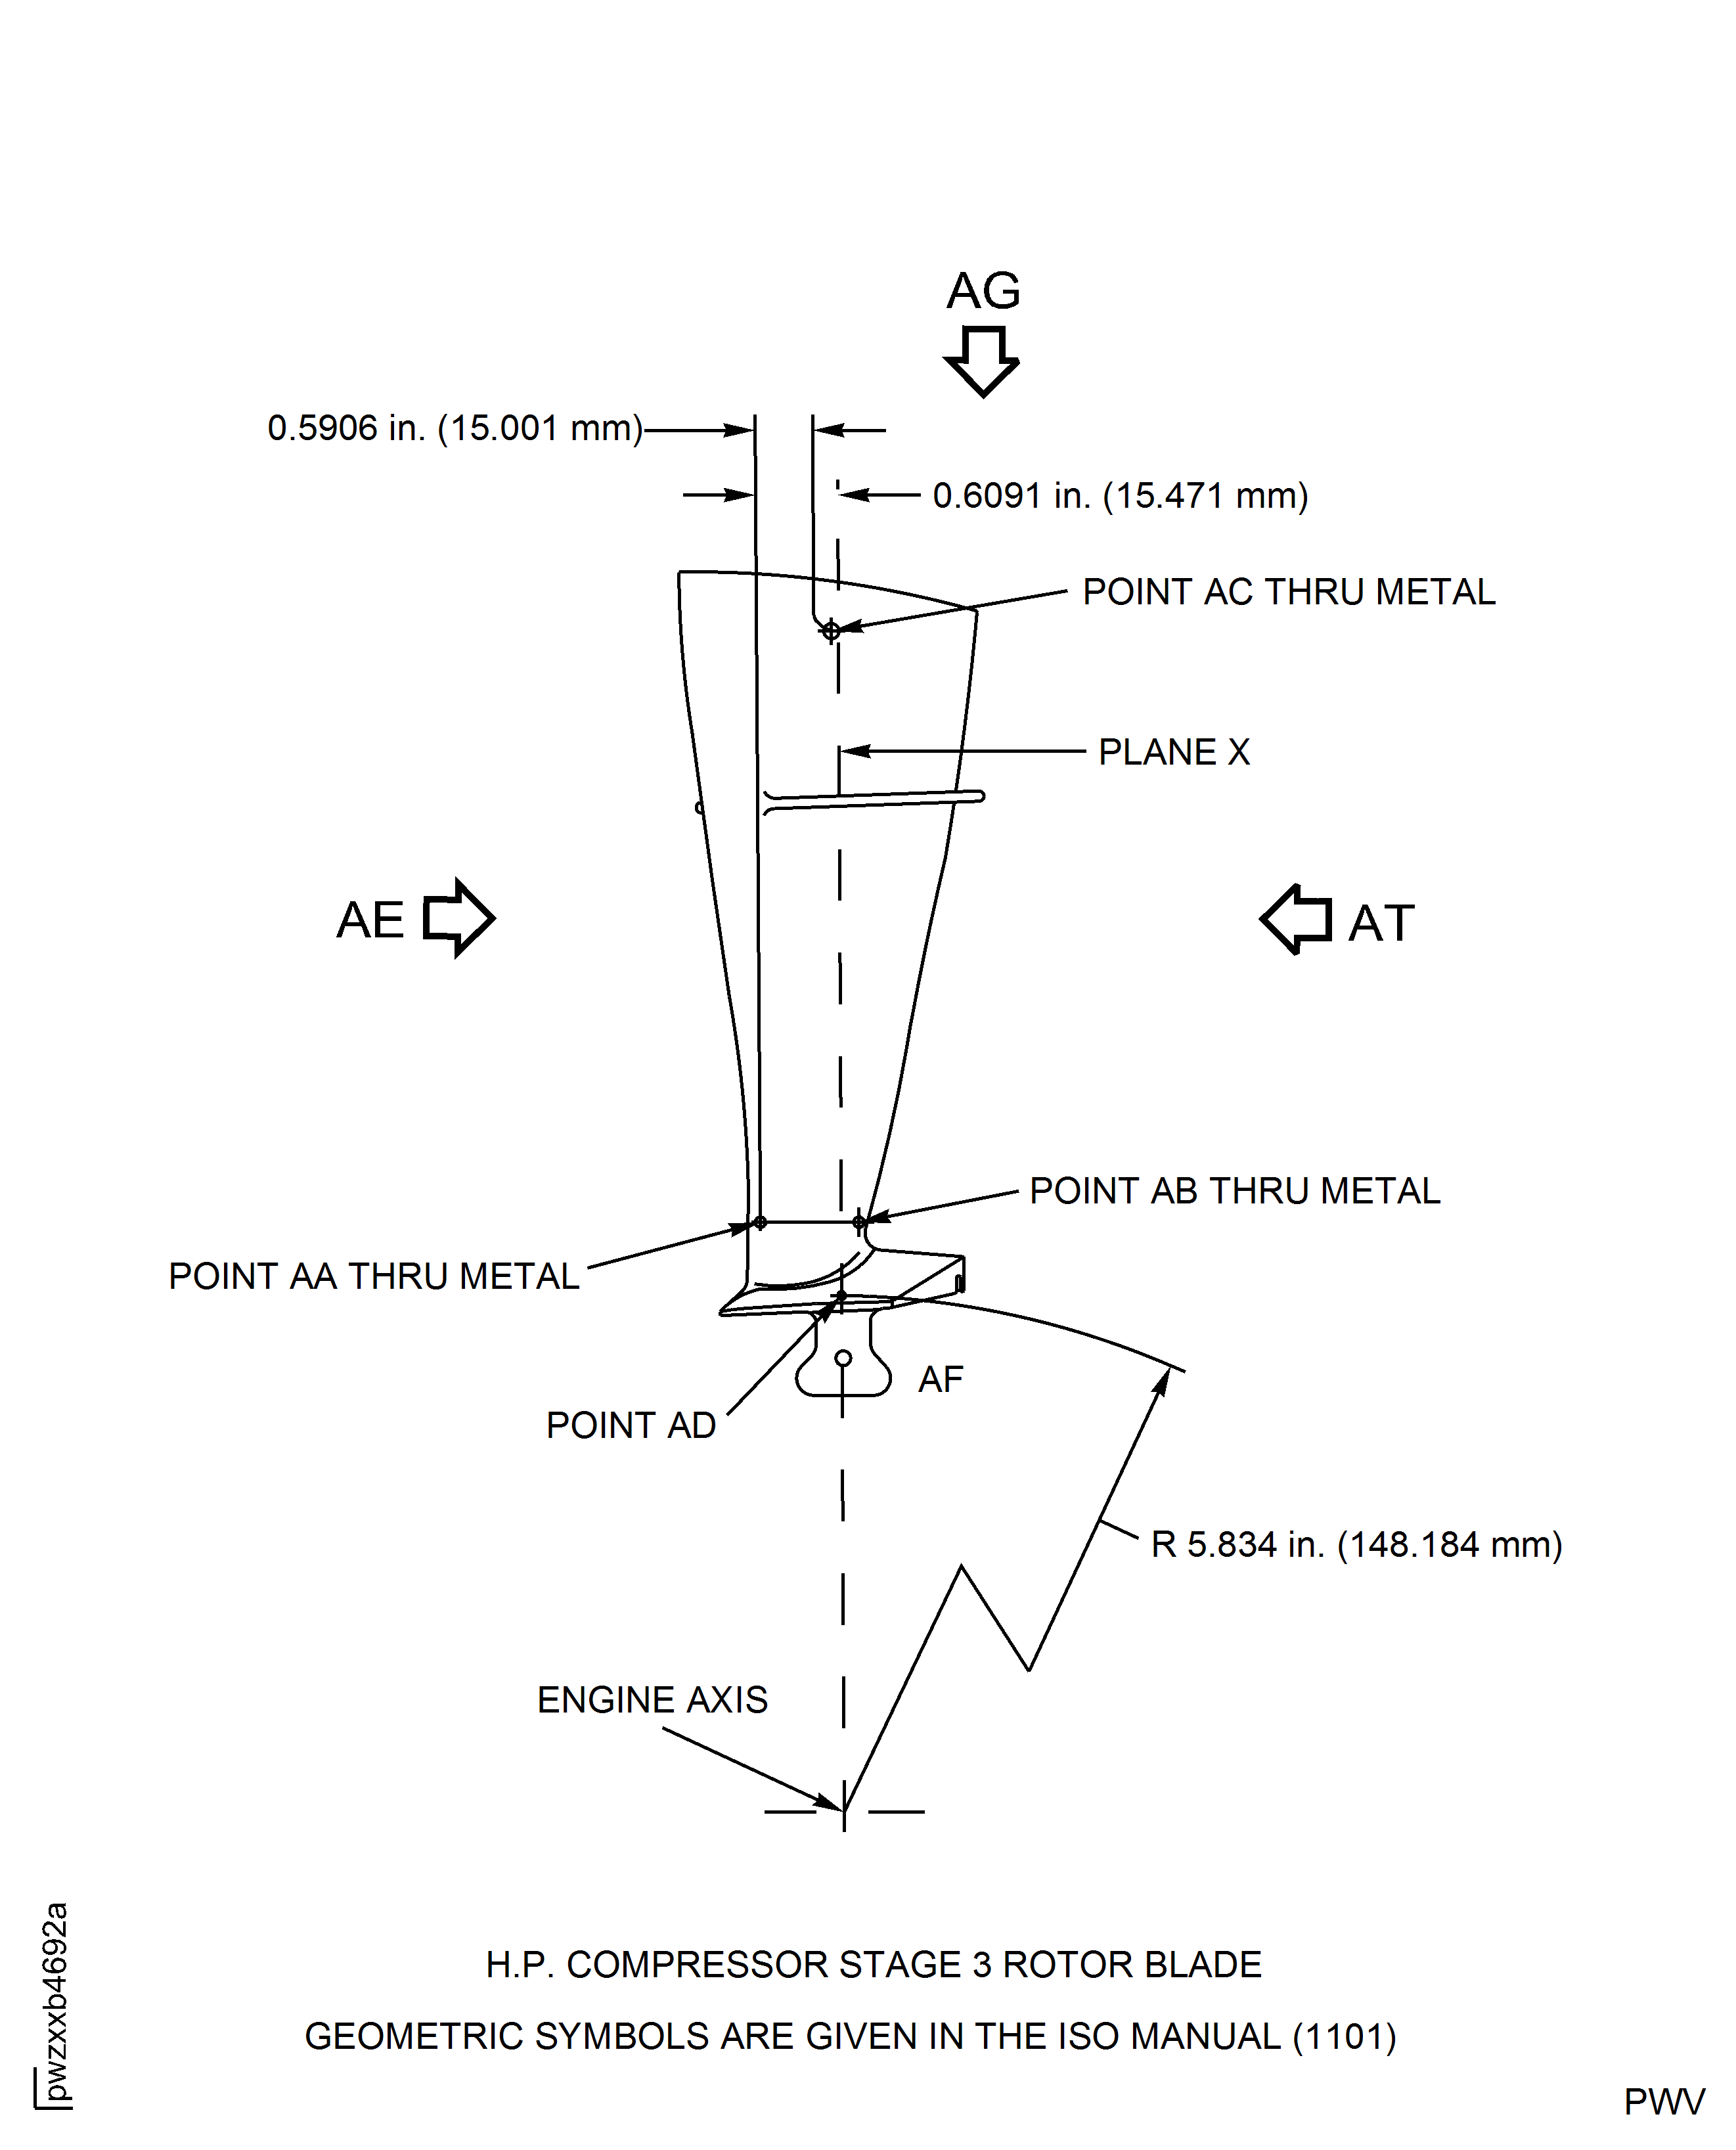
Figure: Repair Details And Dimensions - Assembly F
Repair Details And Dimensions - Assembly F
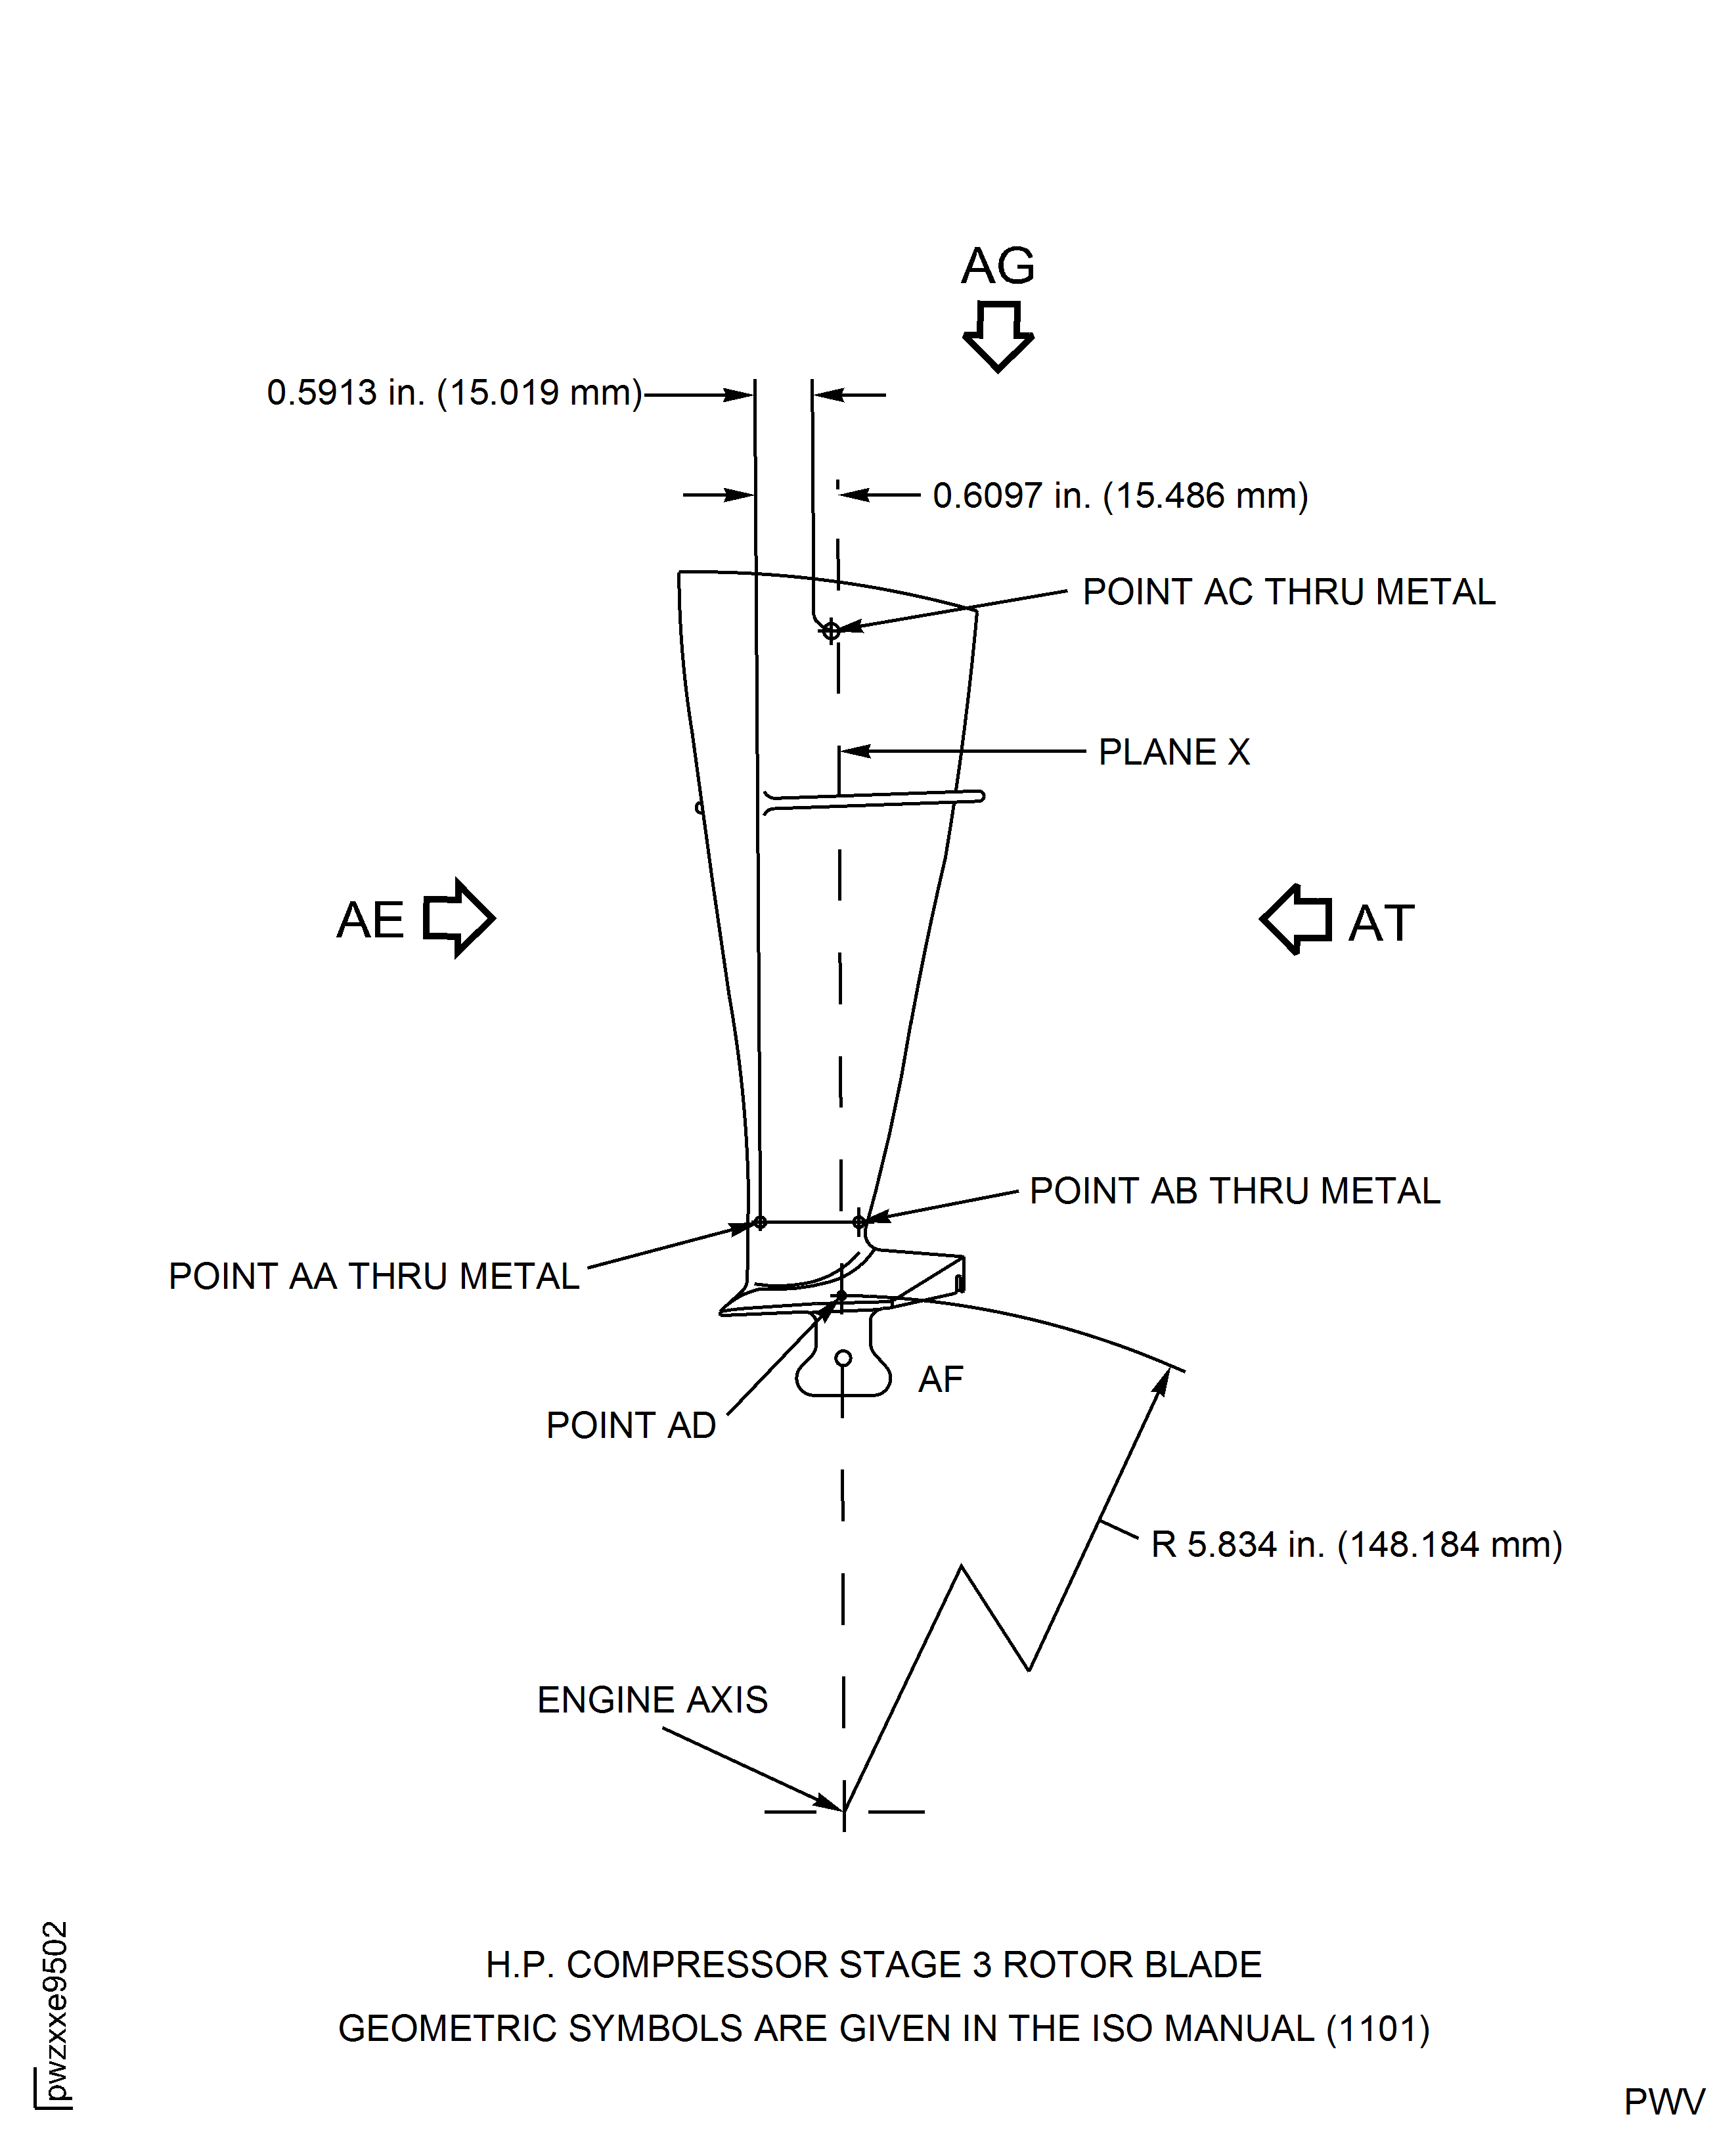
Figure: Repair Details And Dimensions - Assembly A And B
Repair Details And Dimensions - Assembly A And B
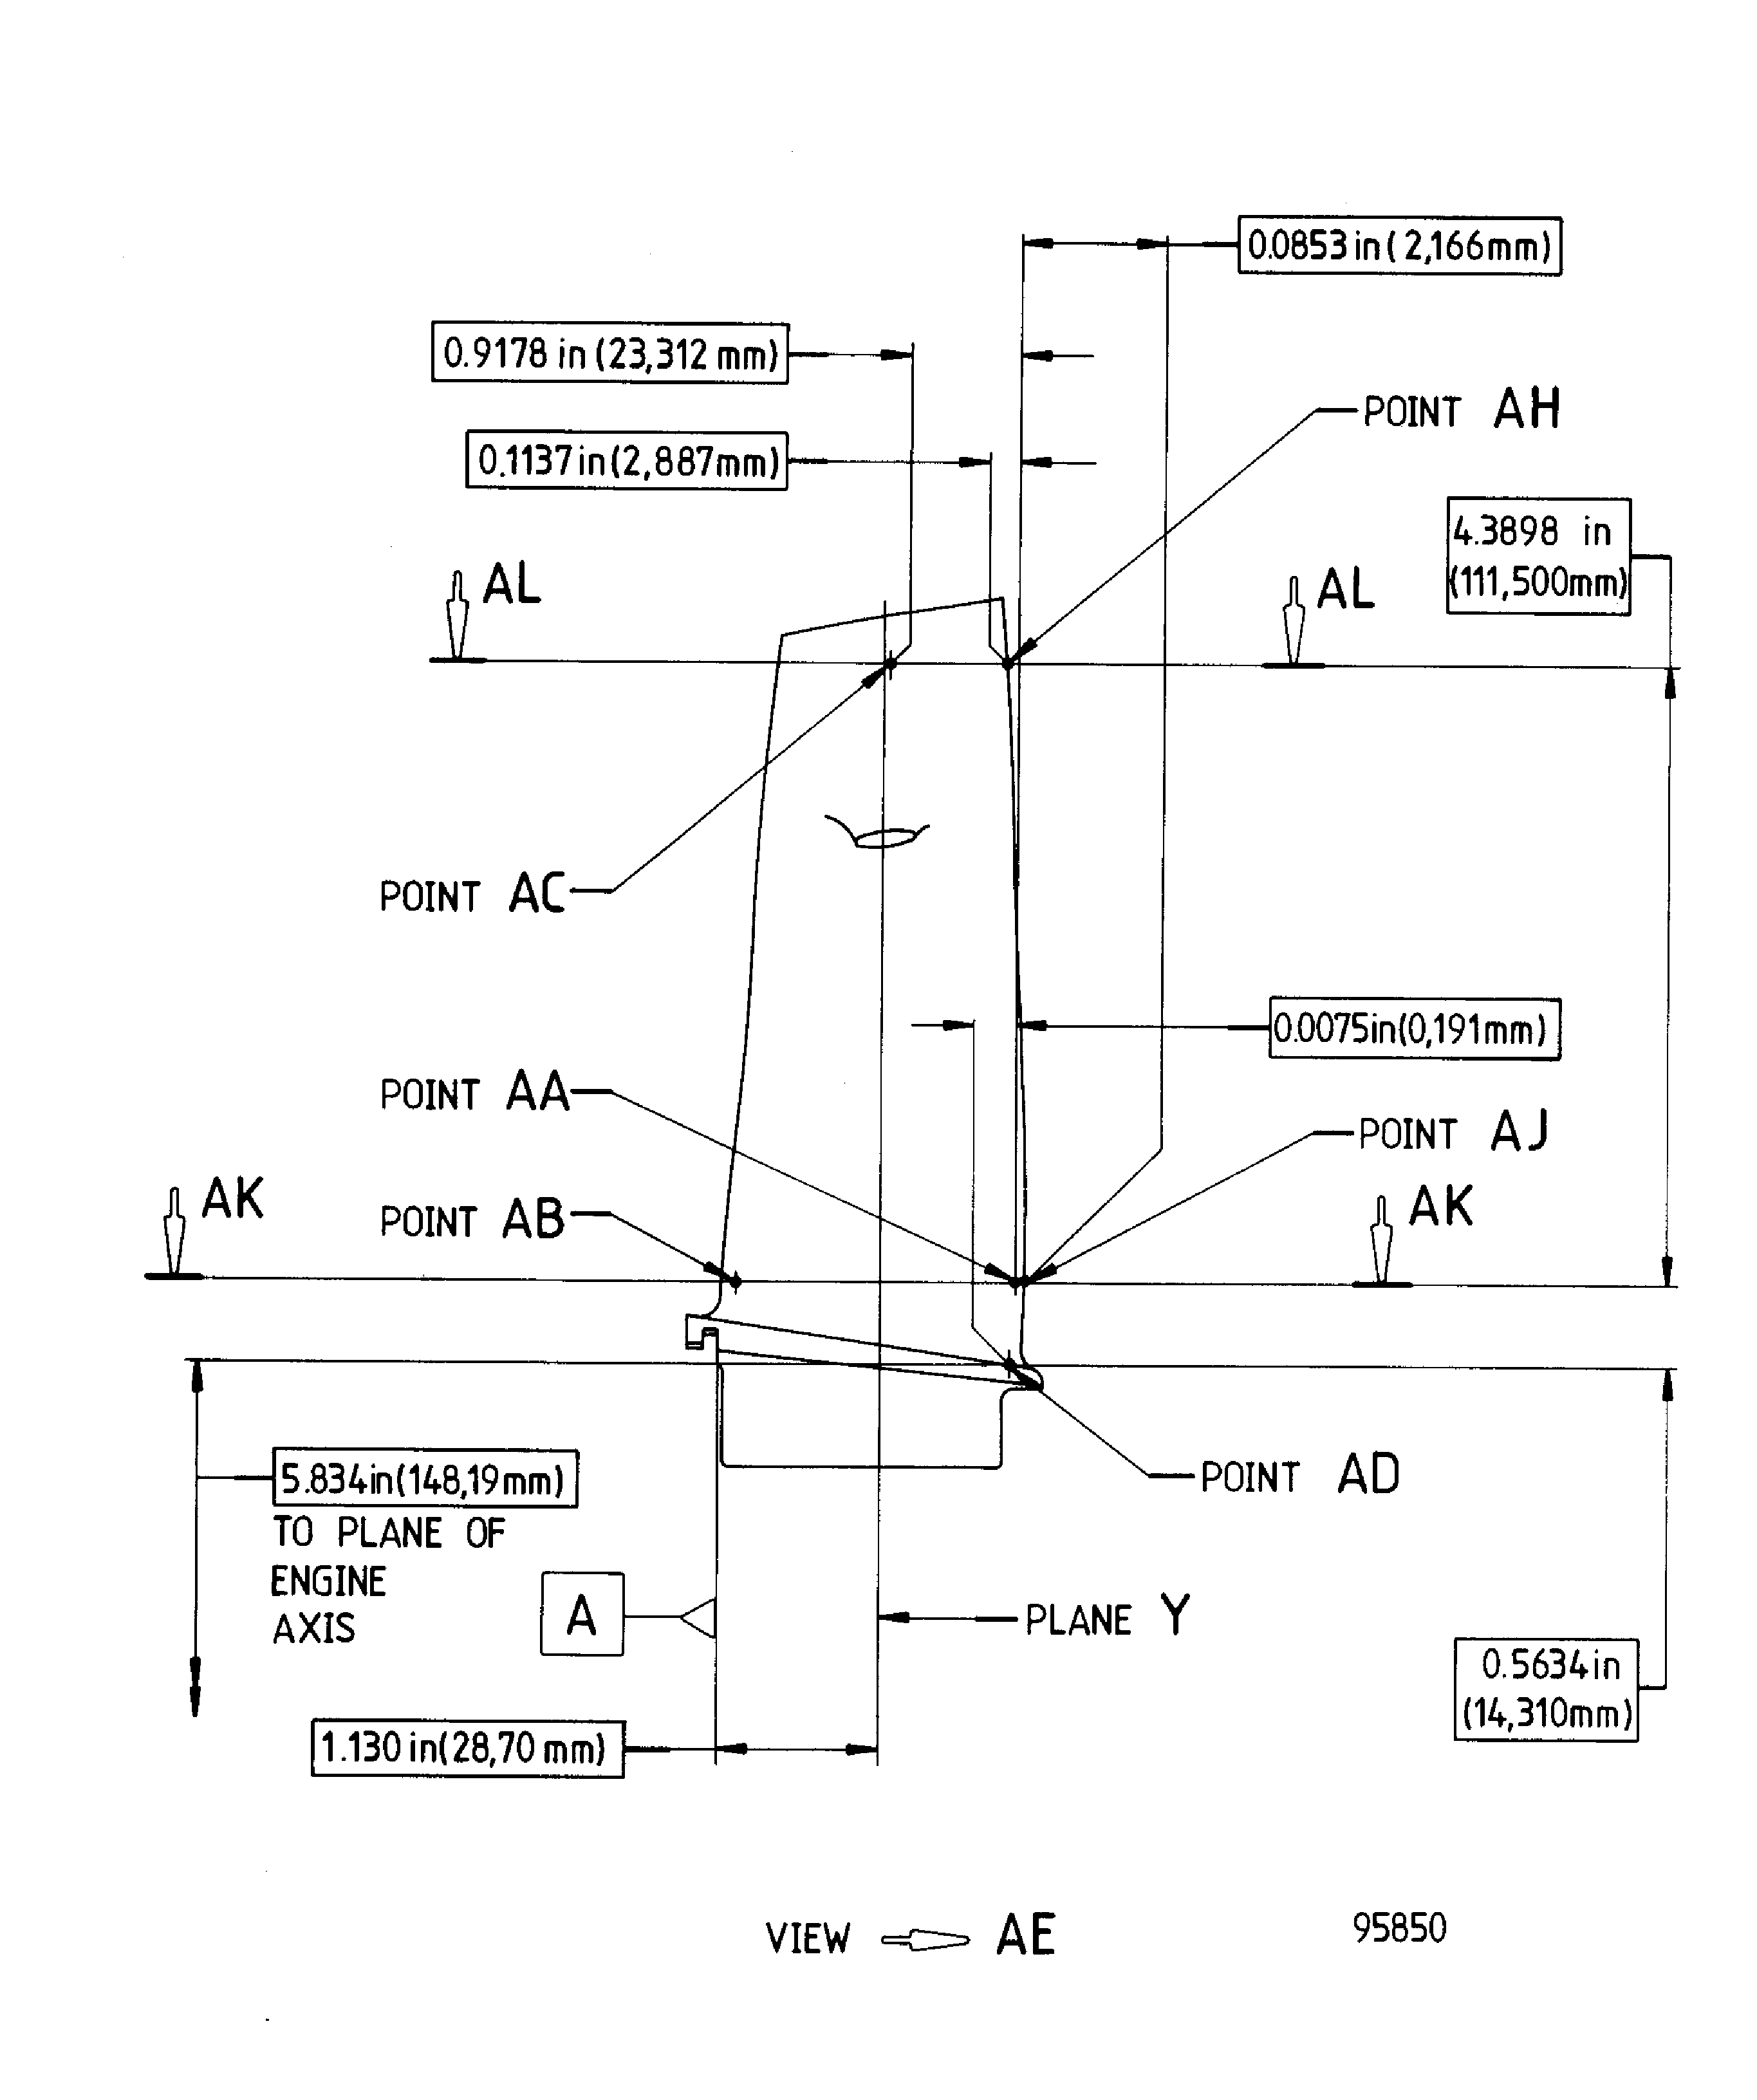
Figure: Repair Details And Dimensions - Assembly E
Repair Details And Dimensions - Assembly E

Figure: Repair Details And Dimensions - Assembly F
Repair Details And Dimensions - Assembly F
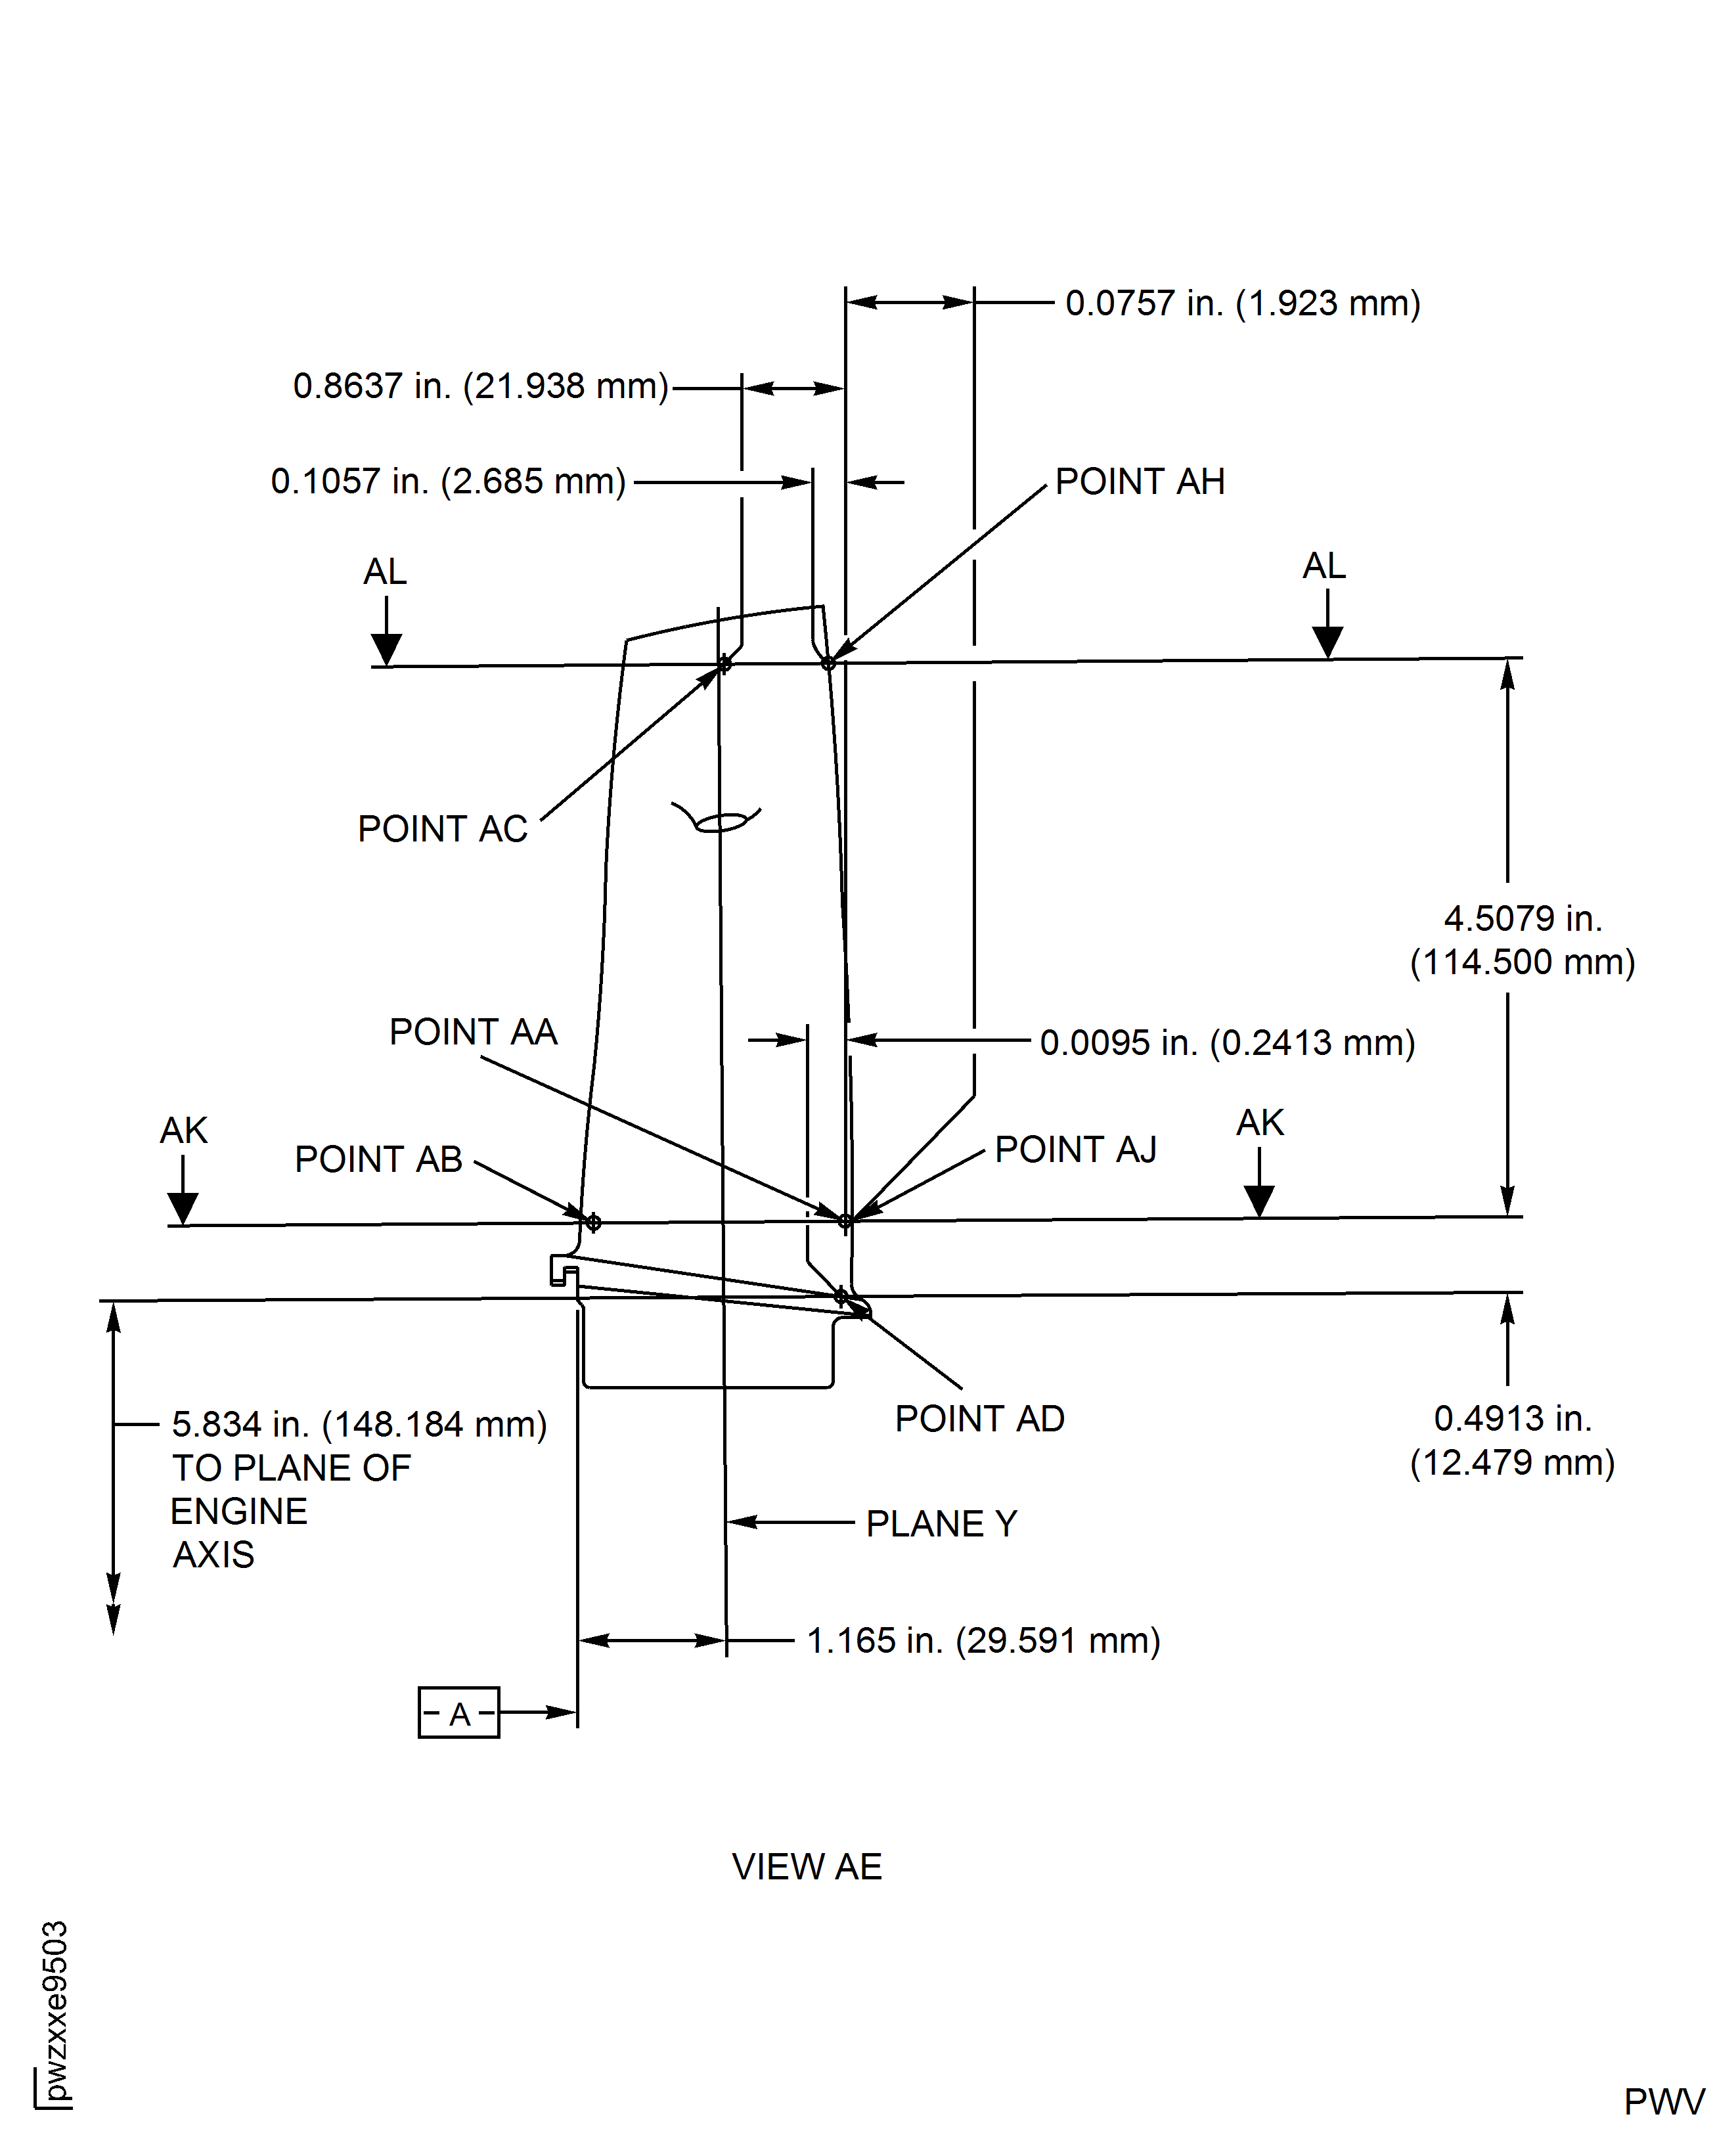
Figure: Repair Details And Dimensions - Assembly A And B
Repair Details And Dimensions - Assembly A And B
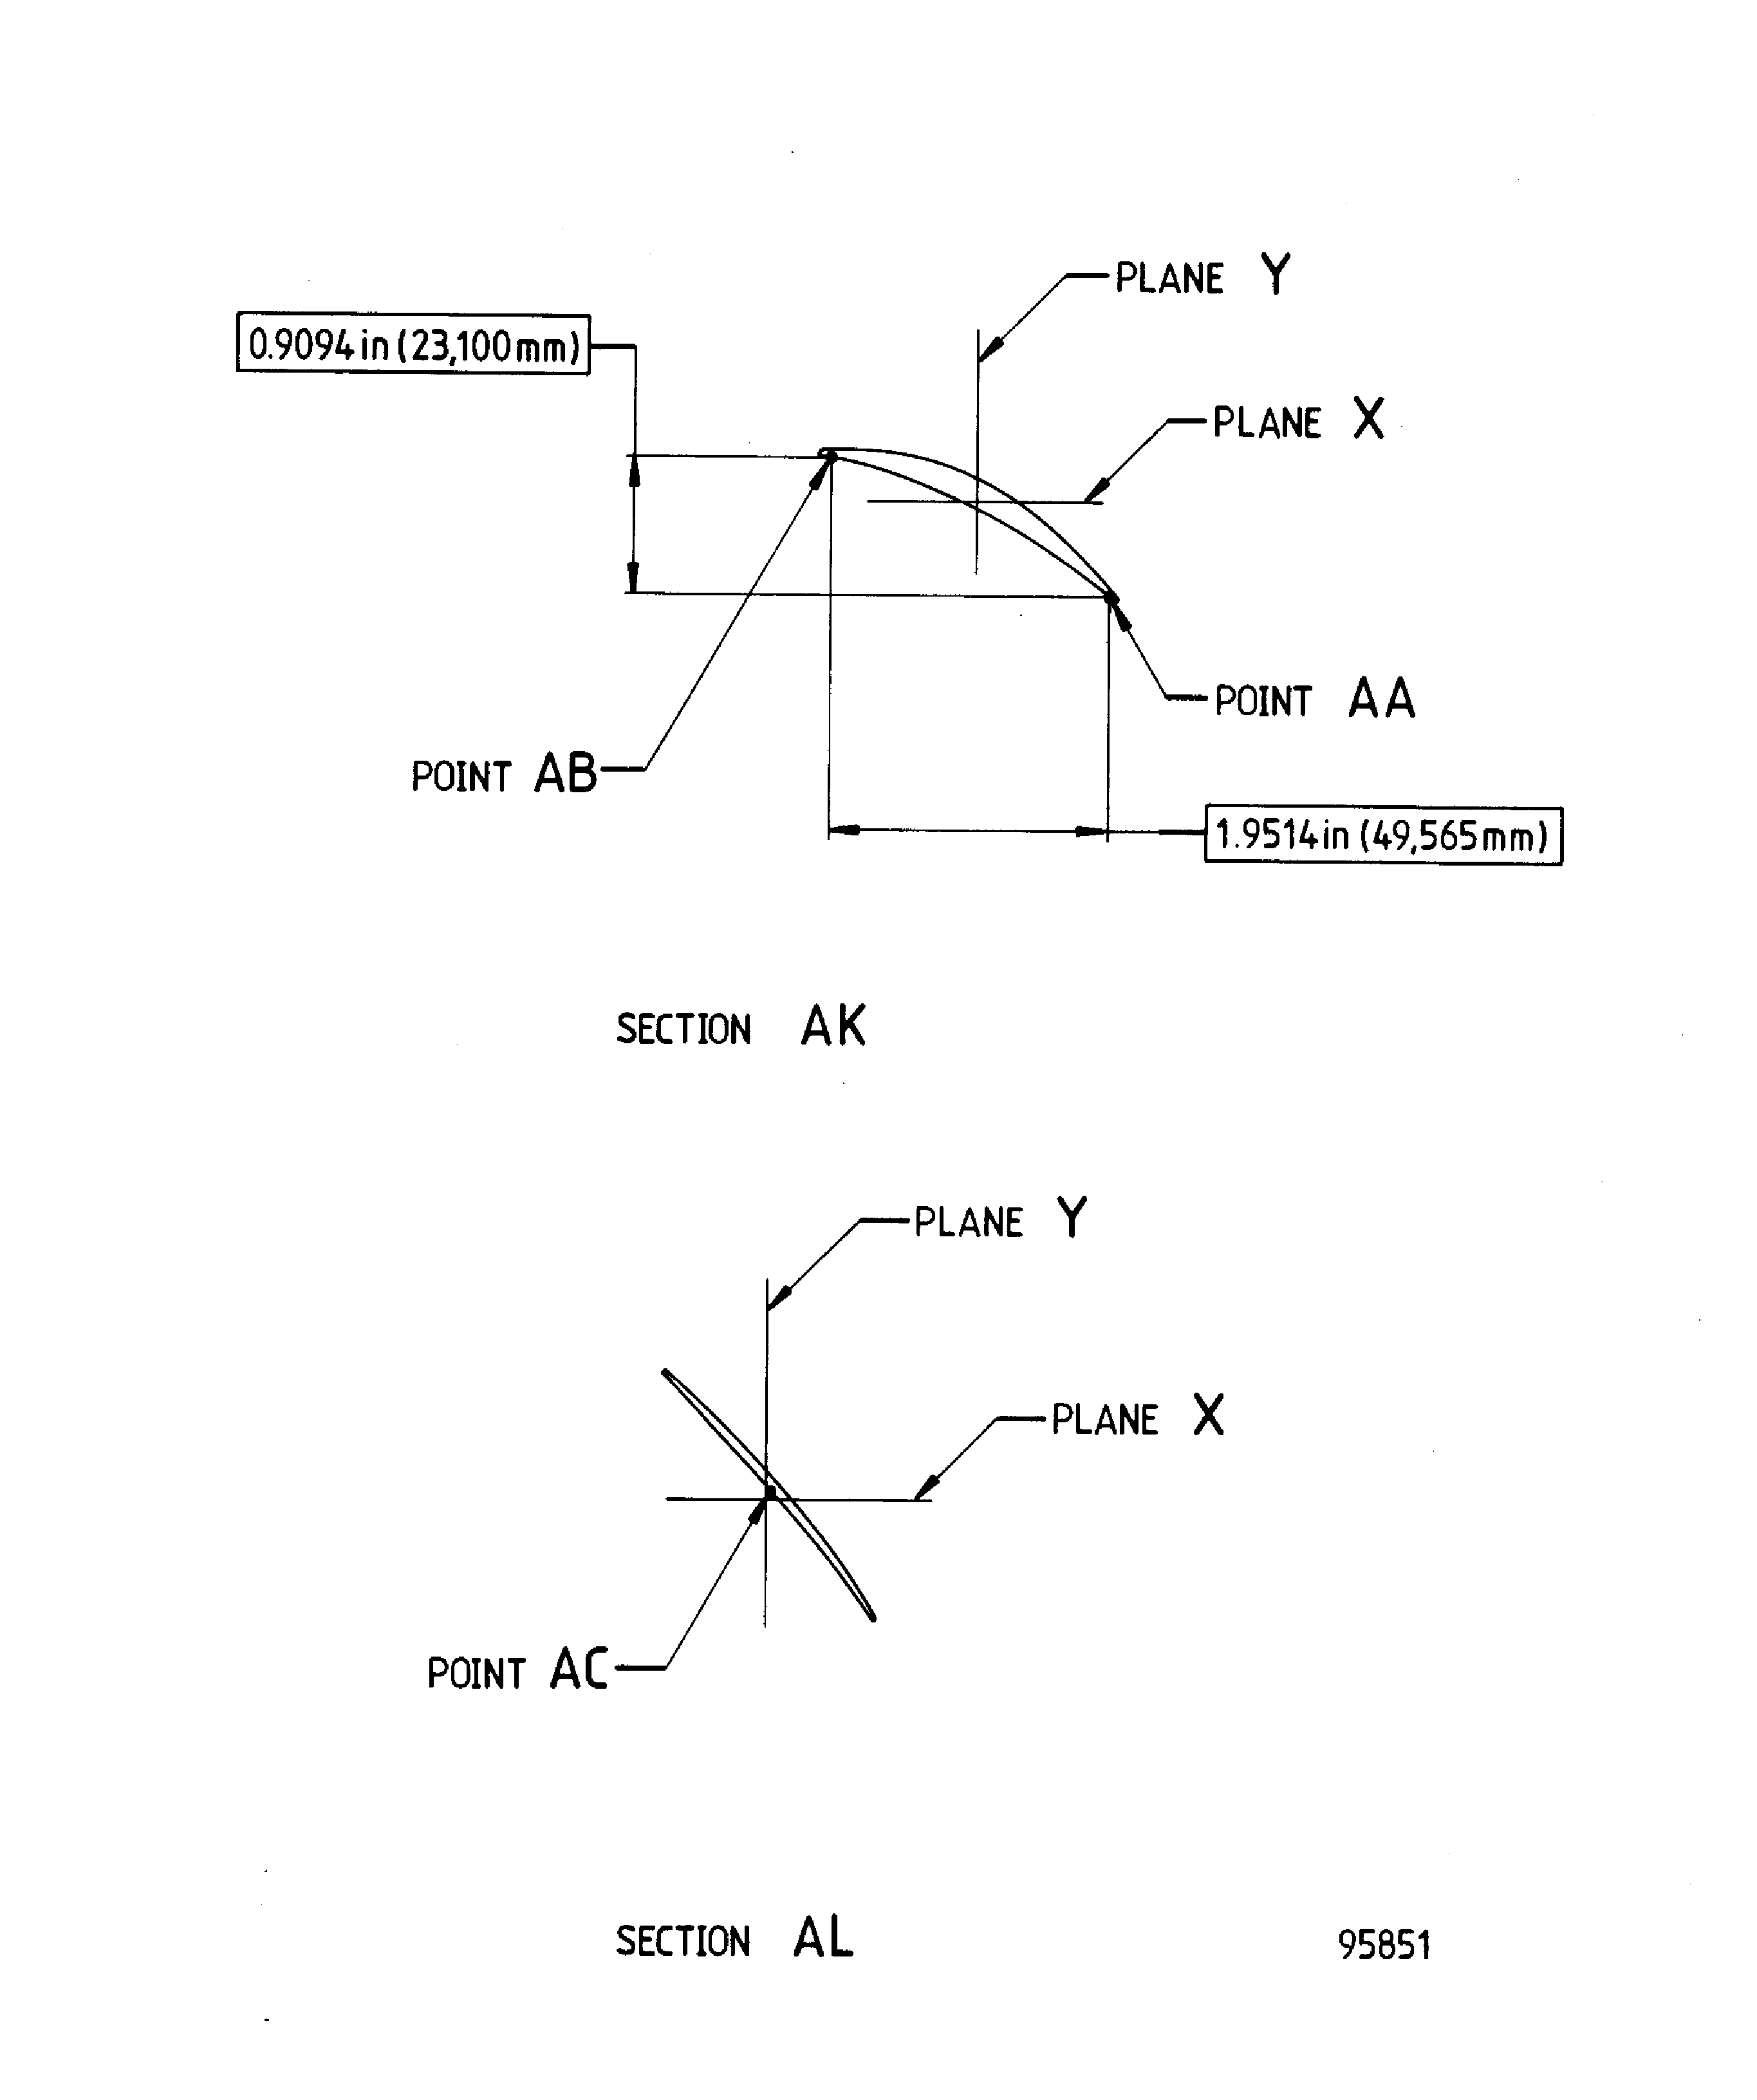
Figure: Repair Details And Dimensions - Assembly E
Repair Details And Dimensions - Assembly E
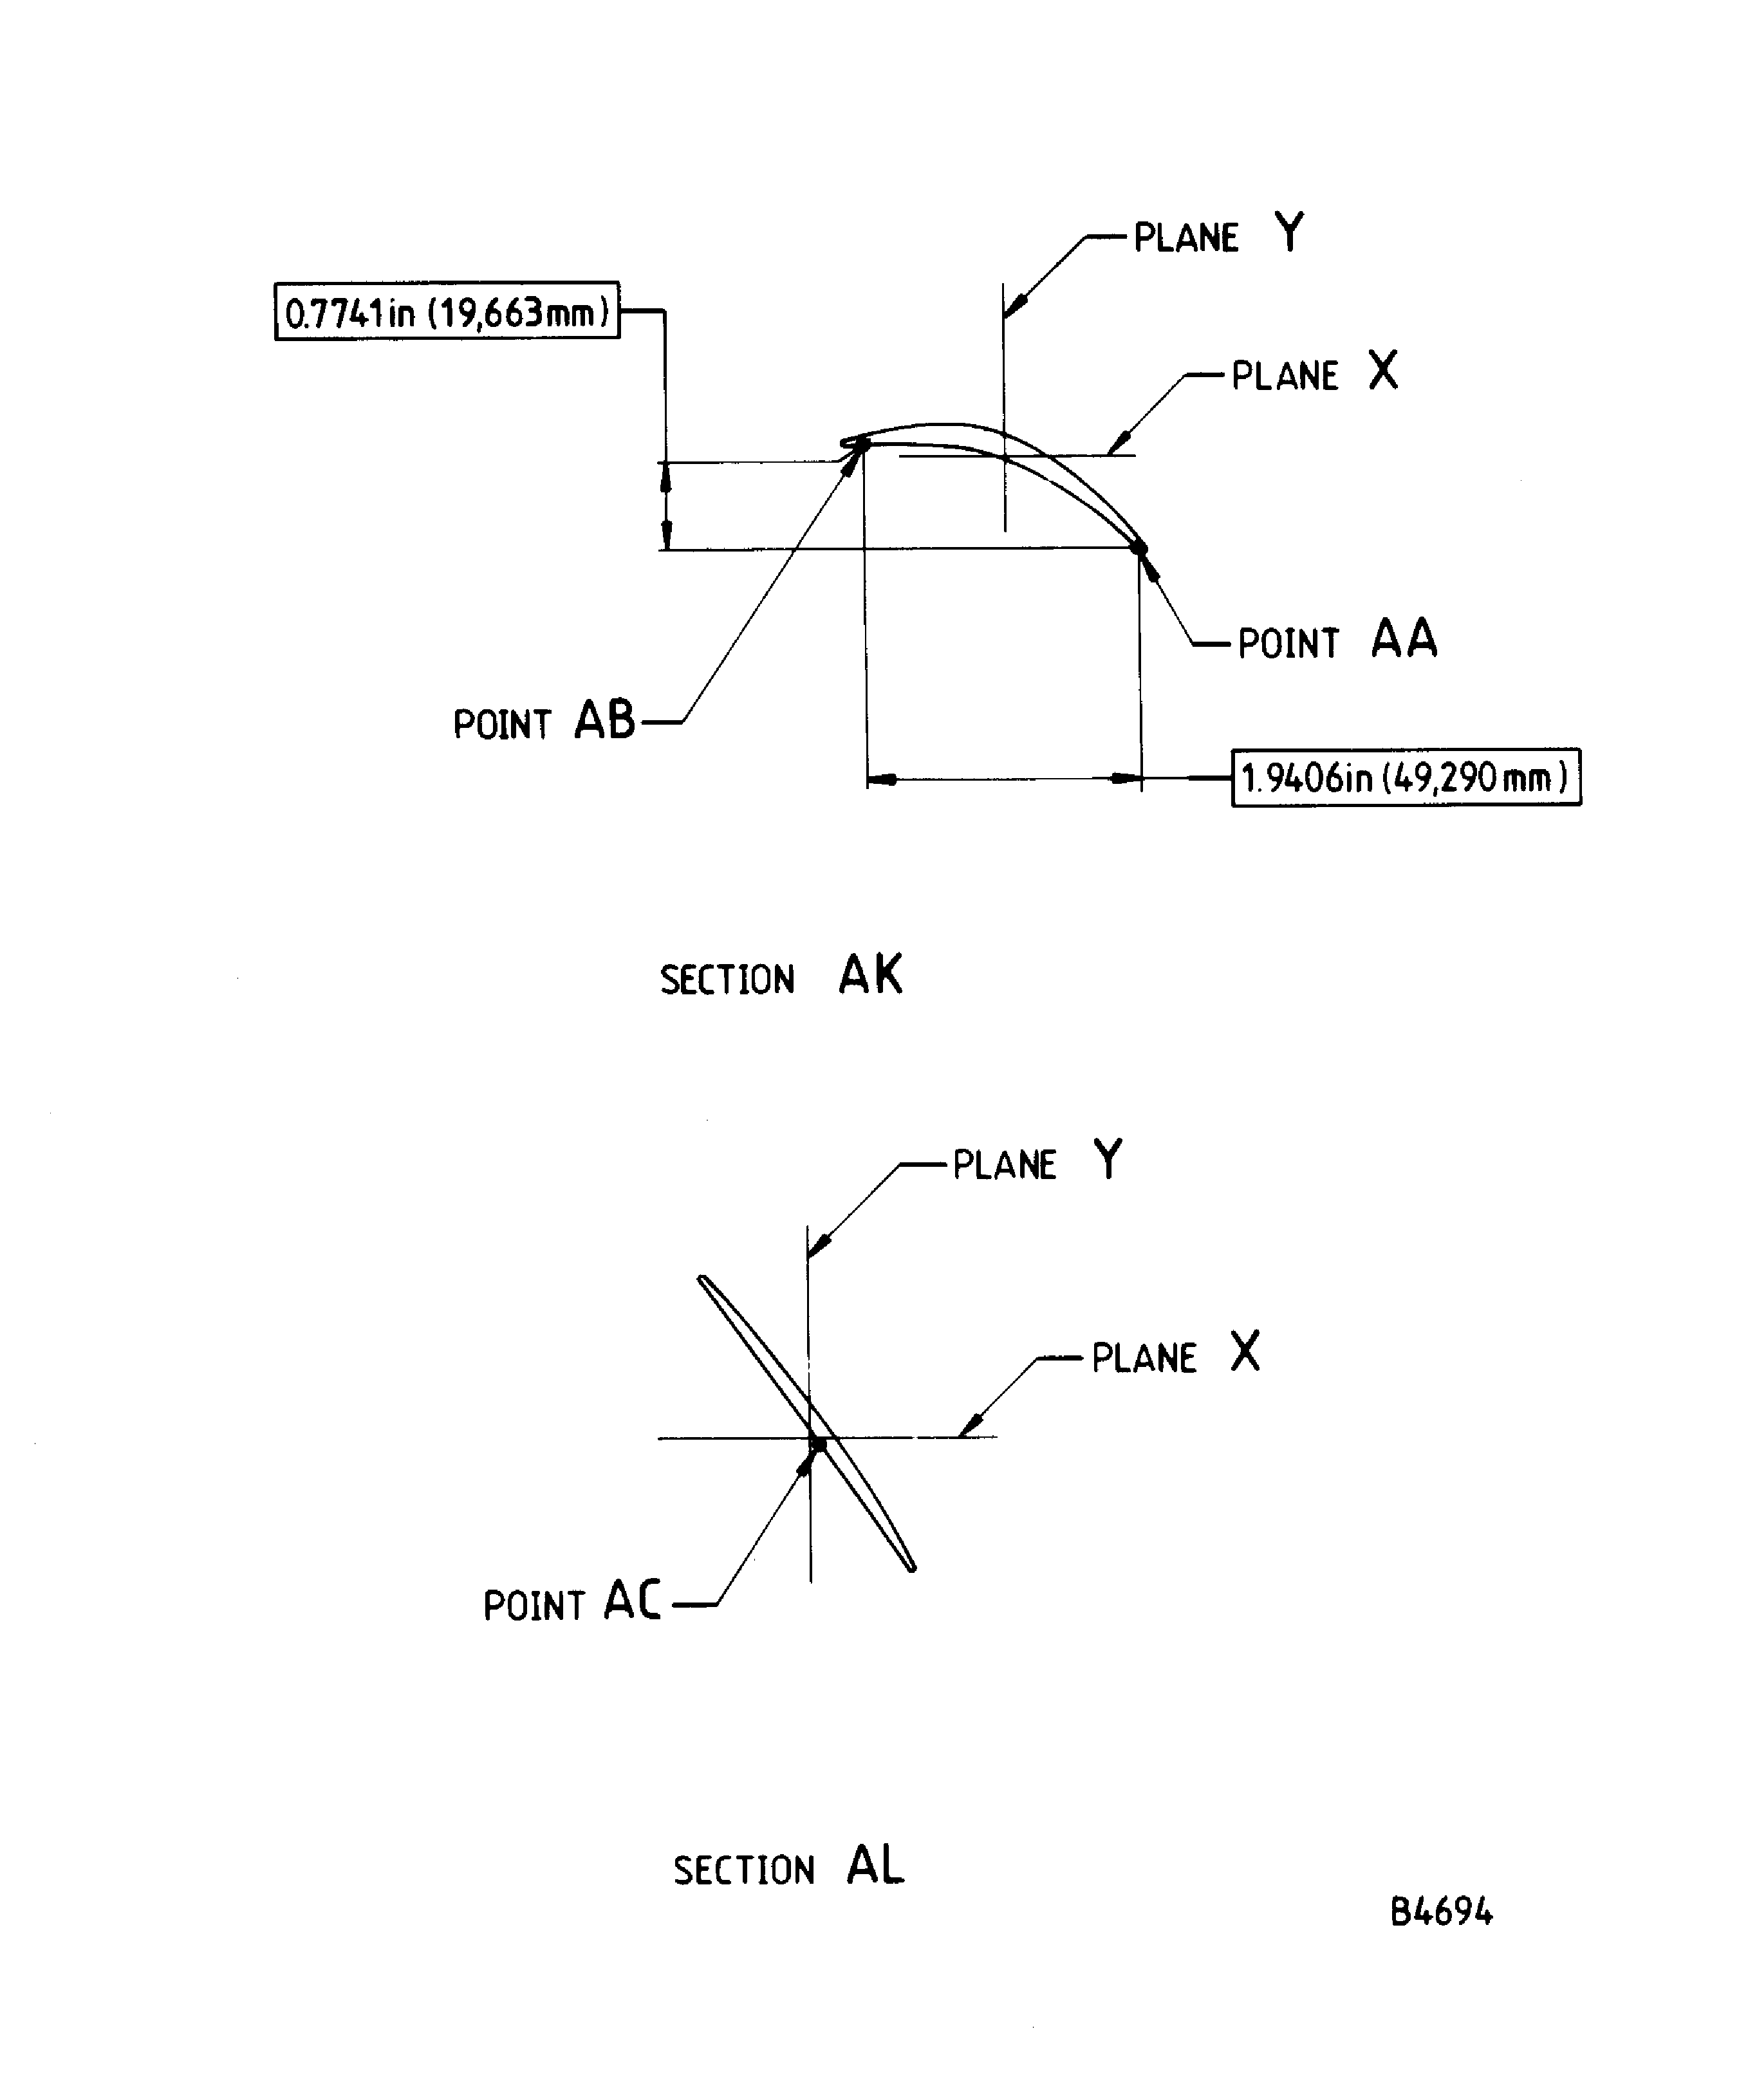
Figure: Repair Details And Dimensions - Assembly F
Repair Details And Dimensions - Assembly F
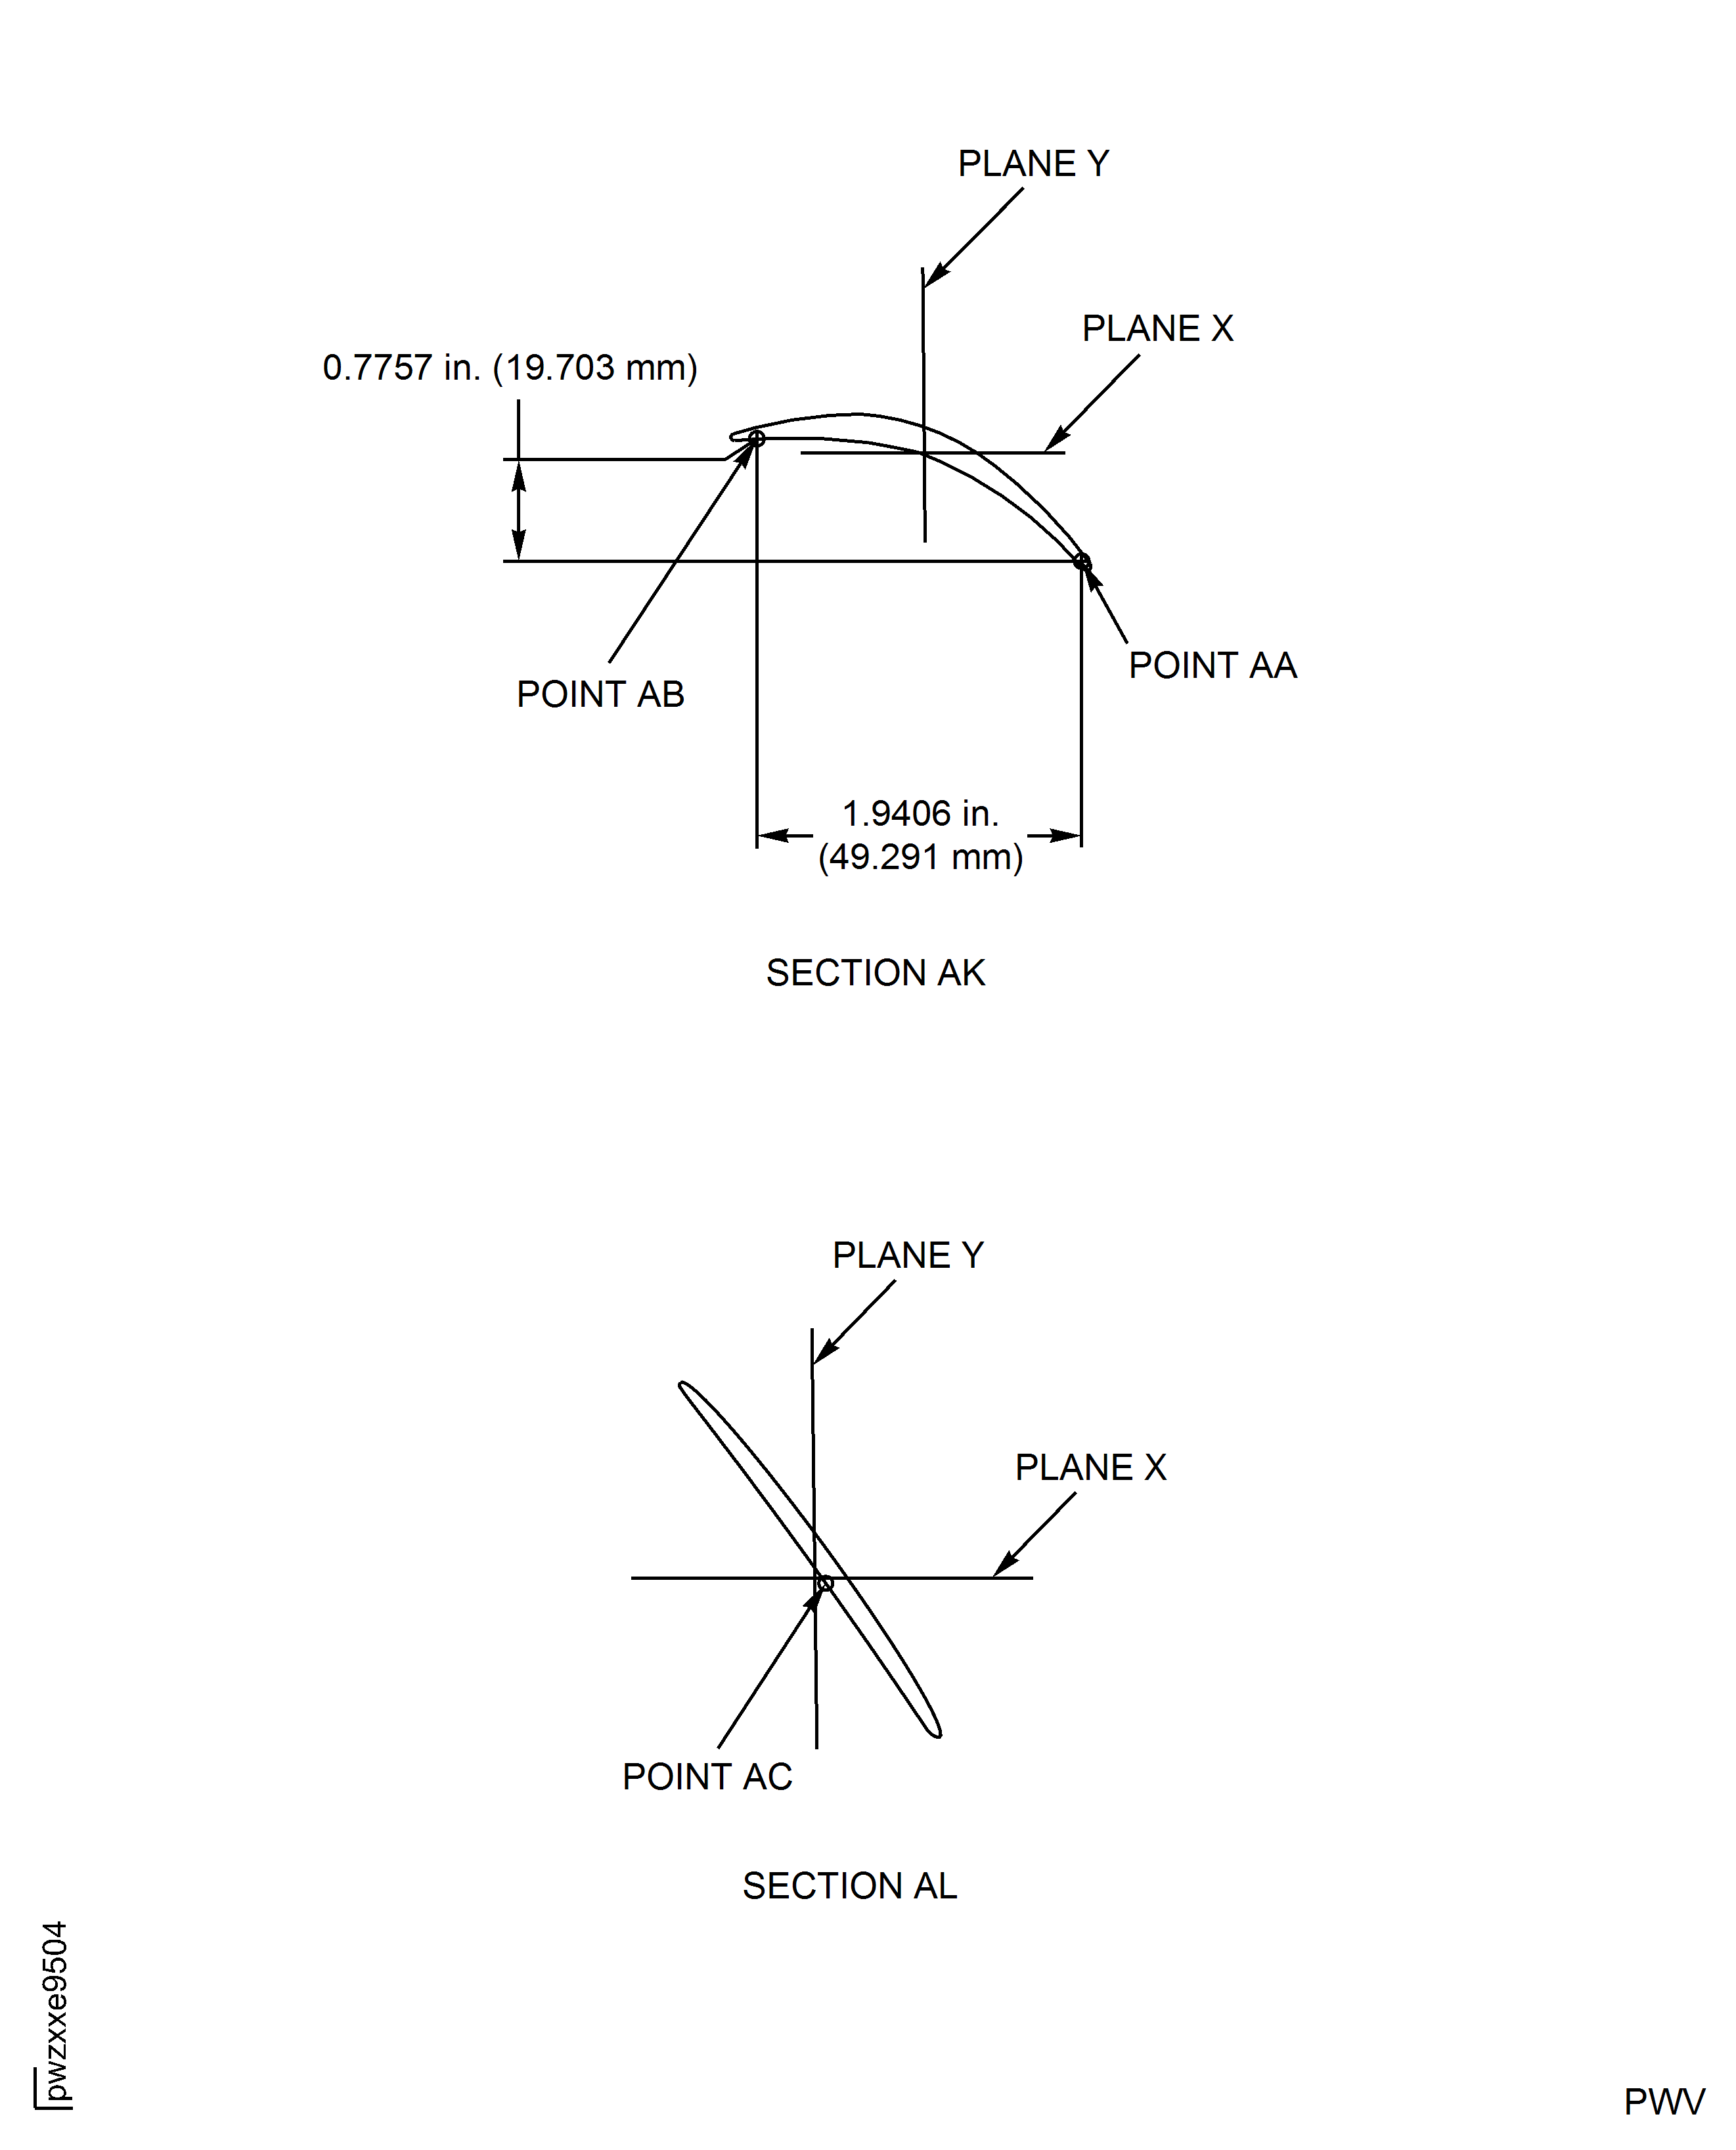
Figure: Repair Details And Dimensions - Assembly A, B, E, and F
Repair Details And Dimensions - Assembly A, B, E, and F
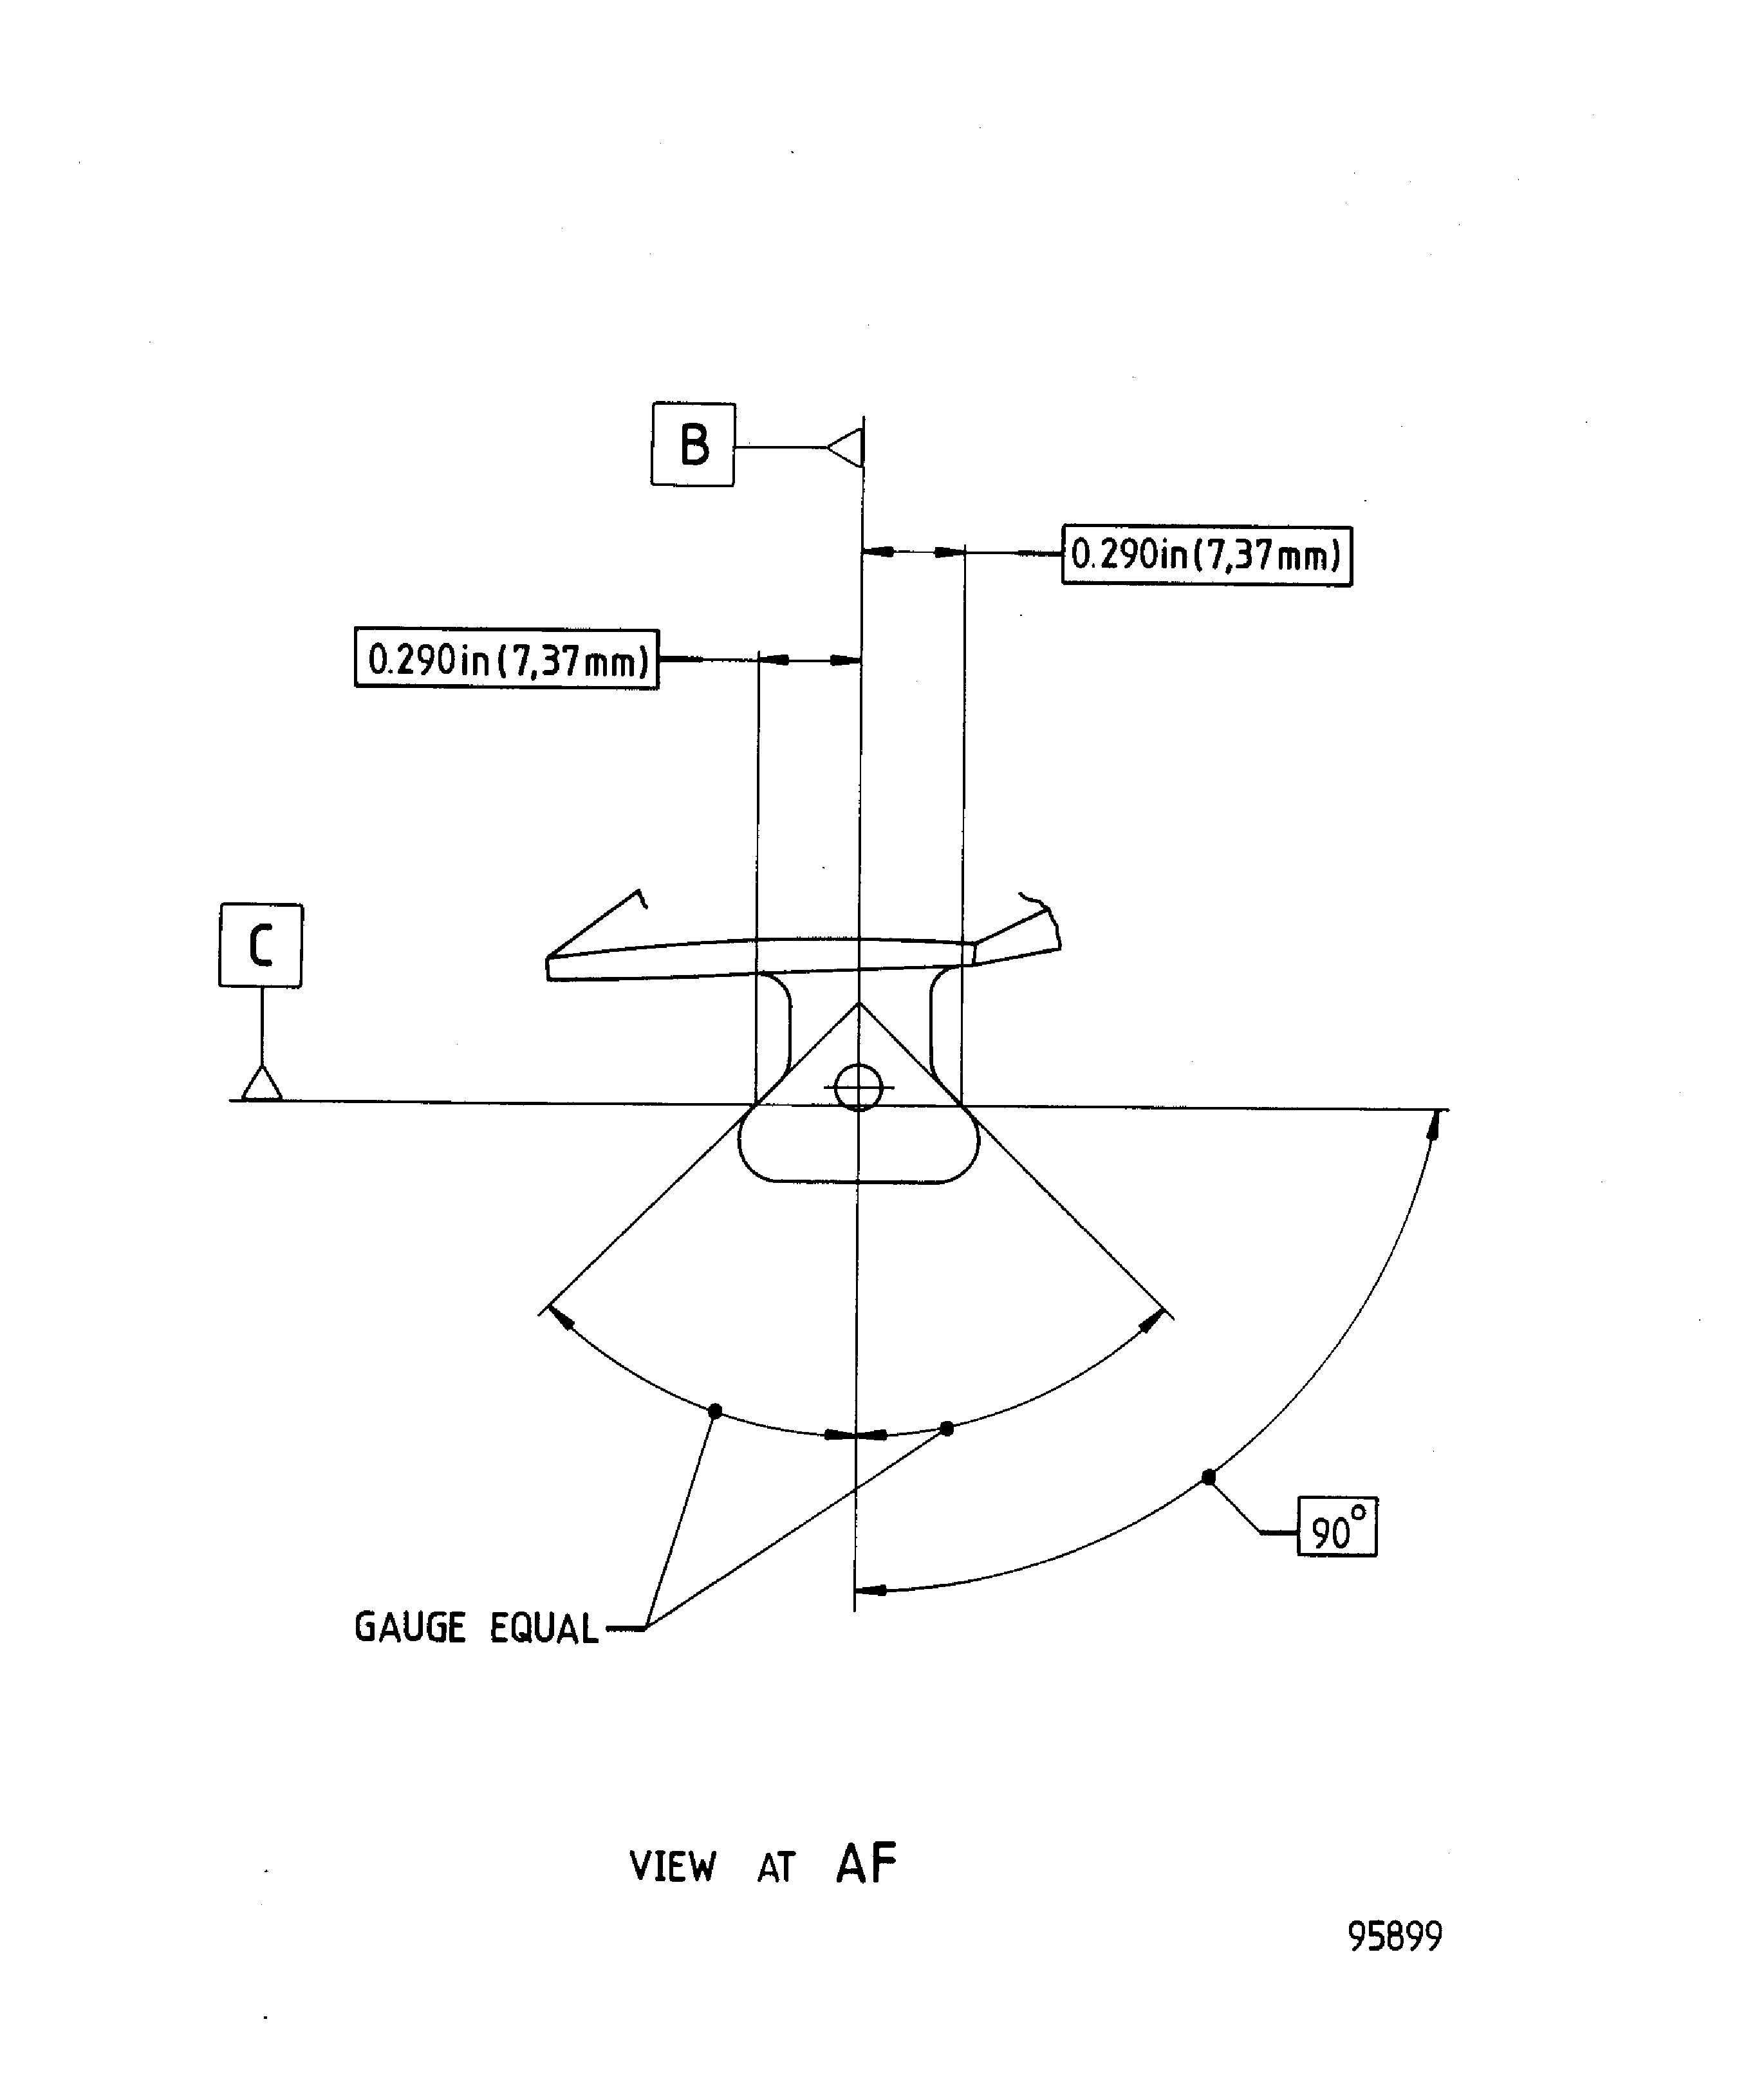
Figure: Repair Details And Dimensions - Assembly A And B
Repair Details And Dimensions - Assembly A And B
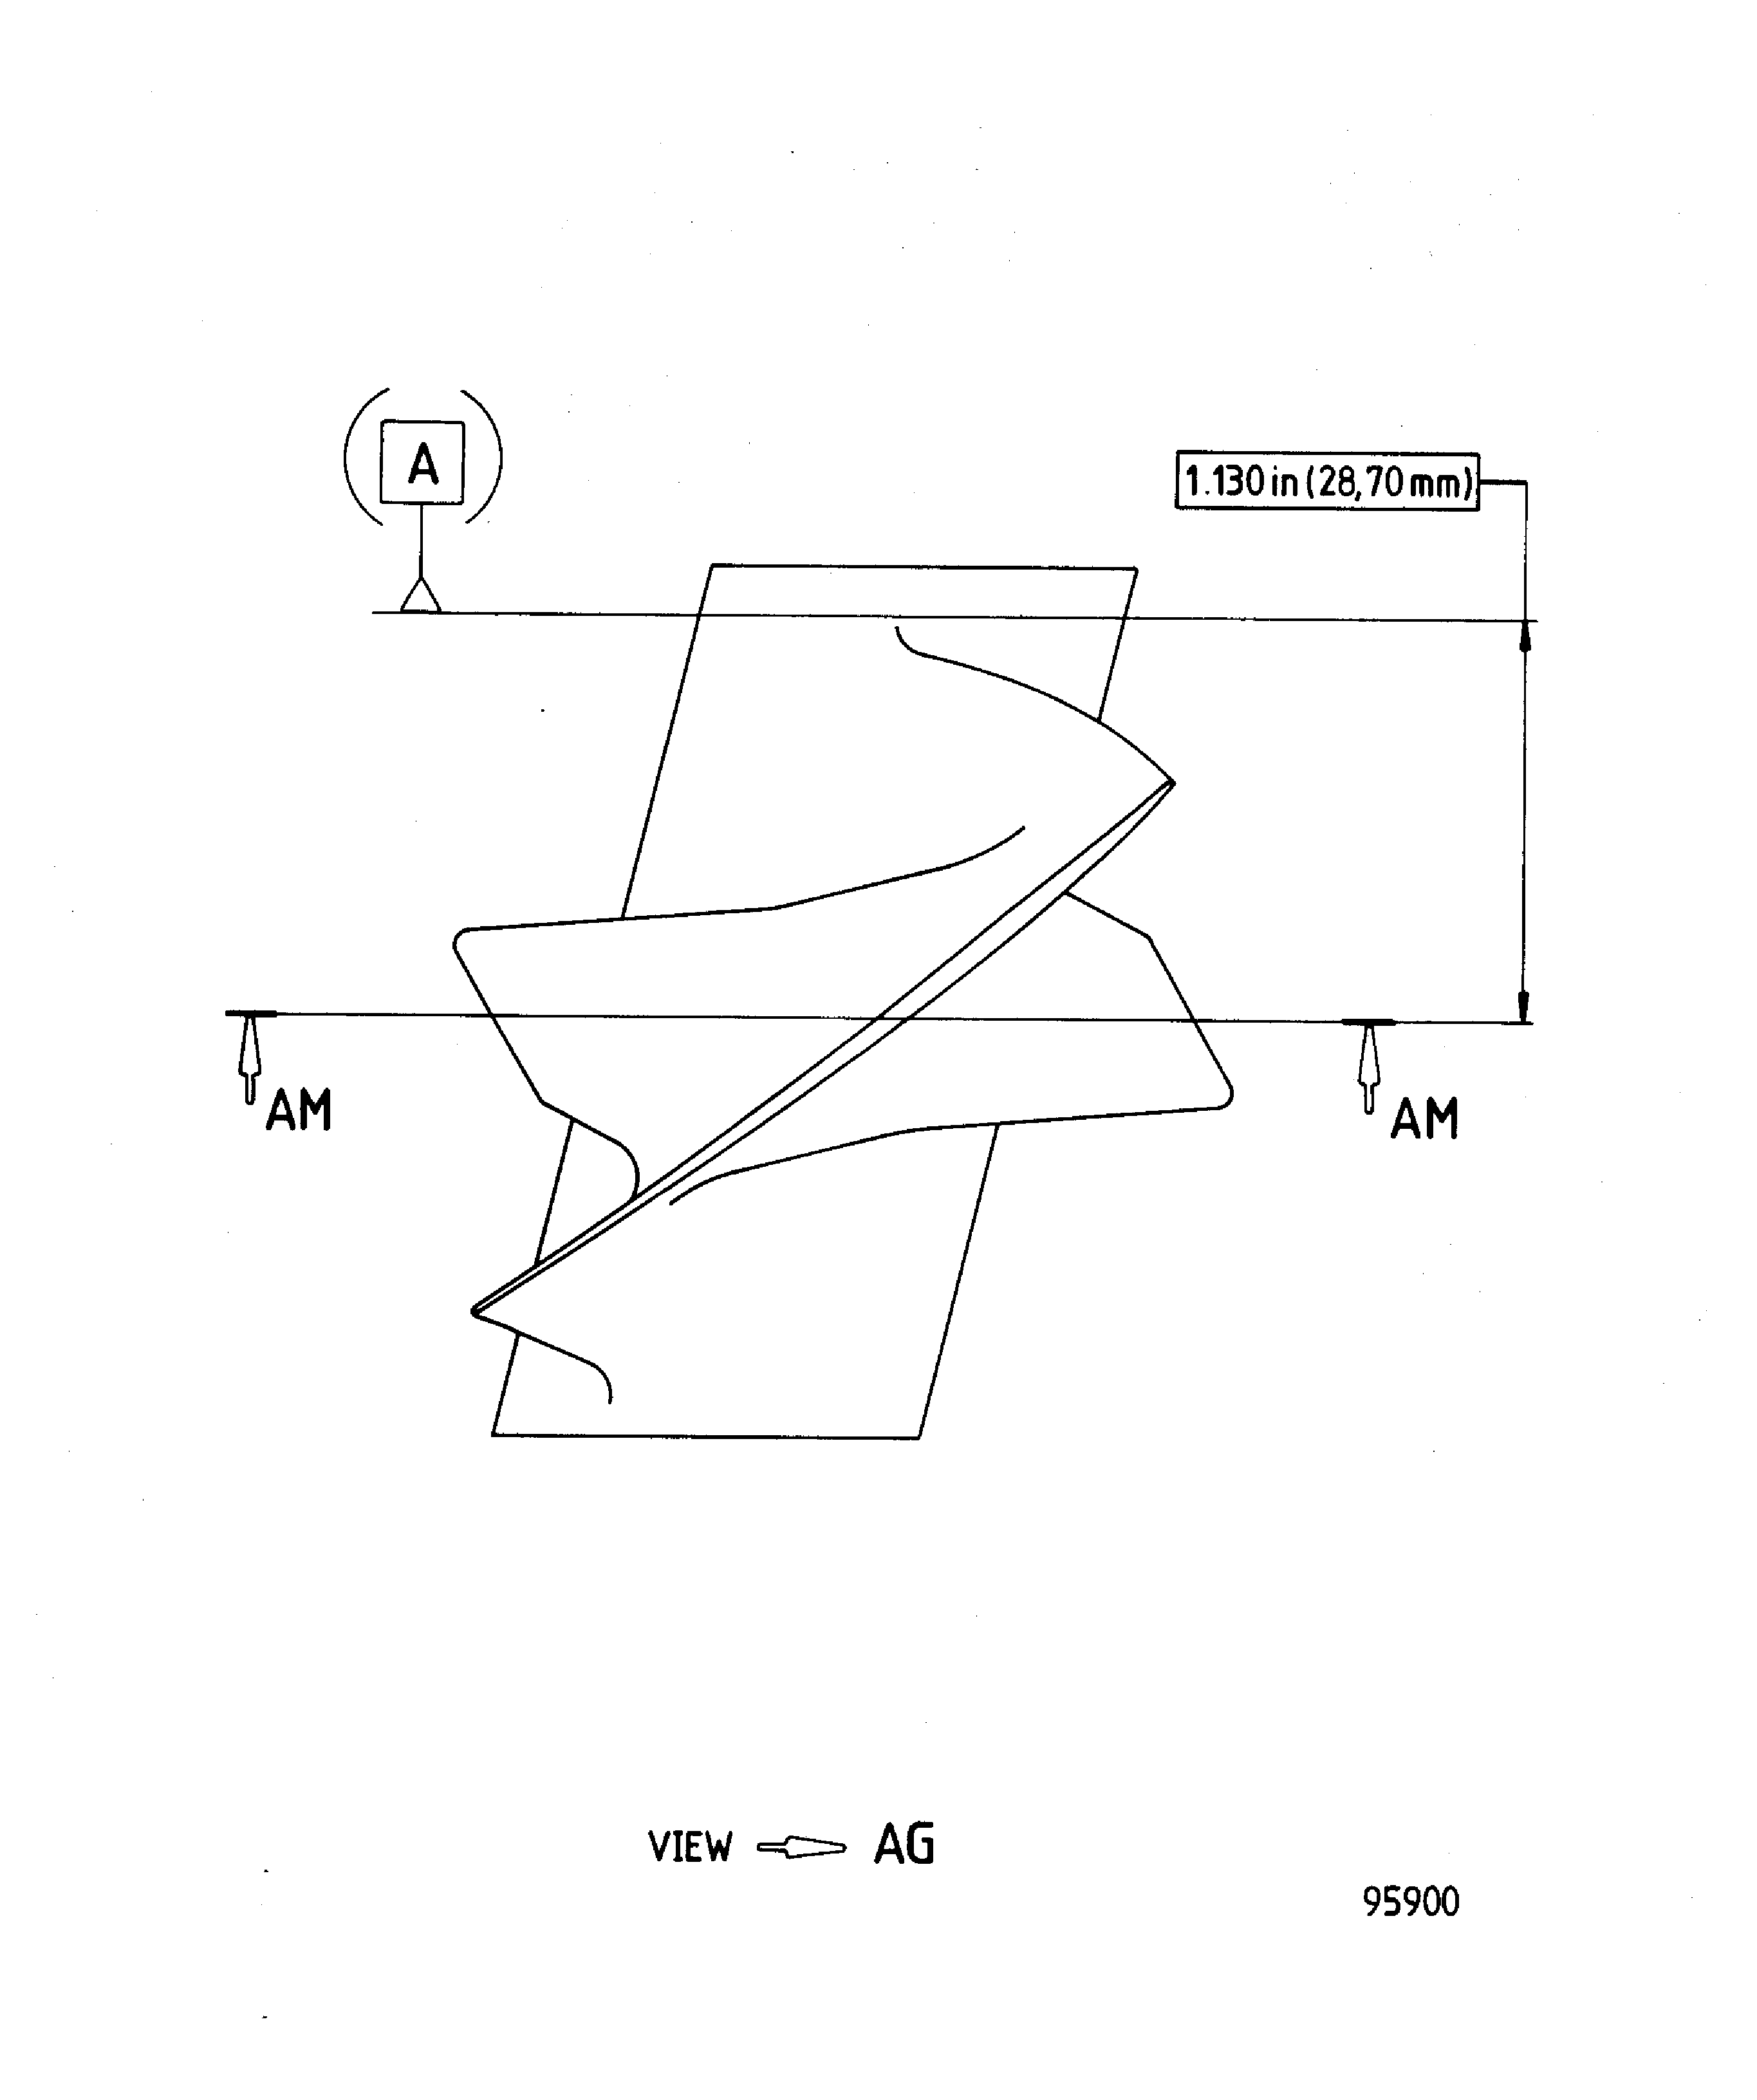
Figure: Repair Details And Dimensions - Assembly E And F
Repair Details And Dimensions - Assembly E And F
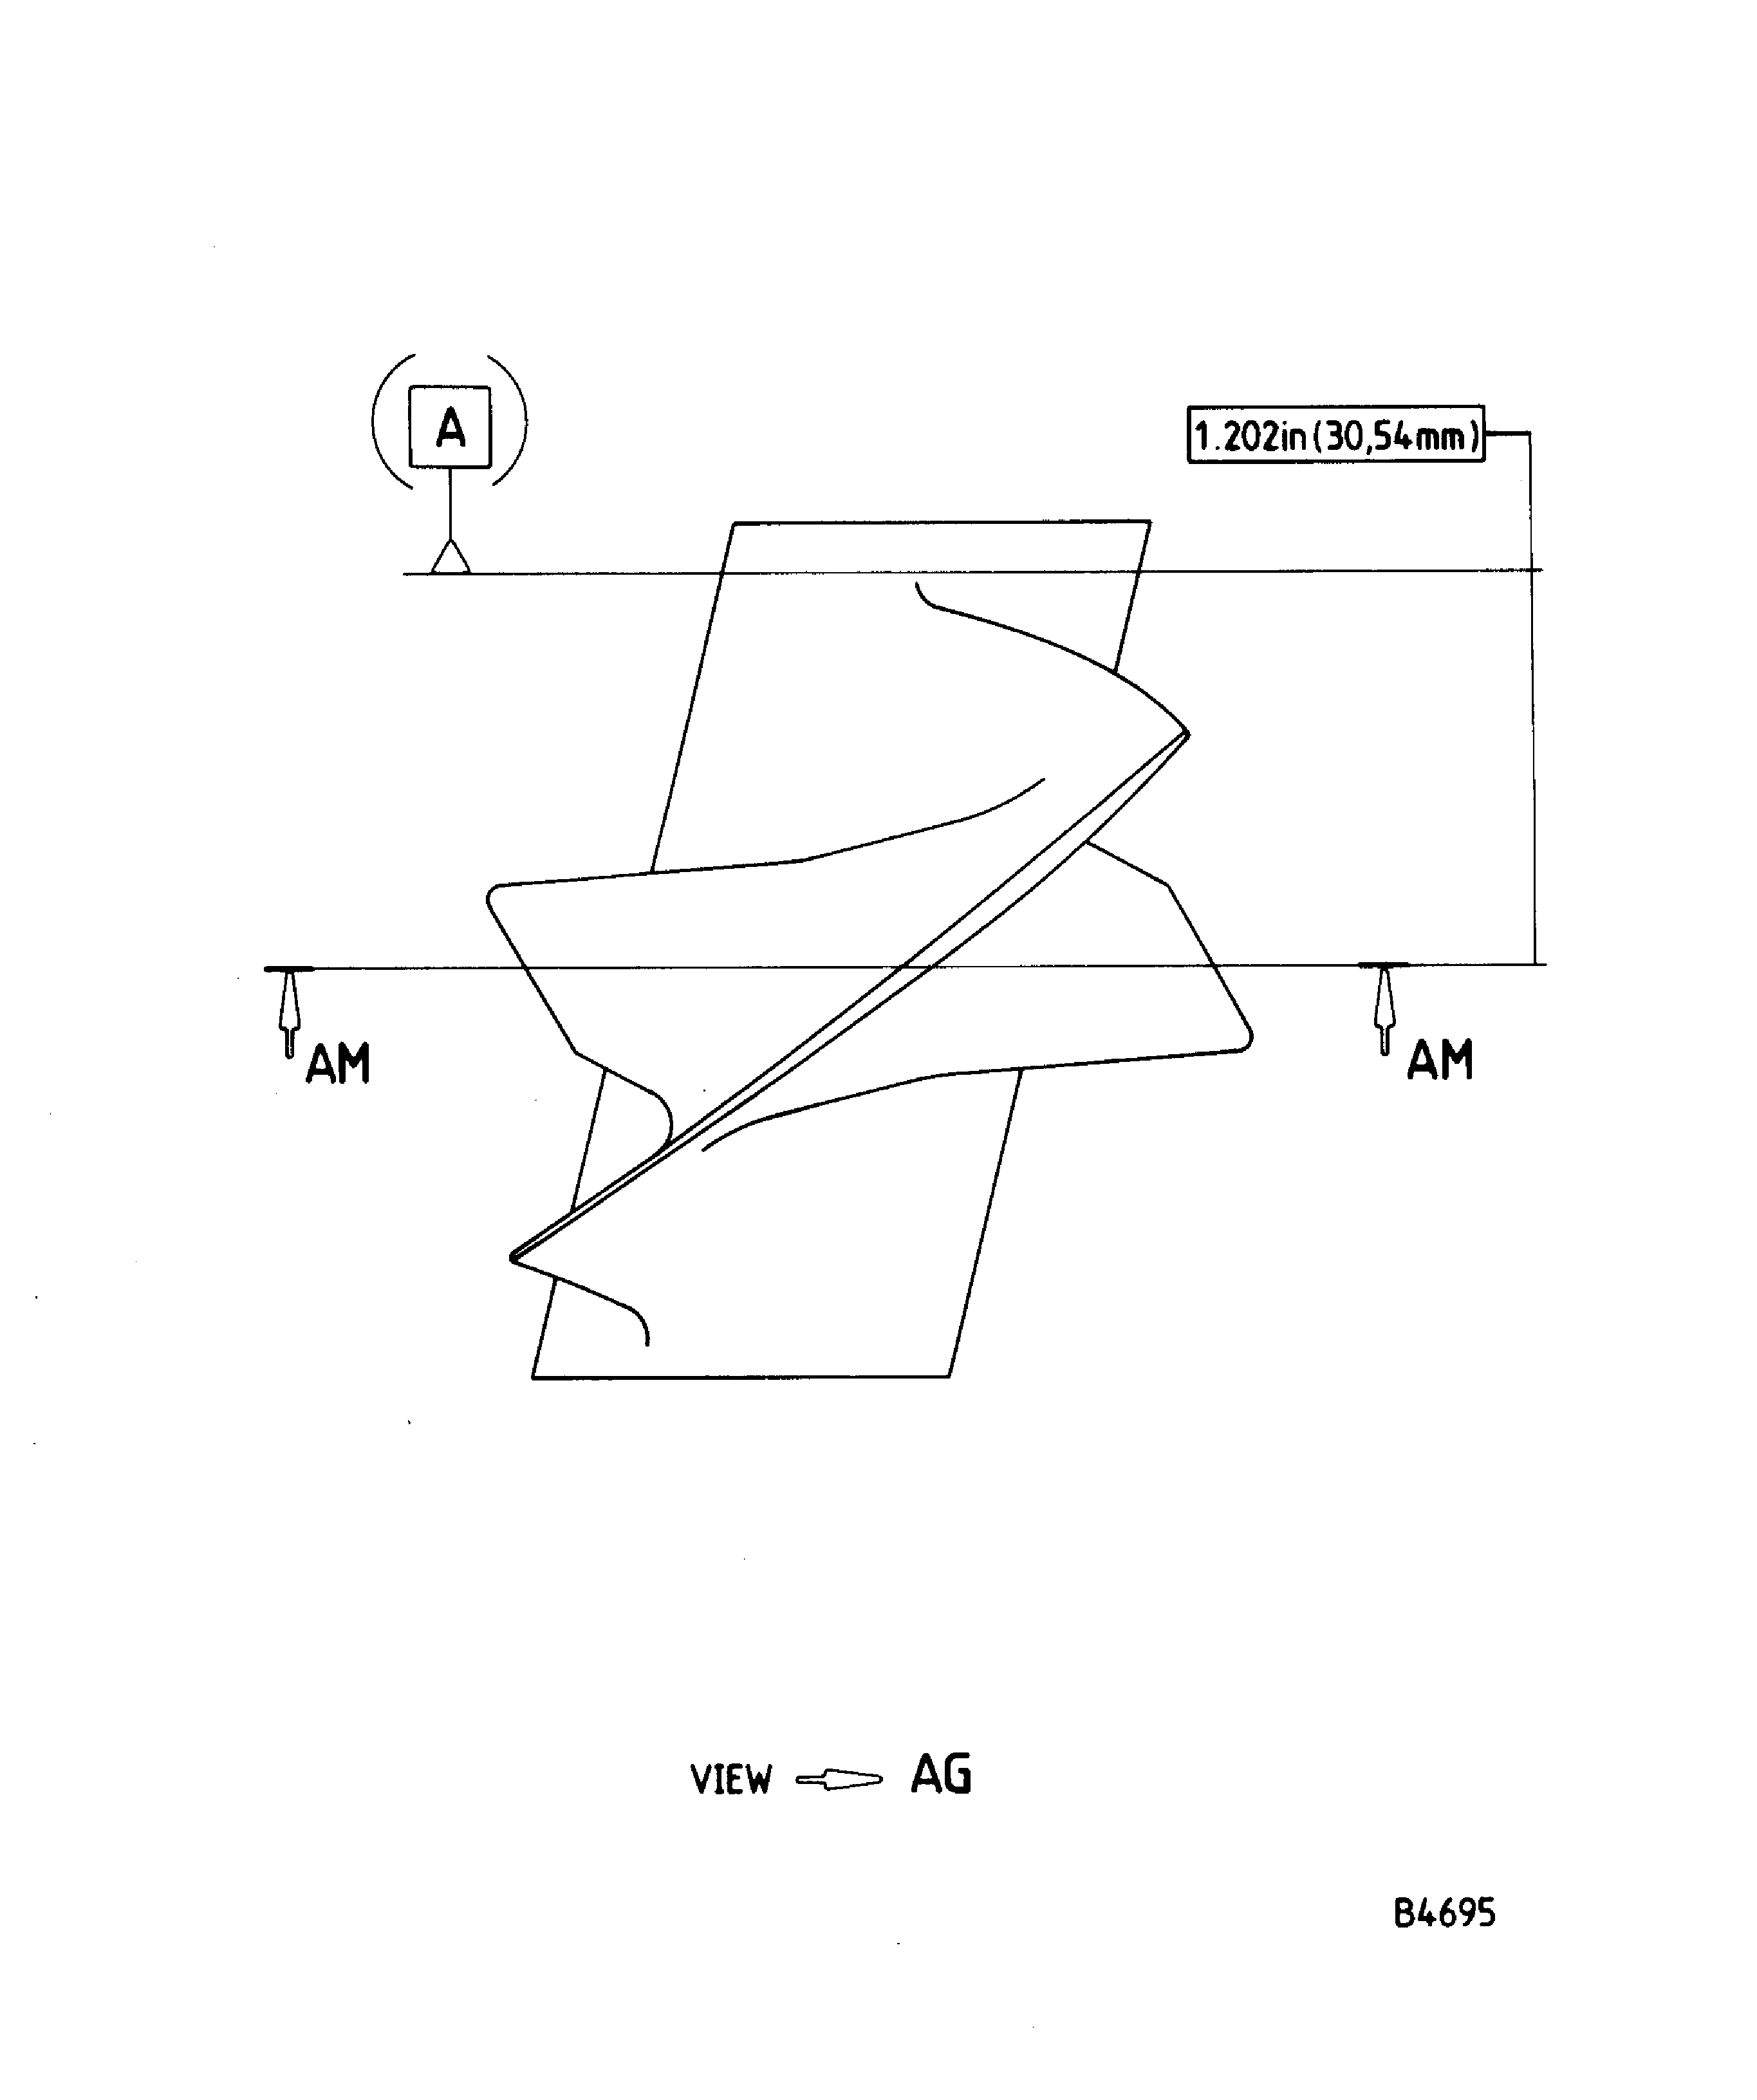
Figure: Repair Details And Dimensions - Assembly A And B (Post Machining, Pre-Weld)
Repair Details And Dimensions - Assembly A And B (Post Machining, Pre-Weld)
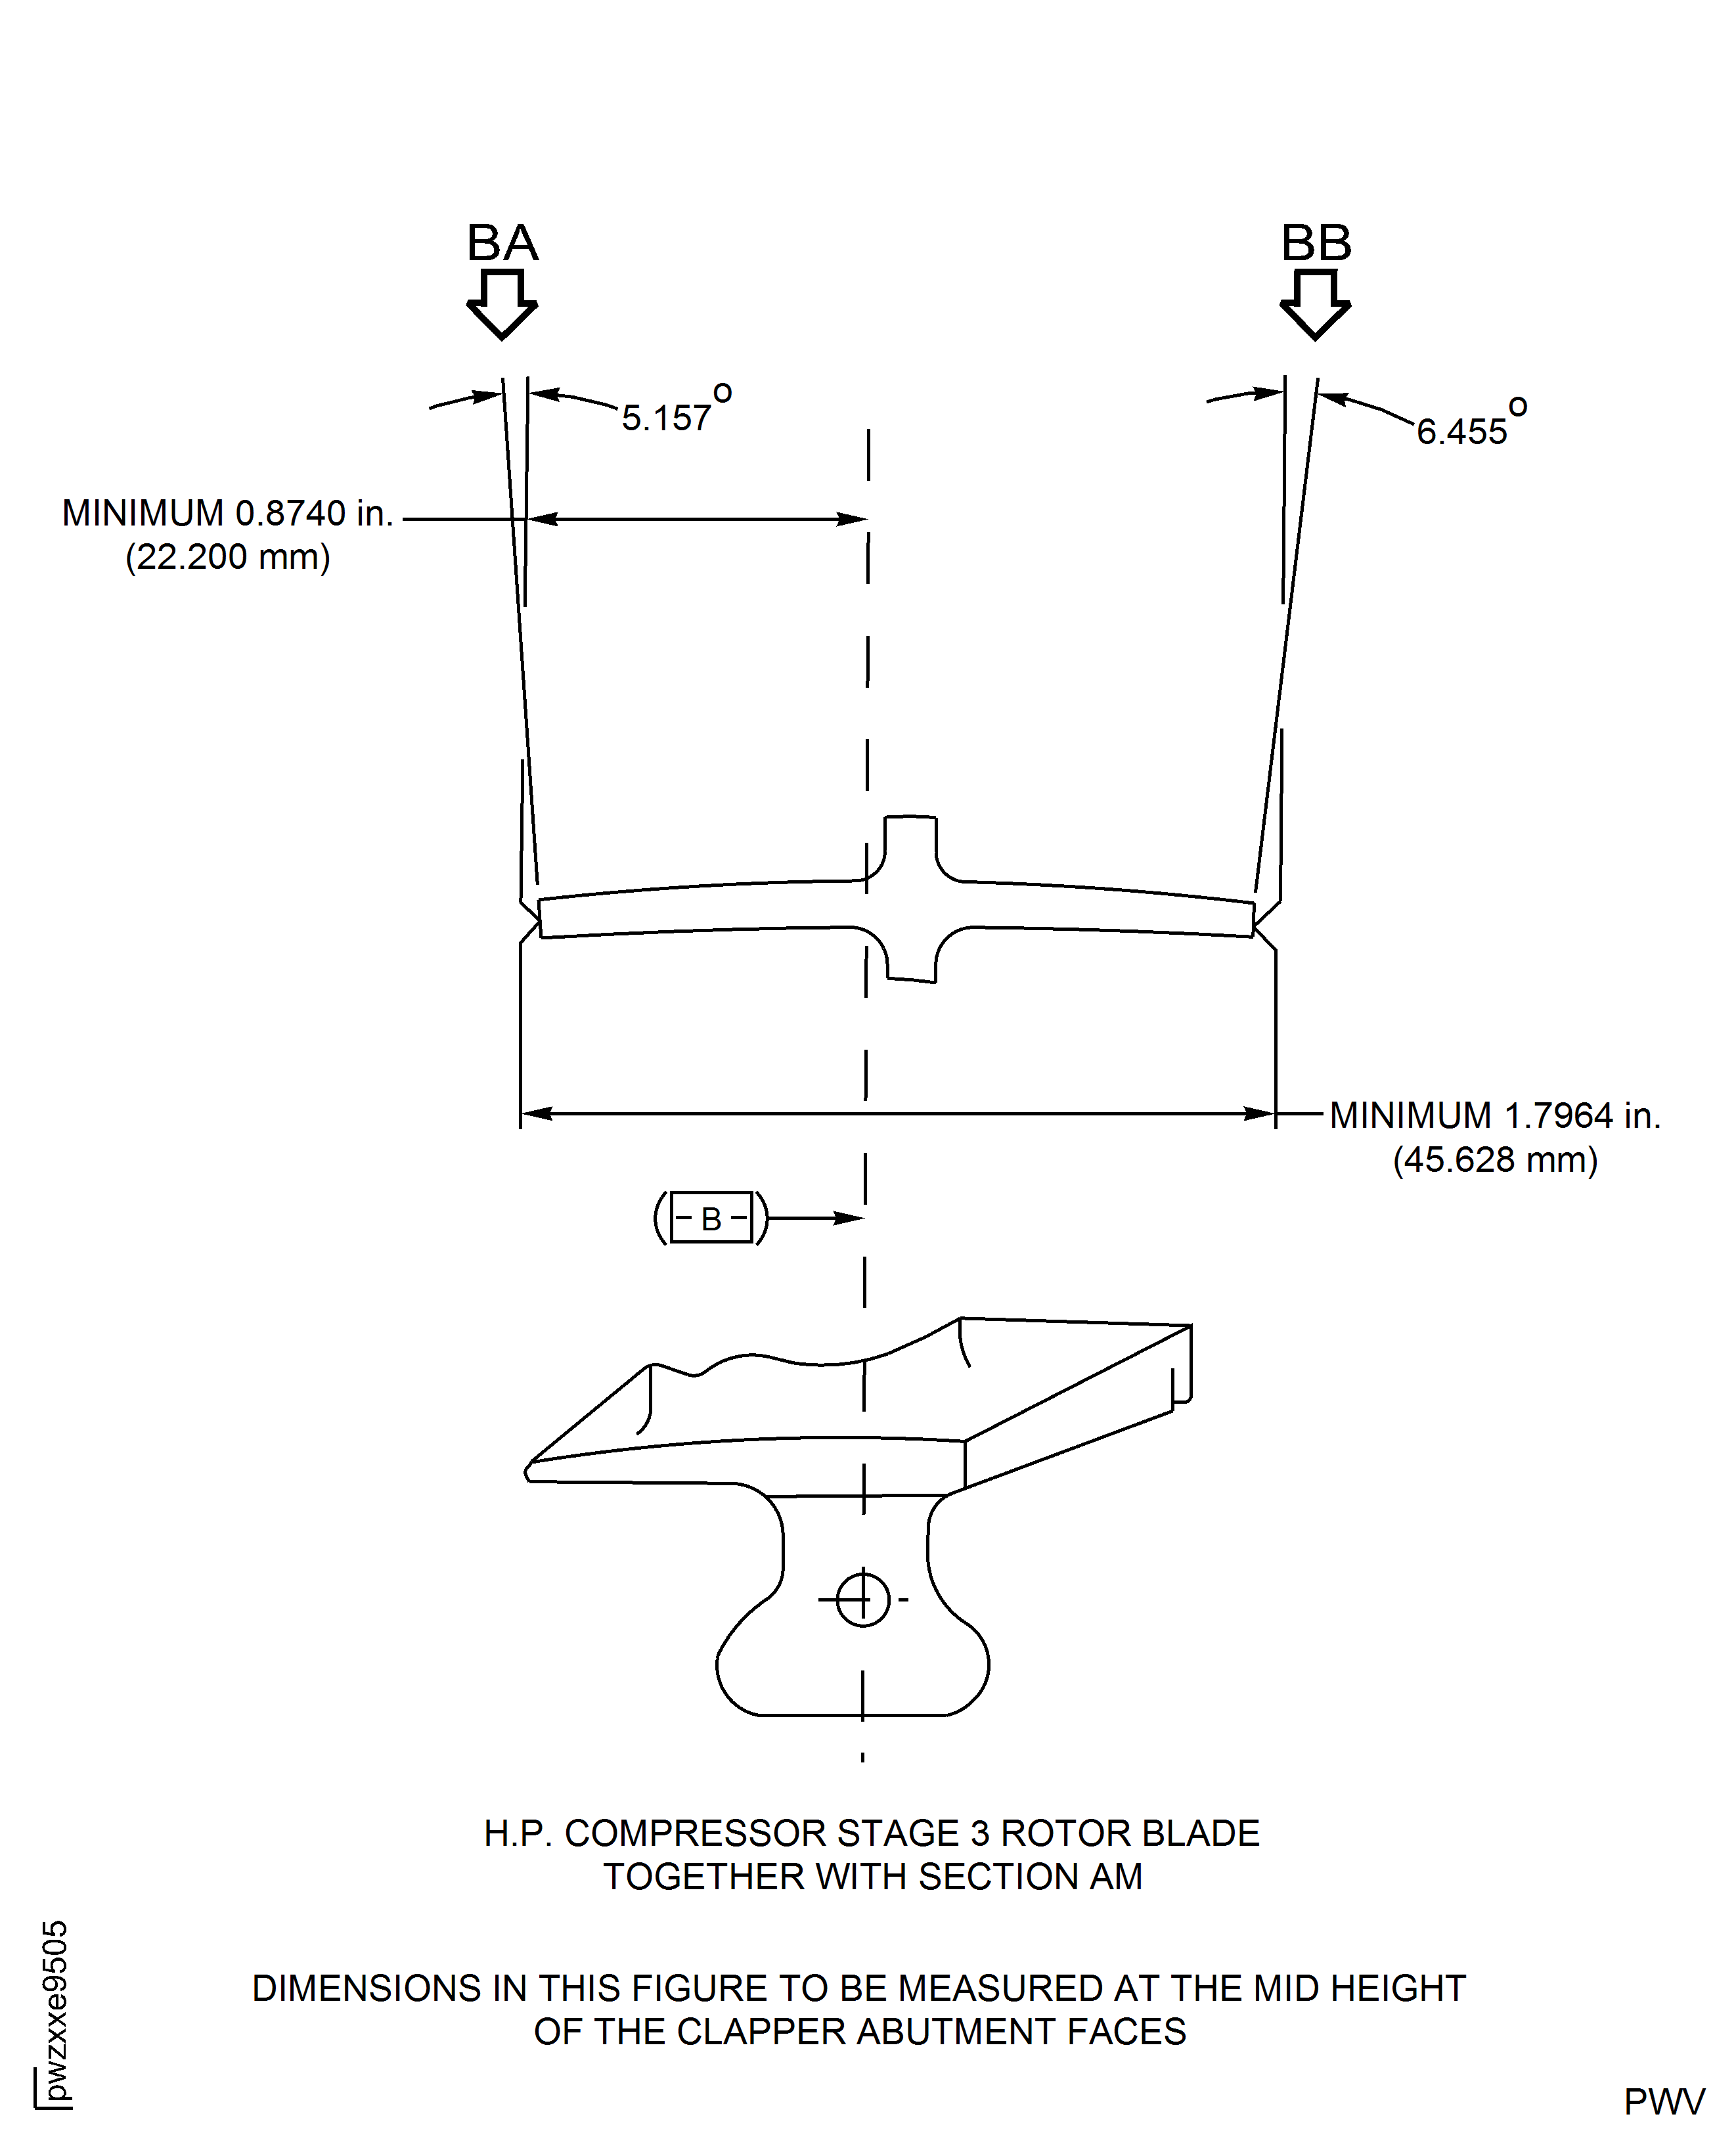
Figure: Repair Details And Dimensions - Assembly C And D (Post Machining, Pre-Weld) (Deleted)
Repair Details And Dimensions - Assembly C And D (Post Machining, Pre-Weld) (Deleted)

Figure: Repair Details And Dimensions - Assembly A And B (Post Machining, Post-Weld)
Repair Details And Dimensions - Assembly A And B (Post Machining, Post-Weld)
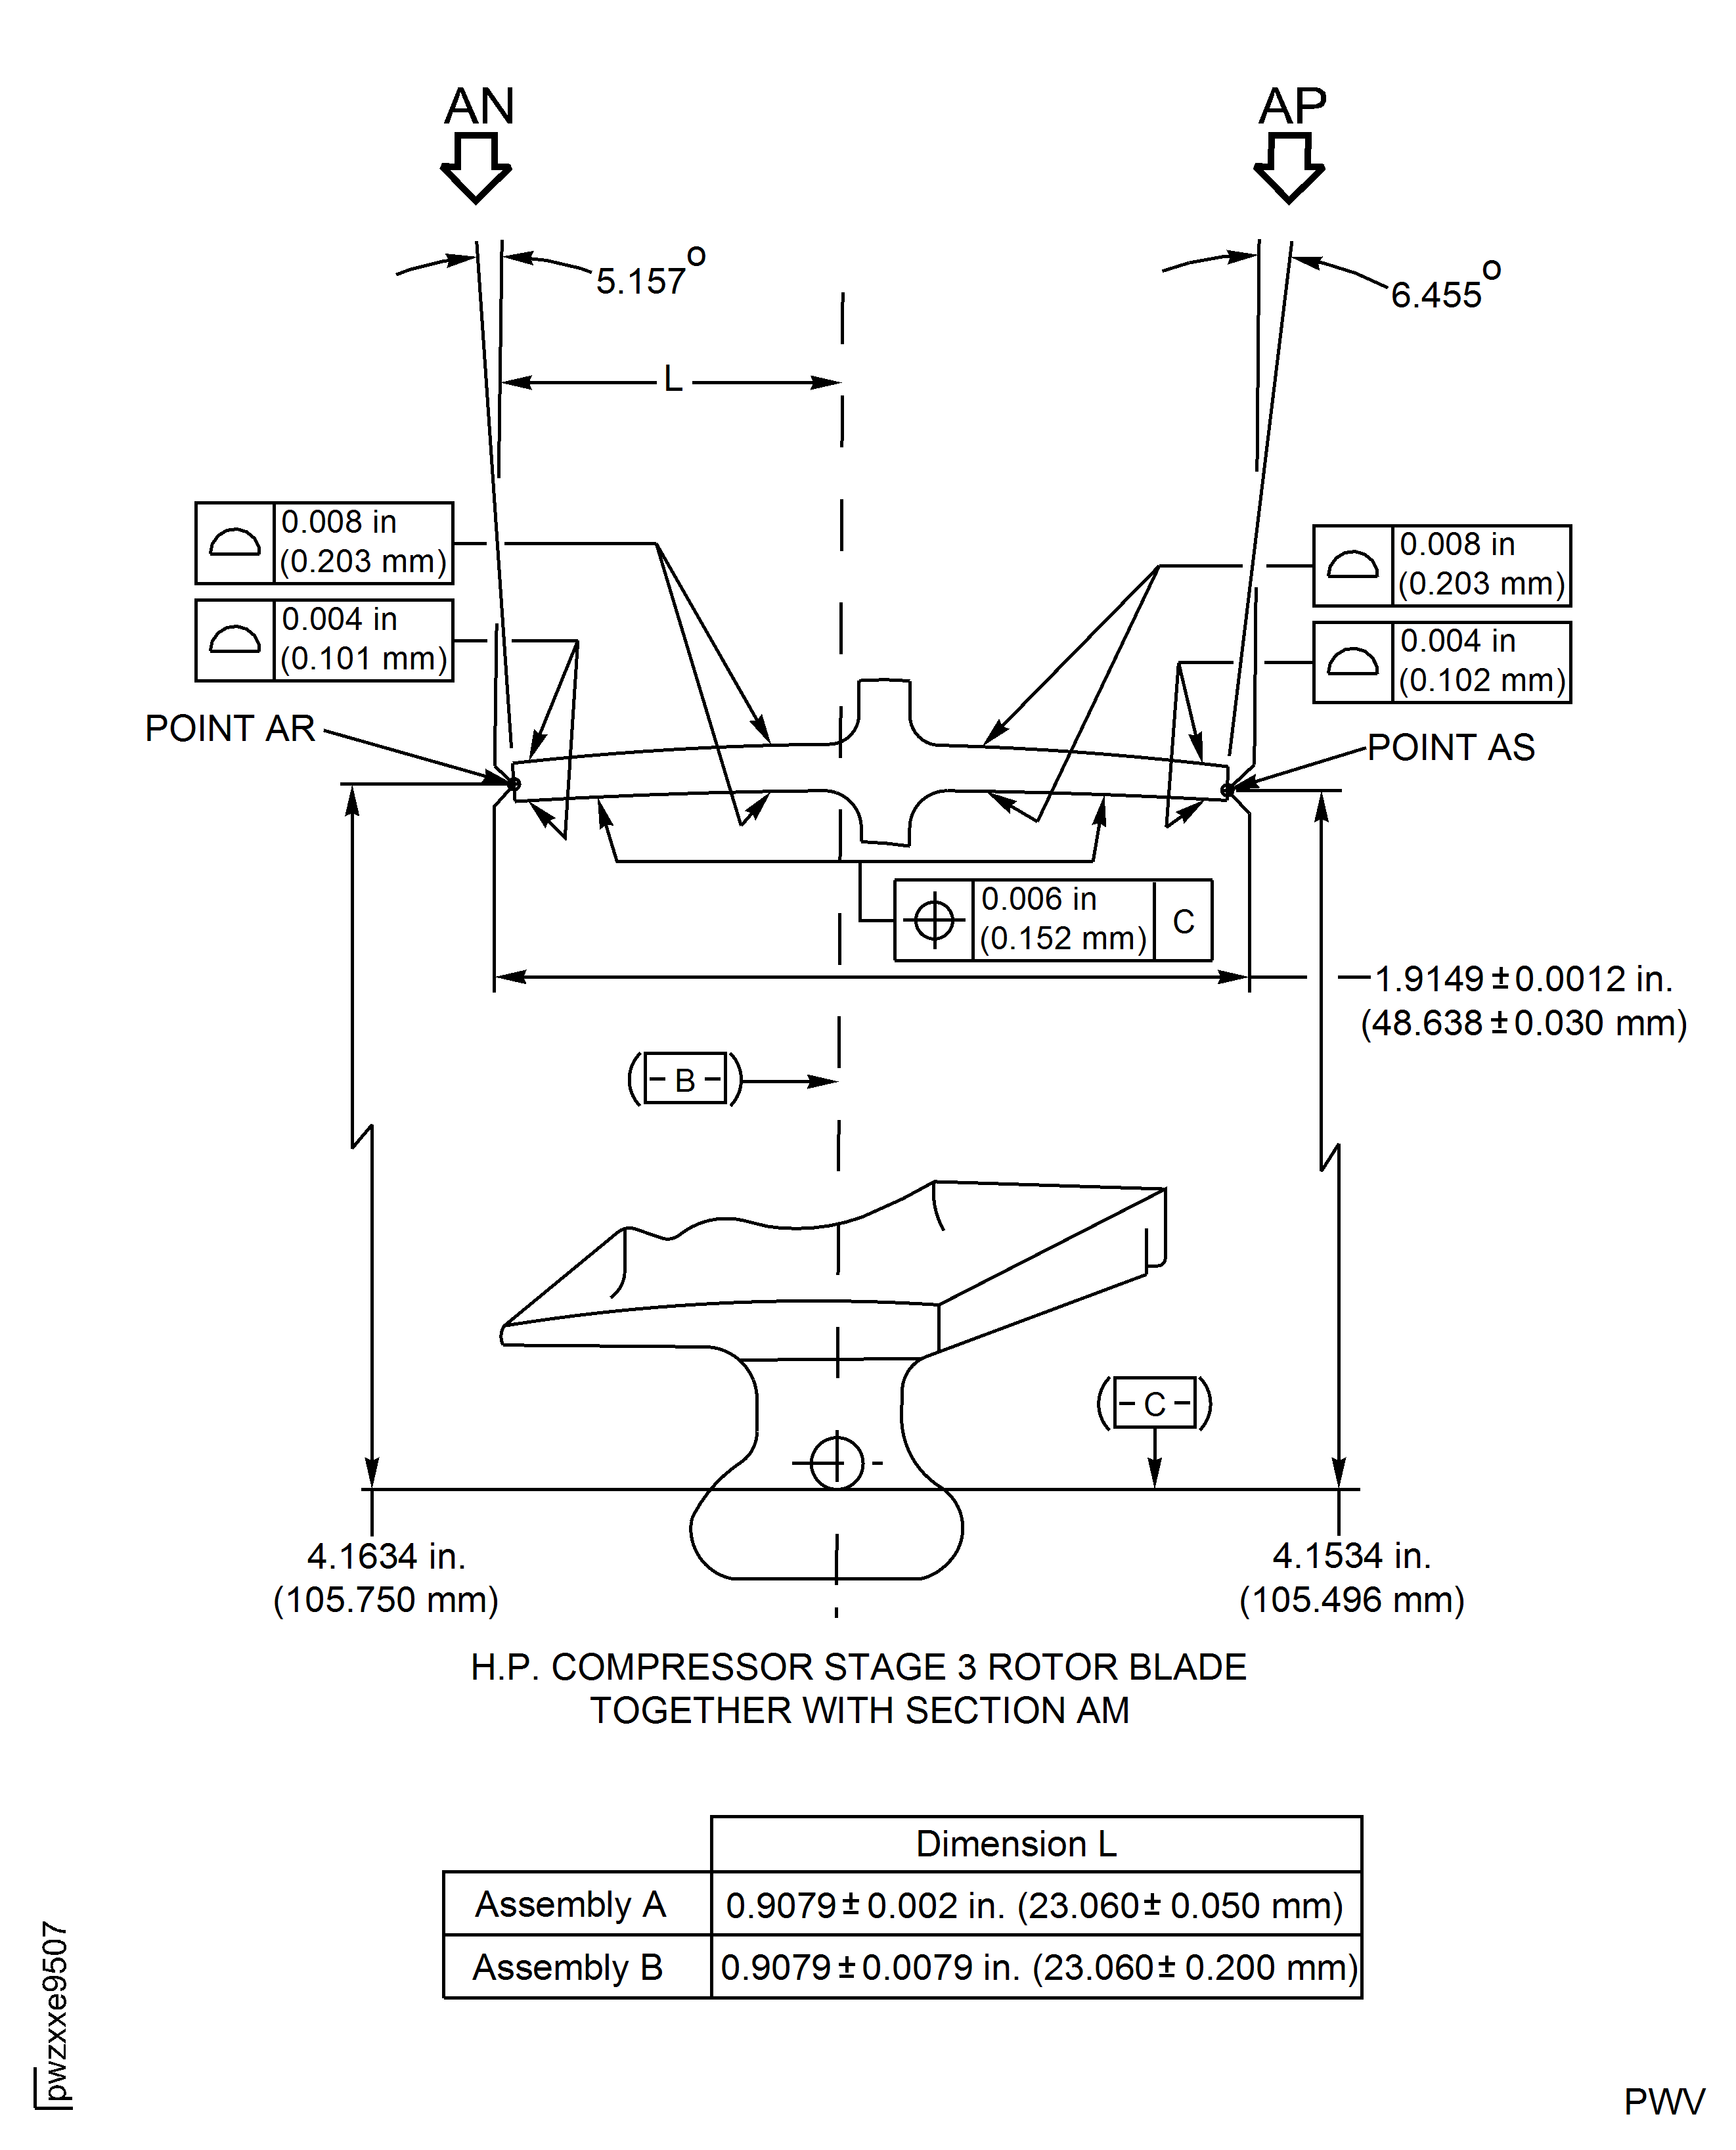
Figure: Repair Details And Dimensions - Assembly C And D (Post Machining, Post-Weld) (Deleted)
Repair Details And Dimensions - Assembly C And D (Post Machining, Post-Weld) (Deleted)

Figure: Repair Details And Dimensions - Assembly E And F (Post Machining, Pre-Weld)
Repair Details And Dimensions - Assembly E And F (Post Machining, Pre-Weld)
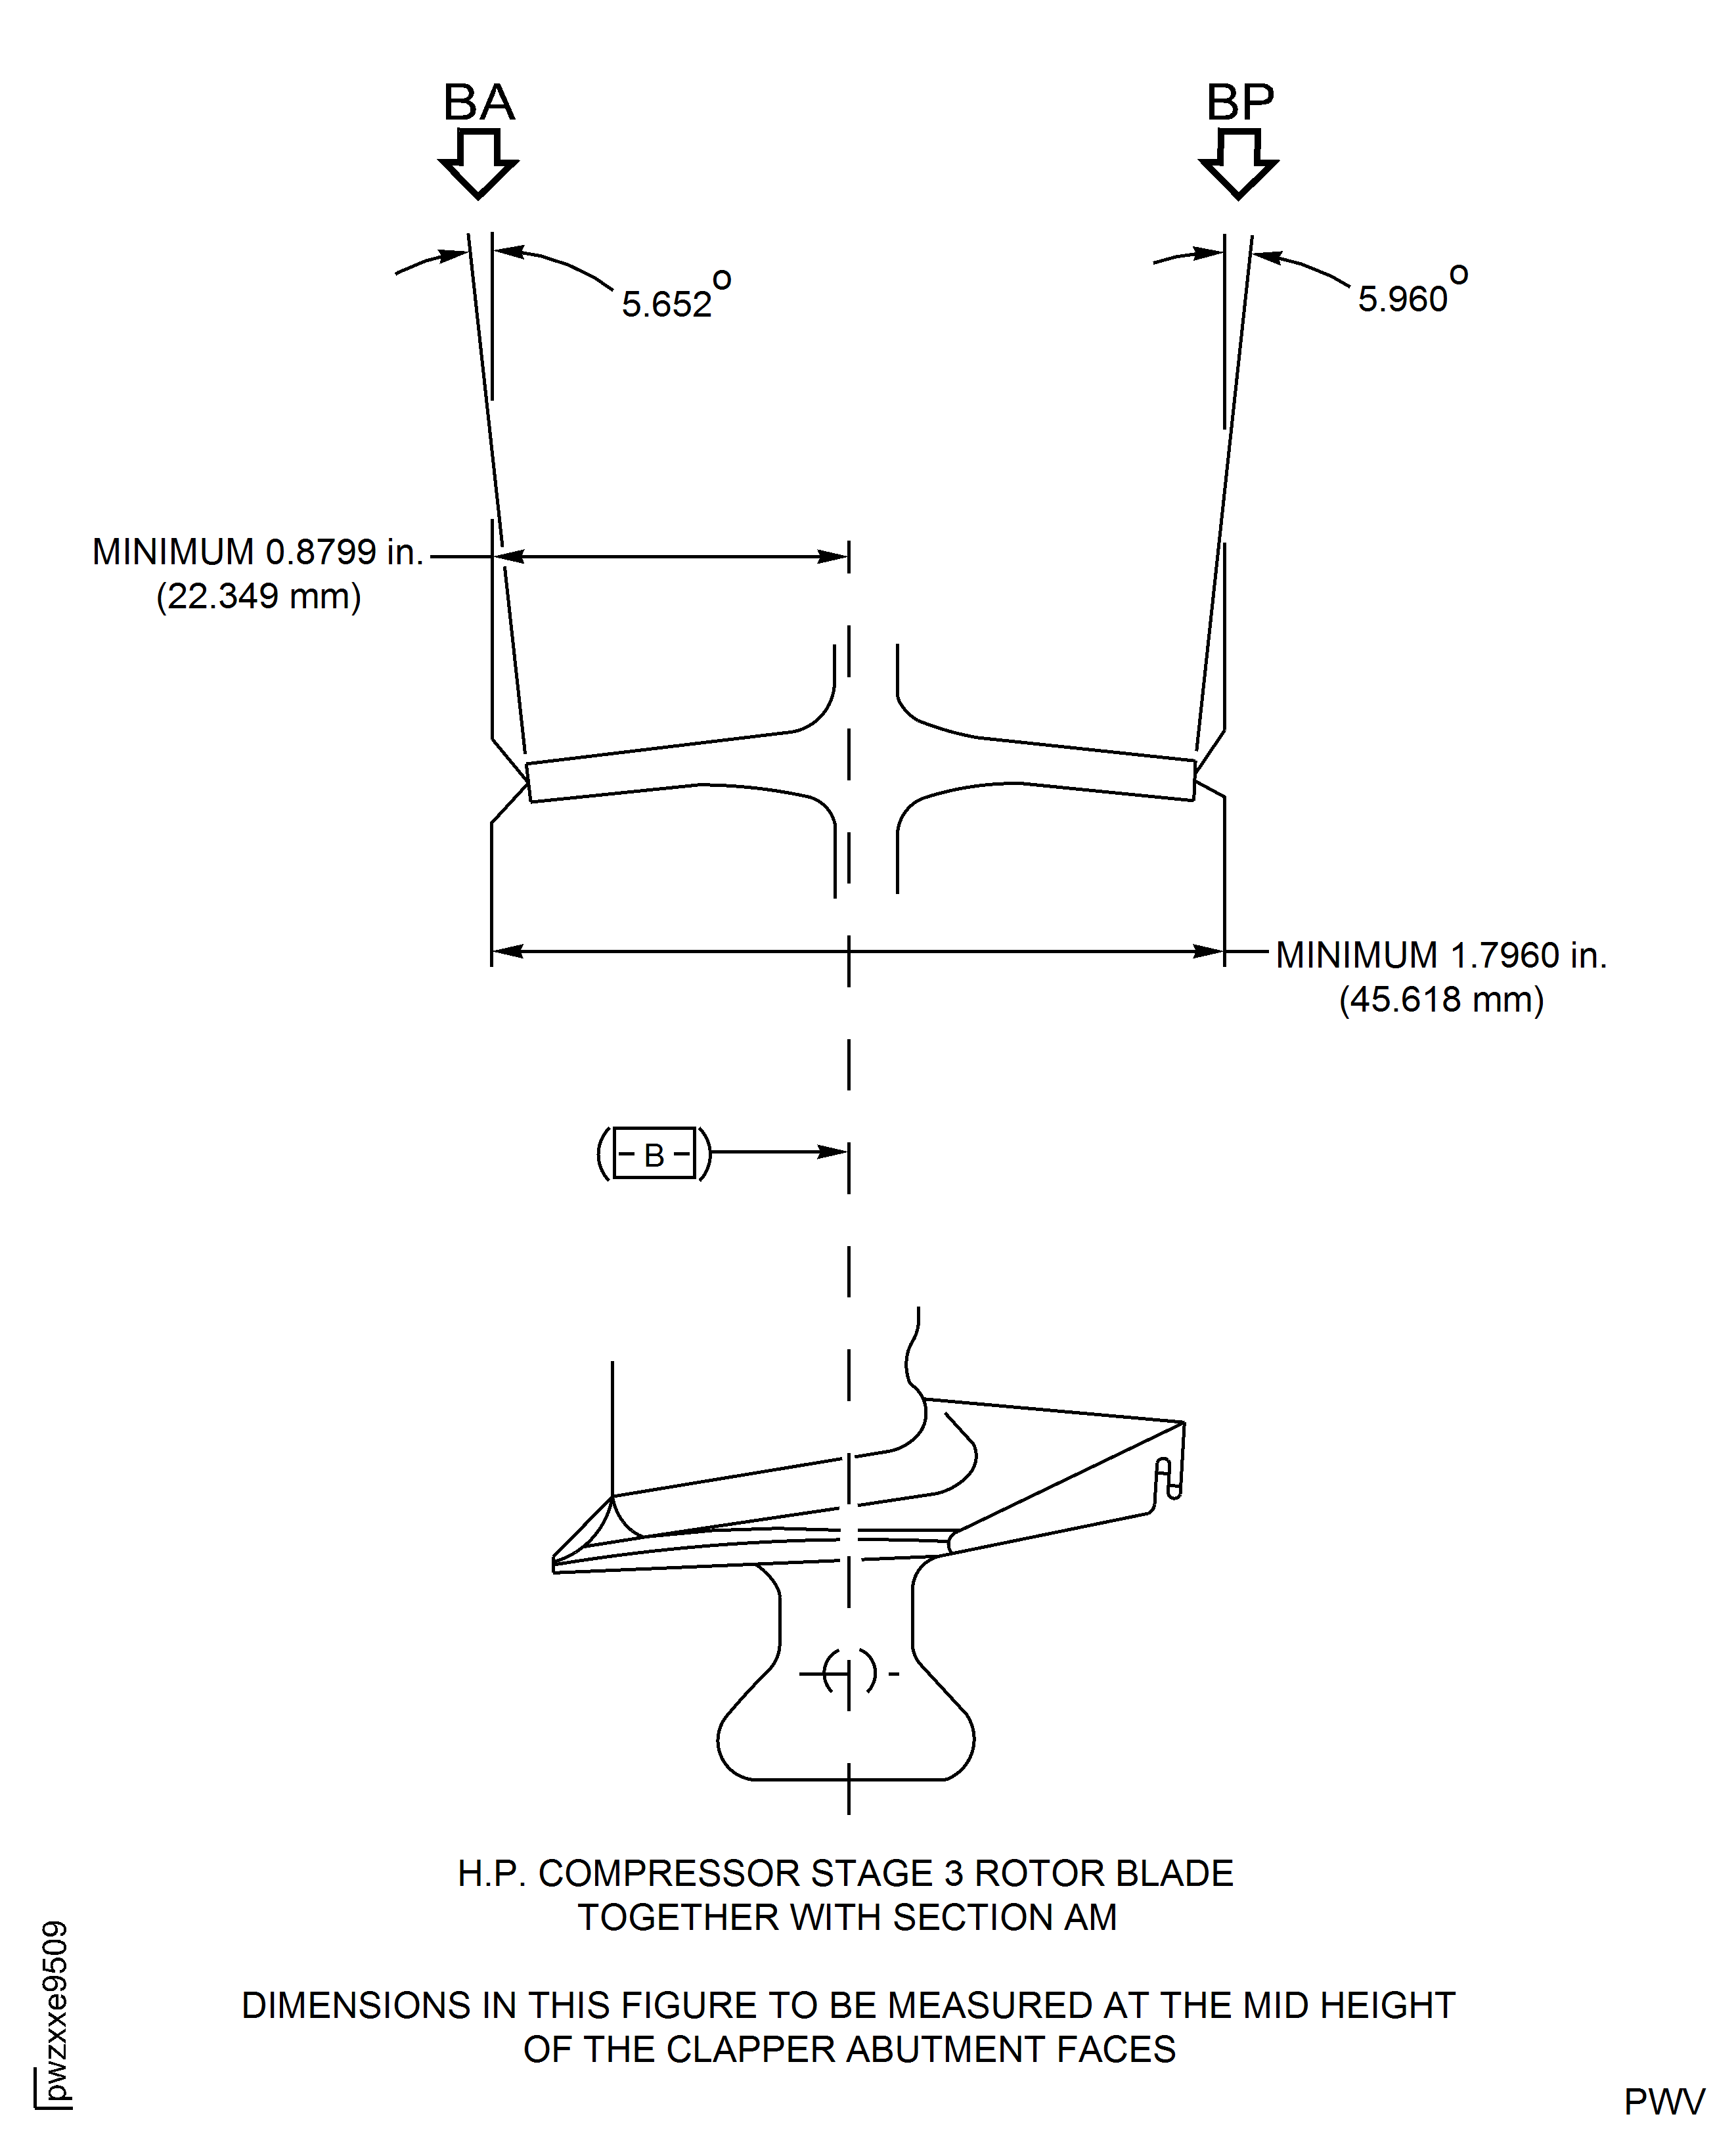
Figure: Repair Details And Dimensions - Assembly E And F (Post-Weld, Post Machining)
Repair Details And Dimensions - Assembly E And F (Post-Weld, Post Machining)
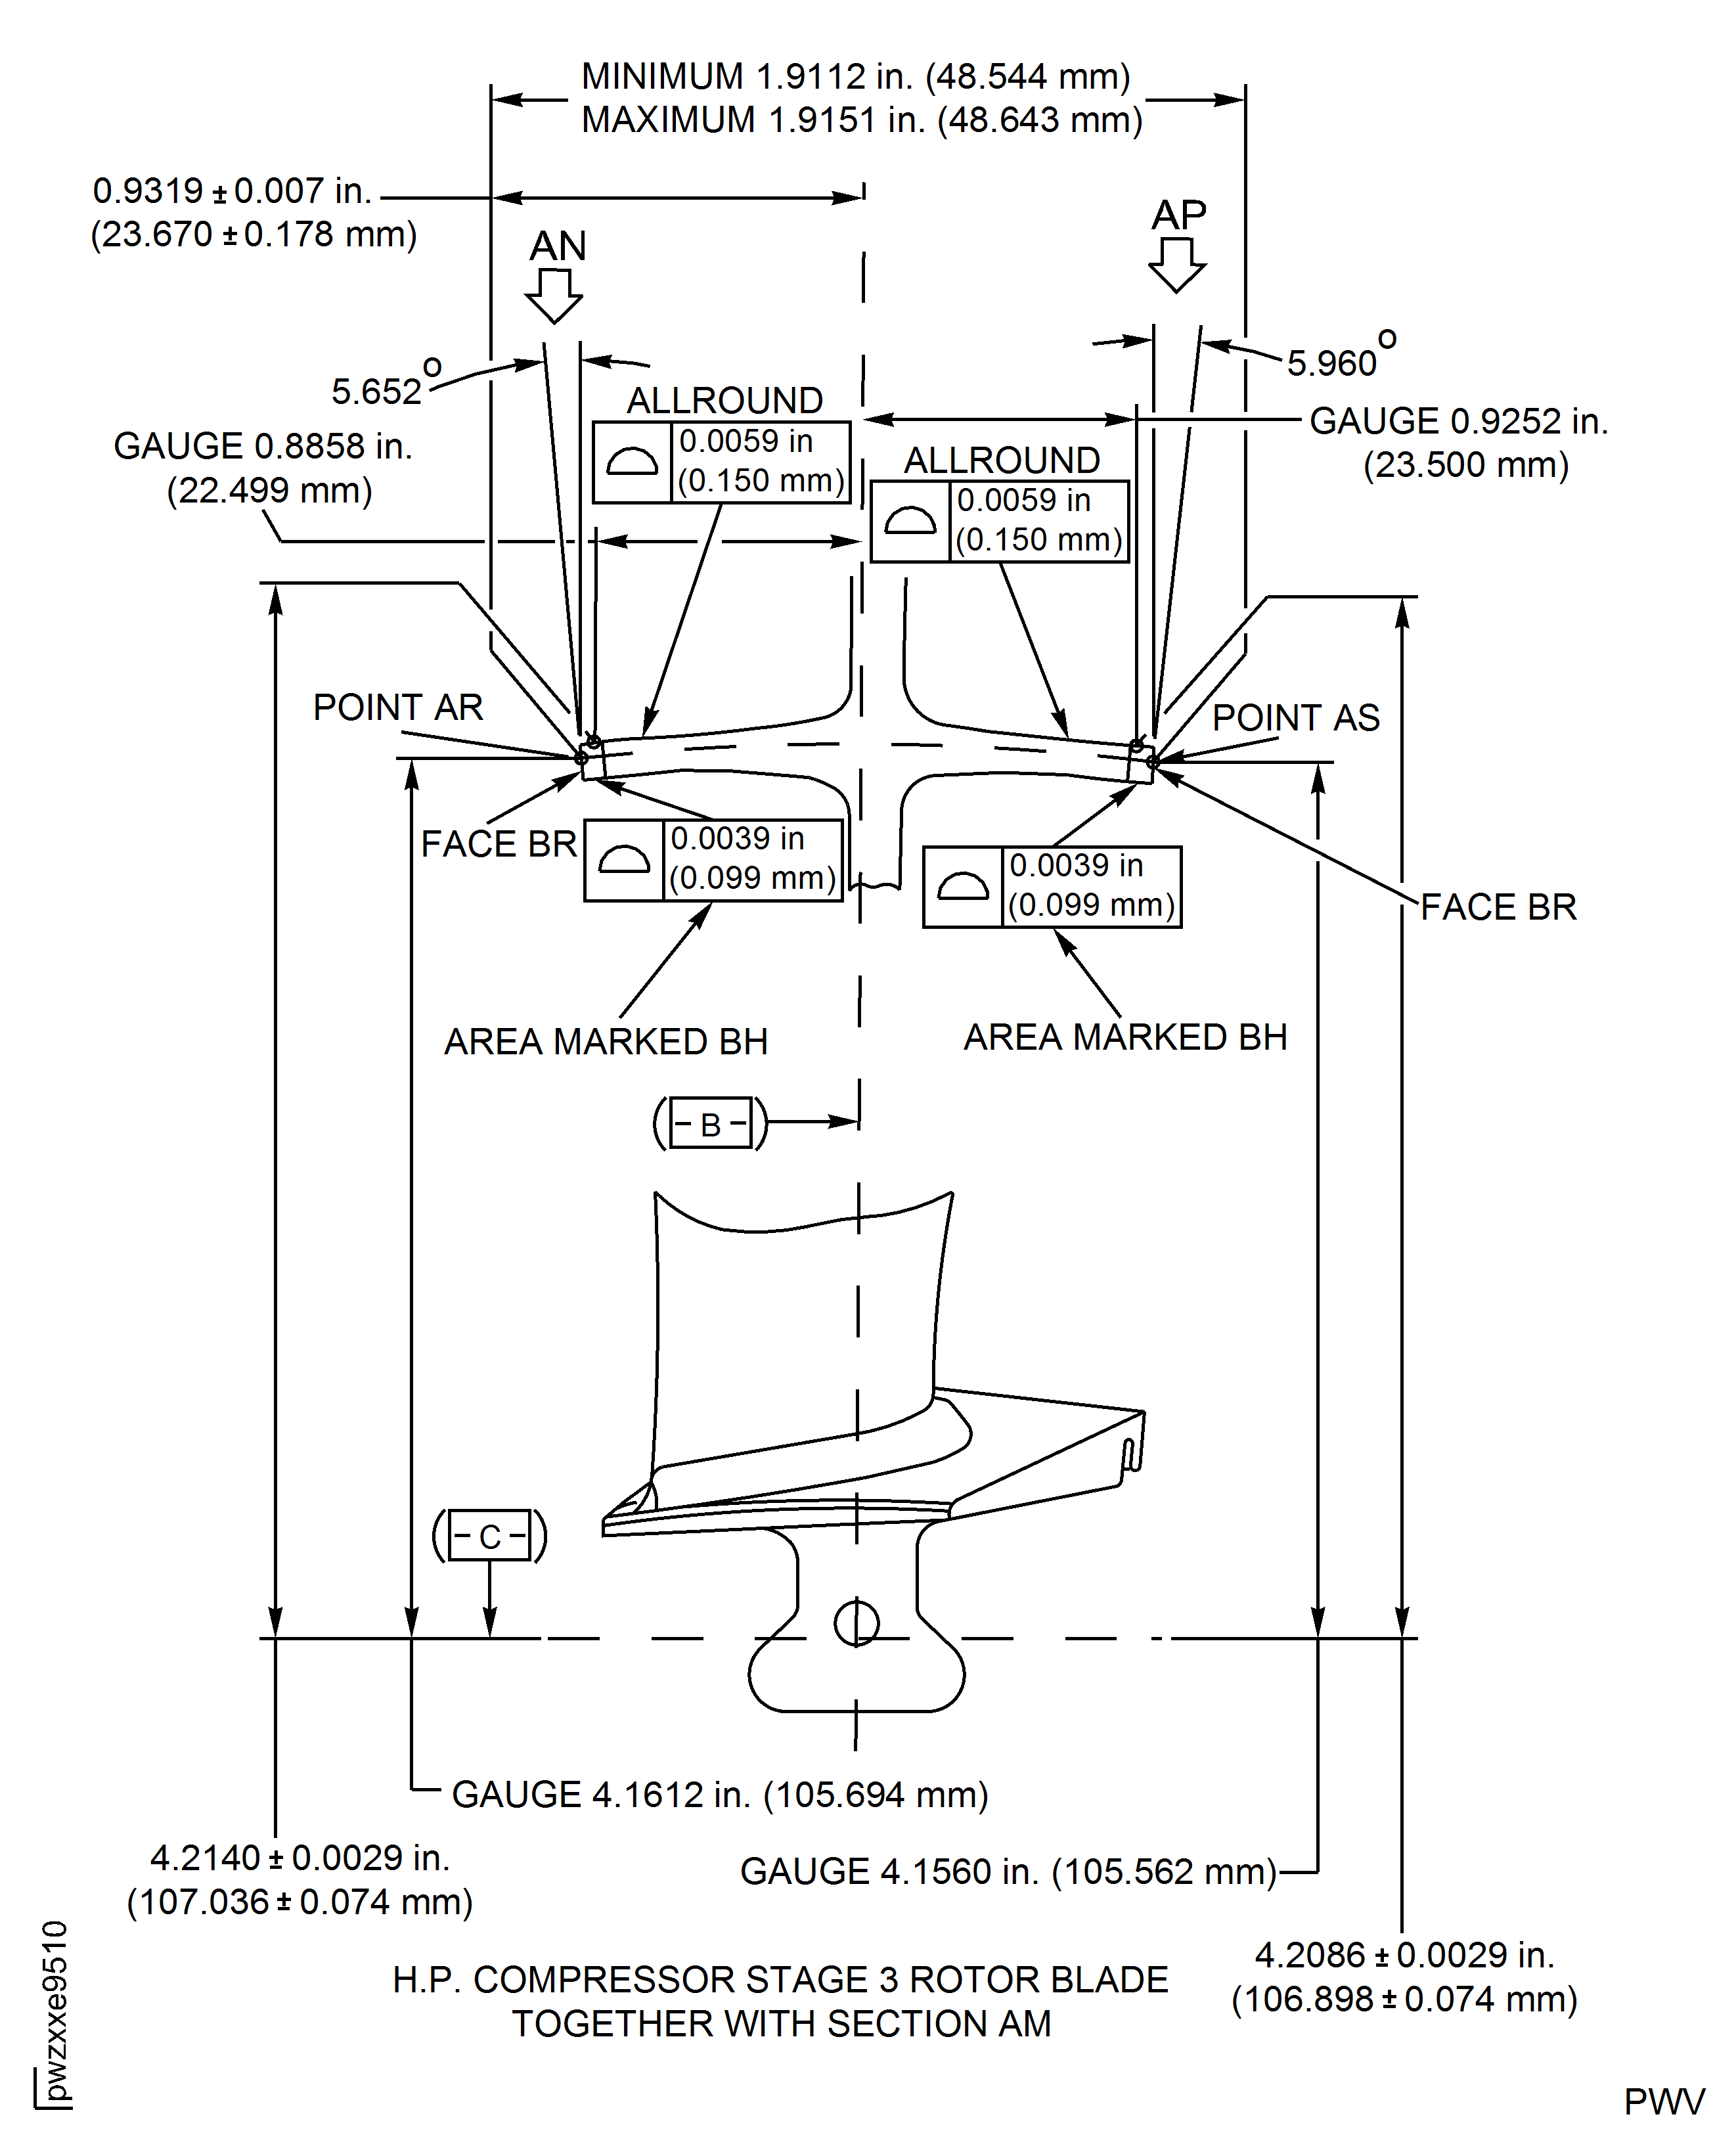
Figure: Repair Details And Dimensions - Assembly A And B
Repair Details And Dimensions - Assembly A And B
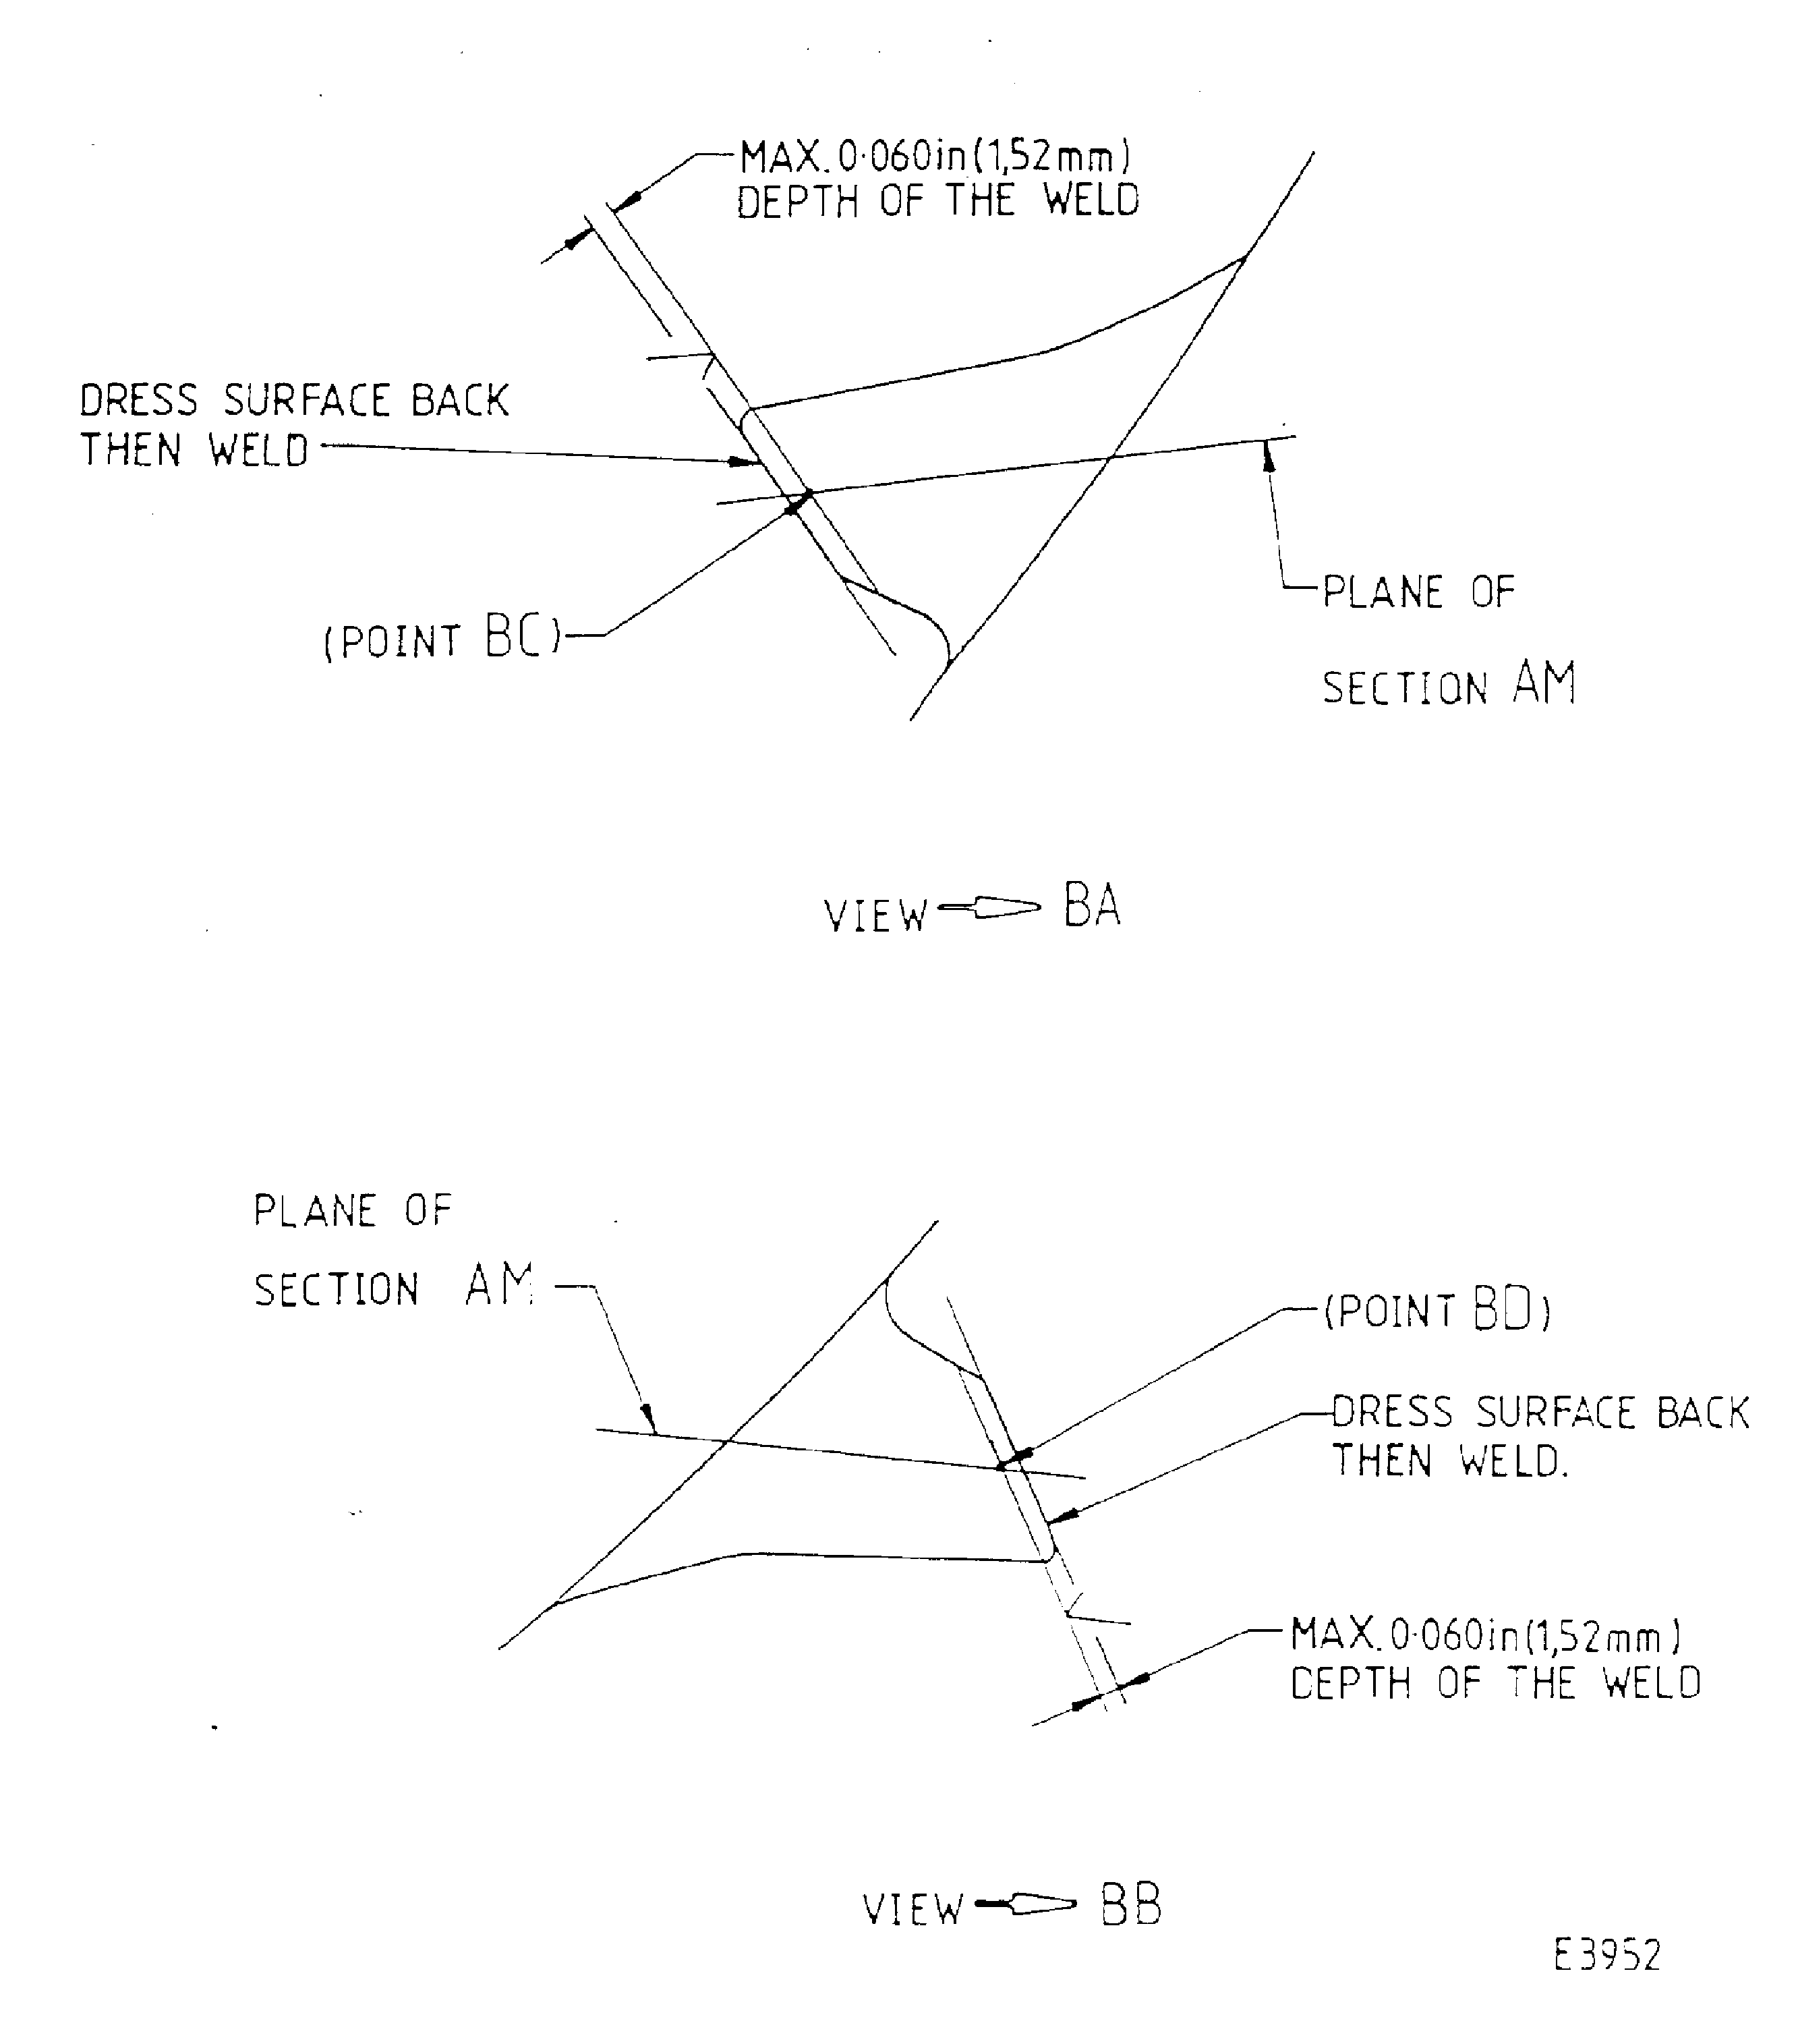
Figure: Repair Details And Dimensions - Assembly E And F
Repair Details And Dimensions - Assembly E And F
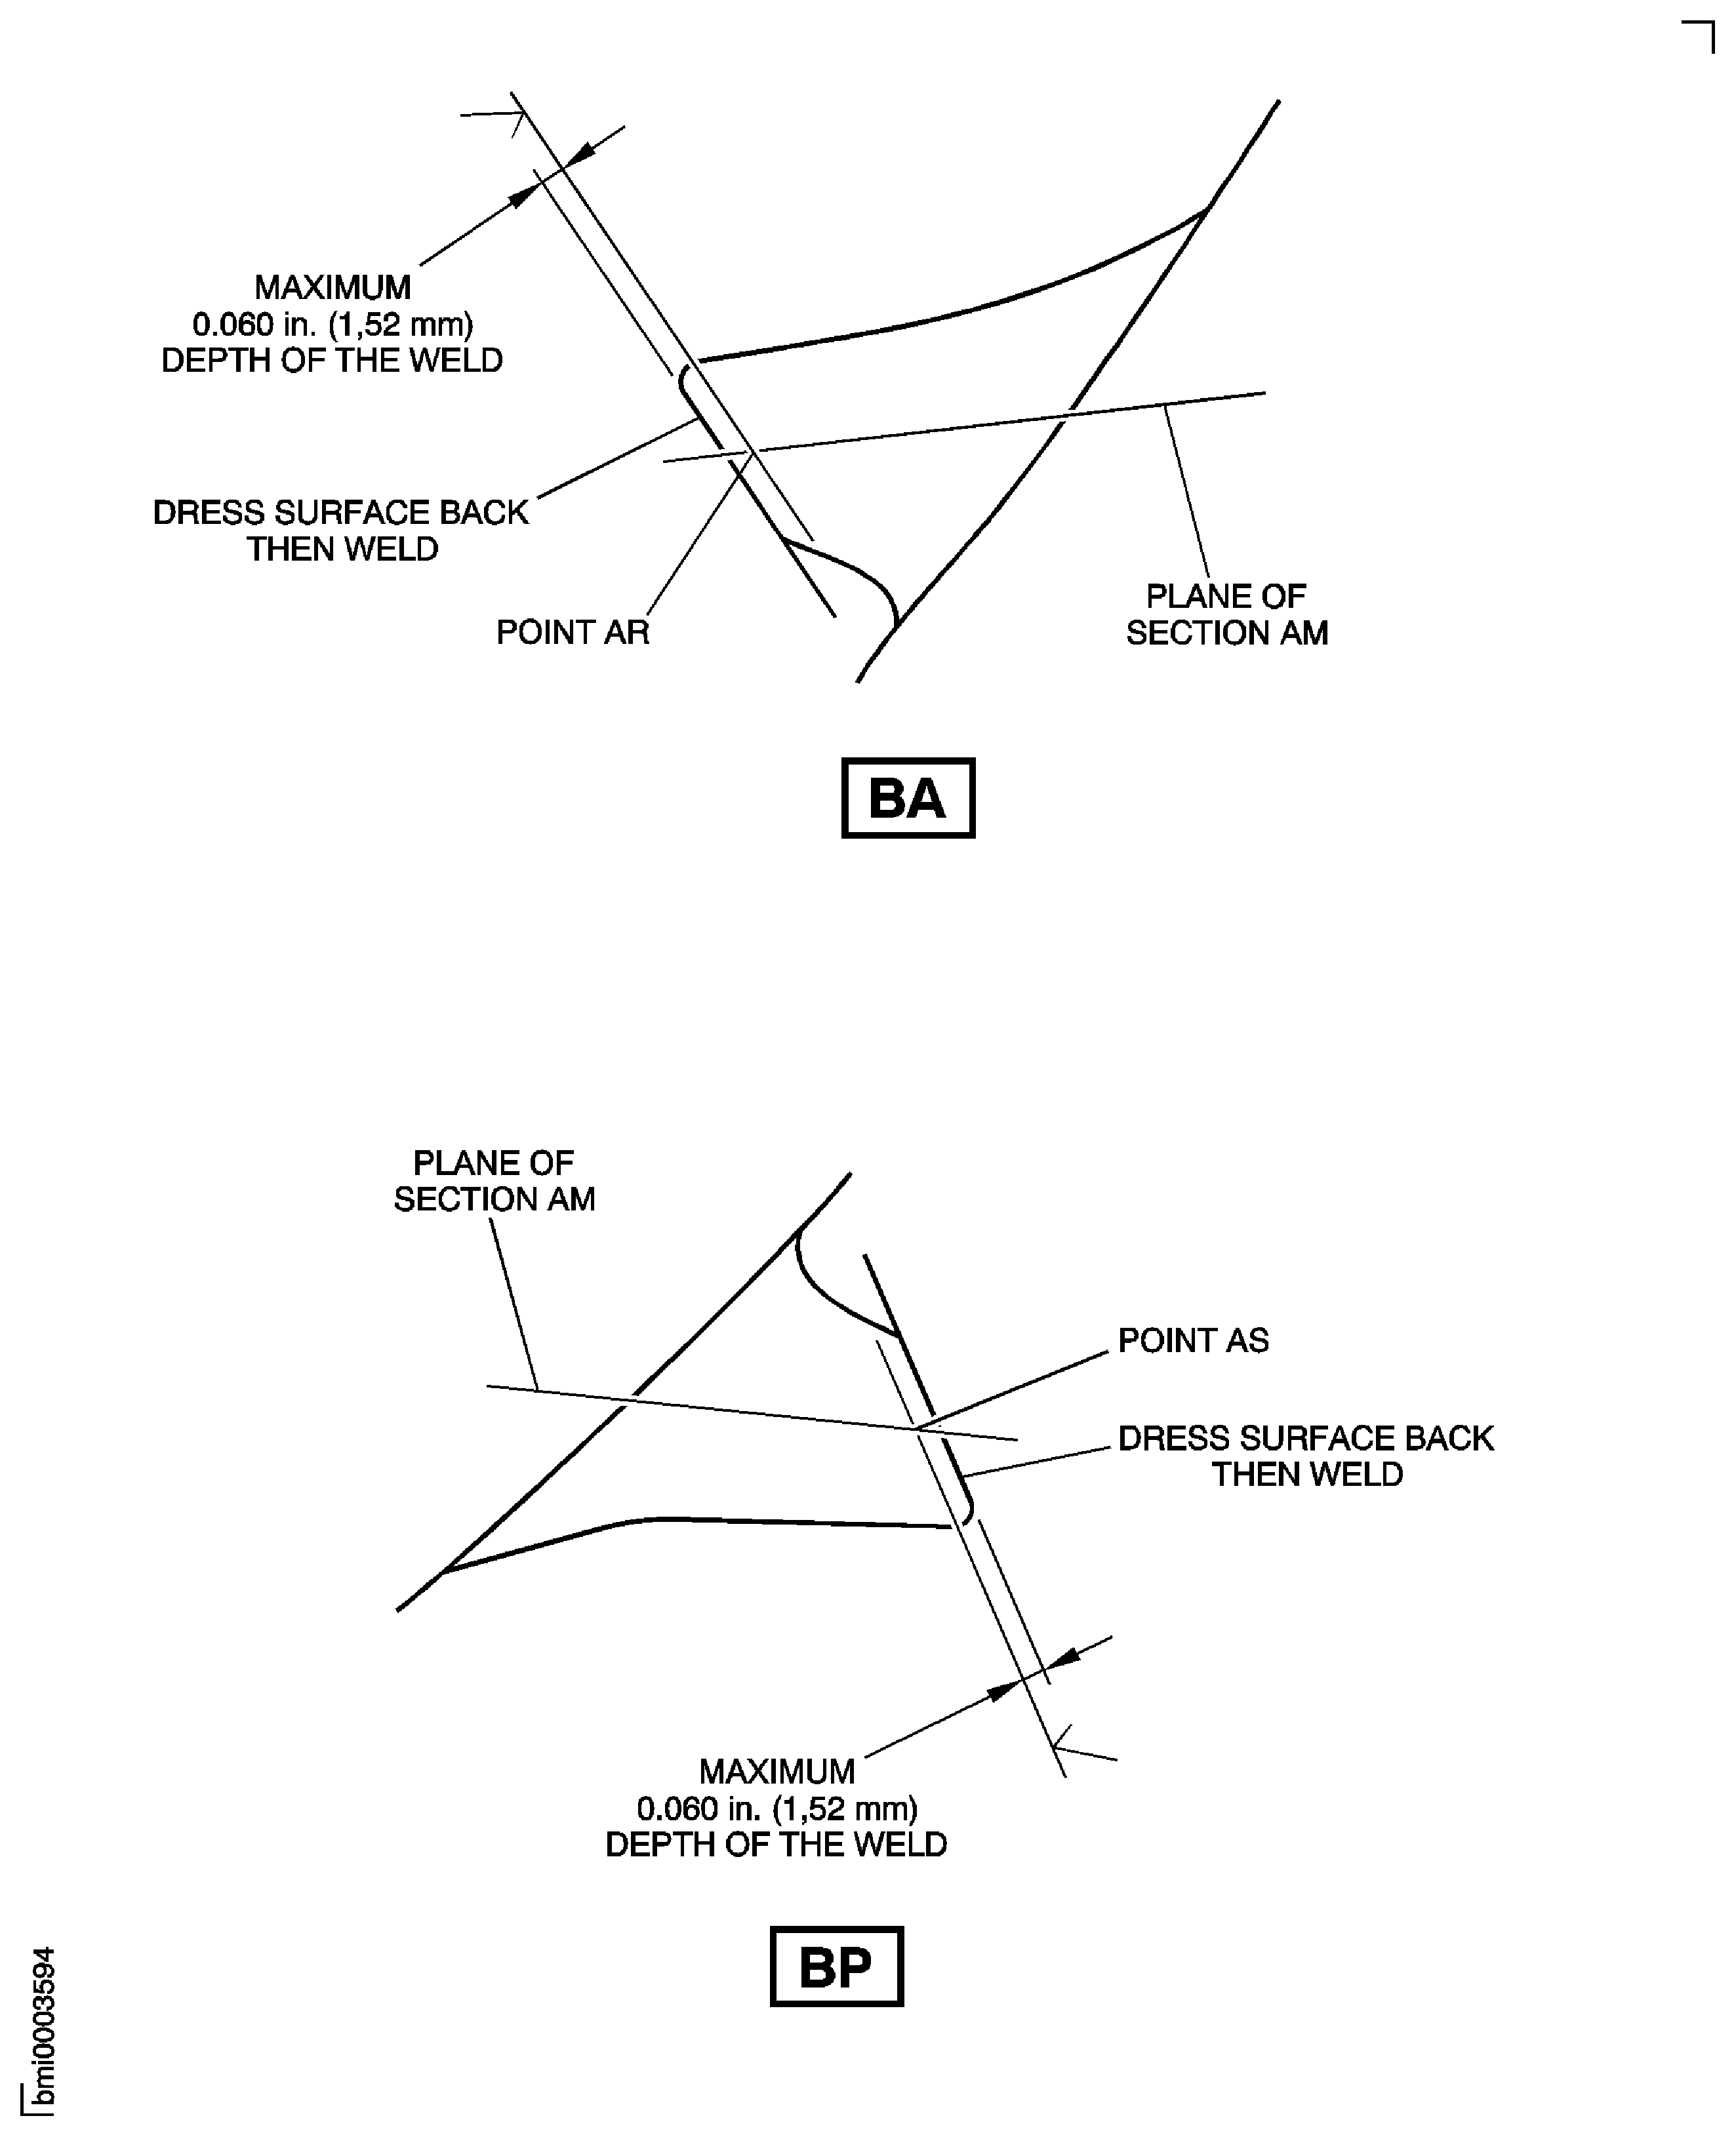
Figure: Repair Details And Dimensions - Assembly A And B
Repair Details And Dimensions - Assembly A And B
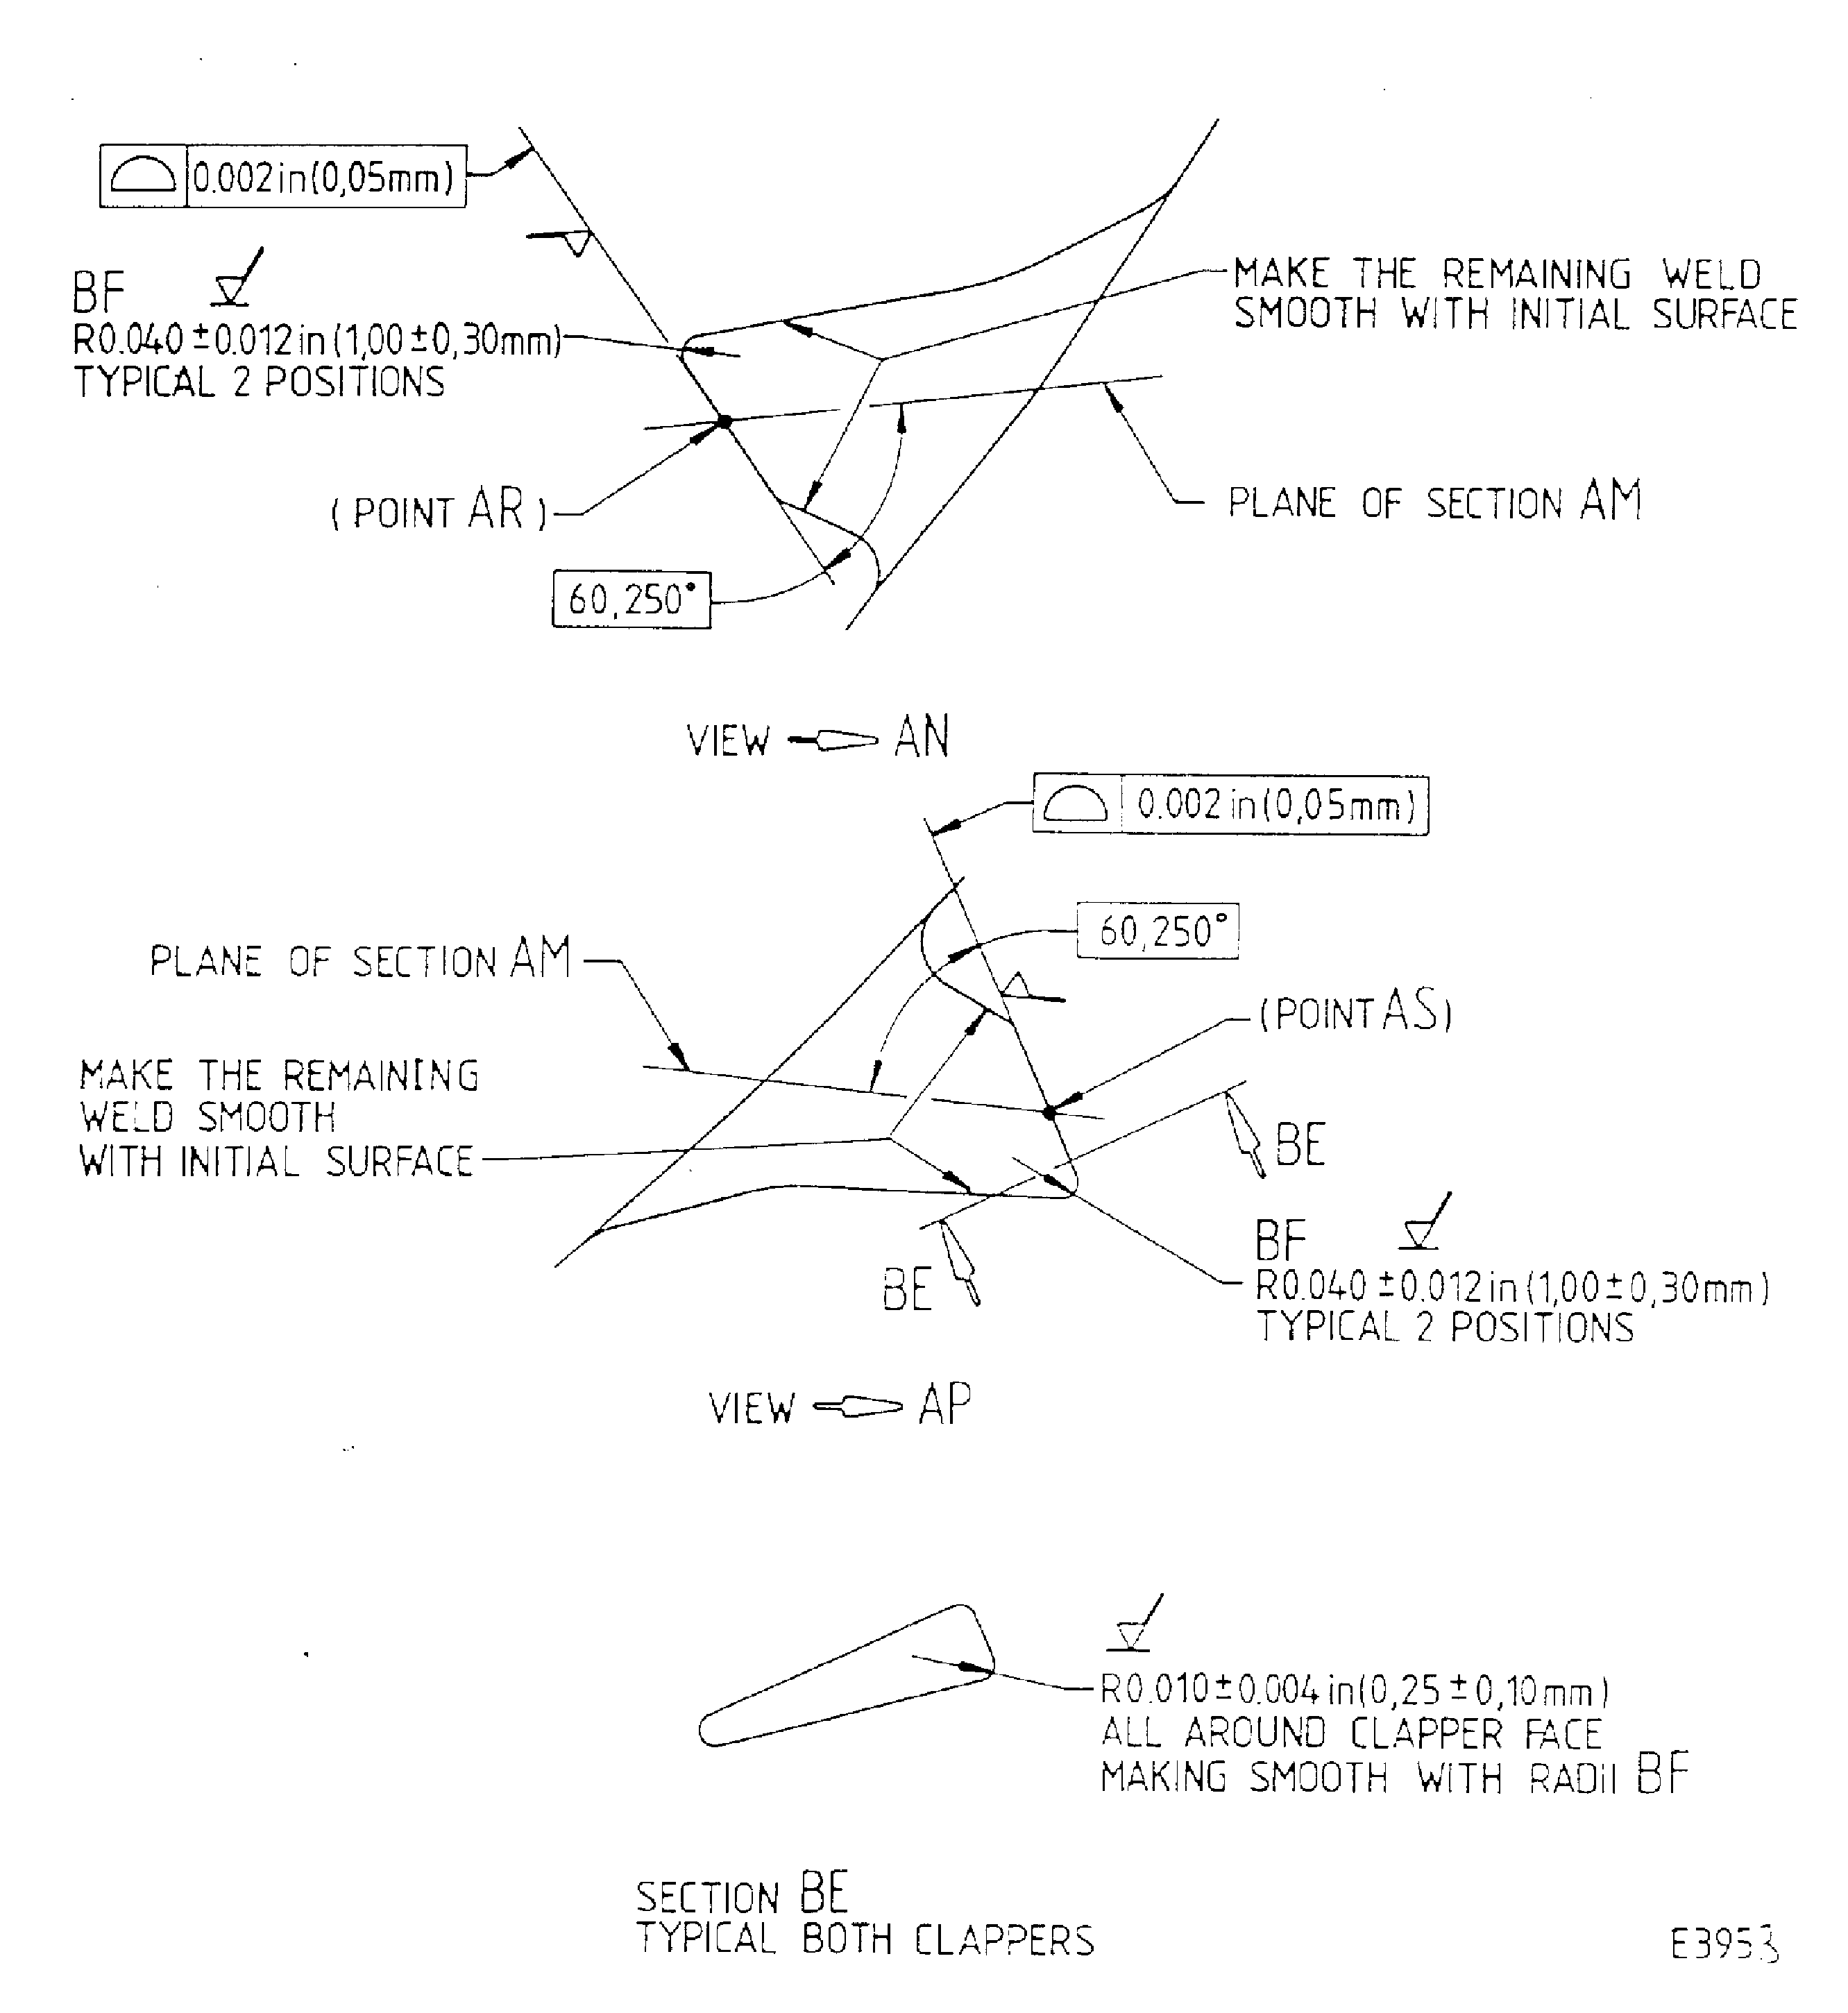
Figure: Repair Details And Dimensions - Assembly D (Deleted)
Repair Details And Dimensions - Assembly D (Deleted)

Figure: Repair Details And Dimensions - Assembly E And F
Repair Details And Dimensions - Assembly E And F
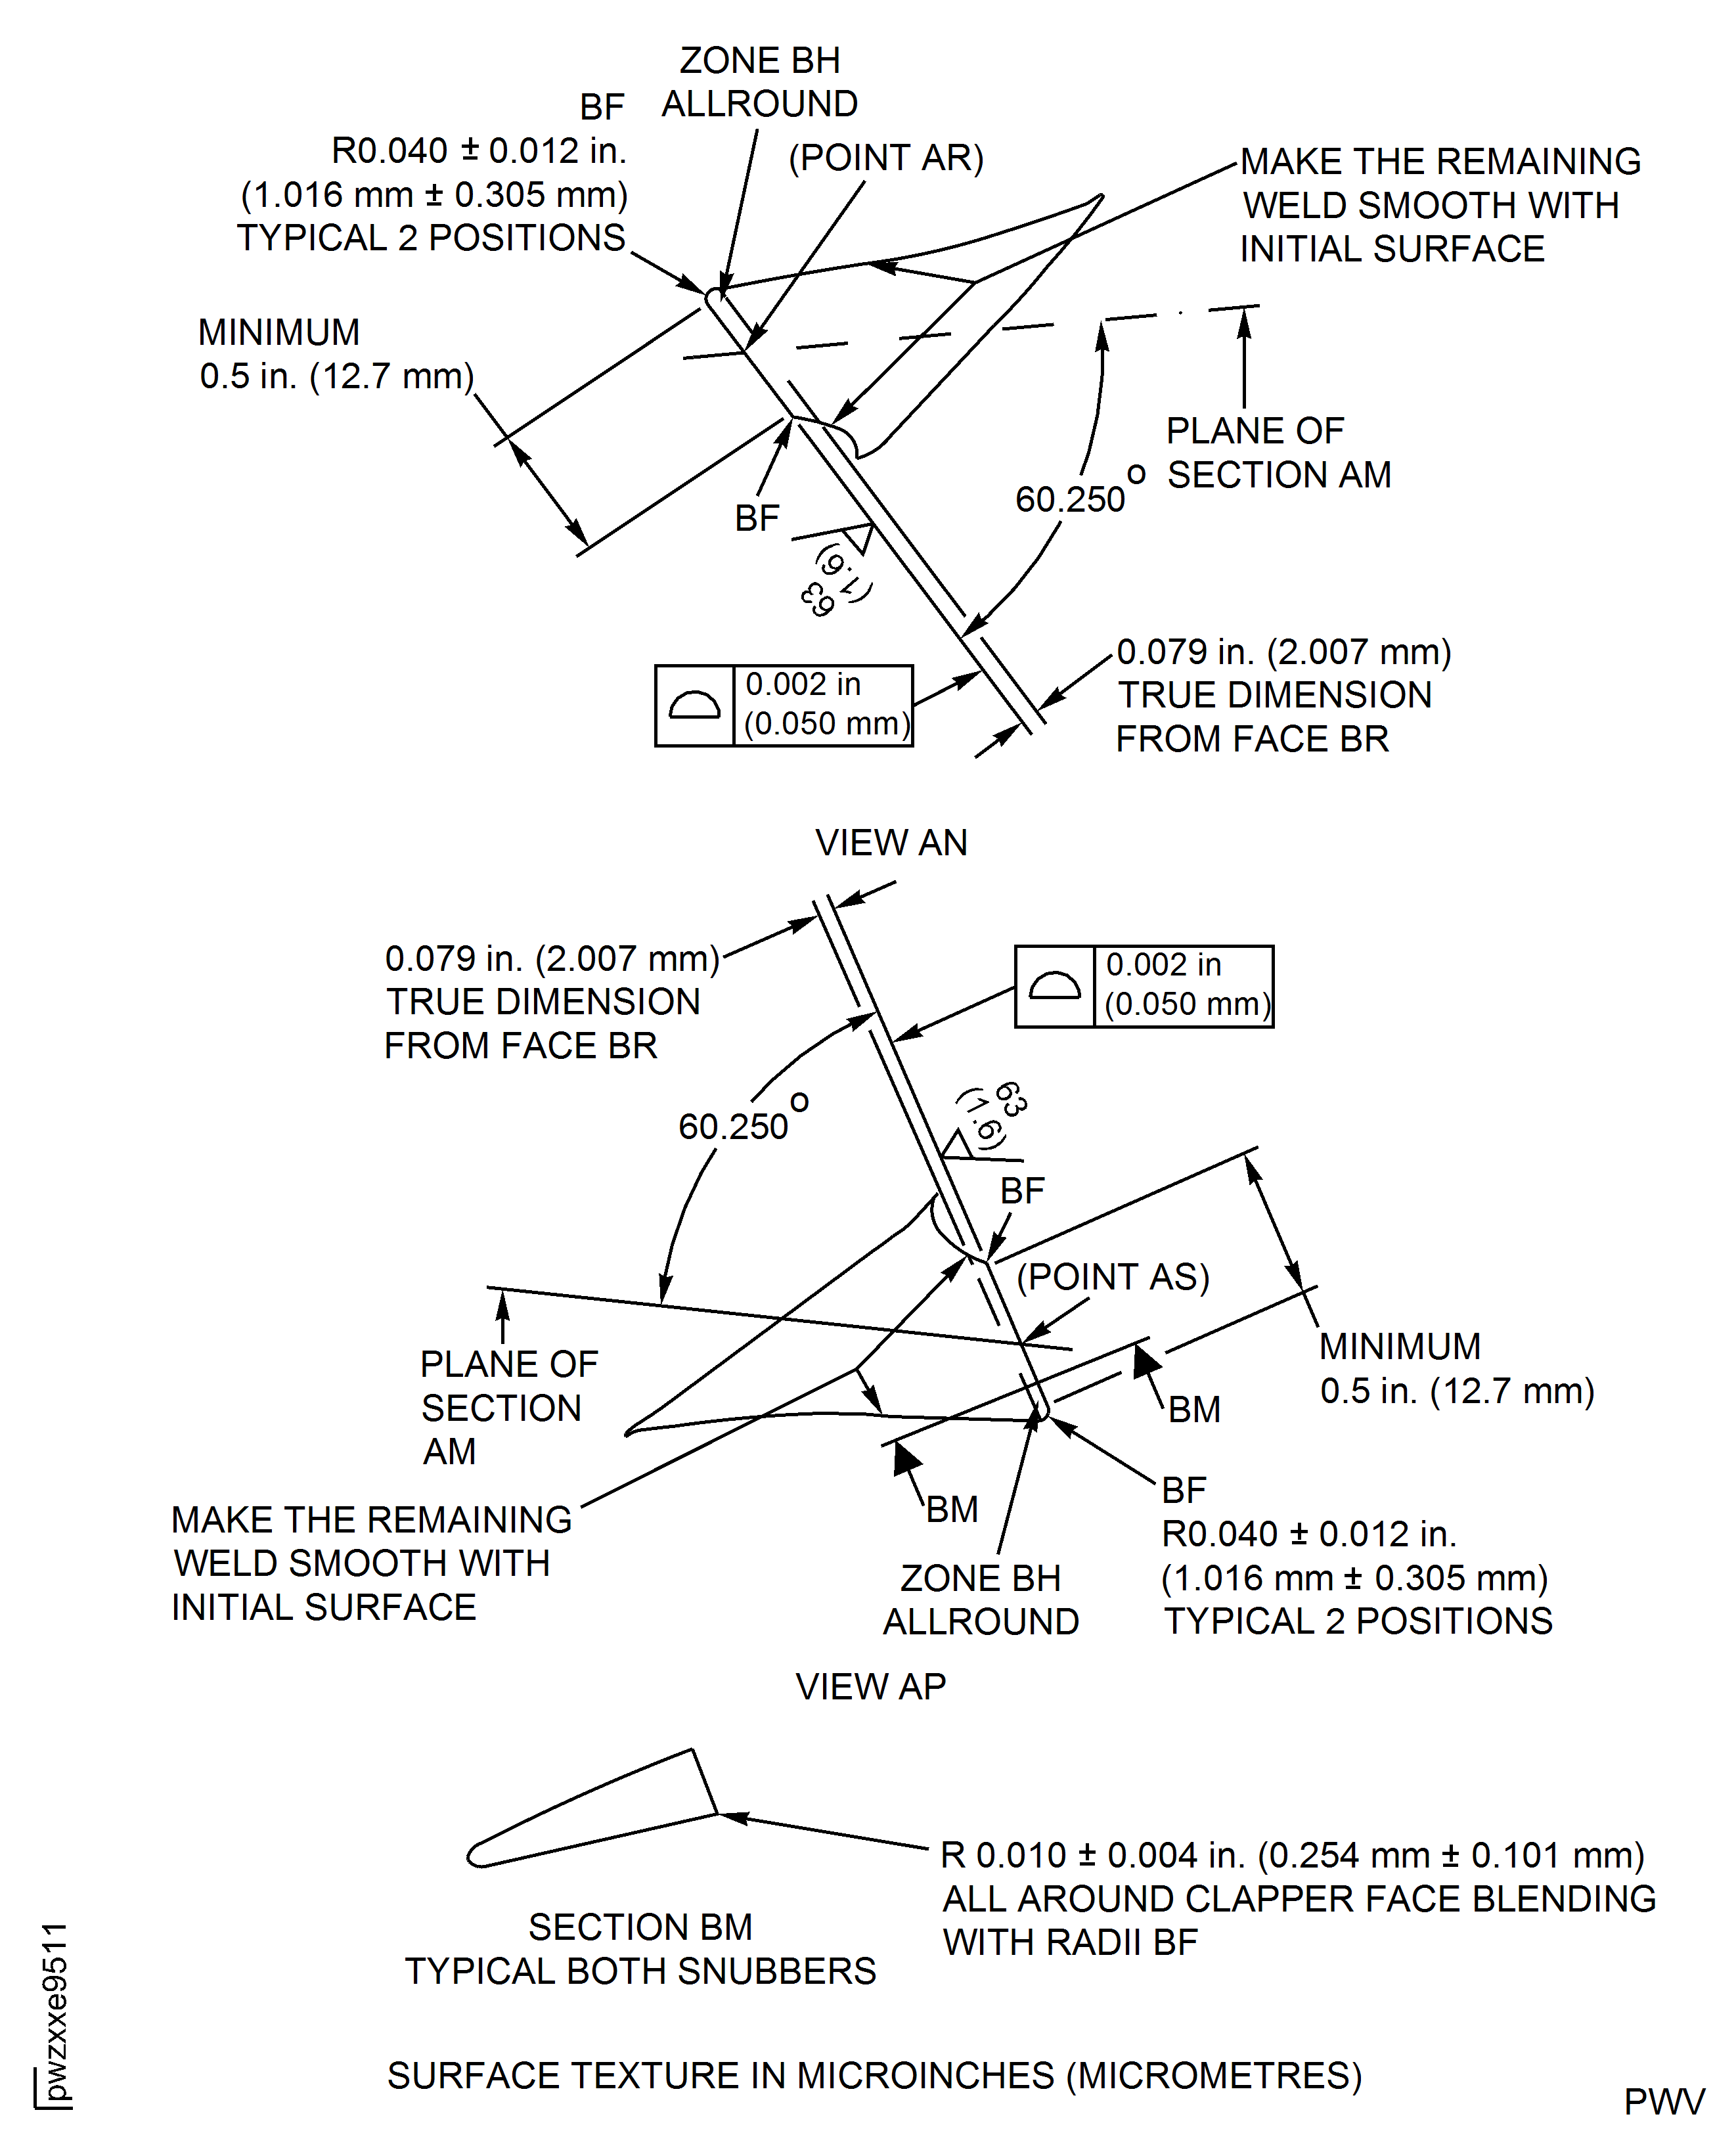
Figure: Repair Details And Dimensions - Assembly E And F
Repair Details And Dimensions - Assembly E And F
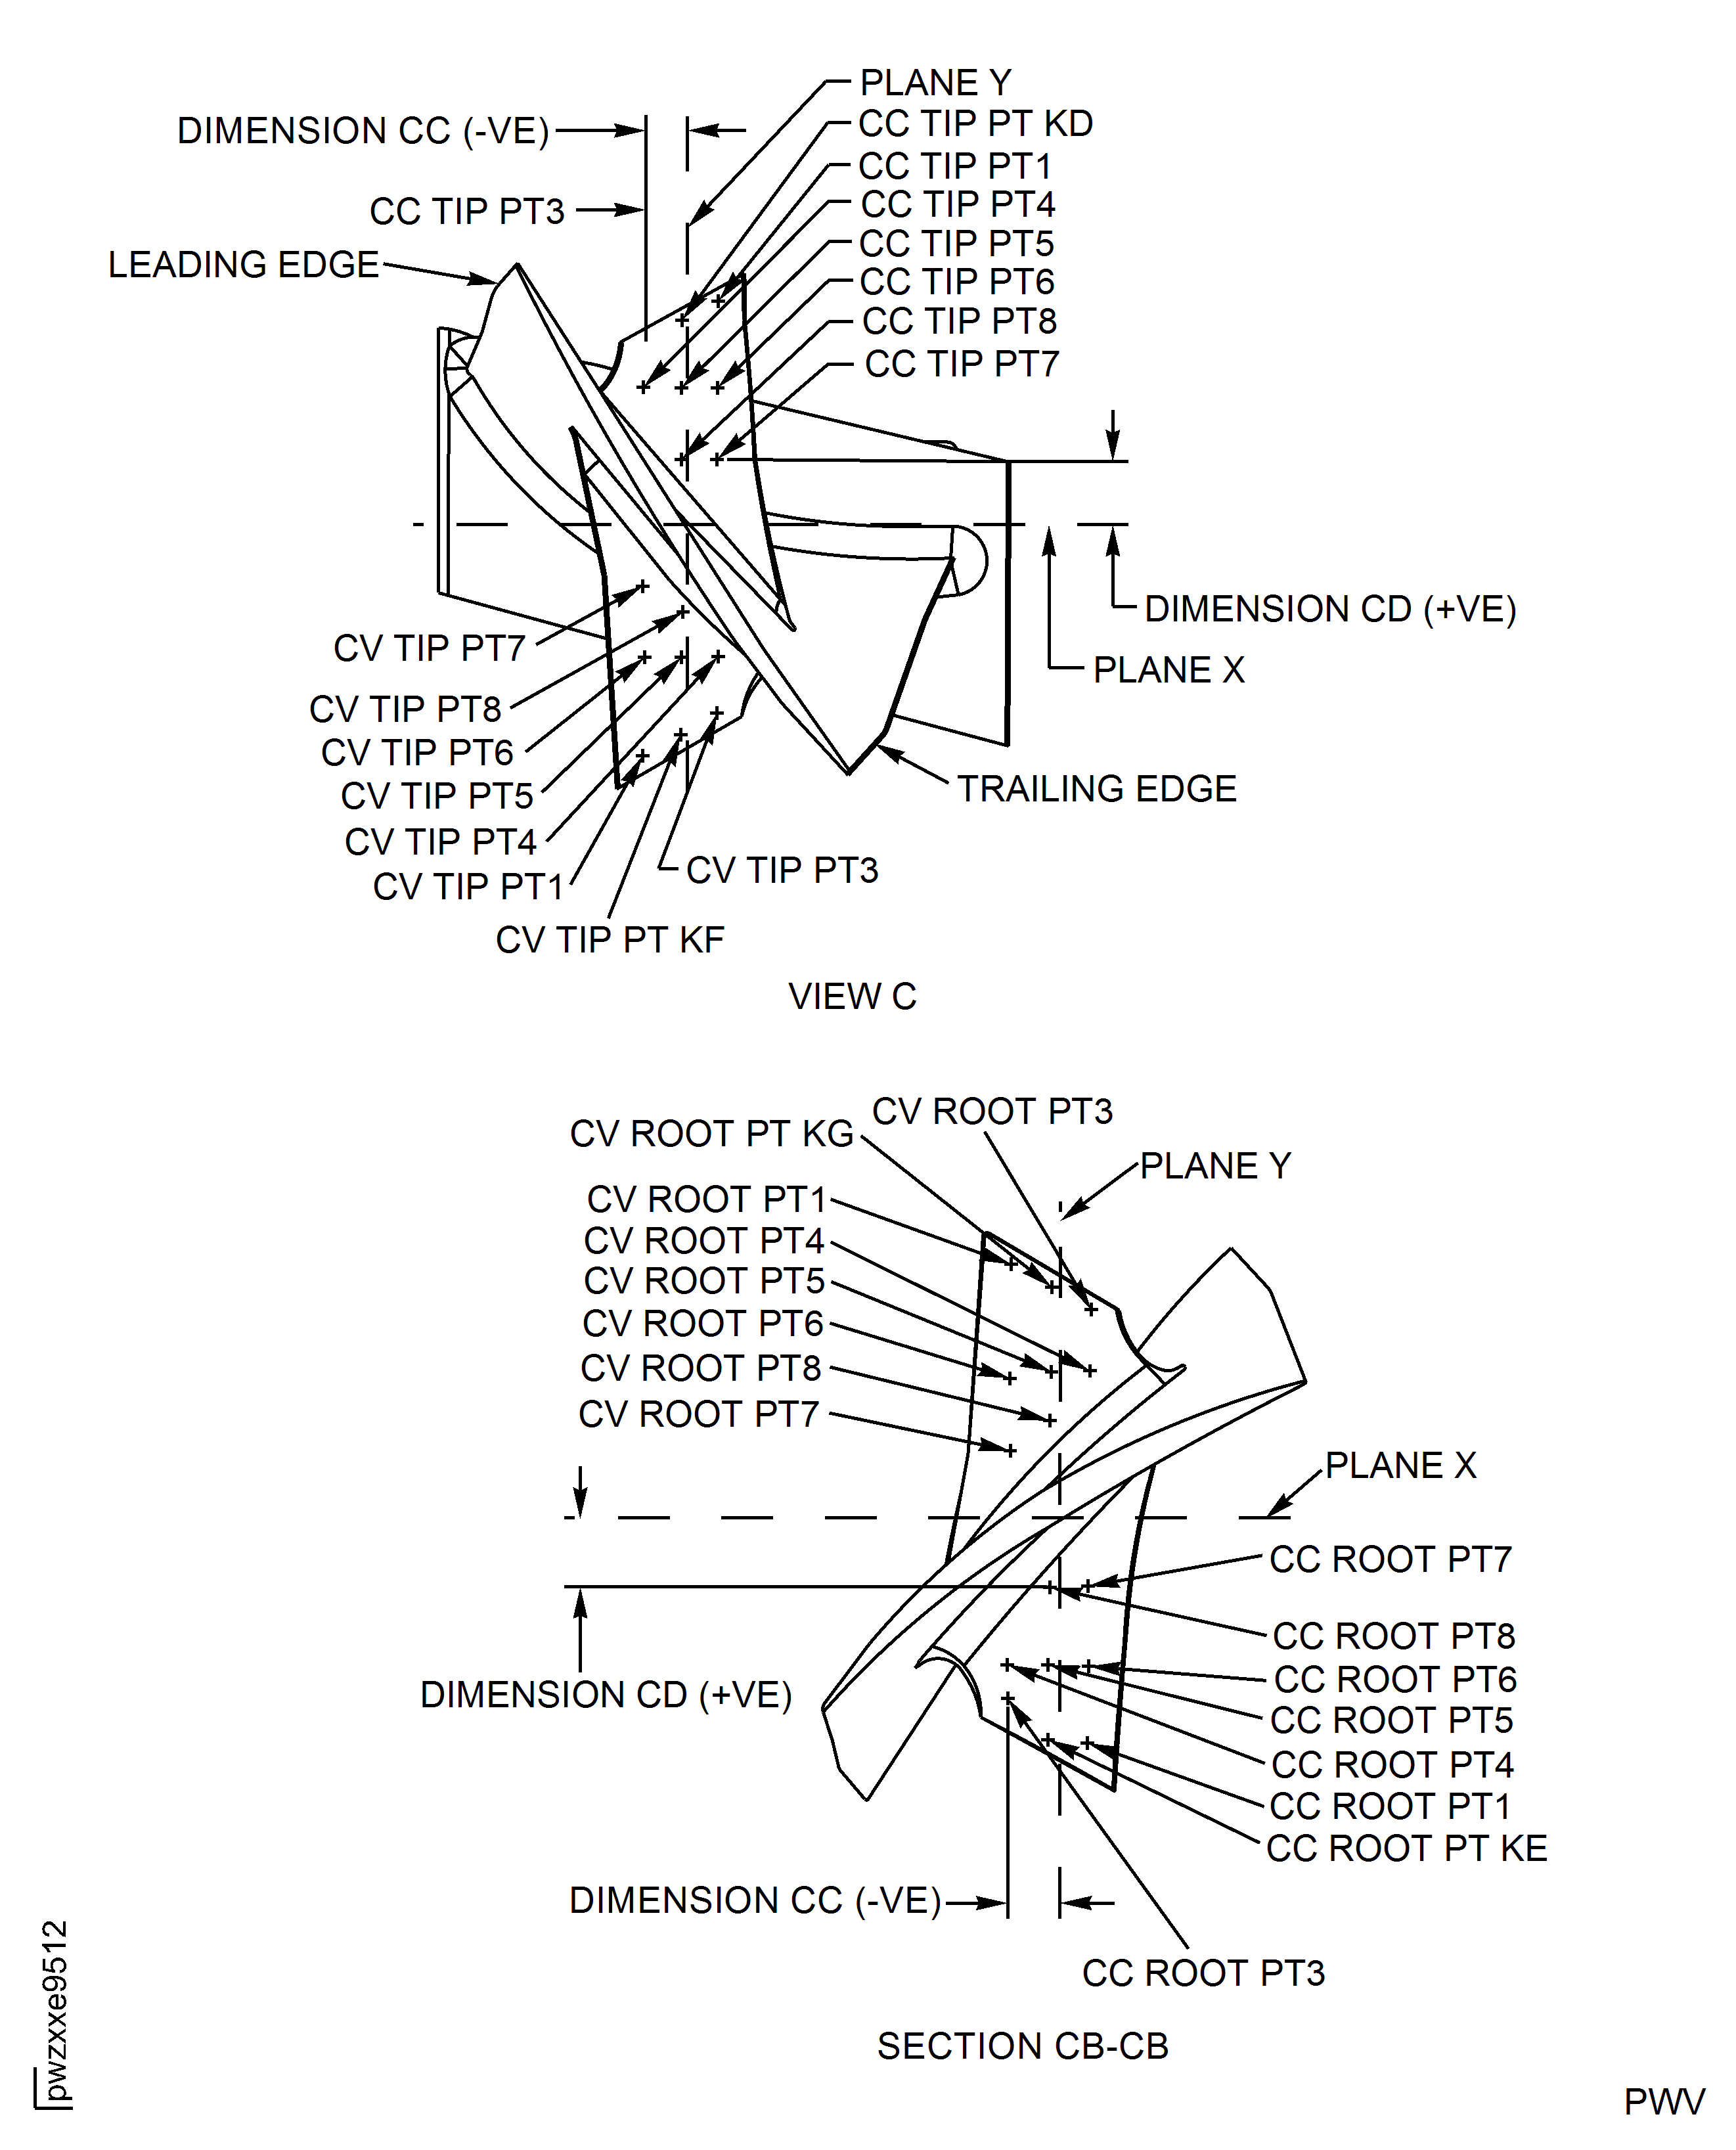
Figure: Repair Details And Dimensions - Assembly E And F
Repair Details And Dimensions - Assembly E And F
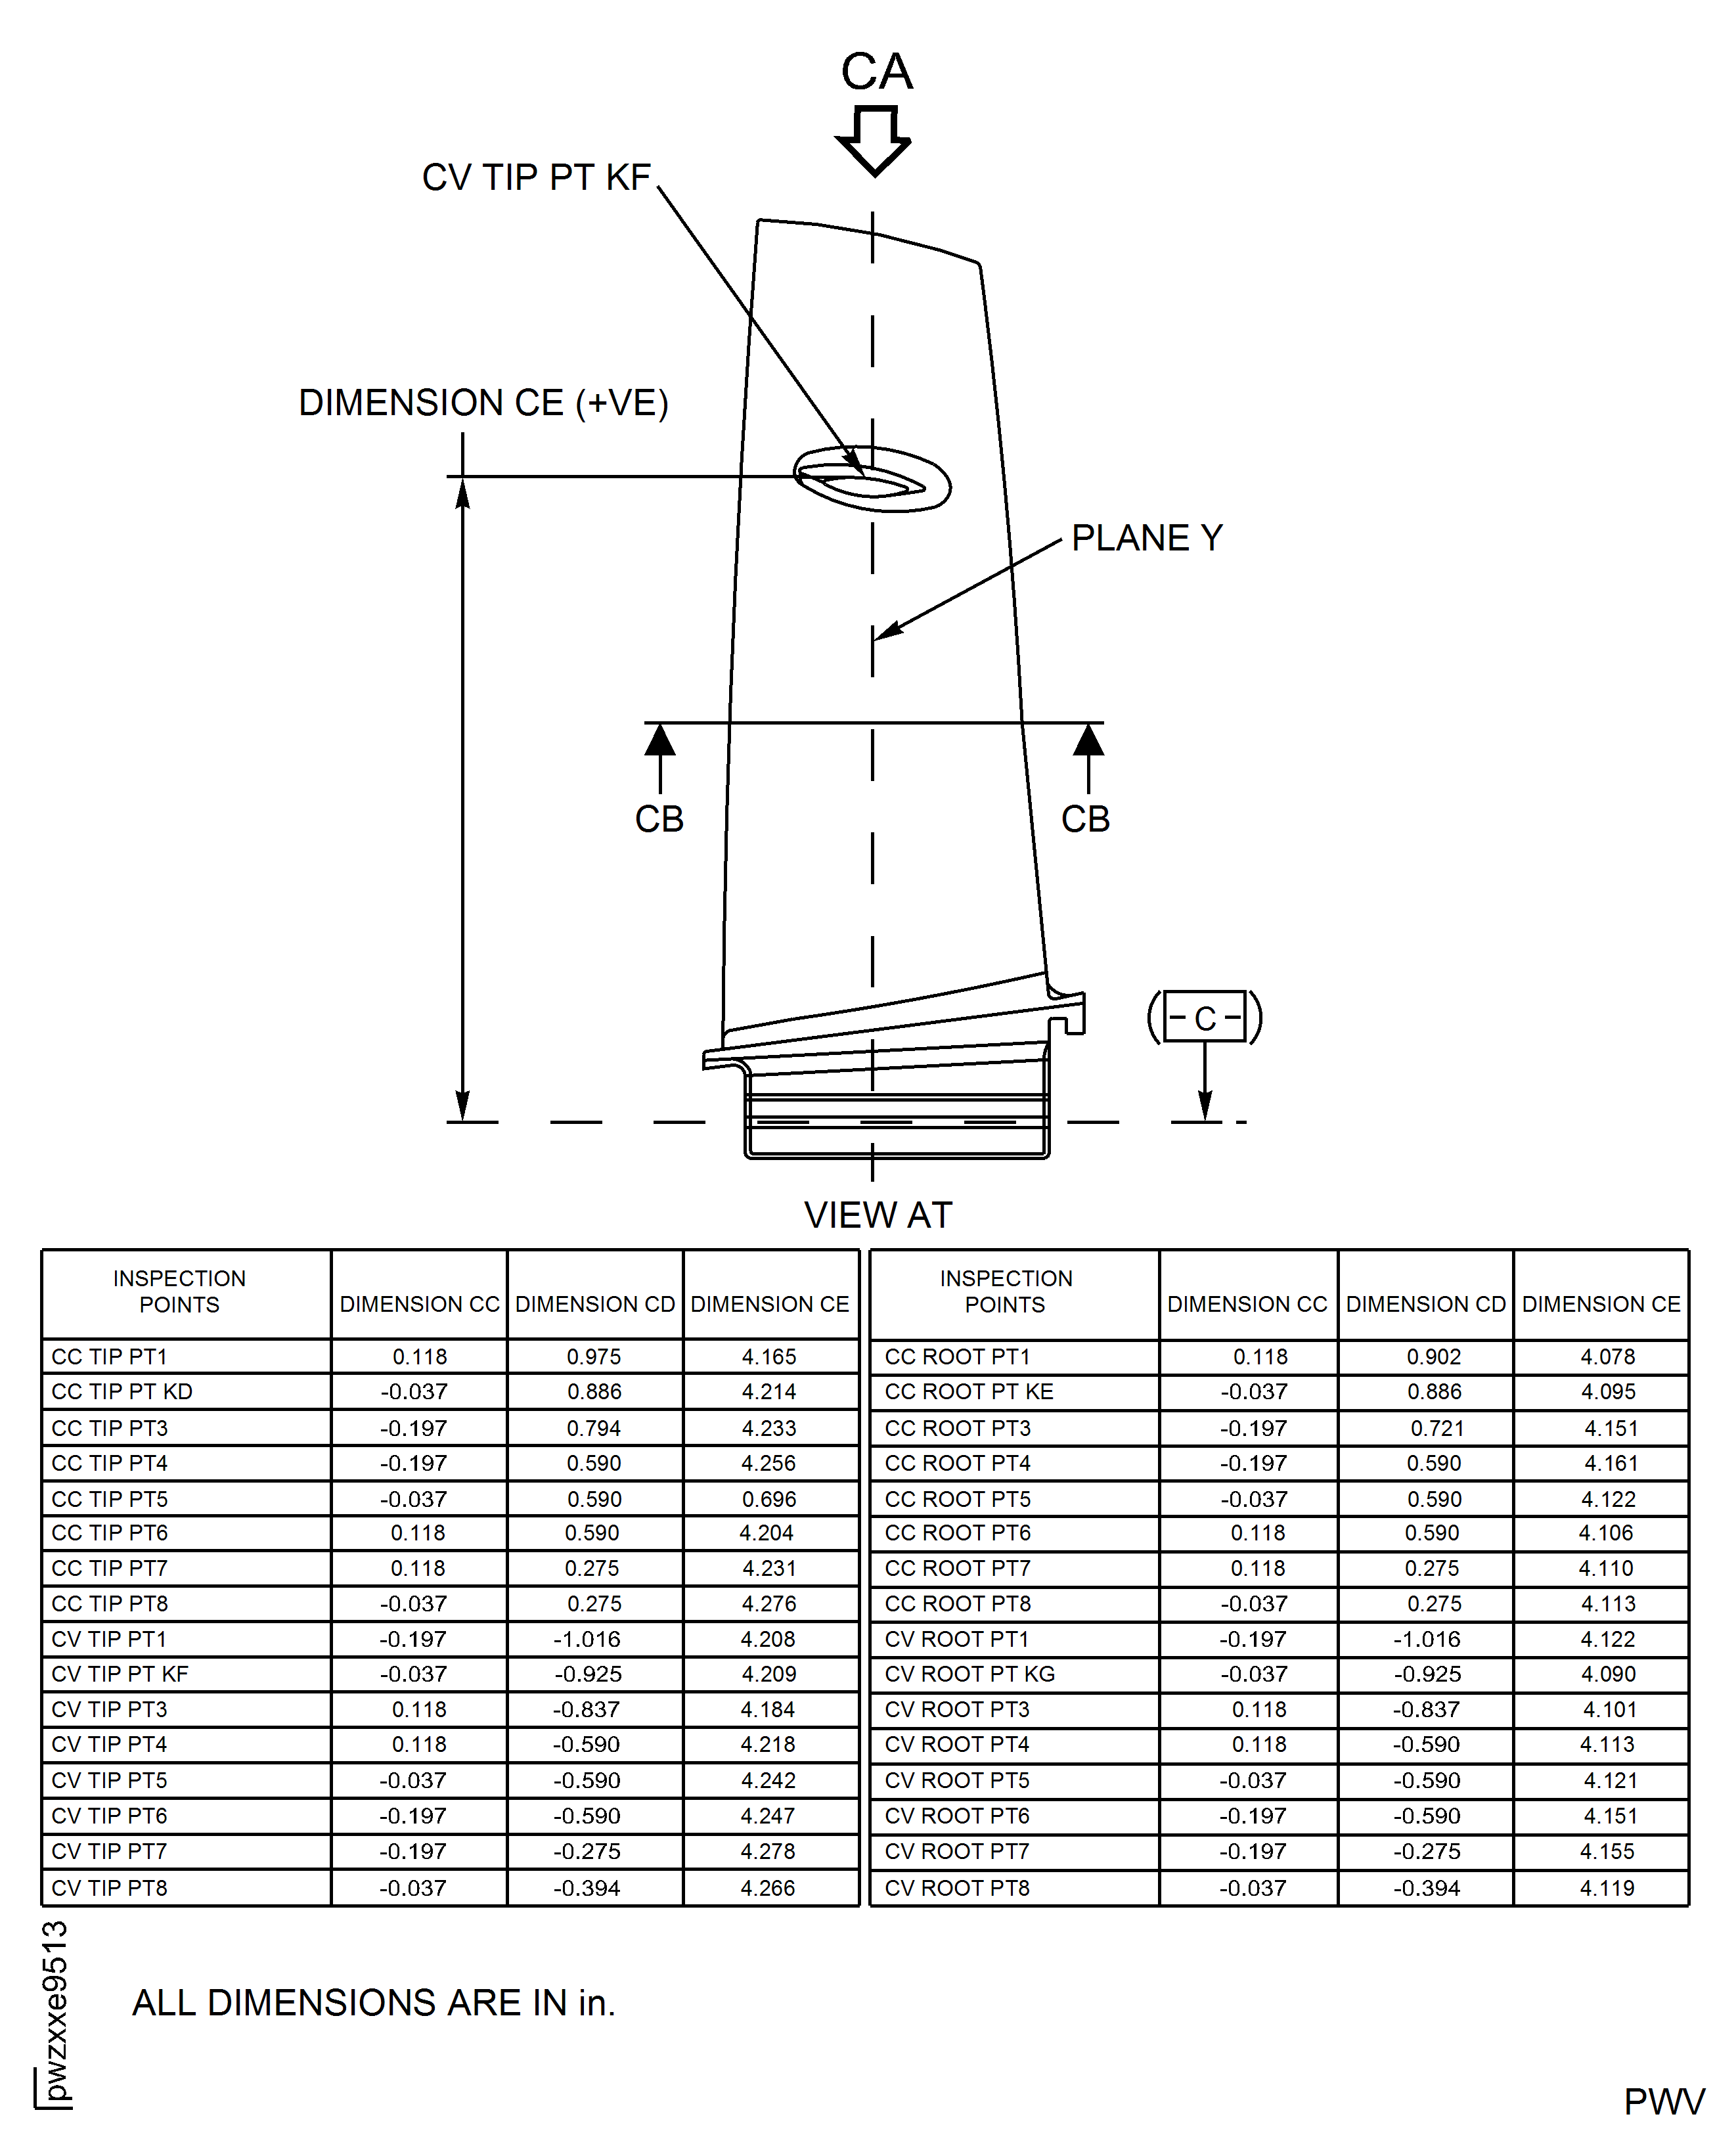
Figure: Repair Details And Dimensions - Assembly A, B, E, and F
Repair Details And Dimensions - Assembly A, B, E, and F
