Export Control
EAR Export Classification: Not subject to the EAR per 15 C.F.R. Chapter 1, Part 734.3(b)(3), except for the following Service Bulletins which are currently published as EAR Export Classification 9E991: SBE70-0992, SBE72-0483, SBE72-0580, SBE72-0588, SBE72-0640, SBE73-0209, SBE80-0024 and SBE80-0025.Copyright
© IAE International Aero Engines AG (2001, 2014 - 2021) The information contained in this document is the property of © IAE International Aero Engines AG and may not be copied or used for any purpose other than that for which it is supplied without the express written authority of © IAE International Aero Engines AG. (This does not preclude use by engine and aircraft operators for normal instructional, maintenance or overhaul purposes.).Applicability
All
Common Information
TASK 72-41-21-300-024 HPC Cross Key Location Ring - Replace The Hard Coat, Repair-024 (VRS6171)
Effectivity
FIG/ITEM | PART NO. | |
|---|---|---|
04-750 | 6A2856 | Assembly A |
04-750 | 6A5737 | Assembly B |
04-750 | 6A4179 | Assembly C |
04-750 | 6A5738 | Assembly D |
Material of component
PART IDENT | SYMBOL | MATERIAL |
|---|---|---|
HP Compressor crosskey location ring | QTX or QRK | Nickel based alloy |
General
This repair must only be done when the instruction to do so is given in 72-41-21 Inspection/Check.
The practices and processes referred to in the procedure by the TASK/SUBTASK number are in the SPM.
Price and availability
Refer to International Aero Engines
Related repairs
None.
NOTE
NOTE
Preliminary Requirements
Pre-Conditions
NONESupport Equipment
| Name | Manufacturer | Part Number / Identification | Quantity | Remark |
|---|---|---|---|---|
| Chemical cleaning equipment | LOCAL | Chemical cleaning equipment | ||
| Lathe | LOCAL | Lathe | ||
| Dial indicator | LOCAL | Dial indicator | ||
| Standard workshop tools | LOCAL | Standard workshop tools | ||
| Milling machine | LOCAL | Milling machine | ||
| Rotary table | LOCAL | Rotary table | Indexing | |
| Abrasive blasting facility | LOCAL | Abrasive blasting facility | ||
| Penetrant Crack Test Equipment | LOCAL | Penetrant crack test equipment | ||
| Gloves | LOCAL | Gloves | Clean cotton or polythene | |
| Brush | LOCAL | Brush | Vacuum assisted | |
| Metal spray equipment | LOCAL | Metal spray equipment | ||
| Workshop inspection equipment | LOCAL | Workshop inspection equipment | ||
| Grinding machine | LOCAL | Grinding machine | ||
| Vibrating marking pencil | LOCAL | Vibrating marking pencil | ||
| IAE 3R18633 Grind Fixture | 0AM53 | IAE 3R18633 | 1 | |
| IAE 3R18634 Turn/Grind Fixture | 0AM53 | IAE 3R18634 | 1 | |
| IAE 3R19118 Grind Fixture | 0AM53 | IAE 3R19118 | 1 | |
| IAE 3R19119 Turn/Grind Fixture | 0AM53 | IAE 3R19119 | 1 |
Consumables, Materials and Expendables
| Name | Manufacturer | Part Number / Identification | Quantity | Remark |
|---|---|---|---|---|
| CoMat 02-001 ADHESIVE TAPE (MASKING) | LOCAL | CoMat 02-001 | ||
| CoMat 02-006 ADHESIVE TAPE ALUMINIUM FOIL | K0993 | CoMat 02-006 | ||
| CoMat 03-239 METAL SPRAYING POWDER, CHROMIUM CARBIDE/NICHROME 75/25, FINE | LOCAL | CoMat 03-239 | ||
| CoMat 03-240 METAL SPRAYING POWDER, CHROMIUM CARBIDE/NICHROME 75/25, FINE | LOCAL | CoMat 03-240 | ||
| CoMat 05-001 ABRASIVE MEDIUM, ALUMINIUM OXIDE, 20/30 GRADE | LOCAL | CoMat 05-001 | ||
| CoMat 06-022 FLUORESCENT PENETRANT (POST-EMULSIFIED ULTRA HIGH SENSITIVITY) | LOCAL | CoMat 06-022 |
Spares
NONESafety Requirements
NONEProcedure
Use chemical cleaning equipment.
Refer to TASK 72-41-21-100-000 (CLEANING-000).
Remove the surface protection.
SUBTASK 72-41-21-110-112 Remove the Surface Protection
Use IAE 3R18634 Turn/Grind Fixture 1 off with a lathe and a dial test indicator.
Install the turn/grind fixture onto a lathe and set to turn correctly.
SUBTASK 72-41-21-325-069-A00 Machine to Remove the Hard Coat, Assembly A
Use IAE 3R18634 Turn/Grind Fixture 1 off with a lathe and a dial test indicator.
Install the turn/grind fixture onto a lathe and set to turn correctly.
SUBTASK 72-41-21-325-069-B00 Machine to Remove the Hard Coat, Assembly B
Use IAE 3R19119 Turn/Grind Fixture 1 off, with a lathe and a dial test indicator.
Install the turn/grind fixture onto a lathe and set to turn corrctly.
SUBTASK 72-41-21-325-069-C00 Machine to Remove the Hard Coat, Assembly C
Use IAE 3R19119 Turn/Grind Fixture 1 off, with a lathe and a dial test indicator.
Install the turn/grind fixture onto a lathe and set to turn correctly.
SUBTASK 72-41-21-325-069-D00 Machine to Remove the Hard Coat, Assembly D
Use IAE 3R18633 Grind Fixture 1 off with a milling machine and an indexing rotary table.
Install the grind fixture onto a milling machine.
SUBTASK 72-41-21-322-001-A00 Remove the Hard Coat on the Location Features, Assembly A
Use IAE 3R18633 Grind Fixture 1 off with a milling machine and an indexing rotary table.
Install the grind fixture onto a milling machine.
SUBTASK 72-41-21-322-001-B00 Remove the Hard Coat on the Location Features, Assembly B
Use IAE 3R19118 Grind Fixture 1 off, with a milling machine and an indexing rotary table.
Install the grind fixture onto a milling machine.
SUBTASK 72-41-21-322-001-C00 Remove the Hard Coat on the Location Features, Assembly C
Use IAE 3R19118 Grind Fixture 1 off, with a milling machine and an indexing rotary table.
Install the grind fixture onto a milling machine.
SUBTASK 72-41-21-322-001-D00 Remove the Hard Coat on the Location Features, Assembly D
Refer to the SPM TASK 70-33-59-300-503, SUBTASK 70-33-59-300-008.
Use CoMat 05-001 ABRASIVE MEDIUM, ALUMINIUM OXIDE, 20/30 GRADE with abrasive blast facility.
Abrasive blast.
SUBTASK 72-41-21-330-058-A00 Remove the Remaining Hard Coat, Assembly A
Refer to the SPM TASK 70-33-59-300-503, SUBTASK 70-33-59-300-004 or SUBTASK 70-33-59-300-007.
Use chemical cleaning equipment.
Chemically degrade the hard coat.
Refer to the SPM TASK 70-33-59-300-503, SUBTASK 70-33-59-300-008.
Use CoMat 05-001 ABRASIVE MEDIUM, ALUMINIUM OXIDE, 20/30 GRADE with abrasive blast facility.
Abrasive blast.
SUBTASK 72-41-21-330-058-B00 Remove the Remaining Hard Coat, Assembly B
Refer to the SPM TASK 70-33-59-300-503, SUBTASK 70-33-59-300-004 or SUBTASK 70-33-59-300-007.
Use chemical cleaning equipment.
Chemically degrade the hard coat.
Refer to the SPM TASK 70-33-59-300-503 SUBTASK 70-33-59-300-008.
Use CoMat 05-001 ABRASIVE MEDIUM, ALUMINIUM OXIDE, 20/30 GRADEblast facility.
Abrasive blast.
SUBTASK 72-41-21-330-058-C00 Remove the Remaining Hard Coat, Assembly C
Refer to the SPM TASK 70-33-59-300-503, SUBTASK 70-33-59-300-004 or SUBTASK 70-33-59-300-007.
Use chemical cleaning equipment.
Chemically degrade the hard coat.
Refer to the SPM TASK 70-33-59-300-503 SUBTASK 70-33-59-300-008<.
Use CoMat 05-001 ABRASIVE MEDIUM, ALUMINIUM OXIDE, 20/30 GRADE blast facility.
Abrasive blast.
SUBTASK 72-41-21-330-058-D00 Remove the Remaining Hard Coat, Assembly D
Use penetrant crack test equipment.
Cracks are not permitted.
Refer to the SPM TASK 70-23-01-230-501.
Do a penetrant crack test.
SUBTASK 72-41-21-230-102 Do a Crack Test
Use chemical cleaning equipment.
Refer to the SPM TASK 70-11-01-300-503.
Chemically clean the ring.
SUBTASK 72-41-21-110-113 Chemically Clean
Refer to the SPM TASK 70-12-02-120-501.
Use CoMat 05-001 ABRASIVE MEDIUM, ALUMINIUM OXIDE, 20/30 GRADE with an abrasive blast facility.
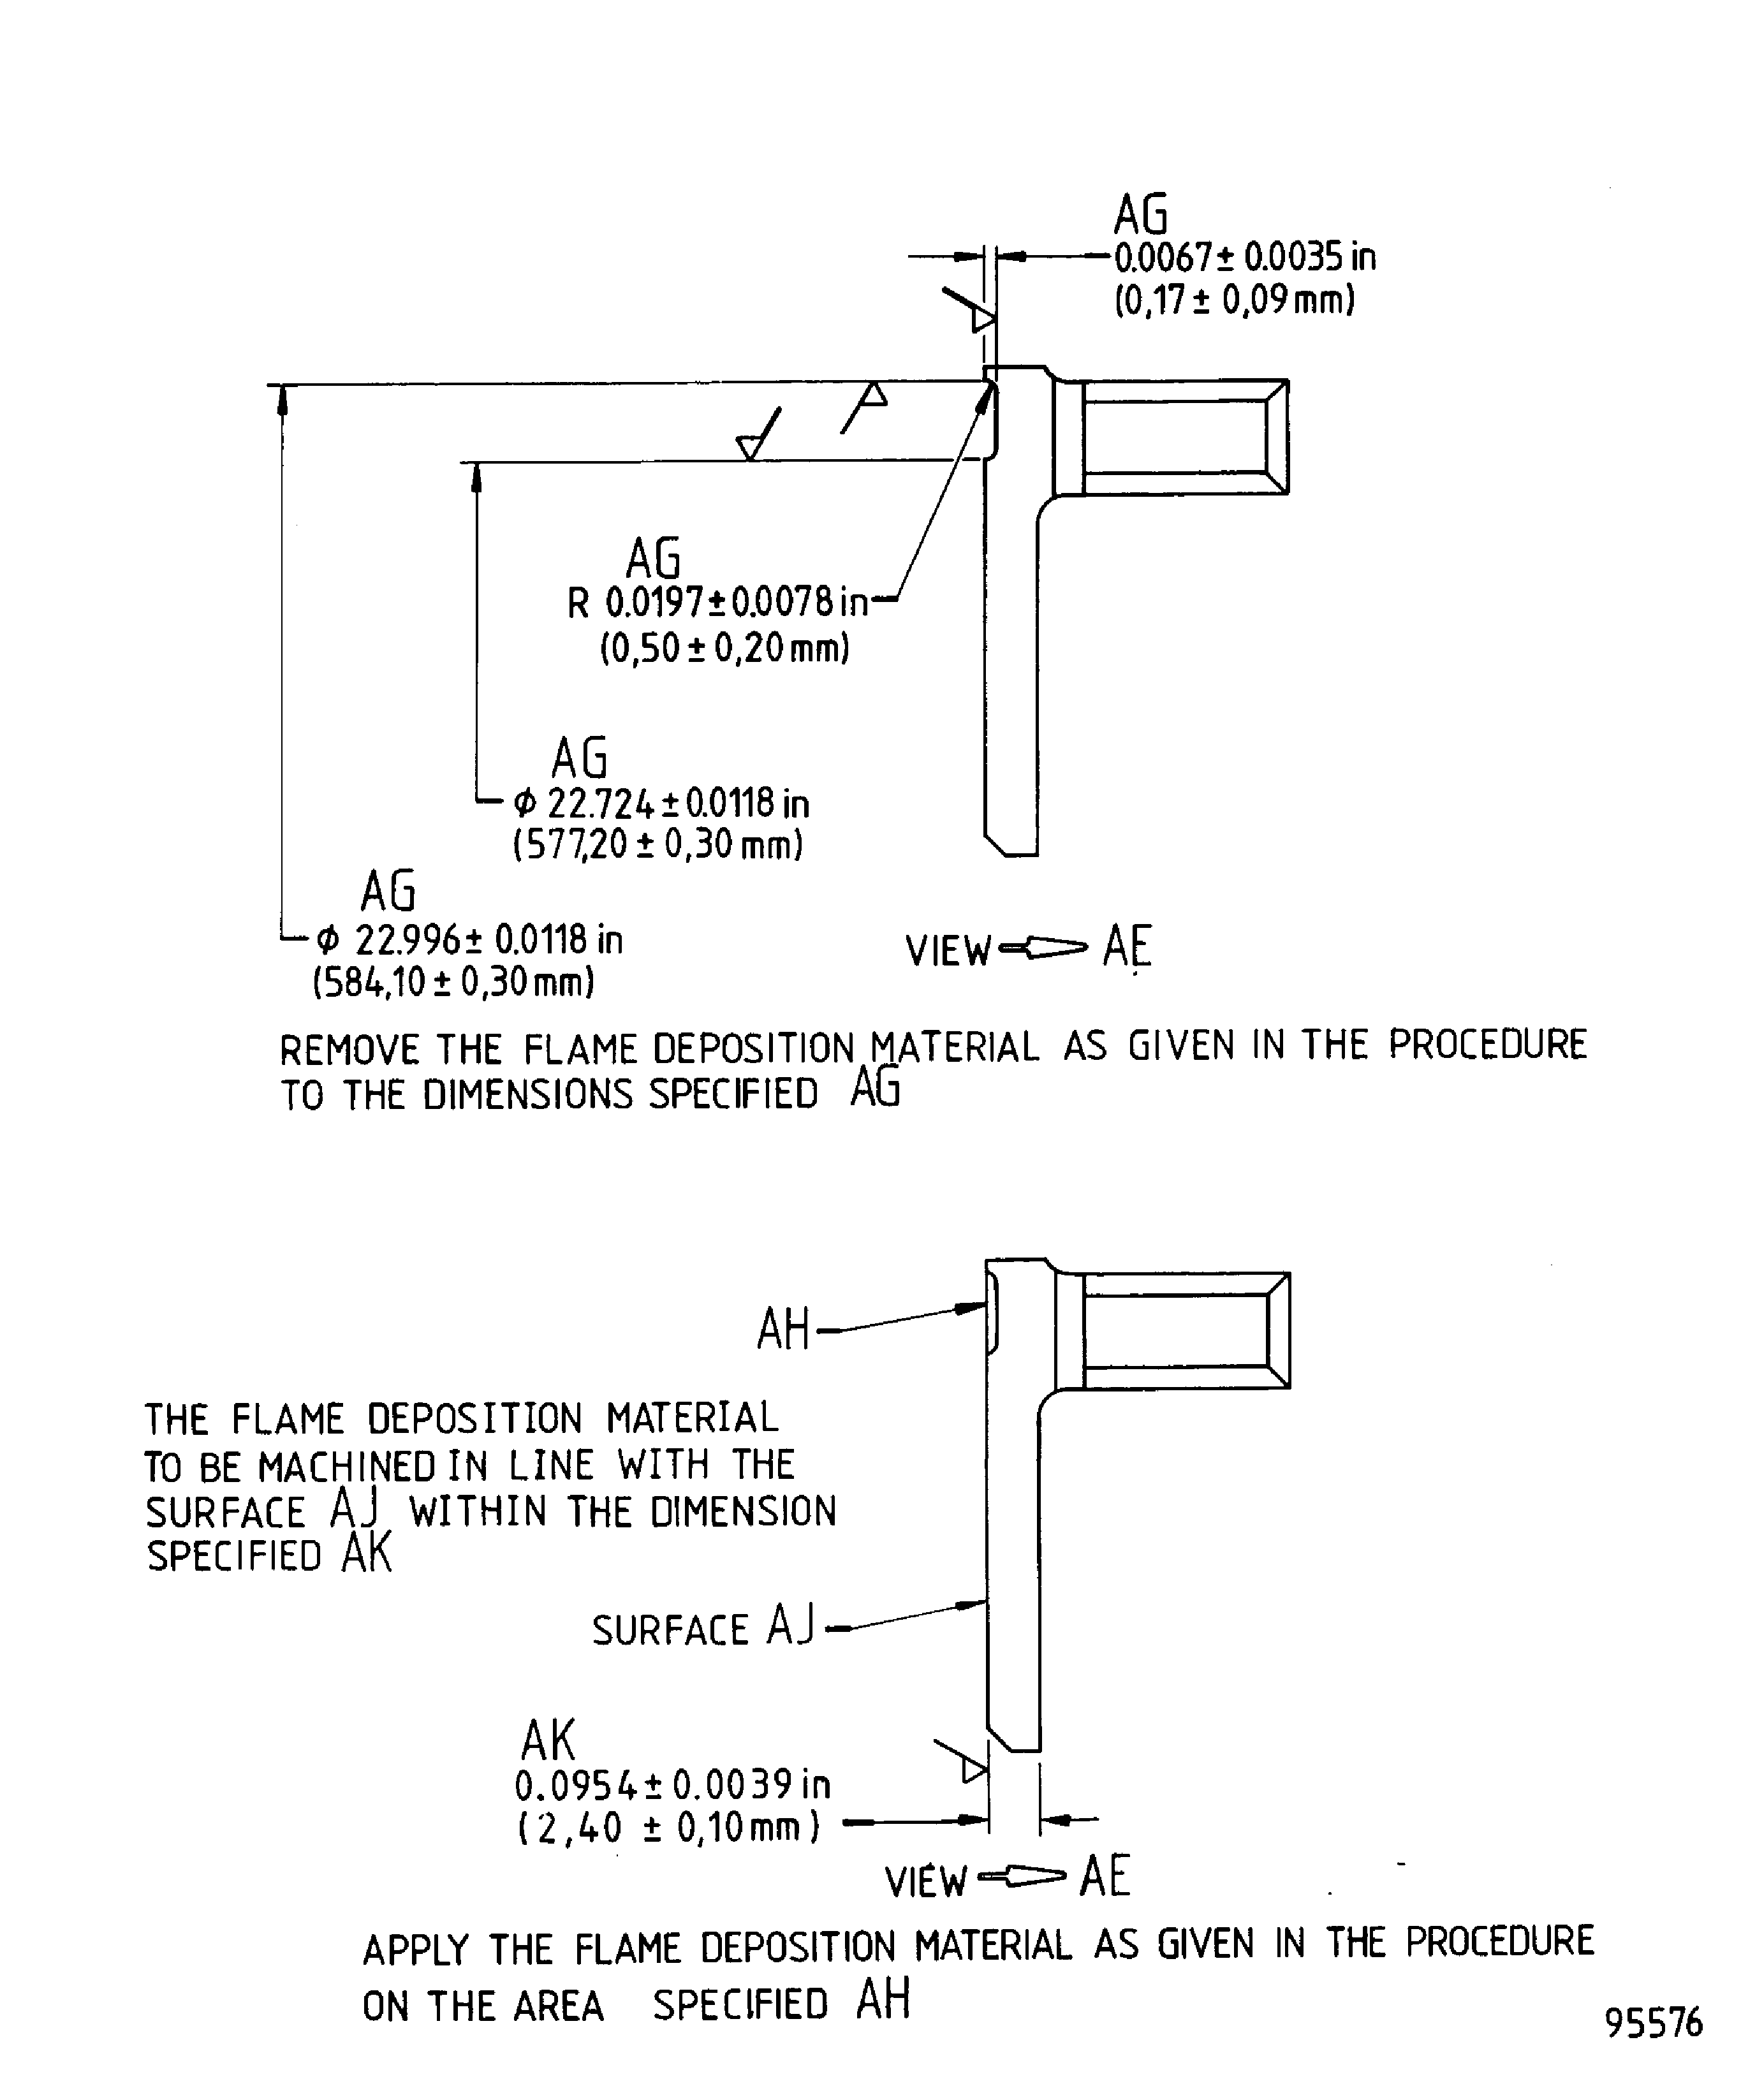
Abrasive blast the ring on surfaces 'AH'.
SUBTASK 72-41-21-120-059-A00 Abrasive Blast the Ring, Assembly A
Refer to the SPM TASK 70-12-02-120-501.
Use CoMat 05-001 ABRASIVE MEDIUM, ALUMINIUM OXIDE, 20/30 GRADE with an abrasive blast facility.
Abrasive blast the ring on surfaces 'AH'.
SUBTASK 72-41-21-120-059-B00 Abrasive Blast the Ring, Assembly B
Refer to the SPM TASK 70-12-02-120-501.
Use CoMat 05-001 ABRASIVE MEDIUM, ALUMINIUM OXIDE, 20/30 GRADE with an abrasive blast facility.
Abrasive blast the ring on surfaces 'AH'.
SUBTASK 72-41-21-120-059-C00 Abrasive blast the Ring, Assembly C
Refer to the SPM TASK 70-12-02-120-501.
Use CoMat 05-001 ABRASIVE MEDIUM, ALUMINIUM OXIDE, 20/30 GRADE with an abrasive blast facility.
Abrasive blast the ring on surfaces 'AH'.
SUBTASK 72-41-21-120-059-D00 Abrasive Blast the Ring, Assembly D
Refer to SPM TASK 70-34-01-340-501, SUBTASK 70-34-01-340-026.
Apply a layer of sufficient thickness to get the correct dimensions after the assembly is machined.
Apply the hard coat to surfaces 'AH'.
SUBTASK 72-41-21-340-059-A00 Apply the Hard Coat to the HP Compressor Crosskey Location Ring, Assembly A
Refer to the SPM TASK 70-34-01-340-501, SUBTASK 70-34-01-340-026.
Apply a layer of sufficient thickness to get the correct dimensions after the assembly is machined.
Apply the hard coat to surfaces 'AH'.
SUBTASK 72-41-21-340-059-B00 Apply the Hard Coat to the HP Compressor Crosskey Location Ring, Assembly B
Refer to the SPM TASK 70-34-01-340-501, SUBTASK 70-34-01-340-026.
Apply a layer of sufficient thickness to get the correct dimensions after the assembly is machined.
Apply the hard coat to surfaces 'AH'.
SUBTASK 72-41-21-340-059-C00 Apply the Hard Coat to the HP Compressor Crosskey Location Ring, Assembly C
Refer to the SPM TASK 70-34-01-340-501, SUBTASK 70-34-01-340-026.
Apply a layer of sufficient thickness to get the correct dimensions after the assembly is machined.
Apply the hard coat to surfaces 'AH'.
SUBTASK 72-41-21-340-059-D00 Apply the Hard Coat to the HP Compressor Crosskey Location Ring, Assembly D
Refer to the SPM TASK 70-34-01-340-501.
Use workshop inspection equipment.
Visually examine and measure the dimensions of the hard coat.
SUBTASK 72-41-21-220-251-A00 Examine the Hard Coat, Assembly A
Refer to the SPM TASK 70-34-01-340-501.
Use workshop inspection equipment.
Visually examine and measure the dimensions of the hard coat.
SUBTASK 72-41-21-220-251-B00 Examine the Hard Coat, Assembly B
Refer to the SPM TASK 70-34-01-340-501.
Use workshop inspection equipment.
Visually examine and measure the dimensions of the hard coat.
SUBTASK 72-41-21-220-251-C00 Examine the Hard Coat, Assembly C
Refer to the SPM TASK 70-34-01-340-501.
Use workshop inspection equipment.
Visually examine and measure the dimensions of the hard coat.
SUBTASK 72-41-21-220-251-D00 Examine the Hard Coat, Assembly D
Use IAE 3R18634 Turn/Grind Fixture 1 off with a grinding machine and a dial test indicator.
Install the grind fixture onto a grinding machine and set to turn correctly.
SUBTASK 72-41-21-324-051-A00 Machine the Hard Coat, Assembly A
Use IAE 3R19119 Turn/Grind Fixture 1 off with a grinding machine and a dial test indicator.
Install the grind fixture onto a grinding machine and set to turn correctly.
SUBTASK 72-41-21-324-051-B00 Machine the Hard Coat, Assembly B
Use IAE 3R19119 Turn/Grind Fixture 1 off with a grinding machine and a dial test indicator.
Install the grind fixture onto a grinding machine and set to turn correctly.
SUBTASK 72-41-21-324-051-C00 Examine the Hard Coat, Assembly C
Use IAE 3R19119 Turn/Grind Fixture 1 off, with a grinding machine and a dial test indicator.
Install the grind fixture onto a grinding machine and set to turn correctly.
SUBTASK 72-41-21-324-051-D00 Machine the Hard Coat, Assembly D
Use IAE 3R18633 Grind Fixture 1 off, with a grinding machine and an indexing rotary table.
Install the grind fixture onto a grinding machine.
SUBTASK 72-41-21-324-052-A00 Machine the Hard Coat on the Location Features, Assembly A
Use IAE 3R18633 Grind Fixture 1 off, with a grinding machine and an indexing rotary table.
Install the grind fixture onto a grinding machine and set to turn correctly.
SUBTASK 72-41-21-324-052-B00 Machine the Hard Coat on the Location Features, Assembly B
Refer to Figure.
Use IAE 3R19119 Turn/Grind Fixture 1 off, with a grinding machine and an indexing rotary table.
Install the grind fixture onto a grinding machine and set to turn correctly.
SUBTASK 72-41-21-324-052-C00 Machine the Hard Coat on the Location Features, Assembly C, , 72-41-21-990-073-003and
Use IAE 3R19119 Turn/Grind Fixture 1 off, with a grinding machine and an indexing rotary table.
Install the grind fixture onto a grinding machine and set to turn correctly.
SUBTASK 72-41-21-324-052-D00 Machine the Hard Coat on the Location Features, Assembly D
Refer to the SPM TASK 70-34-01-340-501.
Use workshop inspection equipment.
Visually examine and measure the dimensions of the location features at 'AH'.
SUBTASK 72-41-21-220-053-A00 Examine the Location Features, Assembly A
Refer to the SPM TASK 70-34-01-340-501.
Use workshop inspection equipment.
Visually examine and measure the dimensions of the location features at 'AH'.
SUBTASK 72-41-21-220-053-B00 Examine the Location Features, Assembly B
Refer to the SPM TASK 70-09-00-400-501, SUBTASK 70-09-00-400-001.
Use vibro-engraving equipment.
Mark VRS6171 adjacent to the part number.
SUBTASK 72-41-21-350-083 Identify the Repair
Figure: Repair details and dimensions - Assembly A
Sheet 1
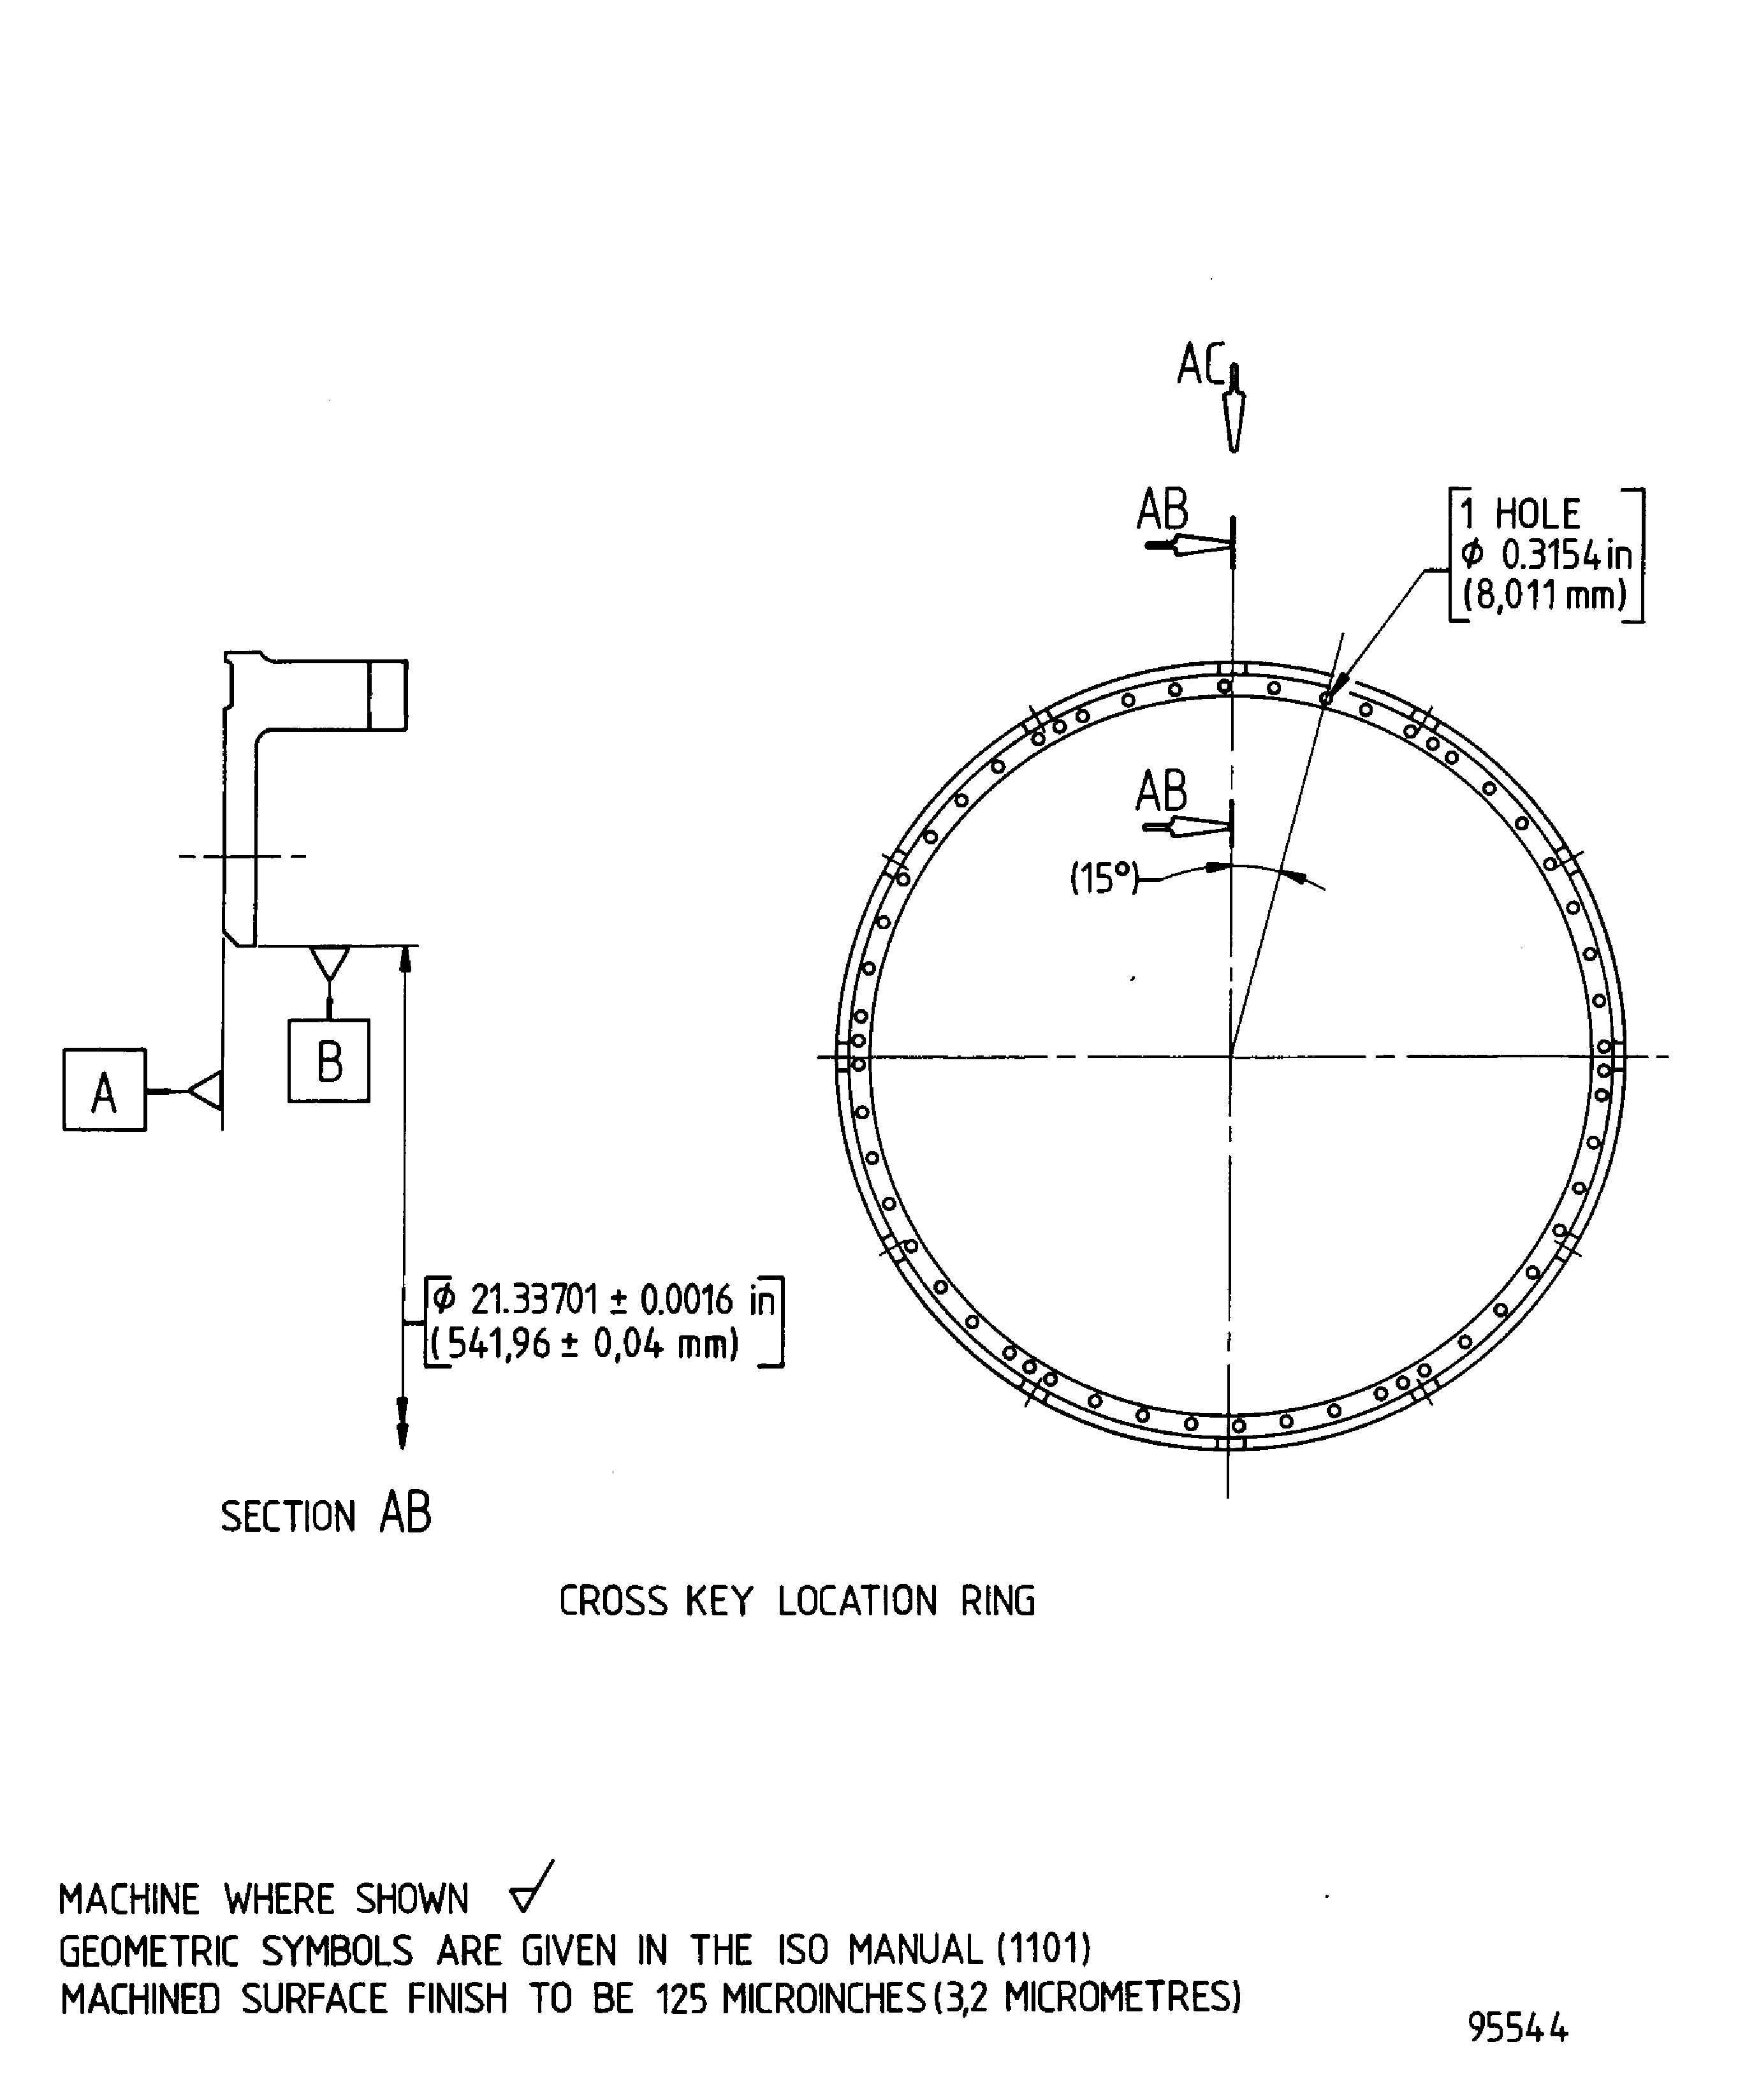
Figure: Repair details and dimensions - Assembly B
Sheet 2
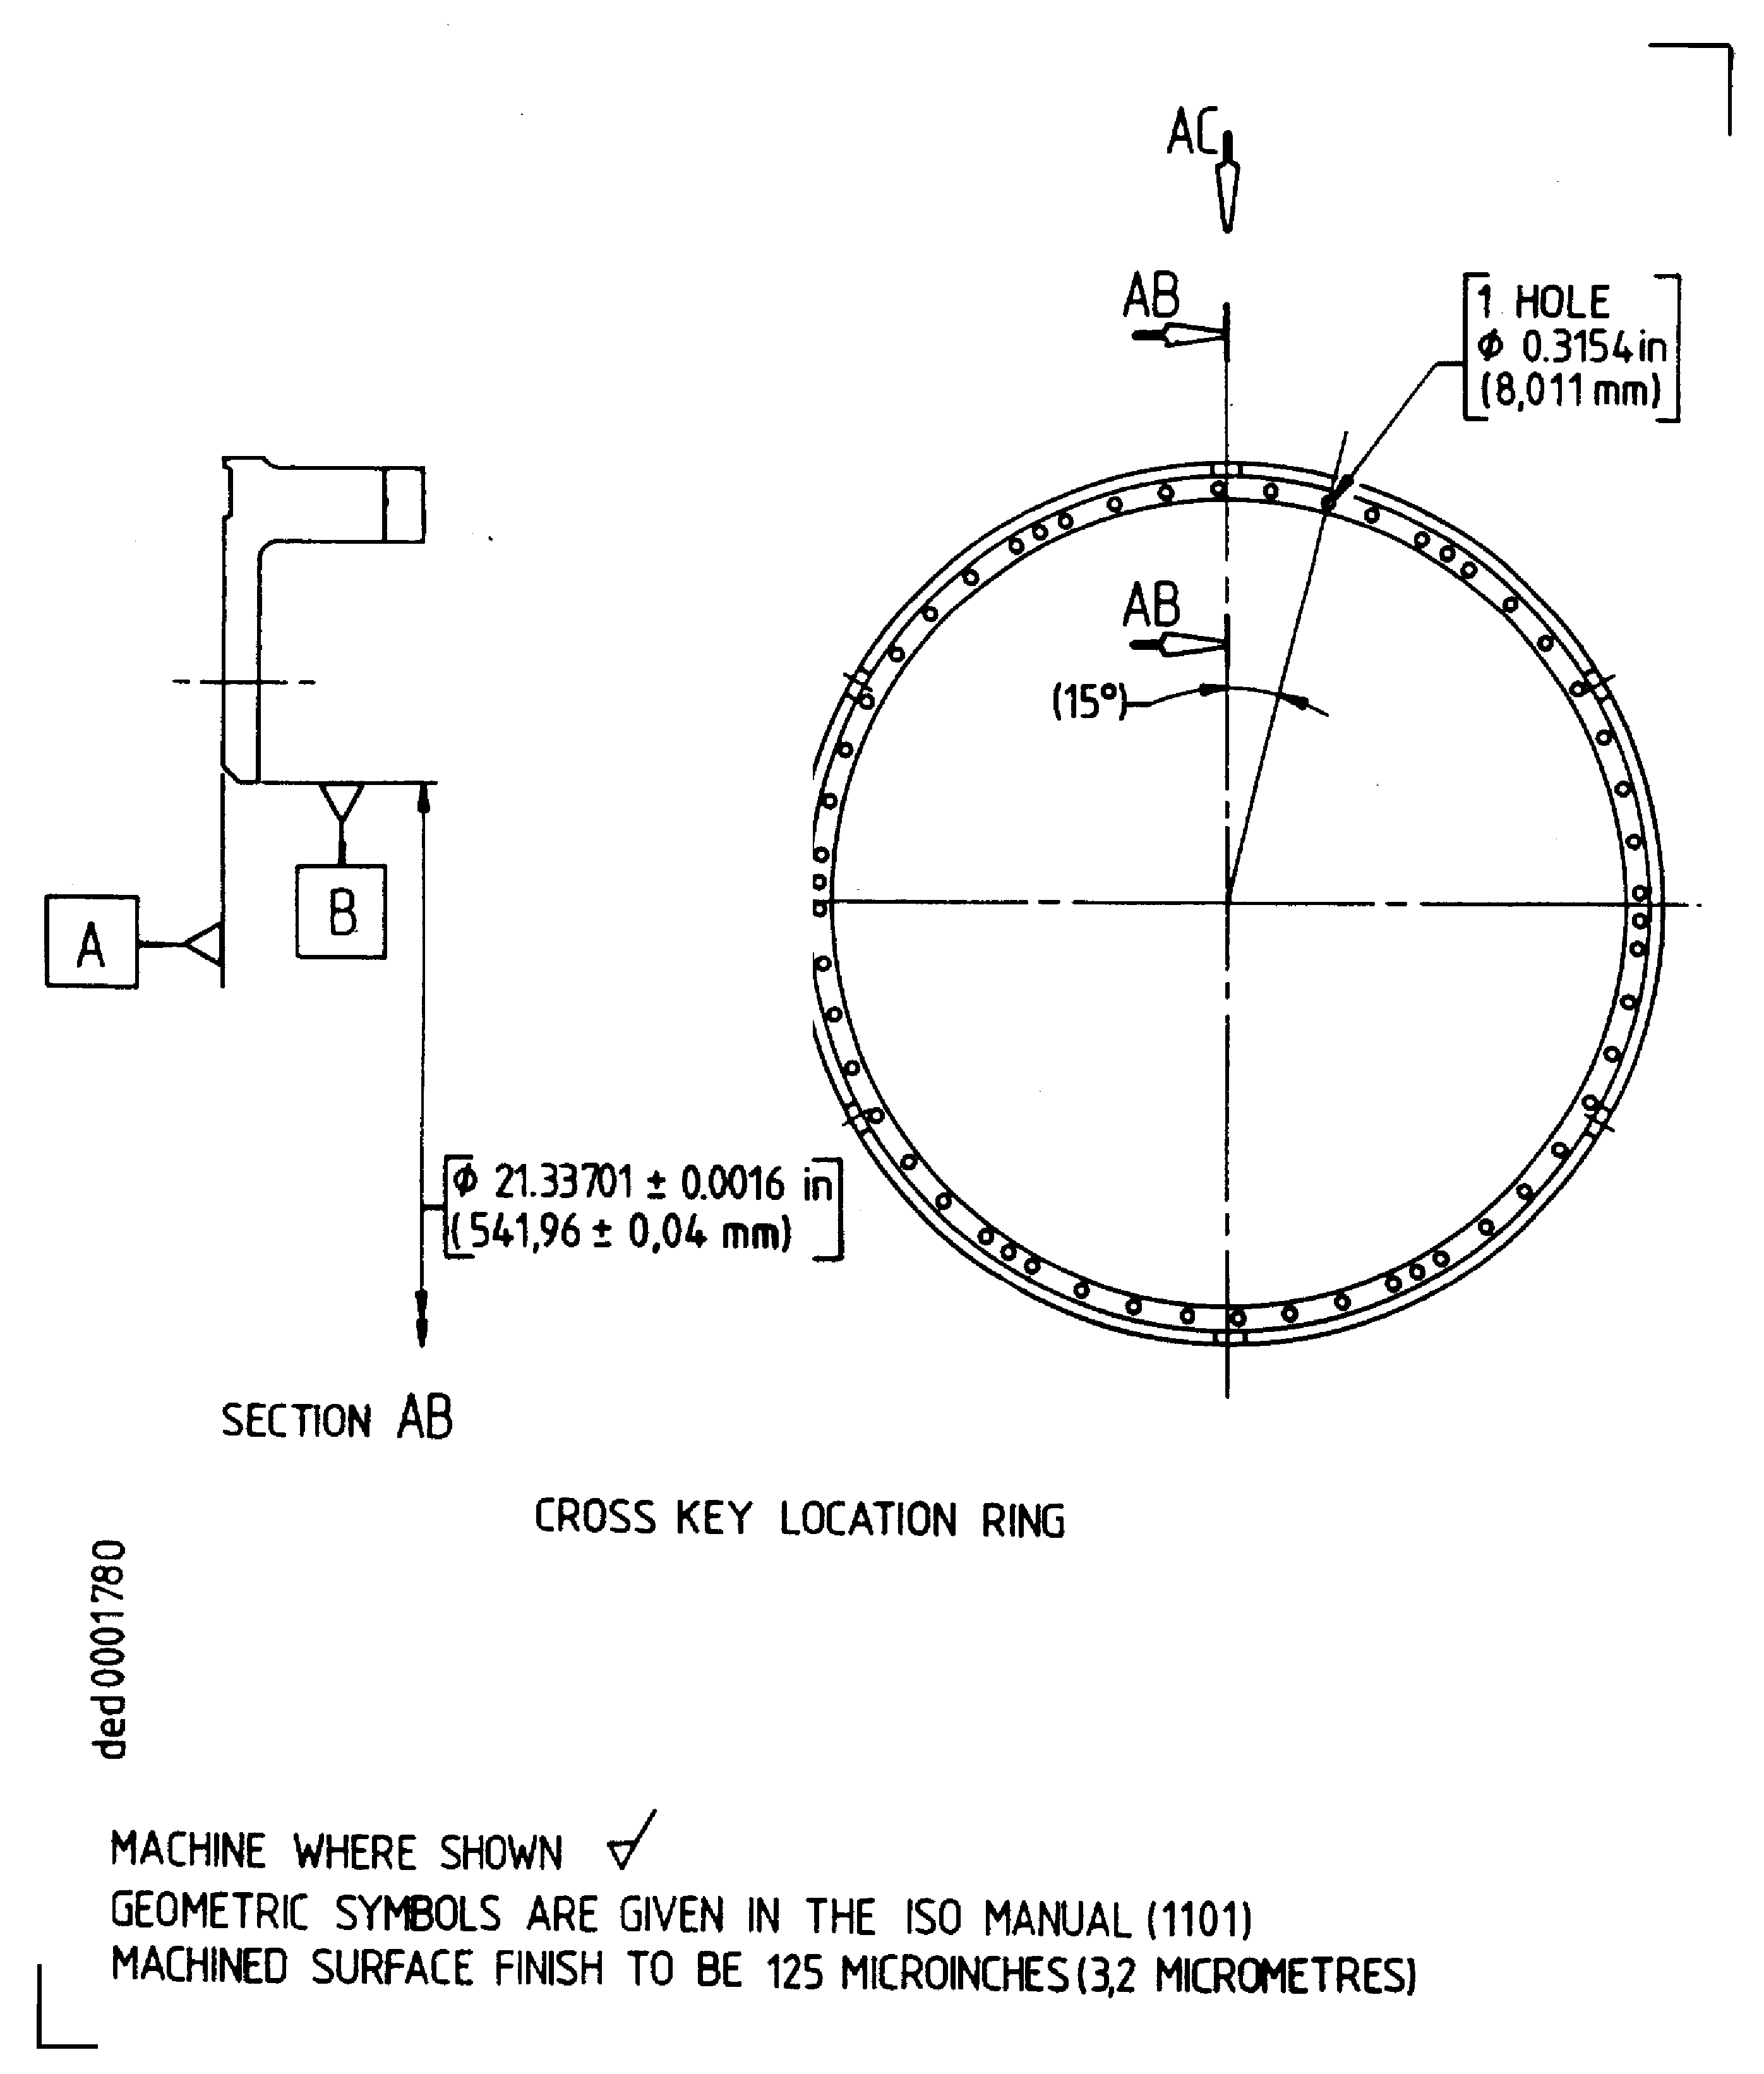
Figure: Repair details and dimensions - Assembly C
Sheet 3
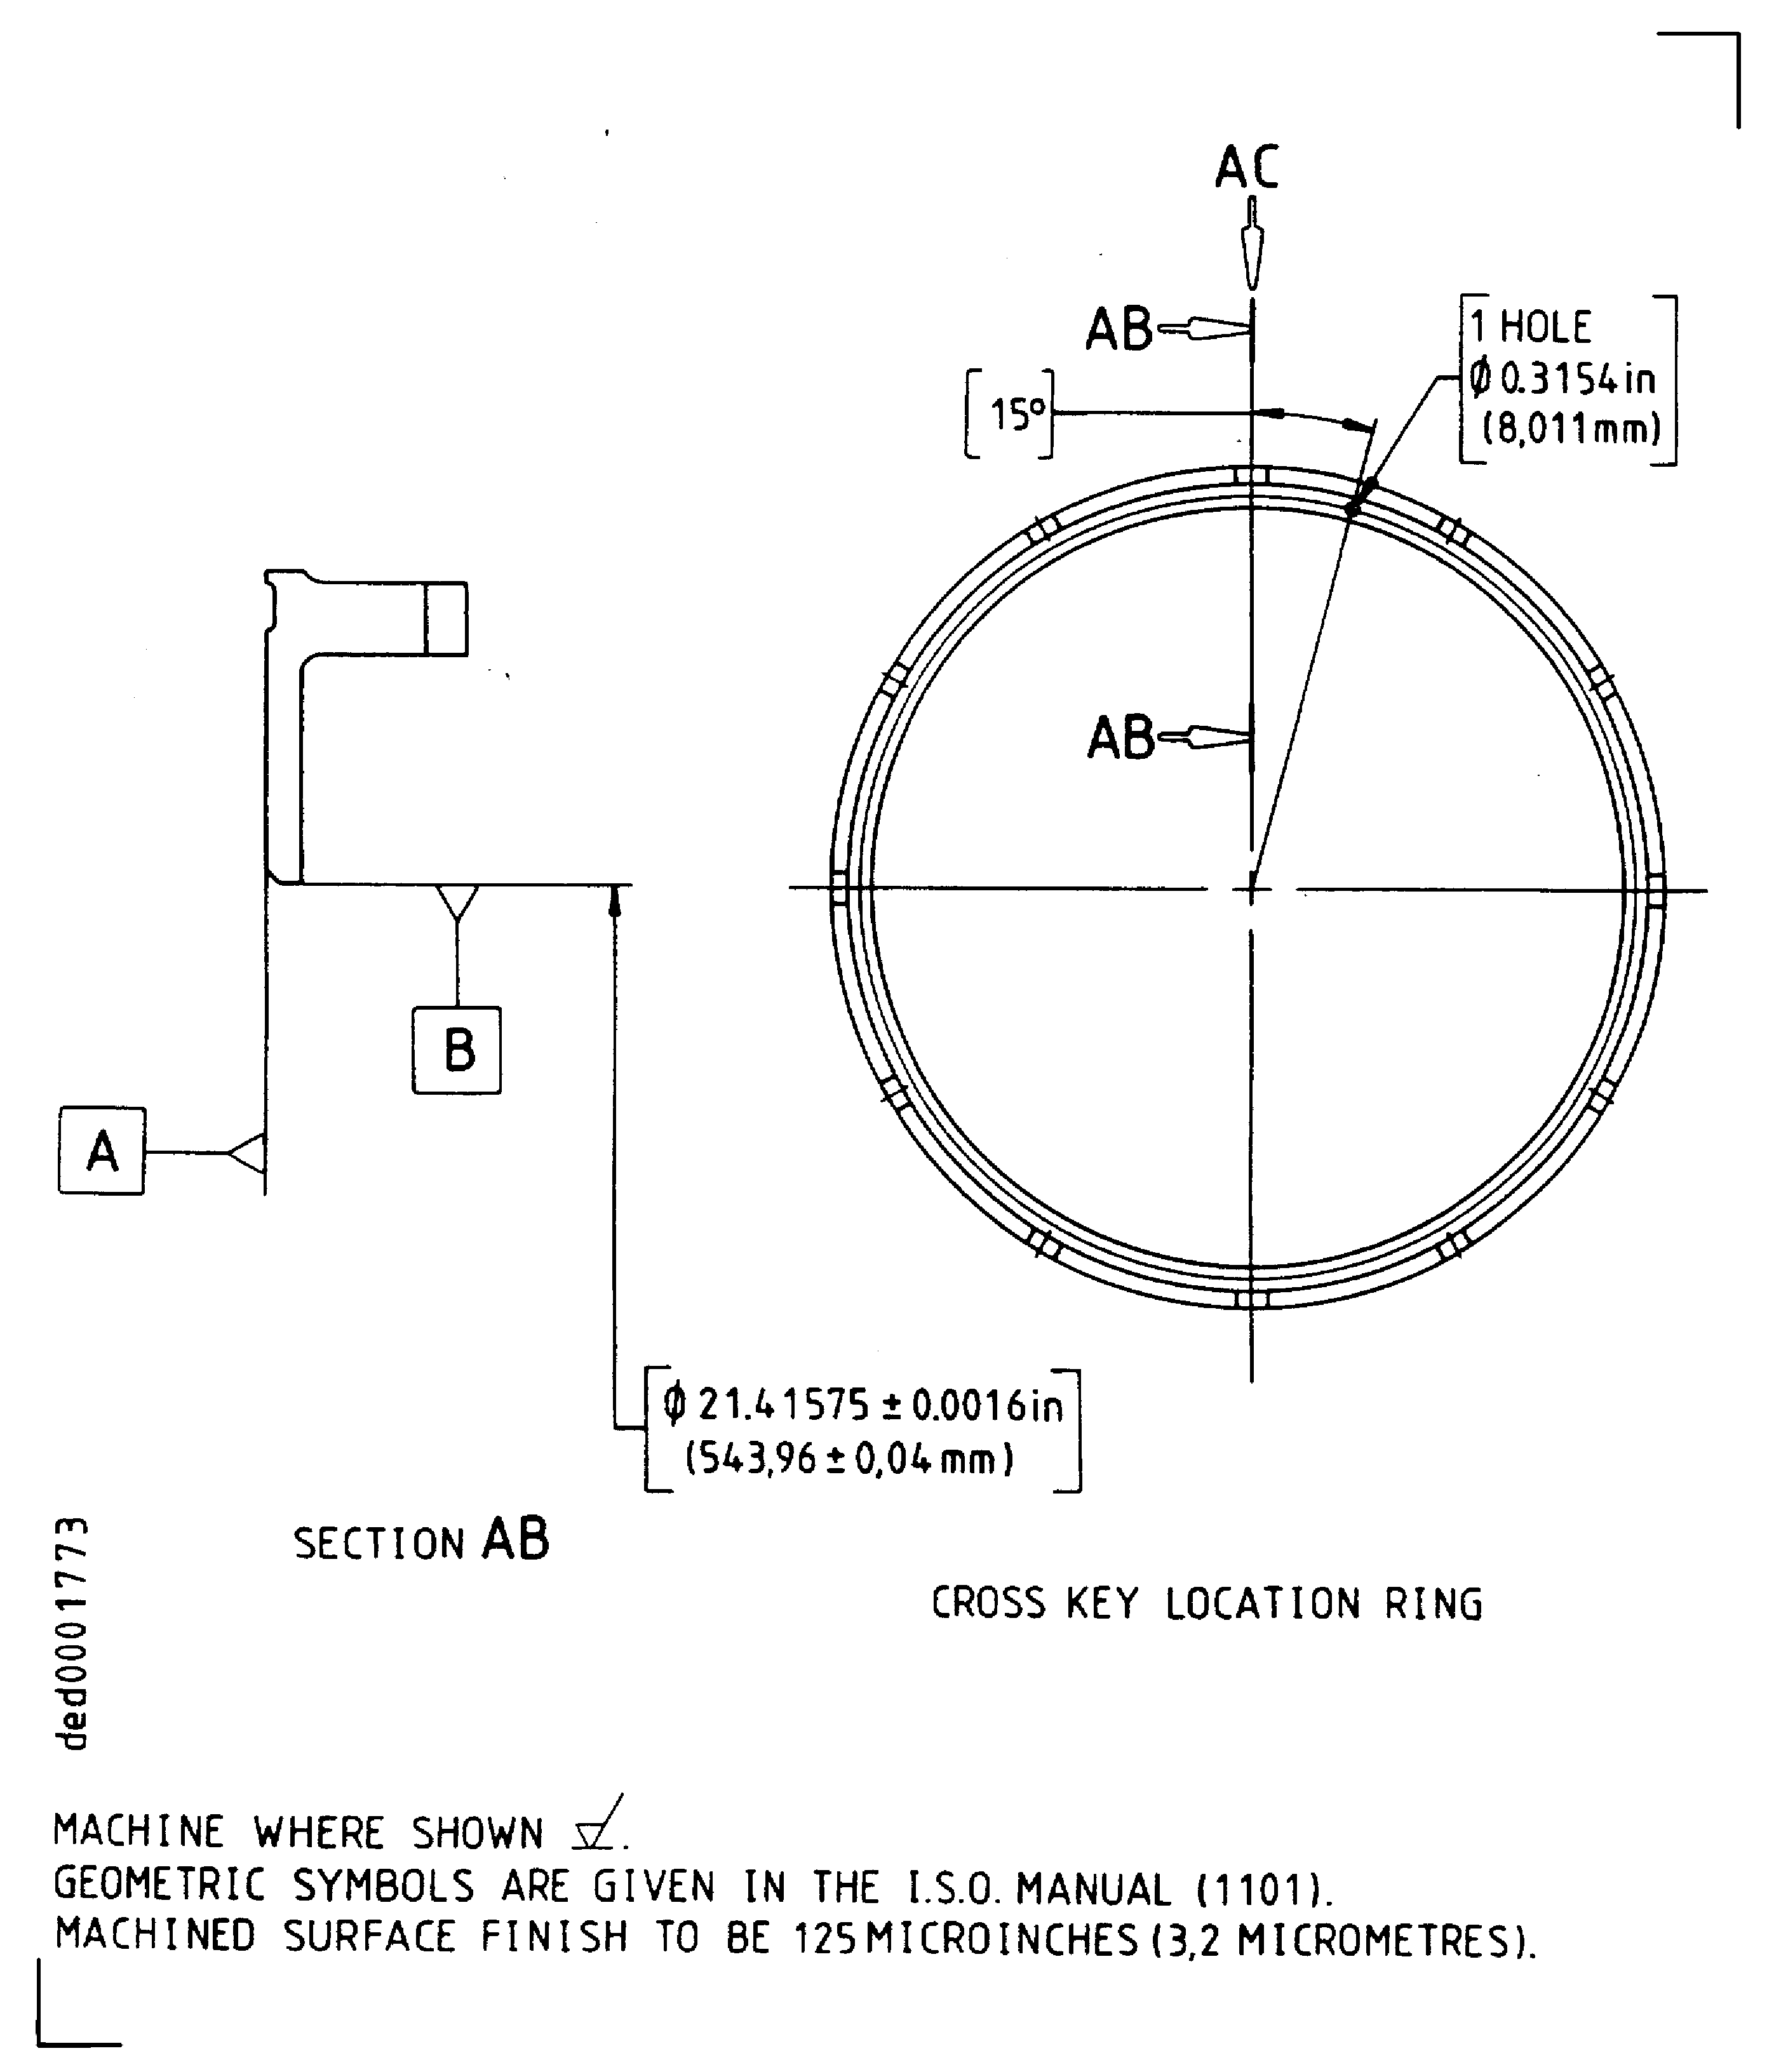
Figure: Repair details and dimensions - Assembly D
Sheet 4
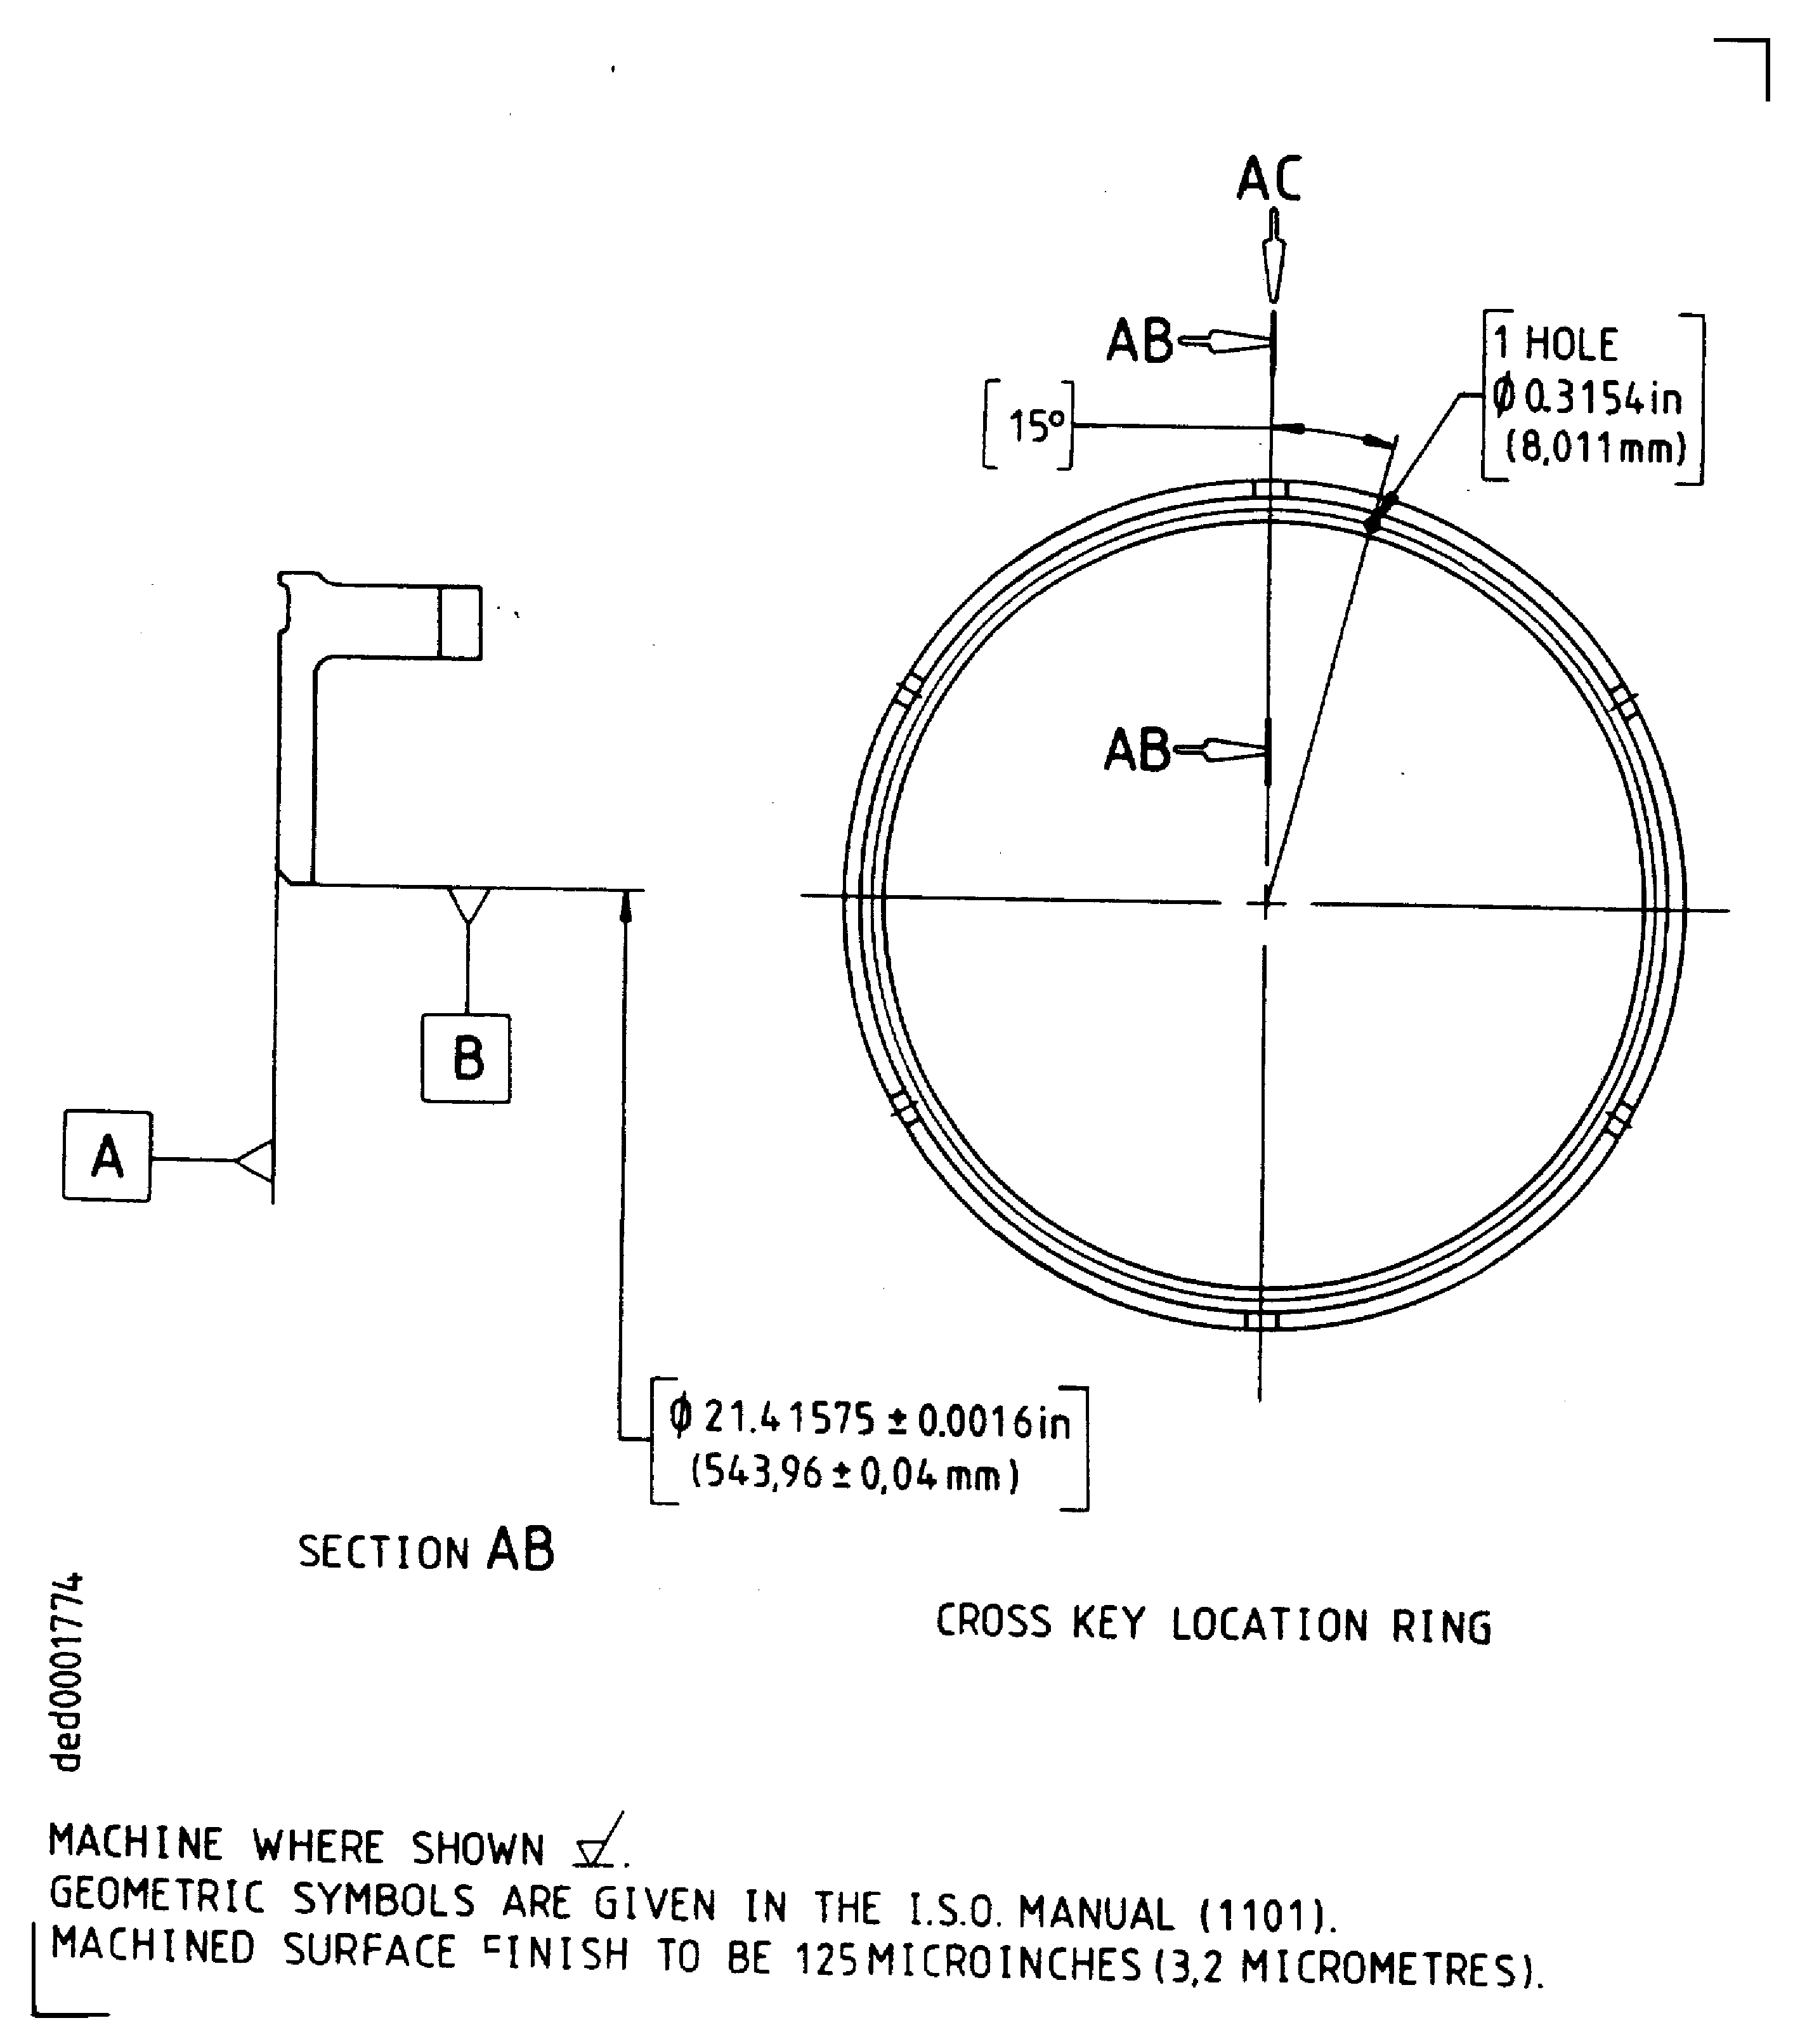
Figure: Repair details and dimensions - Assy's A, B, C and D
Repair details and dimensions - Assy's A, B, C and D
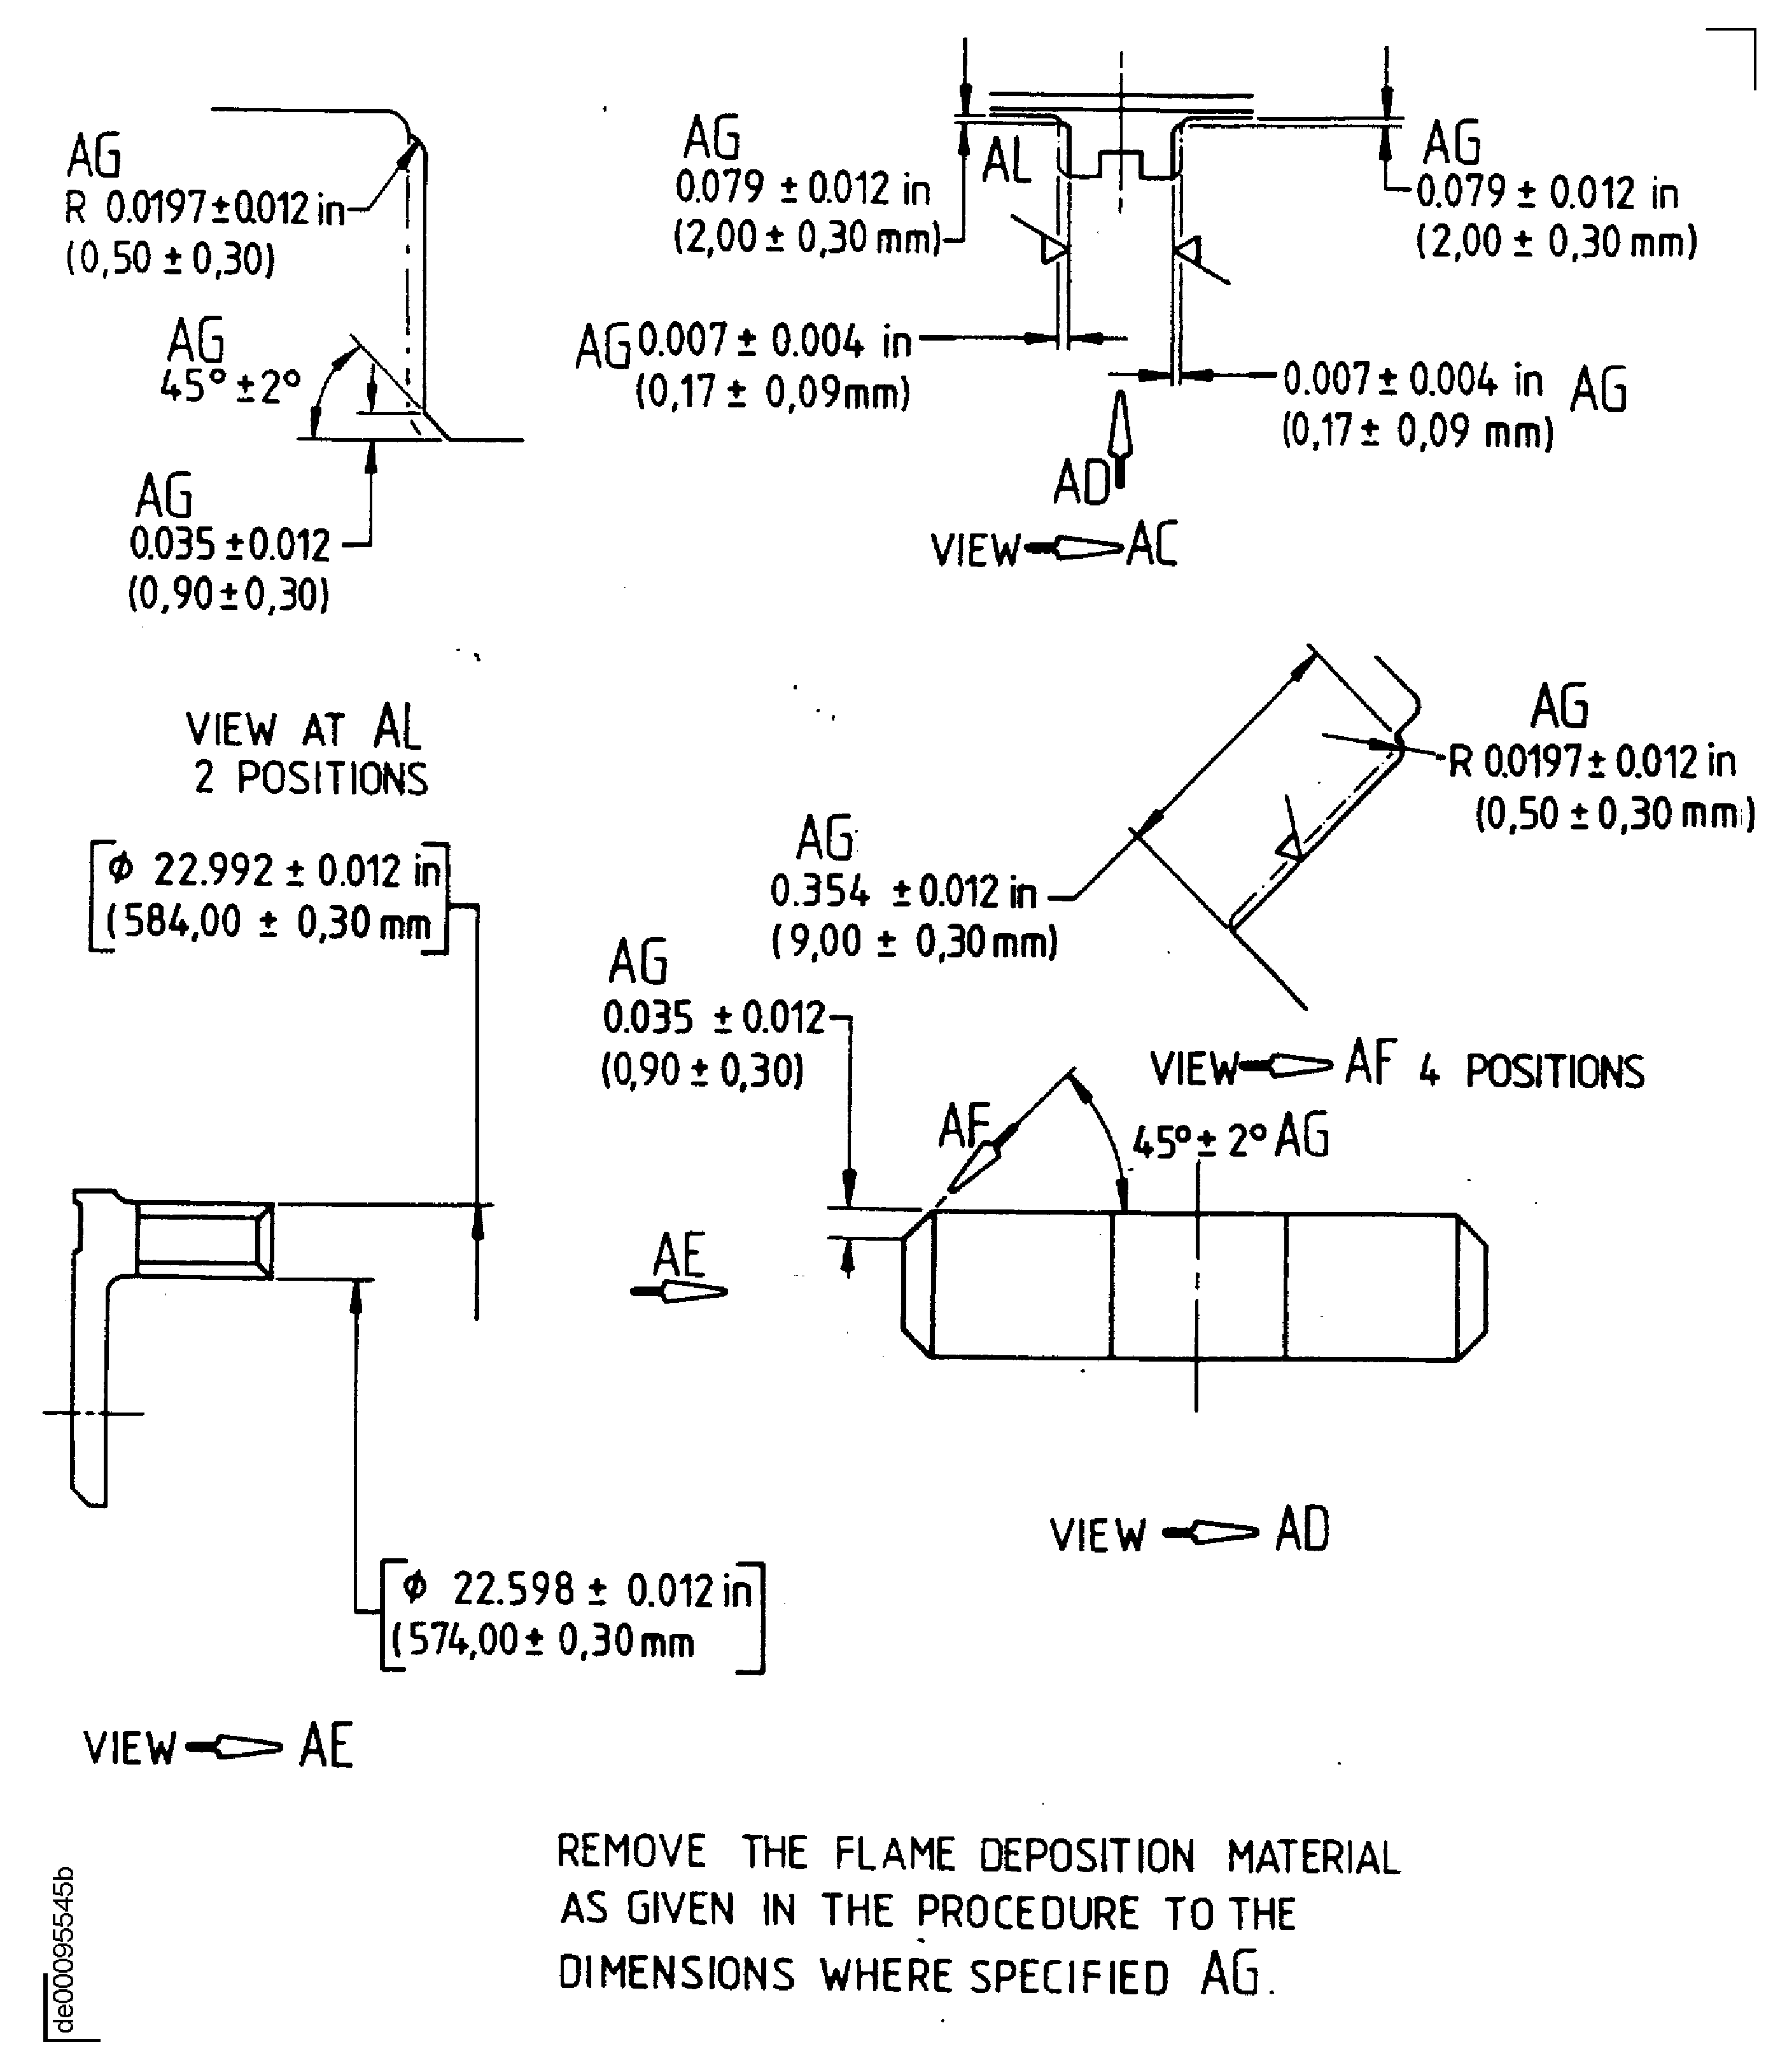
Figure: Repair details and dimensions - Assy's A, B, C and D
Repair details and dimensions - Assy's A, B, C and D
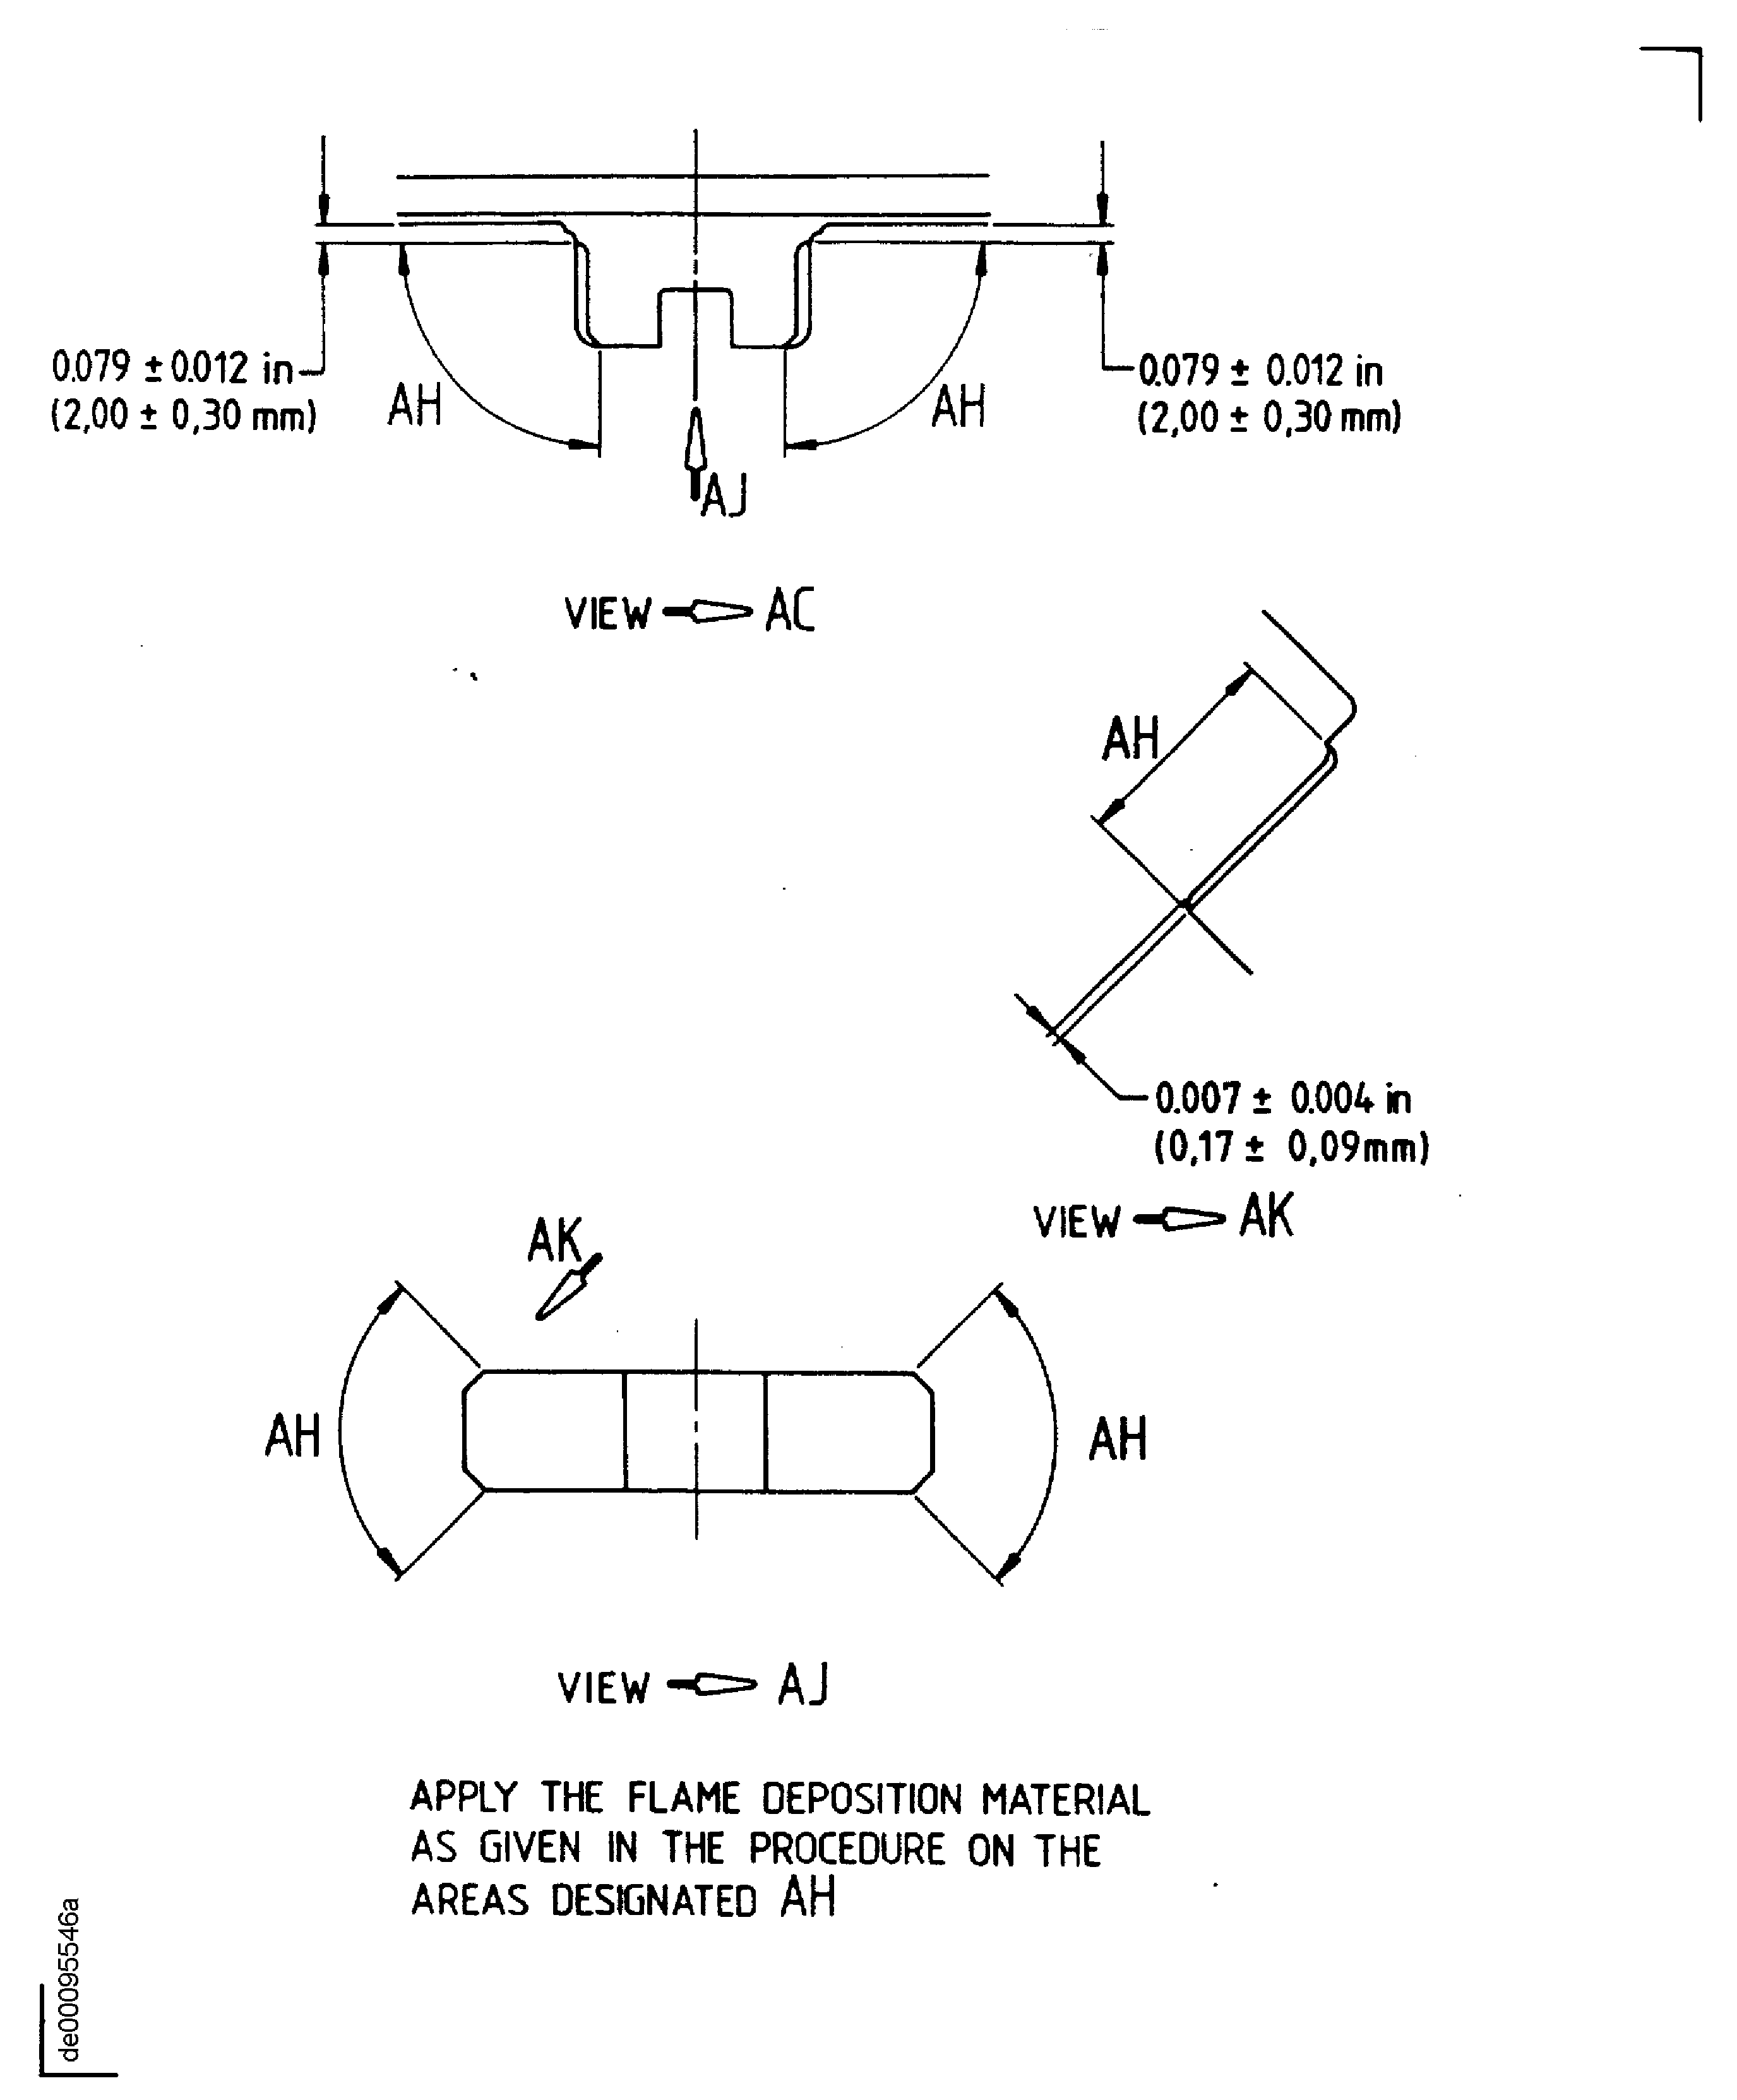
Figure: Repair details and dimensions - Assy's A, B, C and D
Repair details and dimensions - Assy's A, B, C and D
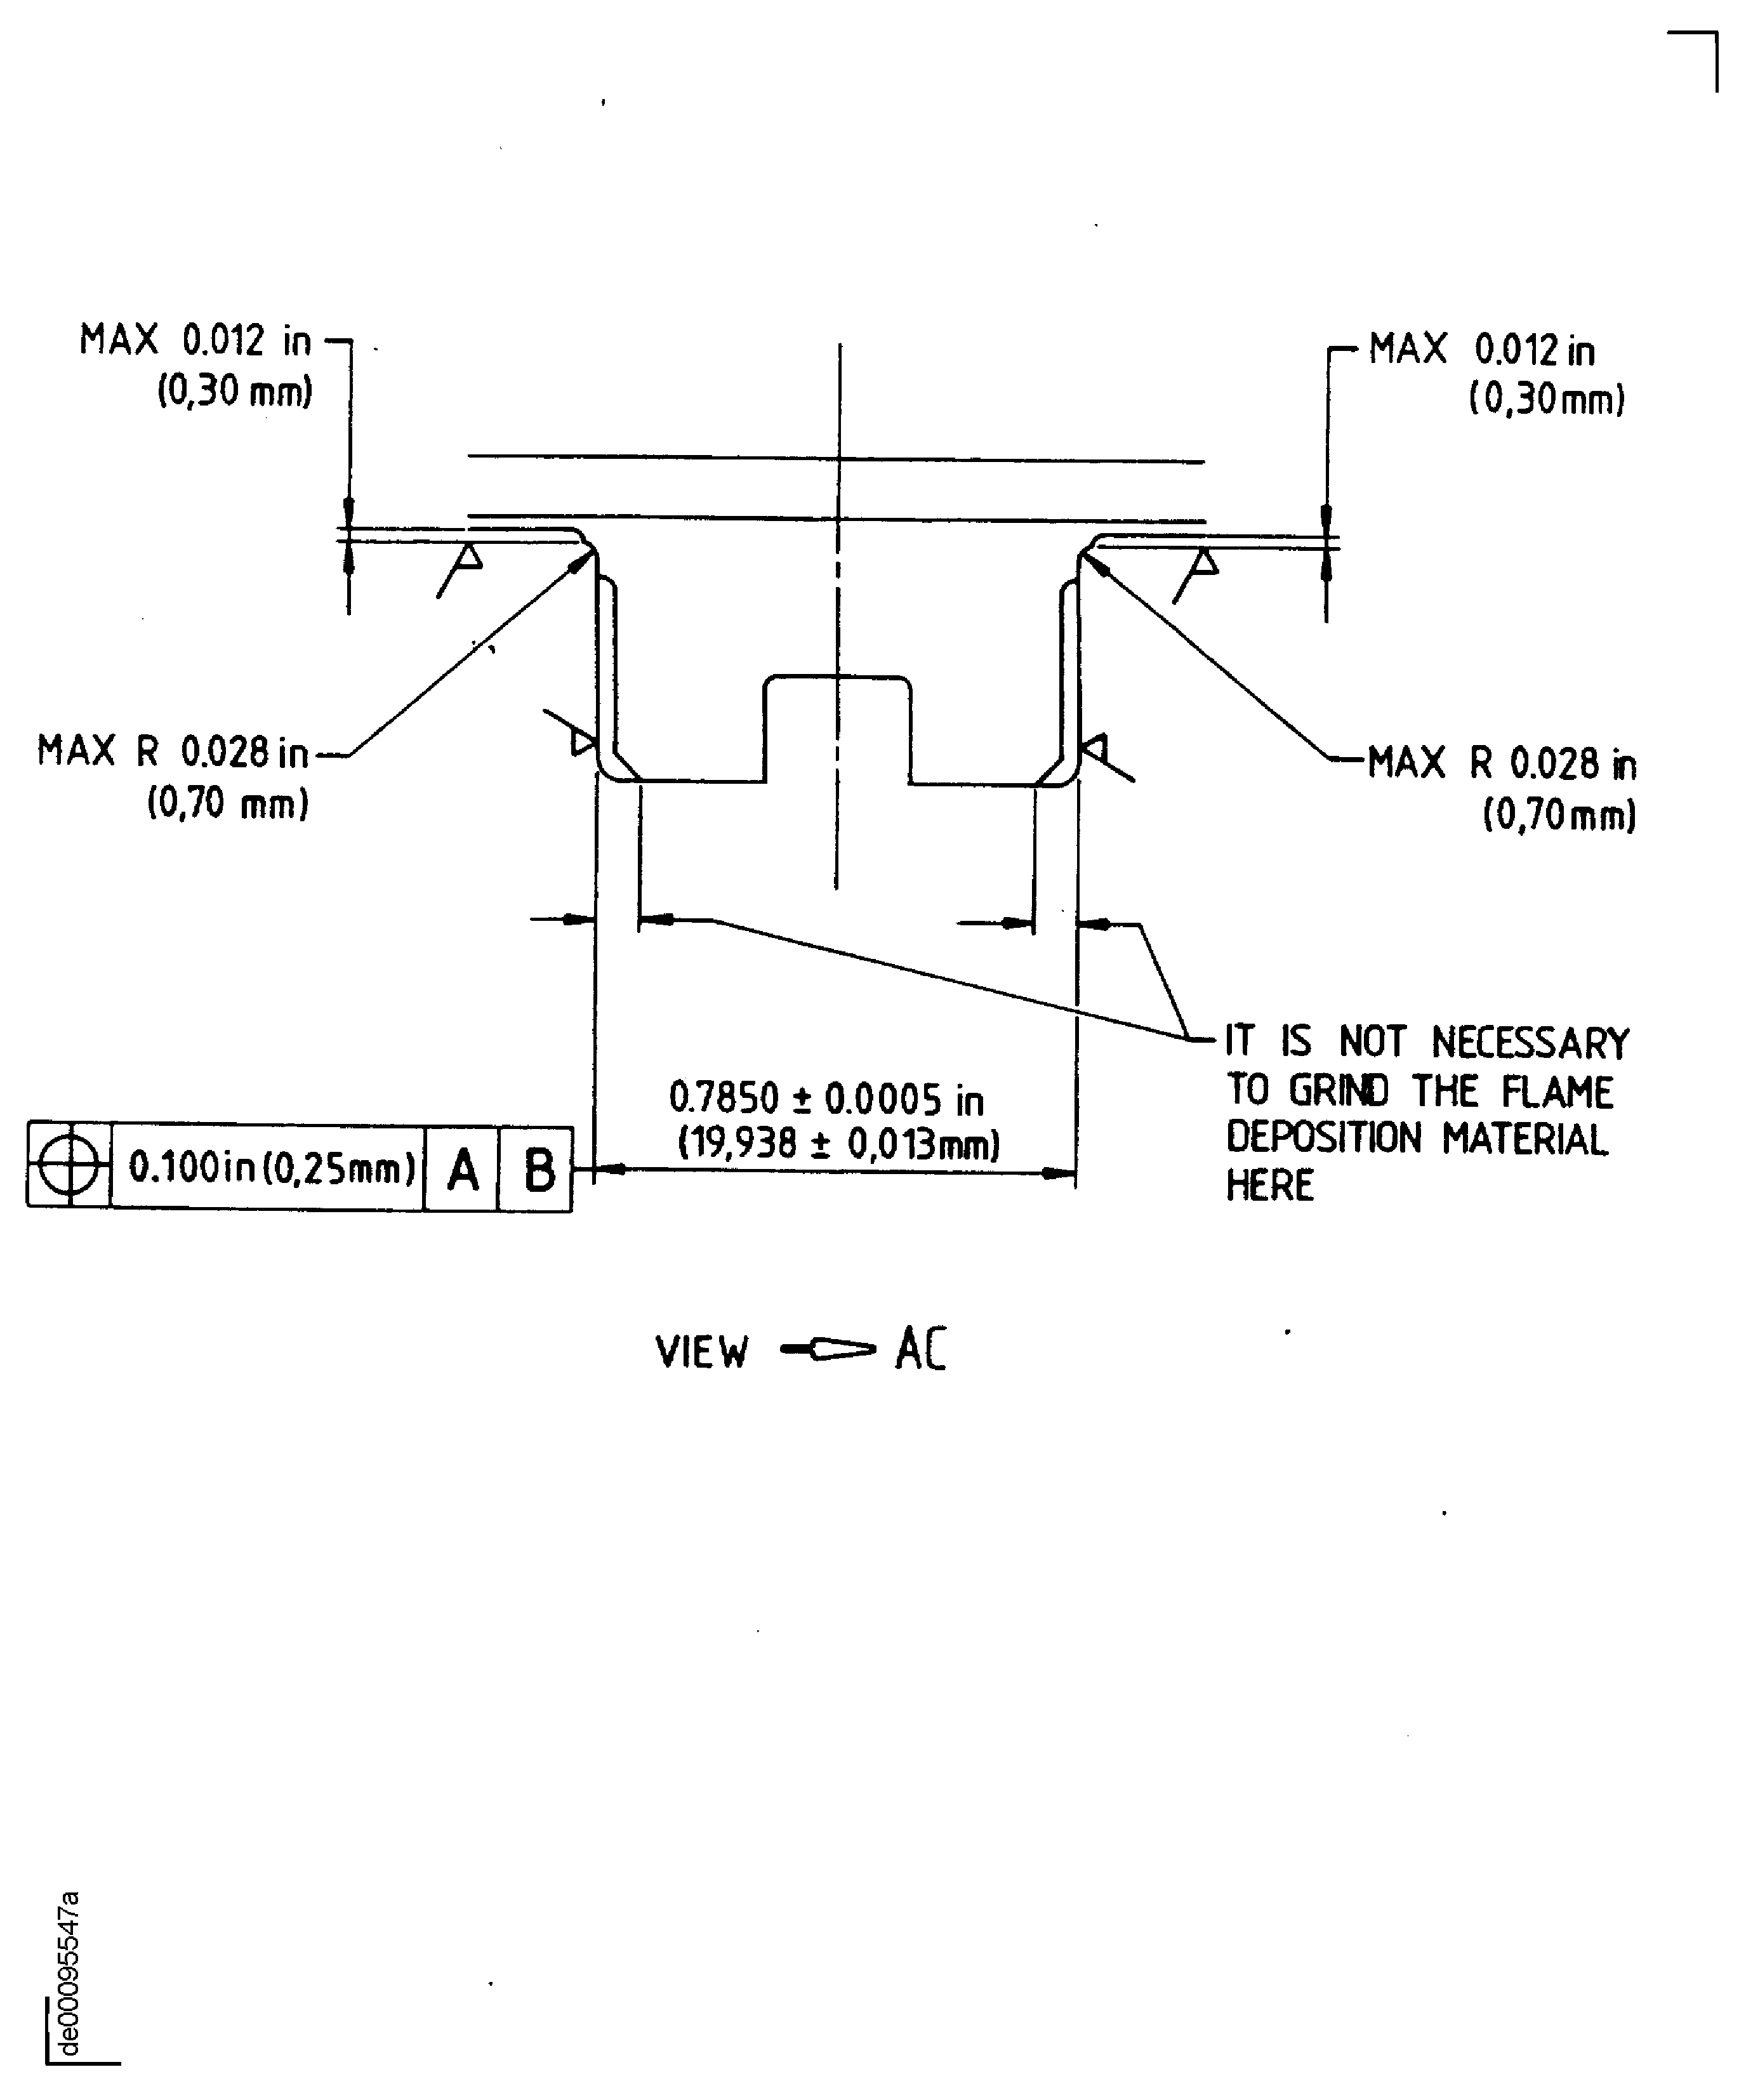
Figure: Repair details and dimensions - Assy's A, B, C and D
Repair details and dimensions - Assy's A, B, C and D
