TASK 72-41-21-300-006 HPC Stage 7 and Stage 8 Rotor Path Case Assembly - Replace The Surface Protection, Repair-006 (VRS6163)

DMC:V2500-A0-72-41-2107-00A-609A-C|Issue No:003.00|Issue Date:2019-02-01

Export Control

EAR Export Classification: Not subject to the EAR per 15 C.F.R. Chapter 1, Part 734.3(b)(3), except for the following Service Bulletins which are currently published as EAR Export Classification 9E991: SBE70-0992, SBE72-0483, SBE72-0580, SBE72-0588, SBE72-0640, SBE73-0209, SBE80-0024 and SBE80-0025.

Copyright

© IAE International Aero Engines AG (2001, 2014 - 2021) The information contained in this document is the property of © IAE International Aero Engines AG and may not be copied or used for any purpose other than that for which it is supplied without the express written authority of © IAE International Aero Engines AG. (This does not preclude use by engine and aircraft operators for normal instructional, maintenance or overhaul purposes.).

Applicability

All

Common Information

TASK 72-41-21-300-006 HPC Stage 7 and Stage 8 Rotor Path Case Assembly - Replace The Surface Protection, Repair-006 (VRS6163)

Effectivity

FIG/ITEM

PART NO.

03-500

6A3500

03-500

6A4310

03-500

6A4569

03-500

6A7019

03-500

6A6548

03-500

6A7529

03-500

6A7578

03-500

6A7624

03-500

6B1432

Material of component

PART IDENT

SYMBOL

MATERIAL

HPC Stage 7 Case Assembly

EAK, EBL or EAE

Corrosion Resistant Steel

General

This Repair replaces the surface protection on the HPC Stage 7 Case and HPC Stage 8 Rotor Path Case Assembly.

Related repairs - None

Preliminary Requirements

Pre-Conditions

Action/ConditionData Module/Technical Publication
Make sure that all the cleaning and inspection procedures, including any required FPI and other needed repairs, are done before this repair.

Support Equipment

NONE

Consumables, Materials and Expendables

NameManufacturerPart Number / IdentificationQuantityRemark
CoMat 06-073 INK, METAL MARKINGLOCALCoMat 06-073
CoMat 07-035 CORROSION RESISTANT COATINGLOCALCoMat 07-035
CoMat 07-104 ALUMINIUM HIGH HEAT RESISTANT PAINTLOCALCoMat 07-104
CoMat 07-125 LACQUER0W199CoMat 07-125
CoMat 07-175 COATING COMPOUND - ALUMINUM, INORGANIC BINDER53012CoMat 07-175

Spares

NONE

Safety Requirements

NONE

Procedure

    1. SUBTASK 72-41-21-350-282 Mark the Part

    2. Mark the part with VRS6163 adjacent to the assembly part number.

    3. Use vibration peen by SPM TASK 70-09-00-400-501.

    4. For PN 6A3500, PN 6A4310, PN 6A4569 and PN 6A7019, refer to Figure, Index [4].

    5. For PN 6A6548, PN 6A7529, PN 6A7578 and PN 6A7624, refer to Figure, Index [2].

    6. For PN 6B1432, refer to Figure, Index [2].

    1. SUBTASK 72-41-21-380-156 Apply Surface Protection

      1. Prepare the surface and apply surface protection coating and examine the coated surface on the part by one of the following procedures. Refer to Figure, Figure and figure 3. Unless otherwise stated in the figures, apply coat all over the part.

        1. For PN 6A3500, PN 6A4310, PN 6A4569 and PN 6A7019, refer to Figure.

        2. For PN 6A6548, PN 6A7529, PN 6A7578 and PN 6A7624, refer to Figure.

        3. For PN 6B1432, refer to Figure.

        1. For PN 6A3500, PN 6A4310, PN 6A4569 and PN 6A7019, refer to Figure.

        2. For PN 6A6548, PN 6A7529, PN 6A7578 and PN 6A7624, refer to Figure.

        3. For PN 6B1432, refer to Figure.

        1. For PN 6A3500, PN 6A4310, PN 6A4569 and PN 6A7019, refer to Figure.

        2. For PN 6A6548, PN 6A7529, PN 6A7578 and PN 6A7624, refer to Figure.

    1. SUBTASK 72-41-21-350-283 Mark the Part

      1. Mark the part with VRS6163 adjacent to the assembly part number.

      2. Use temporary marking by SPM TASK 70-09-01-400-501.

        1. CoMat 06-073 INK, METAL MARKING must be completely dry prior to application of CoMat 07-125 LACQUER.

        2. Apply two thin coats of CoMat 07-125 LACQUER to avoid dissolving ink pigment. Allow each layer to dry prior to the next coat.

        3. Heavier application of CoMat 07-125 LACQUER is permitted after the light application of the coating completely dries.

      3. For PN 6A3500, PN 6A4310, PN 6A4569 and PN 6A7019, refer to Figure, Index [4].

      4. For PN 6A6548, PN 6A7529, PN 6A7578 and PN 6A7624, refer to Figure, Index [2].

      5. For PN 6B1432, refer to Figure, Index [2].

  1. Figure: Repair Details and Dimensions

    Repair Details and Dimensions
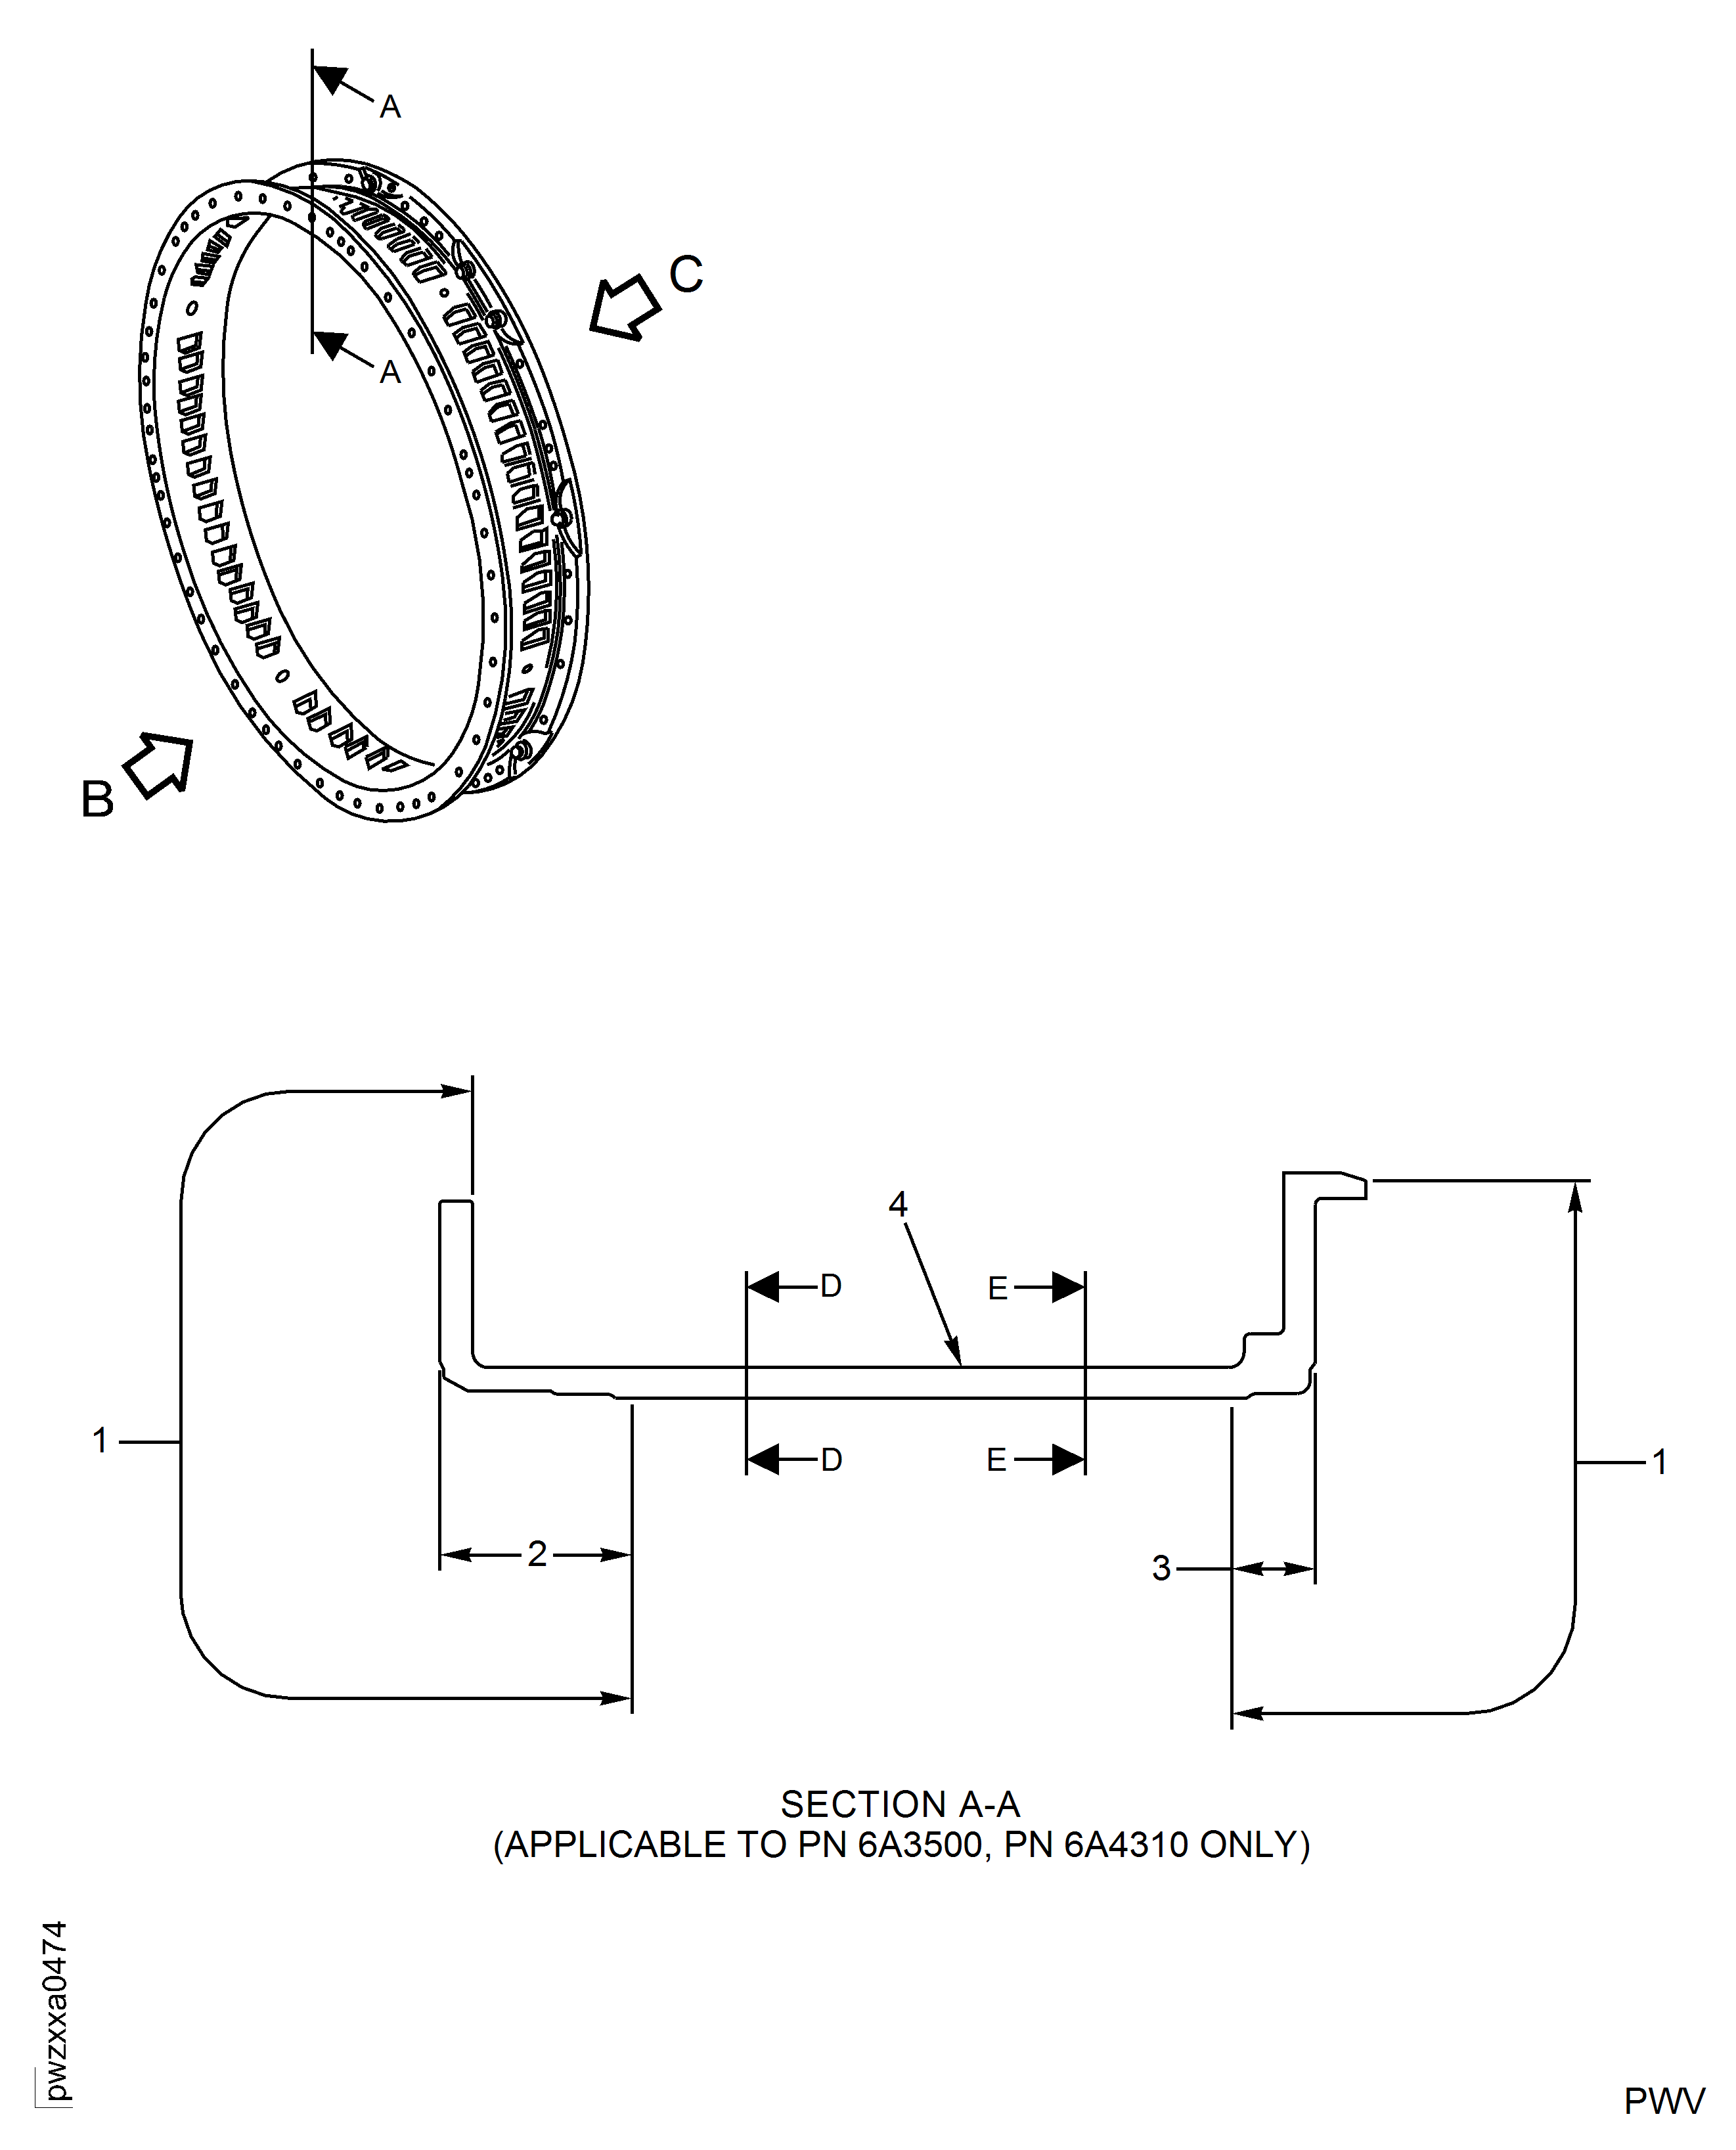
    Repair Details and Dimensions
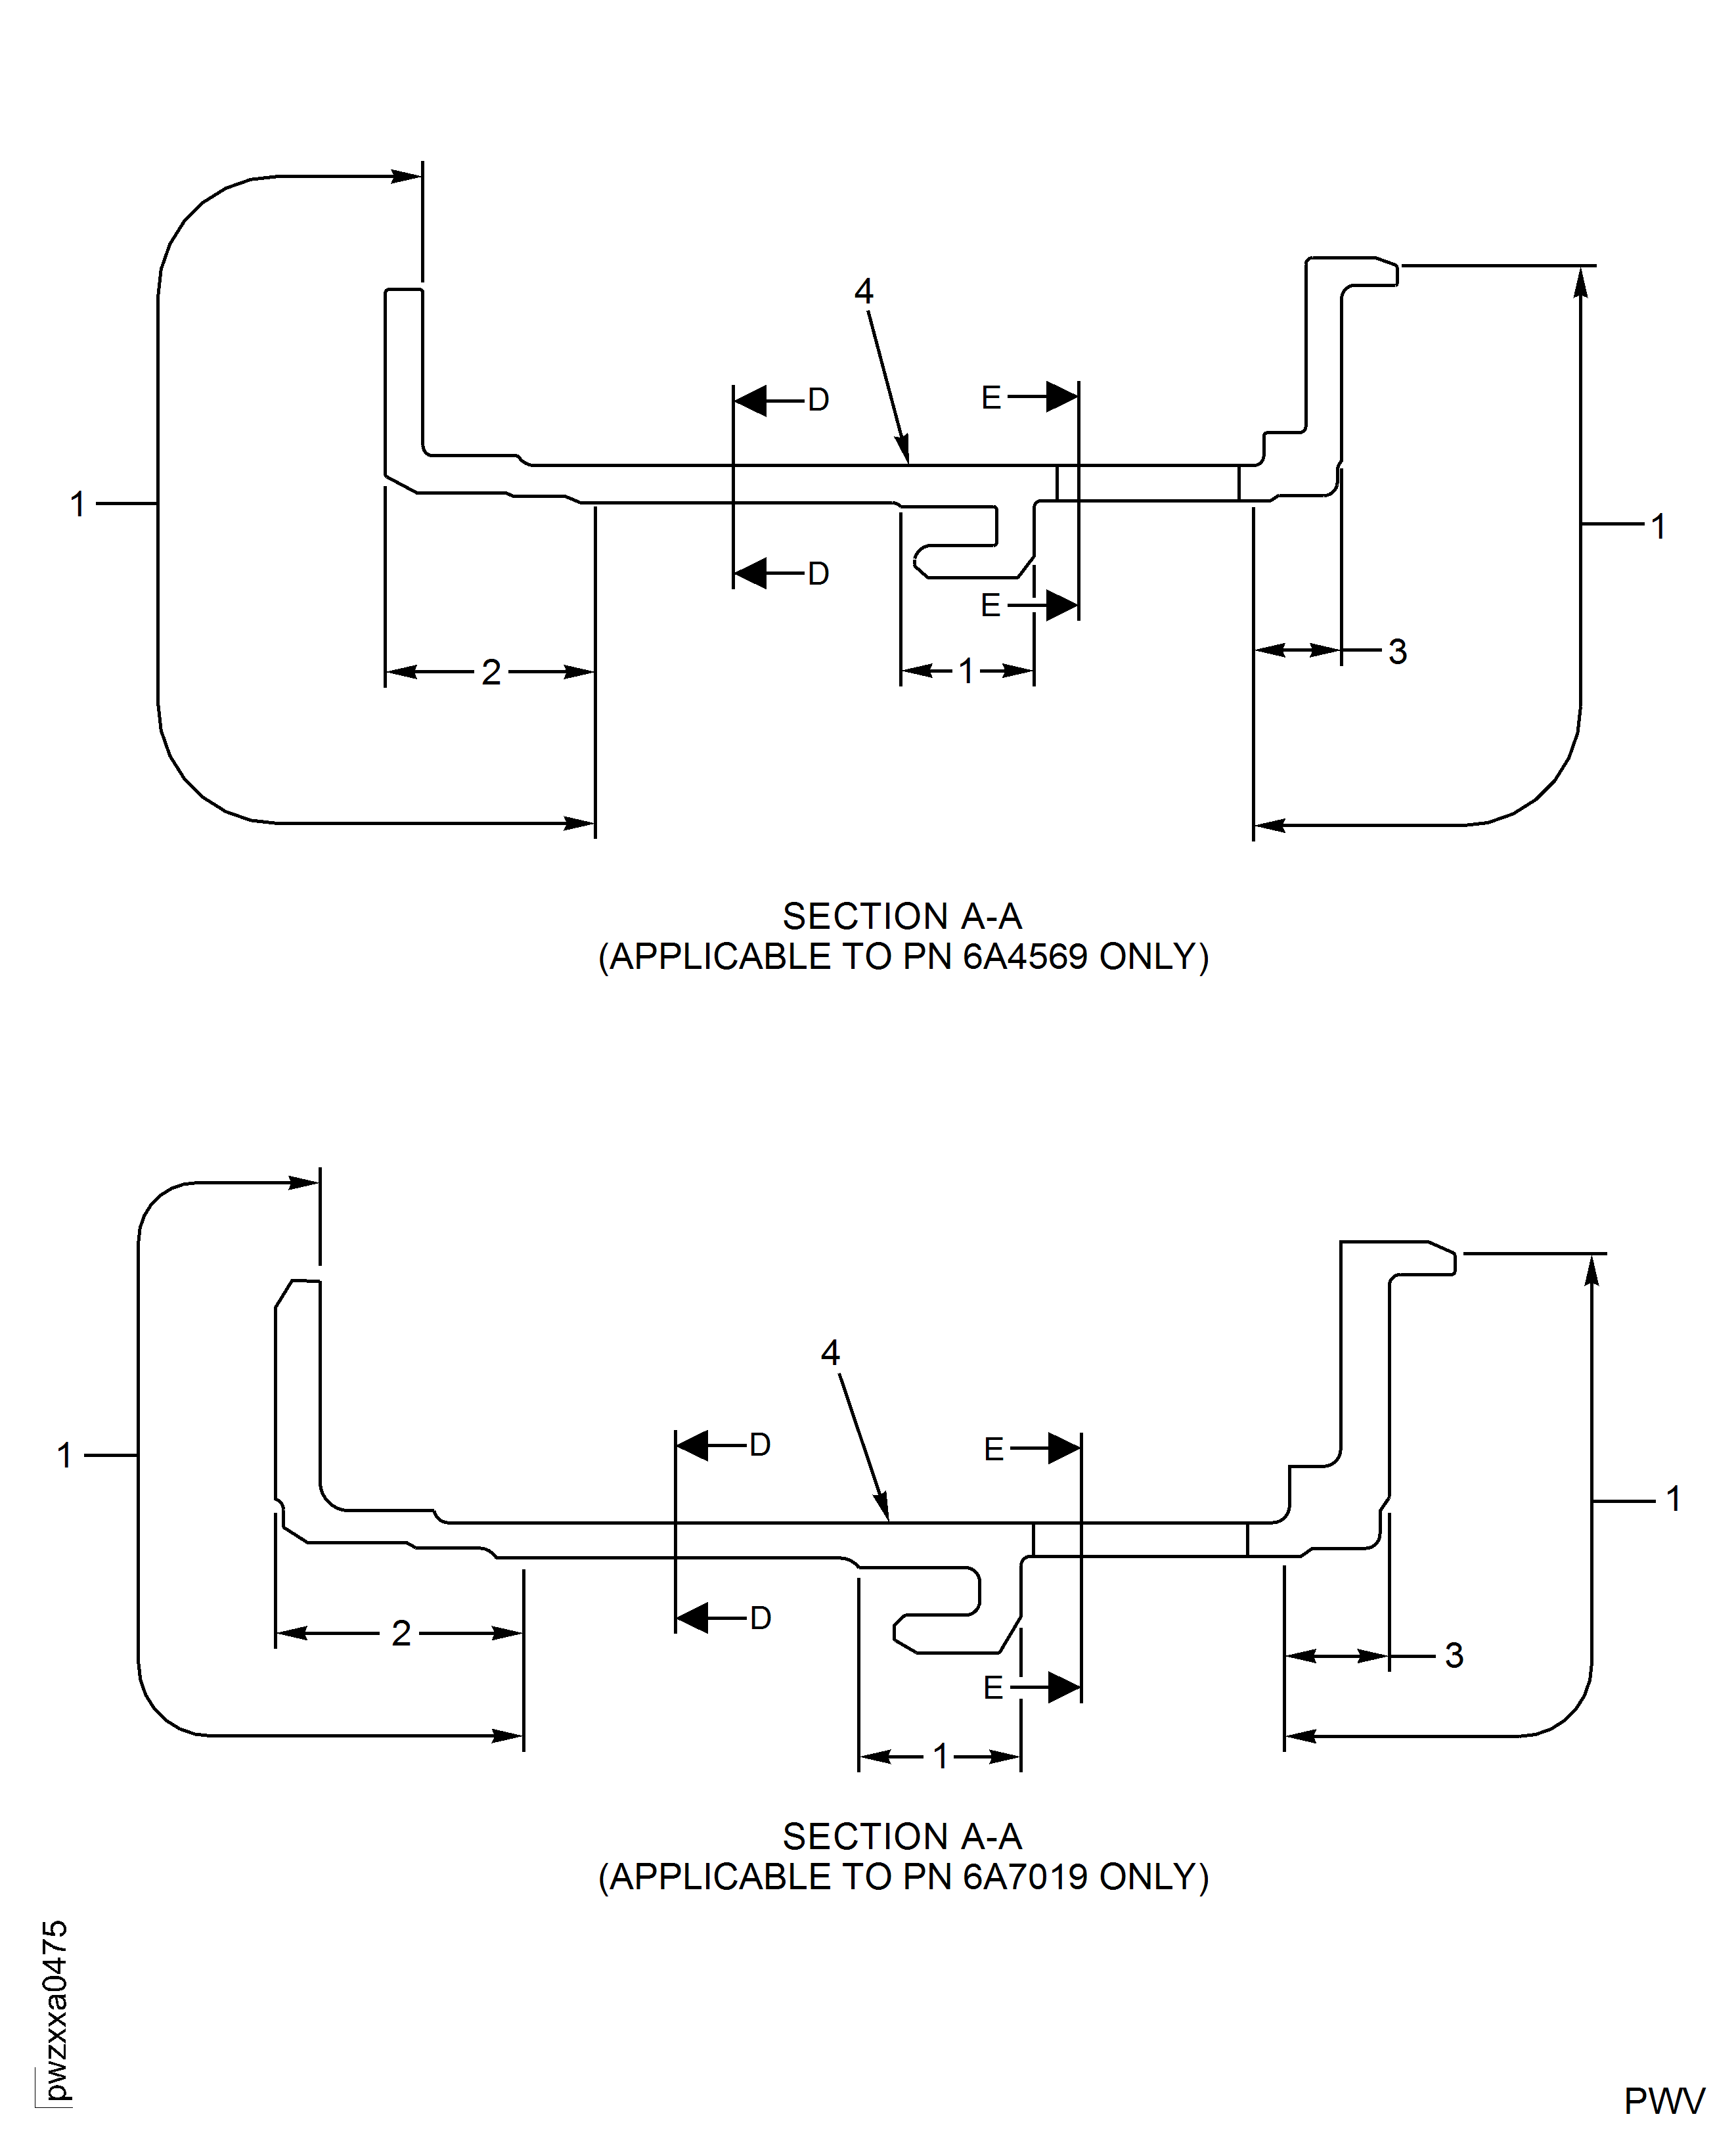
    Repair Details and Dimensions
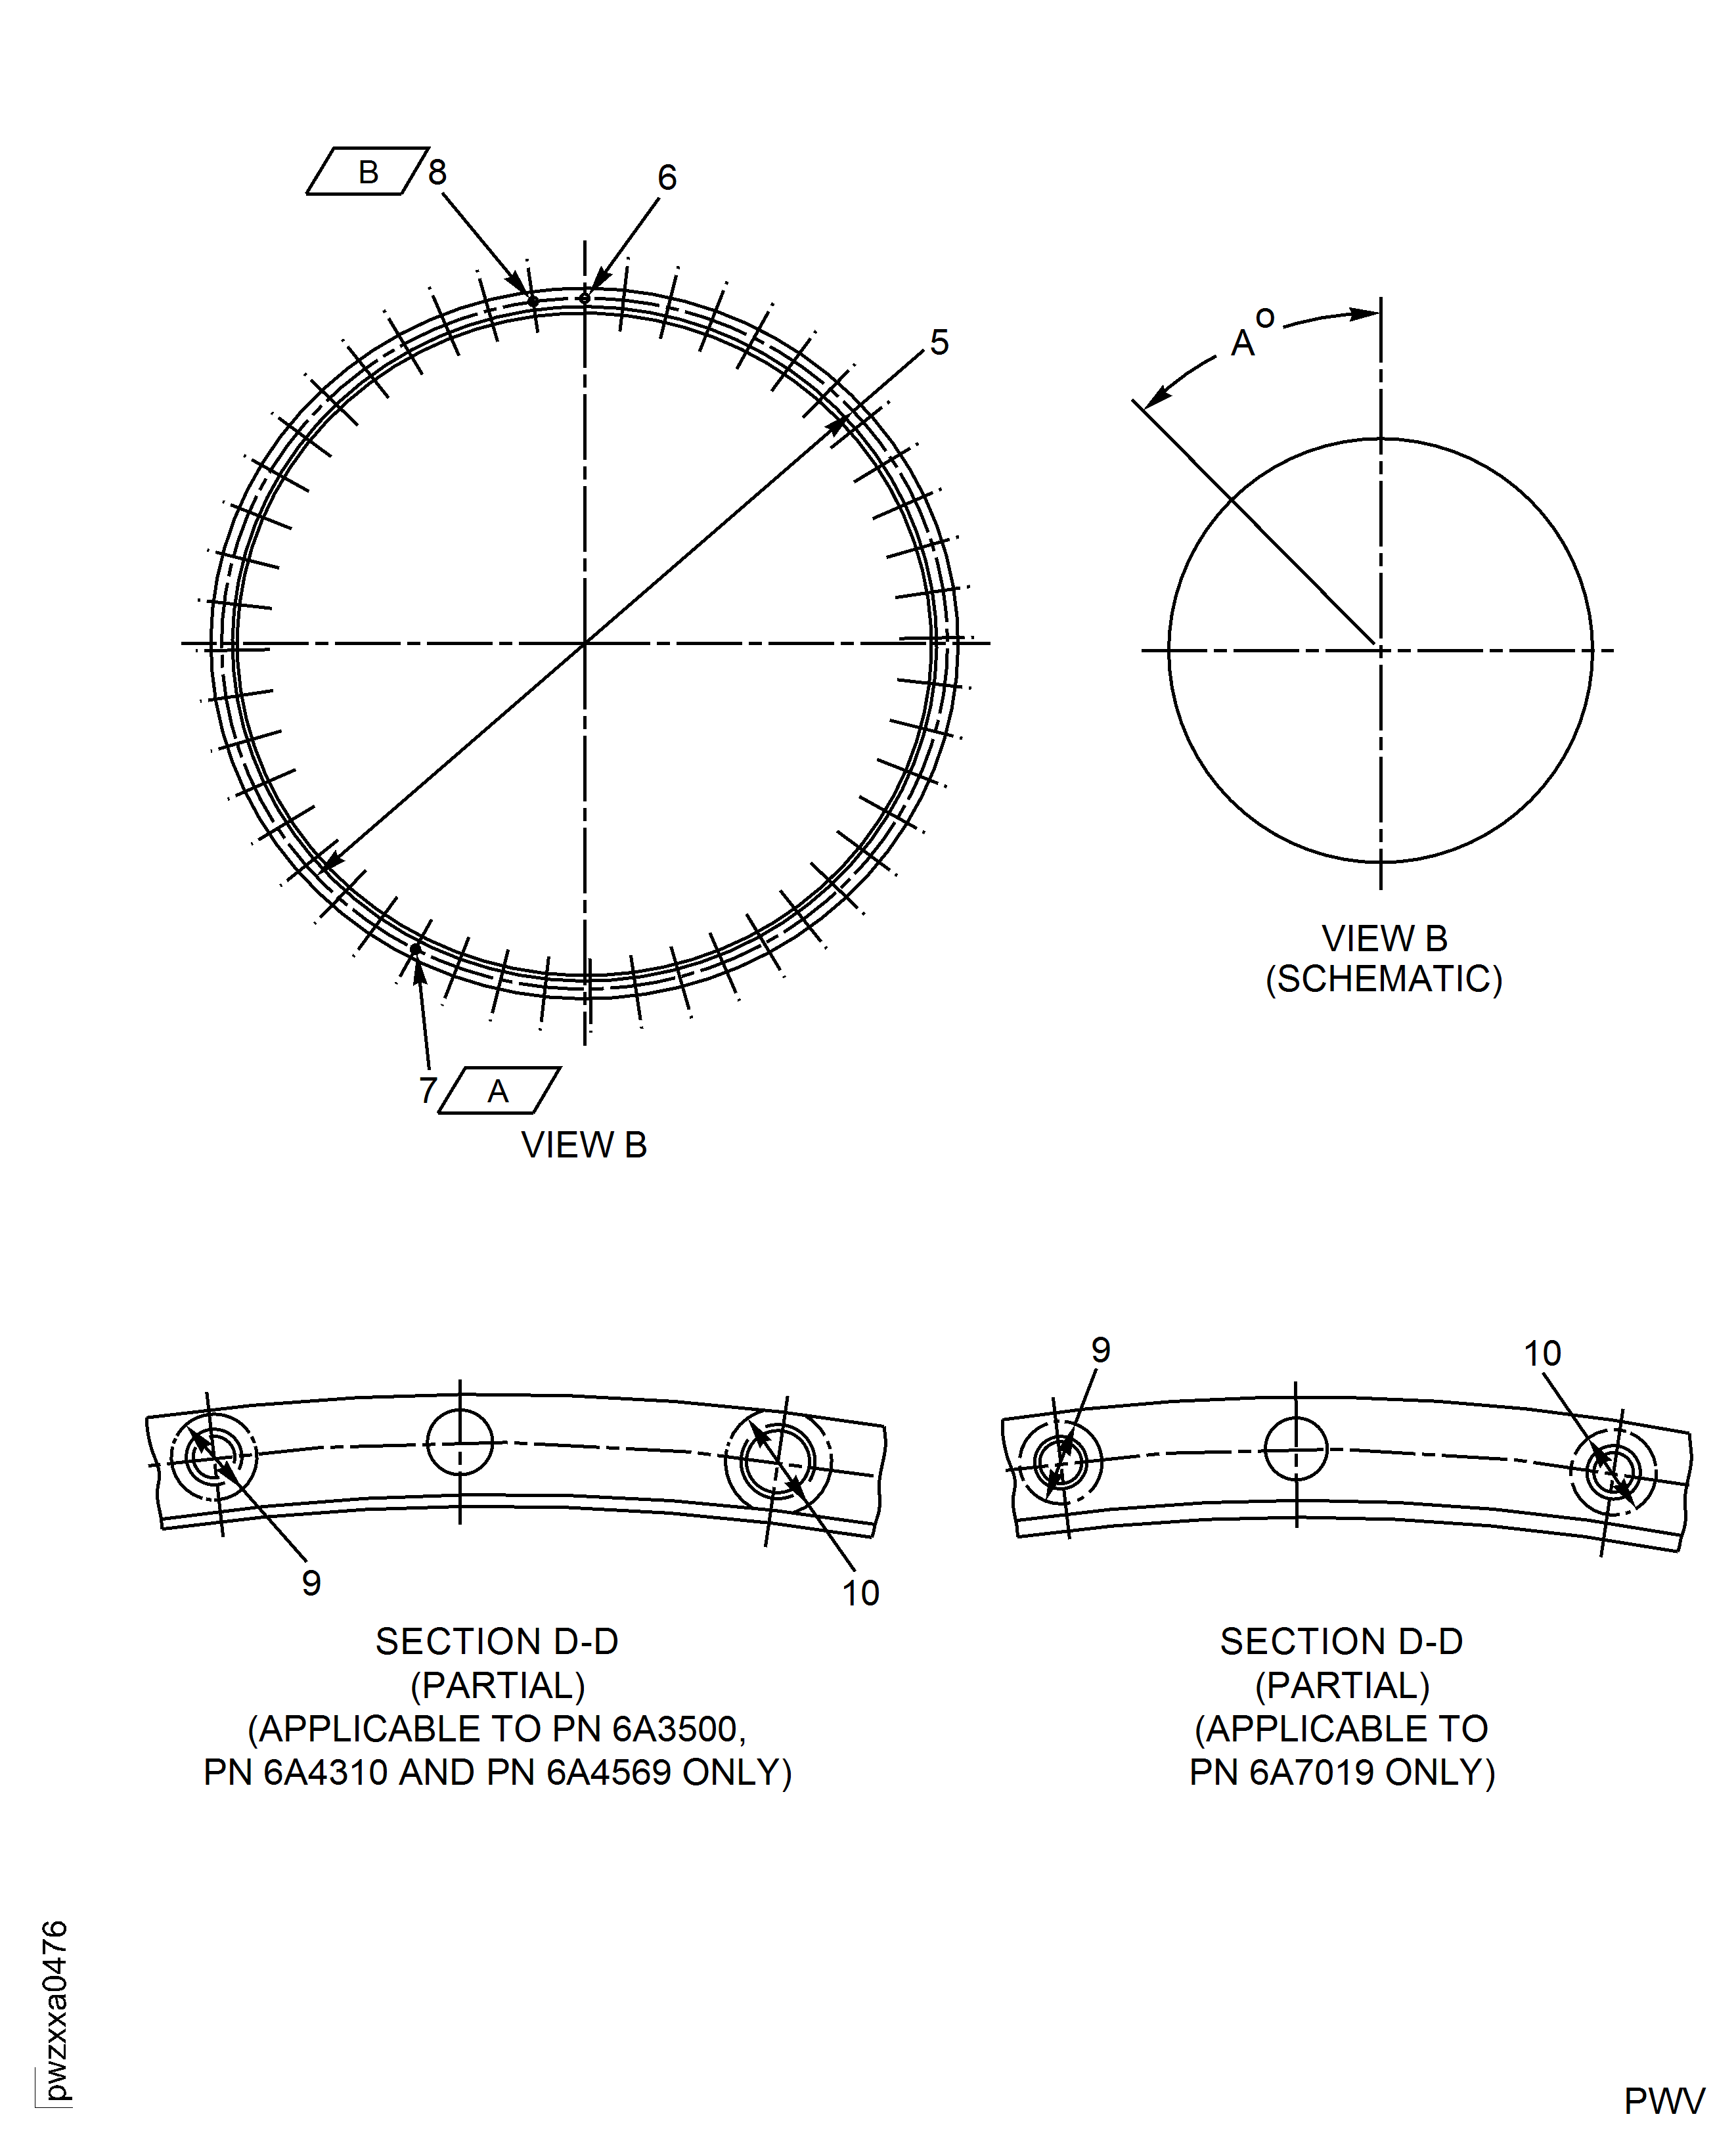
    Repair Details and Dimensions
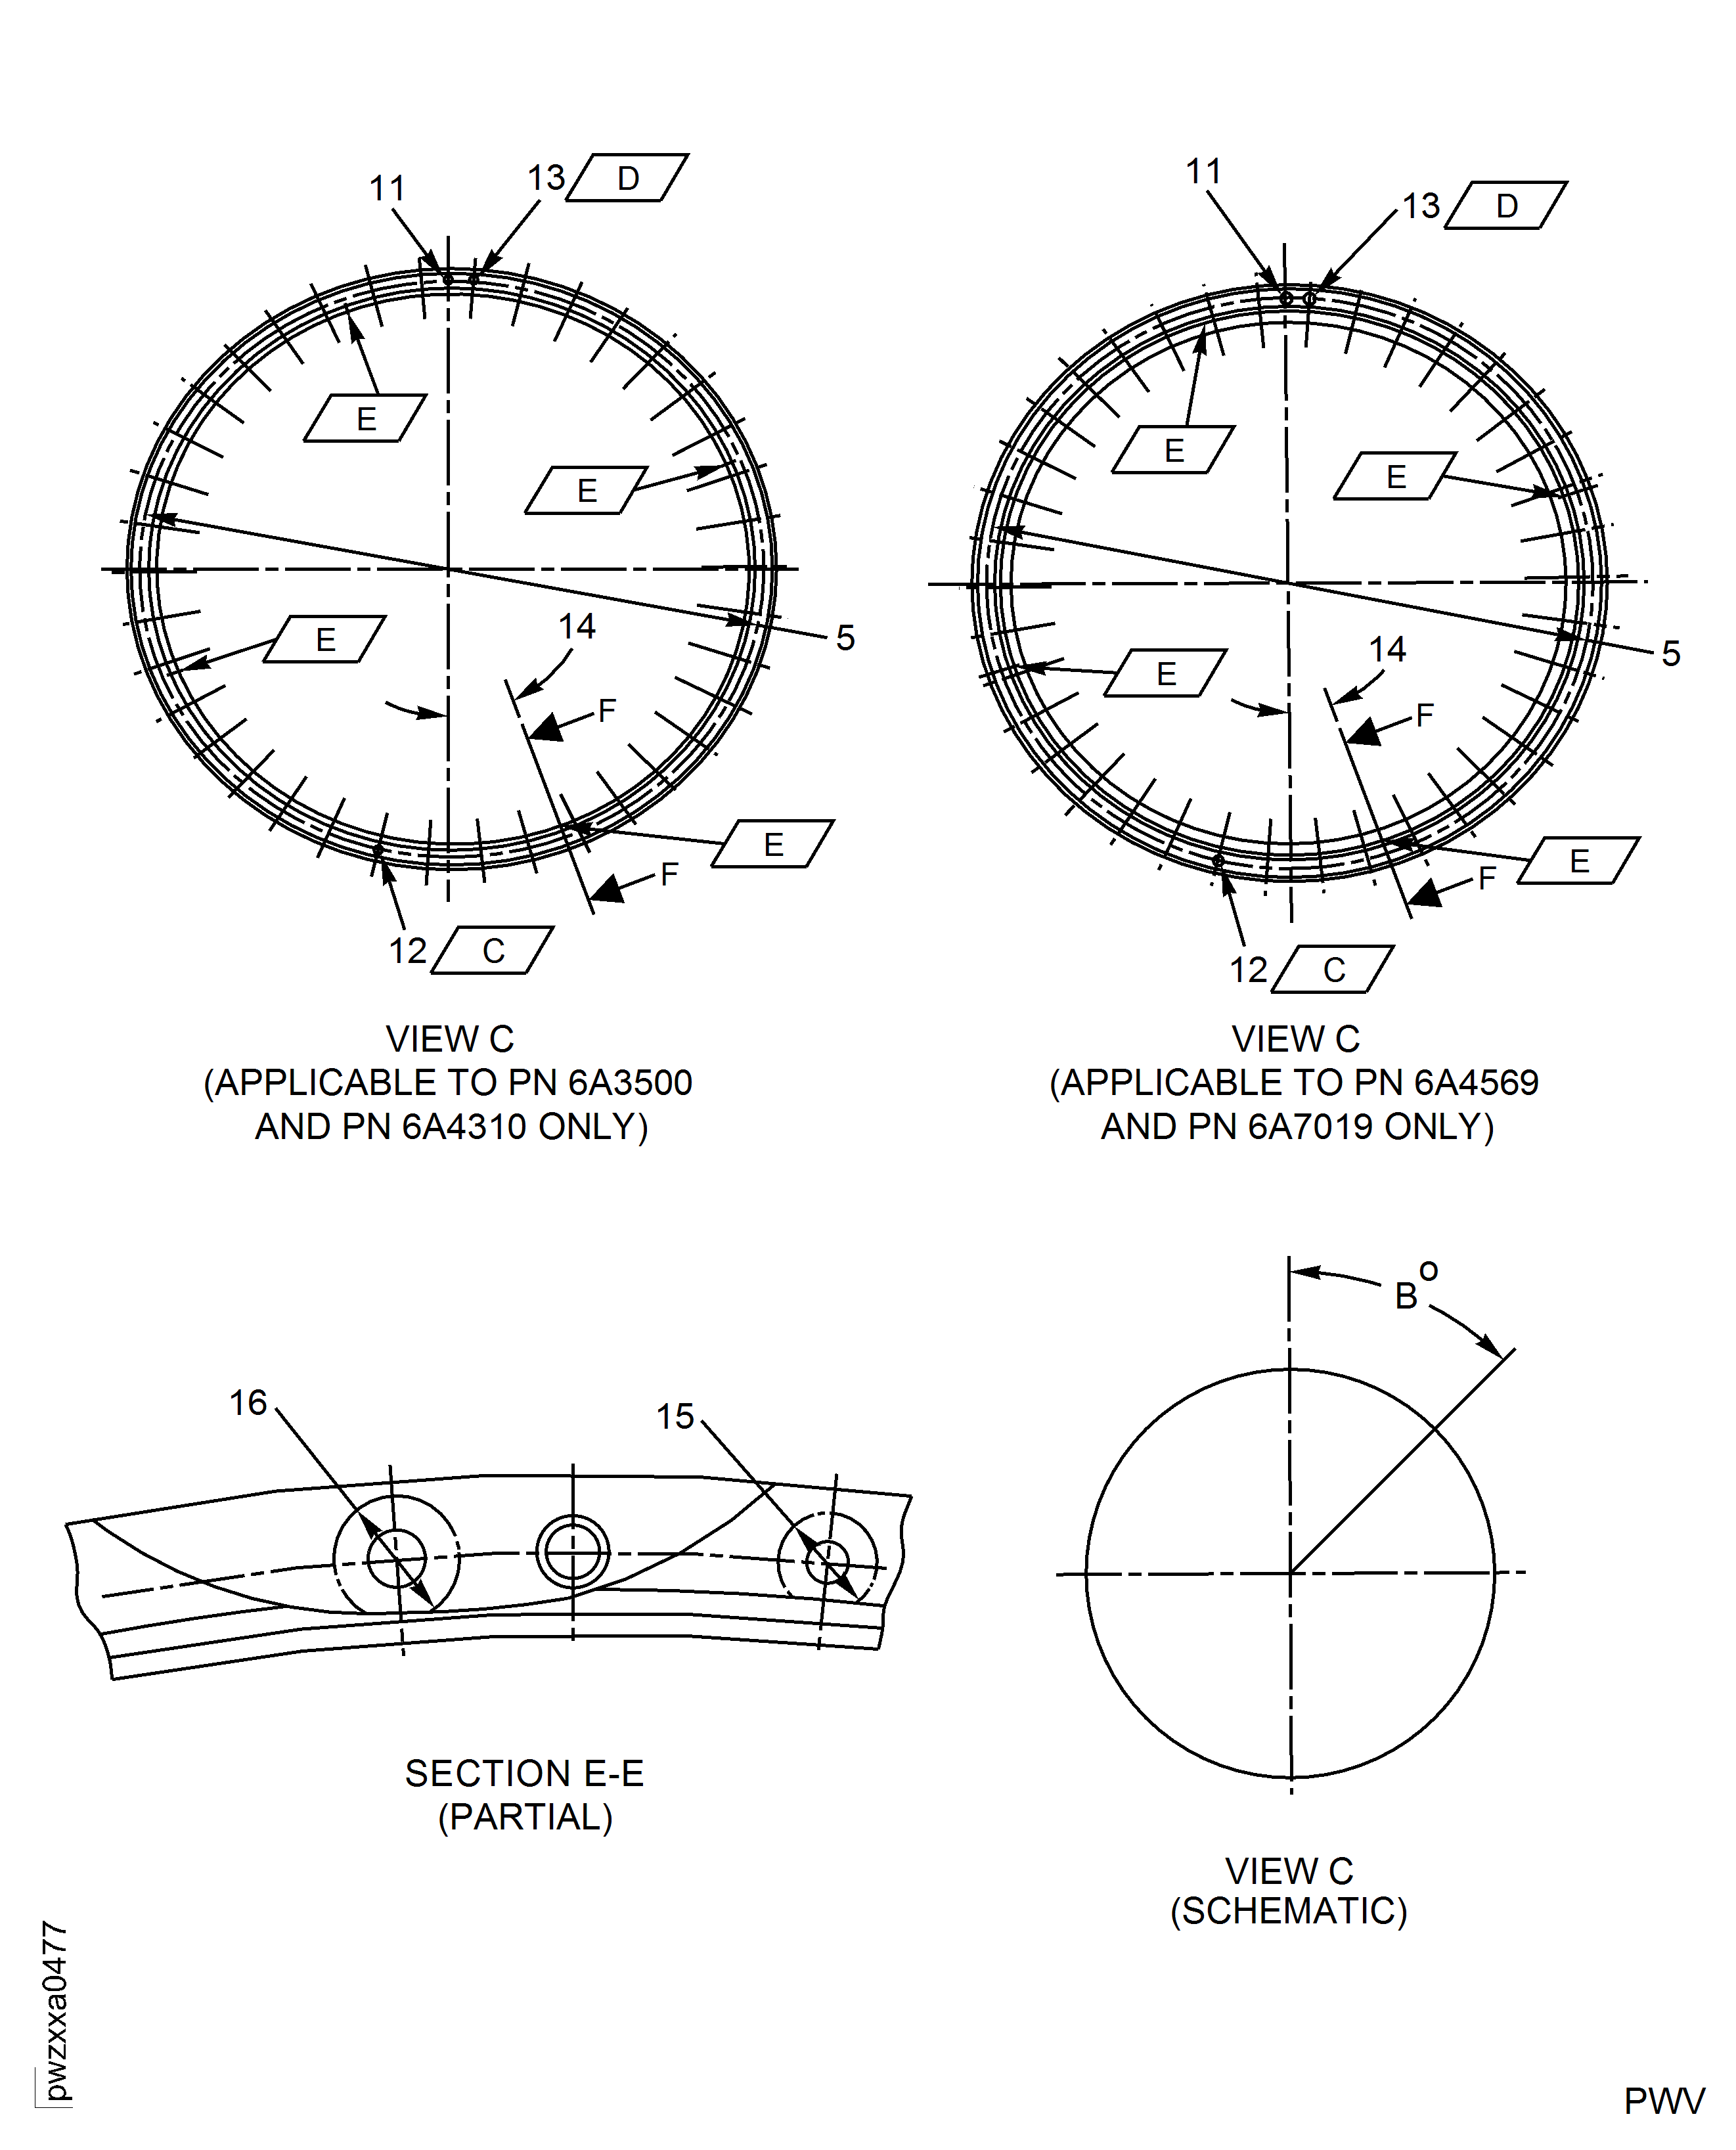
    Repair Details and Dimensions
    Repair Details and Dimensions
    Repair Details and Dimensions

    Legend
    1

    Repair Details and Dimensions

    (1) Area To Be Masked. Dry Abrasive Blast And Coat Not Allowed In These Areas And Holes.

    (2) 0.512 - 0.591 Inch (13.00 - 15.00 mm).

    (3) 0.197 - 0.276 Inch (5.00 - 7.00 mm).

    (4) Marking Location.

    2

    Repair Details and Dimensions

    (1) Area To Be Masked. Dry Abrasive Blast And Coat Not Allowed In These Areas And Holes.

    (2) 0.512 - 0.591 Inch (13.00 - 15.00 mm).

    (3) 0.197 - 0.276 Inch (5.00 - 7.00 mm).

    (4) Marking Location.

    3

    Repair Details and Dimensions

    (5) For PN 6A3500 And PN 6A4310, 21.850 Inch (555.00 mm), Basic Diameter, Reference.

    For PN 6A4569 And PN 6A7019, 22.028 Inch (559.50 mm) Basic Diameter, Reference.

    (6) Dowel Hole, 0.3150 Inch - 0.3158 Inch (8.000 mm - 8.022 mm) Diameter, Reference.

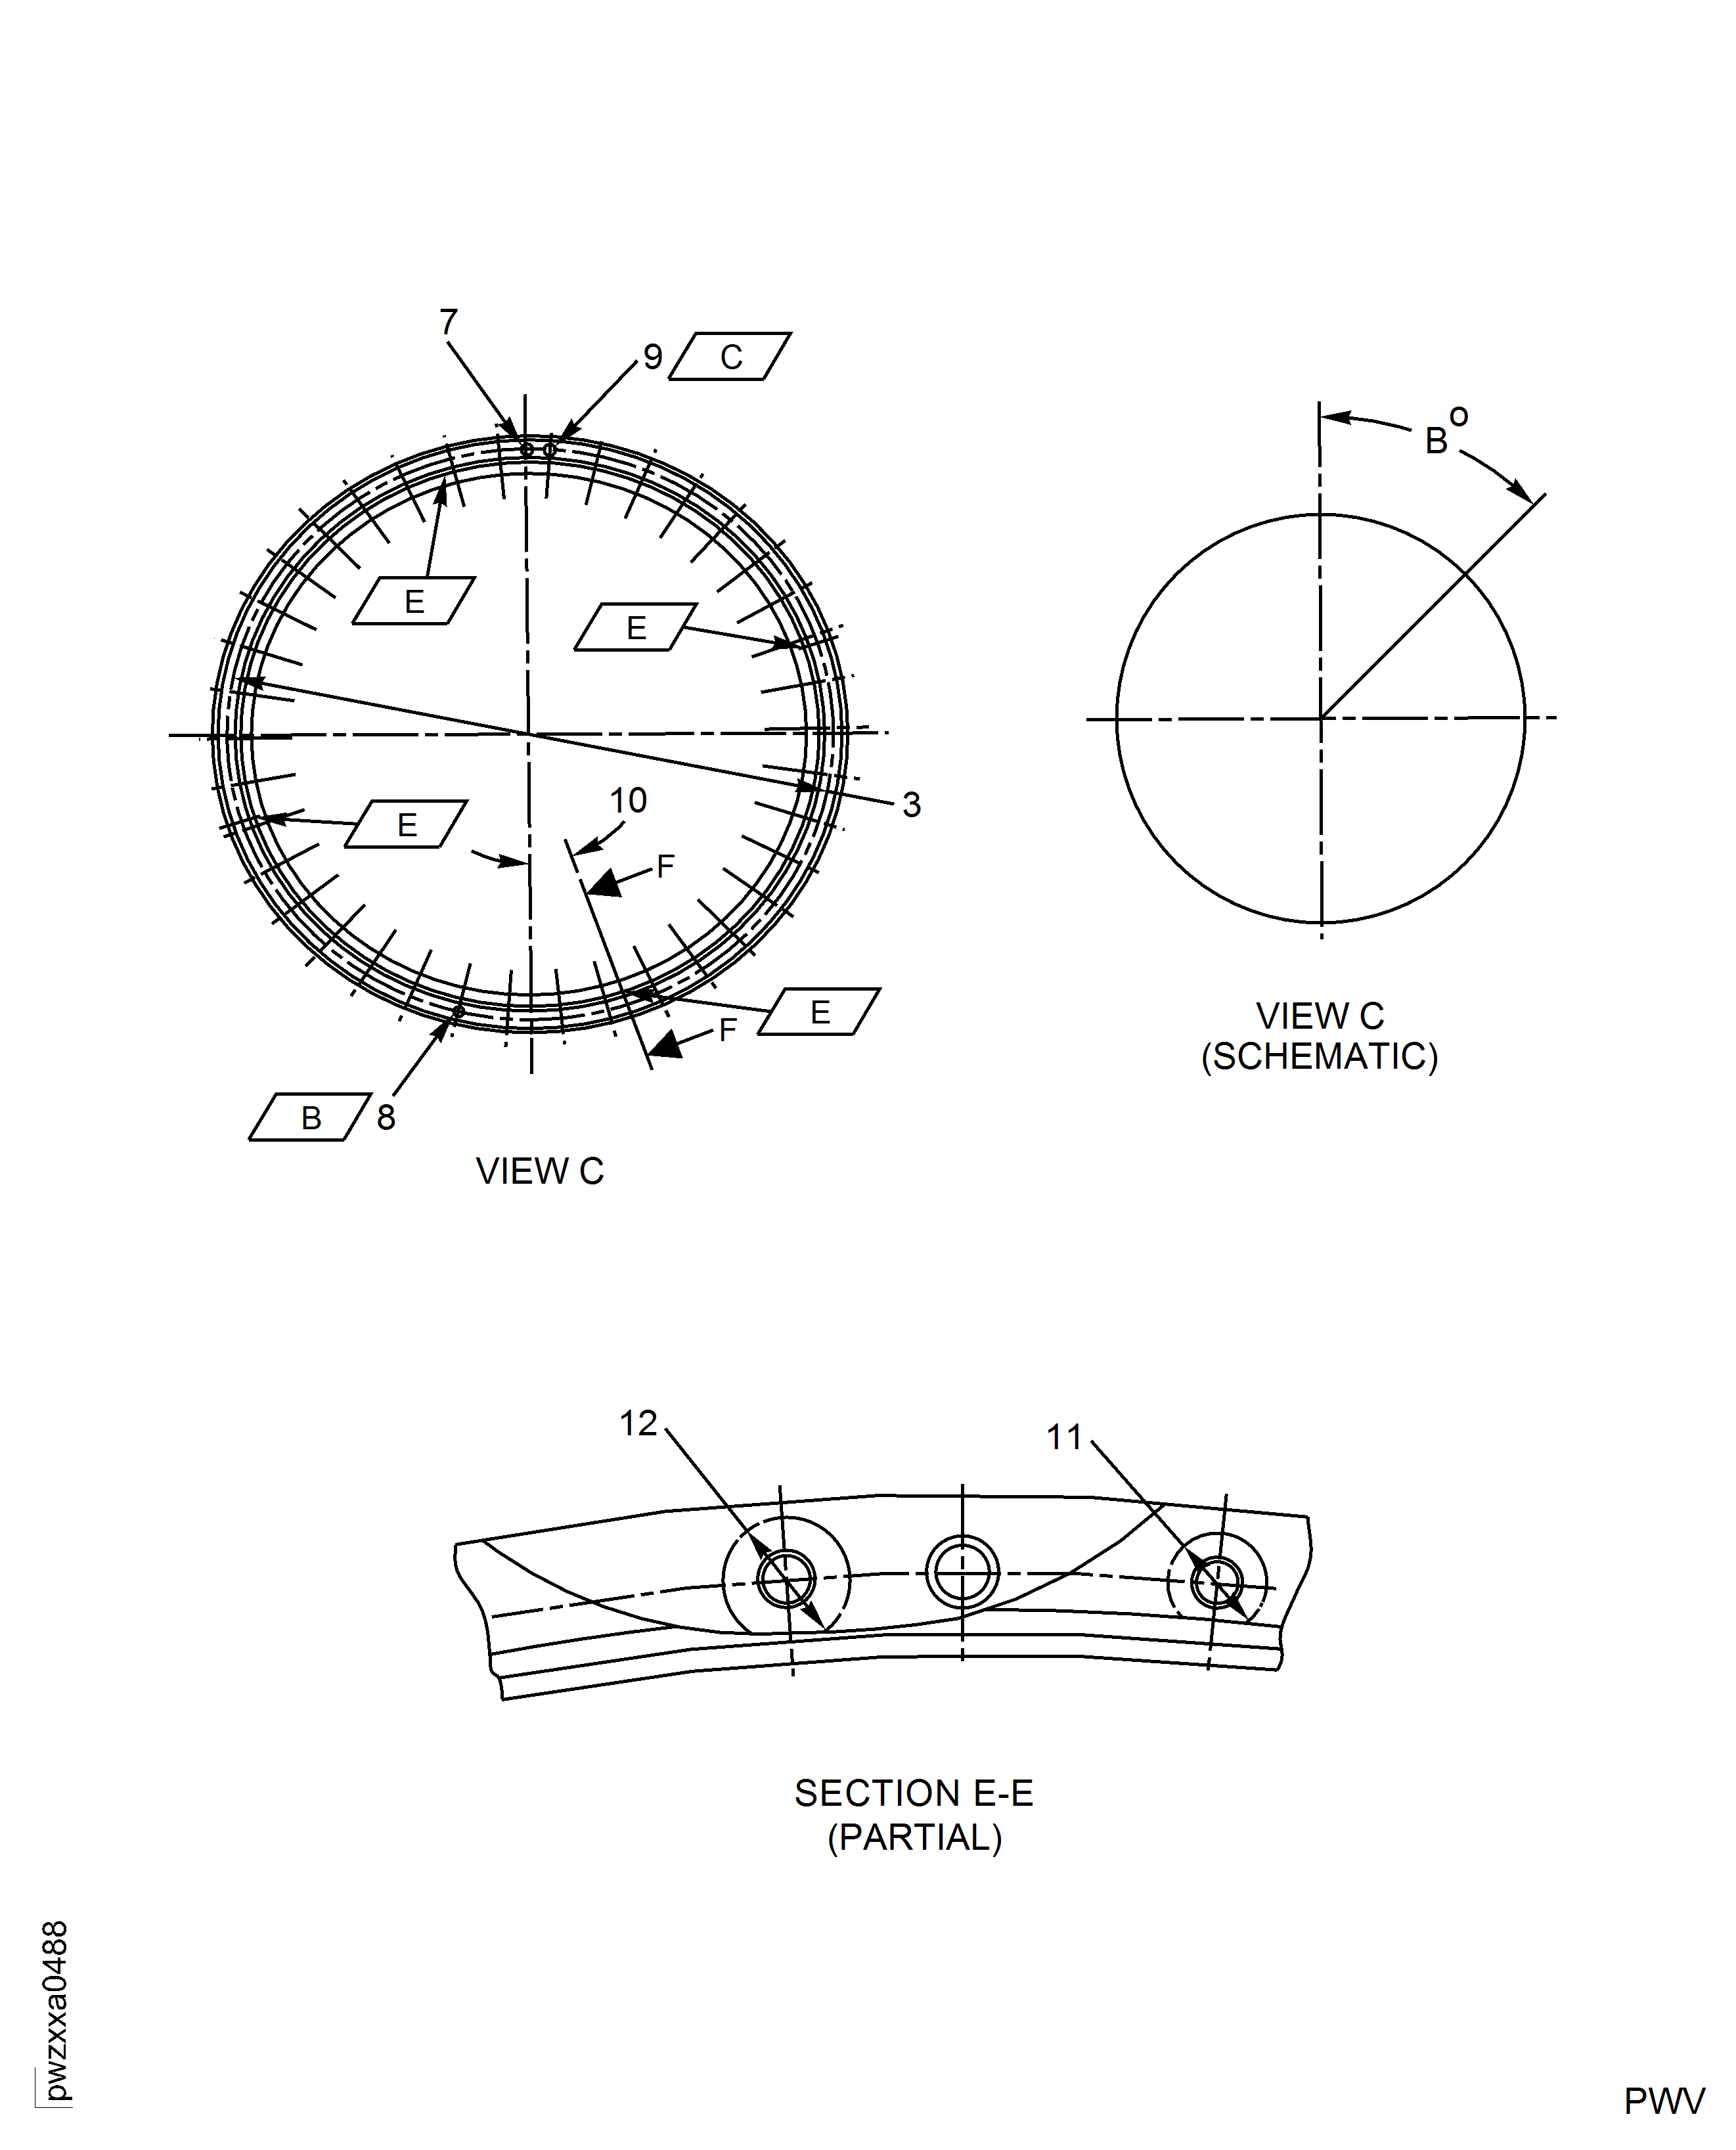
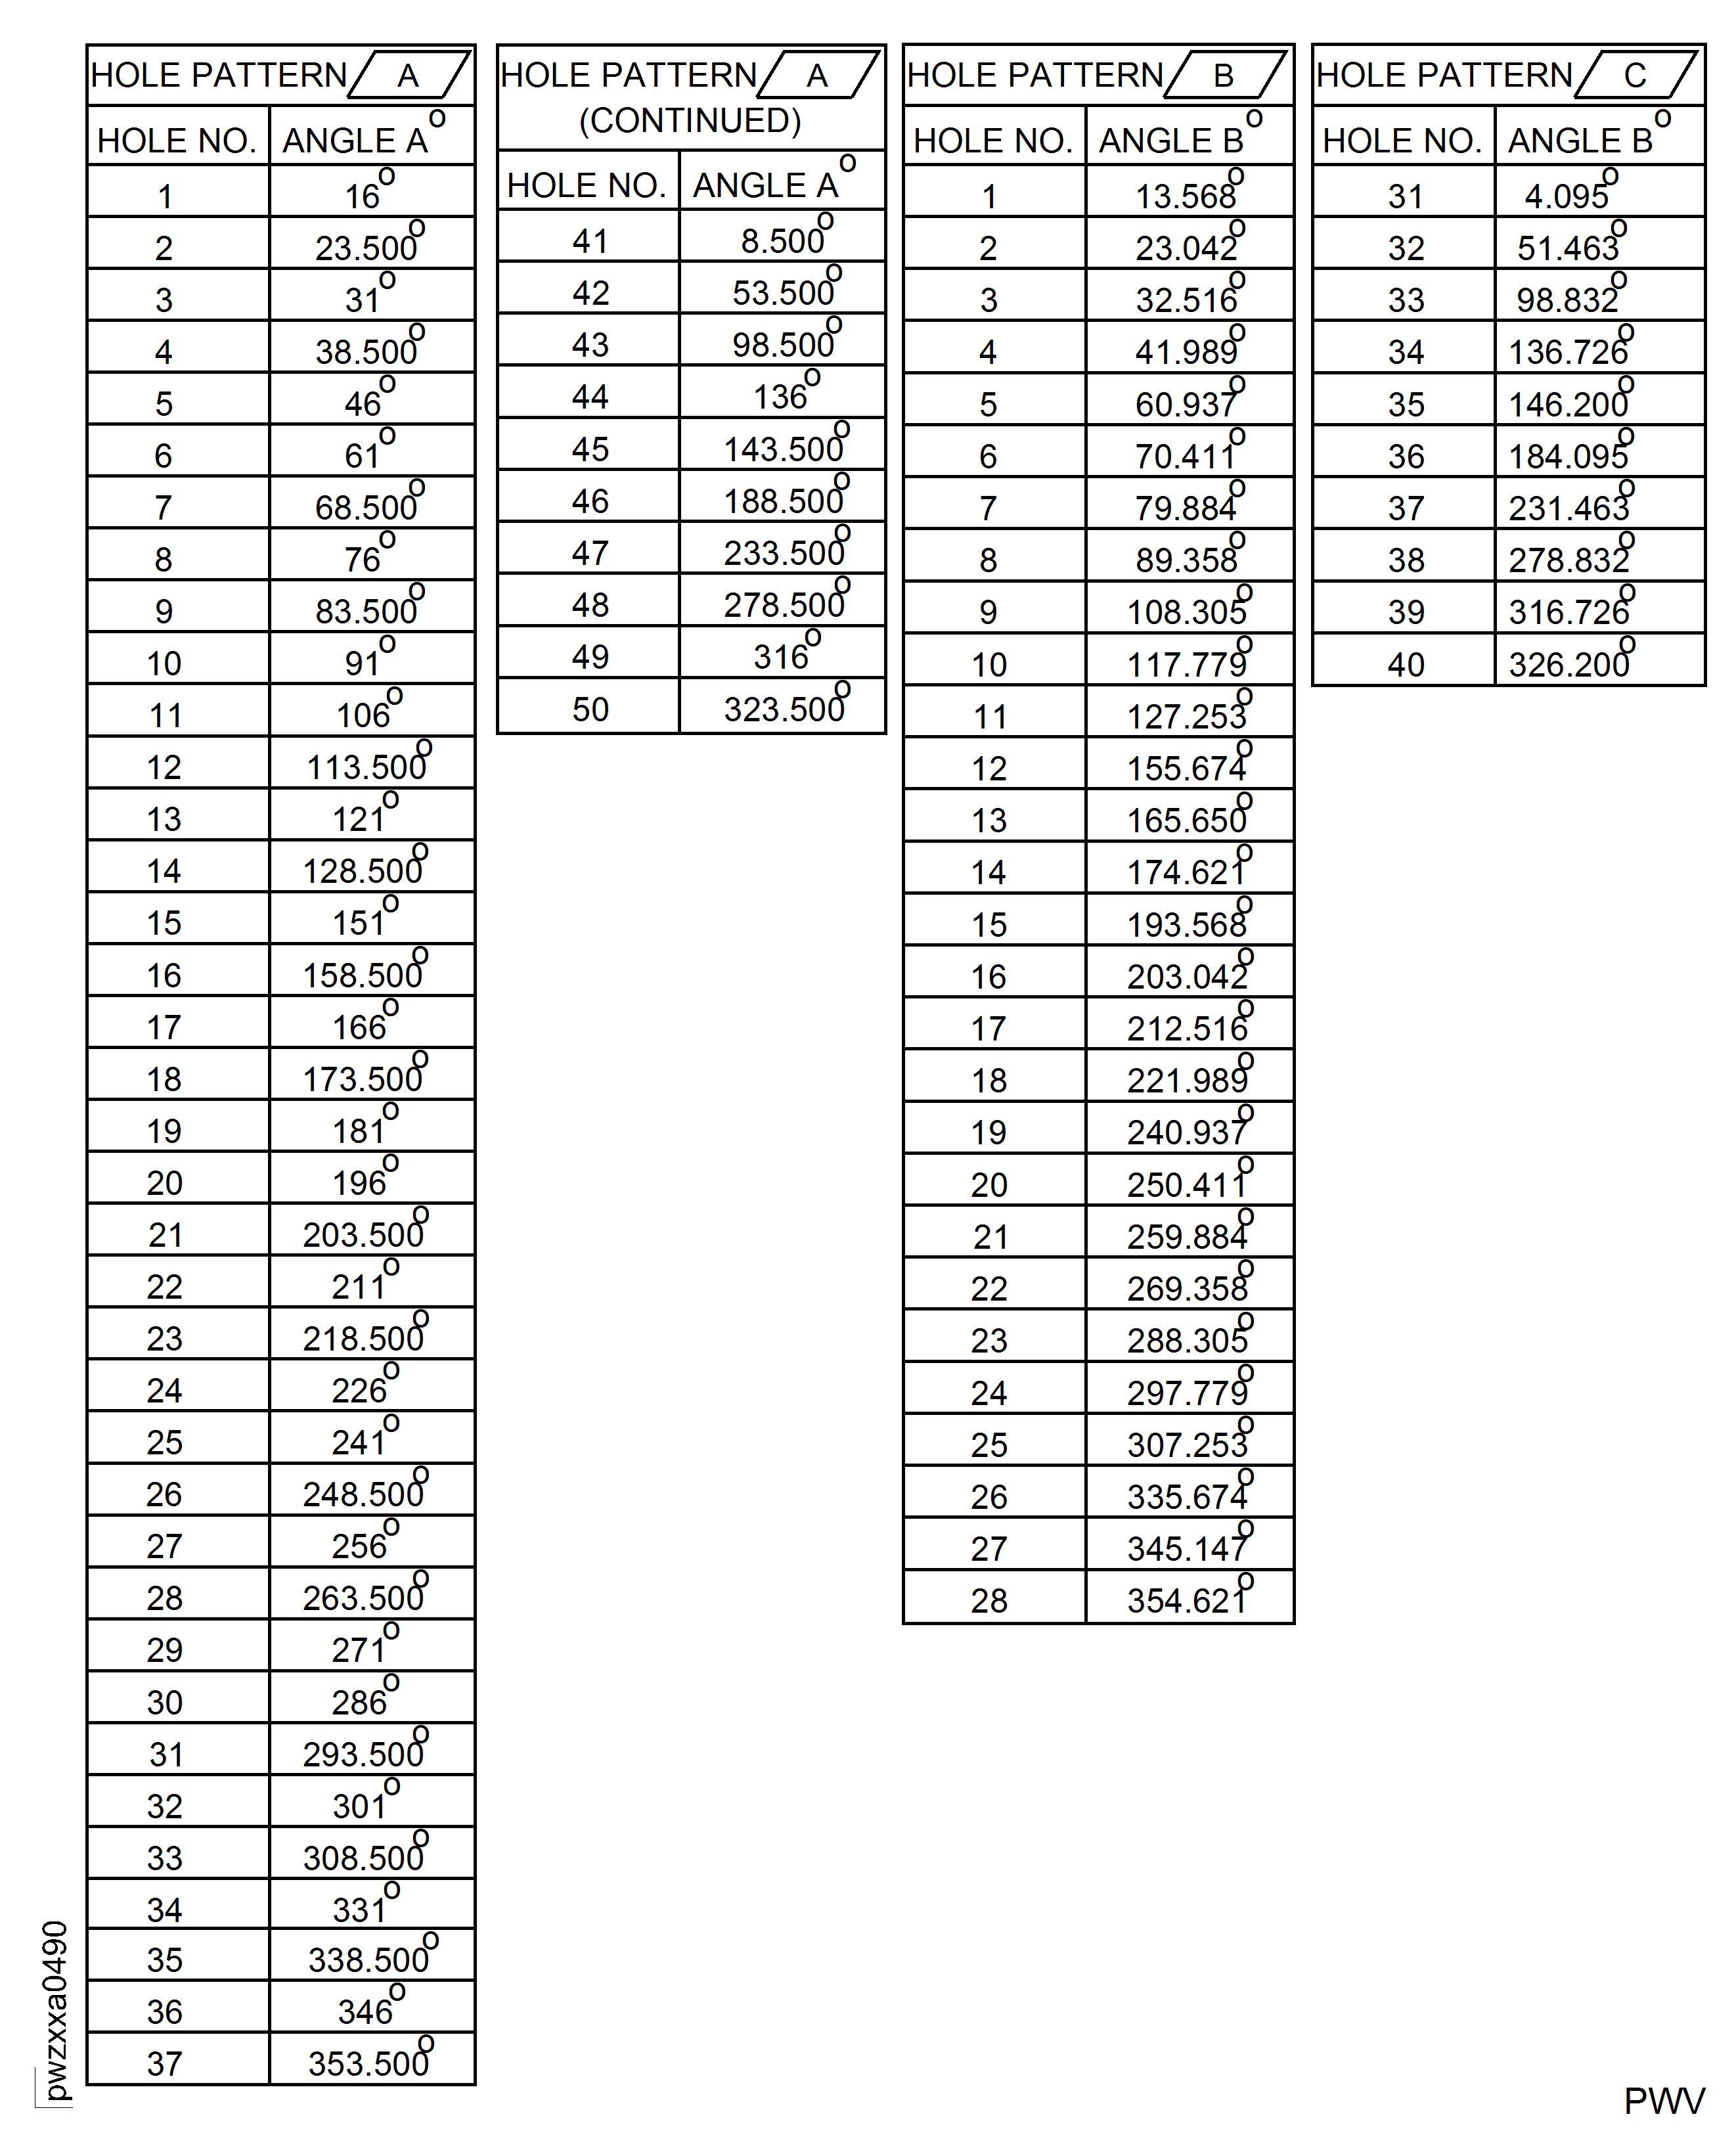
    (7) Hole Pattern A, 37 Locations, 0.220 Inch - 0.232 Inch (5.60 mm - 5.90 mm) Diameter, Reference. See Figure, Sheet 7 of 7.

    (8) For PN 6A3500, PN 6A4310 And PN 6A4569, Hole Pattern B, 10 Locations, 0.3150 Inch - 0.3158 Inch (8.000 mm - 8.022 mm) Diameter, Reference. See Figure, Sheet 7 of 7.

    For PN 6A7019, Hole Pattern B, 10 Locations, 0.220 Inch - 0.232 Inch (5.60 mm - 5.90 mm) Diameter, Reference. See Figure, Sheet 7 of 7.

    (9) Hole Pattern A, 37 Locations, 0.394 Inch - 0.472 Inch (10.00 mm - 12.00 mm) Diameter No Coat Zone Around Holes. Dry Abrasive Blast And Coat Not Allowed In These Areas And Holes.

    (10) For PN 6A3500, PN 6A4310 And PN 6A4569, Hole Pattern B, 10 Locations, 0.512 Inch - 0.591 Inch (13.00 mm - 15.00 mm) Diameter No Coat Zone Around Holes. Dry Abrasive Blast And Coat Not Allowed In These Areas And Holes.

    For PN 6A7019, Hole Pattern B, 10 Locations, 0.394 Inch - 0.472 Inch (10.00 mm - 12.00 mm) Diameter No Coat Zone Around Holes. Dry Abrasive Blast And Coat Not Allowed In These Areas And Holes.

    4

    Repair Details and Dimensions

    (5) For PN 6A3500 And PN 6A4310, 21.850 Inch (555.00 mm), Basic Diameter, Reference.

    For PN 6A4569 And PN 6A7019, 22.028 Inch (559.50 mm) Basic Diameter, Reference.

    (11) Dowel Hole, 0.1965 Inch - 0.1972 Inch (4.992 mm - 5.010 mm) Diameter, Reference.

    (12) Hole Pattern C, 28 Locations, 0.190 Inch - 0.193 Inch (4.836 mm - 4.912 mm) Diameter, Reference. See Figure, Sheet 7 of 7.

    (13) Hole Pattern D, 10 Locations, 0.2756 Inch - 0.2765 Inch (7.000 mm - 7.022 mm) Diameter, Reference. See Figure, Sheet 7 of 7.

    (14) For PN 6A3500 And PN 6A4310, 21.200 Degrees, Basic Angle, Reference.

    For All Other PN, 17.600 Degrees, Basic Angle, Reference.

    (15) Hole Pattern C, 28 Locations, 0.394 Inch - 0.472 Inch (10.00 mm - 12.00 mm) Diameter No Coat Zone Around Holes. Dry Abrasive Blast And Coat Not Allowed In These Areas And Holes.

    (16) Hole Pattern D, 10 Locations, 0.512 Inch - 0.591 Inch (13.00 mm - 15.00 mm) Diameter No Coat Zone Around Holes. Dry Abrasive Blast And Coat Not Allowed In These Areas And Holes.

    5

    Repair Details and Dimensions

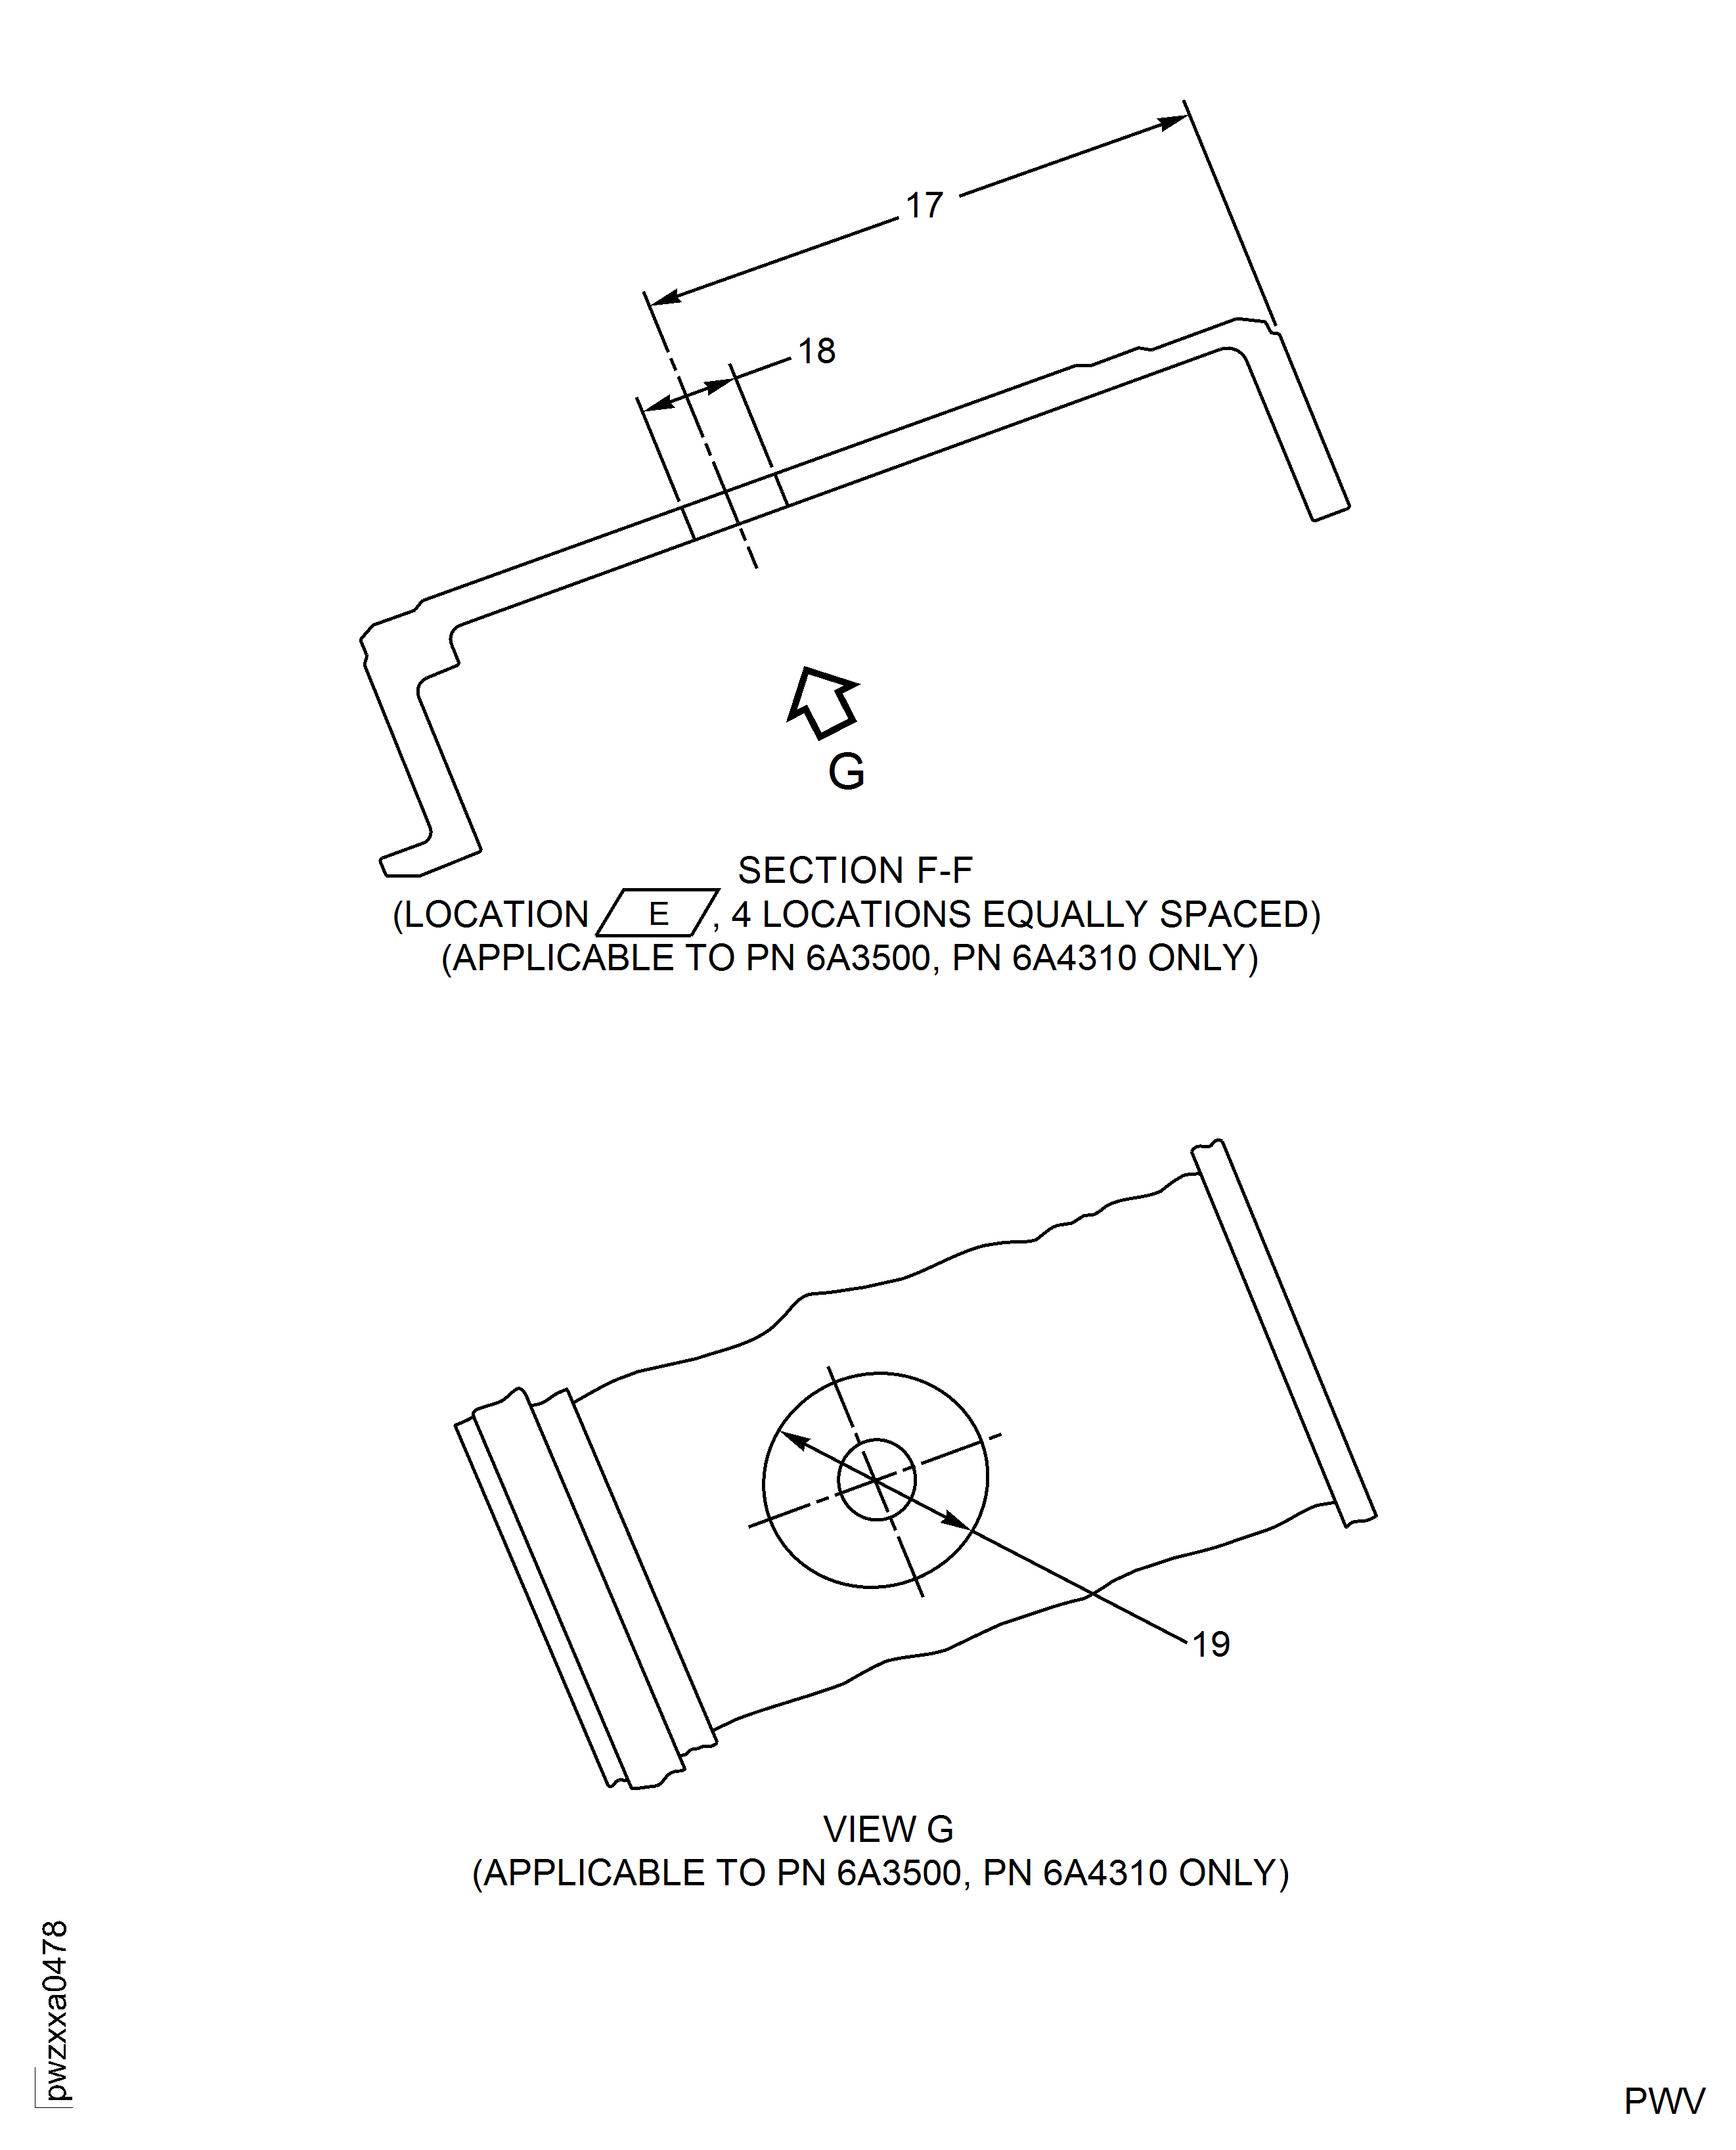
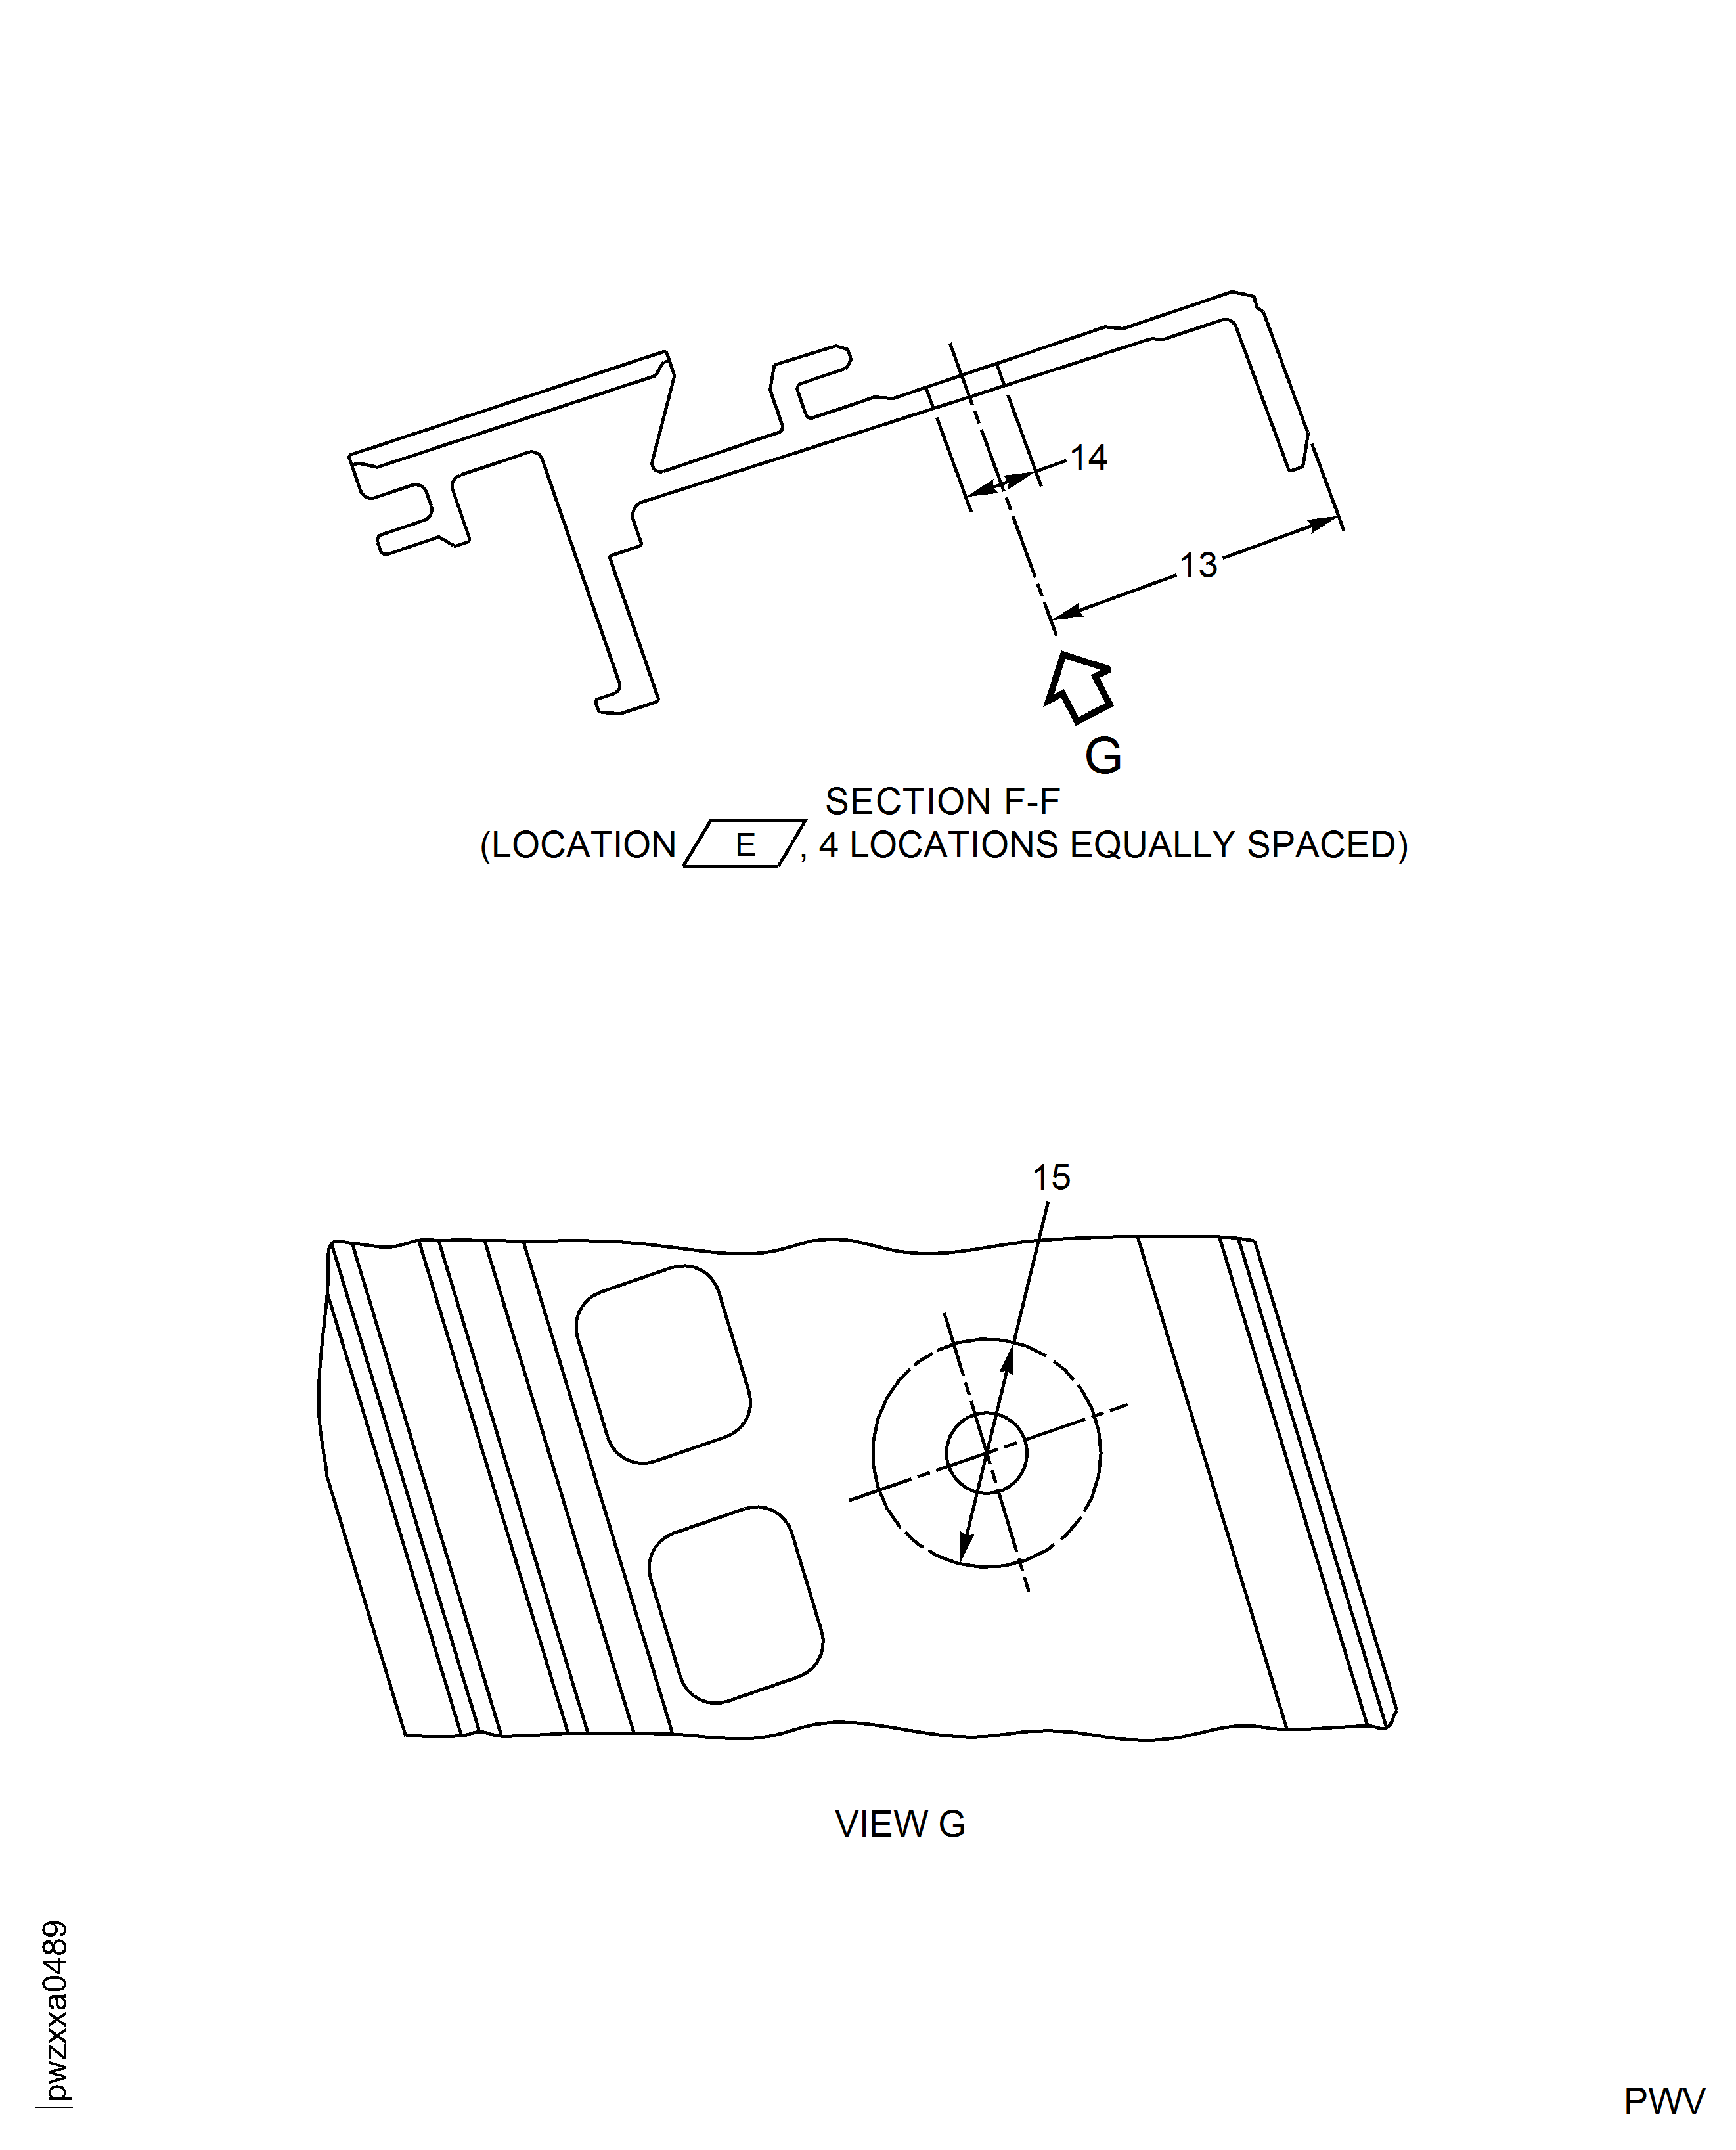
    (17) For PN 6A3500 And PN 6A4310, 1.437 Inches (36.50 mm), Basic Dimension, Reference.

    For PN 6A4569, 1.024 Inches (26.00 mm), Reference.

    For PN 6A7019, 1.024 Inches (26.00 mm), Basic Dimension, Reference.

    (18) 0.250 Inch - 0.254 Inch (6.36 mm - 6.44 mm) Diameter, Reference.

    (19) 0.669 Inch - 0.748 Inch (17.00 mm - 19.00 mm) Diameter No Coat Zone Around Holes On Both Sides. Dry Abrasive Blast And Coat Not Allowed In These Areas And Holes, Typical 4 Locations.

    6

    Repair Details and Dimensions

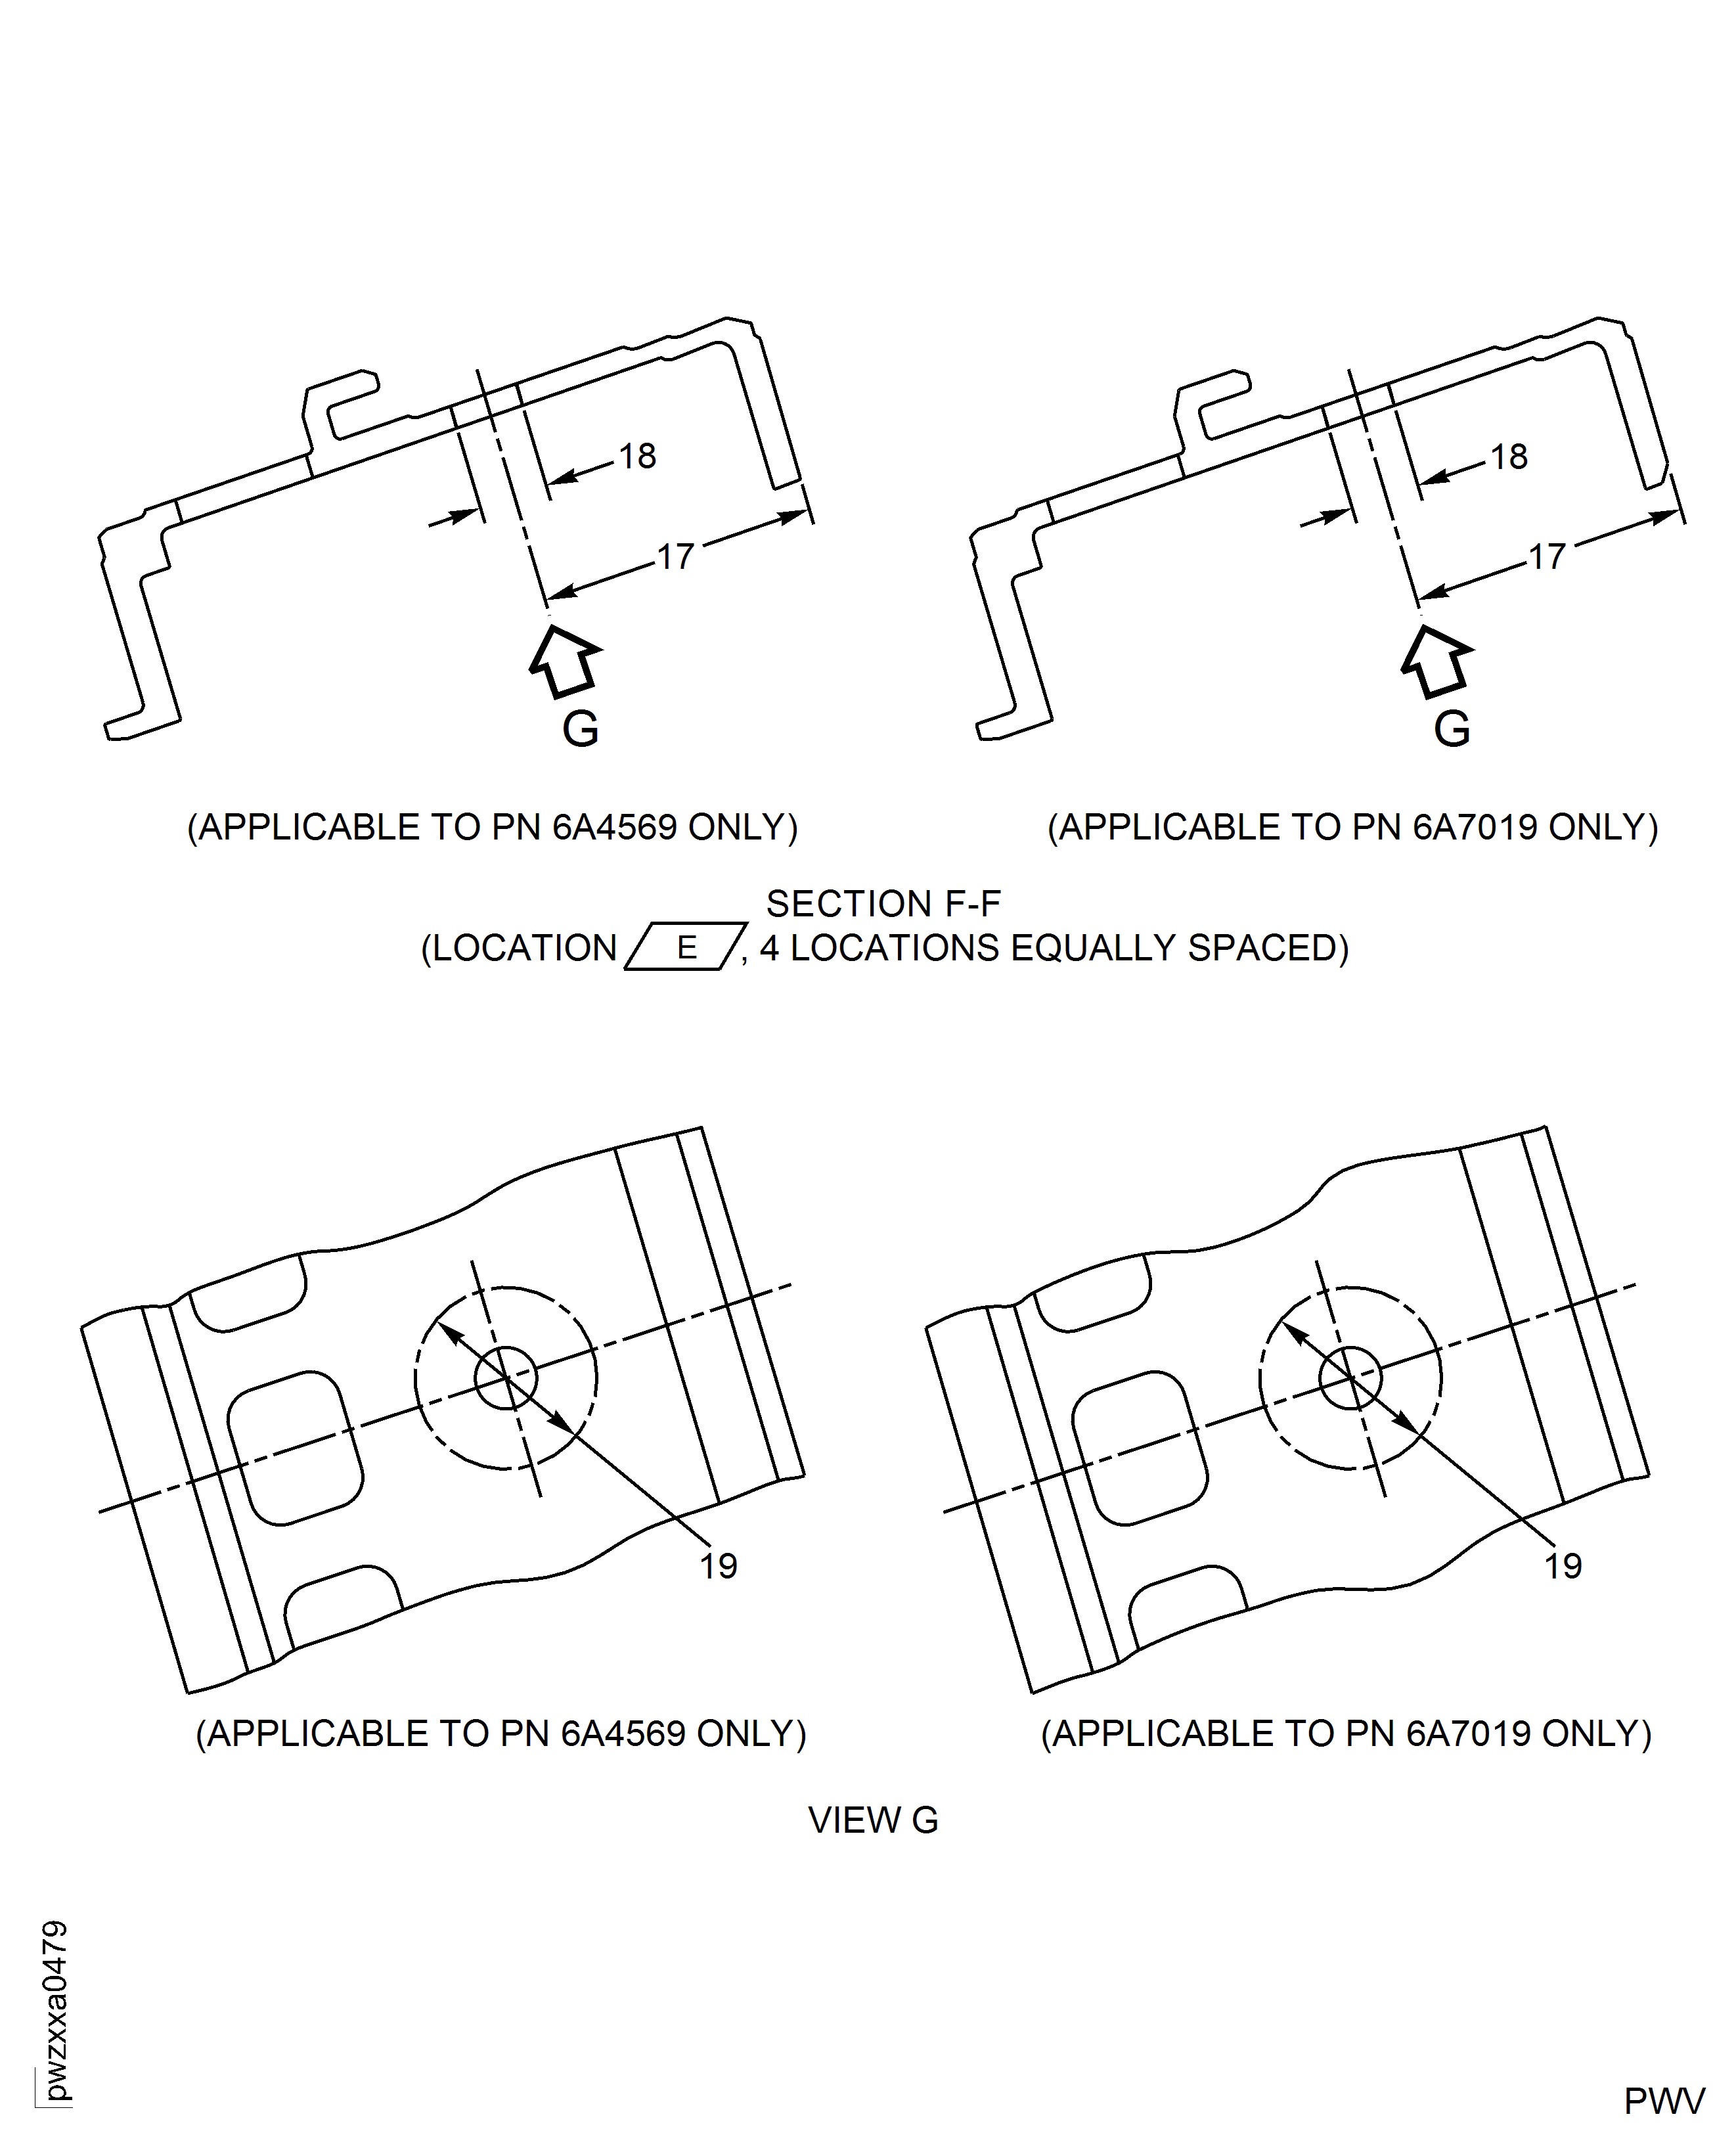
    (17) For PN 6A3500 And PN 6A4310, 1.437 Inches (36.50 mm), Basic Dimension, Reference.

    For PN 6A4569, 1.024 Inches (26.00 mm), Reference.

    For PN 6A7019, 1.024 Inches (26.00 mm), Basic Dimension, Reference.

    (18) 0.250 Inch - 0.254 Inch (6.36 mm - 6.44 mm) Diameter, Reference.

    (19) 0.669 Inch - 0.748 Inch (17.00 mm - 19.00 mm) Diameter No Coat Zone Around Holes On Both Sides. Dry Abrasive Blast And Coat Not Allowed In These Areas And Holes, Typical 4 Locations.

    7

    Repair Details and Dimensions

    (1) Area To Be Masked. Dry Abrasive Blast And Coat Not Allowed In These Areas And Holes.

    (2) 0.512 - 0.591 Inch (13.00 - 15.00 mm).

    (3) 0.197 - 0.276 Inch (5.00 - 7.00 mm).

    (4) Marking Location.

    (5) For PN 6A3500 And PN 6A4310, 21.850 Inch (555.00 mm), Basic Diameter, Reference.

    For PN 6A4569 And PN 6A7019, 22.028 Inch (559.50 mm) Basic Diameter, Reference.

    (6) Dowel Hole, 0.3150 Inch - 0.3158 Inch (8.000 mm - 8.022 mm) Diameter, Reference.

    (7) Hole Pattern A, 37 Locations, 0.220 Inch - 0.232 Inch (5.60 mm - 5.90 mm) Diameter, Reference. See Figure, Sheet 7 of 7.

    (8) For PN 6A3500, PN 6A4310 And PN 6A4569, Hole Pattern B, 10 Locations, 0.3150 Inch - 0.3158 Inch (8.000 mm - 8.022 mm) Diameter, Reference. See Figure, Sheet 7 of 7.

    For PN 6A7019, Hole Pattern B, 10 Locations, 0.220 Inch - 0.232 Inch (5.60 mm - 5.90 mm) Diameter, Reference. See Figure, Sheet 7 of 7.

    (9) Hole Pattern A, 37 Locations, 0.394 Inch - 0.472 Inch (10.00 mm - 12.00 mm) Diameter No Coat Zone Around Holes. Dry Abrasive Blast And Coat Not Allowed In These Areas And Holes.

    (10) For PN 6A3500, PN 6A4310 And PN 6A4569, Hole Pattern B, 10 Locations, 0.512 Inch - 0.591 Inch (13.00 mm - 15.00 mm) Diameter No Coat Zone Around Holes. Dry Abrasive Blast And Coat Not Allowed In These Areas And Holes.

    For PN 6A7019, Hole Pattern B, 10 Locations, 0.394 Inch - 0.472 Inch (10.00 mm - 12.00 mm) Diameter No Coat Zone Around Holes. Dry Abrasive Blast And Coat Not Allowed In These Areas And Holes.

    (11) Dowel Hole, 0.1965 Inch - 0.1972 Inch (4.992 mm - 5.010 mm) Diameter, Reference.

    (12) Hole Pattern C, 28 Locations, 0.190 Inch - 0.193 Inch (4.836 mm - 4.912 mm) Diameter, Reference. See Figure, Sheet 7 of 7.

    (13) Hole Pattern D, 10 Locations, 0.2756 Inch - 0.2765 Inch (7.000 mm - 7.022 mm) Diameter, Reference. See Figure, Sheet 7 of 7.

    (14) For PN 6A3500 And PN 6A4310, 21.200 Degrees, Basic Angle, Reference.

    For All Other PN, 17.600 Degrees, Basic Angle, Reference.

    (15) Hole Pattern C, 28 Locations, 0.394 Inch - 0.472 Inch (10.00 mm - 12.00 mm) Diameter No Coat Zone Around Holes. Dry Abrasive Blast And Coat Not Allowed In These Areas And Holes.

    (16) Hole Pattern D, 10 Locations, 0.512 Inch - 0.591 Inch (13.00 mm - 15.00 mm) Diameter No Coat Zone Around Holes. Dry Abrasive Blast And Coat Not Allowed In These Areas And Holes.

    (17) For PN 6A3500 And PN 6A4310, 1.437 Inches (36.50 mm), Basic Dimension, Reference.

    For PN 6A4569, 1.024 Inches (26.00 mm), Reference.

    For PN 6A7019, 1.024 Inches (26.00 mm), Basic Dimension, Reference.

    (18) 0.250 Inch - 0.254 Inch (6.36 mm - 6.44 mm) Diameter, Reference.

    (19) 0.669 Inch - 0.748 Inch (17.00 mm - 19.00 mm) Diameter No Coat Zone Around Holes On Both Sides. Dry Abrasive Blast And Coat Not Allowed In These Areas And Holes, Typical 4 Locations.

    Close

    Figure: Repair Details and Dimensions

    Repair Details and Dimensions
    Repair Details and Dimensions
    Repair Details and Dimensions
    Repair Details and Dimensions
    Repair Details and Dimensions
    Legend
    1

    Repair Details and Dimensions

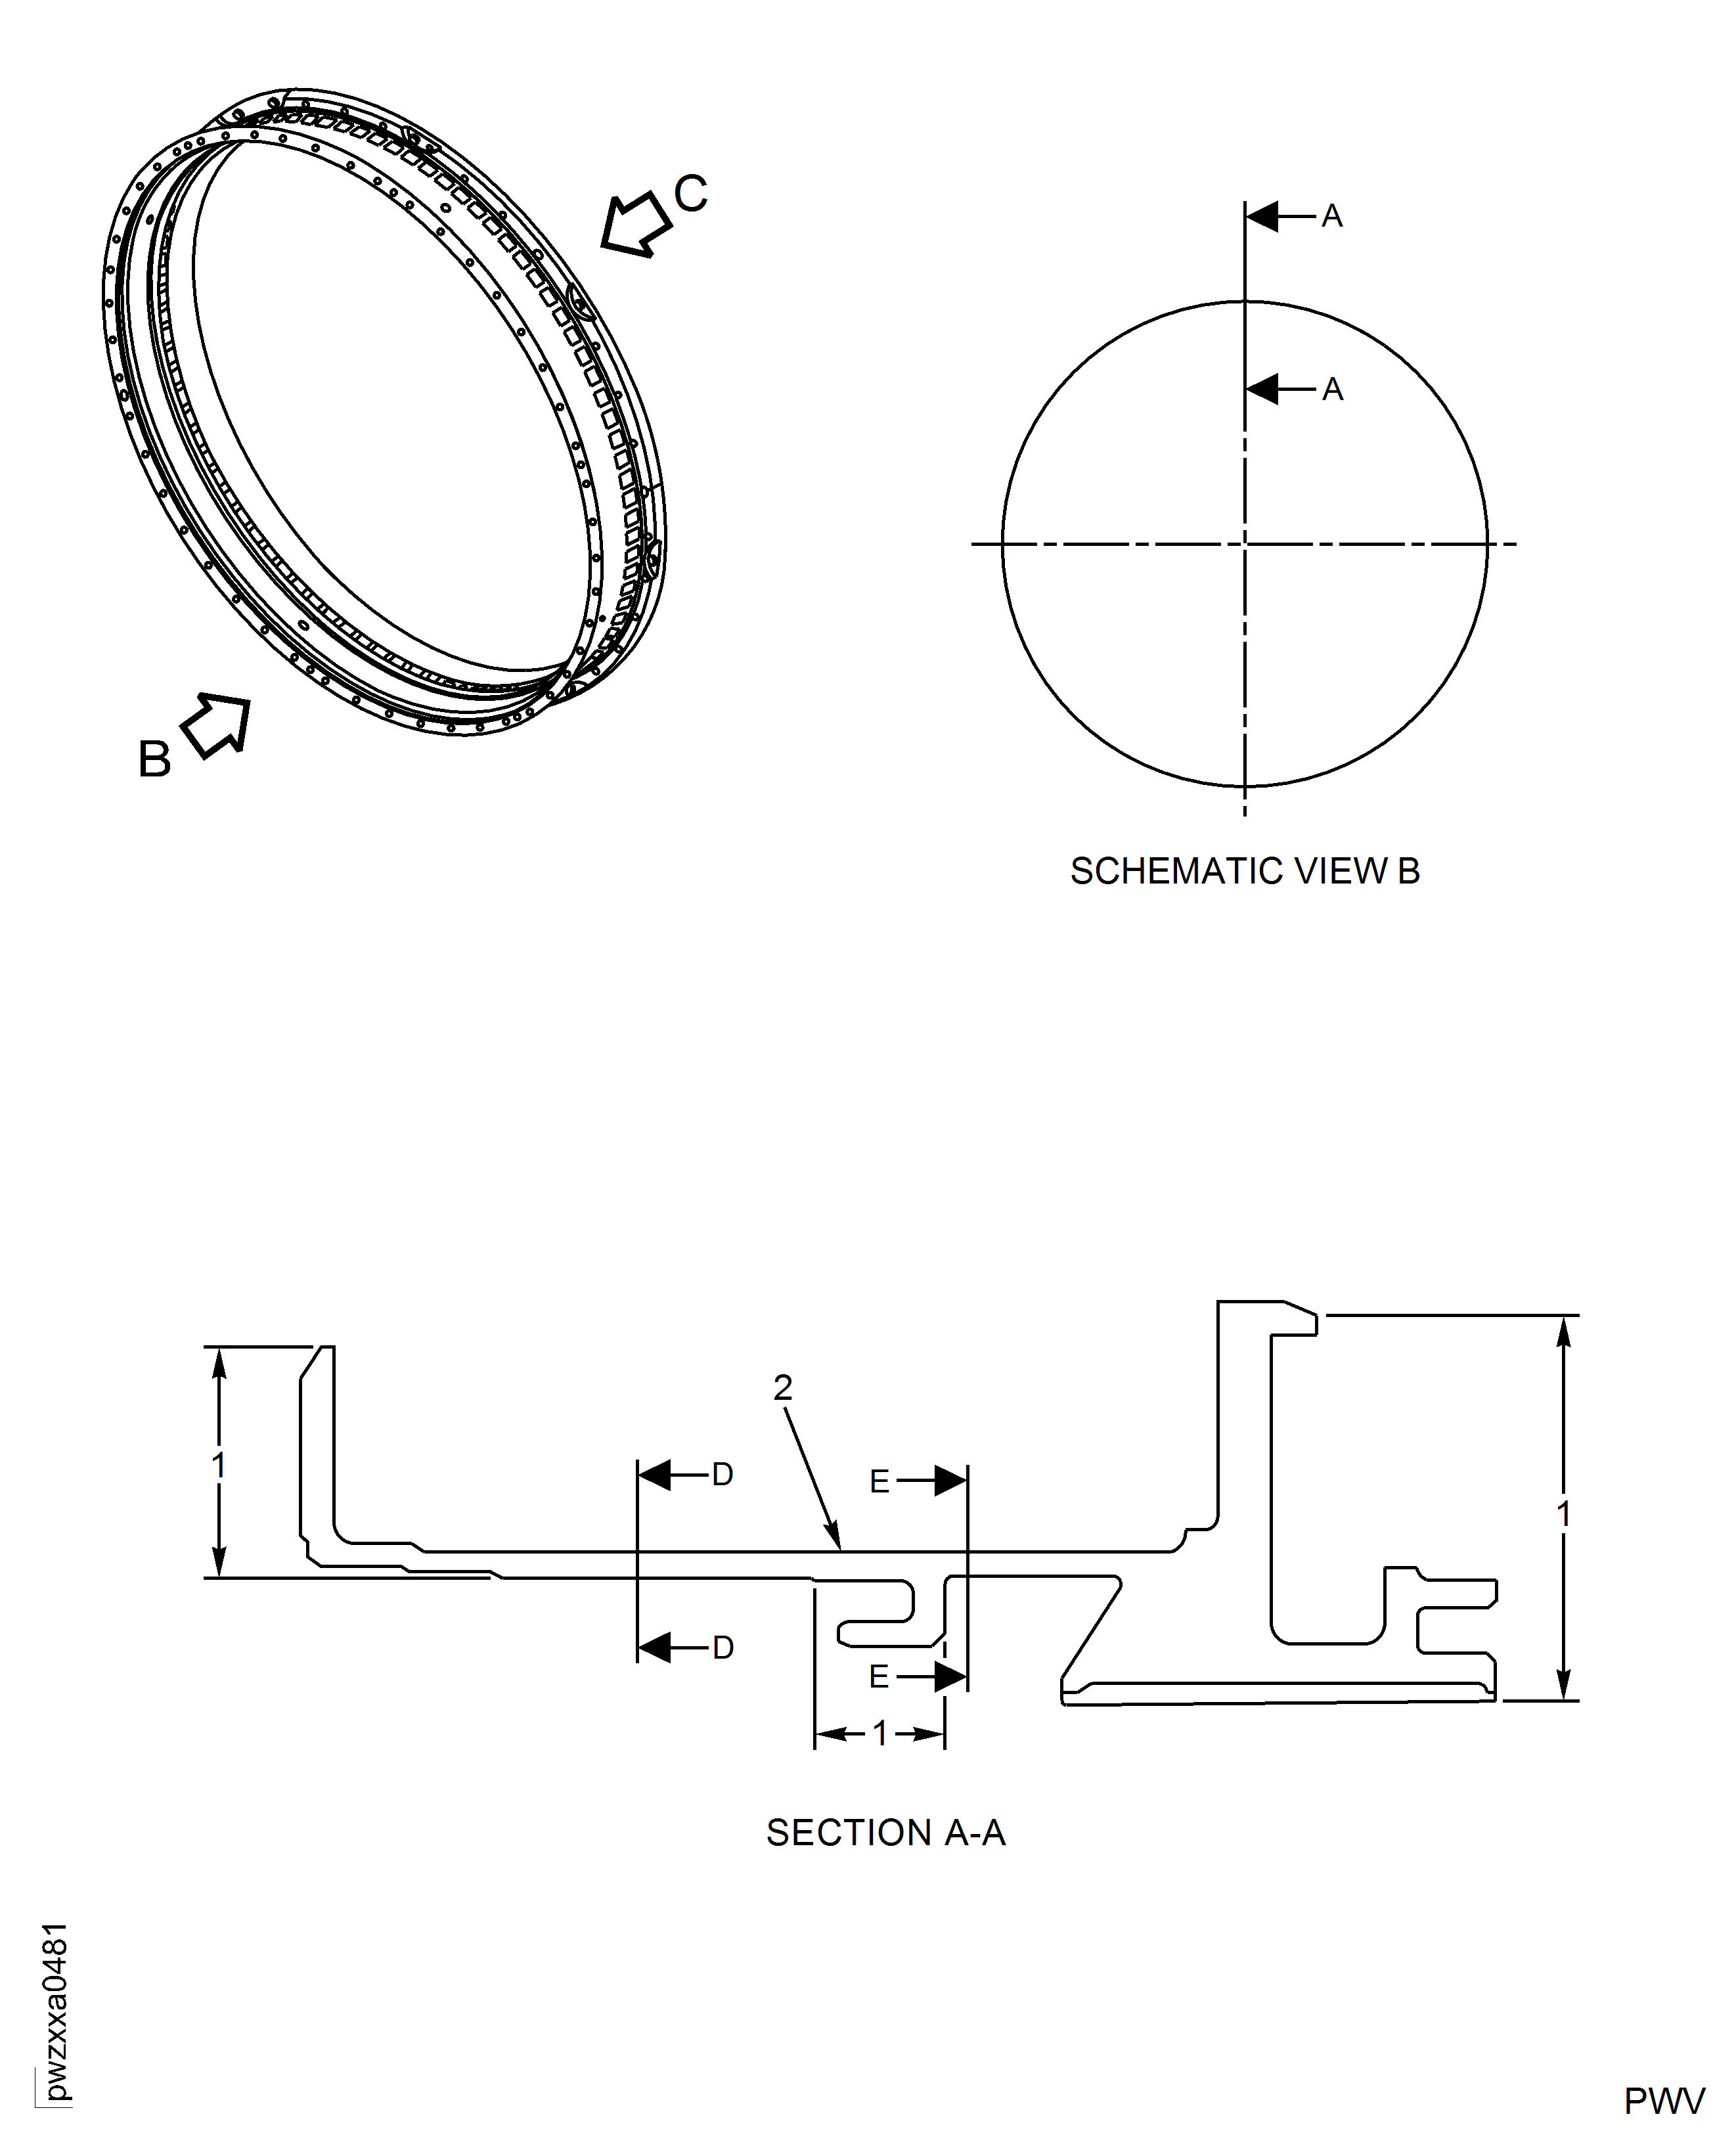
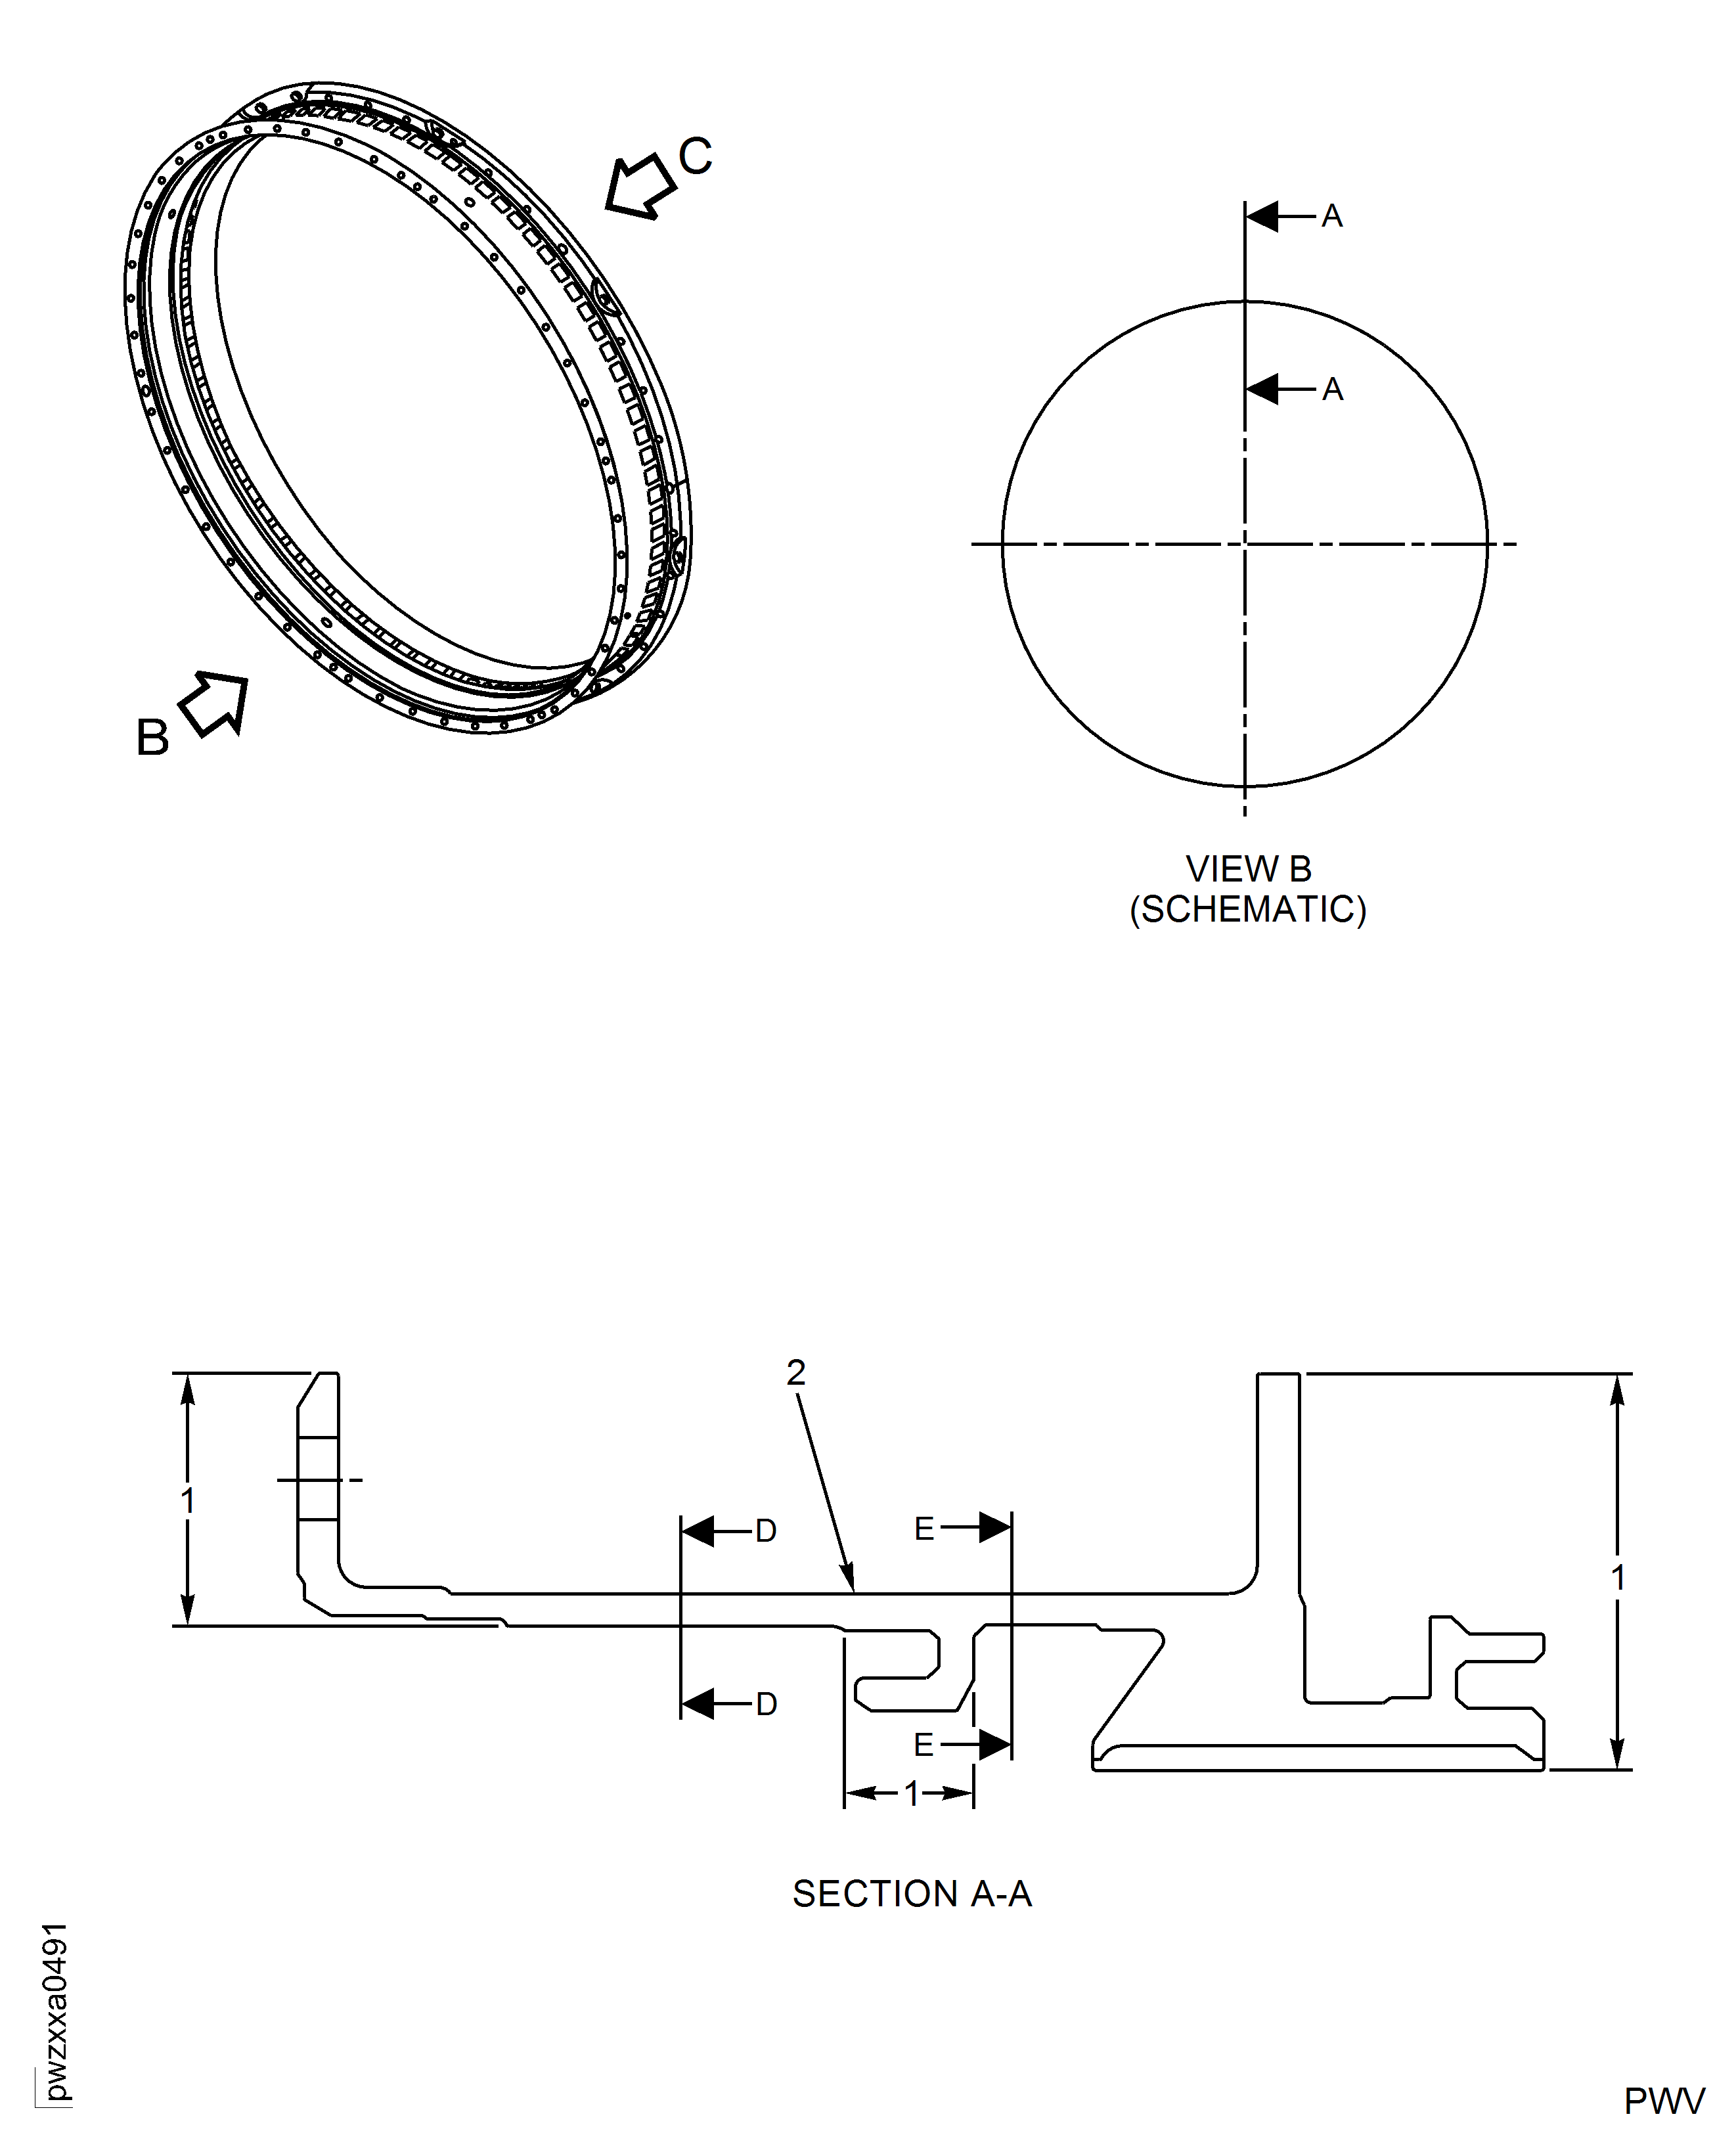
    (1) Area To Be Masked. Dry Abrasive Blast And Coat Not Allowed In These Areas And Holes.

    (2) Marking Location

    2

    Repair Details and Dimensions

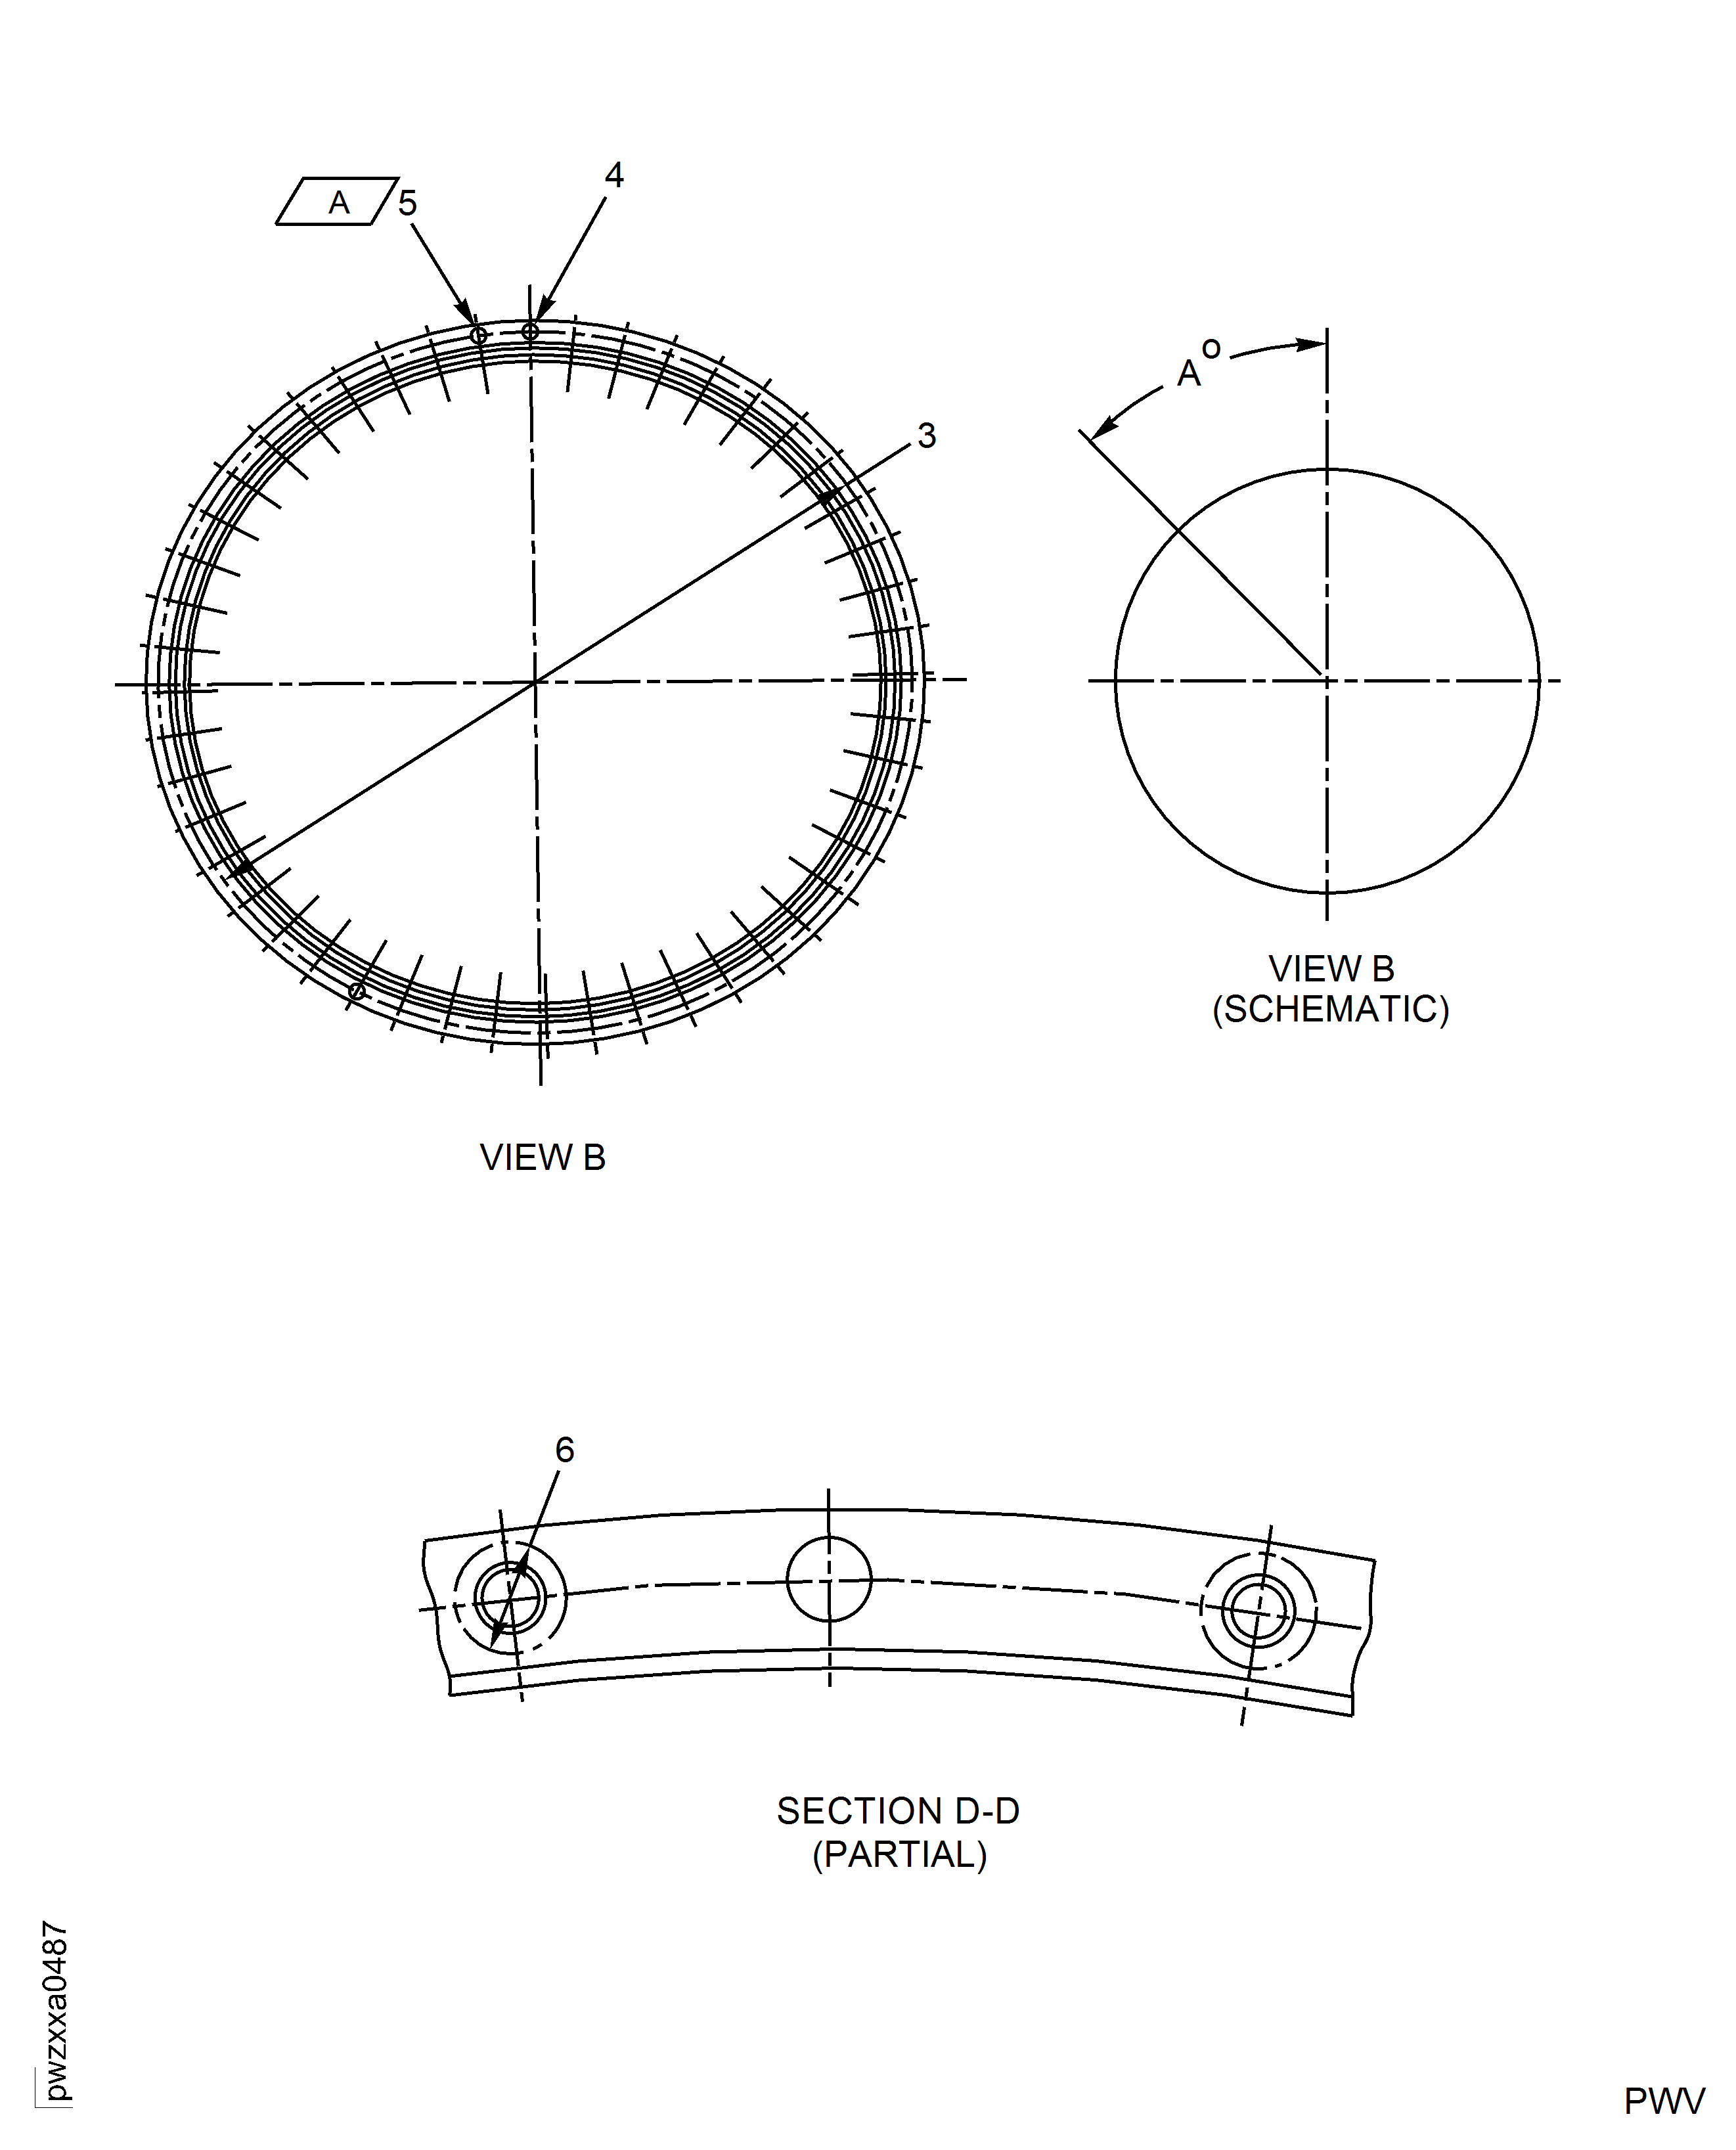
    (3) 22.028 Inch (559.50 mm) Basic Diameter, Reference.

    (4) Dowel Hole, 0.3150 Inch - 0.3158 Inch (8.000 mm - 8.022 mm) Diameter, Reference.

    (5) Hole Pattern A, 47 Locations, 0.220 Inch - 0.232 Inch (5.60 mm - 5.90 mm) Diameter, Reference. See Figure, Sheet 5 of 5.

    (6) Hole Pattern A, 47 Locations, 0.394 Inch - 0.472 Inch (10.00 mm - 12.00 mm) Diameter No Coat Zone Around Holes. Dry Abrasive Blast And Coat Not Allowed In These Areas And Holes.

    3

    Repair Details and Dimensions

    (3) 22.028 Inch (559.50 mm) Basic Diameter, Reference.

    (7) Dowel Hole, 0.1965 Inch - 0.1972 Inch (4.992 mm - 5.010 mm) Diameter, Reference.

    (8) Hole Pattern B, 28 Locations, 0.190 Inch - 0.193 Inch (4.836 mm - 4.912 mm) Diameter, Reference. See Figure, Sheet 5 of 5.

    (9) Hole Pattern C, 10 Locations, 0.2756 Inch - 0.2765 Inch (7.000 mm - 7.022 mm) Diameter, Reference. See Figure, Sheet 5 of 5.

    (10) 17.600 Degrees Basic Angle, Reference.

    (11) Hole Pattern B, 28 Locations, 0.394 Inch - 0.472 Inch (10.00 mm - 12.00 mm) Diameter No Coat Zone Around Holes. Dry Abrasive Blast And Coat Not Allowed In These Areas And Holes.

    (12) Hole Pattern C, 10 Locations, 0.512 Inch - 0.591 Inch (13.00 mm - 15.00 mm) Diameter No Coat Zone Around Holes. Dry Abrasive Blast And Coat Not Allowed In These Areas And Holes.

    4

    Repair Details and Dimensions

    (13) For PN 6A6548, PN 6A7529 And PN 6A7624, 1.024 Inches (26.00 mm), Reference.

    For PN 6A7578, 1.024 Inches (26.00 mm), Basic Dimension, Reference.

    (14) 0.250 Inch - 0.254 Inch (6.36 mm - 6.44 mm) Diameter, Reference.

    (15) 0.669 Inch - 0.748 Inch (17.00 mm - 19.00 mm) Diameter No Coat Zone Around Holes On Both Sides. Dry Abrasive Blast And Coat Not Allowed In These Areas And Holes, Typical 4 Locations.

    5

    Repair Details and Dimensions

    (1) Area To Be Masked. Dry Abrasive Blast And Coat Not Allowed In These Areas And Holes.

    (2) Marking Location

    (3) 22.028 Inch (559.50 mm) Basic Diameter, Reference.

    (4) Dowel Hole, 0.3150 Inch - 0.3158 Inch (8.000 mm - 8.022 mm) Diameter, Reference.

    (5) Hole Pattern A, 47 Locations, 0.220 Inch - 0.232 Inch (5.60 mm - 5.90 mm) Diameter, Reference. See Figure, Sheet 5 of 5.

    (6) Hole Pattern A, 47 Locations, 0.394 Inch - 0.472 Inch (10.00 mm - 12.00 mm) Diameter No Coat Zone Around Holes. Dry Abrasive Blast And Coat Not Allowed In These Areas And Holes.

    (7) Dowel Hole, 0.1965 Inch - 0.1972 Inch (4.992 mm - 5.010 mm) Diameter, Reference.

    (8) Hole Pattern B, 28 Locations, 0.190 Inch - 0.193 Inch (4.836 mm - 4.912 mm) Diameter, Reference. See Figure, Sheet 5 of 5.

    (9) Hole Pattern C, 10 Locations, 0.2756 Inch - 0.2765 Inch (7.000 mm - 7.022 mm) Diameter, Reference. See Figure, Sheet 5 of 5.

    (10) 17.600 Degrees Basic Angle, Reference.

    (11) Hole Pattern B, 28 Locations, 0.394 Inch - 0.472 Inch (10.00 mm - 12.00 mm) Diameter No Coat Zone Around Holes. Dry Abrasive Blast And Coat Not Allowed In These Areas And Holes.

    (12) Hole Pattern C, 10 Locations, 0.512 Inch - 0.591 Inch (13.00 mm - 15.00 mm) Diameter No Coat Zone Around Holes. Dry Abrasive Blast And Coat Not Allowed In These Areas And Holes.

    (13) For PN 6A6548, PN 6A7529 And PN 6A7624, 1.024 Inches (26.00 mm), Reference.

    For PN 6A7578, 1.024 Inches (26.00 mm), Basic Dimension, Reference.

    (14) 0.250 Inch - 0.254 Inch (6.36 mm - 6.44 mm) Diameter, Reference.

    (15) 0.669 Inch - 0.748 Inch (17.00 mm - 19.00 mm) Diameter No Coat Zone Around Holes On Both Sides. Dry Abrasive Blast And Coat Not Allowed In These Areas And Holes, Typical 4 Locations.

    Close

    Figure: Repair Details and Dimensions

    Repair Details and Dimensions
    Repair Details and Dimensions
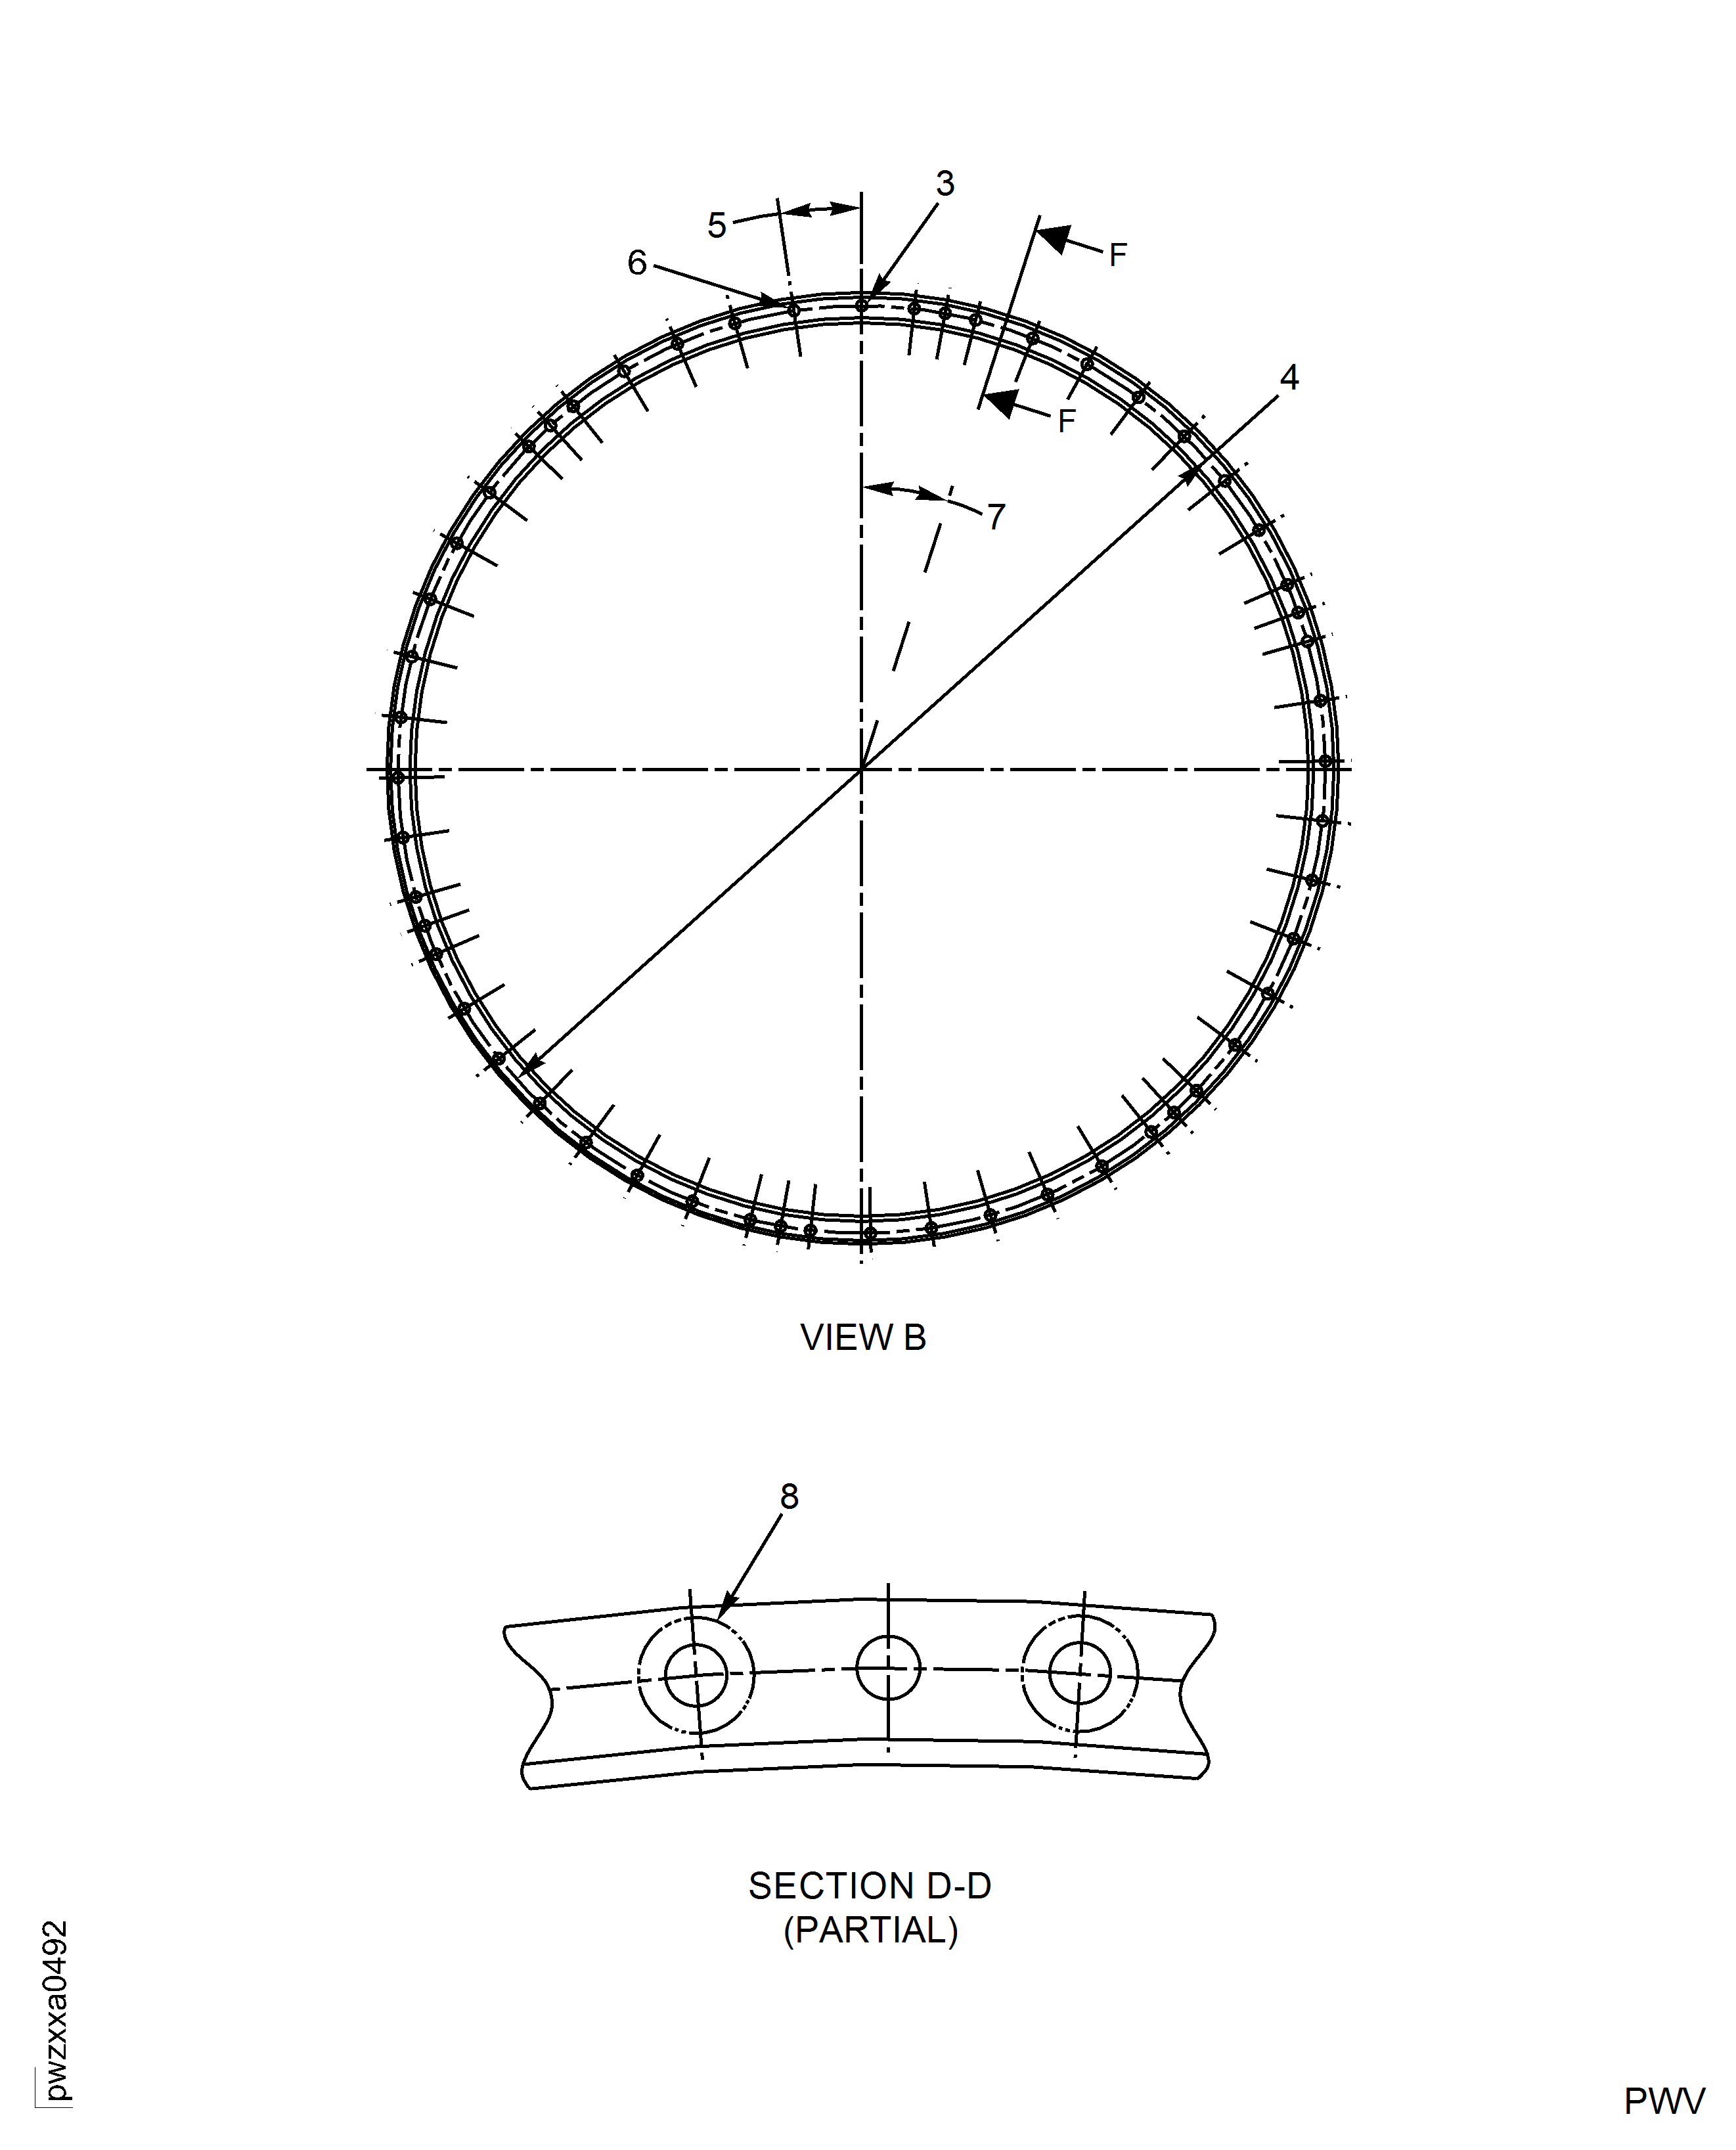
    Repair Details and Dimensions
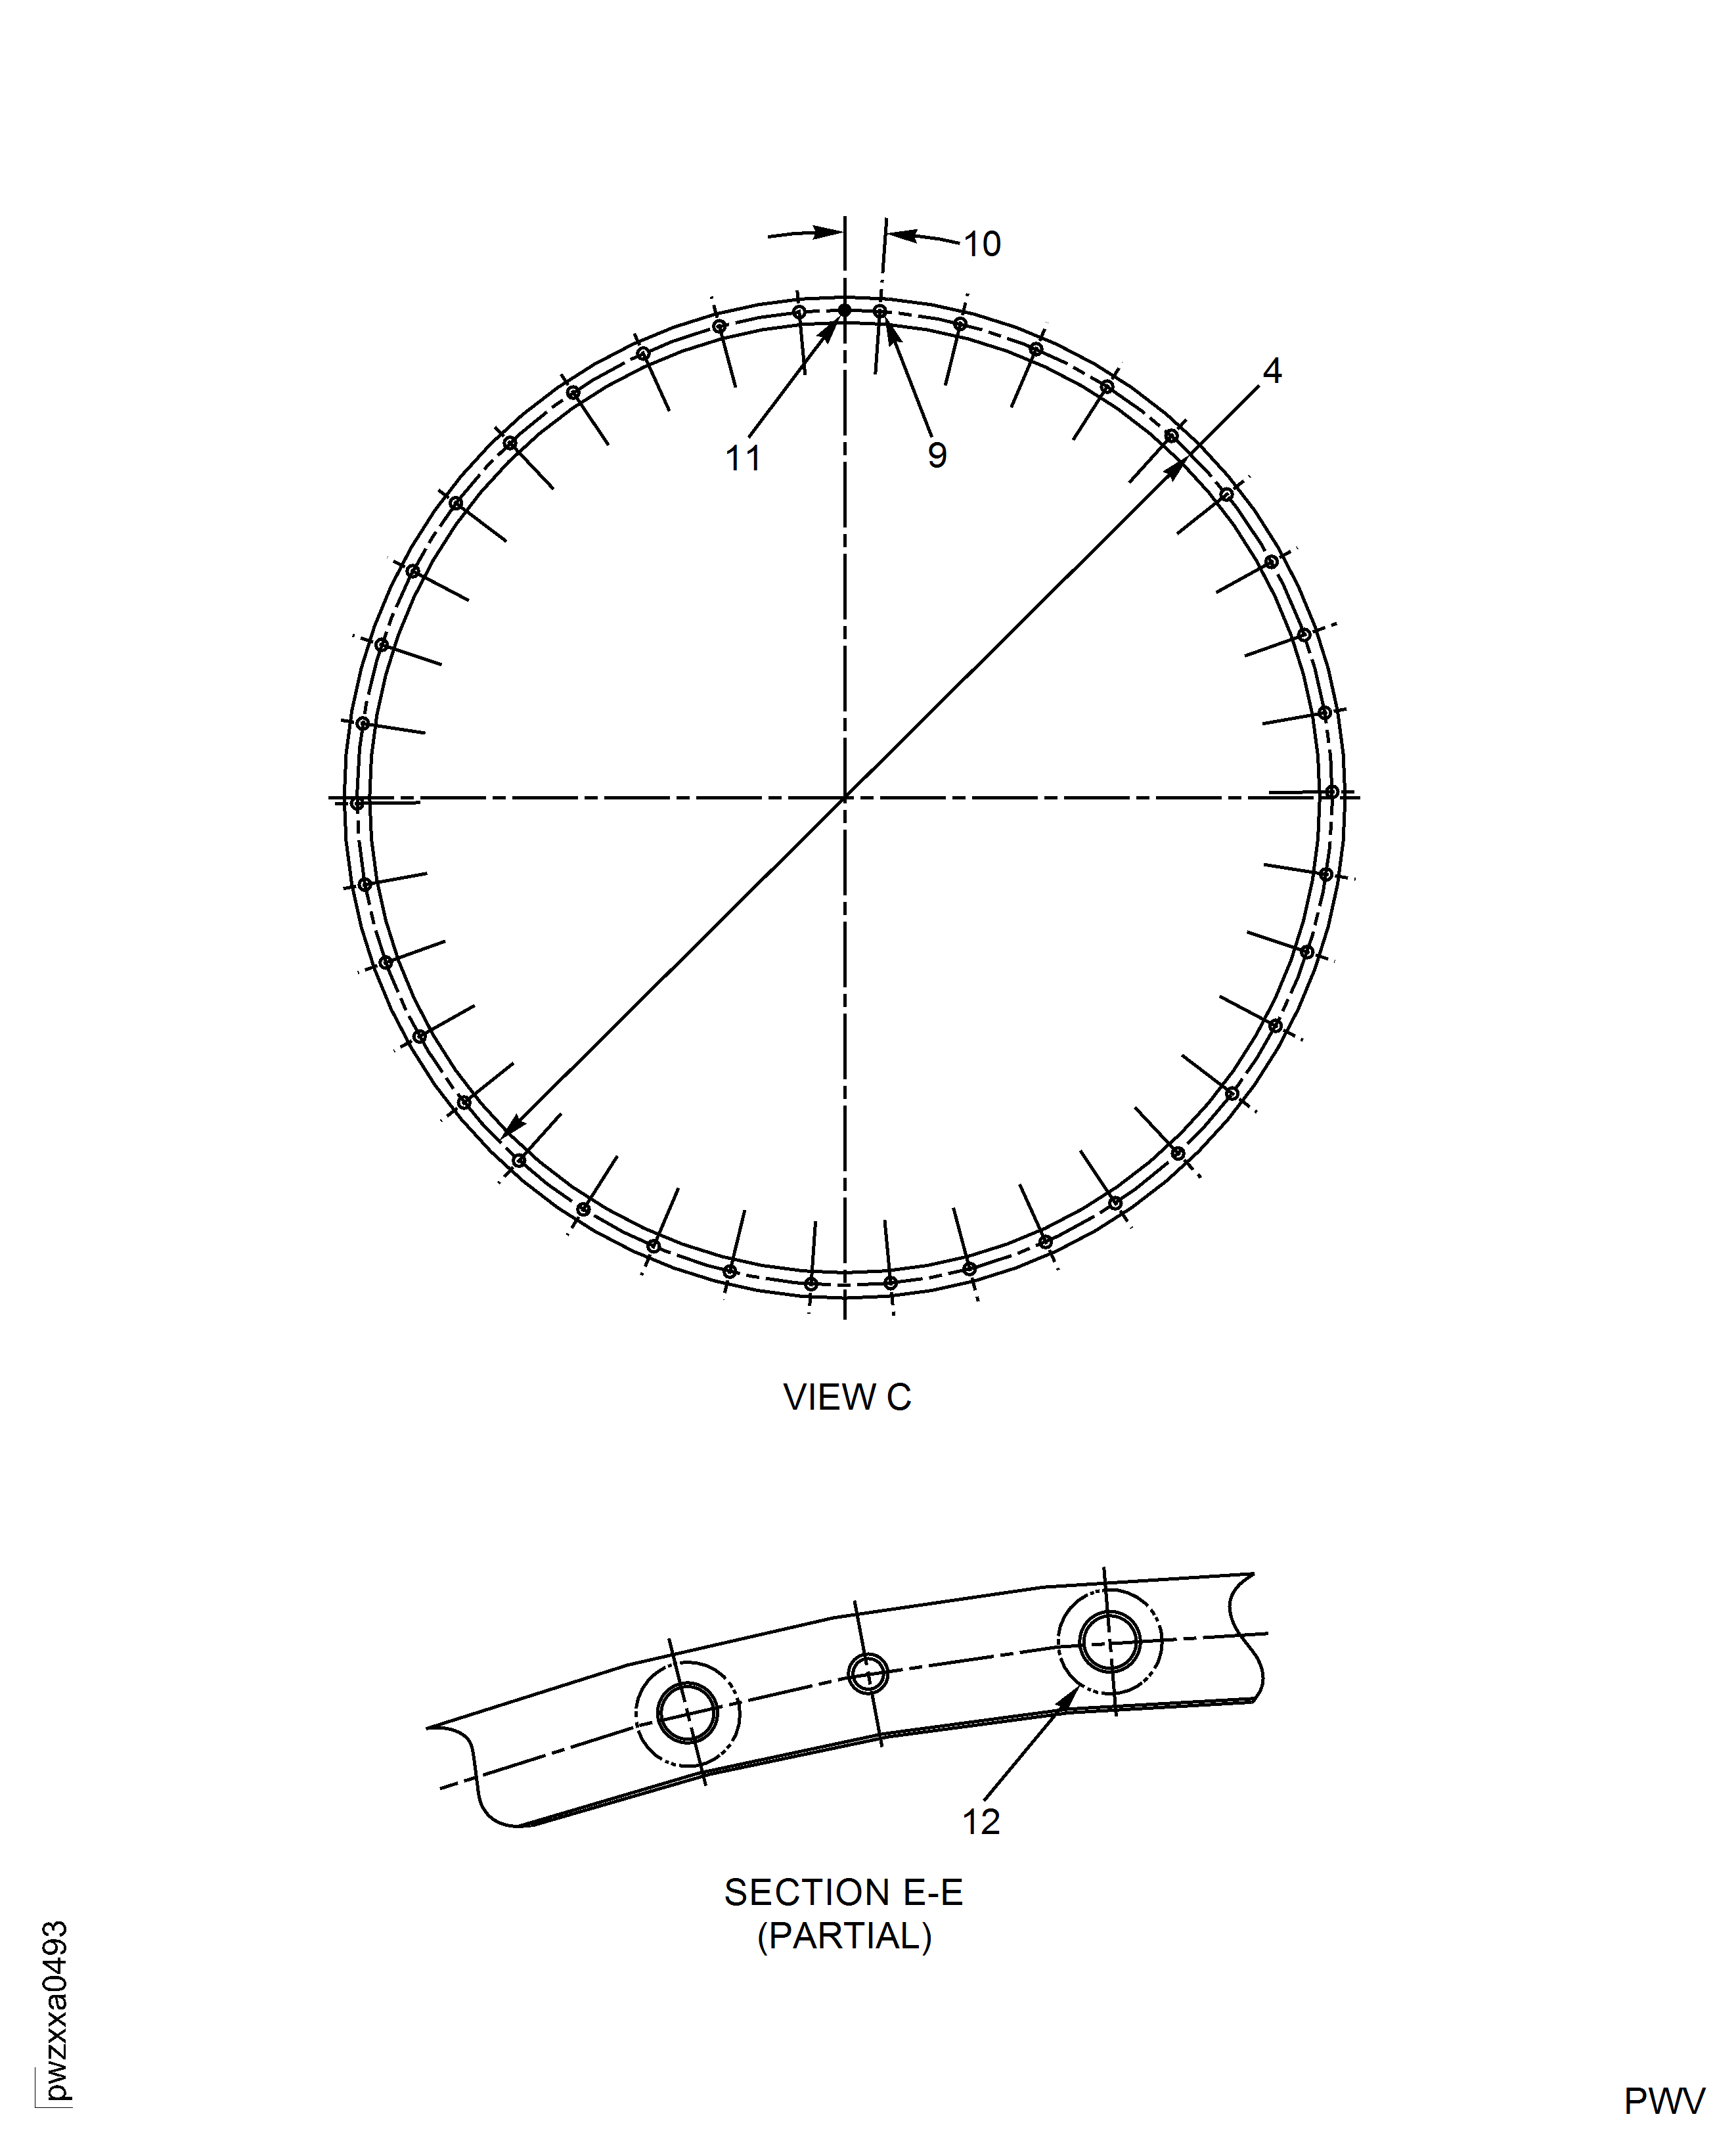
    Repair Details and Dimensions
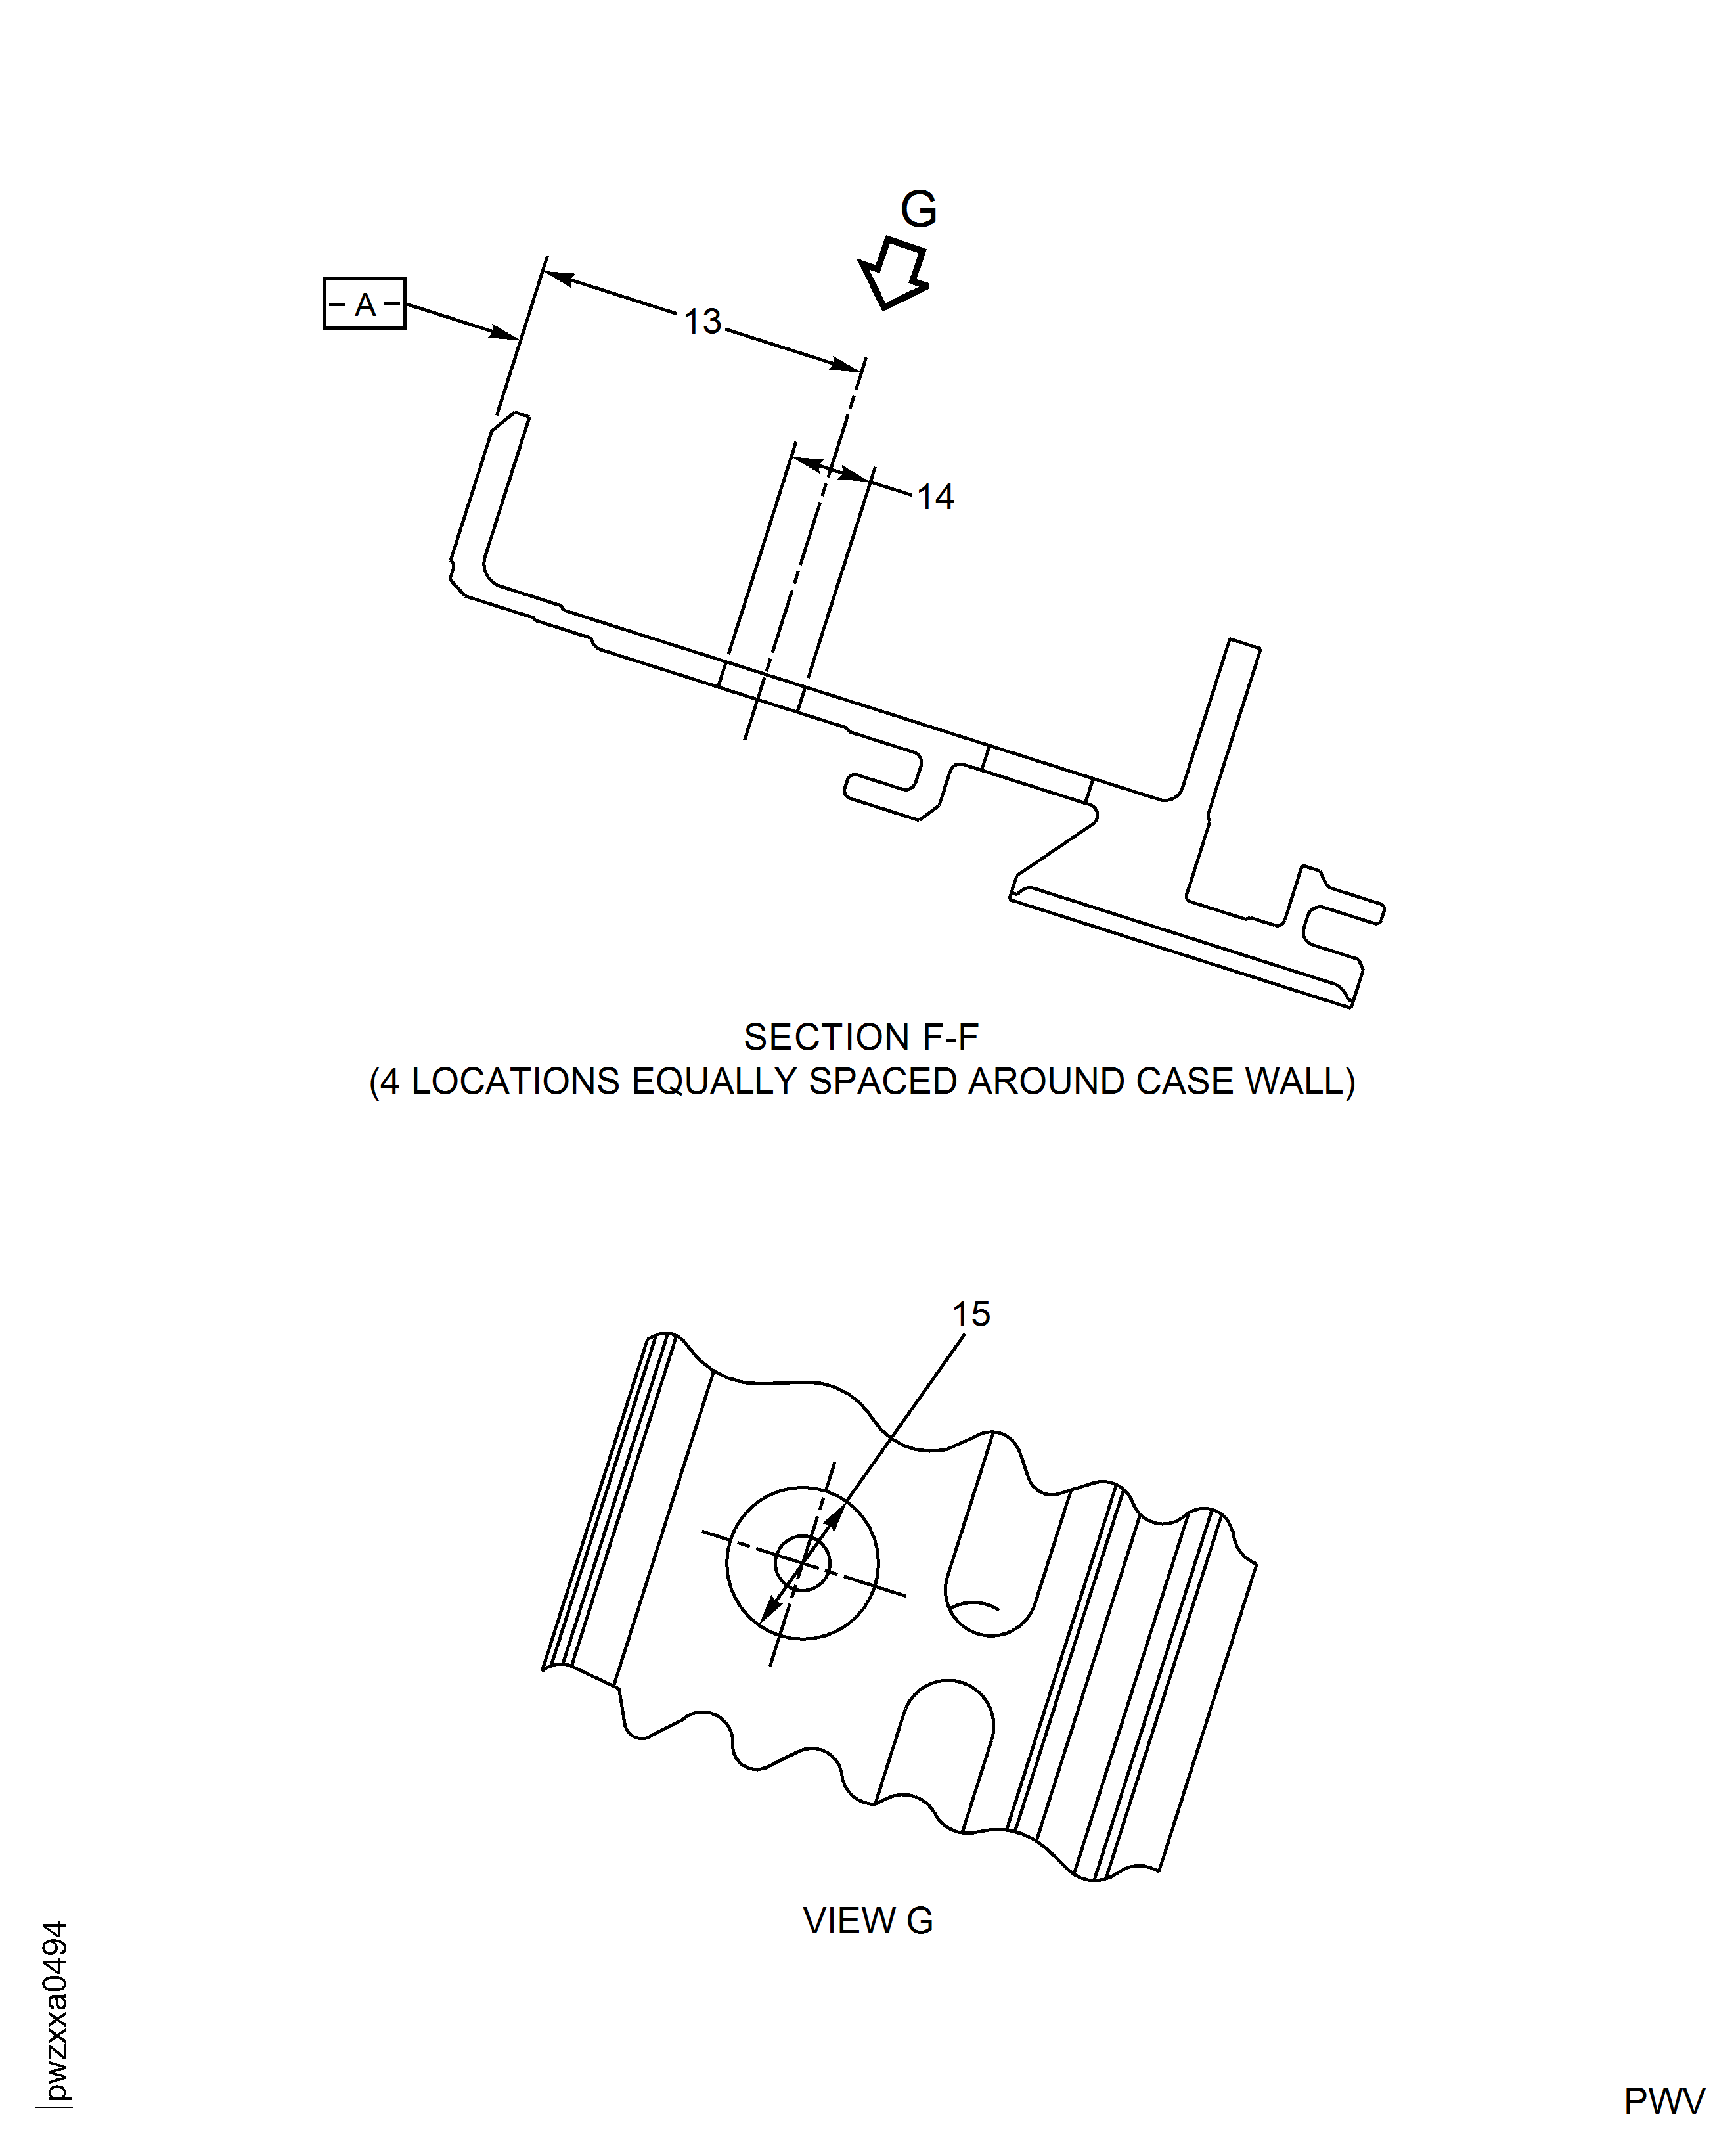
    Legend
    1

    Repair Details and Dimensions

    (1) Area To Be Masked. Dry Abrasive Blast And Coat Not Allowed In These Areas And Holes.

    (2) Marking Location

    2

    Repair Details and Dimensions

    (3) Dowel Hole, 0.164 Inch - 0.171 Inch (4.16 mm - 4.34 mm) Diameter, Reference.

    (4) 22.028 Inch (559.50 mm) Basic Diameter, Reference.

    (5) 8.500 Degrees, Basic Angle, Reference.

    (6) 0.220 Inch - 0.232 Inch (5.60 mm - 5.90 mm) Diameter, 47 Equally Spaced Holes, Reference.

    (7) 17.600 Degrees Basic Angle, Reference.

    (8) 0.394 Inch - 0.472 Inch (10.00 mm - 12.00 mm) Diameter No Coat Zone Around Holes, 47 Locations. Dry Abrasive Blast And Coat Not Allowed In These Areas And Holes.

    3

    Repair Details and Dimensions

    (4) 22.028 Inch (559.50 mm) Basic Diameter, Reference.

    (9) 0.220 Inch - 0.232 Inch (5.60 mm - 5.90 mm) Diameter, 38 Equally Spaced Holes, Reference.

    (10) 4.094 Degrees Basic Angle, Reference.

    (11) Dowel Hole, 0.1572 Inch - 0.1579 Inch (3.992 mm - 4.010 mm) Diameter, Reference.

    (12) 0.394 Inch - 0.472 Inch (10.00 mm - 12.00 mm) Diameter No Coat Zone Around Holes, 38 Locations. Dry Abrasive Blast And Coat Not Allowed In These Areas And Holes.

    4

    Repair Details and Dimensions

    (13) 1.024 Inches (26.00 mm) Basic Axial Distance, Reference.

    (14) 0.250 Inch - 0.254 Inch (6.36 mm - 6.44 mm) Diameter, Reference.

    (15) 0.669 Inch - 0.748 Inch (17.00 mm - 19.00 mm) Diameter No Coat Zone Around Holes On Both Sides. Dry Abrasive Blast And Coat Not Allowed In These Areas And Holes, Typical 4 Locations.

    Close

Requirements After Job Completion

Follow-On Conditions

NONE
Change Type:

Revised the procedure in its entirety. (16VG014)

Manufacturer Code:0W199
Enterprise Name:THE SHERWIN-WILLIAMS CO
BU Name:THE SHERWIN-WILLIAMS CO
Street:2390 ARBOR BOULEVARD
City:DAYTON
State:OH
Zip Code:45439
Country:USA
Phone Number:1-937-298-8691
Fax Number:1-937-298-3820
Internet:www.sherwin-williams.com, www.sherwin.com
Manufacturer Code:53012
Enterprise Name:COATINGS FOR INDUSTRY INC
BU Name:COATINGS FOR INDUSTRY INC
Street:319 TOWNSHIP LINE ROAD
City:SOUDERTON
State:PA
Zip Code:18964
Country:USA
Phone Number:1-215-723-0919
Fax Number:1-215-723-0911
Internet:www.coating4ind.com
Manufacturer Code:LOCAL
Enterprise Name:LOCALLY SUPPLIED
Manufacturer Code:LOCAL
Supply Number:CoMat 06-073
Type:sp01
Supply Short Name:CoMat 06-073 INK, METAL MARKING
Supply Name:CoMat 06-073 INK, METAL MARKING
Suppliers:
ManufacturerRemarks
LOCAL
Manufacturer Code:LOCAL
Supply Number:CoMat 07-035
Type:sp01
Supply Short Name:CoMat 07-035 CORROSION RESISTANT COATING
Supply Name:CoMat 07-035 CORROSION RESISTANT COATING
Specification Groups:
Doc NumberType
OMAT:7/46B (RR REF)
JCR-030 (JAEC REF)
IPCOTE 9183 RI
Suppliers:
ManufacturerRemarks
LOCAL
IE200
K3504
00BB6
Manufacturer Code:00BB6
Supply Number:CoMat 07-104
Type:sp01
Supply Short Name:CoMat 07-104 ALUMINIUM HIGH HEAT RESISTANT PAINT
Supply Name:CoMat 07-104 ALUMINIUM HIGH HEAT RESISTANT PAINT
Specification Groups:
Doc NumberType
IP 9253-R2
Suppliers:
ManufacturerRemarks
00BB6
K3504
Manufacturer Code:0W199
Supply Number:CoMat 07-125
Type:sp01
Supply Short Name:CoMat 07-125 LACQUER
Supply Name:CoMat 07-125 LACQUER
Specification Groups:
Doc NumberType
PMC 1641CRYSTAL CLEAR ACRYLIC SPRAY 1303
Suppliers:
ManufacturerRemarks
0W199
Manufacturer Code:53012
Supply Number:CoMat 07-175
Type:sp01
Supply Short Name:CoMat 07-175 COATING COMPOUND -ALUMINUM, INORGANIC BINDER
Supply Name:CoMat 07-175 COATING COMPOUND - ALUMINUM, INORGANIC BINDER
Specification Groups:
Doc NumberType
PWA 36595 (PW REF)ALSEAL 5K
Suppliers:
ManufacturerRemarks
53012