Export Control
EAR Export Classification: Not subject to the EAR per 15 C.F.R. Chapter 1, Part 734.3(b)(3), except for the following Service Bulletins which are currently published as EAR Export Classification 9E991: SBE70-0992, SBE72-0483, SBE72-0580, SBE72-0588, SBE72-0640, SBE73-0209, SBE80-0024 and SBE80-0025.Copyright
© IAE International Aero Engines AG (2001, 2014 - 2021) The information contained in this document is the property of © IAE International Aero Engines AG and may not be copied or used for any purpose other than that for which it is supplied without the express written authority of © IAE International Aero Engines AG. (This does not preclude use by engine and aircraft operators for normal instructional, maintenance or overhaul purposes.).Applicability
All
Common Information
TASK 72-41-21-300-002 HPC Stage 7 Rotor Path Ring - Repair Surface Damage (And Cone Assembly) By Material Removal, Repair-002 (VRS6092)
Effectivity
FIG/ITEM | PART NO. | ASSEMBLY |
|---|---|---|
03-300 | 6A6540 | C |
03-300 | 6A7577 | C |
03-300 | 6B1430 | D |
03-450 | 6A3651 | A |
03-450 | 6A4101 | A |
03-450 | 6A4161 | B |
03-450 | 6A5992 | A |
03-450 | 6A5995 | B |
03-450 | 6A7623 | B |
03-450 | 6A7626 | A |
Material of component
PART IDENT | MATERIAL |
|---|---|
HP Compressor Stage 7 Rotor Path Ring (and Cone Assembly) | Corrosion resistant steel |
General
This Repair must only be done when the instruction to do so is given in inspection procedures (identified by the applicable part number) located in section 72-41-21.
This TASK gives the procedure to repair to remove surface damage on the HP Compressor Stage 7 Rotor Path Ring (and Cone Assembly) by material removal.
TASKS identified by SPM TASK are in the Standard Practices Manual (SPM).
Price and availability
Refer to International Aero engines (IAE).
Related Repairs
HP Compressor Stage 7 Rotor Path Ring (and Cone Assembly) - Replace Surface Protection, refer to Repair, VRS6161 TASK 72-41-21-300-004.
NOTE
NOTE
NOTE
NOTE
Preliminary Requirements
Pre-Conditions
NONESupport Equipment
| Name | Manufacturer | Part Number / Identification | Quantity | Remark |
|---|---|---|---|---|
| Chemical cleaning equipment | LOCAL | Chemical cleaning equipment | ||
| Penetrant Crack Test Equipment | LOCAL | Penetrant crack test equipment | ||
| Standard workshop equipment | LOCAL | Standard workshop equipment | ||
| Workshop inspection equipment | LOCAL | Workshop inspection equipment | ||
| Lathe | LOCAL | Lathe | ||
| Jig boring machine | LOCAL | Jig boring machine | ||
| Dial test indicator | LOCAL | Dial test indicator |
Consumables, Materials and Expendables
| Name | Manufacturer | Part Number / Identification | Quantity | Remark |
|---|---|---|---|---|
| CoMat 05-106 ABRASIVE STONE | K6835 | CoMat 05-106 | ||
| CoMat 05-074 ALUMINIUM OXIDE ABRASIVE PAPER | 06565 | CoMat 05-074 | ||
| CoMat 05-111 EMERY POLISHING PAPER | 06565 | CoMat 05-111 | ||
| CoMat 06-064 FLUORESCENT PENETRANT (WATER WASHABLE MEDIUM SENSITIVITY) | LOCAL | CoMat 06-064 | ||
| CoMat 07-037 CORROSION RESISTANT TOUCH-UP COATING | LOCAL | CoMat 07-037 | ||
| CoMat 07-038 AIR DRYING ENAMEL | k3504 | CoMat 07-038 |
Spares
NONESafety Requirements
NONEProcedure
Refer to the SPM TASK 70-11-03-300-503.
Chemically clean the part.
SUBTASK 72-41-21-110-204 Chemically Clean
Refer to SPM TASK 70-35-03-300-501.
The diameter of the repaired areas is to be 50 times the depth. The maximum depth of the repaired areas is to be 0.028 in. (0.71 mm).
Remove the damage at locations 1 to 3, 1145, 1180 and all remaining surfaces as necessary.
Refer to SPM TASK 70-35-03-300-501.
Remove all sharp corners and sudden changes of the slope.
Blend the area(s) of repair.
Refer to SPM TASK 70-35-03-300-501.
Polish the repaired area and the areas made smooth.
Make sure all the scratches are removed and the surface finish is the same as the adjacent material.
Polish the area(s) of repair.
SUBTASK 72-41-21-350-076 Remove the Damage by Blending
Use vertical Lathe or Jig boring machine with locally sourced machining fixture.
Set face to be machined, true to datums with Dial test indicator.
Machine only damaged holes.
Remove only the minimum amount of material required to remove damage, up to the maximum size.
Machine the damage at the hole inner diameter at locations 4 and 1186 (Assembly A and Assembly B) and locations 4, 5, 6 and 7 (Assembly C and Assembly D) as necessary.
Boltholes 5 of Assembly C, front side only and location dowel hole of Assembly C, rear side only.
Boltholes 6 of Assembly D, front side only.
In the following holes only:
Re-introduce hole chamfers as necessary.
Use hand tools.
Remove sharp edges and/or burrs.
SUBTASK 72-41-21-320-005 Remove the Damage to the Boltholes by Machining
Refer to the SPM TASK 70-11-26-300-503.
Use chemical cleaning equipment.
Chemically clean the part.
SUBTASK 72-41-21-110-263 Chemically Clean
Make sure the surface finish is 125 microinches (3.2 micrometers) or better.
Make sure the holes are not larger than the maximum allowed diameter.
Continue with Step.
If surface damage is removed.
Do a visual and dimensional inspection of the machined bolthole(s).
SUBTASK 72-41-21-220-223 Examine the Repaired Area
Refer to the SPM TASK 70-11-26-300-503.
Chemically clean the part.
Refer to the SPM TASK 70-11-39-300-503, SUBTASK 70-11-39-300-001.
Swab etch the repaired area(s).
SUBTASK 72-41-21-110-264 Do a Swab Etch
Refer to the SPM TASK 70-23-05-230-501.
Cracks are not permitted.
Do a local penetrant crack test on the repaired area(s).
SUBTASK 72-41-21-230-243 Do a Crack Test
Refer to Repair, VRS6161 TASK 72-41-21-300-004 (REPAIR-004).
Apply surface protection to the repaired areas where the surface protection is removed.
SUBTASK 72-41-21-380-055 Apply Surface Protection to Repaired Areas as necessary
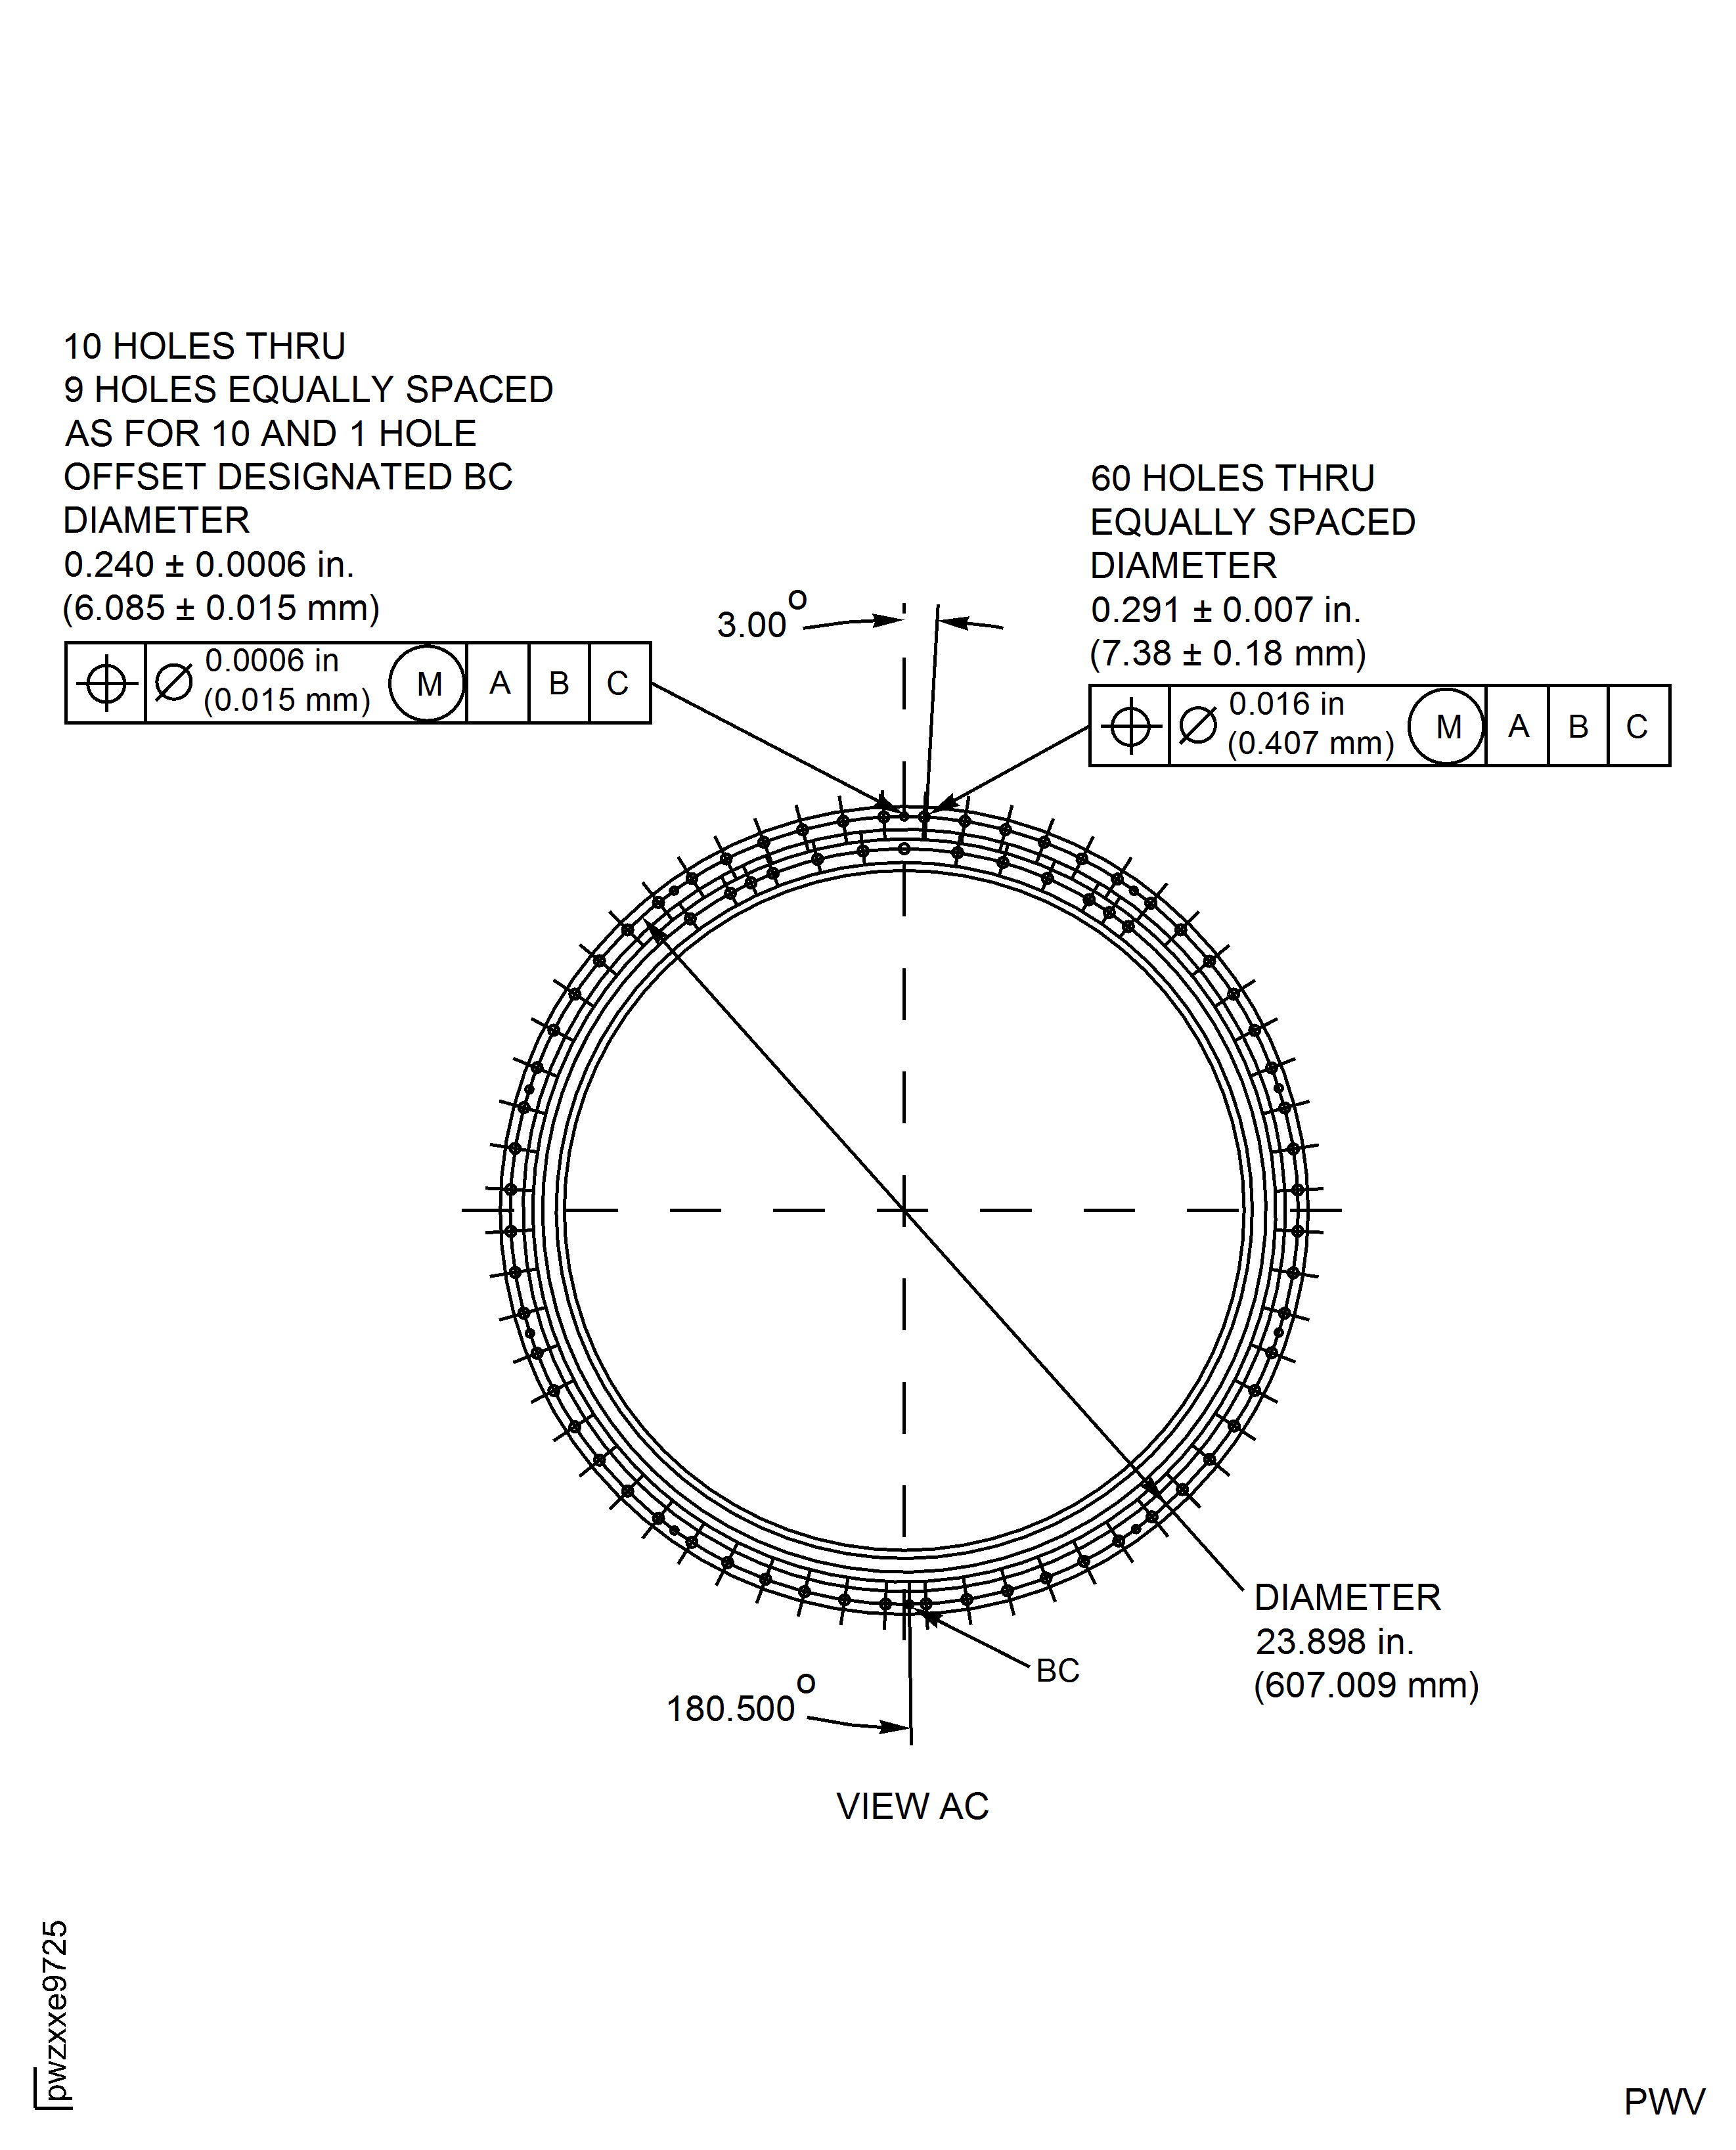
Figure: Repair Details and Dimensions
Repair Details and Dimensions

Figure: Repair Details and Locations - Assembly A and Assembly B
Repair Details and Locations - Assembly A and Assembly B
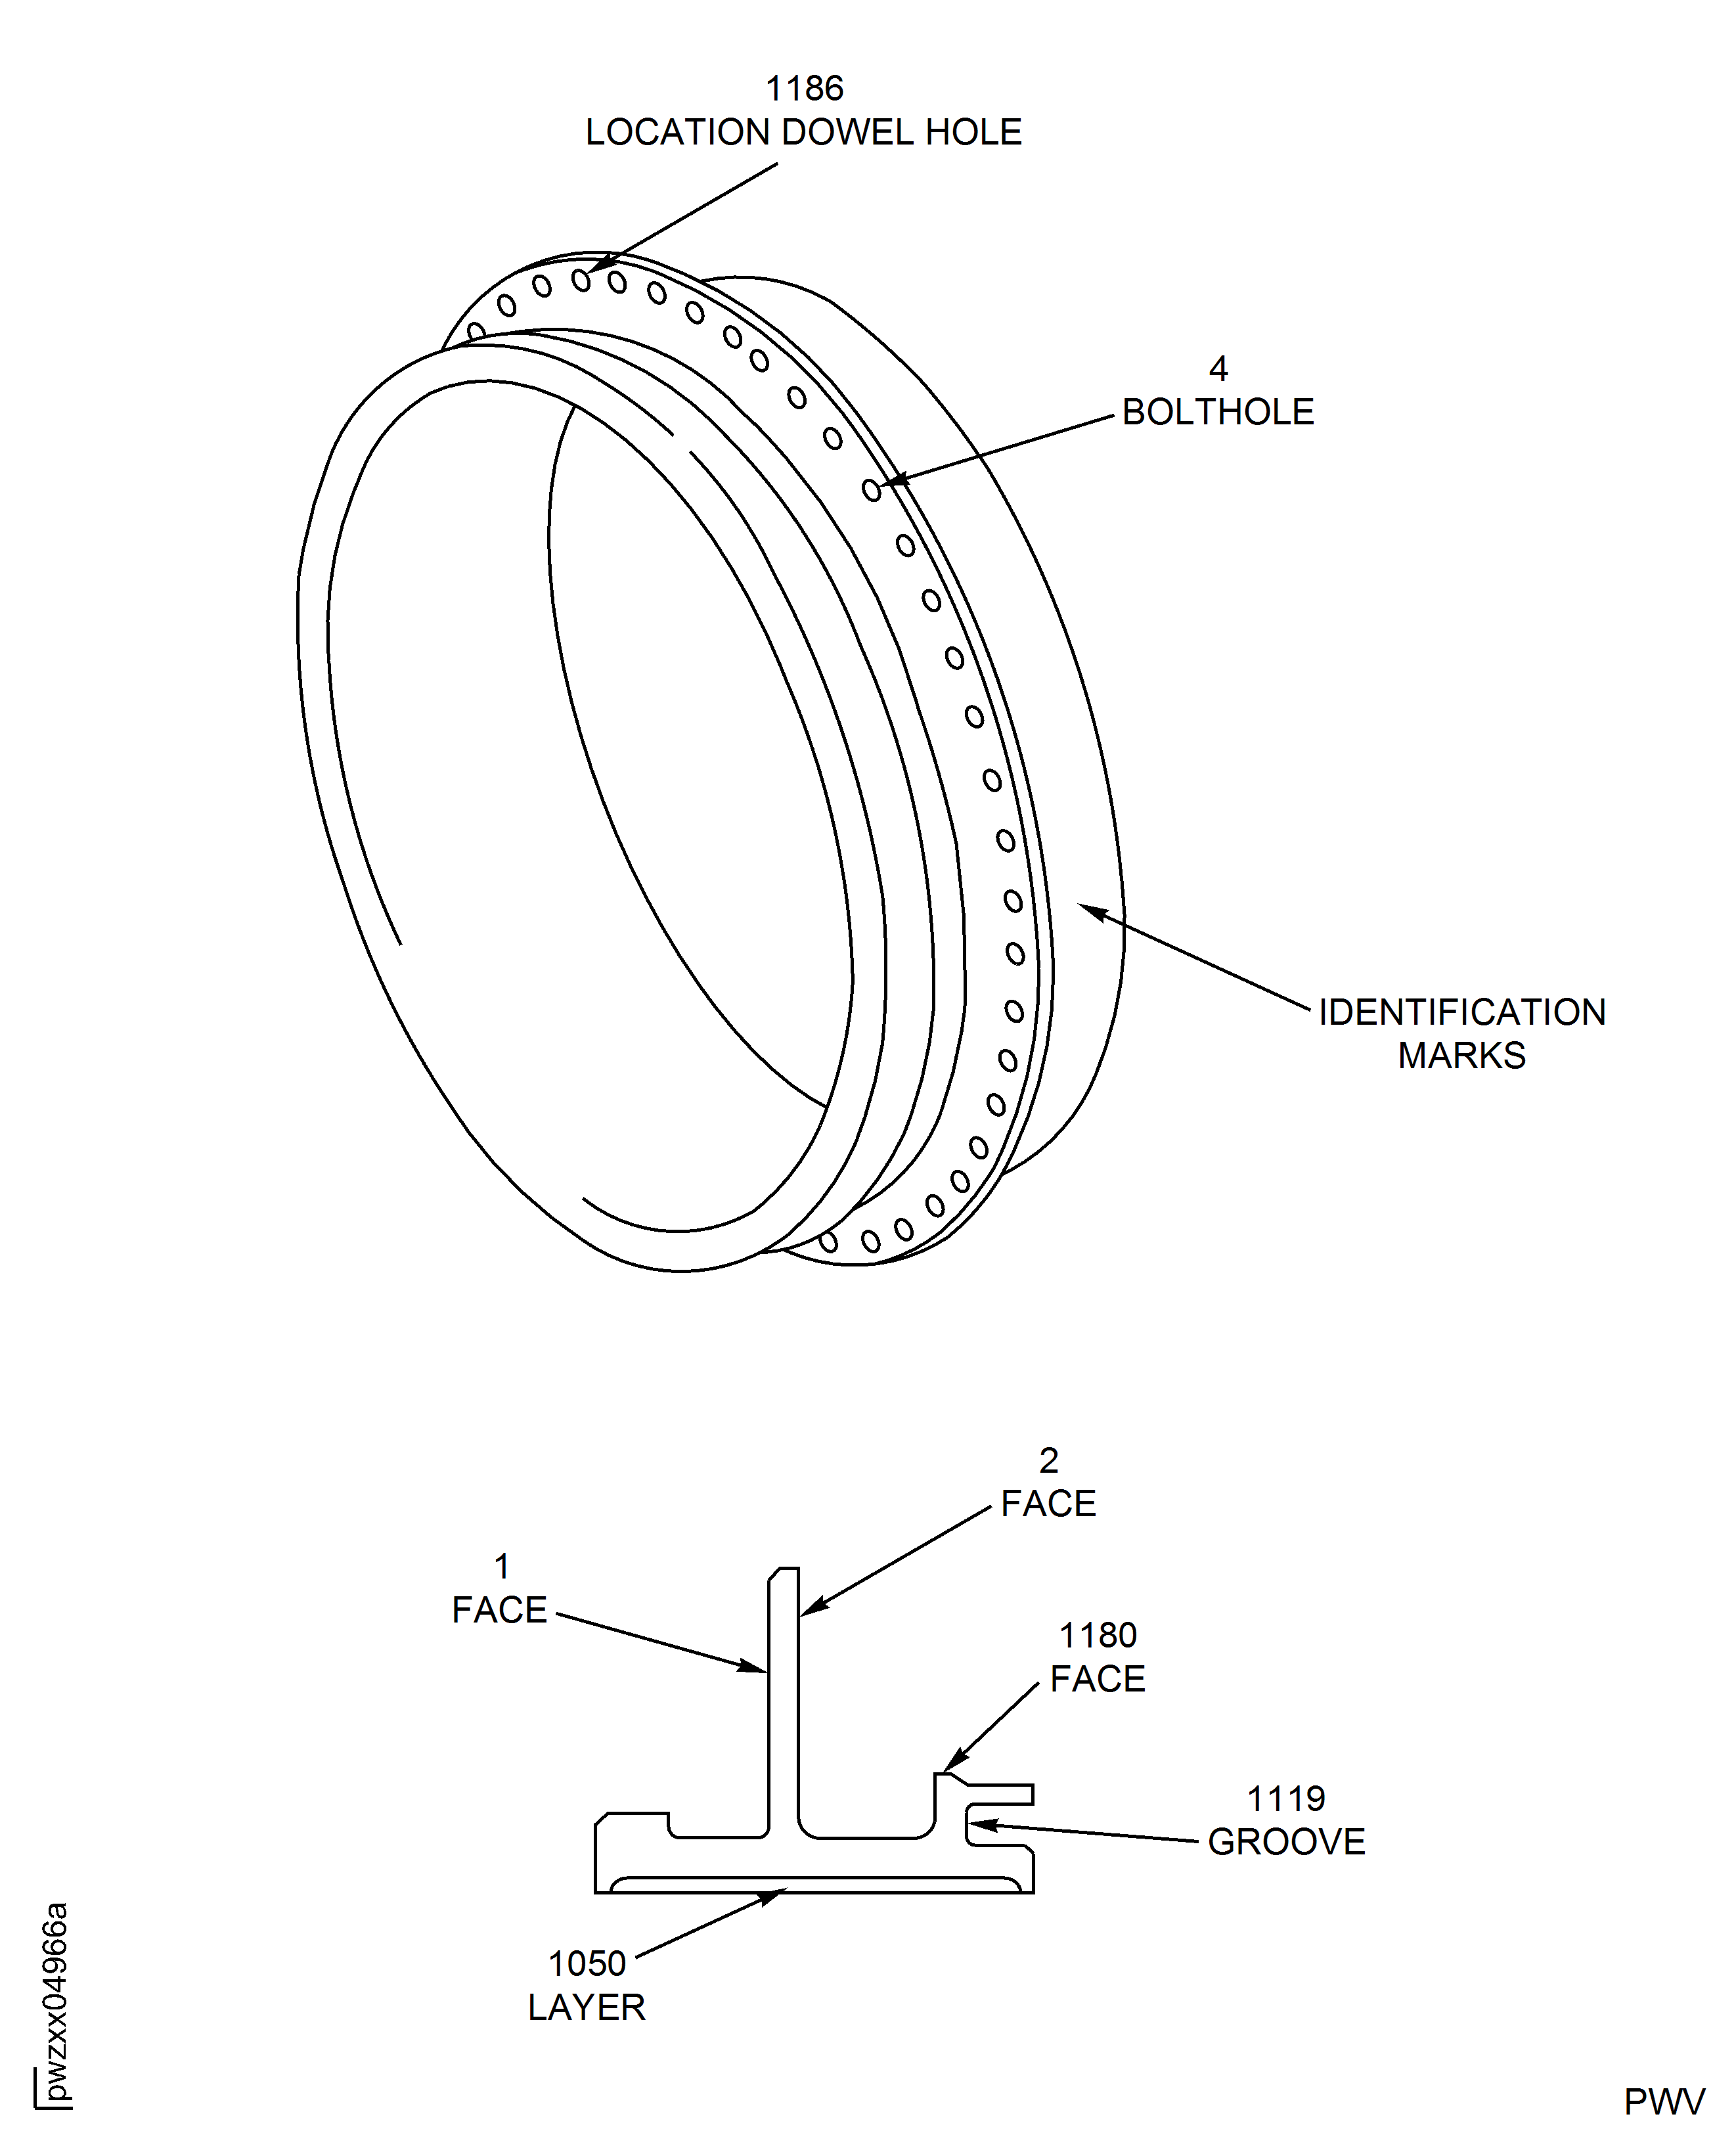
Figure: Repair Details and Locations - Assembly C and Assembly D
Repair Details and Locations - Assembly C and Assembly D
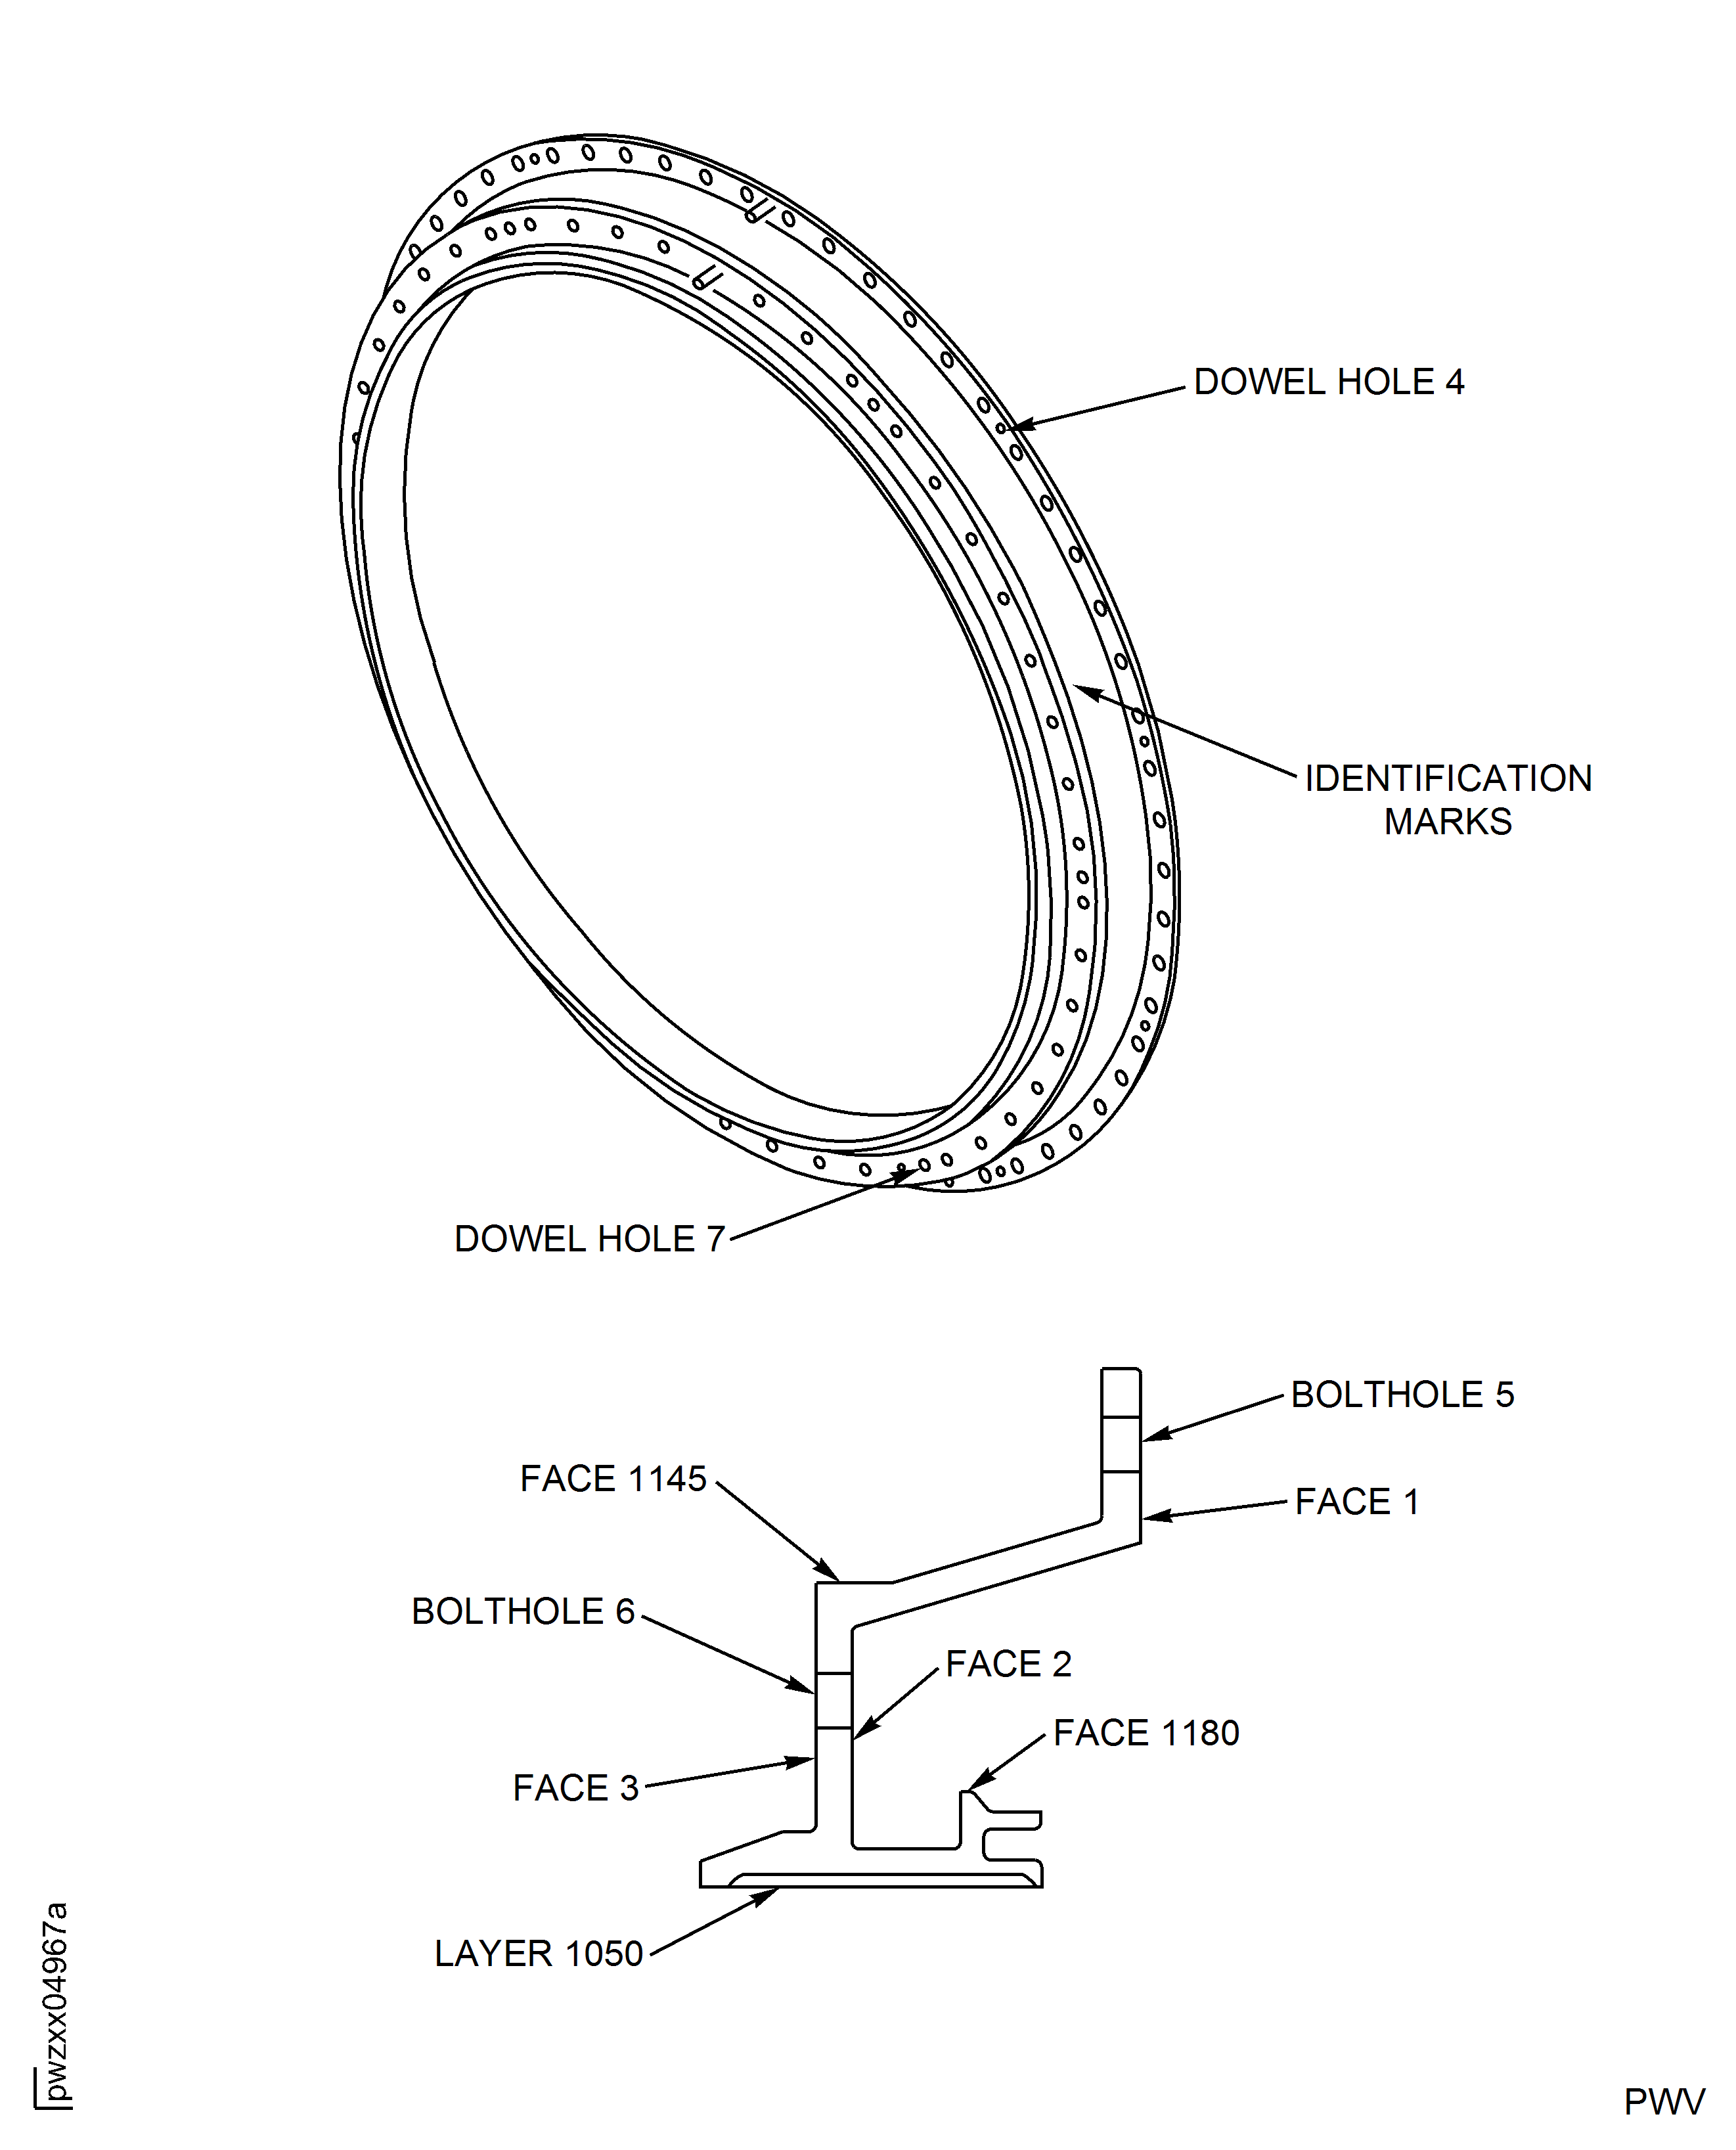
Figure: Repair Details and Dimensions - Assembly A
Repair Details and Dimensions - Assembly A
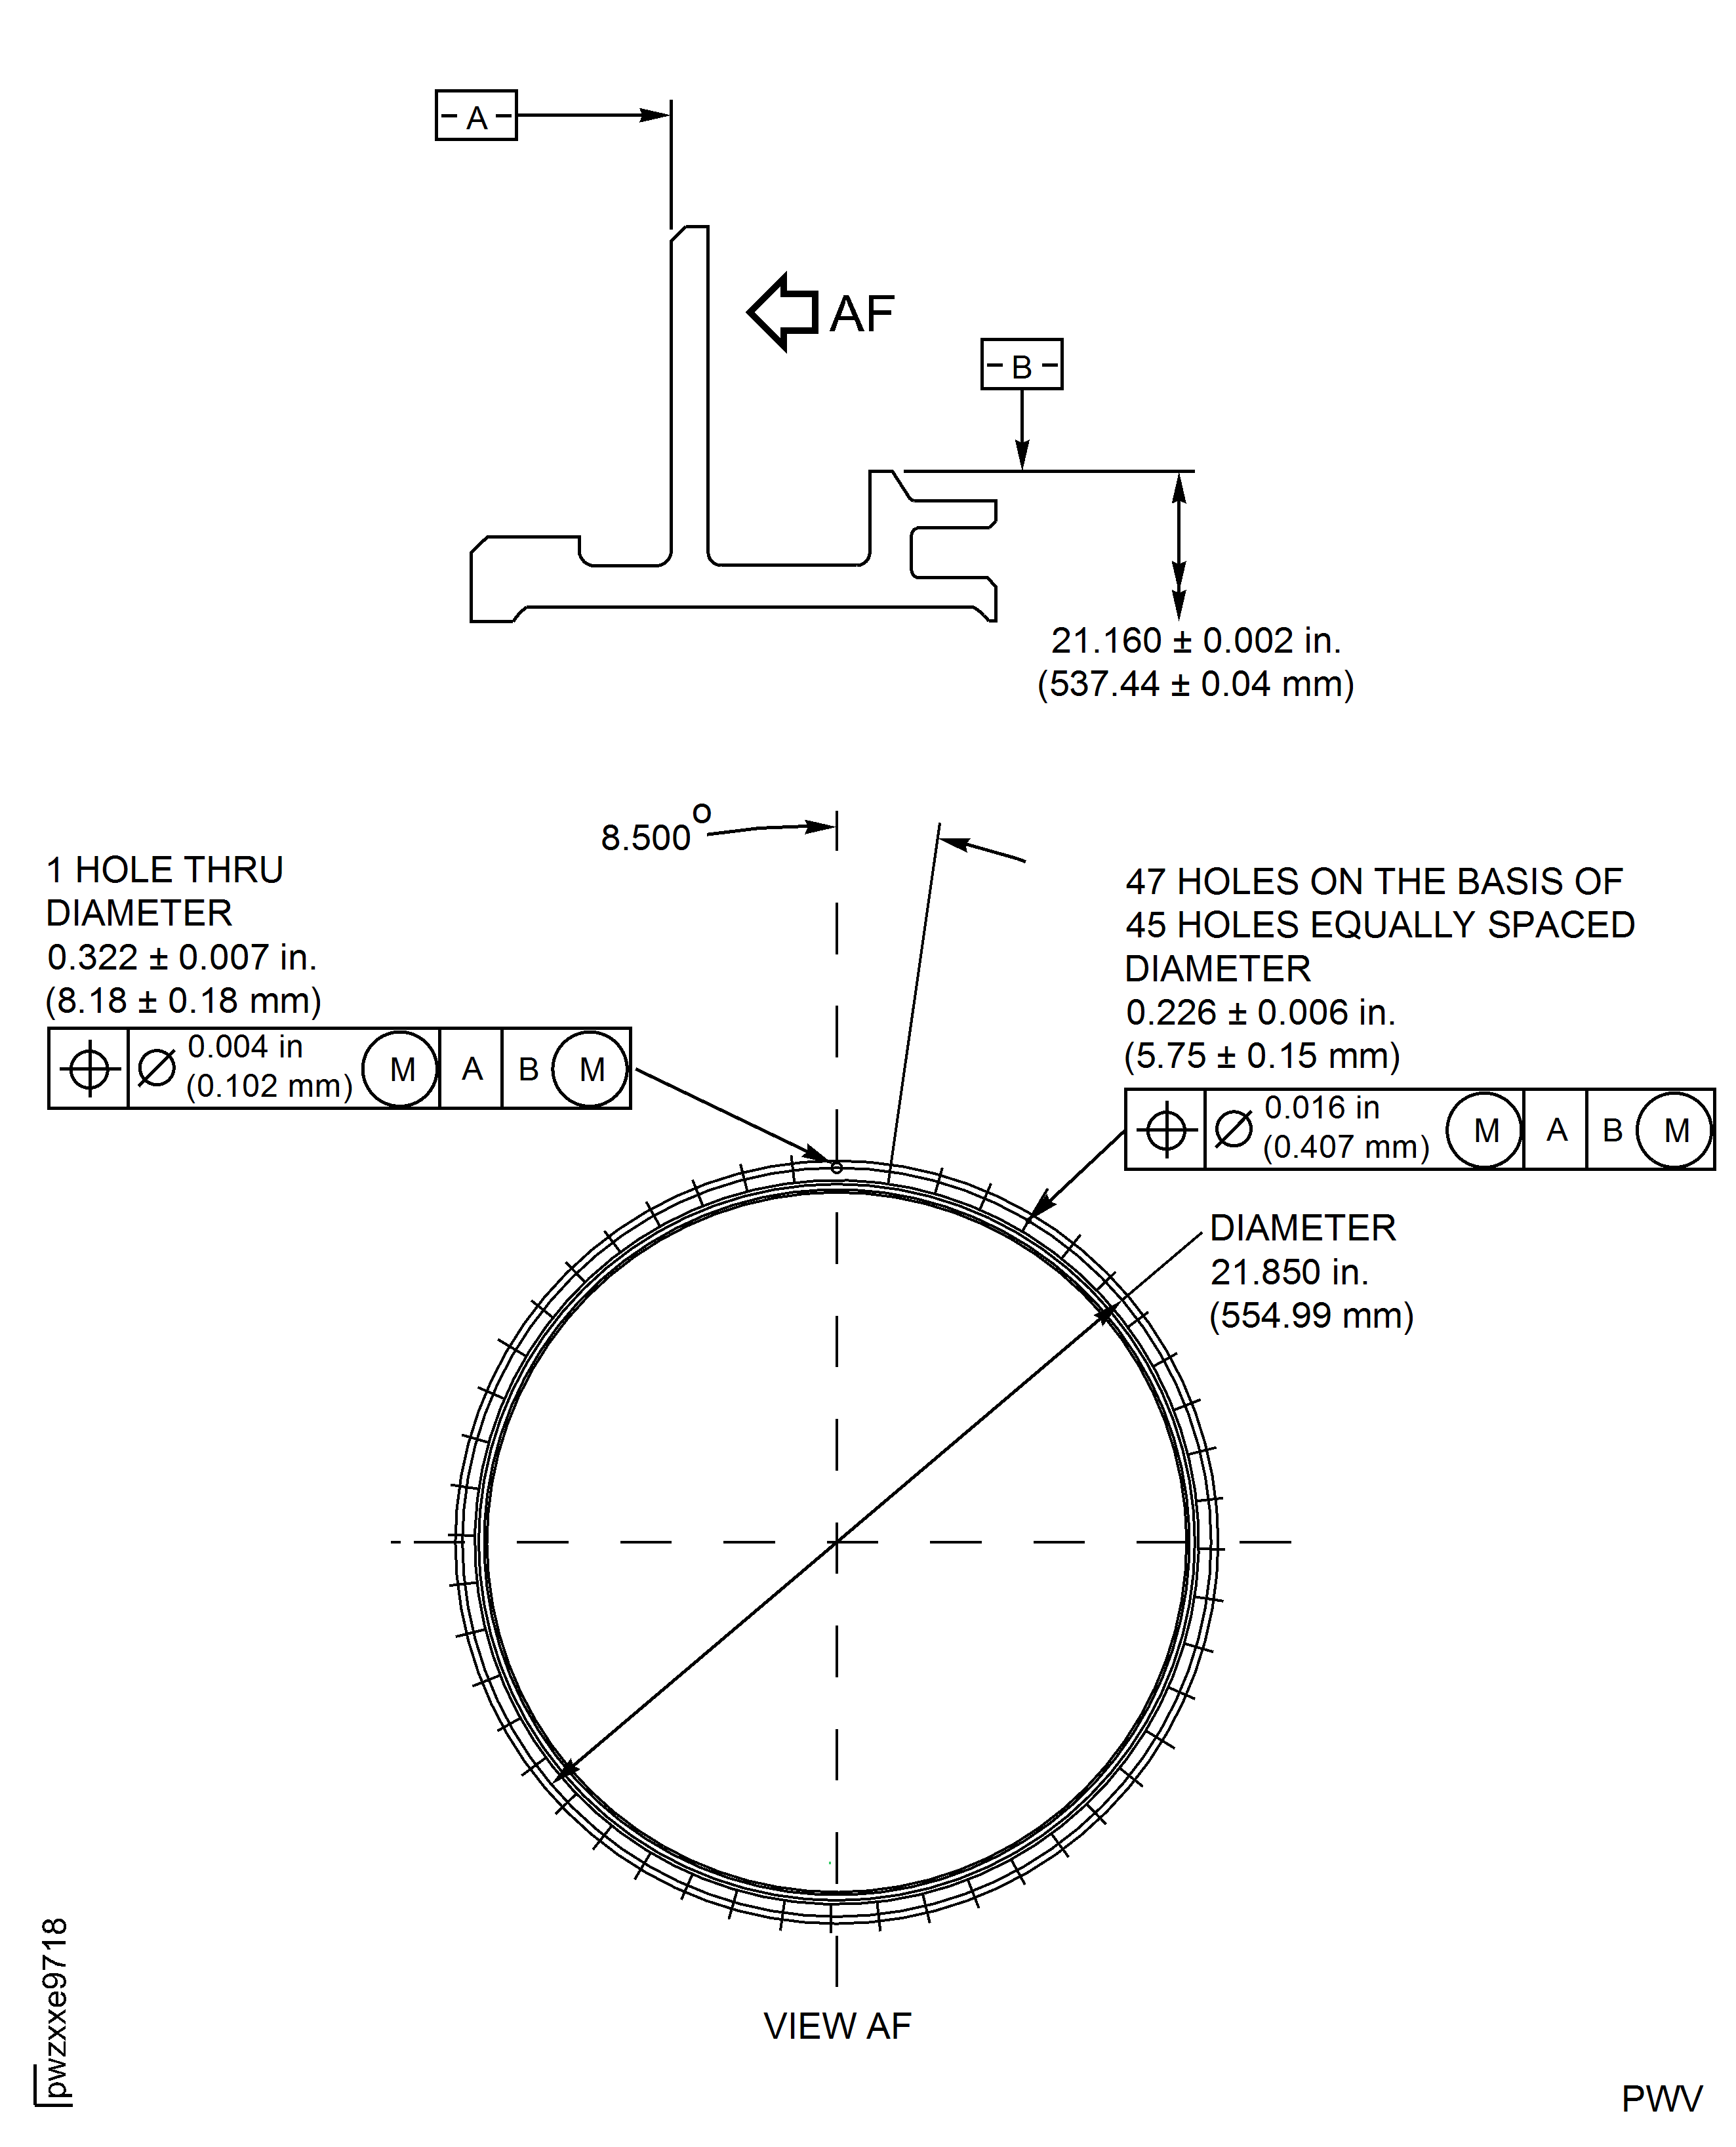
Figure: Repair Details and Dimensions - Assembly B
Repair Details and Dimensions - Assembly B
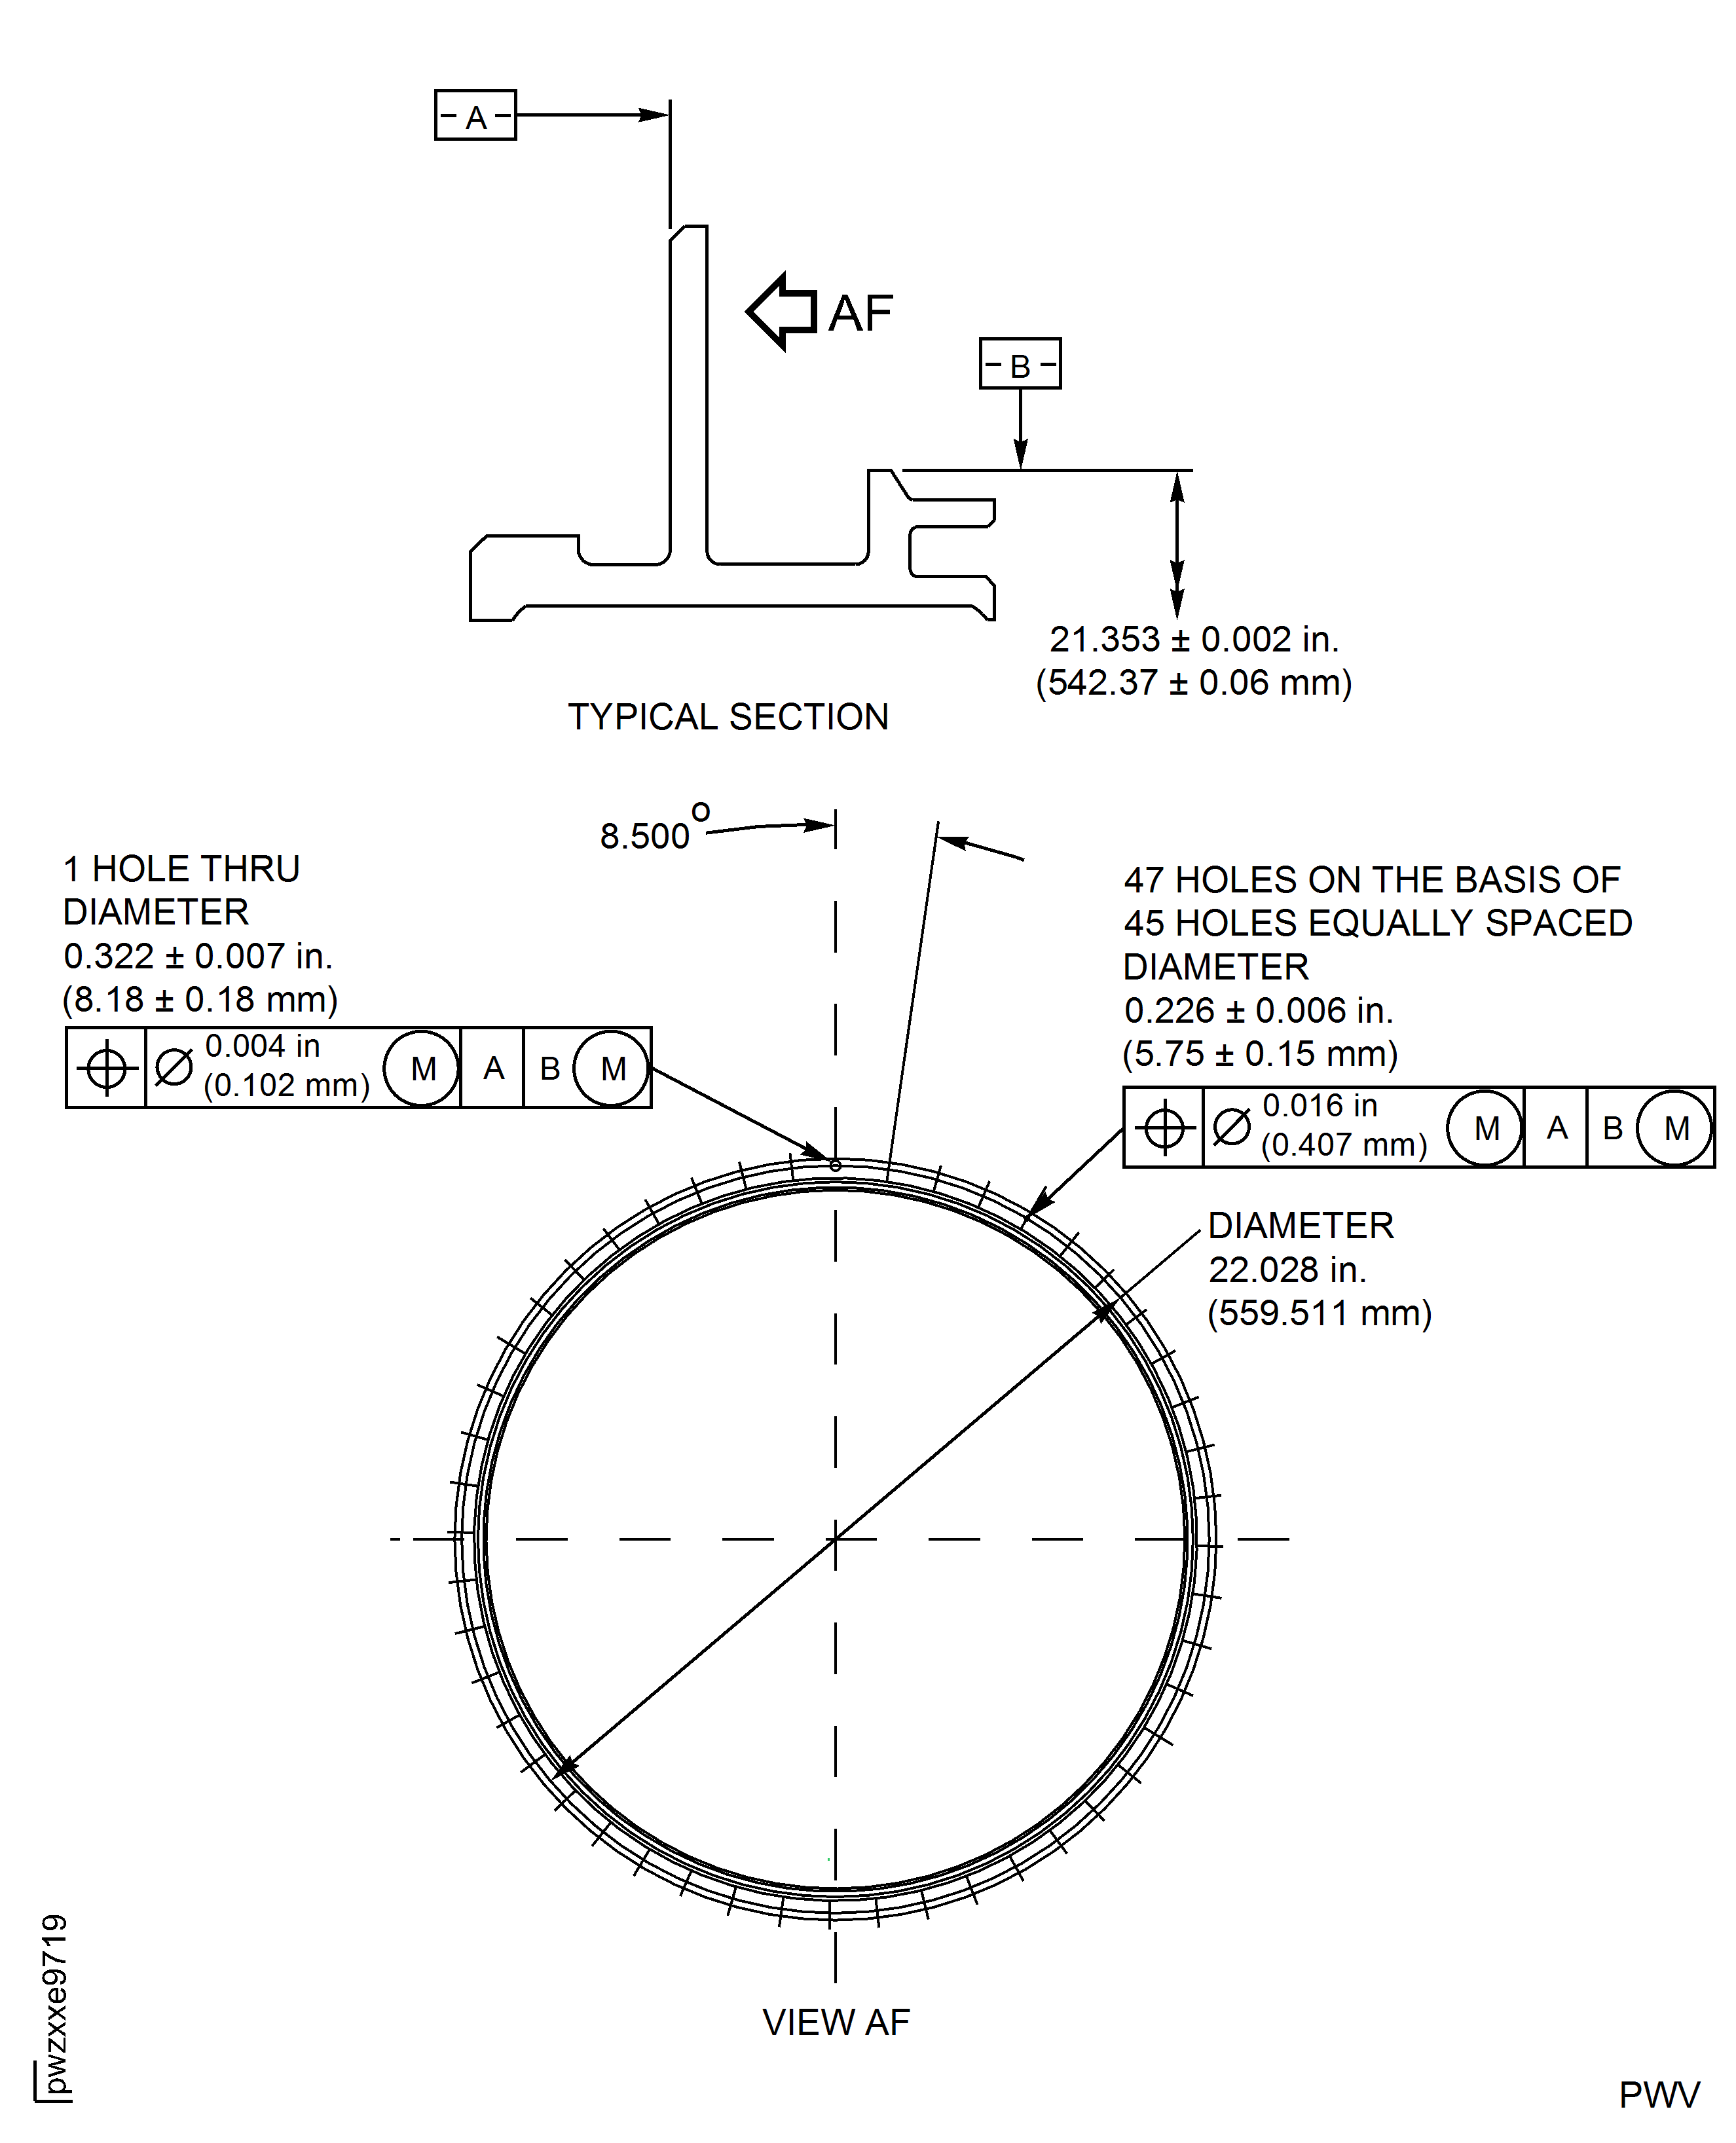
Figure: Repair Details and Dimensions - Assembly C
Repair Details and Dimensions - Assembly C
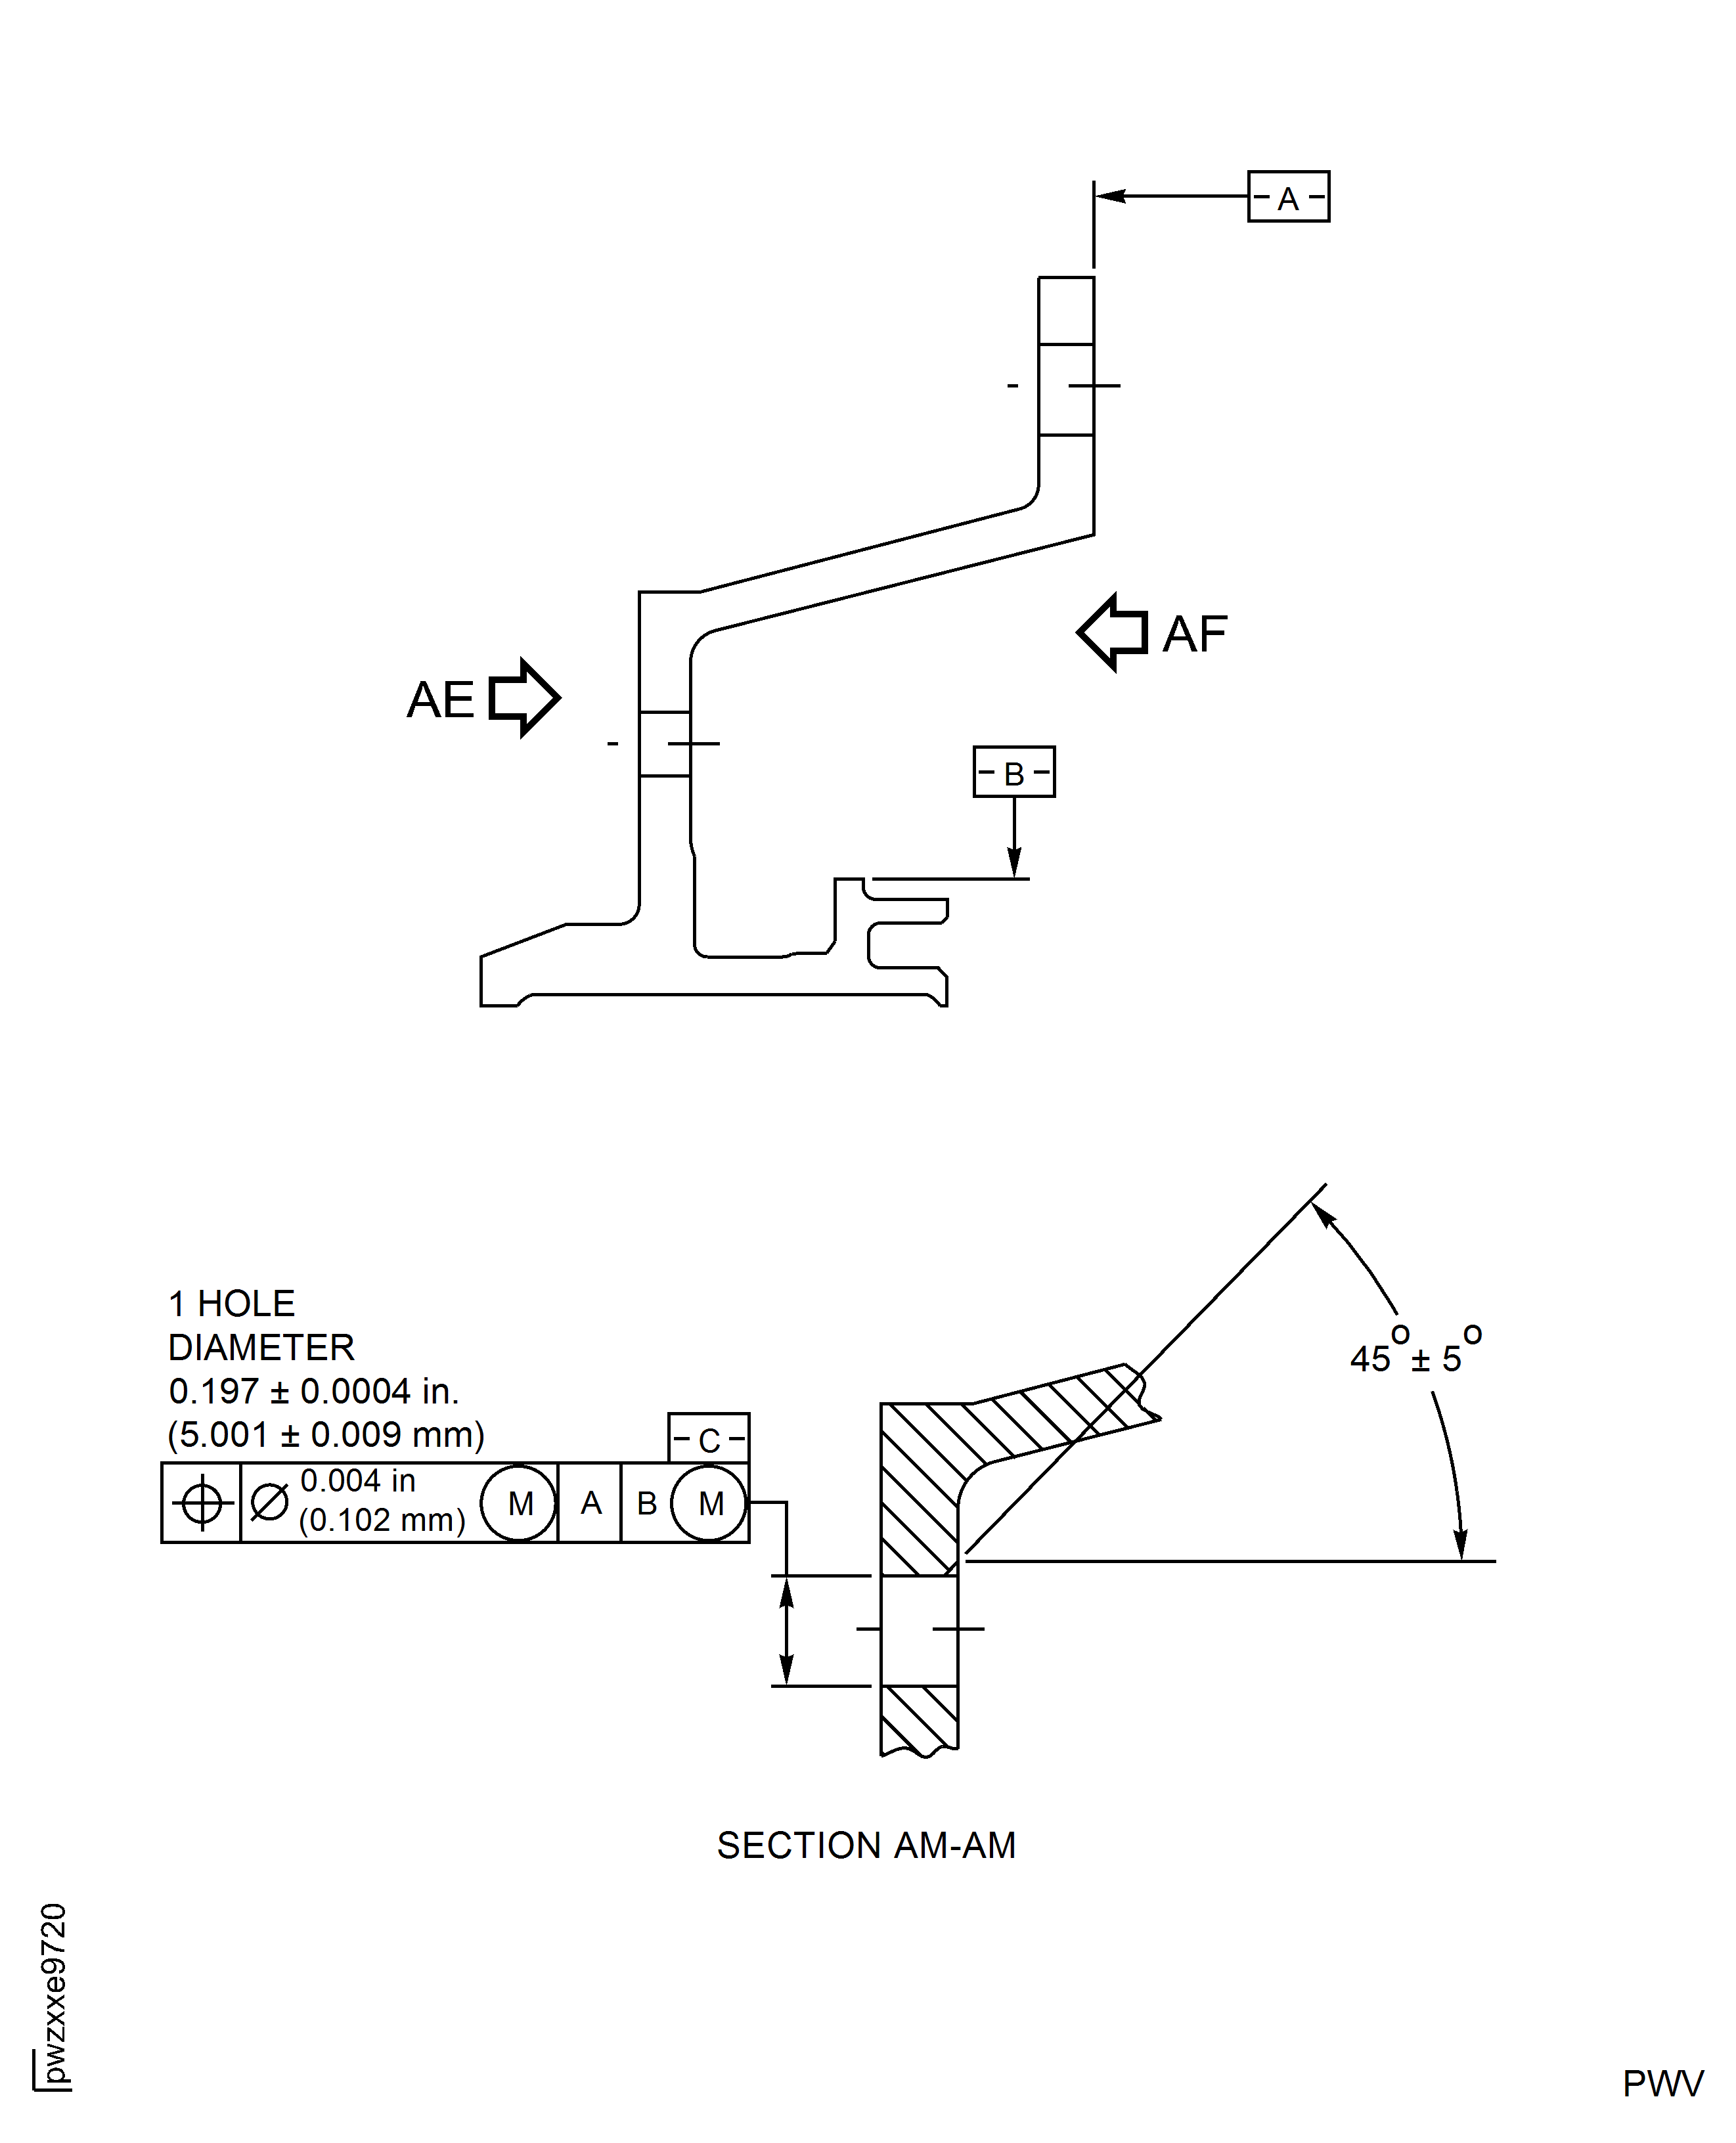
Figure: Repair Details and Dimensions - Assembly C
Repair Details and Dimensions - Assembly C
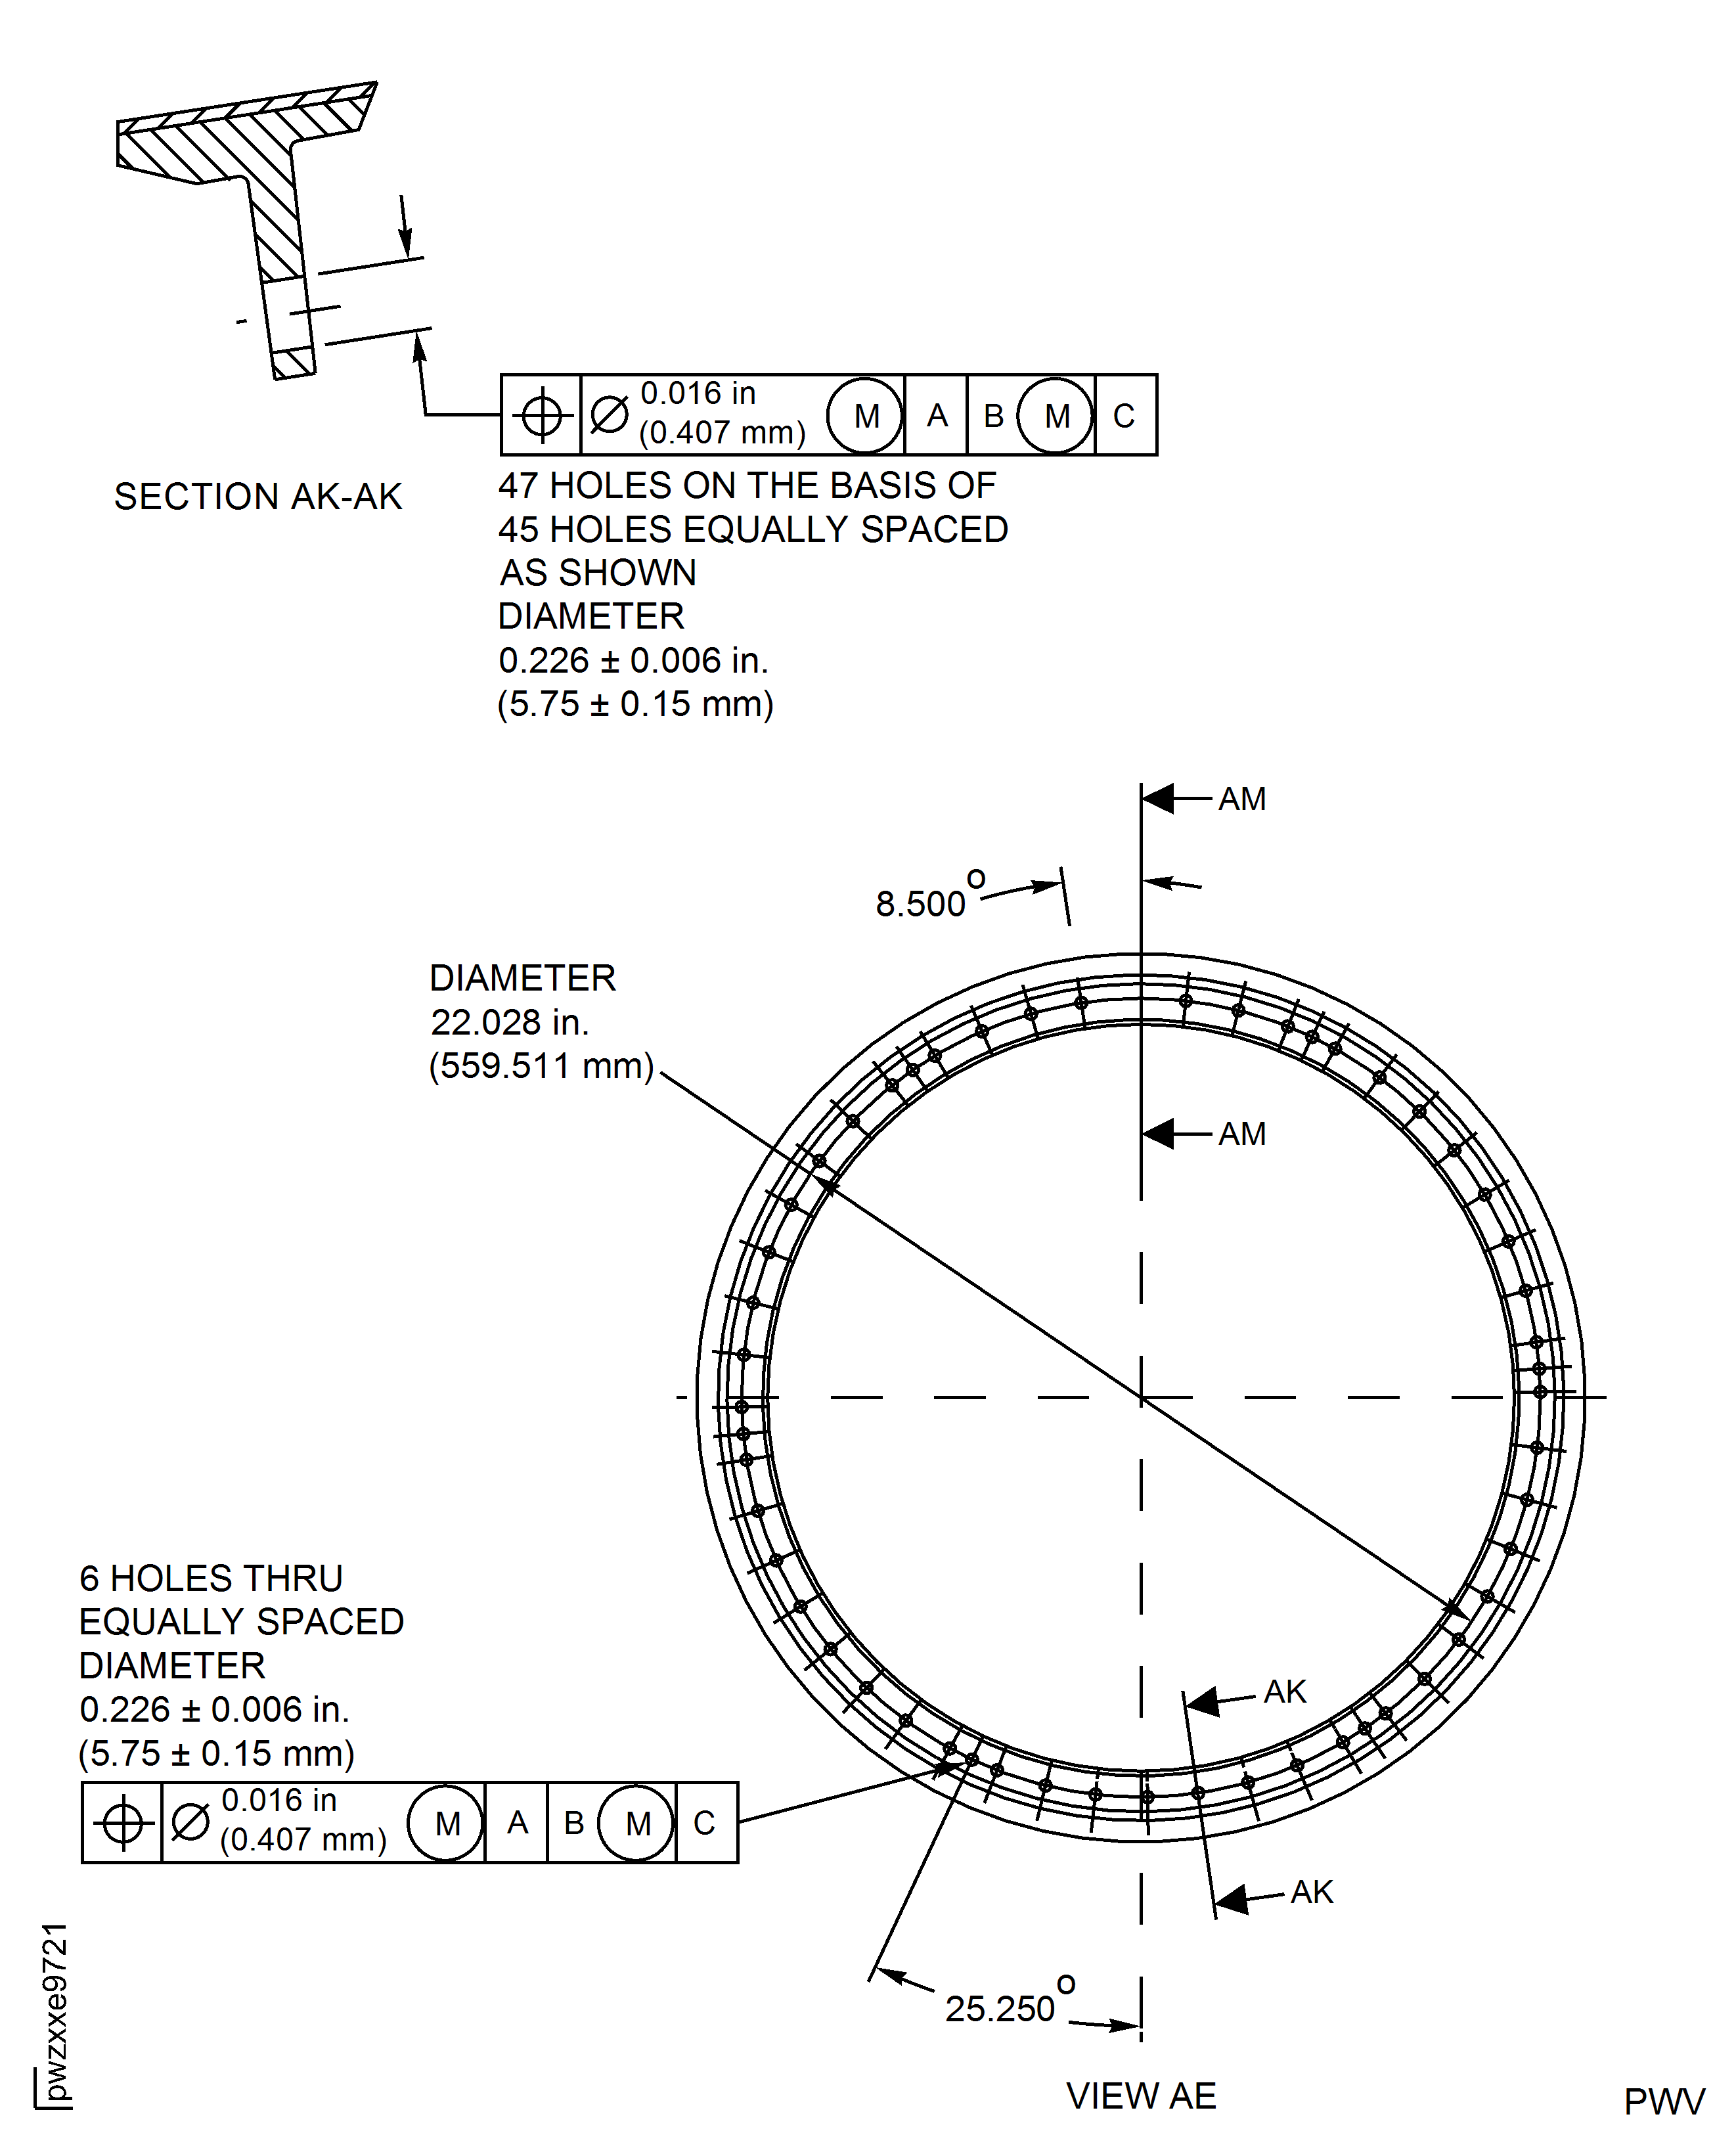
Figure: Repair Details and Dimensions - Assembly C
Repair Details and Dimensions - Assembly C
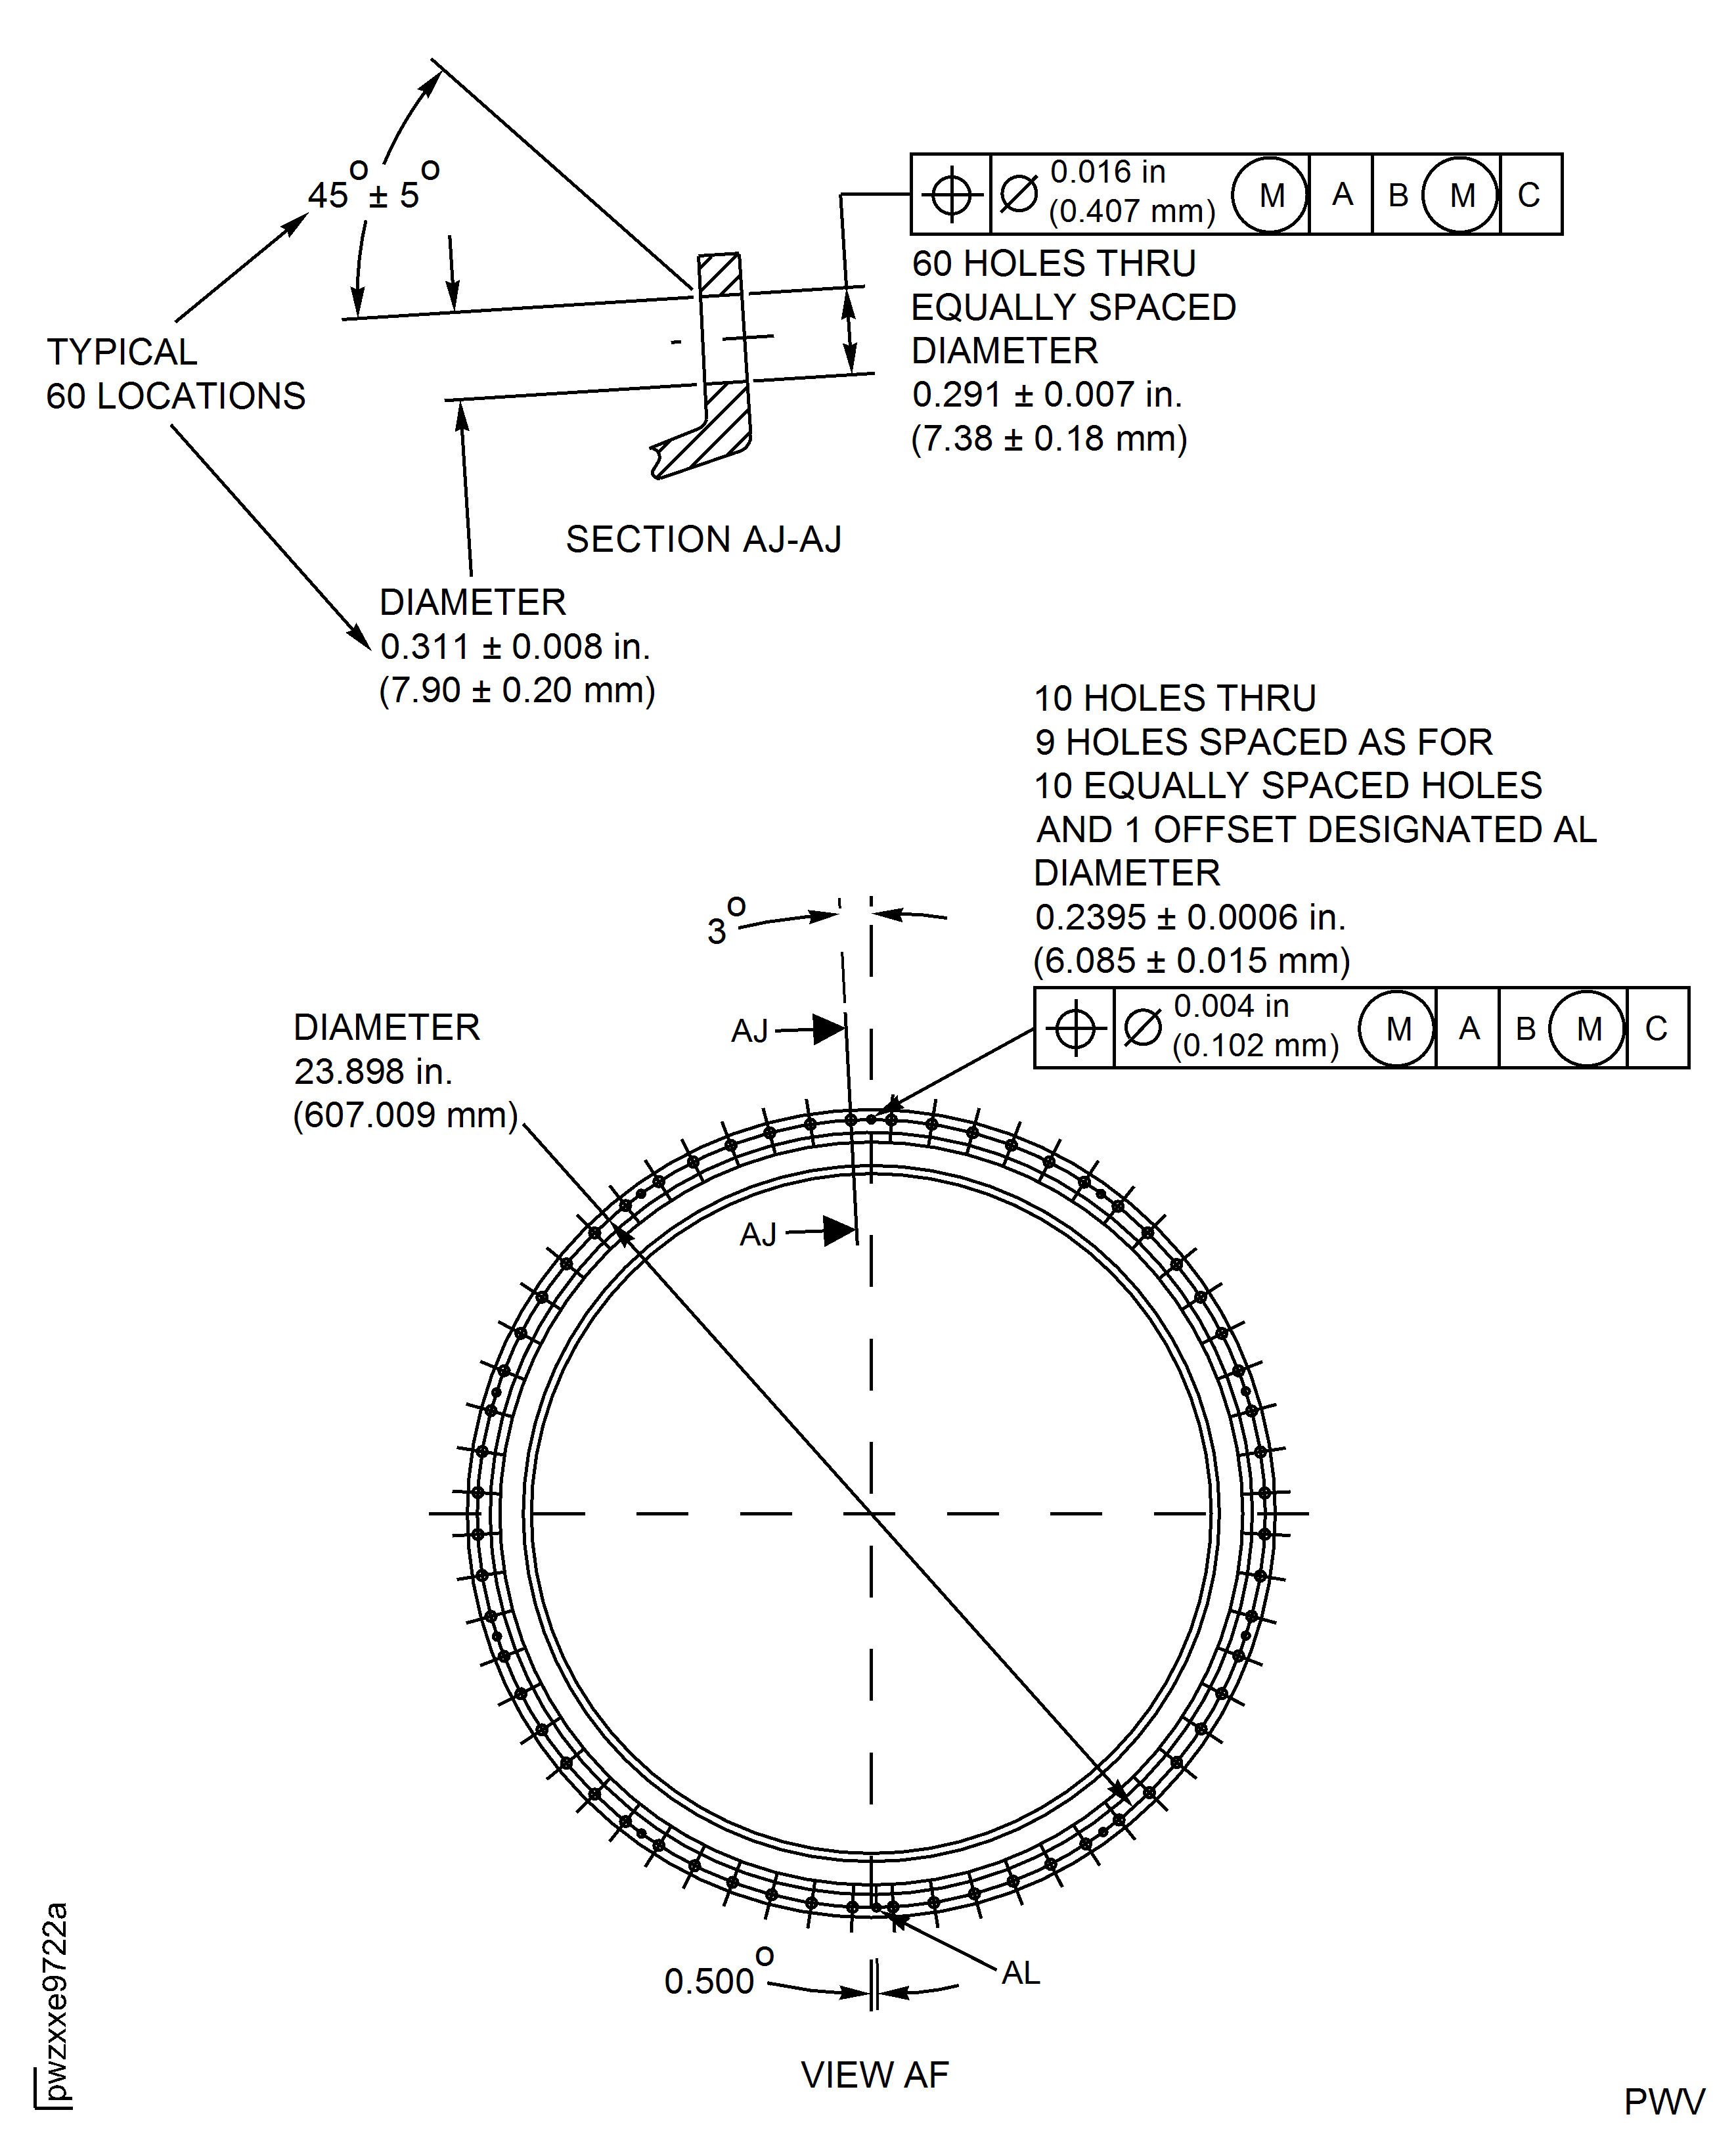
Figure: Repair Details and Dimensions - Assembly D
Repair Details and Dimensions - Assembly D
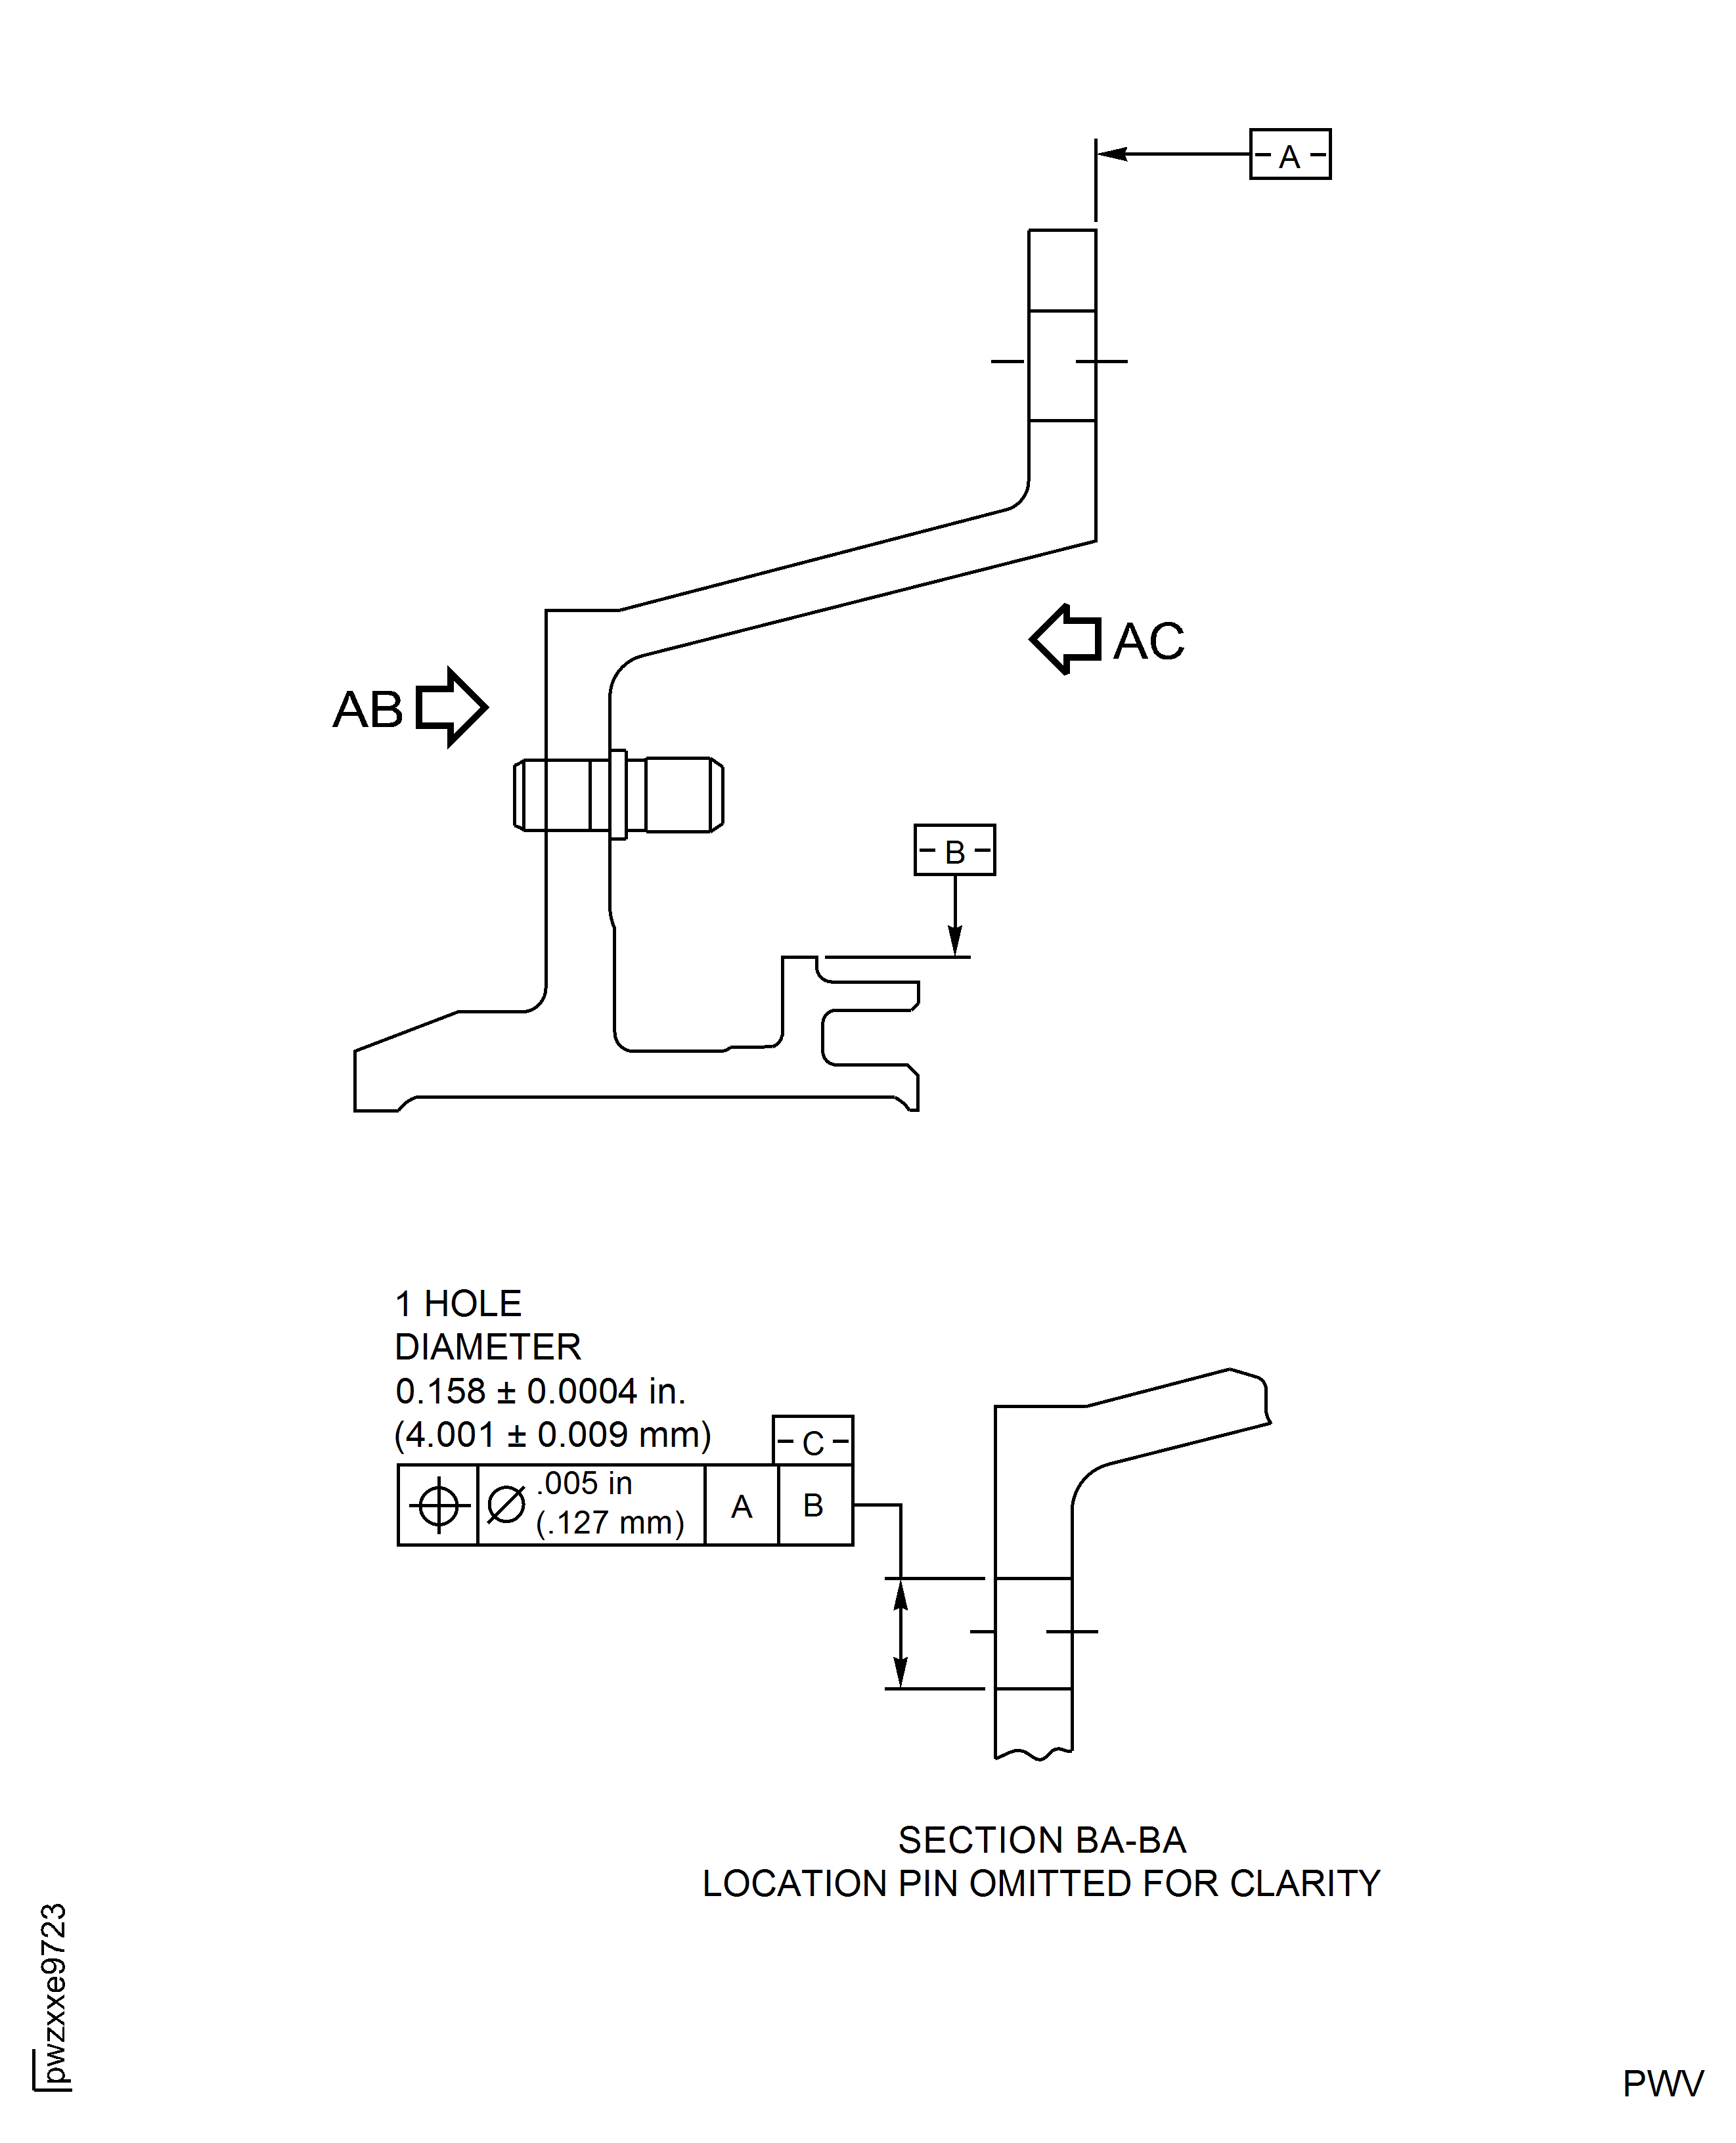
Figure: Repair Details and Dimensions - Assembly D
Repair Details and Dimensions - Assembly D
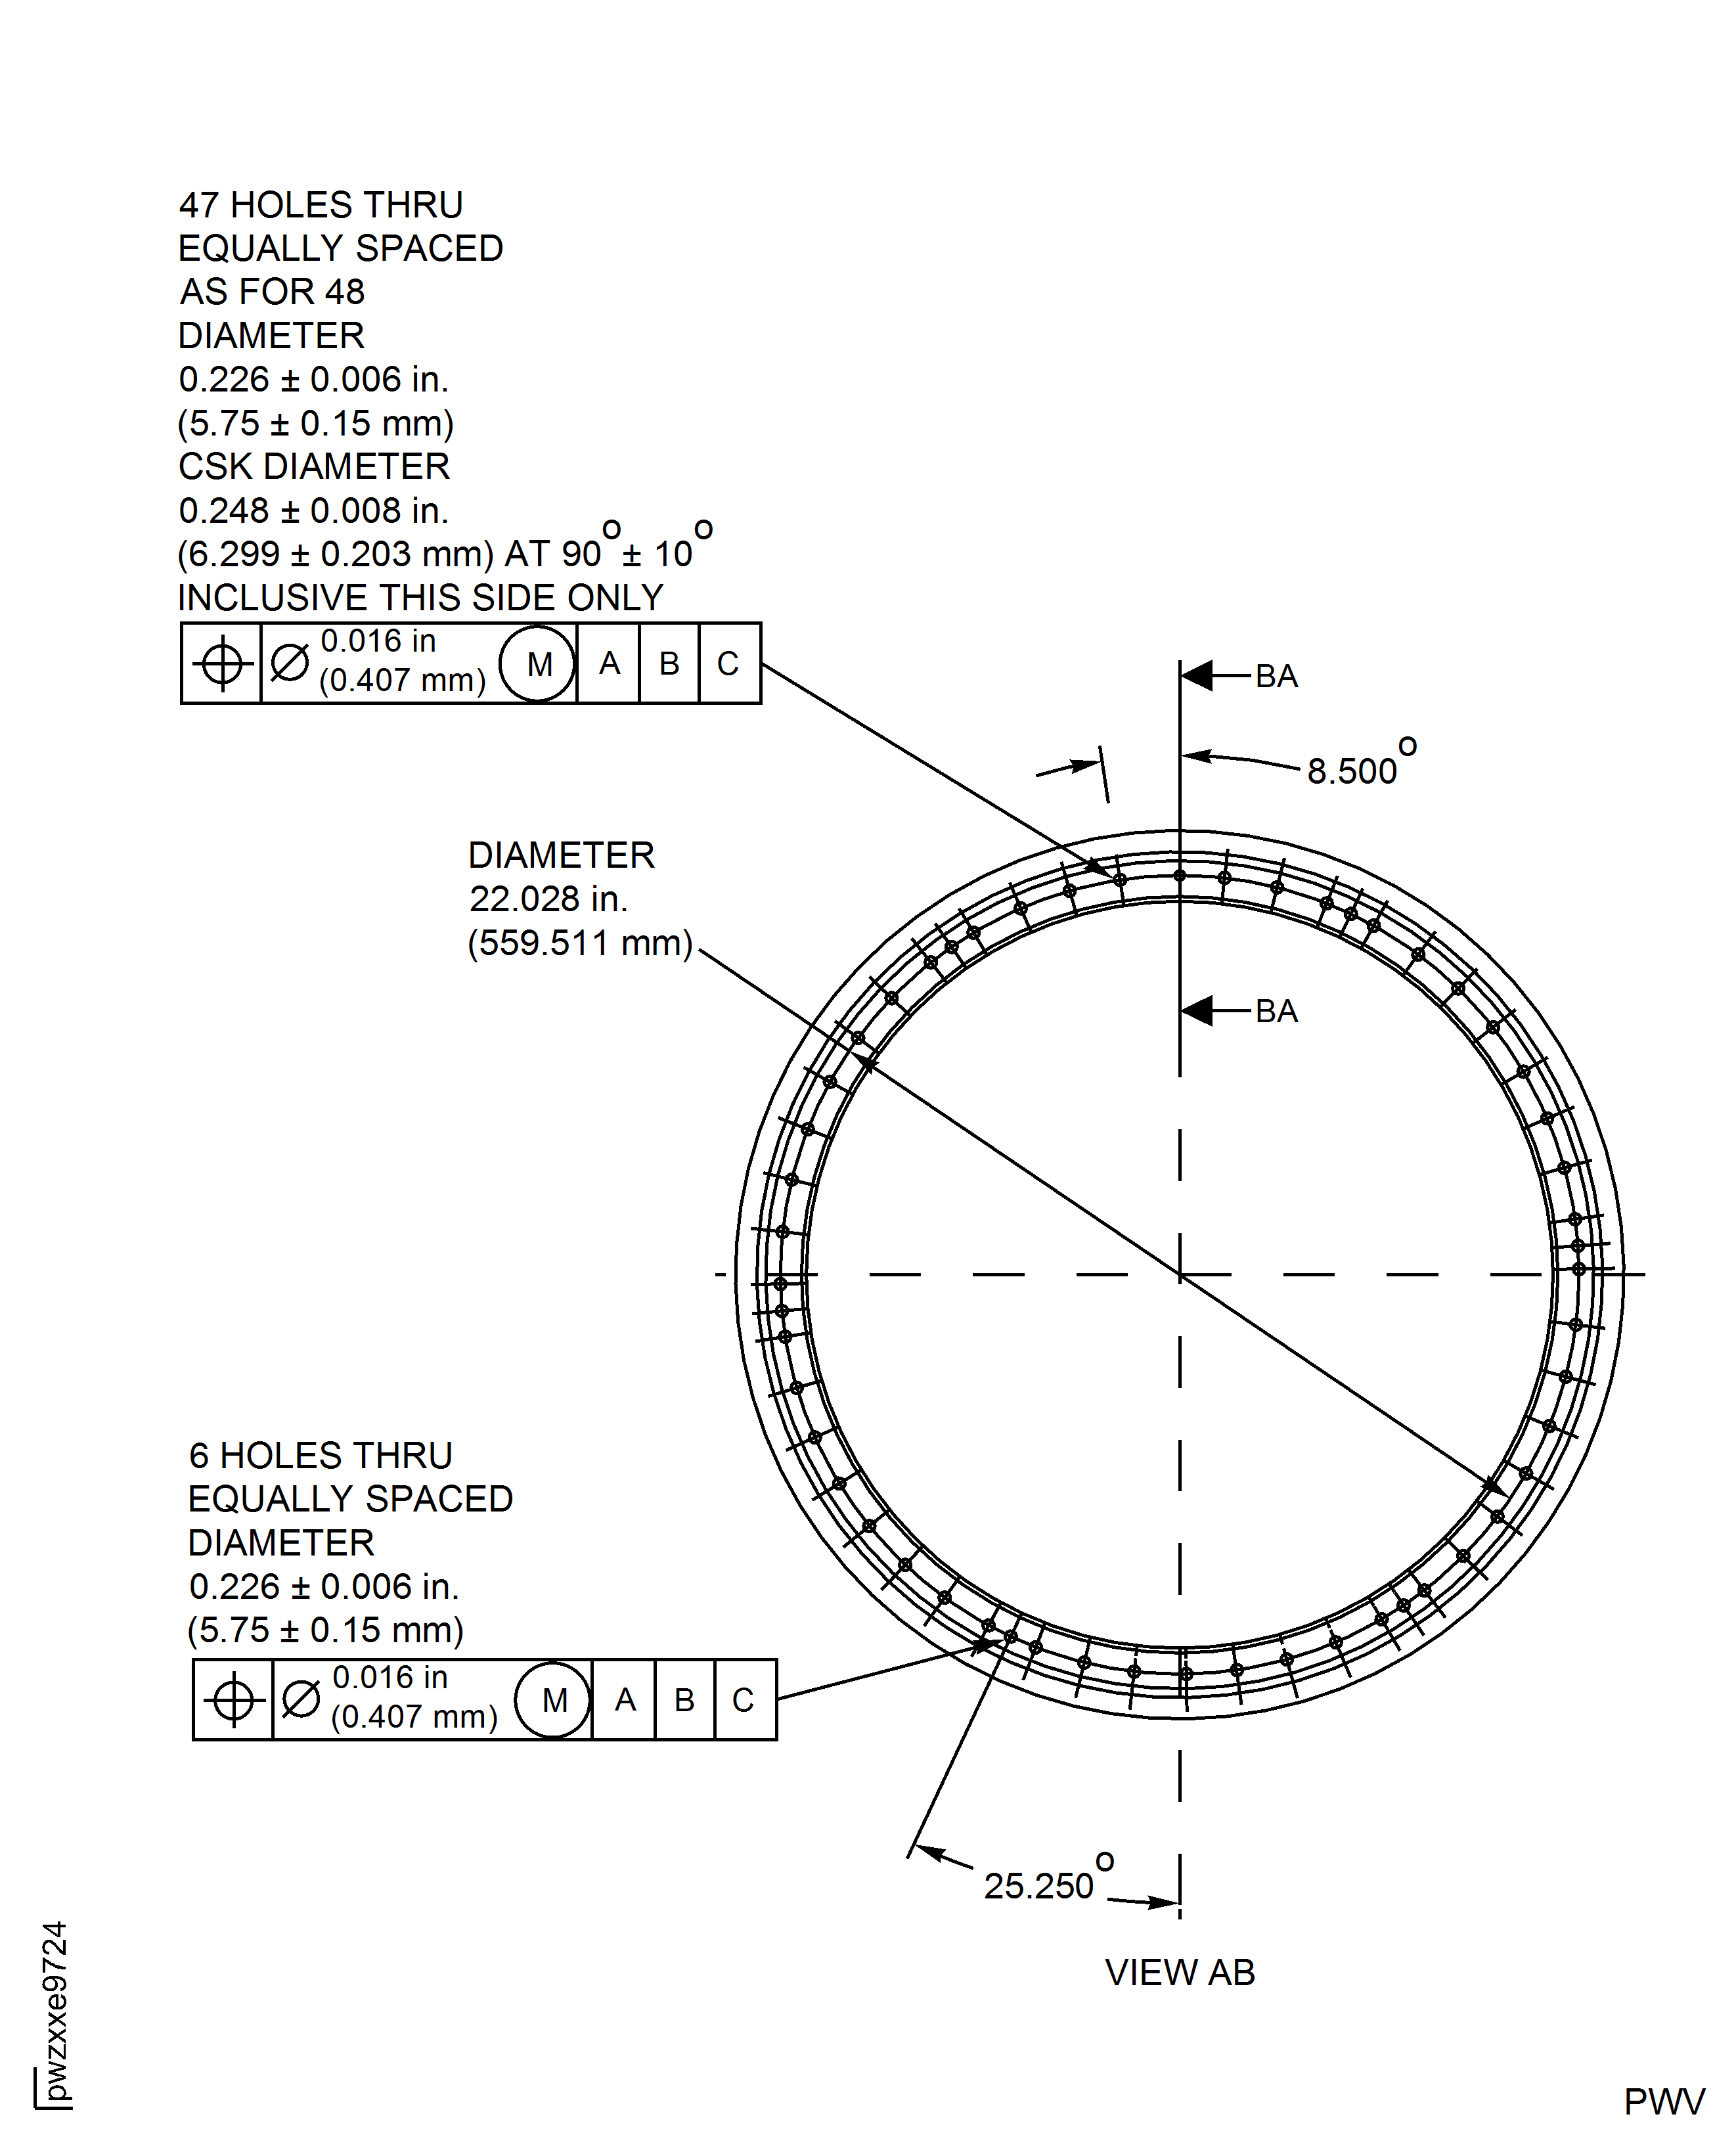
Figure: Repair Details and Dimensions - Assembly D
Repair Details and Dimensions - Assembly D
