Export Control
EAR Export Classification: Not subject to the EAR per 15 C.F.R. Chapter 1, Part 734.3(b)(3), except for the following Service Bulletins which are currently published as EAR Export Classification 9E991: SBE70-0992, SBE72-0483, SBE72-0580, SBE72-0588, SBE72-0640, SBE73-0209, SBE80-0024 and SBE80-0025.Copyright
© IAE International Aero Engines AG (2001, 2014 - 2021) The information contained in this document is the property of © IAE International Aero Engines AG and may not be copied or used for any purpose other than that for which it is supplied without the express written authority of © IAE International Aero Engines AG. (This does not preclude use by engine and aircraft operators for normal instructional, maintenance or overhaul purposes.).Applicability
All
Common Information
TASK 72-41-23-300-001 HPC Rear Outer Case - Blend Repair, Repair-001 (VRS6104)
Effectivity
FIG/ITEM | PART NO. |
|---|---|
02-400 | 6A2949 |
02-400 | 6A3557 |
02-400 | 6A4154 |
02-400 | 6A5495 |
02-400 | 6A5682 |
02-400 | 6A8162 |
02-400 | 6B1427 |
General
This repair must only be done when the instruction to do is given in 72-41-23, Inspection/Check.
TASKs identified by SPM TASK are in Standard Practices and Processes Manual (SPM).
Related repair.
Repair the HP Compressor Rear Outer Case by Replacing Surface Protection, refer to Repair, VRS6178 TASK 72-41-23-300-003 (REPAIR-003).
NOTE
Preliminary Requirements
Pre-Conditions
| Action/Condition | Data Module/Technical Publication |
|---|---|
| Make sure that all the cleaning and inspection procedures are done before this repair. |
Support Equipment
NONEConsumables, Materials and Expendables
| Name | Manufacturer | Part Number / Identification | Quantity | Remark |
|---|---|---|---|---|
| DELETED | LOCAL | DELETED | ||
| CoMat 07-037 CORROSION RESISTANT TOUCH-UP COATING | 00BB6 | CoMat 07-037 | ||
| CoMat 07-038 AIR DRYING ENAMEL | 00BB6 | CoMat 07-038 |
Spares
NONESafety Requirements
NONEProcedure
Refer to SPM TASK 70-35-03-300-501.
The maximum depth of the repaired area(s) must be 0.005 in. (0.13 mm), unless otherwise specified in the referenced figures and paragraphs as follows.
The diameter of the repaired area(s) must be 50 times the depth.
Remove all sharp corners and make sure smooth blend into the adjacent material.
Remove and blend the damage.
Refer to SPM TASK 70-35-03-300-501.
Blend must maintain a minimum 50:1 length to depth ratio.
Remove only the minimum amount of material necessary to remove the damage.
Remove all sharp corners and make sure a smooth blend into the adjacent material.
For PN 6B1427, individual blend length must not exceed 0.100 in. (2.540 mm). The cumulative blend must not exceed 20 percent of the surface area on any of the flange mating faces (Face 1, Face 2, Face 3, and Face 4). No blending shall be allowed within a 0.630 in. (16.00 mm) circle centered on any fastener hole on the Rear Inner Flange Forward Face.
Refer to Figure and Figure for blend limits, repair exclusion zone and edge breakout limits. Blend must not form a leak path across the boss face. Refer to Figure for internal case surface dressing limits.
Remove and blend the damage on flange and port faces.
Refer to SPM TASK 70-35-03-300-501.
The maximum depth of damage to be repaired is 0.041 in. (1.04 mm) in the axial direction of the dowel hole.
Dress and polish to remove raised metal only from bore, hole diameter must not be more than 0.240 in. (6.10 mm).
Bore dressing:
Dress and polish raised metal flush to 0.004 in. (0.10 mm) under-flush with initial surface.
Dents in flange surface around edge of hole must be polished smooth, remove minimum material (50:1 blend ratio requirement waived).
End face dressing:
Remove all sharp edges.
NOTE
Refer to Figure for repair requirements and limits.
Remove and blend the damage on front flange dowel hole.
Refer to SPM TASK 70-35-03-300-501.
Material removal is limited to the local areas indicated in the bleed duct port aperture wall surface, for the removal of frettage and/or crack damage only.
Blend must maintain a minimum 50:1 length to depth ratio.
Remove minimum material.
0.098 in. (2.50 mm) maximum depth.
1.102 in. (28.00 mm) maximum length.
0.295 in. (7.50 mm) maximum width.
0.197 in. (5.00 mm) minimum distance between edge of repair and the nearest bolthole.
Dress to the following limits:
Remove all sharp corners and make sure a smooth blend into the adjacent material.
Refer to Figure for damage or repair locations. Do not dress the permitted cutter witness marks which are found in the same area.
Remove frettage and/or crack damage from bleed duct port aperture wall surface only.
Refer to SPM TASK 70-35-03-300-501.
Polish the repaired and blended area(s). Make sure all the scratches are removed and the surface finish is the same as the adjacent material.
Remove frettage and/or crack damage from bleed duct port aperture wall surface only.
SUBTASK 72-41-23-350-051 Remove the Damage
Refer to SPM TASK 70-11-03-300-503.
Chemically clean the repaired area(s).
SUBTASK 72-41-23-110-105 Chemically Clean
Use medium sensitivity.
Cracks are not permitted.
Do a local penetrant crack test of the repaired area(s) by SPM TASK 70-23-05-230-501.
Cracks are not permitted.
Do a penetrant crack test of the repaired area(s) by SPM TASK 70-23-01-230-501 or TASK 70-23-02-230-501.
Do a penetrant crack test of the repaired area(s) by one of the methods that follow:
SUBTASK 72-41-23-230-056 Examine the HP Compressor Rear Outer Case for Cracks
Refer to SPM TASK 70-09-00-400-501, SUBTASK 70-09-00-400-001.
Vibration peen VRS6104 adjacent to the part number.
SUBTASK 72-41-23-350-002 Identify the Repair
Refer to Figure.
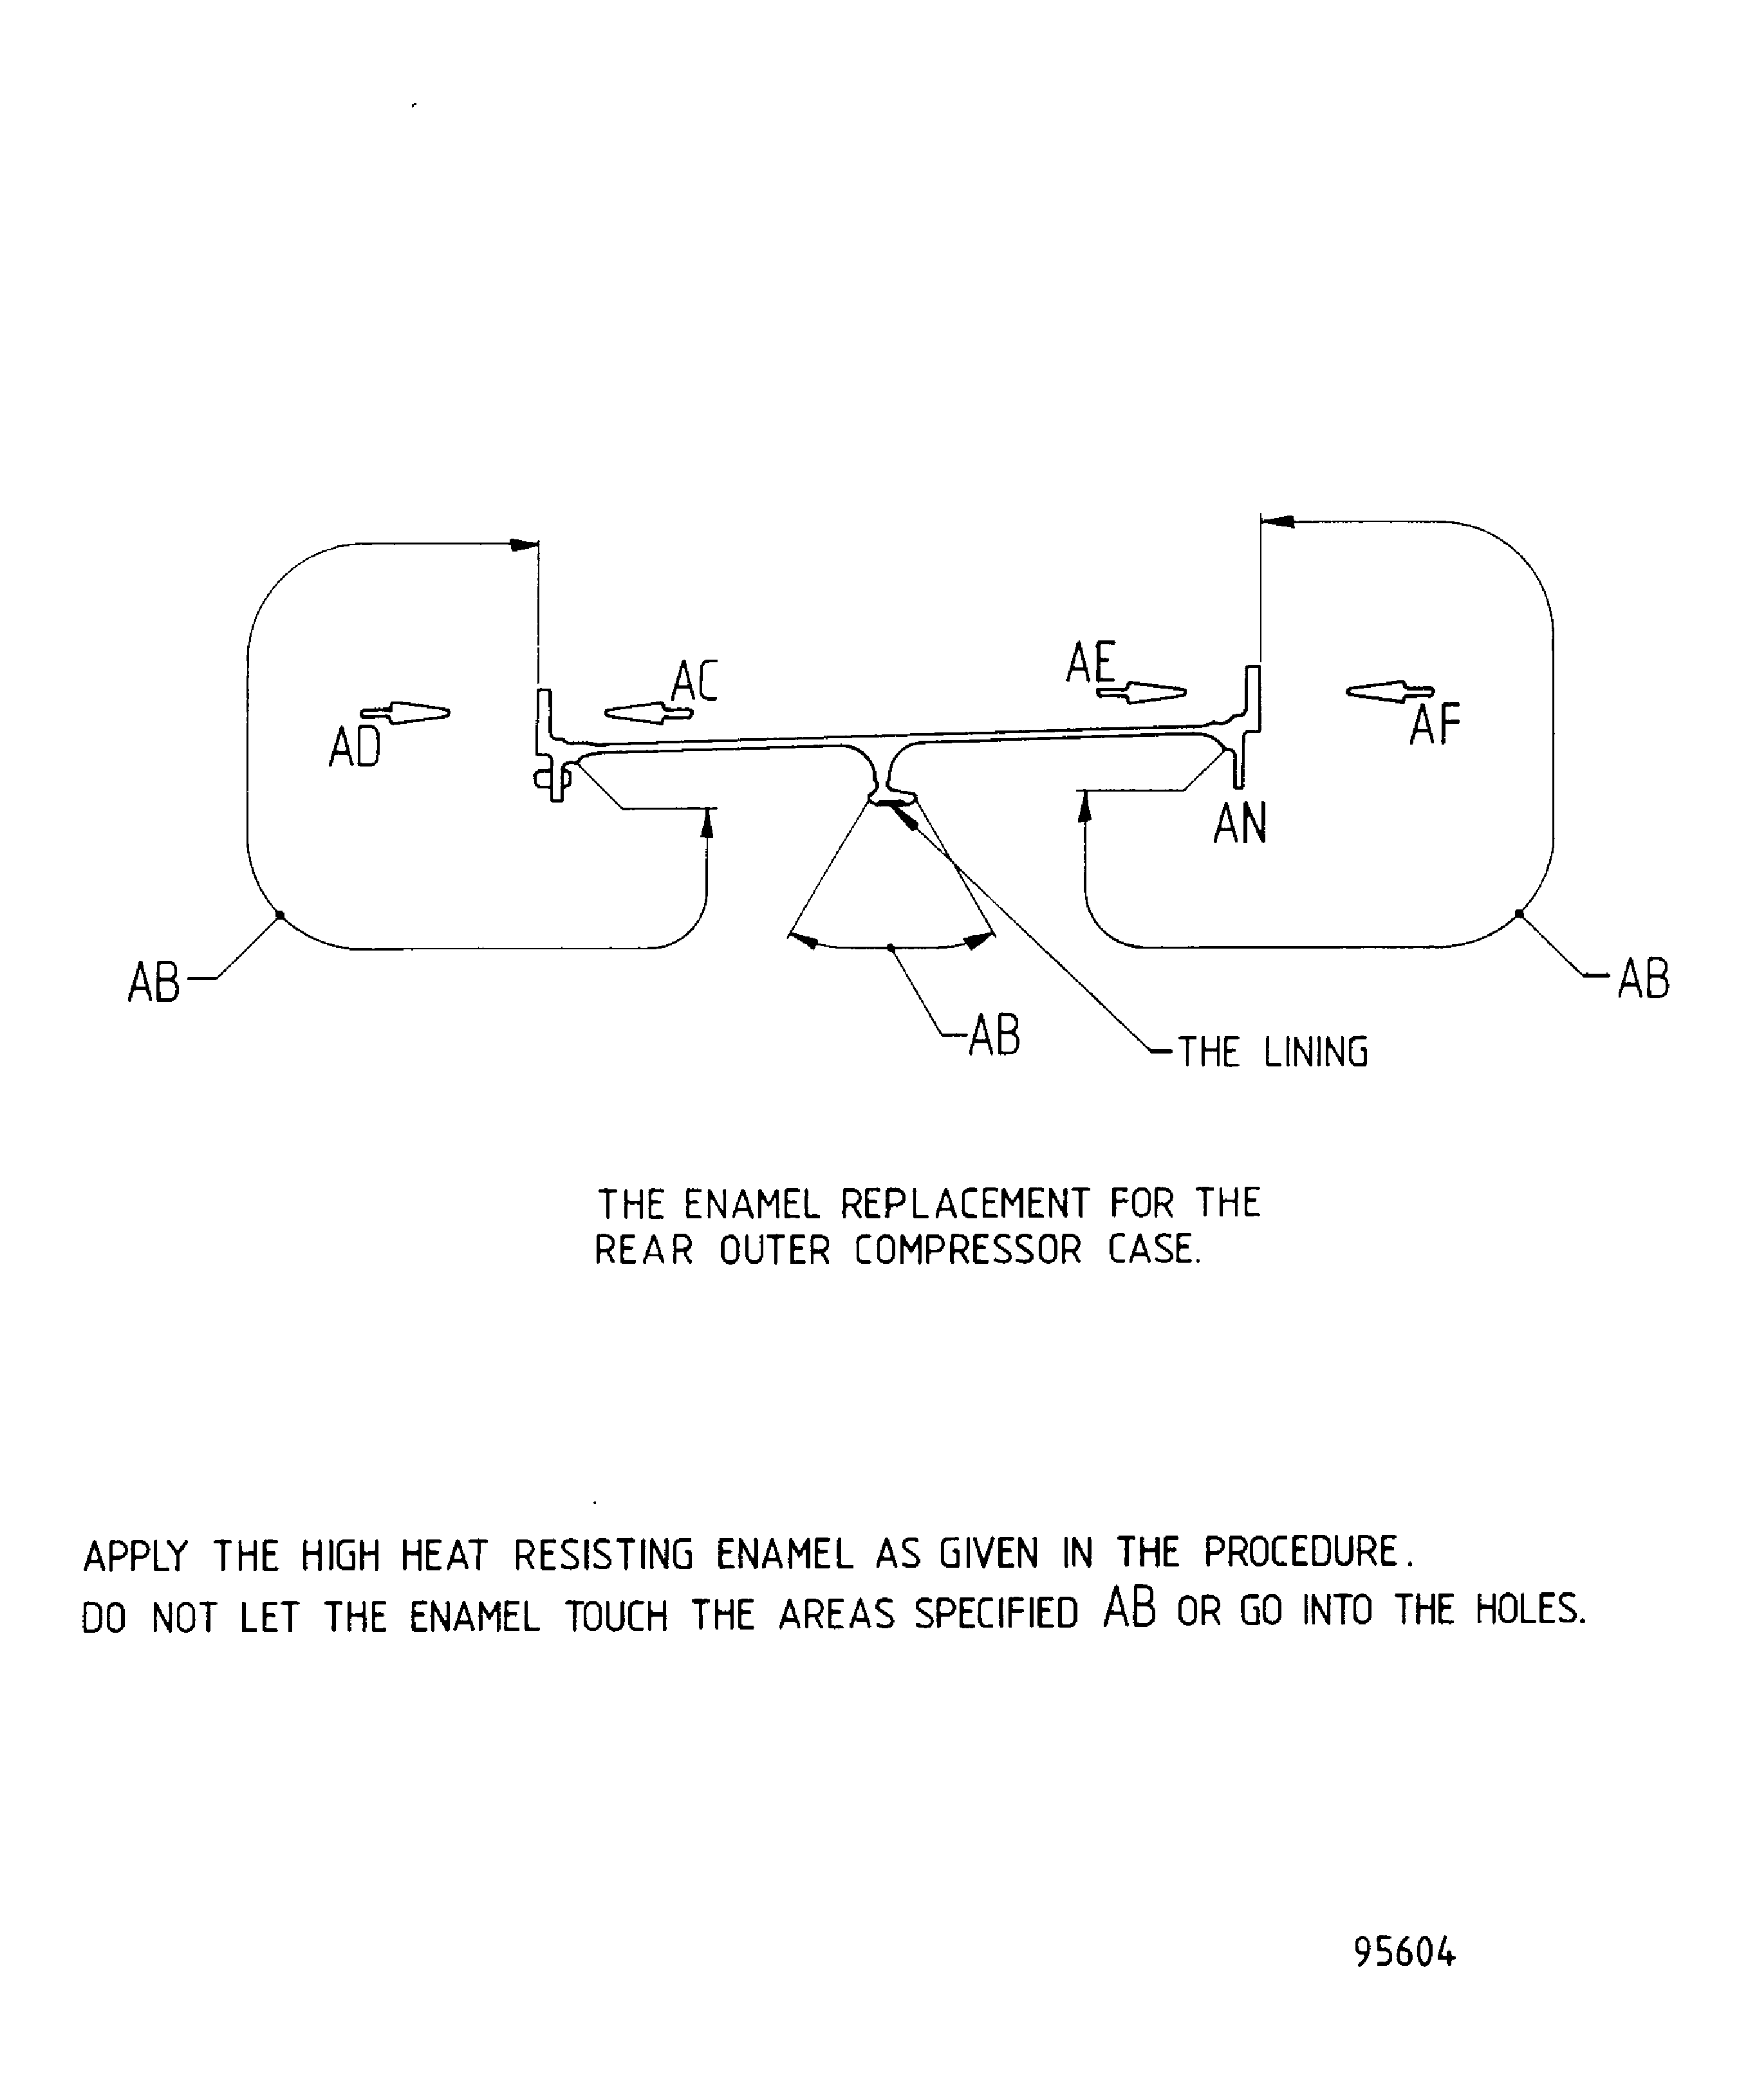
To apply complete surface protection, refer to the Repair, VRS6178 TASK 72-41-23-300-003 (REPAIR-003) or to apply local surface protection.
Apply surface protection as necessary.
SUBTASK 72-41-23-380-051 Apply Surface Protection to HP Compressor Rear Outer Case
Figure: Repair Details and Dimensions
Repair Details and Dimensions

Figure: Typical Section Through HP Compressor Rear Outer Case
Typical Section Through HP Compressor Rear Outer Case
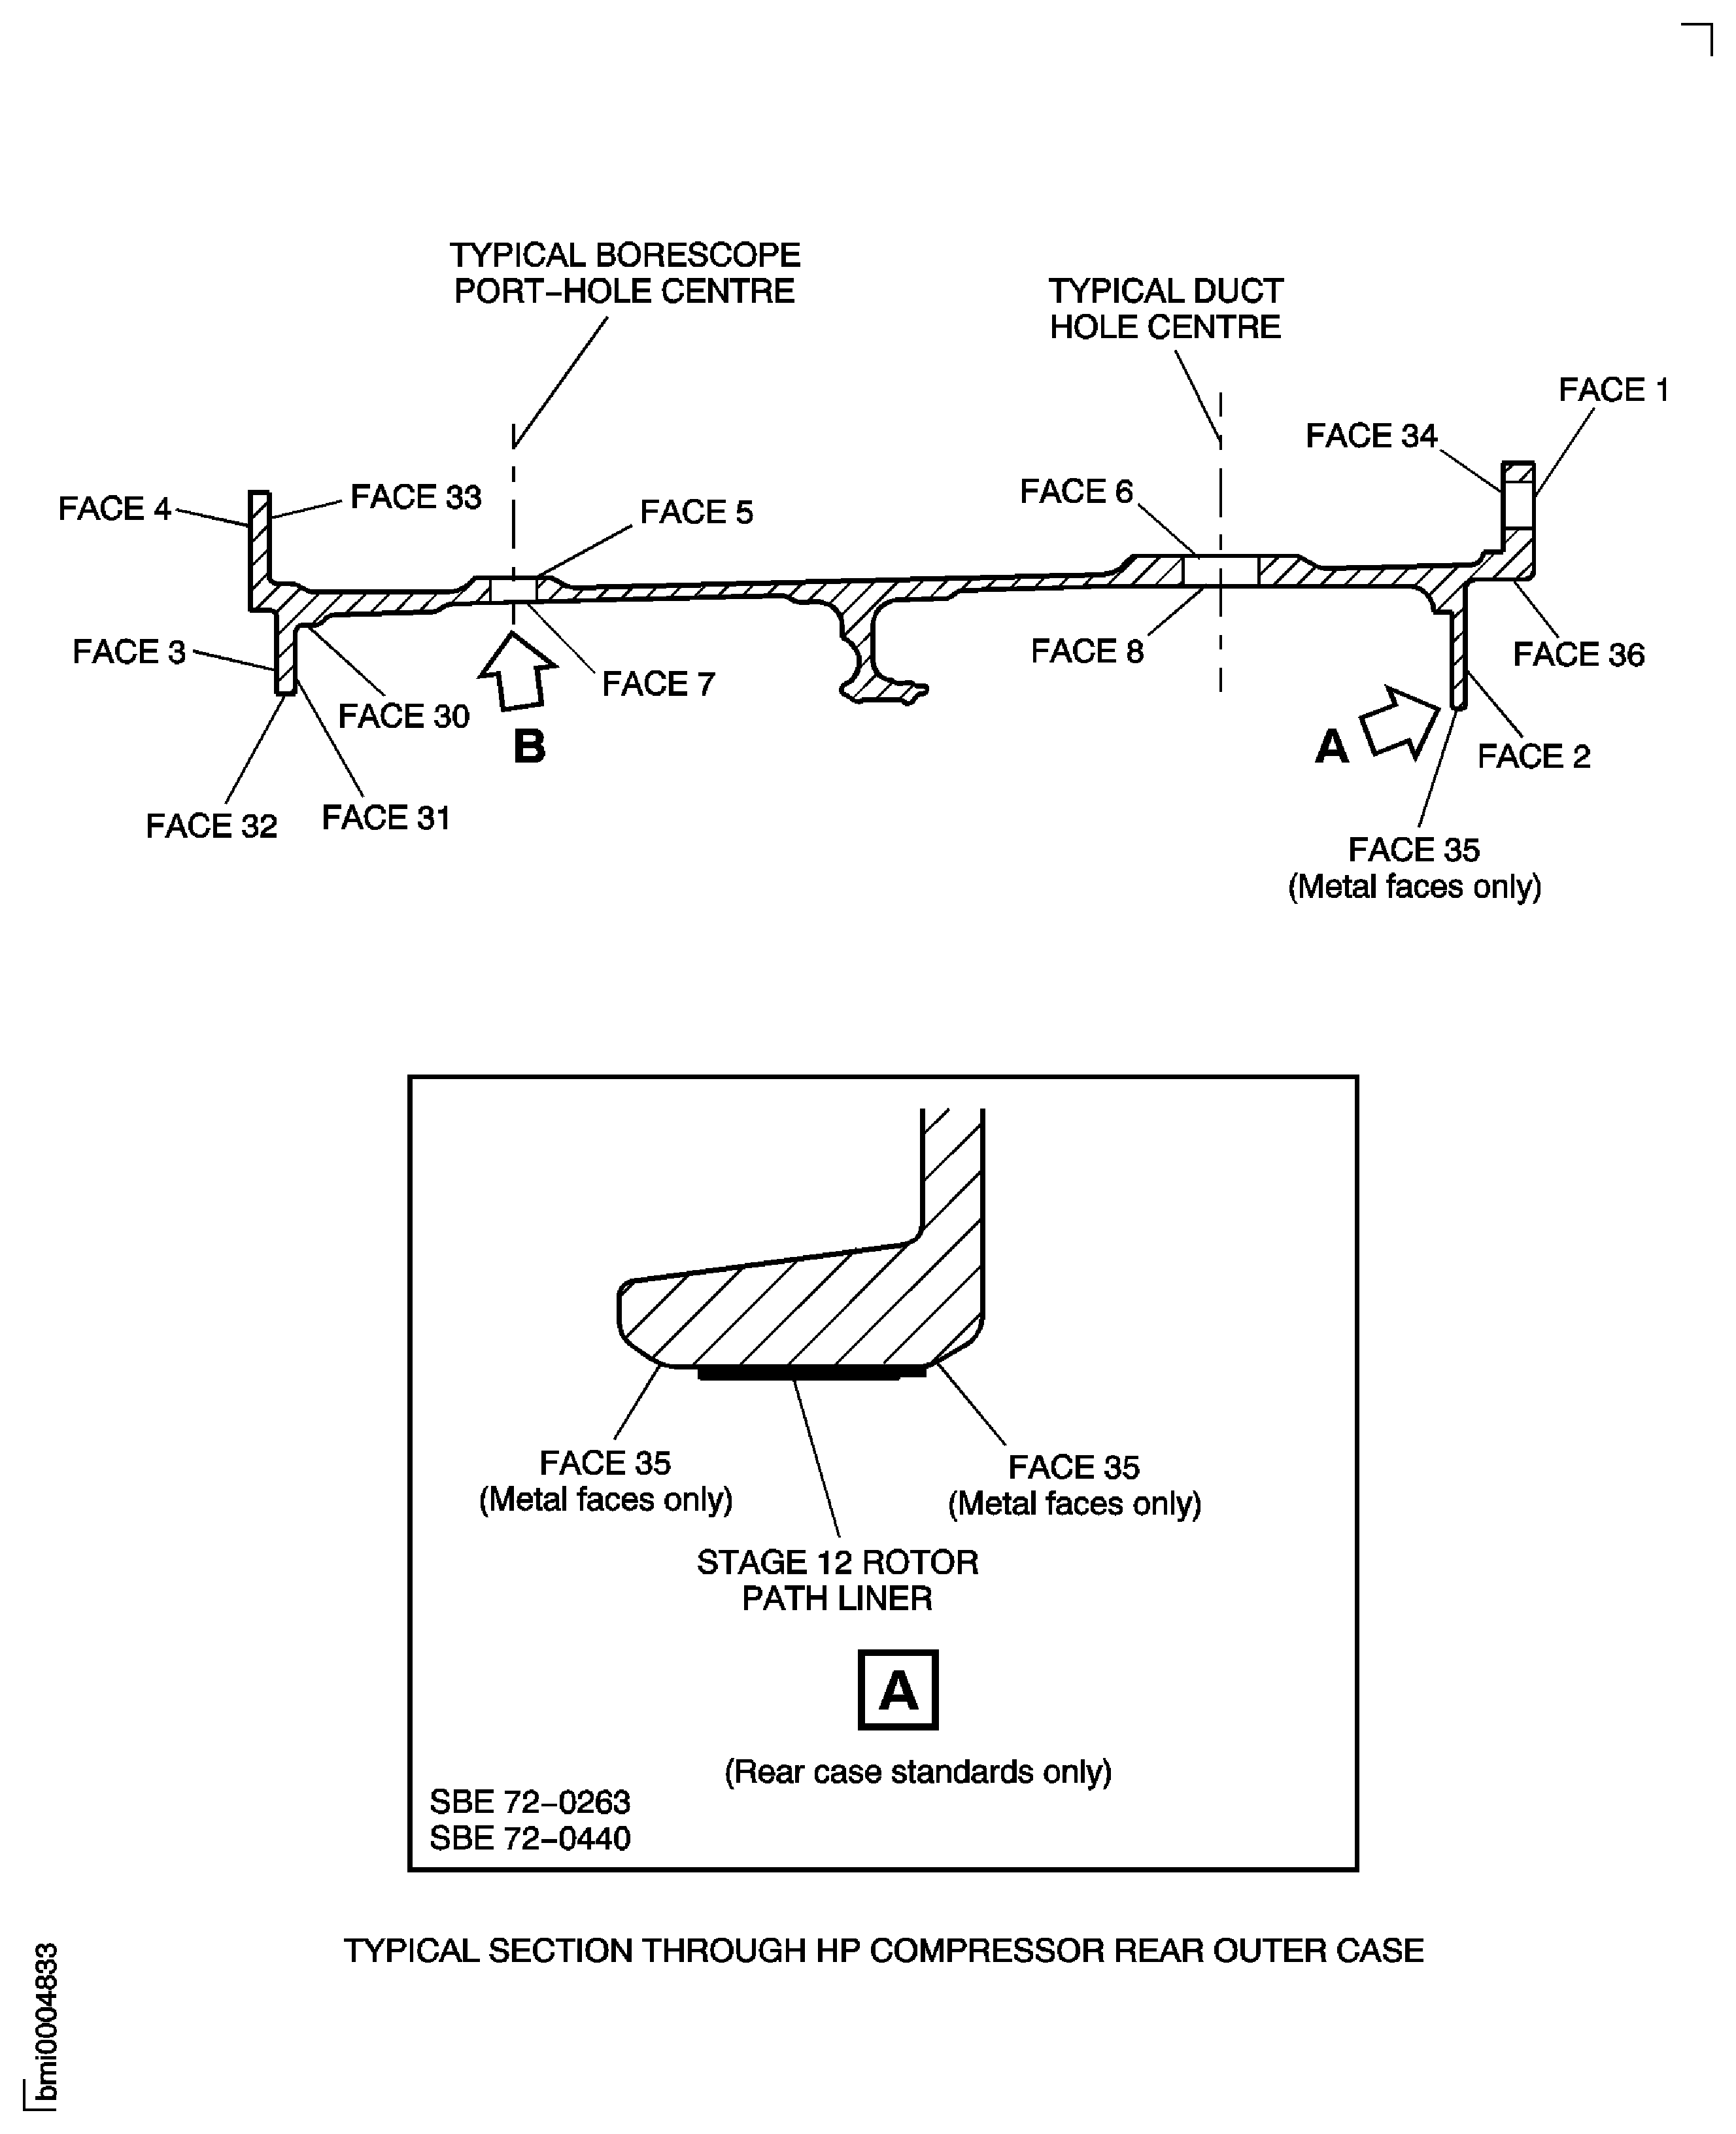
Figure: Extended Repair Limit Areas
Extended Repair Limit Areas
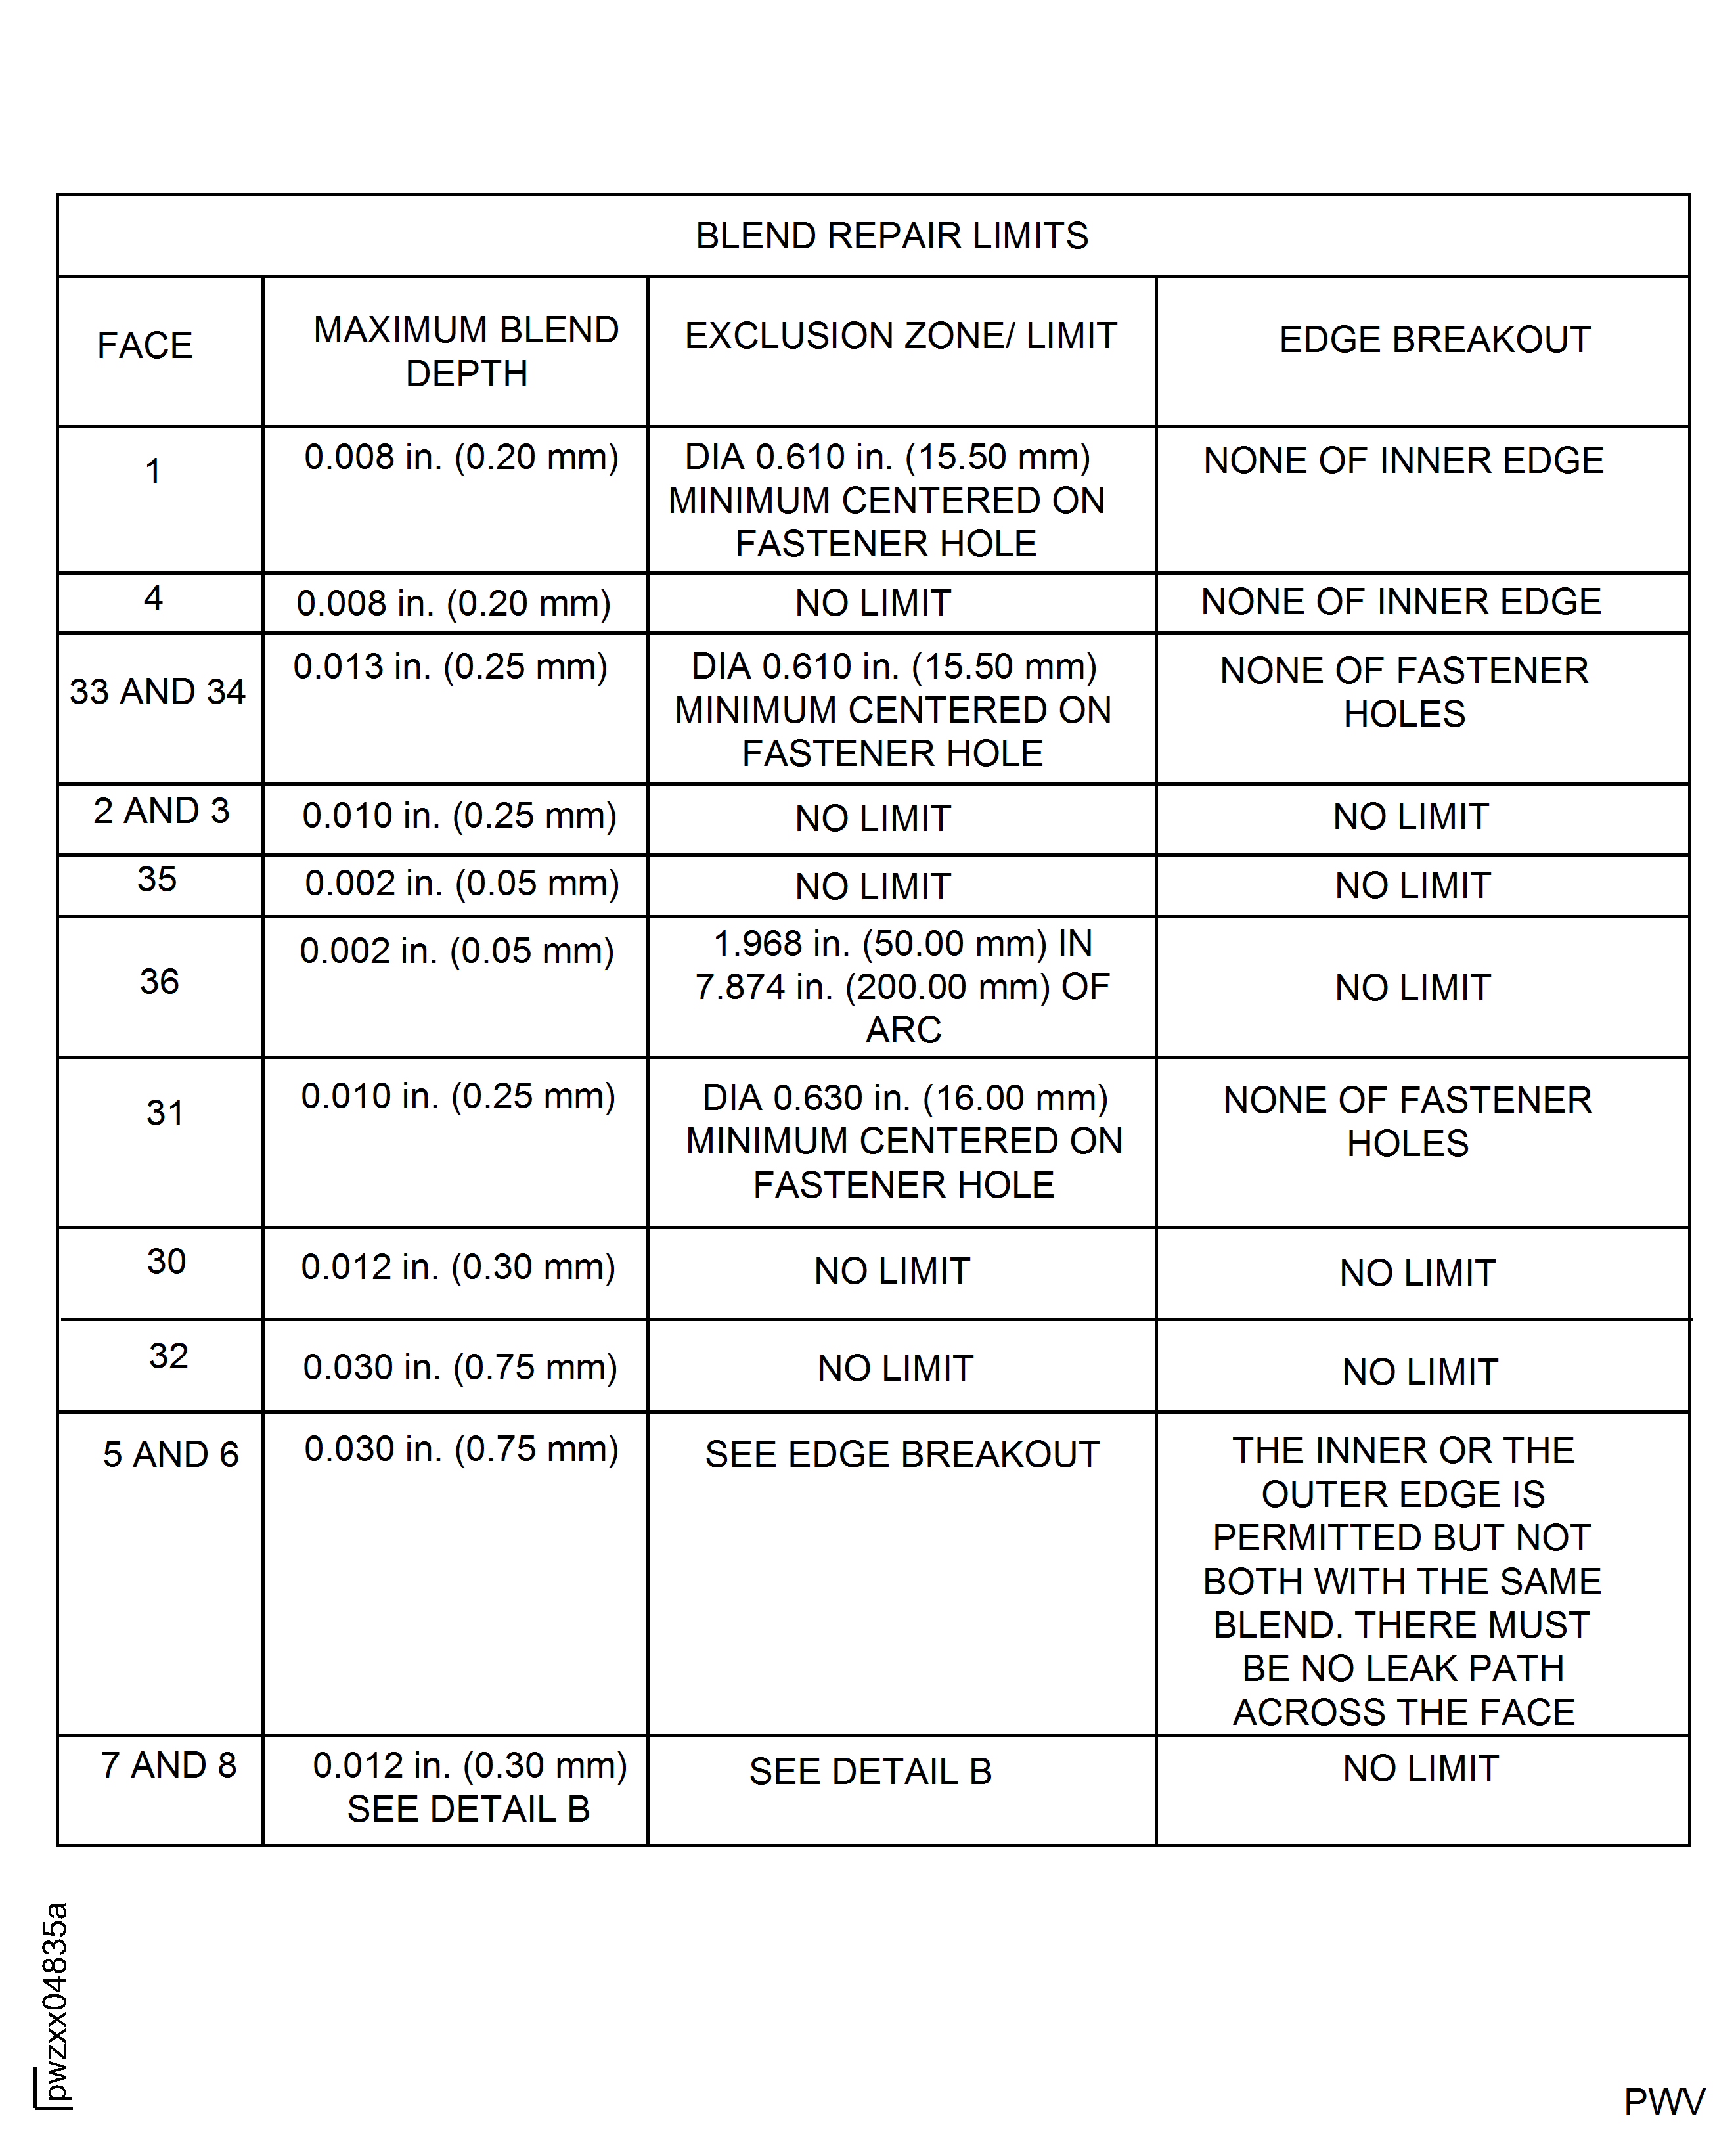
Figure: Length of Blend on Case Inner Surface Typical at All Boss Bolt Holes
Length of Blend on Case Inner Surface Typical at All Boss Bolt Holes
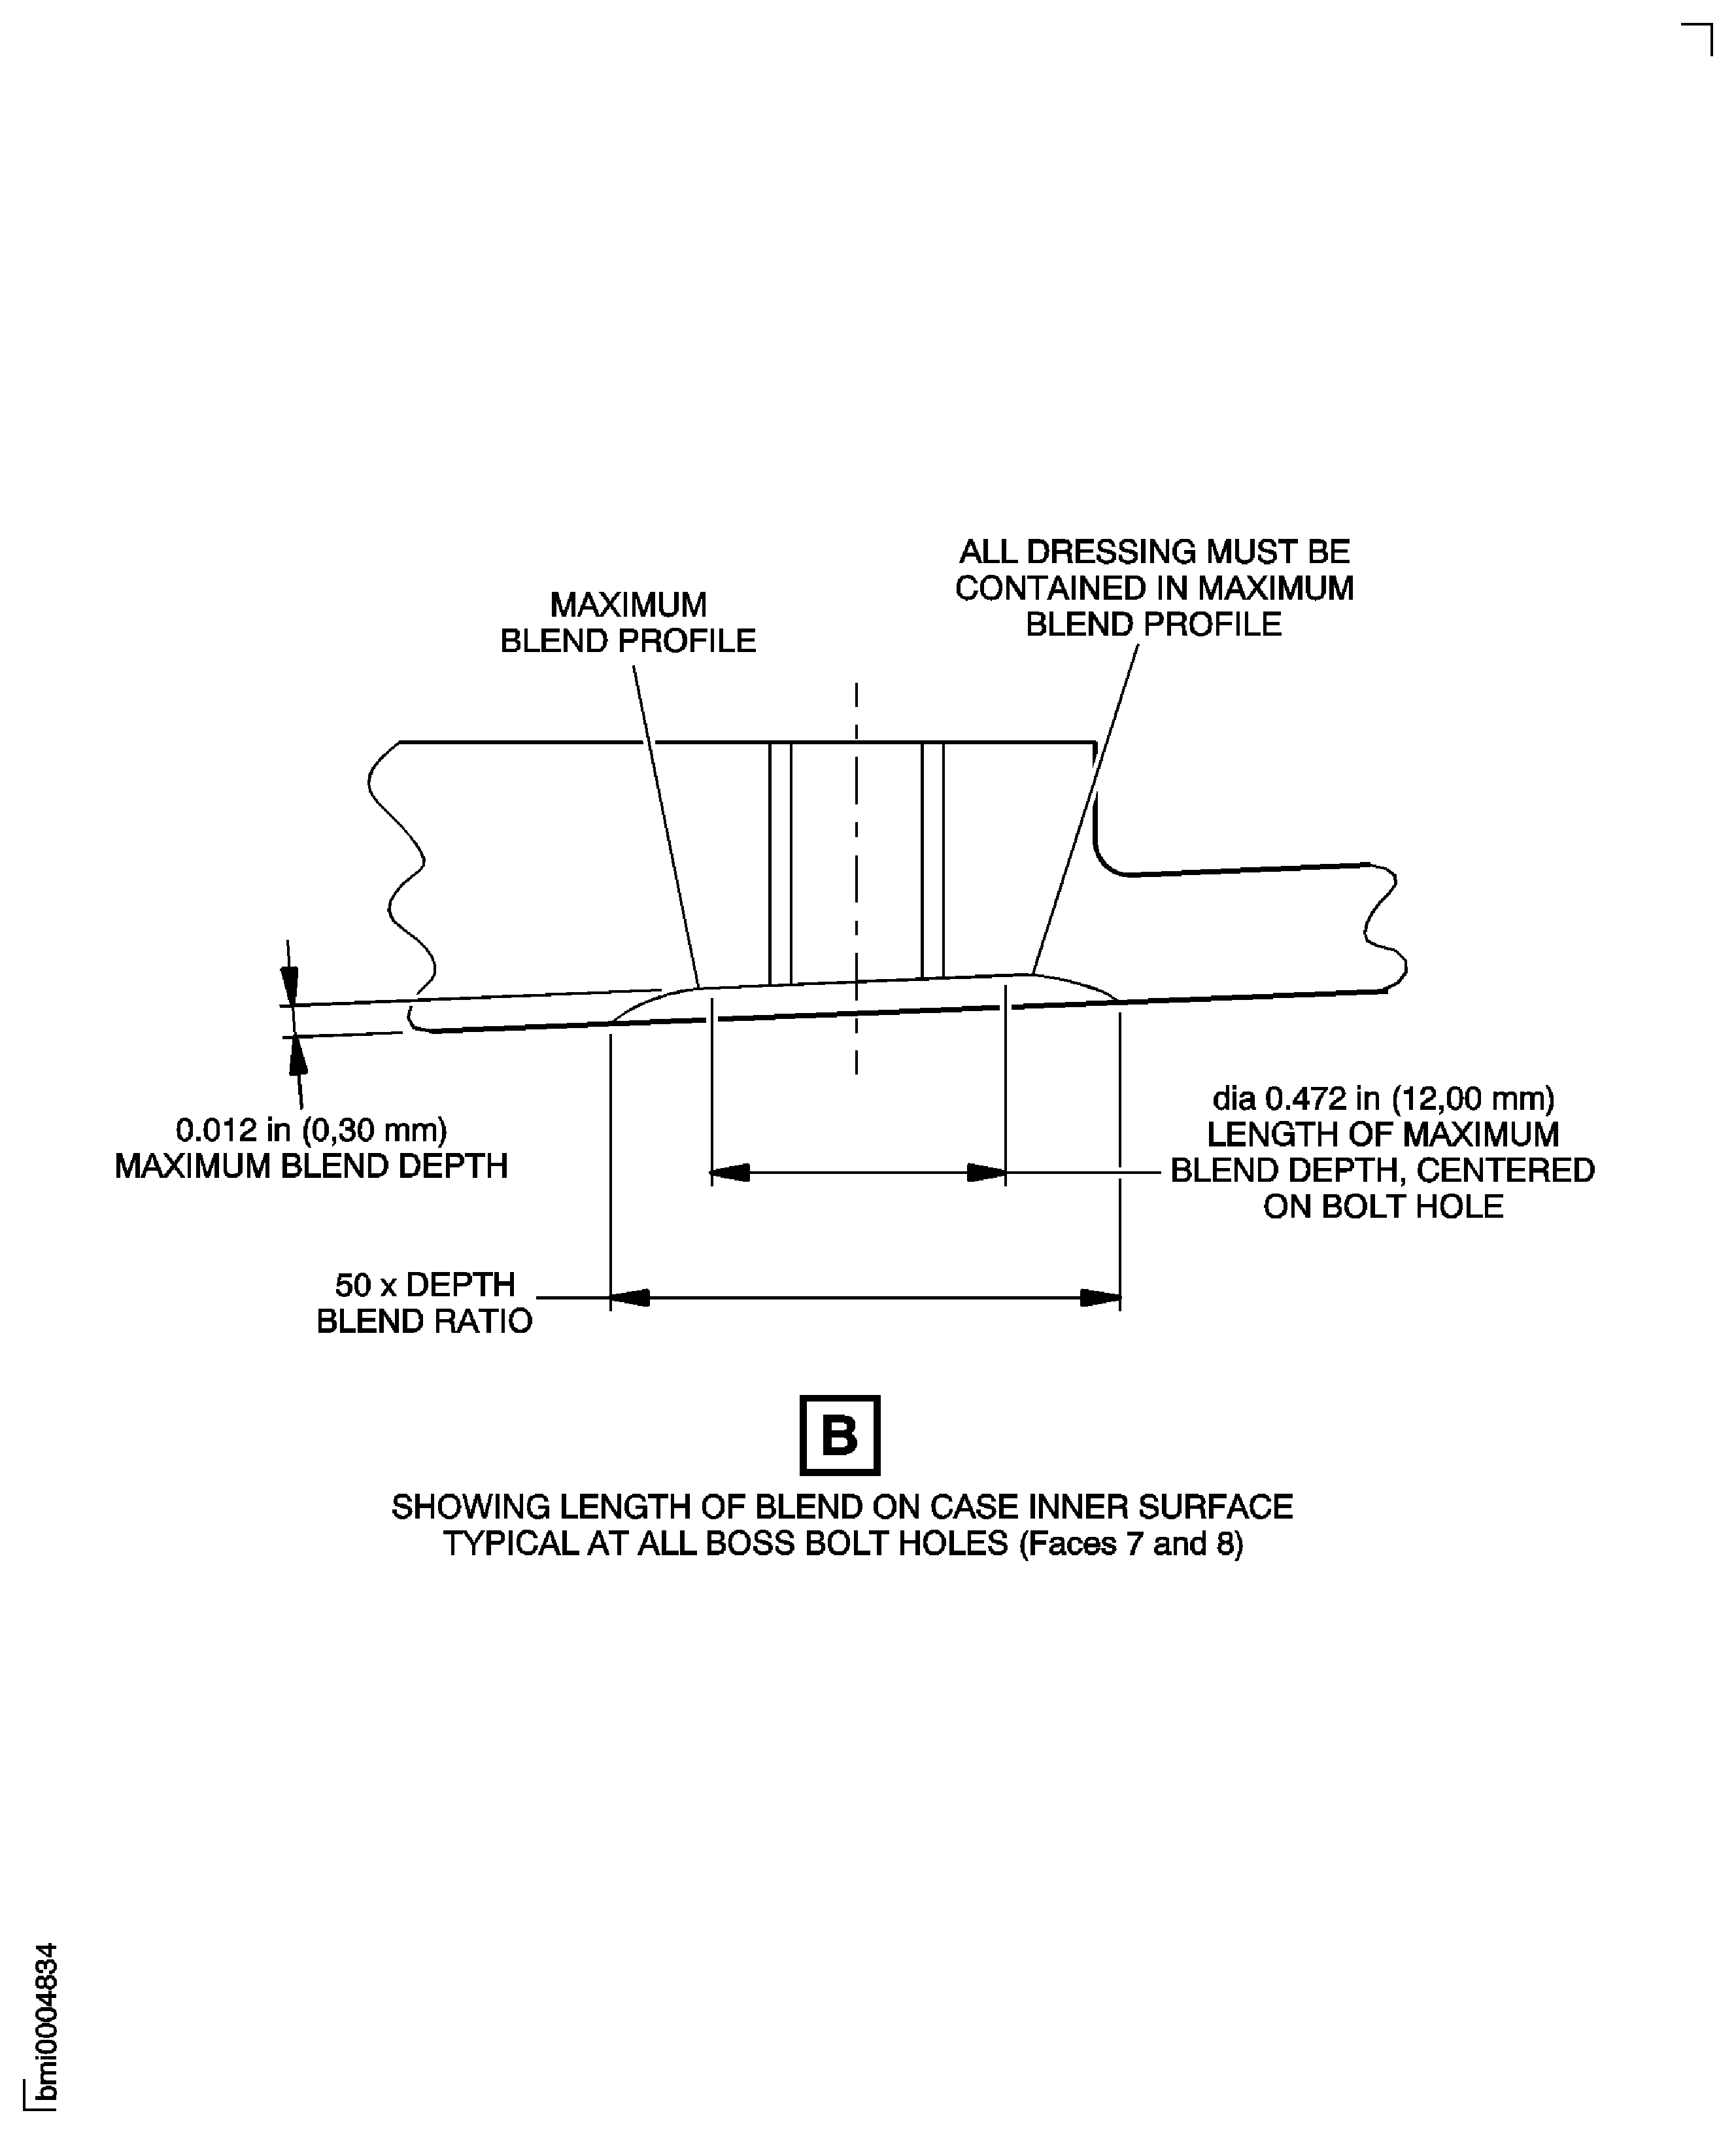
Figure: Repair Details and Dimensions
Repair Details and Dimensions
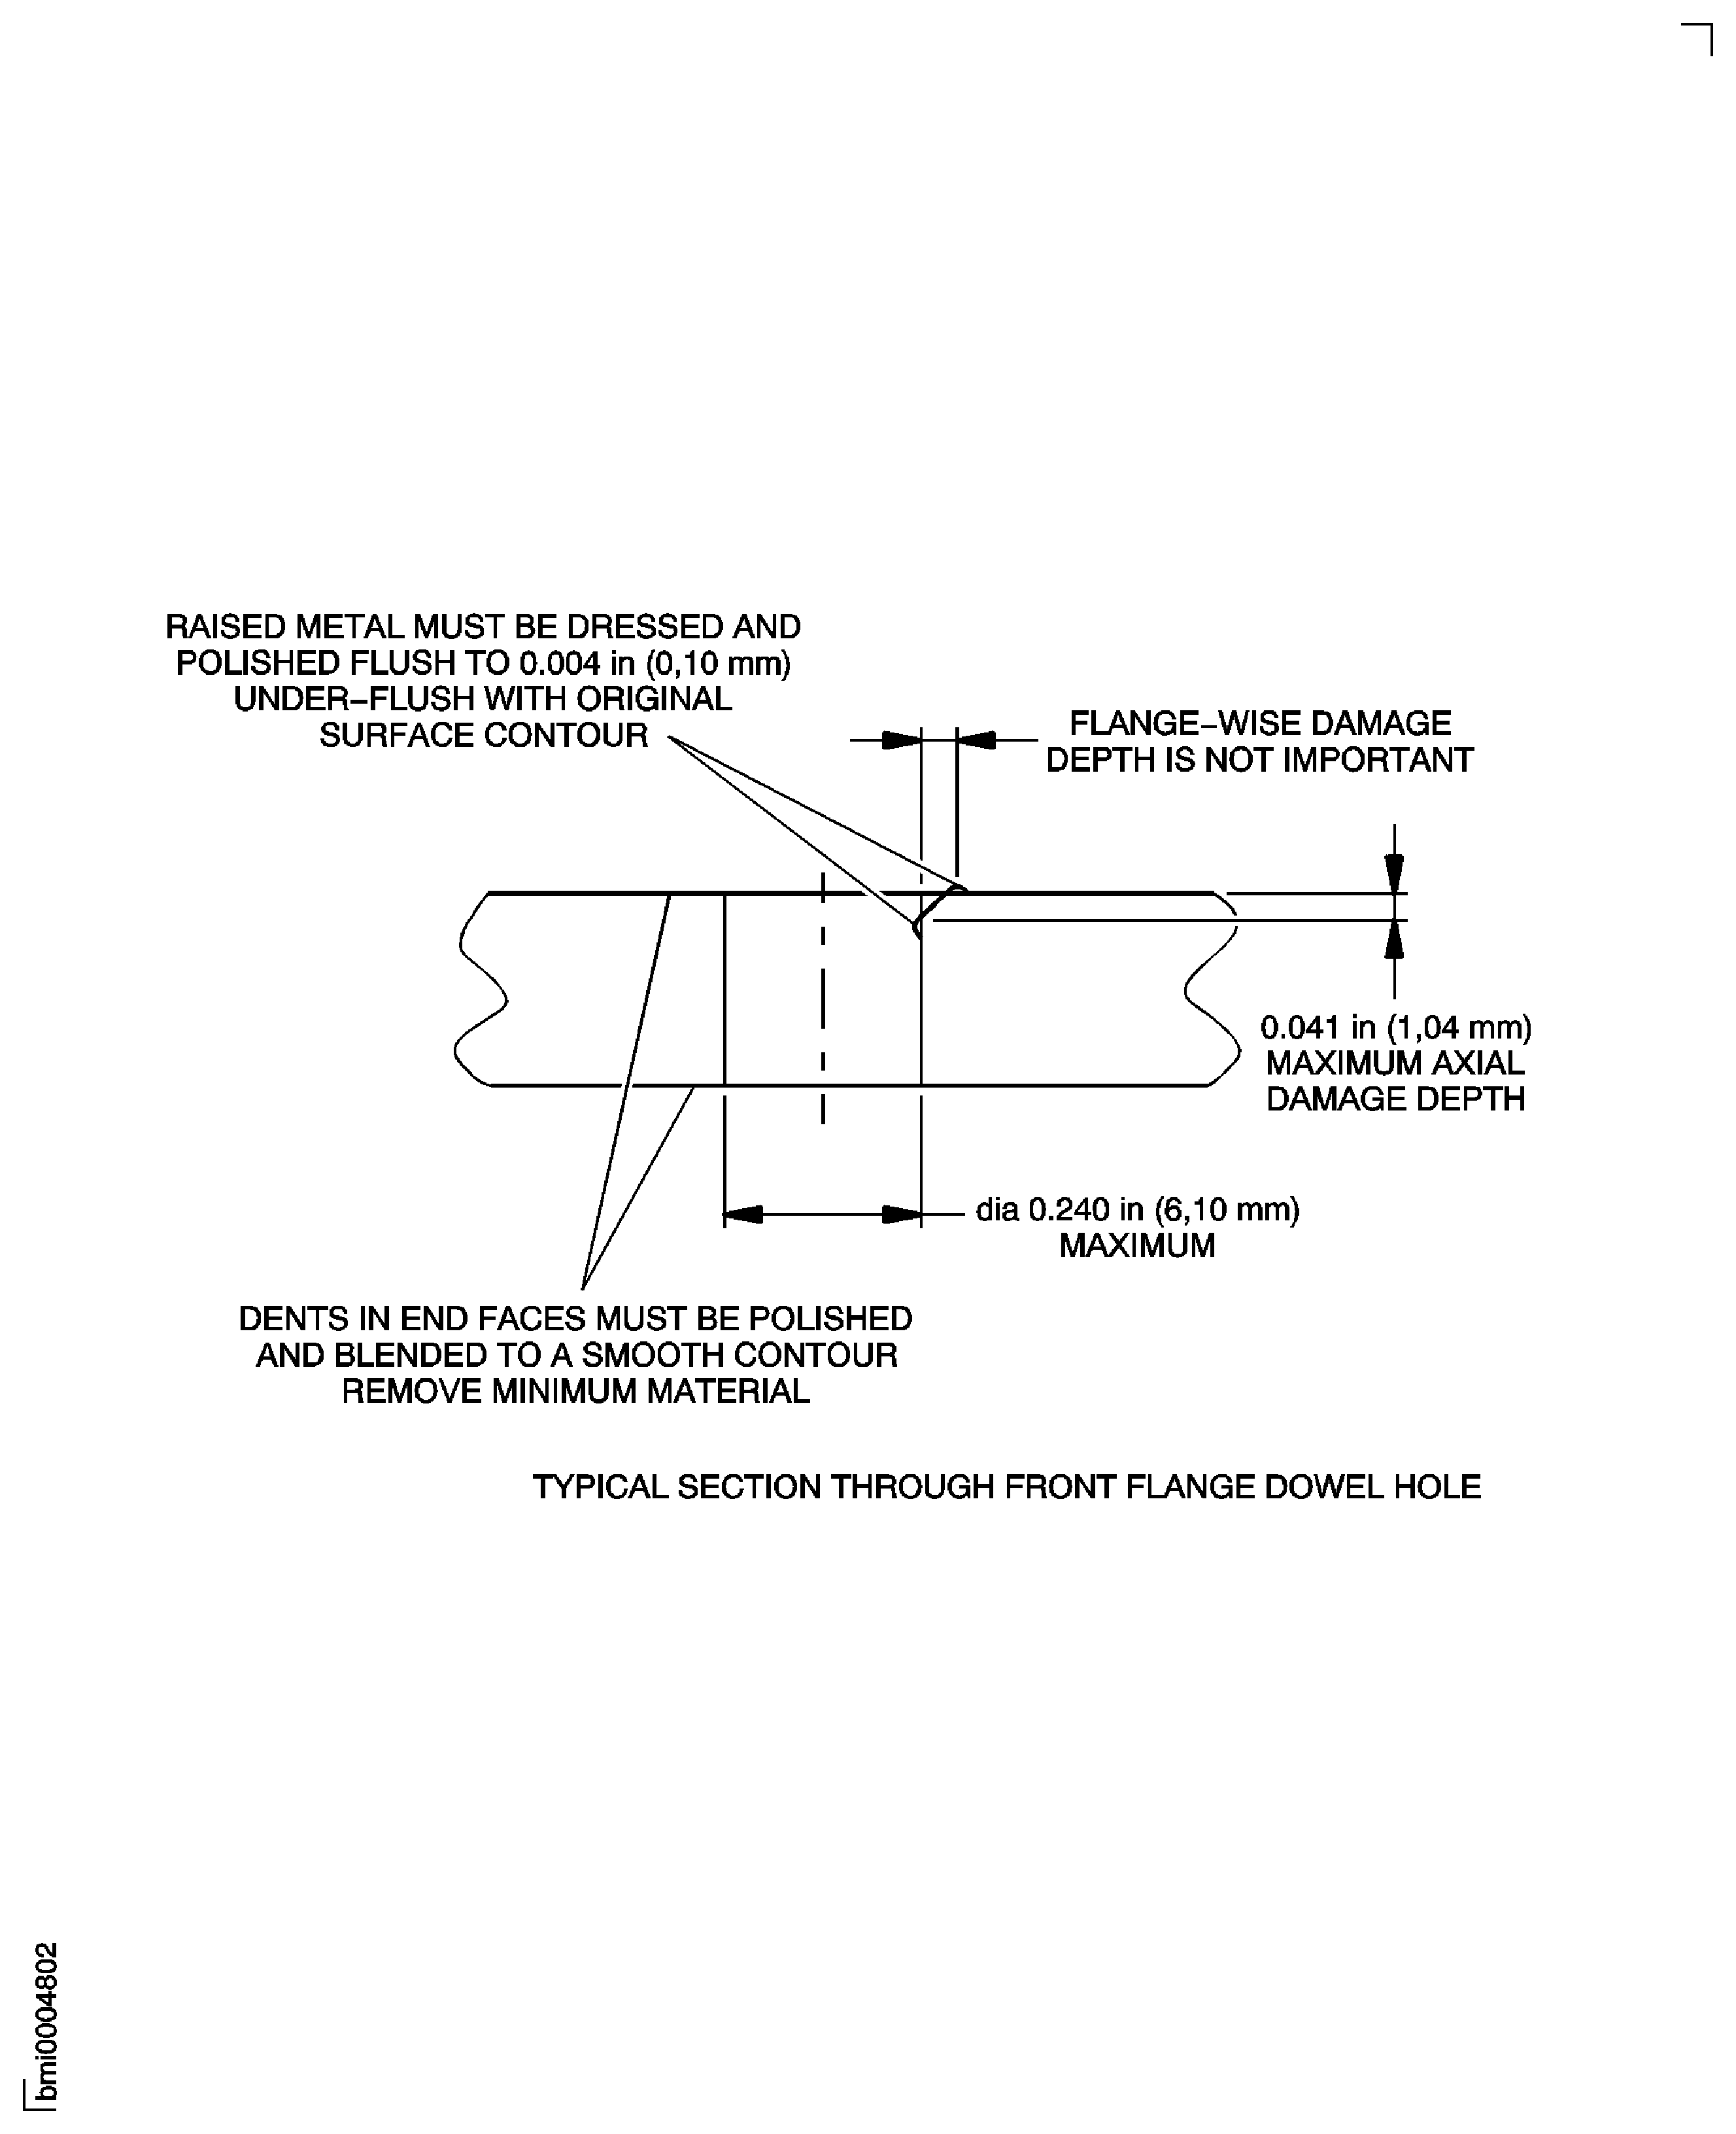
Figure: Repair Details and Dimensions
Repair Details and Dimensions

Figure: Repair Details and Dimensions
Repair Details and Dimensions
