Export Control
EAR Export Classification: Not subject to the EAR per 15 C.F.R. Chapter 1, Part 734.3(b)(3), except for the following Service Bulletins which are currently published as EAR Export Classification 9E991: SBE70-0992, SBE72-0483, SBE72-0580, SBE72-0588, SBE72-0640, SBE73-0209, SBE80-0024 and SBE80-0025.Copyright
© IAE International Aero Engines AG (2001, 2014 - 2021) The information contained in this document is the property of © IAE International Aero Engines AG and may not be copied or used for any purpose other than that for which it is supplied without the express written authority of © IAE International Aero Engines AG. (This does not preclude use by engine and aircraft operators for normal instructional, maintenance or overhaul purposes.).Applicability
All
Common Information
TASK 72-41-31-300-001 HPC Front Case - Blend Repair, Repair-001 (VRS6105)
General
This Repair must only be done when the instruction to do so is given in TASK 72-41-31-200-000 (INSPECTION-000).
This TASK gives the procedure to remove surface damage on the HP compressor front case by material removal.
Preliminary Requirements
Pre-Conditions
| Action/Condition | Data Module/Technical Publication |
|---|---|
| Make sure that all the necessary cleaning and inspection procedures are done before this repair. |
Support Equipment
NONEConsumables, Materials and Expendables
NONESpares
NONESafety Requirements
NONEProcedure
Refer to the SPM TASK 70-35-03-300-501.
The maximum depth to remove the damage must not be more than 0.005 in. (0.13 mm).
The diameter of the repaired area(s) is to be 50 times the depth.
Remove the area(s) of damage as necessary.
Refer to the SPM TASK 70-35-03-300-501.
The maximum depth to remove the damage must not be more than 0.007 in. (0.18 mm).
The diameter of the repaired area(s) is to be 50 times the depth.
Remove damage from area(s) identified AF as necessary.
Refer to the SPM TASK 70-35-03-300-501.
The diameter of the repaired area(s) is to be 50 times the depth.
Make sure the minimum remaining case wall thickness in repaired areas is 0.165 in. (4.20 mm).
Remove damage from area(s) identified AK as necessary.
Refer to the SPM TASK 70-35-03-300-501.
The maximum depth to remove the damage must not be more than 0.014 in. (0.36 mm).
The diameter of the repaired area(s) is to be 50 times the depth.
Remove damage from area(s) identified AE as necessary.
Refer to SPM TASK 70-35-03-300-501
The maximum depth of damage removal is not to exceed 0.018 in. (0.457 mm).
The maximum circumferential length is not to exceed 8.700 in. (220.98 mm).
If damage is removed on zone AM:
Refer to the SPM TASK 70-35-03-300-501.
Remove raised material and burrs only.
Remove the area(s) of damage on the Dowel Holes at Location 16 as necessary for Assembly A and C. Refer to Figure and Figure.
Refer to the SPM TASK 70-35-03-300-501.
The maximum radial depth to remove the damage must not be more than 0.032 in. (0.81 mm).
The maximum axial width to remove the damage must not be more than 0.055 in. (1.40 mm).
The maximum circumferential length to remove the damage must not be more than 0.375 in. (9.53 mm).
Remove the area(s) of damage on the Dowel Holes at Location 16 as necessary for Assembly B. Refer to Figure and Figure.
Refer to the SPM TASK 70-35-03-300-501.
Remove raised material and burrs only.
Remove the area(s) of damage on the Dowel Holes at Location 17 as necessary for Assembly A, B, and C. Refer to Figure and Figure.
Refer to the SPM TASK 70-35-03-300-501.
Remove raised material and burrs only.
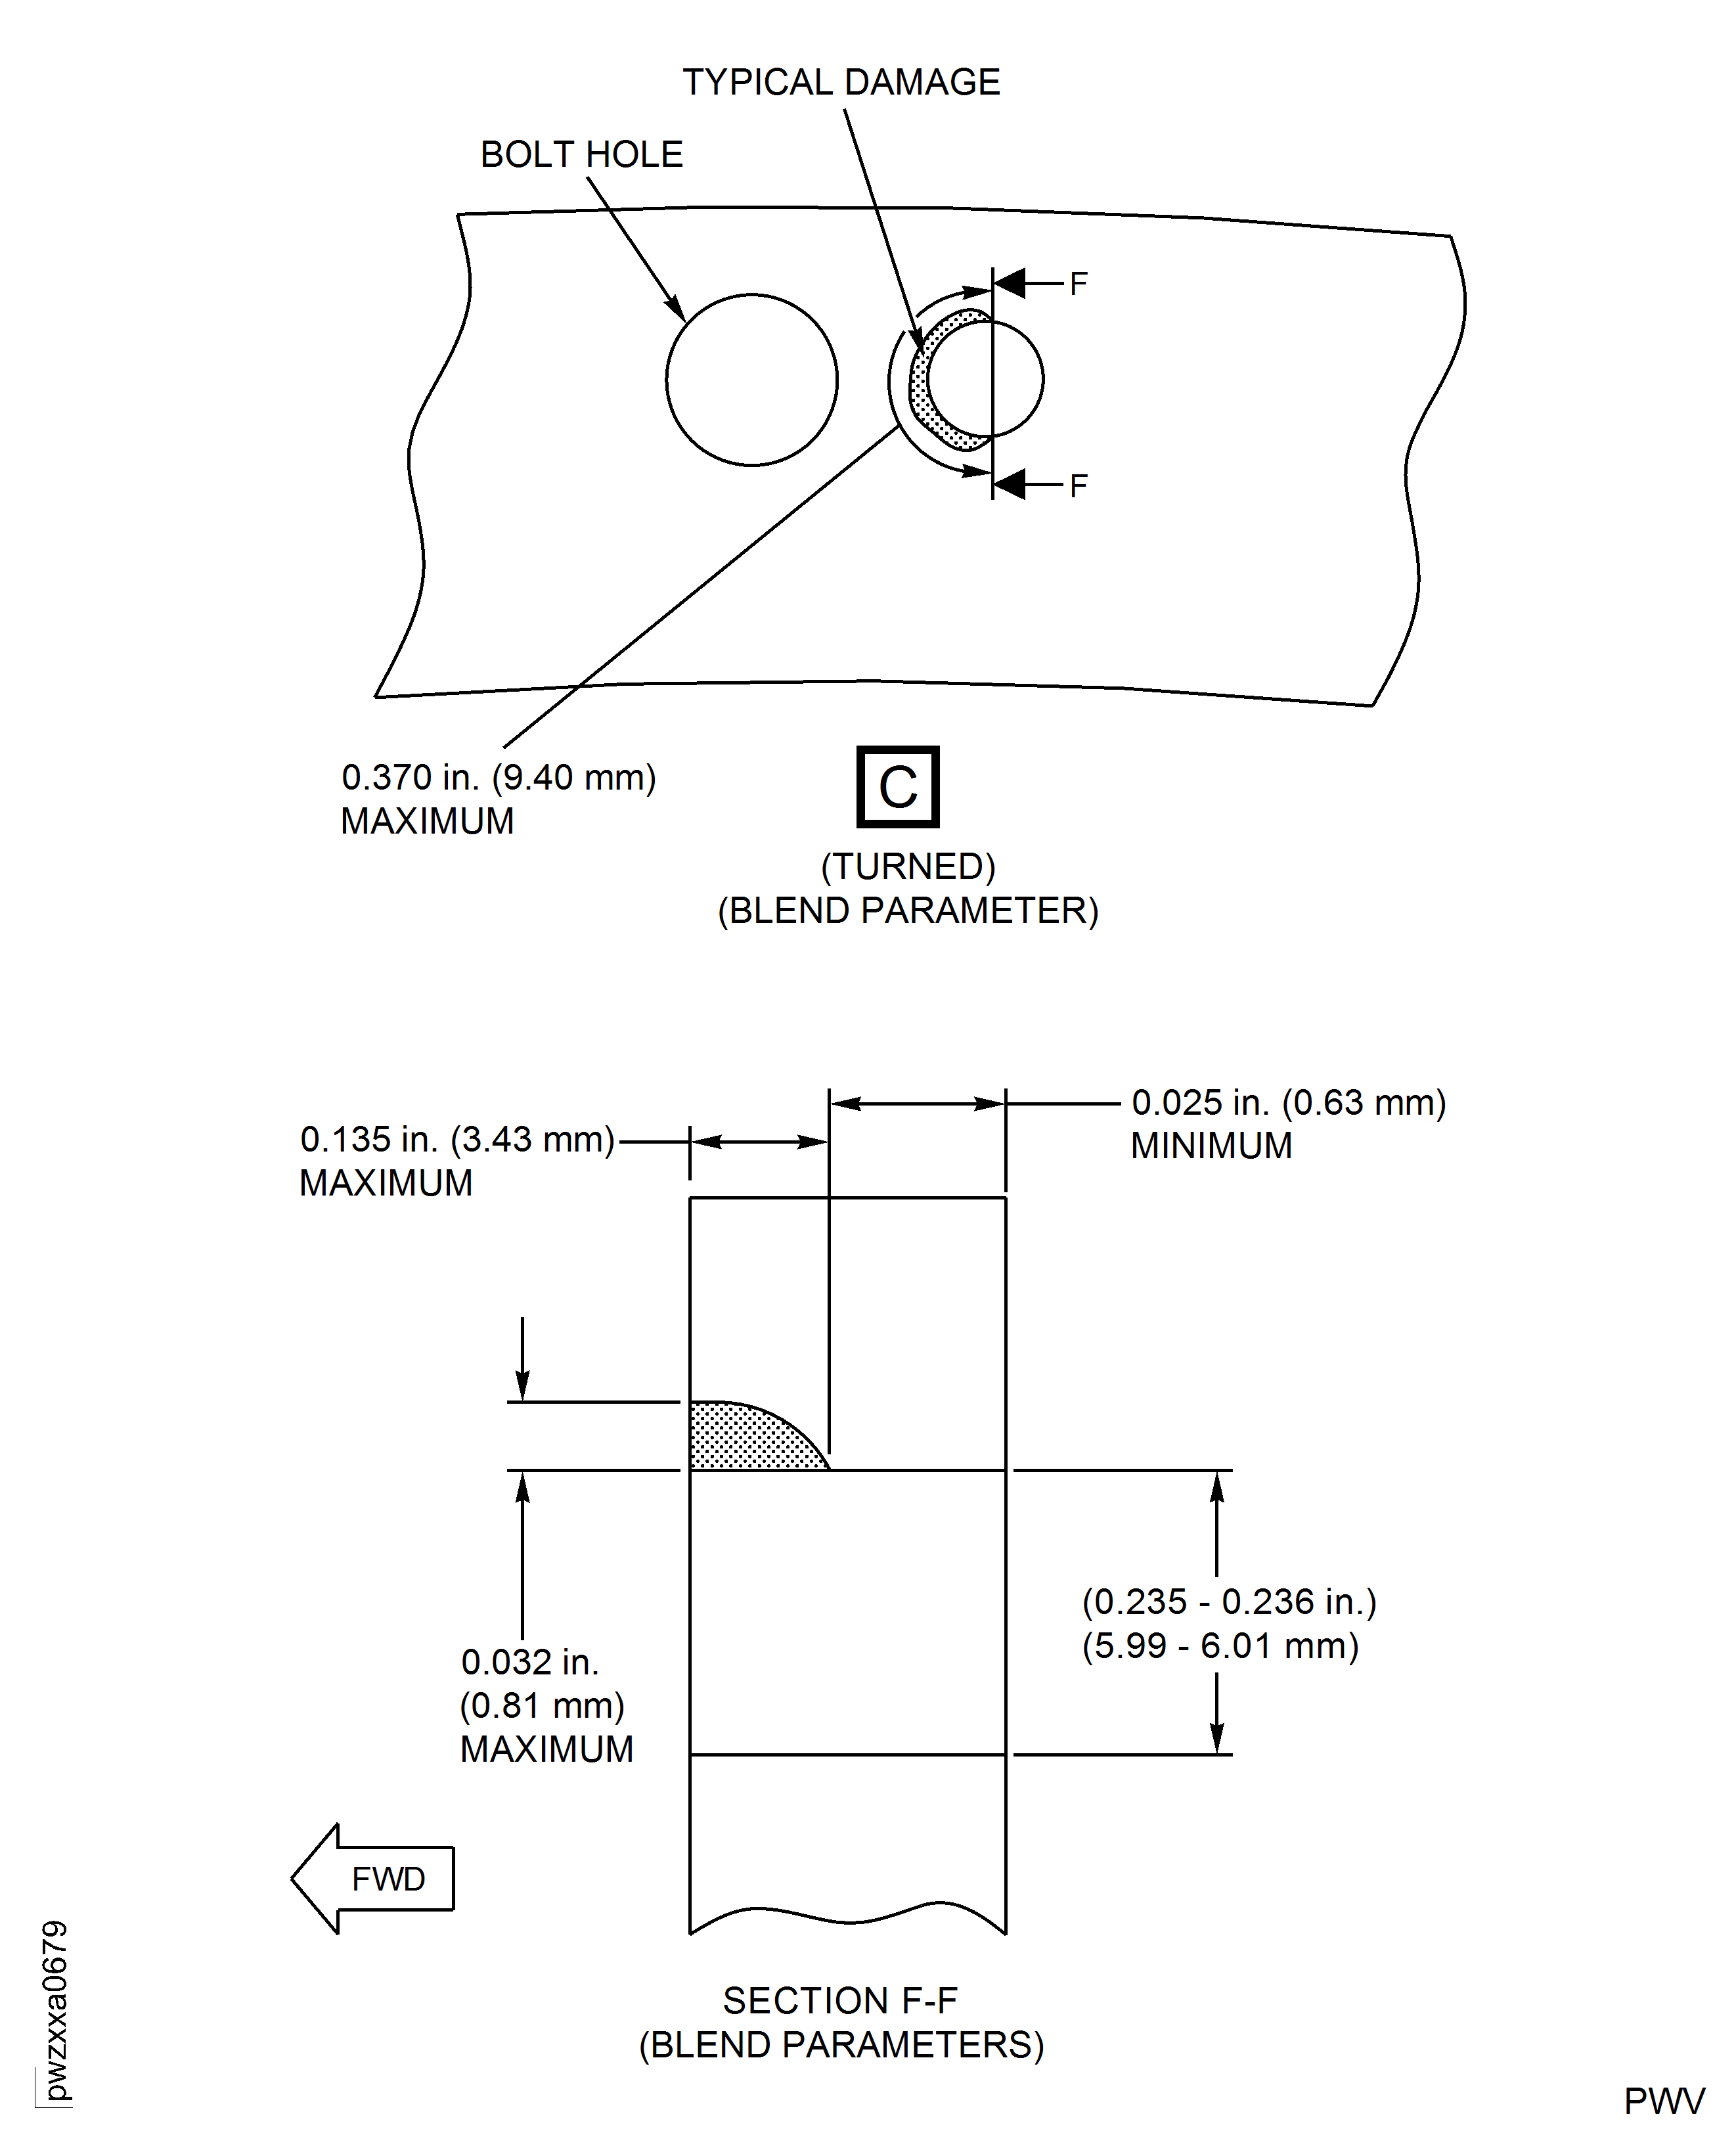
Remove the area(s) of damage on the Dowel Holes at Location 18 as necessary for Assembly A and C. Refer to Figure and Figure.
Refer to the SPM TASK 70-35-03-300-501.
The maximum radial depth to remove the damage must not be more than 0.032 in. (0.81 mm).
The maximum axial width to remove the damage must not be more than 0.135 in. (3.43 mm).
The maximum cumulative circumferential length to remove the damage must not be more than 0.370 in. (9.40 mm).
The minimum axial thickness remaining at the blend location must not be less than 0.025 in. (0.63 mm).
Remove the area(s) of damage on the Dowel Holes at Location 18 as necessary for Assembly B. Refer to Figure and Figure.
SUBTASK 72-41-31-350-051 Remove the Damaged Area(s)
Refer to the SPM TASK 70-11-08-300-503, SUBTASK 70-11-08-300-001.
Chemically clean the repaired area.
Refer to the SPM TASK 70-11-08-300-503, SUBTASK 70-11-08-300-002.
Swab etch the repaired area.
SUBTASK 72-41-31-110-094 Do a Swab Etch
FPI of repaired area(s) by SPM TASK 70-23-02-230-501. Cracks are not permitted.
Local FPI of repaired area(s) by SPM TASK 70-23-05-230-501. Use medium sensitivity. Cracks are not permitted.
Do a local penetrant crack test on the repaired area(s) by one of the following methods:
SUBTASK 72-41-31-230-093 Do a Crack Test
Make sure the maximum depth of the repaired area in areas other than identified AE, AF and AK are not more than 0.005 in. (0.13 mm).
Make sure the maximum depth of the repaired area in areas identified AF is not more than 0.007 in. (0.18 mm).
Make sure the minimum remaining wall thickness in the repaired areas identified AK is 0.165 in. (4.20 mm).
Make sure the maximum depth of the repaired area in areas identified AE is not more than 0.014 in. (0.36 mm).
Make sure diameter of the repaired area(s) is 50 times the depth.
Make sure the maximum radial depth of the repaired area at Dowel Hole Location 16 is 0.032 in. (0.81 mm) for Assembly B.
Make sure the maximum axial width of the repaired area at Dowel Hole Location 16 is 0.055 in. (1.40 mm) for Assembly B.
Make sure the maximum circumferential length of the repaired area at Dowel Hole Location 16 is 0.375 in. (9.53 mm) for Assembly B.
Make sure the maximum radial depth of the repaired area at Dowel Hole Location 18 is 0.032 in. (0.81 mm) for Assembly B.
Make sure the maximum axial width of the repaired area at Dowel Hole Location 18 is 0.135 in. (3.43 mm) for Assembly B.
Make sure the maximum cumulative circumferential length of the repaired area at Dowel Hole Location 18 is 0.370 in. (9.40 mm) for Assembly B.
Make sure the minimum axial thickness remaining at the repaired area is 0.025 in. (0.63 mm) for Assembly B.
Do a visual and dimensional inspection.
SUBTASK 72-41-31-220-101 Examine the Repair
Refer to the SPM TASK 70-09-00-400-501, SUBTASK 70-09-00-400-001.
SUBTASK 72-41-31-350-126 Identify the repair
Figure: Repair Details and Dimensions - Assembly A
Repair Details and Dimensions - Assembly A
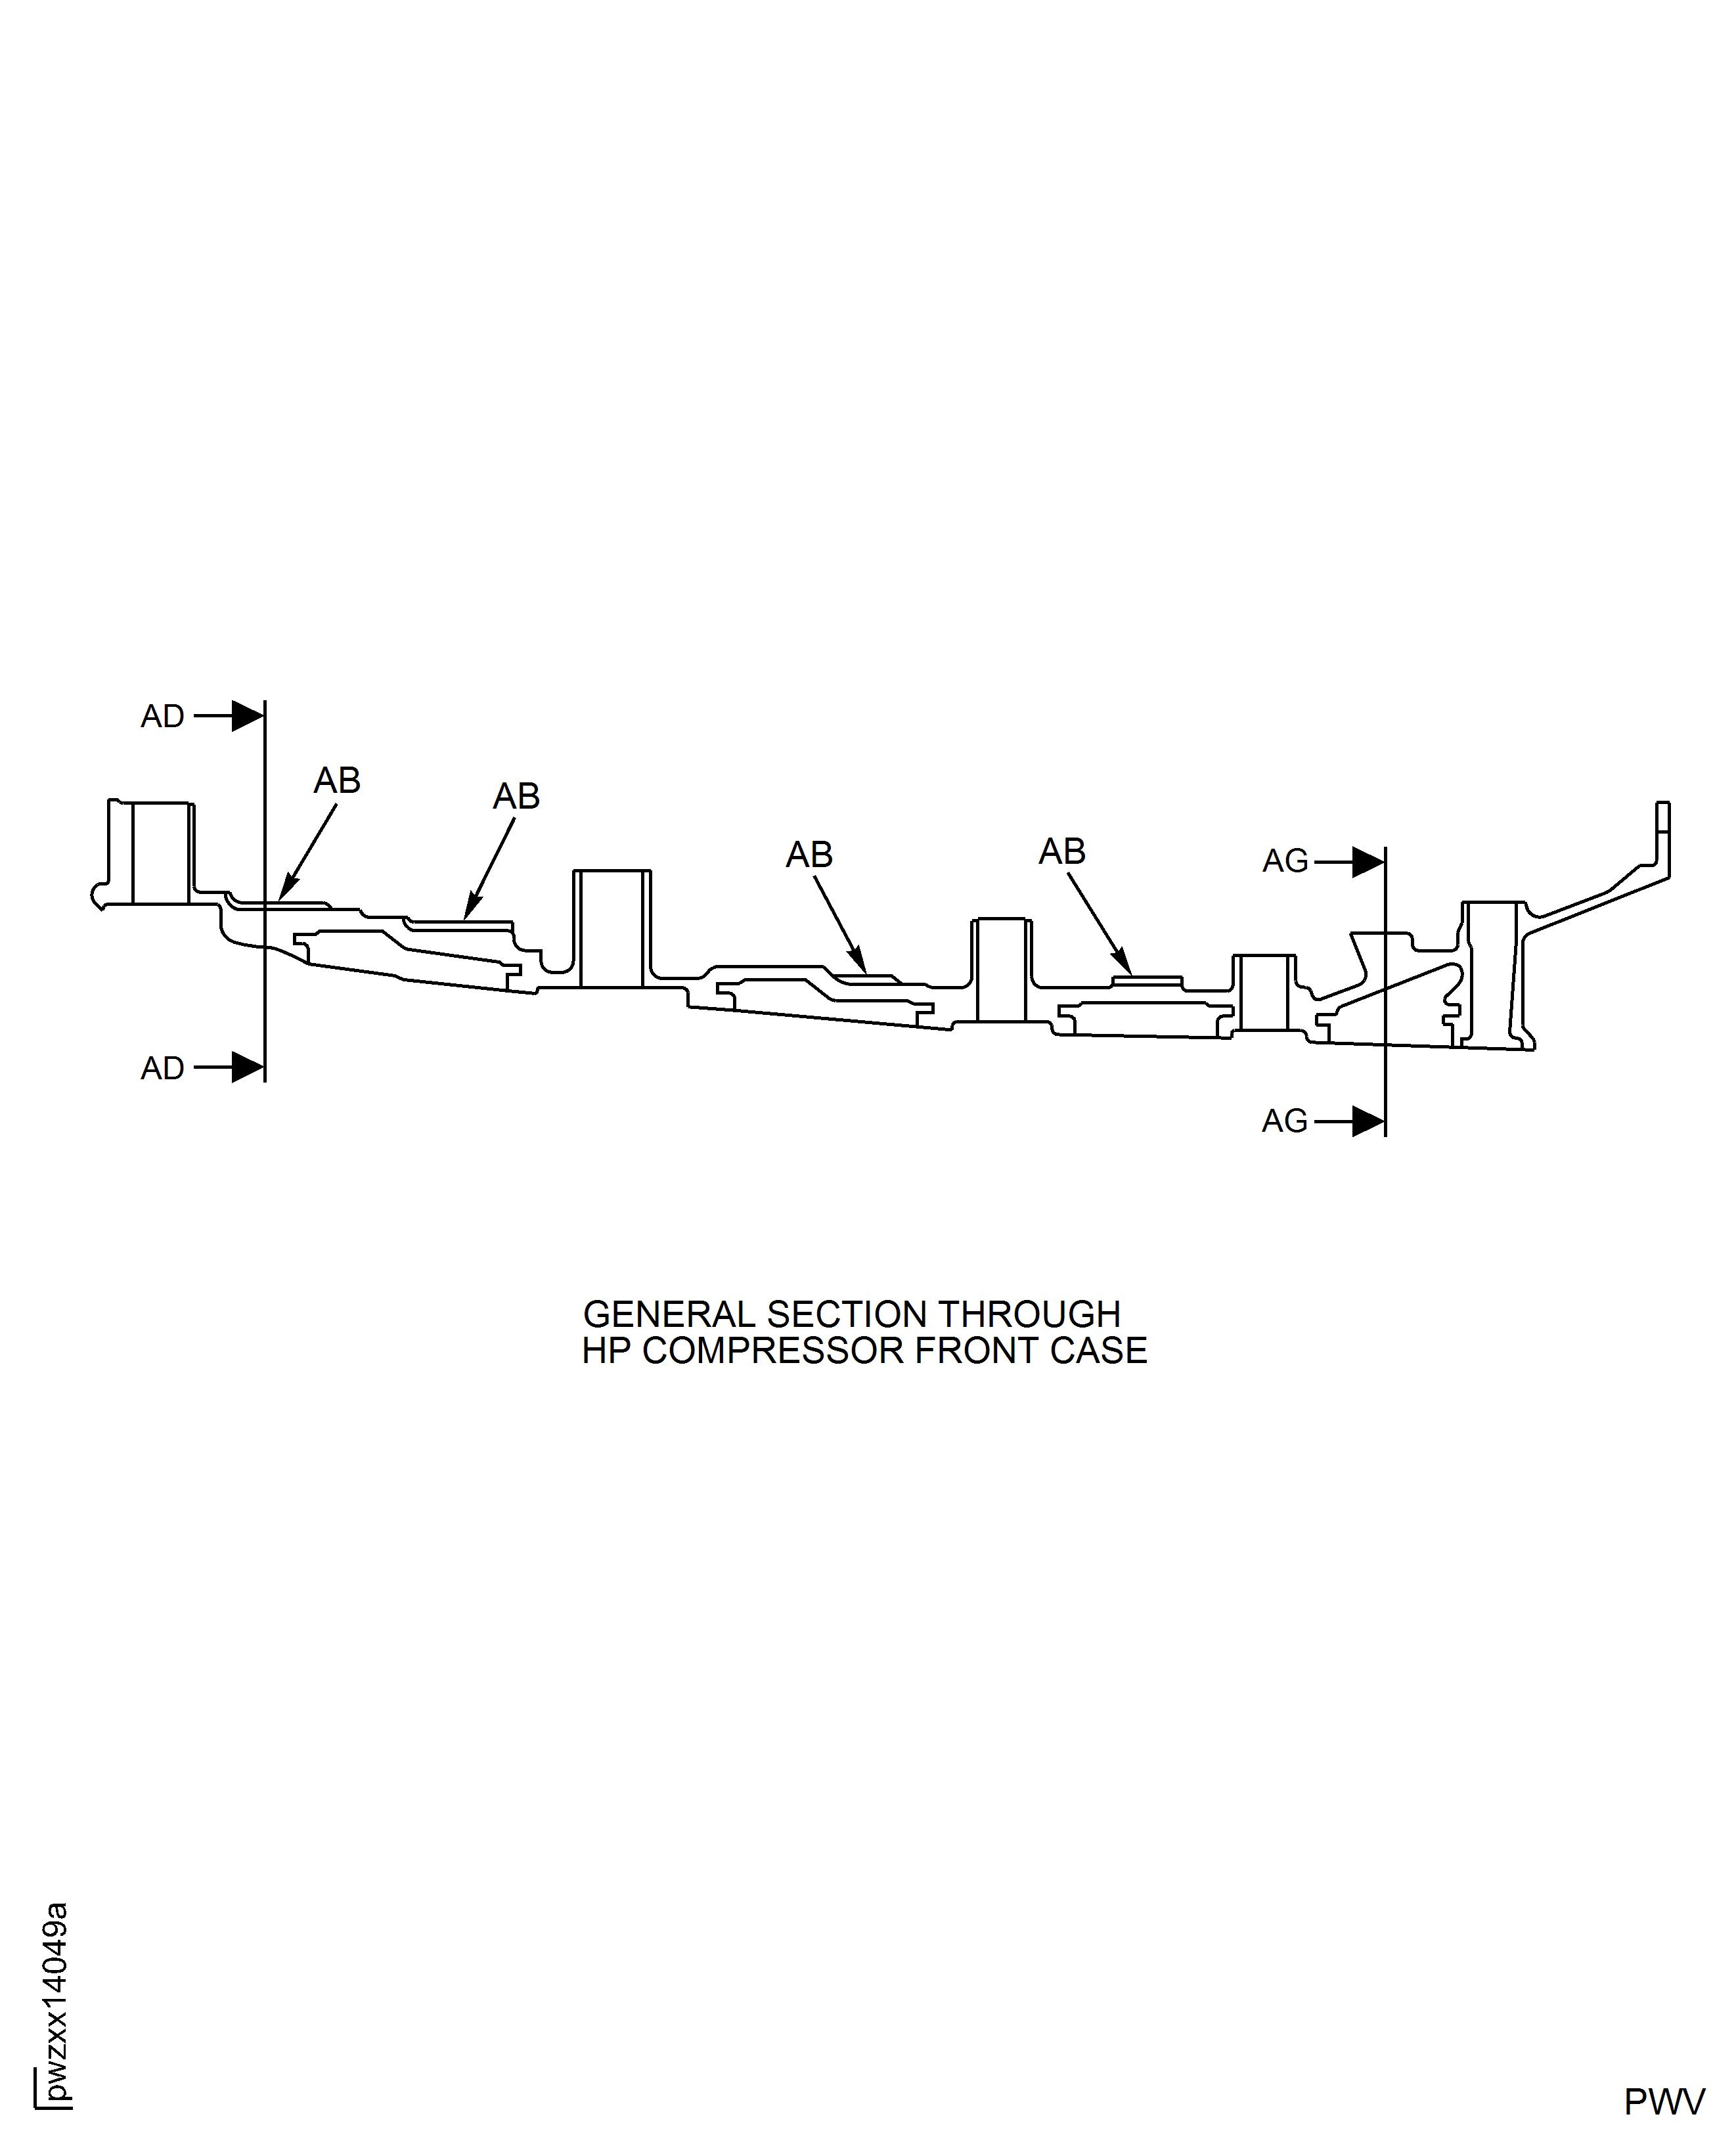
Figure: HP Compressor Front Case - Repair Zones - Assembly B
HP Compressor Front Case - Repair Zones - Assembly B
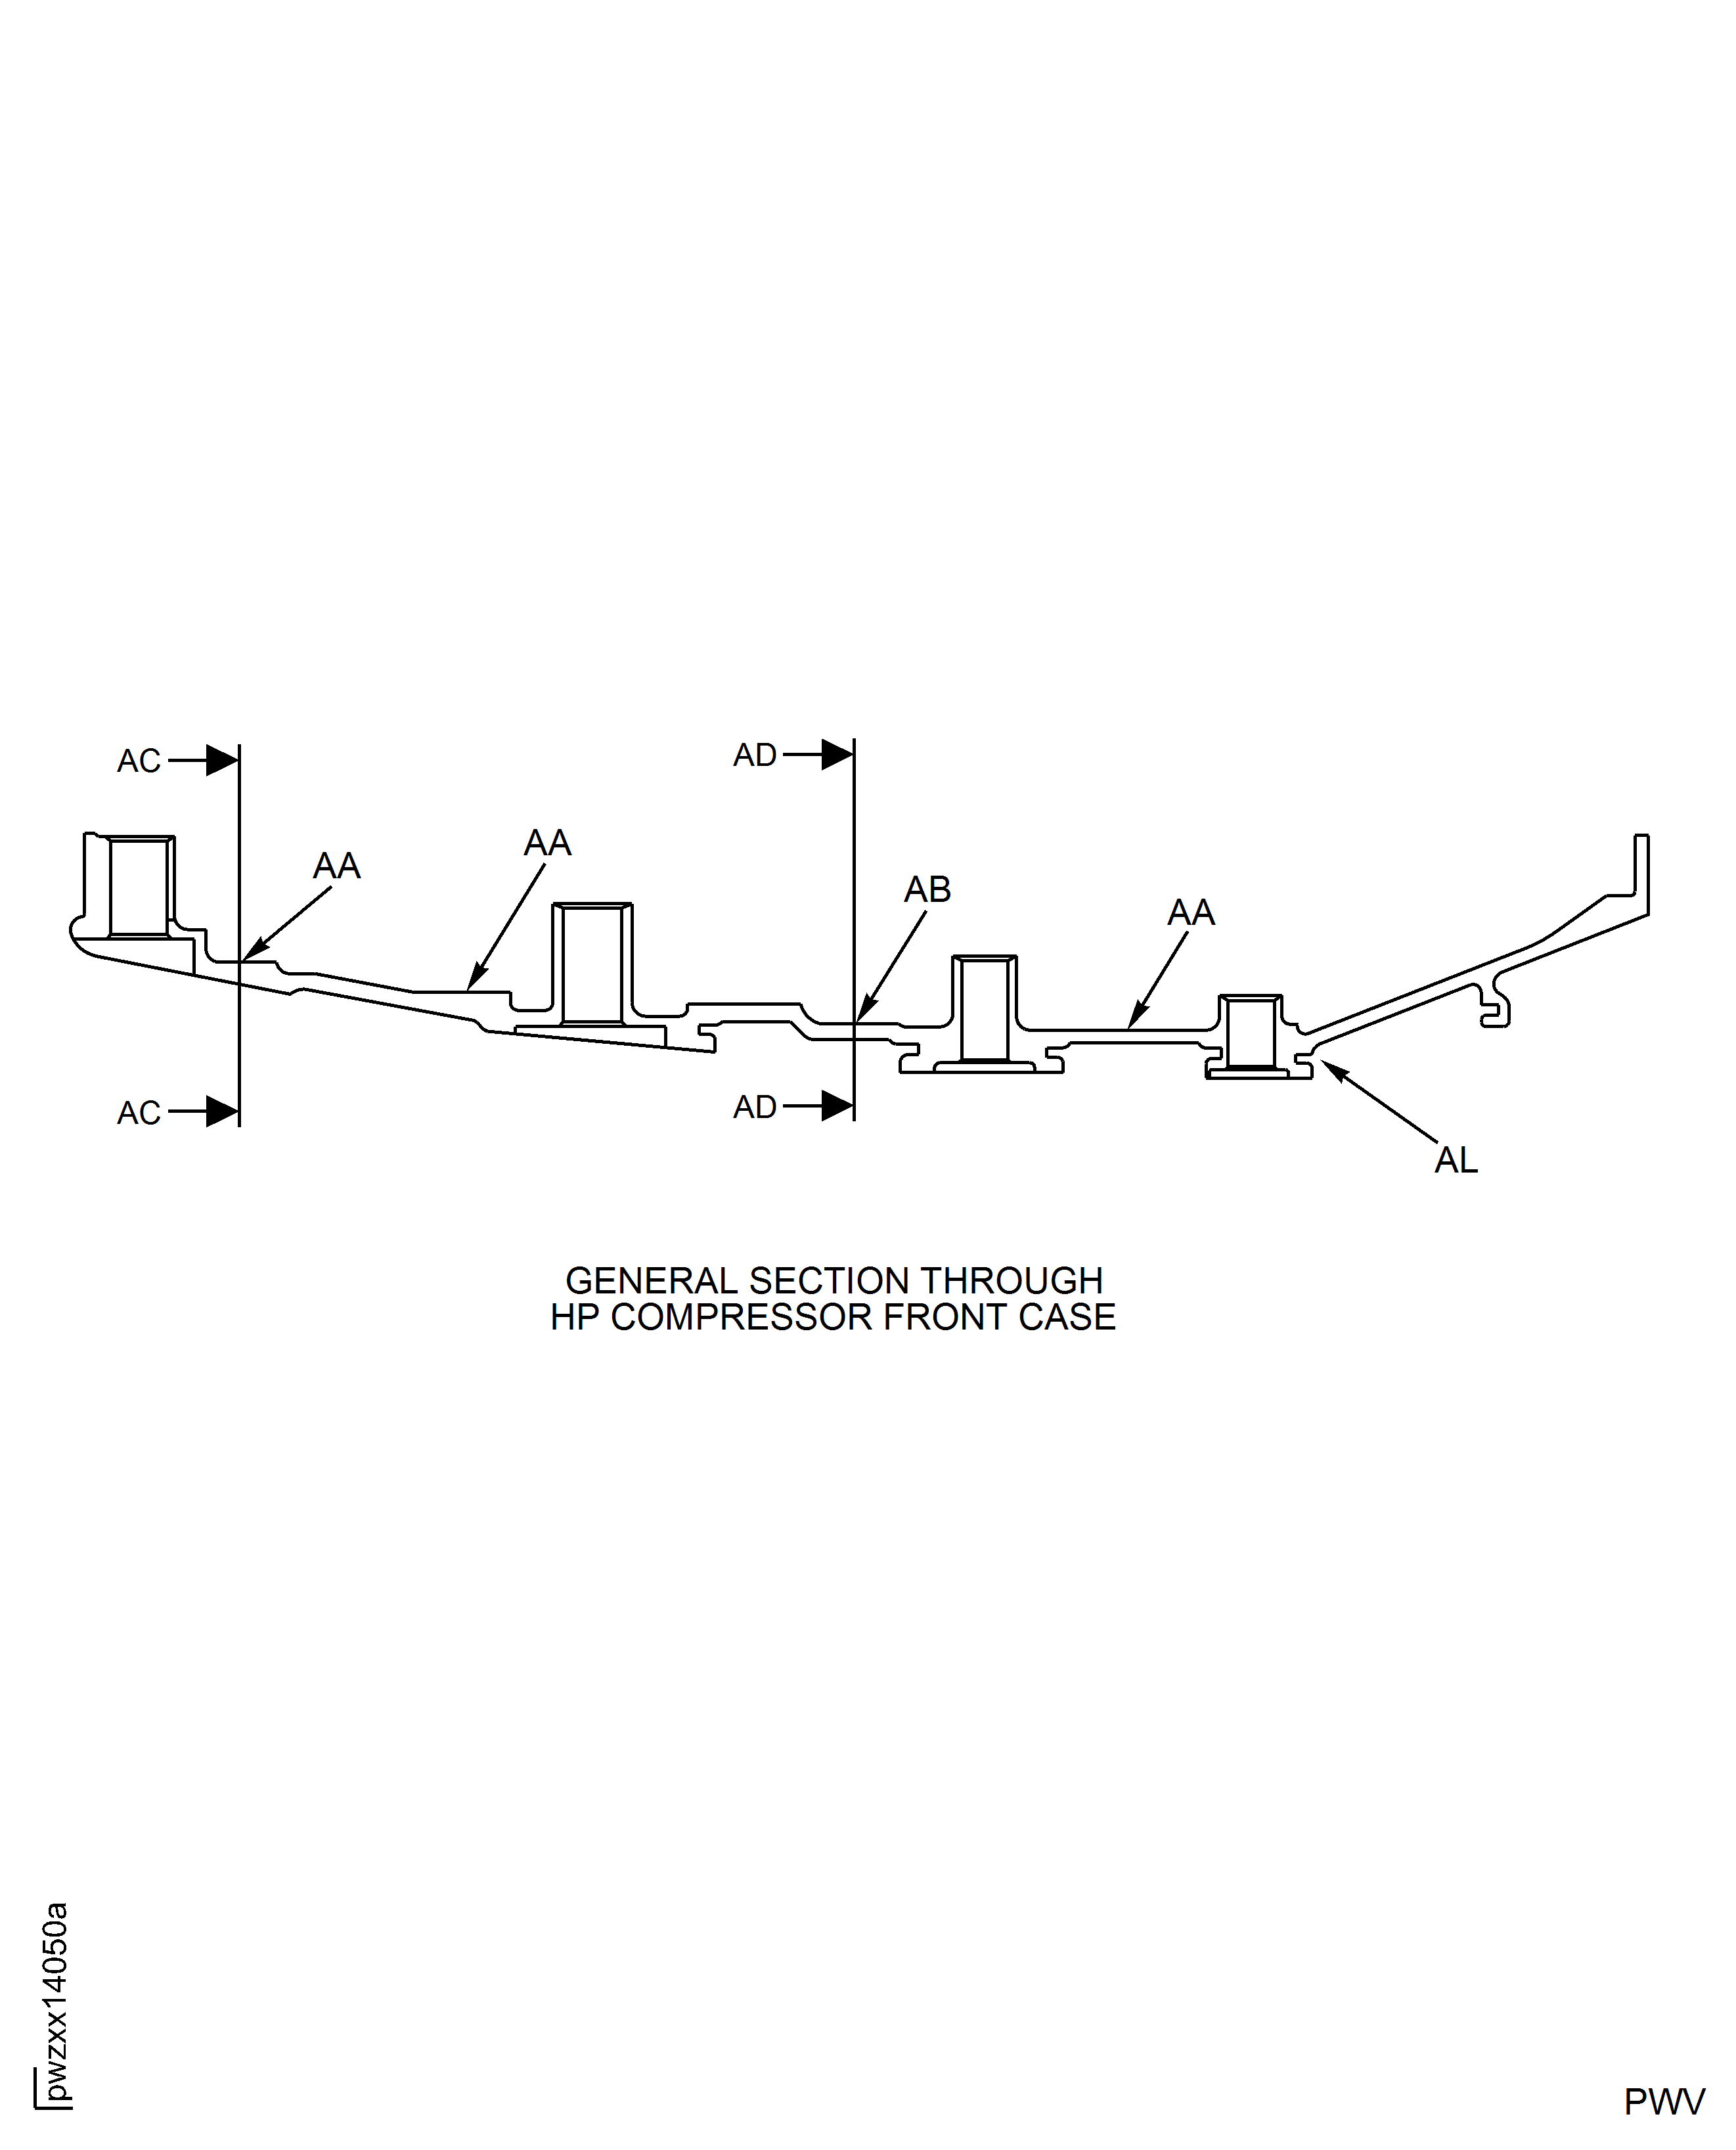
Figure: HP Compressor Front Case - Repair Zones - Assembly C
HP Compressor Front Case - Repair Zones - Assembly C
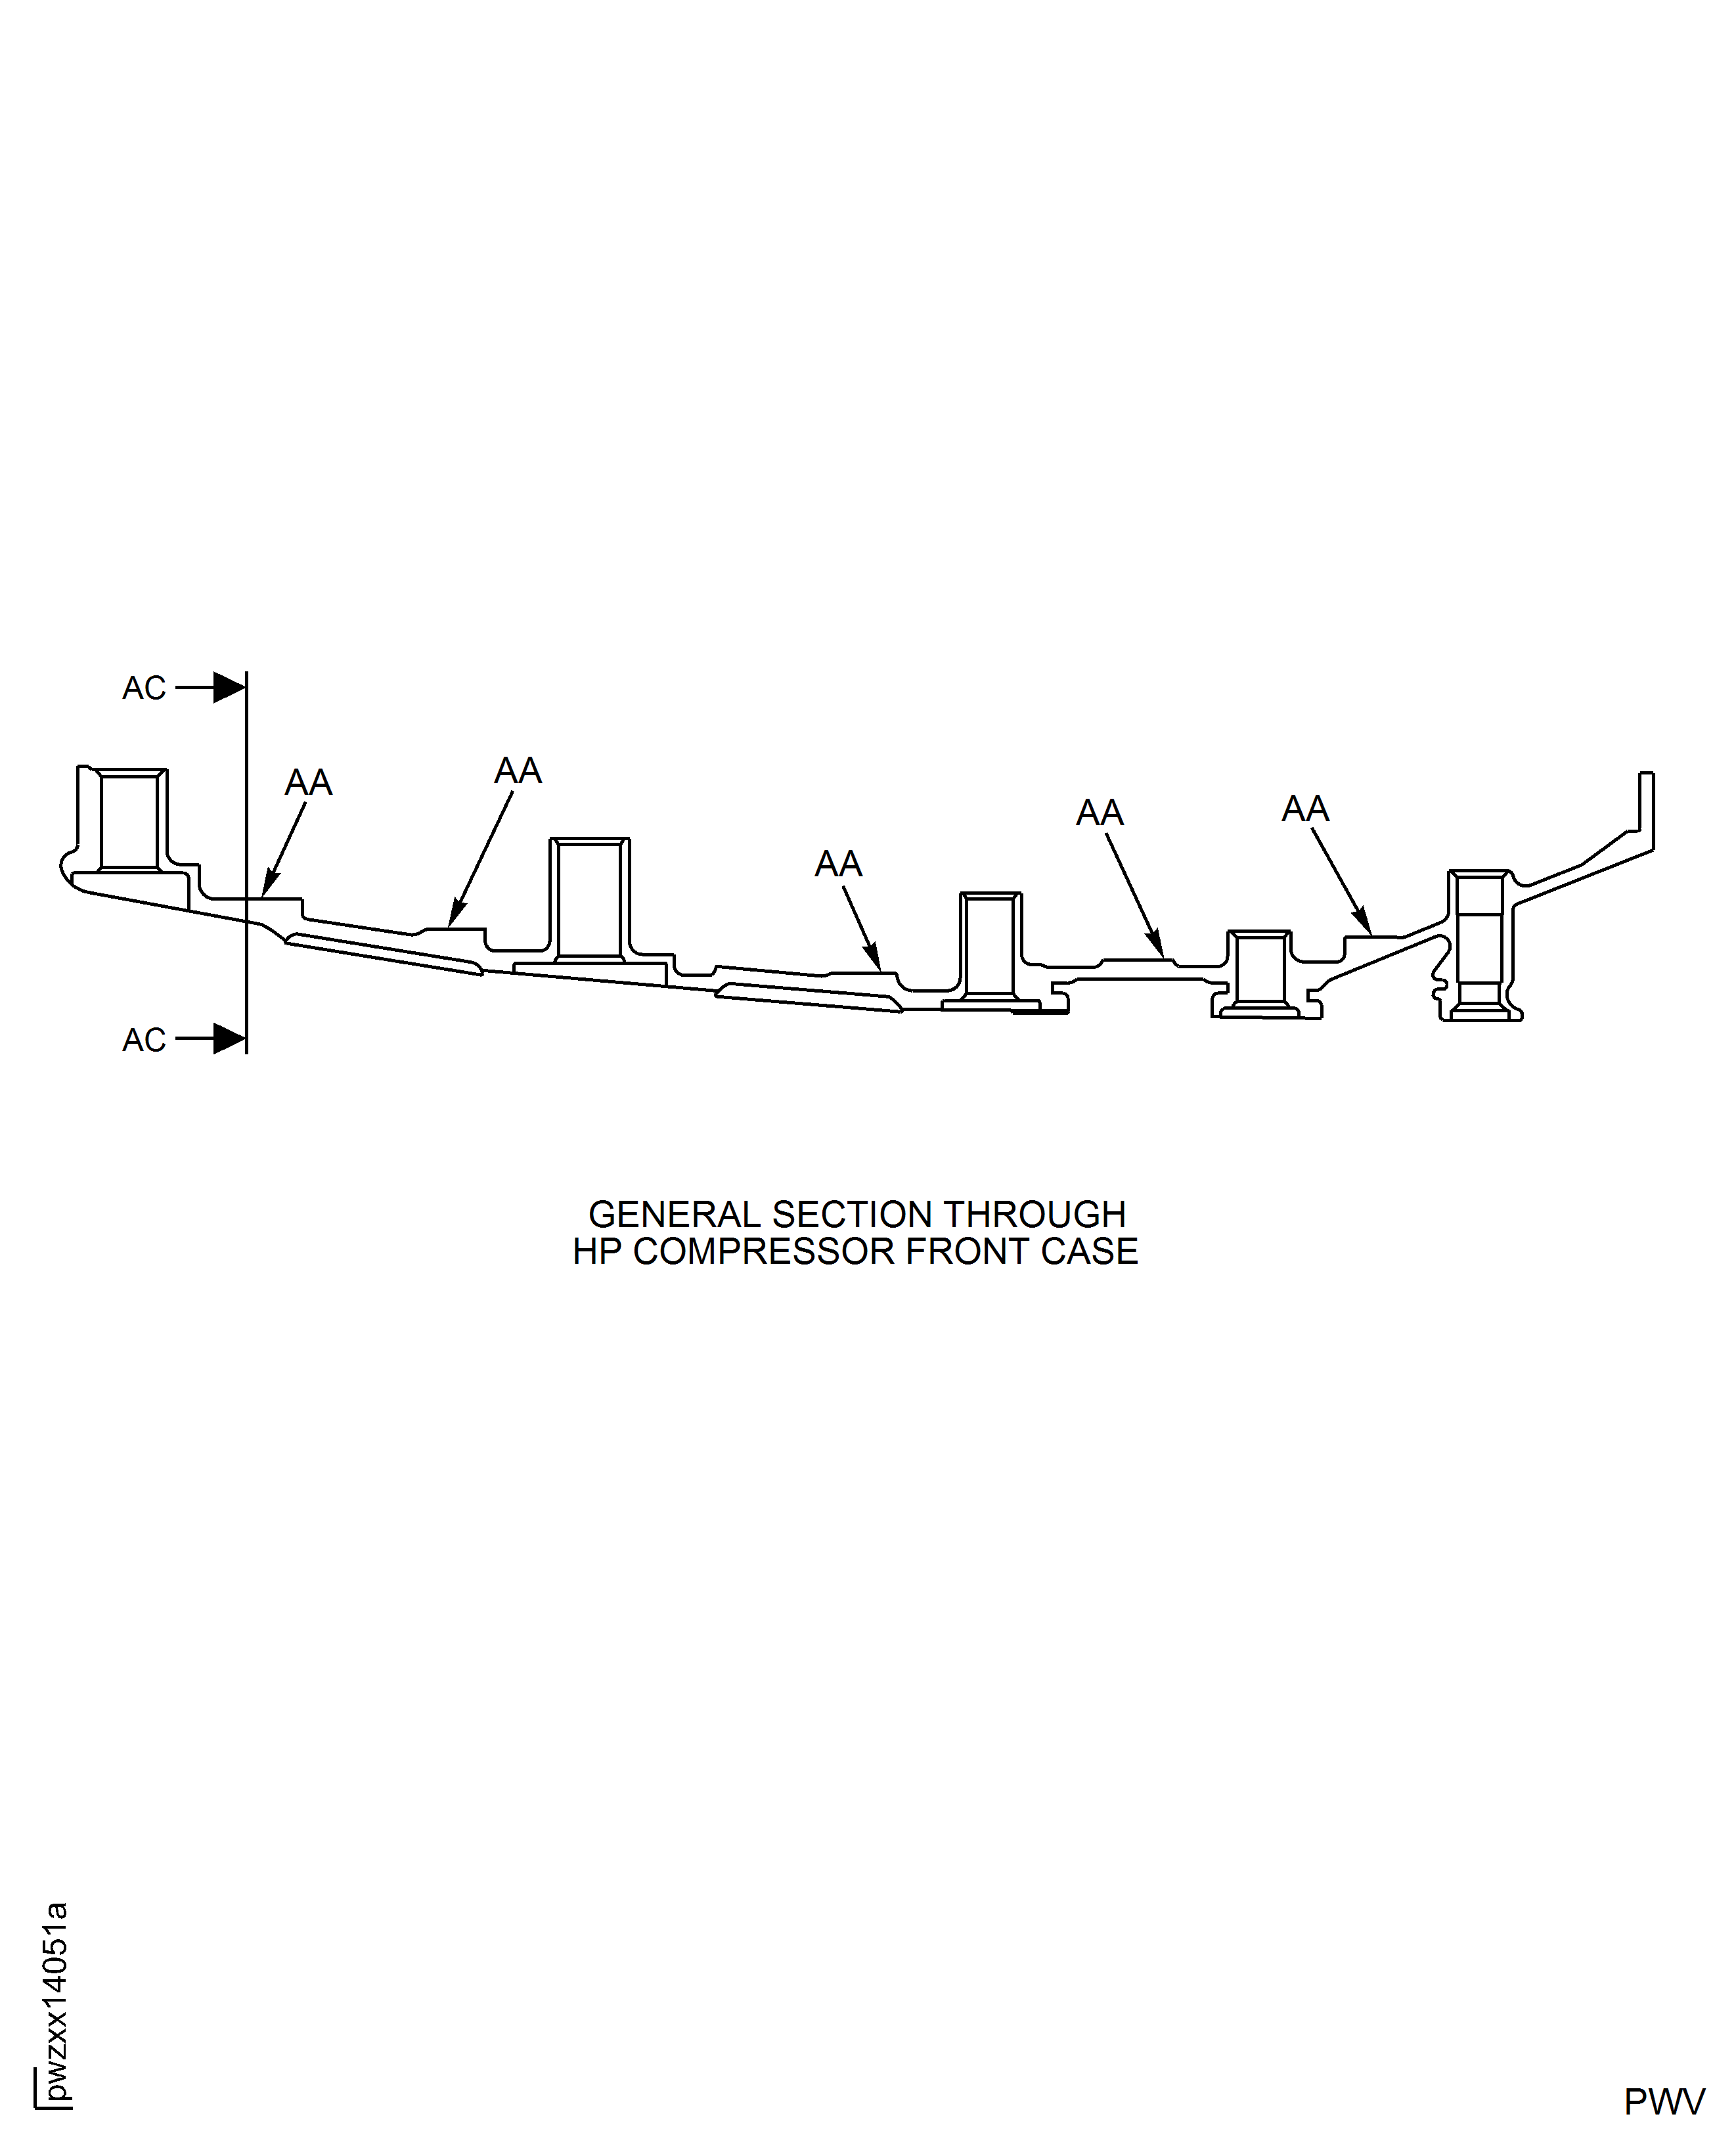
Figure: HP Compressor Front Case - Repair Zones - Assembly B and C
HP Compressor Front Case - Repair Zones - Assembly B and C
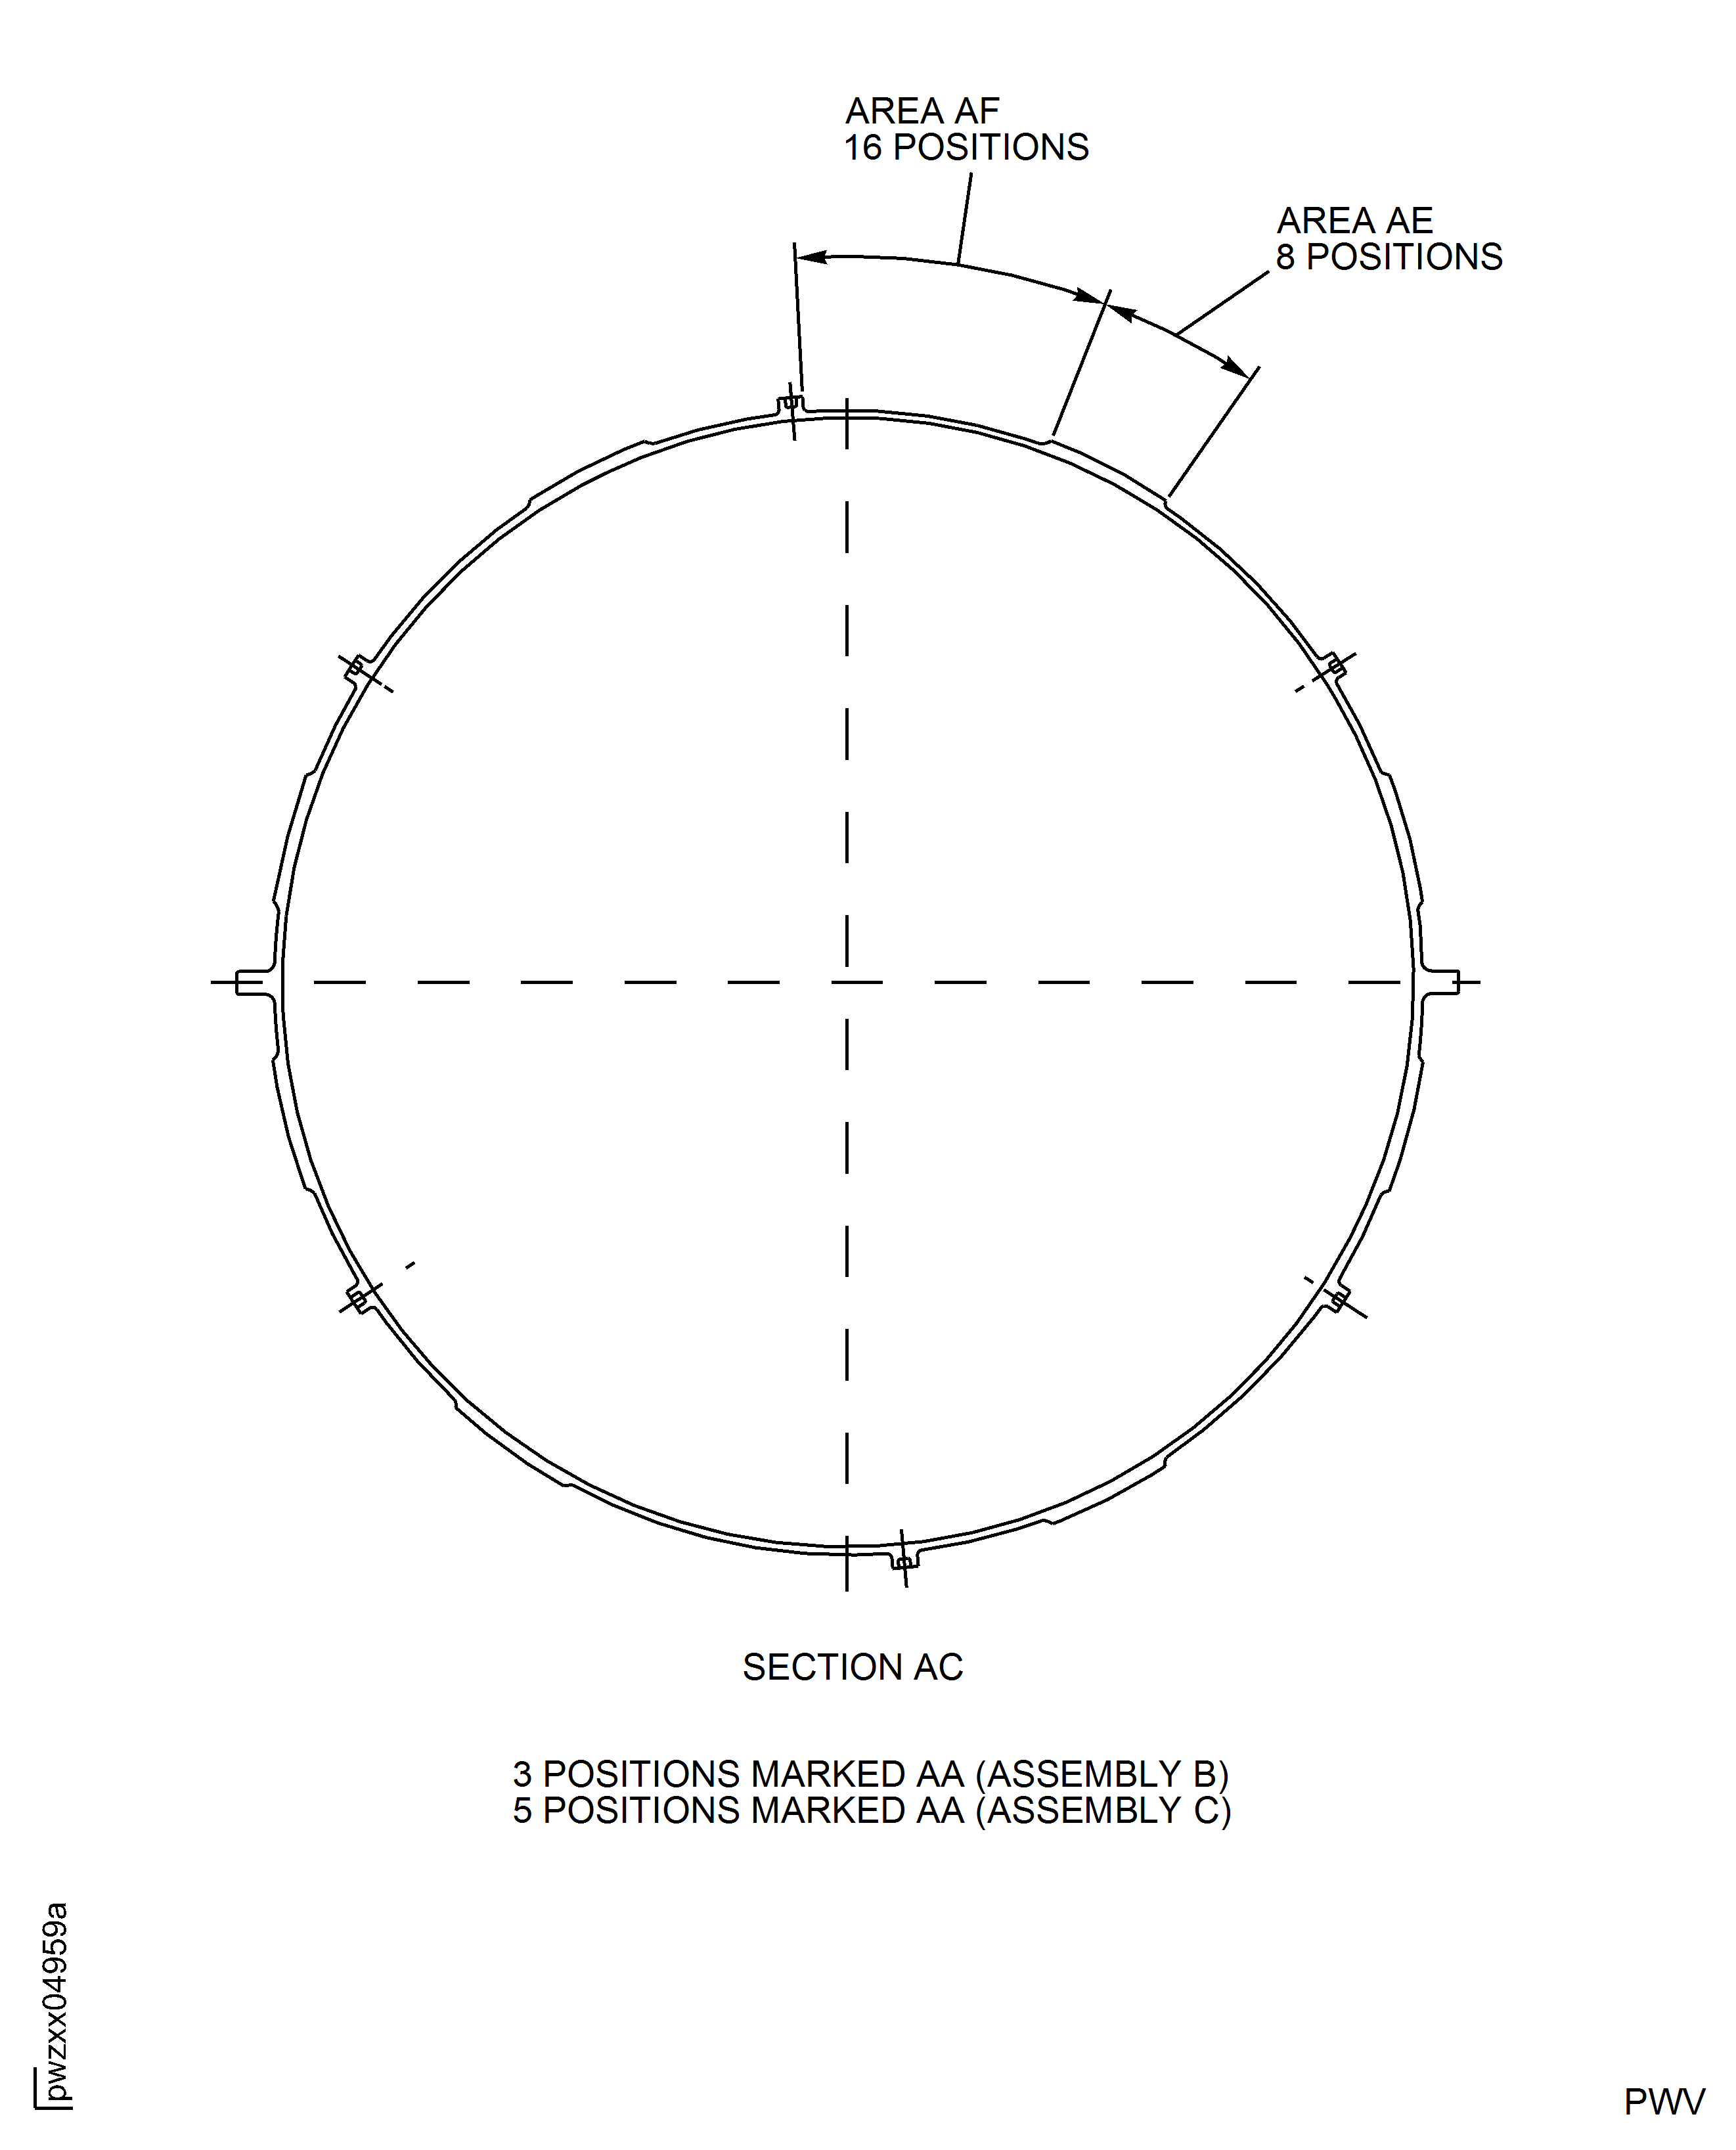
Figure: HP Compressor Front Case - Repair Zones - Assembly A and B
HP Compressor Front Case - Repair Zones - Assembly A and B
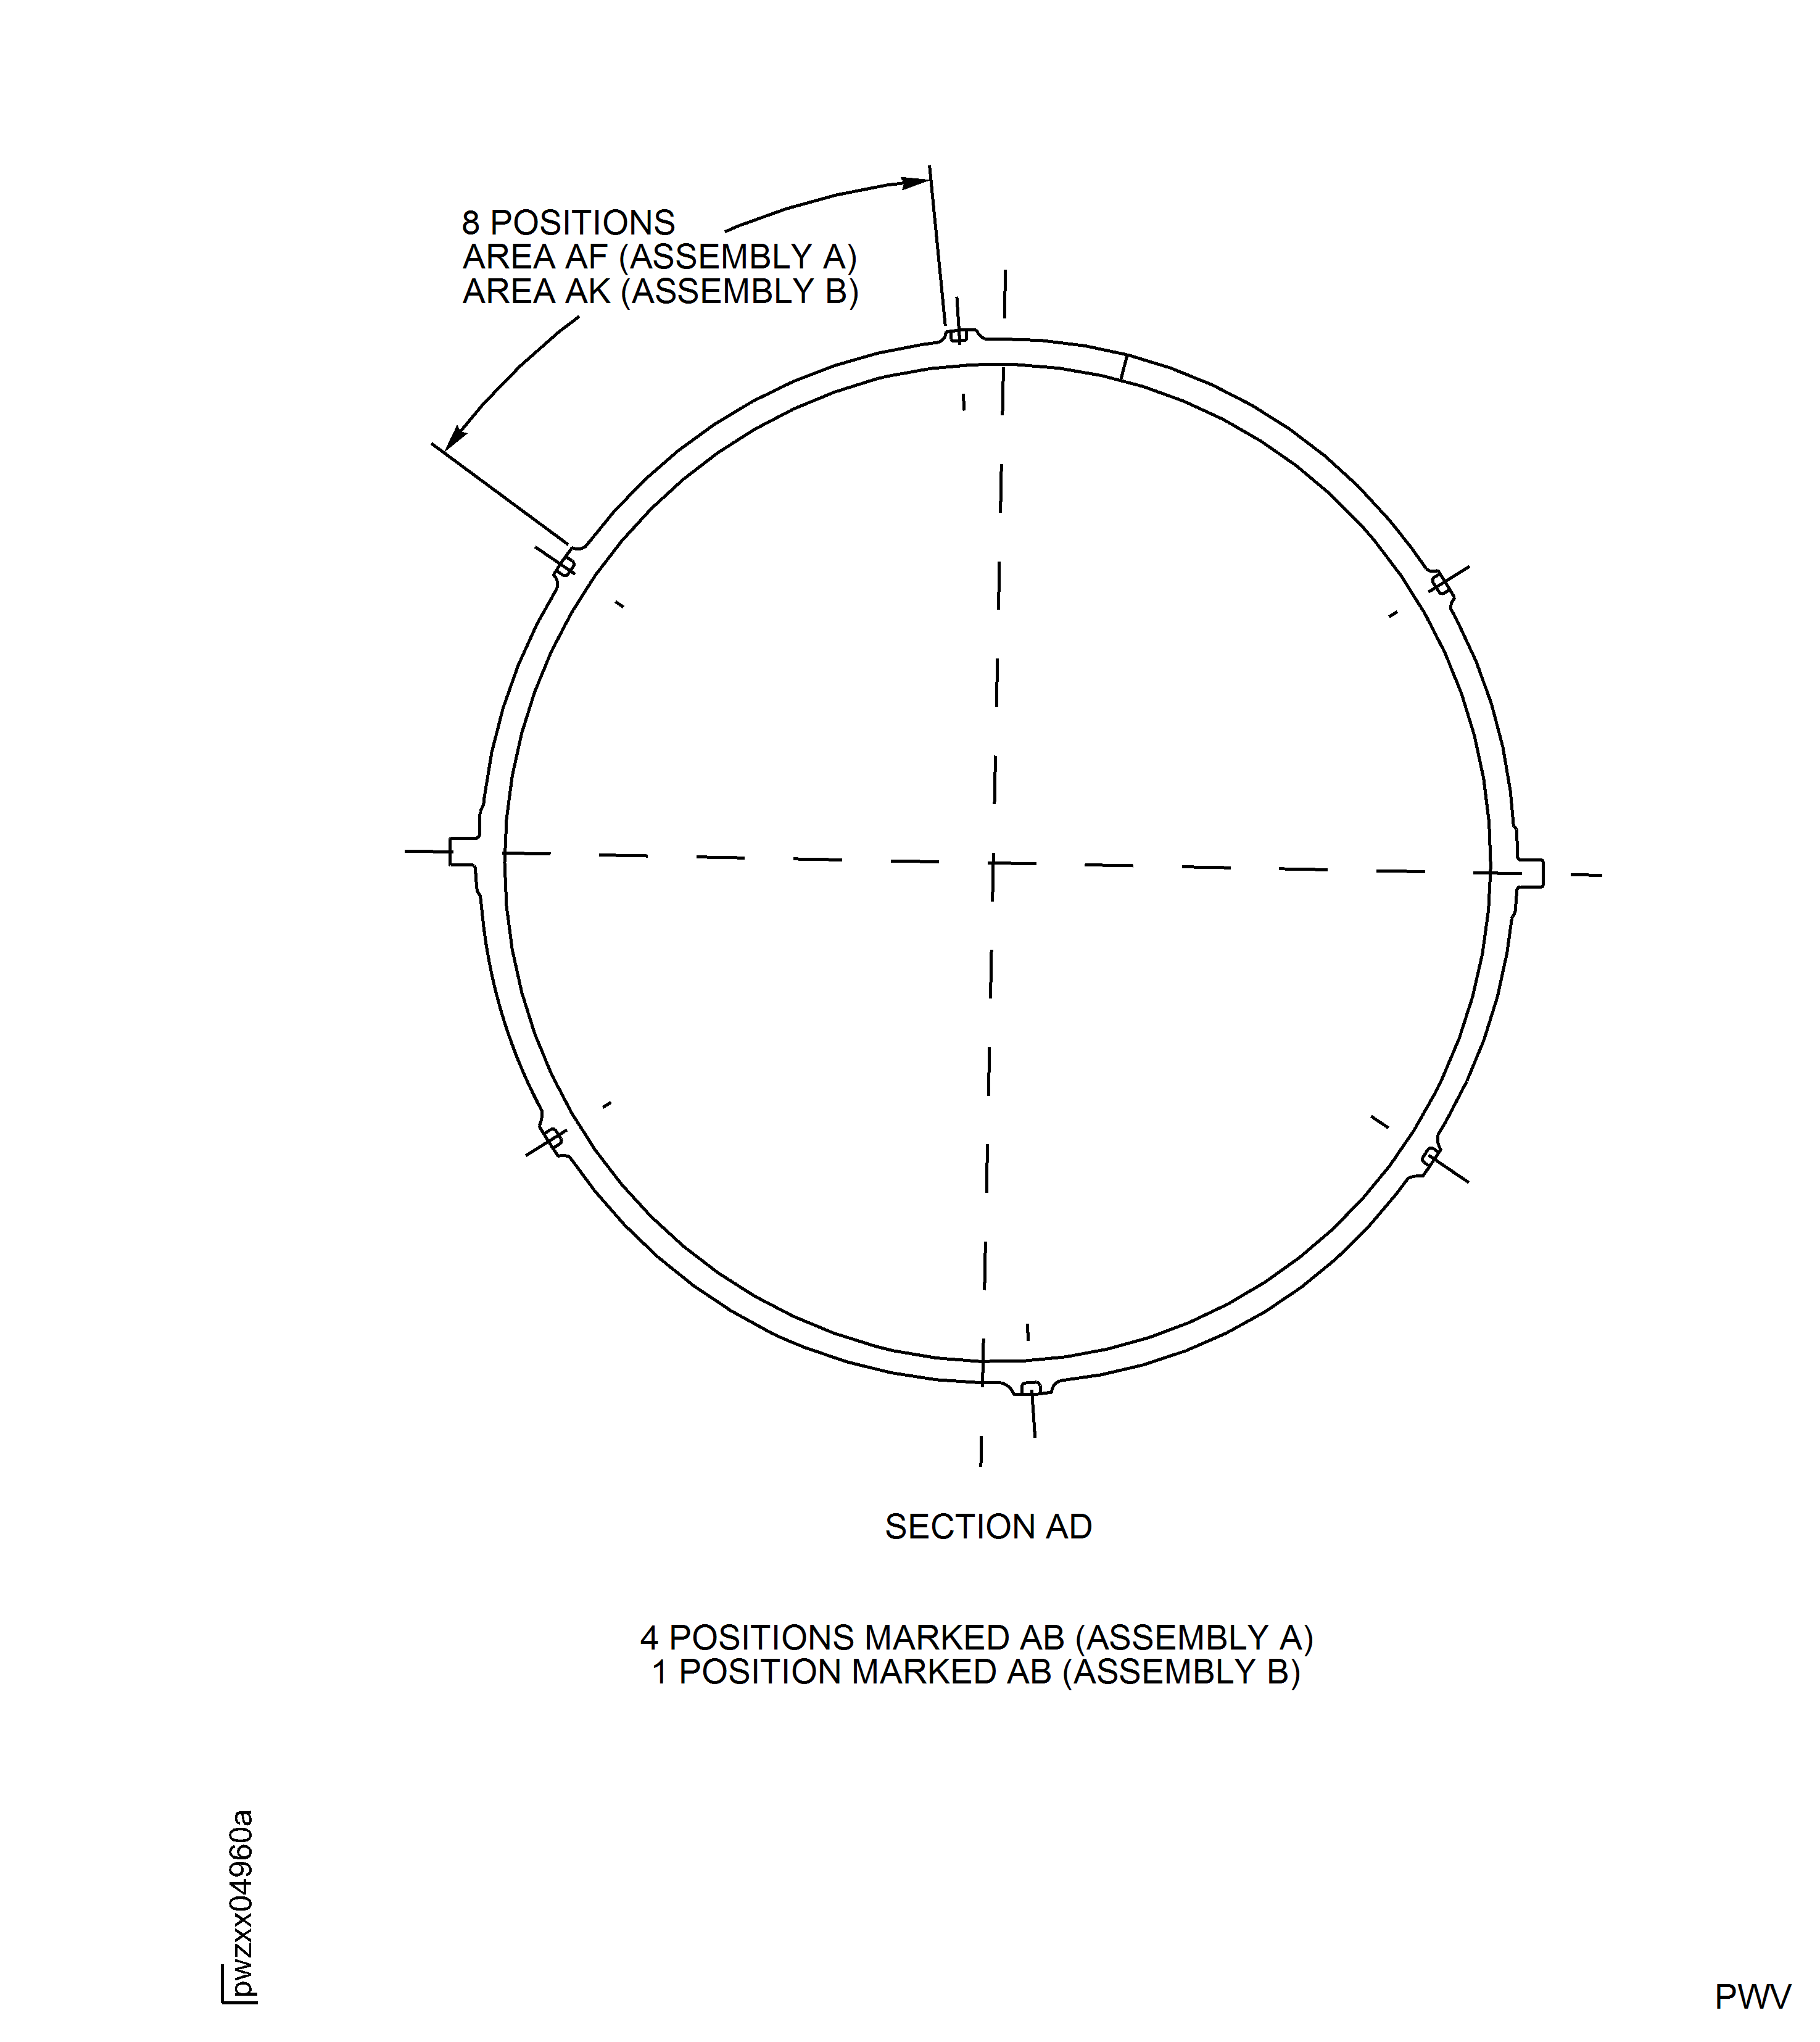
Figure: Repair Details and Dimensions - Assembly A
Repair Details and Dimensions - Assembly A
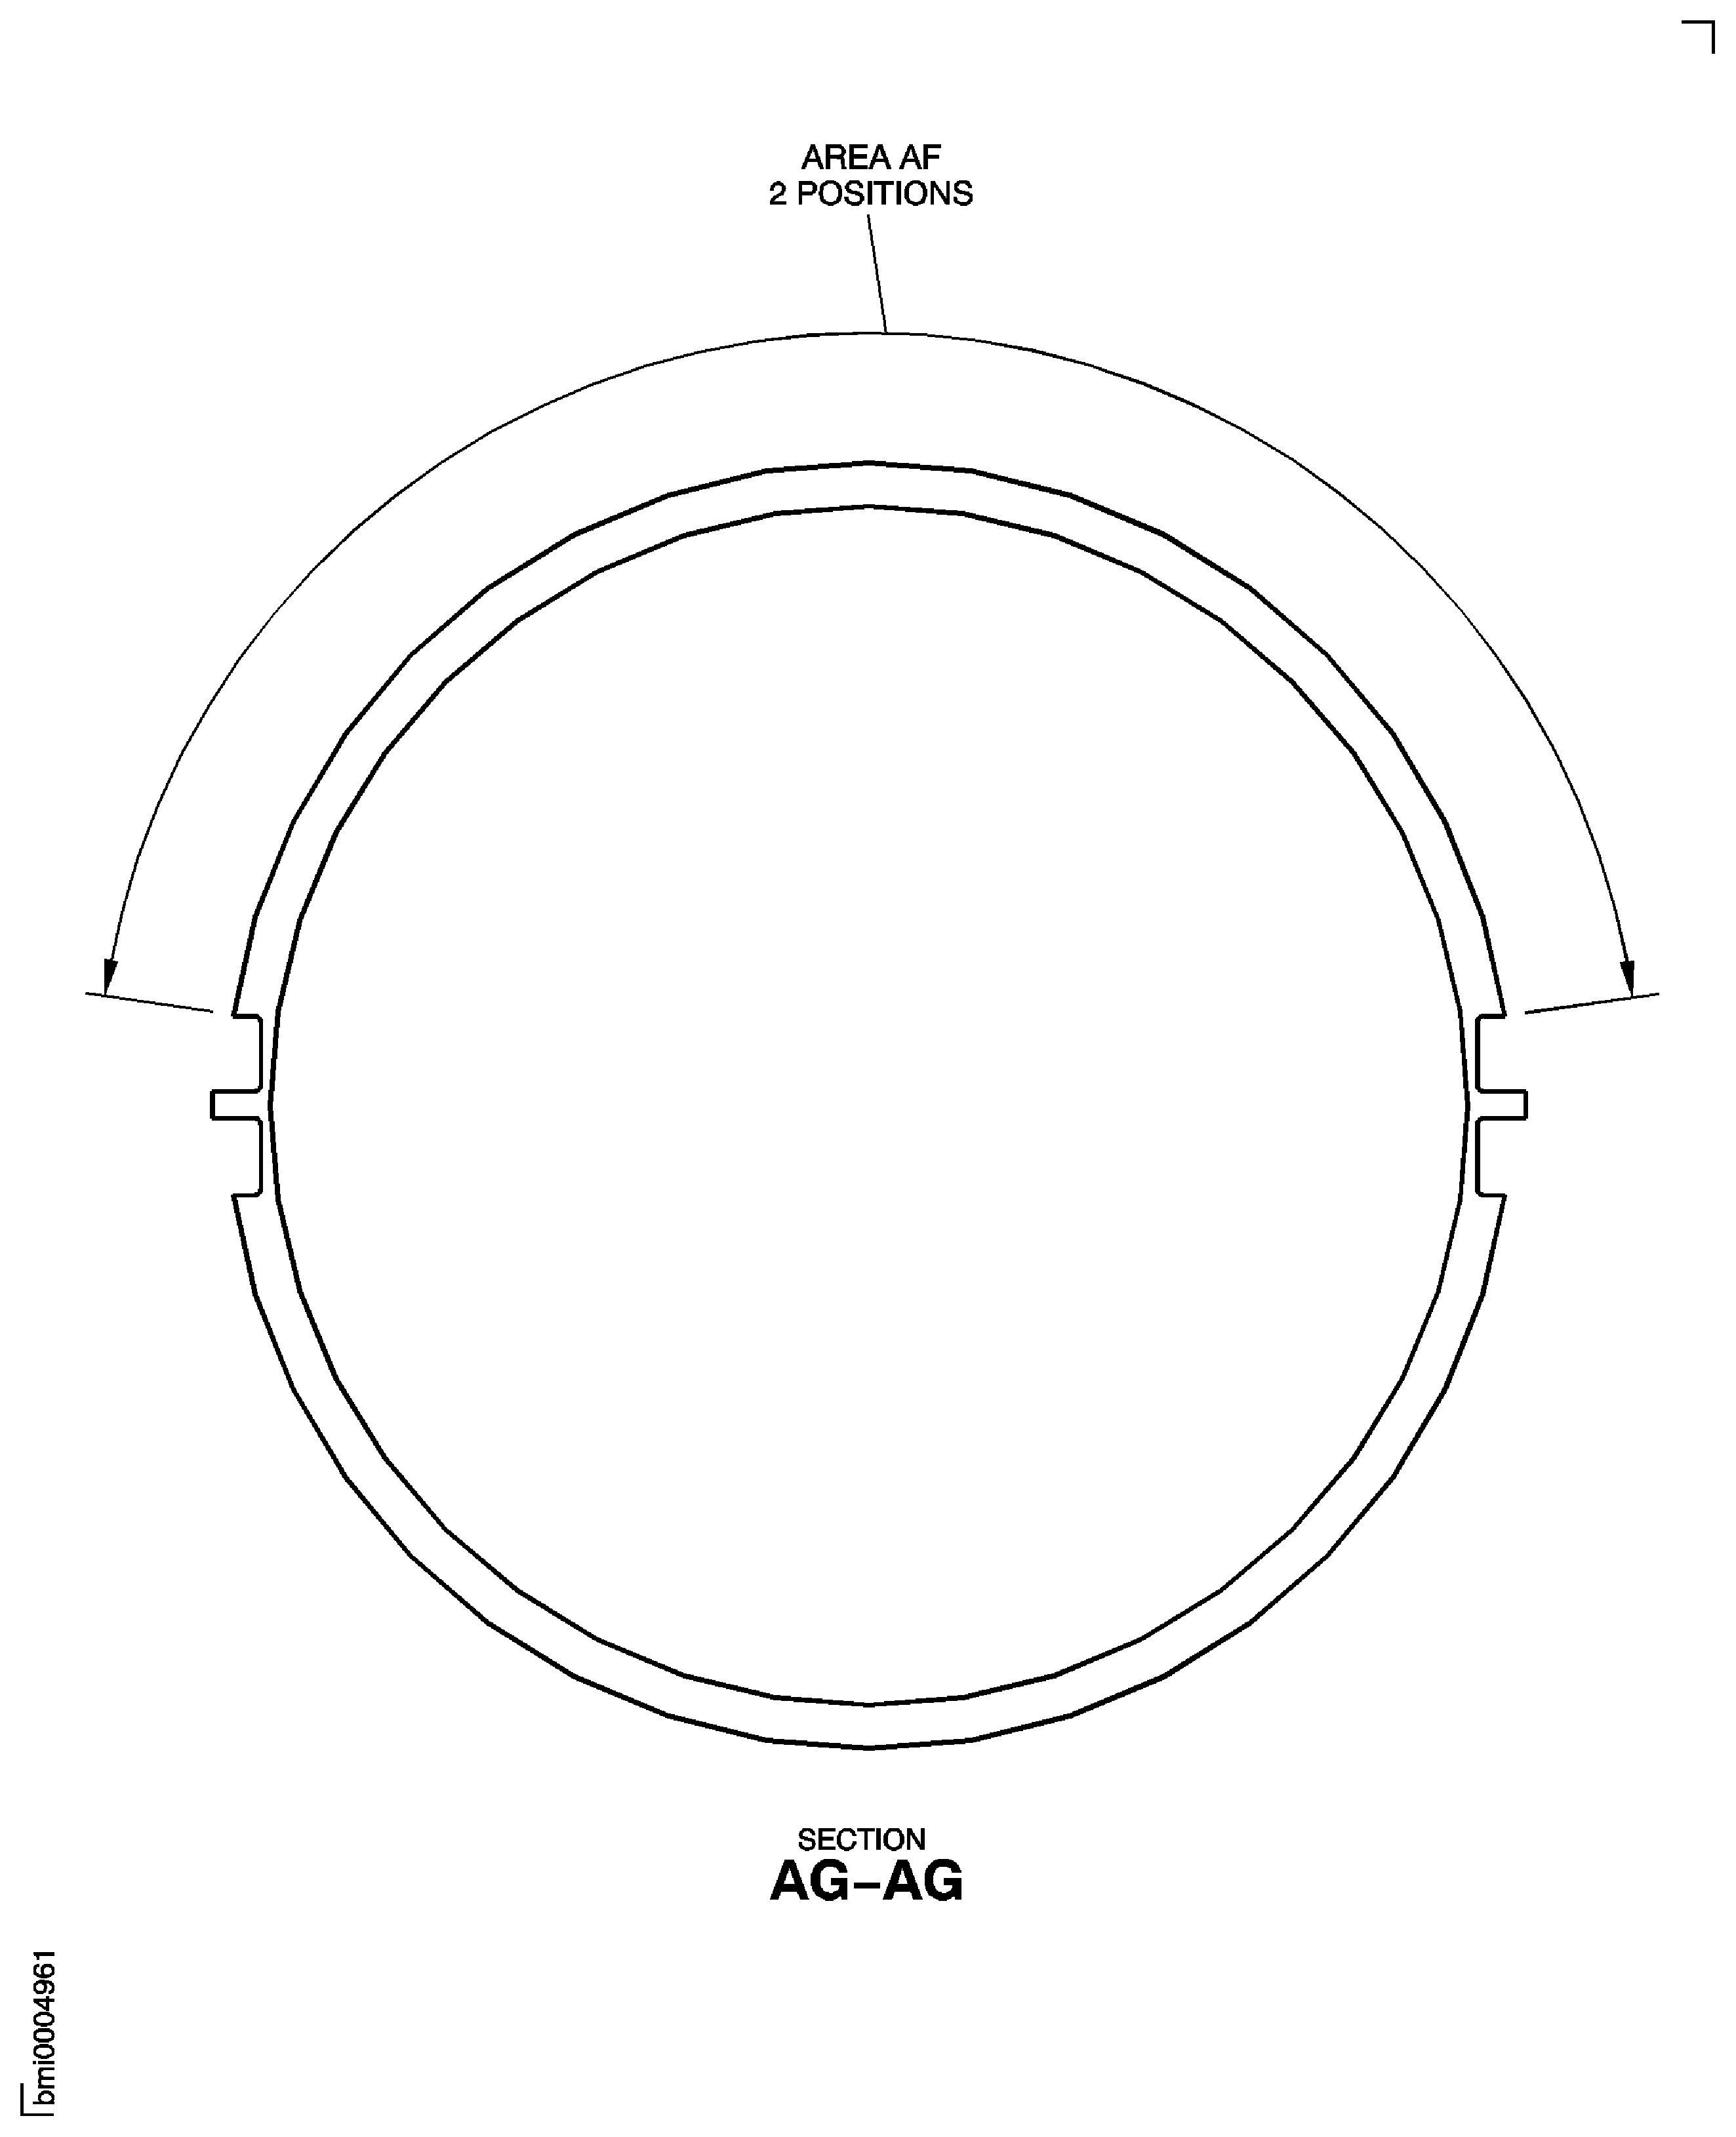
Figure: HP Compressor Front Case - Post Repair Detail and Dimensions - All Assemblies
HP Compressor Front Case - Post Repair Detail and Dimensions - All Assemblies
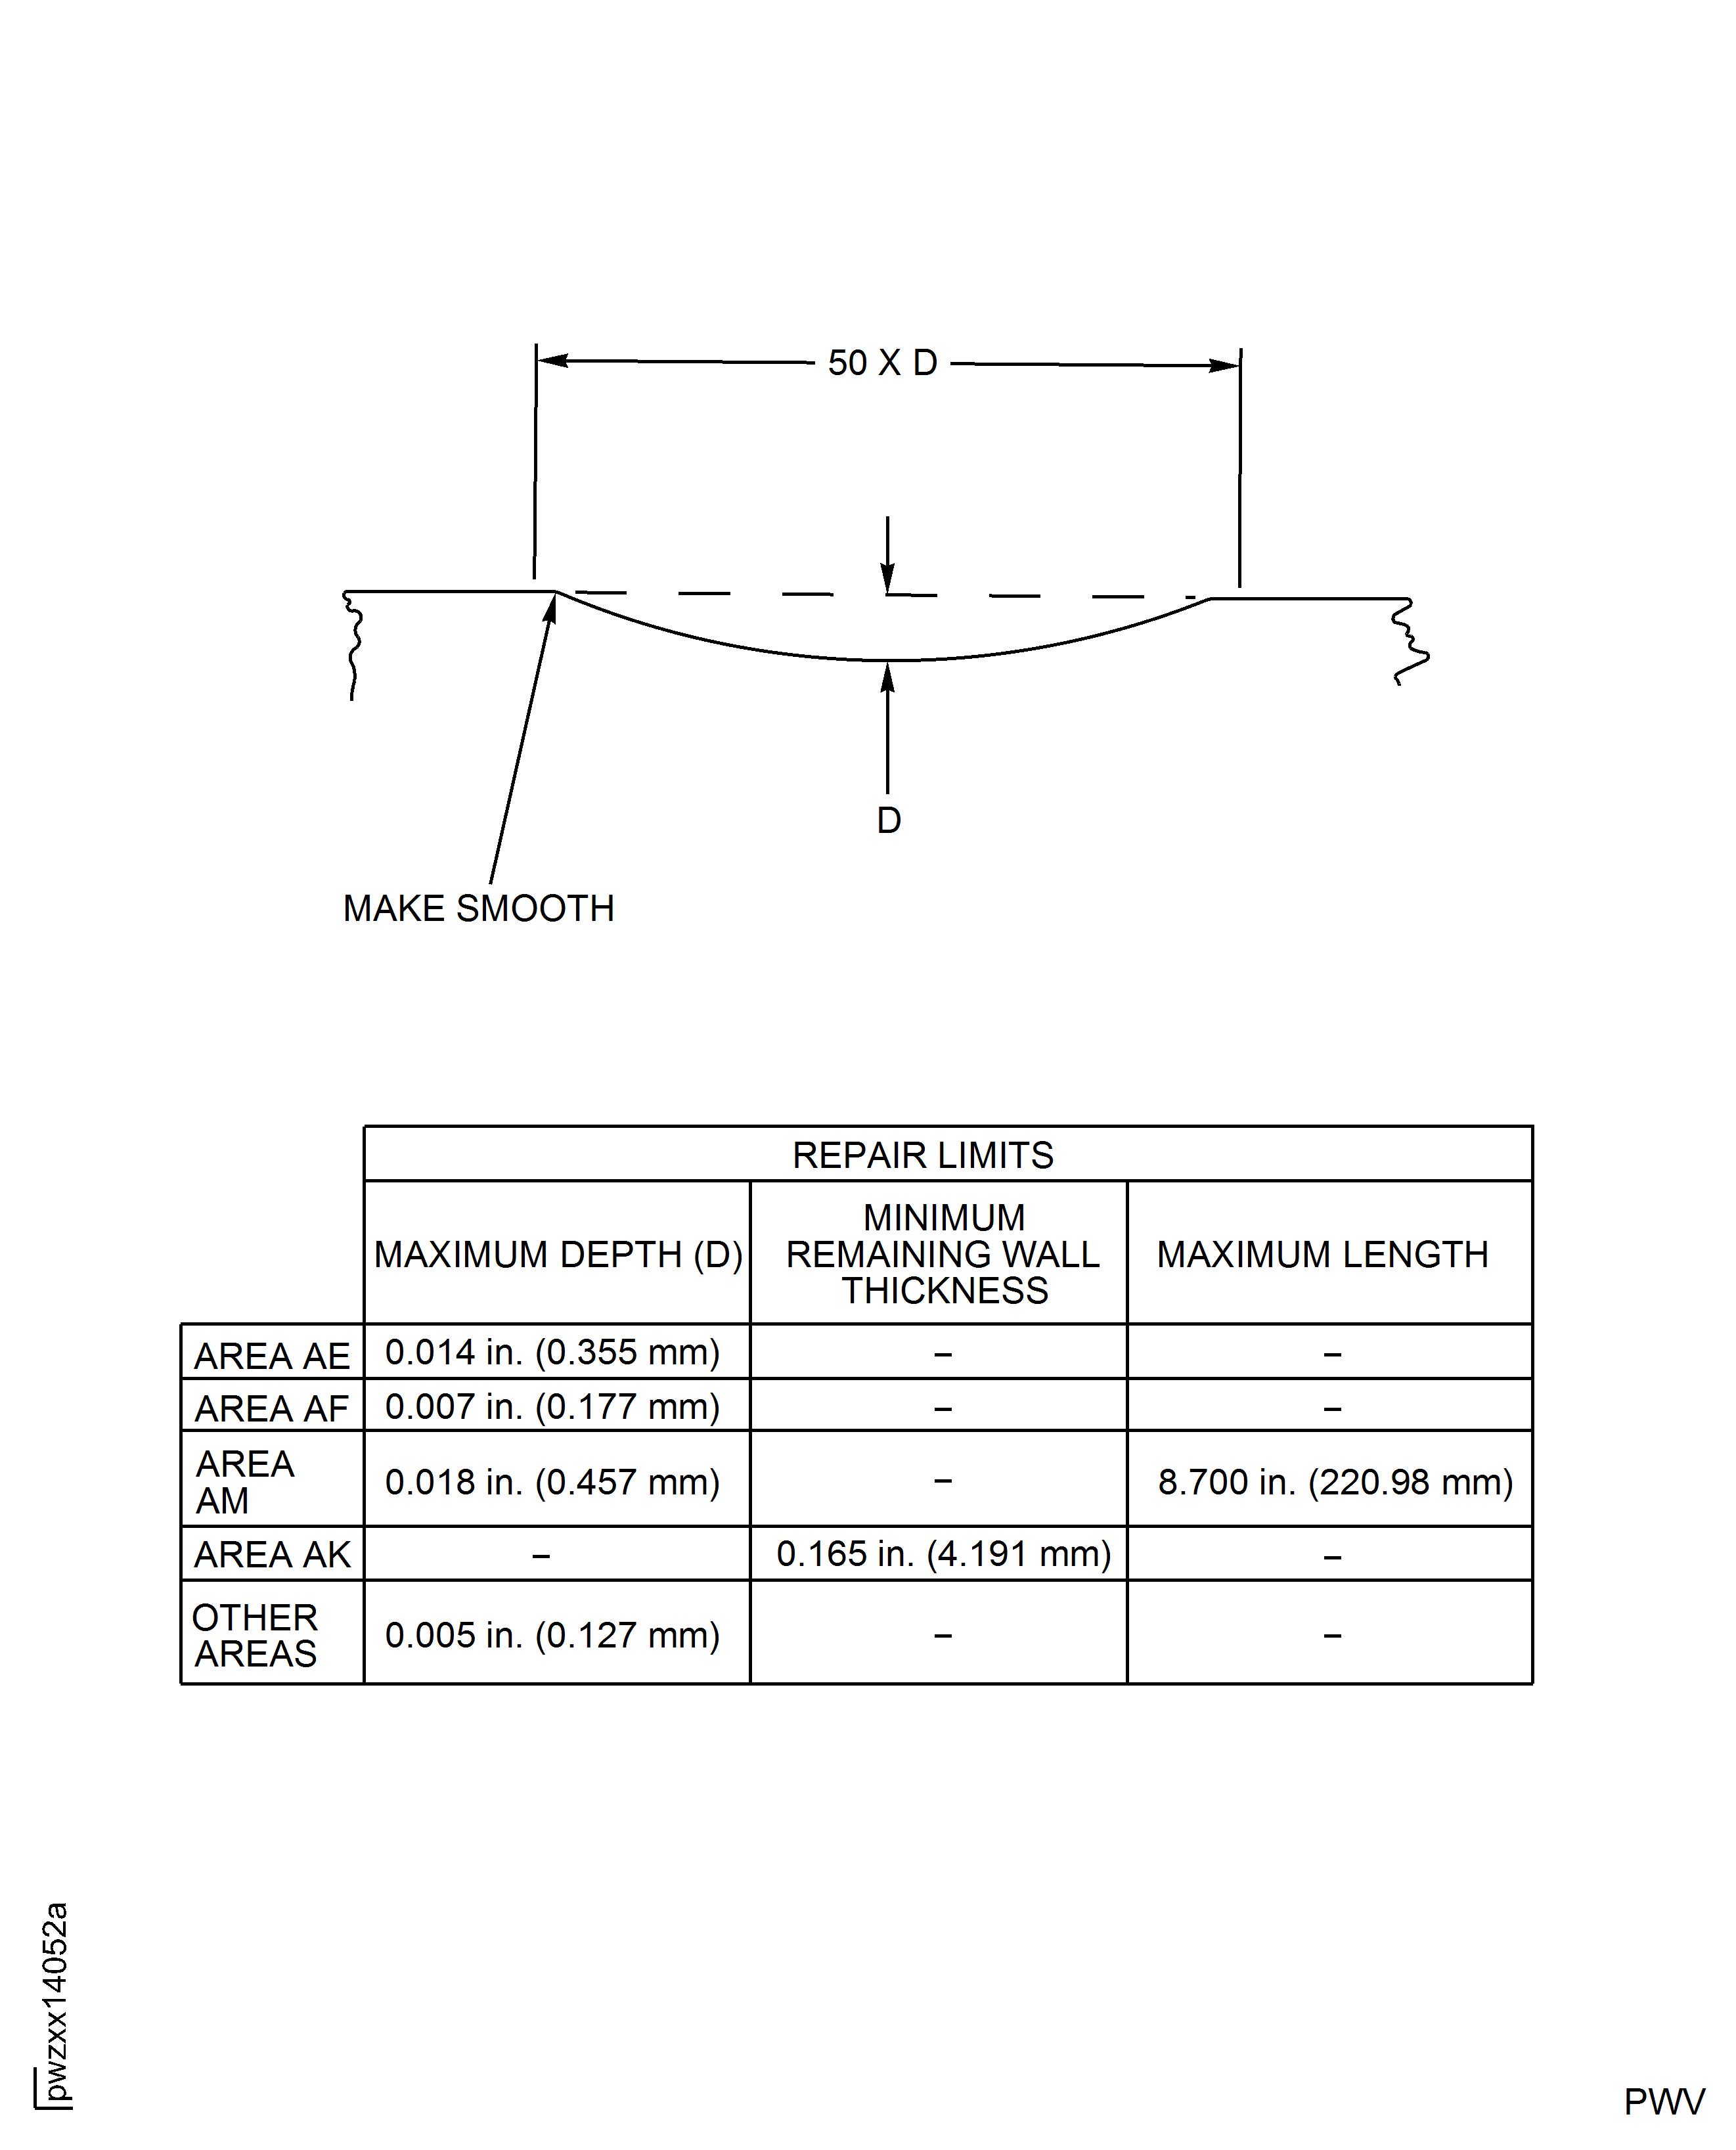
Figure: Repair Details and Dimensions - Assembly B
Repair Details and Dimensions - Assembly B
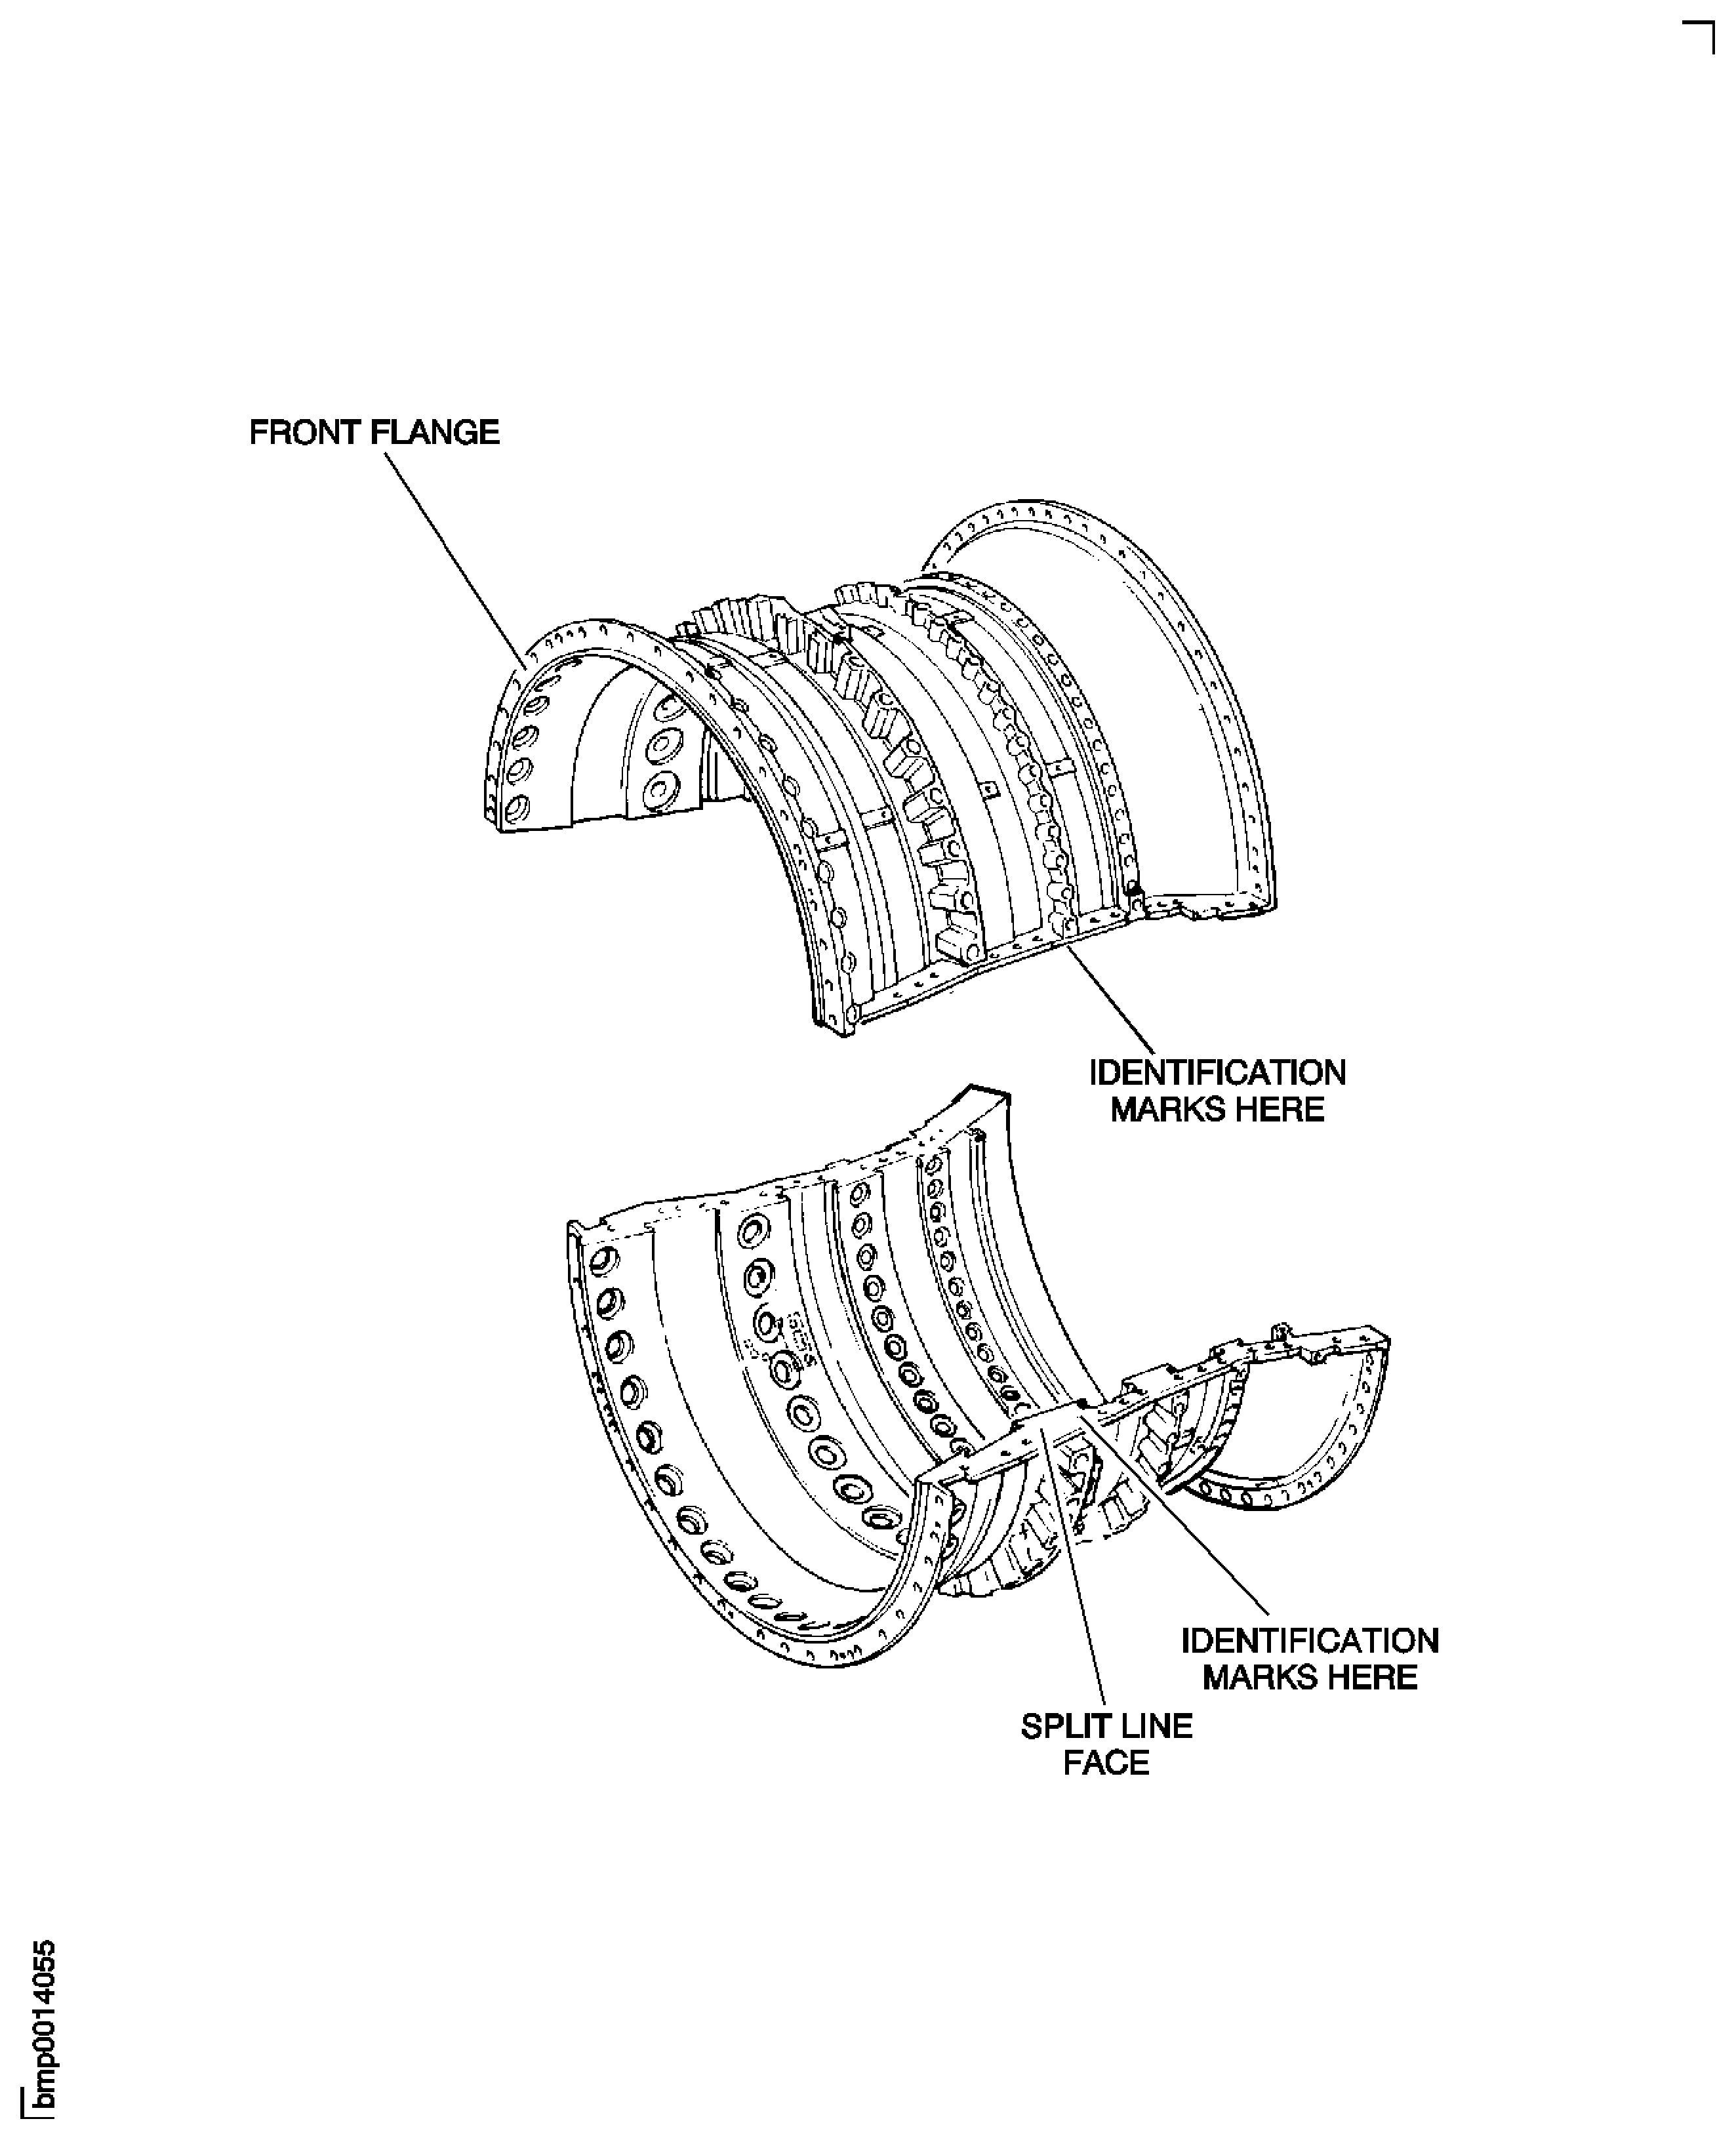
Figure: Repair Details and Dimensions - Assembly A and Assembly C
Repair Details and Dimensions - Assembly A and Assembly C
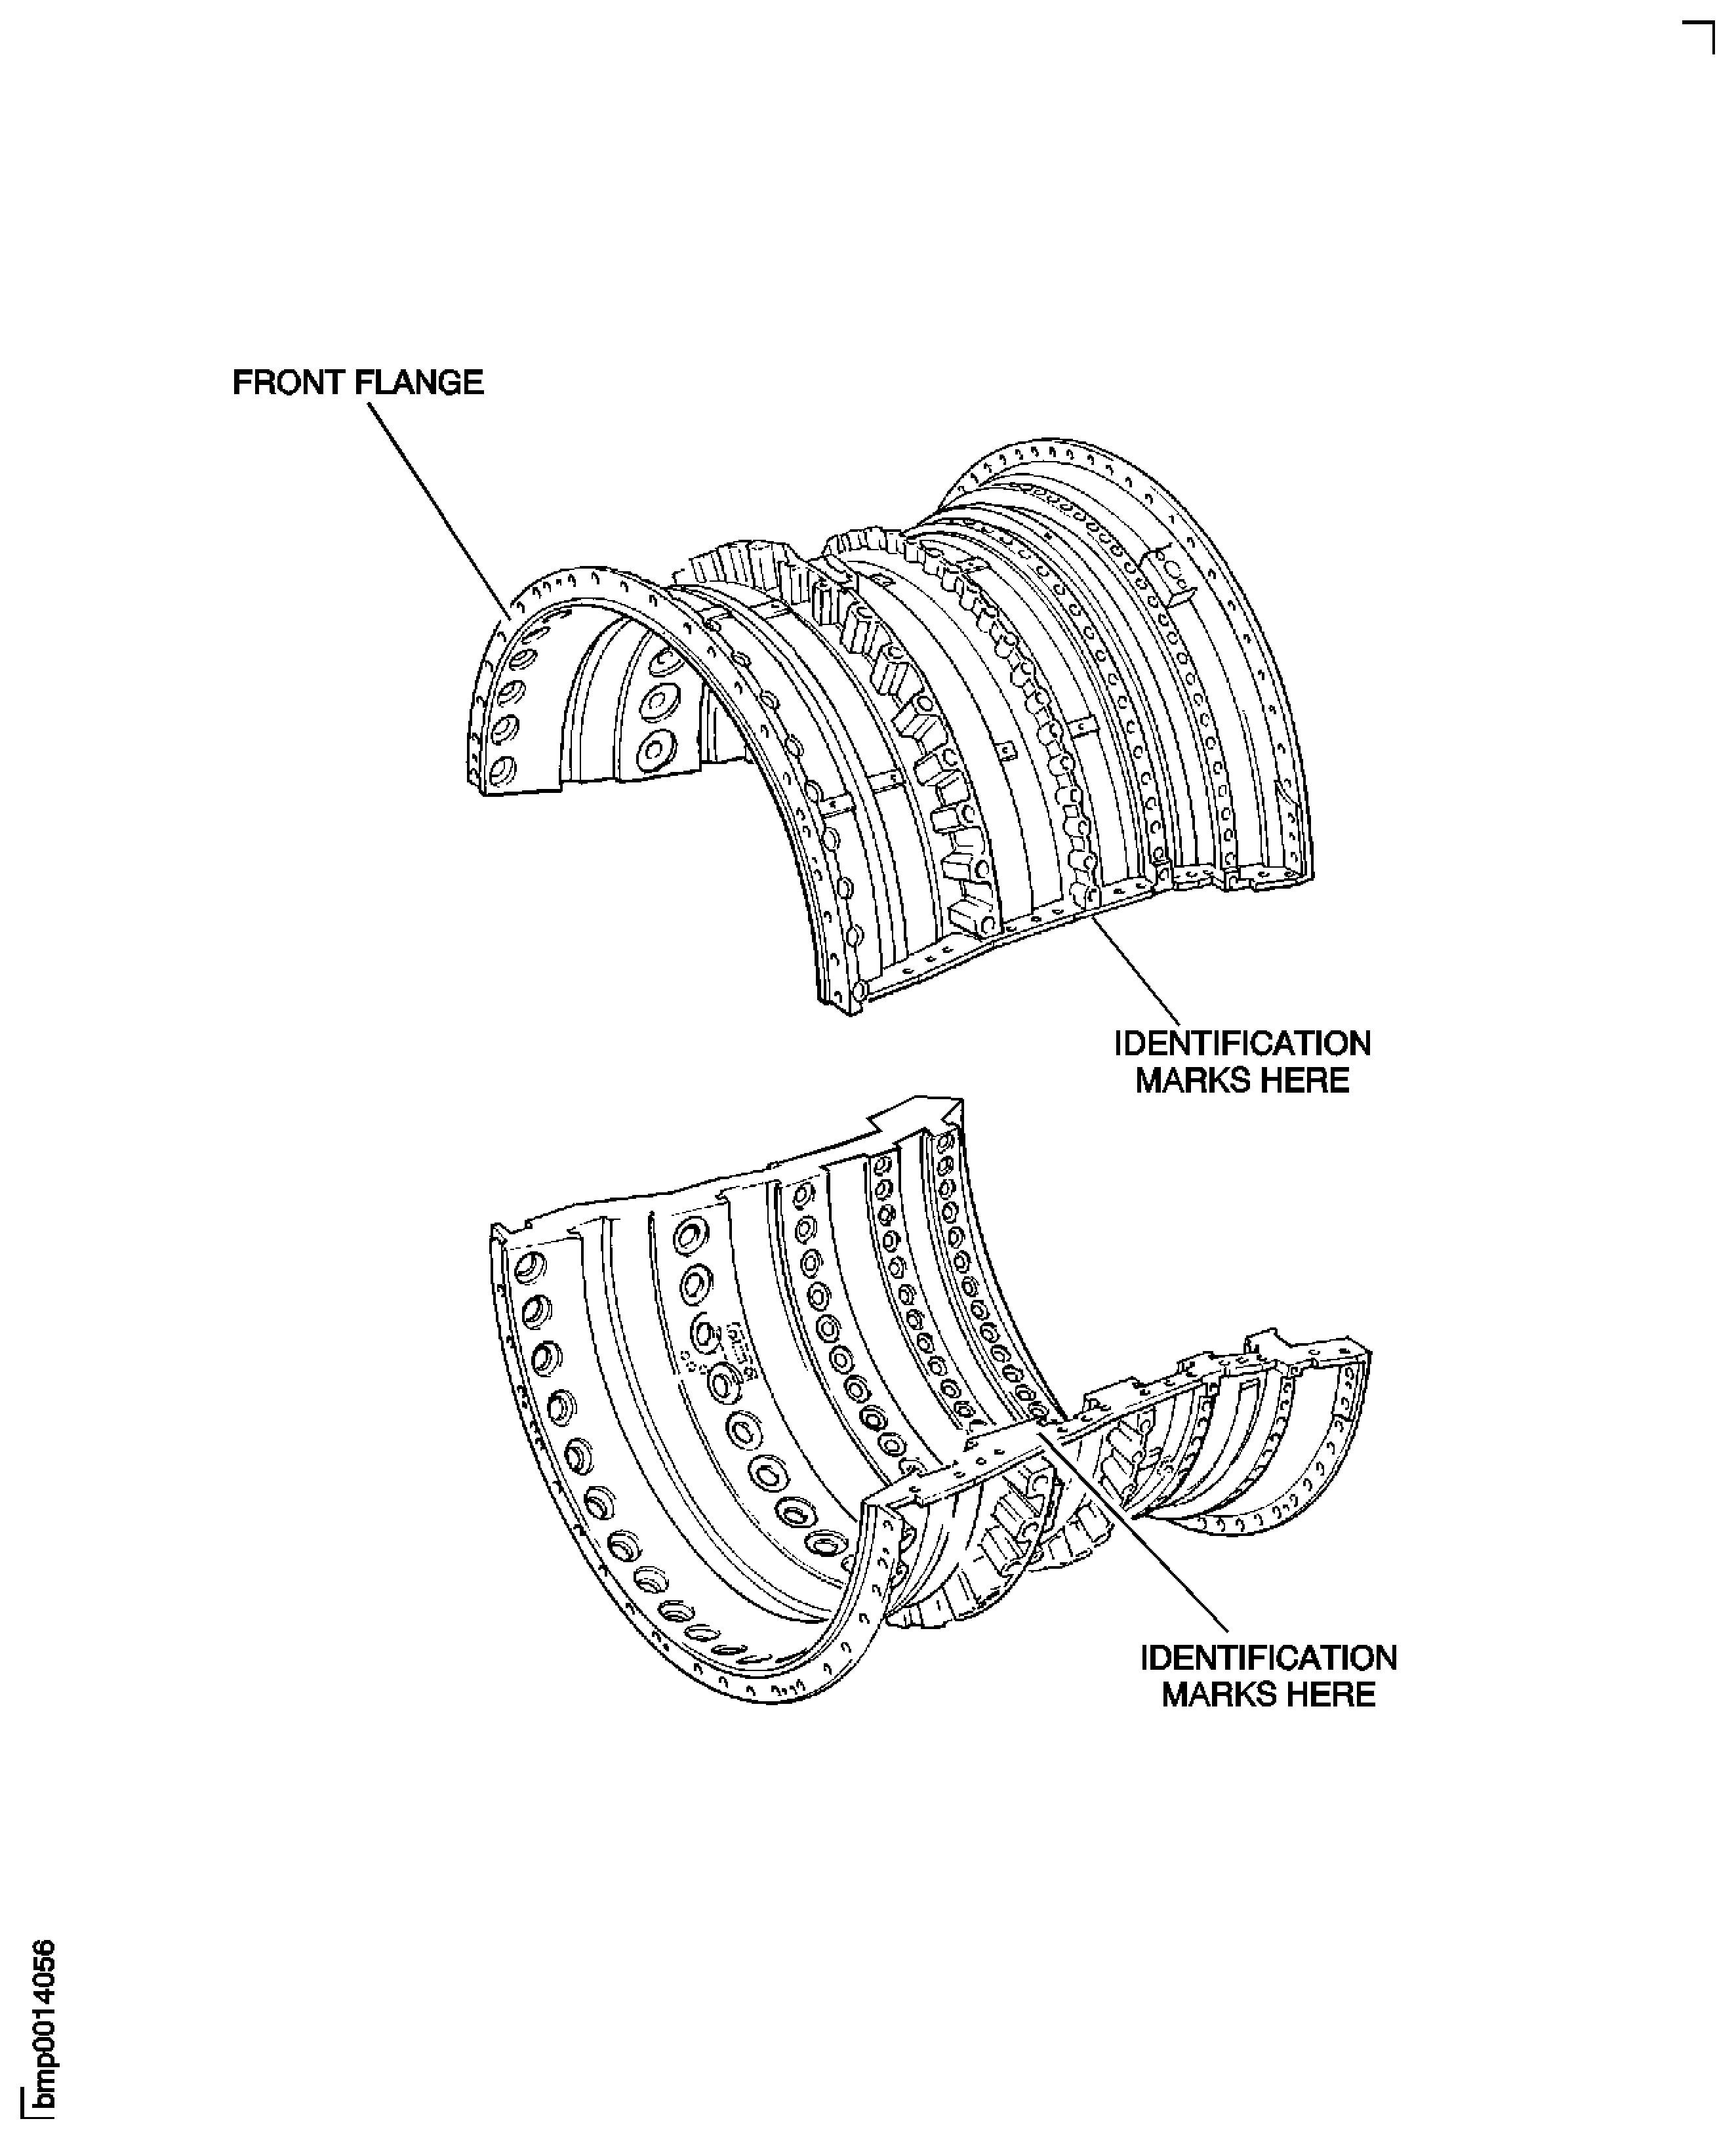
Figure: HP Compressor Front Case - Post Repair Dimensions - Assembly B
HP Compressor Front Case - Post Repair Dimensions - Assembly B
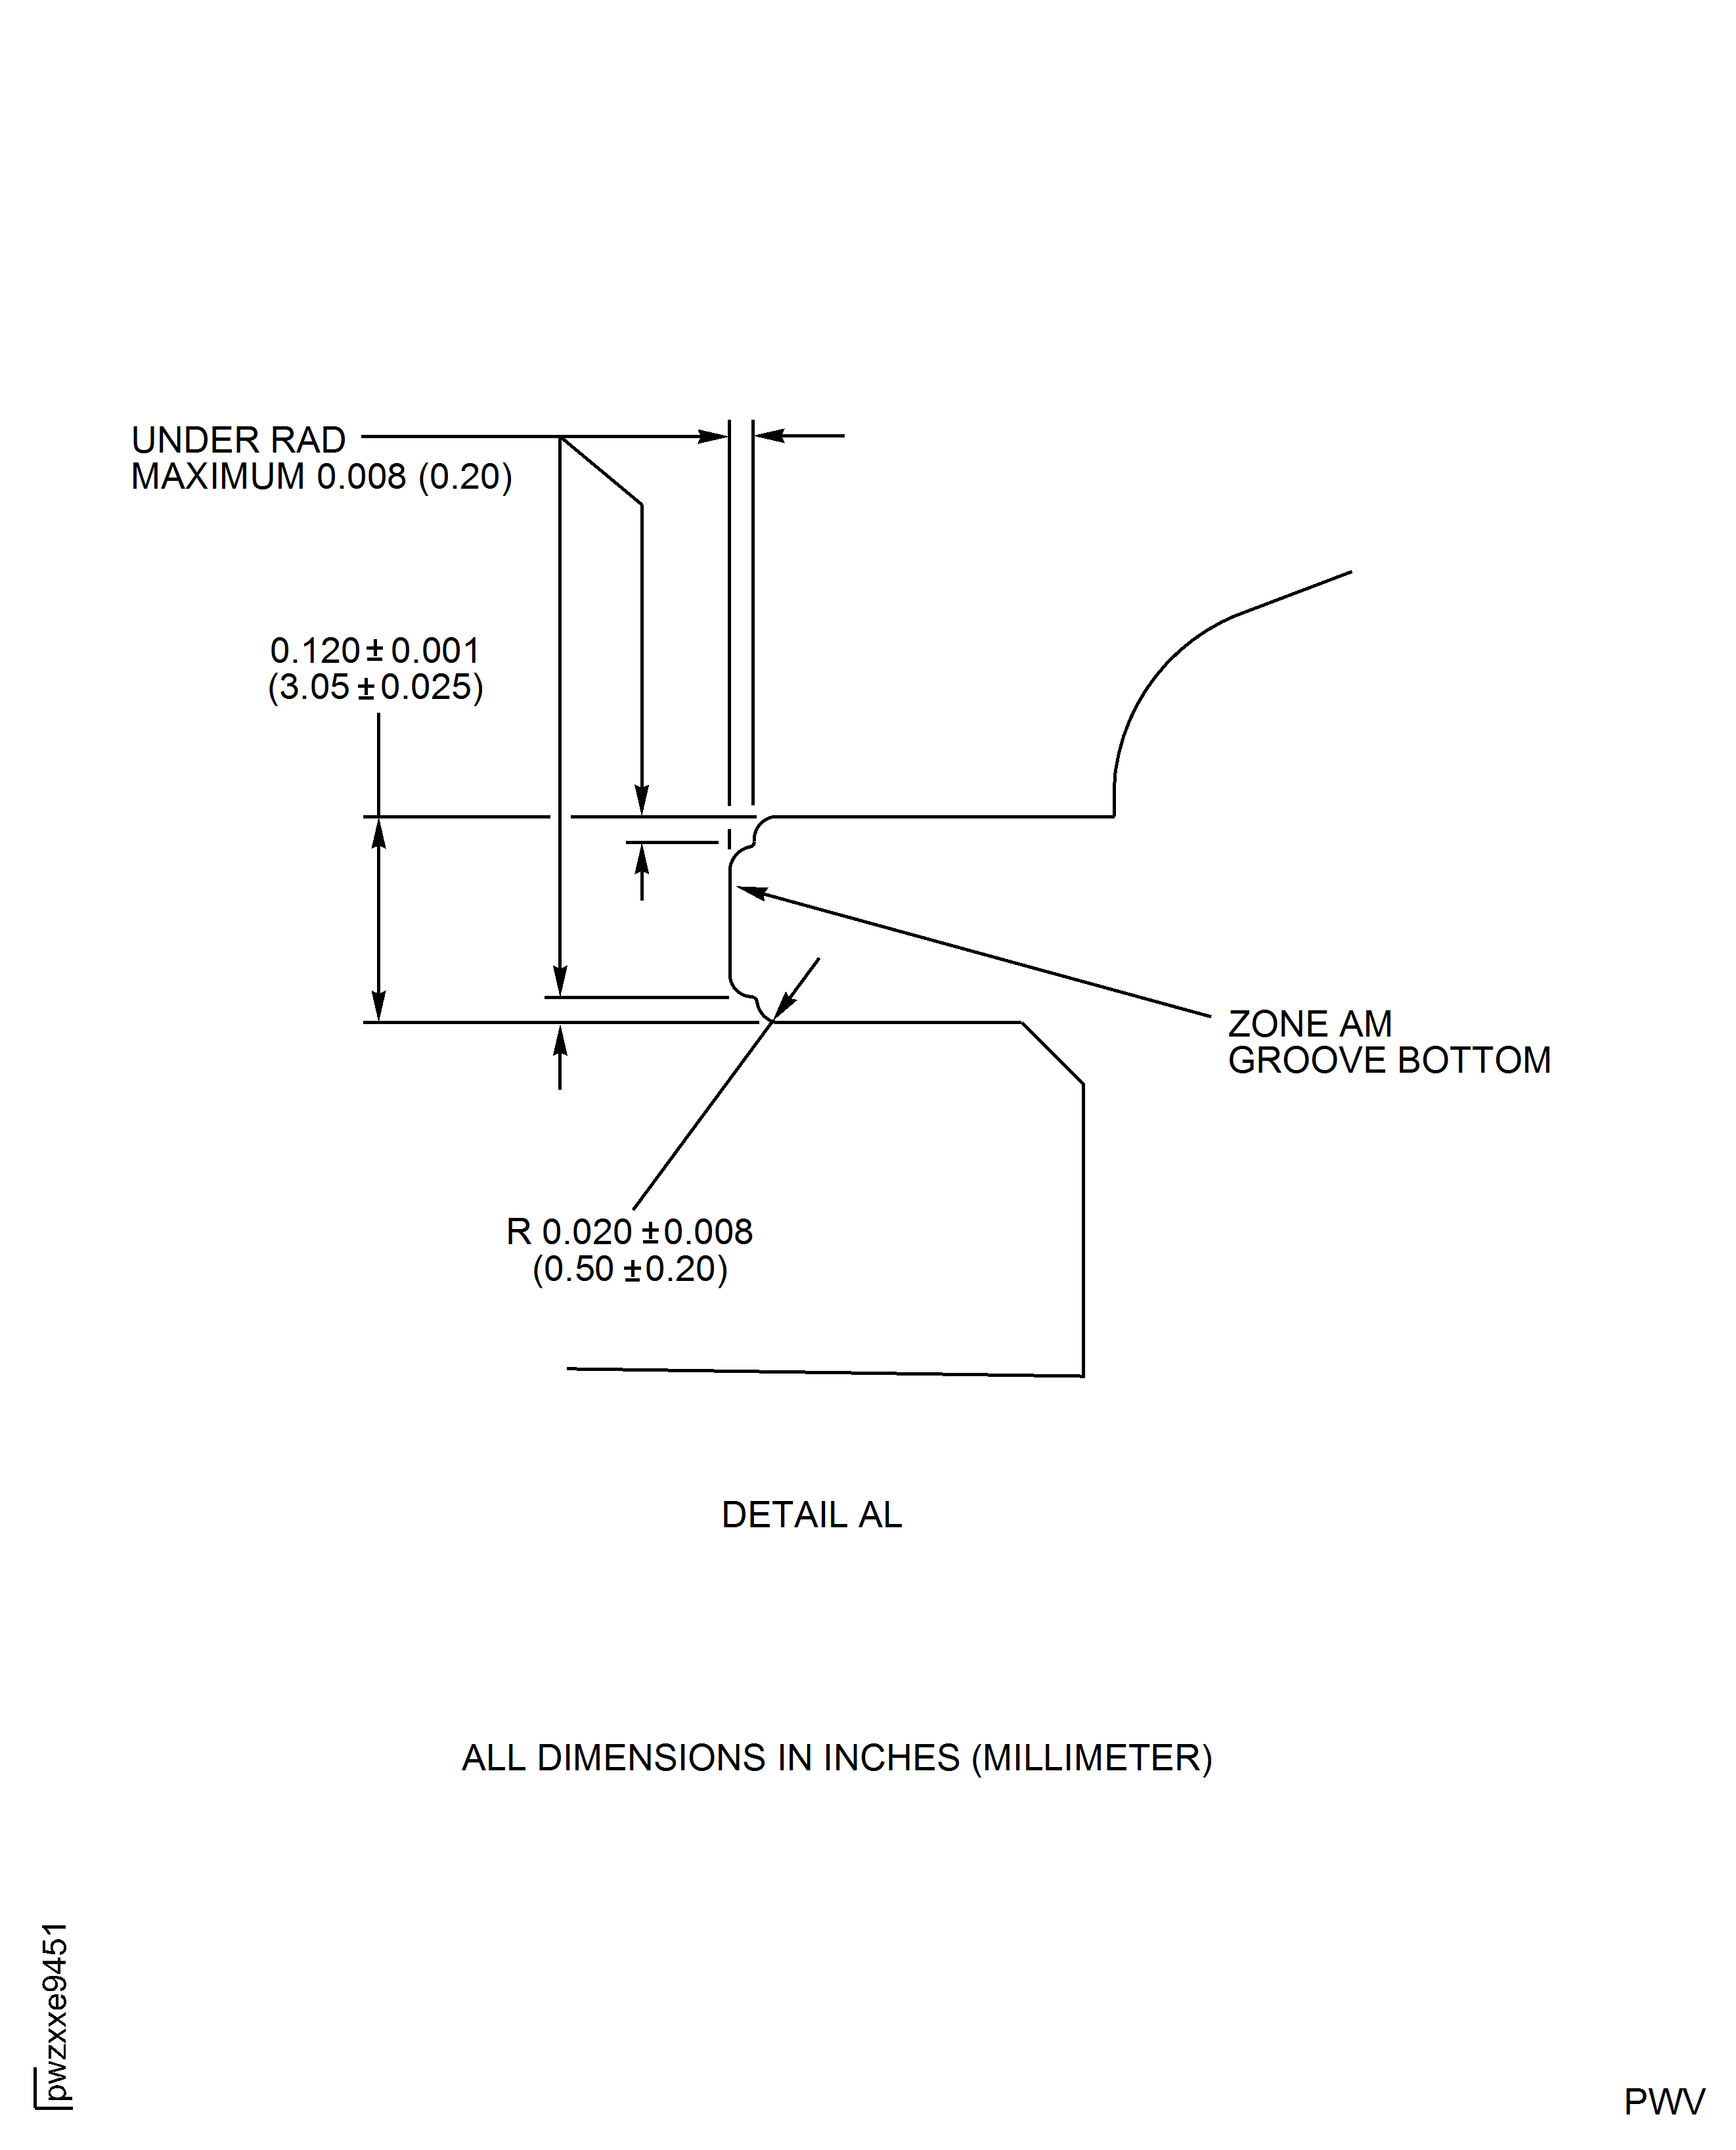
Figure: HP Compressor Front Cases - Repair Zone - Location 16 And Location 17 - Assembly B
HP Compressor Front Cases - Repair Zone - Location 16 And Location 17 - Assembly B
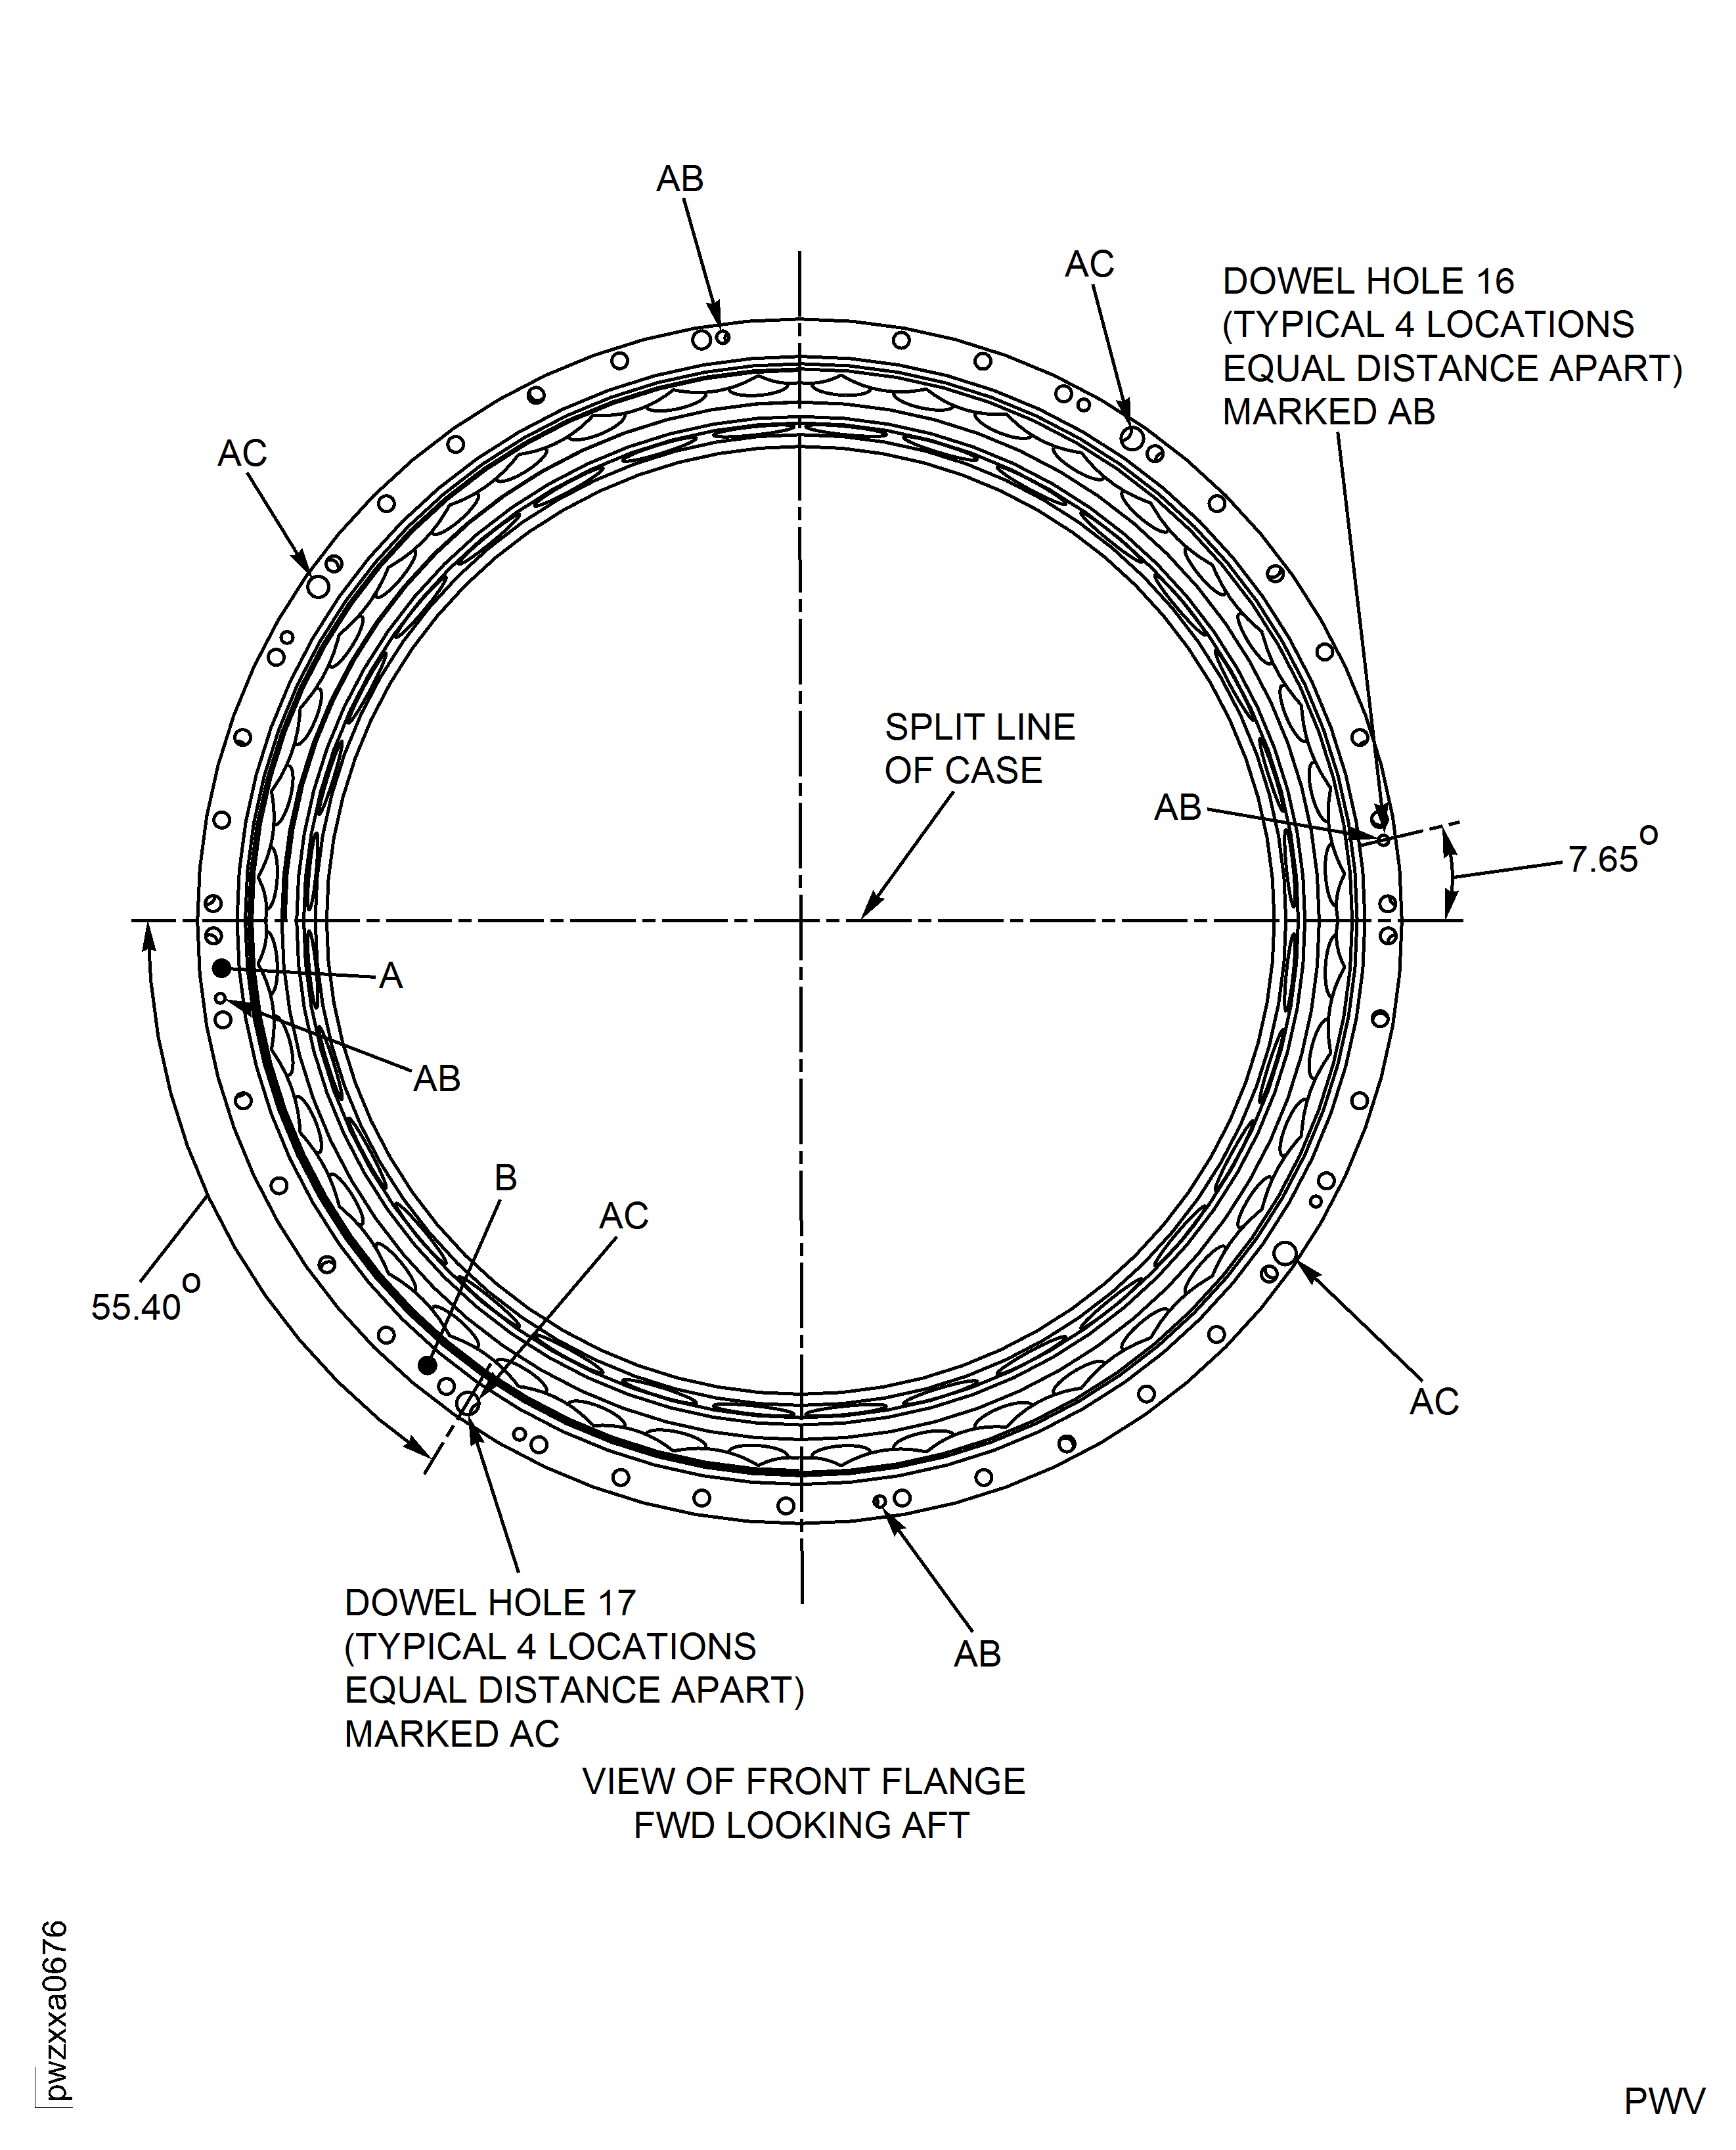
Figure: HP Compressor Front Cases - Repair Zone - Location 18 - Assembly B
HP Compressor Front Cases - Repair Zone - Location 18 - Assembly B
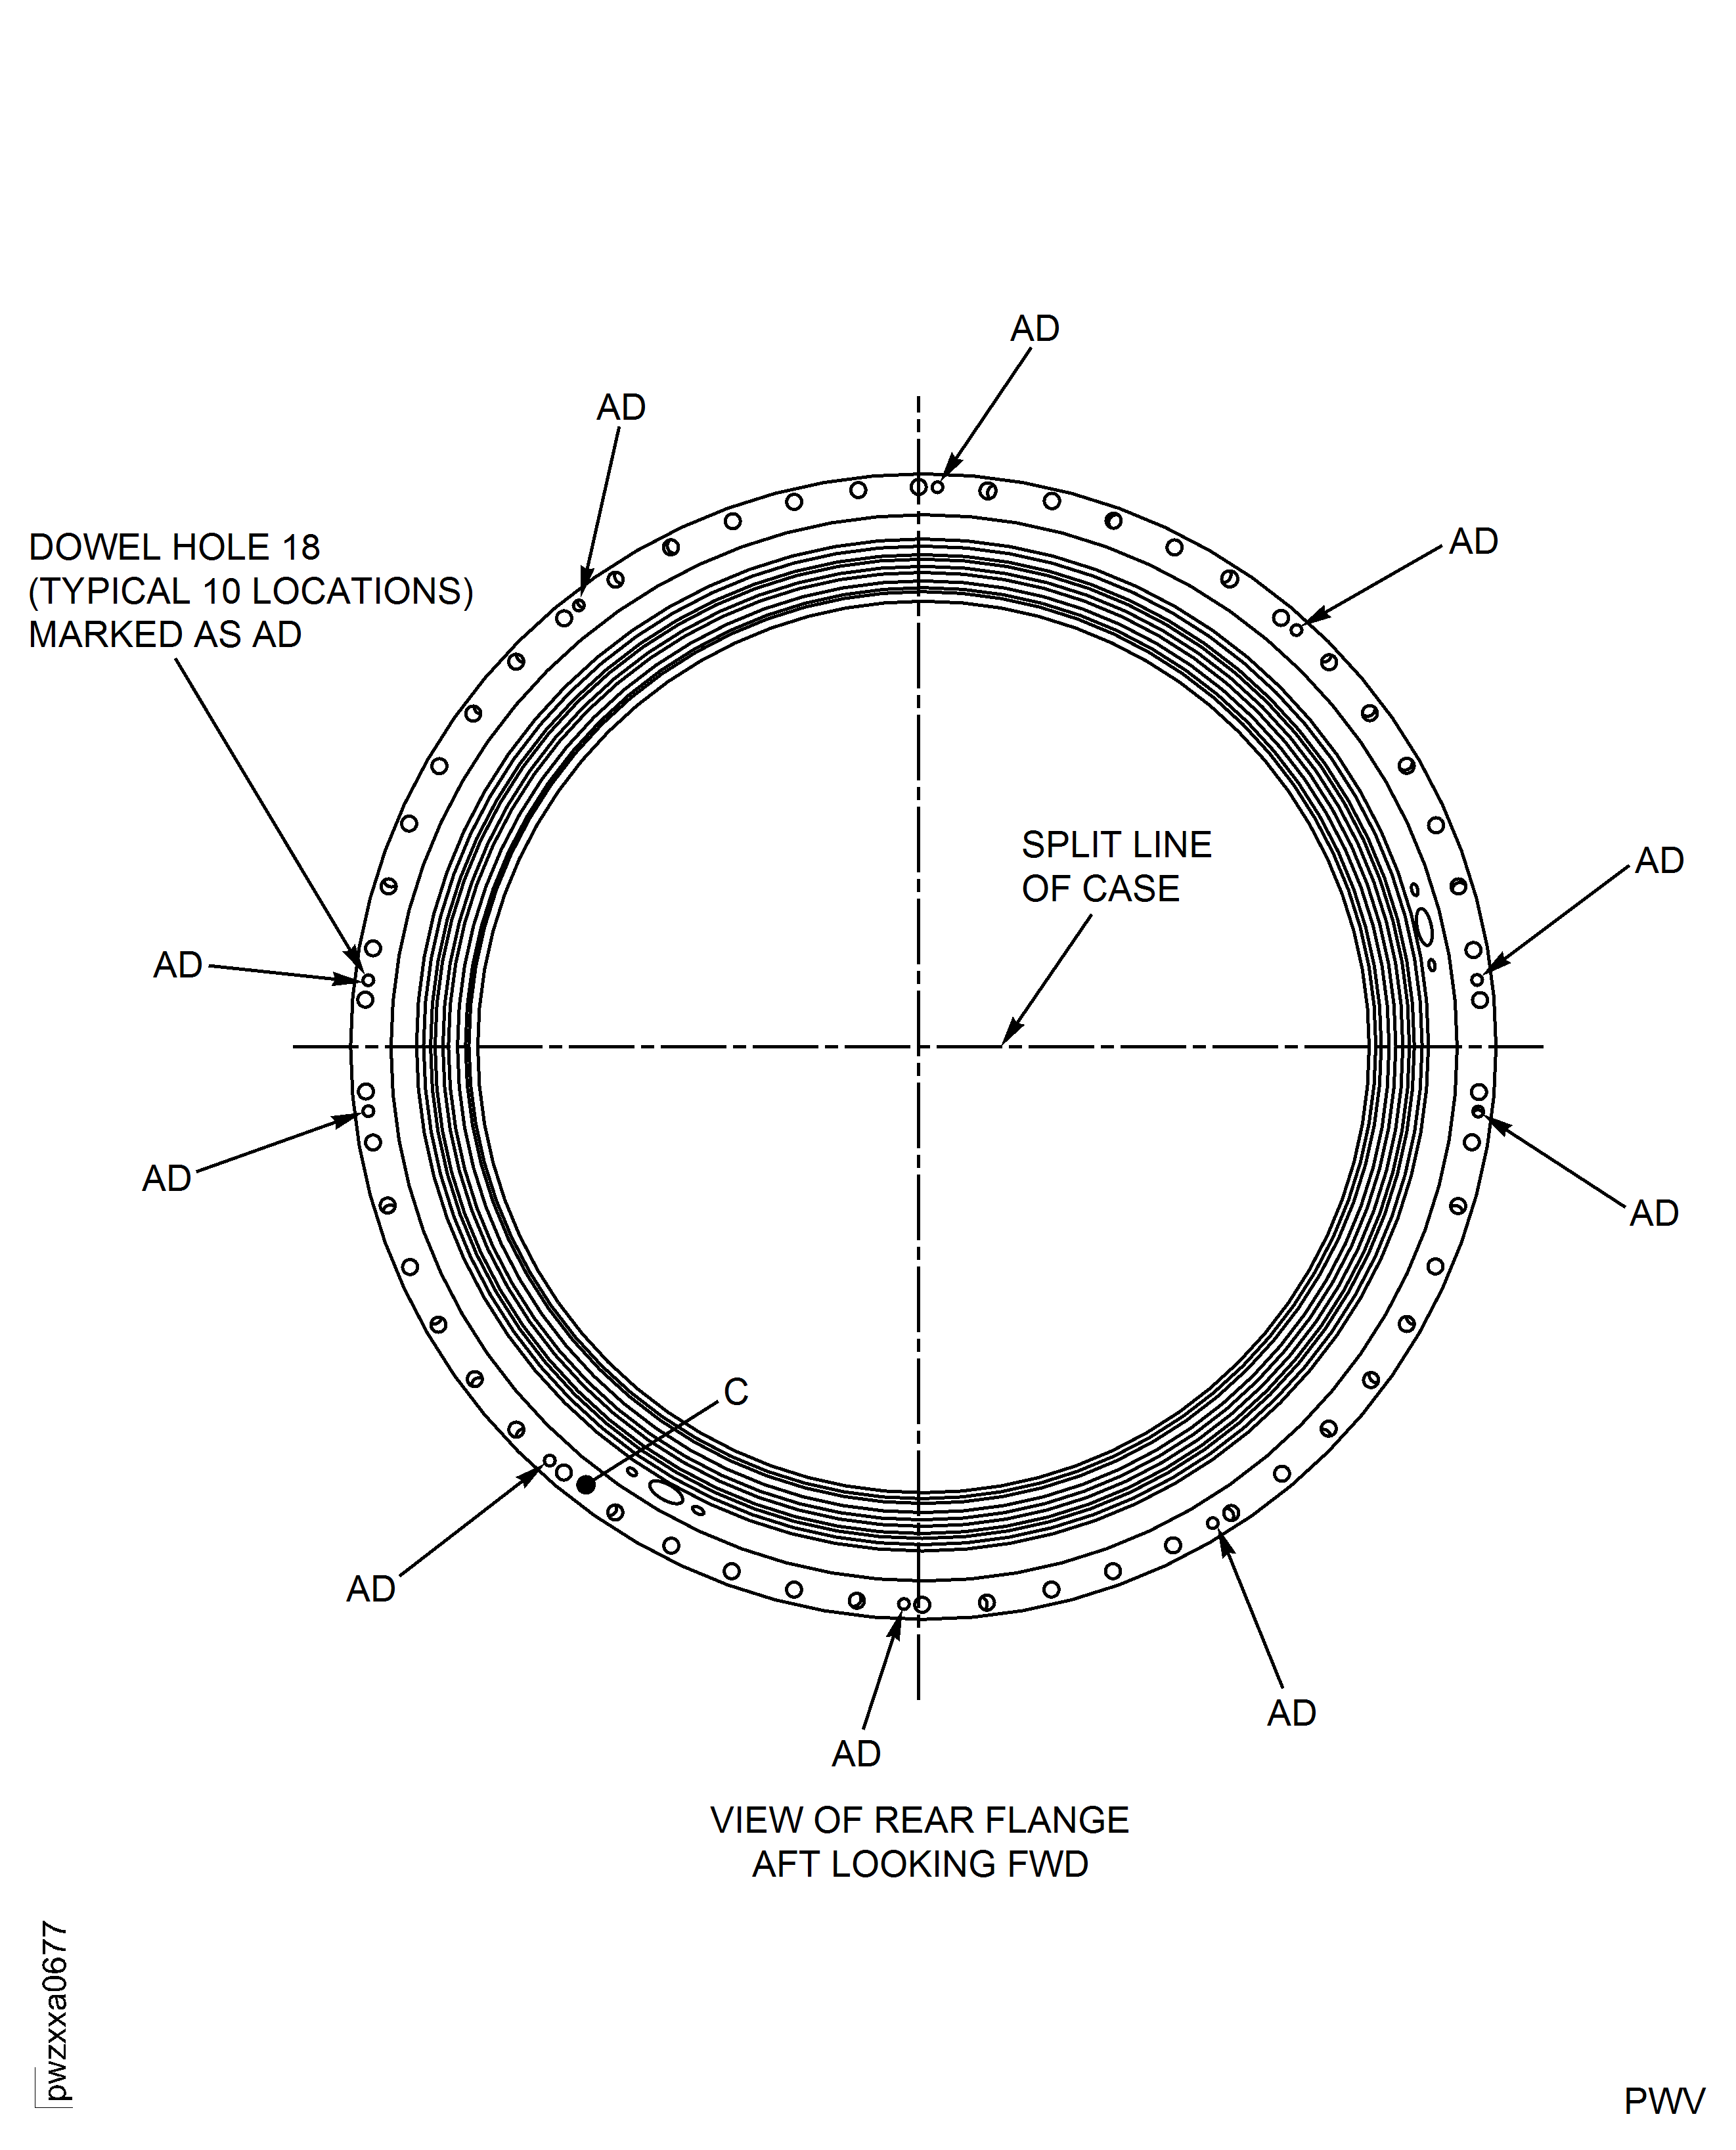
Figure: HP Compressor Front Cases - Repair Details and Dimensions - Location 16 And Location 17 - Assembly B
HP Compressor Front Cases - Repair Details and Dimensions - Location 16 And Location 17 - Assembly B
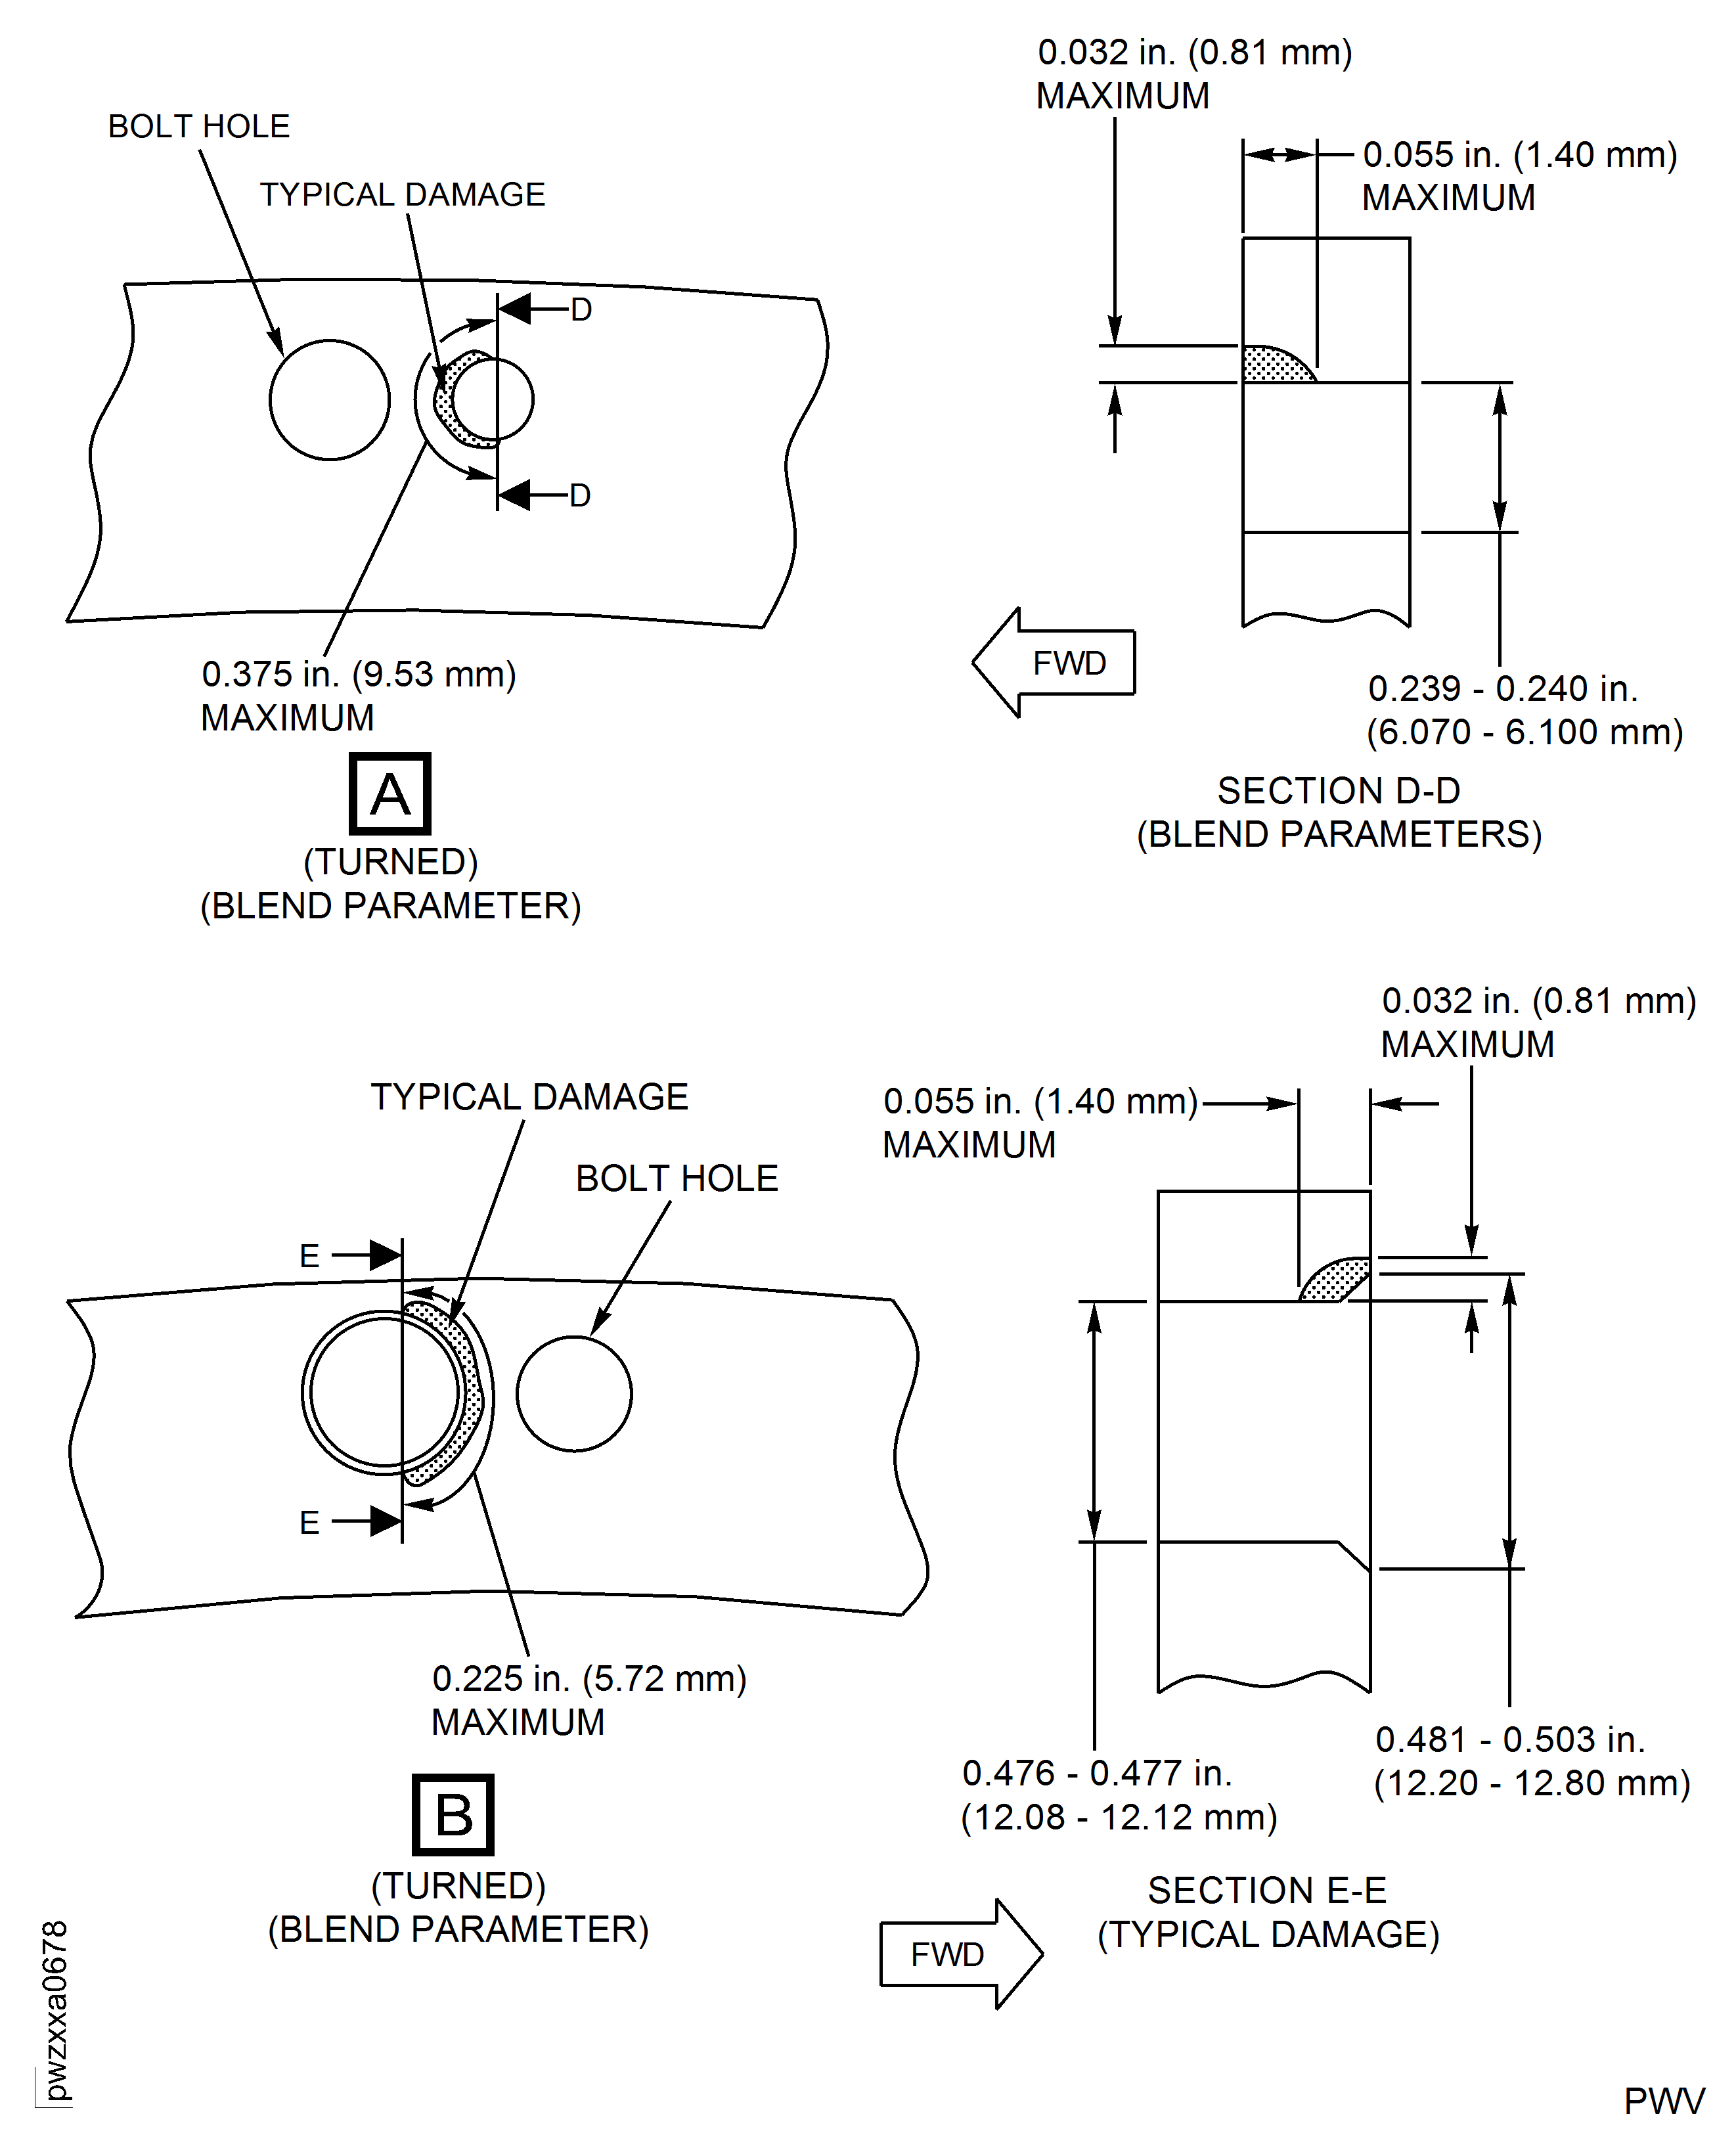
Figure: HP Compressor Front Cases - Repair Details and Dimensions - Location 18 - Assembly B
HP Compressor Front Cases - Repair Details and Dimensions - Location 18 - Assembly B
Requirements After Job Completion
Follow-On Conditions
| Action/Condition | Data Module/Technical Publication |
|---|---|
| Apply the surface protection | TASK 72-41-31-300-021 |
