Export Control
EAR Export Classification: Not subject to the EAR per 15 C.F.R. Chapter 1, Part 734.3(b)(3), except for the following Service Bulletins which are currently published as EAR Export Classification 9E991: SBE70-0992, SBE72-0483, SBE72-0580, SBE72-0588, SBE72-0640, SBE73-0209, SBE80-0024 and SBE80-0025.Copyright
© IAE International Aero Engines AG (2001, 2014 - 2021) The information contained in this document is the property of © IAE International Aero Engines AG and may not be copied or used for any purpose other than that for which it is supplied without the express written authority of © IAE International Aero Engines AG. (This does not preclude use by engine and aircraft operators for normal instructional, maintenance or overhaul purposes.).Applicability
All
Common Information
TASK 72-43-12-300-002 No. 4 Bearing Seal Spacer - Chromium Plate Repair The Contact Surfaces, Repair-002 (VRS3105)
General
Price and availability - refer to IAE
The practices and processes referred to in the procedure by the TASK numbers are in the SPM.
Preliminary Requirements
Pre-Conditions
NONEConsumables, Materials and Expendables
NONESpares
NONESafety Requirements
NONEProcedure
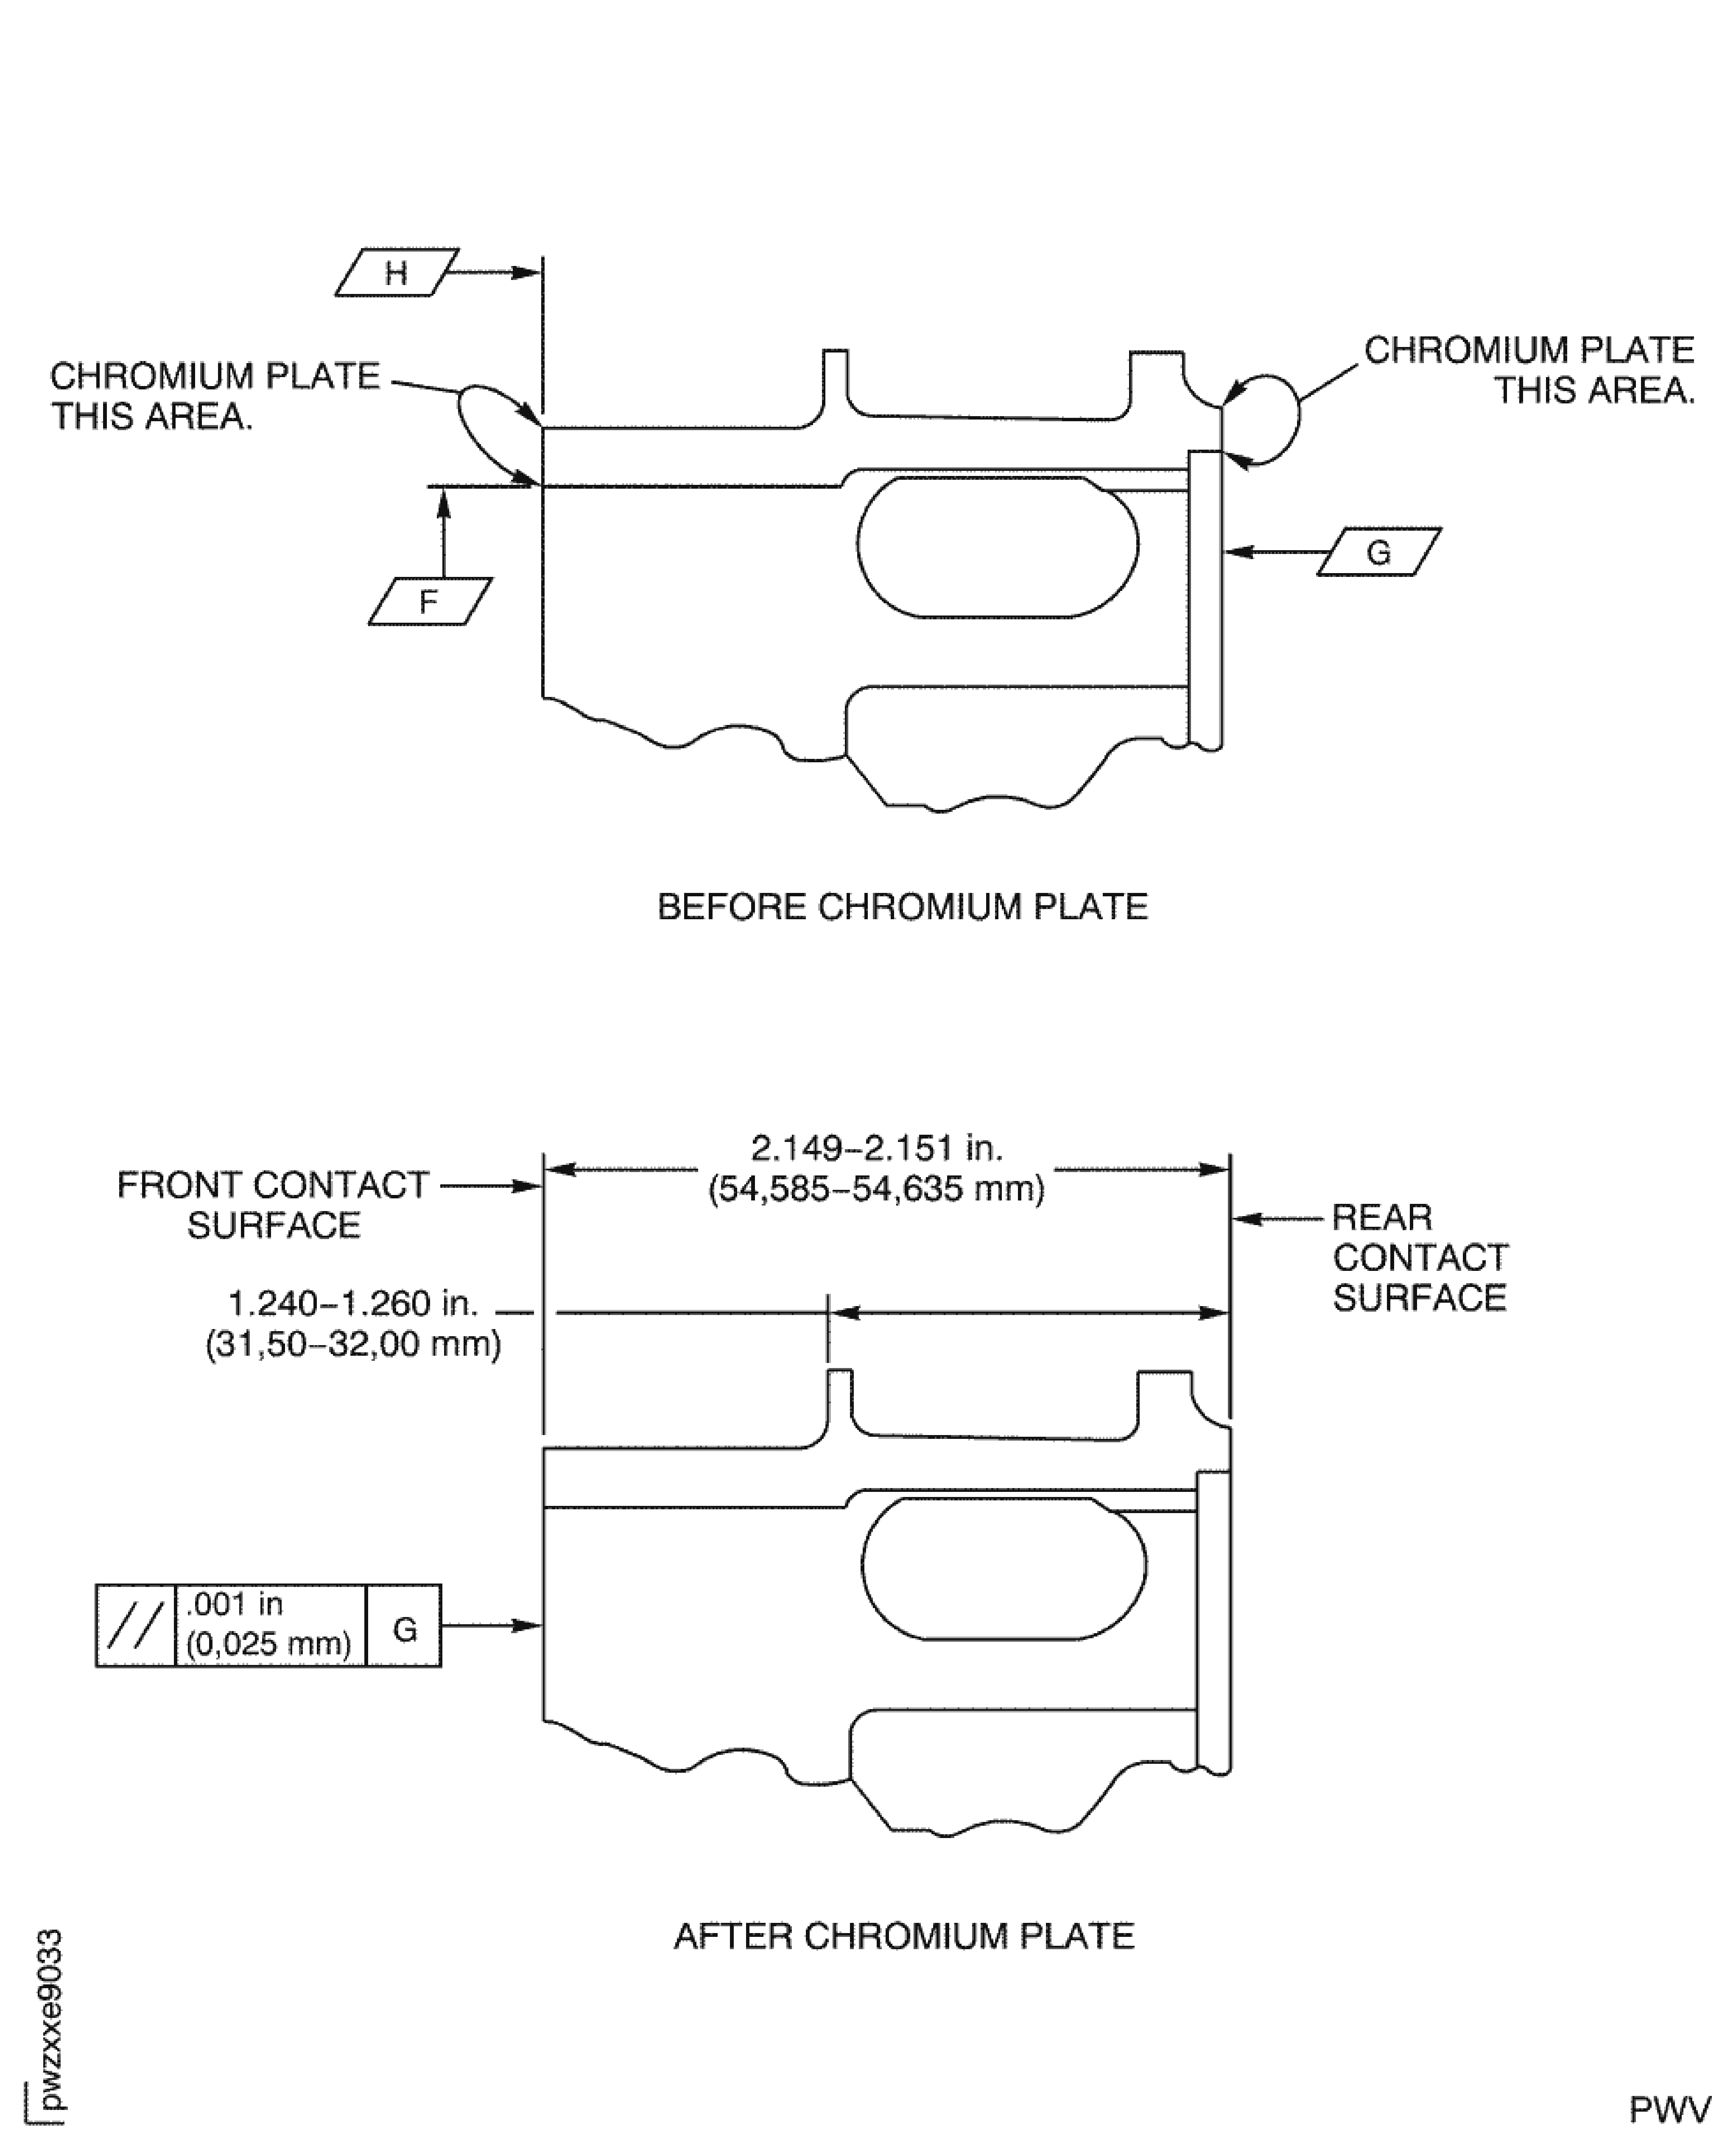
Refer to Figure.
Remove the chromium plate that is on the part by SPM TASK 70-33-02-300-503. If the cromium plate was not removed fully by SPM TASK 70-33-02-300-503, grind to remove the chromium plate.
NOTE
If both contact surfaces need to be repaired, make sure the 1.240 to 1.260 in. (31.50 to 32.00 mm) dimension is maintained.If there is chromium plate.
Hold to the maximum axial dimension.
All dimensions apply when Surface G is flat by 0.001in. (0.025 mm) and Diameter F maintains a clearance envelope of 5.130in. (130.302 mm) in a free or held condition.
NOTE
Part hardness must be more than HRC 40.
Post-strip bake is necessary.
Hold the spacer only on Surfaces G and H and Diameter F.
If there is no chromium plate, machine the contact surface(s) sufficiently to permit a plating thickness of 0.003 to 0.006in. (0.077 to 0.152 mm).
SUBTASK 72-43-12-320-053 Machine the Contact Surface(s) of the No. 4 Bearing Seal Spacer
Refer to SPM TASK 70-11-03-300-503.
Clean the No. 4 bearing seal spacer.
SUBTASK 72-43-12-110-058 Clean the No. 4 Bearing Seal Spacer
Refer to SPM TASK 70-23-05-230-501.
NOTE
Do not shotpeen.Use medium sensitivity, water washable. No cracks permitted.
If you use grind procedure to remove chromium plate, then do a local fluorescent inspection of the repair area.
SUBTASK 72-43-12-230-052 Examine the No. 4 Bearing Seal Spacer
Refer to SPM TASK 70-11-26-300-503.
Clean the repair area locally.
SUBTASK 72-43-12-110-059 Clean the Repair Area of No. 4 Bearing Seal Spacer
Refer to SPM TASK 70-38-24-300-503.
Apply a mask to the areas of the No. 4 bearing seal spacer that are not to be plated.
SUBTASK 72-43-12-350-001 Apply a Mask to the No. 4 Bearing Seal Spacer
Refer to Figure.
Refer to SPM TASK 70-33-02-300-503.
Make sure to apply chromium plate a sufficient thickness to permit finish machining.
Chromium plate the contact surface(s).
SUBTASK 72-43-12-330-052 Chromium Plate the Contact Surface(s) of the No. 4 Bearing Seal Spacer
Refer to SPM TASK 70-33-02-300-503. Do this process as quickly as possible in less than four hours after chromium plate.
Bake the No. 4 bearing seal spacer after chromium plate.
SUBTASK 72-43-12-370-001 Bake After Chromium Plate
Refer to Figure.
Machine the contact surface so the chromium plate is 0.003 to 0.006in. (0.077 to 0.152 mm) thick.
The axial dimension must be 2.149 to 2.151in. (54.585 to 54.635 mm).
All dimensions apply when Surface G is flat by 0.001in. (0.025 mm) and Diameter F maintains a clearance envelope of 5.130in. (130.302 mm) in a free or held condition.
Hold the spacer only on Surfaces G and H and Diameter F.
Grind the contact surface(s) with a lathe after chromium plate.
SUBTASK 72-43-12-320-054 Grind the No. 4 Bearing Seal Spacer
Refer to SPM TASK 70-11-03-300-503.
Clean the No. 4 bearing seal spacer.
SUBTASK 72-43-12-110-060 Clean the No. 4 Bearing Seal Spacer
Refer to Figure.
Refer to Figure and TASK 72-43-12-200-000 (INSPECTION-000).
Examine the seal spacer after chromium plate repair.
SUBTASK 72-43-12-220-056 Examine the Repair
Make a permanent mark by the procedure given in SPM TASK 70-09-00-400-501.
Use vibration peen procedure.
Remove high metal caused by marking the number.
Mark VRS3105 on the repaired No. 4 bearing seal spacer adjacent to the part number.
SUBTASK 72-43-12-220-058 Identify the Repair
Figure: Repair Details and Dimensions
Repair Details and Dimensions

