Export Control
EAR Export Classification: Not subject to the EAR per 15 C.F.R. Chapter 1, Part 734.3(b)(3), except for the following Service Bulletins which are currently published as EAR Export Classification 9E991: SBE70-0992, SBE72-0483, SBE72-0580, SBE72-0588, SBE72-0640, SBE73-0209, SBE80-0024 and SBE80-0025.Copyright
© IAE International Aero Engines AG (2001, 2014 - 2021) The information contained in this document is the property of © IAE International Aero Engines AG and may not be copied or used for any purpose other than that for which it is supplied without the express written authority of © IAE International Aero Engines AG. (This does not preclude use by engine and aircraft operators for normal instructional, maintenance or overhaul purposes.).Applicability
All
Common Information
TASK 72-44-50-300-004 HPT Stage 1 Cooling (TOBI) Duct - Axial Dimension Plasma Spray Repair, Repair-004 (VRS3183)
Effectivity
FIG/ITEM | PART NO. |
|---|---|
01-010 | 2A0008-01 |
01-010 | 2A1997-01 |
01-010 | 2A1997-001 |
01-010 | 2A1997-002 |
01-010 | 2A1997-003 |
01-010 | 2A2141-01 |
01-010 | 2A3180-01 |
01-010 | 2A3329-01 |
01-010 | 2A3487-01 |
01-010 | 2A3487-001 |
01-010 | 2A3491-01 |
01-010 | 2A3914-01 |
01-010 | 2A3914-001 |
01-010 | 2A4086 |
General
Price and availability - refer to IAE
The practices and processes referred to in the procedure by the TASK numbers are in the SPM.
NOTE
Preliminary Requirements
Pre-Conditions
NONESupport Equipment
NONEConsumables, Materials and Expendables
| Name | Manufacturer | Part Number / Identification | Quantity | Remark |
|---|---|---|---|---|
| CoMat 02-047 TAPE, HEAT REFLECTIVE | LOCAL | CoMat 02-047 | ||
| CoMat 03-089 METAL SPRAYING POWDER Ni/Al (95/5) | 33870 | CoMat 03-089 | ||
| CoMat 03-090 METAL SPRAYING POWDER Ni/Al (95/5) | X111X | CoMat 03-090 |
Safety Requirements
NONEProcedure
Drill out the flared shank with a bit that is slightly smaller than 0.182 in. (4.6228 mm) diameter.
Use a drift to push out the remaining part of the PIN - SHOULDER that is in the hole.
SUBTASK 72-44-50-320-079 Remove the Locating Pin from the Stage 1 HPT Cooling Duct
Use CoMat 02-047 TAPE, HEAT REFLECTIVE or equivalent.
Strip the coating by the procedure given in SPM TASK 70-33-78-300-503.
Strip to remove the coating.
SUBTASK 72-44-50-330-052 Remove the Coating by Stripping
Use CoMat 02-047 TAPE, HEAT REFLECTIVE or equivalent.
Machine the diameter to be repaired to 0.109 in. to 0.115 in. (2.769 mm to 2.921 mm).
Remove the minimum amount of material possible to keep in the limits given in the figure.
The surface will be shiny when you remove the coating by machine.
Apply a mask to the areas not to be coated.
NOTE
If the measured dimension in a free condition is not satisfactory, a held condition is permitted. All dimensions apply when Surface N is flat by 0.002 in. (0.051 mm) and Diameter L maintains a clearance envelope of 13.040 in. (331.216 mm) diameter in a free or held condition. In a free condition, Surface N must be flat by 0.005 in. (0.127 mm) and Diameter L must be 13.008 in. to 13.059 in. (330.40 mm to 331.70 mm). Hold the duct only on Surfaces N, M and W, and Diameter L.Machine to remove the coating.
SUBTASK 72-44-50-320-054-A00 Remove the Coating by Machining (PNs 2A0008-01, 2A1997-01, and 2A1997-002)
Use CoMat 02-047 TAPE, HEAT REFLECTIVE or equivalent.
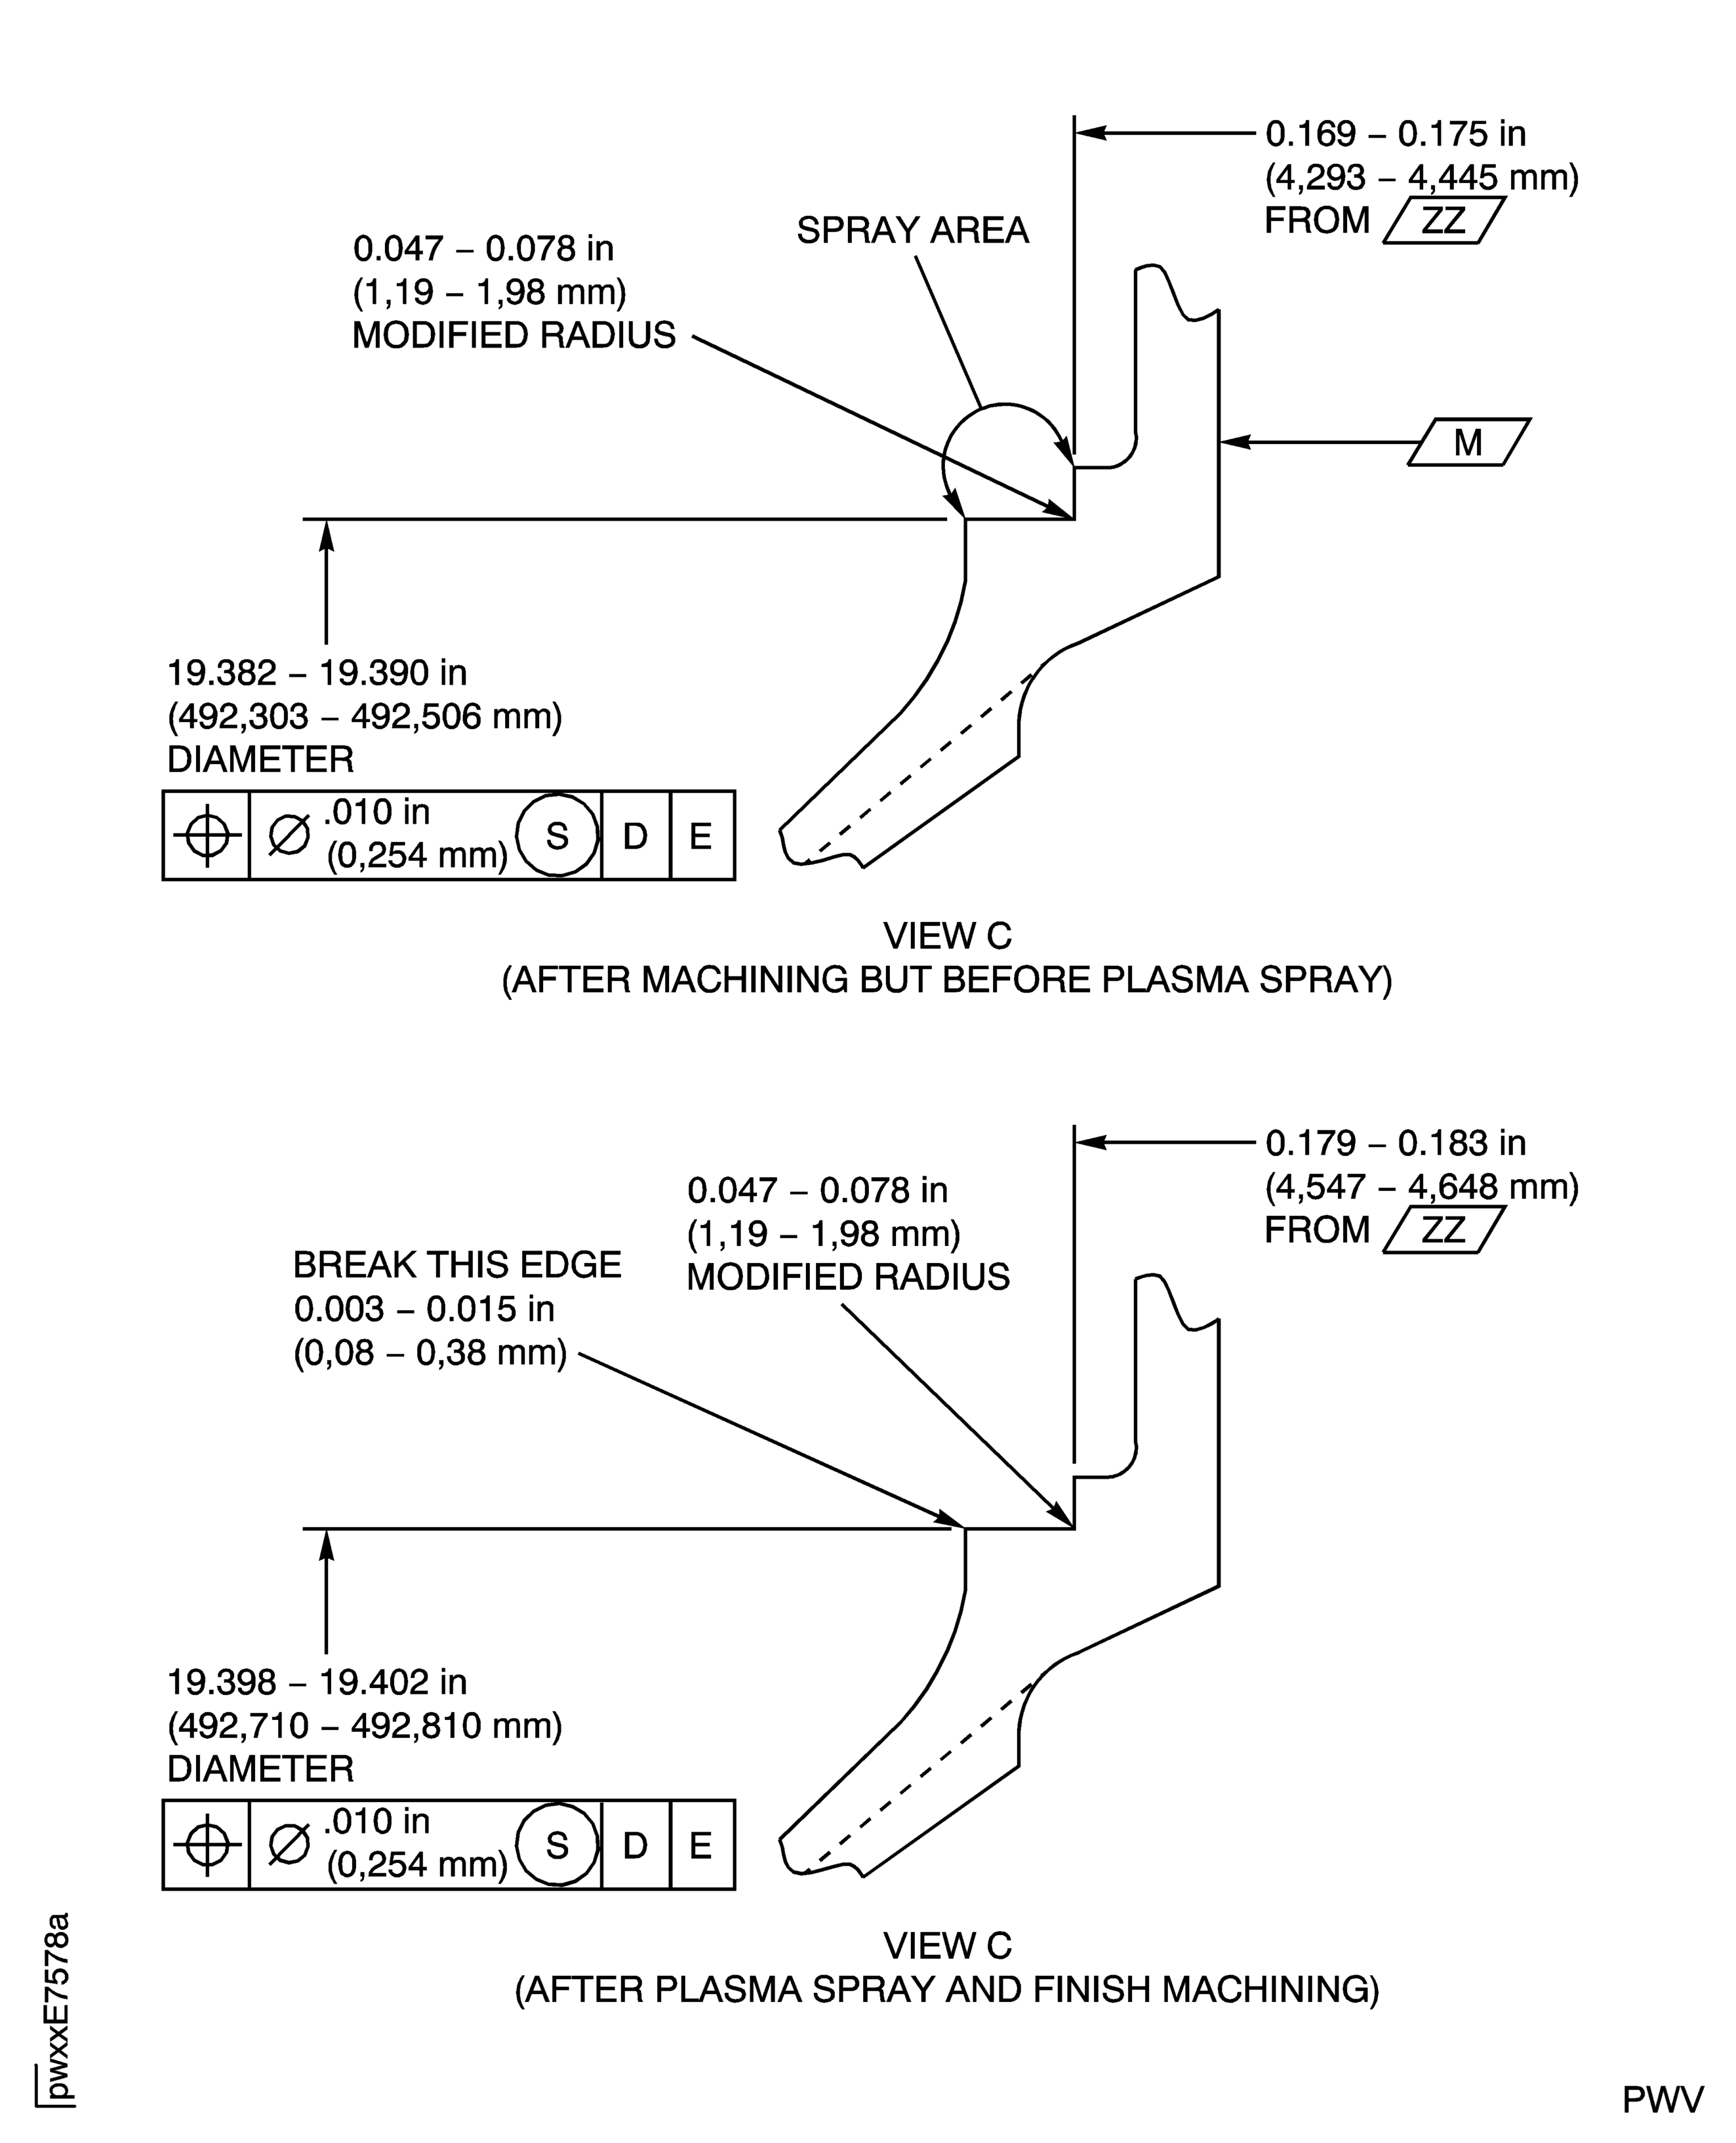
Machine the diameter to be repaired to 0.169 in. to 0.175 in. (4.29 mm to 4.45 mm).
Remove the minimum amount of material possible to keep in the limits given in the figure.
The surface will be shiny when you remove the coating by machine.
Apply a mask to the areas not to be coated.
NOTE
If the measured dimension in a free condition is not satisfactory, a held condition is permitted. All dimensions apply when Surface N is flat by 0.002 in. (0.051 mm) and Diameter L maintains a clearance envelope of 13.040 in. (331.22 mm) diameter in a free or held condition. In a free condition, Surface N must be flat by 0.005 in. (0.13 mm) and Diameter L must be 13.008 in. to 13.059 in. (330.40 mm to 331.70 mm). Hold the duct only on Surfaces N, M and W, and Diameter L.Machine to remove the coating.
SUBTASK 72-44-50-320-054-B00 Remove the Coating by Machining (PNs 2A1997-001, 2A1997-003, 2A2141-01, 2A3180-01, 2A3329-01, 2A3487-01, 2A3487-001, 2A3491-01, 2A3914-01, 2A3914-001, and 2A4086)
No overspray is permitted.
The thickness of the plasma spray must be 0.010 in. to 0.020 in. (0.254 mm to 0.508 mm).
Refer to SPM TASK 70-34-03-340-501.
Plasma spray the axial dimension.
SUBTASK 72-44-50-340-052 Plasma Spray Repair the Axial Dimension
NOTE
If the measured dimension in a free condition is not satisfactory, a held condition is permitted. All dimensions apply when Surface N is flat by 0.002 in. (0.051 mm) and Diameter L maintains a clearance envelope of 13.040 in. (331.216 mm) diameter in a free or held condition. In a free condition, Surface N must be flat by 0.005 in. (0.127 mm) and Diameter L must be 13.008 in. to 13.059 in. (330.40 mm to 331.70 mm). Hold the duct only on Surfaces N, M and W, and Diameter L.Machine the axial dimension after plasma spray.
SUBTASK 72-44-50-320-055-A00 Machine the Axial Dimension after Plasma Spray (PNs 2A0008-01, 2A1997-01, and 2A1997-002)
NOTE
If the measured dimension in a free condition is not satisfactory, a held condition is permitted. All dimensions apply when Surface N is flat by 0.002 in. (0.05 mm) and Diameter L maintains a clearance envelope of 13.040 in. (331.22 mm) diameter in a free or held condition. In a free condition, Surface N must be flat by 0.005 in. (0.13 mm) and Diameter L must be 13.008 to 13.059 in. (330.40 mm to 331.70 mm). Hold the duct only on Surfaces N, M and W, and Diameter L.Machine the axial dimension after plasma spray.
SUBTASK 72-44-50-320-055-B00 Machine the Axial Dimension after Plasma Spray (PNs 2A1997-001, 2A1997-003, 2A2141-01, 2A3180-01, 2A3329-01, 2A3487-01, 2A3487-001, 2A3491-01, 2A3914-01, 2A3914-001, and 2A4086)
Use the vibration peen method.
Make a permanent mark by the procedure given in the SPM TASK 70-09-00-400-501.
NOTE
If VRS3183 is marked on the duct, it is not necessary to do this procedure.Mark VRS3183 adjacent to the part number.
SUBTASK 72-44-50-350-063 Identify the Repair
Use an applicable flaring tool to flare the locating pin to install it tightly.
Install a new PIN - SHOULDER to the duct in the correct position in the flange hole.
SUBTASK 72-44-50-350-088 Install a New Locating Pin to the Stage 1 HPT Cooling Duct
Figure: Repair Details and Dimensions (PNs 2A0008-01, 2A1997-01, and 2A1997-002)
Sheet 1
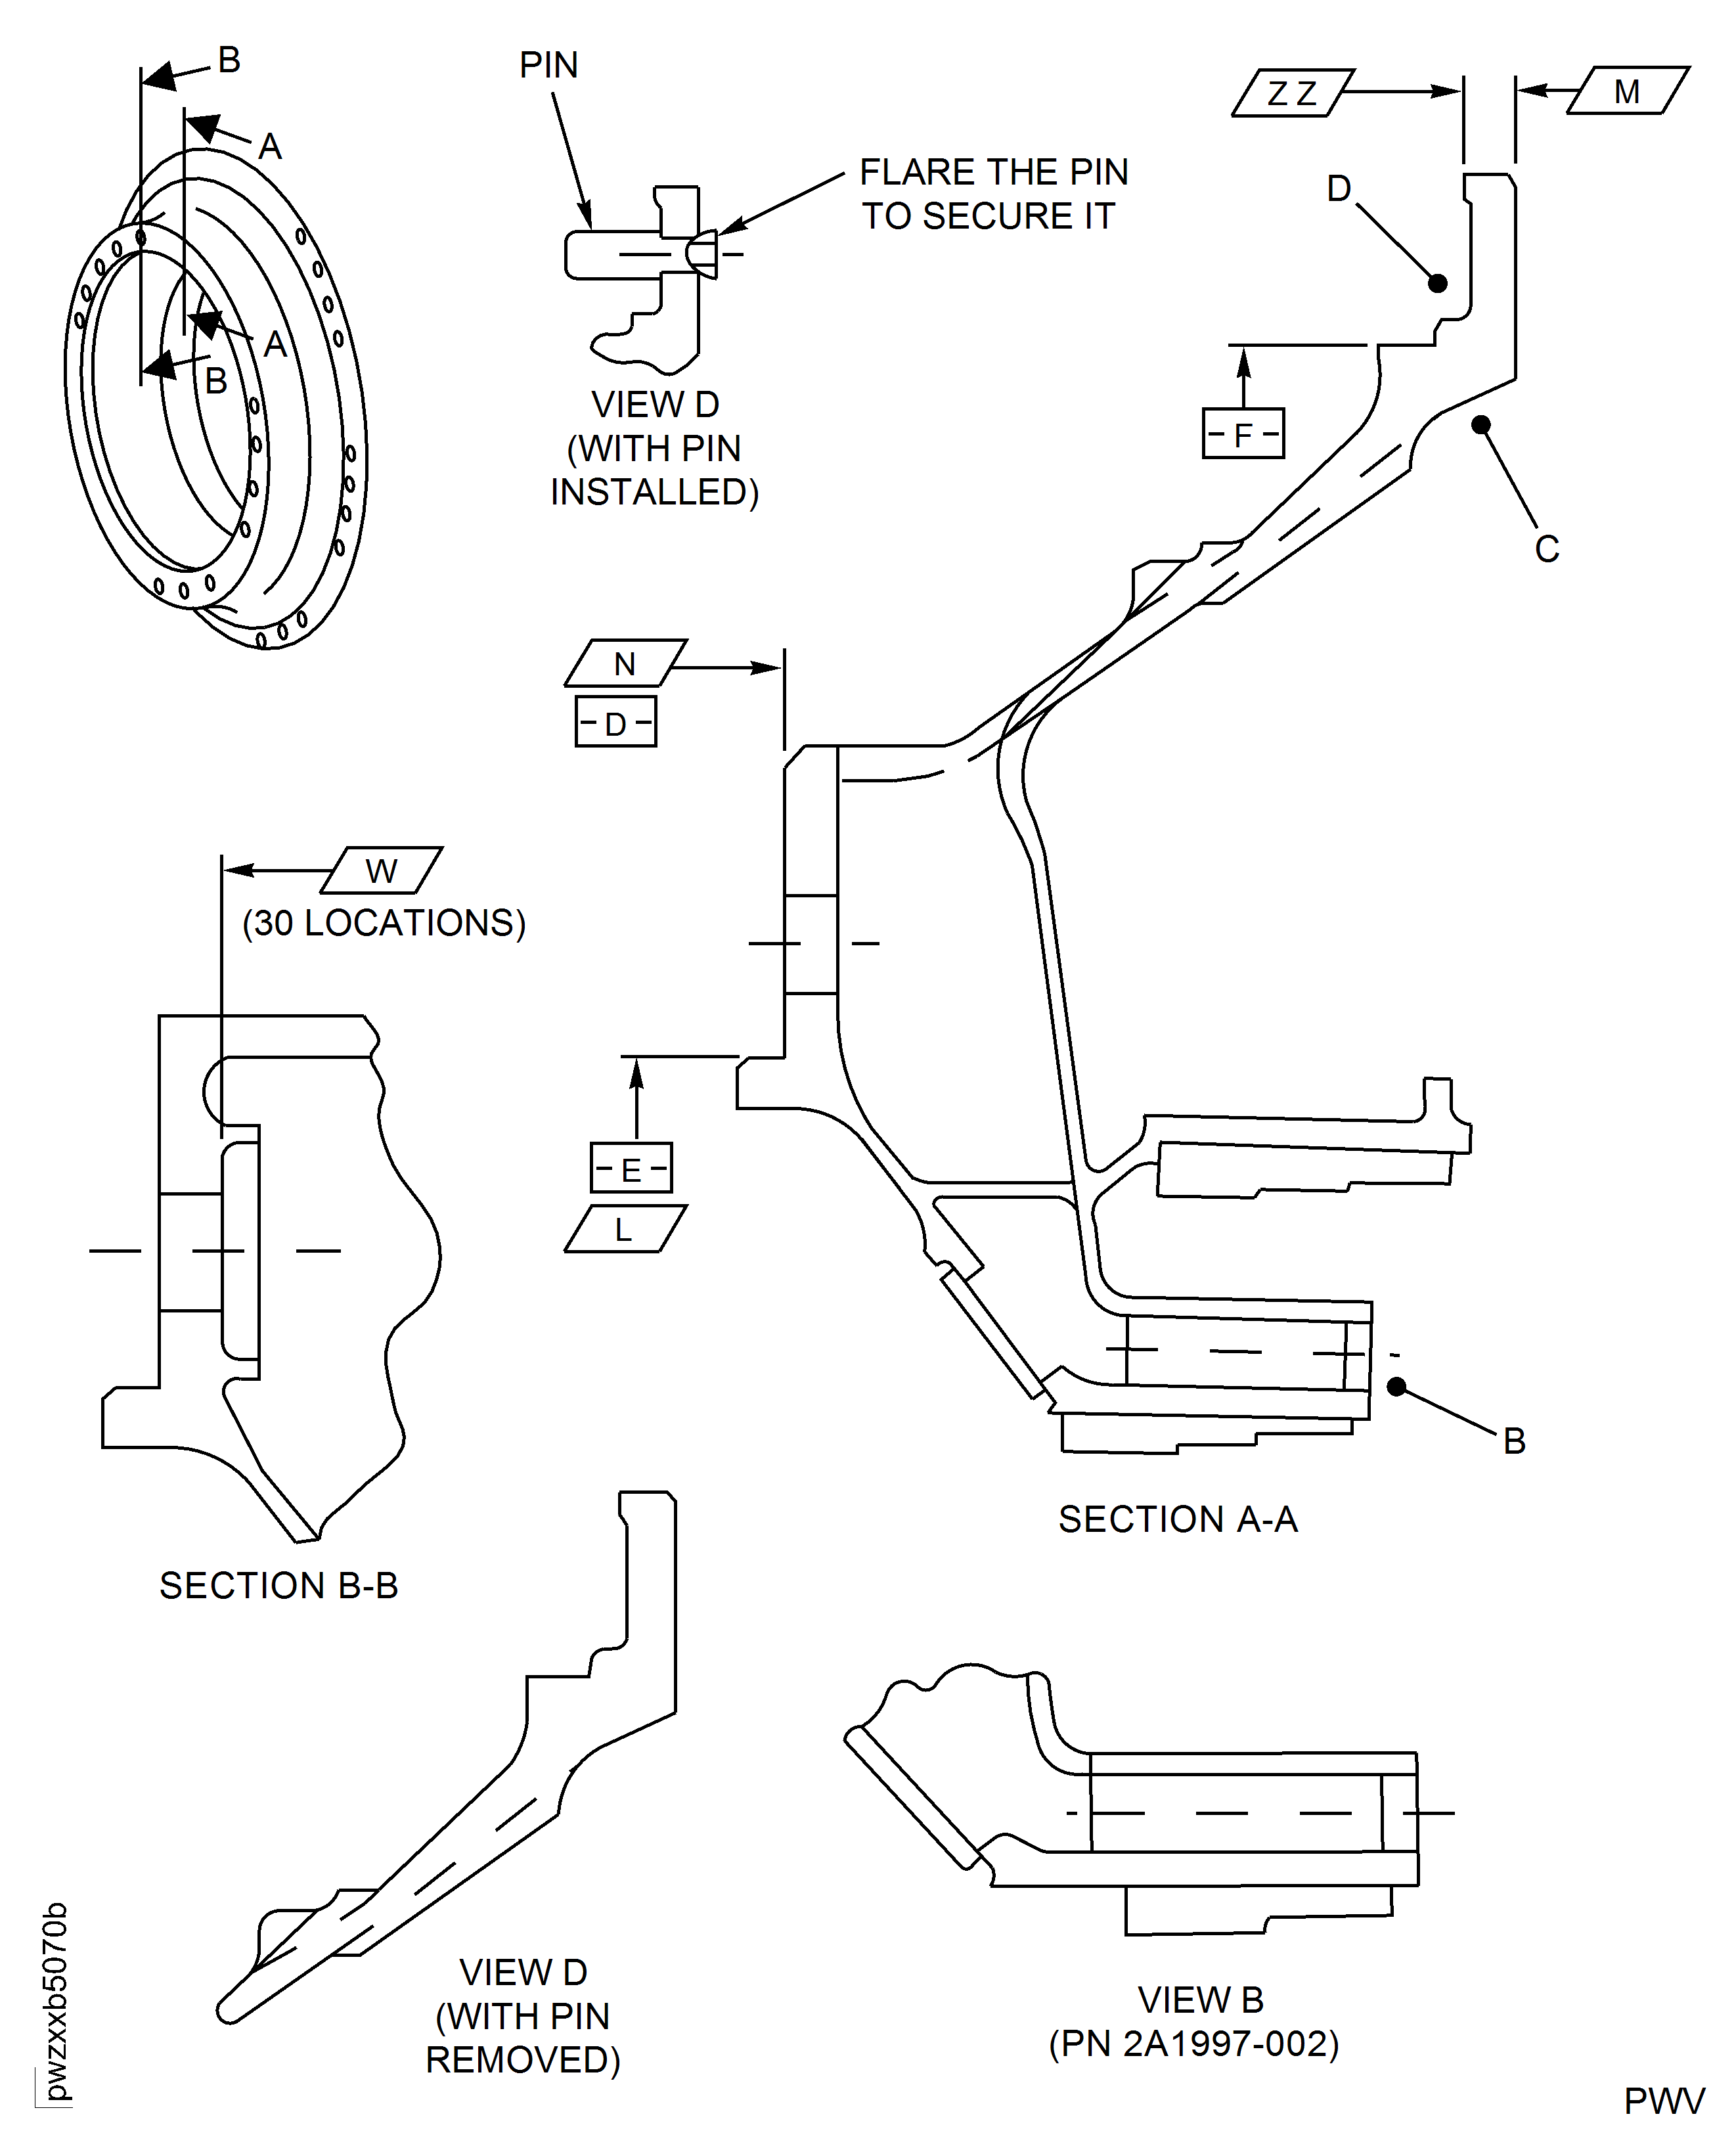
Figure: Repair Details and Dimensions
Repair Details and Dimensions
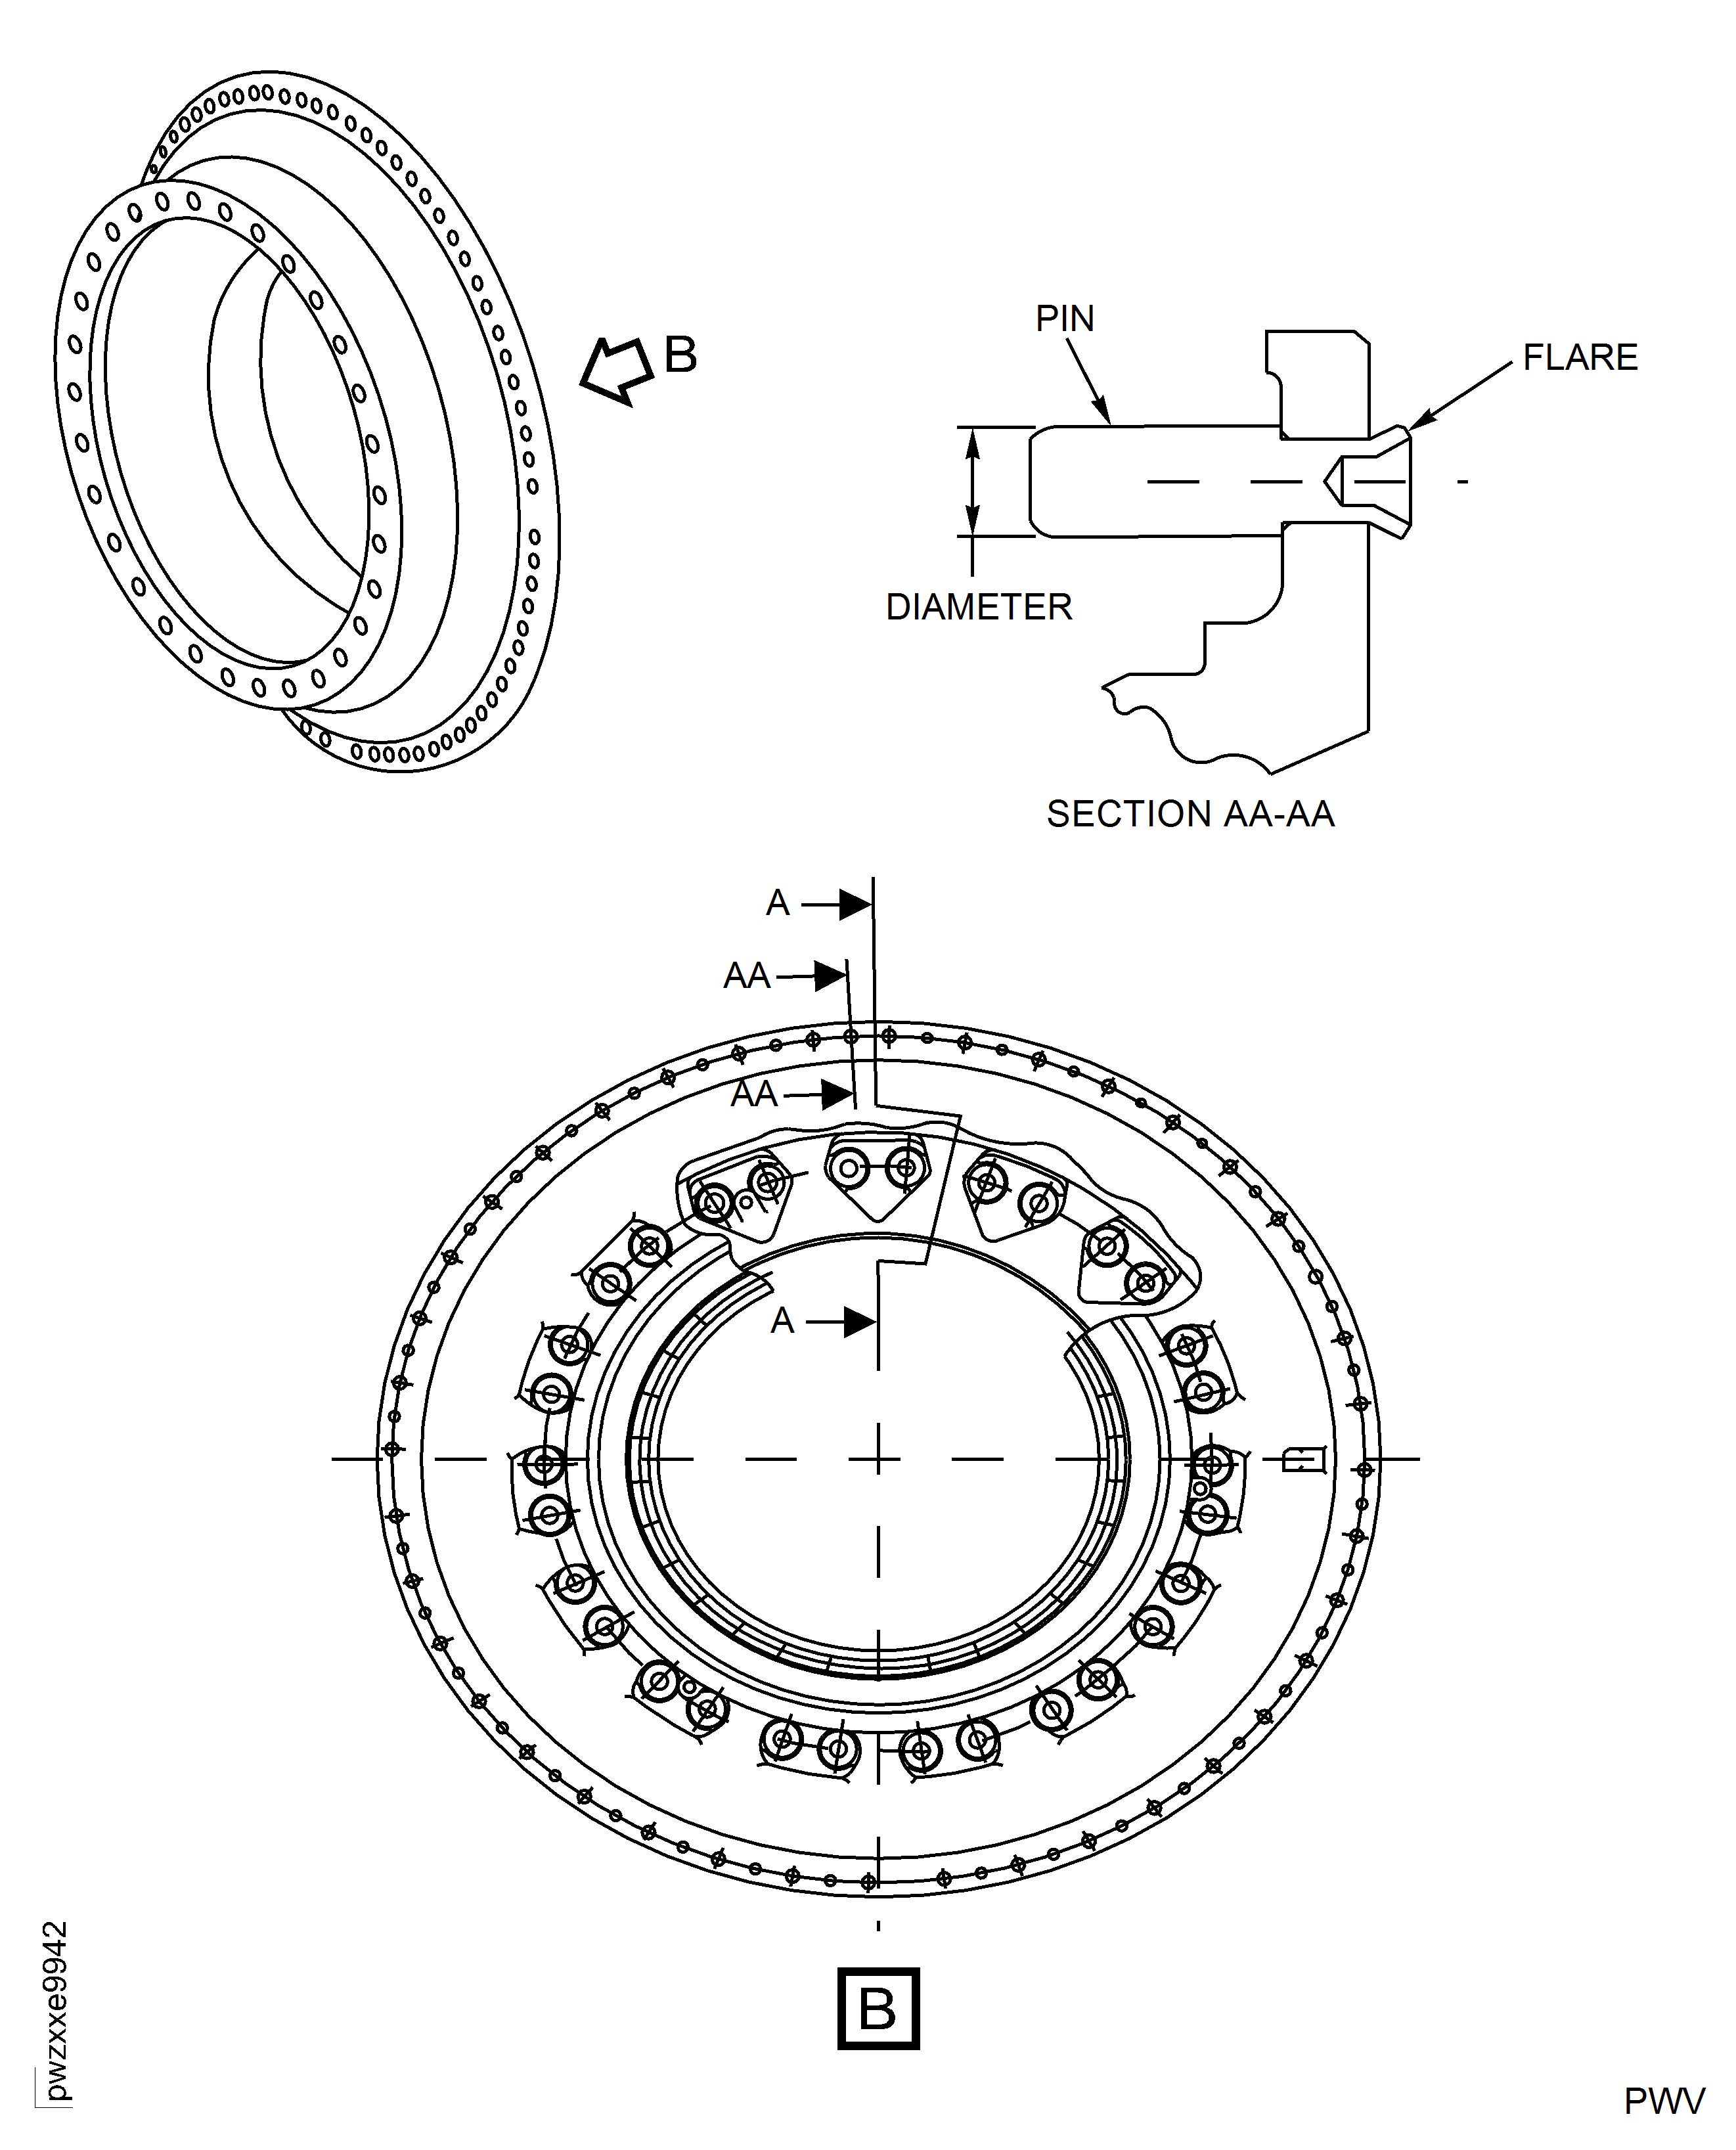
Figure: Repair Details and Dimensions (PNs 2A0008-01, 2A1997-01, and 2A1997-002)
Sheet 2
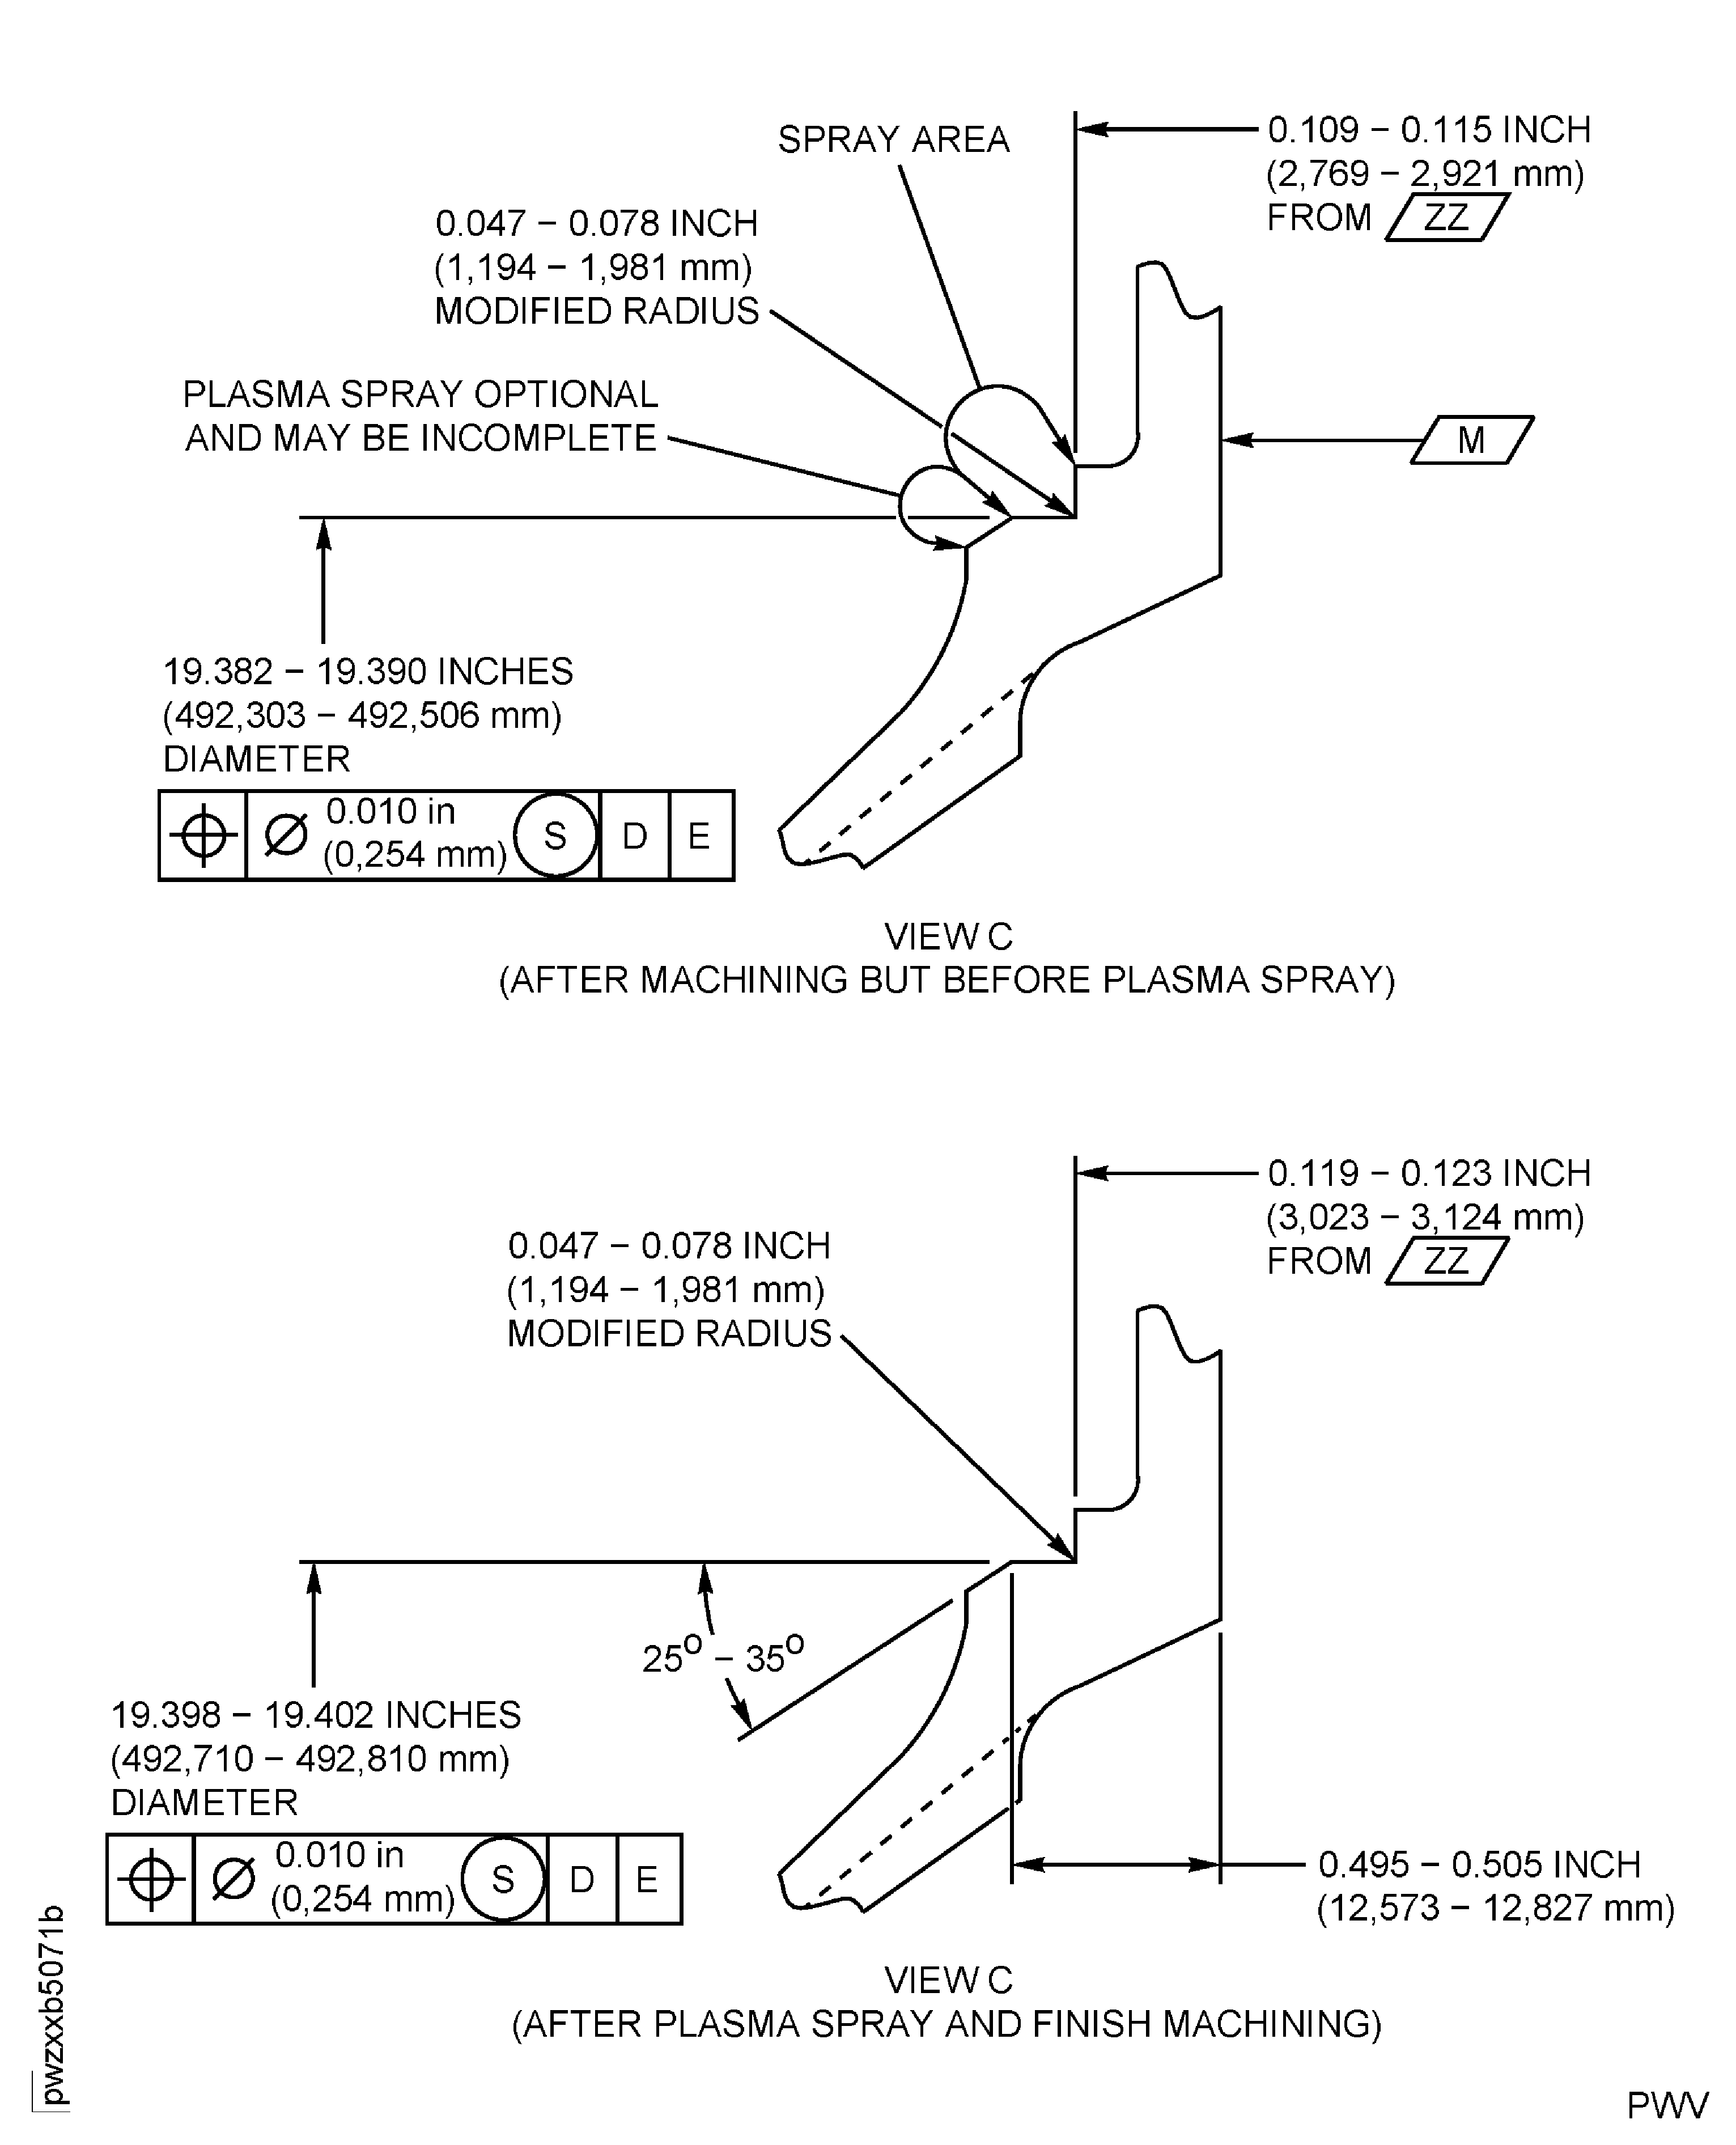
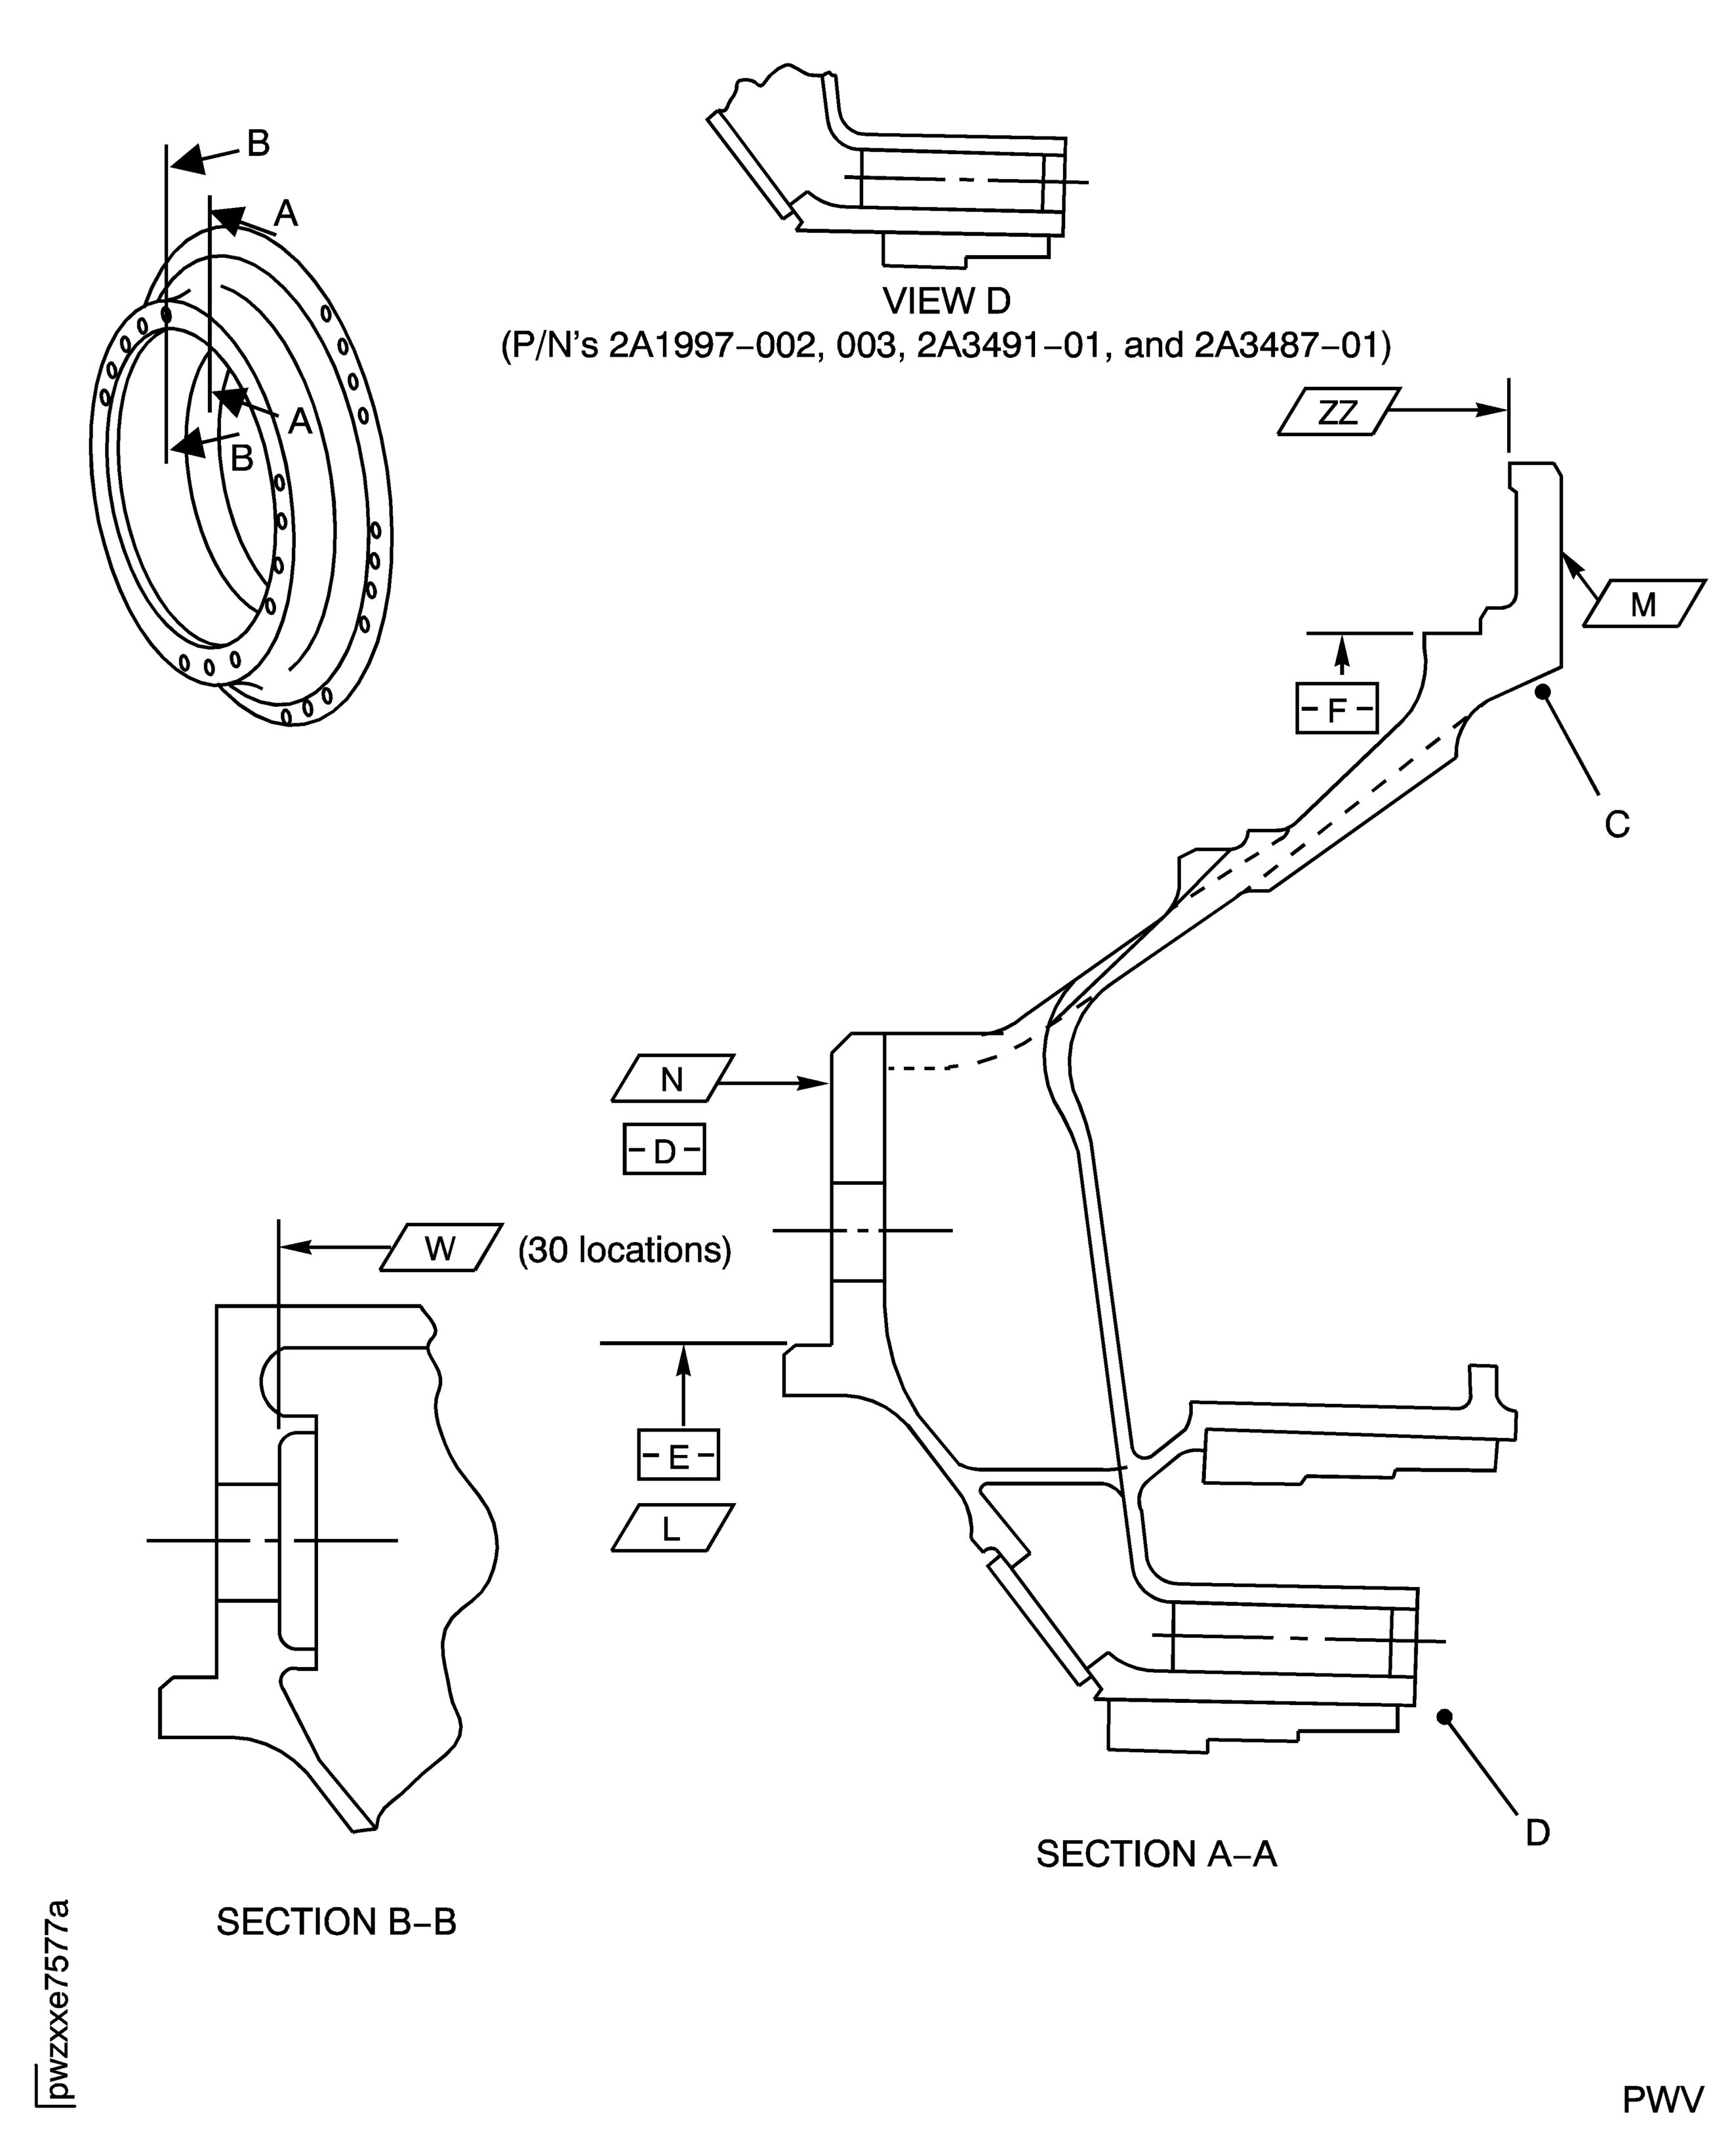
Figure: Repair Details and Dimensions (PNs 2A1997-001, 2A1997-003, 2A2141-01, 2A3180-01, 2A3329-01, 2A3487-01, 2A3487-001, 2A3491-01, 2A3914-01, 2A3914-001, and 2A4086)
Repair Details and Dimensions (PNs 2A1997-001, 2A1997-003, 2A2141-01, 2A3180-01, 2A3329-01, 2A3487-01, 2A3487-001, 2A3491-01, 2A3914-01, 2A3914-001, and 2A4086)
