Export Control
EAR Export Classification: Not subject to the EAR per 15 C.F.R. Chapter 1, Part 734.3(b)(3), except for the following Service Bulletins which are currently published as EAR Export Classification 9E991: SBE70-0992, SBE72-0483, SBE72-0580, SBE72-0588, SBE72-0640, SBE73-0209, SBE80-0024 and SBE80-0025.Copyright
© IAE International Aero Engines AG (2001, 2014 - 2021) The information contained in this document is the property of © IAE International Aero Engines AG and may not be copied or used for any purpose other than that for which it is supplied without the express written authority of © IAE International Aero Engines AG. (This does not preclude use by engine and aircraft operators for normal instructional, maintenance or overhaul purposes.).Applicability
All
Common Information
TASK 72-45-22-300-002 HPT Stage 1 Duct Support Segment - Replace One Detail Segment Of The Set, Repair-002 (VRS3379)
General
The practices and processes referred to in the procedure by TASK number are in the SPM.
A ** following SPM TASK referenced in this repair indicates that the Process is not yet published in the current revision of the manual and the parts must be rejected. Contact IAE for additional information concerning the Process.
Price and availability - none
Preliminary Requirements
Pre-Conditions
NONESupport Equipment
| Name | Manufacturer | Part Number / Identification | Quantity | Remark |
|---|---|---|---|---|
| Abrasive blast equipment | LOCAL | Abrasive blast equipment | ||
| Grinding equipment | LOCAL | Grinding equipment | ||
| Machining equipment | LOCAL | Machining equipment | ||
| Plasma spray equipment | LOCAL | Plasma spray equipment | ||
| Workshop inspection equipment | LOCAL | Workshop inspection equipment | ||
| IAE 3P16273 Grind fixture | 0AM53 | IAE 3P16273 | 1 |
Consumables, Materials and Expendables
| Name | Manufacturer | Part Number / Identification | Quantity | Remark |
|---|---|---|---|---|
| CoMat 02-047 TAPE, HEAT REFLECTIVE | 52152 | CoMat 02-047 | ||
| CoMat 02-048 TAPE, HEAT REFLECTIVE | 0AM53 | CoMat 02-048 | ||
| CoMat 02-049 TAPE, HEAT REFLECTIVE | 0AM53 | CoMat 02-049 | ||
| CoMat 02-051 HIGH TEMPERATURE GLASS CLOTH TAPE | 0AM53 | CoMat 02-051 | ||
| CoMat 02-052 HIGH TEMPERATURE GLASS CLOTH TAPE | 0AM53 | CoMat 02-052 | ||
| CoMat 02-053 HIGH TEMPERATURE GLASS CLOTH TAPE | 0AM53 | CoMat 02-053 | ||
| CoMat 03-067 PLASMA SPRAY POWDER | LOCAL | CoMat 03-067 | ||
| CoMat 05-035 ALUMINUM OXIDE ABRASIVE | 62596 | CoMat 05-035 | ||
| CoMat 05-036 DELETED | 0AM53 | CoMat 05-036 | ||
| CoMat 05-037 DELETED | 0AM53 | CoMat 05-037 |
Spares
| Name | Manufacturer | Part Number / Identification | Quantity | Remark |
|---|---|---|---|---|
| Stage 1 HPT duct support segment | 2A0178 | 1 |
Safety Requirements
NONEProcedure
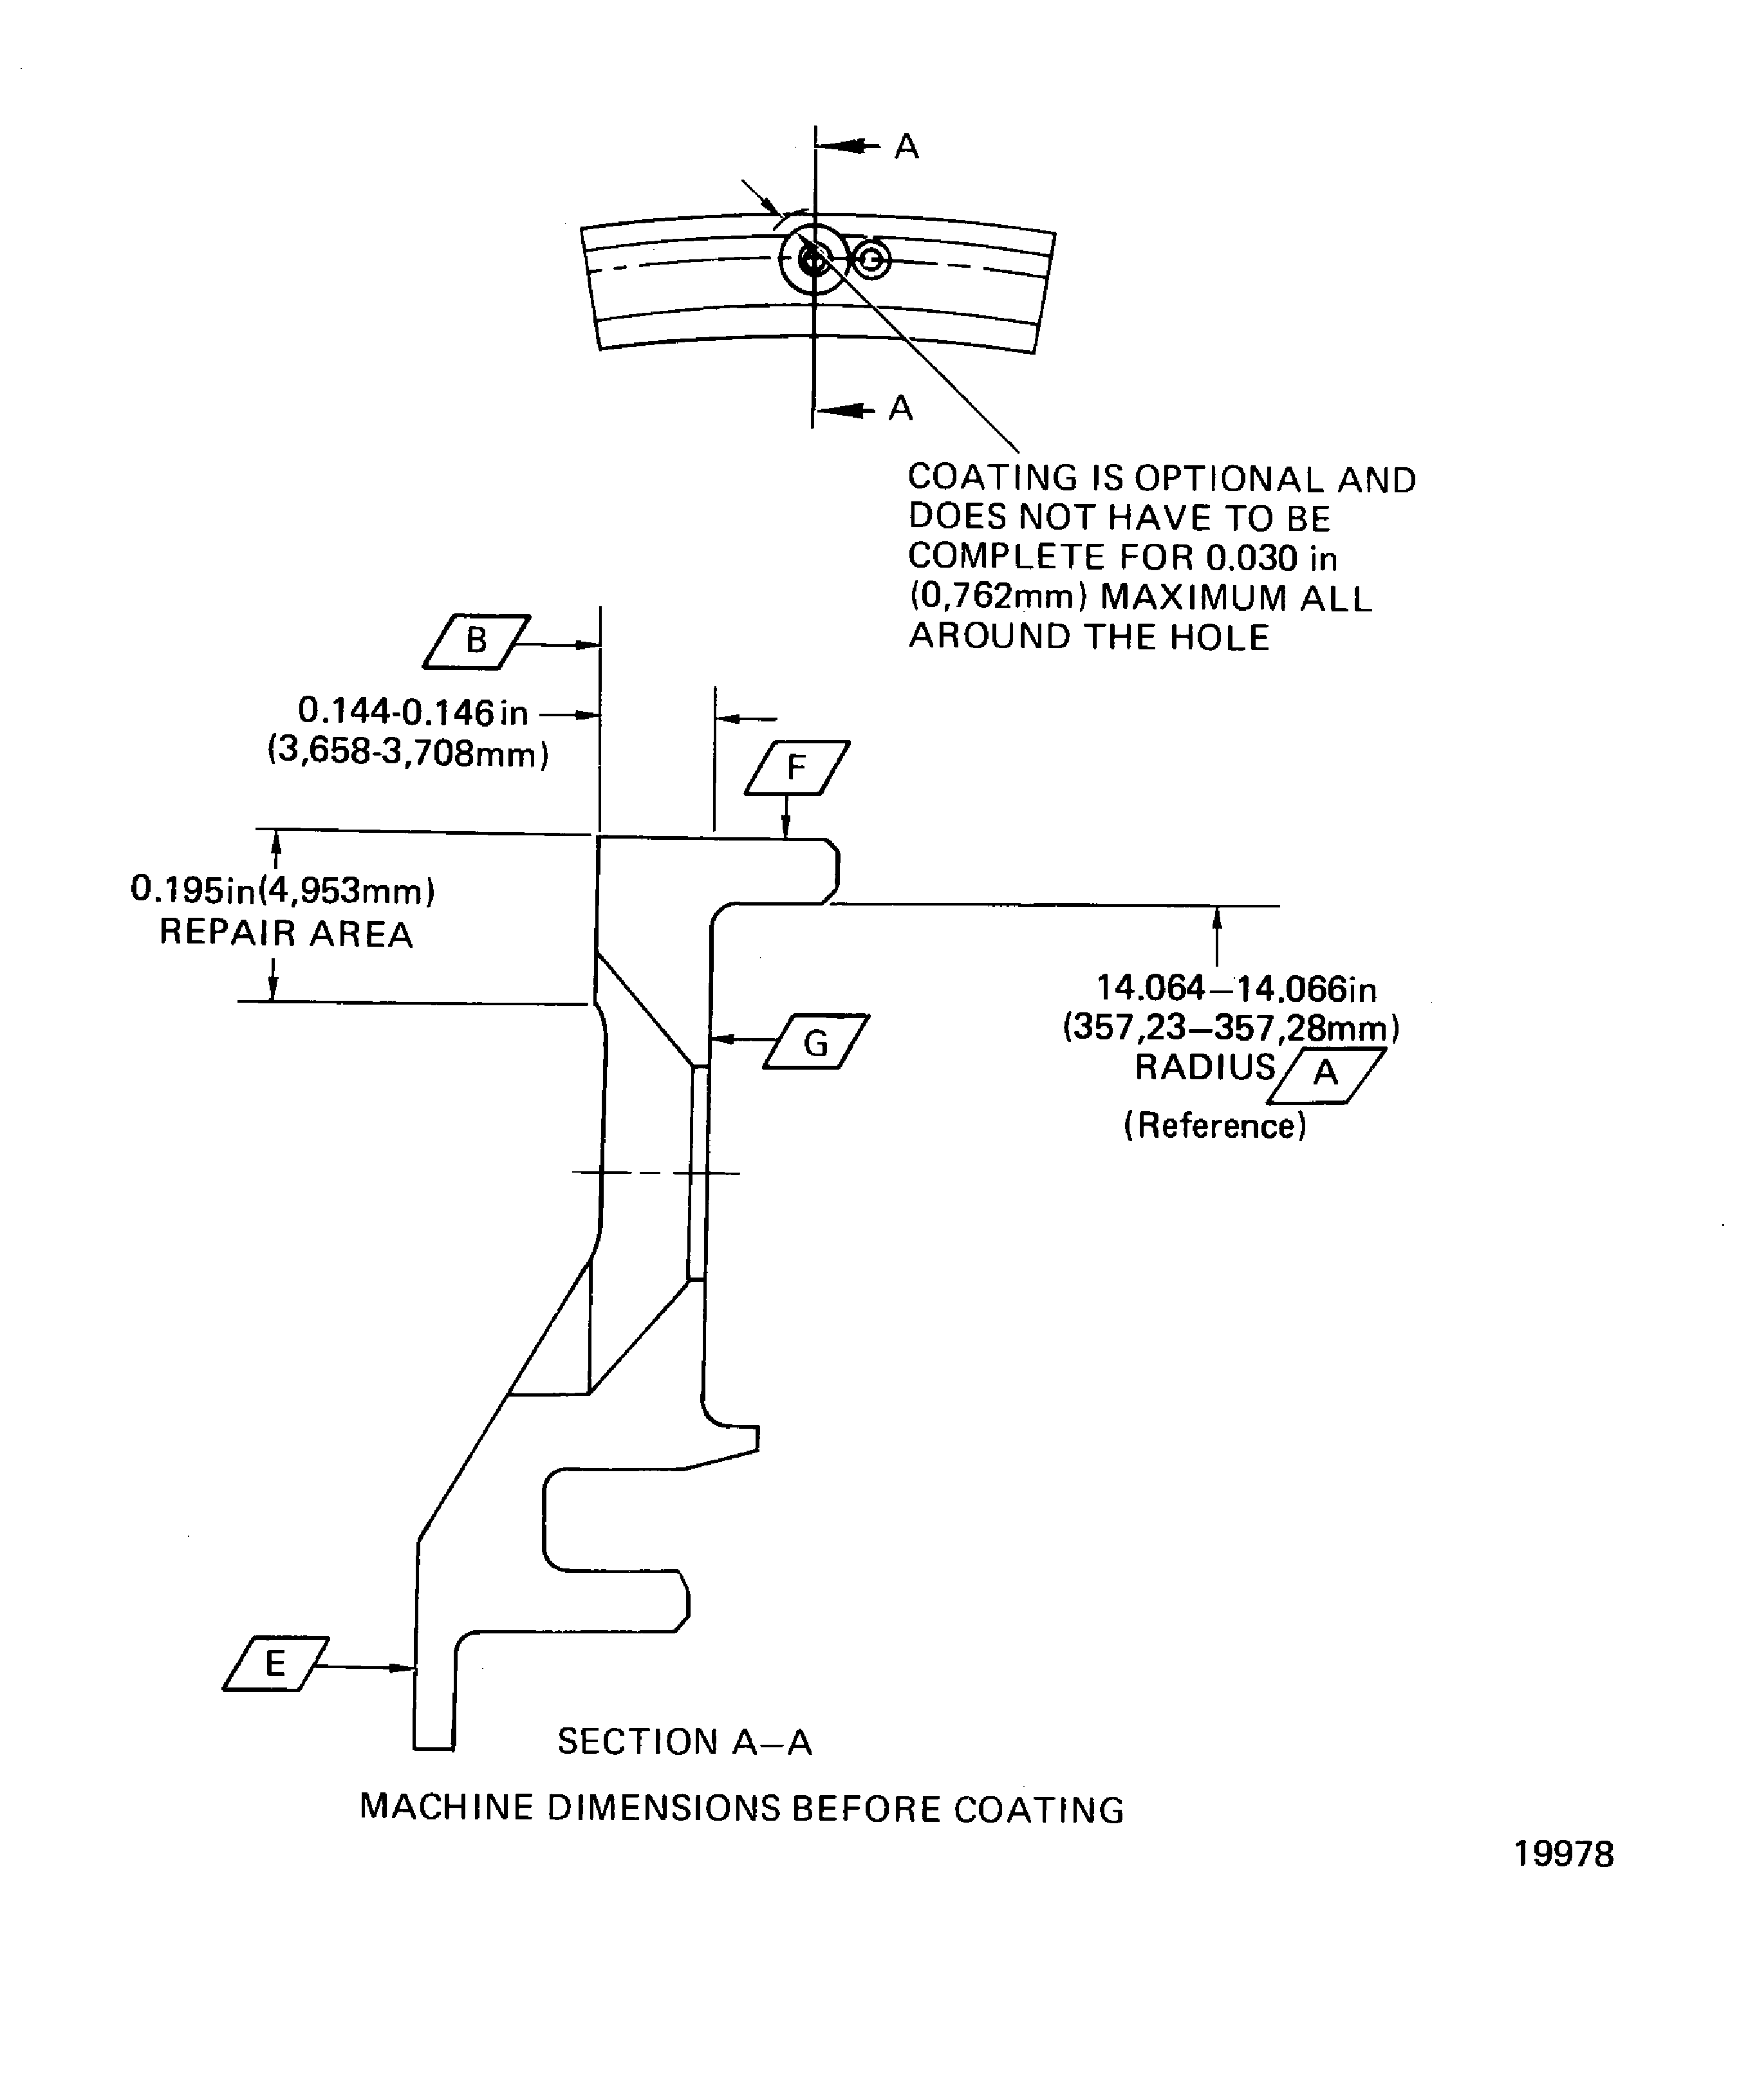
Refer to Figure, requirements.
Grinding is permitted.
Use IAE 3P16273 Grind fixture 1 off or equivalent.
NOTE
All dimensions apply when Surface G is flat by 0.002in. (0.051 mm) and the 14.064 to 14.066in. (357.23 to 357.28 mm) Radius A is in the limits given in a free or held condition. Hold the segment on Surfaces B and G and Radius A.
Set-up and machine Surface B and hold to the maximum dimension.
SUBTASK 72-45-22-320-051 Machine the Front Face of the Replacement Duct Support Segment
Refer to Figure, requirements.
Do a dimensional inspection on the 0.144 to 0.146 in. (3.658 to 3.708 mm) dimension.
SUBTASK 72-45-22-220-057 Examine the Repair Area before Coating
Refer to Figure, requirements.
Mask all the areas not to be coated.
Use CoMat 02-047 TAPE, HEAT REFLECTIVE, CoMat 02-048 TAPE, HEAT REFLECTIVE, CoMat 02-049 TAPE, HEAT REFLECTIVE, CoMat 02-051 HIGH TEMPERATURE GLASS CLOTH TAPE, CoMat 02-052 HIGH TEMPERATURE GLASS CLOTH TAPE or CoMat 02-053 HIGH TEMPERATURE GLASS CLOTH TAPE.
Grit blast to clean the front face by the procedure given in the SPM TASK 70-12-09-120-501.
Grit blast the front face on Surface B.
SUBTASK 72-45-22-350-051 Grit Blast the Front Face before Coating
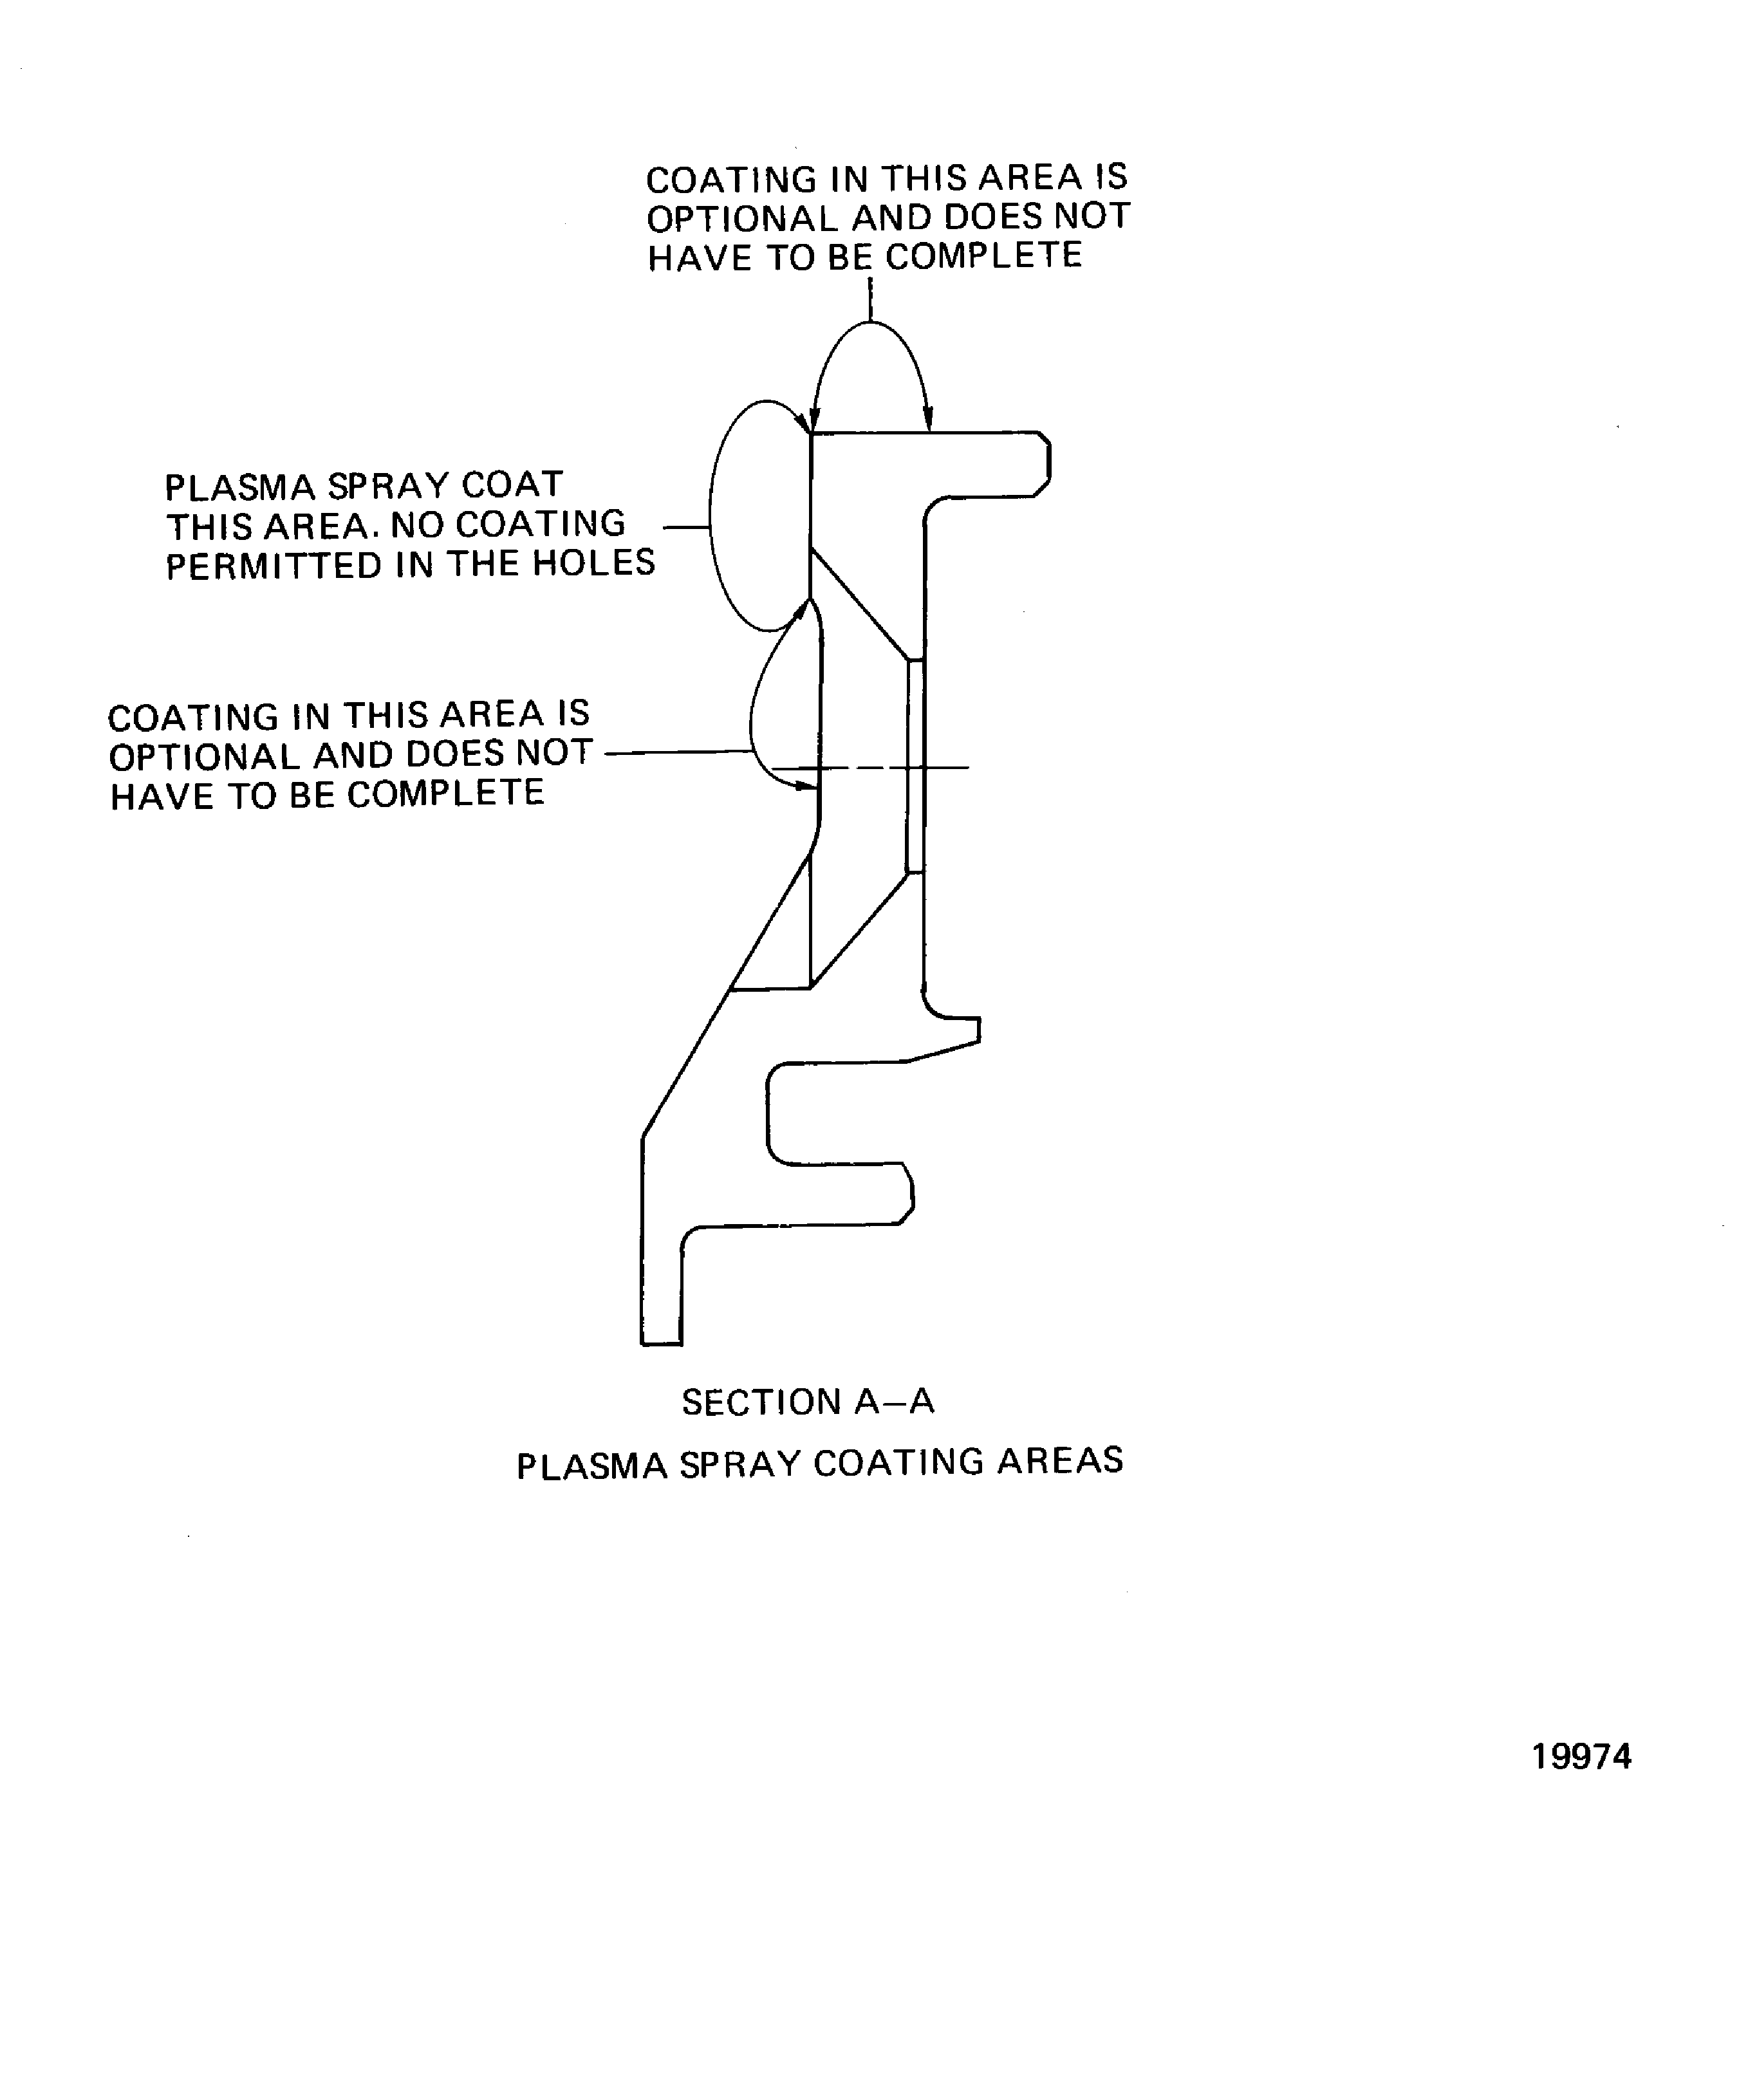
Refer to Figure, requirements.
Make sure the masking tape is still applied in all the areas not to be coated.
Apply the plasma spray coating to a sufficient thickness which will permit the final machining of the dimensions given in the figure.
No overspray is permitted in the holes or out of the area not to be coated.
Do the procedure given in the SPM TASK 70-34-03-340-501.
Plasma spray the front face.
SUBTASK 72-45-22-340-051 Plasma Spray Coat the Front Face
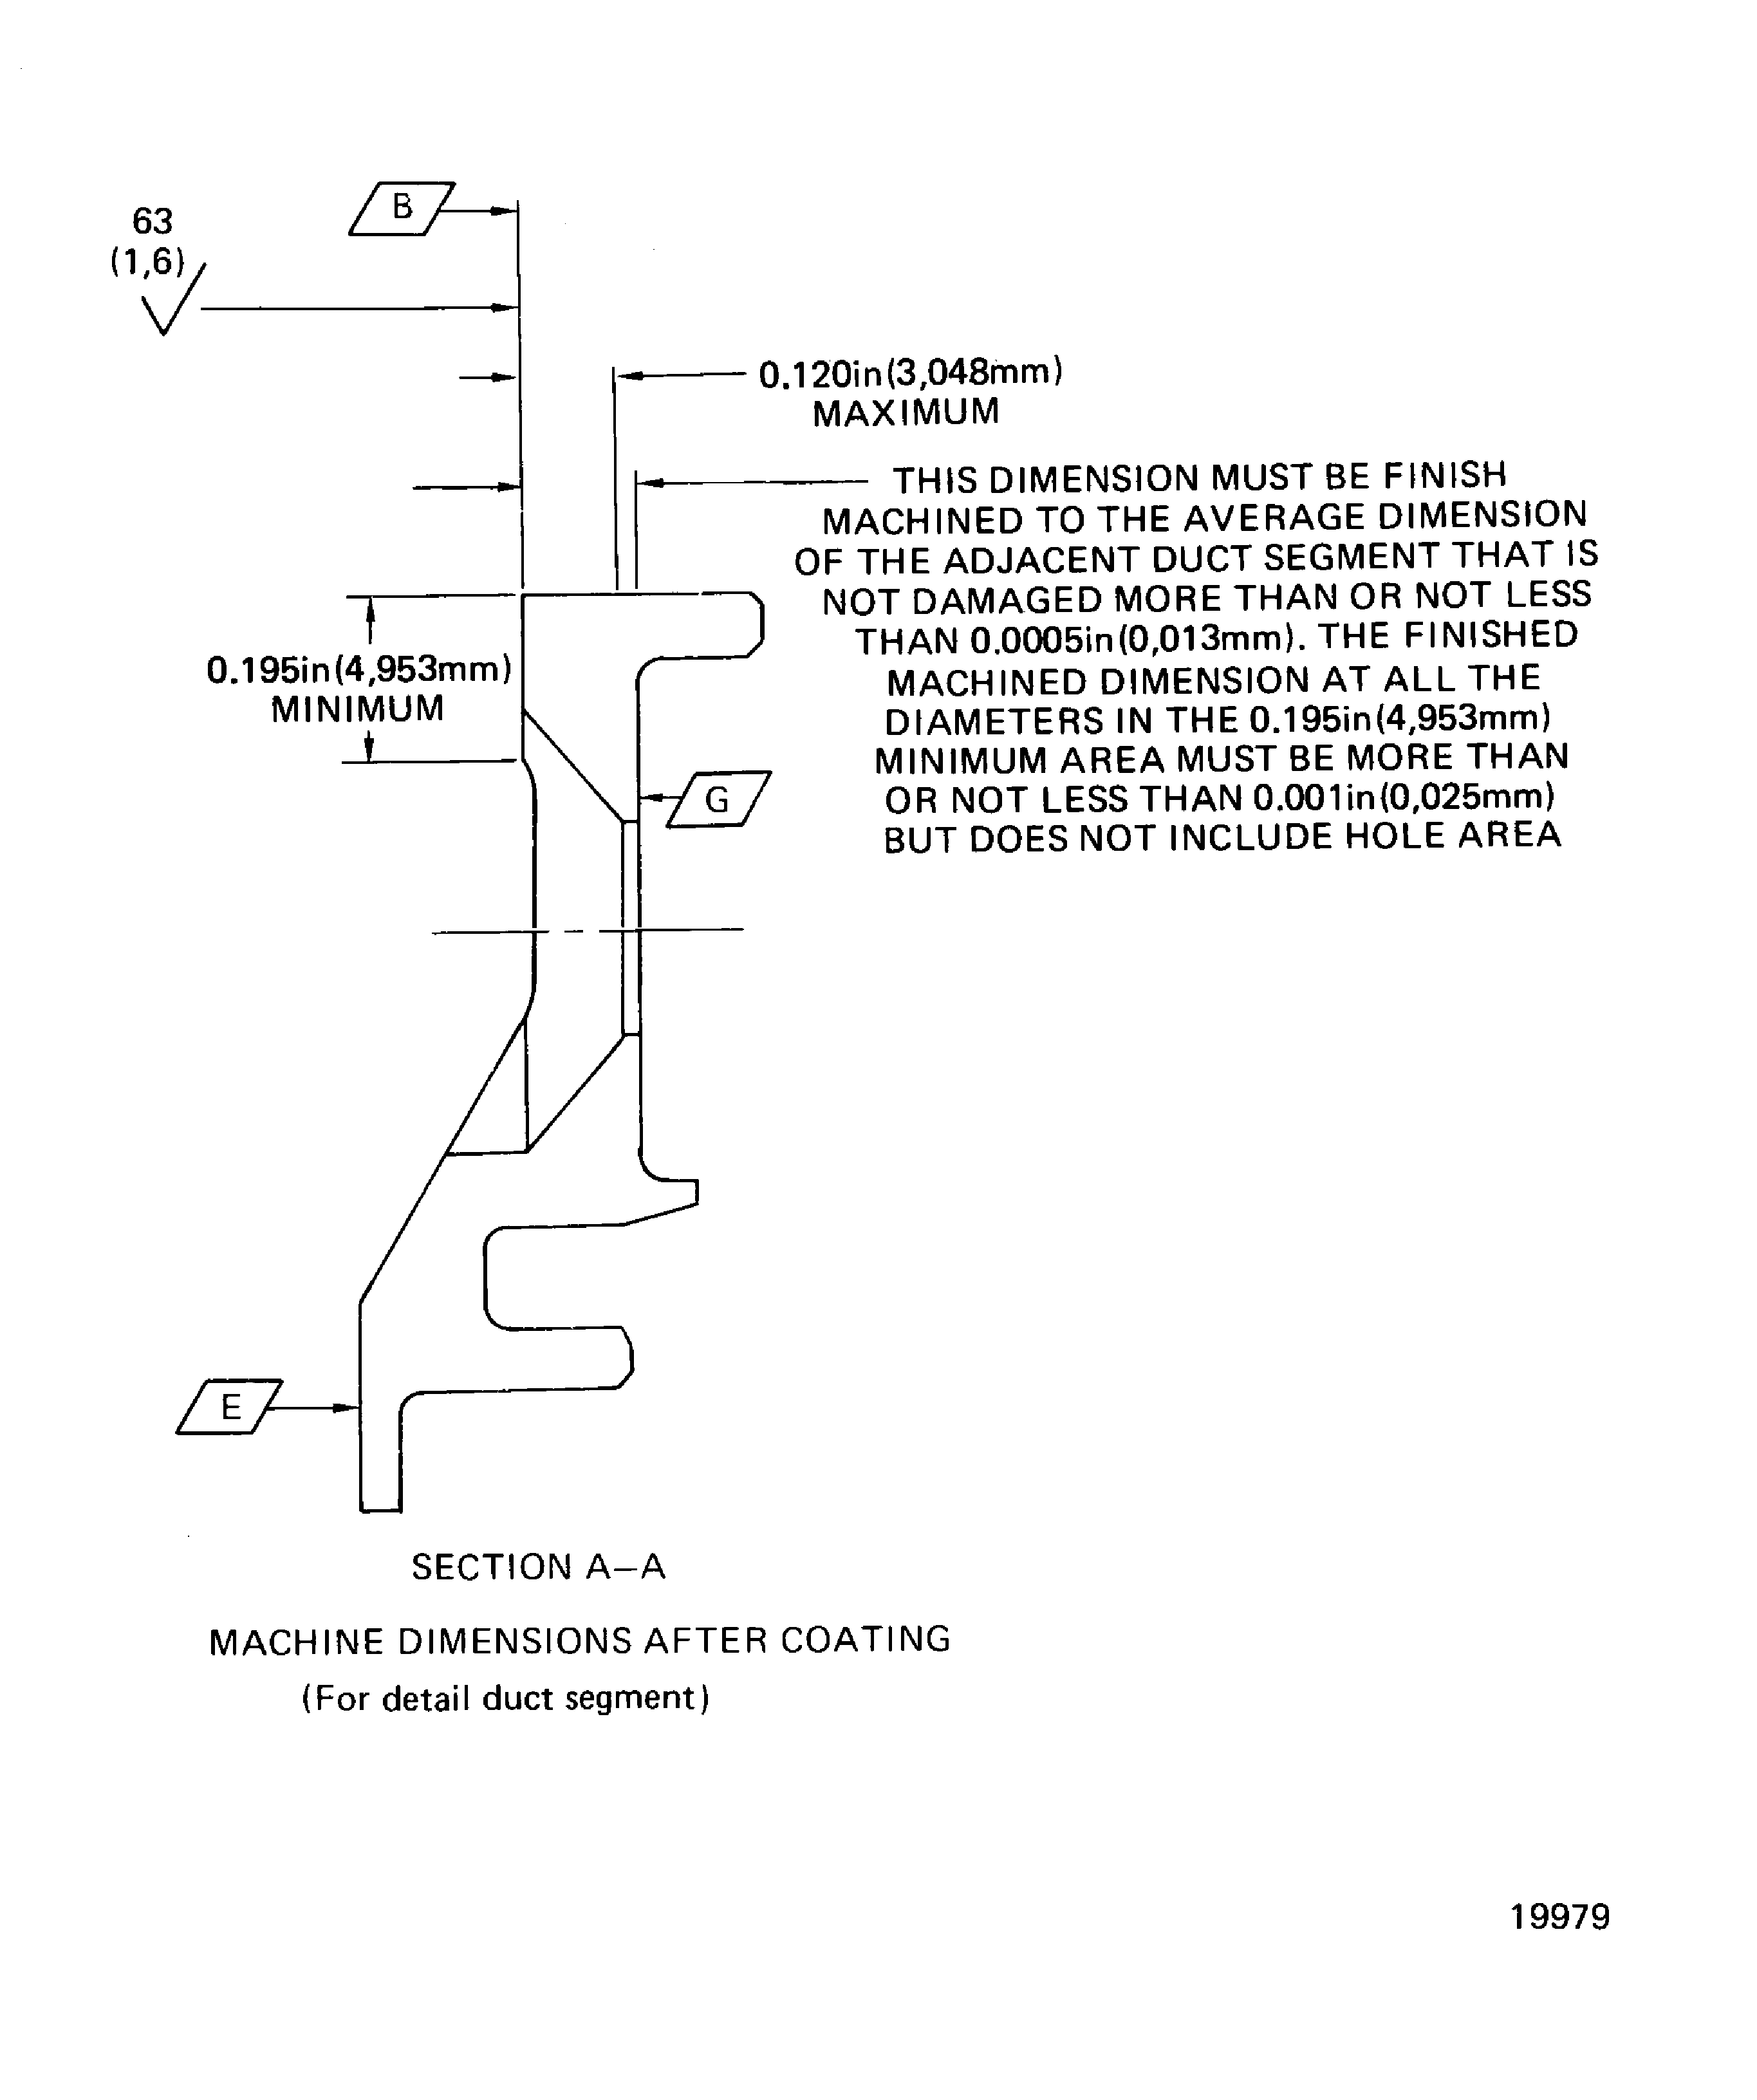
Refer to Figure, requirements.
The finished plasma spray thickness must be a minimum of 0.002in. (0.051 mm).
Grinding is permitted.
Use the IAE 3P16273 Grind fixture 1 off or equivalent.
NOTE
All dimensions apply when Surface G is flat by 0.002in. (0.051 mm) and the 14.064 to 14.066in. (357.23 to 357.28 mm) Radius A is in the limits given in a free or held condition. Hold the segment on Surfaces B and G and Radius A.
Set-up and finish machine Surface B to the dimensions given in the figure.
SUBTASK 72-45-22-320-052 Finish Machine the Front Face
Refer to Figure, requirements.
Do a dimensional and visual inspection.
SUBTASK 72-45-22-220-059 Examine the Repair
Refer to Figure.
Make a permanent mark by the procedures given in the SPM TASK 70-09-00-400-501.
Use the vibration peen method.
NOTE
Example of a duct support set number is X-2A0177.Example of a duct support segment numerical sequence number is between 1 and 19.
Mark the replacement duct support segment with the old duct segment numerical sequence number and the duct support set number adjacent to the part number on Surface E.
SUBTASK 72-45-22-350-052 Identify the Replacement Duct Support Segment
Figure: Stage 1 HPT support segment replacement repair areas
Stage 1 HPT support segment replacement repair areas

Figure: Stage 1 HPT support segment replacement repair areas
Stage 1 HPT support segment replacement repair areas

Figure: Stage 1 HPT duct support segment replacement repair areas
Stage 1 HPT duct support segment replacement repair areas

