Export Control
EAR Export Classification: Not subject to the EAR per 15 C.F.R. Chapter 1, Part 734.3(b)(3), except for the following Service Bulletins which are currently published as EAR Export Classification 9E991: SBE70-0992, SBE72-0483, SBE72-0580, SBE72-0588, SBE72-0640, SBE73-0209, SBE80-0024 and SBE80-0025.Copyright
© IAE International Aero Engines AG (2001, 2014 - 2021) The information contained in this document is the property of © IAE International Aero Engines AG and may not be copied or used for any purpose other than that for which it is supplied without the express written authority of © IAE International Aero Engines AG. (This does not preclude use by engine and aircraft operators for normal instructional, maintenance or overhaul purposes.).Applicability
All
Common Information
TASK 72-45-24-300-021 HPT Stage 2 Ring Segment And Vane Cluster - Replace The Vane Cover, Repair-021 (VRS3320)
Effectivity
FIG/ITEM | PART NO. |
|---|---|
02-130 | 2A0152CL21 |
02-131 | 2A0152CL22 |
02-132 | 2A0152CL23 |
02-133 | 2A0152CL24 |
02-134 | 2A0152CL25 |
02-135 | 2A0152CL26 |
02-136 | 2A0152CL27 |
02-137 | 2A0152CL28 |
02-138 | 2A0152CL29 |
02-139 | 2A0152CL30 |
02-140 | 2A0152CL31 |
02-141 | 2A0152CL32 |
02-142 | 2A0152CL33 |
02-143 | 2A0152CL34 |
02-144 | 2A0152CL35 |
02-145 | 2A0152CL36 |
02-146 | 2A0152CL37 |
02-147 | 2A0152CL38 |
02-148 | 2A0152CL39 |
02-149 | 2A0152CL40 |
02-150 | 2A0152CL41 |
02-350 | 2A0152CL21 |
02-351 | 2A0152CL22 |
02-352 | 2A0152CL23 |
02-353 | 2A0152CL24 |
02-354 | 2A0152CL25 |
02-355 | 2A0152CL26 |
02-356 | 2A0152CL27 |
02-357 | 2A0152CL28 |
02-358 | 2A0152CL29 |
02-359 | 2A0152CL30 |
02-360 | 2A0152CL31 |
02-361 | 2A0152CL32 |
02-362 | 2A0152CL33 |
02-363 | 2A0152CL34 |
02-364 | 2A0152CL35 |
02-365 | 2A0152CL36 |
02-366 | 2A0152CL37 |
02-367 | 2A0152CL38 |
02-368 | 2A0152CL39 |
02-369 | 2A0152CL40 |
02-370 | 2A0152CL41 |
02-420 | 2A1052CL21 |
02-421 | 2A1052CL22 |
02-422 | 2A1052CL23 |
02-423 | 2A1052CL24 |
02-424 | 2A1052CL25 |
02-425 | 2A1052CL26 |
02-426 | 2A1052CL27 |
02-427 | 2A1052CL28 |
02-428 | 2A1052CL29 |
02-429 | 2A1052CL30 |
02-430 | 2A1052CL31 |
02-431 | 2A1052CL32 |
02-432 | 2A1052CL33 |
02-433 | 2A1052CL34 |
02-434 | 2A1052CL35 |
02-435 | 2A1052CL36 |
02-436 | 2A1052CL37 |
02-437 | 2A1052CL38 |
02-438 | 2A1052CL39 |
02-439 | 2A1052CL40 |
02-440 | 2A1052CL41 |
02-130 | 2A1152CL21 |
02-131 | 2A1152CL22 |
02-132 | 2A1152CL23 |
02-133 | 2A1152CL24 |
02-134 | 2A1152CL25 |
02-135 | 2A1152CL26 |
02-136 | 2A1152CL27 |
02-137 | 2A1152CL28 |
02-138 | 2A1152CL29 |
02-139 | 2A1152CL30 |
02-140 | 2A1152CL31 |
02-141 | 2A1152CL32 |
02-142 | 2A1152CL33 |
02-143 | 2A1152CL34 |
02-144 | 2A1152CL35 |
02-145 | 2A1152CL36 |
02-146 | 2A1152CL37 |
02-147 | 2A1152CL38 |
02-148 | 2A1152CL39 |
02-149 | 2A1152CL40 |
02-150 | 2A1152CL41 |
02-350 | 2A1152CL21 |
02-351 | 2A1152CL22 |
02-352 | 2A1152CL23 |
02-353 | 2A1152CL24 |
02-354 | 2A1152CL25 |
02-355 | 2A1152CL26 |
02-356 | 2A1152CL27 |
02-357 | 2A1152CL28 |
02-358 | 2A1152CL29 |
02-359 | 2A1152CL30 |
02-360 | 2A1152CL31 |
02-361 | 2A1152CL32 |
02-362 | 2A1152CL33 |
02-363 | 2A1152CL34 |
02-364 | 2A1152CL35 |
02-365 | 2A1152CL36 |
02-366 | 2A1152CL37 |
02-367 | 2A1152CL38 |
02-368 | 2A1152CL39 |
02-369 | 2A1152CL40 |
02-370 | 2A1152CL41 |
02-420 | 2A1252CL21 |
02-421 | 2A1252CL22 |
02-422 | 2A1252CL23 |
02-423 | 2A1252CL24 |
02-424 | 2A1252CL25 |
02-425 | 2A1252CL26 |
02-426 | 2A1252CL27 |
02-427 | 2A1252CL28 |
02-428 | 2A1252CL29 |
02-429 | 2A1252CL30 |
02-430 | 2A1252CL31 |
02-431 | 2A1252CL32 |
02-432 | 2A1252CL33 |
02-433 | 2A1252CL34 |
02-434 | 2A1252CL35 |
02-435 | 2A1252CL36 |
02-436 | 2A1252CL37 |
02-437 | 2A1252CL38 |
02-438 | 2A1252CL39 |
02-439 | 2A1252CL40 |
02-440 | 2A1252CL41 |
Material of component
RR | ||
|---|---|---|
DESCRIPTION | SYMBOL | MATERIAL |
Stage 2 HPT vane assembly | - | Nickel alloy |
Stage 2 HPT vane cover | - | Nickel alloy |
General
The practices and processes referred to in the procedure by the TASK number are in the SPM.
Price and availability - refer to IAE
Preliminary Requirements
Pre-Conditions
NONESupport Equipment
| Name | Manufacturer | Part Number / Identification | Quantity | Remark |
|---|---|---|---|---|
| Magnifying glass | LOCAL | Magnifying glass |
Consumables, Materials and Expendables
| Name | Manufacturer | Part Number / Identification | Quantity | Remark |
|---|---|---|---|---|
| CoMat 03-151 HIGH TEMP. BRAZING FILLERPOWDER | LOCAL | CoMat 03-151 | ||
| CoMat 03-152 BRAZING FILLER POWDER | LOCAL | CoMat 03-152 | ||
| CoMat 03-154 BRAZING FILLER POWDER | LOCAL | CoMat 03-154 | ||
| CoMat 03-287 WELDING FILLER WIRE | LOCAL | CoMat 03-287 |
Spares
| Name | Manufacturer | Part Number / Identification | Quantity | Remark |
|---|---|---|---|---|
| Cover | 2A0049 | AR | (for PN 2A0152 and PN 2A1052) | |
| Cover | 2A0049 | AR | ||
| Cover | 2A0049 | AR | ||
| Cover | 2A2706 | AR | (for PN 2A1152, PN 2A1252 and 2A3152) | |
| Cover | 2A2706 | AR | ||
| Cover | 2A2706 | AR |
Safety Requirements
NONEProcedure
Refer to Figure. Remove the minimum material necessary from the vane surface so you do not open the plug welded vane cavity hole.
Remove the cover from the vane.
NOTE
If you open the vane cavity hole, you can prepare and weld the hole with CoMat 03-287 WELDING FILLER WIRE and the manual gas tungsten arc method.
SUBTASK 72-45-24-350-085 Remove the Cover from the Vane Assembly
Do the procedure given in the SPM TASK 70-11-03-300-503. You can also clean the vane in a furnace that is at 1250 to 1350 deg F (677 to 732 deg C) for a minimum of five minutes with a minimum of 10 minutes above 1000 deg F (537.8 deg C). The time above 1000 deg F (537.8 deg C) must not be more than 60 minutes. If you clean the vane in a furnace, you must also do an abrasive clean.
Clean the vane.
SUBTASK 72-45-24-110-057 Clean the Vane Assembly
Do the procedure given in the SPM TASK 70-31-16-310-501. Braze the cover at 1950 to 2000 deg F (1066 to 1093 deg C).
Use CoMat 03-151 HIGH TEMP. BRAZING FILLERPOWDERCoMat 03-152 BRAZING FILLER POWDERCoMat 03-154 BRAZING FILLER POWDER. Nickel plate can be omitted if brazed in a vacuum. If you do not braze in a vacuum, nickel plate the area to be brazed by the procedure given in the SPM TASK 70-33-06-300-503. You can tack weld the cover with CoMat 03-287 WELDING FILLER WIRE before you braze it. A minimum of 30 percent joining is required, with the line of braze requirement waived.
Braze the cover to the vane.
SUBTASK 72-45-24-310-054-001 Install the Replacement Cover by Brazing
NOTE
You can braze the cover and the honeycomb at the same time. Refer to Repair, VRS3223 TASK 72-45-24-300-006 (REPAIR-006).Do the procedure given in the SPM TASK 70-31-13-310-501. Weld the cover with the manual gas tungsten arc or laser beam method. You can use CoMat 03-287 WELDING FILLER WIRE. You can tack weld the cover to align it.
Weld the cover to the vane.
SUBTASK 72-45-24-310-054-002 Install the Replacement Cover by Welding
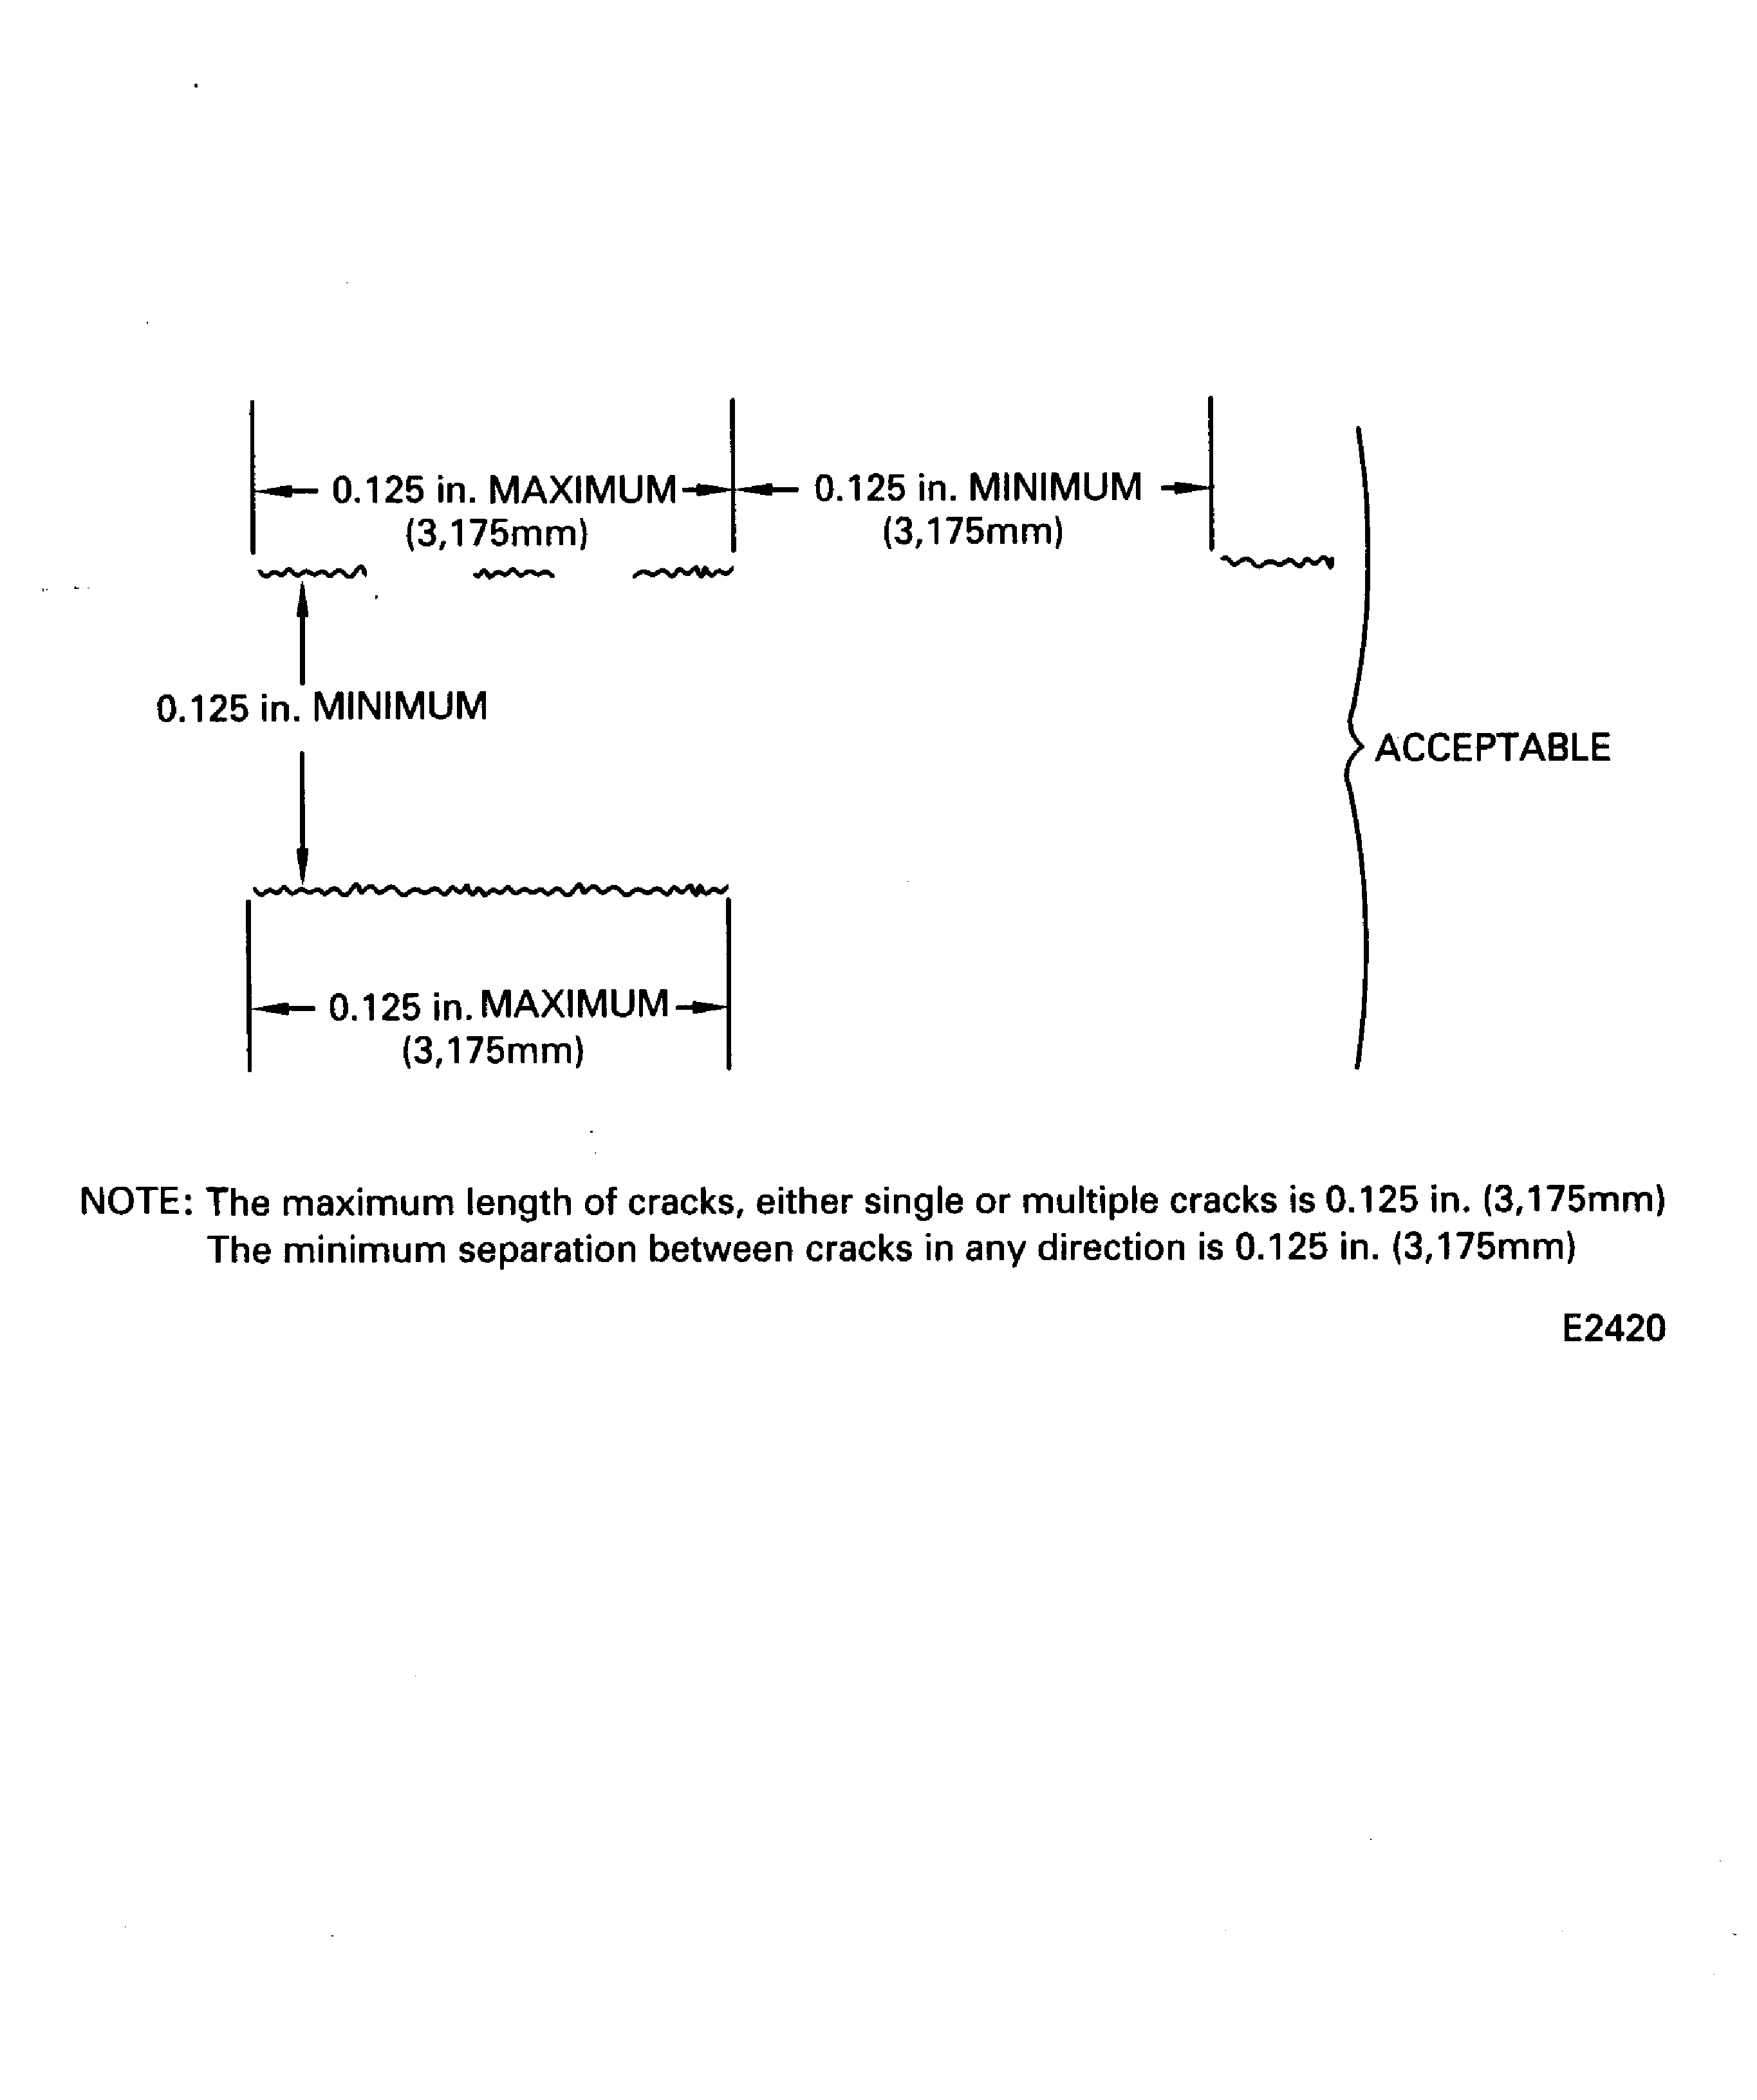
Refer to Figure.
Use a magnifying glass. Discontinuites that are in 0.015in. (0.381 mm) or less, random or in clusters, are permitted if they are not in linear alignment. Six discontinuites that are porosity, voids or shrinkage and are 0.030in. (0.762 mm) or less are permitted in each joint if they are separated by a minimum of 0.125in. (3.175 mm). Cracks that are 0.125in. (3.175 mm) or less in length and are separated by a minimum of 0.125in. (3.175 mm) in all directions are permitted in the weld or braze material of each joint. Two or more cracks that are separated in a 0.125in. (3.175 mm) crack length distance is treated as a single crack and are permitted in the weld or braze material of each joint.
Visually inspect the repaired area.
SUBTASK 72-45-24-220-123 Examine the Repaired Area
NOTE
This procedure is an alternative to Step.Do the procedure given in the SPM TASK 70-23-01-230-501 or SPM TASK 70-23-02-230-501.
Refer to Figure.
Discontinuities that are 0.015in. (0.381 mm) or less, random or in clusters, are permitted if they are not in linear alignment. Six discontinuities that are porosity, voids or shrinkage and are 0.030in. (0.762 mm) or less are permitted in each joint if they are separated by a minimum of 0.125in. (3.175 mm). Cracks that are 0.125in. (3.175 mm) or less in length and are separated by a minimum of 0.125in. (3.175 mm) in all directions are permitted in the weld or braze material of each joint. Two or more cracks that are separated in a 0.125in. (3.175 mm) crack length distance is treated as a single crack and are permitted in the weld or braze material of each joint.
Fluorescent penetrant inspect the repaired area.
SUBTASK 72-45-24-230-059 Examine the Repaired Area
NOTE
This procedure is an alternative to Step.
Figure: Stage 2 HPT vane cover replacement
Stage 2 HPT vane cover replacement
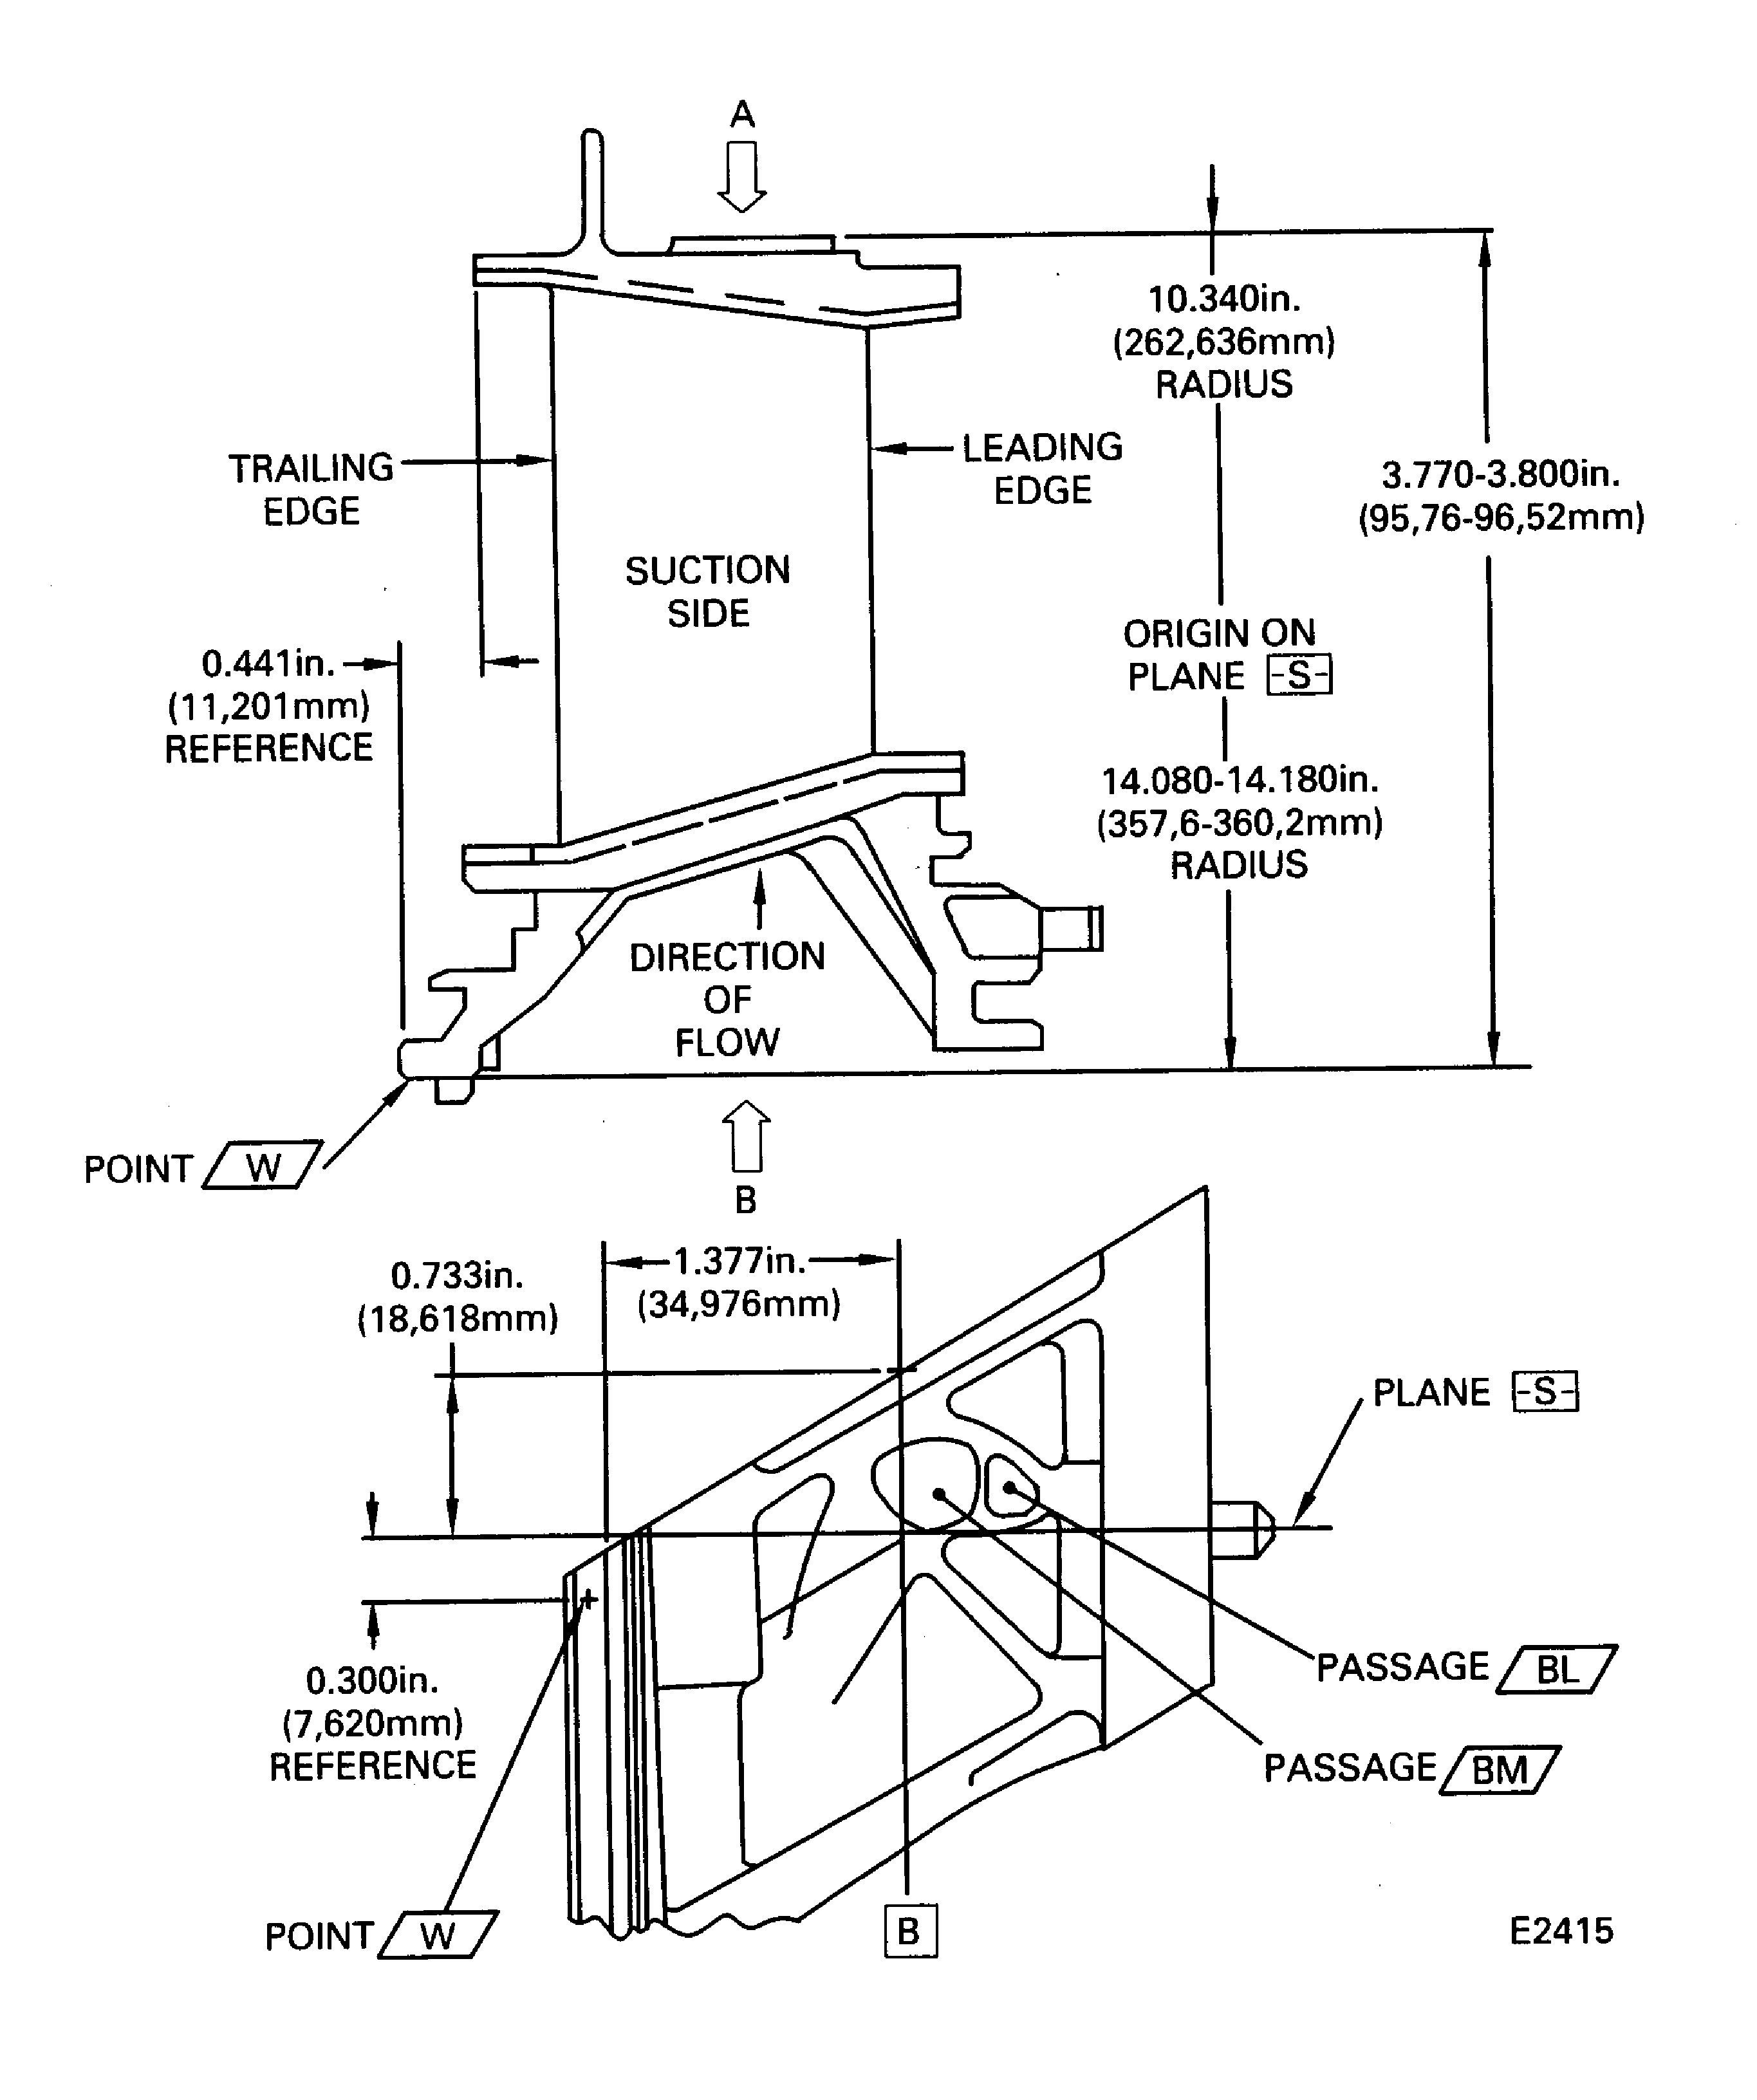
Figure: Stage 2 HPT vane cover replacement
Stage 2 HPT vane cover replacement
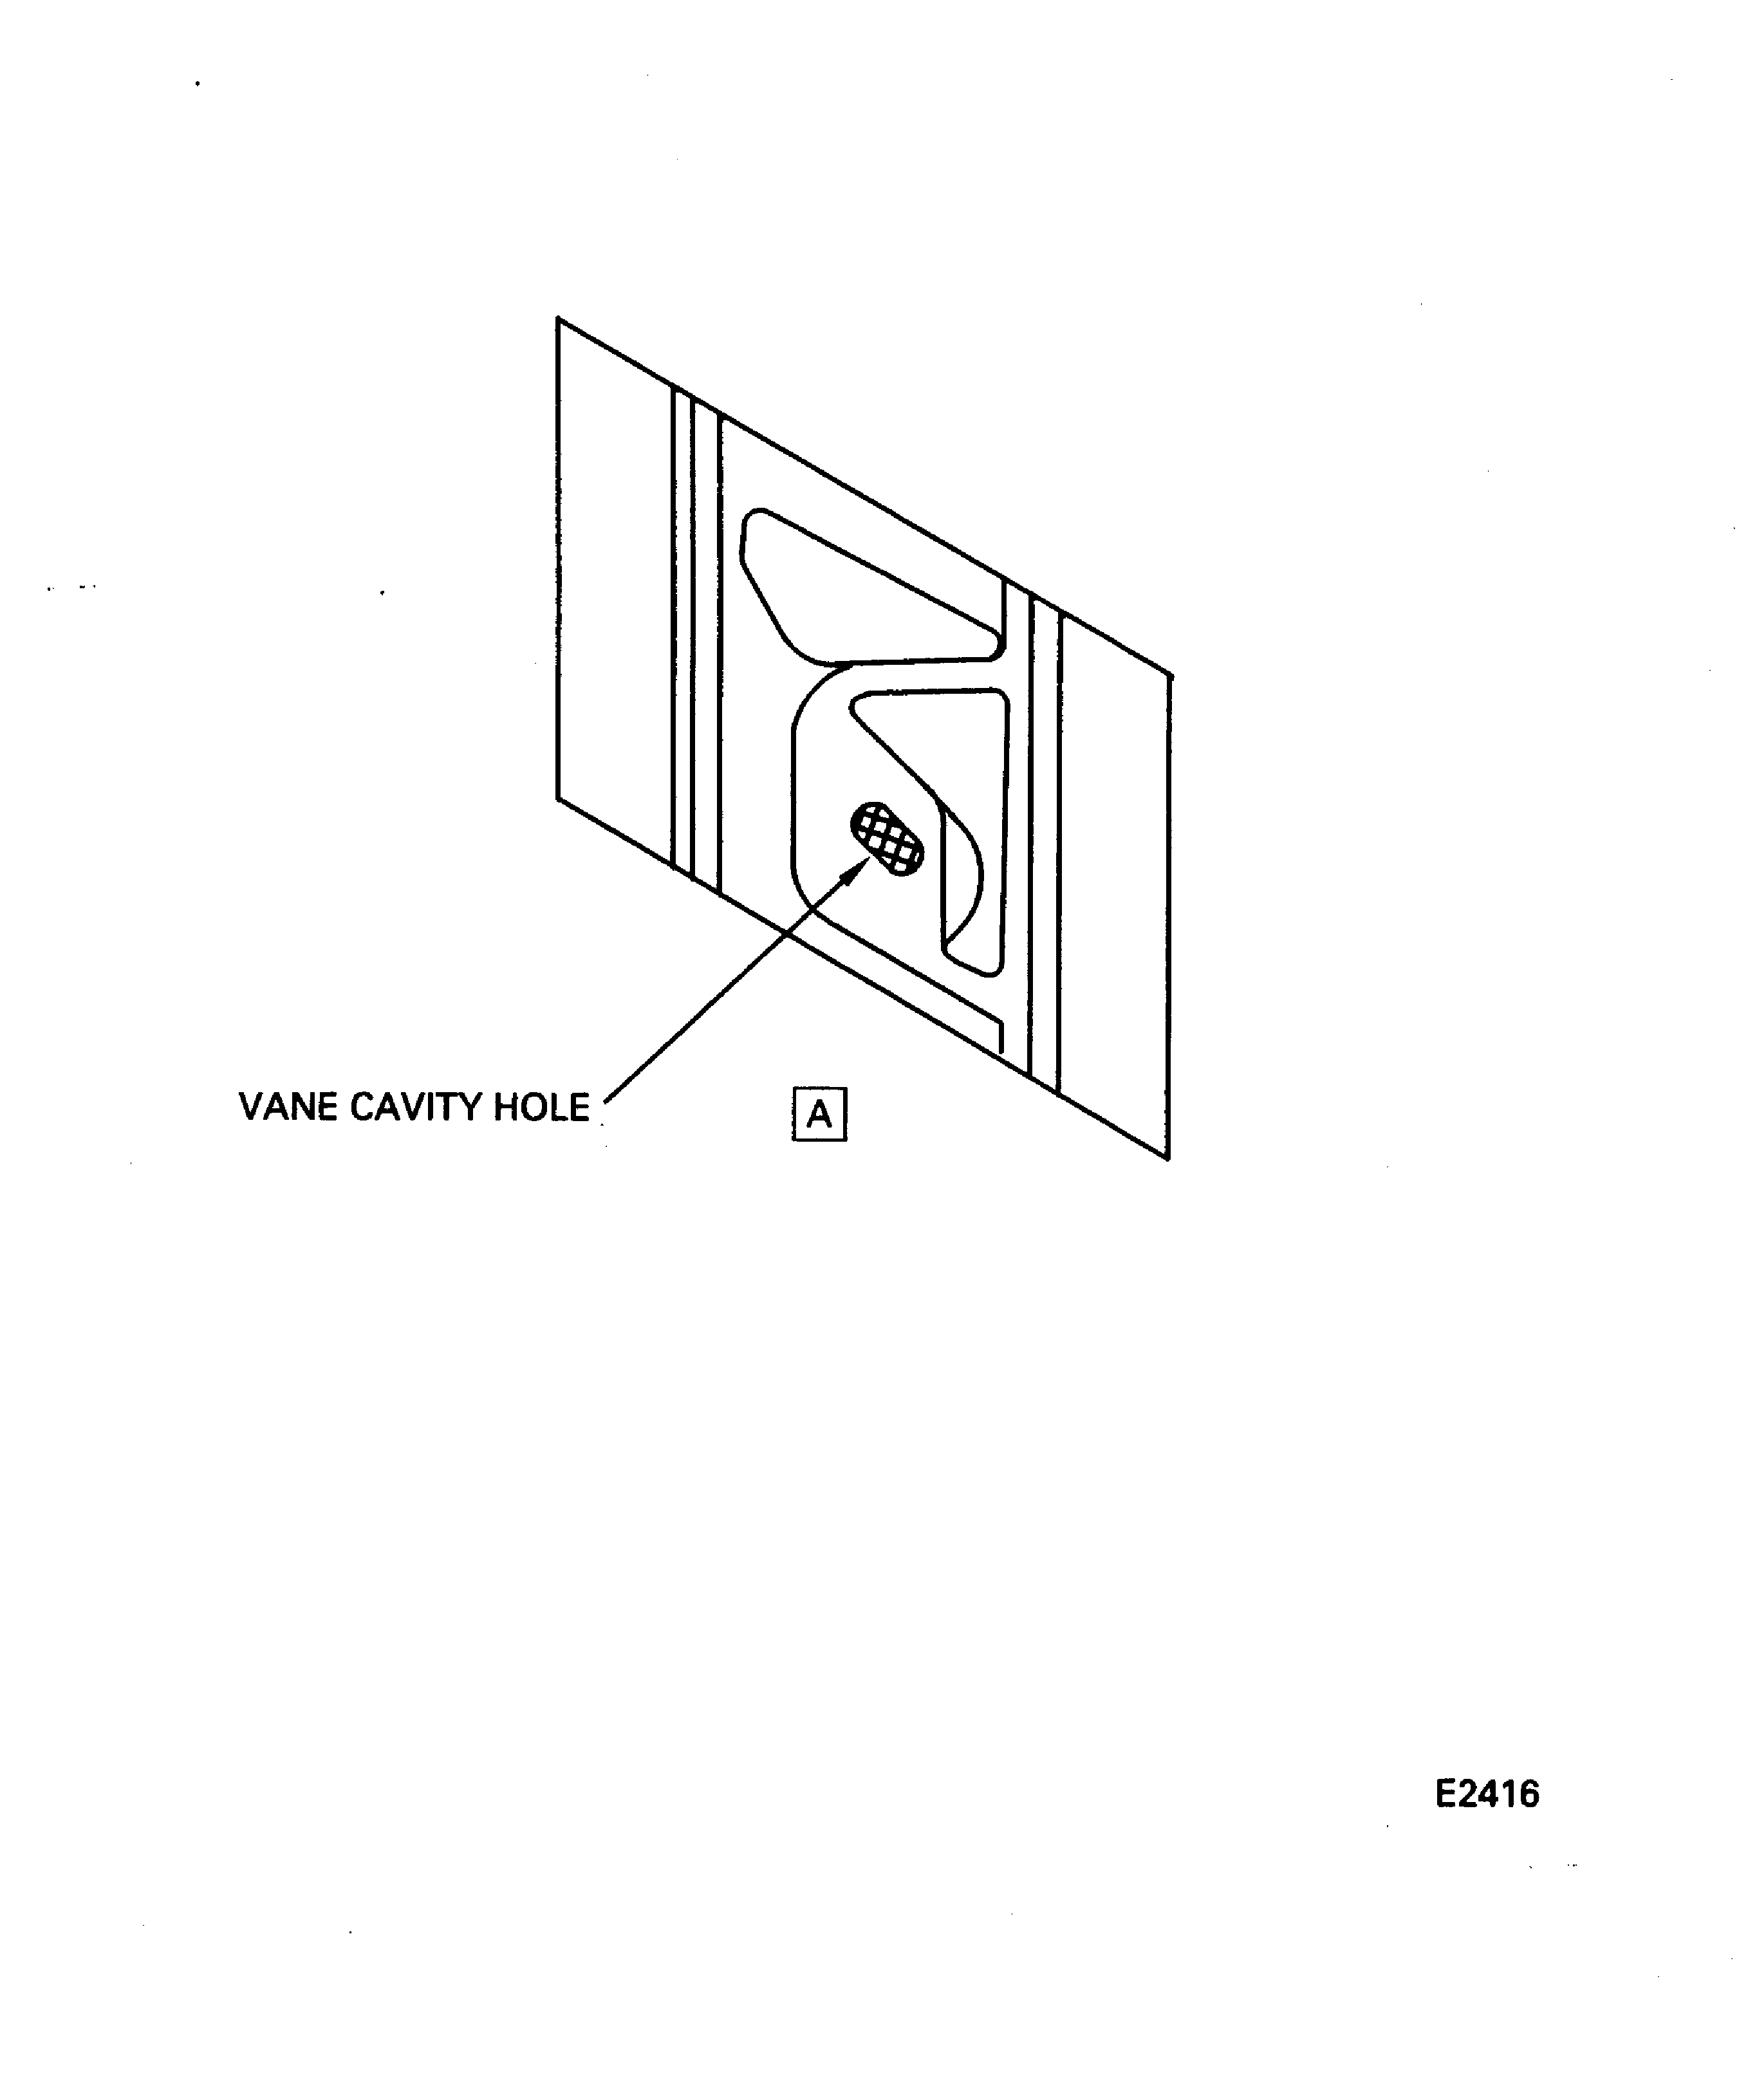
Figure: Weld or braze the replacement stage 2 HPT vane cover (PN 2A0049)
Weld or braze the replacement stage 2 HPT vane cover (PN 2A0049)
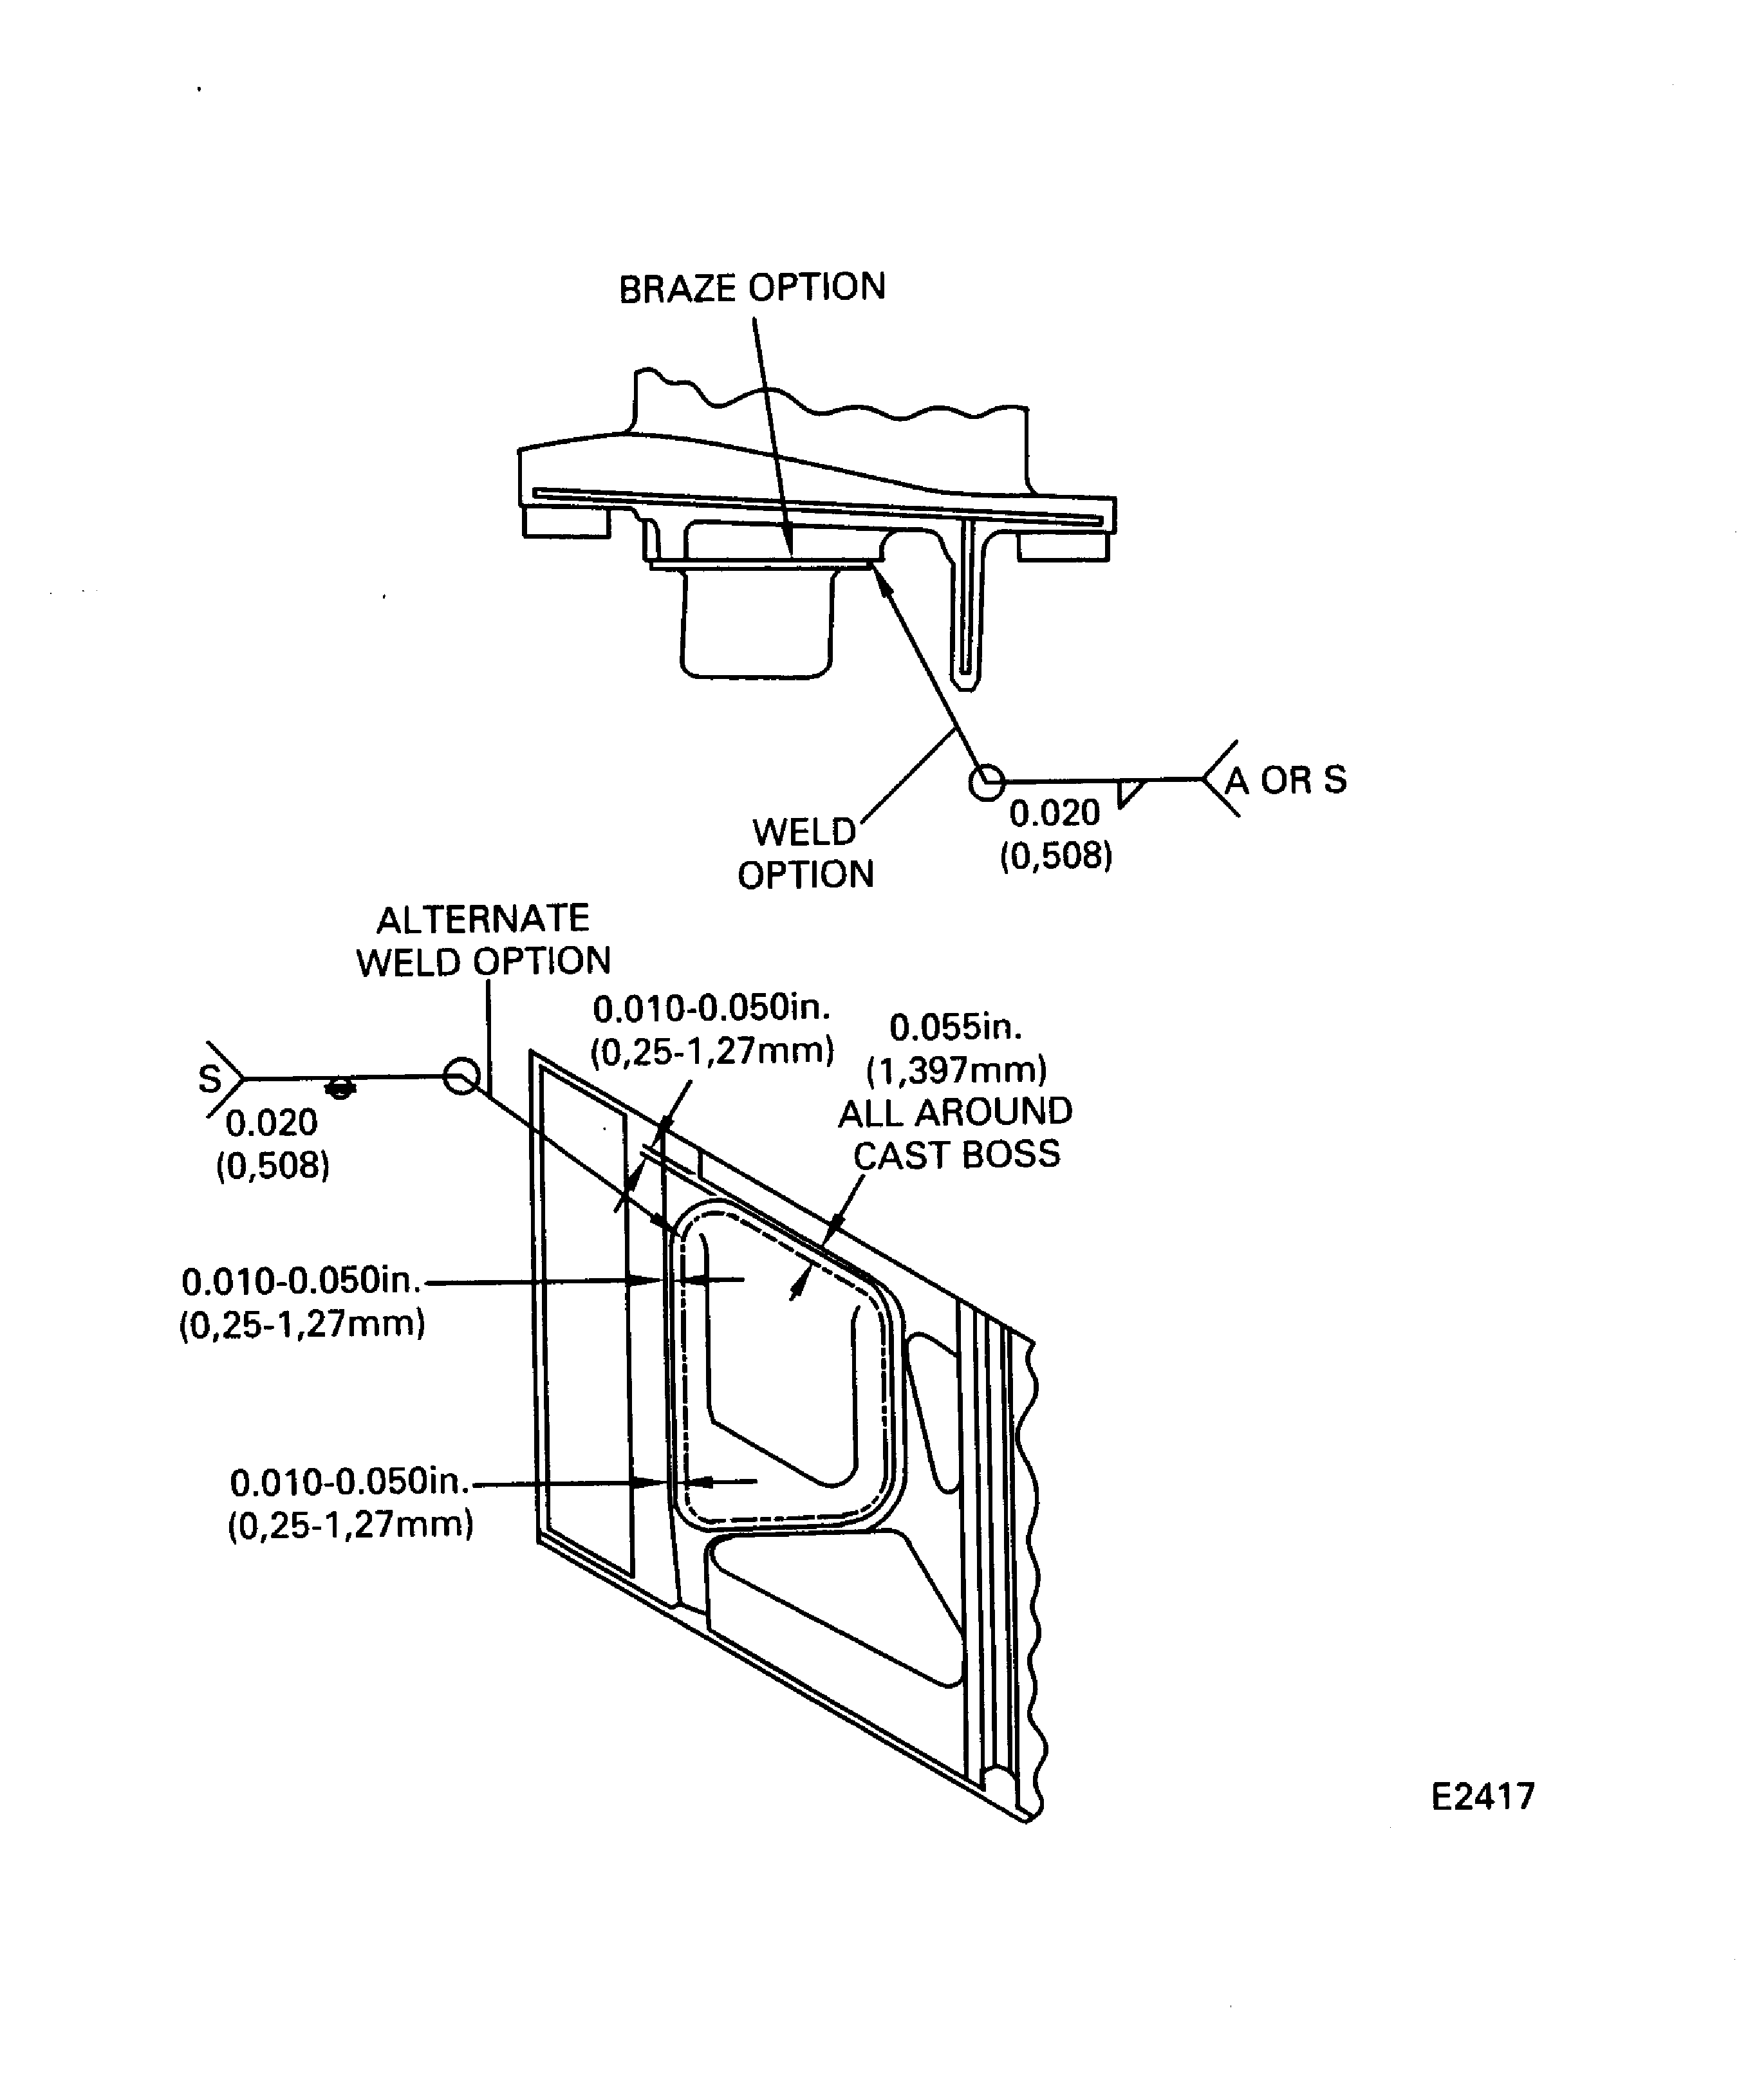
Figure: Weld or braze the replacement stage 2 HPT vane cover (PN 2A2706)
Weld or braze the replacement stage 2 HPT vane cover (PN 2A2706)
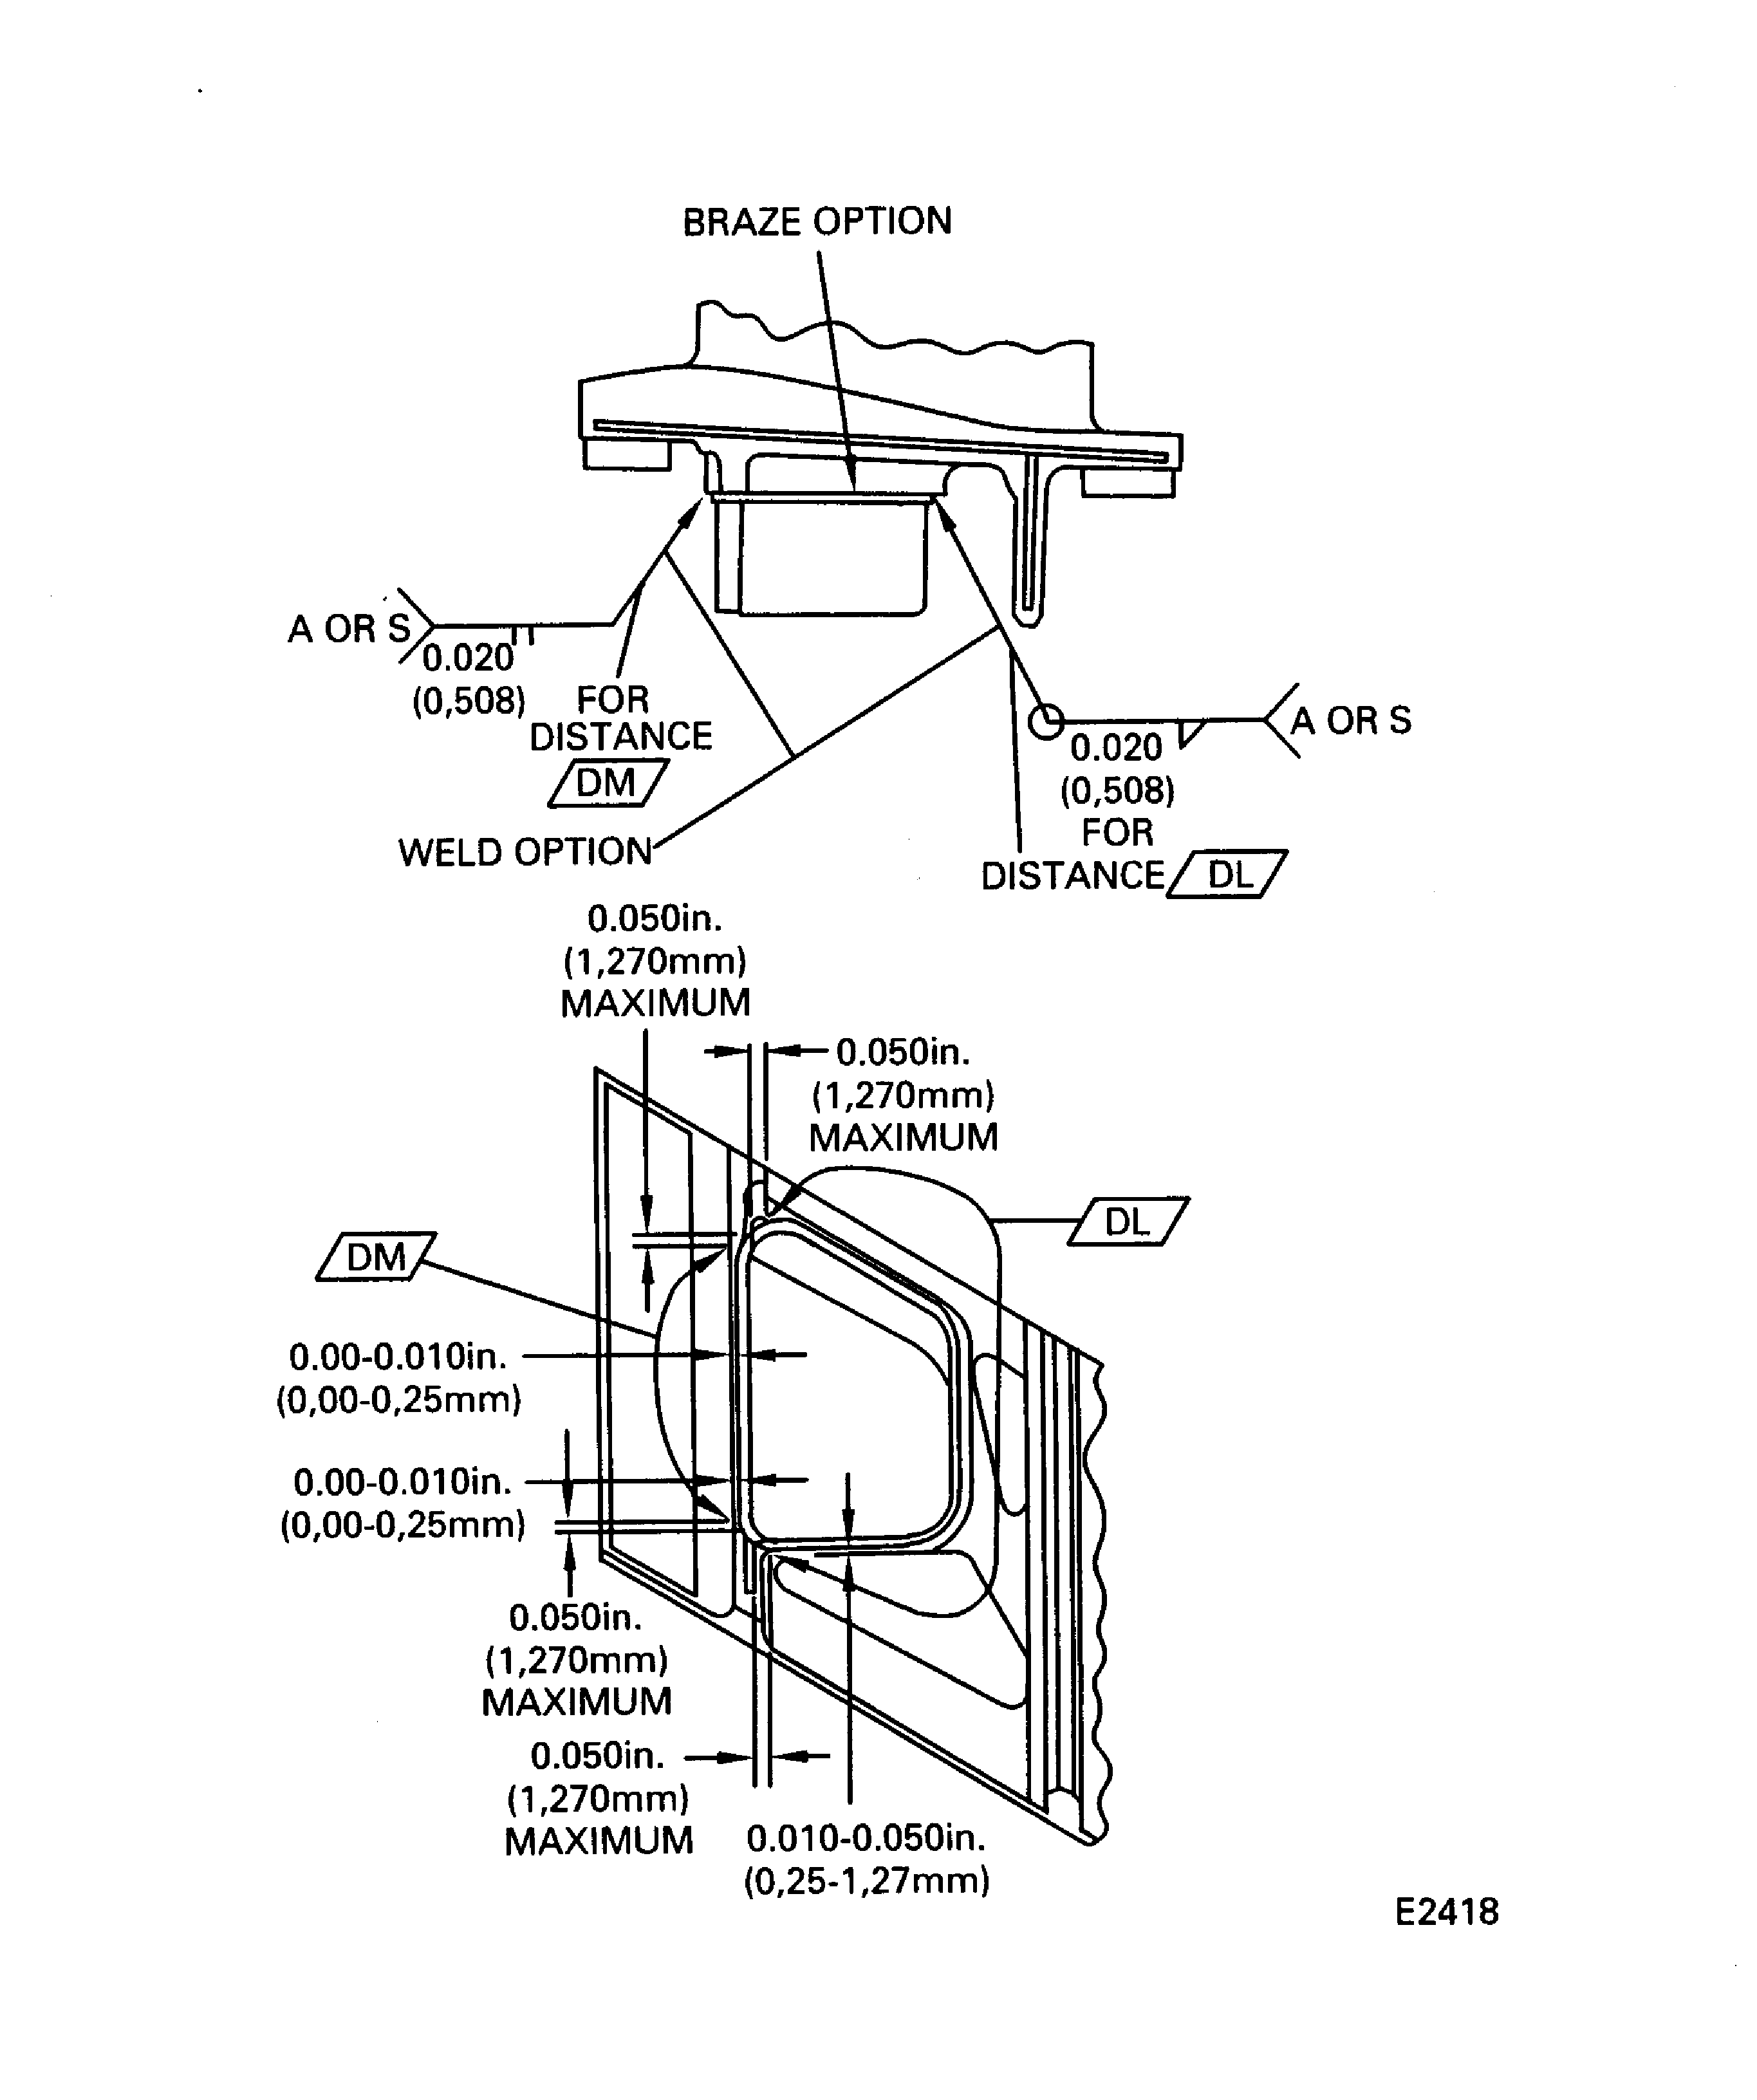
Figure: Stage 2 HPT vane airflow check limits
Stage 2 HPT vane airflow check limits
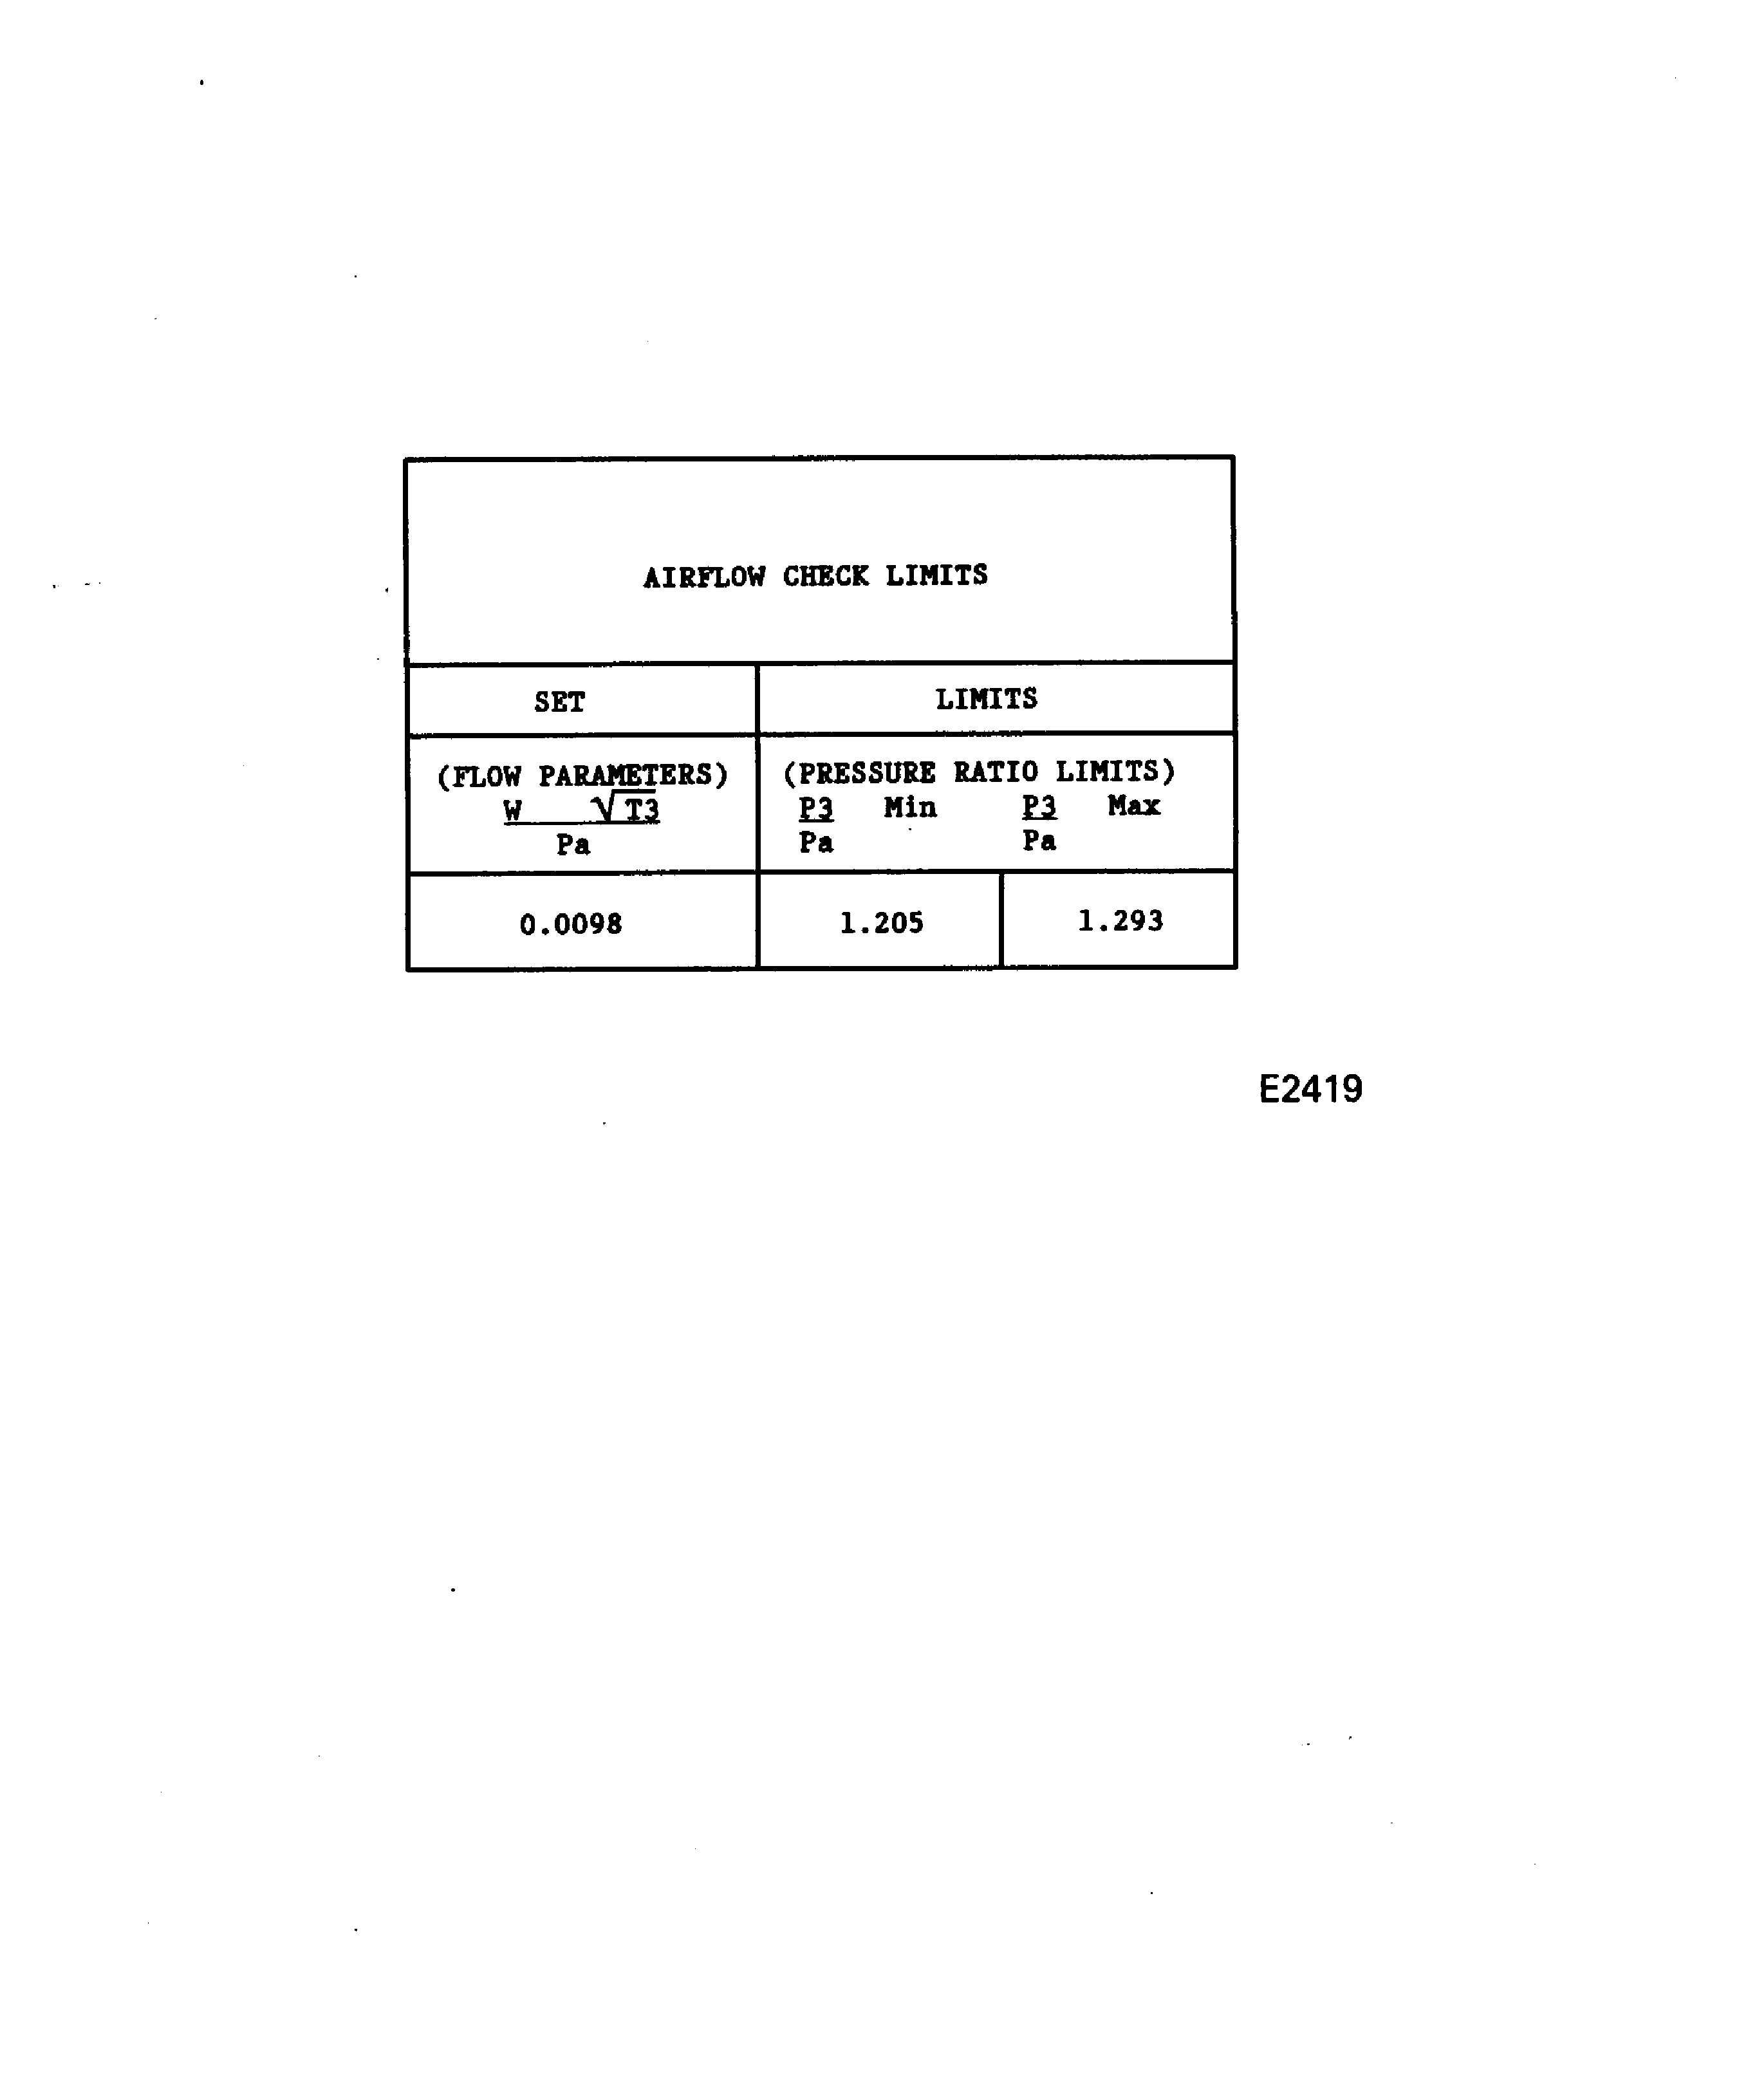
Figure: Weld and braze joints crack limits
Weld and braze joints crack limits
