TASK 72-50-00-300-008 LP Turbine (LPT) And Turbine Exhaust Case (TEC) Unit - Blend Repair, Repair-008 (VRS4375)

DMC:V2500-A0-72-50-0000-00A-649A-C|Issue No:003.00|Issue Date:2015-02-01

Export Control

EAR Export Classification: Not subject to the EAR per 15 C.F.R. Chapter 1, Part 734.3(b)(3), except for the following Service Bulletins which are currently published as EAR Export Classification 9E991: SBE70-0992, SBE72-0483, SBE72-0580, SBE72-0588, SBE72-0640, SBE73-0209, SBE80-0024 and SBE80-0025.

Copyright

© IAE International Aero Engines AG (2001, 2014 - 2021) The information contained in this document is the property of © IAE International Aero Engines AG and may not be copied or used for any purpose other than that for which it is supplied without the express written authority of © IAE International Aero Engines AG. (This does not preclude use by engine and aircraft operators for normal instructional, maintenance or overhaul purposes.).

Applicability

All

Common Information

TASK 72-50-00-300-008 LP Turbine (LPT) And Turbine Exhaust Case (TEC) Unit - Blend Repair, Repair-008 (VRS4375)

Effectivity

FIG/ITEM

PART NO.

01-001

4W5192

01-001

4W6013

01-001

4W6243

01-001

4W6423

01-001

4W5222

01-001

4W5224

01-001

4W5225

01-001

4W5227

General

VRS 4375 TASK 72-50-00-300-008 (REPAIR-008) gives a blend repair for surface damage in specified areas of the outer diffuser segment, the stage 3 turbine vane and stage 3 turbine blade for a LP Turbine Module, which is not disassembled.

Price and availability - none

The practices and processes referred to in the procedure by the TASK number are in the SPM.

Material of component

PART IDENT

SYMBOL

MATERIAL

Outer diffuser segment

INCO 713 or INCO 939

Stage 3 turbine vane

MAR-M-247 or M247LC-DS

Stage 3 turbine blade

INCONEL 100

Coating

PART IDENT

COATING

Outer diffuser segment

P/N 3A0090, 3A0958

PWA 73 Aluminide

Outer diffuser segment

P/N 3A1791

Uncoated

Stage 3 turbine vane

PWA 73 Aluminide

Stage 3 turbine blade

PWA 73 Aluminide

NOTE

For more equipment and materials necessary to do this repair refer to TASK 70-11-26-300-503 and TASK 70-23-05-230-501.
Equivalent materials or equipment may be used.

NOTE

All dimensions are in inch and (mm).
The letter "A" defines the different blend repair areas.

Preliminary Requirements

Pre-Conditions

NONE

Support Equipment

NameManufacturerPart Number / IdentificationQuantityRemark
Action swivel viseLOCALAction swivel vise
Radius gage setLOCALRadius gage set
Illuminated comparator magnifierLOCALIlluminated comparator magnifier
Dial caliperLOCALDial caliper
External dial caliperLOCALExternal dial caliper

Consumables, Materials and Expendables

NONE

Spares

NONE

Safety Requirements

NONE

Procedure

    1. SUBTASK 72-50-00-350-062 General Instructions for the Blend Repair of the Stage 3 Turbine Blade

      NOTE

      1. The blend repair can be done only when the access for blend repair is good enough to allow the complete removal of the damage to get the required quality of the repair.

      2. Be careful that no particles or dirt get into or stay in the assembled LP turbine module.

      3. Unless specified differently, do not blend repair dents.

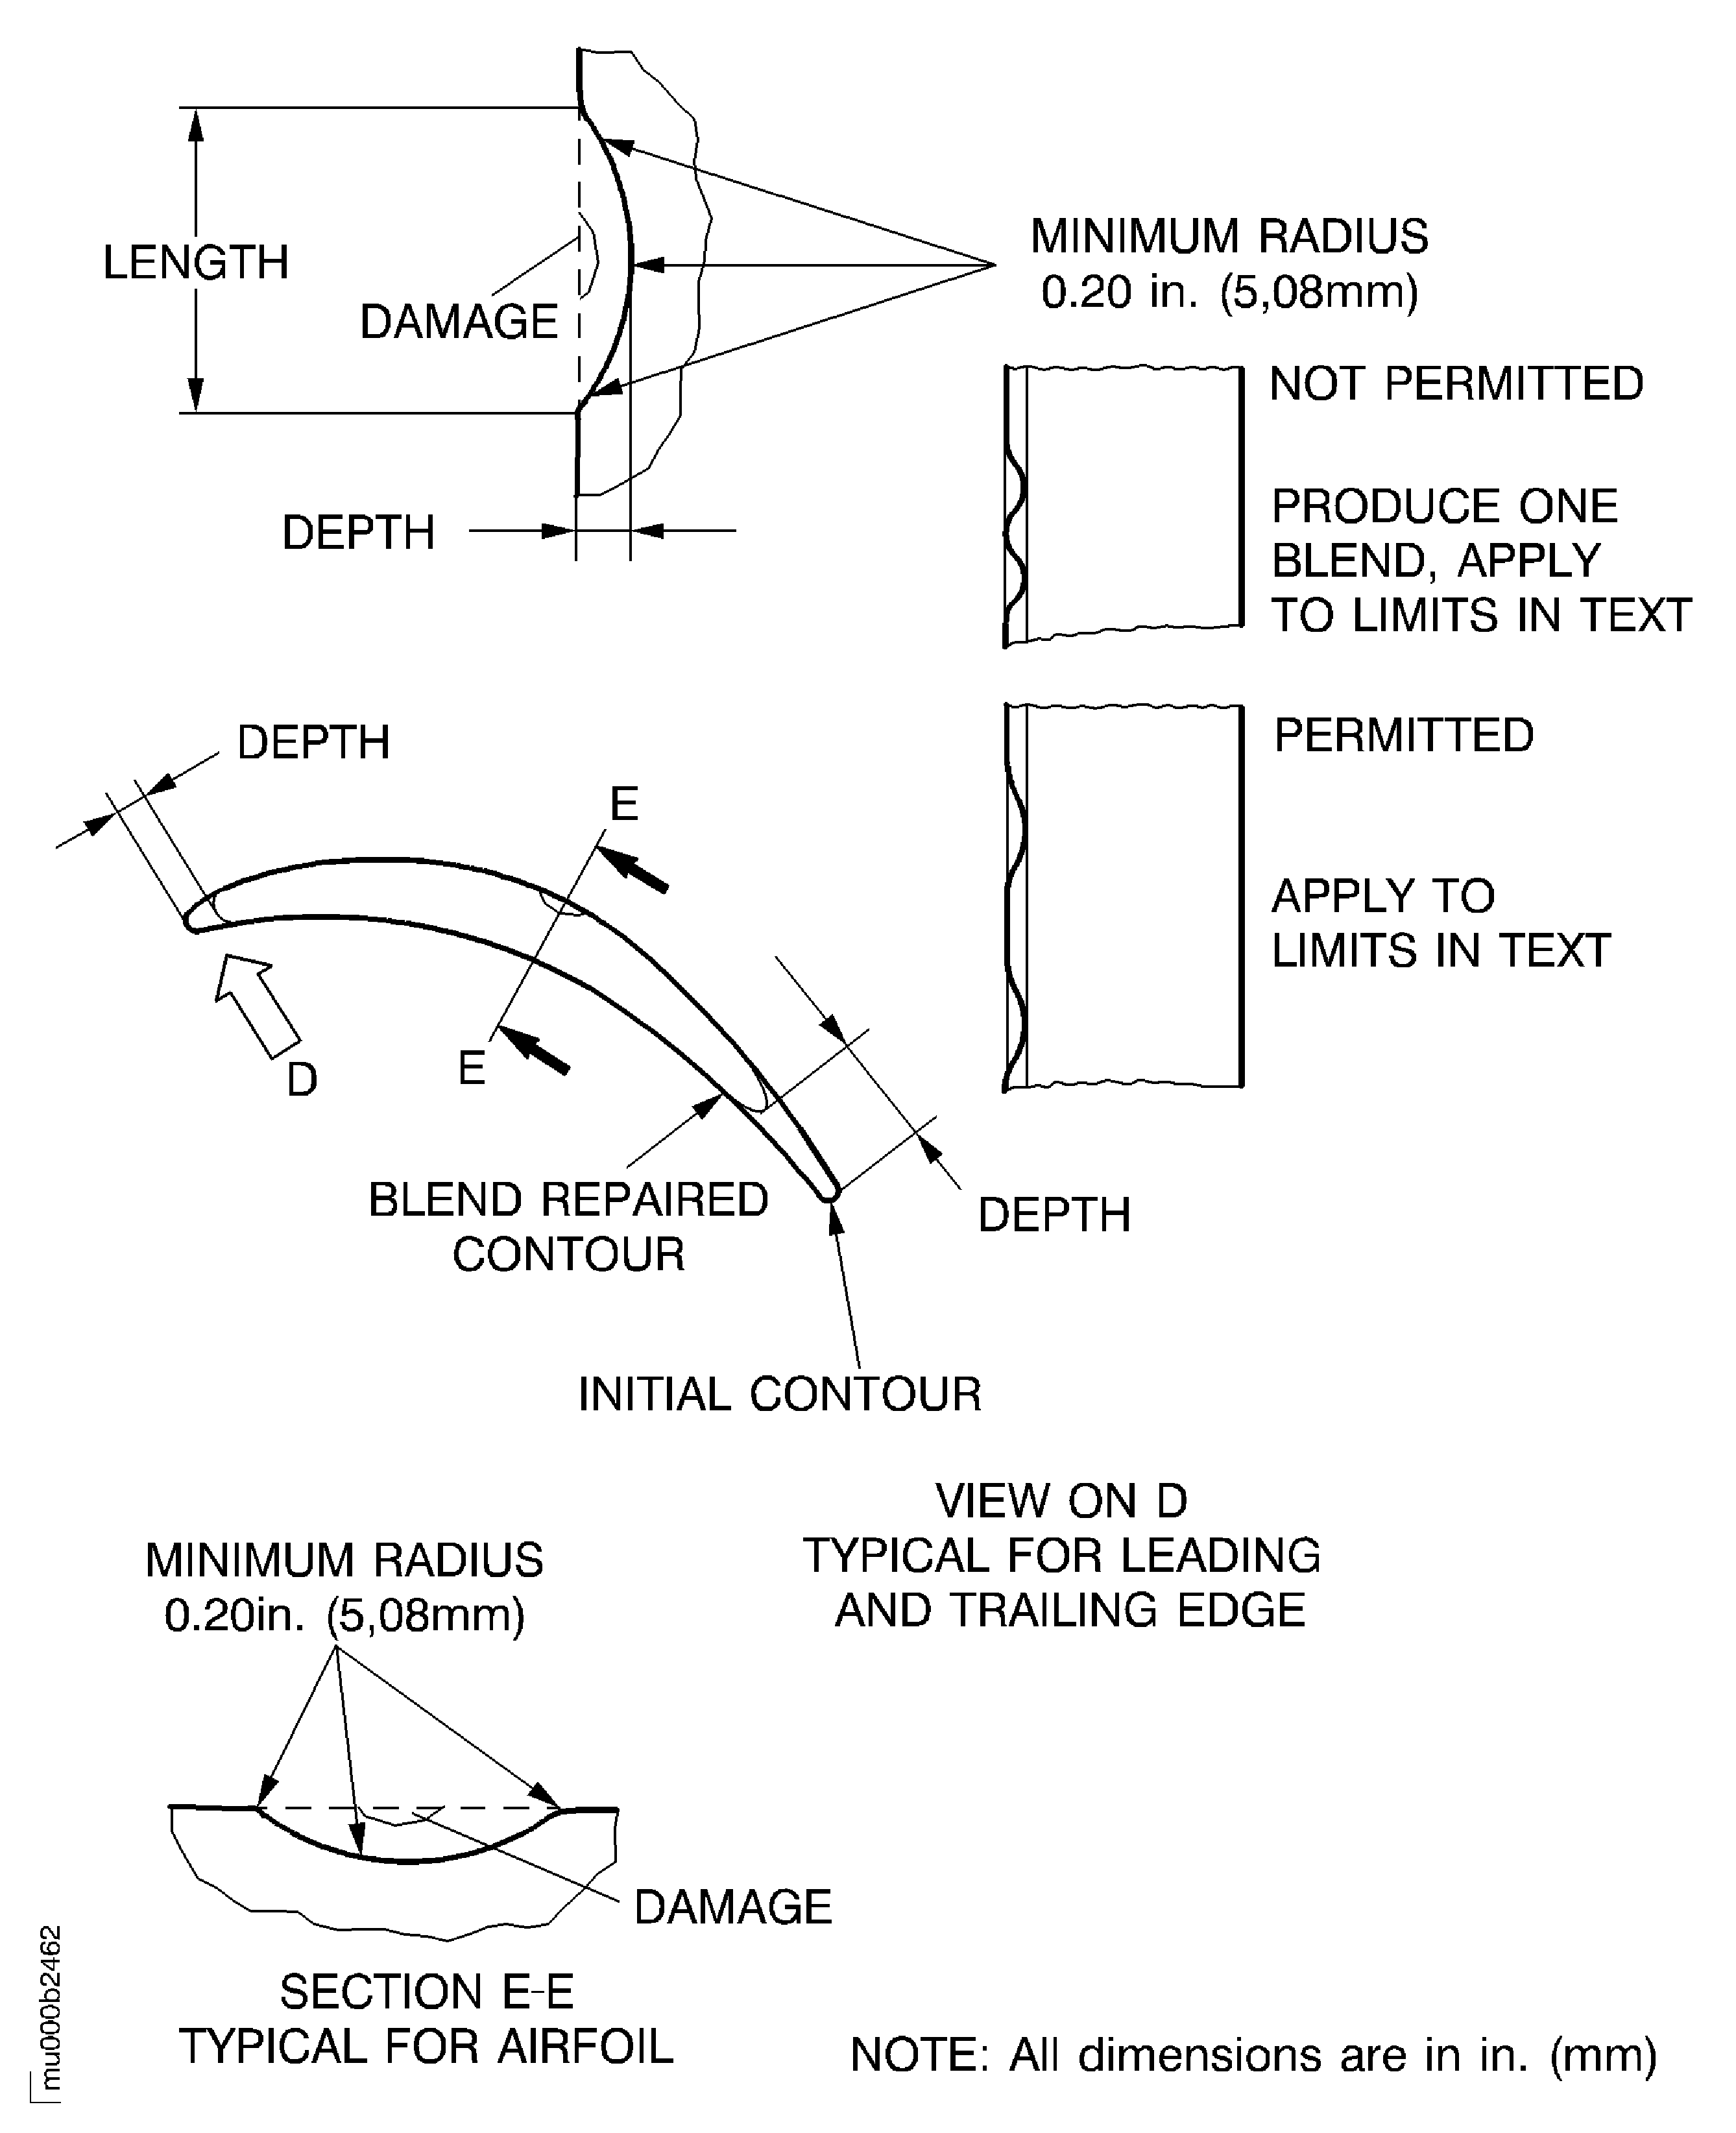
      4. Unless specified differently, the blend ratio, length to depth, must be a minimum of 5:1. For correct shape of the blend refer to Figure.

      5. Unless specified differently, there is no limit for the number of blends. If there is a number of damage marks together, blend the whole area to the specified depth.

      6. The minimum distance between the blends is 0.500in. (12.7 mm) for the outer diffuser segment and the stage 3 turbine vanes leading edge and trailing edge. For the stage 3 turbine blades the minimum distance between the blends is 0.200in. (5.0 mm).

      7. Keep the material removal to the minimum necessary to remove damage.

      8. The surface texture of all repaired surfaces must have the same or better quality to that of the adjacent not damaged area.

      9. After blending in coated areas of vanes and blades, touch-up of the coating is not necessary.

      10. Nicks, within acceptable limits do not require blend repair. If there is raised material, remove it only.

      11. Repeated blending in one place is acceptable to the specified maximum depth, measured from the initial unblended surface.

      1. Blend the nicks and pits.

      2. Do the blend repair.

        Use files, needle files and stones to blend the nicks and pits.

        Use illuminated comparator magnifier to examine the areas during blend repair.

      1. Remove cracks in the coating.

      2. Locally remove cracked or damaged coating at nicks and dents by blend repair.

      1. Polish the blended areas.

      2. Use fine stones to polish the blend repaired areas.

        After the blend repair the surface must be as smooth as the initial surface.

        Edges and corners are not permitted.

    1. SUBTASK 72-50-00-350-063 Blend Repair the Uncoated Outer Diffuser Segments

      NOTE

      1. Refer to SUBTASK 72-50-00-350-062 before you do the blend repairs.

      2. This blend repair is only applicable to uncoated outer diffuser segments P/N 3A1791 (coated outer diffuser segments, P/N 3A0090 and 3A0958 will be replaced).

    2. Refer to: Figure

      1. Blend the surface in area A1.

      2. The maximum permitted depth of blend repair is 0.008in. (0.20 mm).

    1. SUBTASK 72-50-00-350-064 Blend Repair the Stage 3 Turbine Vanes

      NOTE

      1. Refer to SUBTASK 72-50-00-350-062 before you do the blend repairs.

      2. The extent of blend repair is limited. The total area of coatings loss (blended off and worn or damaged coating) is limited to max. 1.000 sqin. (645 sqmm) per vane cluster (shrouds and airfoil together).

      3. Area definition is identical with area definition at visual inspection.

    2. Refer to: Figure

      1. Blend the surface in area A2.1.

      2. Blend depth from initial surface 0.010 in. (0.254 mm).

        The blended area must not be more than 10 percent of the area A2.1.

      1. Surface in area A2.2.

      2. No blends permitted.

      1. Blend the surface in area A2.3.1.

      2. Blend depth from initial surface 0.020 in. (0.508 mm).

        The maximum permitted total depth of opposite blends on leading and trailing edge is 0.020 in. (0.508 mm).

        The total length of all blends on leading edge must not be more than 0.700 in. (17.78 mm).

      1. Blend the surface in area A2.3.2.

      2. Blend depth from initial surface 0.100 in. (2.54mm).

        The maximum permitted total depth of oposite blends on leading and trailing edge is 0.100 in. (2.54 mm).

        The total length of all blends on leading edge must not be more than 0.700 in. (17.78 mm).

      1. Blend the surface in area A2.4.1.

      2. Blend depth from initial surface 0.020 in. (0.508 mm).

        The maximum permitted total depth of opposite blends on leading and trailing edge is 0.020 in. (0.508 mm).

        The total length of all blends on leading edge must not be more than 0.700 in. (17.78 mm).

      1. Blend the surface in area A2.4.2.

      2. Blend depth from initial surface 0.100 in. (2.54 mm).

        The maximum permitted total depth of opposite blends on leading and trailing edge is 0.100 in. (2.54 mm).

        The total length of all blends on trailing edge must not be more than 0.700 in. (17.78 mm).

      1. Blend the surface in area A2.5.

      2. Blend depth from initial surface 0.010 in. (0.254 mm).

        The blended area must not be more than 10 percent of the area A2.5.

      1. Blend the surface in area A2.6.

      2. Blend depth from initial surface 0.010 in. (0.254 mm).

        The blended area must not be more than 10 percent of the area A2.6.

      1. Blend the surface in area A2.7.

      2. No blends permitted.

      1. Blend the surface in area A2.8.

      2. Blend depth from initial surface 0.010 in. (0.254 mm).

        The blended area must not be more than 10 percent of the area A2.8.

    1. SUBTASK 72-50-00-350-065 Blend Repair the Stage 3 Turbine Blades

      NOTE

      1. Refer to SUBTASK 72-50-00-350-001 before you do the blend repairs.

      2. The extent of blend repair is limited. The total area of coatings loss (blended off and worn or damaged coating) is limited to max. 1.000sqin. (645 sqmm) per blade (shrouds and airfoil together).

      3. Area definition is identical with the area definition at visual inspection.

      4. Polish the airfoils in spanwise direction only.

    2. Refer to: Figure

      1. Blend the surface in area A3.1.

      2. Blend depth from initial surface 0.010 in. (0.254 mm).

        The blended area must not be more than 20 percent of area A3.1.

        The blend ratio, length to depth, must be a minimum of 10:1.

        Material thickness after blending is 0.040 in. (1.02 mm) minimum.

        Use a single blade for reference.

      1. Blend the surface in area A3.2.

      2. Blend depth from initial surface 0.010 in. (0.254 mm).

        The blended area must not be more than 20 percent of area A3.2.

        The blend ratio, length to depth, must be a minimum of 10:1.

      1. Blend the surface in area A3.3.1.

      2. Blend depth from initial surface 0.060 in. (1.524 mm).

        The maximum permitted total depth of opposite blends on leading and trailing edge is 0.060 in. (1.524 mm).

        The total length of all blends on leading edge must not be more than 10 percent of the span.

        The minimum transition radius to the outer shroud is 0.08 in. (2.0 mm).

      1. Blend the surface in area A3.3.2.

      2. Blend depth from initial surface 0.030 in. (0.762 mm).

        The maximum permitted total depth of opposite blends on leading and trailing edge is 0.060 in. (1.524 mm).

        The total length of all blends on leading edge must not be more than 10 percent of the span.

        The blend ratio, length to depth, must be a minimum of 6:1.

      1. Blend the surface in area A3.3.3.

      2. Blend depth from initial surface 0.030 in. (0.762 mm).

        The maximum permitted total depth of opposite blends on leading and trailing edge is 0.060 in. (1.524 mm).

        The total length of all blends on each leading and trailing edge must not be more than 10 percent of the span.

        The blend ratio, length to depth, must be a minimum of 6:1.

      1. Blend the surface area A3.4.1.

      2. Blend depth from initial surface 0.030 in. (0.762 mm).

        The maximum permitted total depth of opposite blends on leading and trailing edge is 0.060 in. (1.524 mm).

        The total length of all blends on trailing edge must not be more than 10 percent of the span.

      1. Blend the surface in area A3.4.2.

      2. Blend depth from initial surface 0.030 in. (0.762 mm).

        The maximum permitted total depth of opposite blends on leading and trailing edge is 0.060 in. (1.524 mm).

        The total length of all blends on trailing edge must not be more than 10 percent of the span.

      1. Blend the surface in area A3.5.

      2. Blend depth from initial surface 0.010 in. (0.254 mm).

        The blend area must not be more than 40 percent of A3.5.

        The blend ratio, length to depth, must be a minimum of 10:1.

      1. Blend the surface in area A3.6.

      2. Blend depth from initial surface 0.014 in. (0.356 mm).

        The blend area must not be more than 40 percent of area A3.6.

        The blend ratio lenght to depth must be a minimum of 10:1.

      1. Blend the surface in area A3.7.

      2. Blend depth from initial surface 0.014 in. (0.356 mm).

        The blend area must not be more than 20 percent of area A3.7.

        The blend ratio lenght to depth must be a minimum of 10:1.

      1. Blend the surface in area A3.8.

      2. No blends permitted.

      1. Blend the surface in area A3.9.

      2. No blends permitted.

    1. SUBTASK 72-50-00-110-058 Cleaning

      1. Clean the repaired areas.

      2. Refer to the SPM TASK 70-11-26-300-503.

    1. SUBTASK 72-50-00-230-061 Examine the Blend Repaired Areas for Cracks

      1. Do the test for cracks.

      2. Refer to the SPM TASK 70-23-05-230-501.

        No cracks are permitted.

    1. SUBTASK 72-50-00-220-100 Examine the Blend Repaired Areas

      1. Examine the surface of the blended areas visually.

      2. Use an illuminated comparator magnifier.

        The blended surface must be as smooth as the initial surface.

        Edges and corners are not permitted.

      1. Examine the blend repaired airfoils dimensionally.

      2. Measure the dimensions of the blended vanes and blades.

        The dimensions are given in Step and Step.

  1. Figure: Blend repair the LP-turbine module

    Blend repair the LP-turbine module
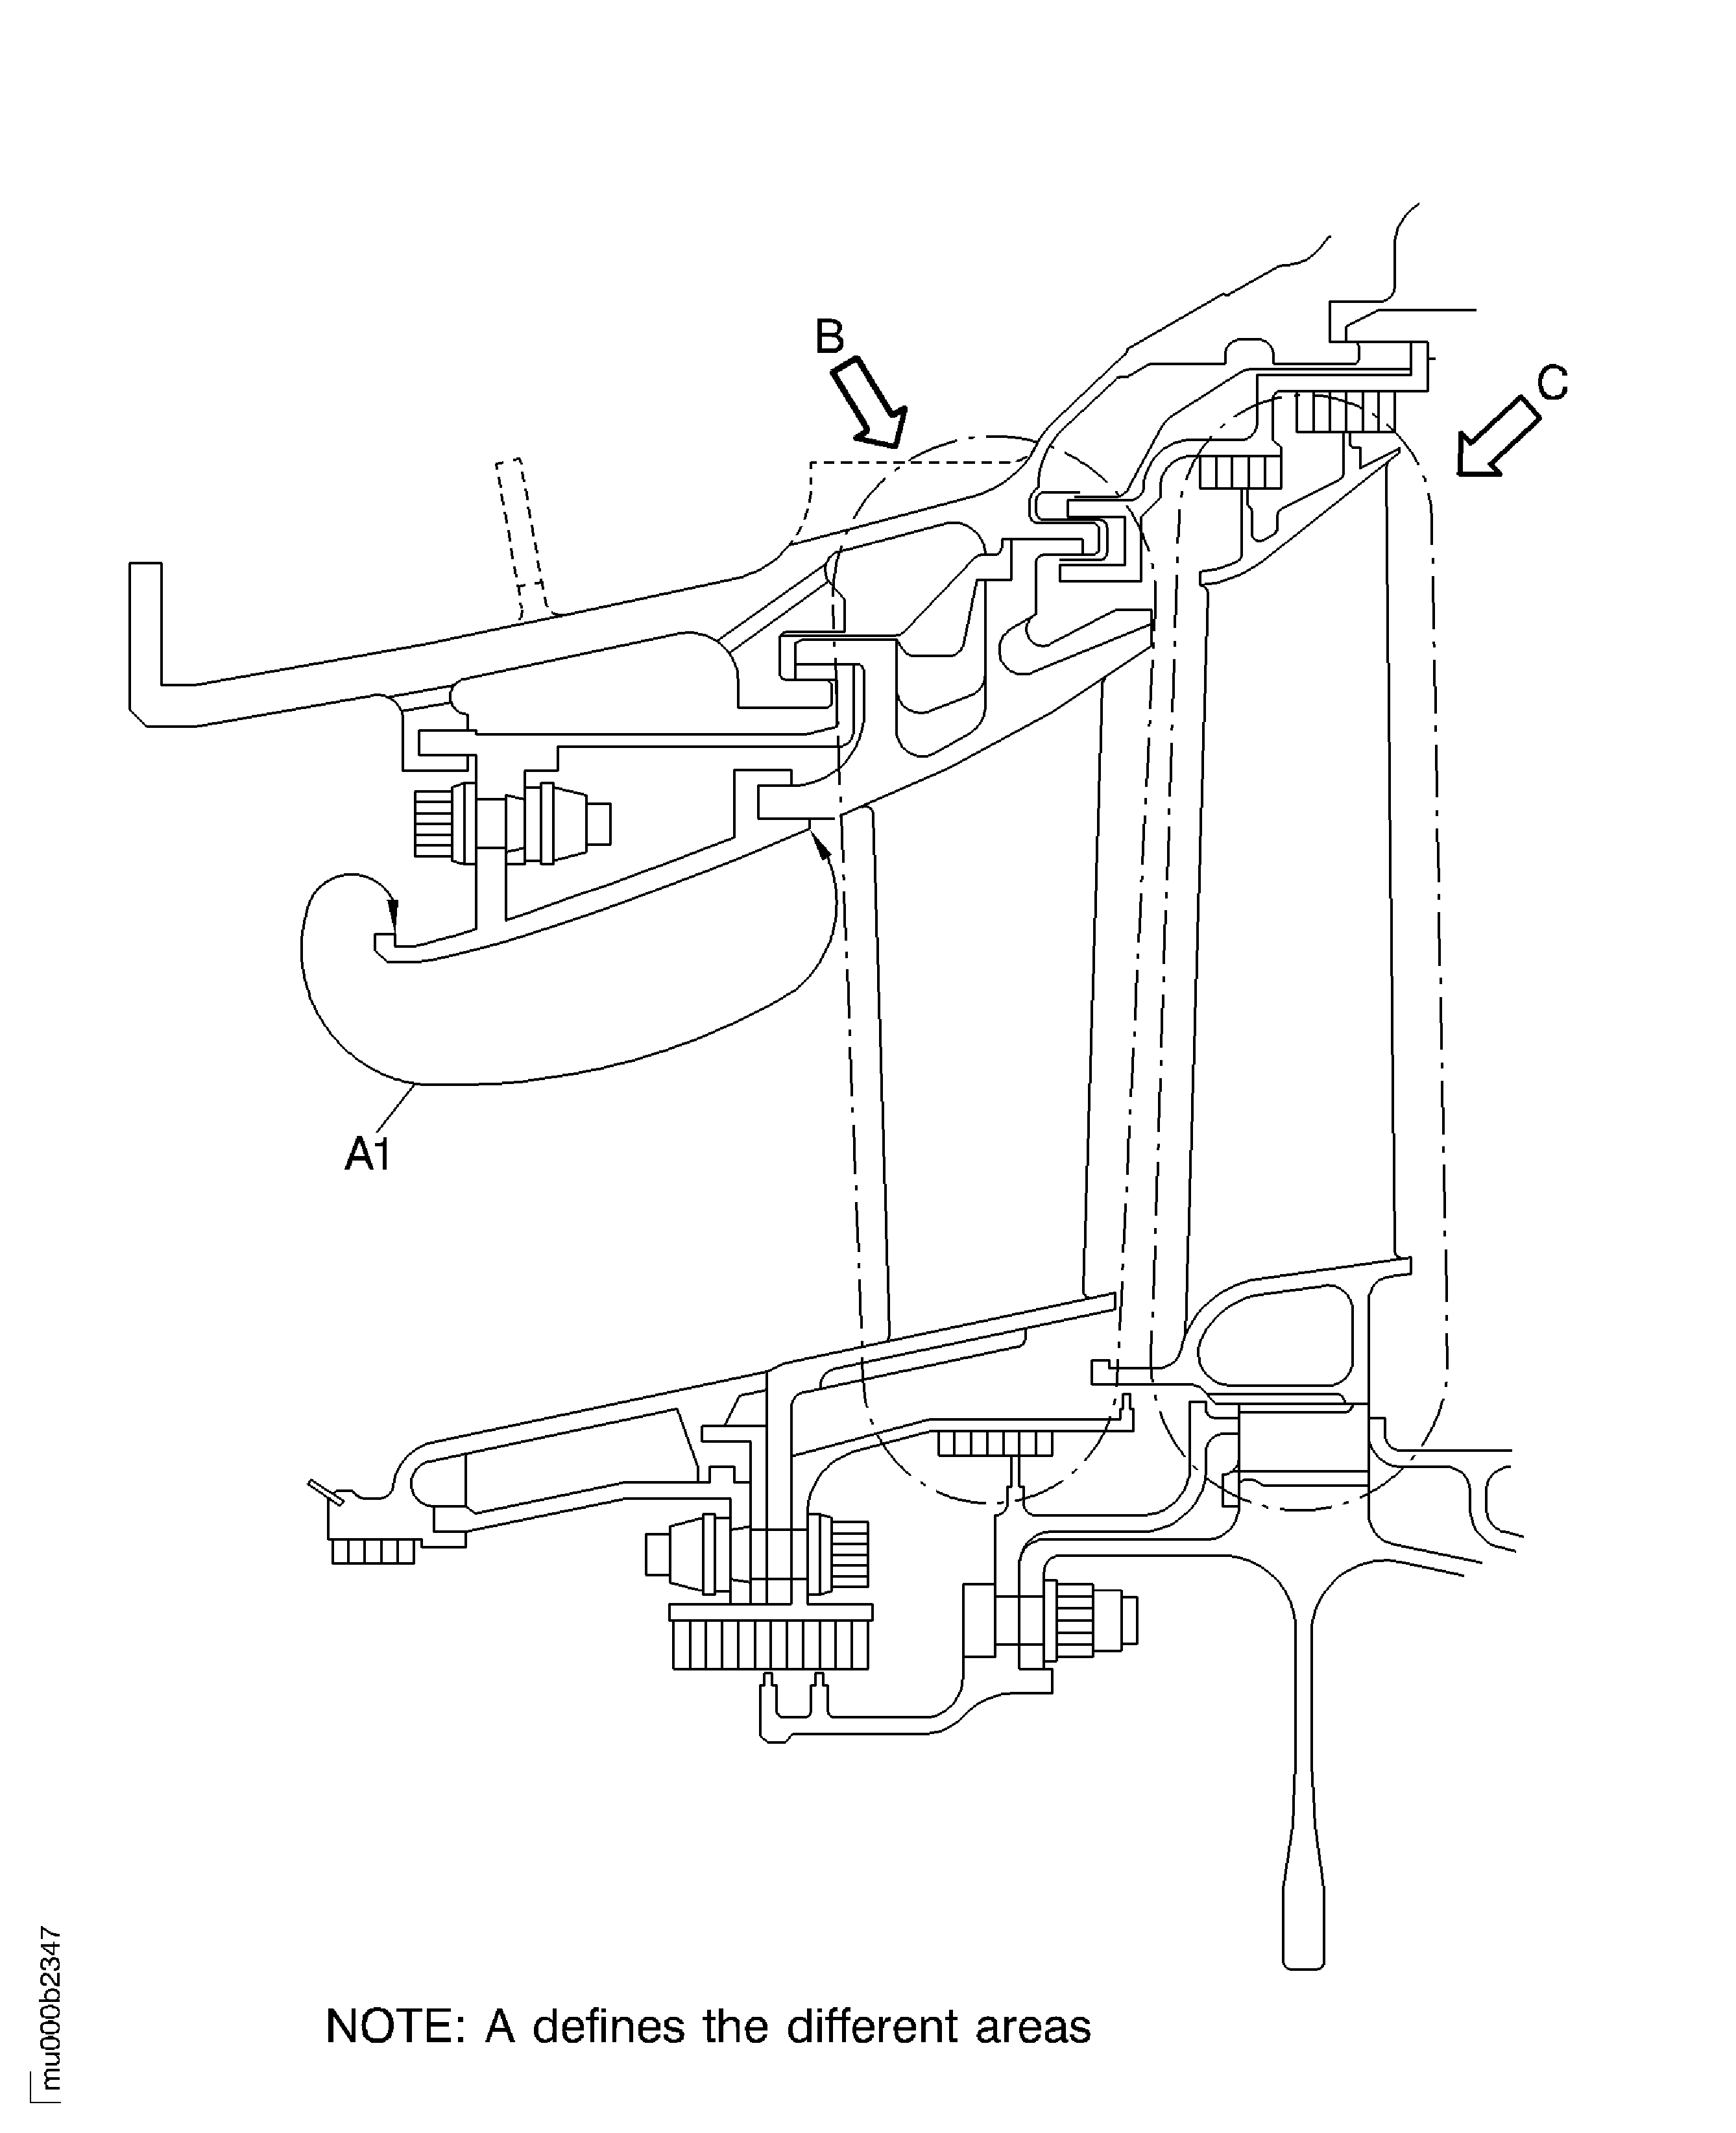
    Figure: Blend repair the stage 3 turbine vanes

    Blend repair the stage 3 turbine vanes
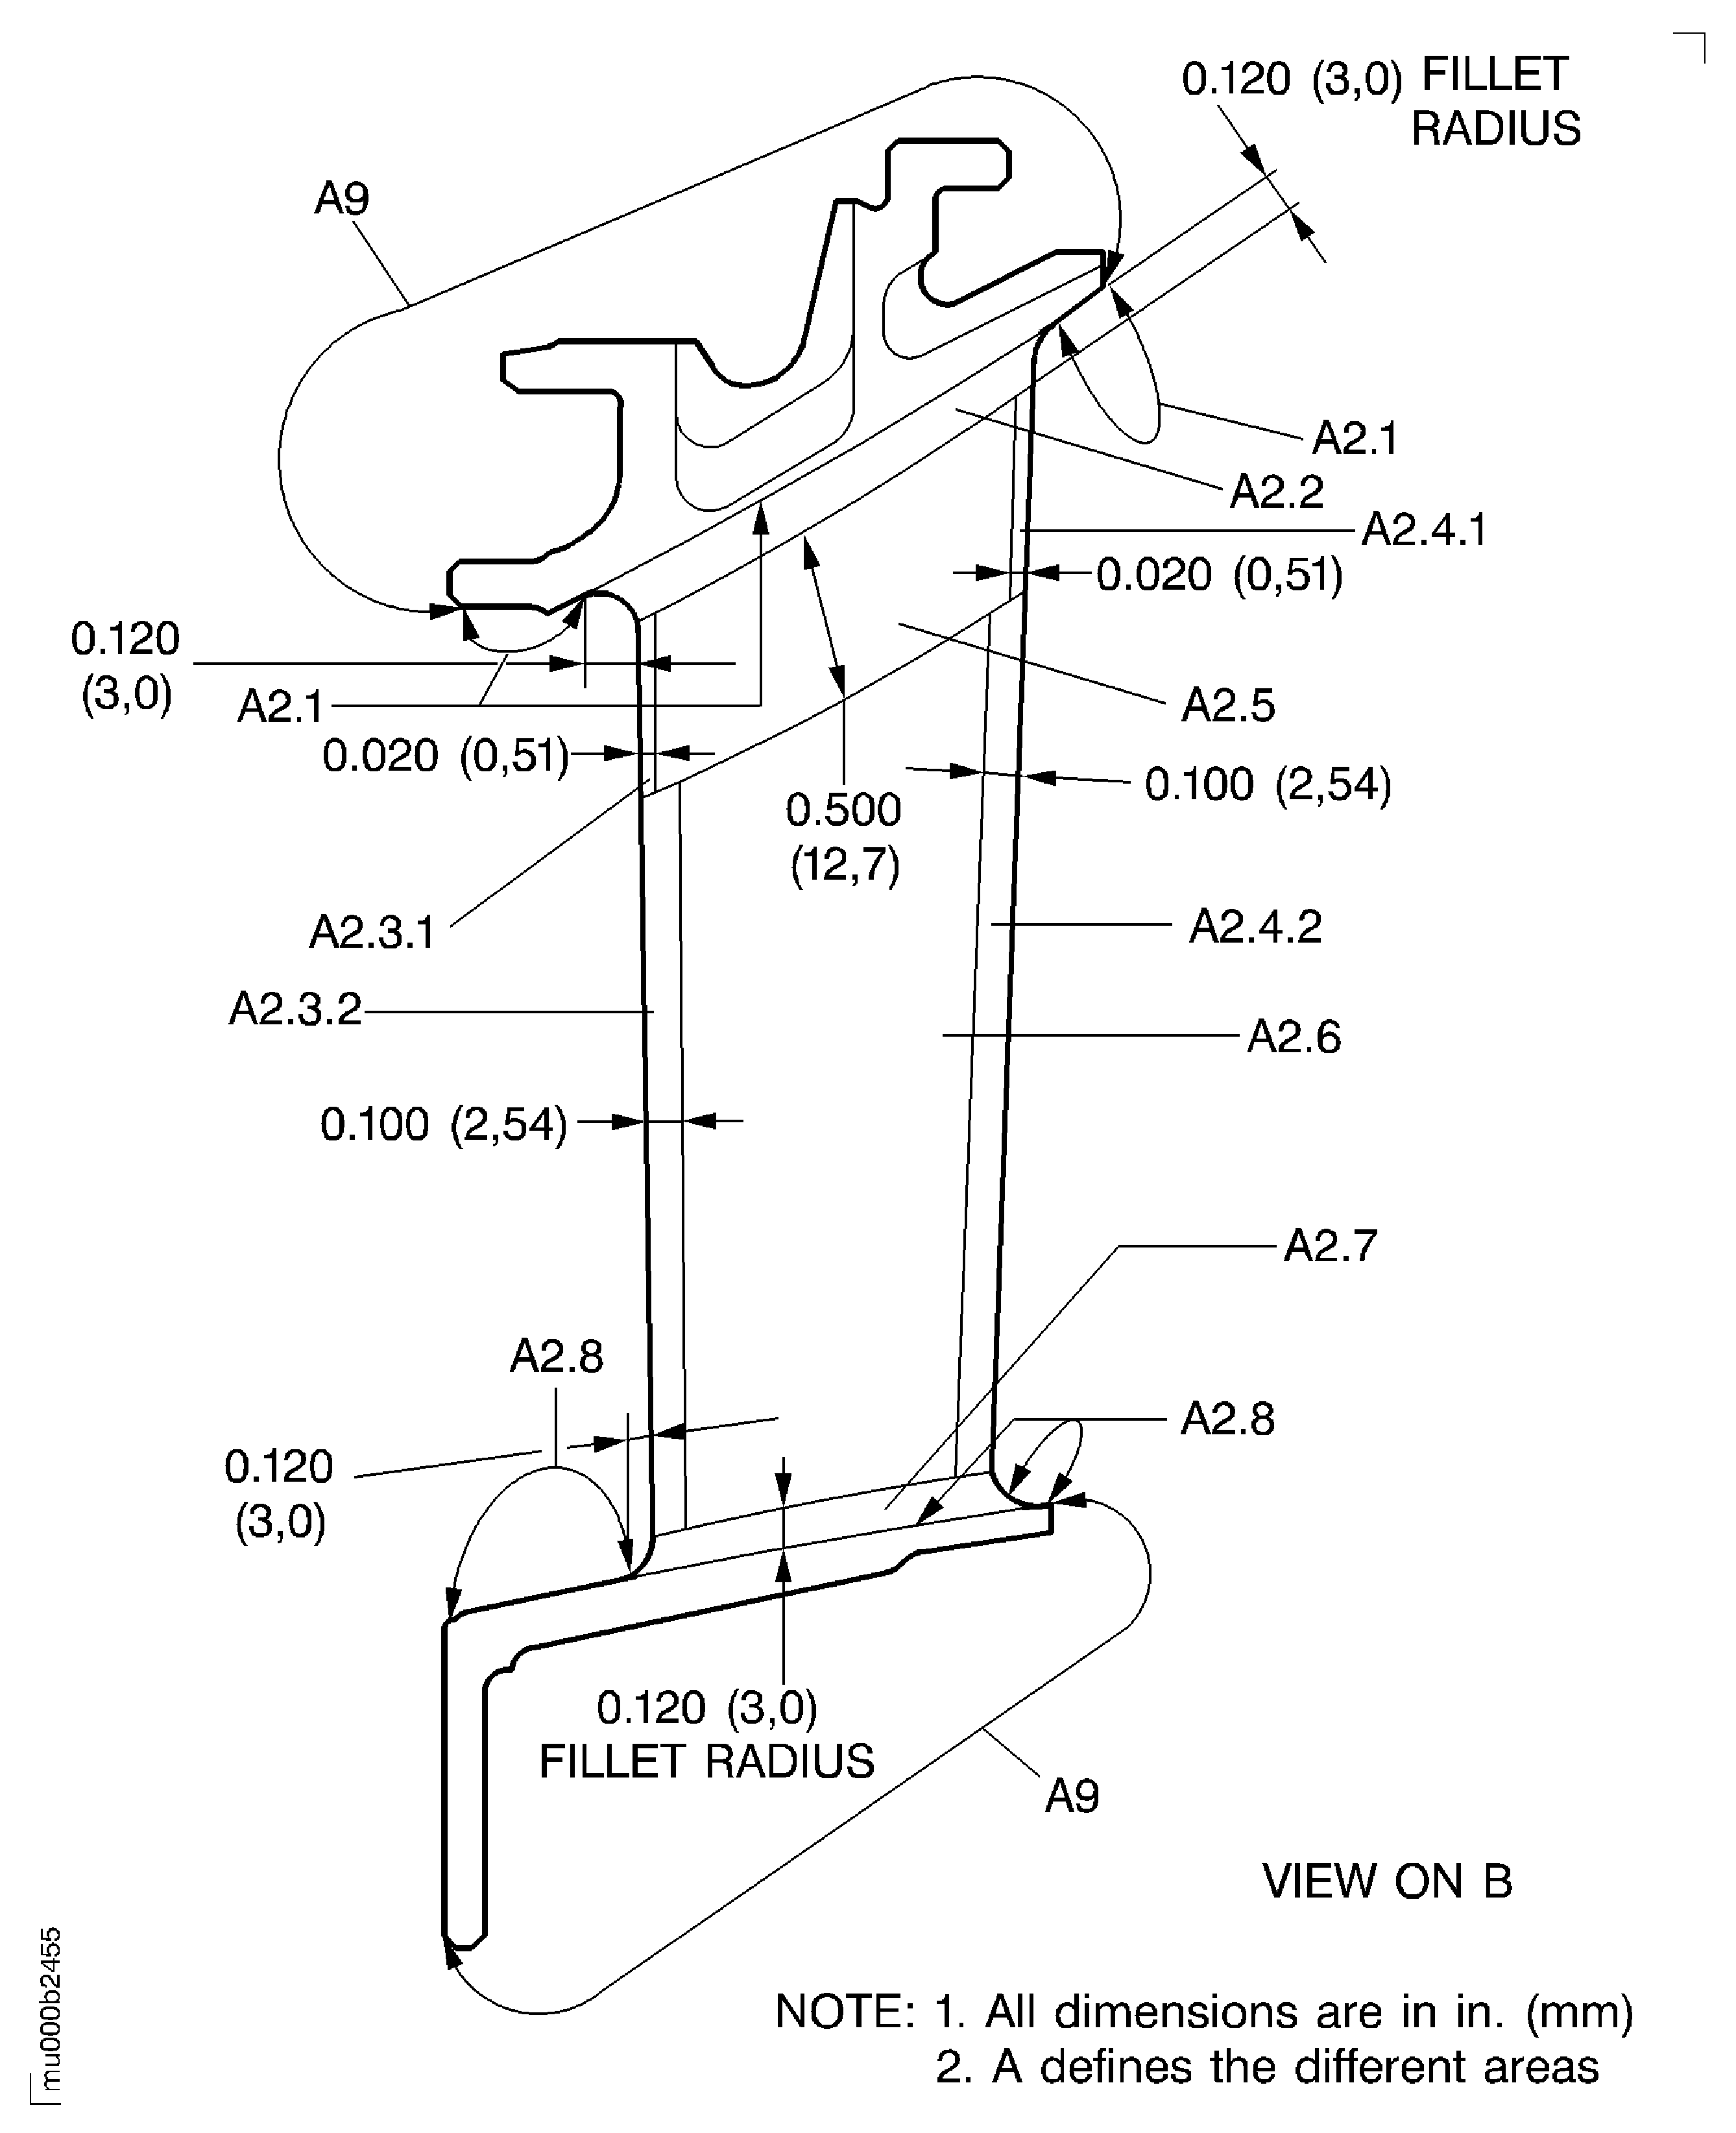
    Figure: Blend repair the stage 3 turbine blades

    Blend repair the stage 3 turbine blades
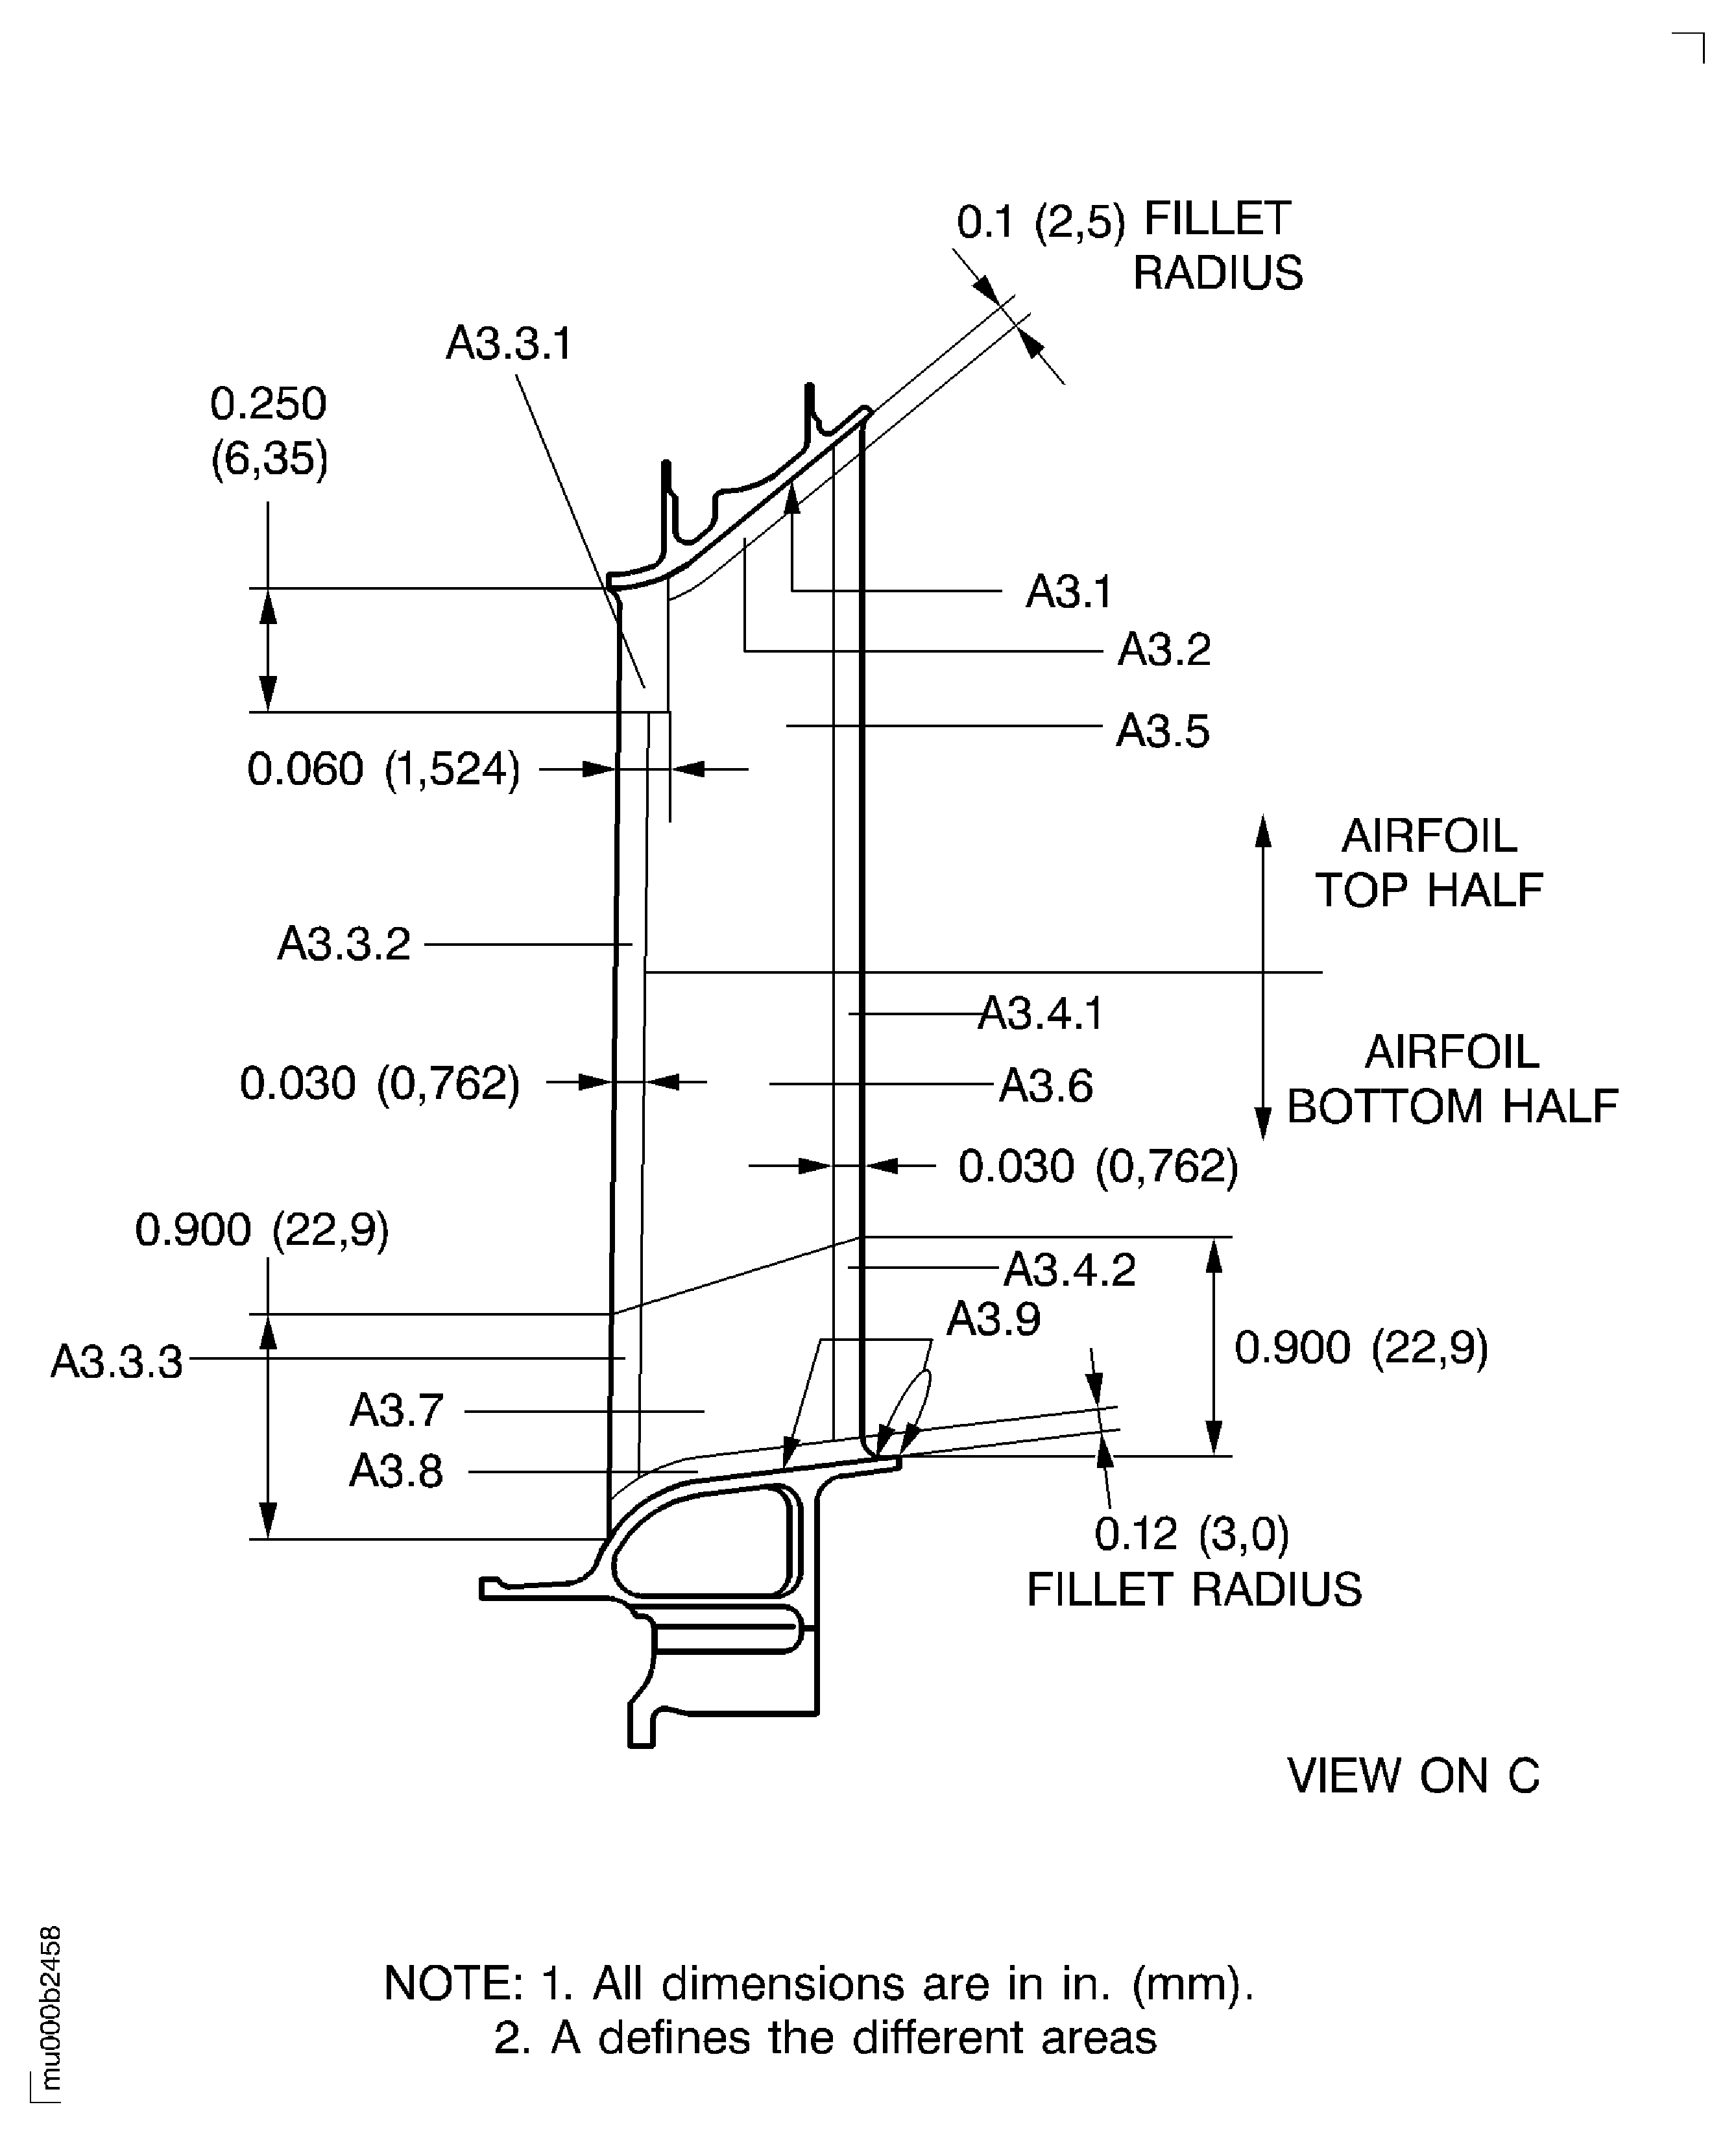
    Figure: Details for the blend repair of the stage 3 turbine vanes and blades

    Details for the blend repair of the stage 3 turbine vanes and blades
Requirements After Job Completion

Follow-On Conditions

NONE
Change Type:

Added part numbers. (98VM542B)

Manufacturer Code:LOCAL
Enterprise Name:LOCALLY SUPPLIED
Manufacturer Code:LOCAL
Tool Number:Action swivel vise
Tool Name:Action swivel vise
Manufacturer Code:LOCAL
Tool Number:Dial caliper
Tool Name:Dial caliper
Manufacturer Code:LOCAL
Tool Number:External dial caliper
Tool Name:External dial caliper
Manufacturer Code:LOCAL
Tool Number:Illuminated comparator magnifier
Tool Name:Illuminated comparator magnifier
Manufacturer Code:LOCAL
Tool Number:Radius gage set
Tool Name:Radius gage set