Export Control
EAR Export Classification: Not subject to the EAR per 15 C.F.R. Chapter 1, Part 734.3(b)(3), except for the following Service Bulletins which are currently published as EAR Export Classification 9E991: SBE70-0992, SBE72-0483, SBE72-0580, SBE72-0588, SBE72-0640, SBE73-0209, SBE80-0024 and SBE80-0025.Copyright
© IAE International Aero Engines AG (2001, 2014 - 2021) The information contained in this document is the property of © IAE International Aero Engines AG and may not be copied or used for any purpose other than that for which it is supplied without the express written authority of © IAE International Aero Engines AG. (This does not preclude use by engine and aircraft operators for normal instructional, maintenance or overhaul purposes.).Applicability
All
Common Information
TASK 72-50-10-200-009 LPT Stage 4 (Bladed) Rotor Assembly - Examine, Inspection-009
General
This TASK gives the procedure for the inspection of the stage 4 LP turbine bladed rotor.
If there are signs of overheating, refer to TASK 72-50-32-200-007-A00 (INSPECTION/CHECK-007, CONFIG) before you do this inspection.
Fig/item numbers in parentheses in the procedure agree with those used in the IPC.
The policy that is necessary for inspection is given in the SPM TASK 70-20-00-200-501.
All the parts must be cleaned where necessary before any part is examined. Refer to TASK 72-50-10-100-008 (CLEANING-008).
All parts must be visually examined for damage, corrosion and wear. Any defects that are not identified in the procedure must be referred to IAE.
Do not discard any part until you are sure there are no repairs available. Refer to the instructions in Repair before a discarded part is used again or oversize parts are installed.
Parts which should be discarded can be held although no repair is available. The repair of discarded parts could be shown to be necessary at a later date.
All parts must be examined to make sure that all the repairs have been completed satisfactorily.
The practices and processes referred to in the procedure by the TASK numbers are in the SPM.
A ** following any repair referenced in this inspection indicates that the repair is not yet published in the current revision of this manual and the part must be rejected. Contact IAE for additional information concerning FAA approved data.
Do the higher level inspection procedure as found in the applicable Chapter/Section/Subject of this manual on the damaged part(s).
It is not necessary to do the higher level inspection on parts that are serviceable to the interface inspection standard.
Reference
Refer to the SPM for data on these items.
Definition of Damage, SPM TASK 70-02-02-350-501
Record and Control of the Lives of Parts, SPM TASK 70-05-00-220-501
Inspection of Parts, SPM TASK 70-20-00-200-501
Some data on these items is contained in this TASK. For more data on these items refer to the SPM.
Method of Testing for Crack Indications
Chemical Processes
Surface Protection
Preliminary Requirements
Pre-Conditions
NONESupport Equipment
NONEConsumables, Materials and Expendables
NONESpares
NONESafety Requirements
NONEProcedure
Refer to Figure.
Disassemble rotor and reject all unlatched blades. Examine stage 4 disk for cracks. Refer to the SPM TASK 70-23-04-230-501. No cracks are permitted
NOTE
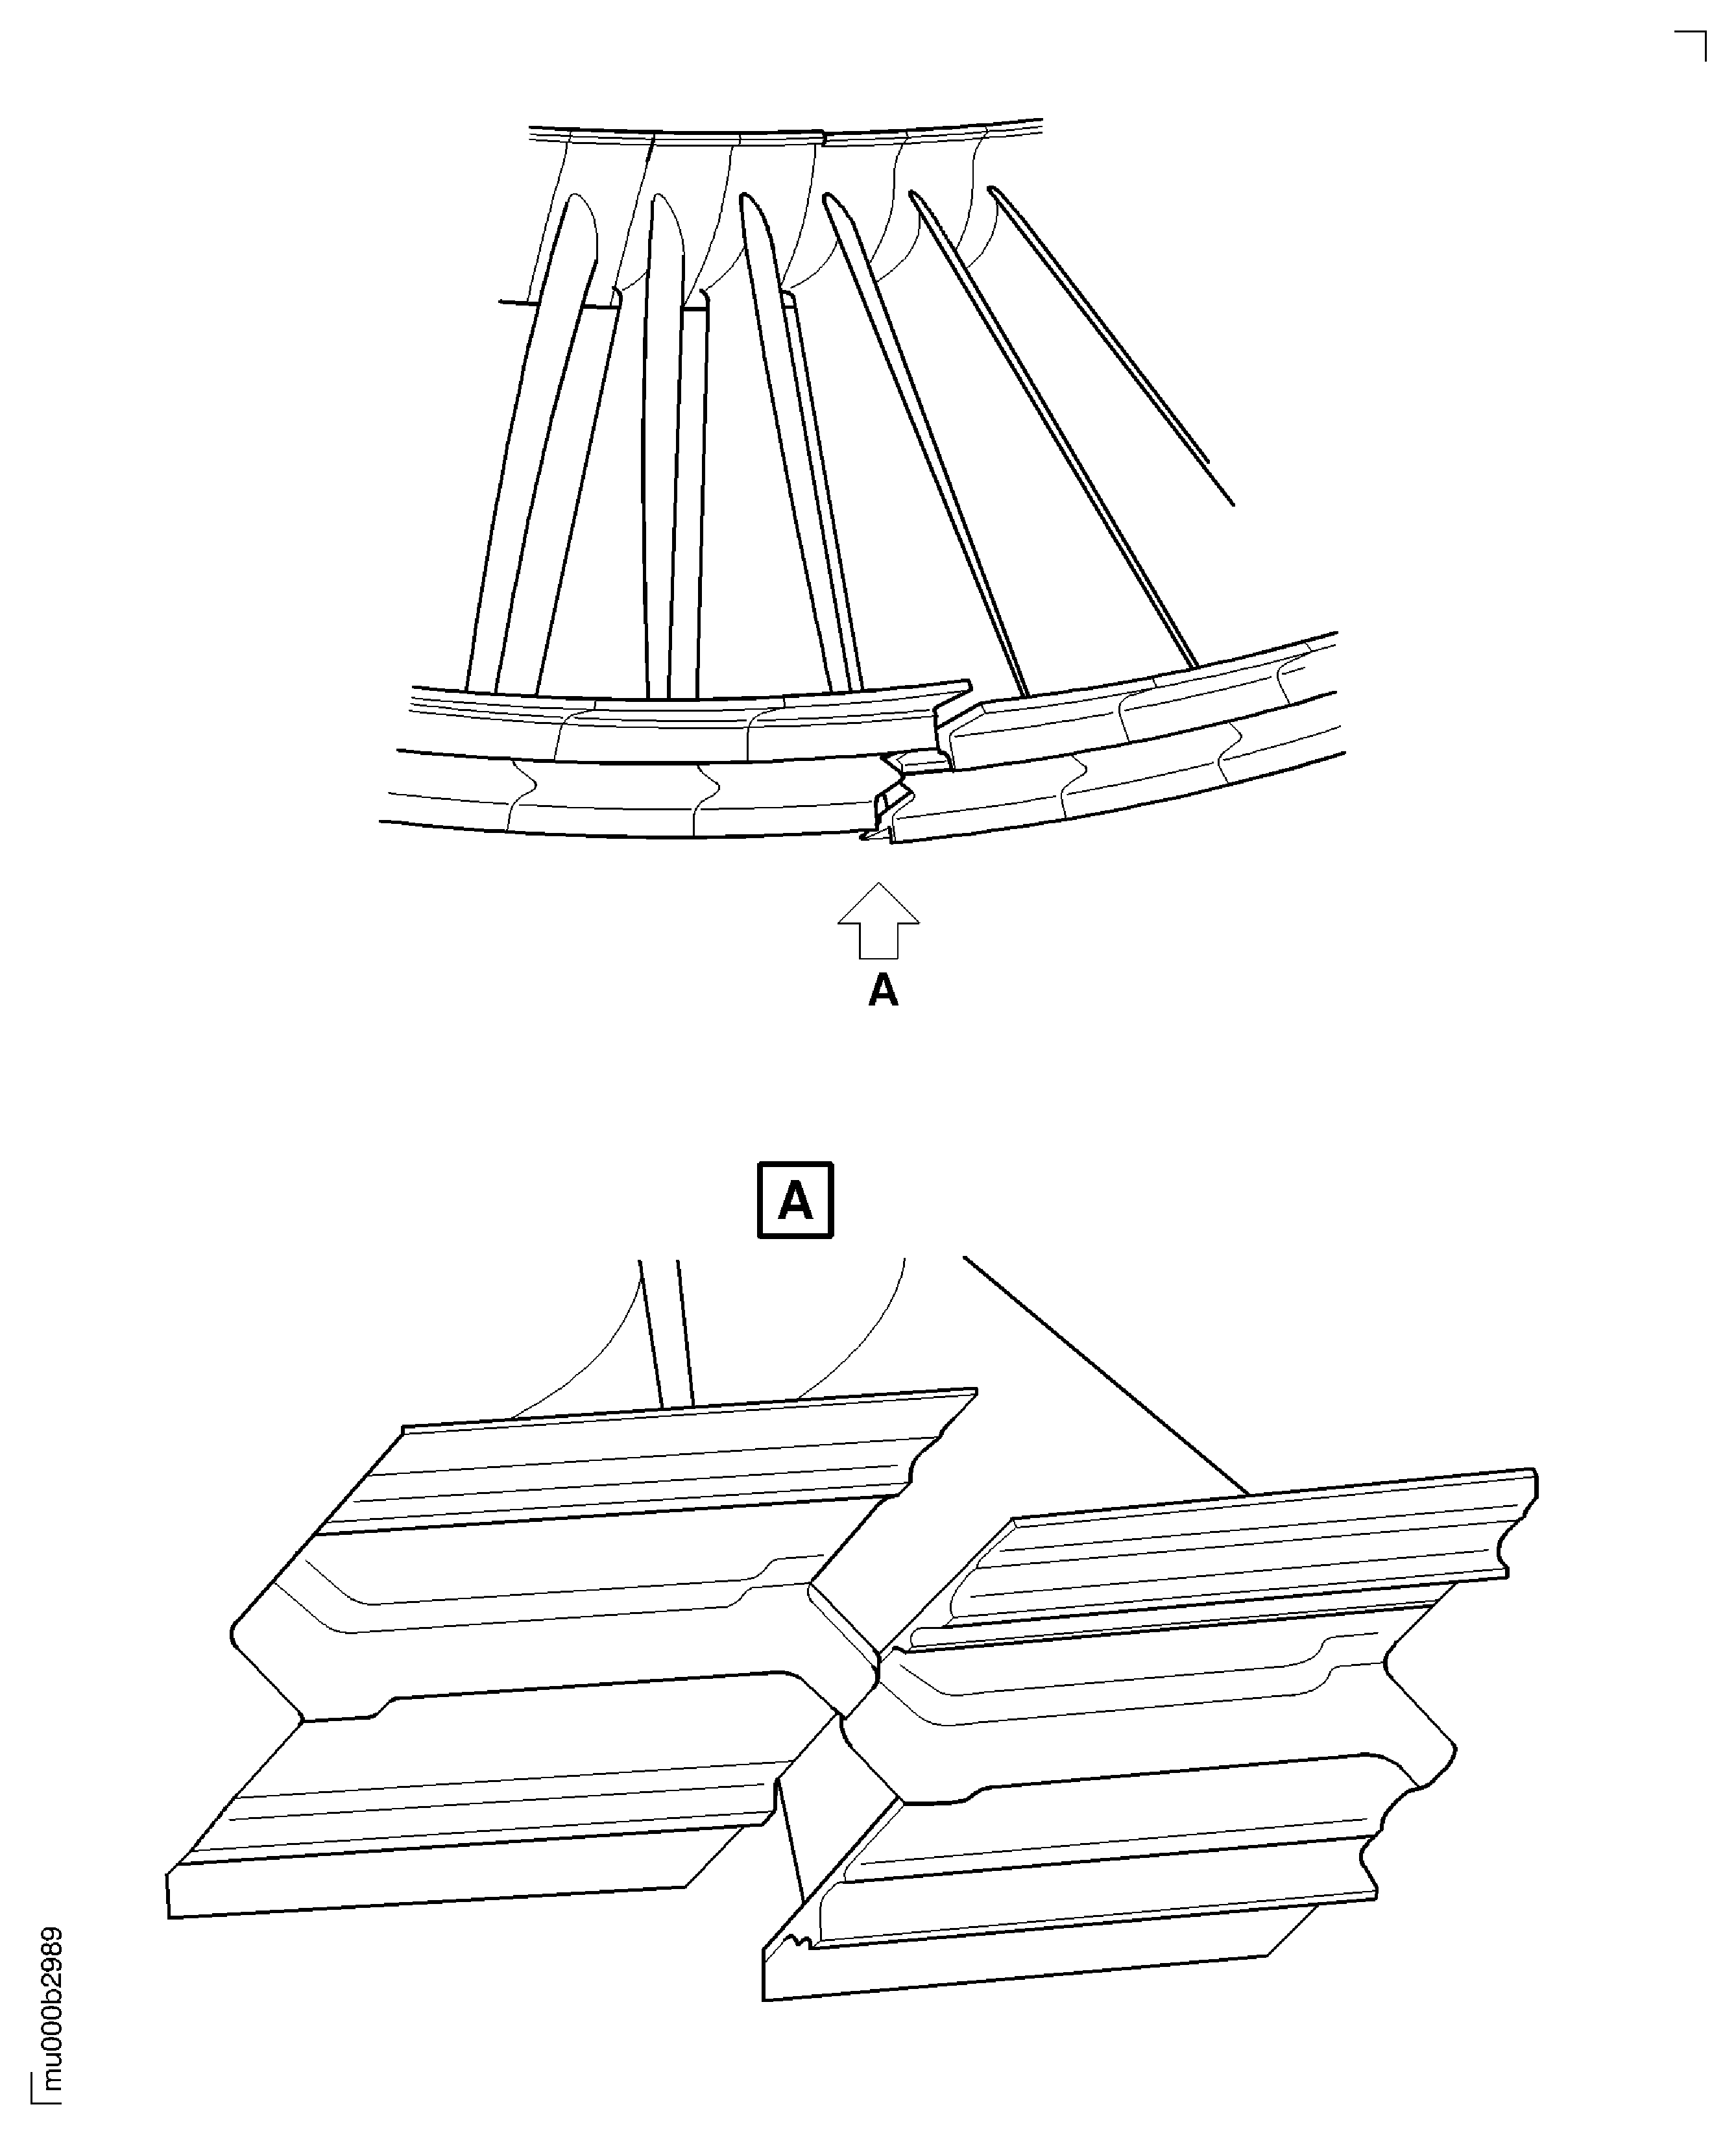
Blades are in unlatched condition if the outer shroud interlock between two blades is lost. A circumferential gap between two adjacent blades is visible at outer shrouds. Unlatched blades are axially not in the line with the adjacent blade at outer shroud and knife edge seals.
Unlatched blades
Examine all blades for signs of unlatching visually.
SUBTASK 72-50-10-220-176 Examine the Stage 4 Rotor Blades for Unlatching
Visually examine for cracks. Refer to the SPM TASK 70-21-01-220-501.
SUBTASK 72-50-10-230-058 Examine the Turbine Rotor for Cracks
This examination includes surface defects which are permitted per production standards, to prevent rejection of acceptable turbine rotor blades. All limits apply to each blade of the bladed rotor.
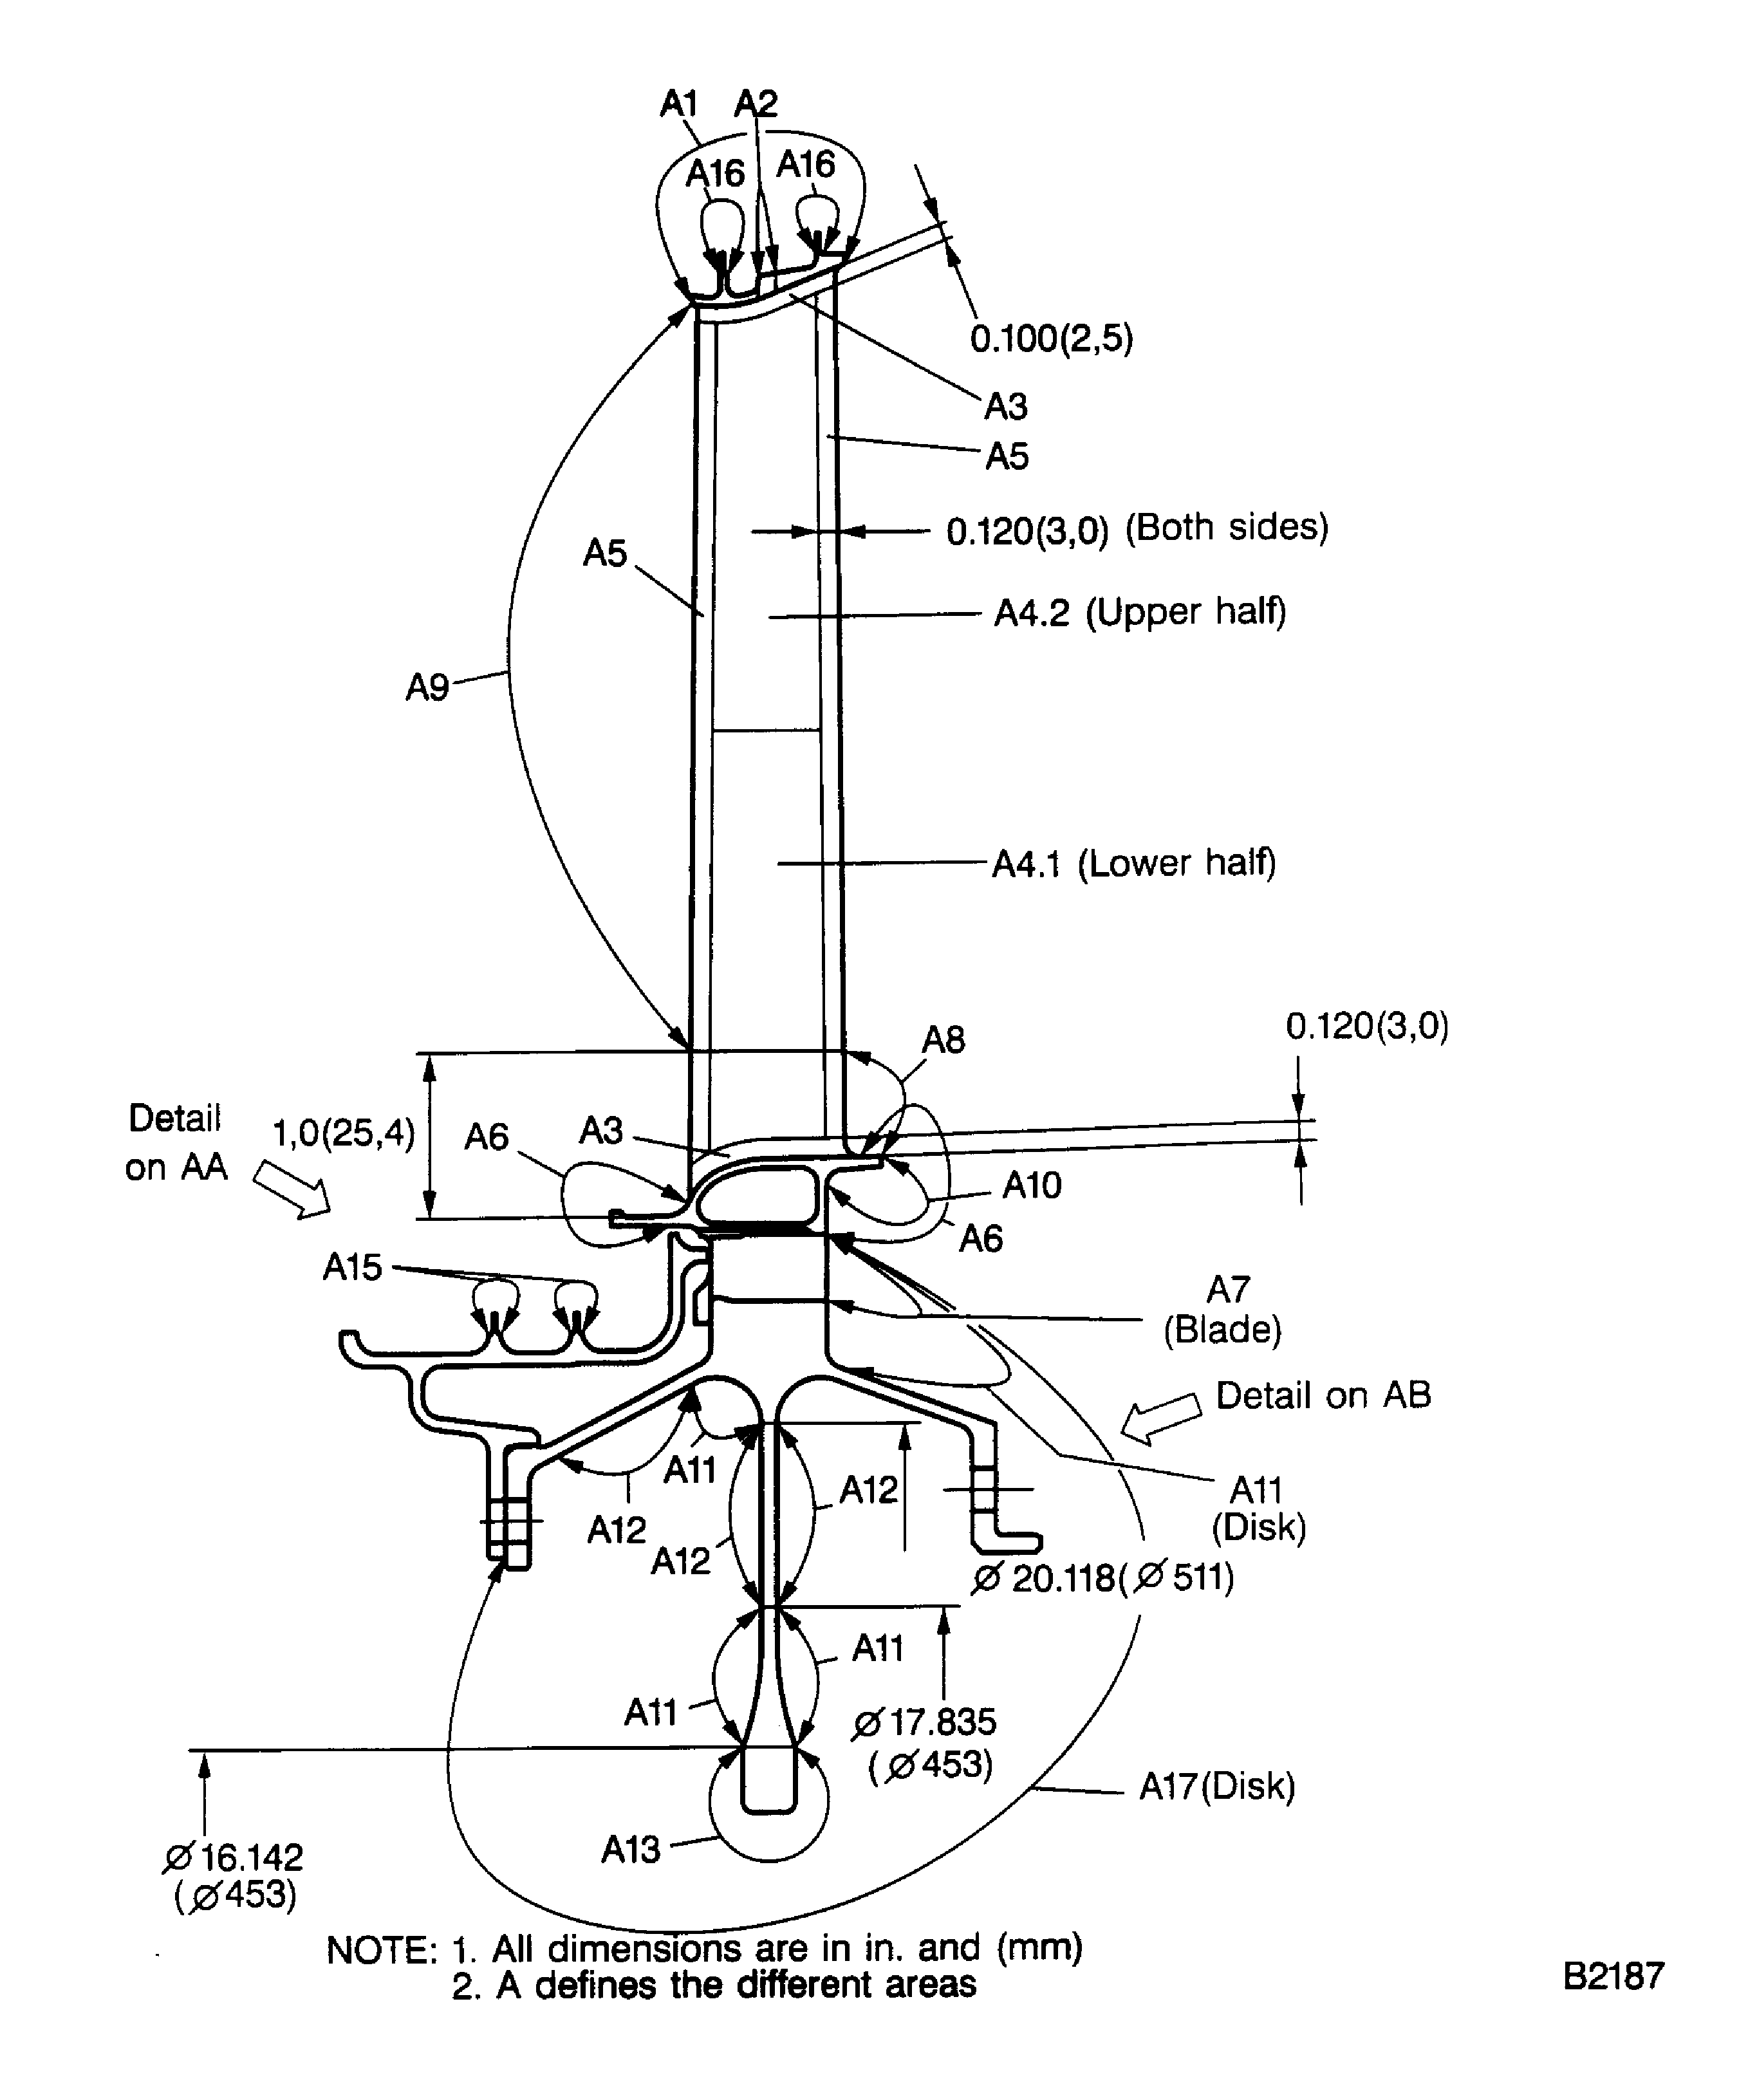
Visually examine locations A1 - A7 for surface defects. Refer to the SPM TASK 70-21-01-220-501.
Surface defects larger than 0.015in. (0.38 mm) diameter must have a bottom which can be seen.
Surface defects not larger than 0.015in. (0.38 mm) must be non bottomed.
A cluster is a defect of four or more surface defects, clearly apart, which must be contained within a 0.200in. (5.08 mm) diameter circle. In the cluster all surface defects must be 0.015in. (0.38 mm) or less.
If not differently specified, surface defects of 0.015in. (0.38 mm) or less must be ignored if they are not found in linear alignment or clusters, or in areas where 0.015in. (0.38 mm) is the maximum acceptable size.
In areas where 0.015in. (0.38 mm) is the maximum permitted size, surface defects 0.010in. (0.25 mm) or less, not in linear alignment or clusters must be ignored.
Visually examine the surface at location A1 (shroud inner and outer side, except fillet radii, hardface area and notch radii). Refer to Figure.
Visually examine the surface at location A2 (hardface areas) where possible. Refer to Figure.
Visually examine the surface at location A3 (fillet radii). Refer to Figure.
Visually examine the surface at location A4 (airfoil area, except fillet radii, leading and trailing edges). Refer to Figure.
Visually examine the surface at location A5 (leading and trailing edges). Refer to Figure.
Visually examine the surface at location A6 (inner platform, inner and outer side). Refer to Figure.
Visually examine the surface at location A7 (root). Refer to Figure.
SUBTASK 72-50-10-220-126 Examine the Turbine Rotor Blades for Surface Defects in Area A1 to A7
NOTE
Visually examine the surface at location A8 and A9 for defects. Refer to Figure.
Repair, VRS4348 TASK 72-50-10-300-003 (REPAIR-003)**
Nicked or pitted
Visually examine the surface at location A8 for defects. Refer to Figure.
Repair, VRS4348 TASK 72-50-10-300-003 (REPAIR-003)**
More than in (a)
Nicked or pitted.
Visually examine the surface at location A9 for defects. Refer to Figure.
Visually examine the surface at location A10 for defects. Refer to Figure.
SUBTASK 72-50-10-220-127 Examine the Turbine Rotor Blades for Surface Defects in Area A8, A9 and A10
NOTE
Not applicable for Rotor Blades with Part Number 3A0884.Repair, VRS4348 TASK 72-50-10-300-003 (REPAIR-003)**
More than in (a)
Nicked and dented.
Repair, VRS4348 TASK 72-50-10-300-003 (REPAIR-003)**
More than in (a)
Scratched.
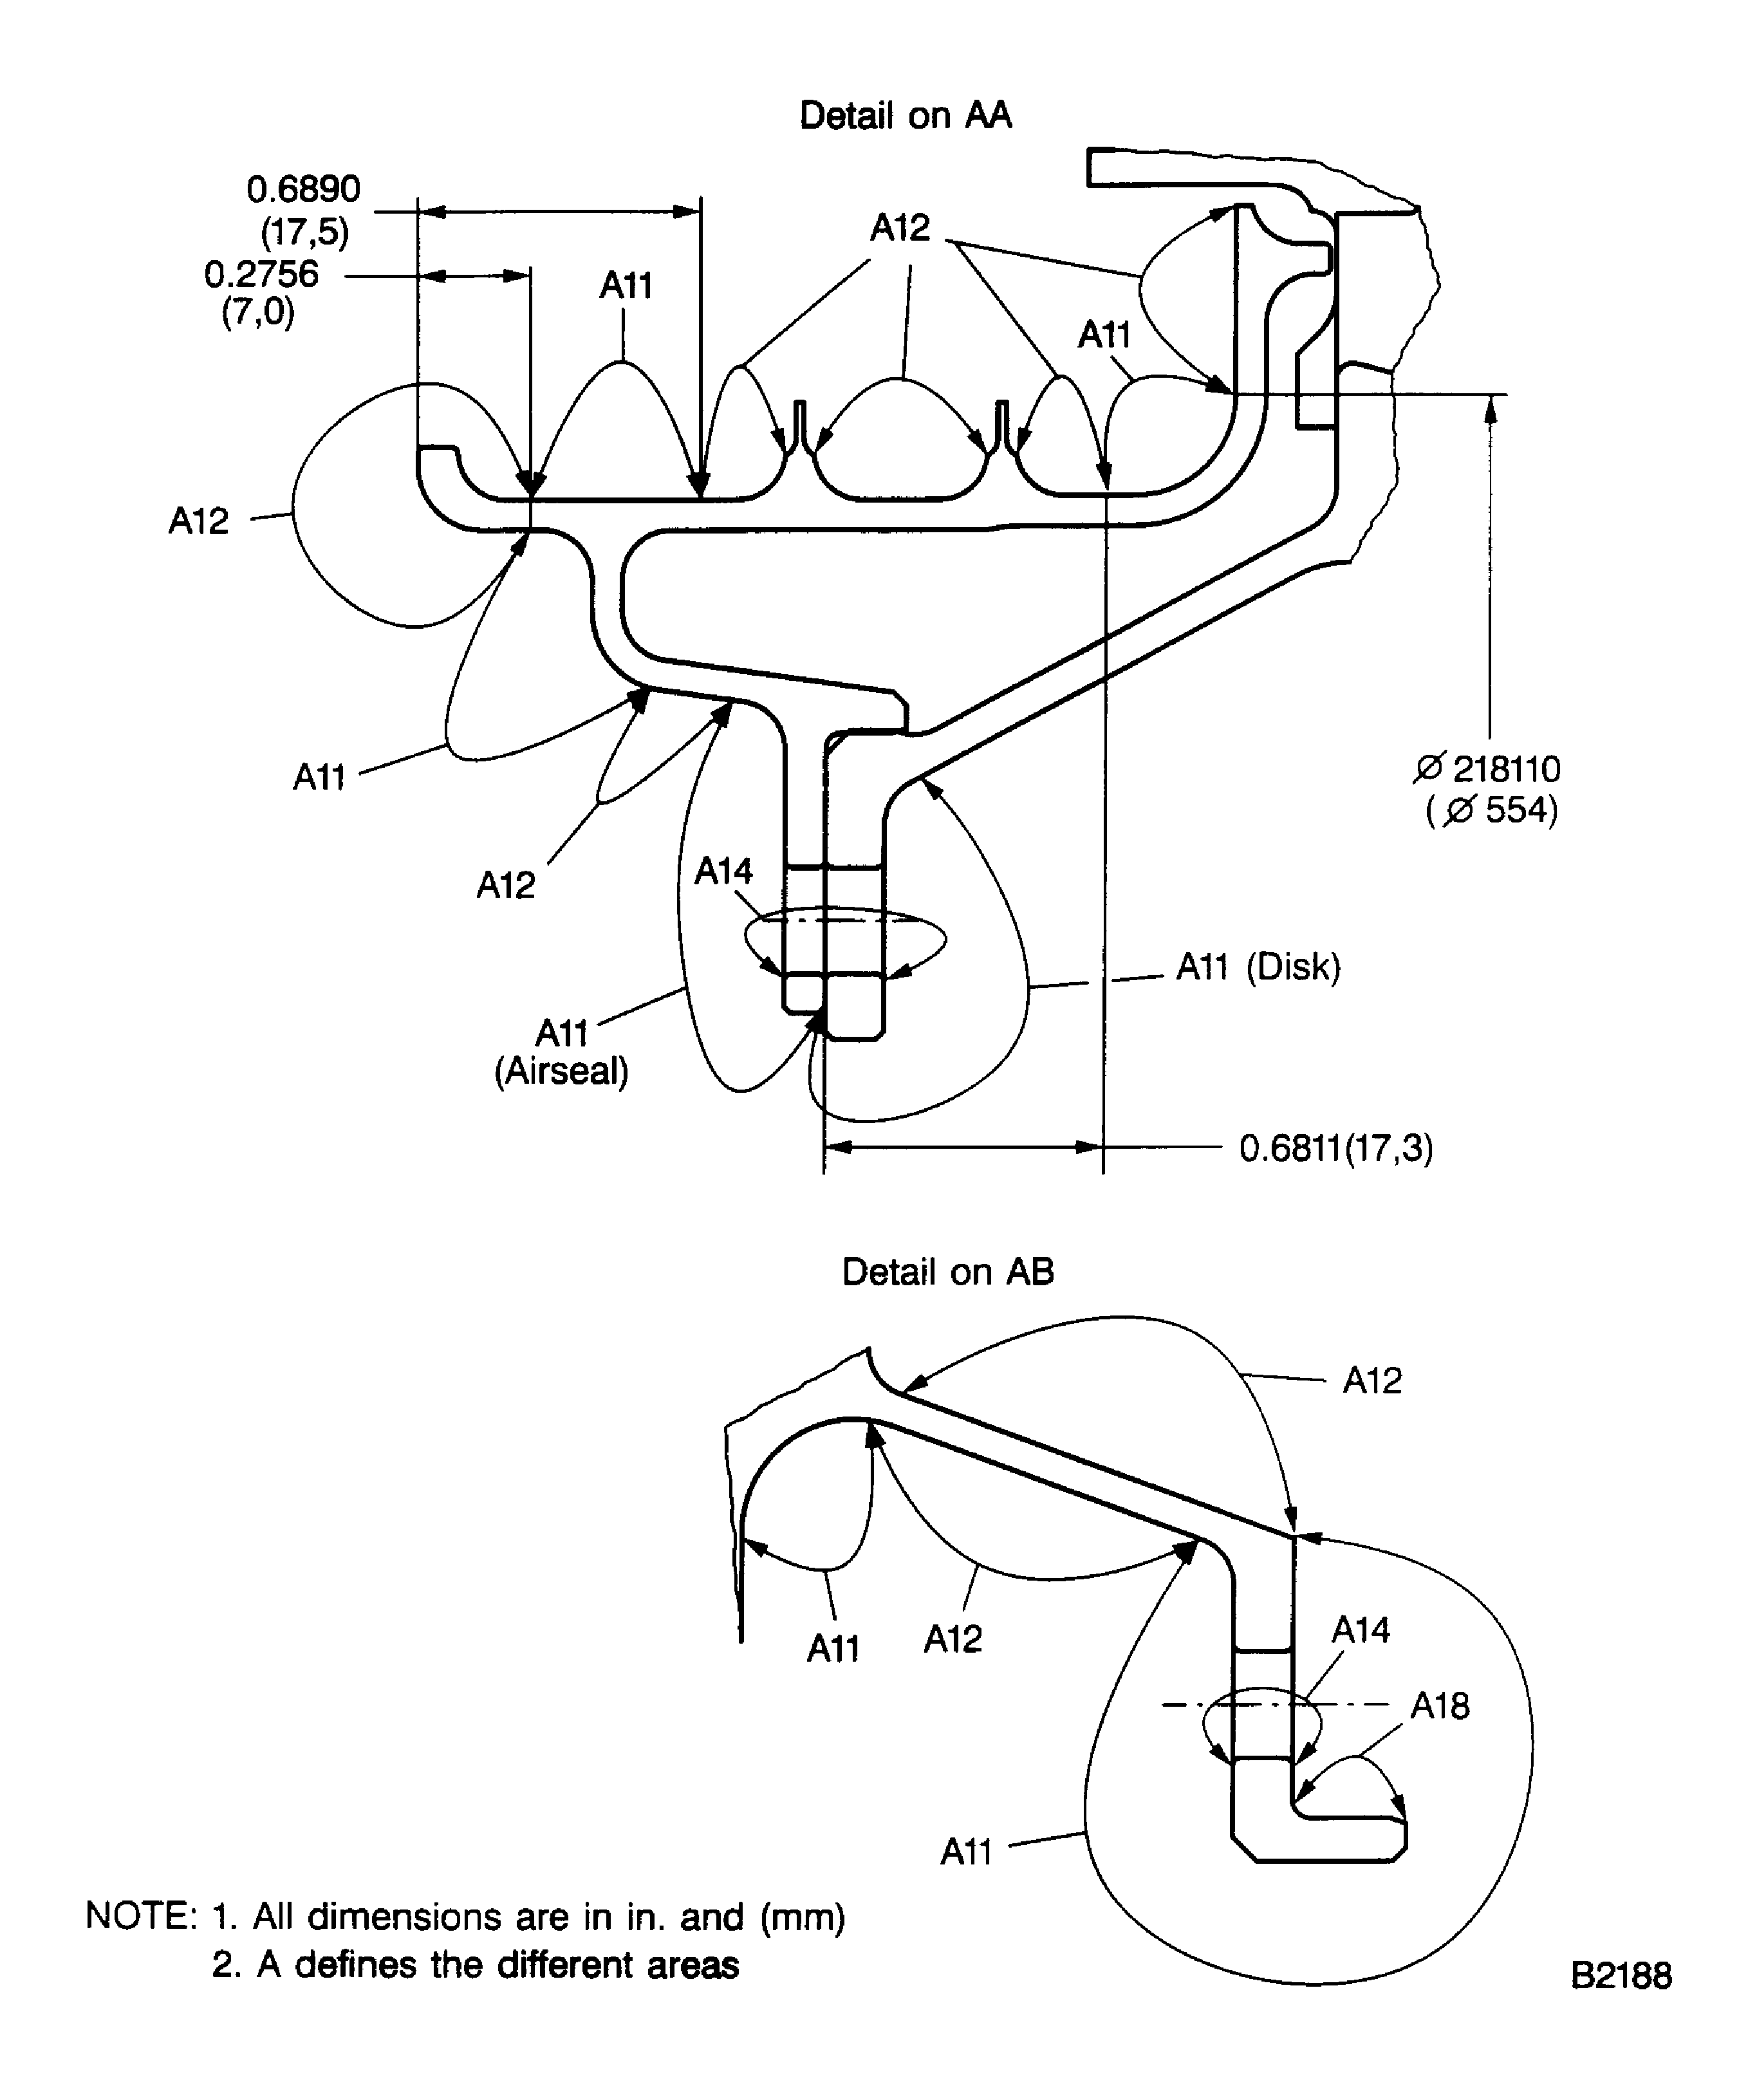
Visually examine the surface for damage in area A11. Refer to Figure.
SUBTASK 72-50-10-220-128 Examine the Turbine Rotor for Surface Damage in Area A11
Repair, VRS4348 TASK 72-50-10-300-003 (REPAIR-003)**
More than in (a)
Dented.
Repair, VRS4348 TASK 72-50-10-300-003 (REPAIR-003)**
More than in (a)
Scratched.
Visually examine the surface for damage in area A12. Refer to Figure.
SUBTASK 72-50-10-220-129 Examine the Turbine Rotor for Surface Damage in Area A12
Visually examine the surface in area A13 for damage. Refer to Figure.
SUBTASK 72-50-10-220-130 Examine the Turbine Rotor for Surface Damage in Area A13
Examine the disk for damage in area A14, (at the tie bolt holes). Refer to Figure.
SUBTASK 72-50-10-220-131 Examine the Turbine Rotor for Surface Damage in Area A14
Examine the airseal surface for damage at location A15. Refer to Figure.
SUBTASK 72-50-10-220-132 Examine Knife Edge Seals of the Turbine Rotor for Surface Damage
Examine the surface at location A16. Refer to Figure.
SUBTASK 72-50-10-220-133 Examine the Knife Edge Seals of the Turbine Rotor Blades for Surface Damage
Visually examine the rotor for corrosion at location A17. Refer to Figure.
SUBTASK 72-50-10-220-134 Examine the Turbine Rotor for Corrosion
Visually examine the turbine rotor at location A18. Refer to Figure.
SUBTASK 72-50-10-220-135 Examine the Turbine Rotor Snap Diameter for Wear
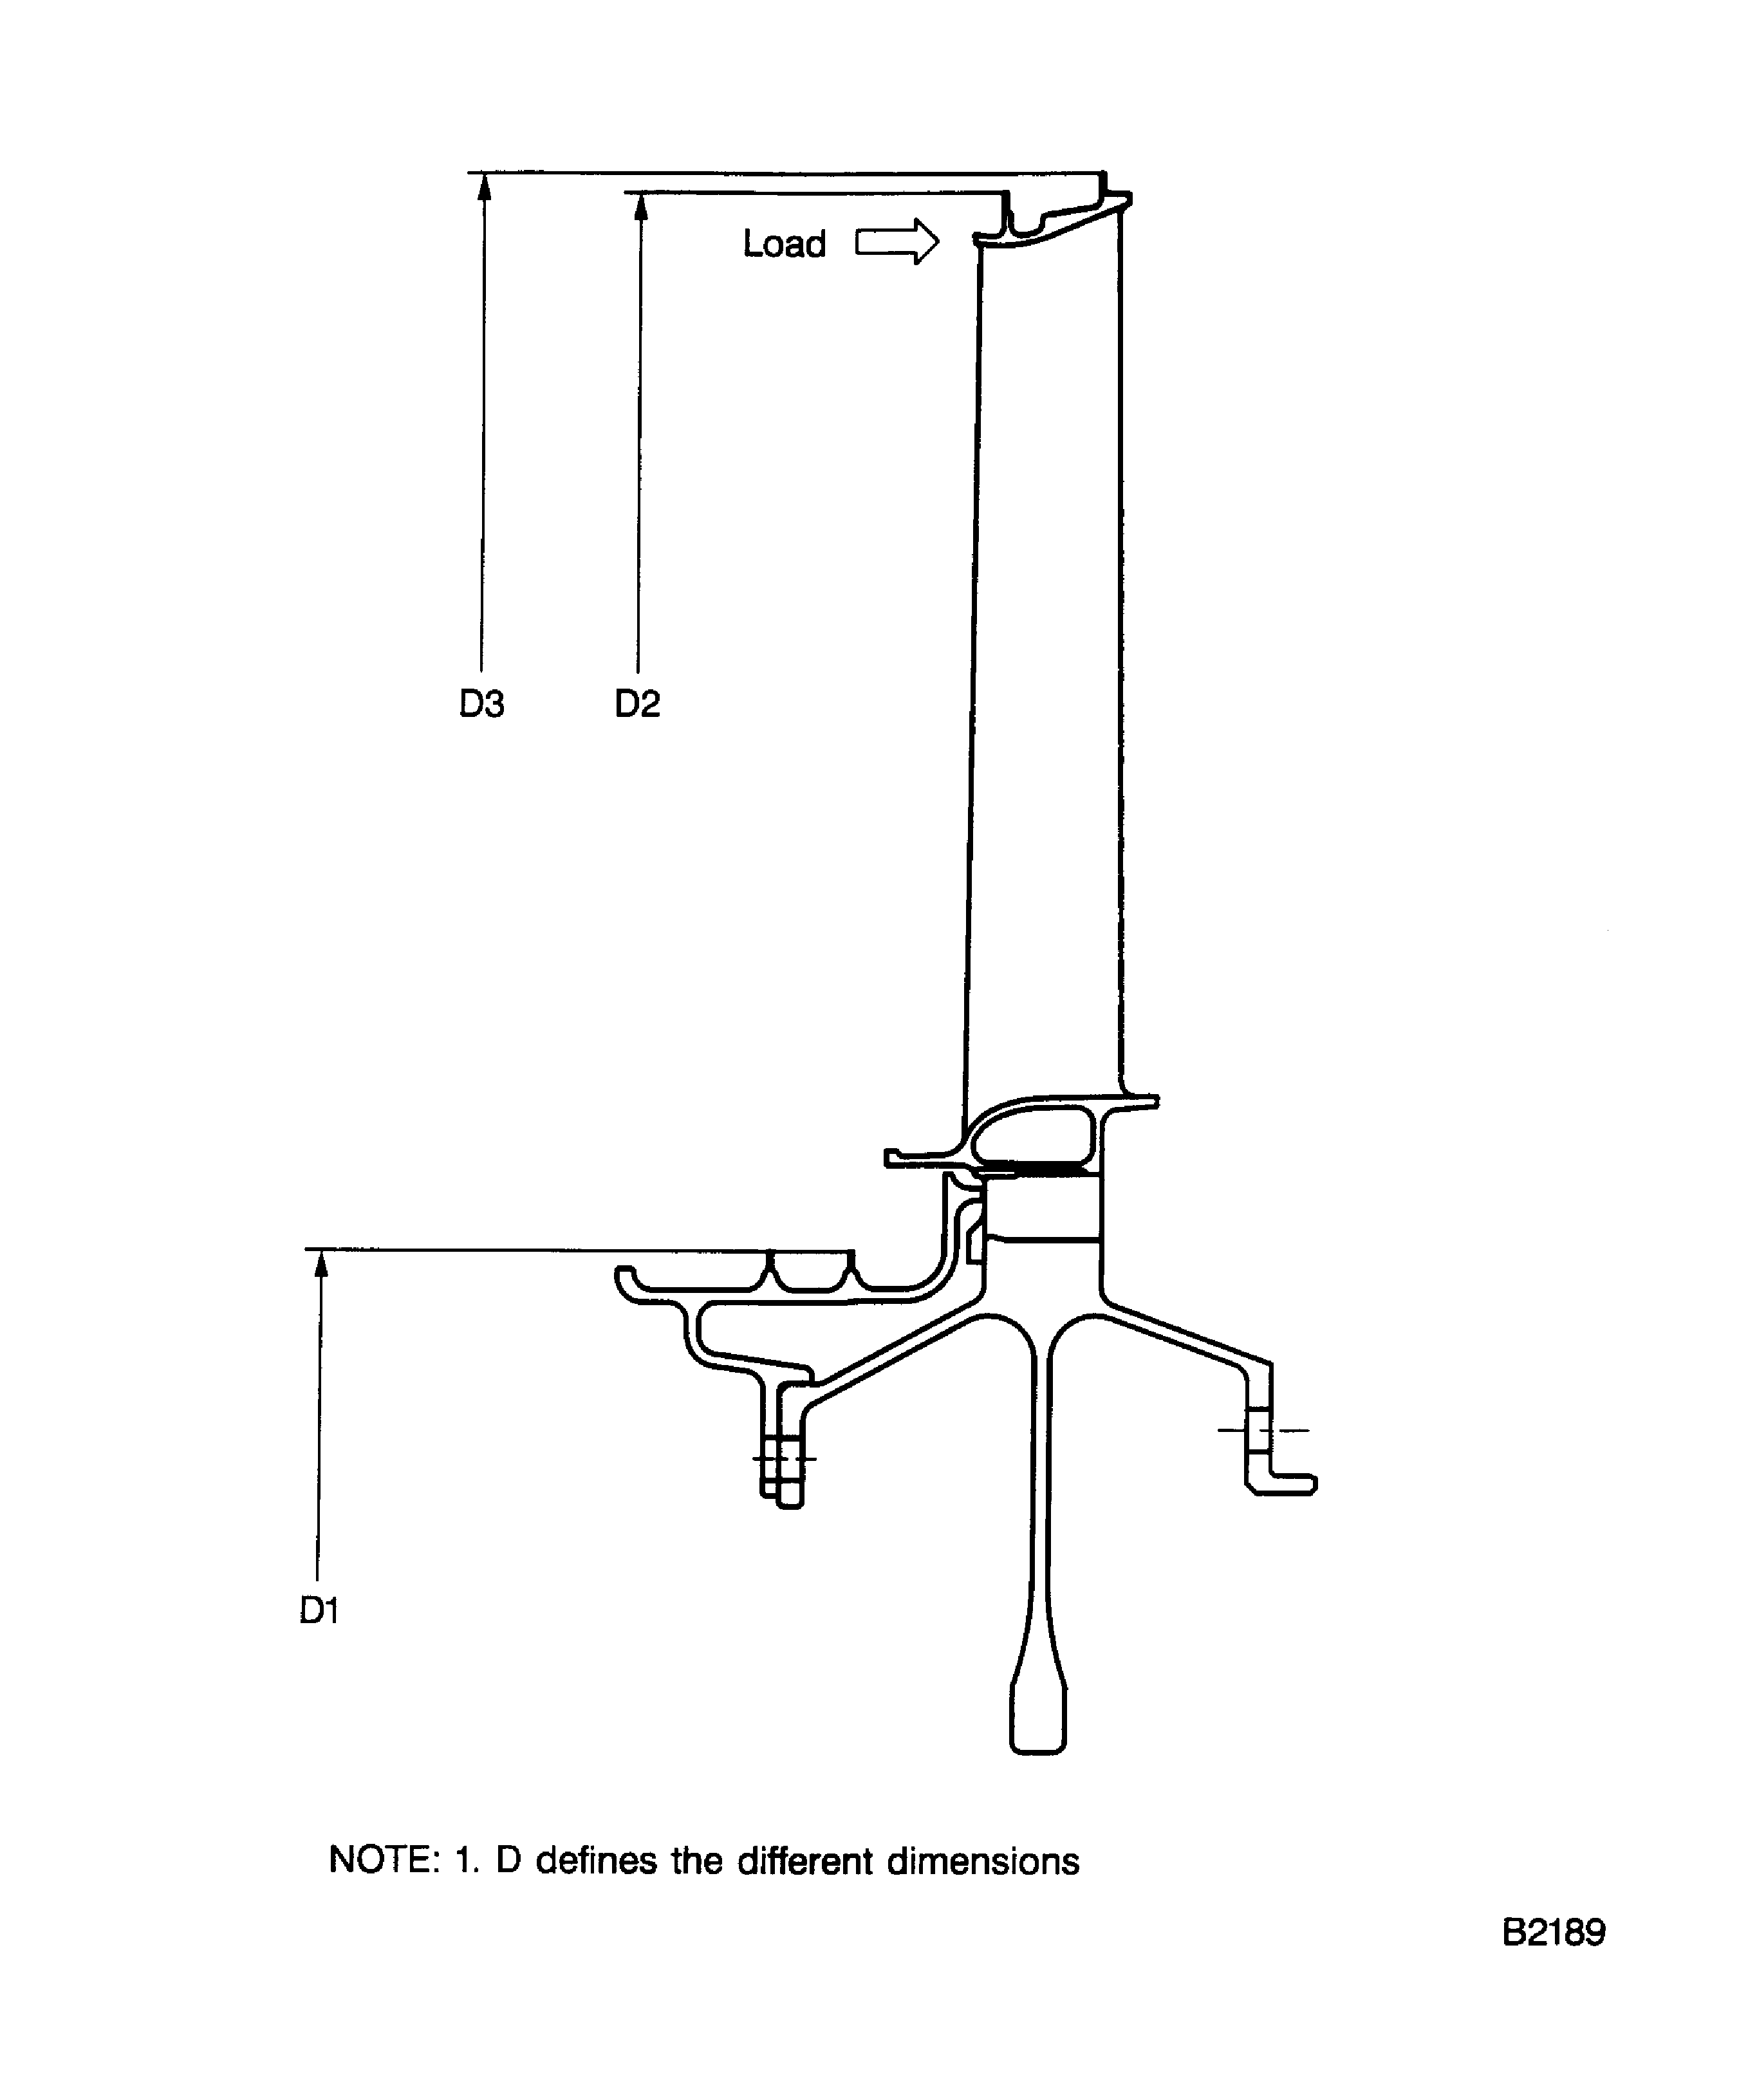
Measure the diameter D1 for wear at the seal fins at 120, 240 and 360 degrees. Get an average dimension. Refer to Figure.
Measure the diameter D2 for wear at 120, 240 and 360 degrees. Get an average dimension. Hand-load the Rotor-Blades in direction shown in Figure to get a correct result.
Measure the diameter D3 for wear at 120, 240 and 360 degrees. Get an average dimension. Hand-load the Rotor-Blades in direction shown in Figure to get a correct result.
SUBTASK 72-50-10-220-136 Examine the Turbine Rotor for Wear
Figure: Examine the LP Turbine Bladed Rotor Stage 4 Areas
Sheet 1

Figure: Examine the LP Turbine Bladed Rotor Stage 4 Areas
Sheet 2

Figure: Examine the LP Turbine Bladed Rotor Stage 4 Dimensions
Examine the LP Turbine Bladed Rotor Stage 4 Dimensions

Figure: Unlatched Blades at LP Turbine Bladed Rotor Stage 4
Unlatched Blades at LP Turbine Bladed Rotor Stage 4

