Export Control
EAR Export Classification: Not subject to the EAR per 15 C.F.R. Chapter 1, Part 734.3(b)(3), except for the following Service Bulletins which are currently published as EAR Export Classification 9E991: SBE70-0992, SBE72-0483, SBE72-0580, SBE72-0588, SBE72-0640, SBE73-0209, SBE80-0024 and SBE80-0025.Copyright
© IAE International Aero Engines AG (2001, 2014 - 2021) The information contained in this document is the property of © IAE International Aero Engines AG and may not be copied or used for any purpose other than that for which it is supplied without the express written authority of © IAE International Aero Engines AG. (This does not preclude use by engine and aircraft operators for normal instructional, maintenance or overhaul purposes.).Applicability
All
Common Information
TASK 72-50-22-200-001-B00 LPT Stage 7 Vane - Examine, Inspection-001
General
This TASK gives the procedure for the inspection of the stage 7 turbine vanes.
Fig/item numbers in parentheses in the procedure agree with those used in the IPC.
A ** following any repair referenced in this inspection indicates that the repair is not yet published in the current revision of this manual and the part must be rejected. Contact IAE for additional information concerning FAA approved data.
The policy that is necessary for inspection is given in the SPM TASK 70-20-00-200-501.
All the parts must be cleaned before any part is examined. Refer to TASK 72-50-22-100-000 (CLEANING-000).
All parts must be visually examined for damage, corrosion and wear. Any defects that are not identified in the procedure must be referred to IAE.
The procedure for those parts which must have a crack test is given in SUBTASK 72-50-22-230-088. Do the crack test before the part is visually examined.
Do not discard any part until you are sure there are no repairs available. Refer to the instructions in Repair before a discarded part is used again or oversize parts are installed.
Parts which should be discarded can be held although no repair is available. The repair of a discarded part could be shown to be necessary at a later date.
All parts must be examined to make sure that all the repairs have been completed satisfactorily.
The practices and processes referred to in the procedure by the TASK numbers are in the SPM.
Reference
Refer to the SPM for data on these items.
Definitions of Damage, SPM TASK 70-02-02-350-501
Record and Control of the Lives of Parts, SPM TASK 70-05-00-220-501
Inspection of Parts, SPM TASK 70-20-00-200-501
Some data on these items is contained in this TASK. For more data on these items refer to the SPM.
Method of Testing for Crack Indications
Chemical processes
Surface Protection
Preliminary Requirements
Pre-Conditions
NONESupport Equipment
| Name | Manufacturer | Part Number / Identification | Quantity | Remark |
|---|---|---|---|---|
| Dial indicator with ball insert | LOCAL | Dial indicator with ball insert | ||
| Dial gage | LOCAL | Dial gage | ||
| Dial indicator with needle insert | LOCAL | Dial indicator with needle insert | ||
| Small hole gage | LOCAL | Small hole gage | ||
| External micrometer | LOCAL | External micrometer | ||
| Dial caliper | LOCAL | Dial caliper |
Consumables, Materials and Expendables
NONESpares
NONESafety Requirements
NONEProcedure
Clean the parts. Refer to TASK 72-50-22-100-000 (CLEANING-000).
Repair, VRS4031 TASK 72-50-22-300-001 (REPAIR-001).
Cracks up to 0.010 in. (0.254 mm) maximum depth
More than in Step
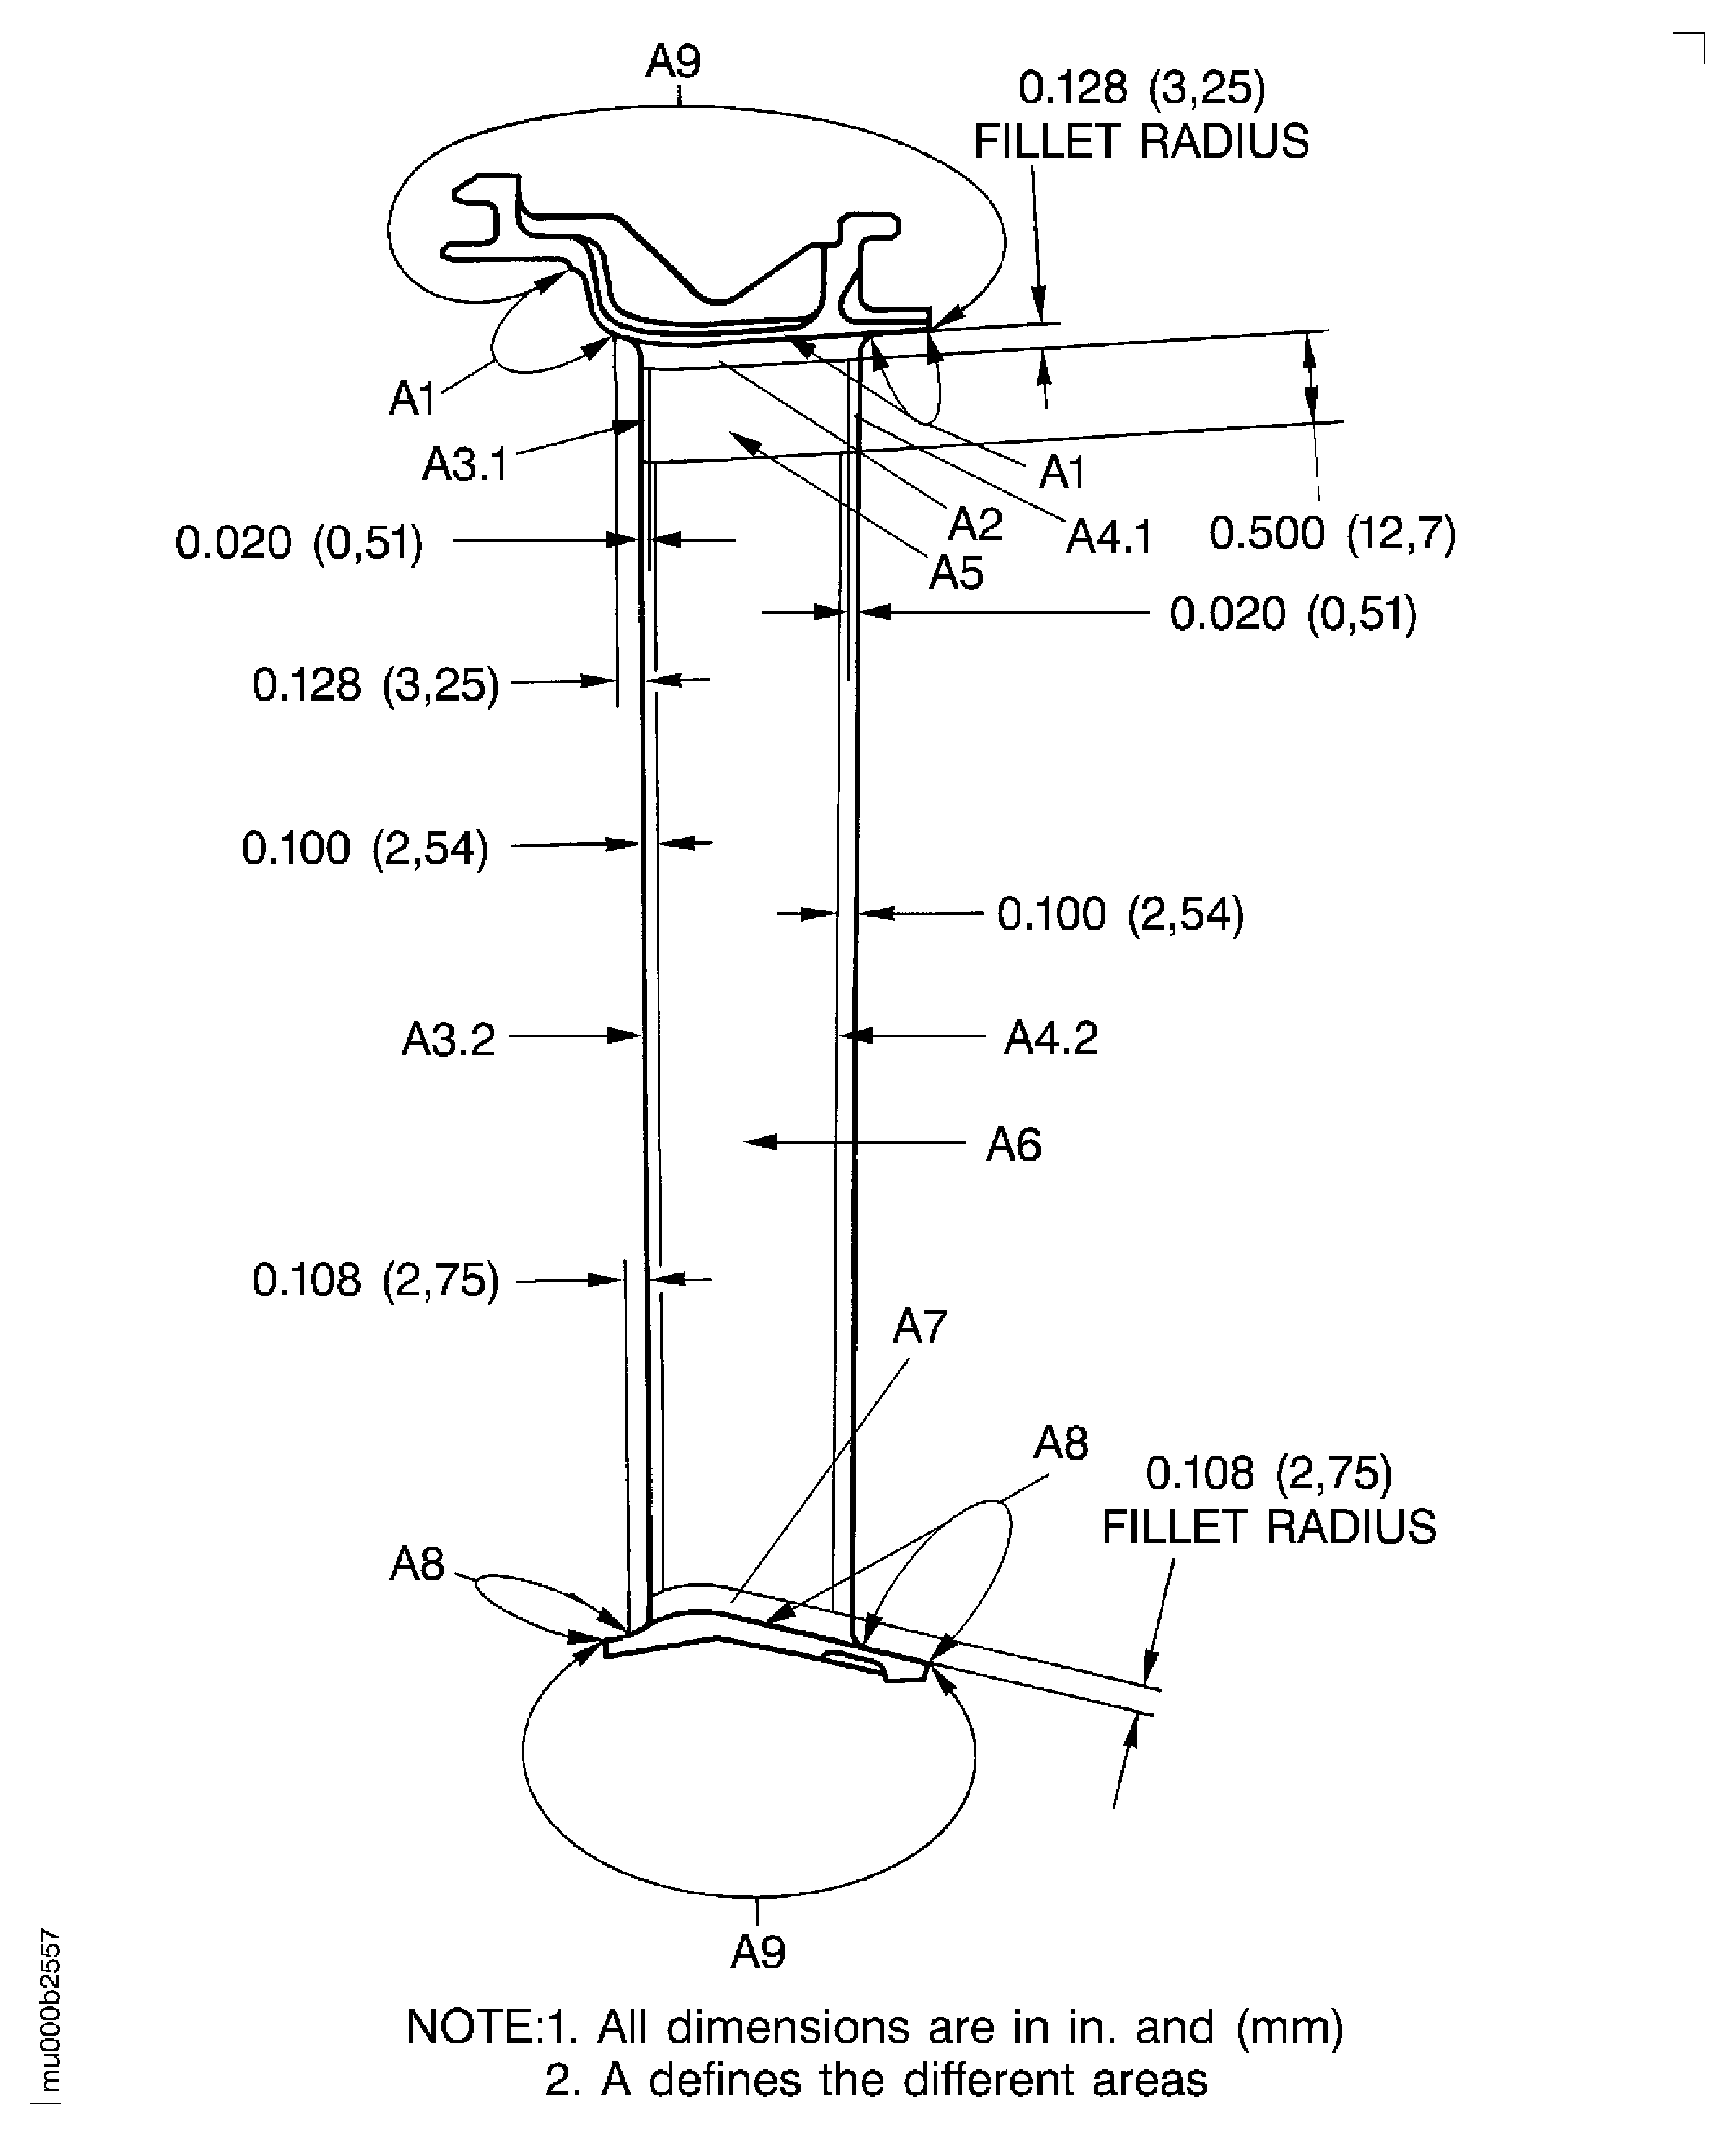
Cracked inner or outer platforms at location A9.
SUBTASK 72-50-22-230-088-001 Do a Crack Test on the Stage 7 Turbine Vanes (Fluorescent Penetrant)
Clean the parts. Refer to TASK 72-50-22-100-000 (CLEANING-000).
Repair, VRS4031 TASK 72-50-22-300-001 (REPAIR-001).
Cracks up to 0.010 in. (0.254 mm) maximum depth
More than in Step
Cracked inner or outer platform at location A9.
SUBTASK 72-50-22-230-088-002 Do a Crack Test on the Stage 7 Turbine Vanes (Fluorescent Penetrant)
Refer to Figure
Repair, VRS4031 TASK 72-50-22-300-001 (REPAIR-001).
Nicked, dented, pitted.
Examine the surface at location A1.
Repair, VRS4031 TASK 72-50-22-300-001 (REPAIR-001).
More than in Step
Nicked, dented, pitted in area A3.1.
Repair, VRS4031 TASK 72-50-22-300-001 (REPAIR-001).
Nicked, dented, pitted in area A3.2.
Examine the surface at location A3.
Repair, VRS4031 TASK 72-50-22-300-001 (REPAIR-001).
More than in Step
Nicked, dented, pitted in area A4.1.
Repair, VRS4031 TASK 72-50-22-300-001 (REPAIR-001).
Nicked, dented, pitted in area A4.2.
Examine the surface at location A4.
Repair, VRS4031 TASK 72-50-22-300-001 (REPAIR-001).
Nicked, dented, pitted.
Examine the surface at location A5.
Repair, VRS4031 TASK 72-50-22-300-001 (REPAIR-001).
Nicked, dented, pitted.
Examine the surface at location A6.
Repair, VRS4031 TASK 72-50-22-300-001 (REPAIR-001).
Nicked, dented, pitted.
Examine the surface at location A8.
Repair, VRS4031 TASK 72-50-22-300-001 (REPAIR-001).
More than in Step
Nicked, dented, pitted
Examine the surface at location A9.
SUBTASK 72-50-22-220-133 Examine the Stage 7 Turbine Vanes at Location A1 to A9 for Surface Damage
Repair, VRS4100 TASK 72-50-22-300-037 (REPAIR-037).
Any quantity unbonded from the vane
Unbonding.
Repair, VRS4100 TASK 72-50-22-300-037 (REPAIR-037).
More than in Step
Worn.
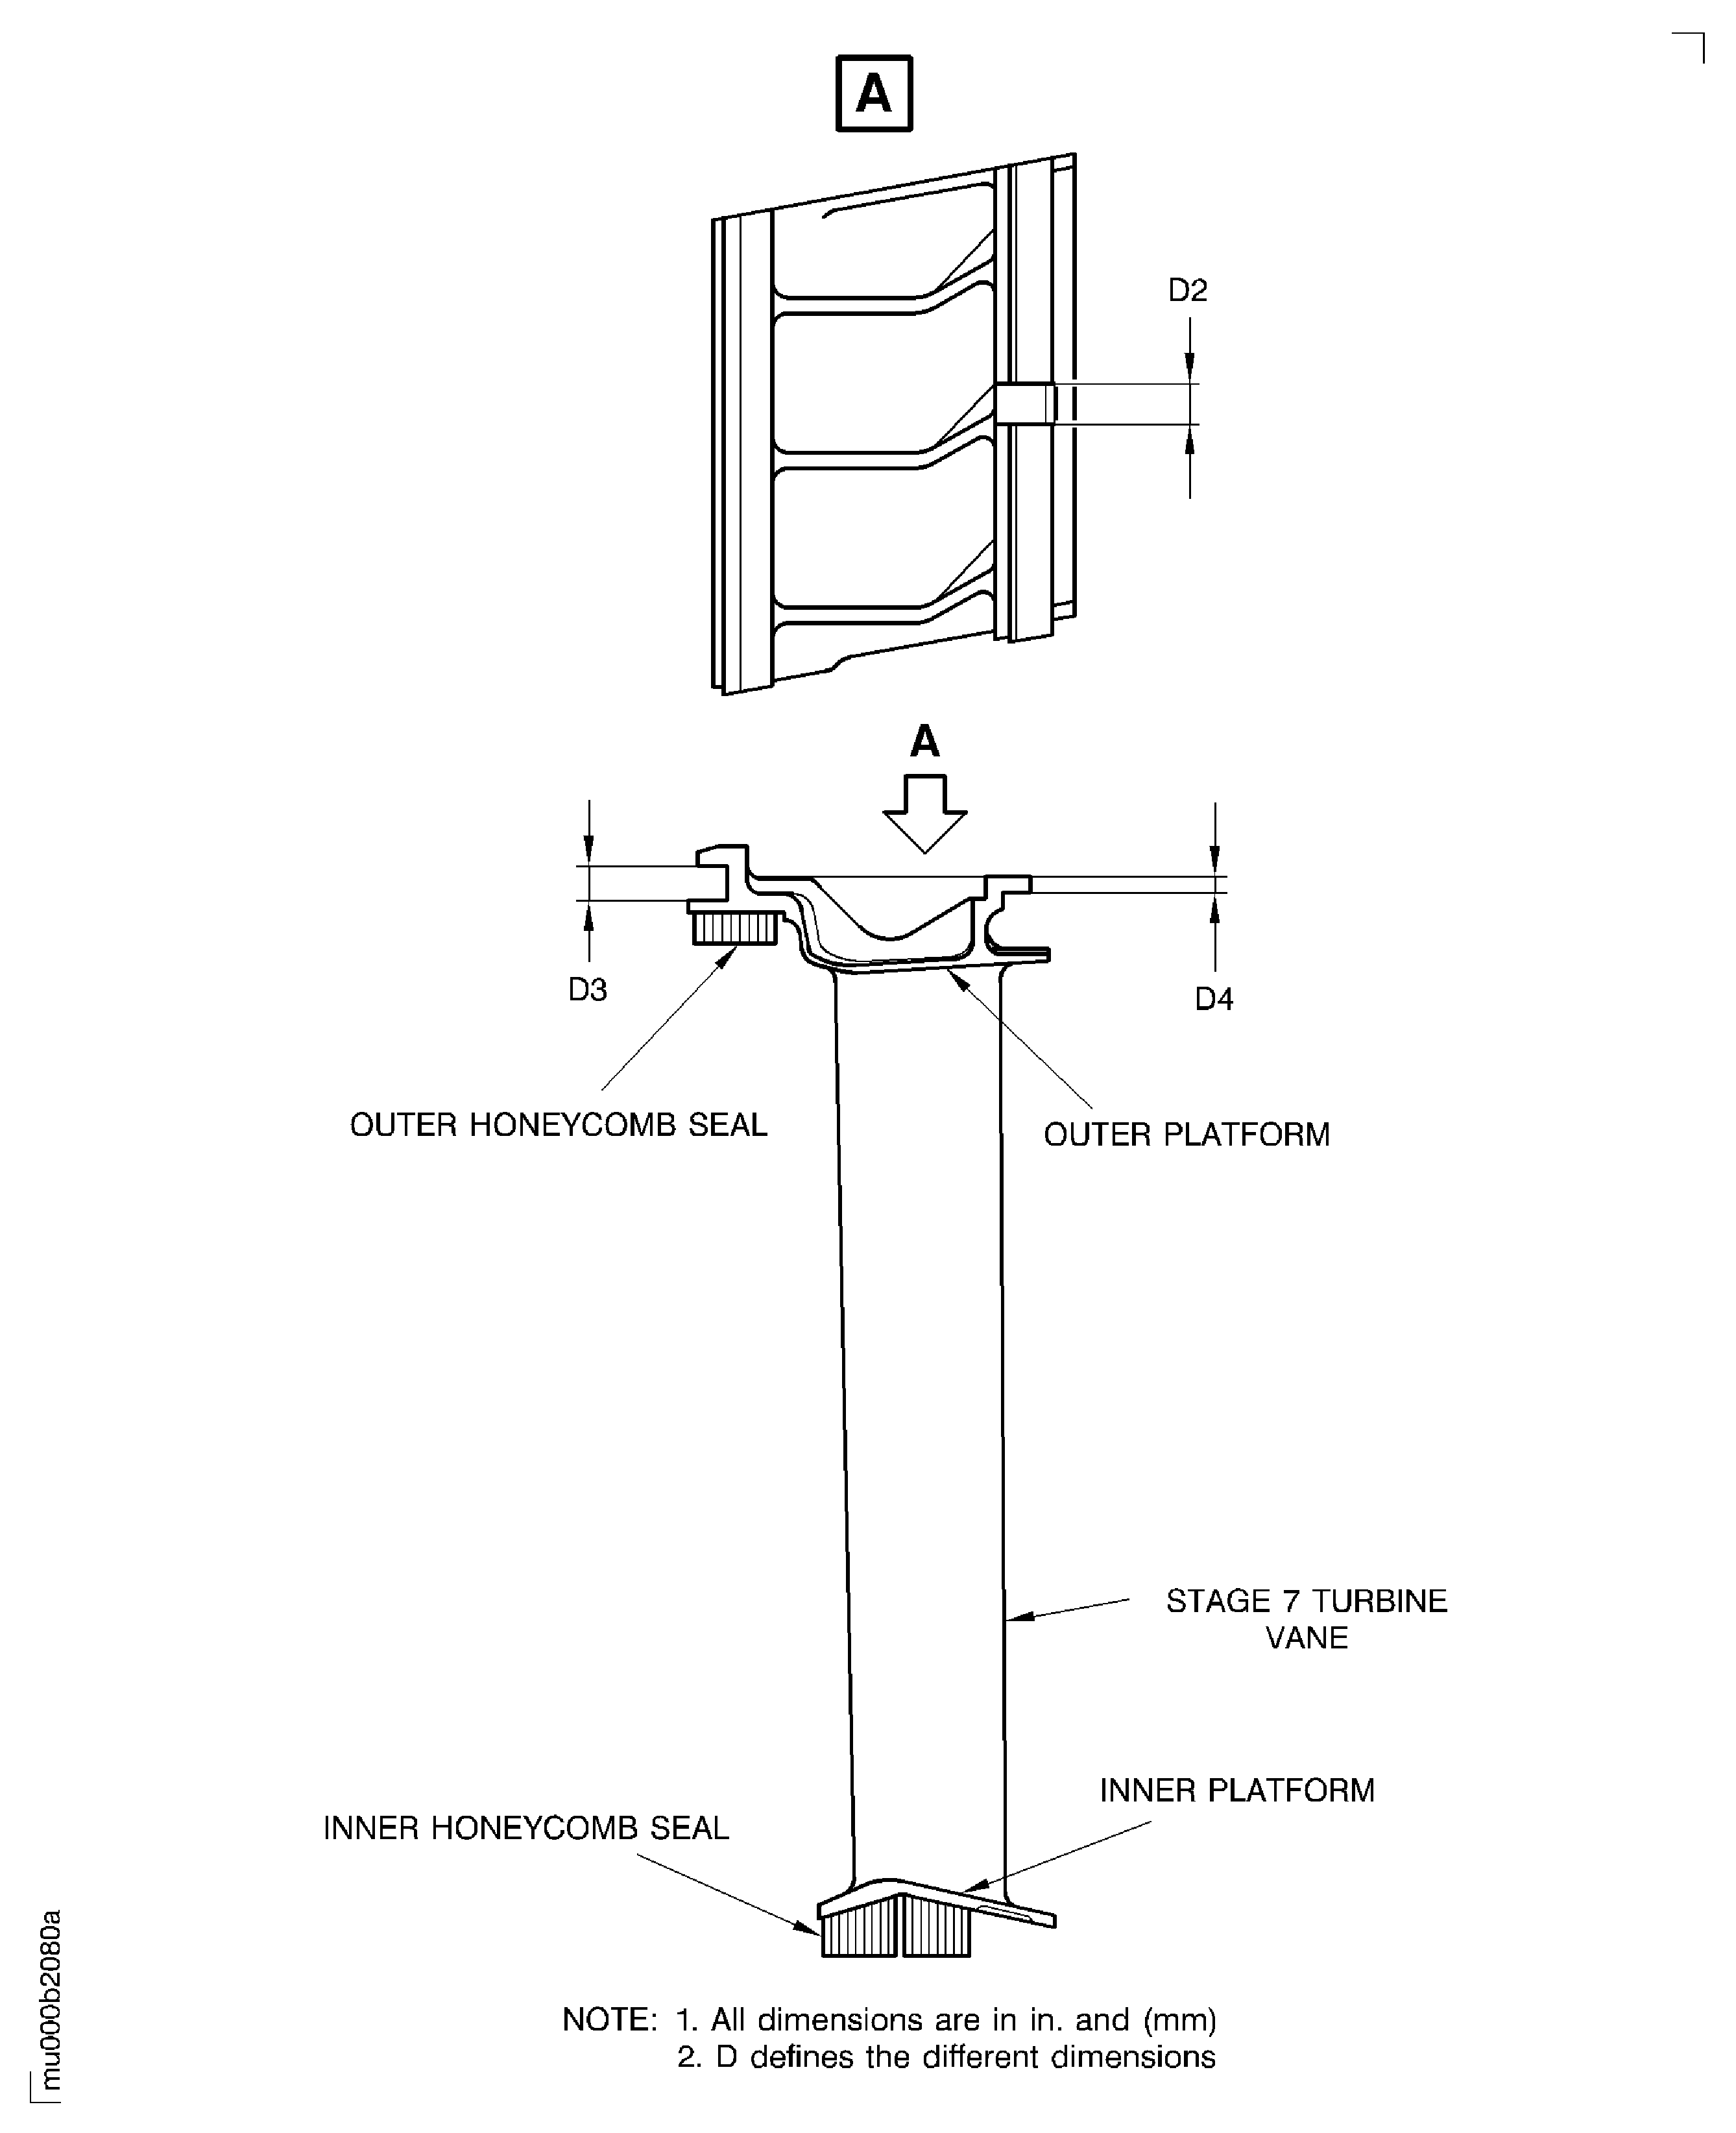
Visually and dimensionally examine. Use dial gage, dial gage magnetic stand, dial indicator with ball insert and dial caliper.
SUBTASK 72-50-22-220-134 Examine the Stage 7 Turbine Vanes Inner Honeycomb Seal
Repair, VRS4106 TASK 72-50-22-300-038 (REPAIR-038).
Any quantity unbonded from the vane
Unbonding.
Repair, VRS4106 TASK 72-50-22-300-038 (REPAIR-038).
More than in Step
Worn.
Visually and dimensionally examine. Use dial gage, dial indicator with ball insert and dial caliper.
SUBTASK 72-50-22-220-135 Examine the Stage 7 Turbine Vanes Outer Honeycomb Seal
More than in Step
Fretted.
Dimensionally examine. Use dial gage and dial indicator with needle insert.
SUBTASK 72-50-22-220-137 Examine the Inner and the Outer Platform End faces of the Stage 7 Turbine Vanes for Wear
Refer to Figure
Repair, VRS4108 TASK 72-50-22-300-039 (REPAIR-039).
Other than in Step
Worn.
Dimensionally examine at location D2. Use dial caliper.
SUBTASK 72-50-22-220-138 Examine the Stage 7 Turbine Vanes at Location D2 for Wear
Figure: Examine the stage 7 turbine vanes
Examine the stage 7 turbine vanes

Figure: Examine the stage 7 turbine vanes
Examine the stage 7 turbine vanes

