Export Control
EAR Export Classification: Not subject to the EAR per 15 C.F.R. Chapter 1, Part 734.3(b)(3), except for the following Service Bulletins which are currently published as EAR Export Classification 9E991: SBE70-0992, SBE72-0483, SBE72-0580, SBE72-0588, SBE72-0640, SBE73-0209, SBE80-0024 and SBE80-0025.Copyright
© IAE International Aero Engines AG (2001, 2014 - 2021) The information contained in this document is the property of © IAE International Aero Engines AG and may not be copied or used for any purpose other than that for which it is supplied without the express written authority of © IAE International Aero Engines AG. (This does not preclude use by engine and aircraft operators for normal instructional, maintenance or overhaul purposes.).Applicability
All
Common Information
TASK 72-50-23-300-007 LPT Stage 7 Outer Shroud Seal Segment - Replace The Machine Key, Repair-007 (VRS4081)
Material of component
RR | ||
|---|---|---|
DESCRIPTION | SYMBOL | MATERIAL |
Stage 7 shroud seal segment | - | Hastelloy X |
Machine key | - | Hastelloy X |
General
Price and availability - none
The practices and processes referred to in the procedure by the TASK number are in the SPM.
NOTE
NOTE
NOTE
Preliminary Requirements
Pre-Conditions
NONESupport Equipment
| Name | Manufacturer | Part Number / Identification | Quantity | Remark |
|---|---|---|---|---|
| Depth gage micrometer | LOCAL | Depth gage micrometer | ||
| Dial caliper | LOCAL | Dial caliper | ||
| Illuminated comparator magnifier | LOCAL | Illuminated comparator magnifier | ||
| Radius gage set | LOCAL | Radius gage set | ||
| Vernier caliper | LOCAL | Vernier caliper | ||
| IAE 3M14229 Clamping fixture | 0AM53 | IAE 3M14229 | 1 |
Consumables, Materials and Expendables
| Name | Manufacturer | Part Number / Identification | Quantity | Remark |
|---|---|---|---|---|
| CoMat 03-197 WELDING FILLER WIRE | LOCAL | CoMat 03-197 |
Spares
| Name | Manufacturer | Part Number / Identification | Quantity | Remark |
|---|---|---|---|---|
| Machine Key | 3A0669 | 1 |
Safety Requirements
NONEProcedure
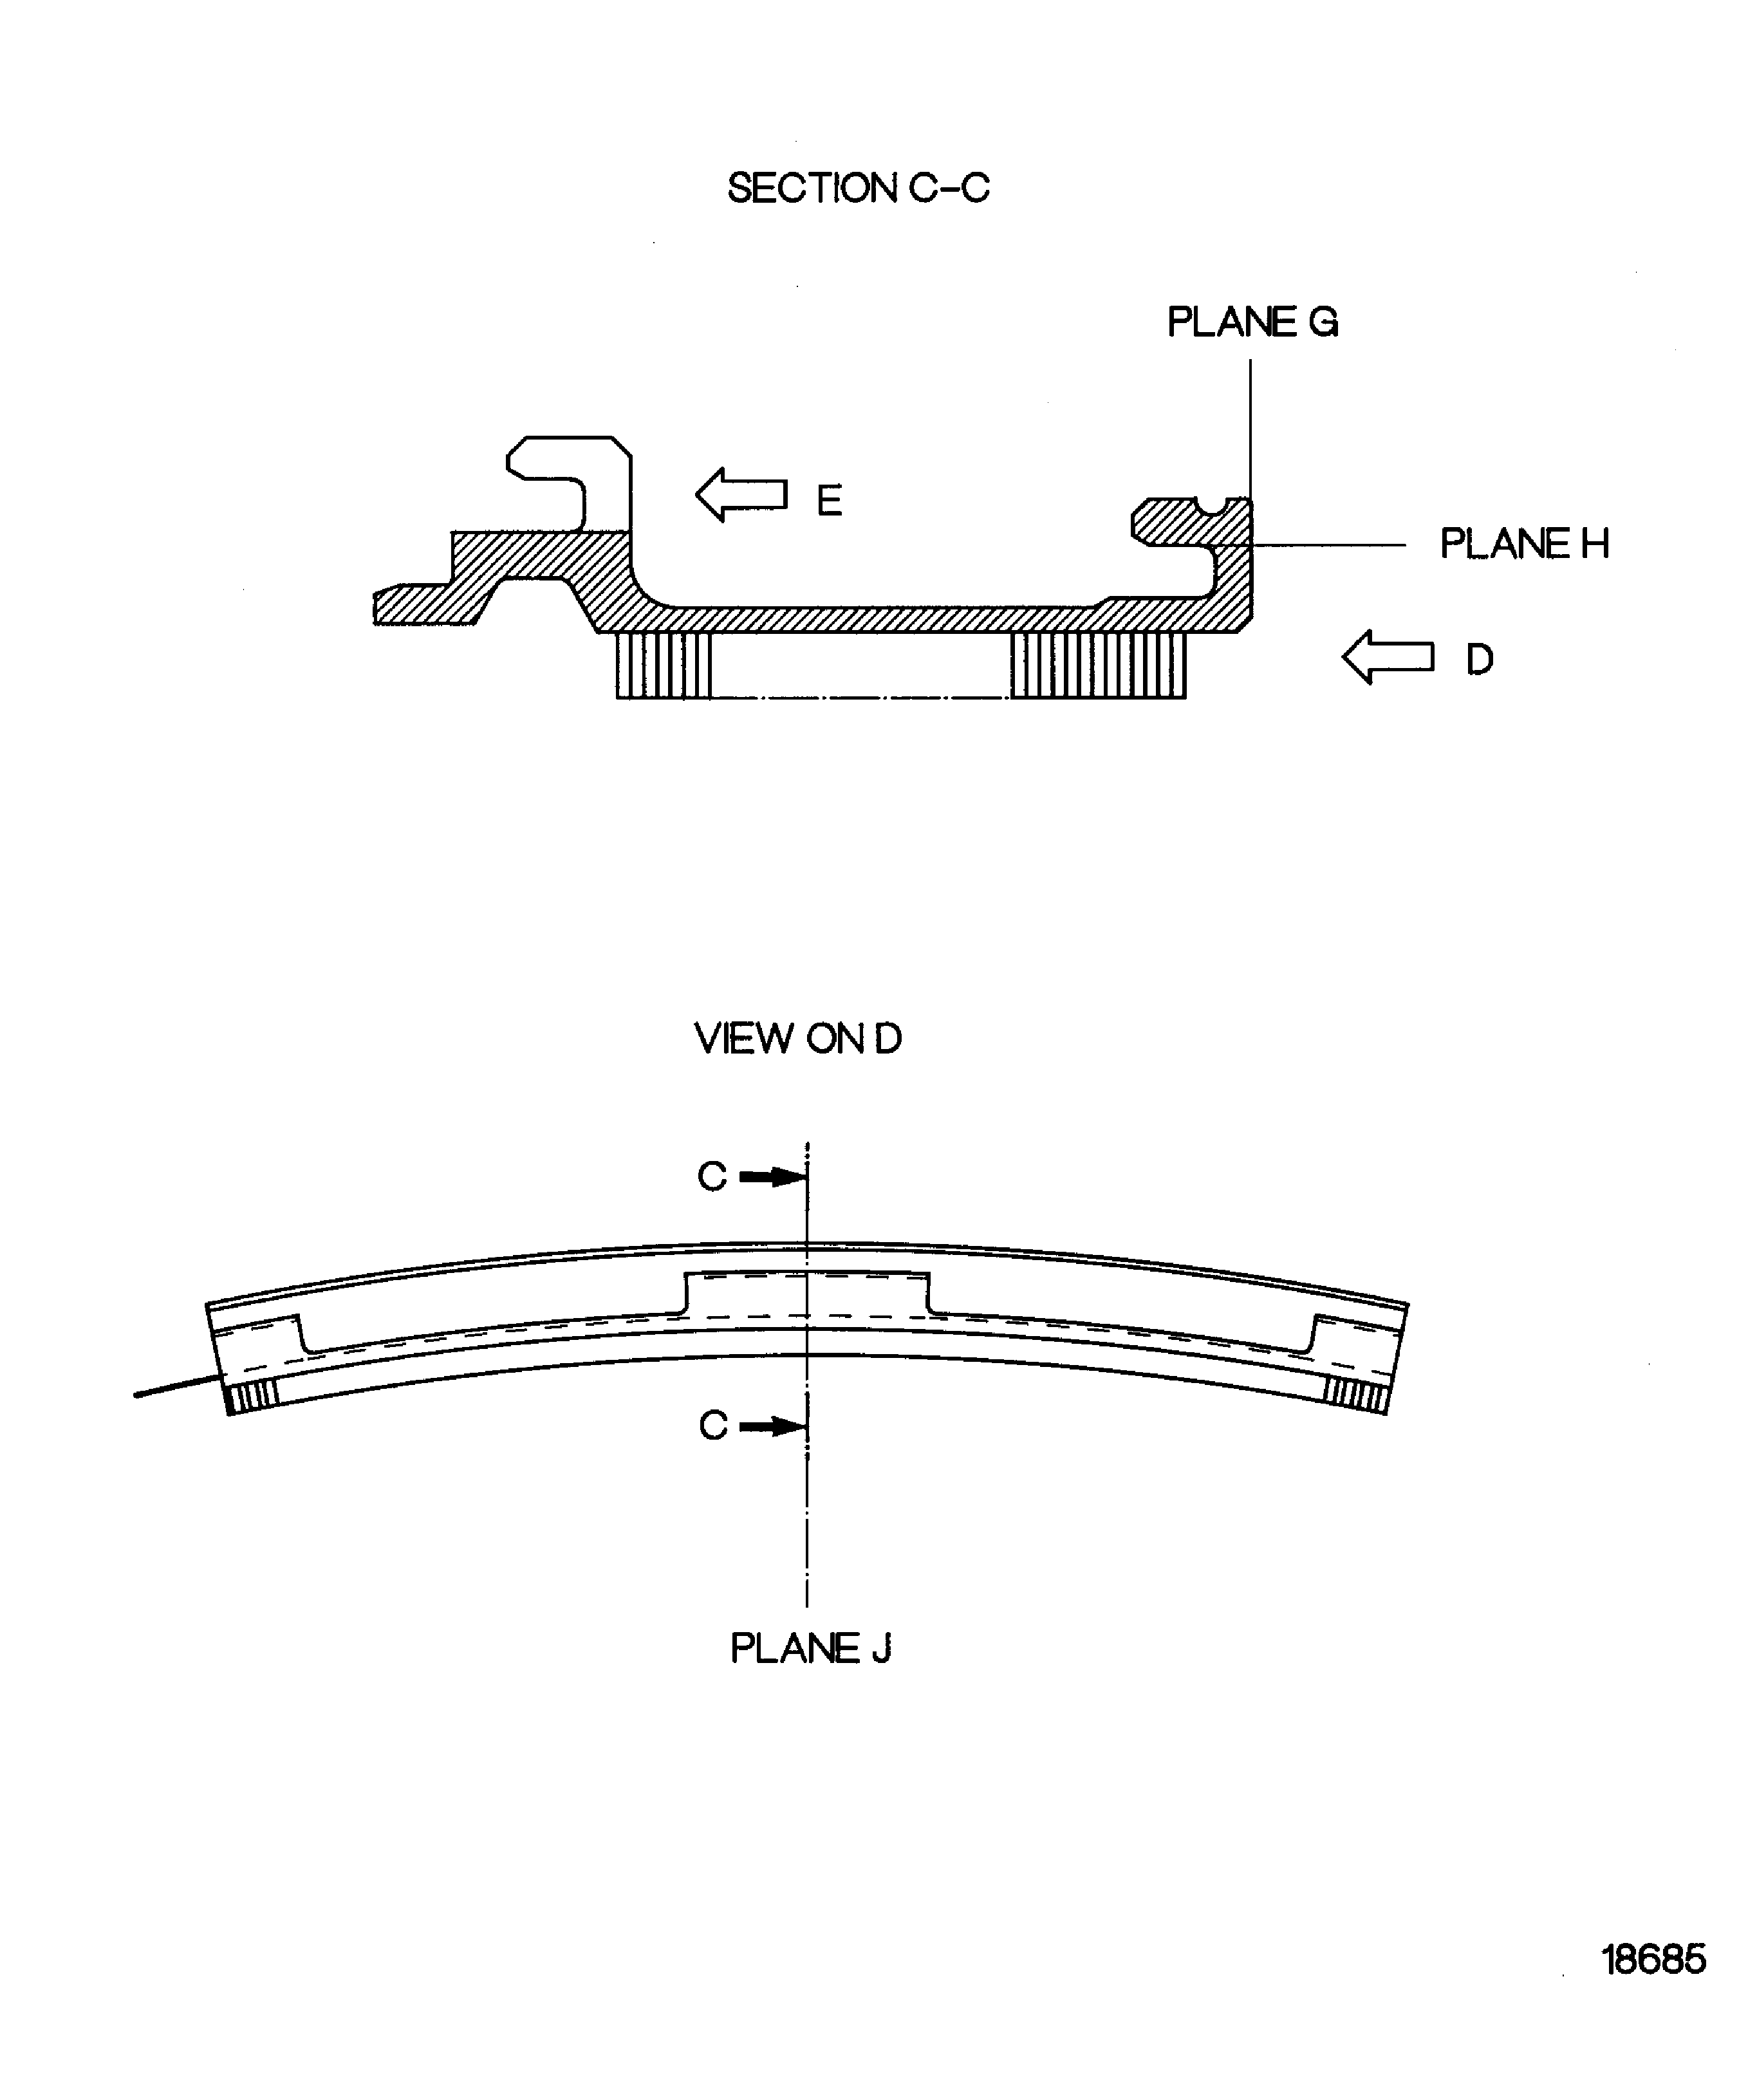
It is permitted to electrical discharge machine the part, refer to the SPM TASK 70-32-03-320-501 and Figure. Do not remove parent material.
Remove all signs of original braze filler before you weld in the new machine key.
Machine off the worn machine key.
SUBTASK 72-50-23-326-051 Remove the Worn Machine Key
NOTE
When you have to repair the honeycomb also (Refer to VRS4080 TASK 72-50-23-300-006) you can braze the machine key in to position at the same time. Use the same filler and information which are given in the VRS4080 TASK 72-50-23-300-006.Refer to the SPM TASK 70-11-01-300-503.
Vapor degrease.
SUBTASK 72-50-23-110-055 Clean the Stage 7 Shroud Seal Segment
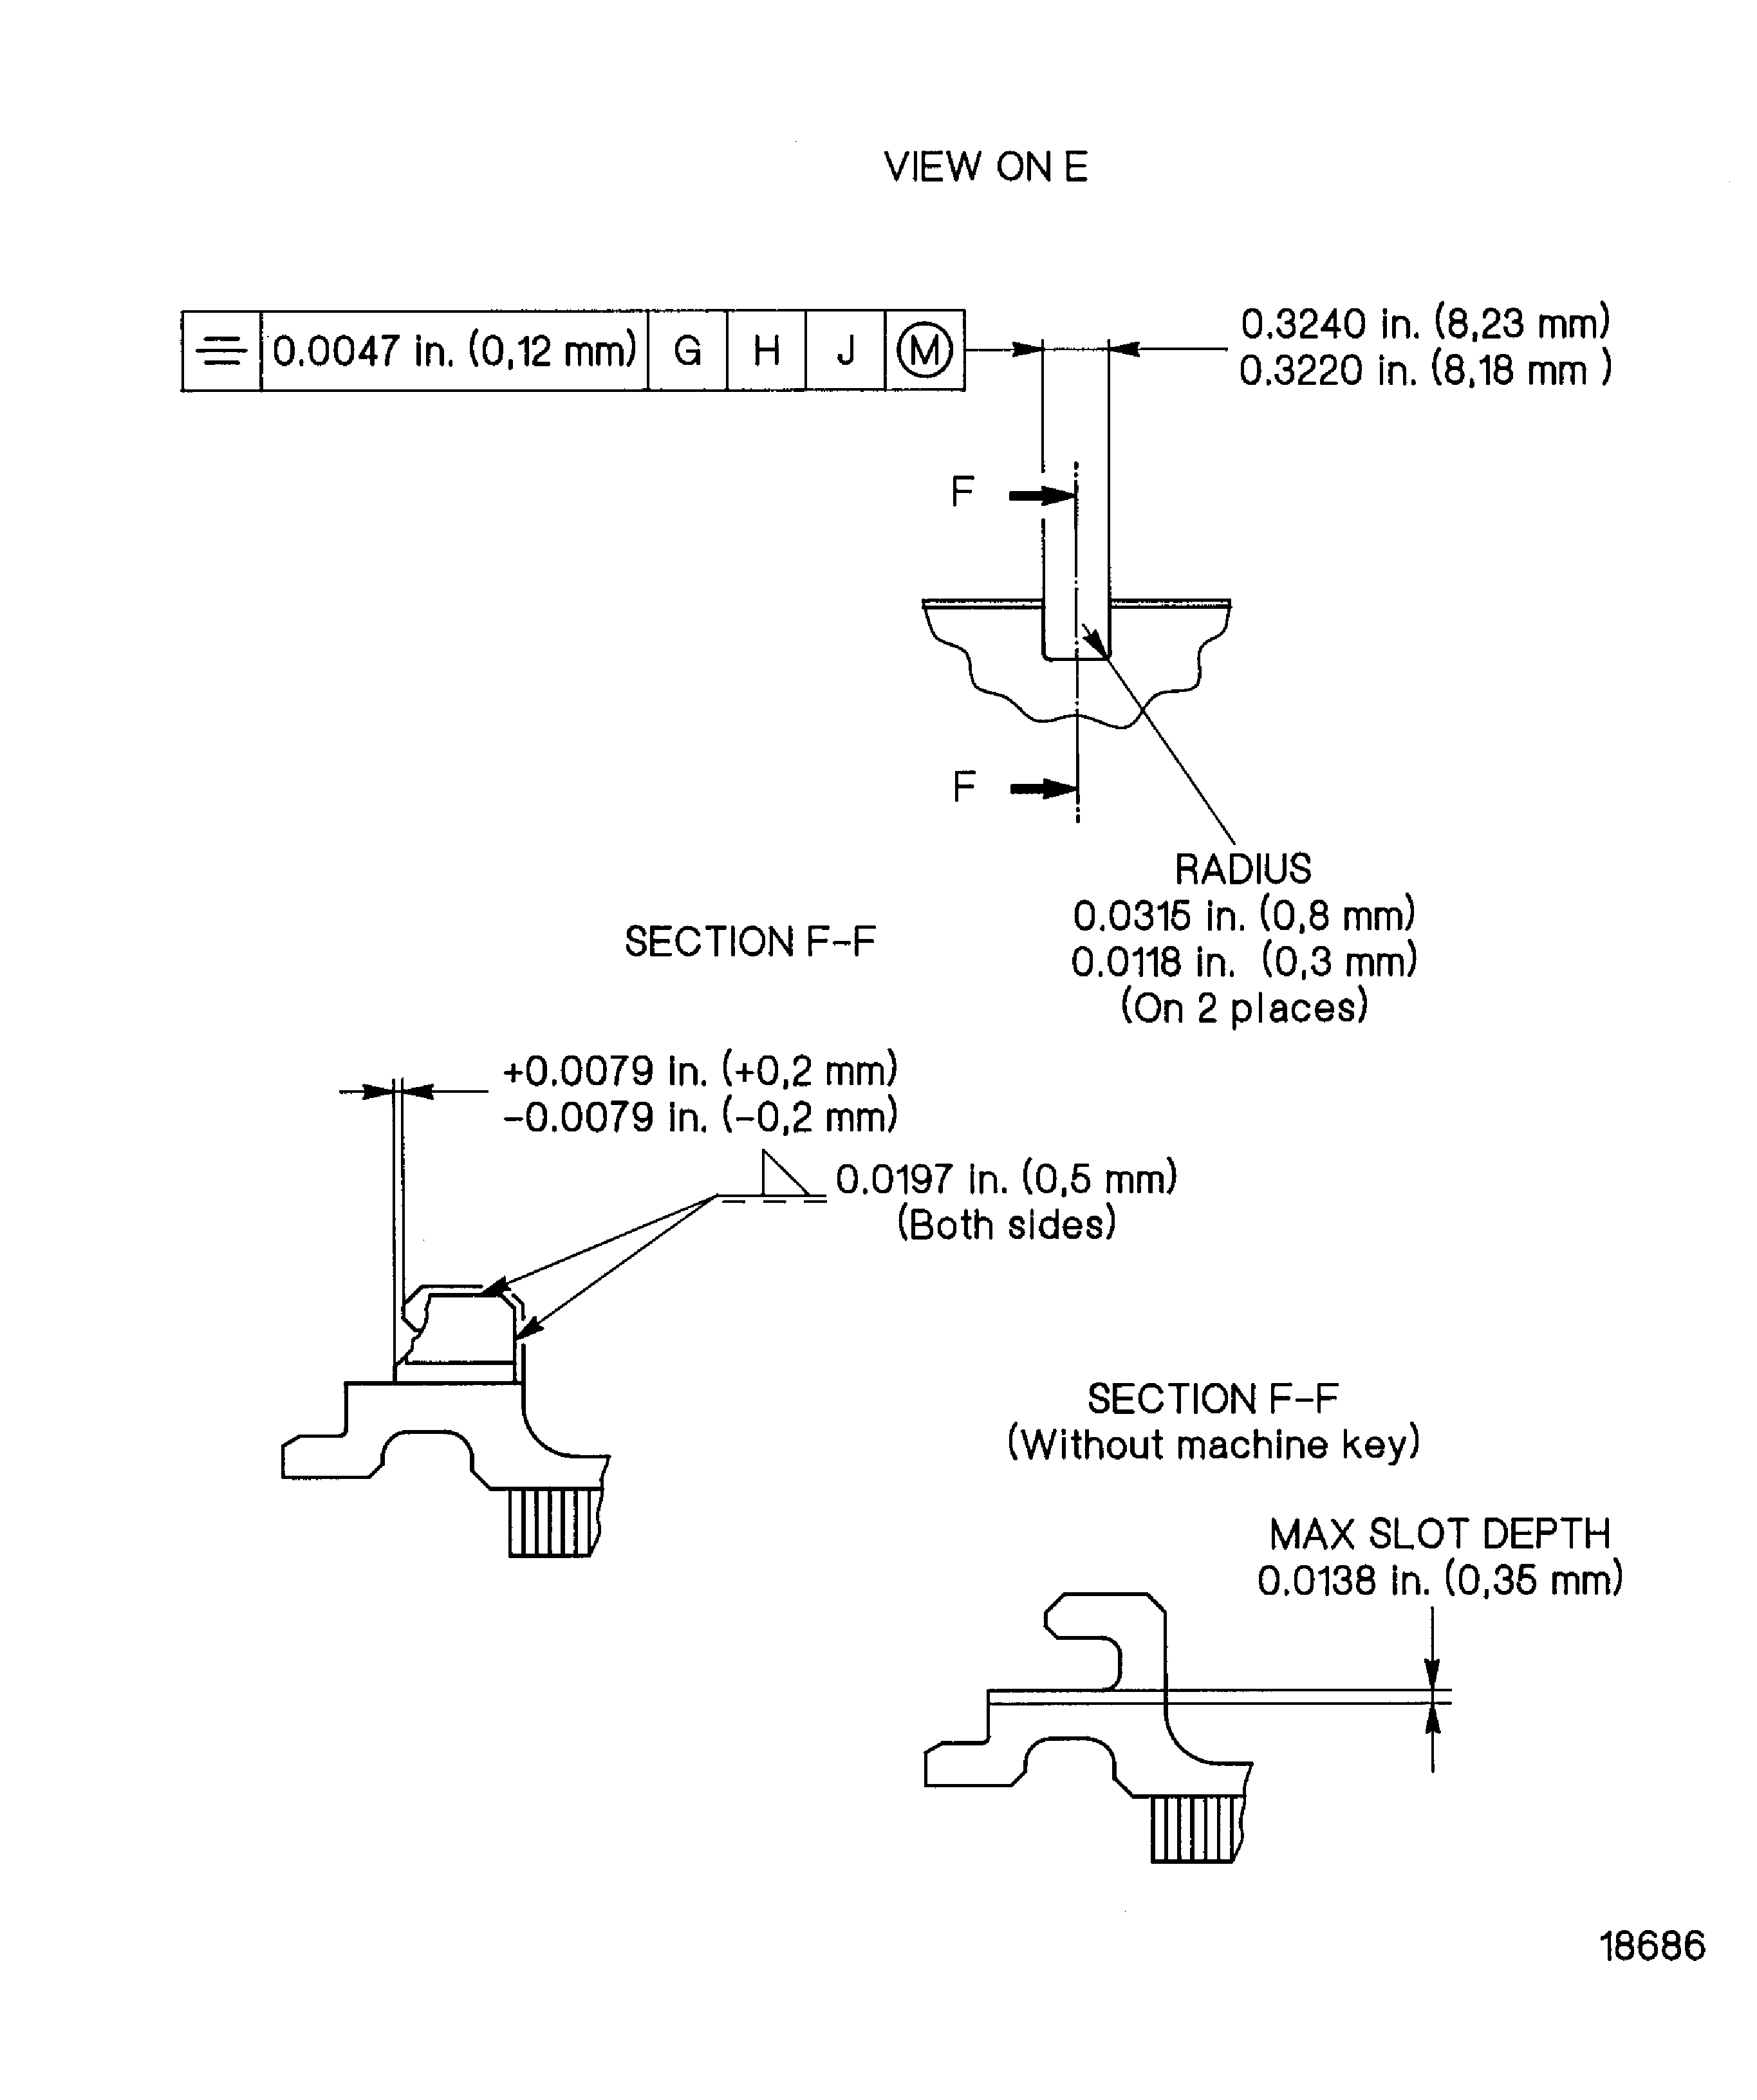
For dimensions refer to Figure. Use radius gage set, depth gage micrometer, dial caliper and vernier caliper.
Dimensionally examine the machined areas.
SUBTASK 72-50-23-220-078 Examine the Stage 7 Shroud Seal Segment
Clamp the machine key to prevent movement. Use the IAE IAE 3M14229 Clamping fixture 1 off. Use CoMat 03-197 WELDING FILLER WIRE to weld the locating key.
Refer to Figure and the SPM TASK 70-31-13-310-501.
Tungsten inert gas weld the machine key in position.
SUBTASK 72-50-23-310-055 Weld in the New Machine Key
Refer to the SPM TASK 70-31-13-310-501. Too much weld material is not permitted. Use illuminated comparator magnifier.
Examine the machined area for completed weld.
For finish dimensions refer to Figure. Use dial caliper and vernier caliper.
Dimensionally examine the new machine key.
SUBTASK 72-50-23-220-079 Do the Post Repair Inspection
Figure: Replace the machine key of the stage 7 shroud seal segment
Replace the machine key of the stage 7 shroud seal segment

Figure: Replace the machine key of the stage 7 shroud seal segment
Replace the machine key of the stage 7 shroud seal segment

