Export Control
EAR Export Classification: Not subject to the EAR per 15 C.F.R. Chapter 1, Part 734.3(b)(3), except for the following Service Bulletins which are currently published as EAR Export Classification 9E991: SBE70-0992, SBE72-0483, SBE72-0580, SBE72-0588, SBE72-0640, SBE73-0209, SBE80-0024 and SBE80-0025.Copyright
© IAE International Aero Engines AG (2001, 2014 - 2021) The information contained in this document is the property of © IAE International Aero Engines AG and may not be copied or used for any purpose other than that for which it is supplied without the express written authority of © IAE International Aero Engines AG. (This does not preclude use by engine and aircraft operators for normal instructional, maintenance or overhaul purposes.).Applicability
All
Common Information
TASK 72-50-32-300-023 LPT Stage 4 Blade - Weld Build Up Repair Of Outer Shroud Hardfacing, Repair-023 (VRS4201)
General
Price and availability - none
The practices and processes referred to in this procedure by the TASK number are in the SPM.
NOTE
NOTE
NOTE
NOTE
Preliminary Requirements
Pre-Conditions
NONESupport Equipment
| Name | Manufacturer | Part Number / Identification | Quantity | Remark |
|---|---|---|---|---|
| Cleaning facility | LOCAL | Cleaning facility | ||
| Welding facility | LOCAL | Welding facility | ||
| Inspection facility | LOCAL | Inspection facility | ||
| Machining facility | LOCAL | Machining facility | ||
| Heat treatment facility | LOCAL | Heat treatment facility | ||
| Crack inspection equipment | LOCAL | Crack inspection equipment | ||
| Blasting facility | LOCAL | Blasting facility | ||
| Marking facility | LOCAL | Marking facility | ||
| IAE 2M14167 Inspection gage | 0AM53 | IAE 2M14167 | 1 | |
| IAE 3M14398 Welding mounting block | 0AM53 | IAE 3M14398 | 1 | |
| IAE 3M14498 Welding fixture | 0AM53 | IAE 3M14498 | 1 | |
| IAE 3M14509 Grinding fixture | 0AM53 | IAE 3M14509 | 1 | (convex/concave side) |
Consumables, Materials and Expendables
| Name | Manufacturer | Part Number / Identification | Quantity | Remark |
|---|---|---|---|---|
| CoMat 03-283 COATING ALLOY | 0CZB2 | CoMat 03-283 | ||
| CoMat 05-030 CAST STEEL SHOT DELETED | 0AM53 | CoMat 05-030 | ||
| CoMat 02-001 ADHESIVE TAPE (MASKING) | LOCAL | CoMat 02-001 |
Spares
NONESafety Requirements
NONEProcedure
Refer to the SPM TASK 70-11-01-300-503.
Vapor degrease.
SUBTASK 72-50-32-110-103 Clean the Stage 4 Turbine Blade
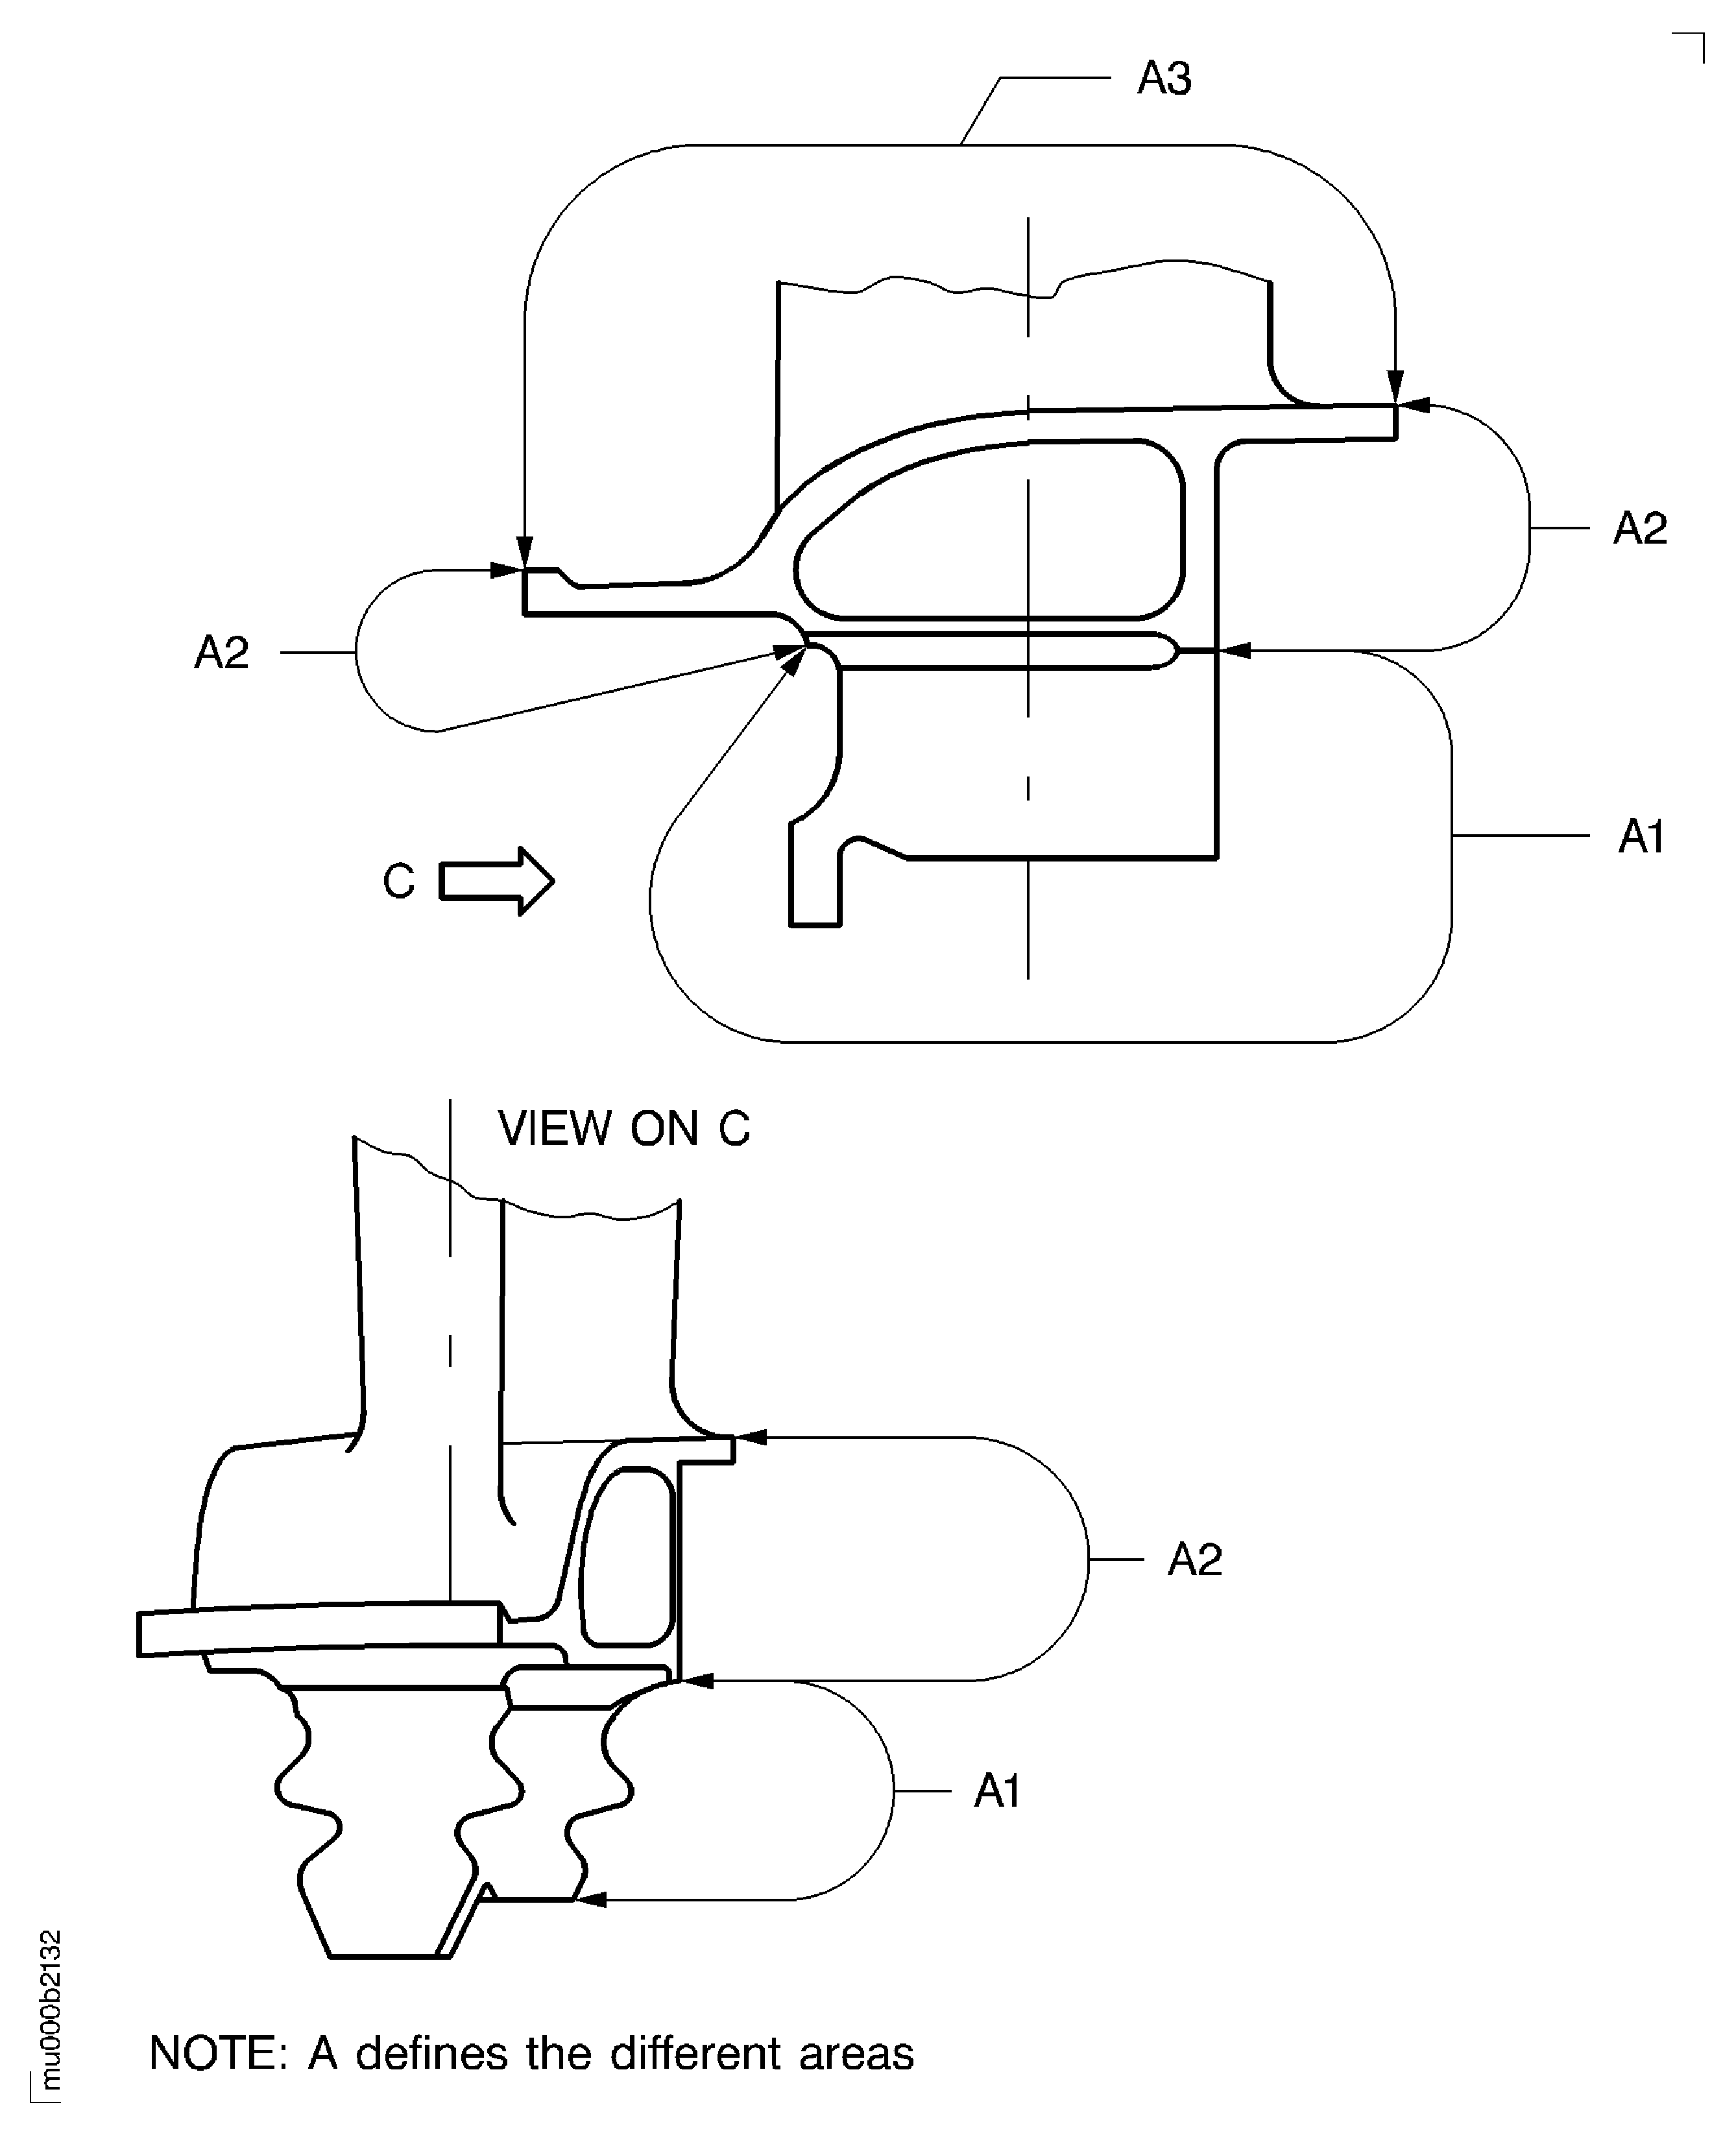
Refer to Fig. 72-50-32-990-141 and the SPM TASK 70-31-08-310-501.
Use IAE 3M14498 Welding fixture 1 off and IAE 3M14398 Welding mounting block 1 off.
Build up sufficient material to do last machining.
In area A4 electrical contact is permitted.
No burning, pitting or selective attack is permitted.
Tungsten inert gas weld build-up surfaces.
SUBTASK 72-50-32-310-061 Weld Build-Up Repair the Worn Surfaces
Refer to the SPM TASK 70-37-00-370-501 and SPM TASK 70-37-10-370-501.
Heating and cooling rate to be maximum 40 deg F (22 deg C) per minute.
Heat treat the stage 4 turbine blade.
SUBTASK 72-50-32-370-075 Heat Treatment after Machining
Refer to the SPM TASK 70-23-03-230-501 or SPM TASK 70-23-08-230-501.
The maximum permitted length of discontinuities is 0.016 in. (0.4 mm) in the repaired areas.
Do the test for cracks.
SUBTASK 72-50-32-230-117 Examine the Stage 4 Turbine Blade for Cracks after Heat Treatment
Refer to the SPM TASK 70-11-01-300-503.
Vapor degrease.
SUBTASK 72-50-32-110-104 Clean the Stage 4 Turbine Blade
Refer to the SPM TASK 70-38-04-300-503.
Use CoMat 05-030 CAST STEEL SHOT DELETED to an intensity of 6A.
Shot peening is permitted in area A2 but must not be complete.
Refer to Figure.
Shot peen area A1.
SUBTASK 72-50-32-380-073 Shot Peen the Surface A1 of the Stage 4 Turbine Blade
If you cannot read any of these, make new marks.
Use roll stamp method.
Refer to the SPM TASK 70-09-00-400-501.
Examine the markings of the stage 4 turbine blade manufacturing code, part number, heat code and serial number.
If you cannot read this marking, make a new mark.
Use vibropeen method.
Refer to the SPM TASK 70-09-00-400-501.
Examine the marking of the stage 4 turbine blade life.
SUBTASK 72-50-32-220-219 Examine the Blade Markings
Figure: Weld build-up of outer shroud hardfacing
Weld build-up of outer shroud hardfacing
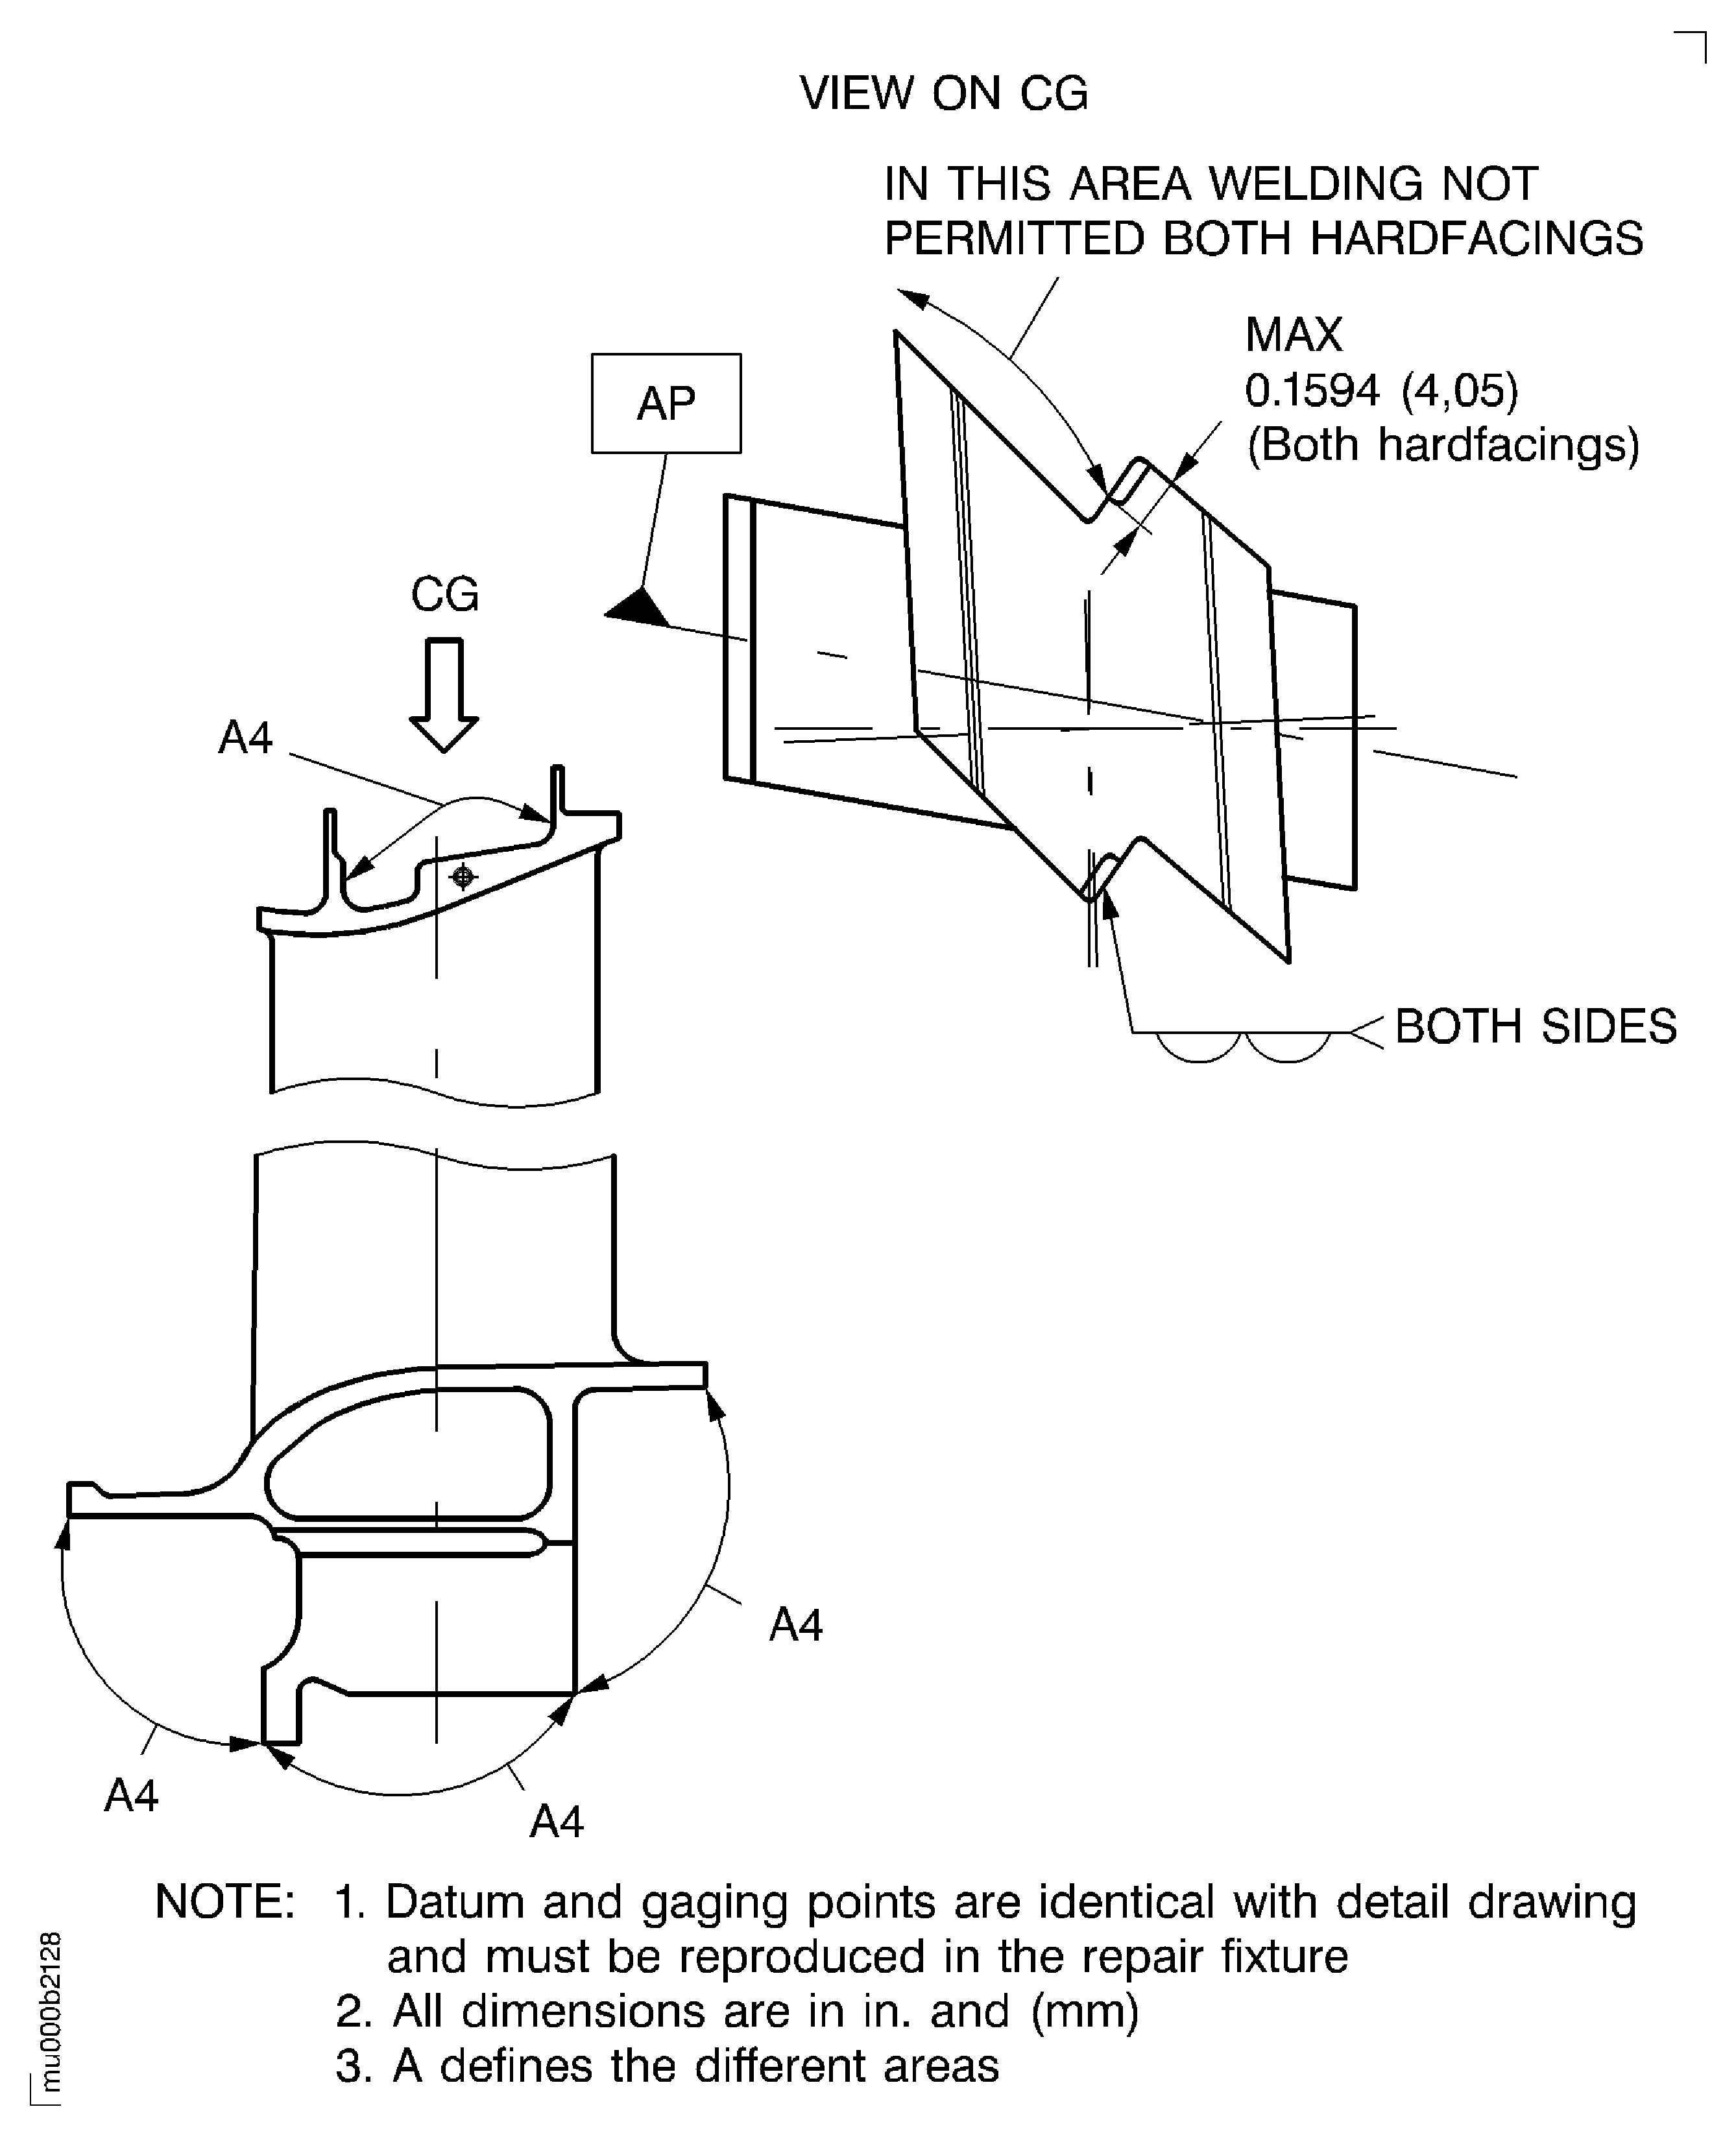
Figure: Weld build-up of outer shroud hardfacing
Weld build-up of outer shroud hardfacing
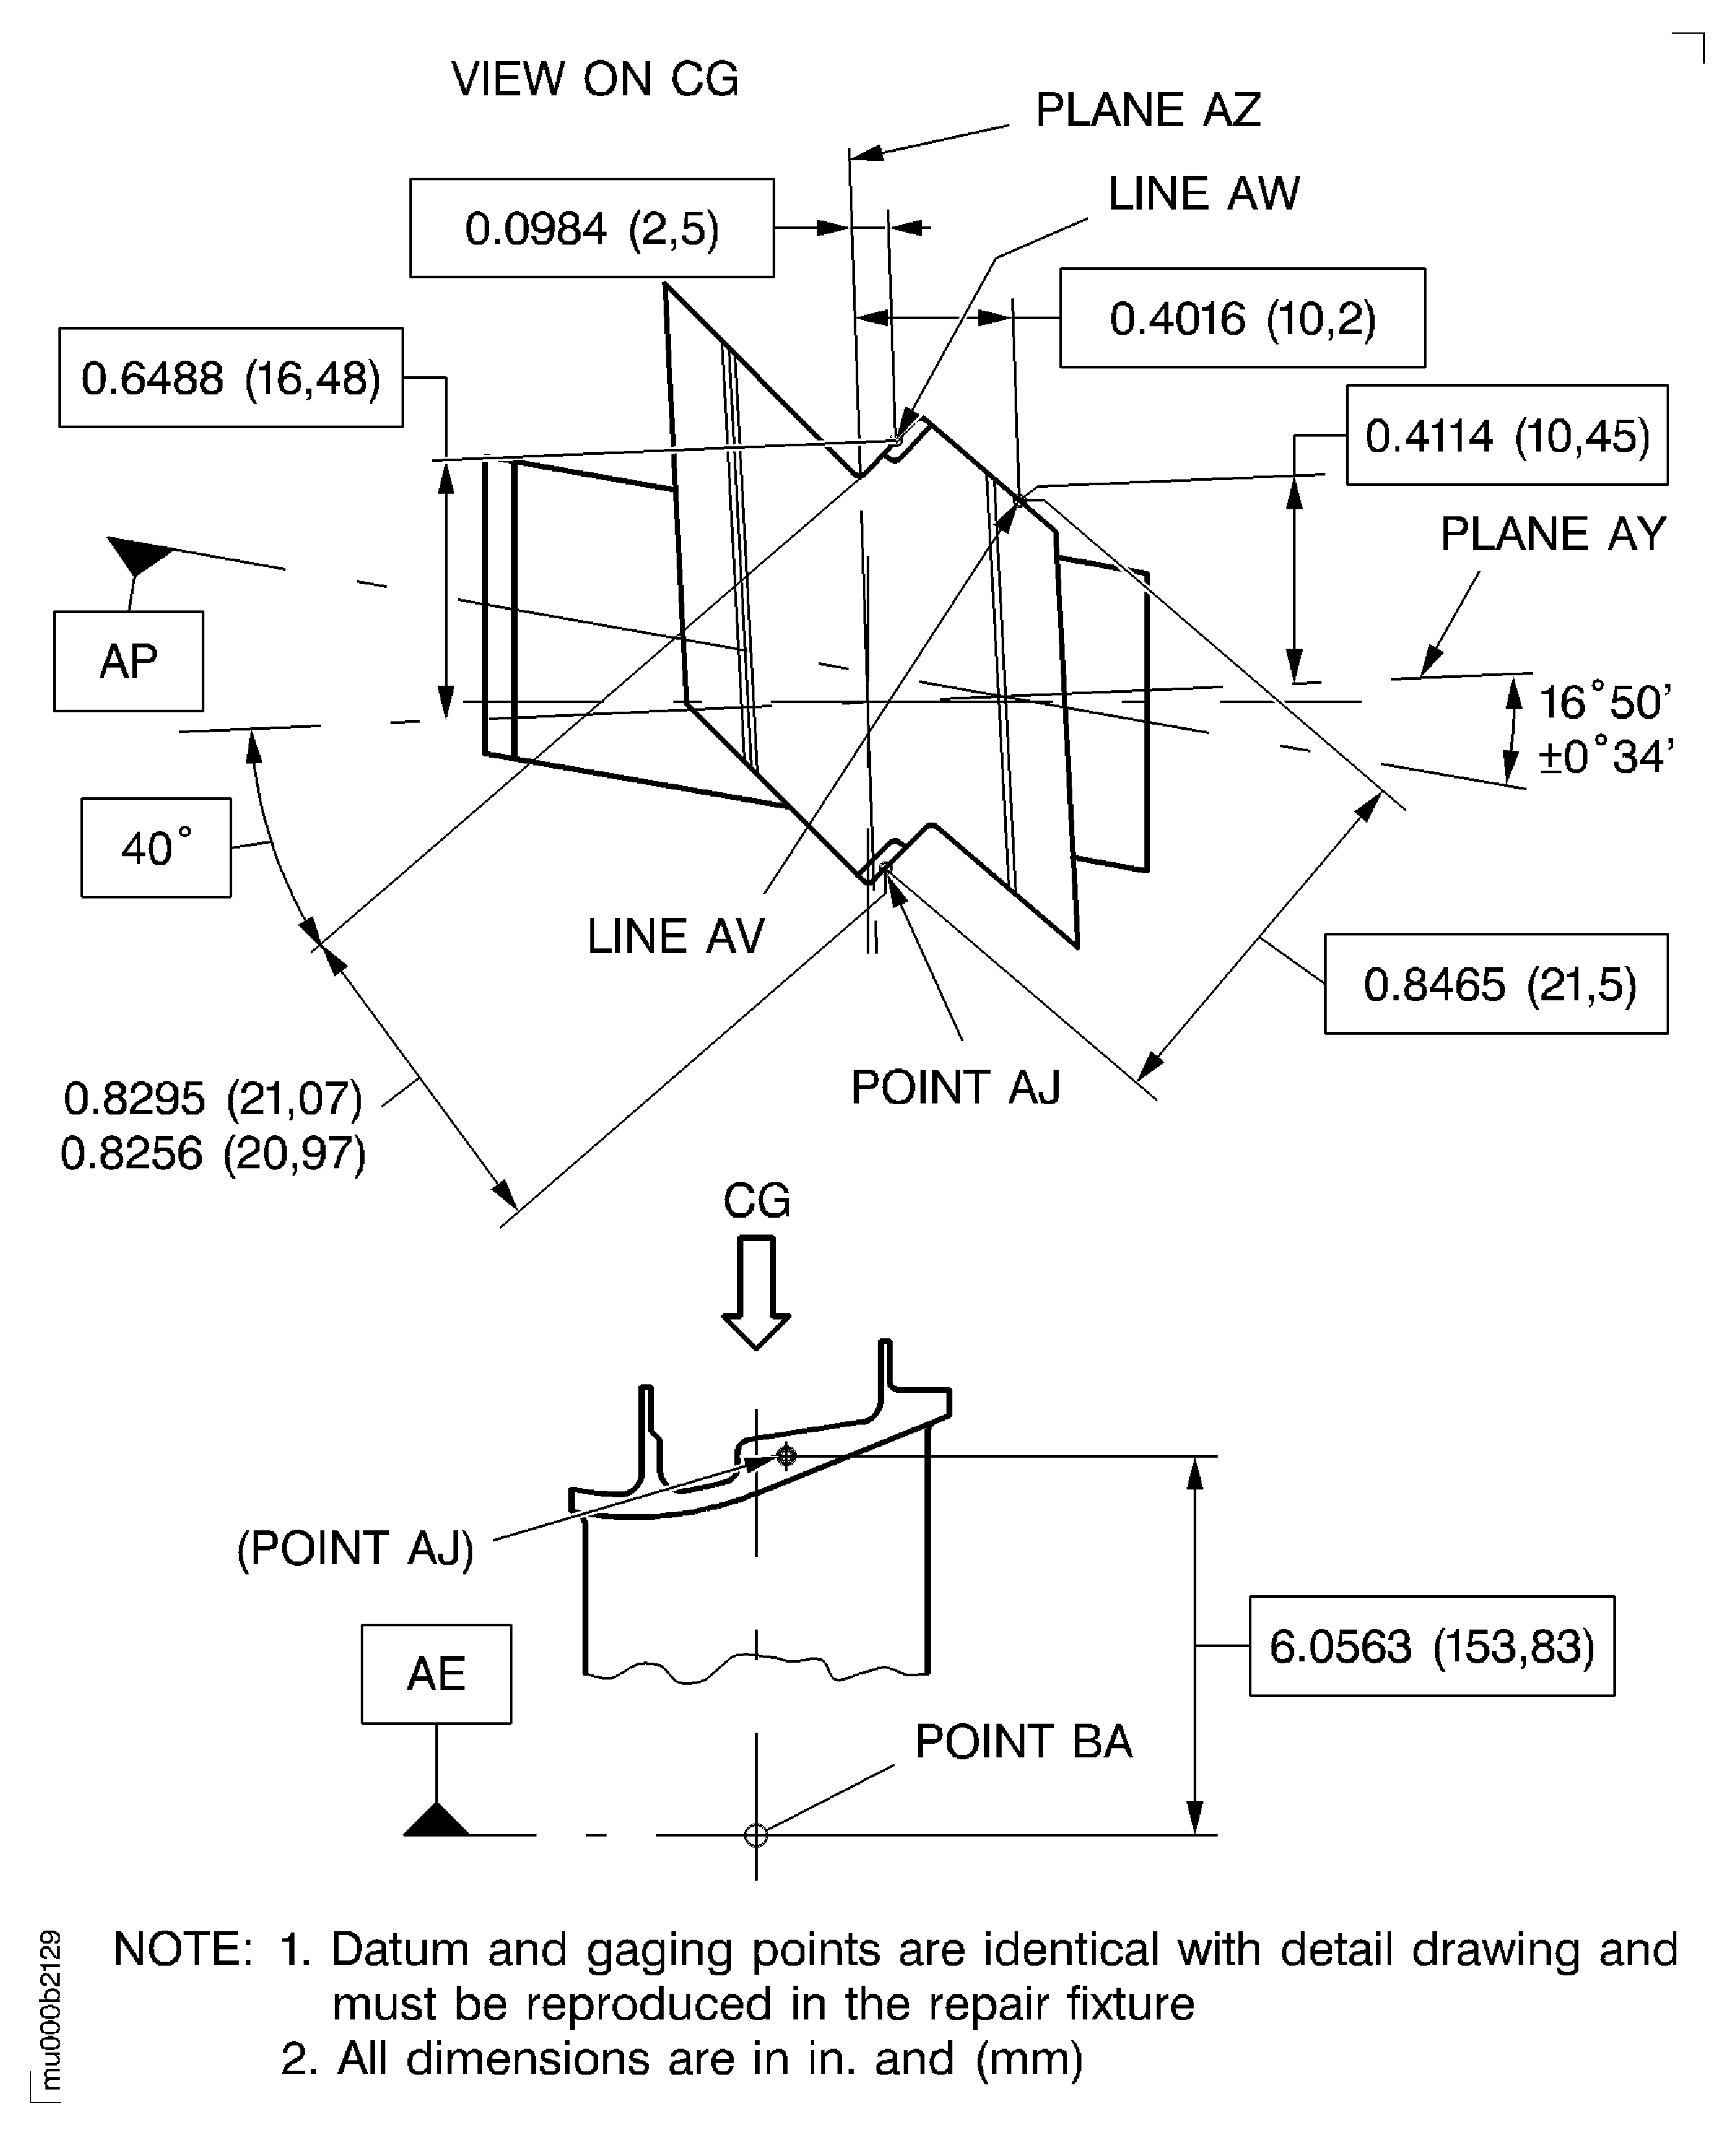
Figure: Weld build-up of outer shroud hardfacing
Weld build-up of outer shroud hardfacing
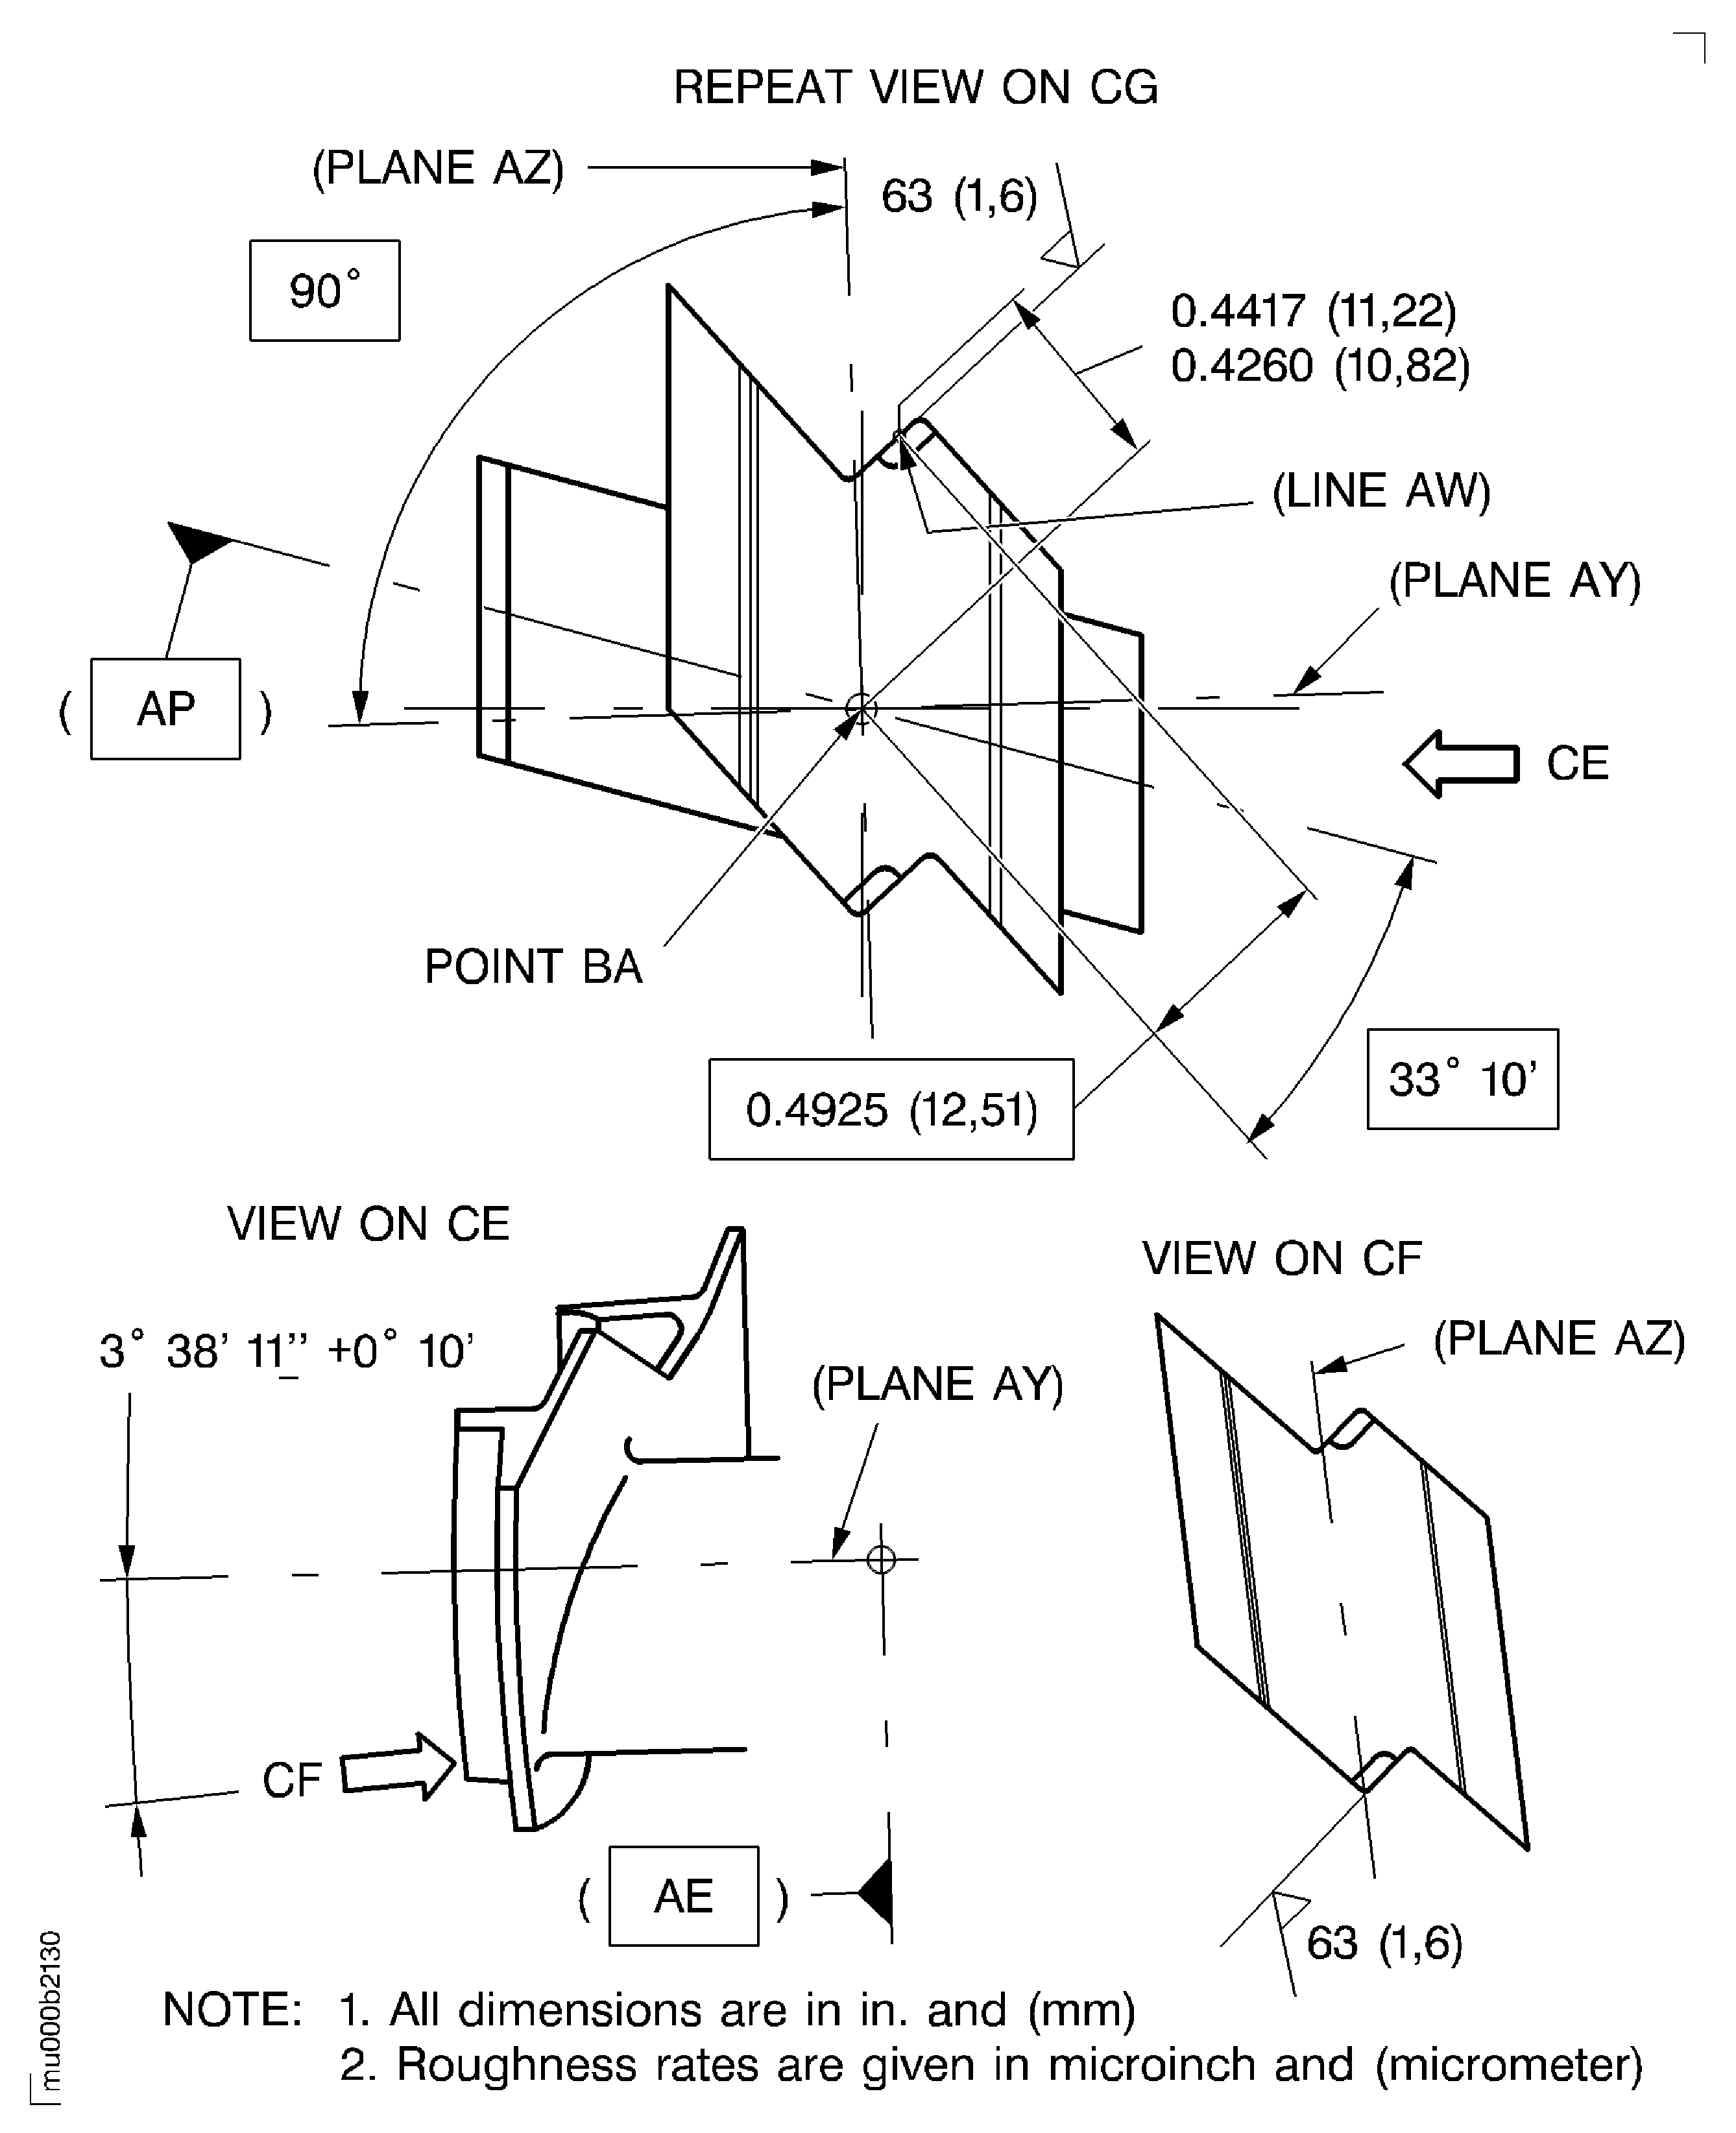
Figure: Weld build-up of outer shroud hardfacing
Weld build-up of outer shroud hardfacing
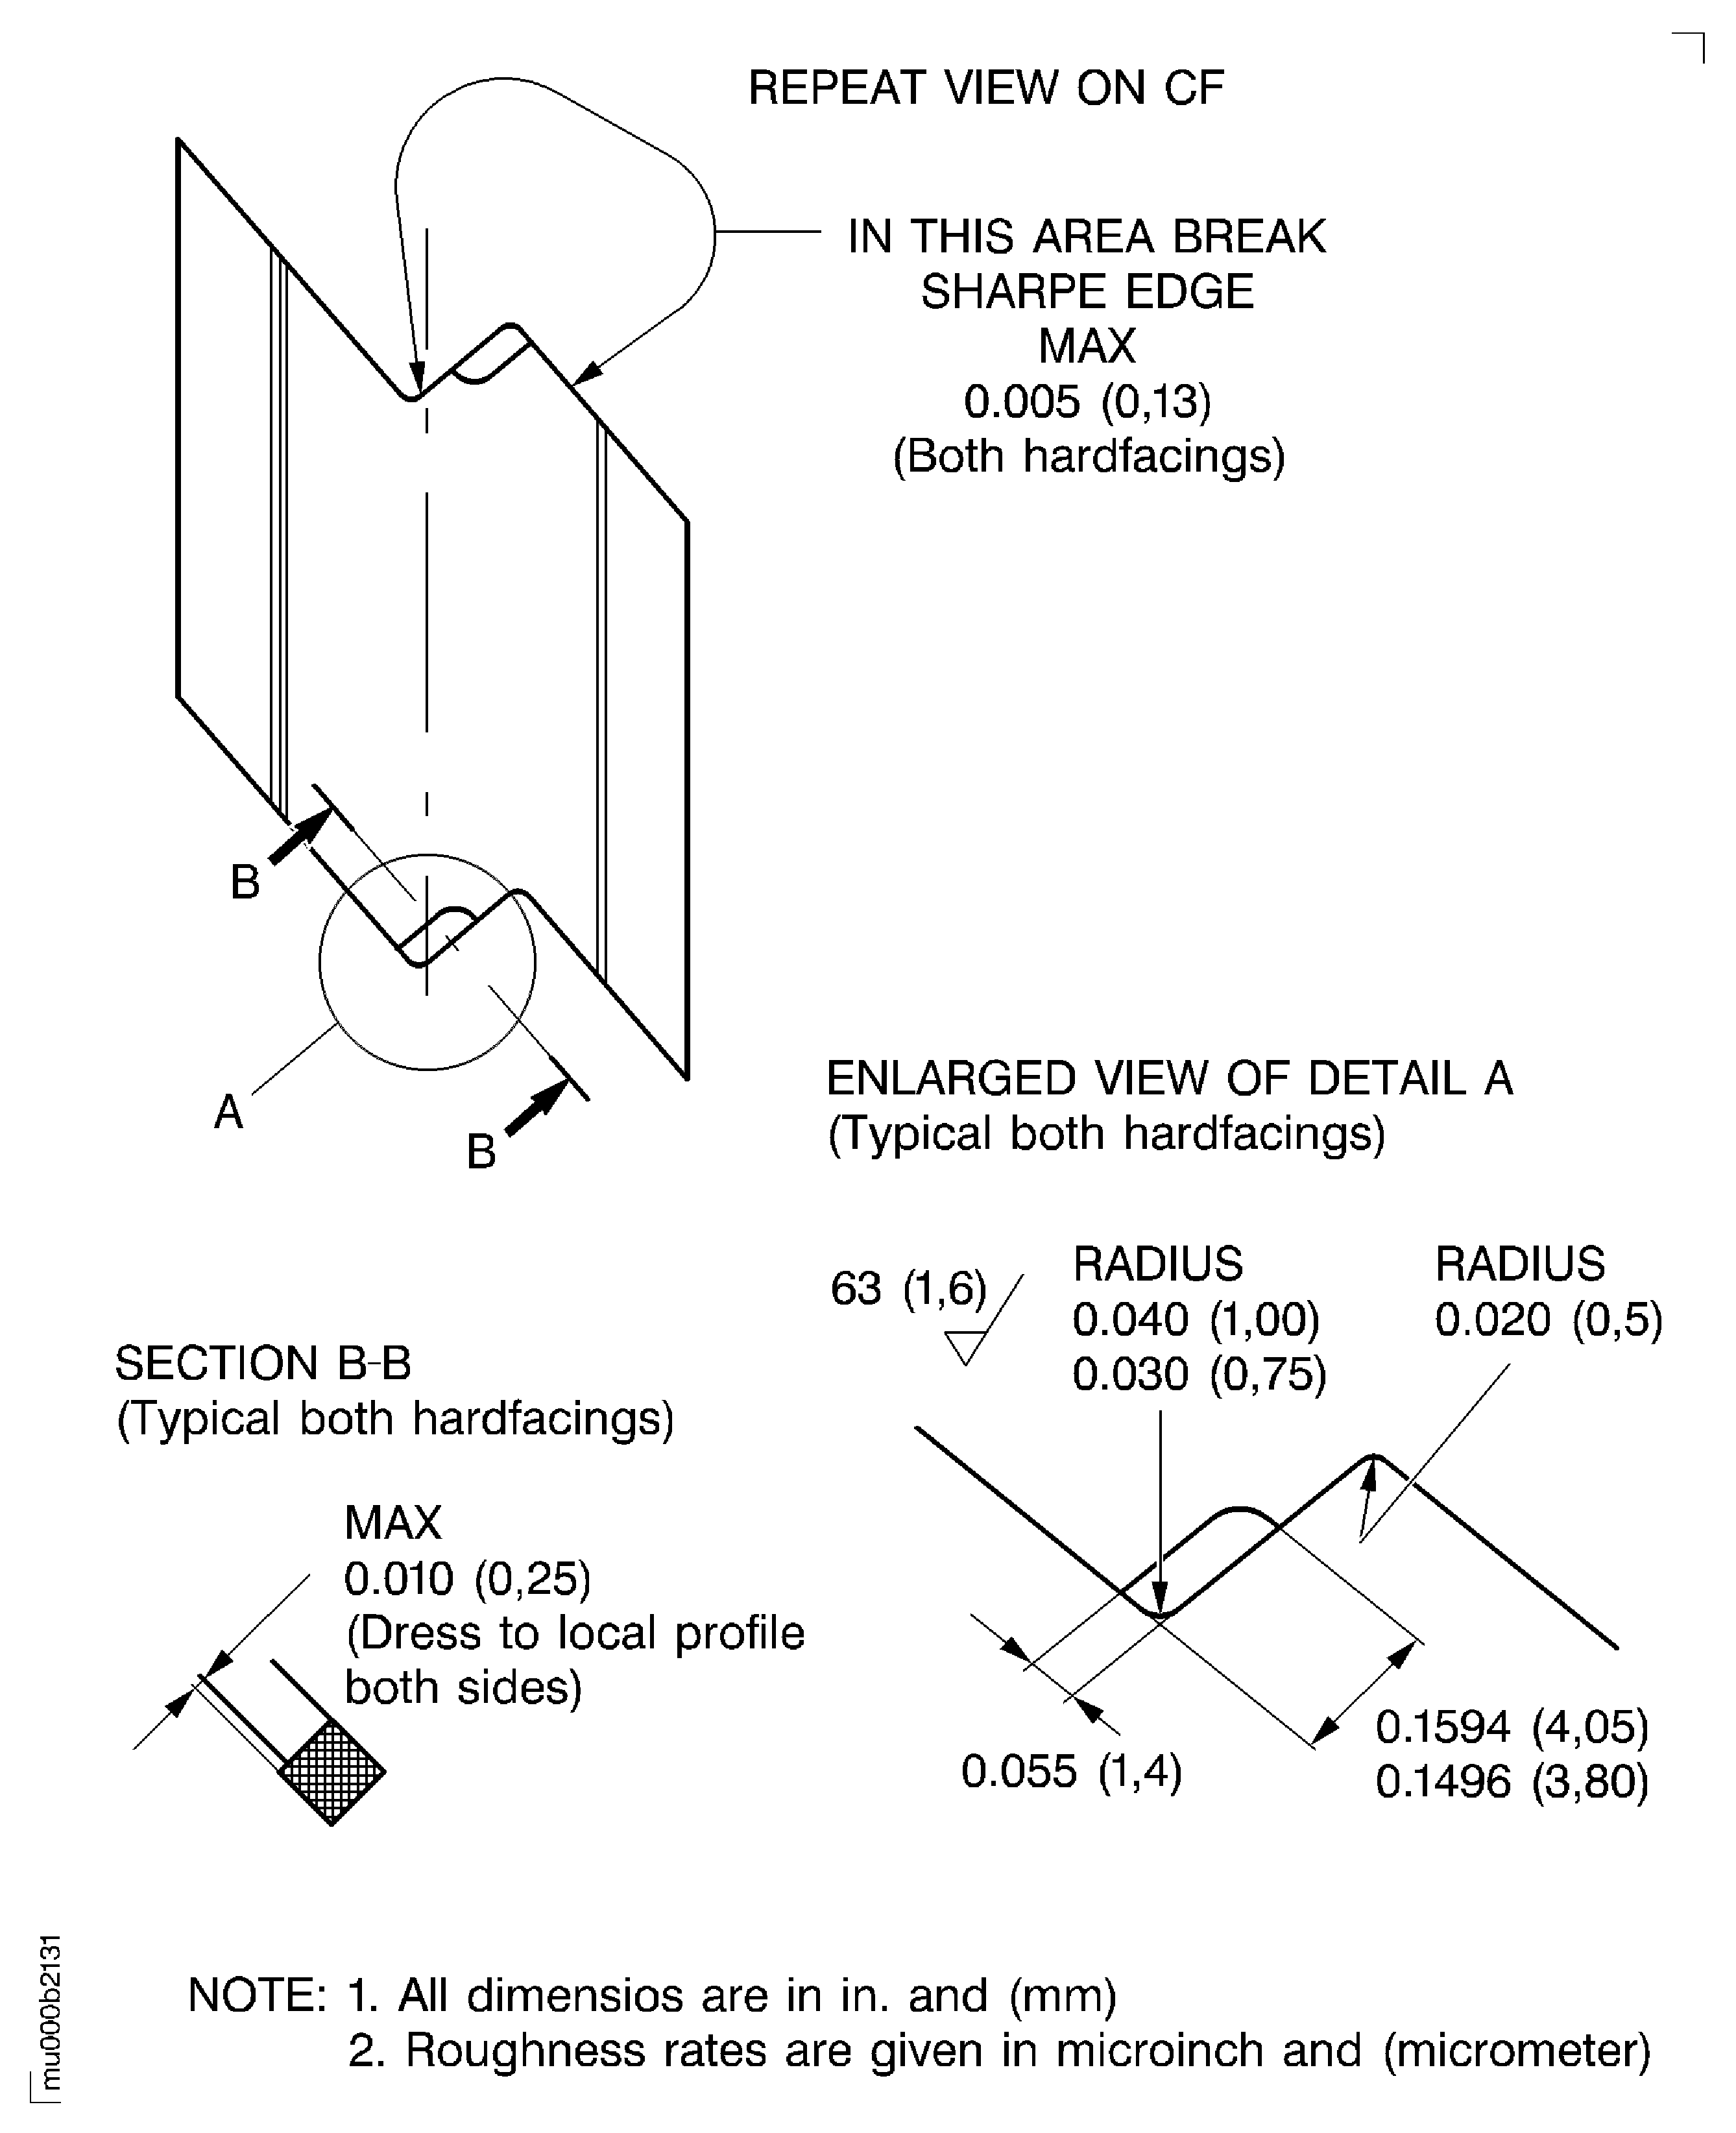
Figure: Weld build-up of outer shroud hardfacing
Weld build-up of outer shroud hardfacing
