Export Control
EAR Export Classification: Not subject to the EAR per 15 C.F.R. Chapter 1, Part 734.3(b)(3), except for the following Service Bulletins which are currently published as EAR Export Classification 9E991: SBE70-0992, SBE72-0483, SBE72-0580, SBE72-0588, SBE72-0640, SBE73-0209, SBE80-0024 and SBE80-0025.Copyright
© IAE International Aero Engines AG (2001, 2014 - 2021) The information contained in this document is the property of © IAE International Aero Engines AG and may not be copied or used for any purpose other than that for which it is supplied without the express written authority of © IAE International Aero Engines AG. (This does not preclude use by engine and aircraft operators for normal instructional, maintenance or overhaul purposes.).Applicability
All
Common Information
TASK 72-50-53-300-071 Turbine Exhaust Case (TEC) - Plasma Spray The Front Flange And The Front Mating Diameter, Repair-071 (VRS3328)
General
Price and availability - refer to IAE
The practices and processes referred to in the procedure by the TASK numbers are in SPM.
To identify the consumable materials refer to the PCI.
Special tools are identified in the procedure by the tool primary number.
Preliminary Requirements
Pre-Conditions
| Action/Condition | Data Module/Technical Publication |
|---|---|
| Make sure that all cleaning and inspection procedures are performed before this repair. |
Support Equipment
| Name | Manufacturer | Part Number / Identification | Quantity | Remark |
|---|---|---|---|---|
| DELETED | 0AM53 | DELETED | ||
| IAE 3P16432 Machining fixture | 0AM53 | IAE 3P16432 |
Consumables, Materials and Expendables
| Name | Manufacturer | Part Number / Identification | Quantity | Remark |
|---|---|---|---|---|
| CoMat 03-096 PLASMA SPRAY POWDER | LOCAL | CoMat 03-096 | ||
| CoMat 07-123 WIRE | 0AM53 | CoMat 07-123 | ||
| DELETED | 0AM53 | DELETED |
Spares
NONESafety Requirements
NONEProcedure
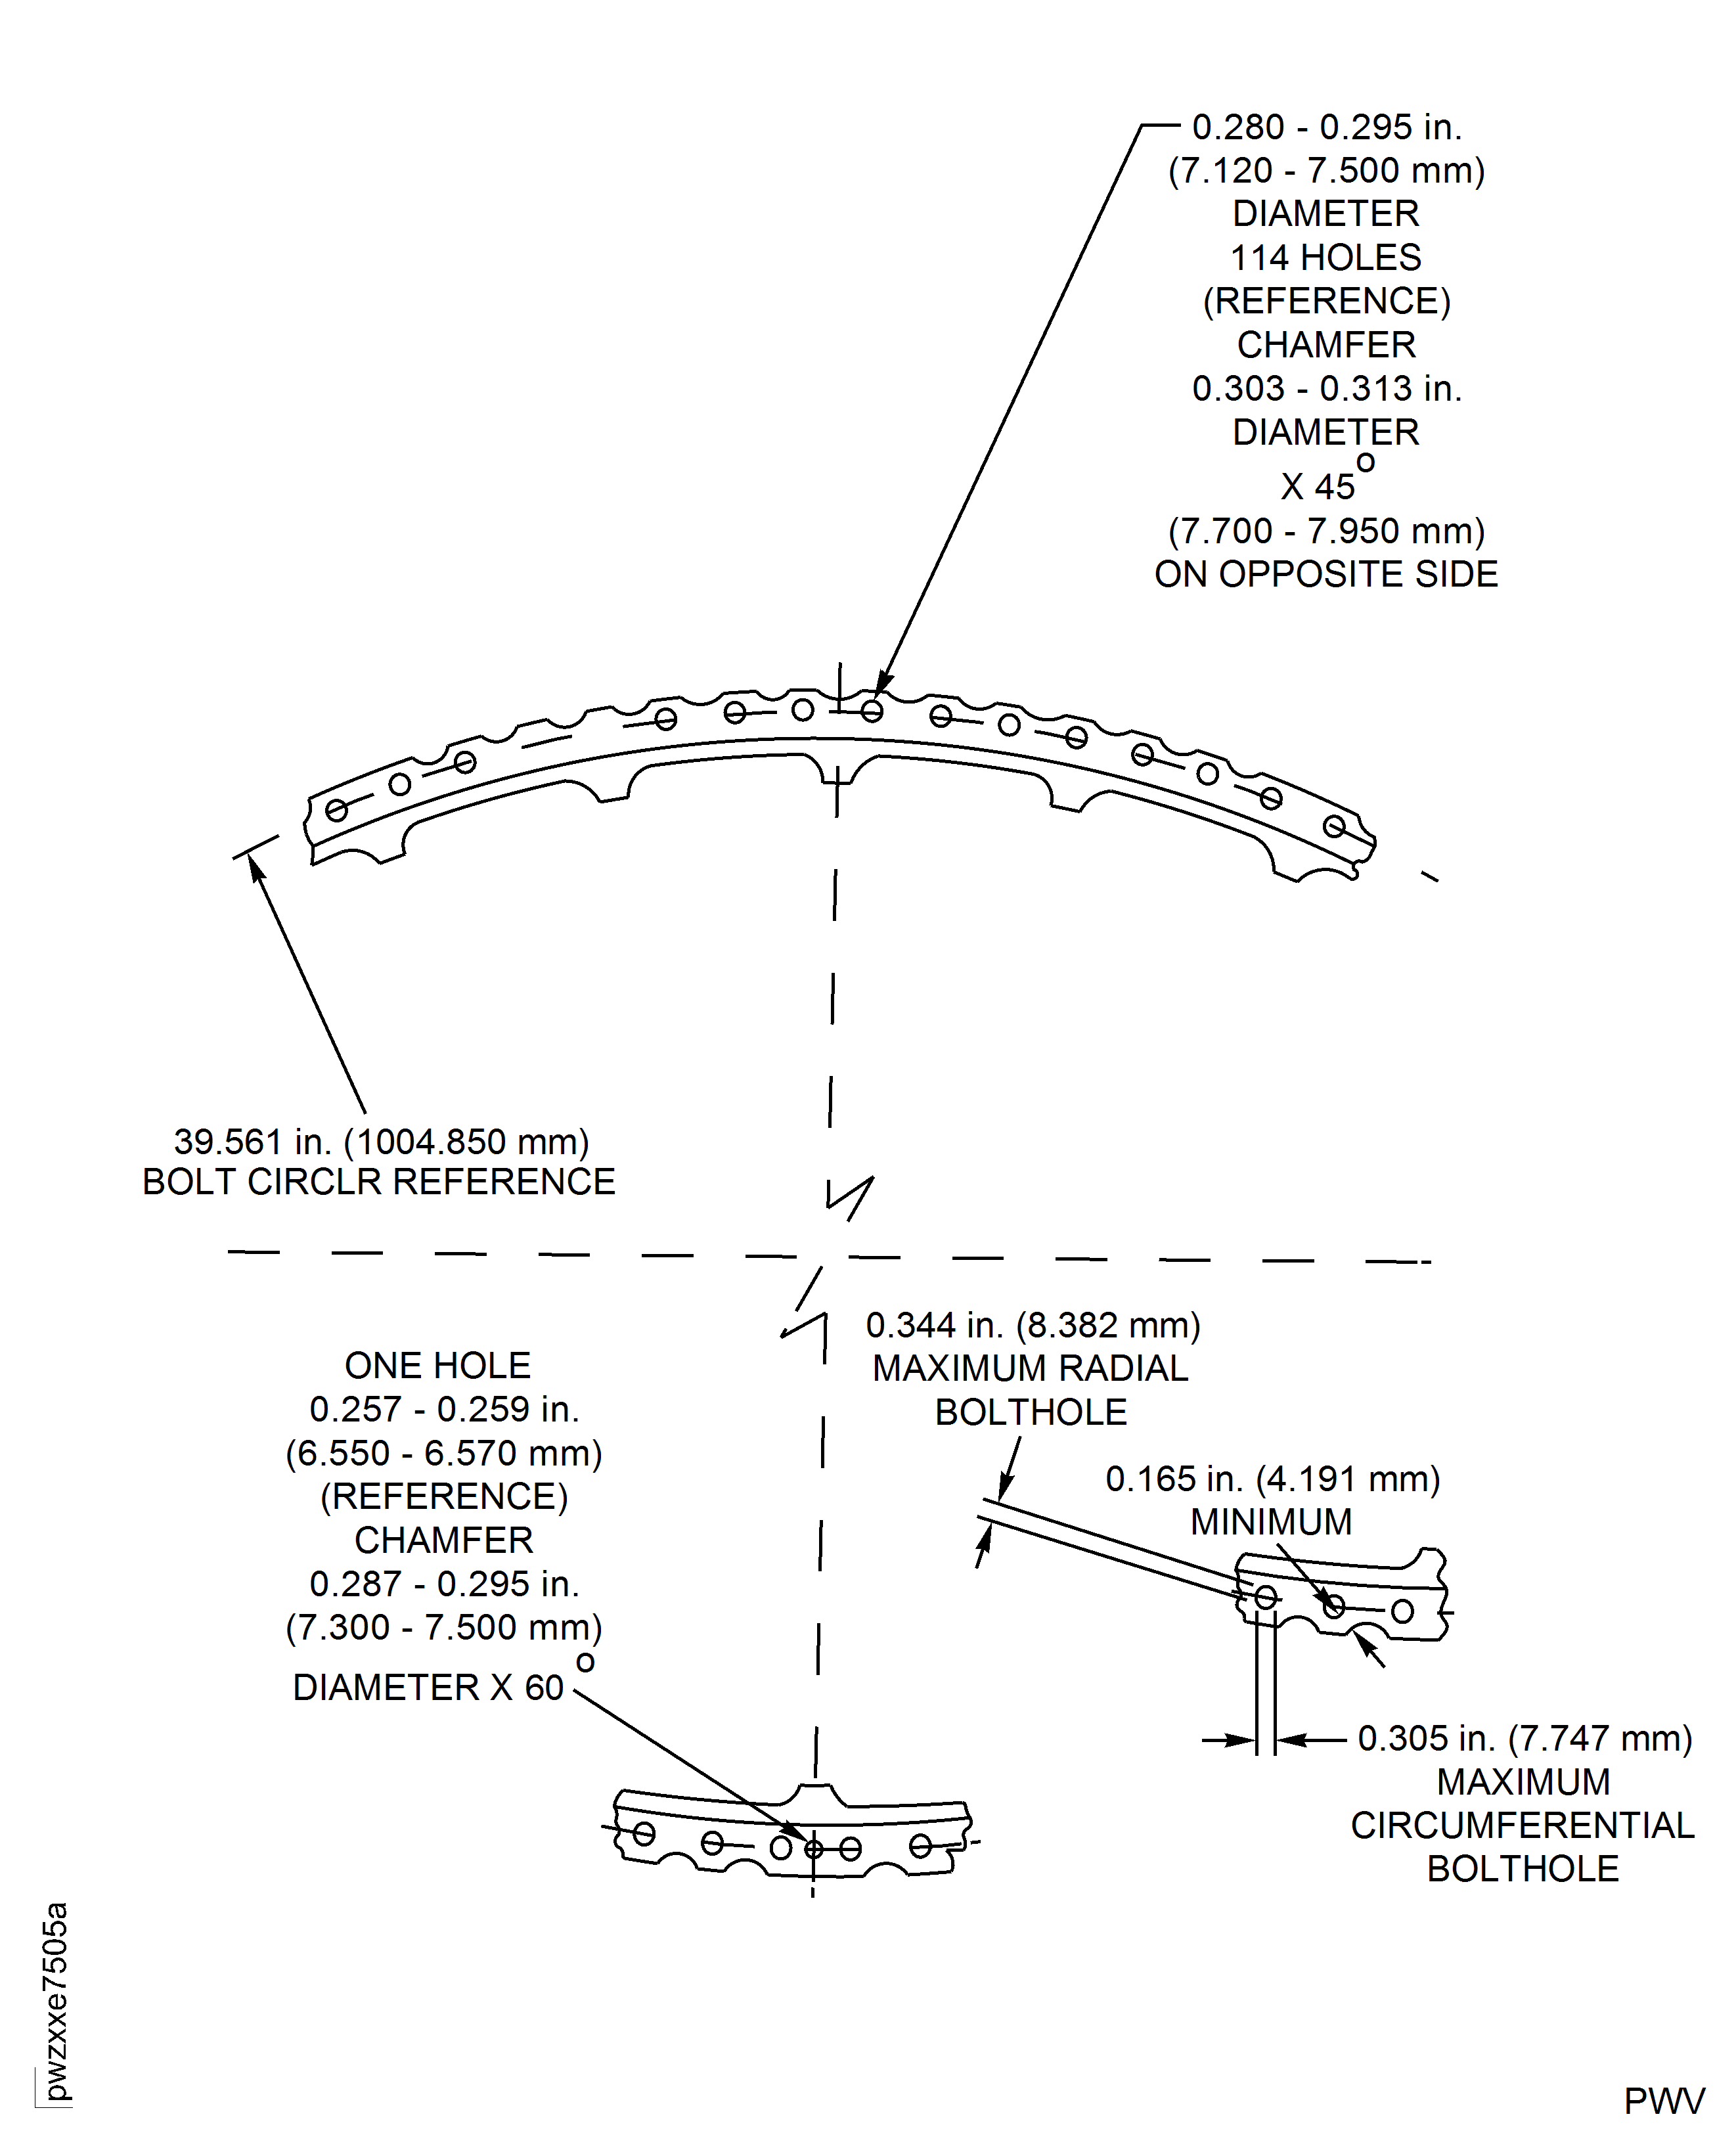
Refer to Figure.
Install the part in the IAE 3P16432 Machining fixture 1 off.
If the machined diameter is between 38.676 in. to 38.752 in. (982.370 mm to 984.3 mm) you must use CoMat 07-123 WIRE.
The inner diameter must be between 38.665 in. to 38.752 in. (982.091 mm to 984.3 mm) after machining. Remove all damage, wear, or coating, but do not remove more than 0.025 in. (0.635 mm) of material.
Machine the front mating diameter to remove wear or surface damage or existing plasma coating.
SUBTASK 72-50-53-320-109 Machine the Front Flange Face and/or the Front Mating Diameter
Refer to SPM TASK 70-11-03-300-503.
Clean the case.
SUBTASK 72-50-53-110-112 Clean the Turbine Exhaust Case
Refer to SPM TASK 70-34-18-380-501.
Grit blast out of repair area(s) is not permitted. Use masks or maskants.
Grit blast the front flange and/or the front mating diameter.
SUBTASK 72-50-53-380-059 Prepare the Front Flange and/or the Front Mating Diameter
Refer to SPM TASK 70-34-03-340-501.
Apply the plasma spray to a sufficient thickness so that the front flange will be 11.590 in. to 11.610 in. (294.39 mm to 294.89 mm) diameter after finish machining.
Apply the plasma spray to a maximum thickness of 0.015 in. (0.381 mm).
No overspray is permitted.
Plasma spray the front flange and/or the front mating diameter.
Refer to SPM TASK 70-34-03-340-501.
If the machined diameter is less than 38.676 in. (982.37 mm), you may use CoMat 03-096 PLASMA SPRAY POWDER. If the machined diameter is between 38.676 in. to 38.752 in. (982.37 mm to 984.30 mm), you must use CoMat 07-123 WIRE.
The front mating diameter must be 38.652 in. to 38.658 in. (981.761 mm to 981.913 mm) after coating and final machining.
Plasma spray the front mating diameter.
SUBTASK 72-50-53-340-052 Plasma Spray the Front Flange and/or the Front Mating Diameter
Set up the part in the IAE 3P16432 Machining fixture (1 off) and machine the front flange and/or the front mating diameter.
SUBTASK 72-50-53-320-179 Machine the Front Flange and/or the Front Mating Diameter
Refer to Figure.
Elongate the boltholes radially inward to 0.344 in. (8.74 mm) maximum length. a. Bolthole ID must not intersect the fillet.
Elongate the boltholes circumferentially to 0.305 in. (7.747 mm) maximum width. a. Minimum strap thickness to edge radius must be 0.165 in. (4.191 mm).
Elongate the locating pin hole radially inward to 0.294 in. (7.47 mm) maximum length.
Radially elongate the 114 equally spaced holes and the locating pin hole to establish the bolt circle again as necessary.
If the bolt circle is not 39.561 in. (1004.85 mm) elongate the holes as follows:
Measure the bolt circle diameter.
SUBTASK 72-50-53-220-229 Examine the BoltHoles and Pin Hole to Establish the Bolt Circle Diameter
Refer to Figure.
Make a permanent mark by the procedure given in SPM TASK 70-09-00-400-501.
Use the shallow etch method.
No burning, pitting or selective attack is permitted from the electrical contact.
Make a beehive symbol mark with the letters PS inside the beehive and mark VRS3328 adjacent to the part number.
SUBTASK 72-50-53-350-115 Identify the Repair
Figure: Repair Details and Dimensions
Repair Details and Dimensions

Figure: Repair Details and Dimensions
Repair Details and Dimensions

Figure: Repair Details and Dimensions
Repair Details and Dimensions

