Export Control
EAR Export Classification: Not subject to the EAR per 15 C.F.R. Chapter 1, Part 734.3(b)(3), except for the following Service Bulletins which are currently published as EAR Export Classification 9E991: SBE70-0992, SBE72-0483, SBE72-0580, SBE72-0588, SBE72-0640, SBE73-0209, SBE80-0024 and SBE80-0025.Copyright
© IAE International Aero Engines AG (2001, 2014 - 2021) The information contained in this document is the property of © IAE International Aero Engines AG and may not be copied or used for any purpose other than that for which it is supplied without the express written authority of © IAE International Aero Engines AG. (This does not preclude use by engine and aircraft operators for normal instructional, maintenance or overhaul purposes.).Applicability
All
Common Information
TASK 72-50-53-300-075 Turbine Exhaust Case (TEC) - Blend Repair On The No. 5 Bearing Oil Tube Boss And Cover Bolt Boss Crack, Repair-075 (VRS3632)
Effectivity
FIG/ITEM | PART NO. |
|---|---|
21-300 | 2A1209-01 |
21-300 | 2A2620-01 |
21-300 | 2A3111-01 |
21-300 | 2A3183-01 |
21-300 | 2A3455-01 |
21-300 | 2A3183-101 |
21-300 | 2A4258-01 |
21-300 | 2A4263-01 |
Material of component
PART IDENT | SYMBOL | MATERIAL |
|---|---|---|
Turbine Exhaust Case Assembly | Corrosion and heat resistant steel |
General
Prices and Availability - Refer to IAE
The practices and processes referred to in the procedure by the TASK number are in the SPM.
NOTE
Preliminary Requirements
Pre-Conditions
NONESupport Equipment
| Name | Manufacturer | Part Number / Identification | Quantity | Remark |
|---|---|---|---|---|
| Fluorescent Penetrant Inspection Equipment | LOCAL | Fluorescent penetrant inspection equipment | ||
| Welding equipment | LOCAL | Welding equipment |
Consumables, Materials and Expendables
| Name | Manufacturer | Part Number / Identification | Quantity | Remark |
|---|---|---|---|---|
| CoMat 06-064 FLUORESCENT PENETRANT (WATER WASHABLE MEDIUM SENSITIVITY) | LOCAL | CoMat 06-064 | ||
| CoMat 01-007 ETHYL ALCOHOL C2H5OH (DENATURED) | LOCAL | CoMat 01-007 | ||
| CoMat 02-099 LINT-FREE CLOTH | LOCAL | CoMat 02-099 | ||
| CoMat 03-378 WELDING WIRE | LOCAL | CoMat 03-378 |
Spares
NONESafety Requirements
NONEProcedure
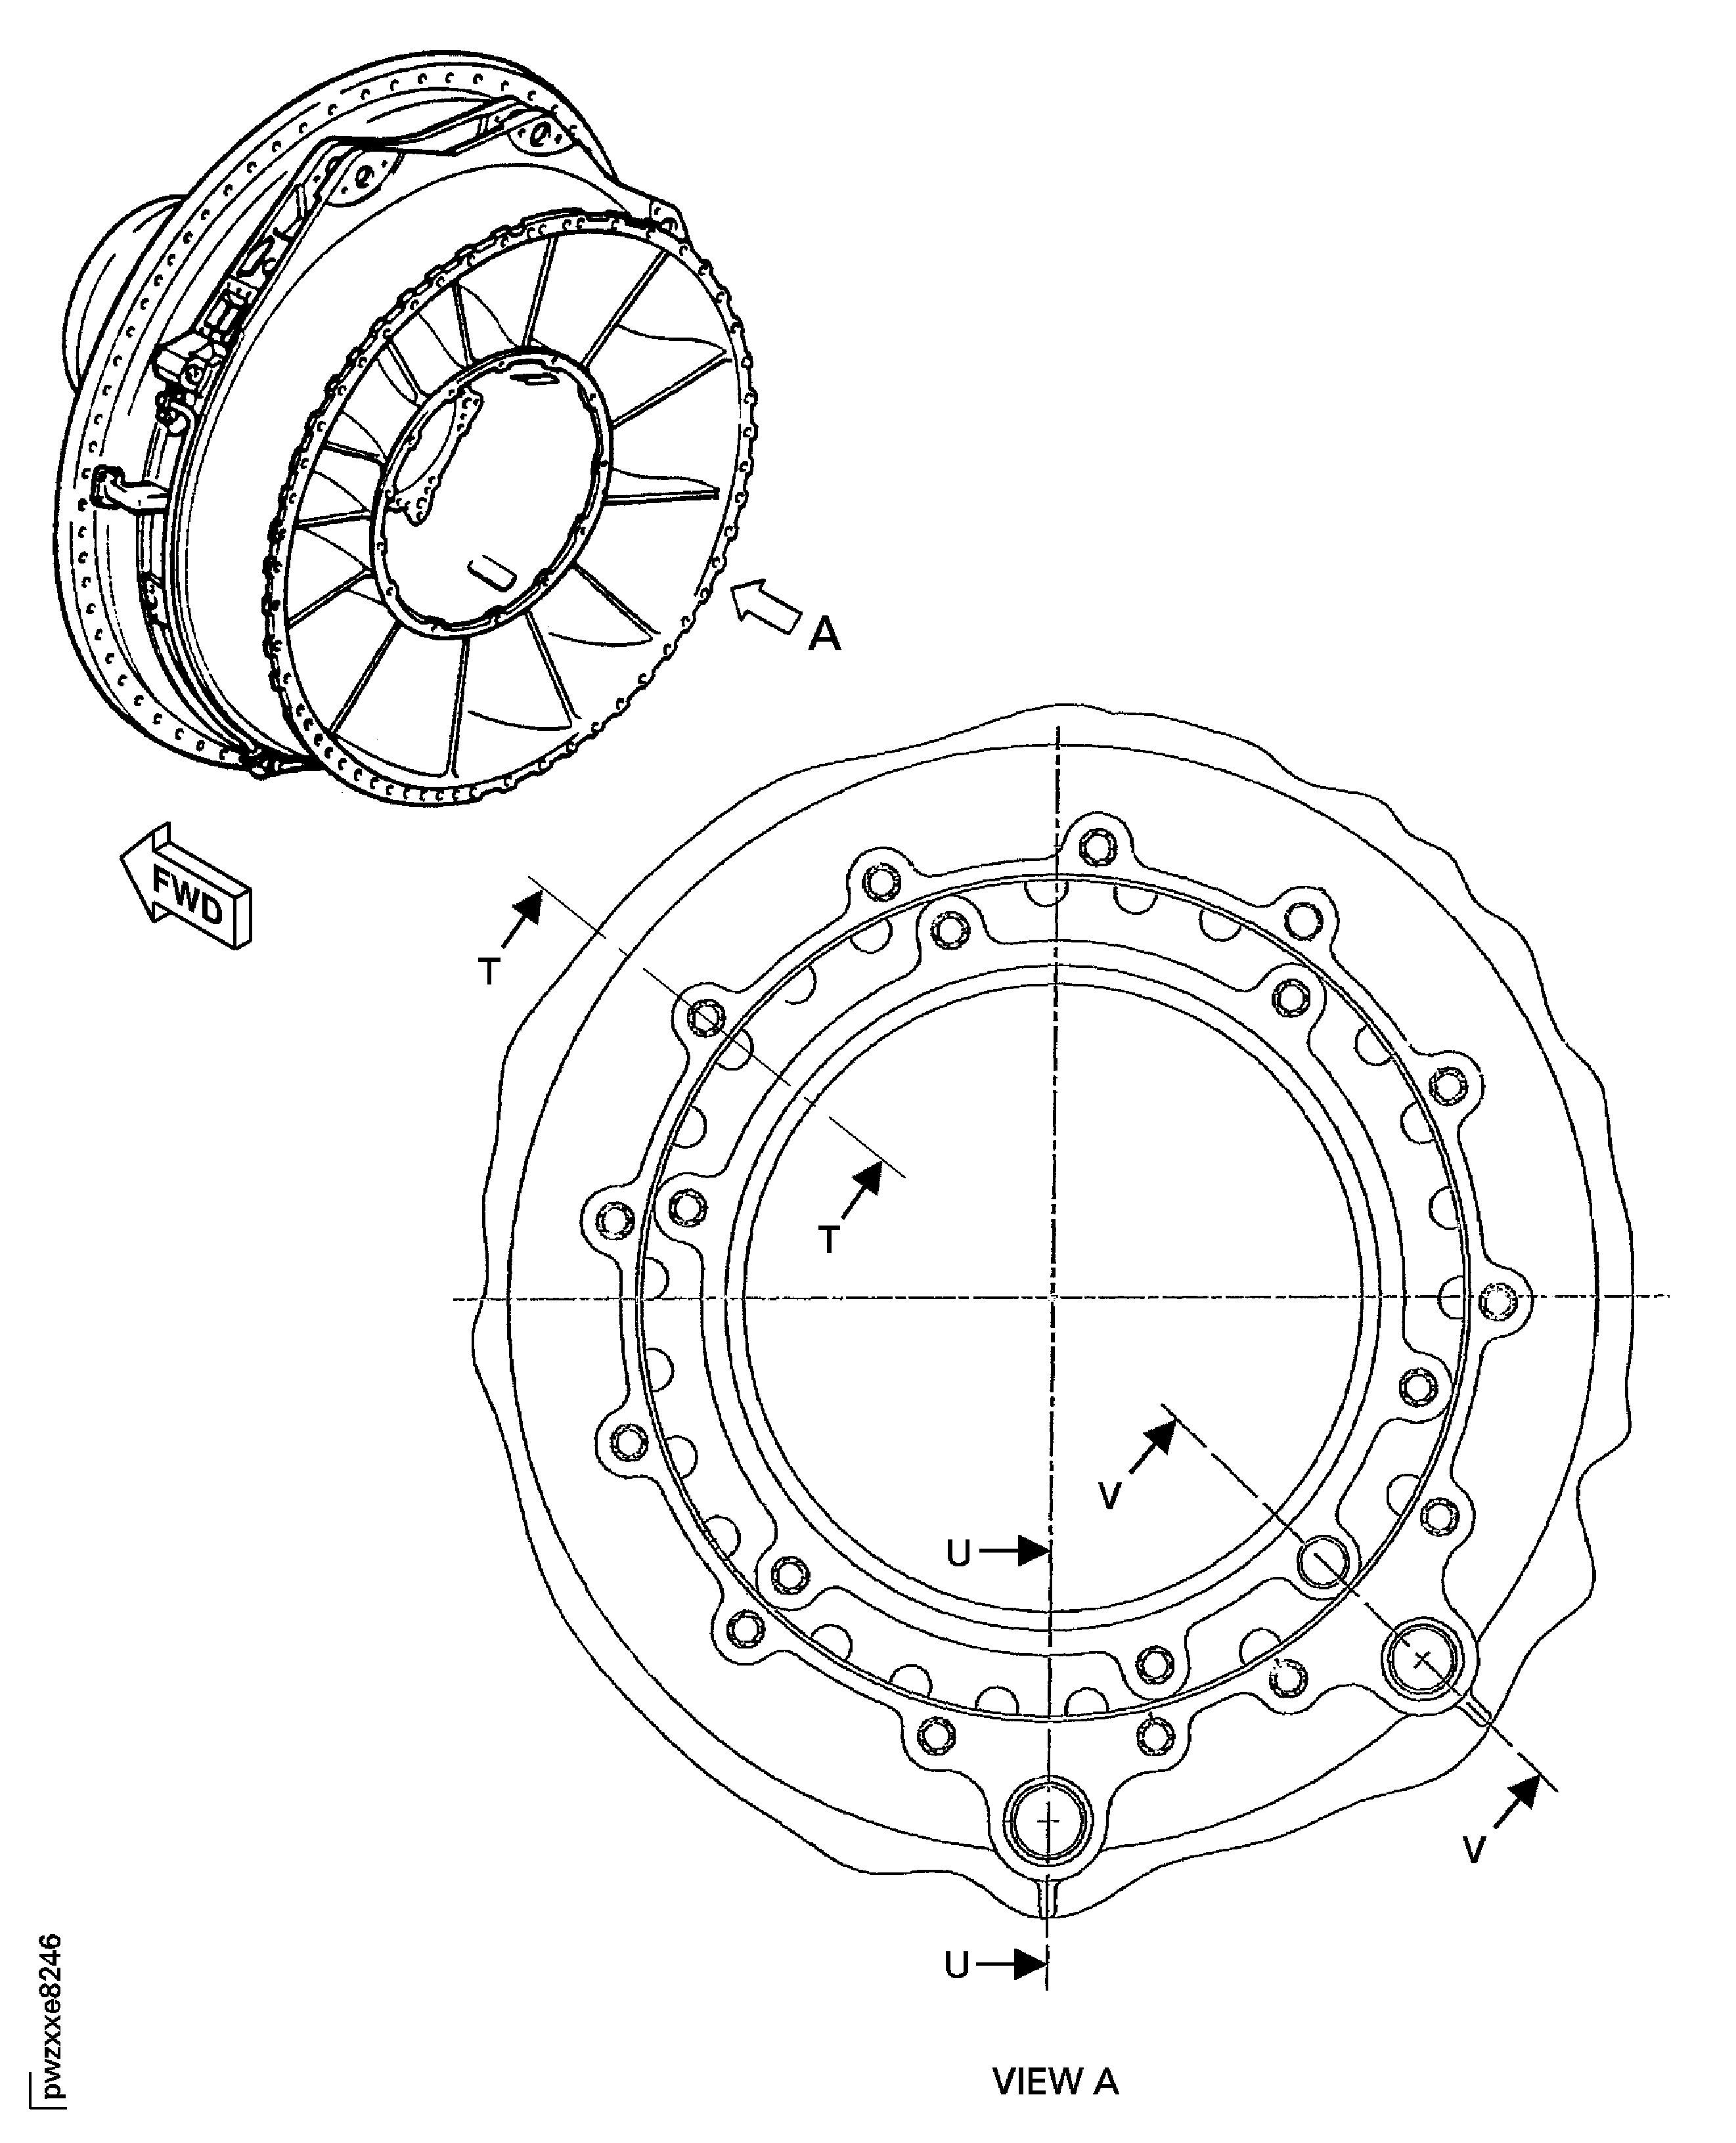
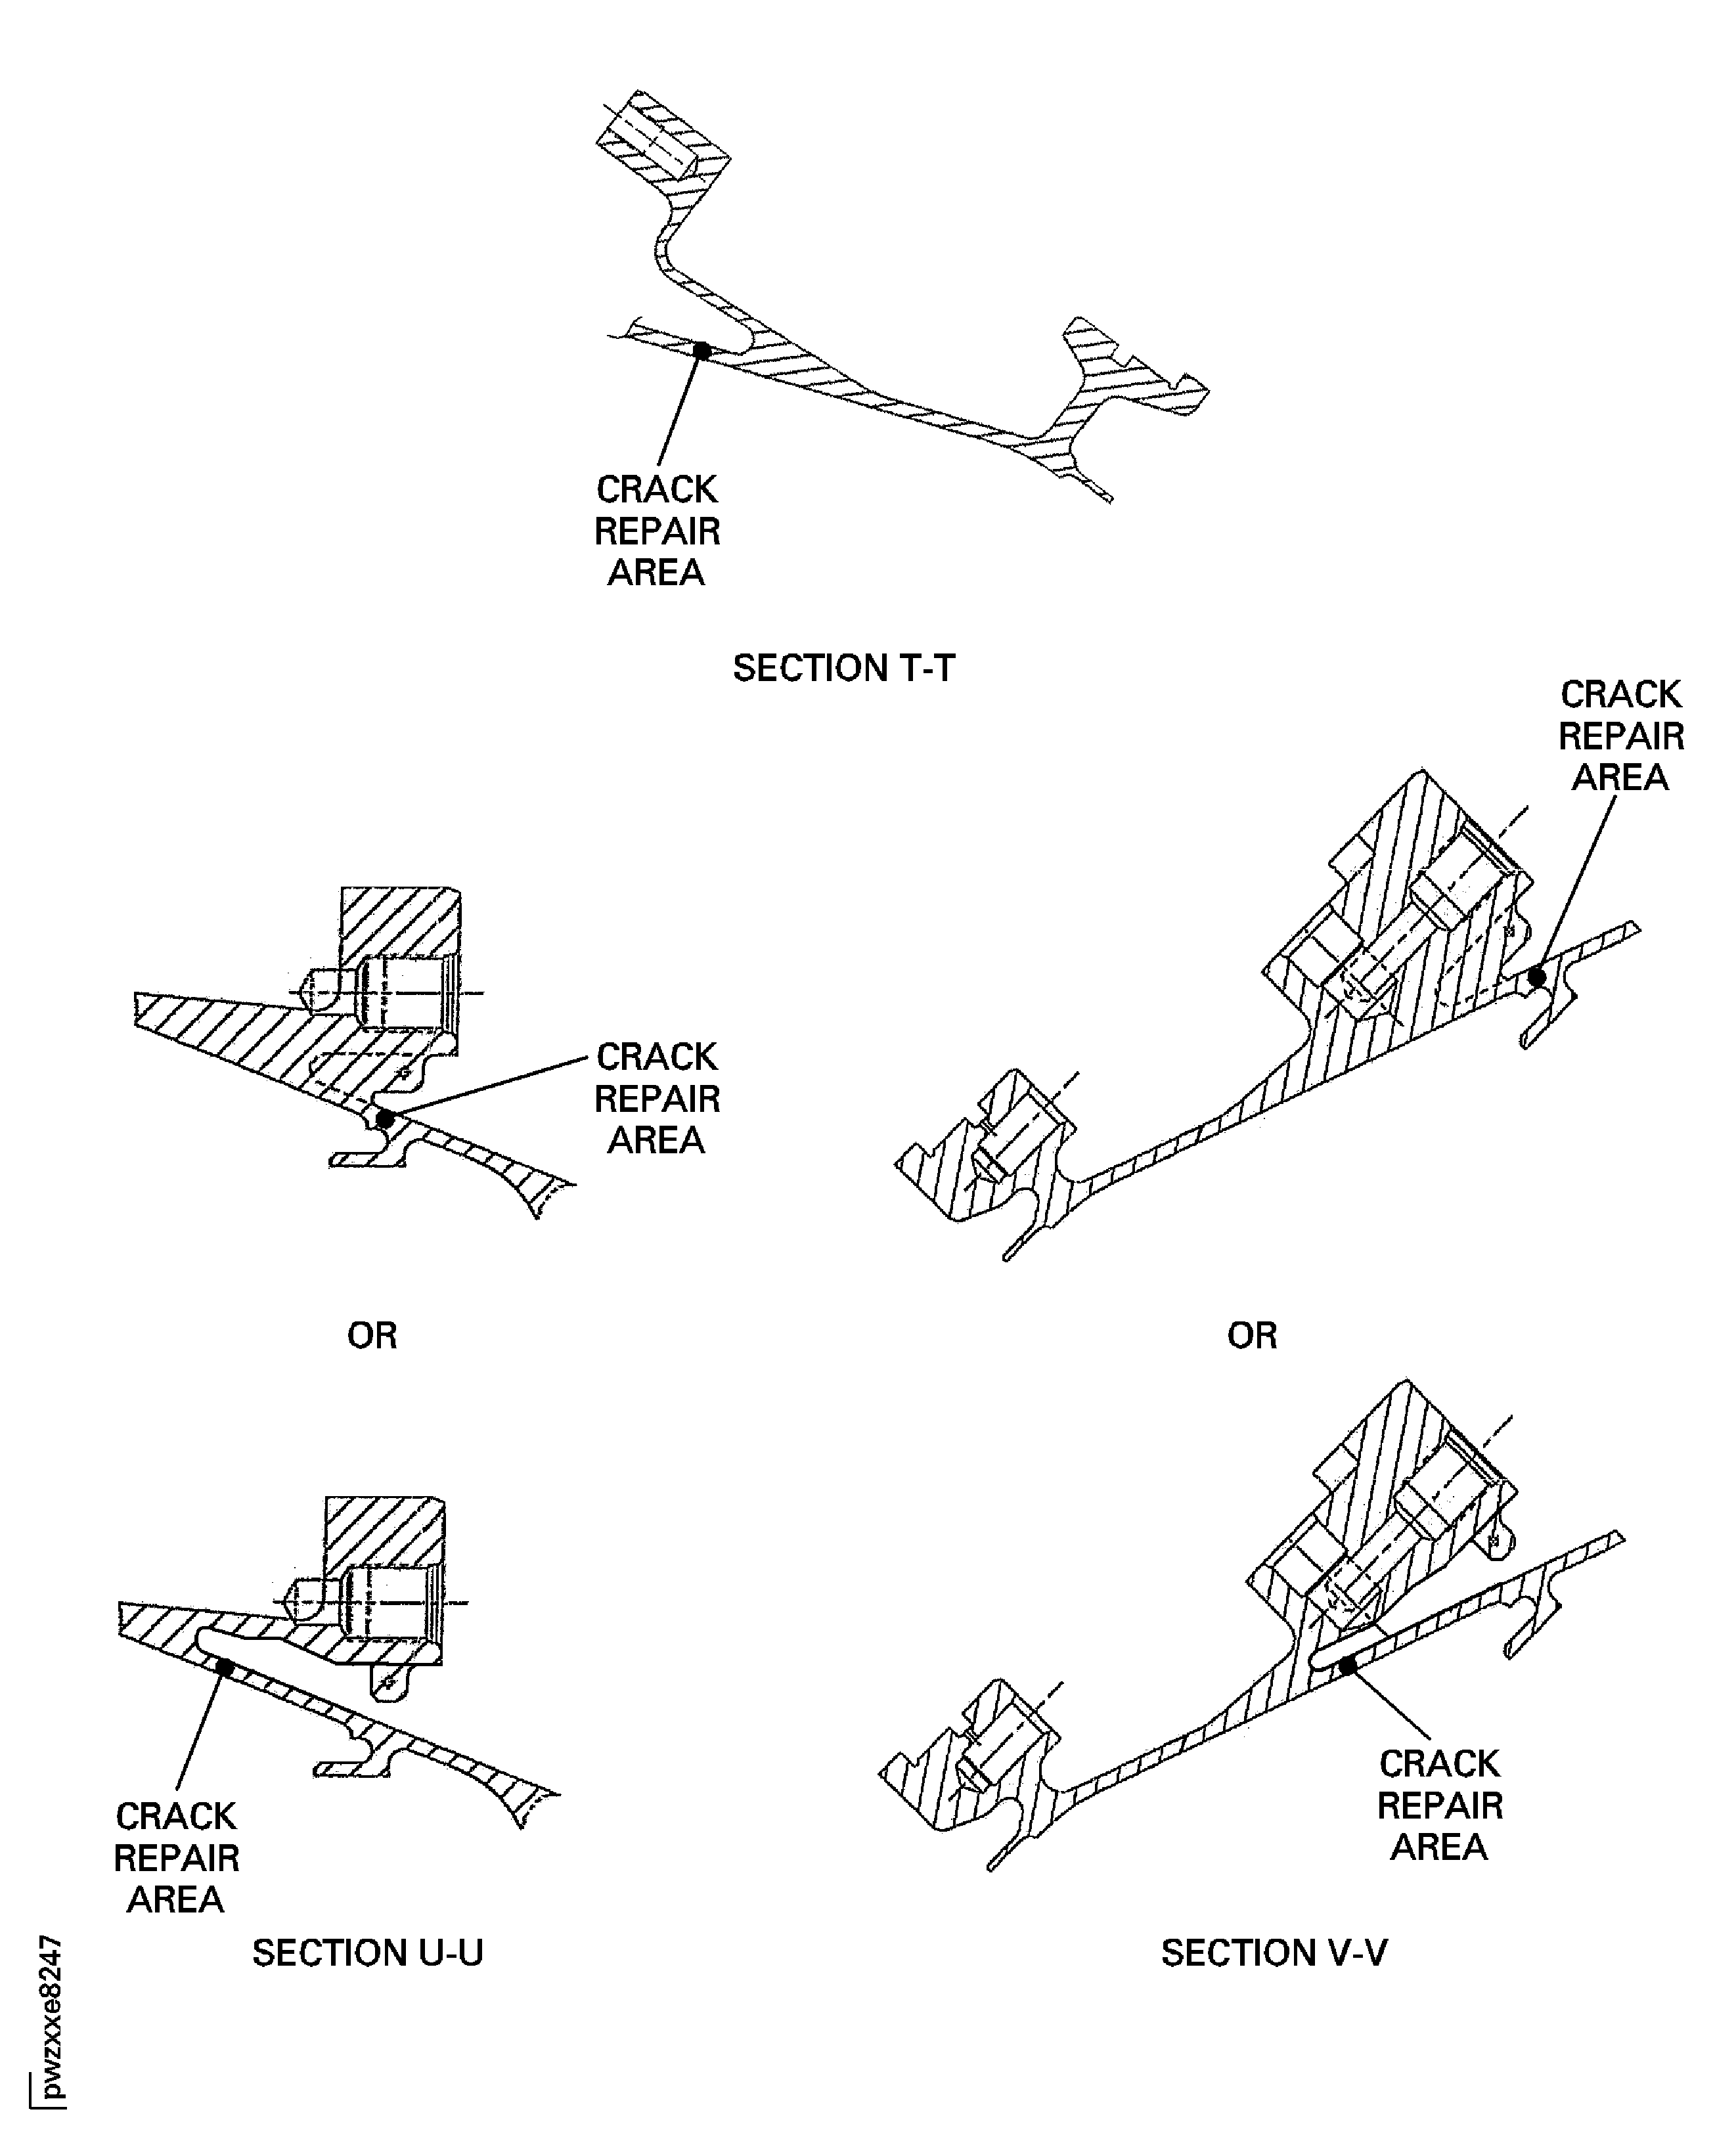
Refer to Figure.
If the wall thickness of the bosses.
after routing is greater than or equal.
to 0.095 in. (2.41 mm), do a blend repair.
of the routed area Step.
If the wall thickness of the bosses.
after routing is less than or equal.
to 0.095 in. (2.41 mm), do a weld repair.
of the routed area Step.
SUBTASK 72-50-53-350-163 Rout the Repair Area to Repair the Cracks
Use a CoMat 02-099 LINT-FREE CLOTH and CoMat 01-007 ETHYL ALCOHOL C2H5OH (DENATURED). Refer to the SPM TASK 70-11-26-300-503.
Clean the routed area.
Refer to the SPM TASK 70-31-02-310-501. Use CoMat 03-378 WELDING WIRE. Apply sufficient material to make sure you can blend to the adjacent surfaces.
Weld the routed area manually.
SUBTASK 72-50-53-310-078 Weld Repair the Routed Repair Area to Keep the Minimum Wall thickness
Do a local fluorescent penetrant inspection procedure. Refer to the SPM TASK 70-23-05-230-501. Use CoMat 06-064 FLUORESCENT PENETRANT (WATER WASHABLE MEDIUM SENSITIVITY).
Inspect for cracks.
SUBTASK 72-50-53-230-110 Inspect for Cracks Using Fluorescent Penetrant Inspection
Refer to the SPM TASK 70-37-13-370-501. If furnace stress relief is used, remove the heat shields, 13 rear inner flange nut plates, 3 carbon seal flange nut plates, 19 bearing cover boss helical coil inserts, and 2 jumper tube boss helical coil inserts.
Do a local or furnace.
stress relieve.
SUBTASK 72-50-53-370-085 Stress Relieve the Turbine Exhaust Case/Weld Repair Areas

CAUTION
KEEP THE TIME BETWEEN WELD REPAIR AND STRESS RELIEF TO A MINIMUM TO DECREASE THE POSSIBILITY OF CRACKS.For a local fluorescent penetrant inspection, refer to the SPM TASK 70-23-05-230-501.
Inspect for cracks using local.
fluorescent penetrant inspection if a.
local stress relief was used.
Inspect for cracks on all of the.
turbine exhaust case if a furnace.
stress relief was used.
SUBTASK 72-50-53-230-111 Inspect for Cracks Using Fluorescent Penetrant Inspection
Figure: Repair Details and Dimensions
Sheet 1

Figure: Repair Details and Dimensions
Sheet 2

