Export Control
EAR Export Classification: Not subject to the EAR per 15 C.F.R. Chapter 1, Part 734.3(b)(3), except for the following Service Bulletins which are currently published as EAR Export Classification 9E991: SBE70-0992, SBE72-0483, SBE72-0580, SBE72-0588, SBE72-0640, SBE73-0209, SBE80-0024 and SBE80-0025.Copyright
© IAE International Aero Engines AG (2001, 2014 - 2021) The information contained in this document is the property of © IAE International Aero Engines AG and may not be copied or used for any purpose other than that for which it is supplied without the express written authority of © IAE International Aero Engines AG. (This does not preclude use by engine and aircraft operators for normal instructional, maintenance or overhaul purposes.).Applicability
All
Common Information
TASK 72-60-21-300-042 Main Gearbox Casing - Repair The Bearing Mating Surface Of The Deoiler By Bushing, Repair-042 (VRS5291)
Material of component
DESCRIPTION | RR SYMBOL | MATERIAL |
|---|---|---|
Accessory gearbox casing | A357/T61 (AMS4219) | Aluminium alloy |
Bushing | - | Wrought aluminum base alloy |
General
NOTE
Preliminary Requirements
Pre-Conditions
NONESupport Equipment
| Name | Manufacturer | Part Number / Identification | Quantity | Remark |
|---|---|---|---|---|
| Arbor Press | LOCAL | Arbor press | ||
| Freezer | LOCAL | Freezer | ||
| IAE 3F10336 Drift, bushing (dia 67) | 0AM53 | IAE 3F10336 | 1 | |
| IAE 3F10428 Guide pin | 0AM53 | IAE 3F10428 | 1 | |
| Magnifying Glass | LOCAL | Magnifying Glass | ||
| Oven | LOCAL | Oven | ||
| Workshop inspection equipment | LOCAL | Workshop inspection equipment |
Consumables, Materials and Expendables
NONESafety Requirements
NONEProcedure
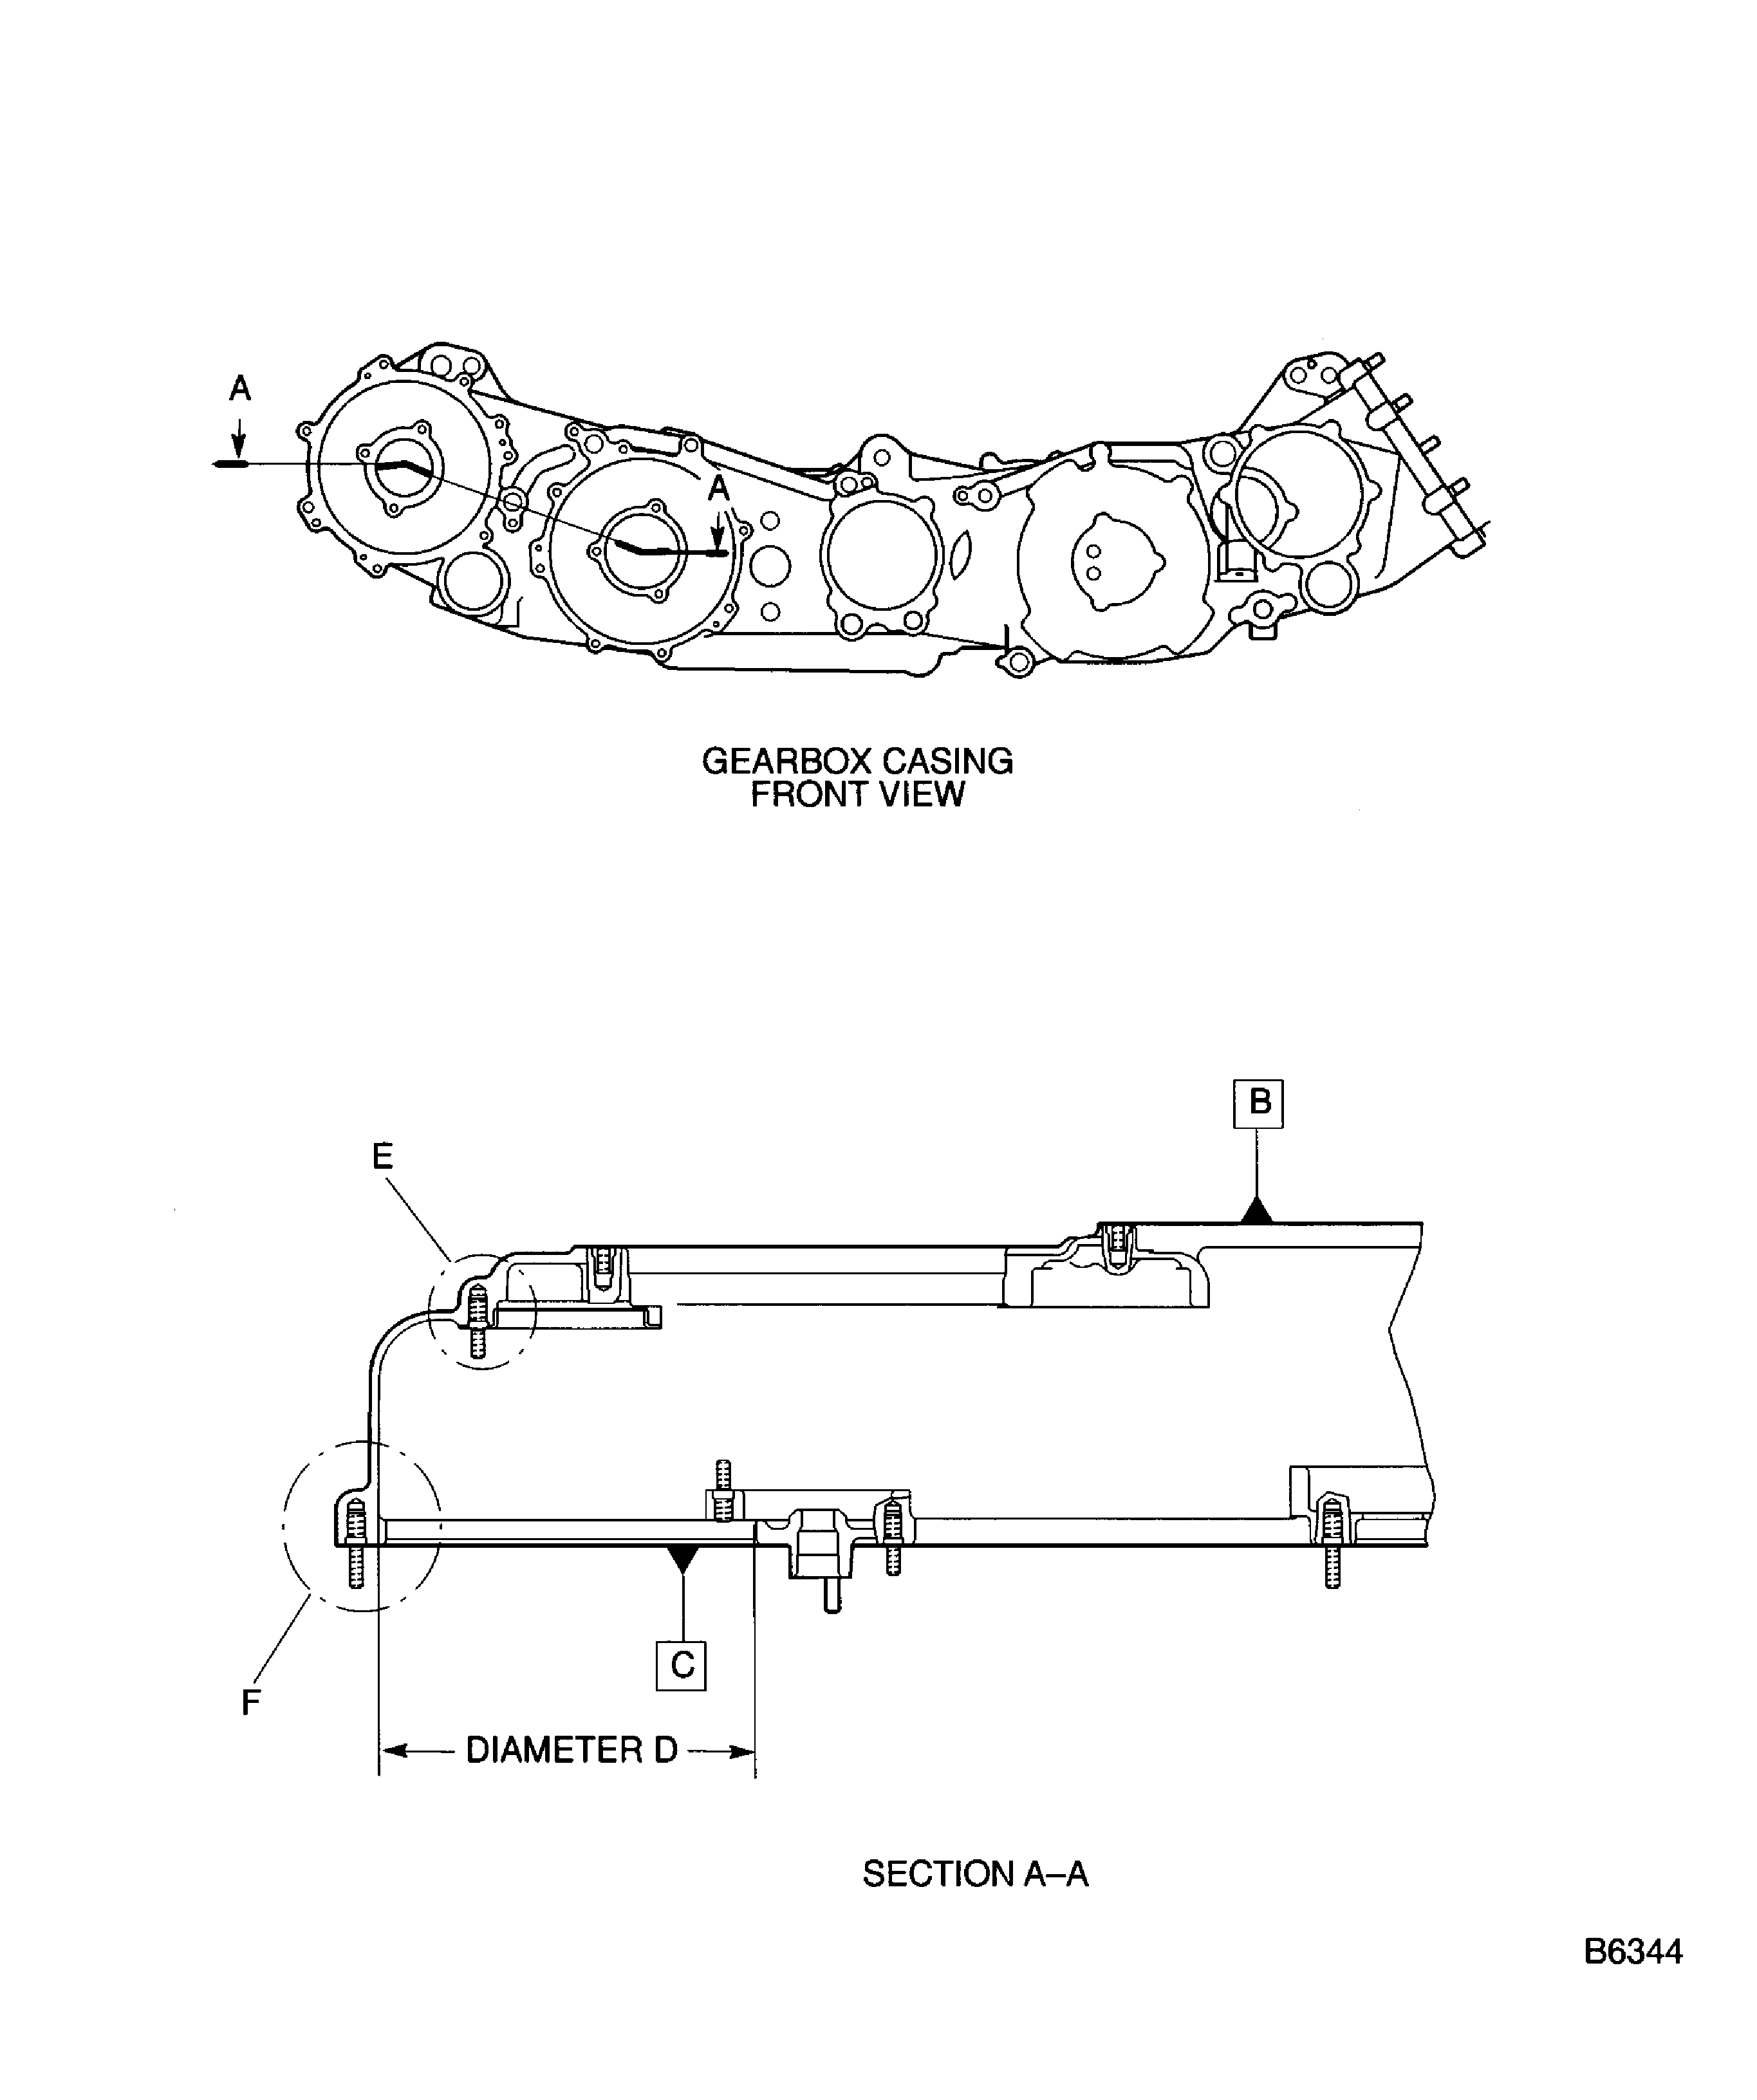
Refer to Figure.
Refer to Repair, VRS 5255, TASK 72-60-21-300-004.
Remove the studs and the lock rings.
SUBTASK 72-60-21-350-086 Remove the Studs
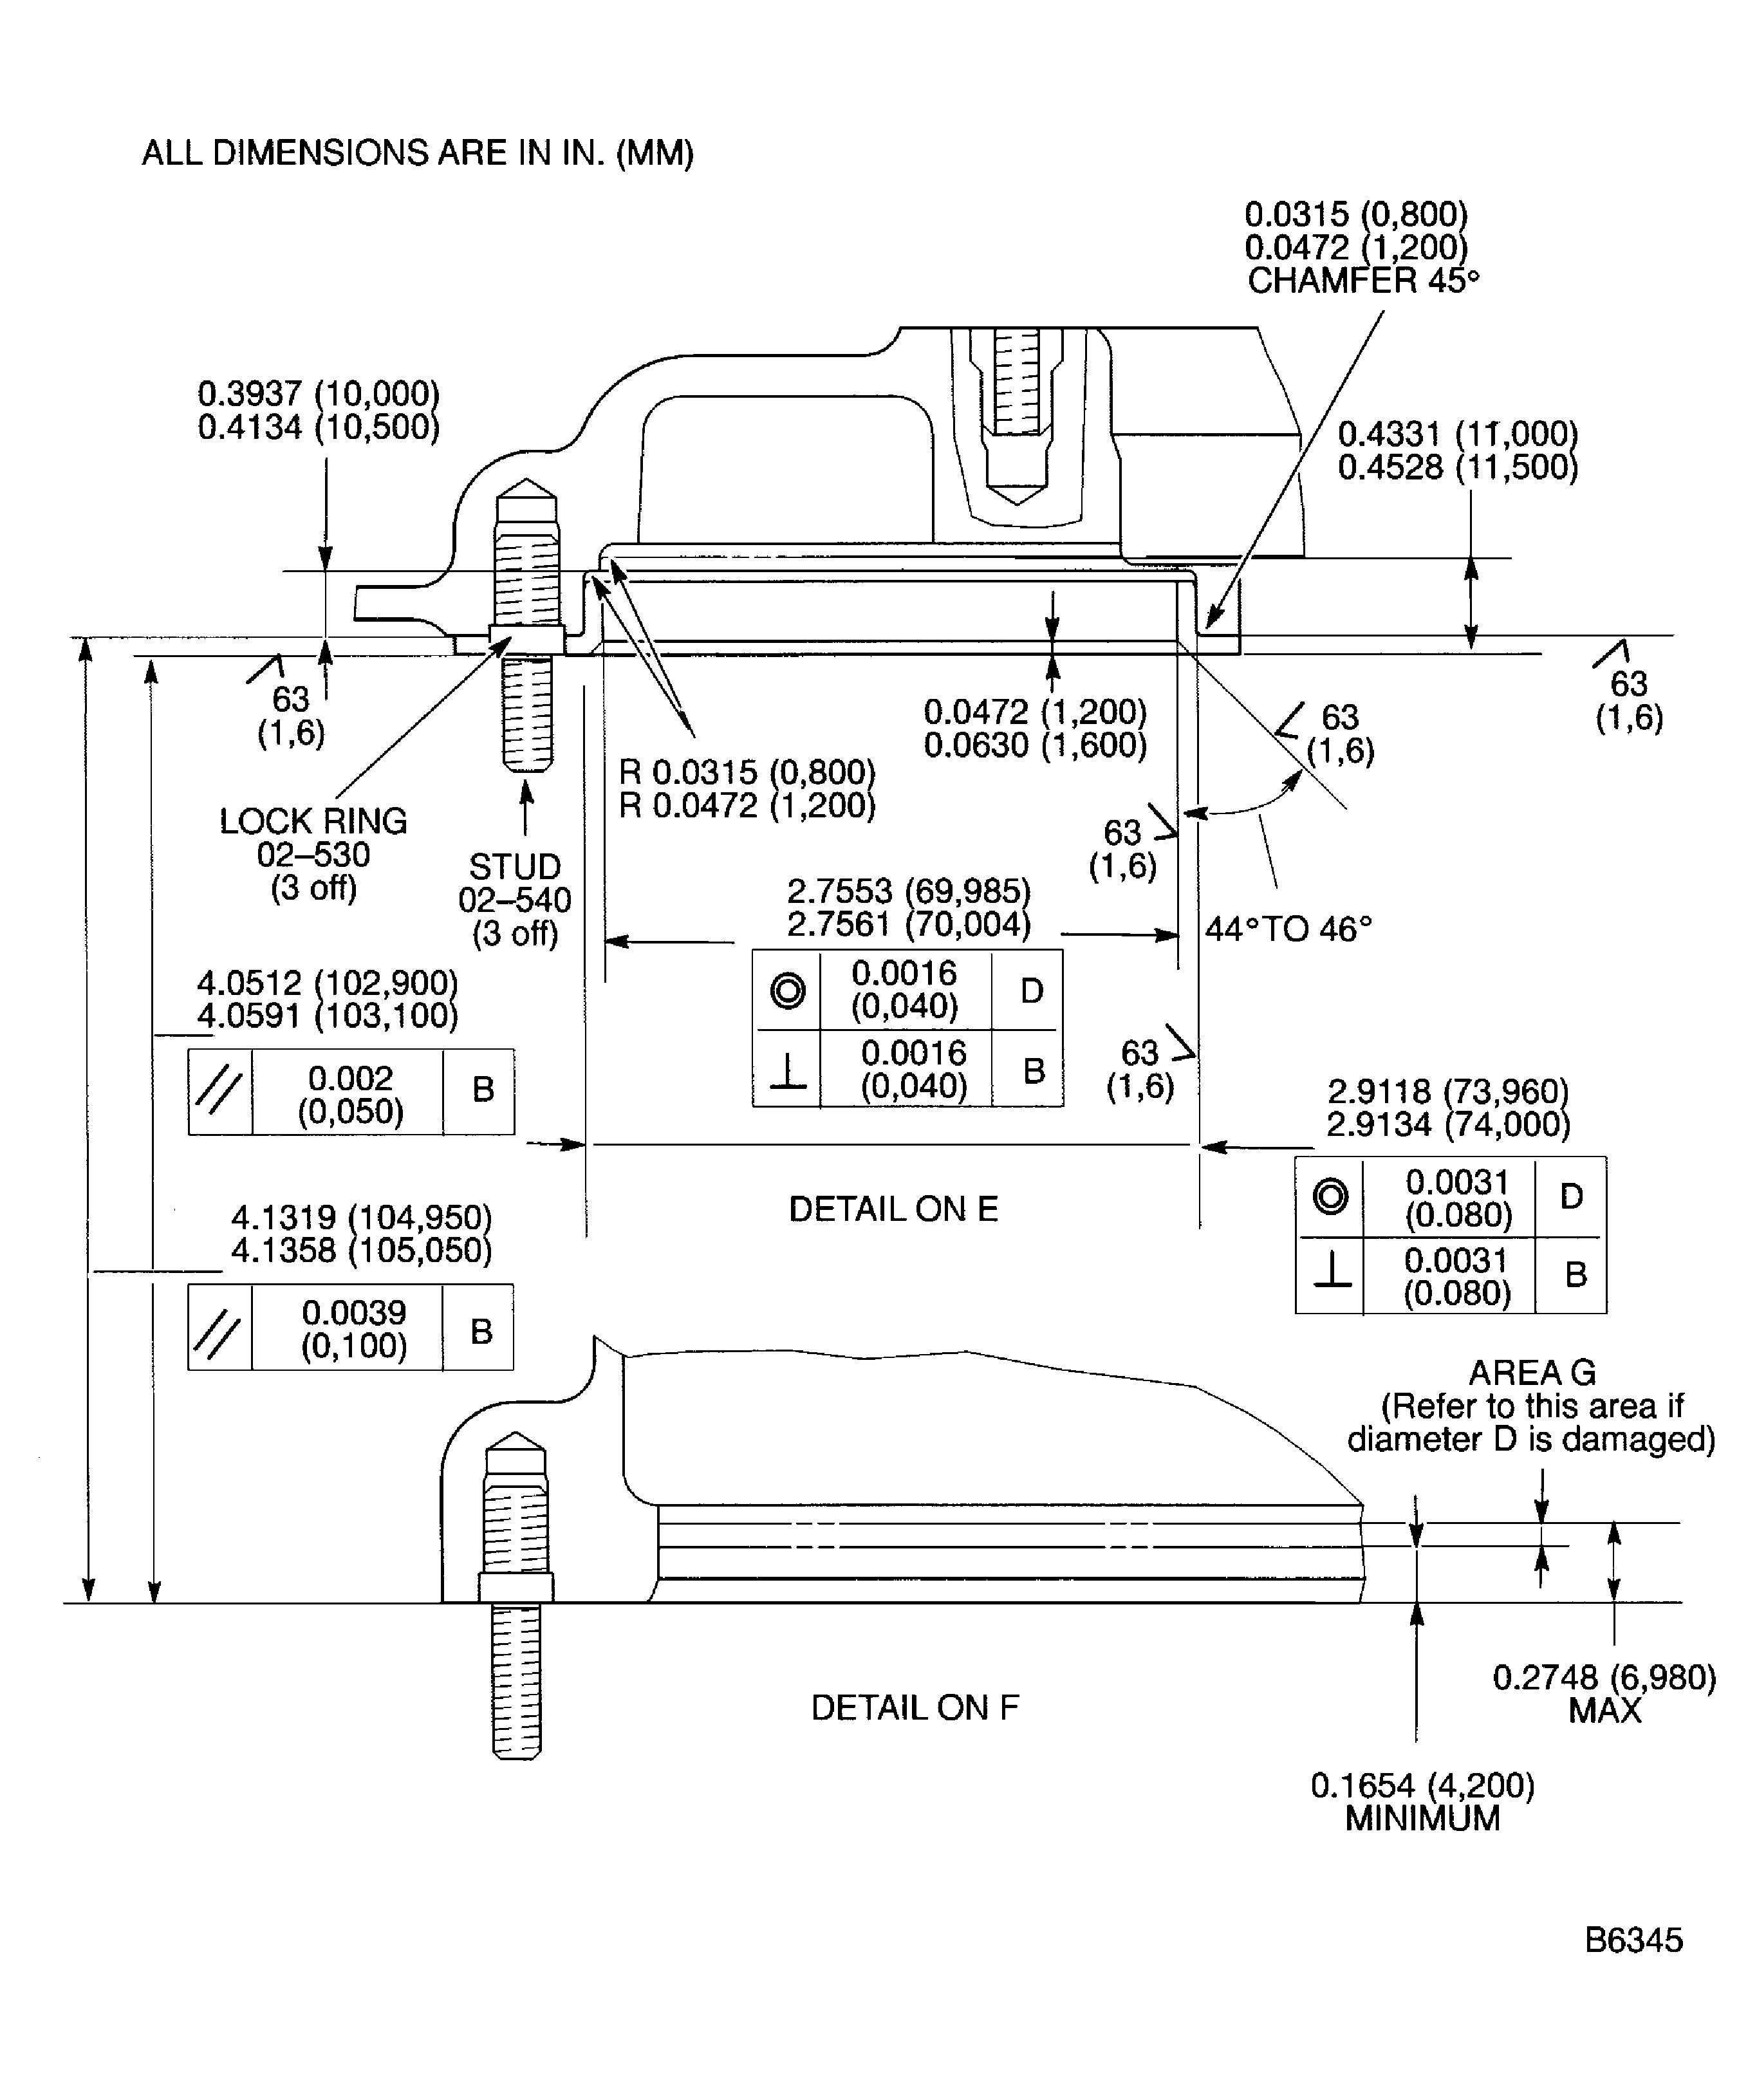
Refer to Figure.
SUBTASK 72-60-21-320-075 Machine the Bearing Bore in the Gearbox Casing
Refer to Figure.
SUBTASK 72-60-21-320-076 Machine the Bearing Mating Surface in the Gearbox Casing
Refer to the SPM TASK 70-38-02-300-503.
Apply the chromate conversion coating to the machined surfaces.
SUBTASK 72-60-21-330-072 Apply the Chromate Conversion Coating
Refer to Figure.
Put IAE 3F10428 Guide pin 1, off in threaded hole on bearing mating surface, adjacent to machined bore.
Install the guide pin.
Install the bushing on the IAE 3F10336 Drift, bushing (dia 67) 1 off.
Do not increase the temperature of the casing above 284 deg F (140 deg C).
Do not decrease the temperature of the assembled drift and bushing below -58 deg F (-50 deg C).

WARNING
DO NOT TOUCH THE HOT PARTS WITHOUT PROTECTIVE GLOVES.HOT PARTS CAN CAUSE REDDENING AND BLISTERING OF THE SKIN IF THE HANDS ARE NOT PROTECTED.IMMERSE THE CONTACTED AREA IN COLD WATER FOR 10 MINUTES IF THE SKIN IS BURNED. IMMEDIATELY GET THE MEDICAL ATTENTION IF PAIN OR BLISTERING PERSIST.Increase the temperature of the gearbox casing and/or decrease the temperature of the assembled drift and bushing.
Give sufficient back-up support at bushing bore area, to prevent casing distortion when you install the bushing.
Use IAE 3F10336 Drift, bushing (dia 67) 1 off and an arbor press.

CAUTION
INSTALL BUSHING IN MACHINED BORE IMMEDIATELY AFTER REMOVAL FROM FREEZER, OTHERWISE BUSHING CANNOT BE CORRECTLY INSTALLED.Install the bushing into machined bore.
SUBTASK 72-60-21-350-087 Install the Bushing
Refer to Figure.
SUBTASK 72-60-21-320-077 Machine the Inner Diameter of the Bushing
Refer to Figure.
SUBTASK 72-60-21-320-078 Machine the Flange Surface of the Bushing
Refer to the SPM TASK 70-38-02-300-503.
Apply the chromate conversion coating to the machined surfaces of the bushing.
SUBTASK 72-60-21-330-073 Apply the Chromate Conversion Coating
Refer to Figure.
Refer to repair VRS5255, TASK 72-60-21-300-004.
Install the new studs and the new lock rings.
SUBTASK 72-60-21-350-088 Install the New Studs
Refer to Figure.
Refer to the SPM TASK 70-09-00-400-501 SUBTASK 70-09-00-400-001.
Make a mark VRS5291 adjacent to the part number.
SUBTASK 72-60-21-350-089 Identify the Repair
Figure: Repair Details And Dimensions
Repair Details And Dimensions

Figure: Repair Details And Dimensions
Repair Details And Dimensions

