Export Control
EAR Export Classification: Not subject to the EAR per 15 C.F.R. Chapter 1, Part 734.3(b)(3), except for the following Service Bulletins which are currently published as EAR Export Classification 9E991: SBE70-0992, SBE72-0483, SBE72-0580, SBE72-0588, SBE72-0640, SBE73-0209, SBE80-0024 and SBE80-0025.Copyright
© IAE International Aero Engines AG (2001, 2014 - 2021) The information contained in this document is the property of © IAE International Aero Engines AG and may not be copied or used for any purpose other than that for which it is supplied without the express written authority of © IAE International Aero Engines AG. (This does not preclude use by engine and aircraft operators for normal instructional, maintenance or overhaul purposes.).Applicability
All
Common Information
TASK 72-60-21-300-056 Main Gearbox Casing - Repair The Screw Thread Insert Holes At The IDG Location By Bushing, Repair-056 (VRS5707)
Effectivity
FIG/ITEM | PART NO. |
|---|---|
02-050 | 4B0053 |
02-050 | 4B0054 |
02-050 | 4B0055 |
02-050 | 4B0057 |
02-050 | 4B0400 |
02-050 | 4B0402 |
02-050 | 4B0423 |
Material of component
PART IDENT | SYMBOL | MATERIAL |
|---|---|---|
Casing, Main Gearbox | A357/T61 (AMS4219) | Aluminum alloy |
Bushing | A357-T61 Spec. AMS 4219, or AMS 4120 (type 2024 T4fT351) | Aluminum alloy, Beryllium free |
Antirotation Pin | A357-T61 Spec. AMS 4219, or AMS 4120 (type 2024 T4fT351) | Aluminum alloy, Beryllium free |
General
The practices and processes referred to in the procedure by the TASK numbers are in SPM.
For the removal of screw thread inserts, refer to Repair, VRS5256 TASK 72-60-21-300-005 (REPAIR-005), SUBTASKS 72-60- 21-320-053 and 72-60-21-350-054.
For the installation of screw thread inserts, refer to Repair, VRS5256) TASK 72-60-21-300-005 (REPAIR-005), SUBTASKS 72-60- 21-350-055 and 72-60-21-350-059.
Preliminary Requirements
Pre-Conditions
NONESupport Equipment
| Name | Manufacturer | Part Number / Identification | Quantity | Remark |
|---|---|---|---|---|
| Fluorescent Penetrant Inspection Equipment | LOCAL | Fluorescent Penetrant Inspection Equipment | ||
| Standard Workshop Equipment | LOCAL | Standard Workshop Equipment | ||
| Vibration peen equipment | LOCAL | Vibration peen equipment | ||
| Vibro-engraving equipment | LOCAL | Vibro-engraving equipment | ||
| Workshop inspection equipment | LOCAL | Workshop inspection equipment | ||
| 10X Magnifying glass | LOCAL | 10X Magnifying glass |
Consumables, Materials and Expendables
| Name | Manufacturer | Part Number / Identification | Quantity | Remark |
|---|---|---|---|---|
| CoMat 01-031 ACETONE (CH3)2CO | LOCAL | CoMat 01-031 | ||
| CoMat 01-459 AQUEOUS WIPE CLEANER | 71410 | CoMat 01-459 | ||
| CoMat 02-002 ADHESIVE TAPE GENERALPURPOSE PAPER | LOCAL | CoMat 02-002 | ||
| CoMat 06-063 FLUORESCENT PENETRANT (POST-EMULSIFIED MEDIUM SENSITIVITY) | X222X | CoMat 06-063 | ||
| CoMat 07-028 CHROMATE CONVERSION COATING FOR ALUMINUM | LOCAL | CoMat 07-028 |
Spares
| Name | Manufacturer | Part Number / Identification | Quantity | Remark |
|---|---|---|---|---|
| RING - LOCKING | 96906 | MS51990E108P | AR | 72-60-21,-02-510 |
| INSERT - SCREW | 96906 | MS51991E208L | AR | 72-60-21, 02-520 |
Safety Requirements
NONEProcedure
NOTE
If the IDG housing bore bushing repair was previously performed by Repair-050 (VRS5422), TASK 72-60-21-300-050, this repair cannot be used to install repair bushings at the (eight) screw thread insert locations at the IDG bore location of the Main Gearbox Casing.NOTE
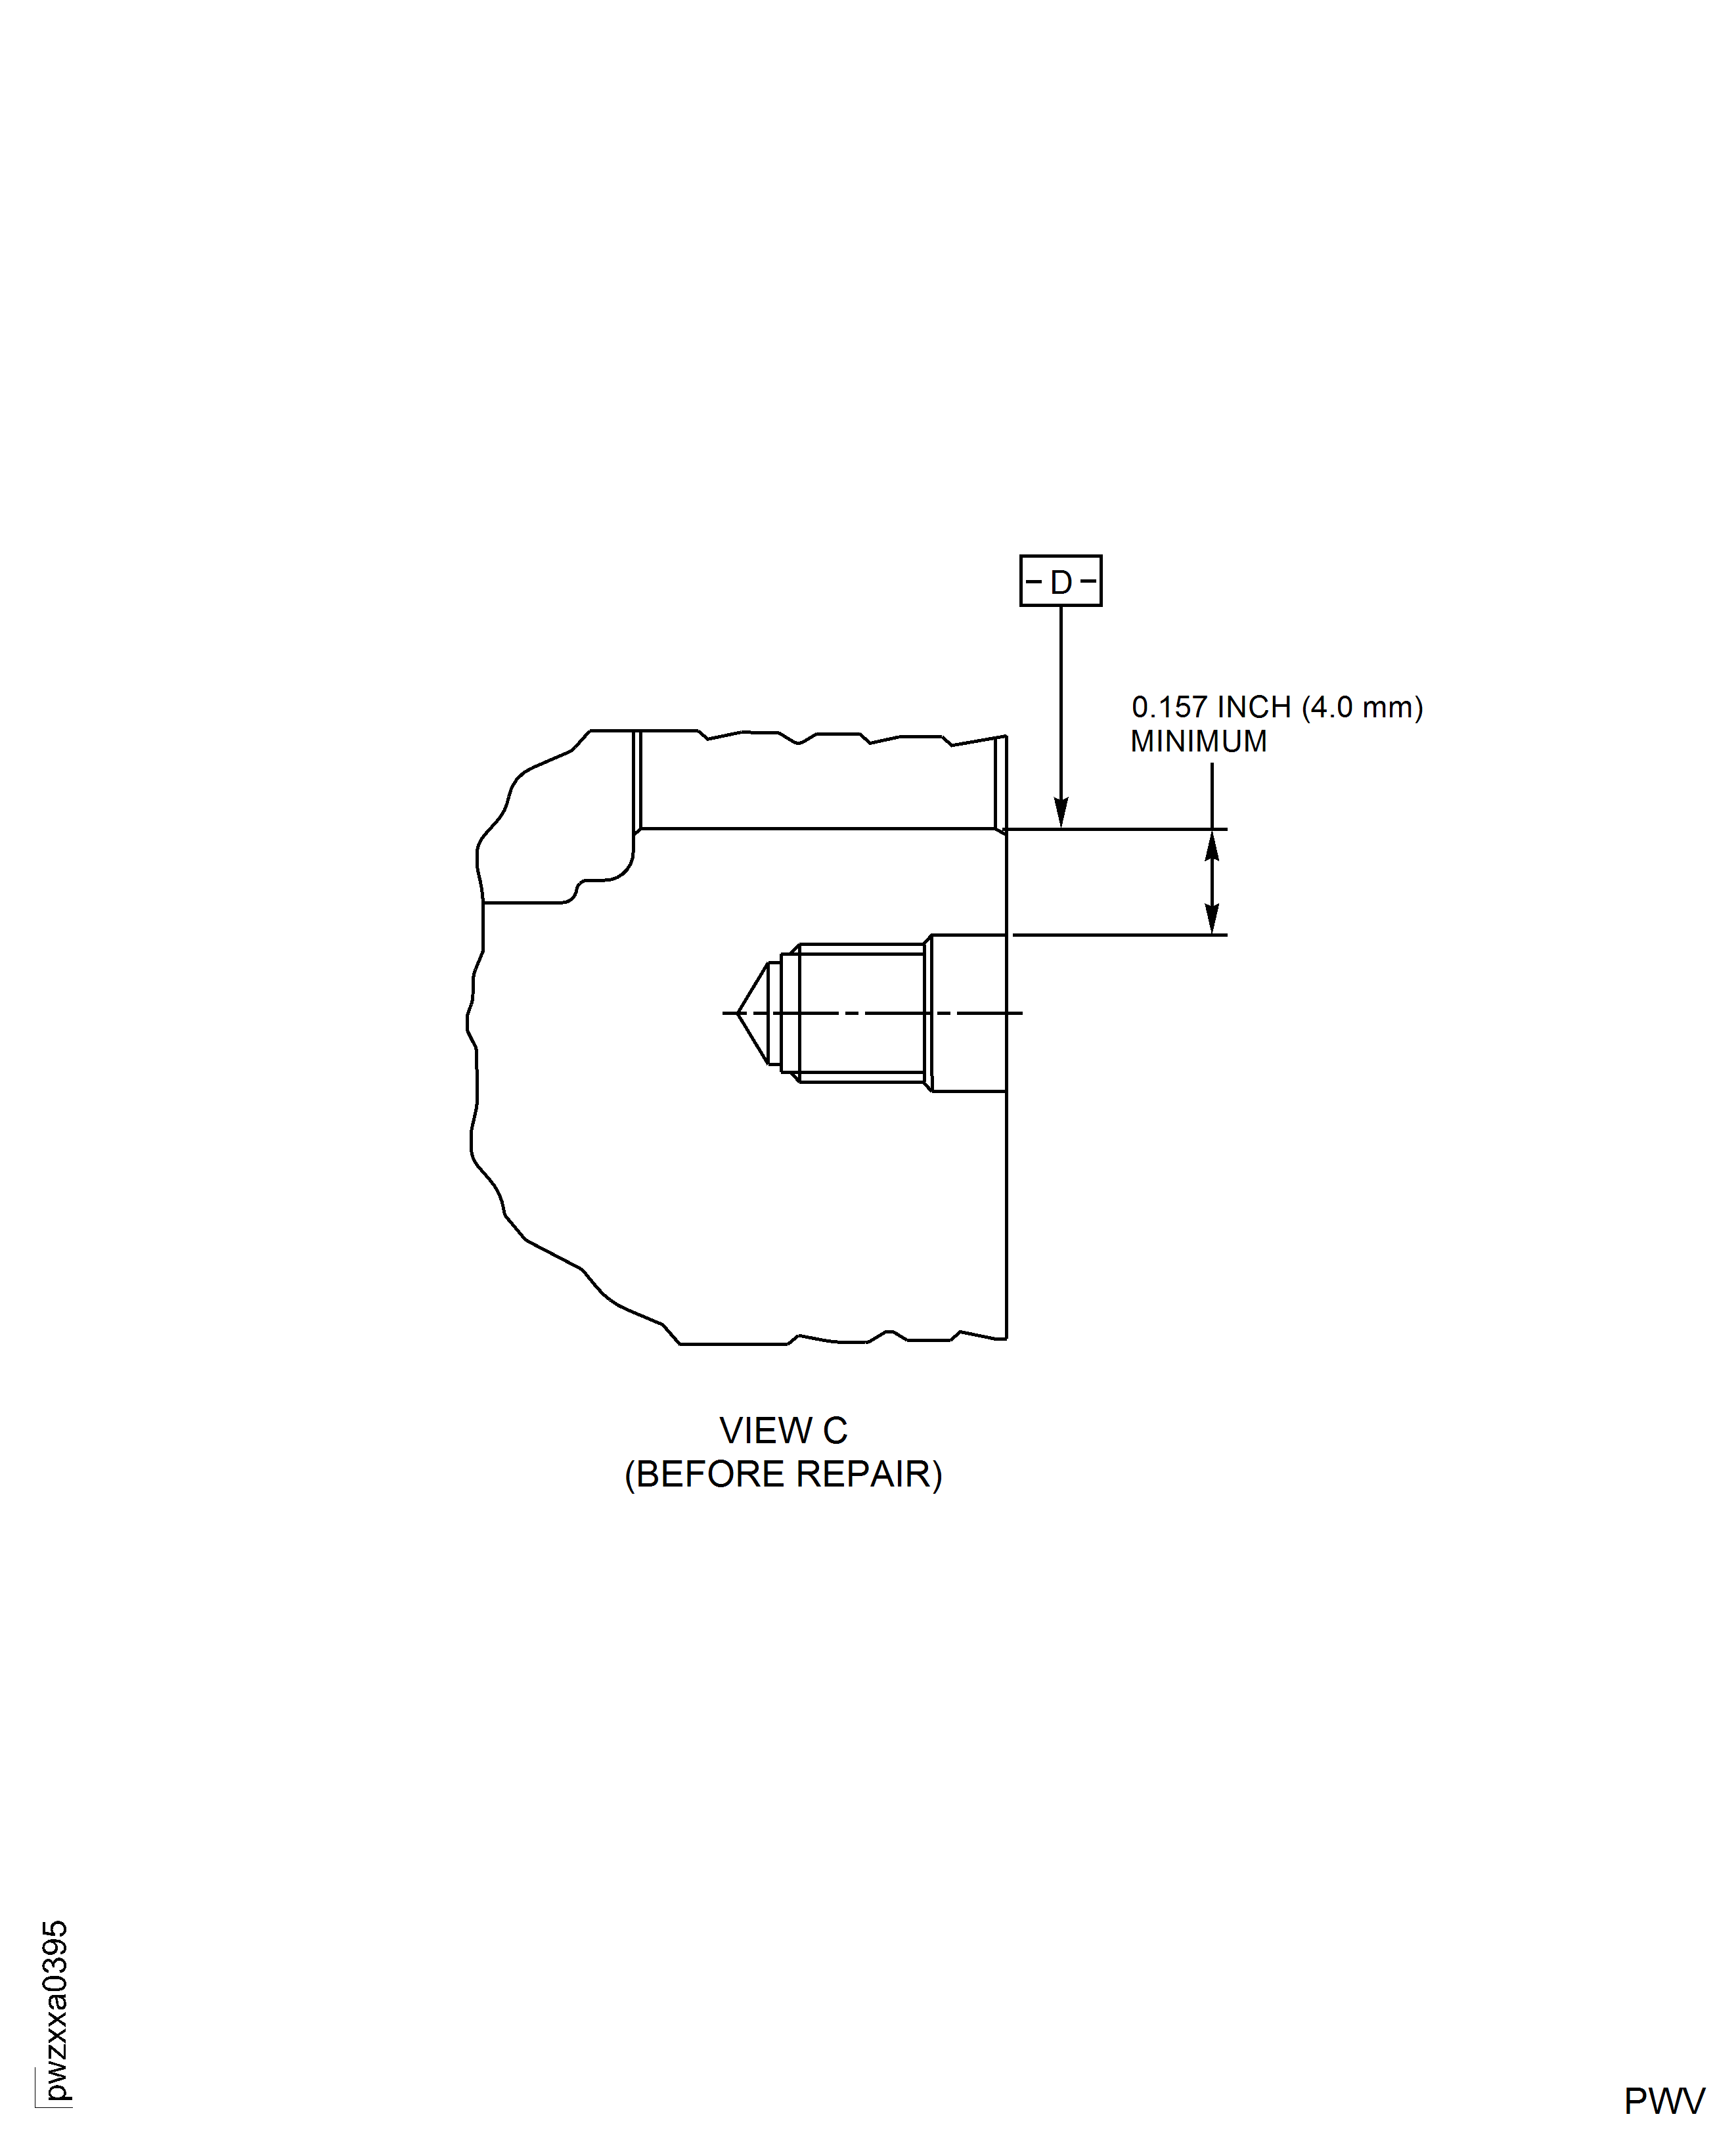
This repair can only be used at a maximum of four locations. A maximum of three adjacent repaired locations is permitted.Refer to Figure.
This repair can be performed.
Not less than 0.157 in. (4.0 mm).
This repair cannot be performed.
Less than 0.157 in. (4.0 mm).
For each repair location, measure the minimum distance from the Lock Ring Counterbore to the IDG pad bore (Datum D).
SUBTASK 72-60-21-220-172 Measure To Determine Repairability
Use CoMat 02-002 ADHESIVE TAPE GENERALPURPOSE PAPER (masking tape or similar).
Mask all bores, holes, passage ways in the proximity of the repair area.
SUBTASK 72-60-21-350-282 Mask the Gearbox Casing
Remove the screw thread inserts and lock rings by repair, VRS5256, TASK 72-60-21-300-005 (REPAIR-005) SUBTASK 72-60-21-350-053 and SUBTASK 72-60-21-350-054.
Remove the damaged or loose screw thread inserts and lock rings.
SUBTASK 72-60-21-300-157 Remove the Screw Thread Insert
Refer to Figure.
Inspect the holes to find if this repair was done before.
If the repair was not previously repair, go to operation Step.

CAUTION
USE APPROPRIATE DRILLING EQUIPMENT TO REMOVE THE PIN FIRST, THEN REMOVE THE BUSHING. MAKE SURE THAT YOU DO NOT DAMAGE THE GEARBOX CASING.If this repair was previously performed, the bushing must be removed by machining.
Go to Step.
Inspect the damaged holes.
Use a 10X Magnifying glass. As an alternative, do a local fluorescent penetrant inspection.
Cracks are not allowed.
Inspect the holes for cracks.
Tap the hole. The thread must be .750 - 16 UNJF - 3B. The depth of the full thread must be a minimum of 0.826 in. (21.0 mm) from the surface of the gearbox casing.
Tap the holes.
SUBTASK 72-60-21-300-158 Machine the Damaged Holes of the Gearbox Casing
Use CoMat 01-031 ACETONE (CH3)2CO or similar.
Locally degrease the repaired area.
Use a 10X Magnifying glass.
Inspect the gearbox casing for cracks in the area of the bore.
Refer to SPM TASK 70-38-02-300-503.
Locally restore the surface protection.
SUBTASK 72-60-21-220-173 Examine the Gearbox Casing
Refer to Figure.
Use the specified types of Aluminum alloy. Do not use other types of material.
Make sure you comply with dimensions and tolerances.
NOTE
A convenient fixture to torque the bushing into its position in the main gearbox casing can be machined on the external flat surface.
Machine the bushing.
Use a 10X Magnifying glass. As an alternative, do a local fluorescent penetrant inspection.
Cracks are not allowed.
Inspect the bushings for cracks.
Refer to SPM TASK 70-38-02-300-503.
Apply the chromate conversion coating to the bushing.
SUBTASK 72-60-21-300-159 Produce a Bushing
Install the bushing in the threaded hole of the casing. Make sure that the bushing reaches the bottom. Do not exceed 220 lbf-in. (25 Nm).
Screw the bushing in.
Machine the bushing end flush with the casing surface.
Machine the bushing.
SUBTASK 72-60-21-300-160 Install the Bushing into the Machined Hole of the Gearbox Casing
Refer to Figure.
Hole diameter for the pin must be between 0.077 - 0.079 in. (1.95 - 2.00 mm).
The tolerance for the perpendicularity of the hole axis is the same as for the previous drilling.
Hole depth is to be 0.193 - 0.200 in. (4.90- 5.10 mm).
The angular location of the pin hole is to be at the location of maximum parent material thickness.
Drill a hole axially across the counterbore between the gearbox casing and the bushing.
Measure and record the pin hole diameter.
Drill the pin hole.
Use the specified types of Aluminum alloy. Do not use other types of material.
Machine a pin to fit into the pin hole with an interference between 0.0004 in. - 0.0007 in. (0.010 mm - 0.020 mm). Pin length is 0.256 in. (6.500 mm) minimum.
Make a pin.
Use a 10X Magnifying glass.
Cracks are not allowed.
Visually inspect the pin for cracks.
Refer to SPM TASK 70-38-02-300-503.
Apply surface protection coating to the pin.
Install the antirotation pin within the dedicated hole. Freeze the pin up to minus 60 deg C. Use of nitrogen liquid is also allowed. Machine the pin end flush with the bushing surface.
Install the antirotation pin.
SUBTASK 72-60-21-300-161 Install an Antirotation Pin
Use a drilling tool with flat head. The diameter of the hole must be 0.4814 - 0.4914 in. (12.228 - 12.480 mm). Drill to a maximum depth of 0.905 in. (23.0 mm).
Drill the hole.
Use a drilling tool with flat head. The diameter must be 0.593 - 0.596 in. (15.06 - 15.14 mm). Drill to depth of 0.172 - 0.202 in. (4.37 - 5.13 mm).
Drill the counterbore.
Use a 10X Magnifying glass. As an alternative, do a local fluorescent penetrant inspection. Follow SPM TASK 70-23-05-230-501, use CoMat 06-063 FLUORESCENT PENETRANT (POST-EMULSIFIED MEDIUM SENSITIVITY).
Cracks are not allowed.
Inspect the holes for cracks.
Tap the hole. The thread must be .5625 - 12 UNJC - 3B. The depth of the thread must be 0.655 in. (16.60 mm) minimum from the surface of the gearbox casing.
Tap the holes.
SUBTASK 72-60-21-320-150 Drill and Tap the Holes for the Screw Thread Inserts in the Bushings
Install the screw thread inserts and lock rings by VRS5256, TASK 72-60-21-300-005, SUBTASK 72-60-21-350-055 and 72-60-21-350-056.
Install the screw thread inserts and lock rings.
Refer to SPM TASK 70-38-02-300-503.
Apply surface protection coating.
SUBTASK 72-60-21-300-162 Install New Screw Thread Inserts
Use Vibro-engraving equipment. Refer to SPM TASK 70-09-00-400-501, SUBTASK 70-09-00-400-001.
Make a mark VRS5707 adjacent to the part number.
Do the touch up process. Refer to SPM TASK 70-38-02-300-503.
Protect the marked area.
SUBTASK 72-60-21-350-282 Identify the Repair
Figure: Repair location
Repair location
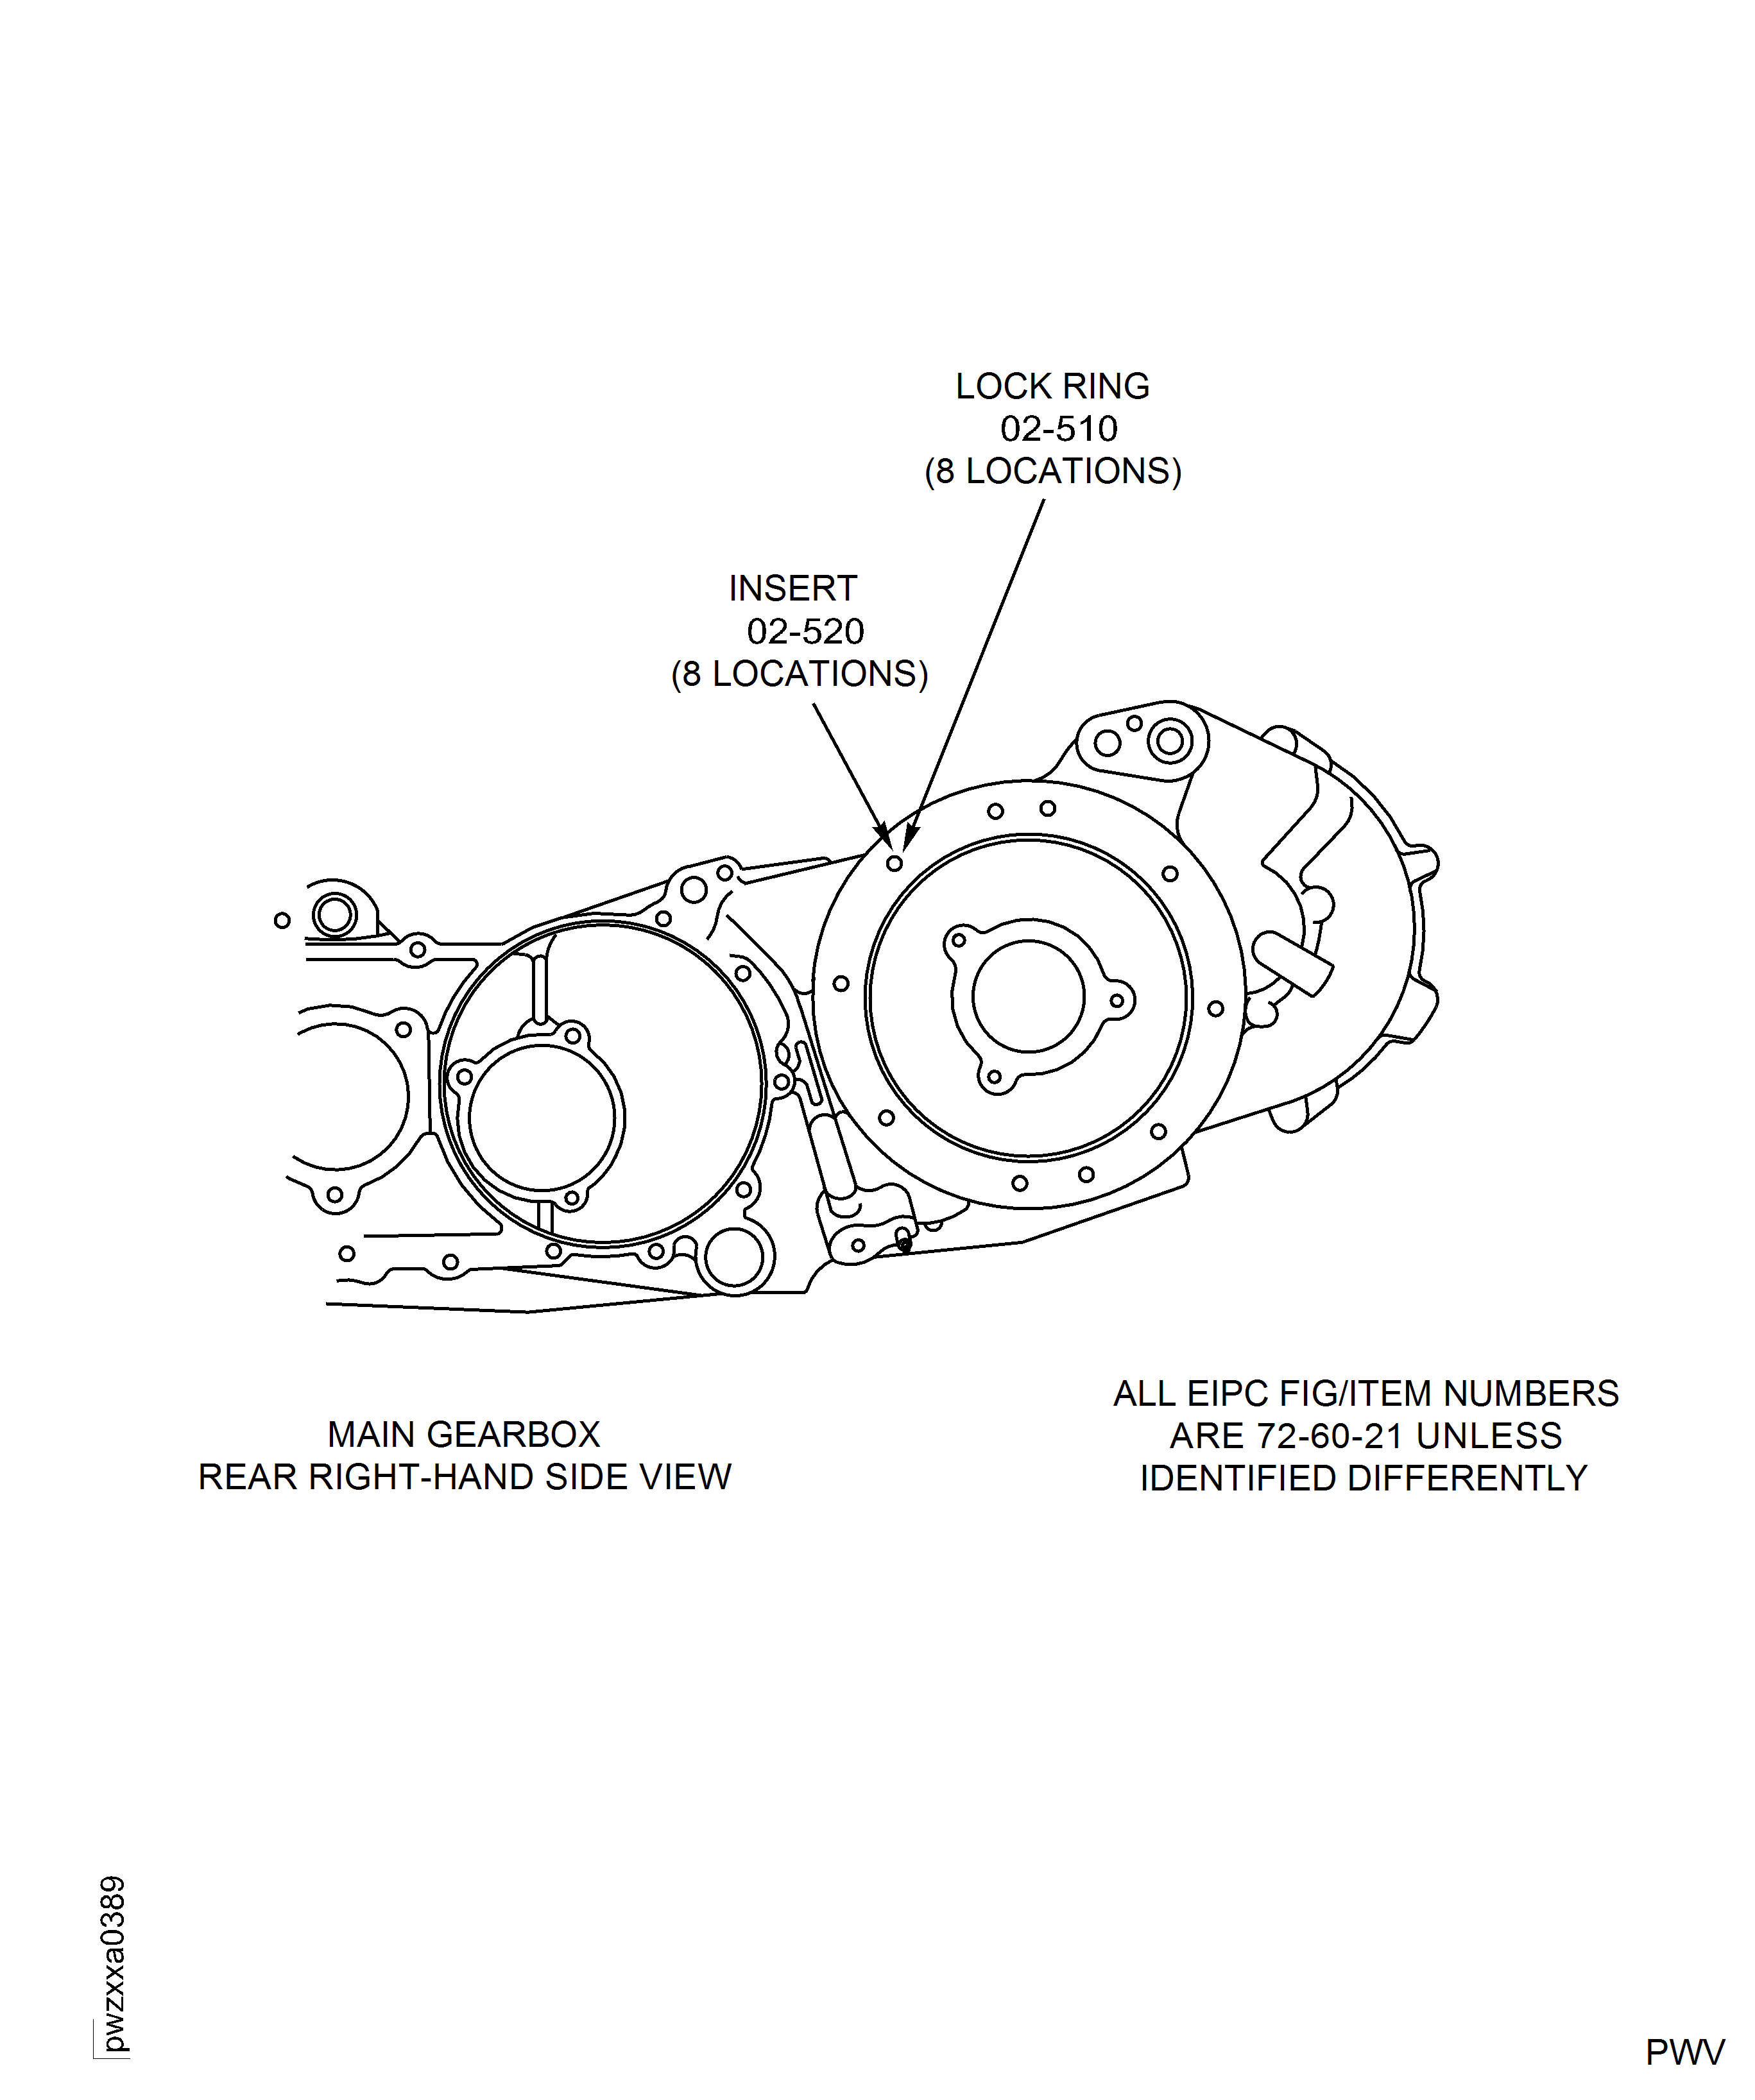
Figure: Repair details
Repair details

Figure: Machine the Casing
Machine the Casing
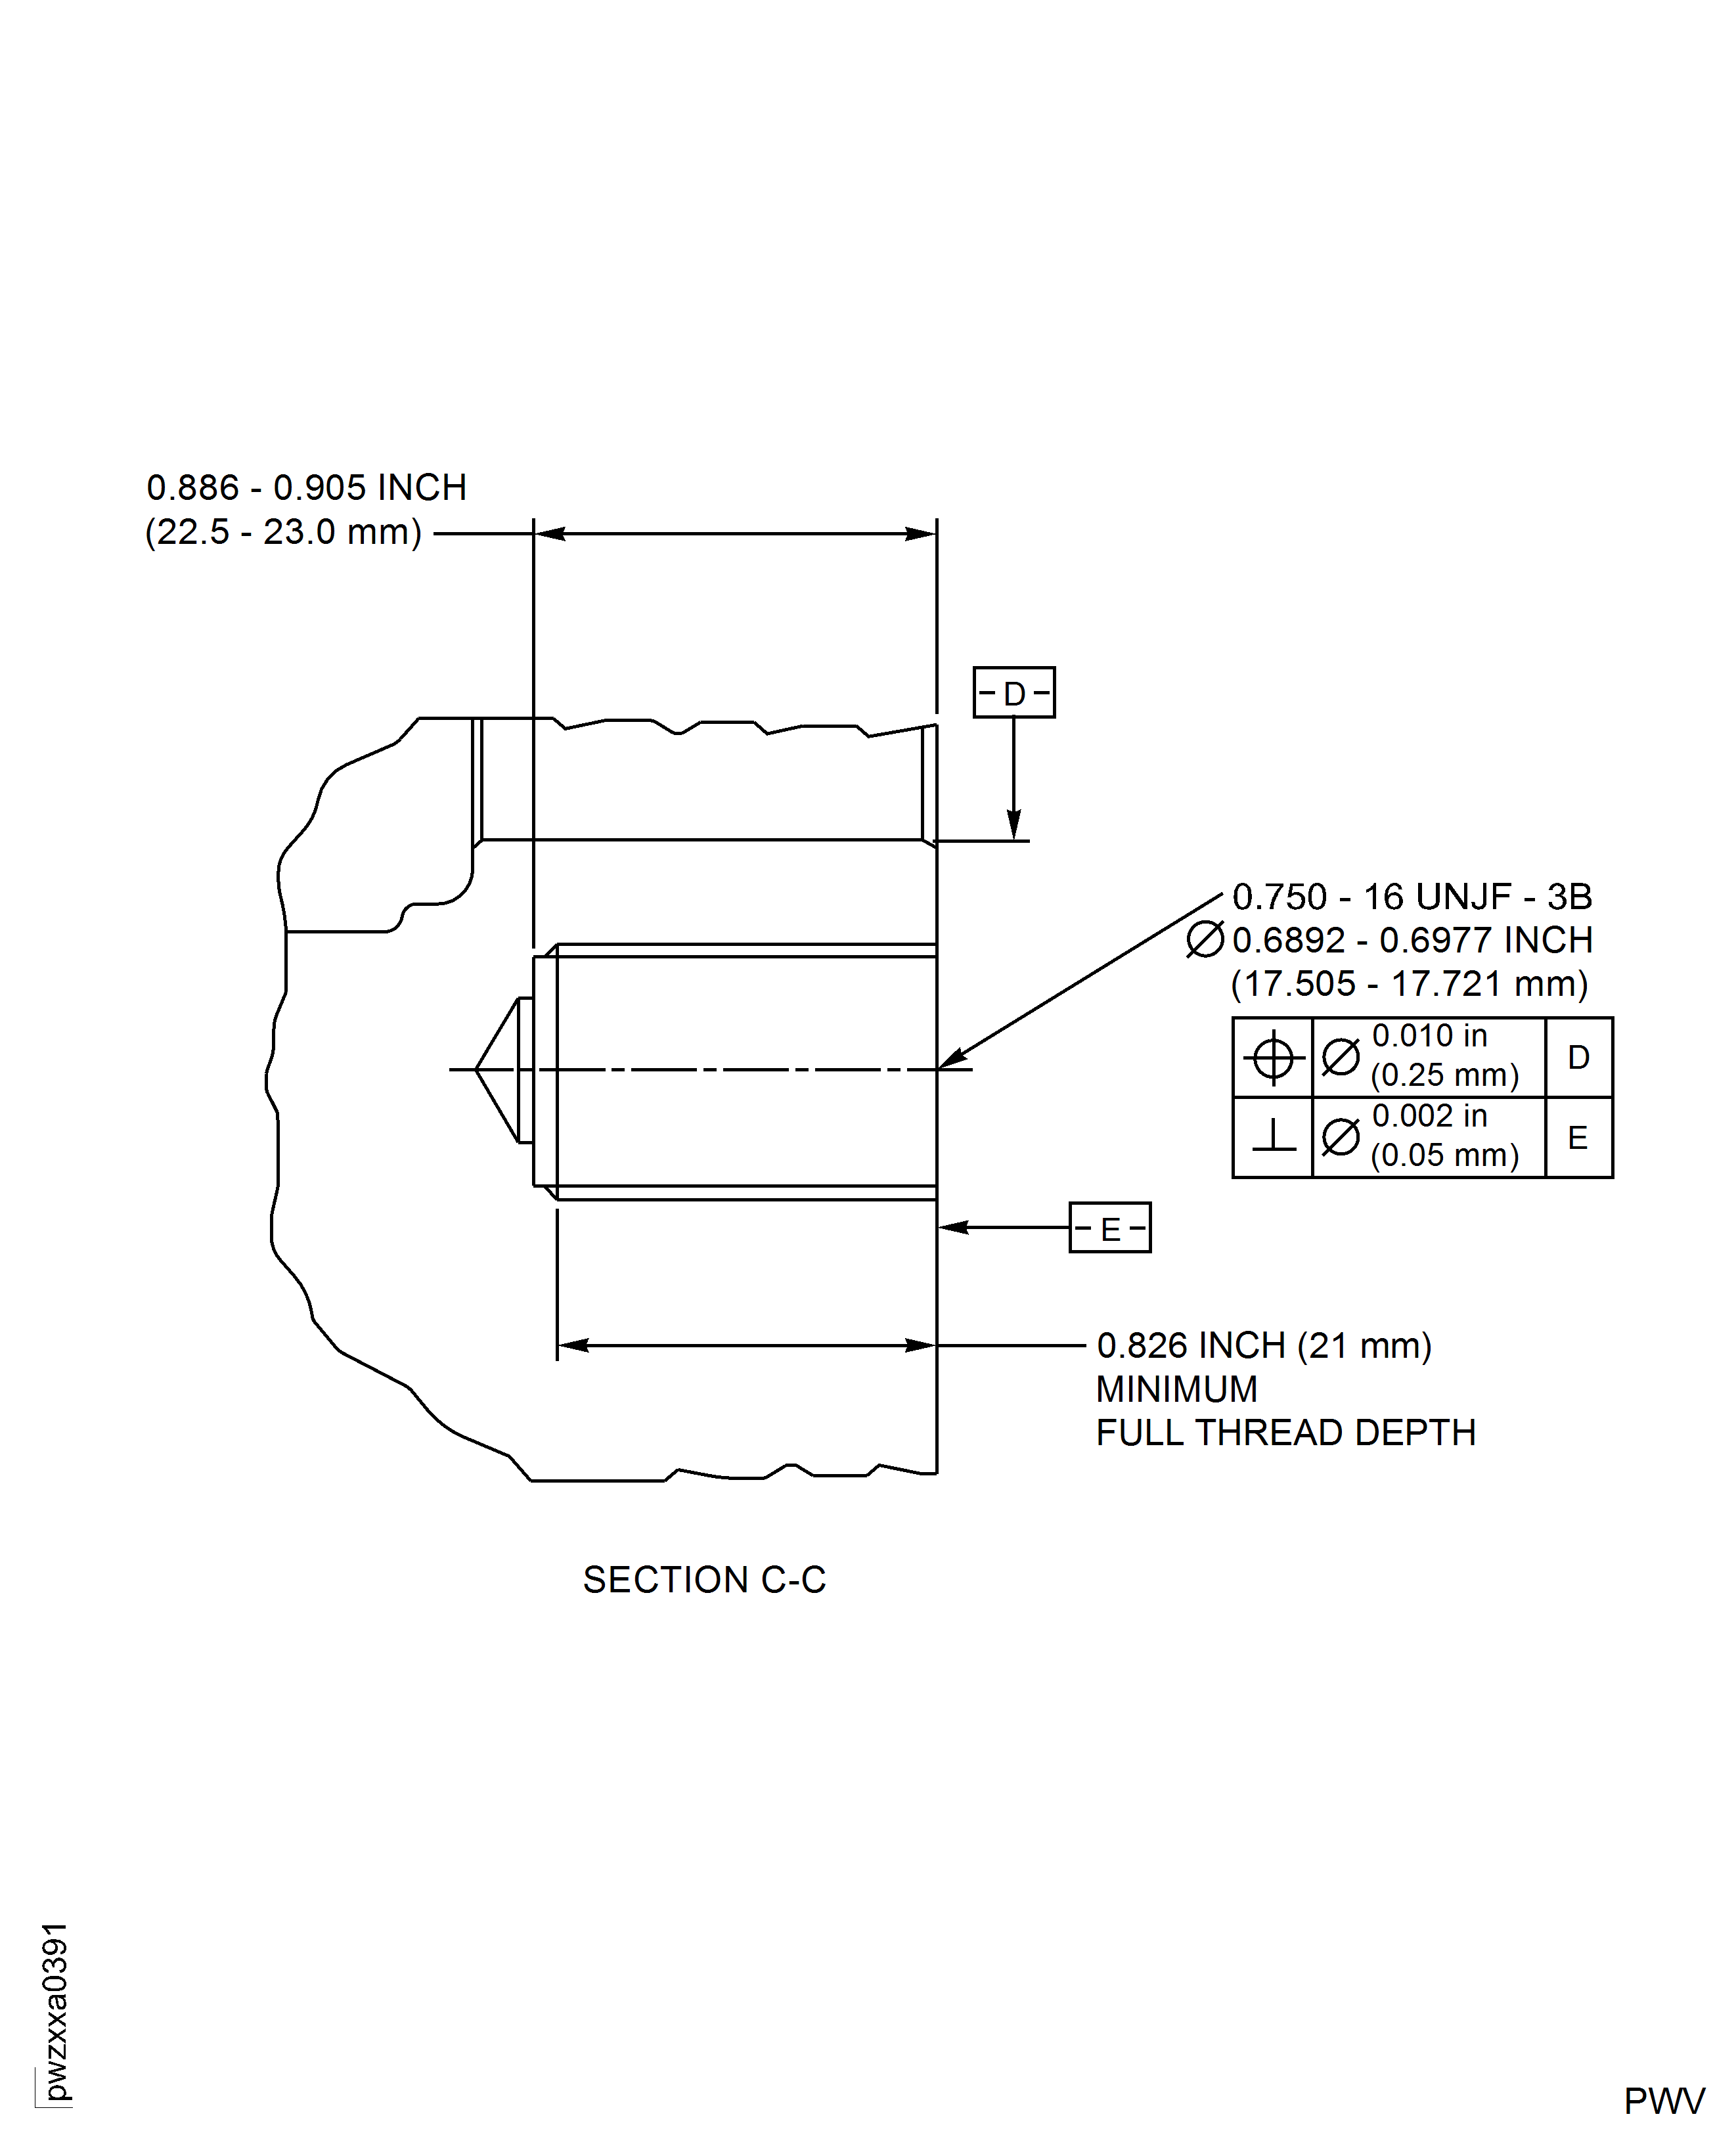
Figure: Bushing Dimensions
Bushing Dimensions
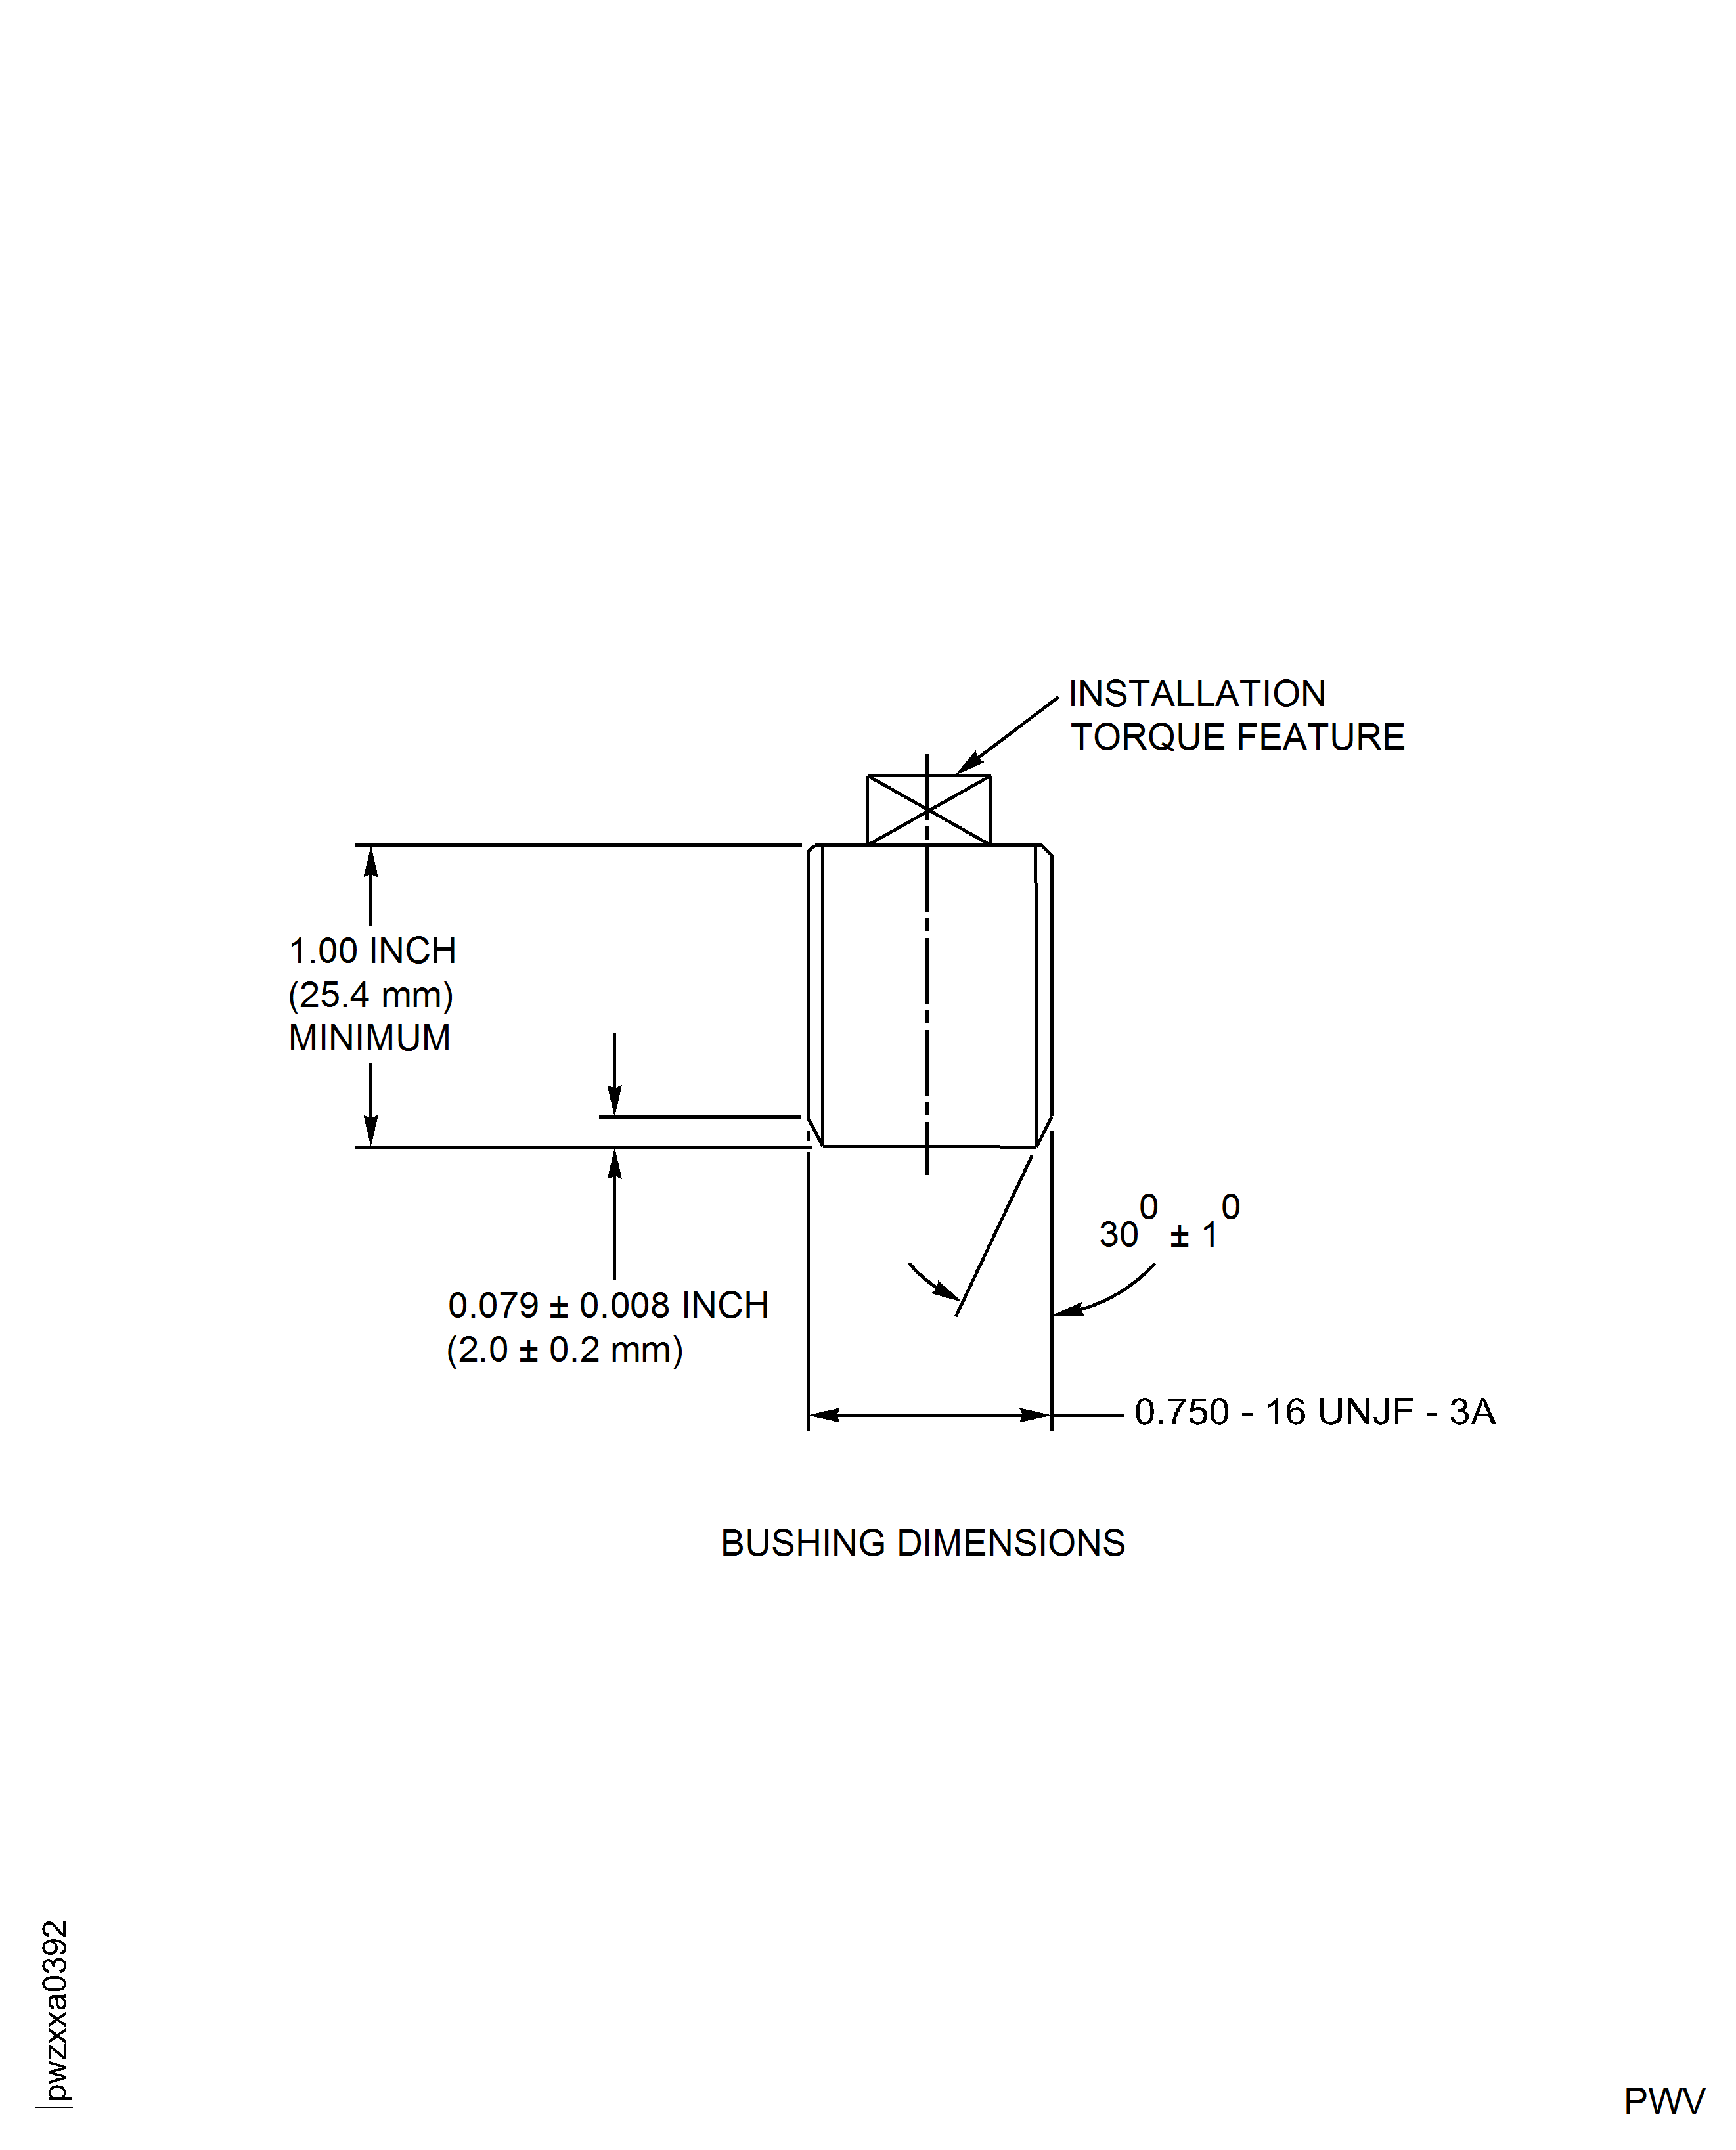
Figure: Antirotation Pin Hole
Antirotation Pin Hole
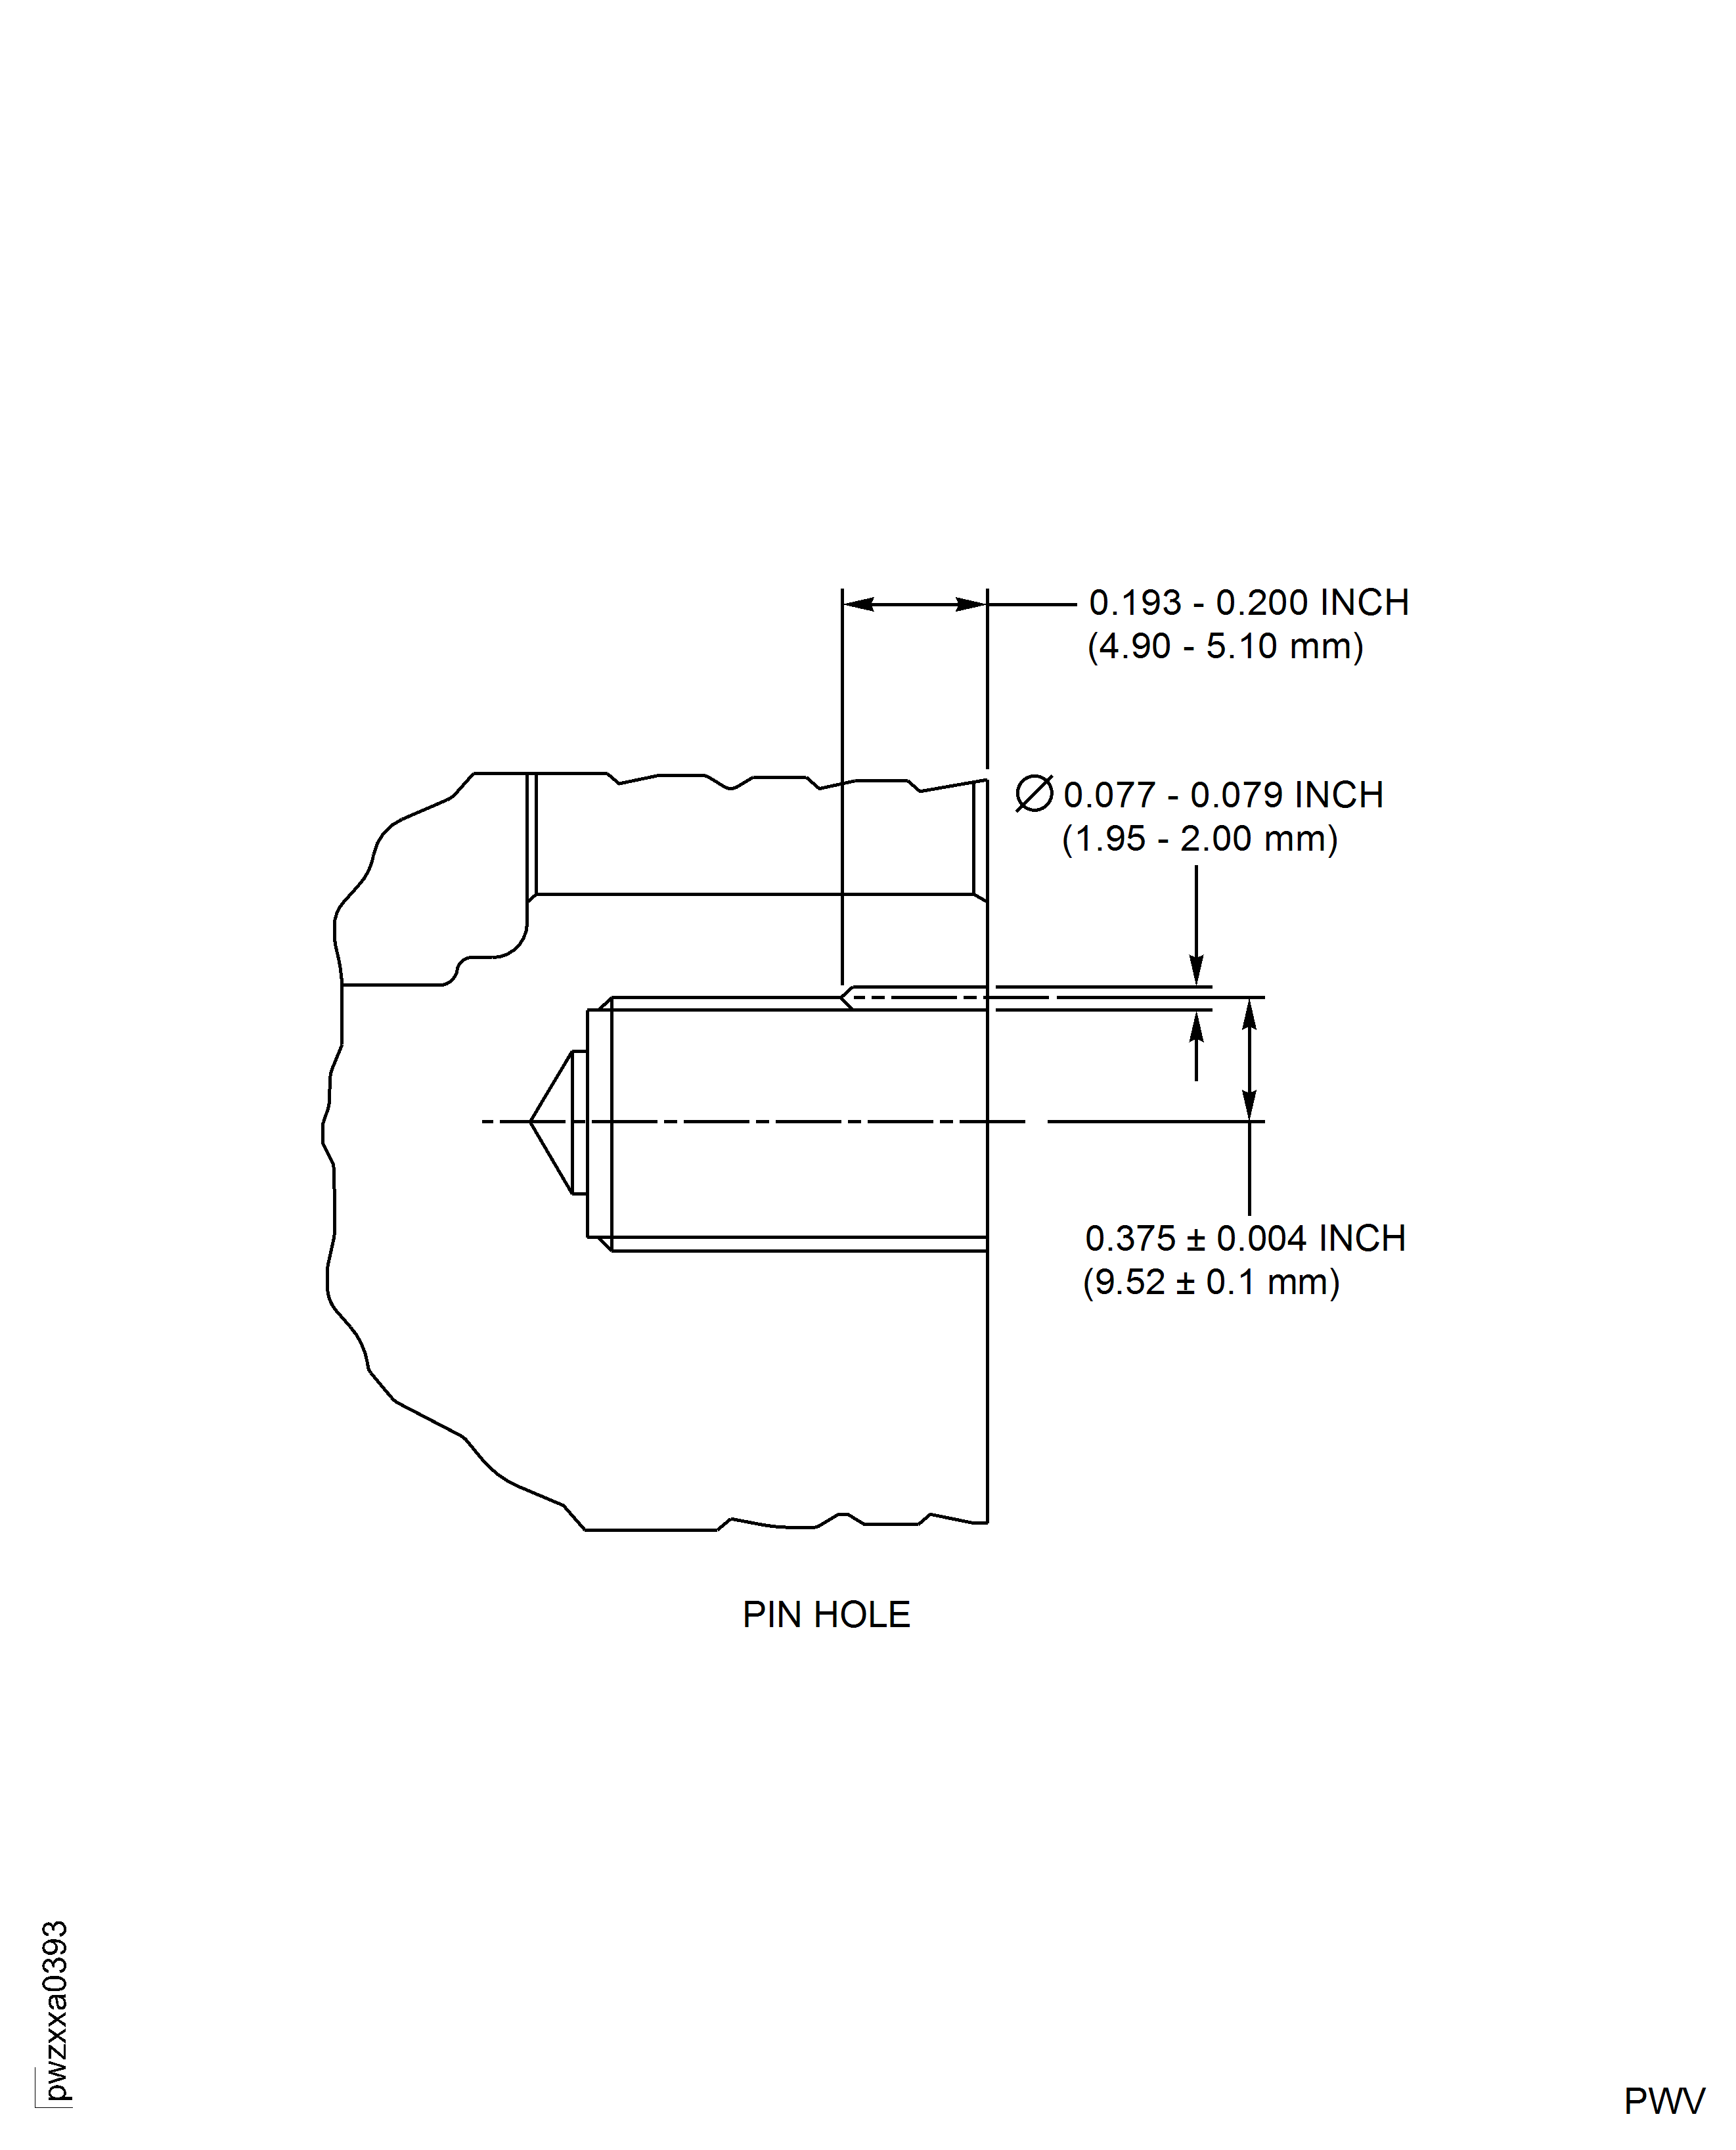
Figure: Machine the Bushing
Machine the Bushing
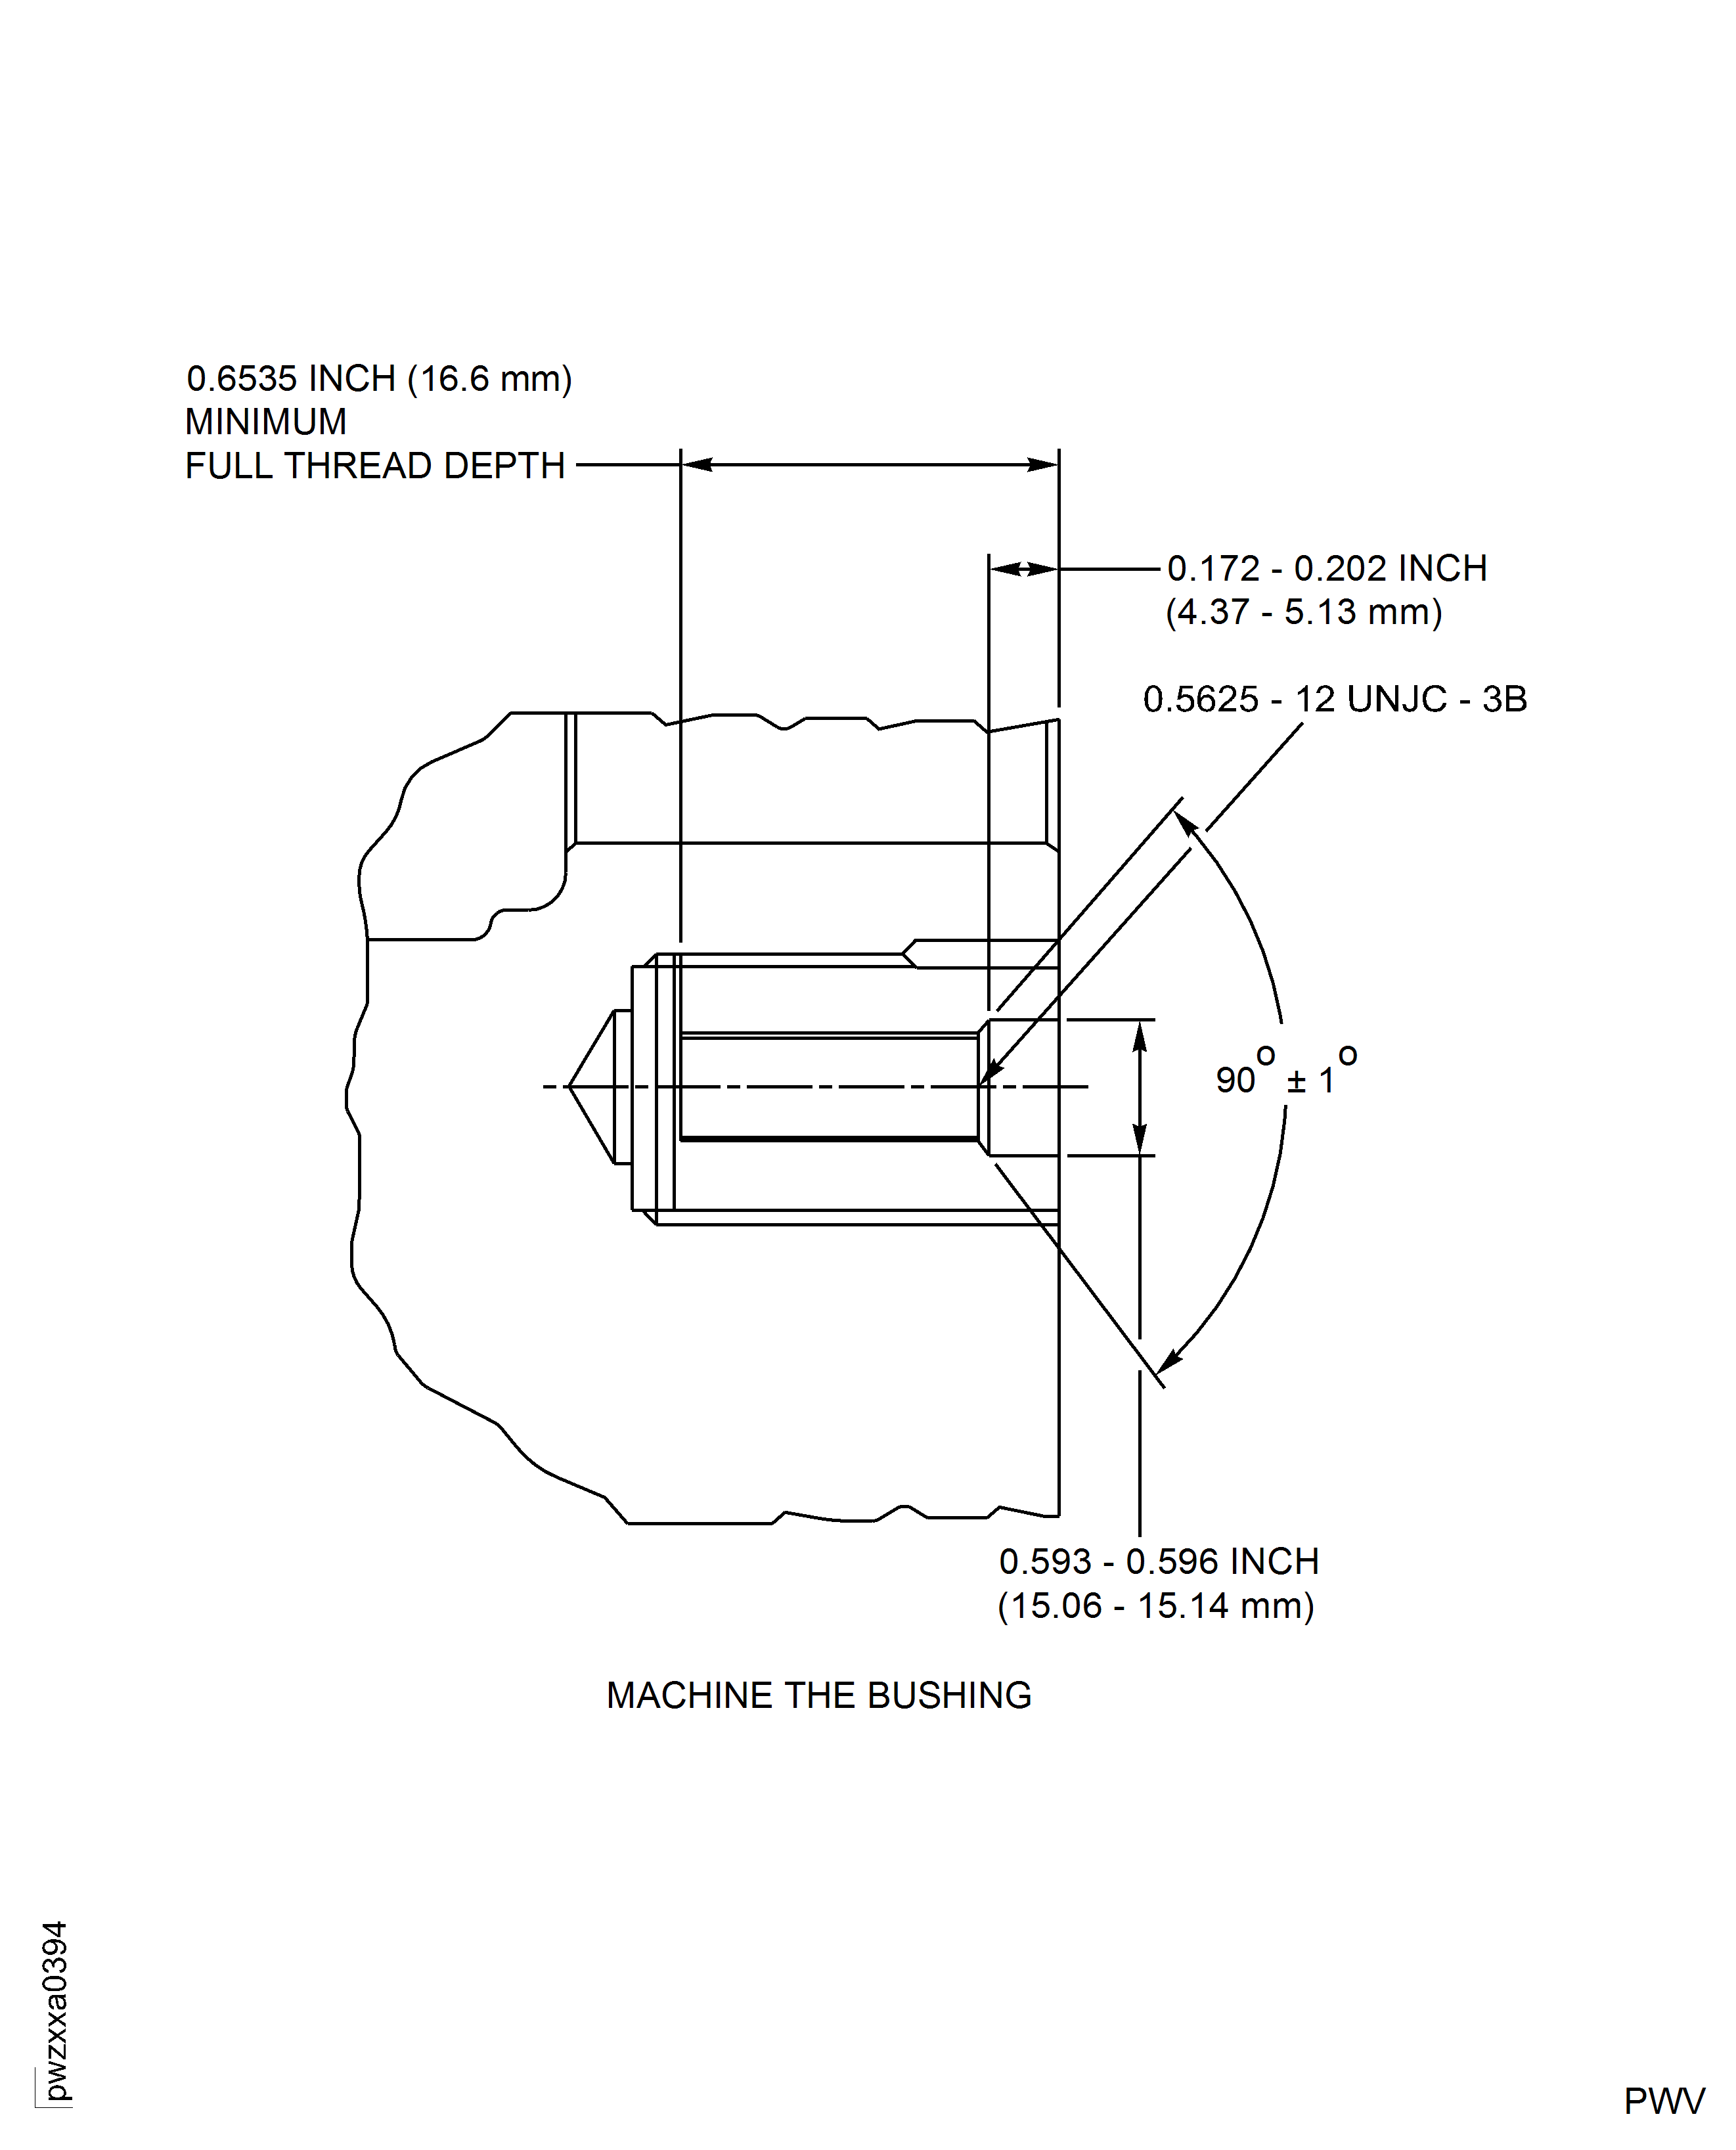
Figure: Measure Minimum Distance
Measure Minimum Distance
