Export Control
EAR Export Classification: Not subject to the EAR per 15 C.F.R. Chapter 1, Part 734.3(b)(3), except for the following Service Bulletins which are currently published as EAR Export Classification 9E991: SBE70-0992, SBE72-0483, SBE72-0580, SBE72-0588, SBE72-0640, SBE73-0209, SBE80-0024 and SBE80-0025.Copyright
© IAE International Aero Engines AG (2001, 2014 - 2021) The information contained in this document is the property of © IAE International Aero Engines AG and may not be copied or used for any purpose other than that for which it is supplied without the express written authority of © IAE International Aero Engines AG. (This does not preclude use by engine and aircraft operators for normal instructional, maintenance or overhaul purposes.).Applicability
All
Common Information
TASK 72-60-21-300-057 Main Gearbox Casing - Repair The Support Bushing Bores Of The Main Gearbox Casing - Repair-057 (VRS5709)
Effectivity
FIG/ITEM | PART NO. |
|---|---|
02-050 | 4B0053 |
02-050 | 4B0054 |
02-050 | 4B0055 |
02-050 | 4B0057 |
02-050 | 4B0400 |
02-050 | 4B0402 |
02-050 | 4B0423 |
Material of component
PART IDENT | SYMBOL | MATERIAL |
|---|---|---|
Gearbox casing | A357/T61 (AMS4219) | Aluminum alloy |
Bushing | 17-4PH | Stainless steel |
General
NOTE
Preliminary Requirements
Pre-Conditions
NONESupport Equipment
| Name | Manufacturer | Part Number / Identification | Quantity | Remark |
|---|---|---|---|---|
| Arbor Press | LOCAL | Arbor Press | ||
| Bore Gage | LOCAL | Bore Gage | ||
| Boring machine | LOCAL | Boring machine | ||
| Brinell hardness tester | LOCAL | Brinell hardness tester | ||
| Drilling equipment | LOCAL | Drilling equipment | ||
| Freezer | LOCAL | Freezer | ||
| Fluorescent penetrant inspection equipment | LOCAL | Fluorescent Penetrant Inspection Equipment | ||
| Hot Air Gun | LOCAL | Hot Air Gun | ||
| Vibrating Marking Pencil | LOCAL | Vibrating Marking Pencil | ||
| Workshop inspection equipment | LOCAL | Workshop inspection equipment |
Consumables, Materials and Expendables
| Name | Manufacturer | Part Number / Identification | Quantity | Remark |
|---|---|---|---|---|
| CoMat 06-063 FLUORESCENT PENETRANT (POST-EMULSIFIED MEDIUM SENSITIVITY) | X222X | CoMat 06-063 |
Spares
NONESafety Requirements
NONEProcedure
Remove the support bushes, if necessary.
Use appropriate tools.
SUBTASK 72-60-21-320-151 Remove the Support Bushes of the Main Gearbox Casing
NOTE
This repair must only be performed if TASK 72-60-21-300-030 (REPAIR-030) is not possible.Refer to Figure.
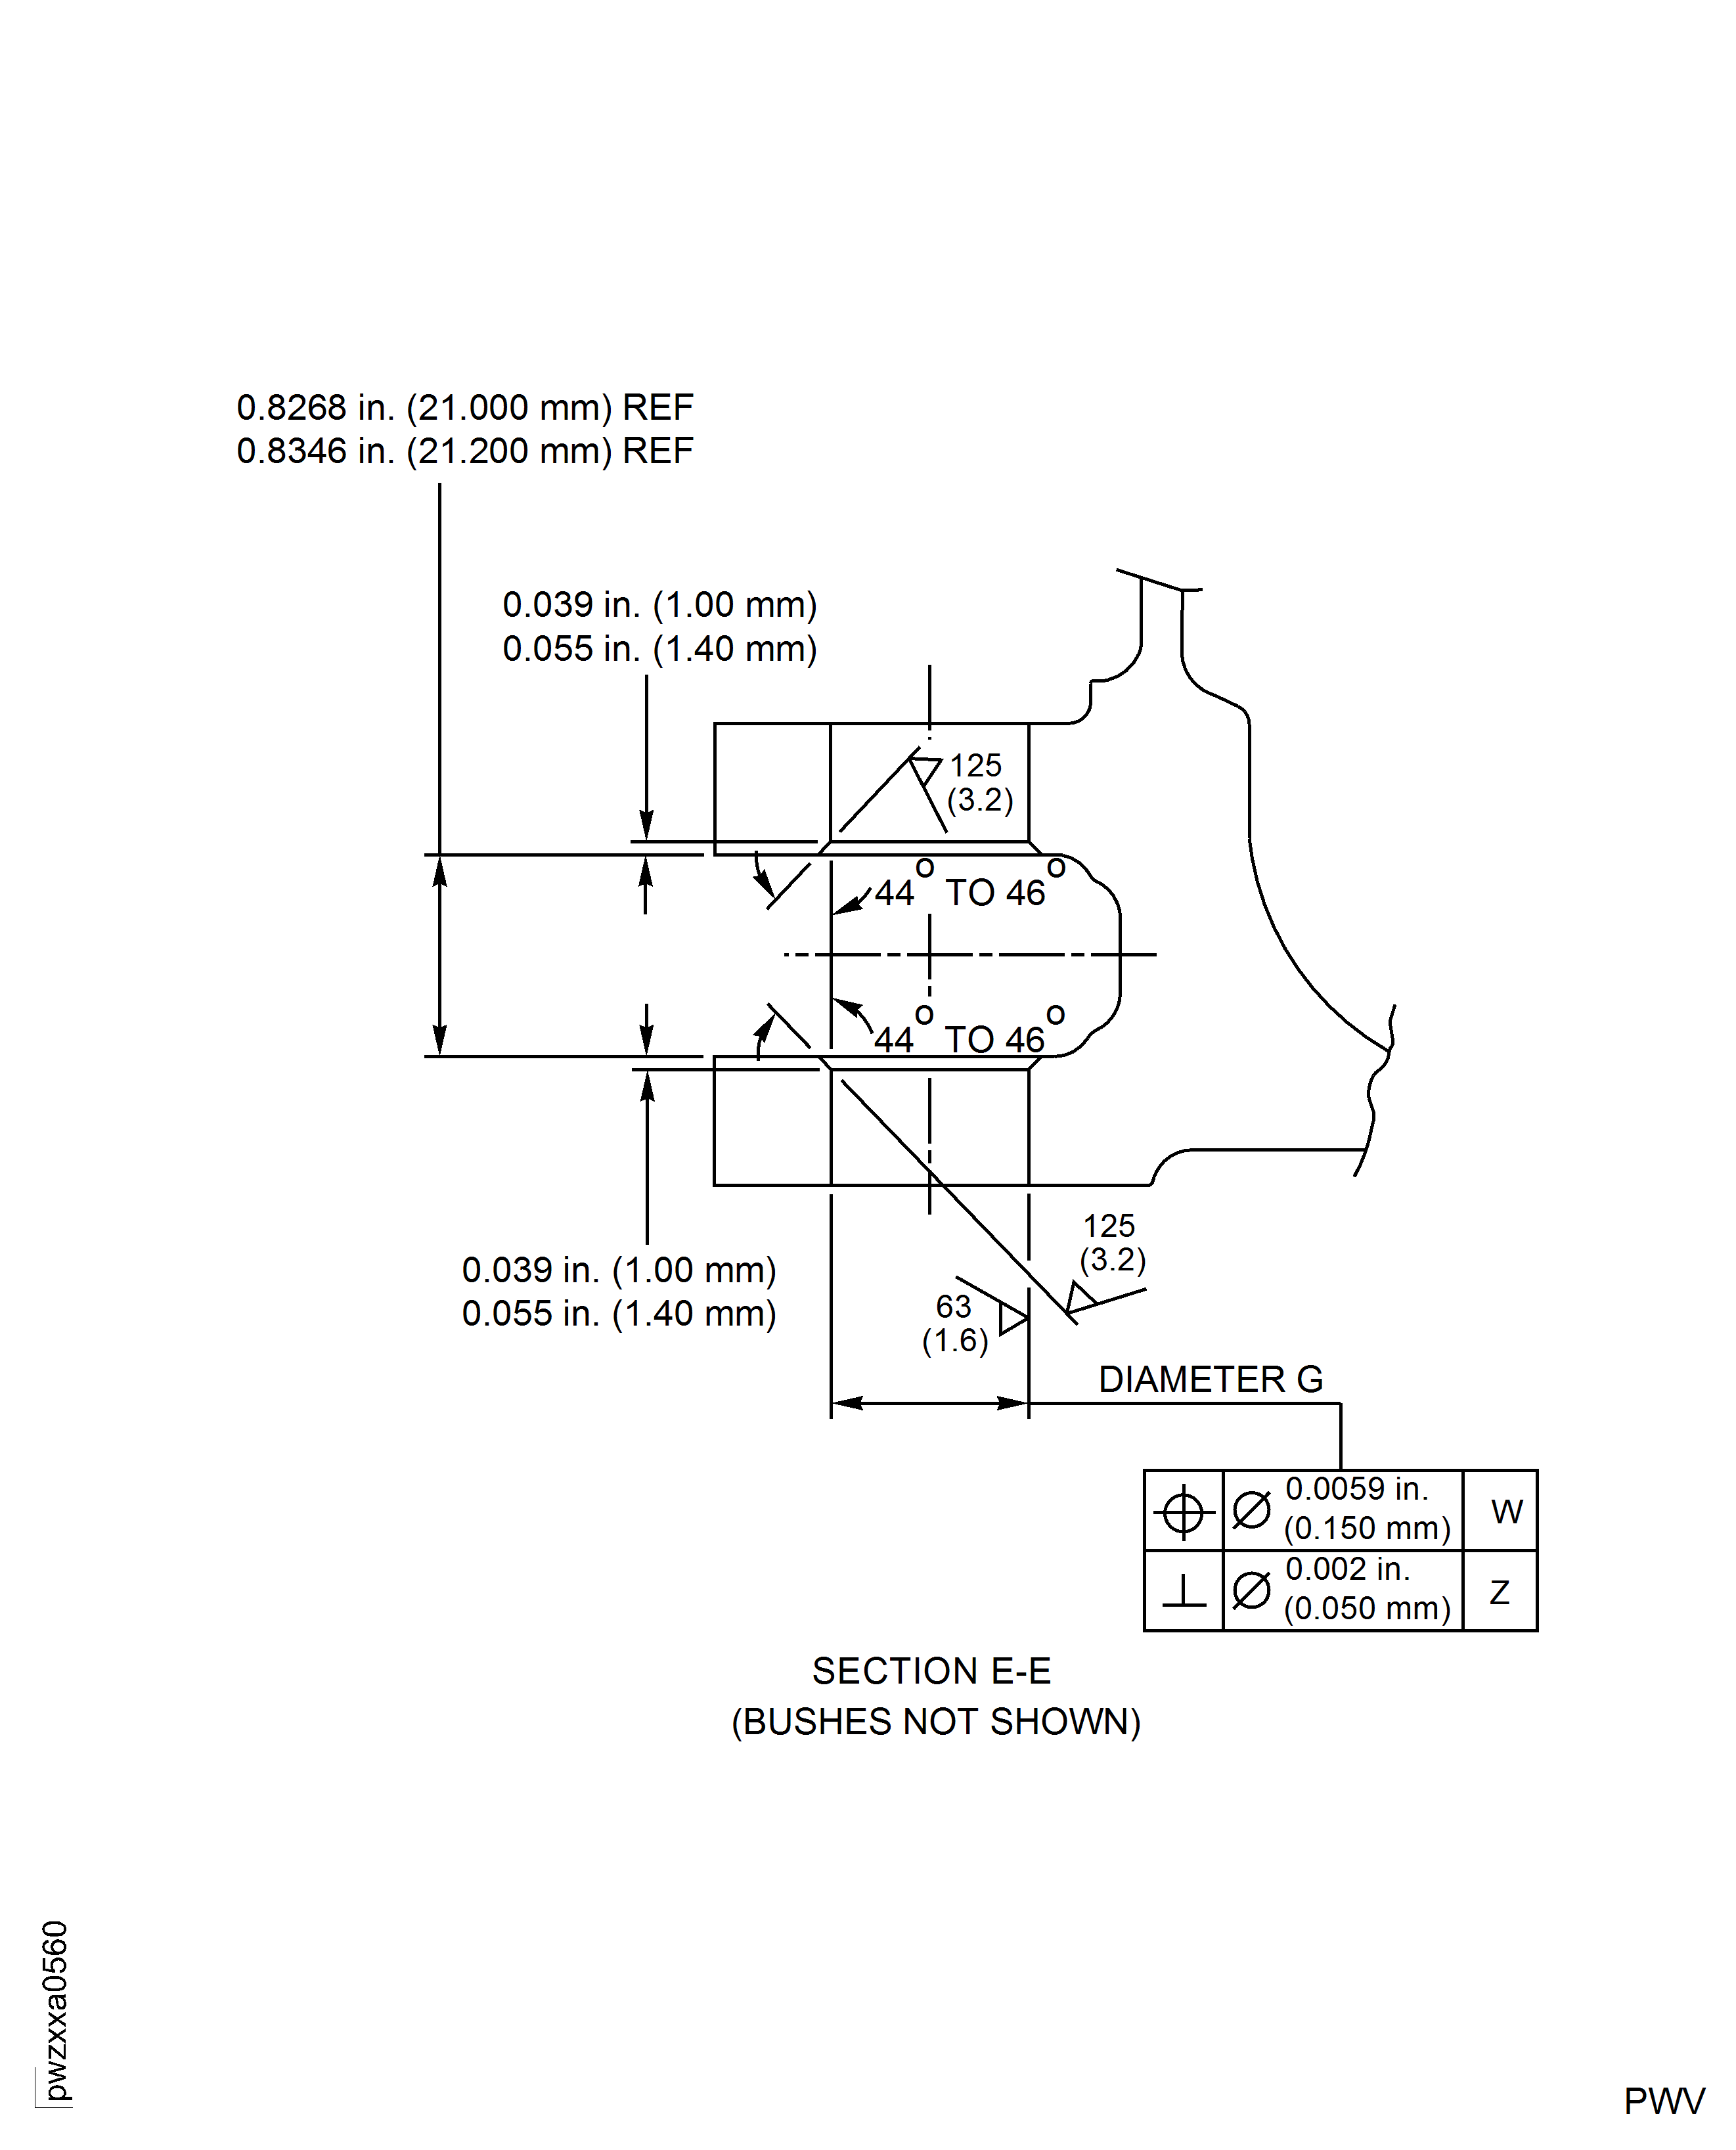
If necessary, machine the bore to remove any damage.
Remove the minimum amount of material to remove the damage.
Scratches, scores and other damage are not allowed.
The maximum bore diameter allowed is 0.8480 in. (21.54 mm).
Use a bore gage.
NOTE
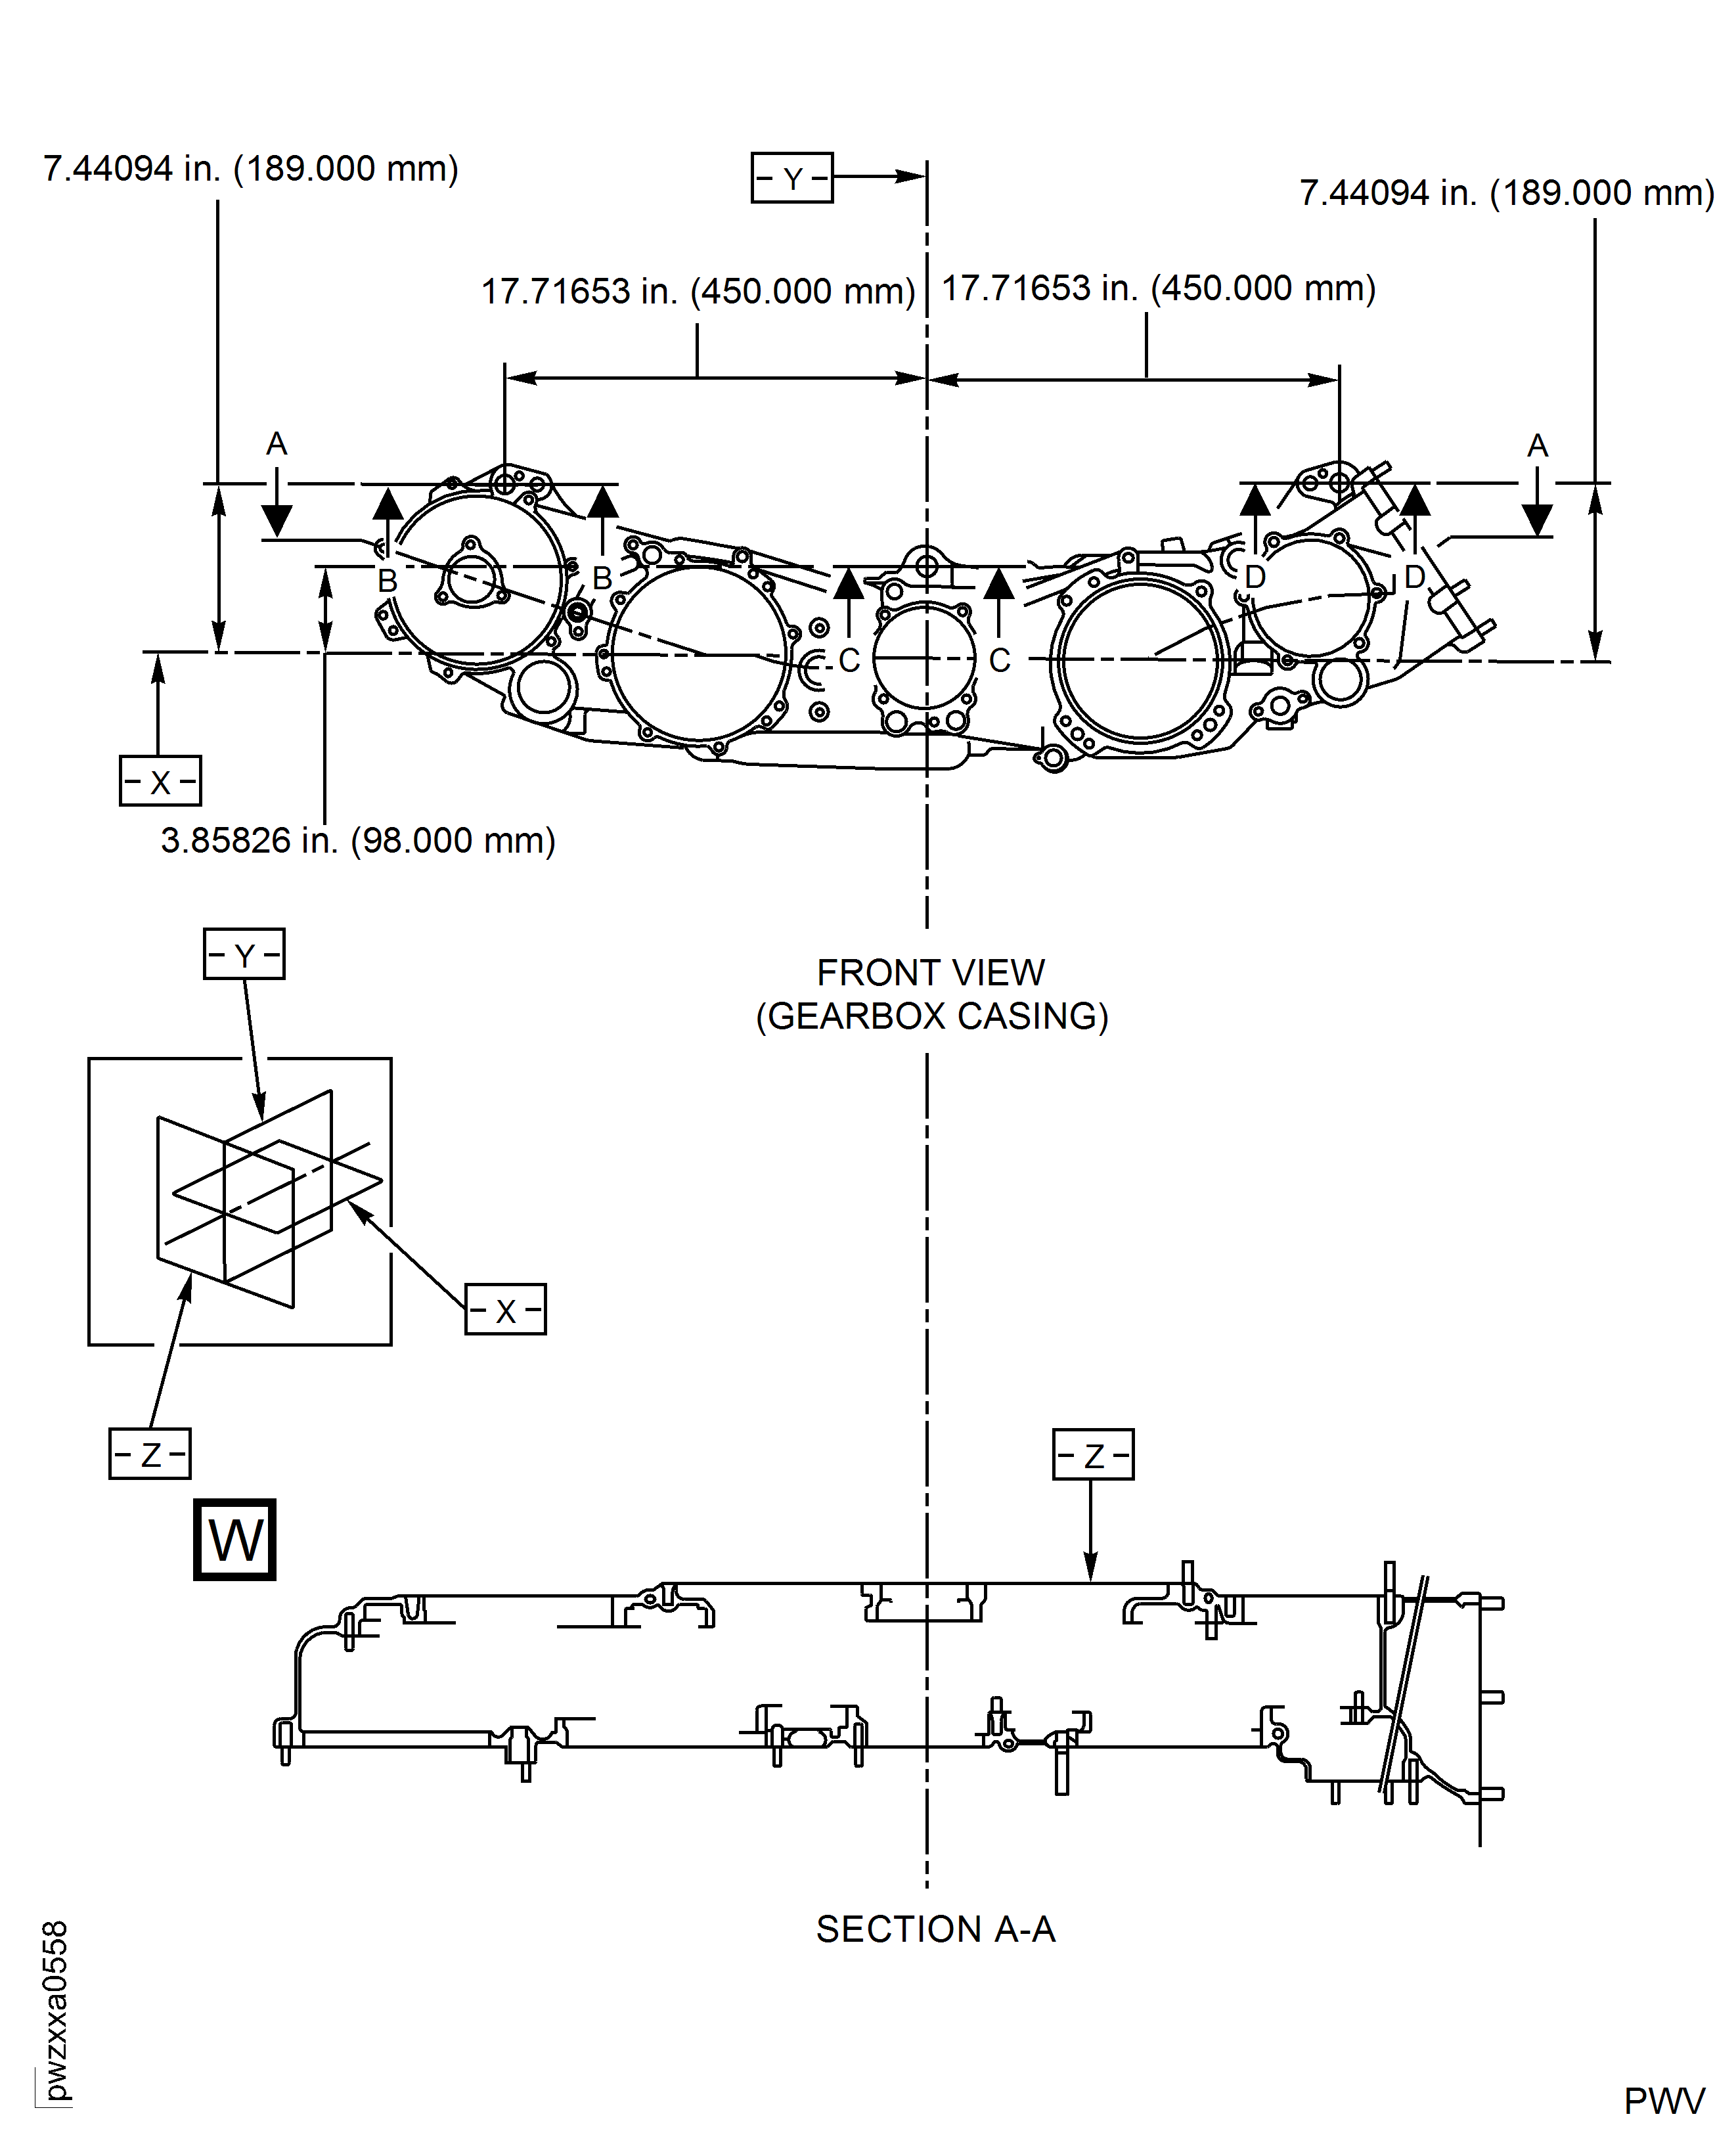
The position of the bore should be located in the same position as the inner diameter of the removed bushing or concentric with the original bore in the Gearbox Casing. If the position of the original bushing is unknown or the bore is damaged too much, it is acceptable to position the hole per the locations identified in Figure.
Measure and record the diameter G.
Inspect the diameter G of the bores of the casing.
SUBTASK 72-60-21-220-191 Inspect the Bores of the Support Bushes
Refer to TASK 70-38-02-300-503.
Apply the chromate conversion coating to the machined surfaces.
SUBTASK 72-60-21-220-193 Apply Chromate Conversion Coating
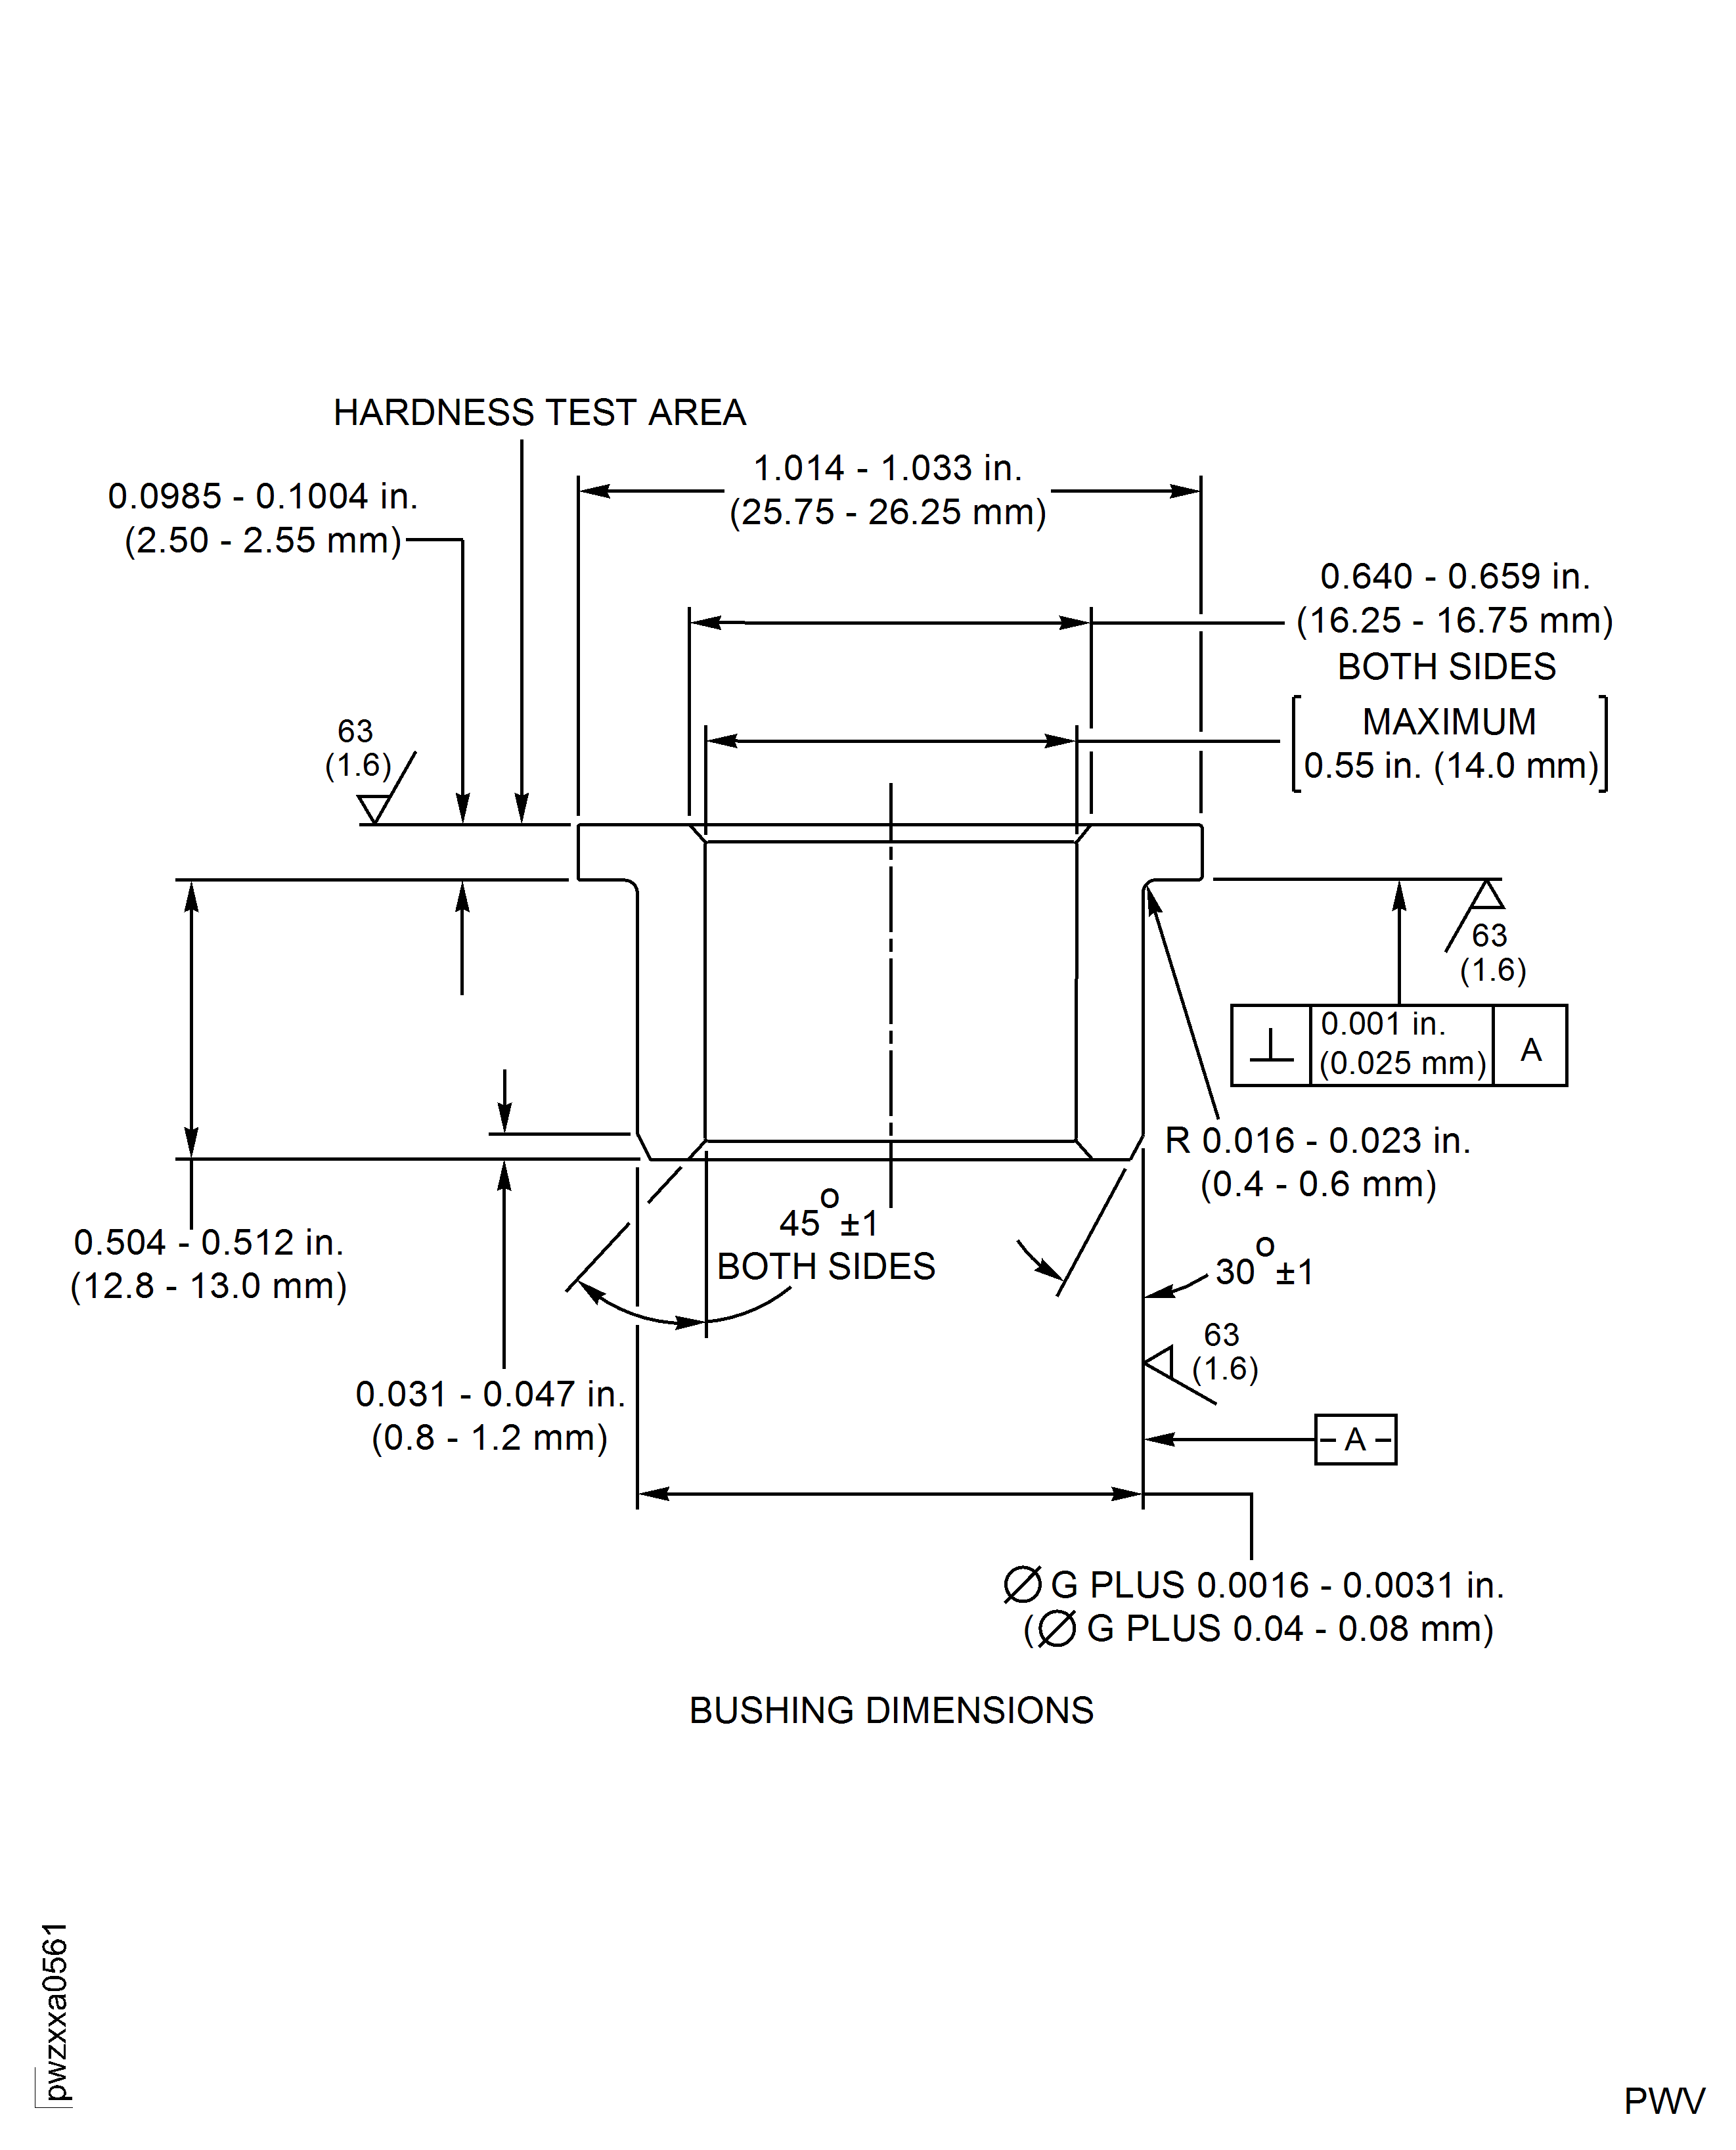
Refer to Figure.
Use the specified types of material. Do not use other types of material.
The interference fit with the bore Diameter G must be 0.0016 in. to 0.0031 in. (0.04 mm to 0.08 mm).
Machine the Bushing.
The hardness must be 331 HB to 401 HB (Brinell scale).
NOTE
The inner diameter of the bushing will be final machined after the bushing is installed to the Gearbox Casing.
Check the hardness of the bushing.
SUBTASK 72-60-21-220-194 Produce the Bushings

WARNING
DO NOT TOUCH THE HOT PARTS WITHOUT PROTECTIVE GLOVES.
WARNING
HOT PARTS CAN CAUSE REDDENING AND BLASTING OF THE SKIN IF THE HANDS ARE NOT PROTECTED.
WARNING
IMMERSE THE CONTACTED AREA IN COLD WATER FOR 10 MINUTES IF THE SKIN IS BURNED. IMMEDIATELY GET MEDICAL ATTENTION IF THE PAIN OR BLISTERING PERSIST.Make sure the temperature of the aluminum housing is not more than 250 deg F (120 deg C).
Make sure that the temperature of the bushing is not less than minus 58 deg F (minus 50 deg C).
Use the hot air gun and/or the freezer to increase the temperature of the housing and/or decrease the temperature of the bushing.
Use protective gloves.
Use an arbor press, a drift and a guide pin.
Give sufficient back - up support at the bushing bore area to prevent housing distortion when you install the bushing.
Install the bushing into the machined bore.

CAUTION
INSTALL THE BUSHING IN THE MACHINED BORE IMMEDIATELY AFTER REMOVAL FROM THE FREEZER, OTHERWISE THE BUSHING CANNOT BE CORRECTLY INSTALLED.Let the part get to room temperature.
Remove the drift and the guide pin.
SUBTASK 72-60-21-350-171 Install the Bushing
NOTE
The difference in temperature between the parts must be less than 250 deg F (120 deg C).Machine the inner diameters of the bushings.
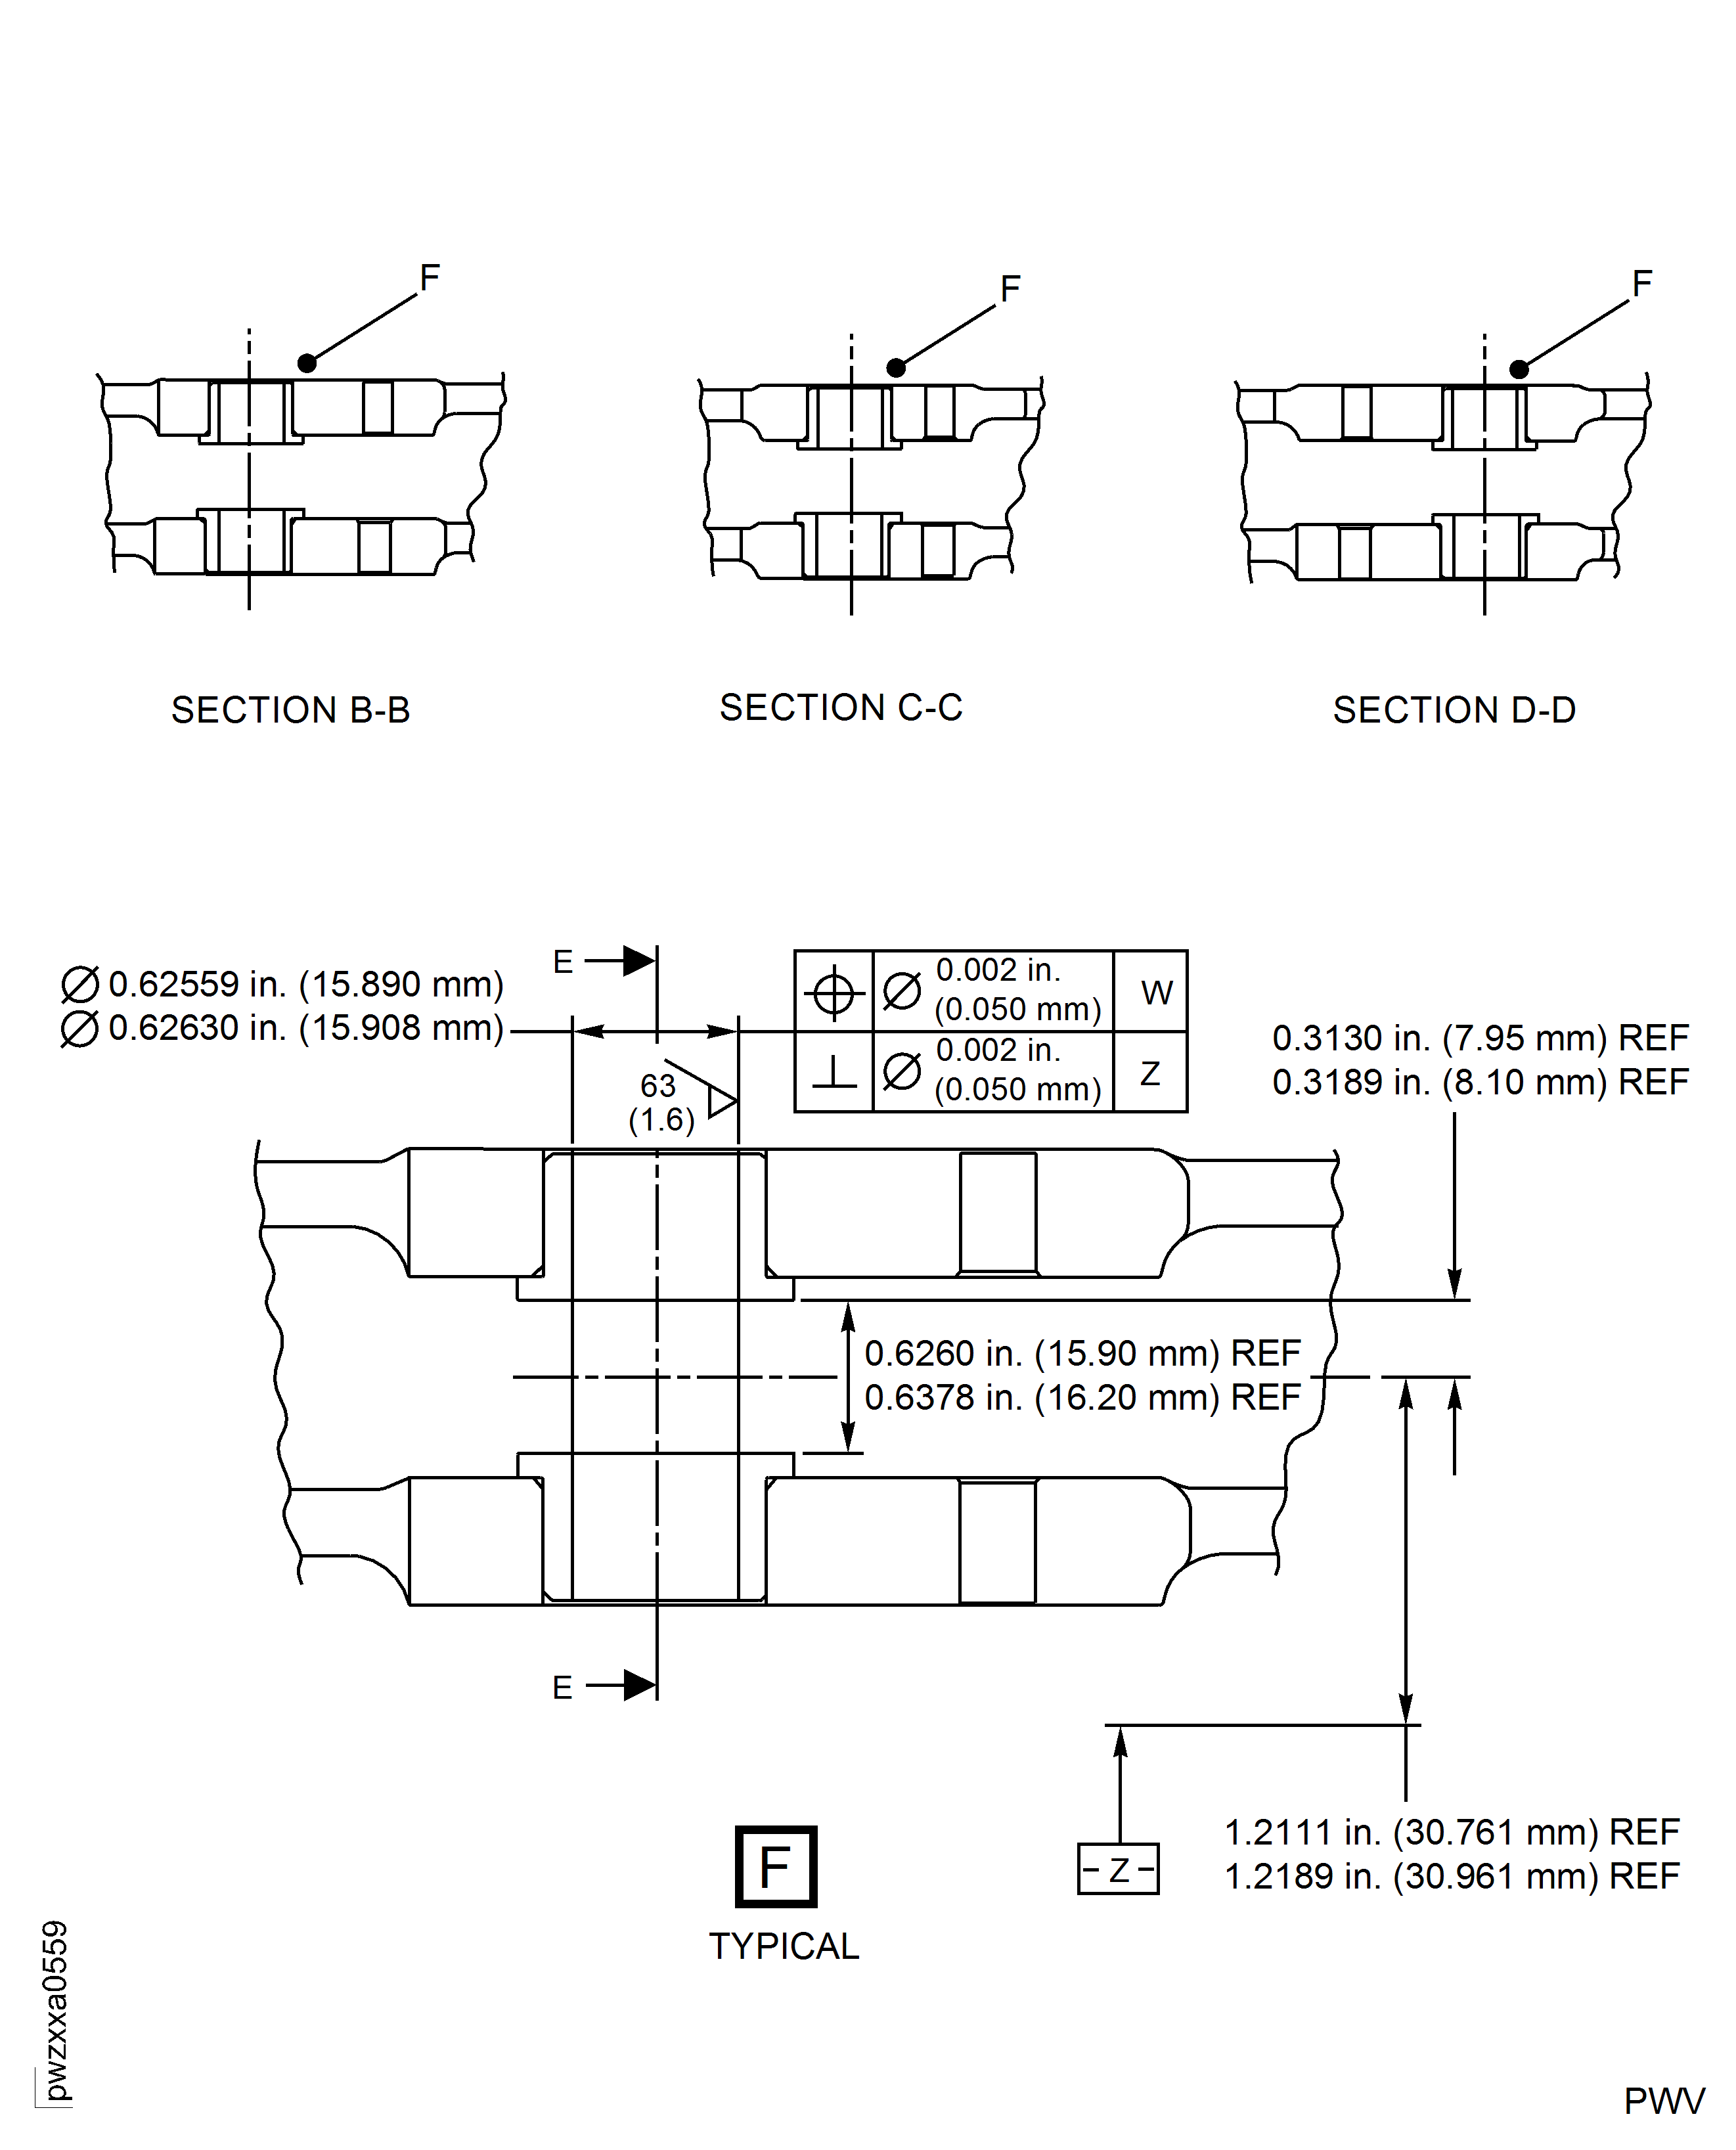
The final dimension must be 0.62559 in. to 0.62630 in. (15.8899 mm to 15.9080 mm).
NOTE
The position of the hole should be located in the same position as the inner diameter of the removed bushing. If the position of the original bushing is unknown or damaged too much, it is acceptable to position the hole per the locations identified in Figure.
The final dimension must be done by line reaming the inner holes of the bushings.
SUBTASK 72-60-32-320-152 Machine the Inner Diameter of the Bushings
Refer to SPM TASK 70-09-00-400-501, SUBTASK 70-09-00-400-001.
Make a mark "VRS5709" adjacent to the part number. Use vibration peen method.
Refer to SPM TASK 70-38-02-300-503.
Touch up the marking area.
SUBTASK 72-60-21-350-172 Identify the Repair
Figure: Repair Details
Repair Details

Figure: Repair Dimensions
Repair Dimensions

Figure: Casing Machining Dimensions
Casing Machining Dimensions

Figure: Bushing Dimensions
Bushing Dimensions

