Export Control
EAR Export Classification: Not subject to the EAR per 15 C.F.R. Chapter 1, Part 734.3(b)(3), except for the following Service Bulletins which are currently published as EAR Export Classification 9E991: SBE70-0992, SBE72-0483, SBE72-0580, SBE72-0588, SBE72-0640, SBE73-0209, SBE80-0024 and SBE80-0025.Copyright
© IAE International Aero Engines AG (2001, 2014 - 2021) The information contained in this document is the property of © IAE International Aero Engines AG and may not be copied or used for any purpose other than that for which it is supplied without the express written authority of © IAE International Aero Engines AG. (This does not preclude use by engine and aircraft operators for normal instructional, maintenance or overhaul purposes.).Applicability
All
Common Information
TASK 72-60-41-300-015 Angle Gearbox Casing - Repair The PTO Shaft Seal Tube Bore By Bushing, Repair-015 (VRS5690)
Material of Component
DESCRIPTION | IAE SYMBOL | MATERIAL |
|---|---|---|
Accessory gearbox casing | A357-T61 (4716 M/2) | Aluminium alloy |
Bushing | A357-T61 (4716 M/2) or AMS 4120 (type 2024 T4/T351) | Aluminium alloy, beryllium free |
General
Price and availability - none
The practices and processes referred to in the procedure by the TASK numbers are in the SPM.
NOTE
Preliminary Requirements
Pre-Conditions
NONESupport Equipment
NONEConsumables, Materials and Expendables
| Name | Manufacturer | Part Number / Identification | Quantity | Remark |
|---|---|---|---|---|
| CoMat 08-163 RETAINING COMPOUND PRESSFIT | LOCAL | CoMat 08-163 | ||
| CoMat 10-140 DRY FILM LUBRICANT, MOLYBDENUM DISULFIDE | 818N1 | CoMat 10-140 |
Spares
NONESafety Requirements
NONEProcedure
Machine Diameter U first.
If there is damage or unwanted runout, Diameter U can be increased to a maximum of 3.693 in. (93.80 mm). Keep material removal to a minimum.
Diameter U must be between 3.658 in. and 3.665 in. (92.90 mm and 93.10 mm).
Axially machine the Diameter U between 0.650 in. and 0.669 in. (16.50 mm and 17.00 mm).
If there is damage or unwanted runout, Diameter V can be increased to a maximum of 3.829 in. (97.26 mm). Keep material removal to a minimum.
Diameter V must be between 3.815 in. and 3.822 in. (96.90 mm and 97.10 mm).
If there is damage, the axial length of Diameter V (Distance D) can be increased to a maximum of 0.234 in. (5.94 mm).
Axially machine the Diameter V between 0.153 in. and 0.161 in. (3.90 mm and 4.10 mm).
Make sure that you obey the tolerance limits.
Record the actual dimensions of Diameter U, Diameter V, and Distance D.
Use a boring machine.
Machine the two diameters of the bore.
SUBTASK 72-60-41-320-078 Machine the Gearbox Casing Bore
Refer to TASK 72-60-00-100-000.
Clean the part.
Refer to SPM TASK 70-23-05-230-501. Use medium sensitivity.
Cracks are not permitted.
Examine the casing for cracks in the area of the bore.
SUBTASK 72-60-41-220-104 Examine the Gearbox Casing Bore
Refer to SPM TASK 70-38-02-300-503.
Apply the chromate conversion coating to the Diameter V and the Surface S.
SUBTASK 72-60-41-330-080 Apply the Chromate Conversion Coating
Use the specified aluminium alloys.
Do not use other materials.
The outside diameters must be equal to U plus 0.0032 in. to 0.0039 in. (0.08 mm to 0.10 mm) and to V minus 0.008 in. to 0.0016 in. (0.02 mm to 0.04 mm).
Make sure that you obey the tolerance limits.
Deleted.
Make a bushing.
Refer to SPM TASK 70-38-02-300-503.
Apply the chromate conversion coating to the machined surfaces. Do not coat the Surface E and the grooves.
SUBTASK 72-60-41-330-081 Make a Bushing
Refer to Figure.
Use an oven.
Do not increase the temperature of the casing more than 220 deg F (104 deg C).
NOTE
The minimum difference in temperature between the parts must be 140 deg F (60 deg C).
Increase the temperature of the casing.
Use protective gloves.
Remove the casing from the oven.
Apply the glue in the grooves of the bushing and on Surface E.
Install the bushing into the machined bore of the casing.
Use an arbor press.
Make sure that the casing is correctly installed on a support to prevent casing distortion when you install the bushing.

CAUTION
INSTALL THE BUSHING INTO THE MACHINED BORE OF THE CASING IMMEDIATELY AFTER REMOVAL OF CASING FROM OVEN. IF YOU DO NOT OBEY, THE BUSHING CANNOT BE INSTALLED CORRECTLY.Install the bushing into the casing.
Let the parts get to the room temperature for a minimum of 48 hours to make sure sufficient cure time is given for glue.
Let the parts get to room temperature.
SUBTASK 72-60-41-350-089 Install the Bushing

WARNING
DO NOT TOUCH THE HOT PARTS WITHOUT PROTECTIVE GLOVES. HOT PARTS CAN CAUSE REDDENING AND BLISTERING OF THE SKIN IF THE HANDS ARE NOT PROTECTED. PUT THE CONTACTED AREA IN COLD WATER FOR 10 MINUTES IF THE SKIN IS BURNED. IF THE PAIN OR BLISTERING CONTINUE, GET THE MEDICAL ATTENTION IMMEDIATELY.The top land of the bushing must be flush with the casing.
Deleted.
The final dimension of the inner diameter of the bushing must be between 3.5039 in. and 3.5053 in (89.000 mm and 89.035 mm).
Make sure that you obey the tolerance limits.
Surface finish is 63 microinches (1.6 micrometers).
Use a boring machine.
Machine the top land and the inner diameter of the bushing.
Surface finish is 63 microinches (1.6 micrometers).
Deleted.
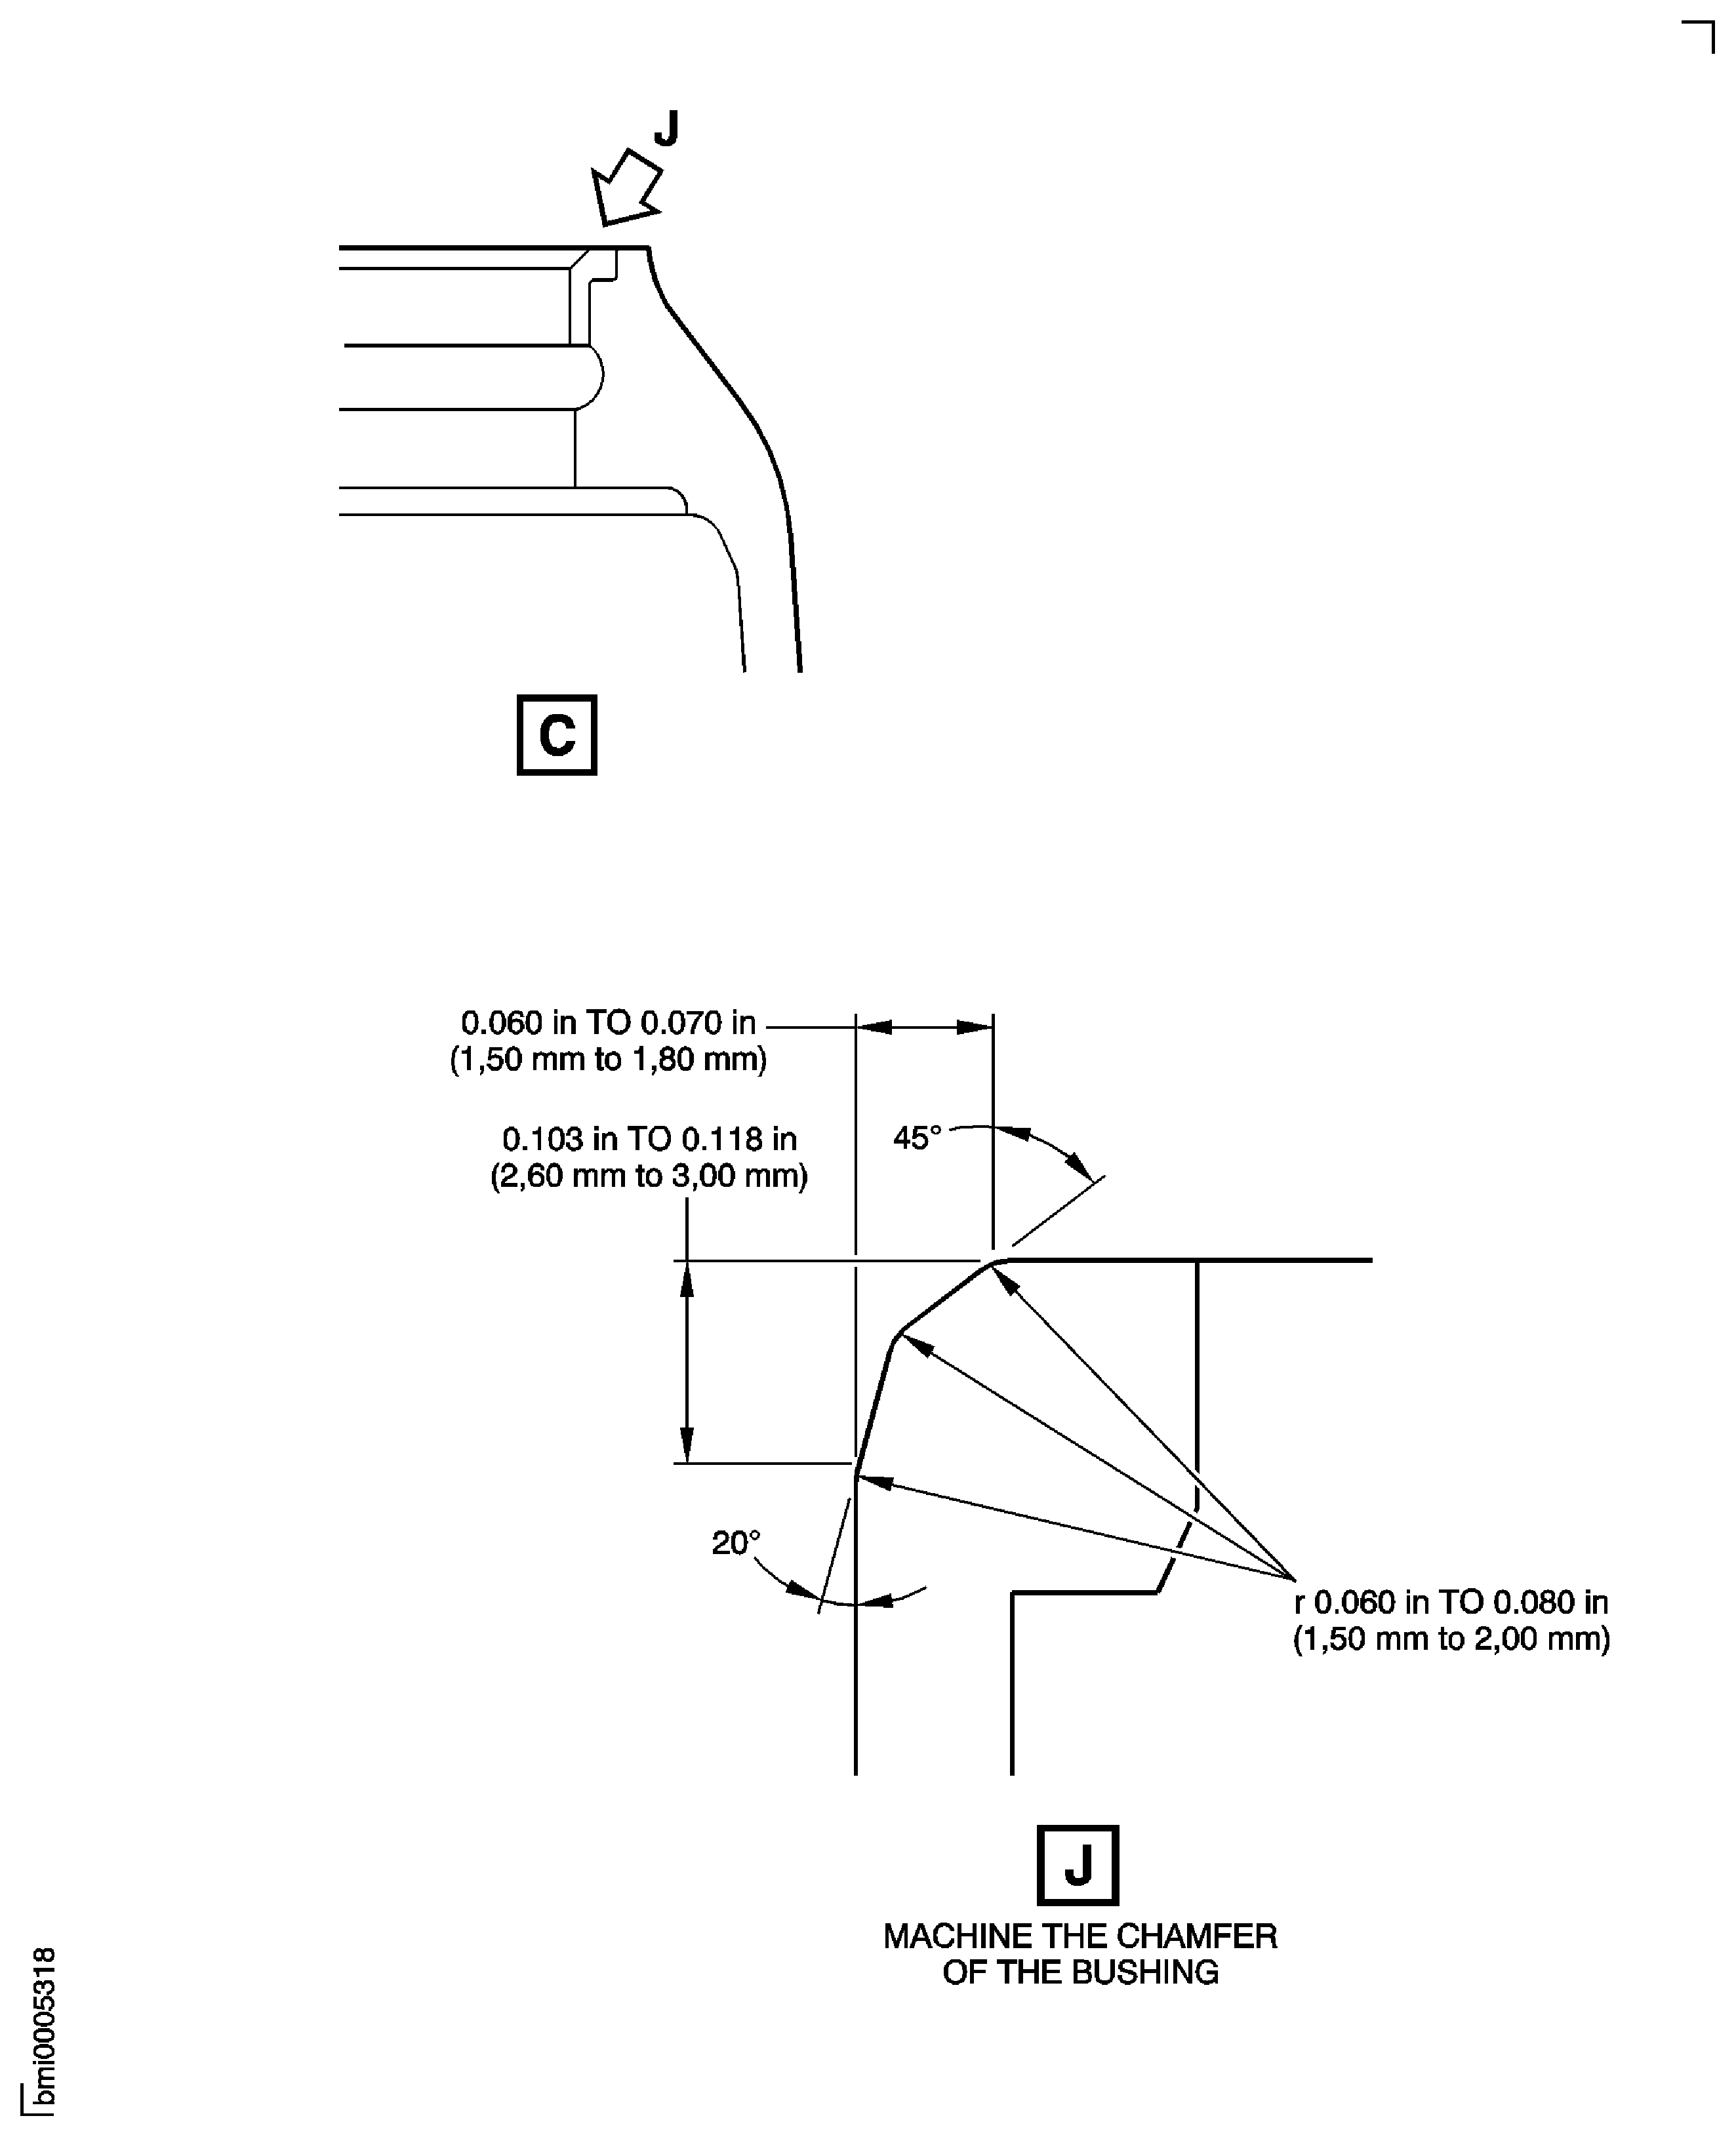
Machine the chamfer of the bushing.
SUBTASK 72-60-41-320-079 Machine the Bushing
Refer to SPM TASK 70-38-02-300-503.
Apply the chromate conversion coating to the machined surfaces of the bushing and the housing.
SUBTASK 72-60-41-330-082 Apply the Chromate Conversion Coating
Refer to SPM TASK 70-38-03-380-501.
Apply the dry film lubricant to the bushing and the housing.
SUBTASK 72-60-41-340-001 Apply the Dry Film Lubricant
Refer to SPM TASK 70-09-00-400-501, SUBTASK 70-09-00-400-001.
If necessary make a mark VRS5690 adjacent to the part number.
SUBTASK 72-60-41-350-090 Identify the Repair
Figure: Repair Details And Dimensions
Repair Details And Dimensions
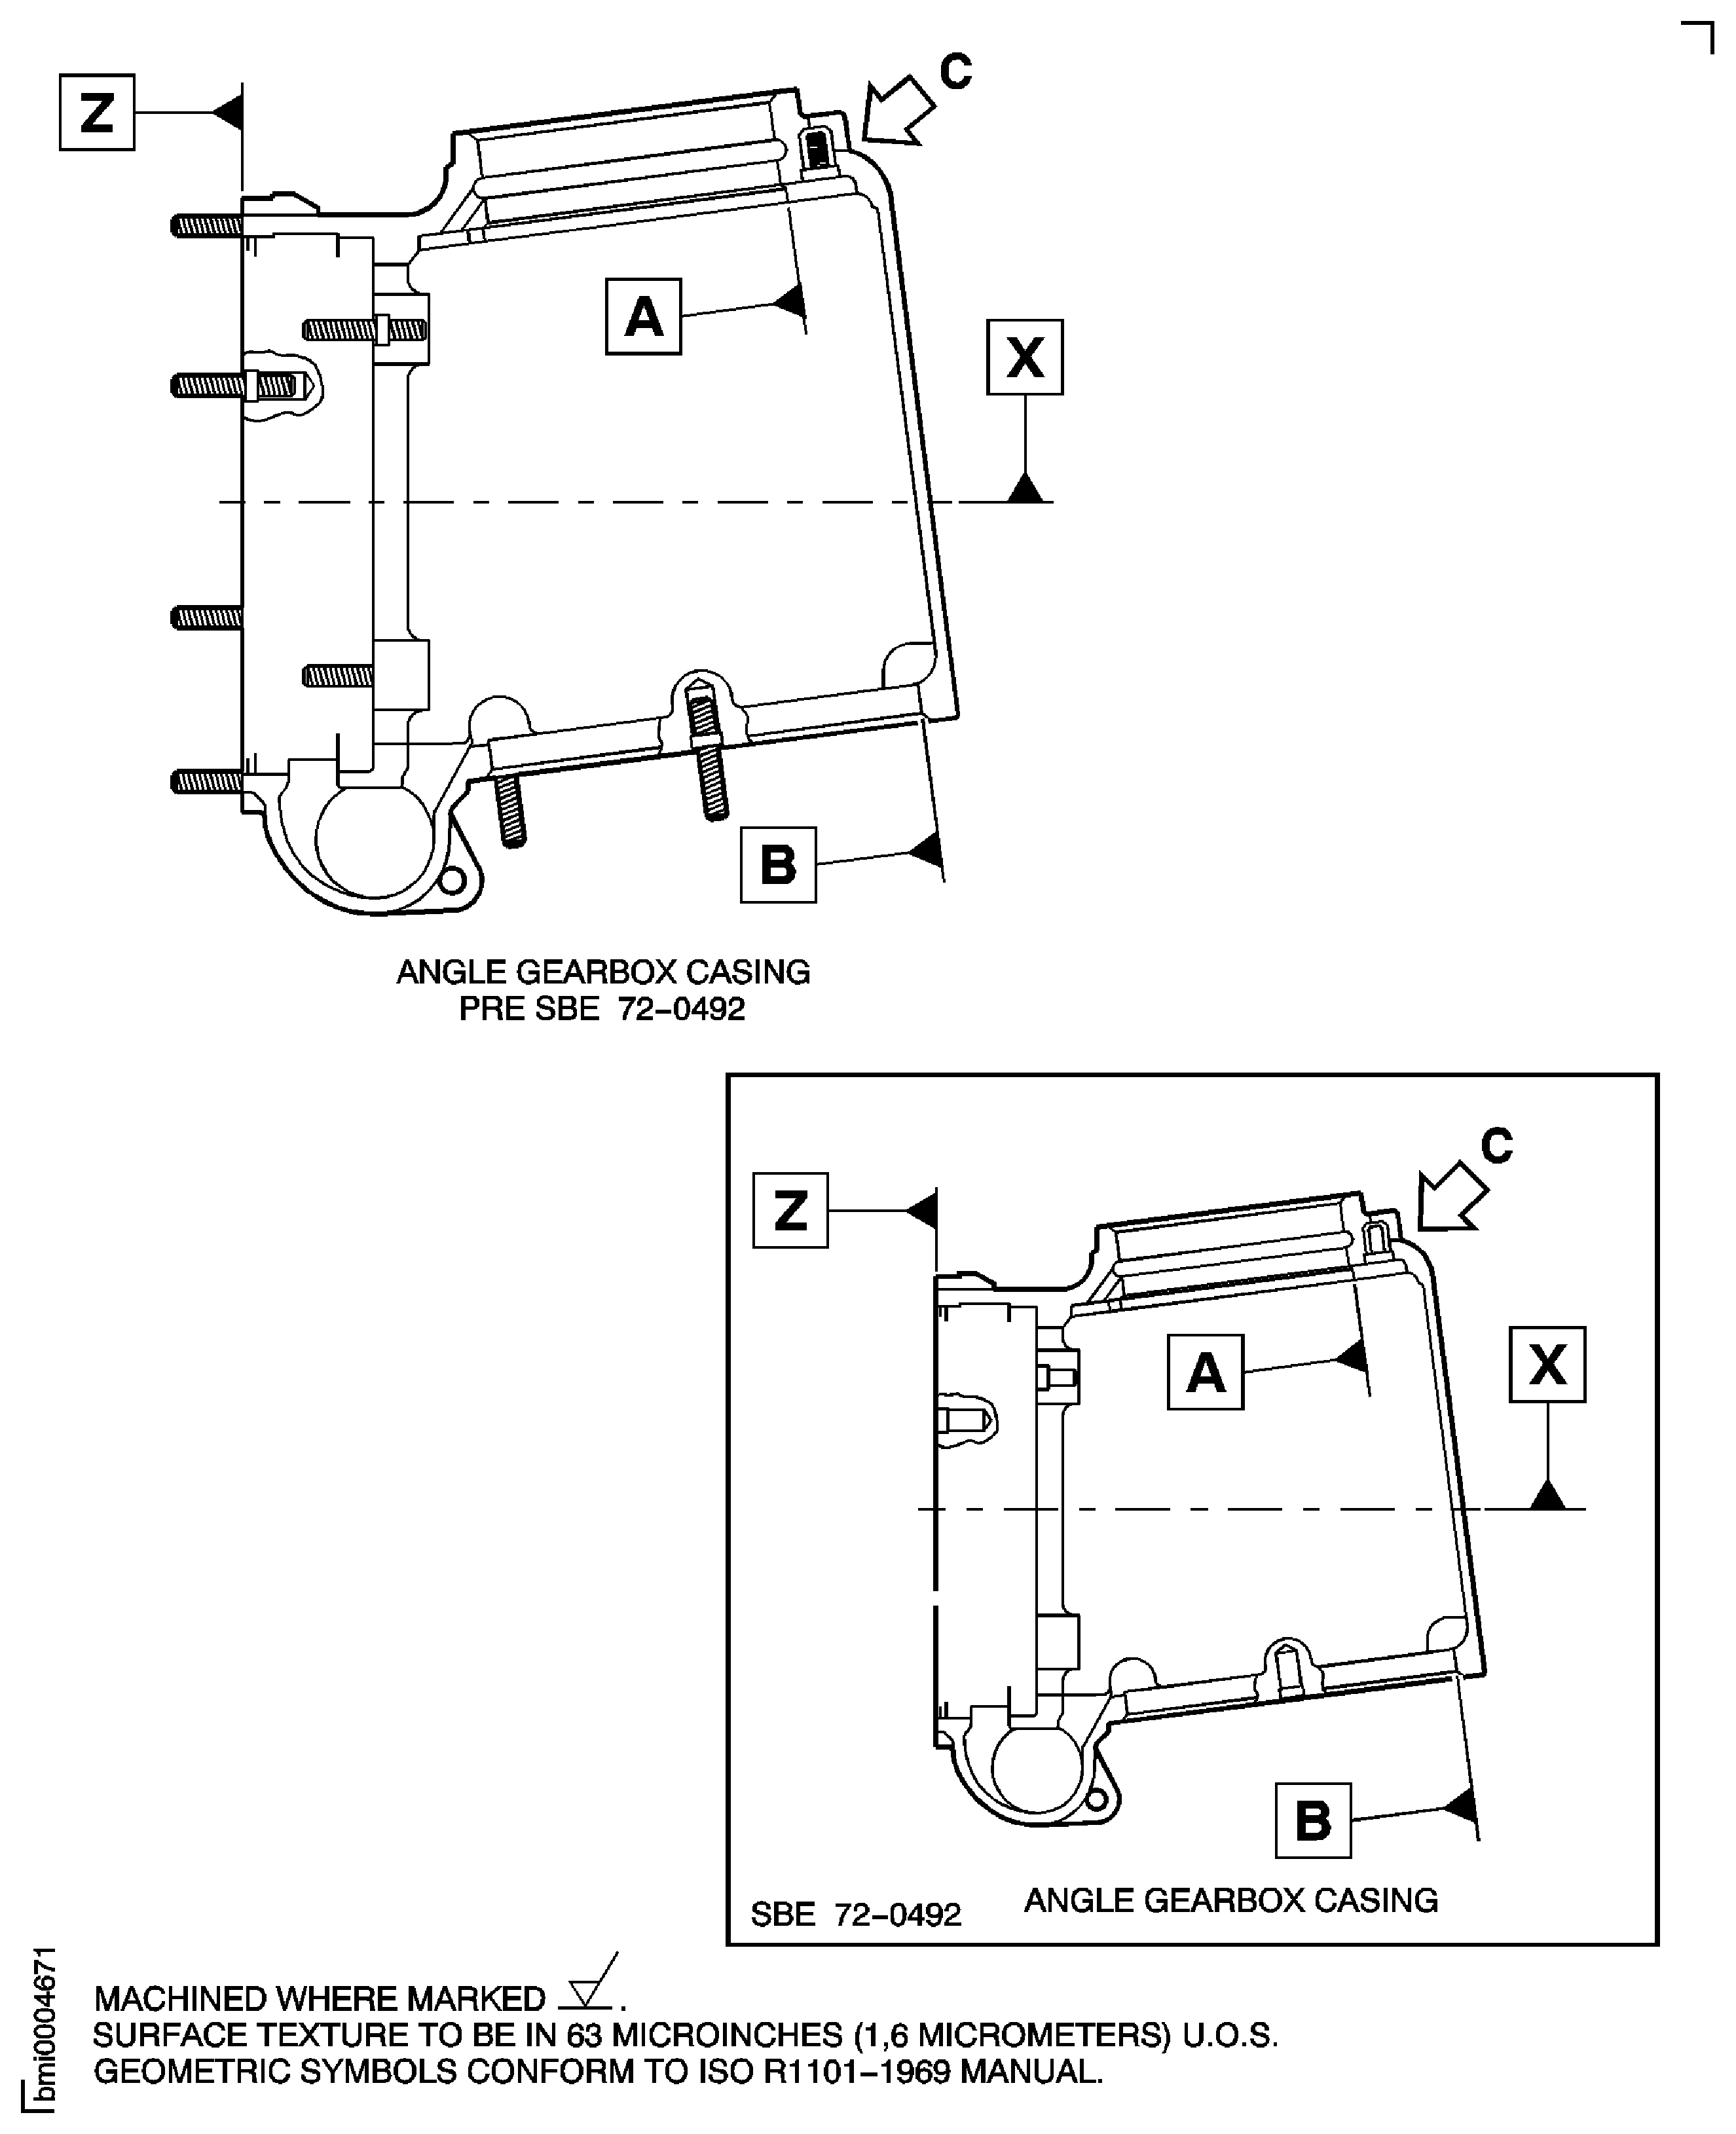
Repair Details And Dimensions
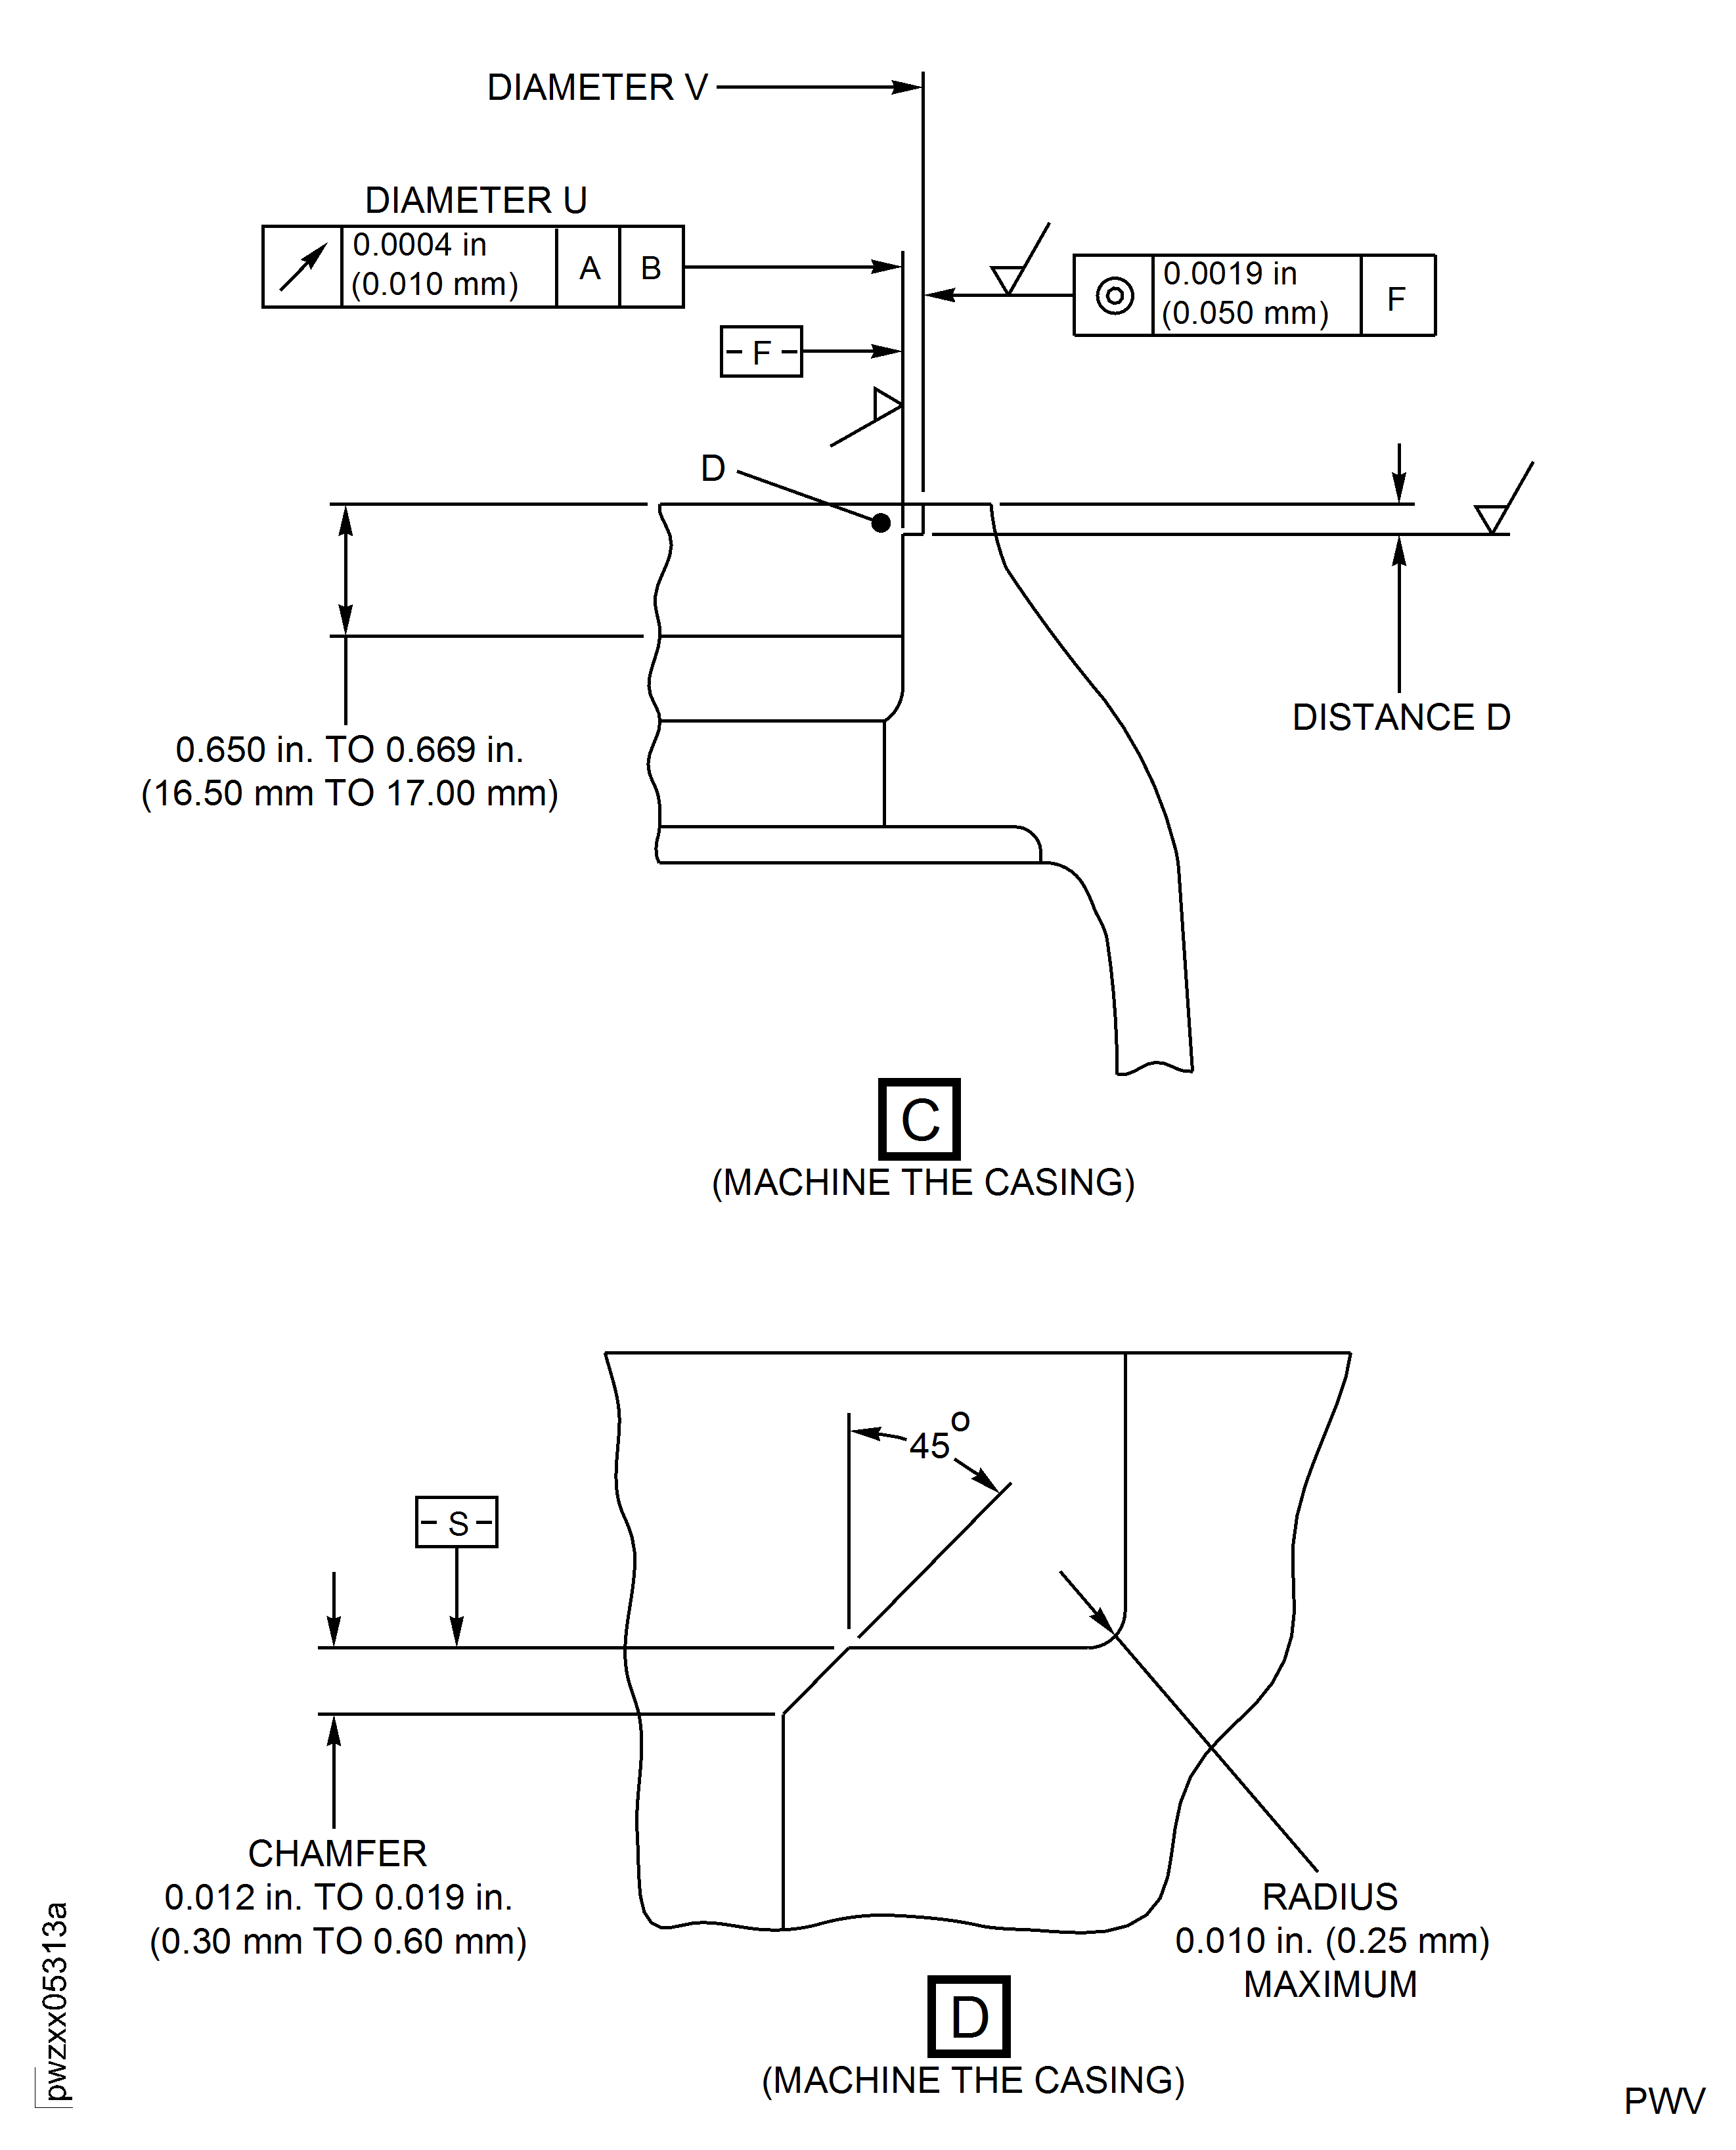
Repair Details And Dimensions
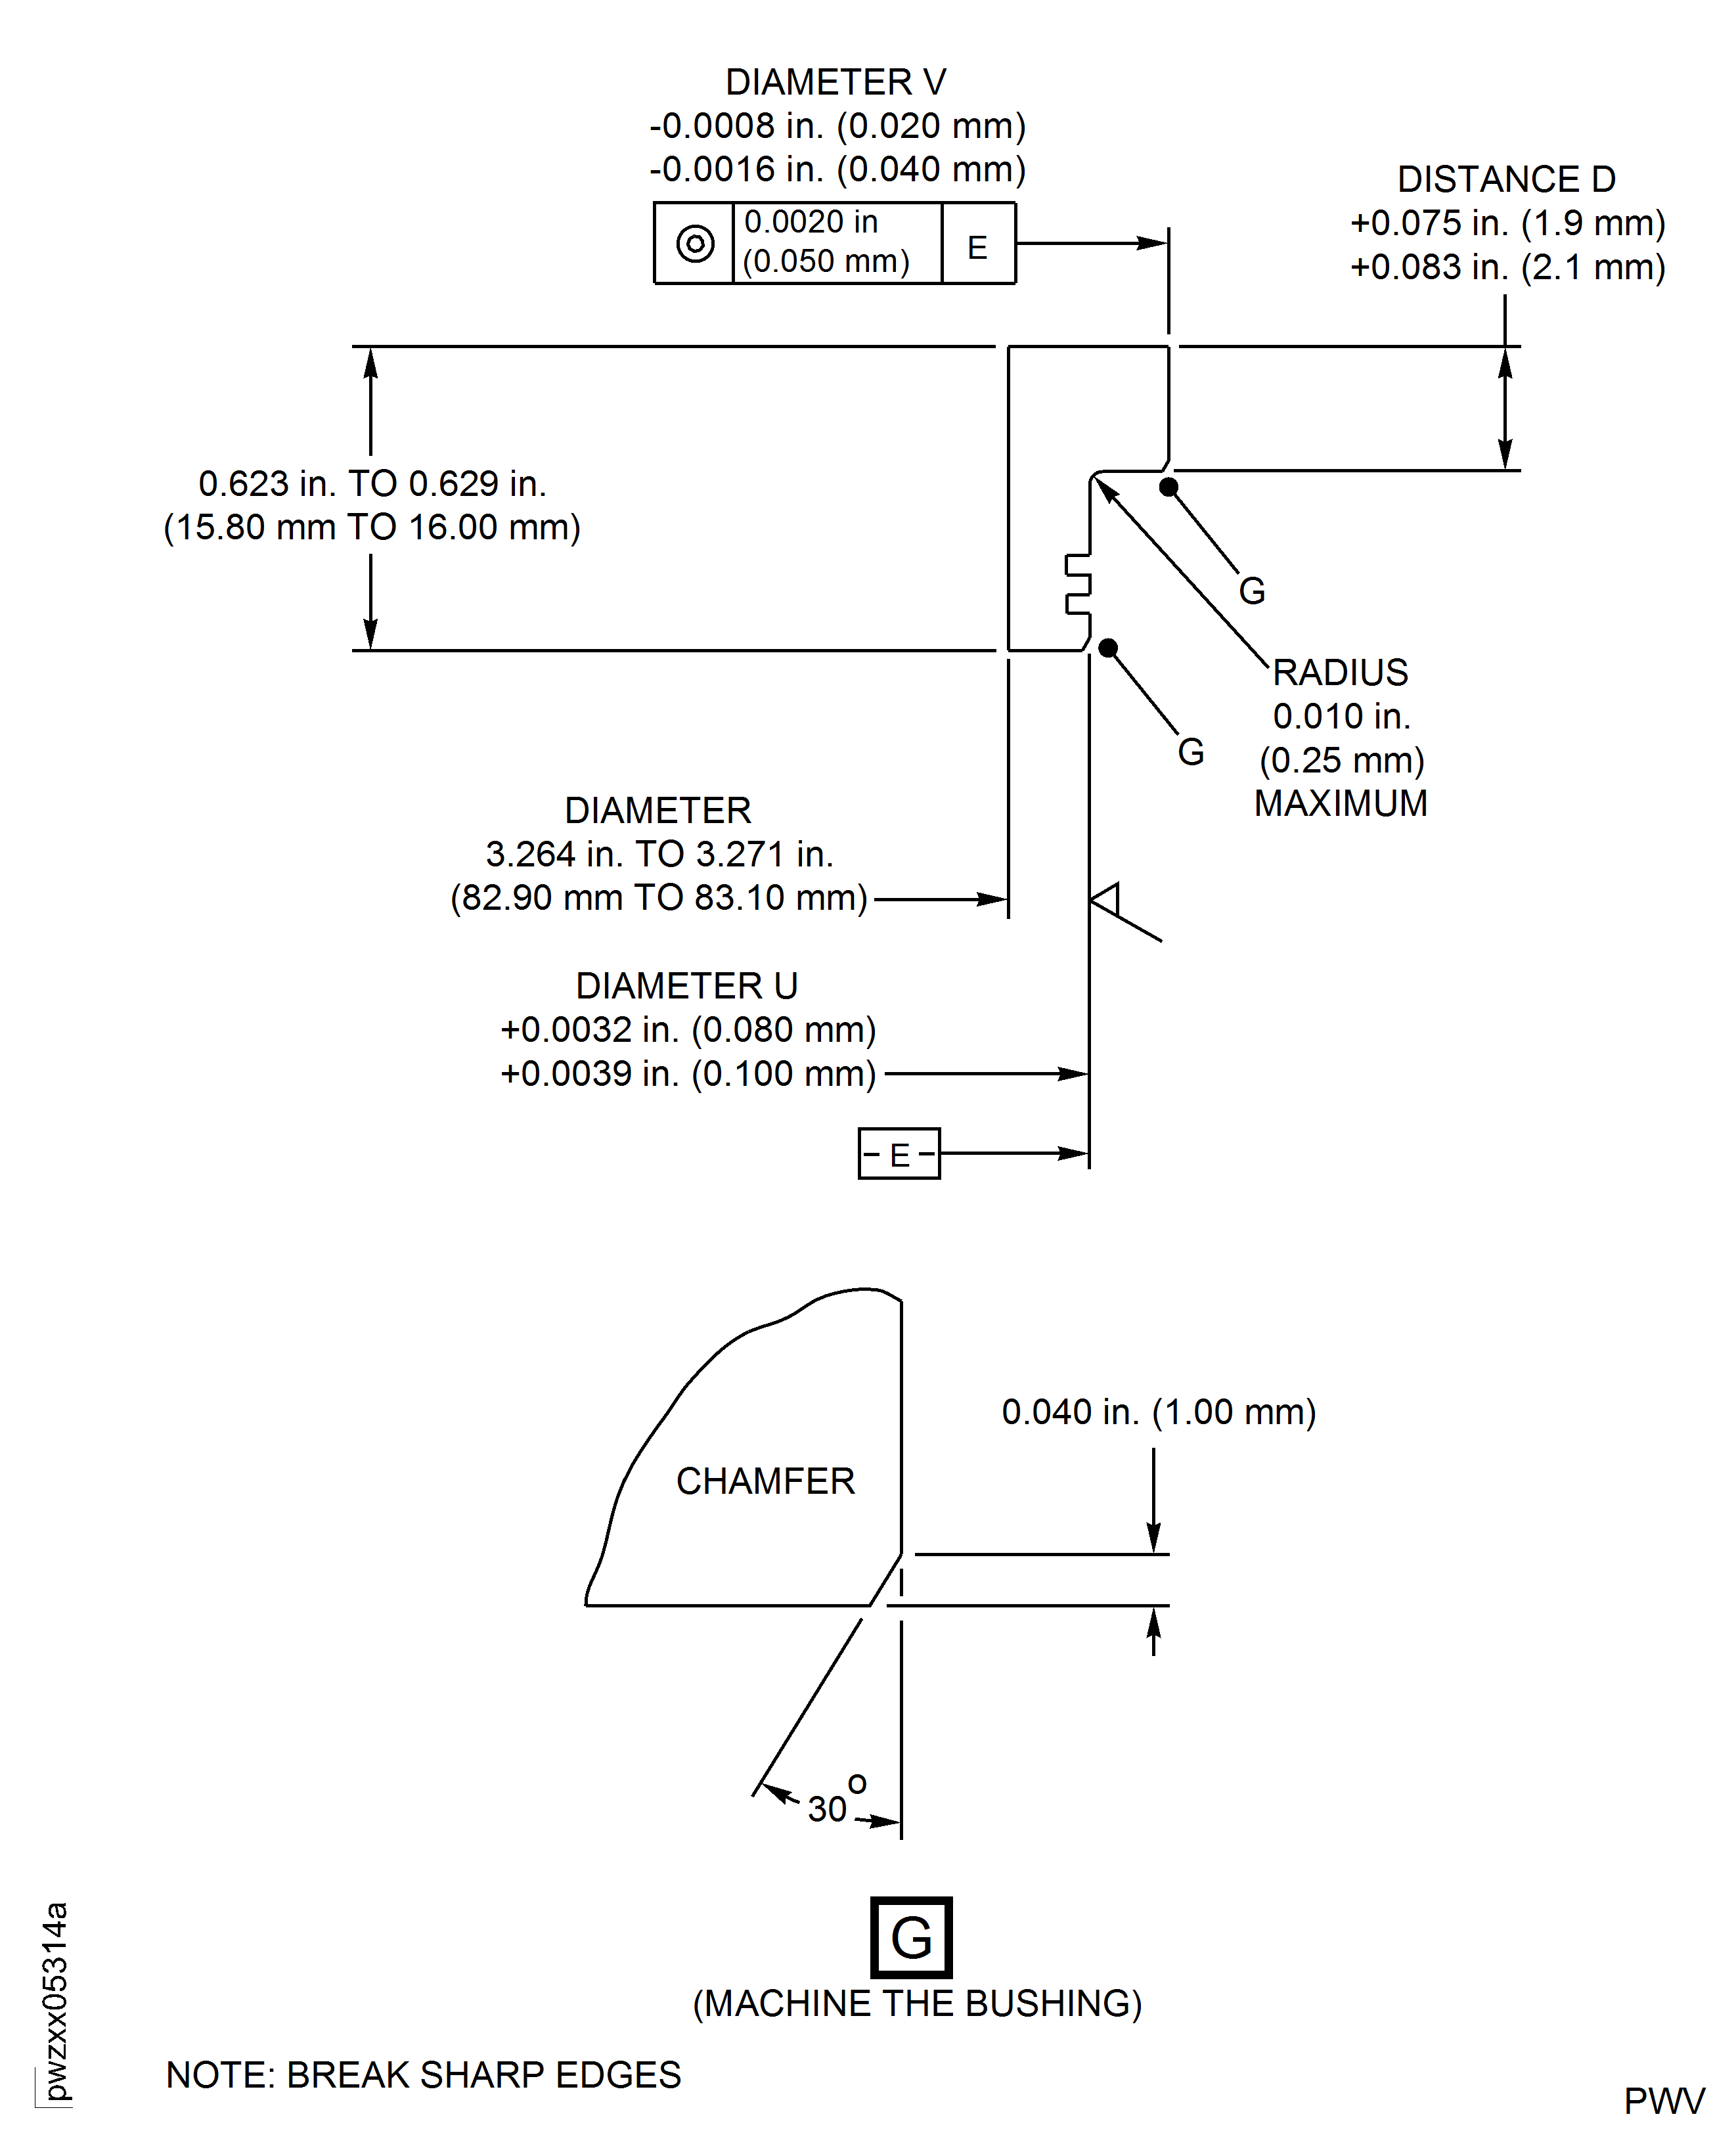
Repair Details And Dimensions
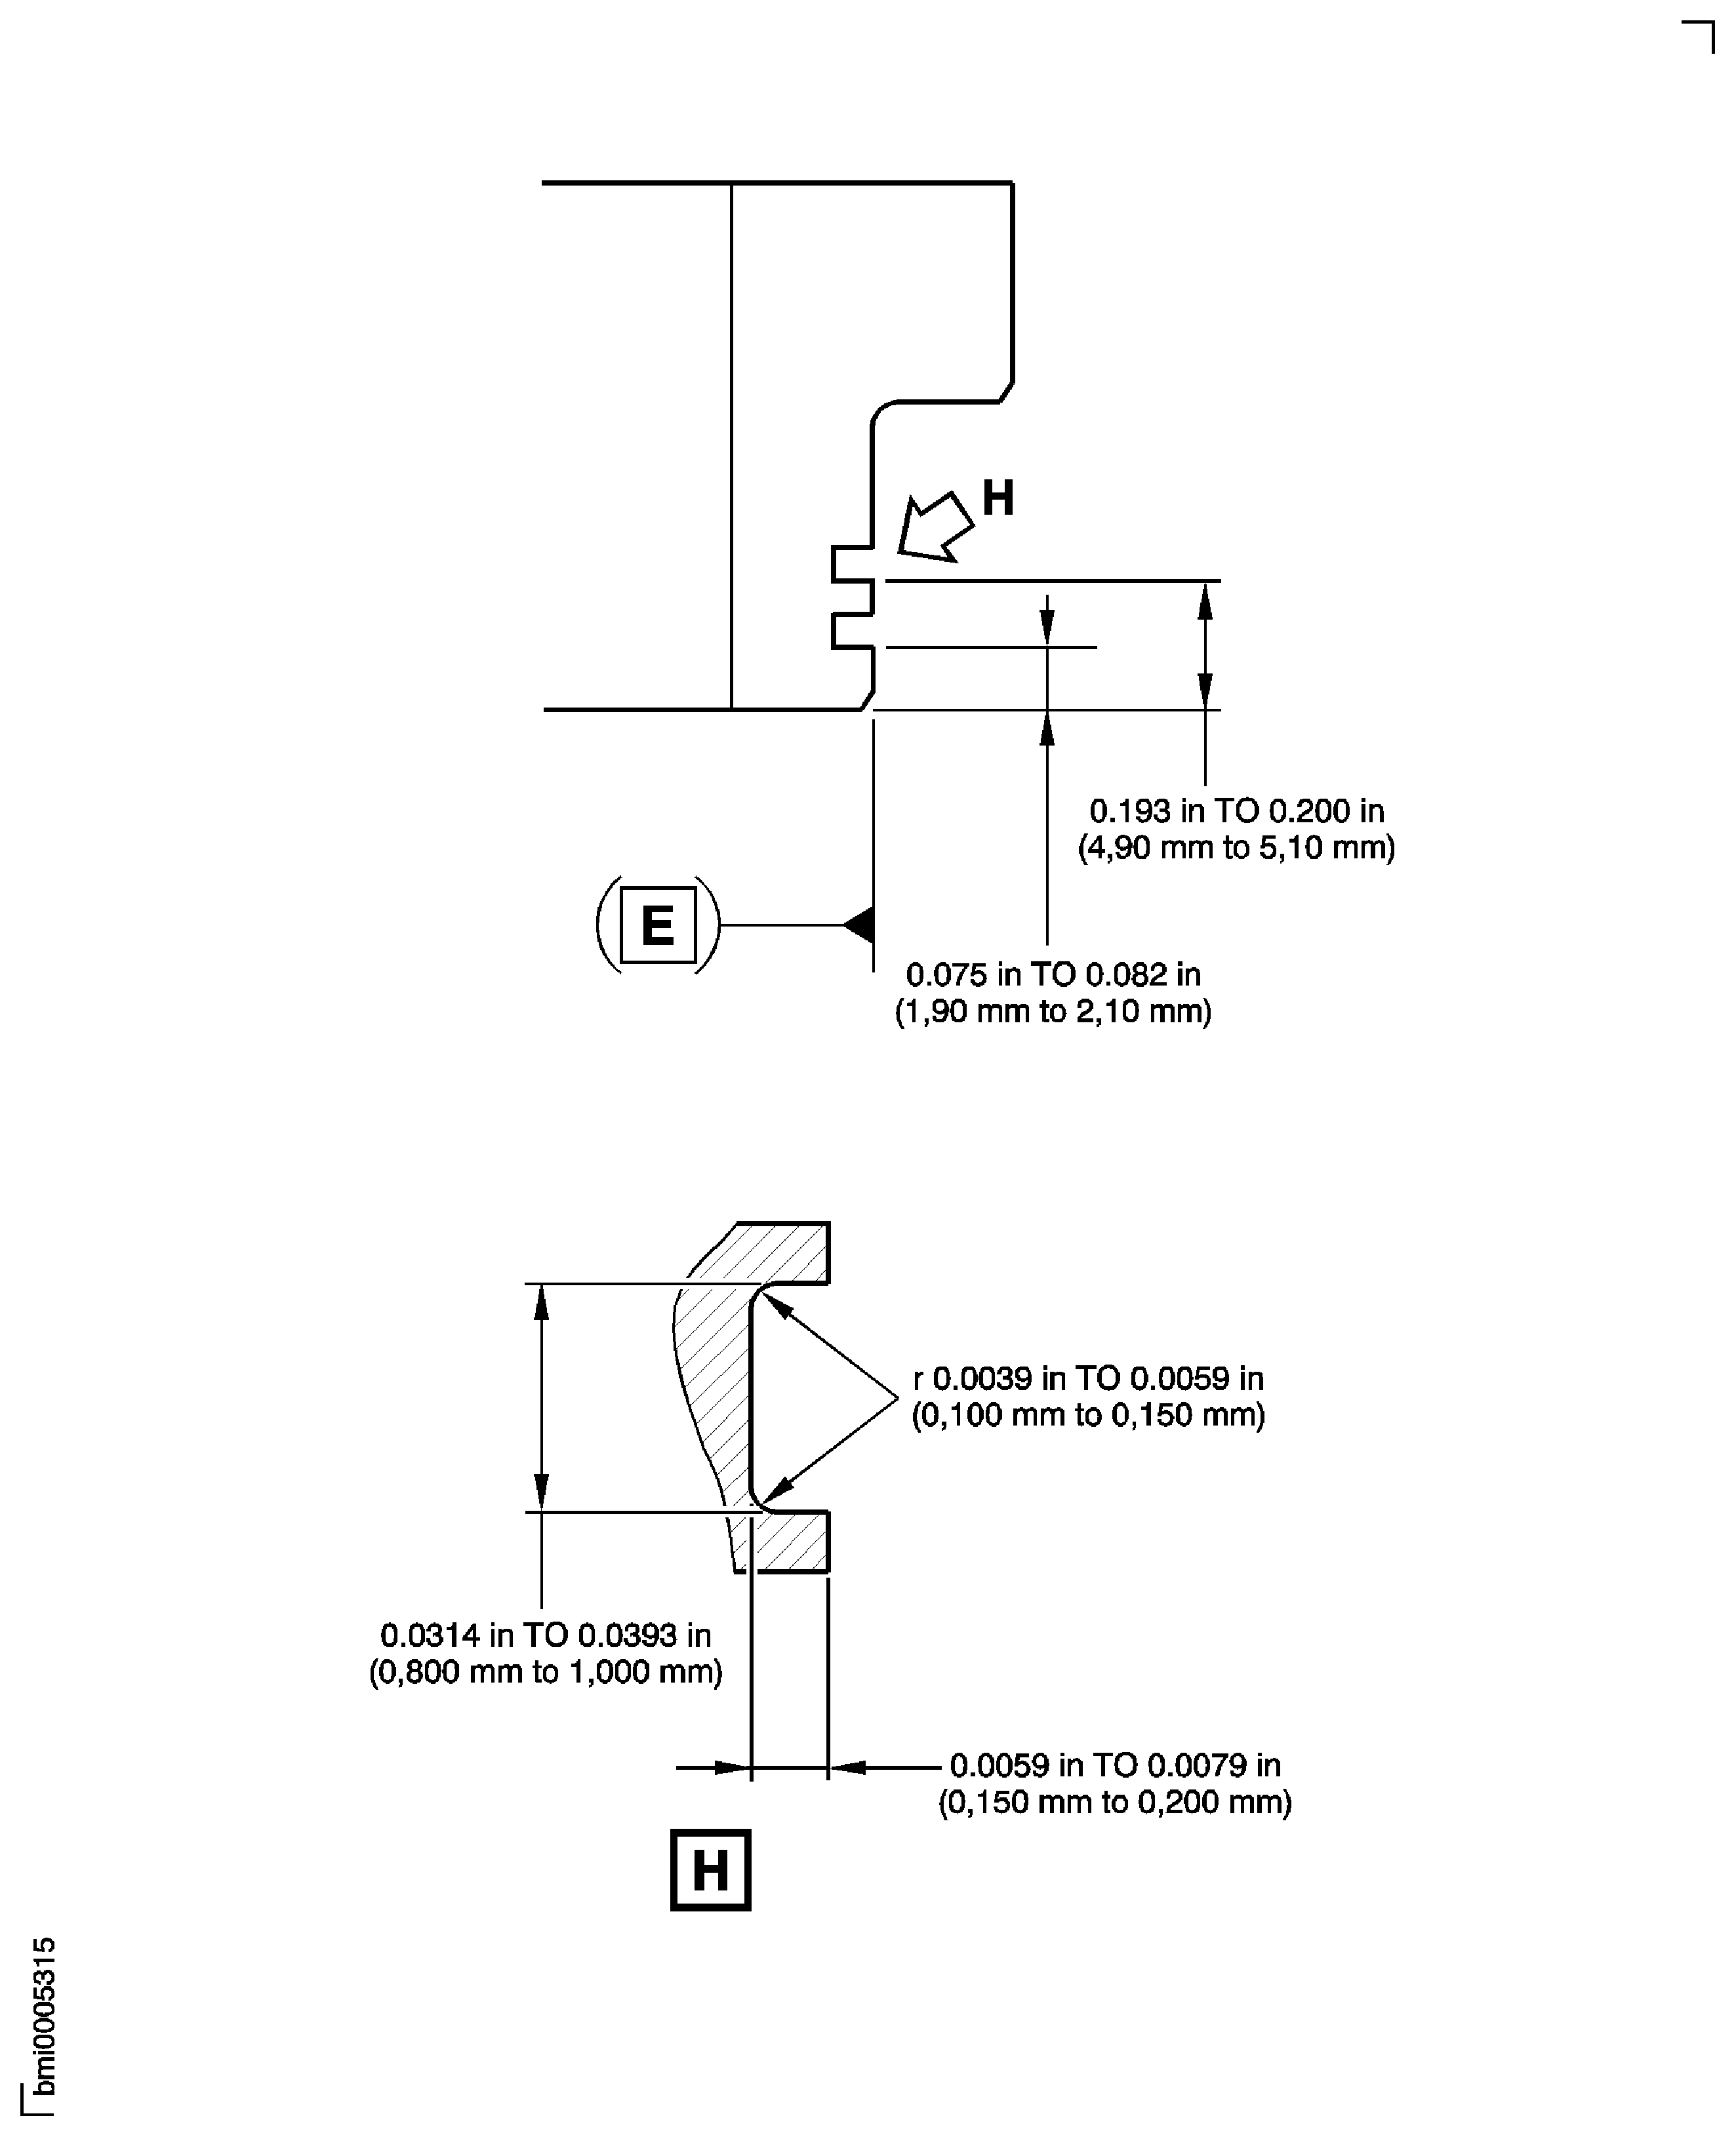
Repair Details And Dimensions
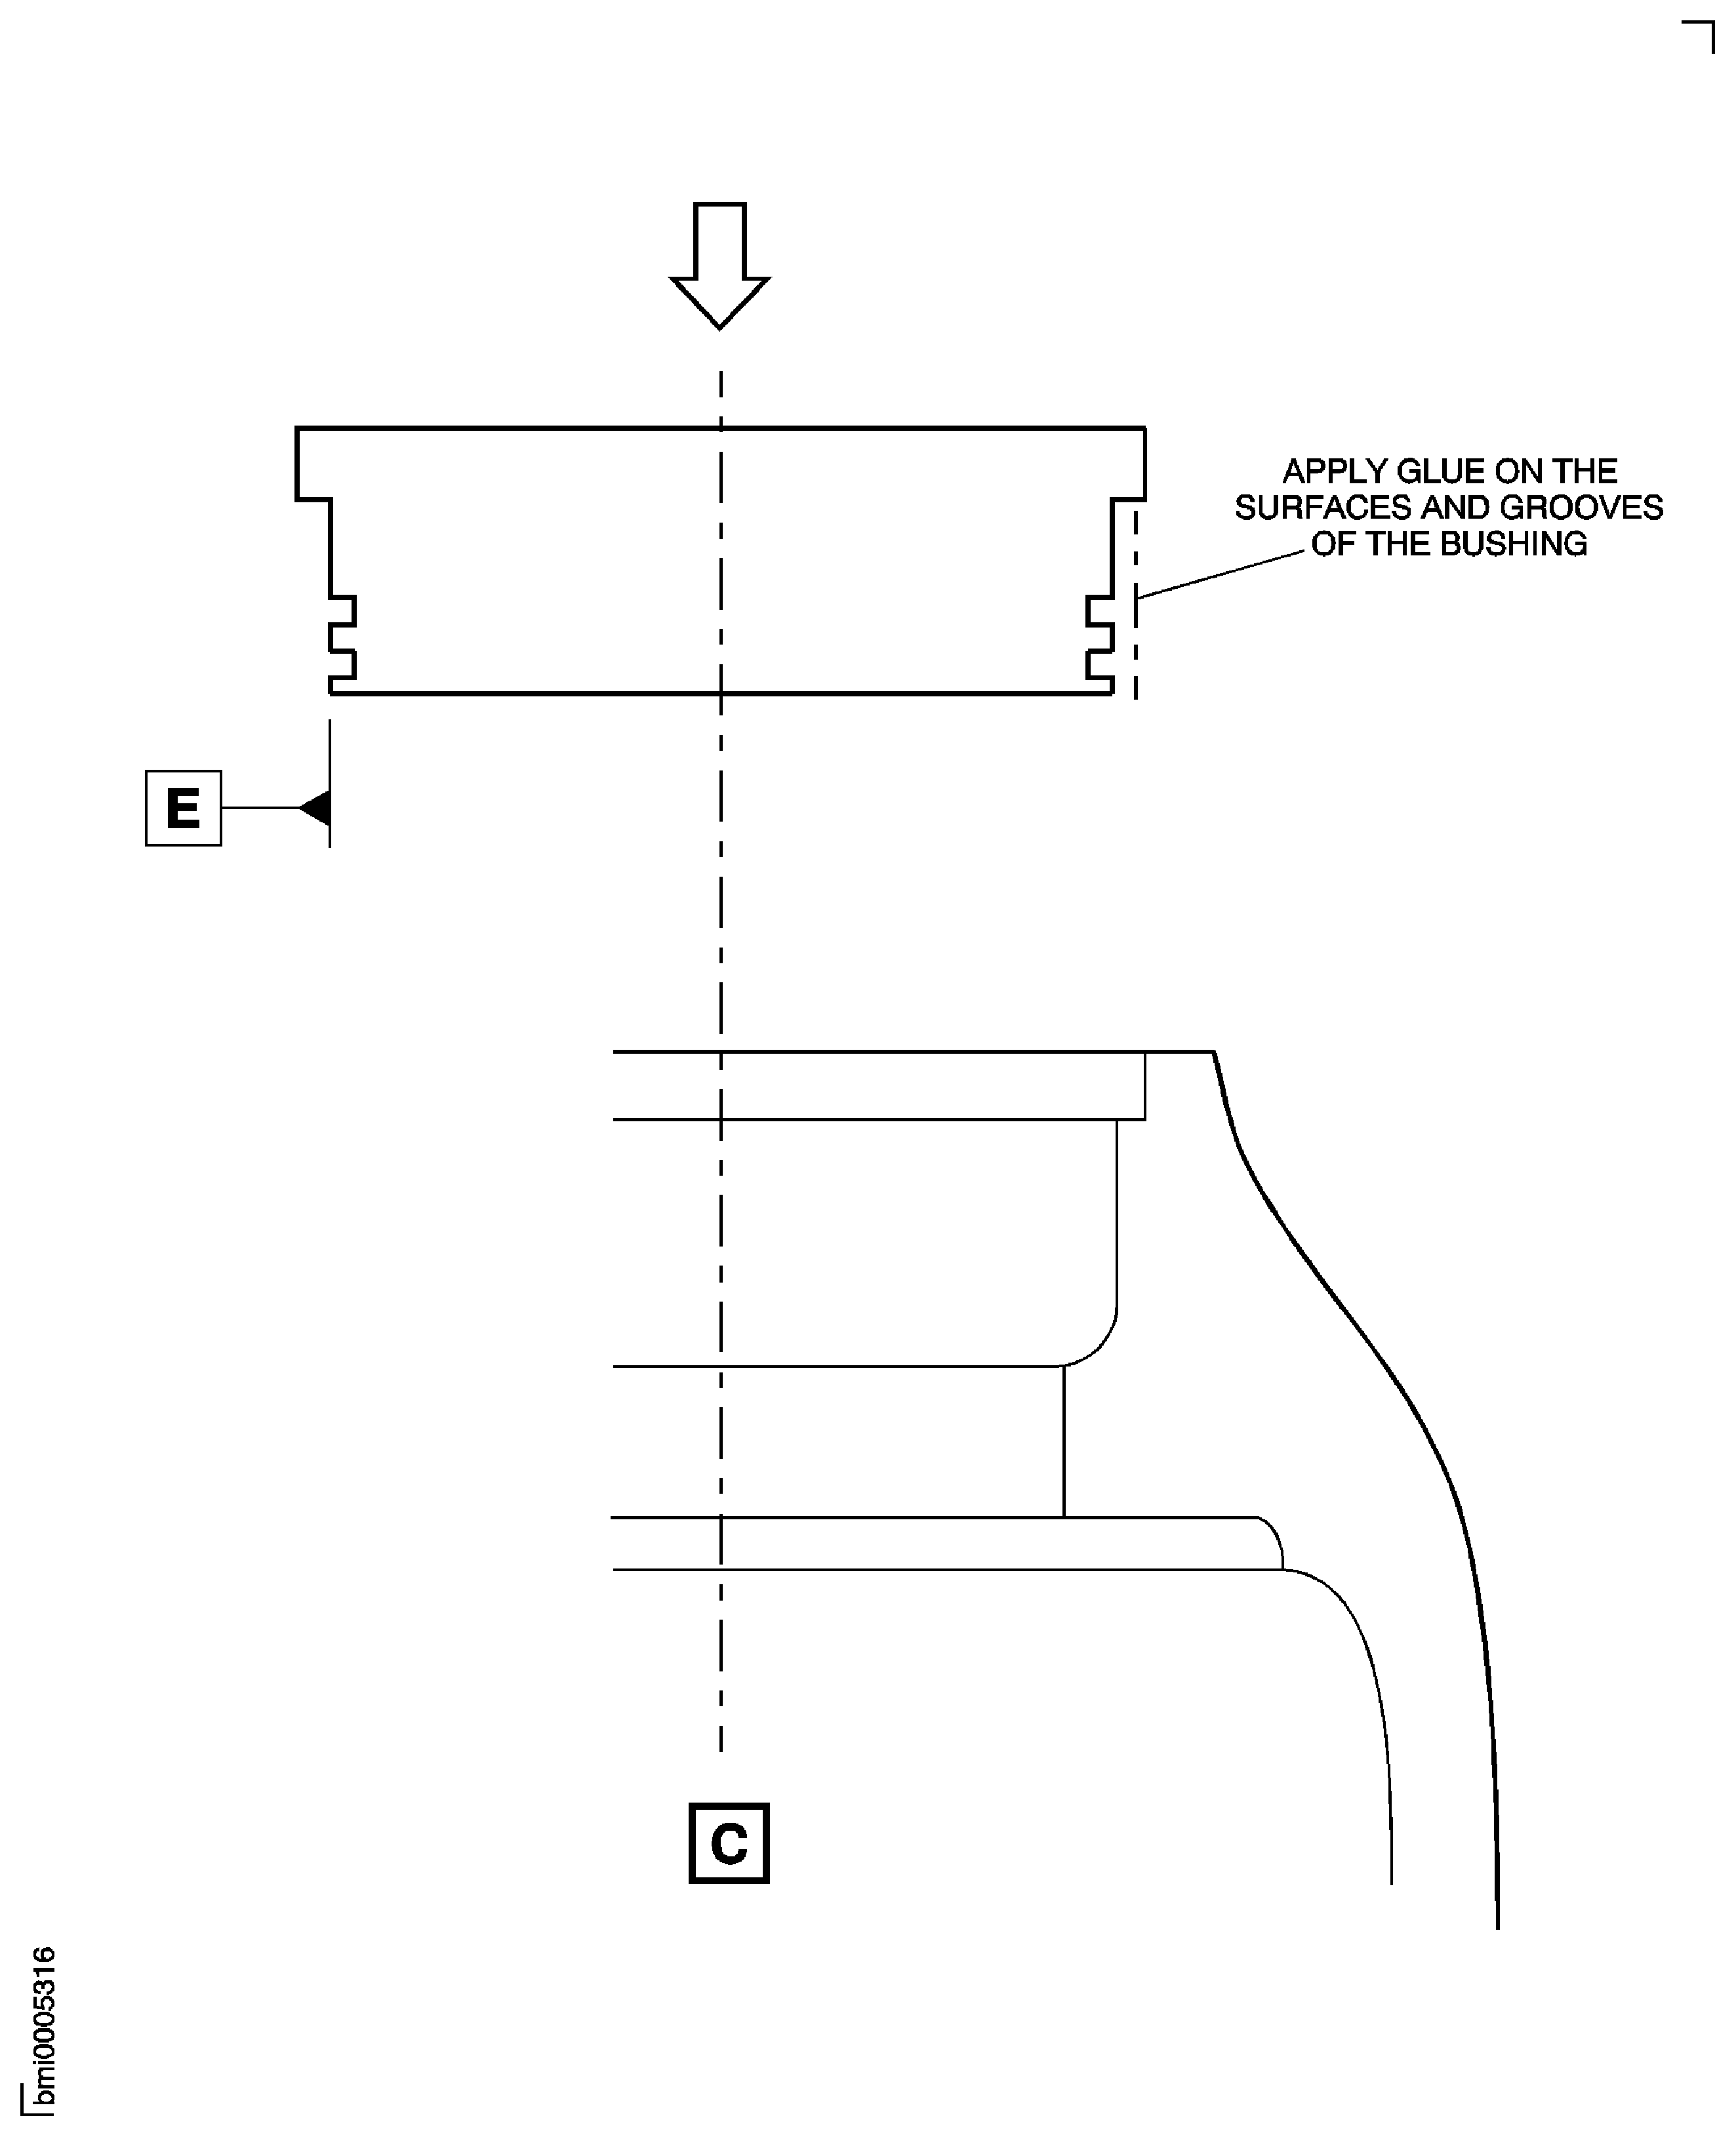
Repair Details And Dimensions
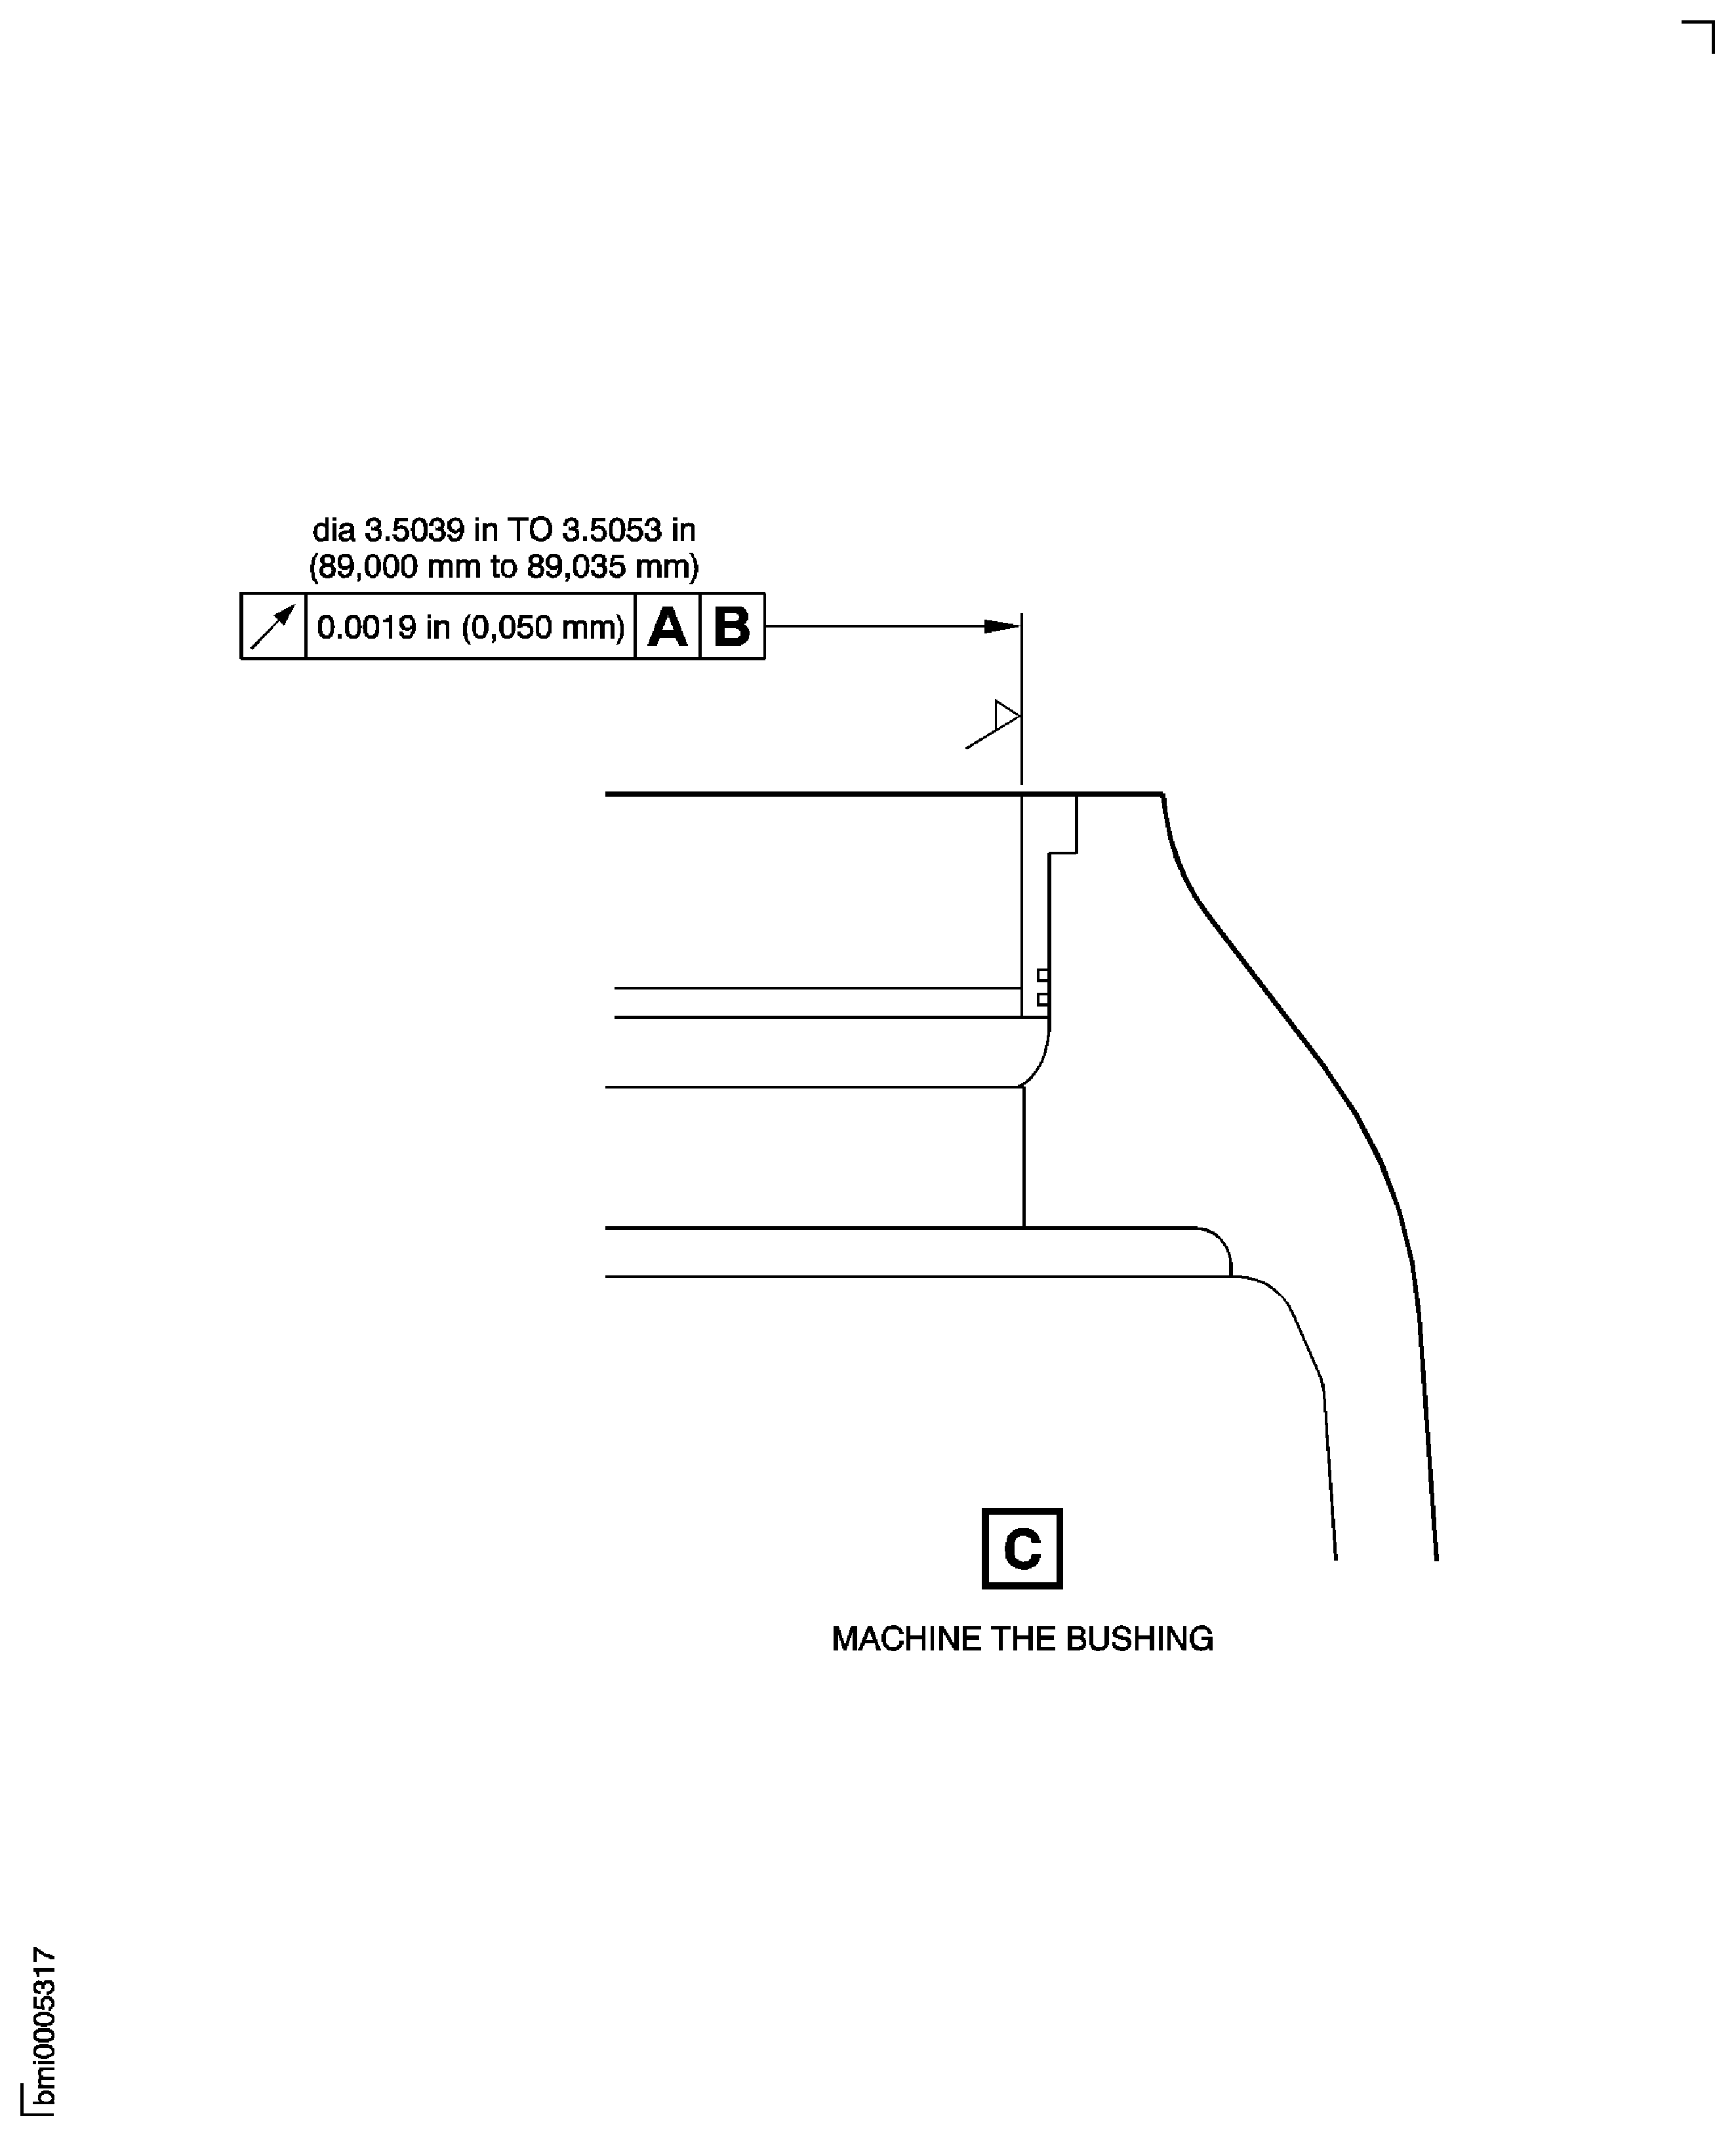
Repair Details And Dimensions
