Export Control
EAR Export Classification: Not subject to the EAR per 15 C.F.R. Chapter 1, Part 734.3(b)(3), except for the following Service Bulletins which are currently published as EAR Export Classification 9E991: SBE70-0992, SBE72-0483, SBE72-0580, SBE72-0588, SBE72-0640, SBE73-0209, SBE80-0024 and SBE80-0025.Copyright
© IAE International Aero Engines AG (2001, 2014 - 2021) The information contained in this document is the property of © IAE International Aero Engines AG and may not be copied or used for any purpose other than that for which it is supplied without the express written authority of © IAE International Aero Engines AG. (This does not preclude use by engine and aircraft operators for normal instructional, maintenance or overhaul purposes.).Applicability
All
Common Information
TASK 73-13-41-700-201 Fuel Nozzle And Support Assembly - Test The Fuel Nozzle
General
Keep the CoMat 10-069 CALIBRATING FLUID at 78 deg F to 82 deg F (26 deg C to 28 deg C) at the fuel inlet fitting during all the tests.
Install the IAE 1P16168 Leak test adapter onto the fuel inlet for all the tests.
Dry the parts before you do the initial nitrogen pressure test.
Complete the leakage test first. Do the tests in the sequence specified.
NOTE
NOTE
Preliminary Requirements
Pre-Conditions
NONESupport Equipment
| Name | Manufacturer | Part Number / Identification | Quantity | Remark |
|---|---|---|---|---|
| Flow bench | LOCAL | Flow bench | Approved for 30 to 550 pph (13,6 to 250 kg per hr) test fluid at 2 to 800 psig (13,8 to 5515,8 kPa) supply pressure. | |
| Flow meter | LOCAL | Flow meter | With range of 30 to 550 pph (13,6 to 250 kg per hr). Use correction curve if the error is greater than range. | |
| Gage I | LOCAL | Gage I | Calibration fluid inlet pressure (PI) - Gage to measure 0 to 600 psig (0 to 4136,9 kPa). Accurate to range. | |
| Gage II | LOCAL | Gage II | Calibration fluid inlet pressure (PI) - Gage to measure 0 to 25 psig (0 to 172,4 kPa). Accurate to range. | |
| Gage | LOCAL | Gage | Nitrogen pressure (PN) - Gage to measure 0 to 250 psig (0 to 1723,7 kPa). Accurate to kPa. | |
| Gage | LOCAL | Gage | Calibration fluid temperature (TI) - Gage to measure calibration fluid temperature at inlet fitting. Range of 75 to 85 deg F (23,9 to 29,4 deg C), accurate to readings. | |
| Heat exchanger | LOCAL | Heat exchanger | To keep test fluid at 78 to 82 deg F (26 to 28 deg C) at inlet fitting. | |
| Nitrogen source | LOCAL | Nitrogen source | 250 psig (1723,7 kPa) zero flow. | |
| IAE 1P16168 Leak test adapter | 0AM53 | IAE 1P16168 | 1 | |
| IAE 1P16169 Leak test clamp | 0AM53 | IAE 1P16169 | 1 |
Consumables, Materials and Expendables
| Name | Manufacturer | Part Number / Identification | Quantity | Remark |
|---|---|---|---|---|
| CoMat 10-069 CALIBRATING FLUID | LOCAL | CoMat 10-069 |
Spares
NONESafety Requirements
NONEProcedure

CAUTION
THE ASSEMBLY MUST BE FULLY DRY BEFORE YOU APPLY NITROGEN IN THE LEAKAGE TEST. DO NOT PUT THE ASSEMBLY INTO THE CALIBRATION FLUID BEFORE PRESSURIZATION. THE CALIBRATION FLUID COULD GO INTO THE ASSEMBLY AND CAUSE INCORRECT LEAK TEST RESULTS.Install the assembly in the IAE 1P16169 Leak test clamp. Make sure that the stepped plug and seal ring (details of clamp) are correctly set at fuel nozzle discharge.
Apply the nitrogen at 10 psig (68.9 kpa) to the adapter.
NOTE
If sufficient precautions have been obeyed, do not do the preliminary pressure build-up. Assembly may be pressurized to 200 psig (1379 kpa) before you put the assembly into the test fluid. Refer to Step.Put the assembly into the test fluid.
Put the nitrogen pressure to zero and remove the clamp.
If you find any leakage, reject the assembly.
SUBTASK 73-13-41-790-051 Do the Leak Test on the Fuel Nozzle and Support Assembly
Connect the fuel nozzle and support assembly to the section of the test stand that measures pressure (hoses thread onto the IAE 1P16168 Leak test adapter).
Make sure the calibration fluid temperature stays at 78 deg F to 82 deg F (26 deg C to 28 deg C) during all flow calibrations.
Write down the inlet pressure (PI), the fuel flow (WF) and the calibration fluid temperature (TI) at each test point.
Let the system become stable for one minute at each test point before you write down the results.
Set the inlet pressure (PI) to test point 1. Record the fuel flow (WF), calibration fluid inlet temperature (TI) and inlet pressure (PI).
Slowly and continuously decrease the inlet pressure (PI) to test point 2. Write down the fuel flow (WF), the calibration fluid inlet temperature (TI) and the inlet pressure (PI).
Set the inlet pressure (PI) and write down the fuel flow (WF). Refer to the table.
Remove the adapter from the fuel inlet connector.
Unwanted material is in the fuel passage. Refer to Cleaning-001 TASK 73-13-41-100-201.
Do the flow test again. Refer to Step.
If the fuel flow (WF) is still low, reject the assembly.
If fuel flow (WF) is low:
The fuel metering plug is eroded and must be replaced. Refer to Repair, VRS3458 TASK 73-13-41-300-002 (Repair-002).
If the fuel flow (WF) is high:
SUBTASK 73-13-41-730-051 Do the Fuel Flow Test on the Fuel Nozzle and Support Assembly
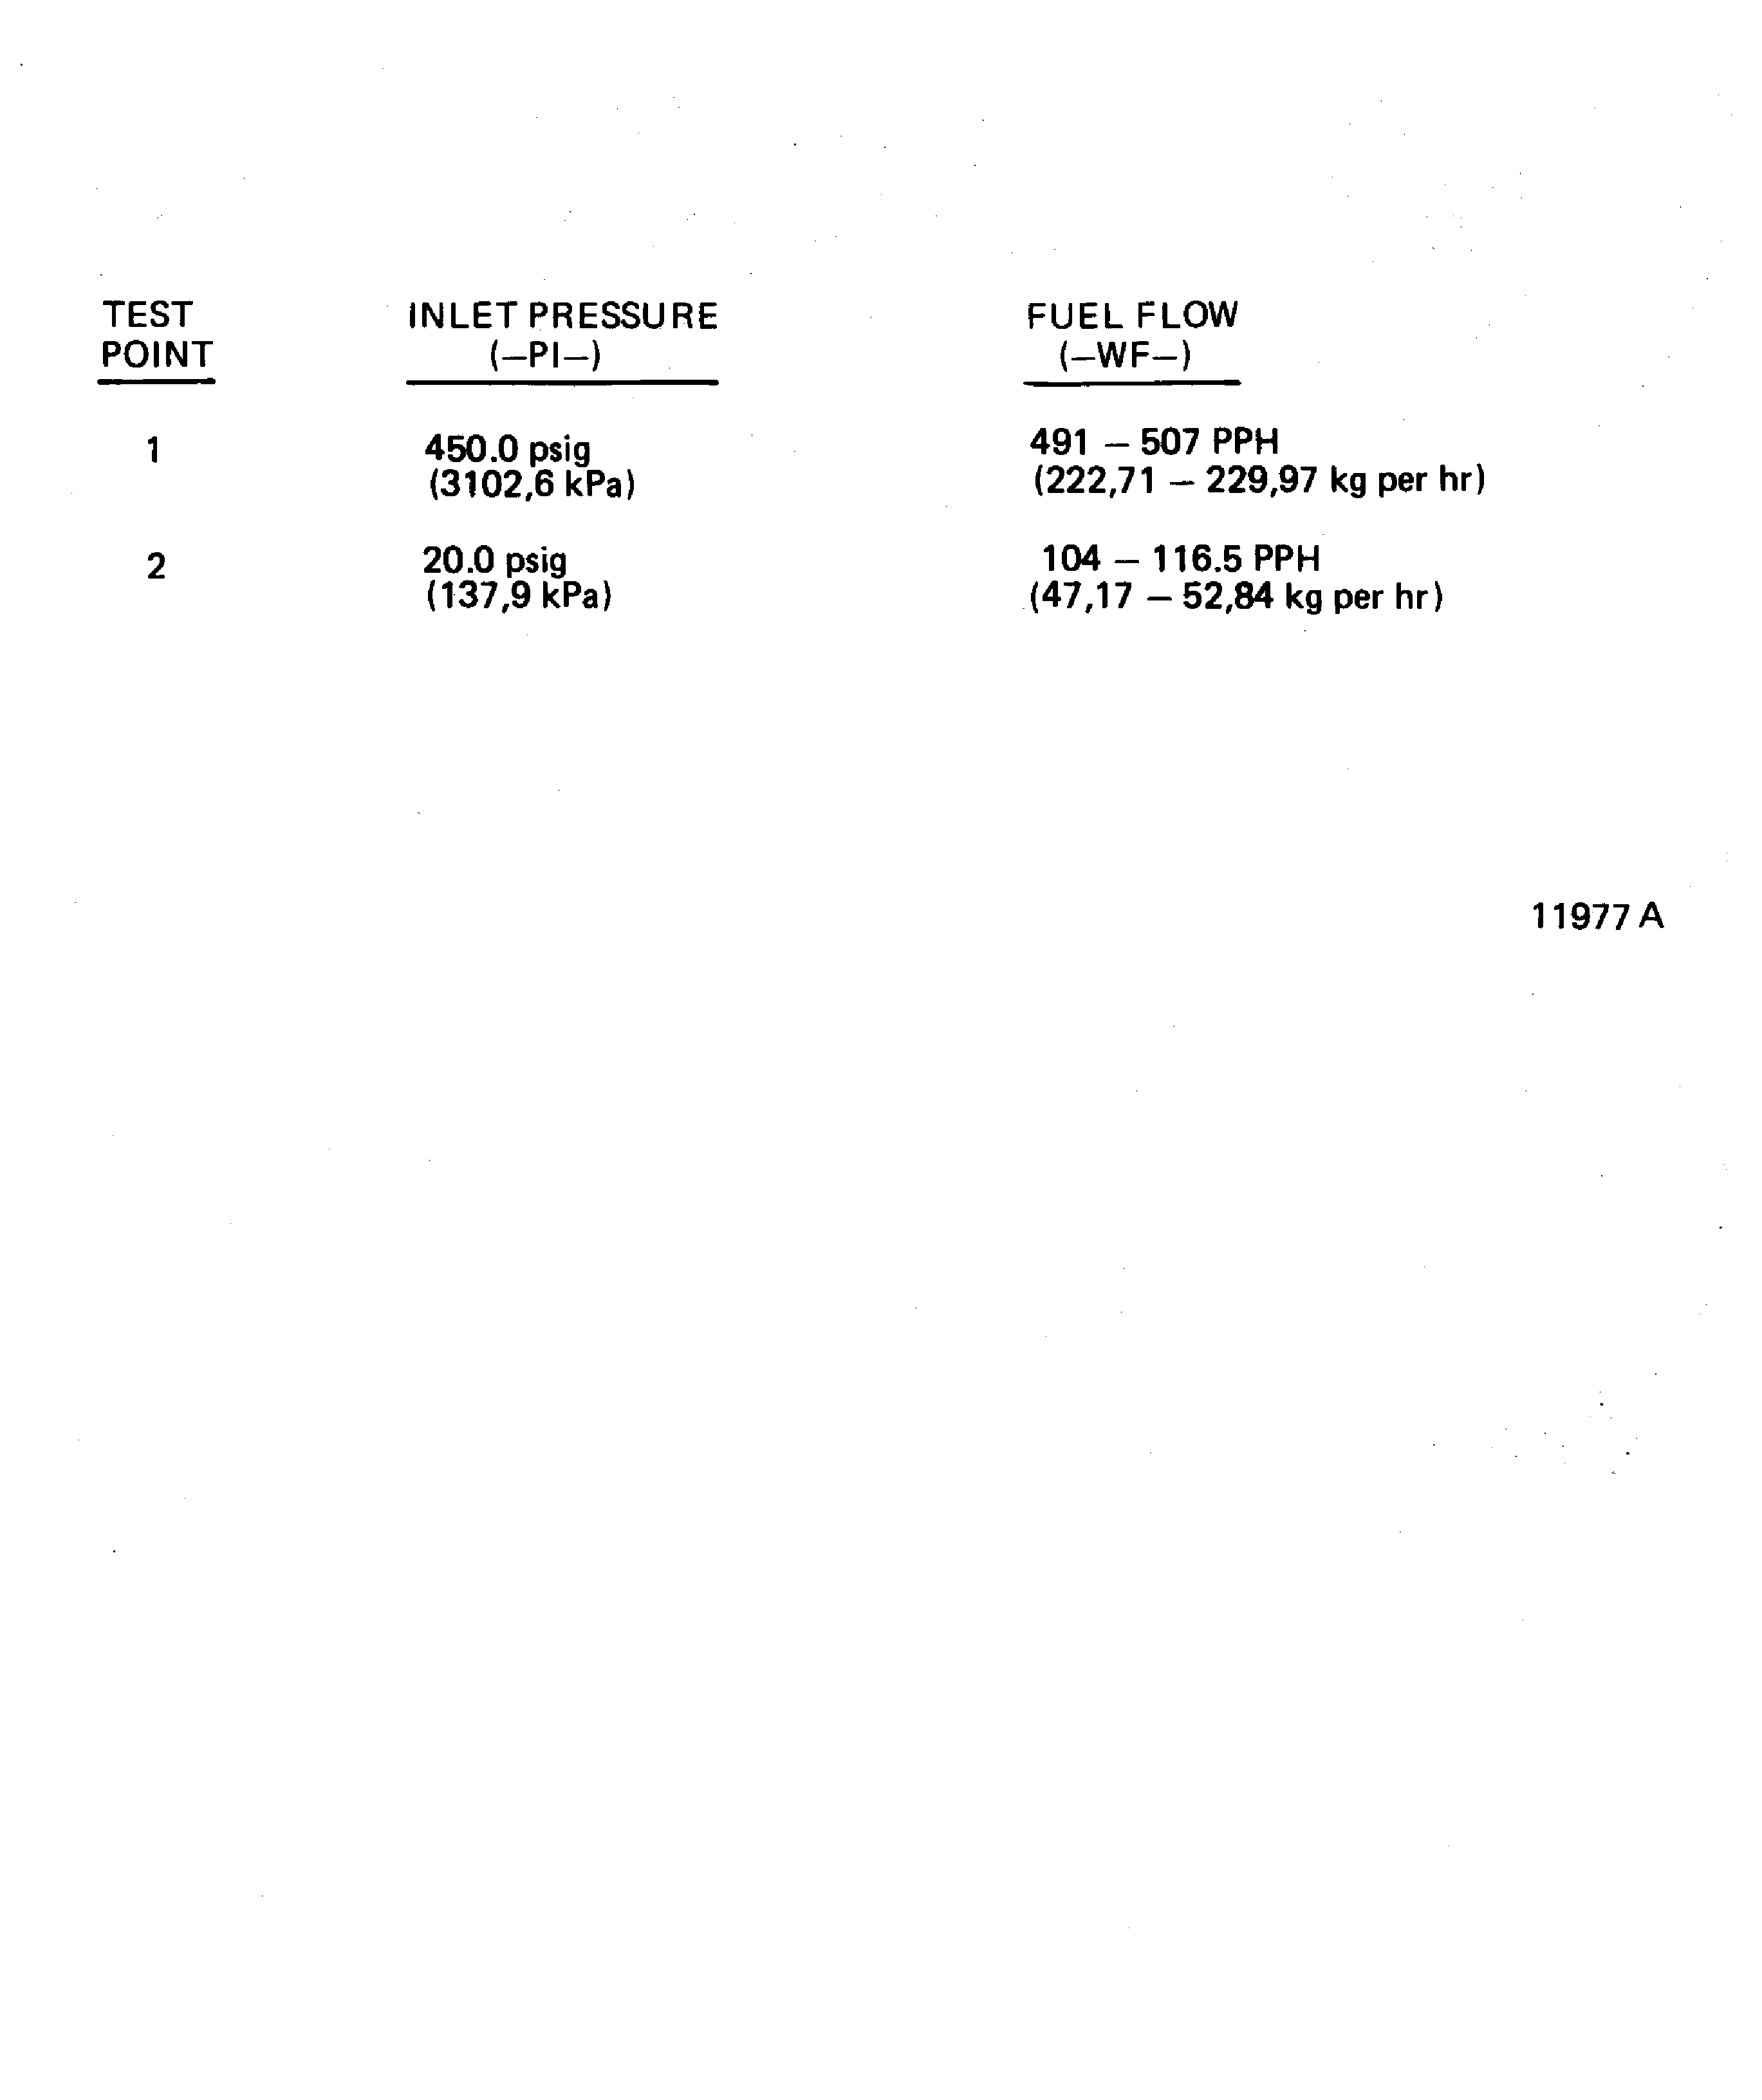
Figure: Flow Test Limits Table (PN 2A0994, 2A1637 and 2A3453)
Flow Test Limits Table (PN 2A0994, 2A1637 and 2A3453)

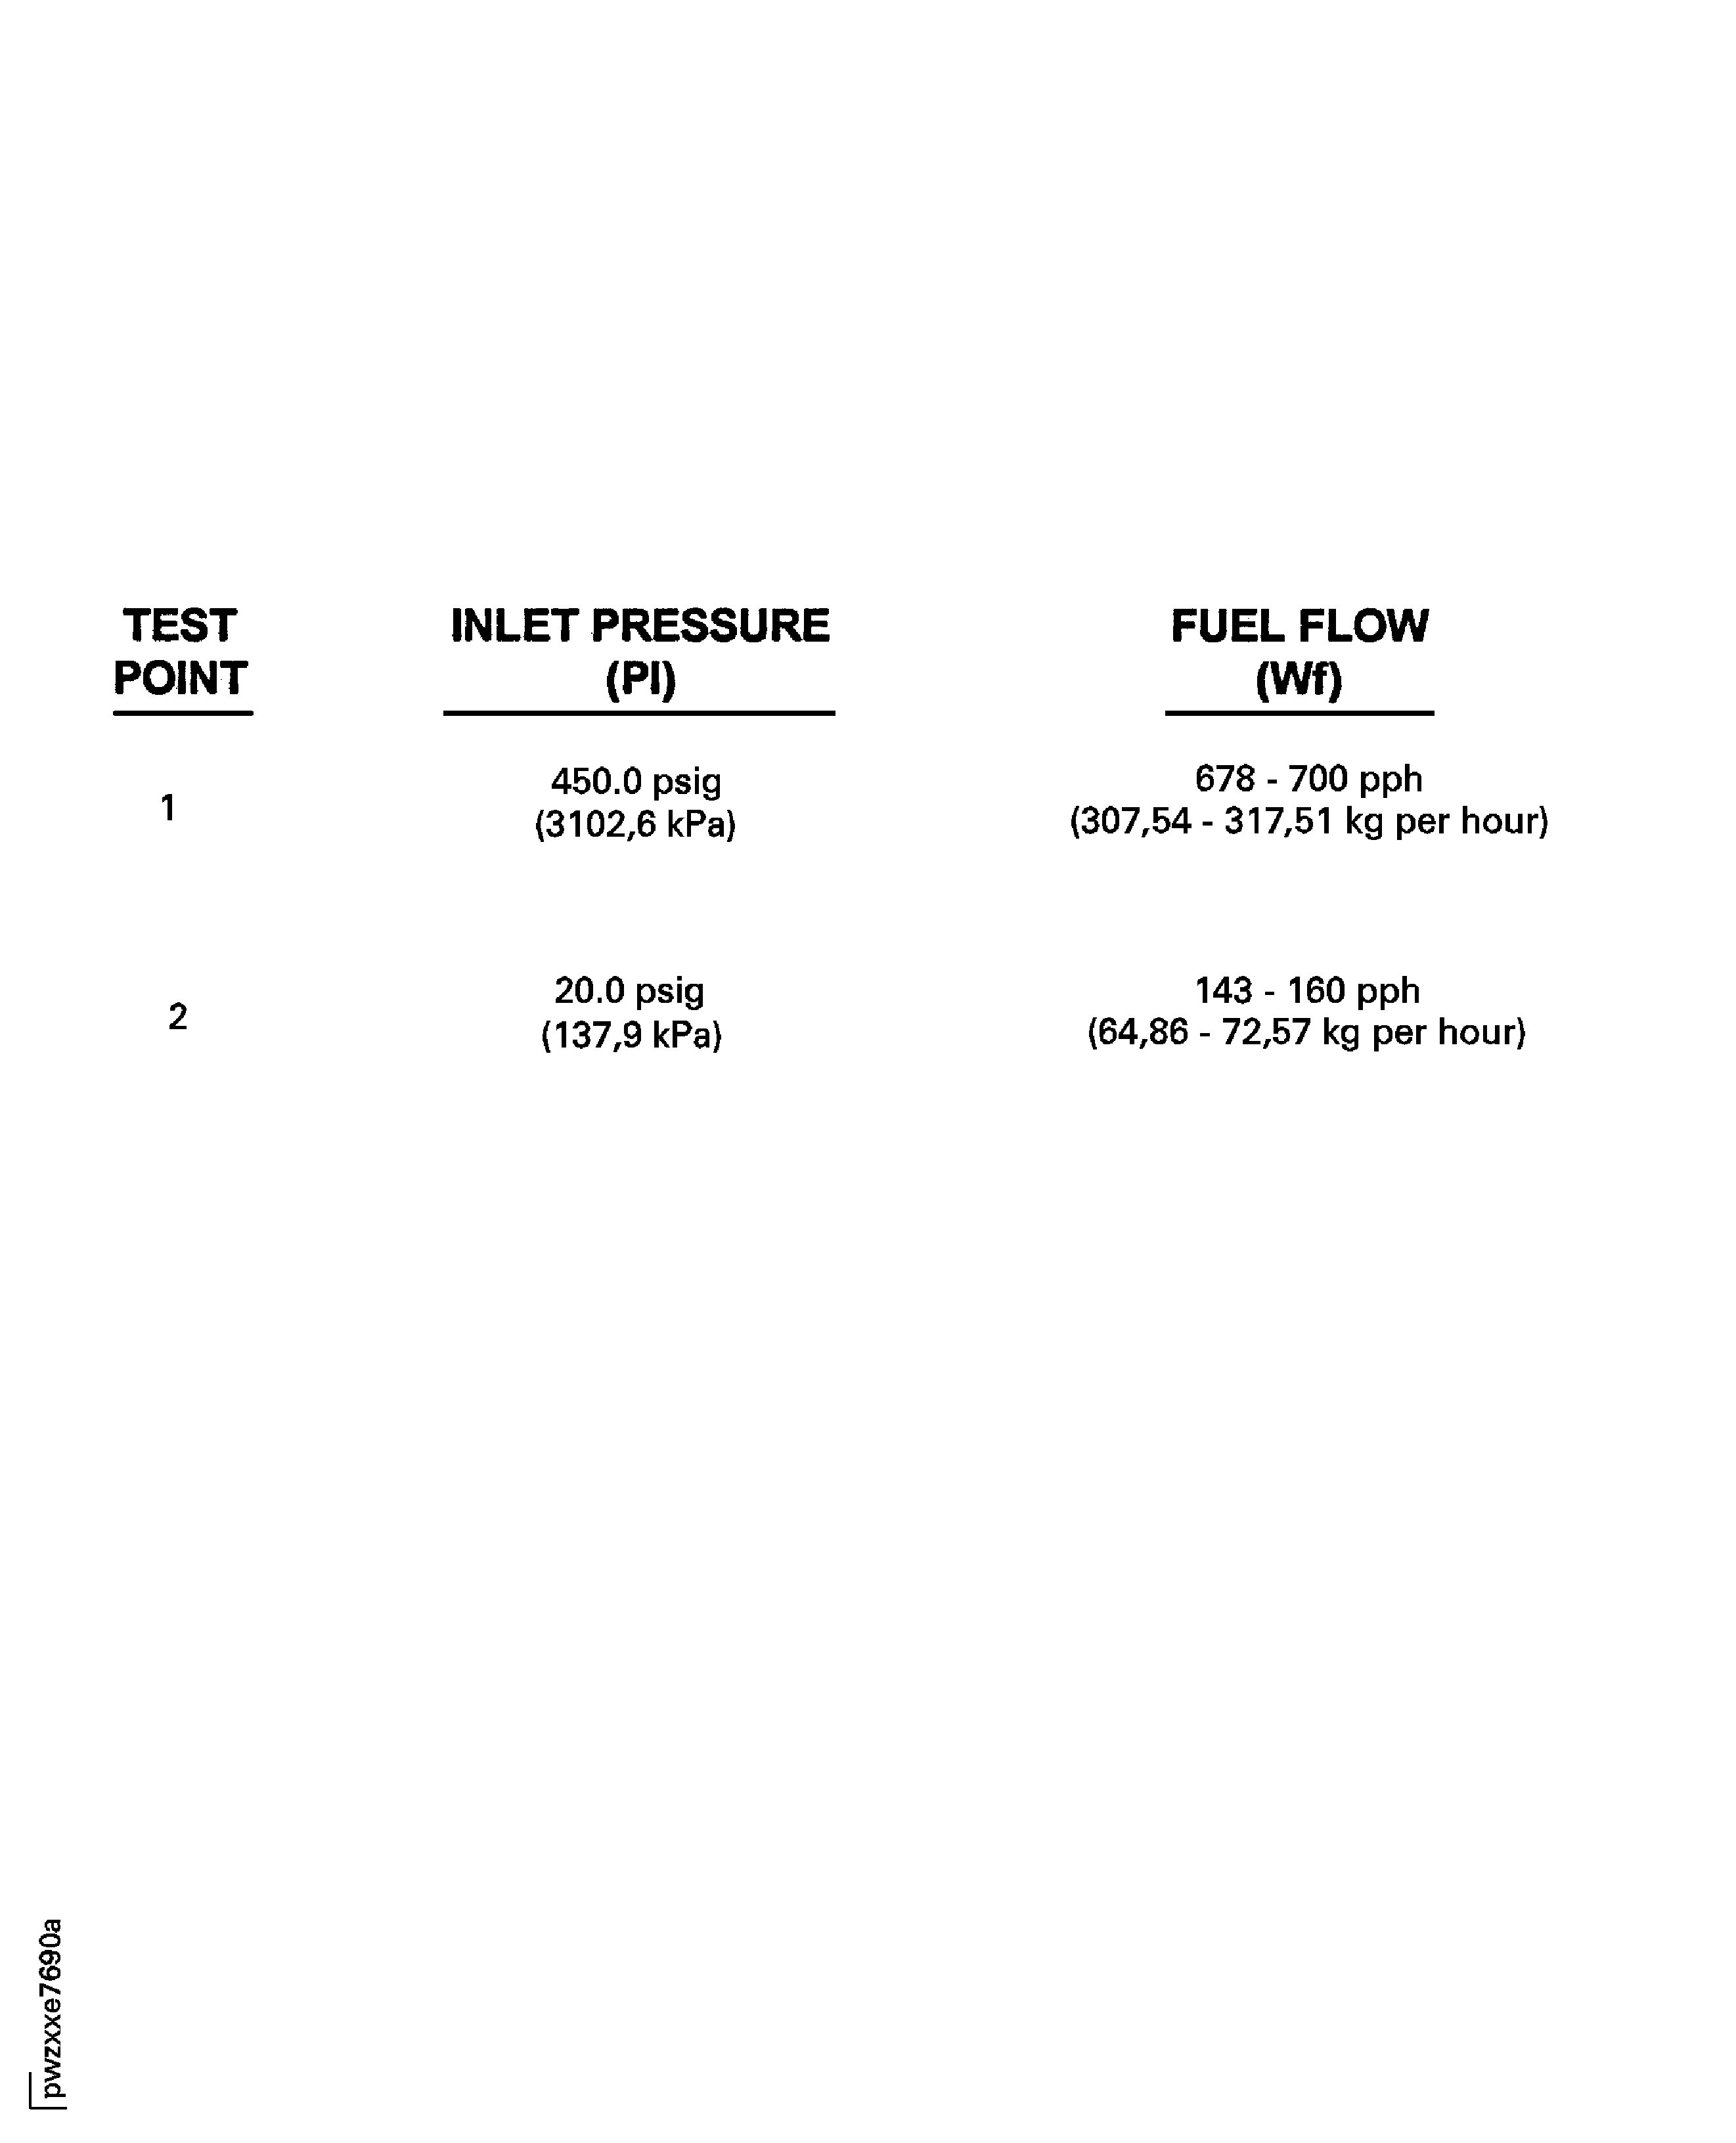
Figure: Flow Test Limits Table (PN 2A2250 and 2A3448)
Flow Test Limits Table (PN 2A2250 and 2A3448)

