TASK 72-00-31-200-005 Inlet Cone Assembly - Examine (Level 2 Inspection Limits), Inspection-005

DMC:V2500-A1-72-00-3101-00A-300A-C|Issue No:002.00|Issue Date:2013-11-01

Export Control

EAR Export Classification: Not subject to the EAR per 15 C.F.R. Chapter 1, Part 734.3(b)(3), except for the following Service Bulletins which are currently published as EAR Export Classification 9E991: SBE70-0992, SBE72-0483, SBE72-0580, SBE72-0588, SBE72-0640, SBE73-0209, SBE80-0024 and SBE80-0025.

Copyright

© IAE International Aero Engines AG (2001, 2014 - 2021) The information contained in this document is the property of © IAE International Aero Engines AG and may not be copied or used for any purpose other than that for which it is supplied without the express written authority of © IAE International Aero Engines AG. (This does not preclude use by engine and aircraft operators for normal instructional, maintenance or overhaul purposes.).

Applicability

V2500-A1

Common Information

TASK 72-00-31-200-005 Inlet Cone Assembly - Examine (Level 2 Inspection Limits), Inspection-005

Effectivity

FIG/ITEM

PART NO.

5A0015

General

This TASK gives the procedure for the inspection of the Inlet Cone Assembly below major soft time and scheduled for a level 2 inspection, as given in the Maintenance Management Program.

Where applicable, these inspections are to be done in conjunction with those given in the interface inspections. Refer to TASK 72-00-00-200-000.

The module will be sufficiently disassembled for the components to be examined as specified in accordance with this procedure. Refer to TASK 72-31-00-030-001.

The policy necessary for the inspection is given in the SPM TASK 70-20-00-200-501.

NOTE

The word "Reject" is used after an interface/SP50 inspection statement to show that a higher-level inspection and possible repair to the damaged part is necessary if the part is rejected, refer to the related inspection/check. Do the higher-level inspection procedure of the damaged part(s) as found in the applicable Chapter/Section/Subject of this manual.

Clean the Inlet Cone Assembly. Refer to TASK 72-38-11-100-000. Degrease the Inlet Cone Assembly, make sure that all dirt and debris have been removed before performing inspection. Refer to the SPM TASK 70-11-03-300-503.

Preliminary Requirements

Pre-Conditions

NONE

Support Equipment

NONE

Consumables, Materials and Expendables

NONE

Spares

NONE

Safety Requirements

NONE

Procedure

    1. SUBTASK 72-00-31-220-134 Examine the Inlet Cone Outer Surface

    2. CAUTION

      YOU MUST DO THE INSPECTIONS THAT FOLLOW IN CONJUNCTION WITH THE INTERFACE INSPECTIONS DEFINED IN TASK 72-38-11-200-000.

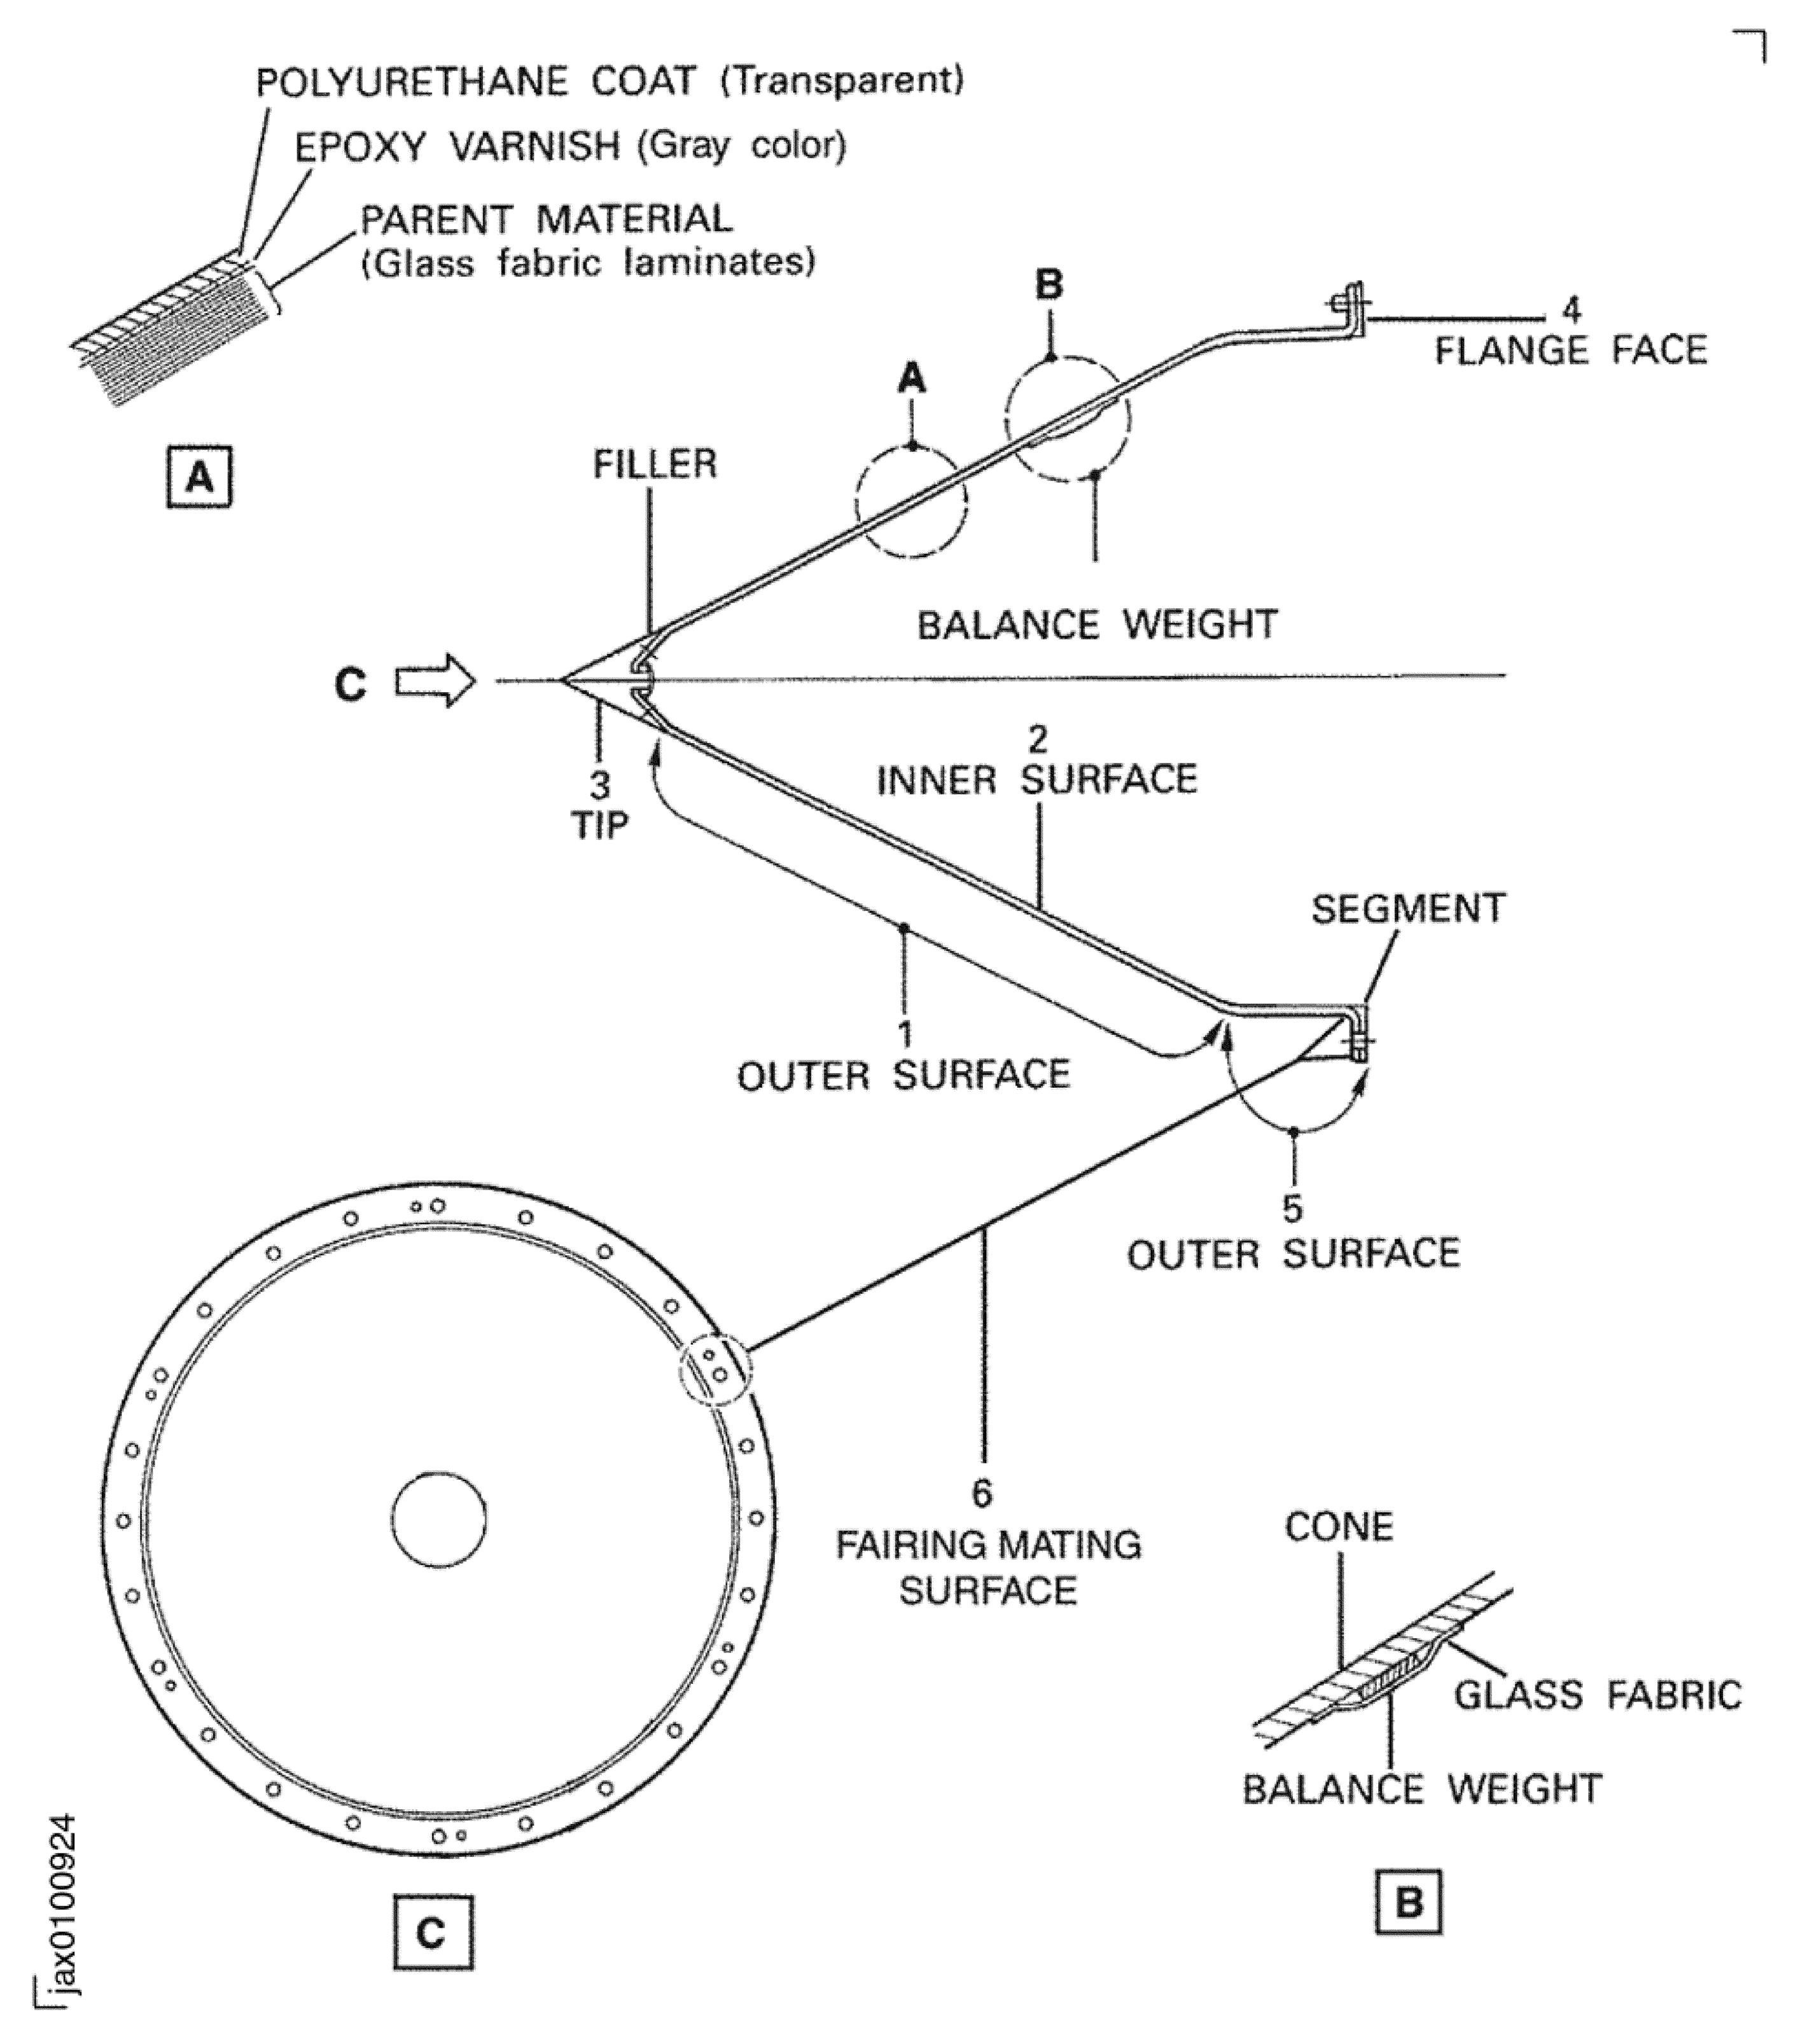
      Refer to Figure.

      1. Examine the outer surface at location 1.

        1. Eroded.

          1. Erosion of polyurethane coating

          2. Accept

          1. Varnish coating colored gray

          2. Repair, VRS1466 TASK 72-38-11-300-001 (Repair-001)

          1. Varnish coating colored black with white spiral

          2. Repair, VRS1458 TASK 72-38-11-300-010 (Repair-010)

        1. Scored, gouged or grooved.

          1. Not more than 0.015 in. (0.38 mm) in depth

          2. Accept

          1. More than in Step

          2. Reject

        1. Cracked

        2. Reject

        1. Delamination

        2. Reject

        1. Missing coating (polyurethane and/or varnish coating).

          1. Not more than 0.315 sq in. (2.03 sq cm) per missing coating area and within five places

          2. Repair, VRS1473 TASK 72-38-11-300-008 (Repair-008)

          1. More than in Step

          2. Repair, VRS1458 TASK 72-38-11-300-010 (Repair-010) or Repair, VRS1466 TASK 72-38-11-300-001 (Repair-001)

    1. SUBTASK 72-00-31-220-135 Examine the Inlet Cone Outer Surface

    2. Refer to Figure.

      1. Examine the outer surface at location 5.

        1. Scored.

          1. Not more than 0.005 in. (0.12 mm) in depth

          2. Accept

          1. More than in Step

          2. Reject

        1. Cracked

        2. Reject

        1. Delamination.

          1. Around pin holes

          2. Repair, VRS1461 TASK 72-38-11-300-015 (Repair-015)

          1. Around bolt holes.

            1. Not more than 0.019 in. (0.50 mm) in depth within the area not more than 0.19 in. (5.0 mm) from the hole edge

            2. Accept

            1. More than in Step

            2. Reject

          1. Any other area

          2. Reject

    1. SUBTASK 72-00-31-220-136 Examine the Inlet Cone Inner Surface

    2. Refer to Figure.

      1. Examine the inlet cone inner surface at location 2.

        1. Cracked

        2. Reject

        1. Delamination

        2. Reject

    1. SUBTASK 72-00-31-220-137 Examine the Inlet Cone Tip

    2. Refer to Figure.

      1. Examine the tip at location 3.

        1. Missing

        2. Repair, VRS1462 TASK 72-38-11-300-002 (Repair-002)

        1. Loss of bond securing tip

        2. Repair, VRS1462 TASK 72-38-11-300-002 (Repair-002)

        1. Tip securely bonded to inlet cone with filler missing

        2. Repair, VRS1462 TASK 72-38-11-300-002 (Repair-002)

    1. SUBTASK 72-00-31-220-138 Examine the Inlet Cone Flange Face

    2. Refer to Figure.

      1. Examine the flange face at location 4.

        1. Cracked

        2. Repair, VRS1467 TASK 72-38-11-300-003 (Repair-003)

        1. Galled.

          1. Not more than 0.003 in. (0.07 mm) in depth

          2. Accept

          1. More than in Step

          2. Repair, VRS1467 TASK 72-38-11-300-003 (Repair-003)

    1. SUBTASK 72-00-31-220-139 Examine the Inlet Cone Fairing Mating Surface

    2. Refer to Figure.

      1. Examine the fairing mating surface at location 6.

        1. Depression.

          1. Any quantity

          2. Repair, VRS1431 TASK 72-38-11-300-013 (Repair-013)

  1. Figure: Location on the Inlet Cone Assembly

    Location on the Inlet Cone Assembly
Requirements After Job Completion

Follow-On Conditions

NONE