Export Control
EAR Export Classification: Not subject to the EAR per 15 C.F.R. Chapter 1, Part 734.3(b)(3), except for the following Service Bulletins which are currently published as EAR Export Classification 9E991: SBE70-0992, SBE72-0483, SBE72-0580, SBE72-0588, SBE72-0640, SBE73-0209, SBE80-0024 and SBE80-0025.Copyright
© IAE International Aero Engines AG (2001, 2014 - 2021) The information contained in this document is the property of © IAE International Aero Engines AG and may not be copied or used for any purpose other than that for which it is supplied without the express written authority of © IAE International Aero Engines AG. (This does not preclude use by engine and aircraft operators for normal instructional, maintenance or overhaul purposes.).Applicability
V2500-A1
Common Information
TASK 72-41-13-440-001-A00 HPC Rear Shaft And Heatshield Assembly - Assemble The Heatshield To The Shaft, Assembly-001
General
This TASK gives the procedure to assemble and balance the HP compressor rear shaft assembly.
Fig/Item numbers in parentheses in the procedure agree with those used in the IPC. Only the primary Fig/item numbers are used. For the service bulletin alpha variants refer to the IPC.
For all parts identified in a different Chapter/Section/Subject, the applicable Chapter/Section/Subject comes before the Fig/item numbers.
Overhaul processes referred to in the procedure by the TASK/SUBTASK number are in SPM.
For standard torque data and procedure refer to SPM TASK 70-41-01-400-501 and SPM TASK 70-41-02-410-501.
Special torque data is identified with the symbol * after the torque value.
Special assembly tolerances are included in this procedure.
Lubricate all threads and mating faces of nuts and bolts with CoMat 10-039 ENGINE OIL, unless other lubricants are referred to in the procedure.
All the curvic teeth and mating faces must be cleaned with CoMat 01-001 SOLVENT, DELETED or CoMat 01-002 SOLVENT, DELETED. before assembly. Refer to SPM TASK 70-11-01-300-503. They must also be dry assembled unless told differently in the procedure.
All of the temporary marks made in this procedure must be removed after completion of this task.
Data to balance.
The tools used in this procedure are used to adapt the HP compressor rear shaft assembly to the 'Schenck HL5' dynamic balancing machine. A balancing speed between 650 and 1000 RPM that gives stable and repeatable results is recommended. The best speed to use will be different for different machines. The correct RPM will usually agree with the gear ratios available. The balancing machine must turn the HP compressor rear shaft assembly in a clockwise direction (direction of engine turn) when seen from the rear of the engine.
NOTE
NOTE
Preliminary Requirements
Pre-Conditions
NONESupport Equipment
| Name | Manufacturer | Part Number / Identification | Quantity | Remark |
|---|---|---|---|---|
| Protective Gloves | LOCAL | |||
| Dynamic balancing machine | LOCAL | Schenck HL-5U | ||
| End drive | LOCAL | Schenk 022748 | ||
| IAE 1F10019 Mechanical wrench | 0AM53 | IAE 1F10019 | 1 | |
| IAE 1R19787 Sling | 0AM53 | IAE 1R19787 | 1 | |
| IAE 1R18089 Lifting adapter | 0AM53 | IAE 1R18089 | 1 | |
| IAE 1R18095 Universal slinging adapter | 0AM53 | IAE 1R18095 | 2 | |
| IAE 1R18322 Turnover stand | 0AM53 | IAE 1R18322 | 1 | |
| IAE 1R18640 Immobilizer stand | 0AM53 | IAE 1R18640 | 1 | |
| IAE 1R18641 Locking plate | 0AM53 | IAE 1R18641 | 1 | |
| IAE 1R18642 Spanner | 0AM53 | IAE 1R18642 | 1 | |
| IAE 1R18643 Lifting bung | 0AM53 | IAE 1R18643 | 1 | |
| IAE 1R18644 Punch | 0AM53 | IAE 1R18644 | 1 | |
| IAE 1R18646 Fitting tool | 0AM53 | IAE 1R18646 | 1 | |
| IAE 1R18647 Beam sling | 0AM53 | IAE 1R18647 | 1 | |
| IAE 1R18649 Slae balancing shaft | 0AM53 | IAE 1R18649 | 1 | |
| IAE 1R18650 Turnover stand adapter | 0AM53 | IAE 1R18650 | 1 |
Consumables, Materials and Expendables
| Name | Manufacturer | Part Number / Identification | Quantity | Remark |
|---|---|---|---|---|
| CoMat 01-001 SOLVENT, DELETED | LOCAL | CoMat 01-001 | ||
| CoMat 01-002 SOLVENT, DELETED. | LOCAL | CoMat 01-002 | ||
| CoMat 02-121 TEMPORARY MARKER PENCIL/CRAYON | IE304 | CoMat 02-121 | ||
| CoMat 02-122 TEMPORARY MARKER PENCIL/CRAYON | K6835 | CoMat 02-122 | ||
| CoMat 03-026 LIQUID NITROGEN | LOCAL | CoMat 03-026 | ||
| CoMat 10-010 DEWATERING FLUID (COLD) | LOCAL | CoMat 10-010 | ||
| CoMat 10-039 ENGINE OIL | LOCAL | CoMat 10-039 |
Spares
NONESafety Requirements
NONEProcedure
Refer to Figure.
Install IAE 1R18643 Lifting bung 1 off to the front of the HP compressor rear shaft ENGINE-HP COMPRESSOR SHAFT (72-41-13, 01-850).
Install the HP compressor rear shaft in to IAE 1R18640 Immobilizer stand 1 off.
SUBTASK 72-41-13-440-051 Install the HP Compressor Rear Shaft in to the Immobilizer Stand
Install IAE 1R18646 Fitting tool 1 off in to the heatshield ENGINE-HP COMPRESSOR SHAFT (72-41-13, 01-875). Refer to Figure.

WARNING
YOU MUST PUT ON PROTECTIVE GLOVES BEFORE HANDLING COMPONENTS THAT HAVE BEEN FROZEN.Put the heatshield fully in to CoMat 03-026 LIQUID NITROGEN until the violent action of the bubbles decreases.
Install the heatshield in to the HP compressor rear shaft.
Install the washer ENGINE-HP COMPRESSOR SHAFT (72-41-13, 01-873) and the ring nut ENGINE-HP COMPRESSOR SHAFT (72-41-13, 01-872) to the front bore of the HP compressor rear shaft and tighten the ring nut hand tight.
Remove all signs of moisture from the heatshield and apply CoMat 10-010 DEWATERING FLUID (COLD) to the heatshield.
Release and remove the four nuts and washers, part of IAE 1R18640 Immobilizer stand immobilizer stand.
Install IAE 1R18641 Locking plate 1 off on to the top of the immobilizer stand.
Install IAE 1F10019 Mechanical wrench 1 off on to the locking plate. Make sure the two dowels of the mechanical wrench are installed in the two holes in the locking plate.
Align the splines of IAE 1R18642 Spanner 1 off with the splines in the mechanical wrench and install the spanner in to the torque multiplier. Make sure that the teeth of the spanner engage in the slots in the nut.
Install the tools necessary to torque tighten the ring nut. Refer to Figure.
Use IAE 1R18644 Punch 1 off to crimp the washer in two positions opposite each other to lock the ring nut in position.
SUBTASK 72-41-13-440-052 Install the Heatshield, Washer and Ring Nut in to the HP Compressor Rear Shaft
Install IAE 1R18650 Turnover stand adapter 1 off to IAE 1R18322 Turnover stand 1 off.
Prepare the turnover stand. Refer to Figure.
Do the procedure given in Step.
Install IAE 1R18643 Lifting bung 1 off to the front of the HP compressor rear shaft assembly. Refer to Figure.
Do the procedure given in Step.
Remove the lifting bung from the HP compressor rear shaft assembly.
SUBTASK 72-41-13-440-053 Install the HP Compressor Rear Shaft Assembly in to the Turnover Stand
Install IAE 1R18649 Slae balancing shaft 1 off to the front of the HP compressor rear shaft assembly.
Turn IAE 1R18650 Turnover stand adapter turnover stand adapter so that the rear shaft is horizontal.
Install IAE 1R18089 Lifting adapter 1 off on to the rear end of the rear shaft. Tighten the lifting adapter.
Install IAE 1R18095 Universal slinging adapter 2 off. Refer to Figure.
SUBTASK 72-41-13-440-054 Prepare the HP Compressor Rear Shaft Assembly for Balancing
Refer to Figure
SUBTASK 72-41-13-440-055 Prepare the Balancing Machine for Use
Install IAE 1R18647 Beam sling 1 off on to the HP compressor rear shaft assembly.
Remove the universal sling adapters. Refer to Figure.
NOTE
The bolts that attach the end drive to the slave balancing machine must all have the same weight.Attach the end drive on to the slave balancing shaft with the six bolts. Make sure that the datum mark on the slave balancing shaft is aligned with the 0 degrees position on the balancing machine protractor.
SUBTASK 72-41-13-440-056 Install the HP Compressor Rear Shaft Assembly in to the Balancing Machine
Plane separate and calibrate the balancing machine through planes AA and AB. Measure and record the quantity and angular positions of the unbalance in both planes. Refer to Figure.
Use CoMat 02-121 TEMPORARY MARKER PENCIL/CRAYON or CoMat 02-122 TEMPORARY MARKER PENCIL/CRAYON to make a mark that identifies the position of the slave balancing shaft in relation to the balancing machine drive head.
Remove the rear shaft assembly from the balancing machine and install it in to the turnover stand. Refer to Step. Remove the slave balancing shaft, but do not remove the universal sling adapters or the lifting adapter.
Turn IAE 1R18650 Turnover stand adapter so that the rear shaft assembly is horizontal.
NOTE
The 180 degree turn of the slave balancing shaft is necessary so that the tool unbalance can be calculated and removed.Install IAE 1R18649 Slae balancing shaft on to the HP compressor rear shaft assembly, 180 degrees from the original position.
Do the procedure given in Step. Make sure that the temporary mark on the slave balancing shaft is aligned with the temporary mark on the balancing machine drive head.
Install the HP compressor rear shaft assembly in to the balancing machine.
Use CoMat 02-121 TEMPORARY MARKER PENCIL/CRAYON or CoMat 02-122 TEMPORARY MARKER PENCIL/CRAYON to make a mark on surface X to identify the initial unbalance (heavy position) in plane AA. Make a temporary mark on surface Z to identify the initial unbalance (heavy position) in plane AB. Refer to Figure.
SUBTASK 72-41-13-440-057 Do a Check Balance of the HP Compressor Rear Shaft Assembly
NOTE
You must let the balancing machine run for a short time so that it can become stable, before balance values are read.Refer to Figure
Find the temporary mark on surface X of the HP compressor rear shaft that identifies the initial unbalance (heavy position) in plane AA. The position of unbalance was identified in Step.
SUBTASK 72-41-13-440-058 Correct the Unbalance of the HP Compressor Rear Shaft Assembly in Plane AA
Find the mark on surface Z of the HP compressor rear shaft that identifies the initial unbalance (heavy position) in plane AB. The position of unbalance was identified in Step.
NOTE
It is better to under estimate the position of the intersection point.Use the initial unbalance graph, Figure the initial unbalance and angle AS to find the quantity of metal to be removed (dimension AU) from tang AT. Record the quantity of metal to be removed.
Dimension AU is found if you make an estimate of where the point of intersection of the initial unbalance line and angle AS line is, along a horizontal line drawn through this intersection point and between the curves either side of it. The horizontal distance between the curves represents 1.00 mm, therefore if the intersection point is estimated at a third of the way along the line, approximately 0.3 mm would be added to the dimension associated with the curve to the left.
Example.
Initial unbalance = 400 gmm.
Angle AS = 24 degrees.
From the initial unbalance graph the quantity of metal to be removed (Dimension AU) from tang AT is 6.50 mm. The position of the intersection point is estimated at half way along a horizontal line drawn between the 6.00 and 7.00 mm curves. Therefore 0.5 mm is added to the 6.00 mm to give a dimension AU of 6.50 mm.
Use the initial unbalance graph, Figure the initial unbalance and angle AV to find the quantity of metal to be removed (dimension AX) from tang AW. Record the quantity of metal to be removed. The procedure to find dimension AX is the same as the procedure to find dimension AU given in Step B.(2).
Example.
Initial unbalance = 400 gmm.
Angle AV = 48 degrees.
From the initial unbalance graph the quantity of metal to be removed (dimension AX) from tang AW is 3.50 mm.
NOTE
To find the quantity of metal to be removed for unbalance values of less than 0.42 ozin. (300 gmm) do step C.Find the position and quantity of metal to be removed from the HP compressor rear shaft tangs to correct the initial unbalance. Refer to Figure.
NOTE
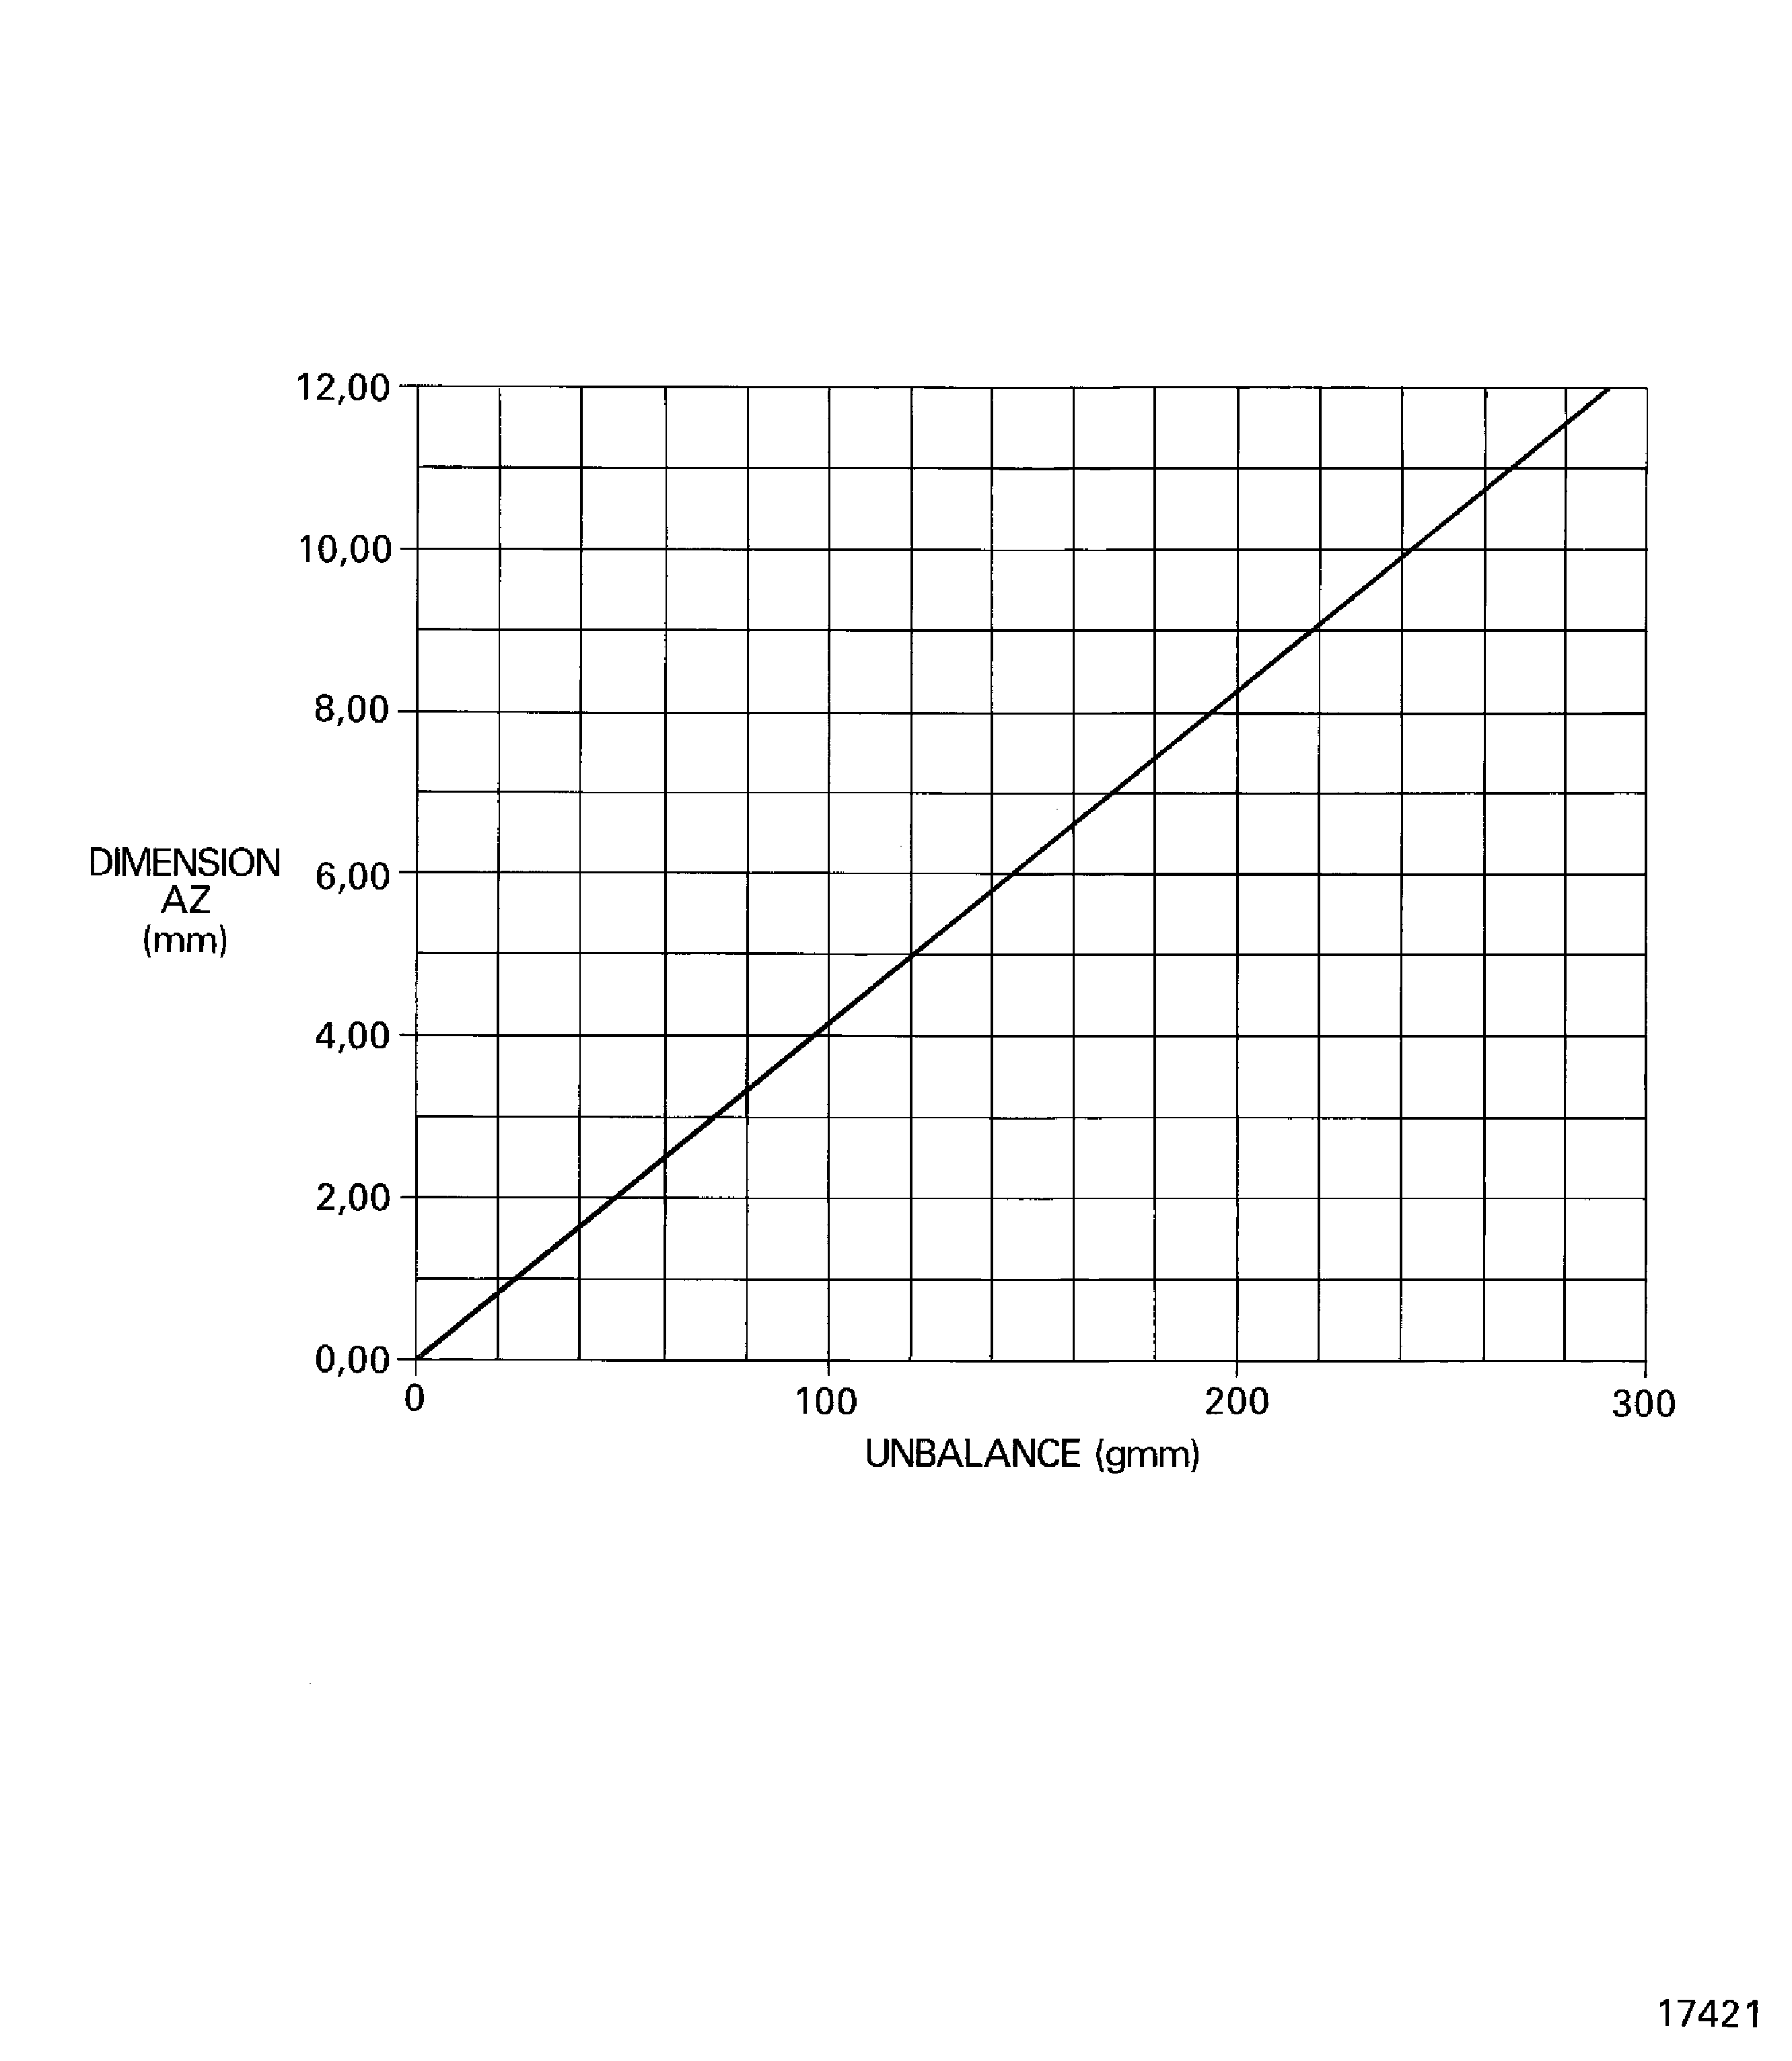
If necessary small amounts of unbalance can be corrected by metal removal from tangs AT and AW. Refer to step B.Use the small quantity of unbalance graph, Figure and the quantity of unbalance to find the quantity of metal to be removed (dimension AZ) from tang AY. Record the quantity of metal to be removed.
Example.
Unbalance = 240 gmm.
From the small quantity unbalance graph the quantity of metal to be removed (dimension AZ) from tang AY is 10.00 mm.
Find the quantity of metal to be removed from the HP compressor rear shaft tangs to correct unbalance values of less than 0.42 ozin. (300 gmm).
Use hand tools to remove the correct quantity of metal from the necessary tangs. Metal can be removed from the tangs up to the minimum dimensions given in Figure. Metal must only be removed from the non-datum face of tang AY.
SUBTASK 72-41-13-440-059 Correct the Unbalance of the HP Compressor Rear Shaft Assembly in Plane AB
Refer to Figure
Do Step again.
Do Step to correct unbalance in plane AA.
Do Step to correct unbalance in plane AB.
Do Step to check the balance of the HP compressor rear shaft assembly.
Make sure the HP compressor rear shaft assembly unbalance is not more than 0.208 ozin (150 gmm) in plane AA or plane AB. If the unbalance is more than the given limit do the steps which follow until the unbalance in both planes is less than the given limit.
SUBTASK 72-41-13-440-060 Do a Check Balance of the HP Compressor Rear Shaft Assembly
Install IAE 1R18089 Lifting adapter 1 off on to the end of the HP compressor rear shaft. Tighten the lifting adapter.
Install the other universal sling adapter on to IAE 1R18649 Slae balancing shaft slave balancing shaft.
Install IAE 1R18095 Universal slinging adapter 1 off. Refer to Figure.
Install IAE 1R18647 Beam sling 1 off on to the HP compressor rear shaft assembly. Refer to Figure.
Make sure IAE 1R18650 Turnover stand adapter 1 off is installed in IAE 1R18322 Turnover stand 1 off.
Install the HP compressor rear shaft assembly in to the turnover stand. Refer to Figure.
Turn IAE 1R18650 Turnover stand adapter so that the rear shaft assembly is vertical and the slave balancing shaft is at the top.
Remove the slave balancing shaft from the HP compressor rear shaft assembly.
SUBTASK 72-41-13-440-061 Install the HP Compressor Rear Shaft Assembly in to the Turnover Stand
Figure: Install the HP compressor rear shaft in to the immobilizer stand
Install the HP compressor rear shaft in to the immobilizer stand
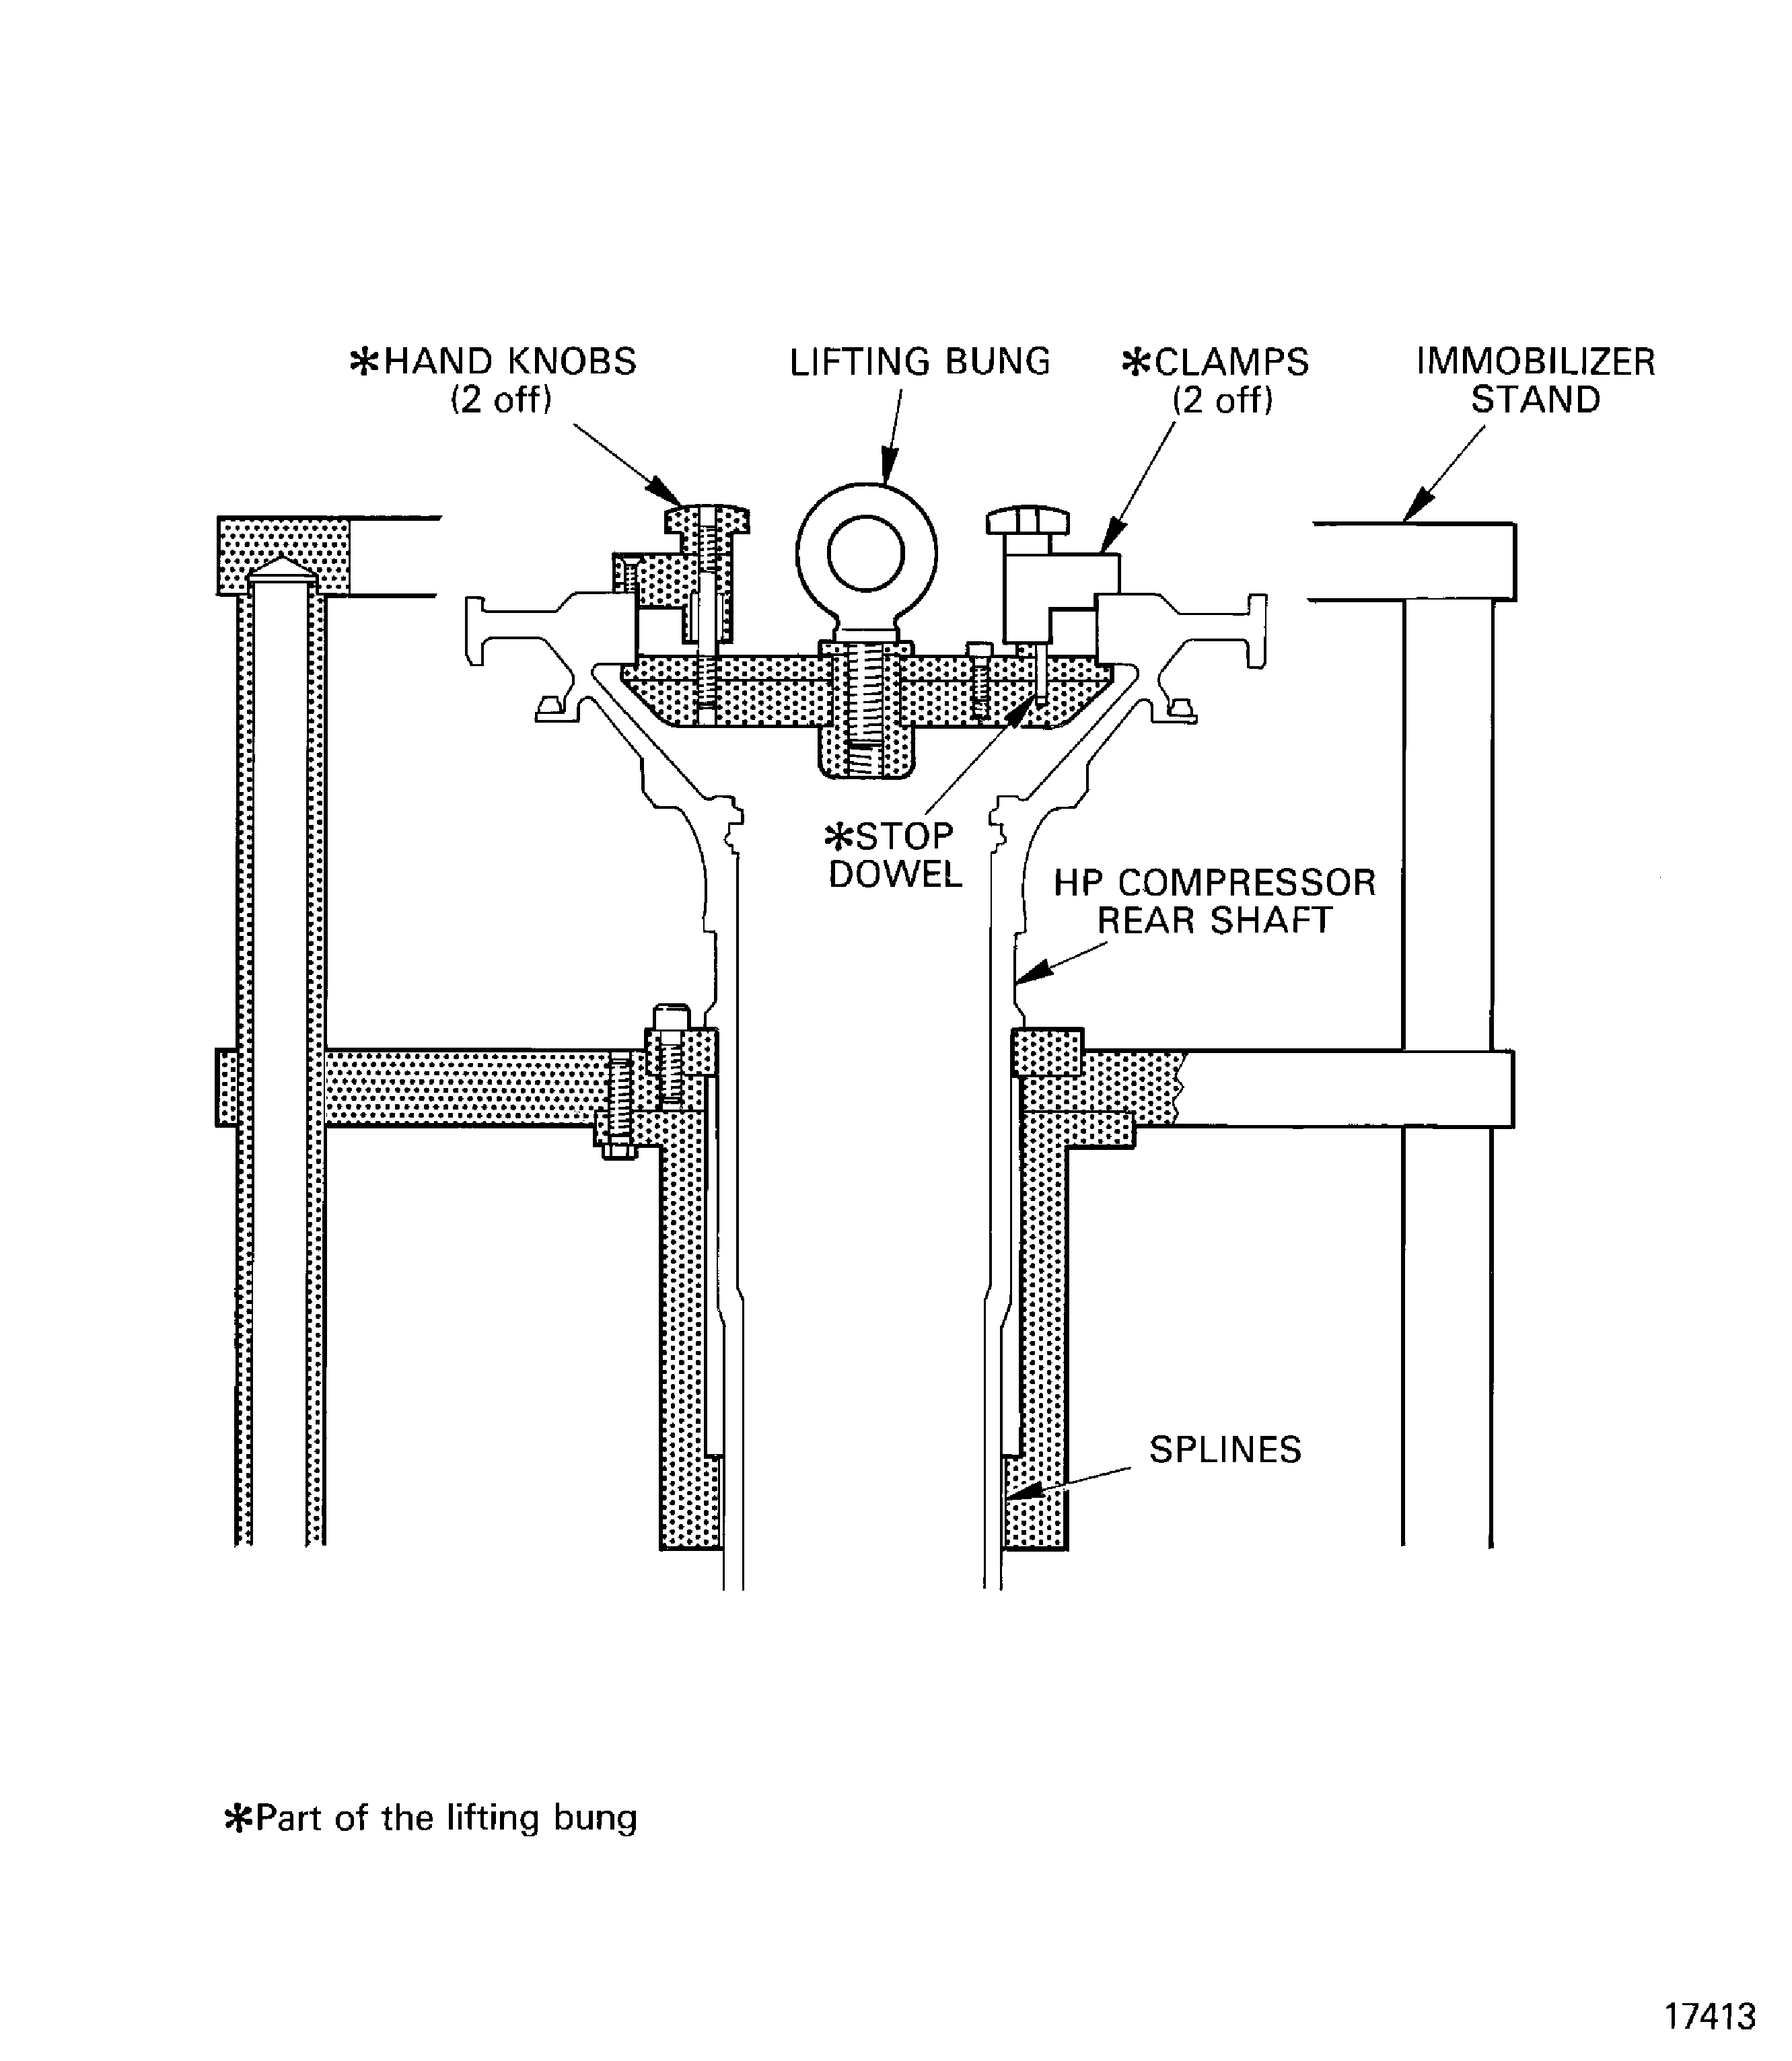
Figure: Install the heatshield in to the HP compressor rear shaft
Install the heatshield in to the HP compressor rear shaft
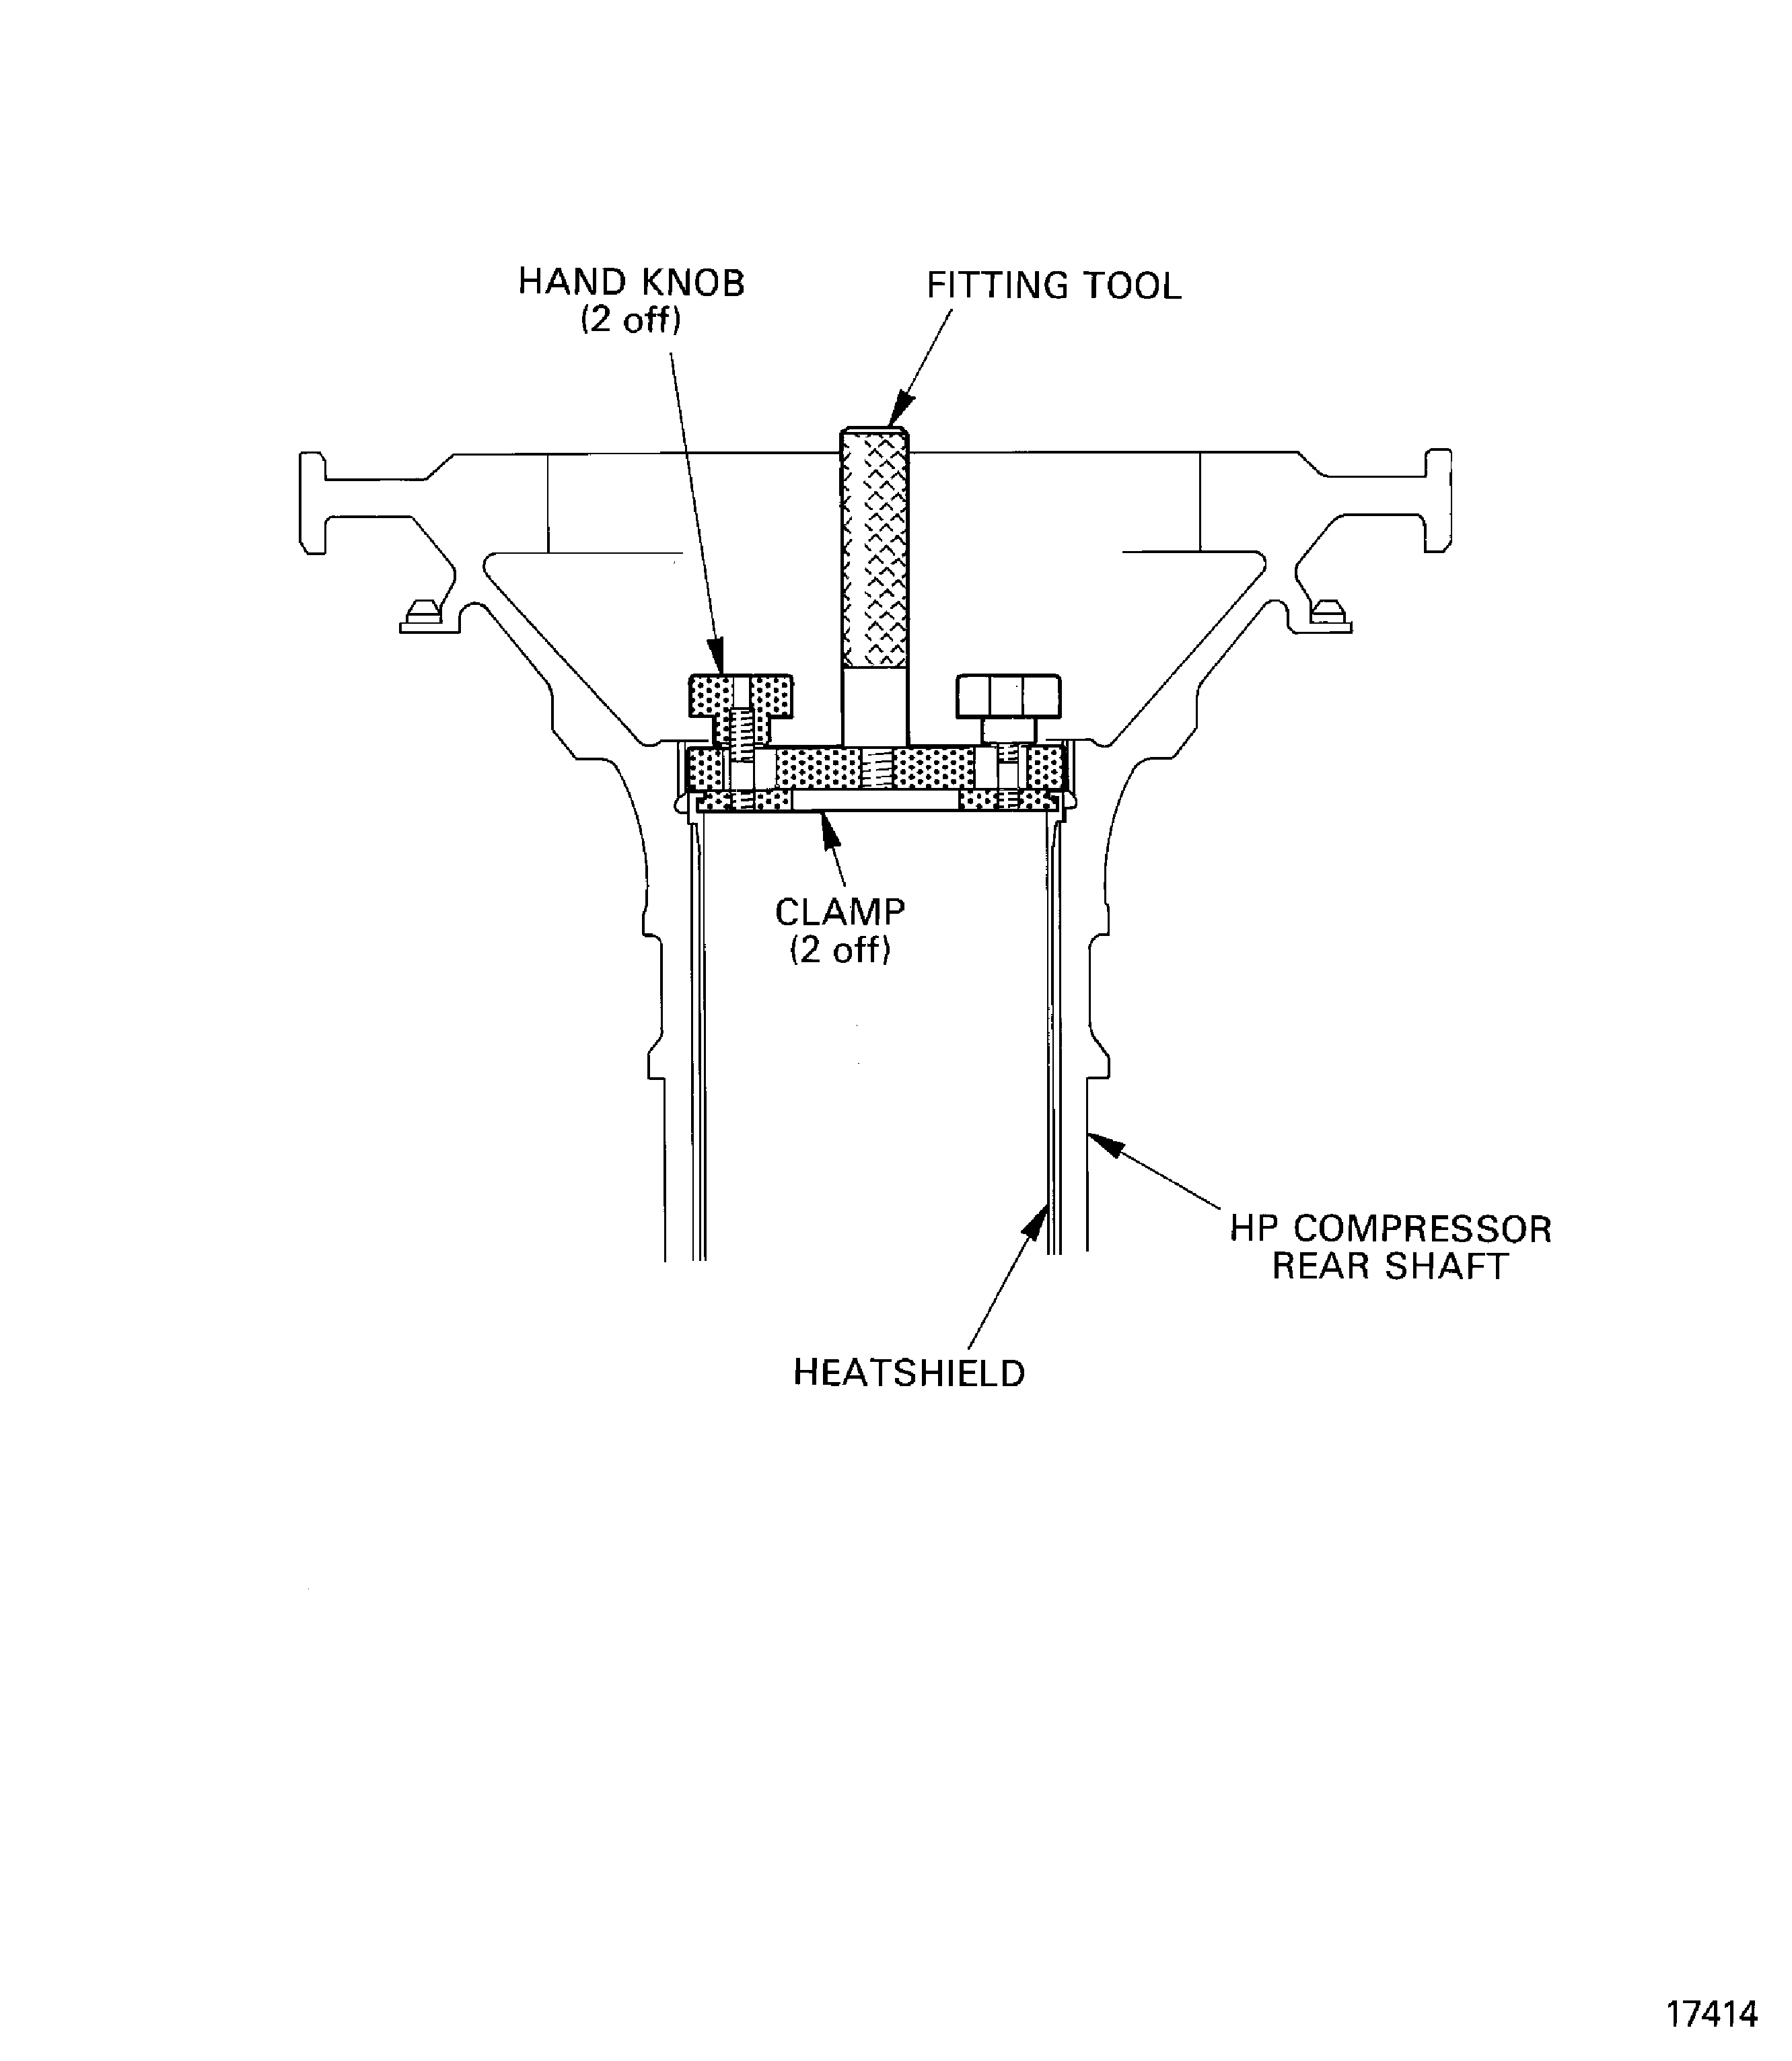
Figure: Install the tools necessary to torque tighten the ring nut
Install the tools necessary to torque tighten the ring nut
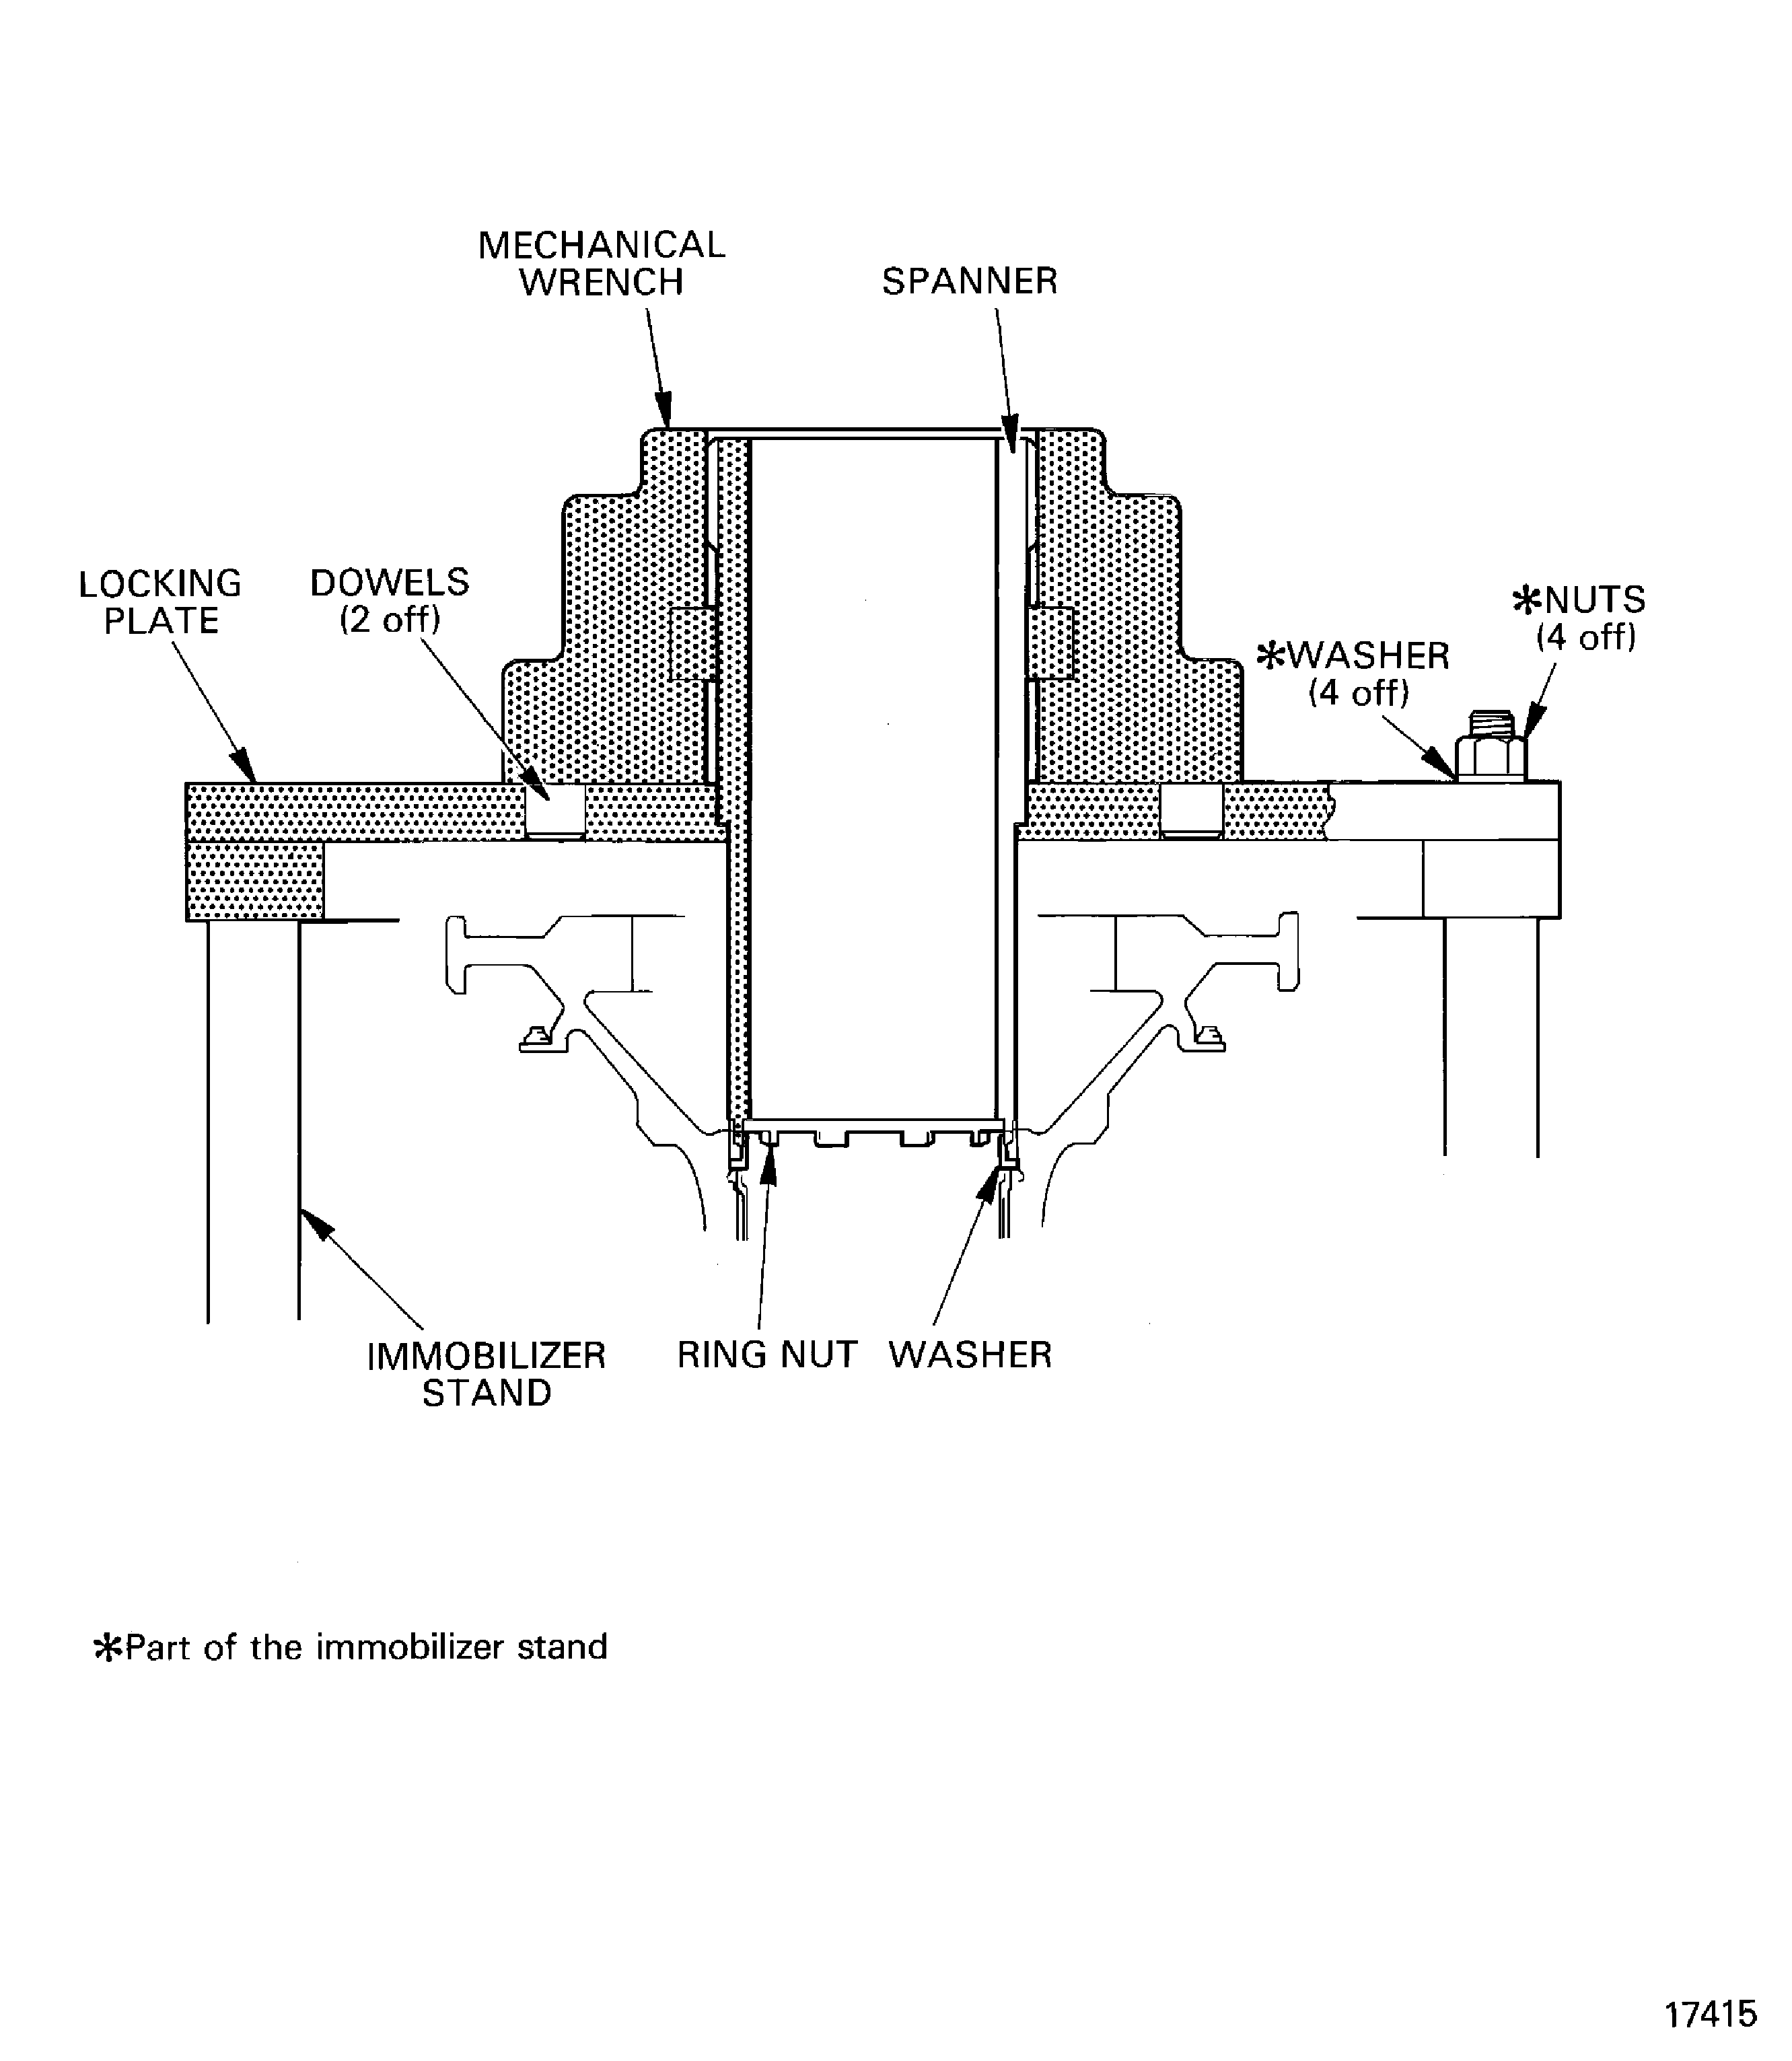
Figure: Install the HP compressor rear shaft assembly in to the turnover stand
Install the HP compressor rear shaft assembly in to the turnover stand
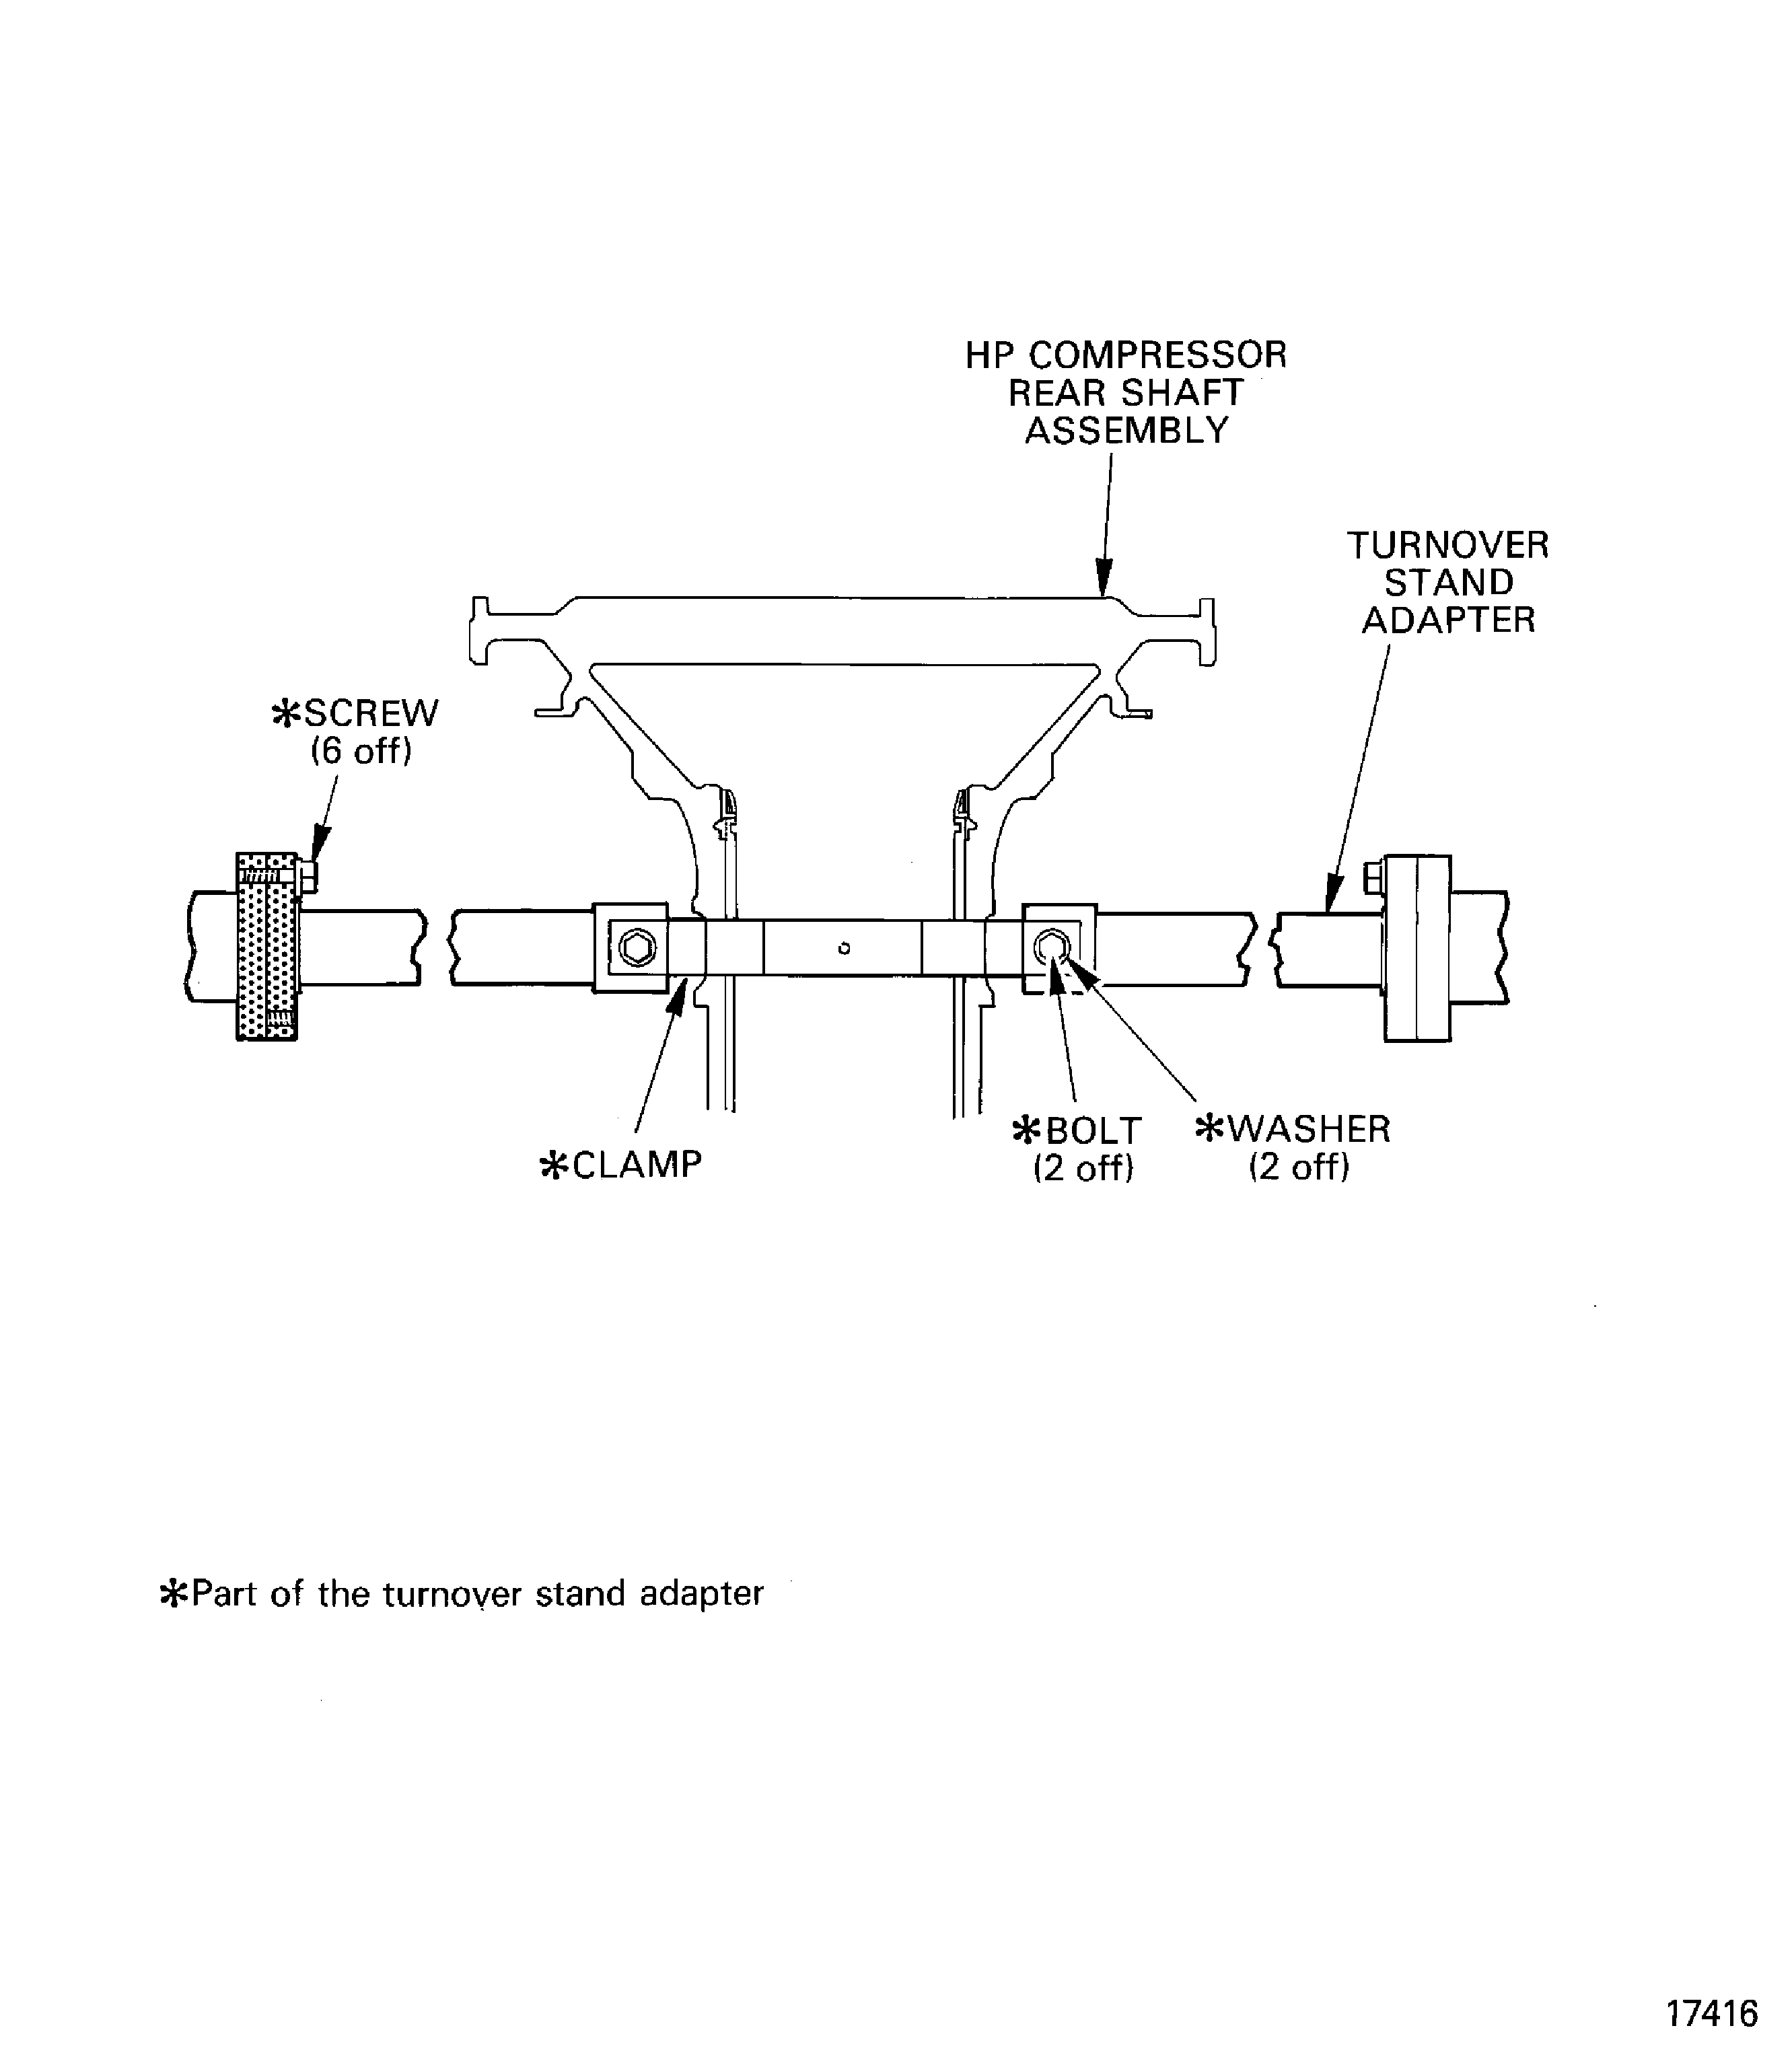
Figure: Install the tools necessary to lift the HP compressor rear shaft assembly
Install the tools necessary to lift the HP compressor rear shaft assembly
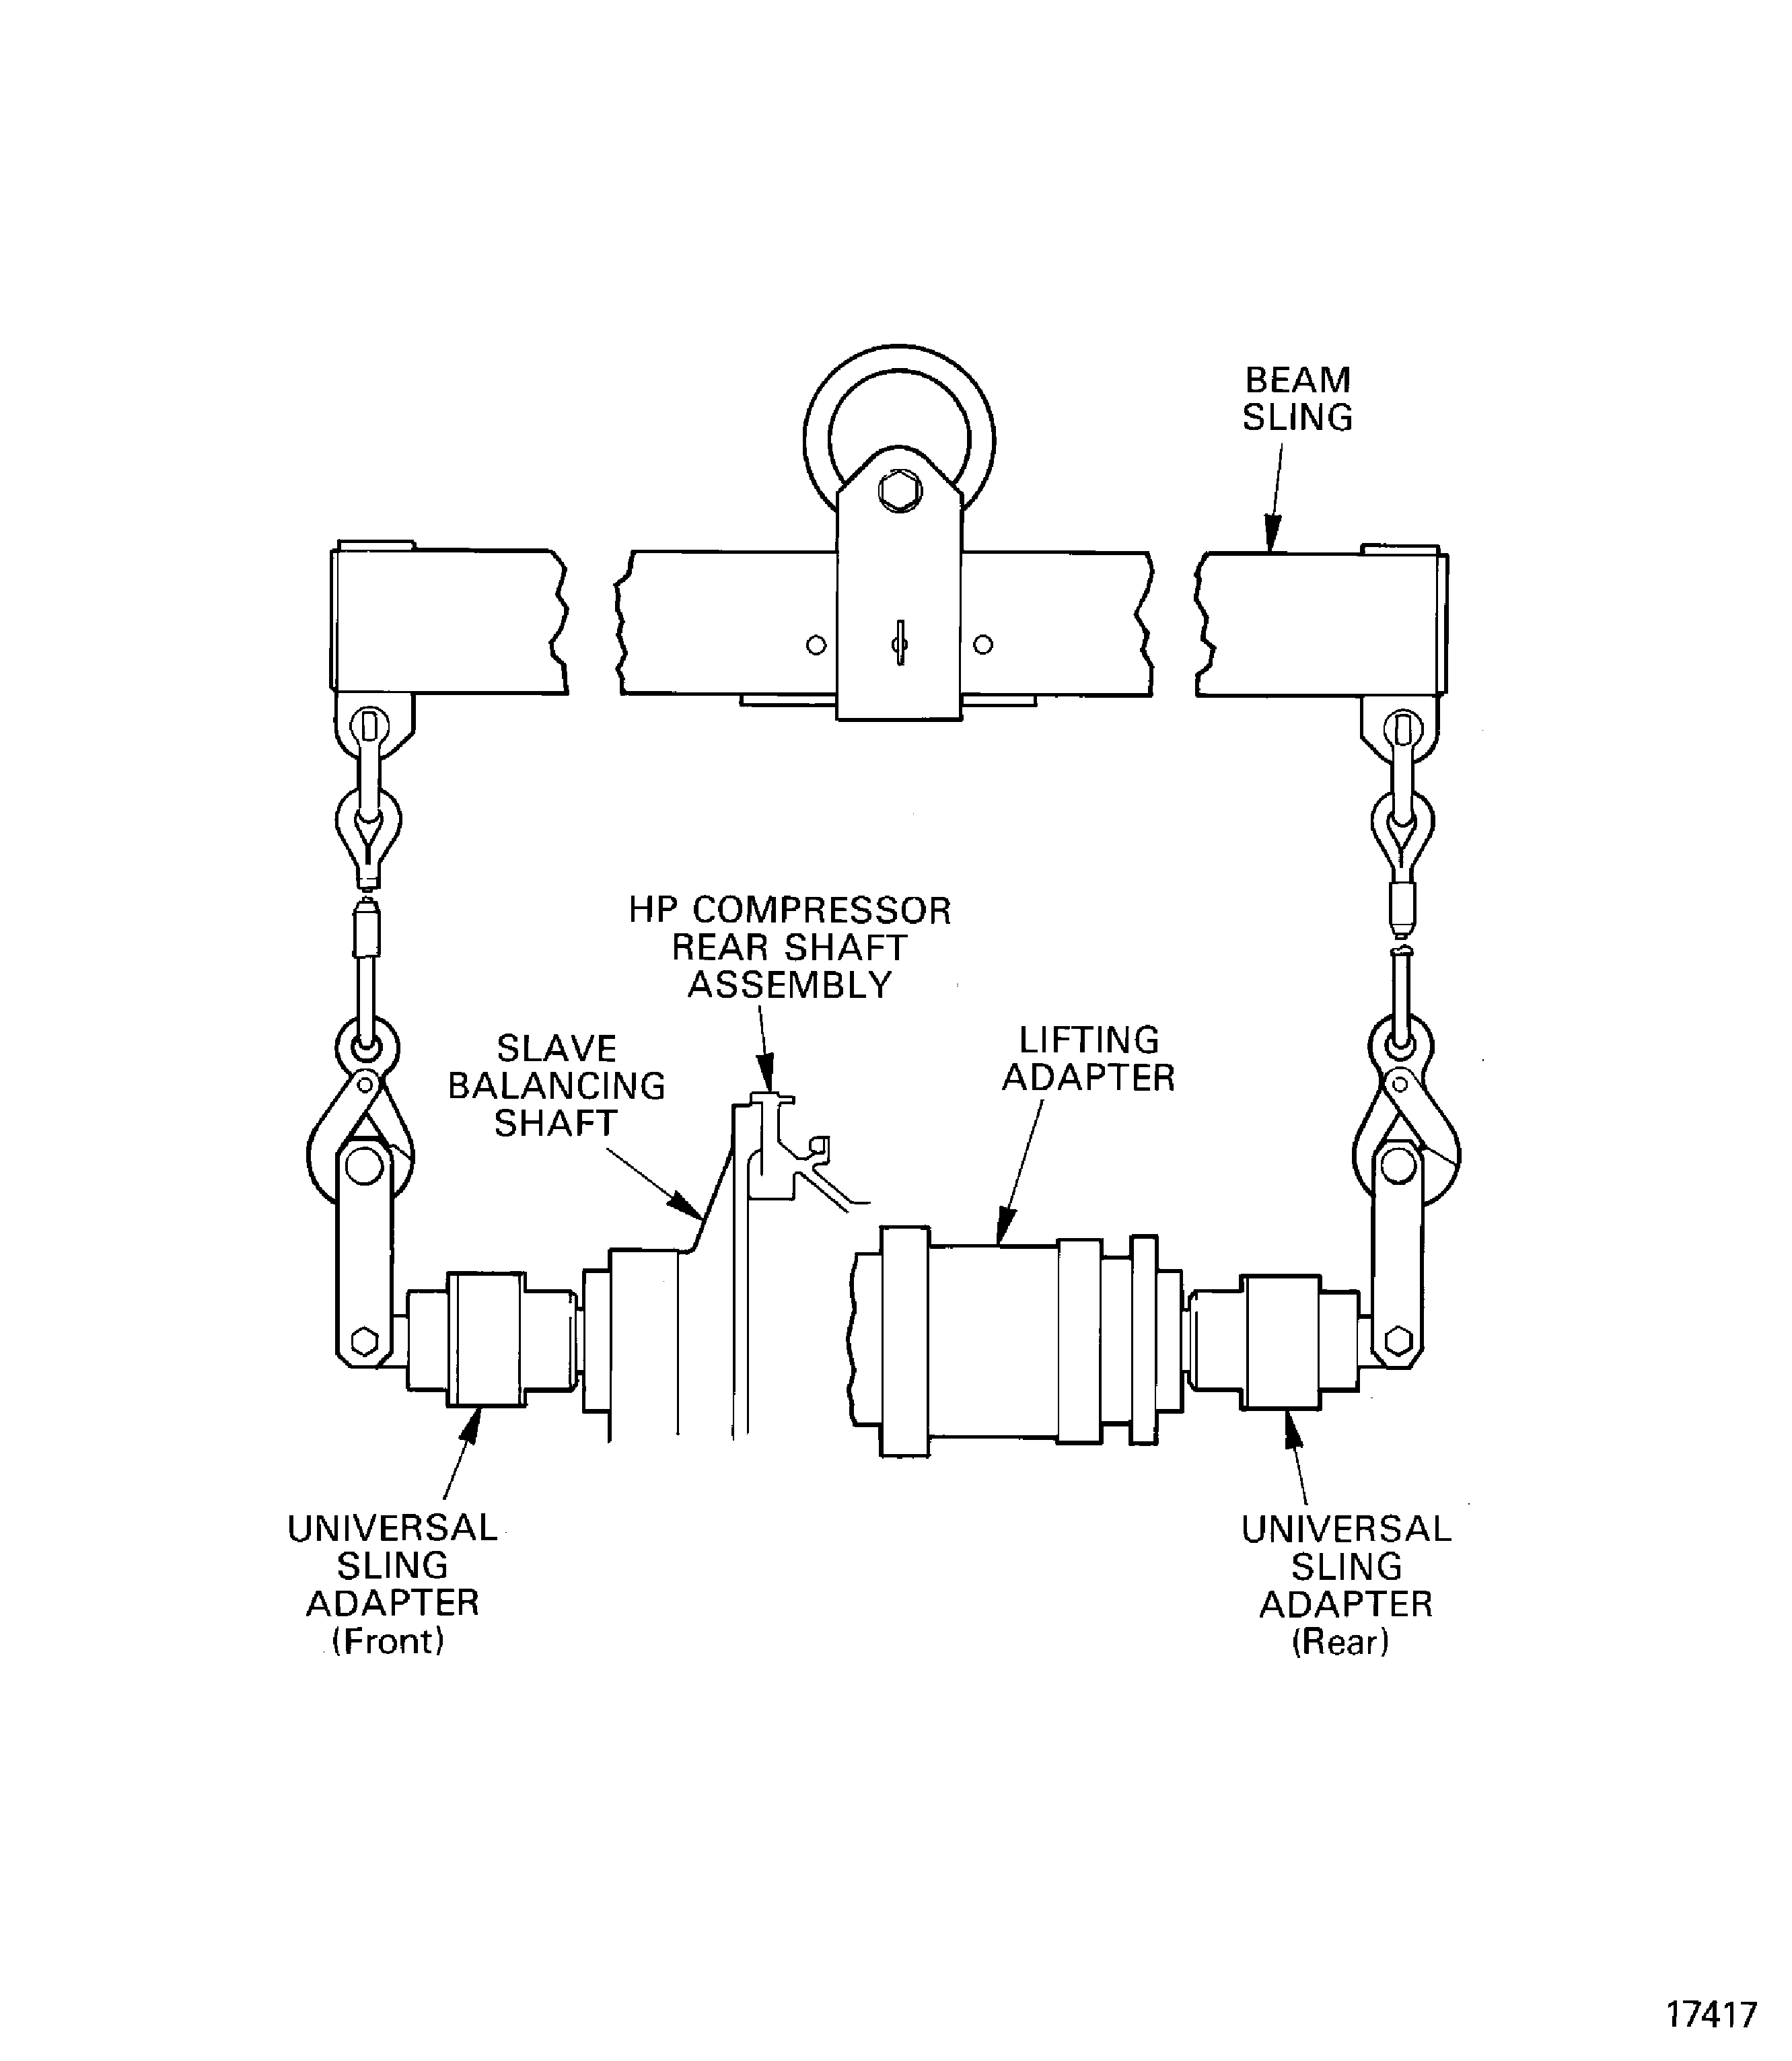
Figure: Remove/install the universal sling adapters
Remove/install the universal sling adapters

Figure: Install the HP compressor rear shaft assembly in to the balancing machine
Install the HP compressor rear shaft assembly in to the balancing machine
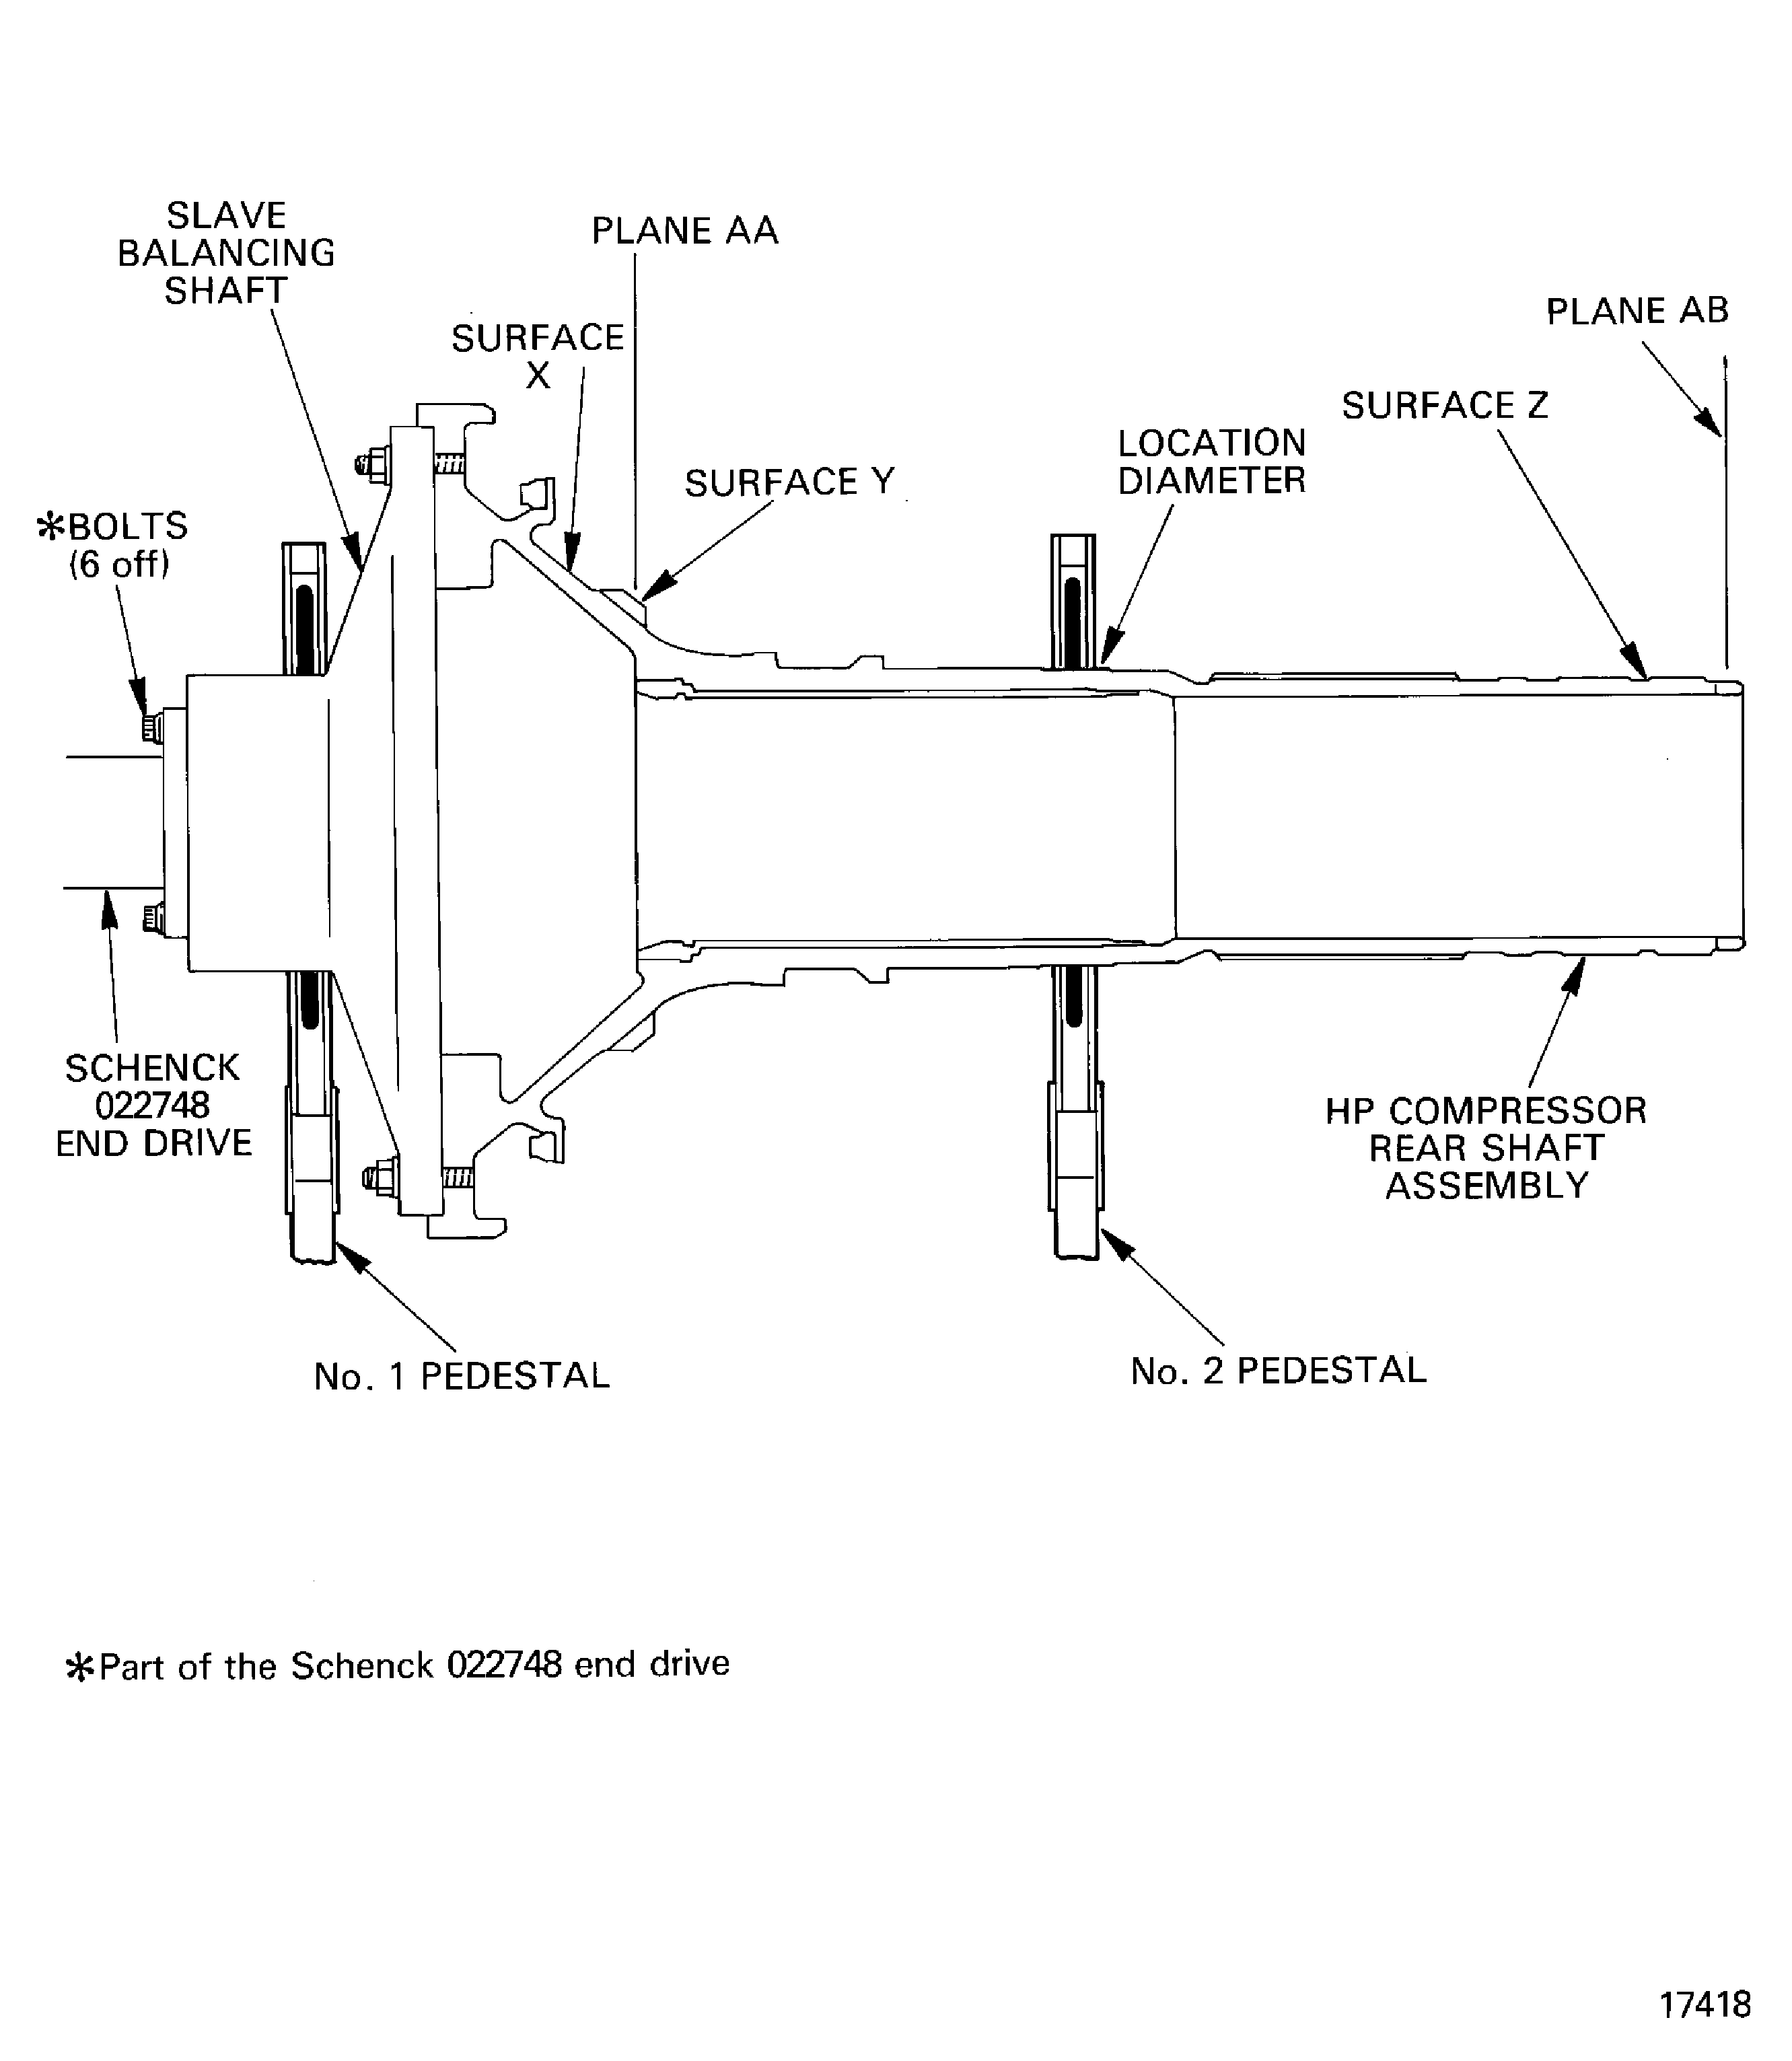
Figure: Example to show positions and quantity of metal to be removed
Example to show positions and quantity of metal to be removed
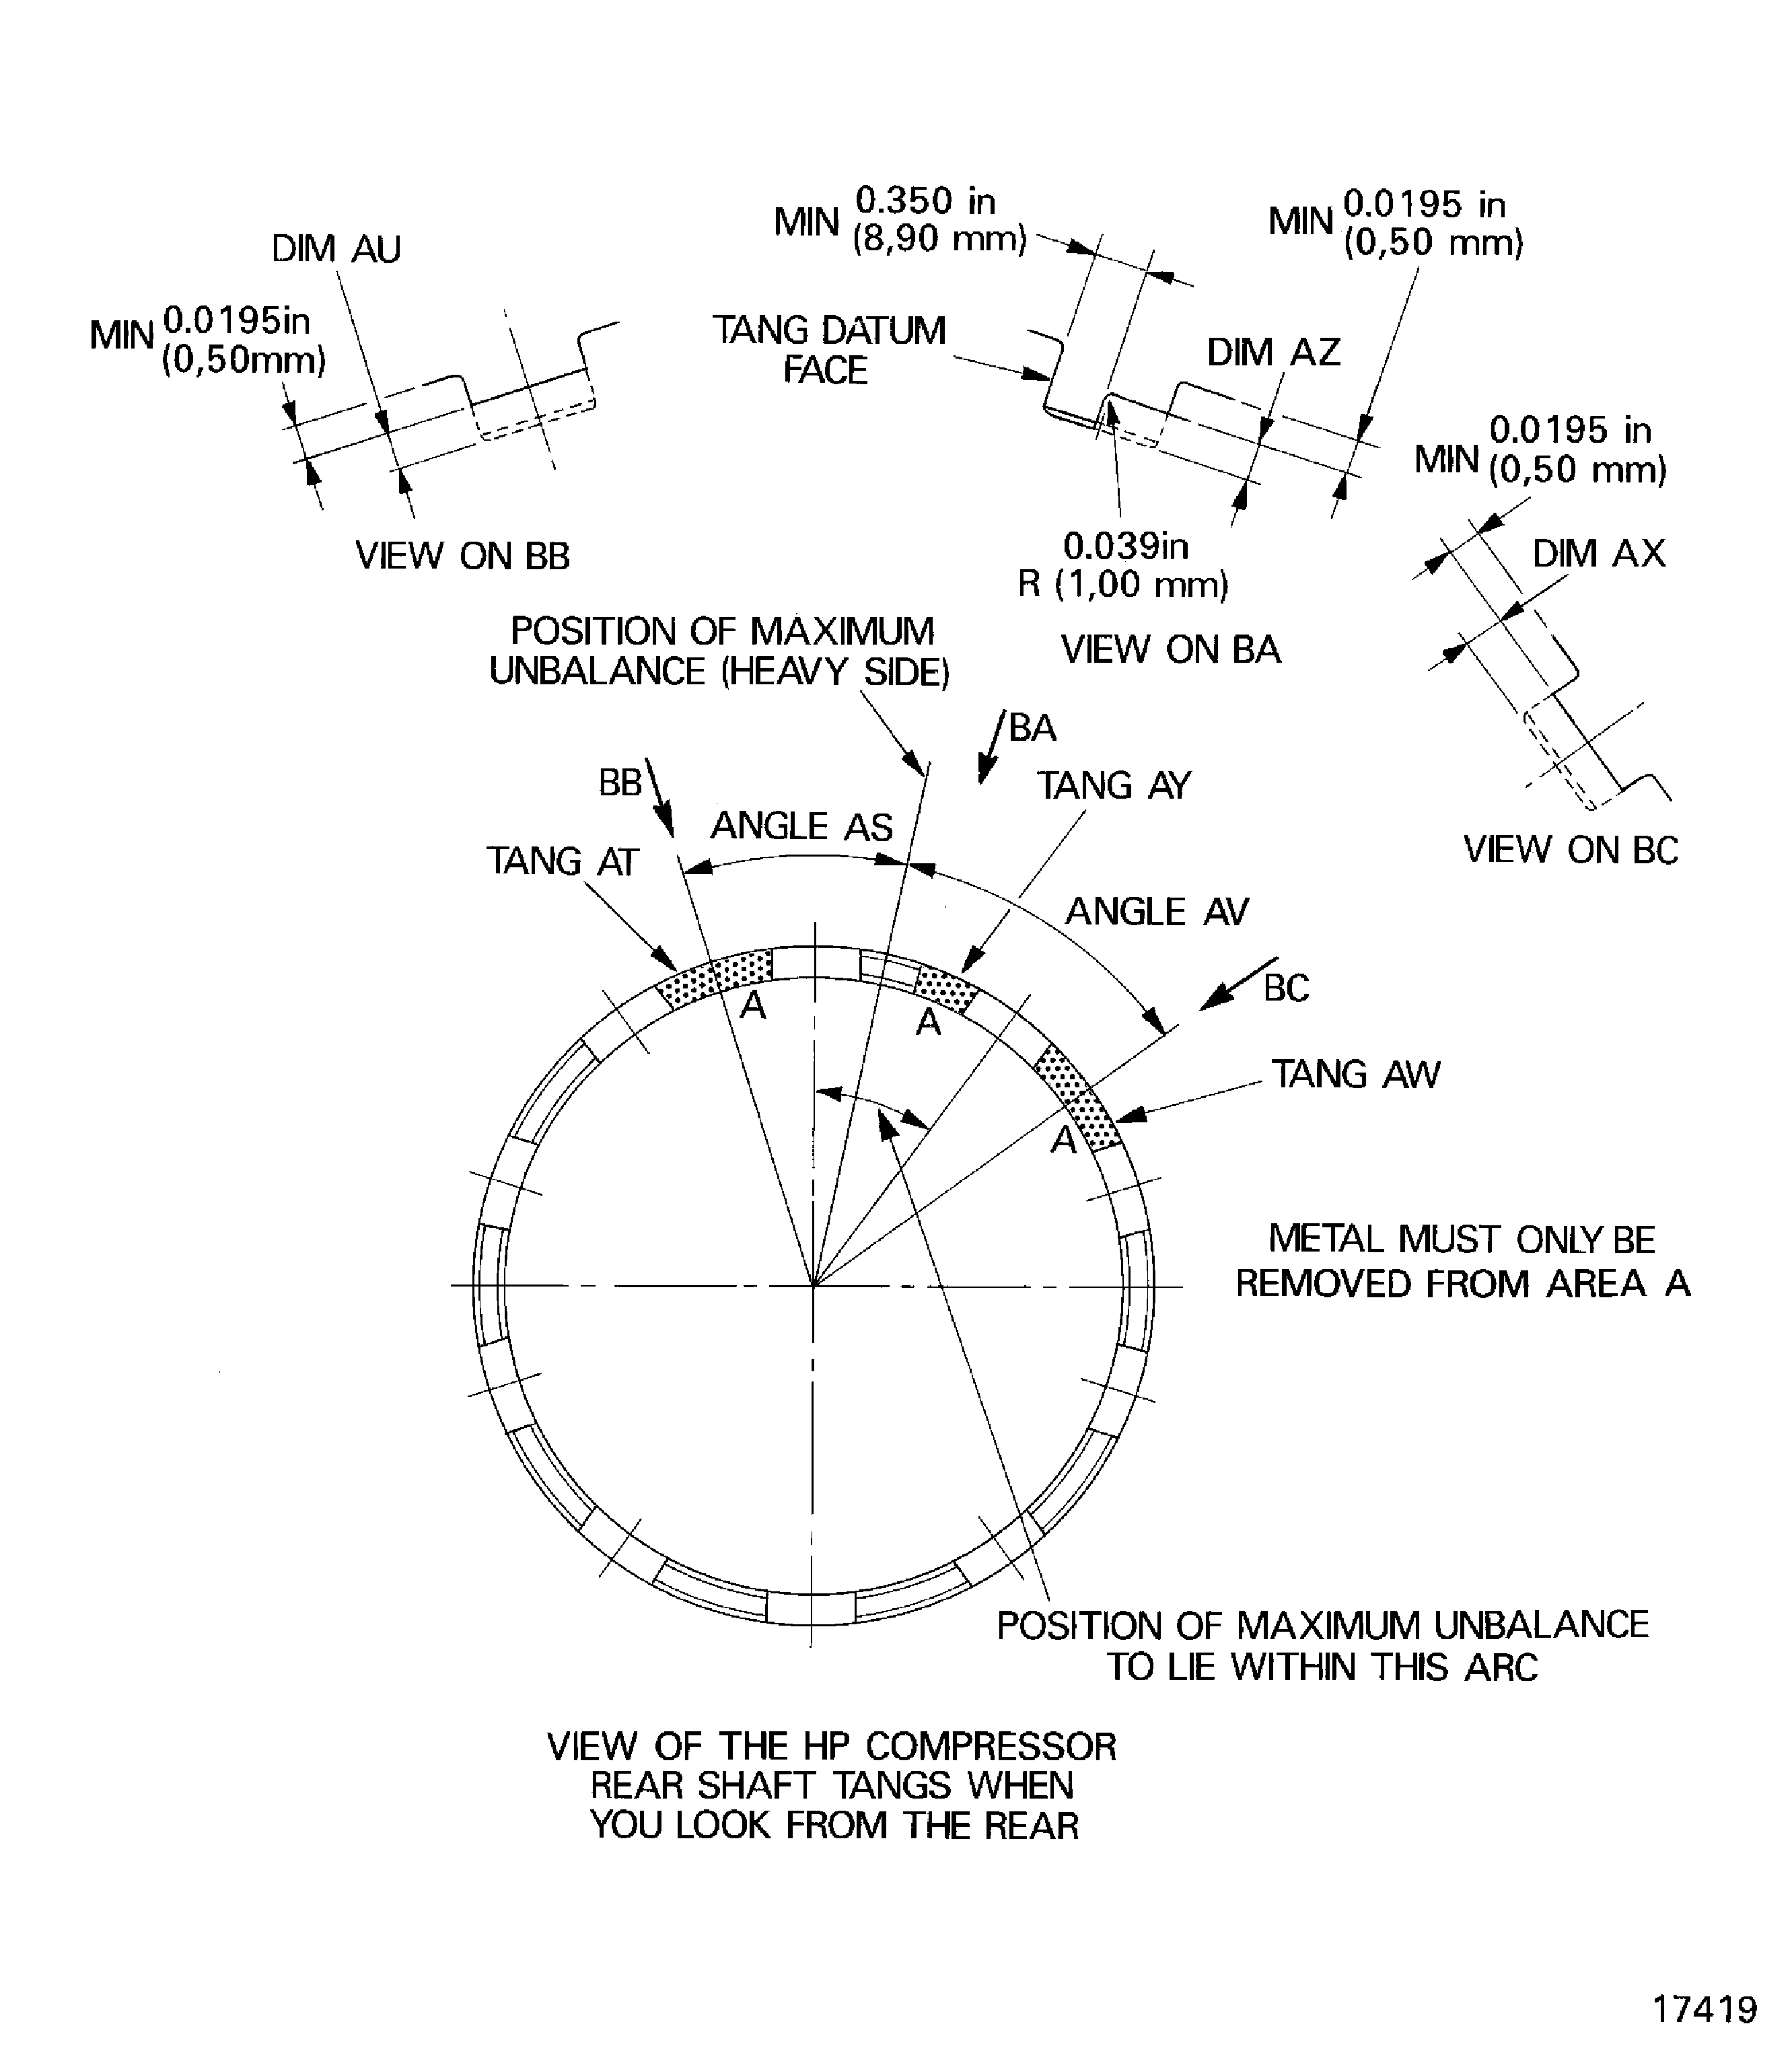
Figure: Initial unbalance graph
Initial unbalance graph
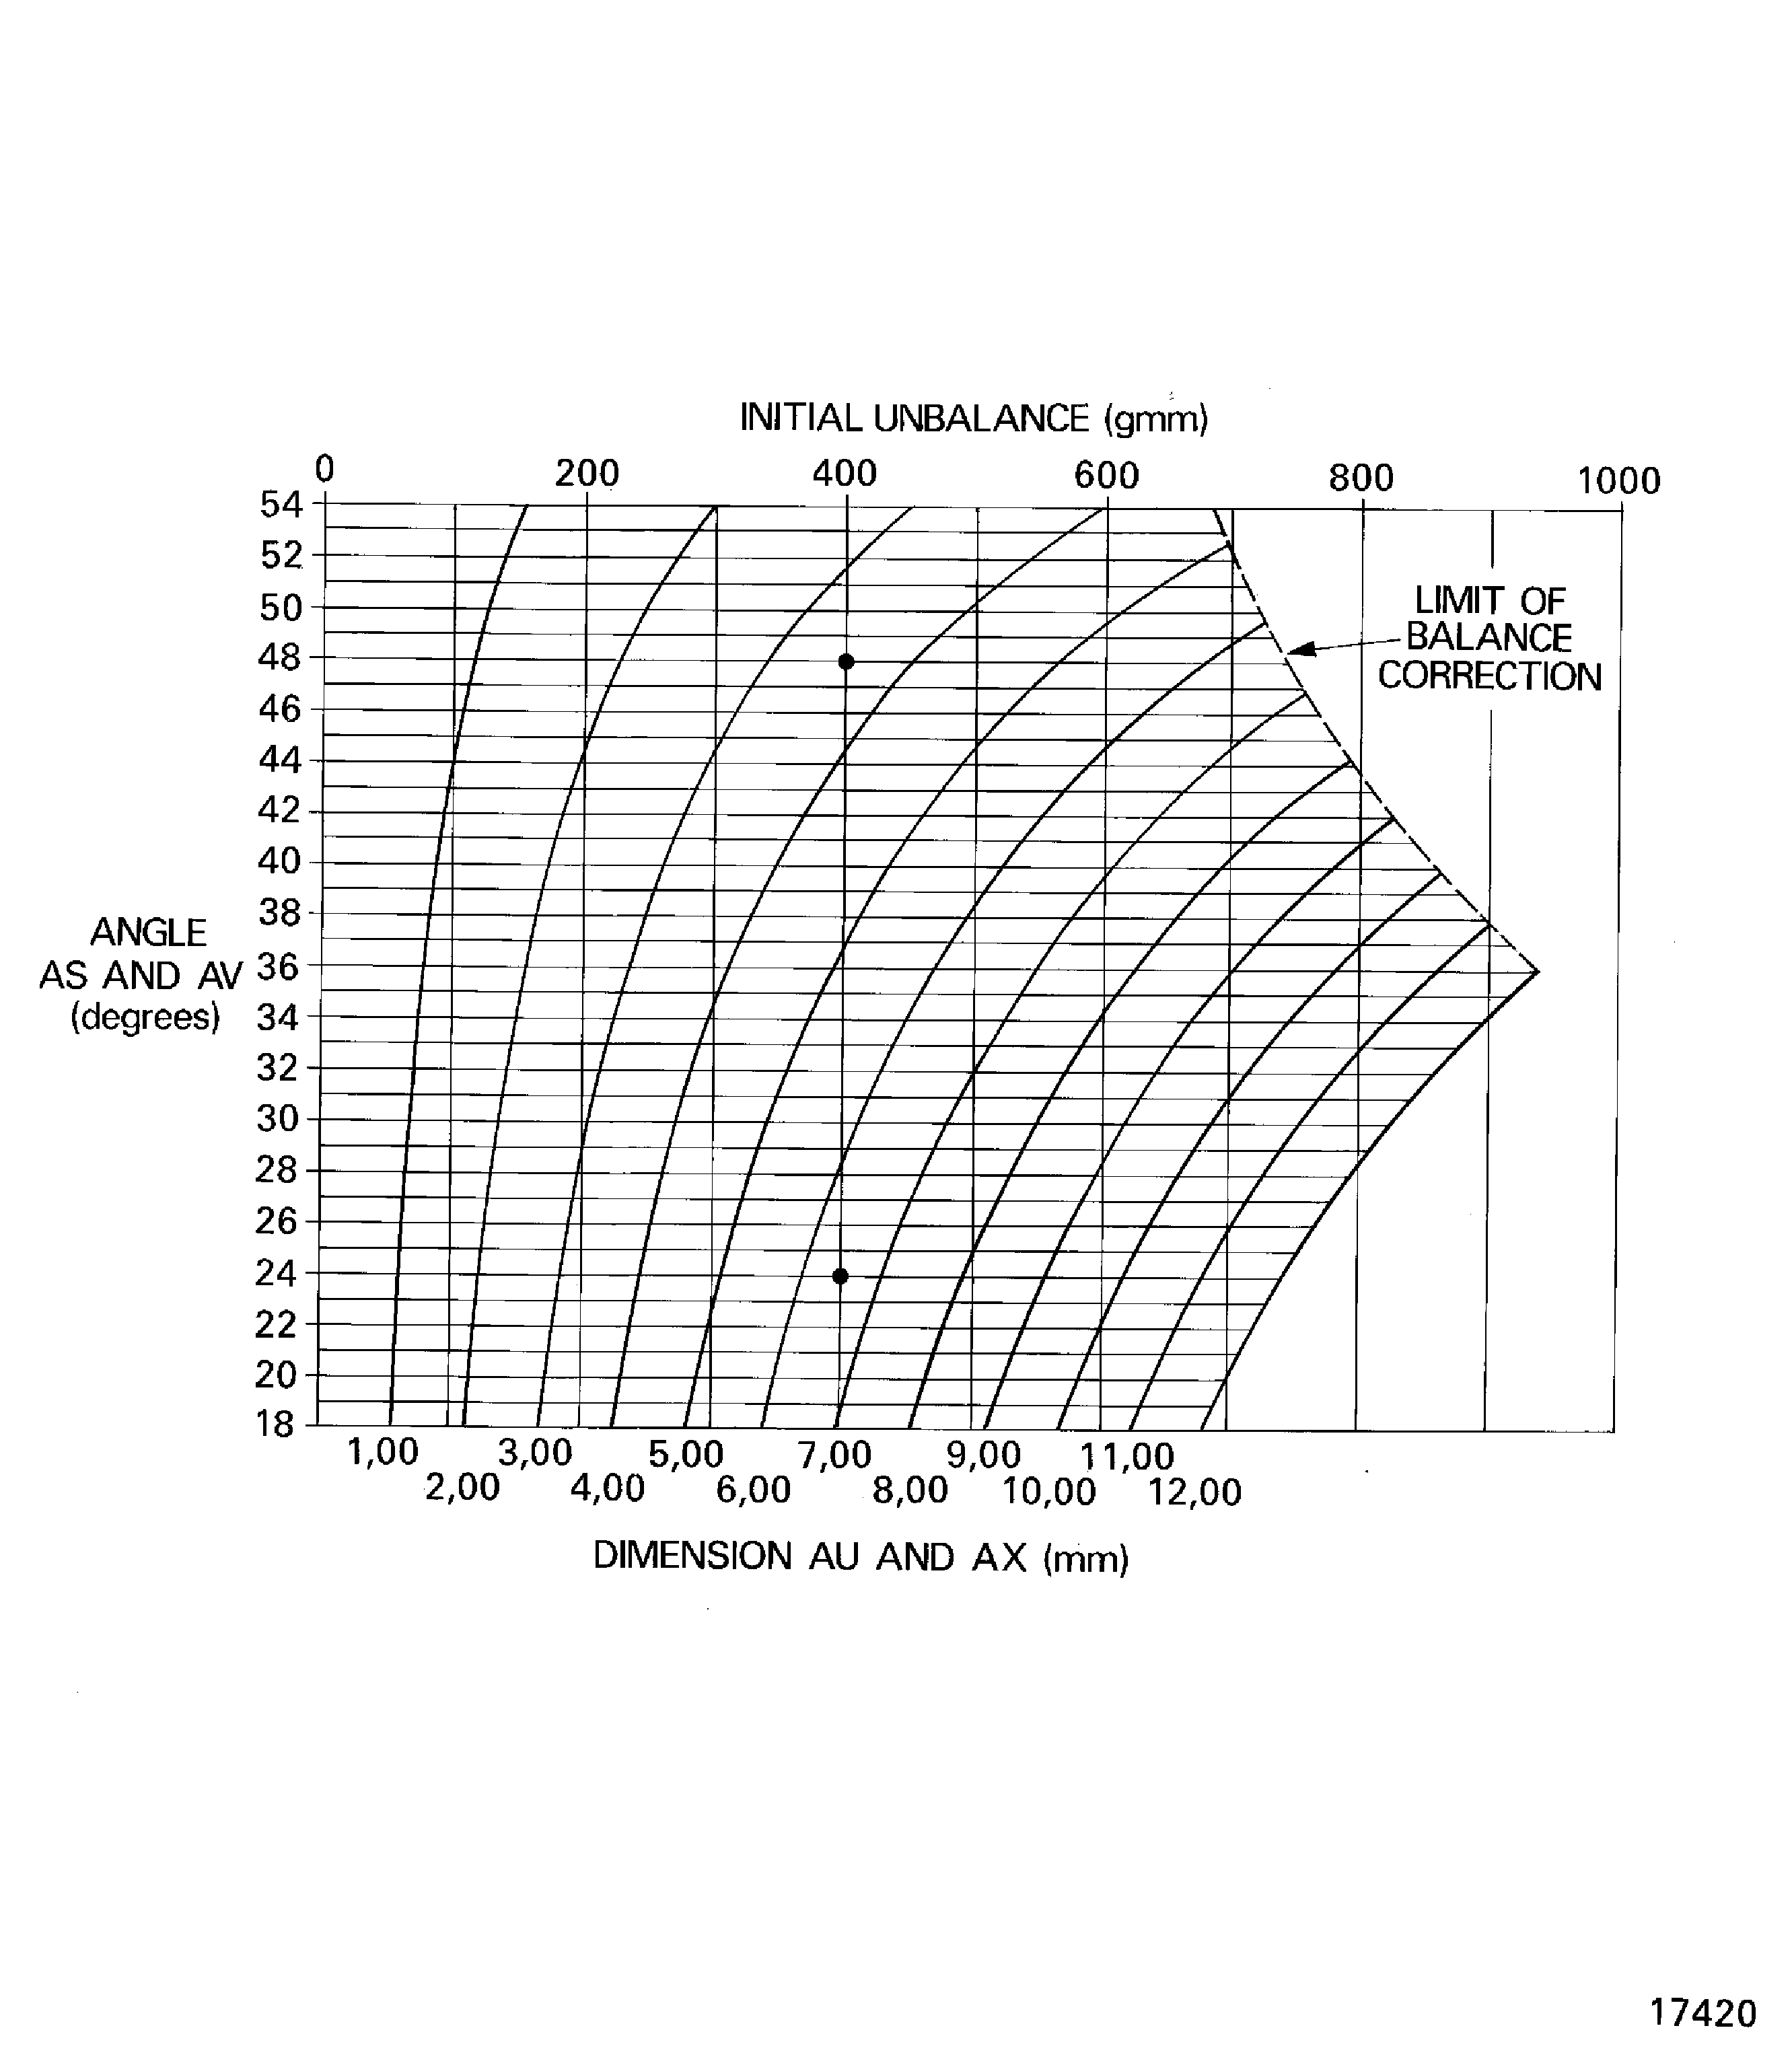
Figure: Small quantity of unbalance graph
Small quantity of unbalance graph
