Export Control
EAR Export Classification: Not subject to the EAR per 15 C.F.R. Chapter 1, Part 734.3(b)(3), except for the following Service Bulletins which are currently published as EAR Export Classification 9E991: SBE70-0992, SBE72-0483, SBE72-0580, SBE72-0588, SBE72-0640, SBE73-0209, SBE80-0024 and SBE80-0025.Copyright
© IAE International Aero Engines AG (2001, 2014 - 2021) The information contained in this document is the property of © IAE International Aero Engines AG and may not be copied or used for any purpose other than that for which it is supplied without the express written authority of © IAE International Aero Engines AG. (This does not preclude use by engine and aircraft operators for normal instructional, maintenance or overhaul purposes.).Applicability
V2500-A1
Common Information
TASK 72-41-20-440-006-A02 HPC Rear Cases And Vanes Assembly - Machine The Stage 7 Through 11 Stator Vane Tips And The Stage 7 Through 12 Rotor Path Ring Liners (Mechanical Clamping Tool Method), Assembly-006
General
Fig/item numbers in parentheses in the procedure agree with those used in the IPC. Only the primary Fig/item numbers are used. For the Service Bulletin alpha variants refer to the IPC.
For all parts identified in a different Chapter/Section/Subject the applicable Chapter/Section/Subject comes before the Fig/item number.
For standard torque data and procedures refer to SPM TASK 70-41-00-400-501, SPM TASK 70-41-01-400-501 and SPM TASK 70-41-02-400-501.
Special torque data and assembly tolerances are included in the procedure.
Lubricate all threads and abutment faces of nuts and bolts with CoMat 10-077 APPROVED ENGINE OILS approved engine oil unless other lubricants are referred to in the procedure.
After assembly apply CoMat 07-038 AIR DRYING ENAMEL to any damaged surface protection, joint flanges and parts used to attach. Use the correct color of the air drying enamel. Refer to SPM TASK 70-63-02-380-501.
The number for each radial location must be identified in a clockwise direction. These start at the engine top position when you look from the rear of the engine, unless stated differently in the procedure.
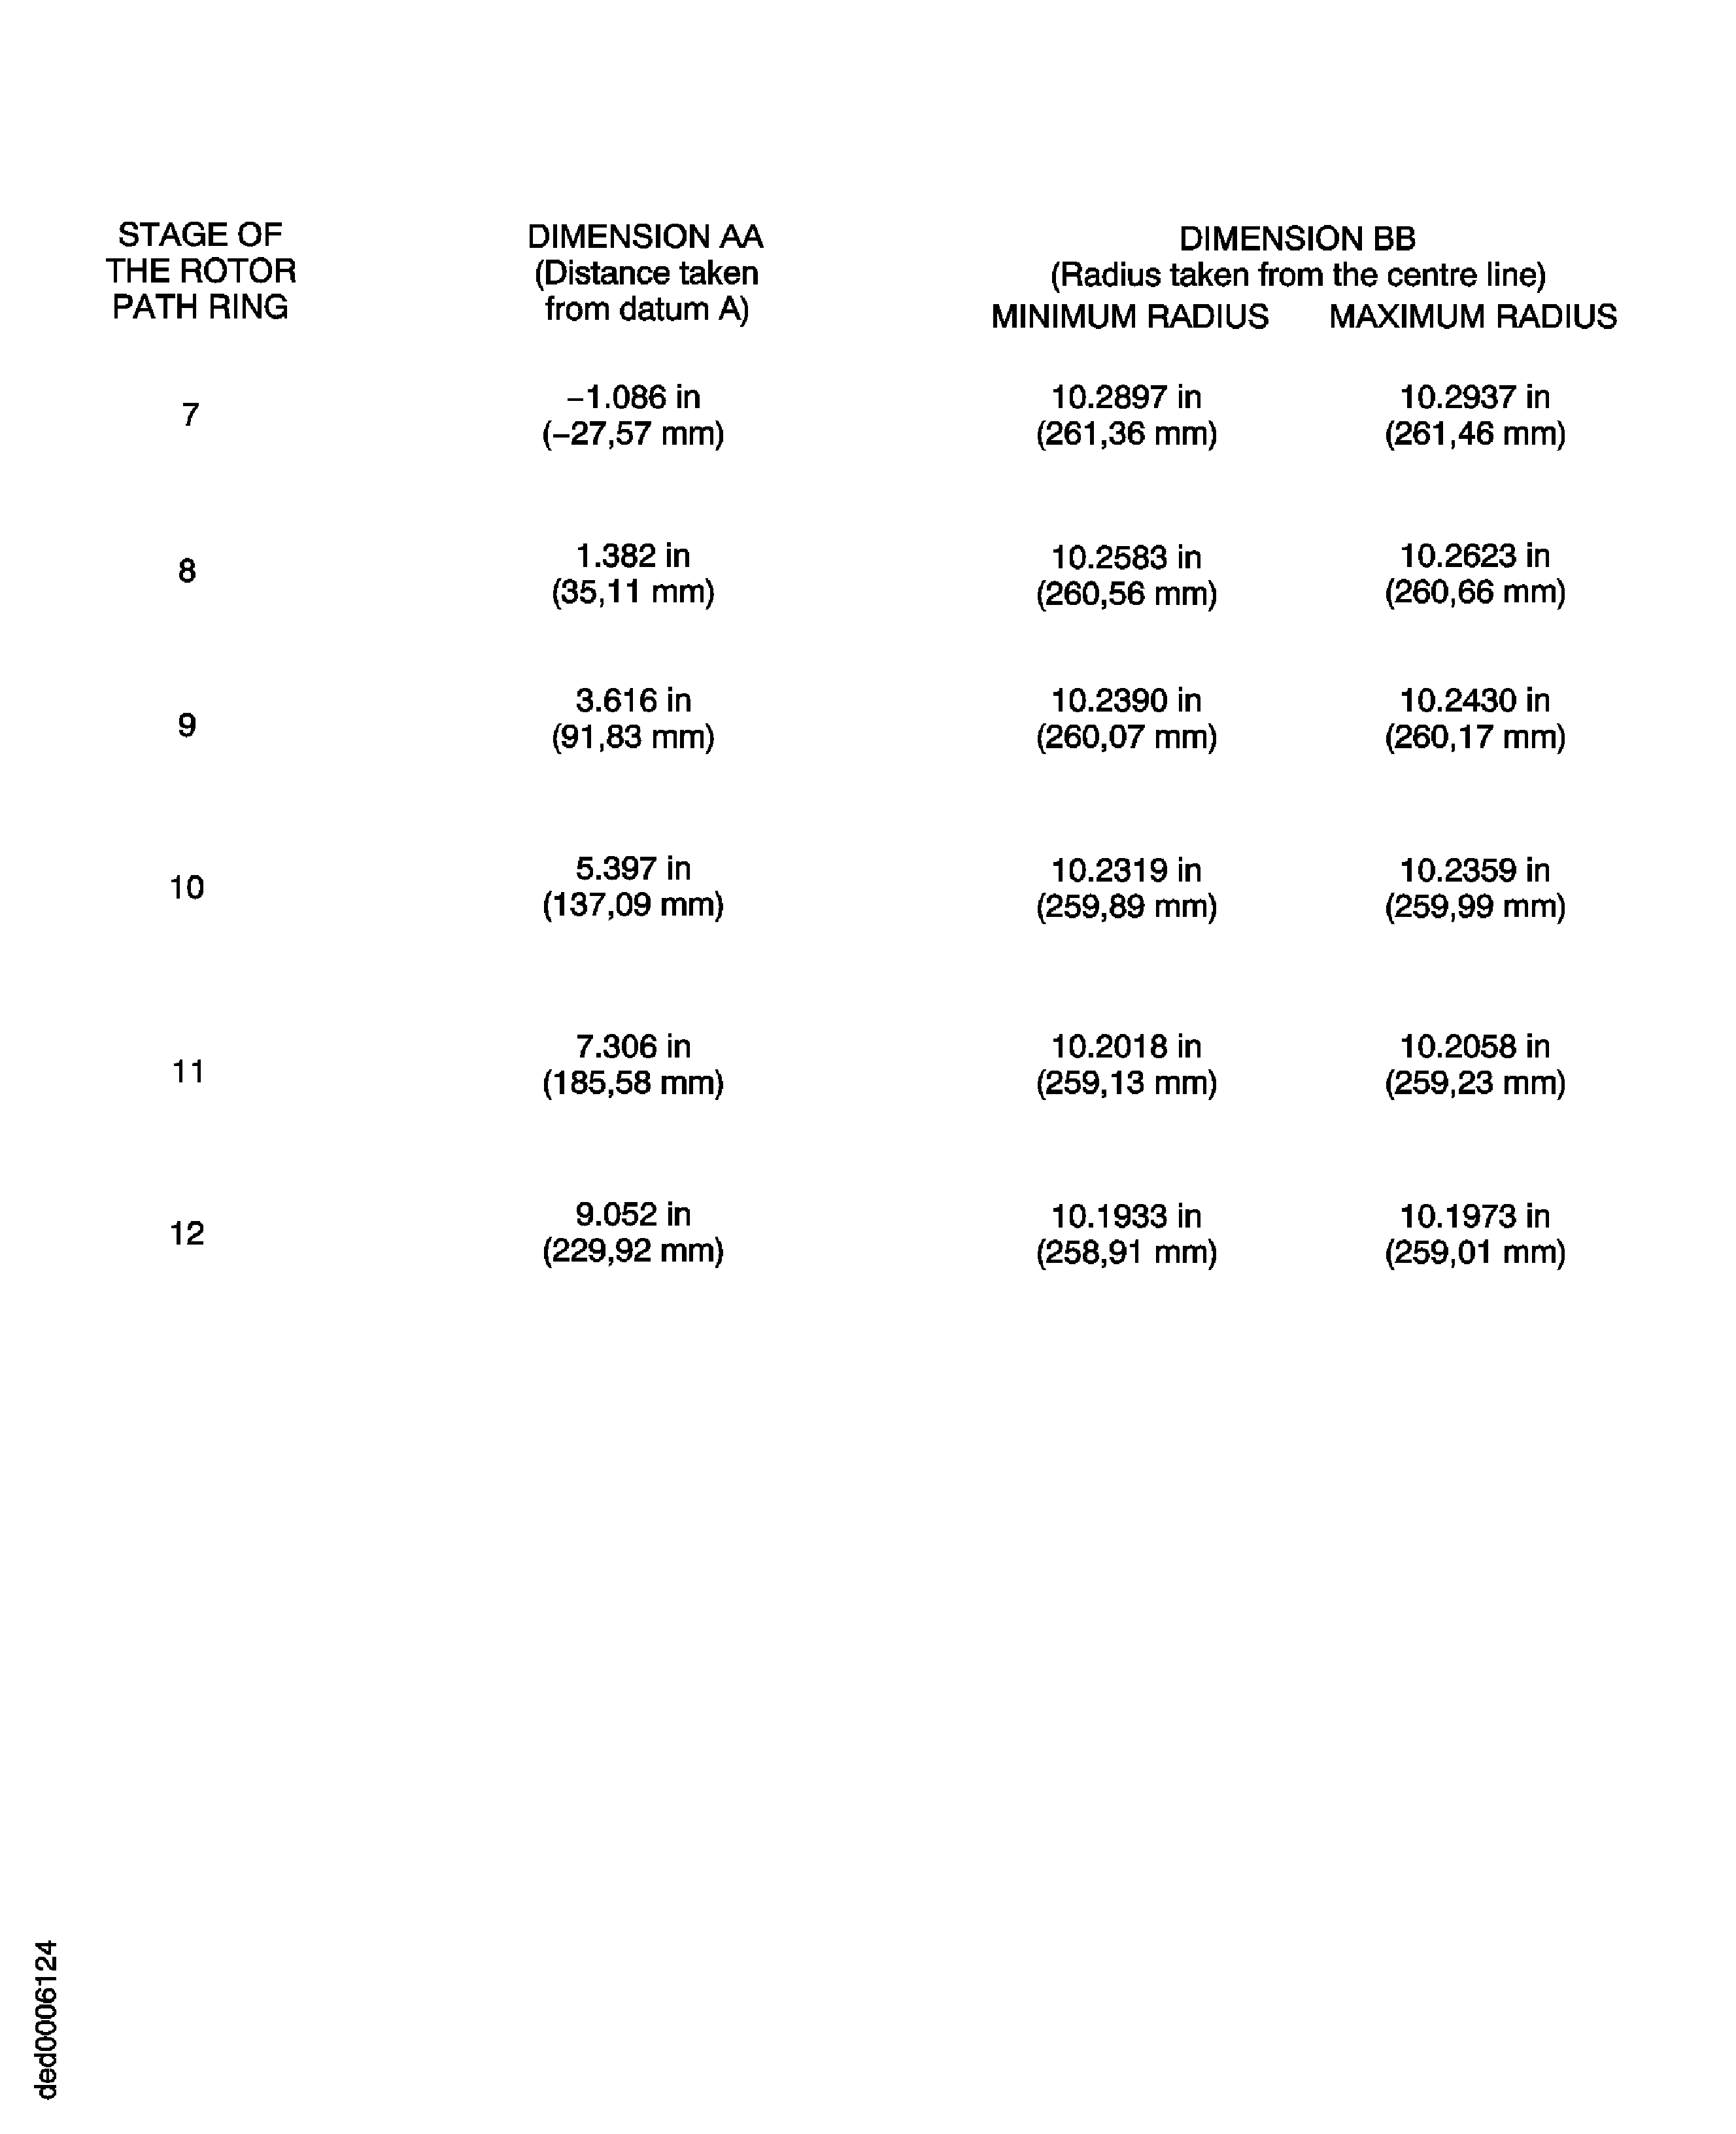
Refer to Figure for a sectional view of the HP compressor rear cases and vanes.
Make sure all the flange faces and tool faces that touch are very clean.
This TASK gives the procedure to replace the wax encapsulating process.
This TASK gives the procedures to machine the stator vane tips and the rotor path ring liners.
Machining Requirements
The data that follows is a guideline. If any additional data is necessary contact IAE.
For the rotor path ring machining, a machine is necessary that can meet the conditions that follow:
Permits a 31.00 in. (787.4 mm) diameter by 16.00 in. (406.4 mm) depth workpiece to be installed.
The workpiece must be turned in a counterclockwise direction, when viewed from the tailstock.
Permits a K Grade Carbide I.T.T. turning tool with a 0.031 in. (0.79 mm) radius tip to be installed.
The conditions that follow must be used when you machine the rotor path linings:
A component surface speed of 70 m/min. This is equivalent to a speed of 43 r.p.m.
The maximum depth of cut to be used is 0.006 in. (0.15 mm).
The feed rate is to be determined by 'general feel' for the workpiece.
For the stator vane tip grinding, a machine is necessary that can meet the conditions that follow:
Permits a 31.00 in. (787.4 mm) diameter by 16.00 in. (406.4 mm) depth workpiece to be installed.
The workpiece must be turned in a clockwise direction, when viewed from the tailstock.
Permits a grinding set-up to be attached to the machine. It will be necessary for the grinding wheel to be turned.
The grinding wheel must be turned in a counterclockwise direction, when viewed from the tailstock.
Permits a swarf extraction unit to be installed.
The conditions that follow must be used when you are grinding the stator vane tips:
A component surface speed of 34 m/min. This is equivalent to a speed of 23 r.p.m.
A grinding wheel surface speed of 1675 m/min. This is equivalent to a speed of approximately 4090 r.p.m. at the recommended grinding wheel diameter.
A grinding wheel diameter of between 4.6 in. and 5.5 in. (117 mm and 140 mm).
It is recommended that you use a plunge grinding method with an infeed rate of 0.0075 mm per revolution.
Use a 'spark-out' time of 10 revolutions or 25 seconds.
NOTE
NOTE
Preliminary Requirements
Pre-Conditions
NONESupport Equipment
| Name | Manufacturer | Part Number / Identification | Quantity | Remark |
|---|---|---|---|---|
| IAE 1R18212 Support ring | 0AM53 | IAE 1R18212 | 1 | |
| IAE 1R18321 Turnover stand | 0AM53 | IAE 1R18321 | 1 | |
| IAE 1R18412 Turning fixture | 0AM53 | IAE 1R18412 | 1 | |
| IAE 1R18413 Turnover stand adaptor | 0AM53 | IAE 1R18413 | 1 | |
| IAE 1R18414 Boring bar | 0AM53 | IAE 1R18414 | 1 | |
| IAE 1R18415 Pallet | 0AM53 | IAE 1R18415 | 1 | |
| IAE 1R18416 Lifting tool | 0AM53 | IAE 1R18416 | 1 | |
| IAE 1R18417 Lifting Turnover trunnions | 0AM53 | IAE 1R18417 | 2 | |
| IAE 1R18418 Multiflex holder | 0AM53 | IAE 1R18418 | 1 | |
| IAE 1R18419 Probe holder | 0AM53 | IAE 1R18419 | 1 | |
| IAE 1R18420 Dressing attachment | 0AM53 | IAE 1R18420 | 1 | |
| IAE 1R18421 Diamond dresser | 0AM53 | IAE 1R18421 | 1 | |
| IAE 1R18422 Support probe bracket | 0AM53 | IAE 1R18422 | 1 | |
| IAE 1R18430 Turning holder | 0AM53 | IAE 1R18430 | 1 | |
| IAE 1R18431 Lifting beam | 0AM53 | IAE 1R18431 | 1 | |
| IAE 1R18700 Machine drawing | 0AM53 | IAE 1R18700 | 1 | |
| IAE 1R18760 Grinding head | 0AM53 | IAE 1R18760 | 1 | |
| IAE 1R18806 Setting piece | 0AM53 | IAE 1R18806 | 1 | |
| IAE 1R18807 Setting piece | 0AM53 | IAE 1R18807 | 1 | |
| IAE 1R18808 Setting piece | 0AM53 | IAE 1R18808 | 1 | |
| IAE 1R18809 Setting piece | 0AM53 | IAE 1R18809 | 1 | |
| IAE 1R19836 TBD | 0AM53 | IAE 1R19836 | 1 | |
| IAE 1R19837 TBD | 0AM53 | IAE 1R19837 | 1 | |
| IAE 3R18232 Lifting beam | 0AM53 | IAE 3R18232 | 1 | |
| Grinding Machine | LOCAL | Grinding Machine | ||
| K Grade I.T.T. Turning Tool | LOCAL | K Grade I.T.T. Turning Tool | ||
| Mechanical Brush | LOCAL | Mechanical Brush | ||
| Protective Gloves | LOCAL | Protective Gloves | ||
| Vacuum | LOCAL | Vacuum | 1 | |
| Vibration peening equipment | LOCAL | Vibration peening equipment |
Consumables, Materials and Expendables
| Name | Manufacturer | Part Number / Identification | Quantity | Remark |
|---|---|---|---|---|
| DELETED | LOCAL | DELETED | ||
| CoMat 07-038 AIR DRYING ENAMEL | k3504 | CoMat 07-038 | ||
| CoMat 10-077 APPROVED ENGINE OILS | X333X | CoMat 10-077 |
Spares
NONESafety Requirements
NONEProcedure

CAUTION
MAKE SURE THAT THE TOOL FACES AND COMPONENT FACES THAT TOUCH ARE CLEAN AND ARE NOT DAMAGED. DIRTY OR DAMAGED SURFACES CAN CAUSE INCORRECT INDICATIONS AND CAN DAMAGE COMPONENTS.
CAUTION
REPLACE DAMAGED CLAMPING ELEMENTS. DAMAGED CLAMPING ELEMENTS CAN CAUSE DAMAGE TO THE STATOR VANES DURING THE GRINDING PROCEDURE.NOTE
Rotor paths must be machined before fitting the mechanical clamping tools.Make sure that the rubber protection faces of the clamping elements (part of the IAE 1R19837 TBD) are clean and free of damage. Damaged rubber protection faces can cause the metal parts of the clamping elements to touch the stator vanes. If the metal parts of the clamping element touch the stator vanes, they can cause damage.
Make sure that the screws (part of IAE 1R19837 TBD) that adjust the clamping elements have been screwed out to the mechanical stops. Do not turn the screws past the mechanical stop.
Examine the clamping elements before use.
Install the stage 11 clamps (part of the IAE 1R19837 TBD) below the stage 11 vanes. Install the clamp 1 first, clamp 2 second and then clamp 3 last.
Use the detachable screw in handles (part of the IAE 1R19837 TBD) for easy loading.
Install the clamping elements between stages 7 through 11 stator vanes.
SUBTASK 72-41-20-440-296 Install the Clamping Tool for Rear Case HP Compressor Stages 7 to 11

CAUTION
YOU MUST MAKE SURE THAT THE TOOL FACES AND COMPONENT FACES THAT TOUCH ARE CLEAN AND ARE NOT DAMAGED. DIRTY OR DAMAGED SURFACES CAN CAUSE INCORRECT INDICATIONS AND CAN DAMAGE COMPONENTS.
CAUTION
YOU MUST REPLACE DAMAGED CLAMPING ELEMENTS. DAMAGED CLAMPING ELEMENTS CAN CAUSE DAMAGE TO THE STATOR VANES DURING THE GRINDING PROCEDURE.
CAUTION
YOU MUST REPLACE CENTRALISING TYRE. DAMAGED TYRE CAN CAUSE DAMAGE TO THE STATOR VANES.Install the centralising pillar (part of the IAE 1R19836 TBD) on the draw bar.
Install the spider (part of the IAE 1R19836 TBD) on the setting bush for stage 11 with the four arms inward.
Carefully collapse the centralising ring tyre (part of IAE 1R19836 TBD) after removal of the round up ring (part of the IAE 1R19836 TBD) and insert into case, resting onto the four spider arms.

WARNING
DO NOT INFLATE AIR CENTRALISING RING TYRE TO MORE THAN 3.5 BAR (51 PSI). IF YOU PUT TOO MUCH PRESSURE IN THE TYRE, THE TYRE CAN EXPLODE. AN EXPLOSION CAN CAUSE INJURY TO PERSONNEL AND DAMAGE EQUIPMENT.Connect the air line and pressure gauge to the tyre of centralising ring and inflate to a maximum pressure of 3.5 bar (51 PSI).
Tighten the bolts (part of IAE 1R19836 TBD) on the stage 7 clamps with the power driver.
SUBTASK 72-41-20-440-297 Install the Centralising Tool for rear Case HP Compressor Stages 7 to 11
Install IAE 1R18413 Turnover stand adaptor1 off, on to IAE 1R18321 Turnover stand 1 off.
Install IAE 1R18412 Turning fixture 1 off, to the turnover stand adapter.
SUBTASK 72-41-20-440-229 Prepare the Tools to Turn the HP Compressor Rear Cases and Vanes from the Horizontal to the Vertical
Align the four holes in the lifting tool with four holes in the front support cone HPC Ring Cases And Related Parts (72-41-21,03-300) outer flange. Use the bolt holes that are on each side of a location dowel hole.
Install the IAE 1R18416 Lifting tool 1 off to the front support cone HPC Ring Cases And Related Parts (72-41-21,03-300).
Carefully lower the HP compressor rear cases and vanes in to the turning fixture. Engage the 10 dowels in the turning fixture with the 10 dowel locating holes in the front support cone outer flange. There is a dowel location hole on each of the legs of the lifting tool. These must be located on two of the dowels on the turning fixture.
Install the 10 clamps removed in Step. Tighten the 10 nuts in sequence.
Install the HP compressor rear cases and vanes in to the tools assembled in Step.
SUBTASK 72-41-20-440-230 Install the HP Compressor Rear Cases and Vanes in the Turning Fixture
Refer to Figure.
Install the four bolts removed in step Step.
Install the IAE 3R18232 Lifting beam 1 off to the IAE 1R18412 Turning fixture 1 off.
Adjust the hoist used in step Step until it just holds the weight of the turning fixture and the HP compressor rear cases and vanes.
Use the hoist and remove the turning fixture with the HP compressor rear cases and vanes from the turnover stand adapter. Carefully lower the assembly in to the IAE 1R18415 Pallet 1 off.
Lift the HP compressor rear cases and vanes.
SUBTASK 72-41-20-440-231 Install the HP Compressor Rear Cases and Vanes in the Pallet
Attach the IAE 1R18760 Grinding head 1 off to the machine. Use a correct adapter plate.
Attach the IAE 1R18420 Dressing attachment 1 off to the grind attachment on the machine and safety with the four set screws.
Set the dressing angle. Use IAE 1R18806 Setting piece 1 off, IAE 1R18807 Setting piece 1 off, IAE 1R18808 Setting piece 1 off, or IAE 1R18809 Setting piece 1 off. Refer to IAE 1R18700 Machine drawing 1 off for correct setting block.
Attach the IAE 1R18421 Diamond dresser 1 off to the dressing attachment and safety with the set screw.
Attach the IAE 1R18422 Support probe bracket 1 off to the grind attachment. Position the support probe bracket behind the dressing attachment and safety with the four set screws.
Attach the IAE 1R18418 Multiflex holder 1 off at the locating slot on the support probe bracket and safety with the three set screws.
Set up the universal machining centre.
To measure the stage 7 to 11 stator vanes attach the IAE 1R18419 Probe holder 1 off at the multiflex holder interface and safety with the allen screw.
Use a Vacuum adjacent to the grinding wheel to remove the dust during the grinding process.
SUBTASK 72-41-20-324-056 Machine the Stage 7 to 11 Stator Vanes
Attach the IAE 1R18414 Boring bar 1 off to the machine tool post and safety with the three set screws.
Attach the IAE 1R18418 Multiflex holder 1 off at the locating slot on the boring bar and safety with the three grub screws.
Attach the IAE 1R18430 Turning holder 1 off to the multiflex holder interface and safety with the allen screw.
Set up the universal machining centre.
To measure the rotor path rings remove the turning holder and install the IAE 1R18419 Probe holder 1 off to the multiflex holder interface and safety with the allen screw.
NOTE
Only remove the minimum quantity of abradable lining to show the metal of the rotor path at the front and rear of the liner.Use a Vacuum adjacent to the grinding wheel to remove unwanted material from accumulating during the grinding procedure.
Remove the unwanted material and the machine cusps after you have machined the rotor path rings.
Put the HP compressor rear cases and vanes in to IAE 1R18415 Pallet 1 off.
SUBTASK 72-41-20-440-214 Machine the Stage 7 to 12 Rotor Path Rings and Rotor Path Case Assemblies
Refer to Figure.
Install the IAE 1R18416 Lifting tool 1 off.
SUBTASK 72-41-20-440-234 Prepare the HP Compressor Rear Cases and Vanes to be Cleaned
Use a Vacuum to remove any loose swarf or dust which may have accumulated during the grinding process.
Aqueous degrease the HP compressor rear case and vanes by TASK 70-11-03-300-503.
SUBTASK 72-41-20-110-056 Clean the HP Compressor Rear Cases and Vanes
Refer to Figure.
Install the IAE 1R18212 Support ring 1 and the IAE 1R18417 Lifting Turnover trunnions 2 off, on the front support cone.
Attach the IAE 1R18431 Lifting beam 1 off on a correct hoist to the lifting turnover trunnions.
SUBTASK 72-41-20-440-235 Install the HP Compressor Rear Cases and Vanes on to the Support Rings
Figure: View through the HP CompressorRear Cases and Vanes
View through the HP CompressorRear Cases and Vanes
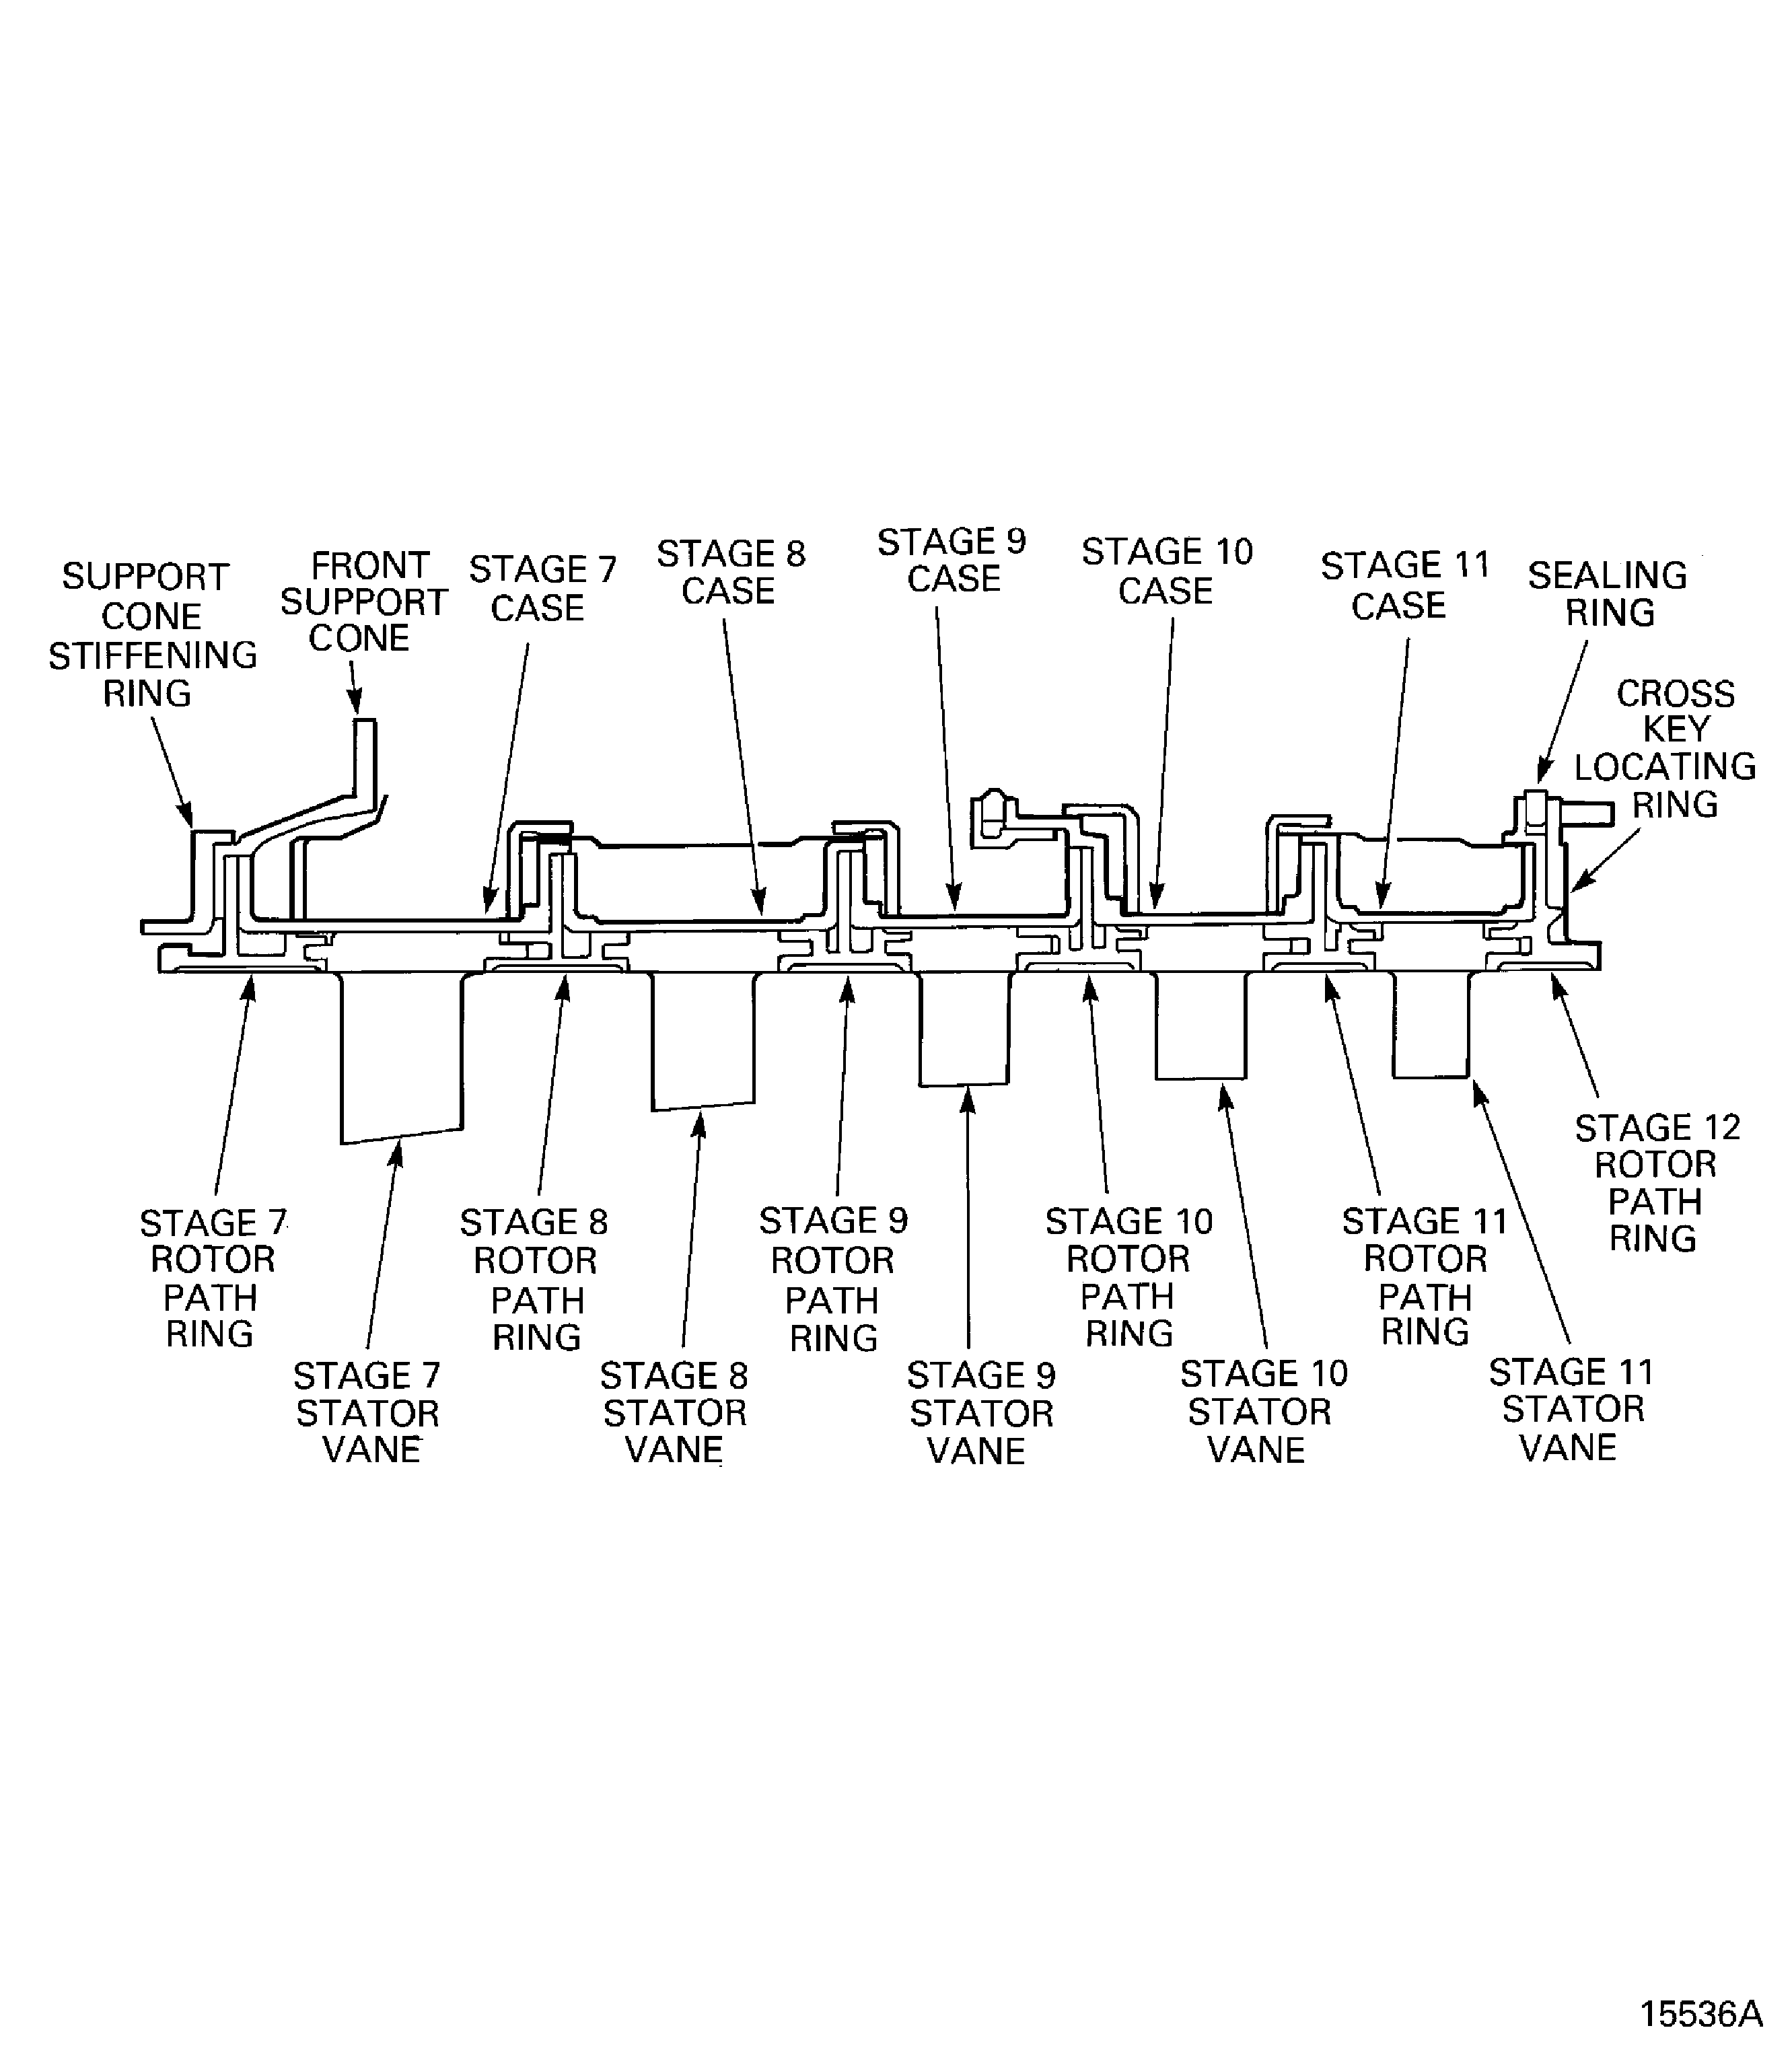
Figure: Install the Clamping Tool
Install the Clamping Tool

Figure: Install the Clamping Tool
Install the Clamping Tool

Figure: Install the Centralising Tool
Install the Centralising Tool

Figure: Install the Centralising Tool
Install the Centralising Tool
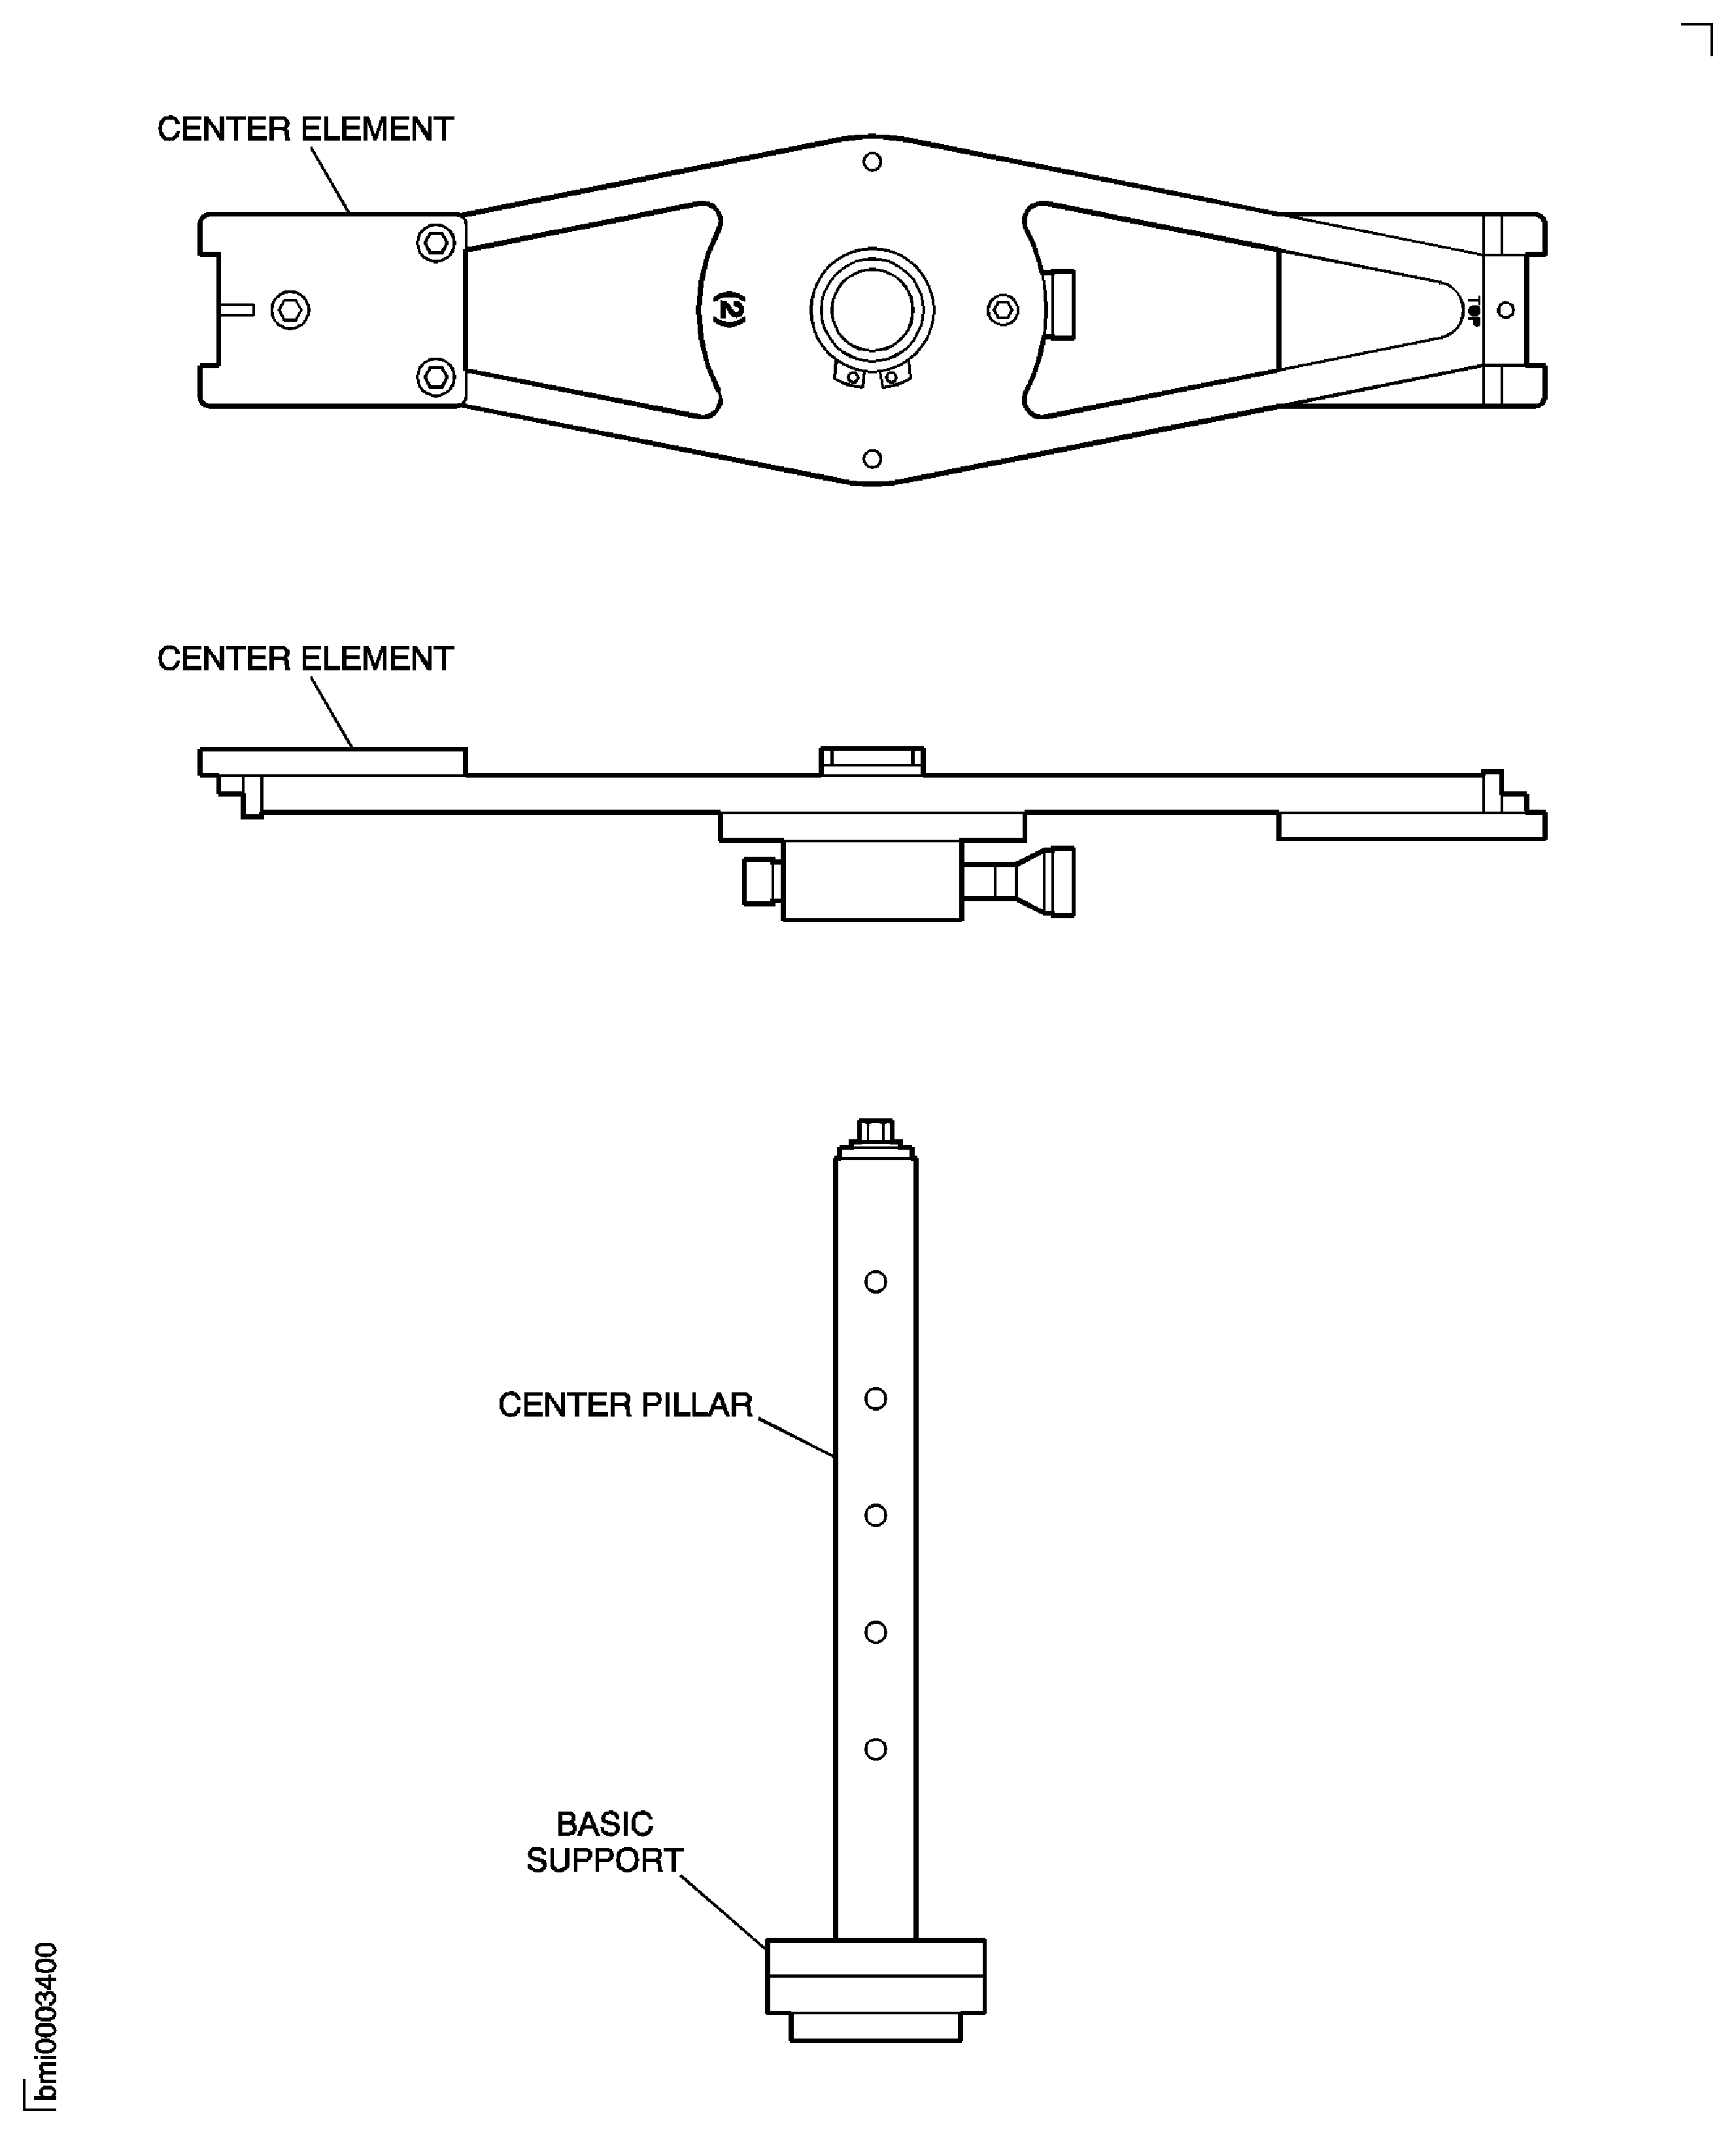
Figure: Install the Centralising Tool
Install the Centralising Tool
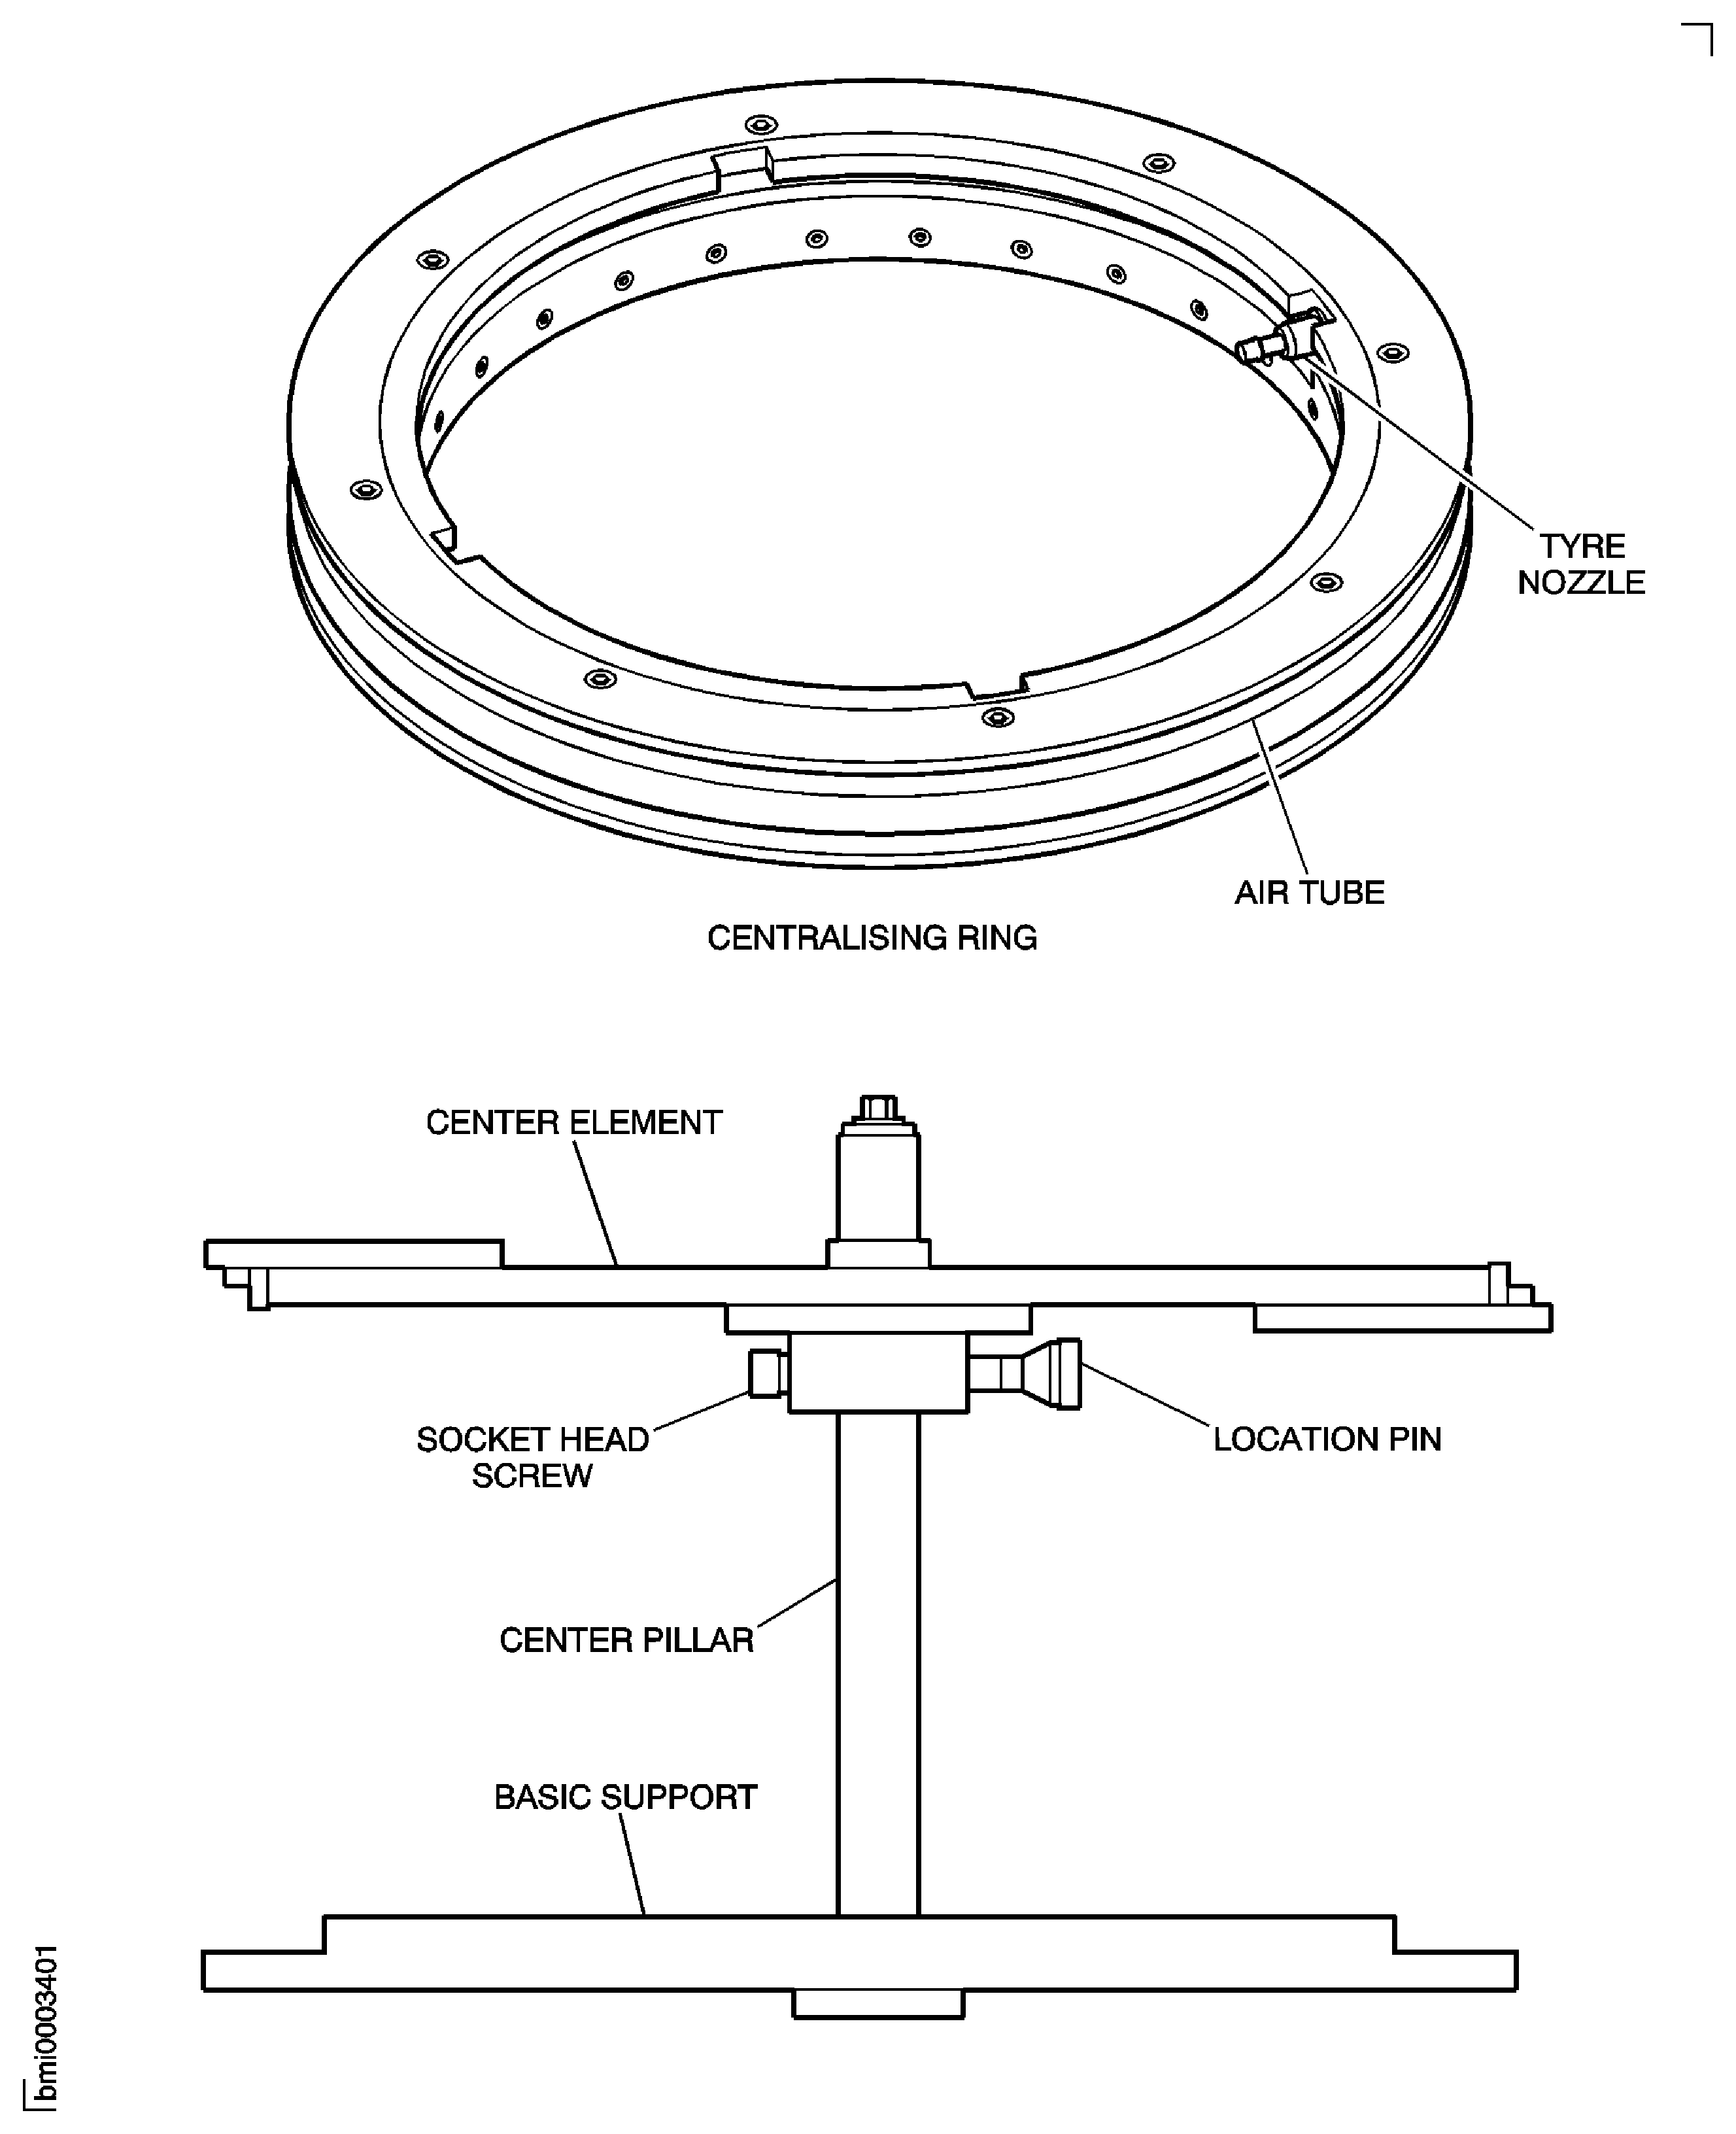
Figure: Install the Centralising Tool
Install the Centralising Tool

Figure: Install the Centralising Tool
Install the Centralising Tool

Figure: Install the Lifting Turnover Trunnions
Install the Lifting Turnover Trunnions
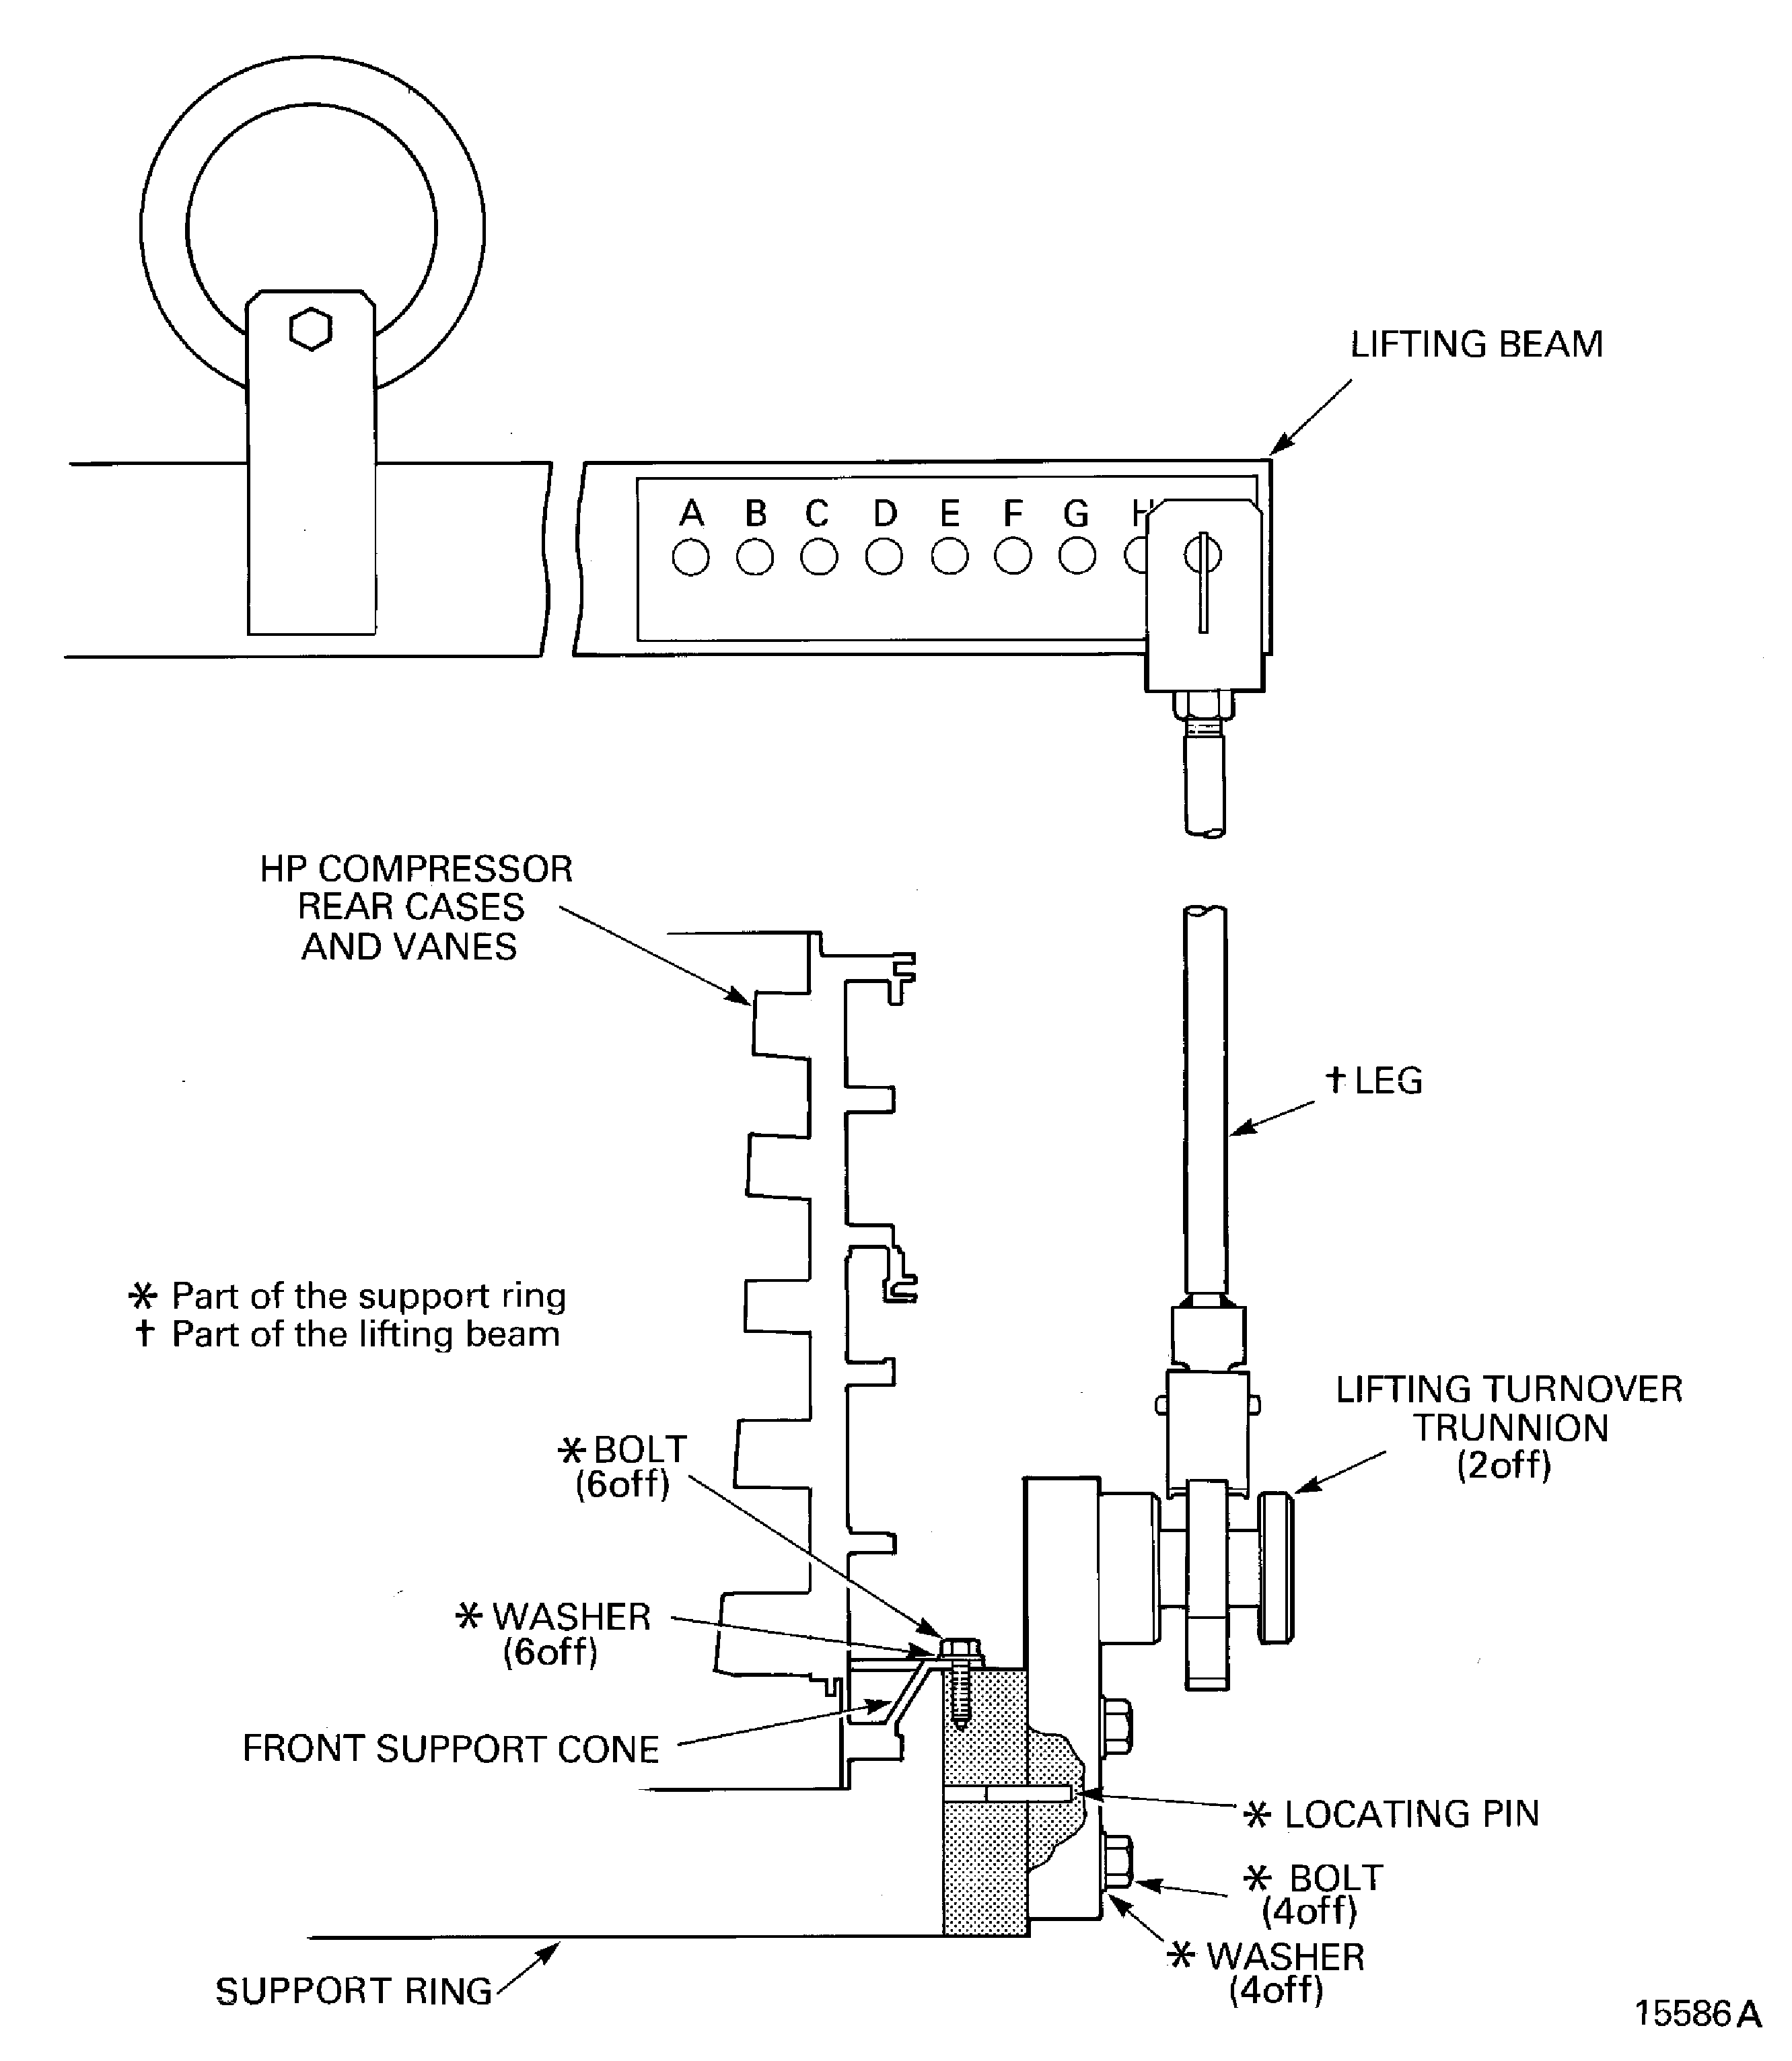
Figure: Prepare the Tools to Turn the HP Compressor Rear cases and Vanes
Prepare the Tools to Turn the HP Compressor Rear cases and Vanes
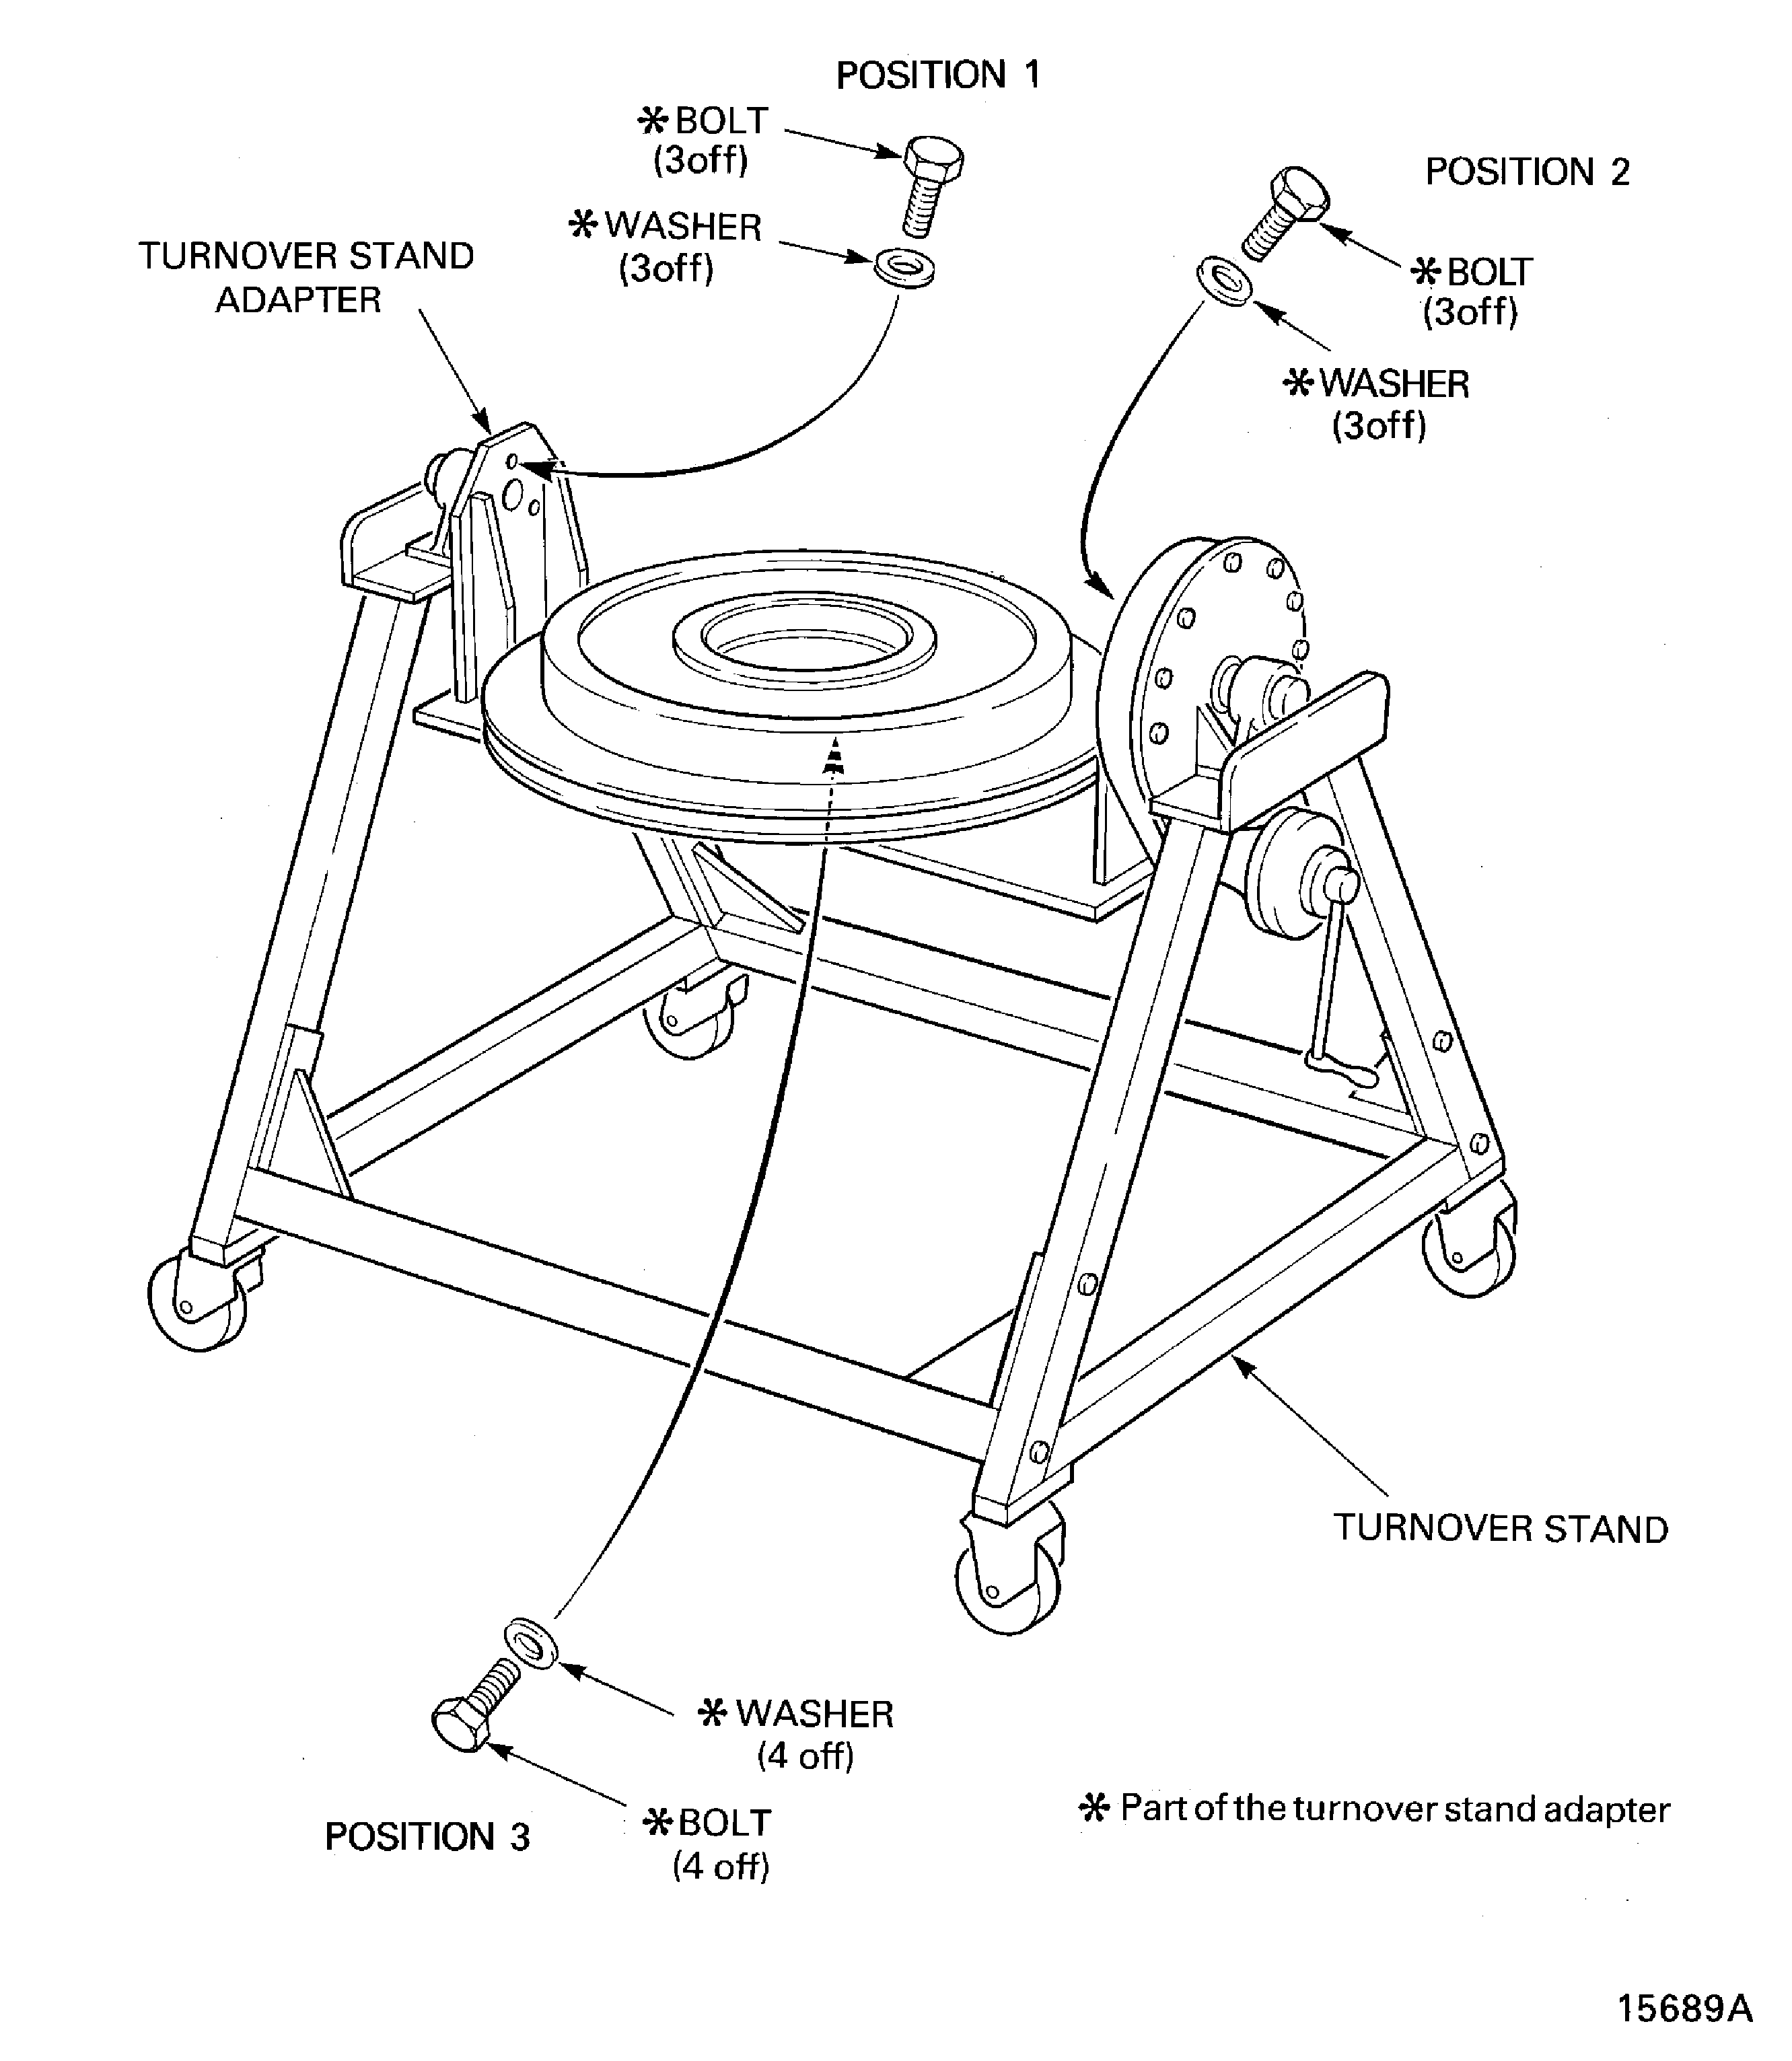
Figure: Install the HP Compressor Rear Cases and Vanes into the Turning Fixture
Install the HP Compressor Rear Cases and Vanes into the Turning Fixture
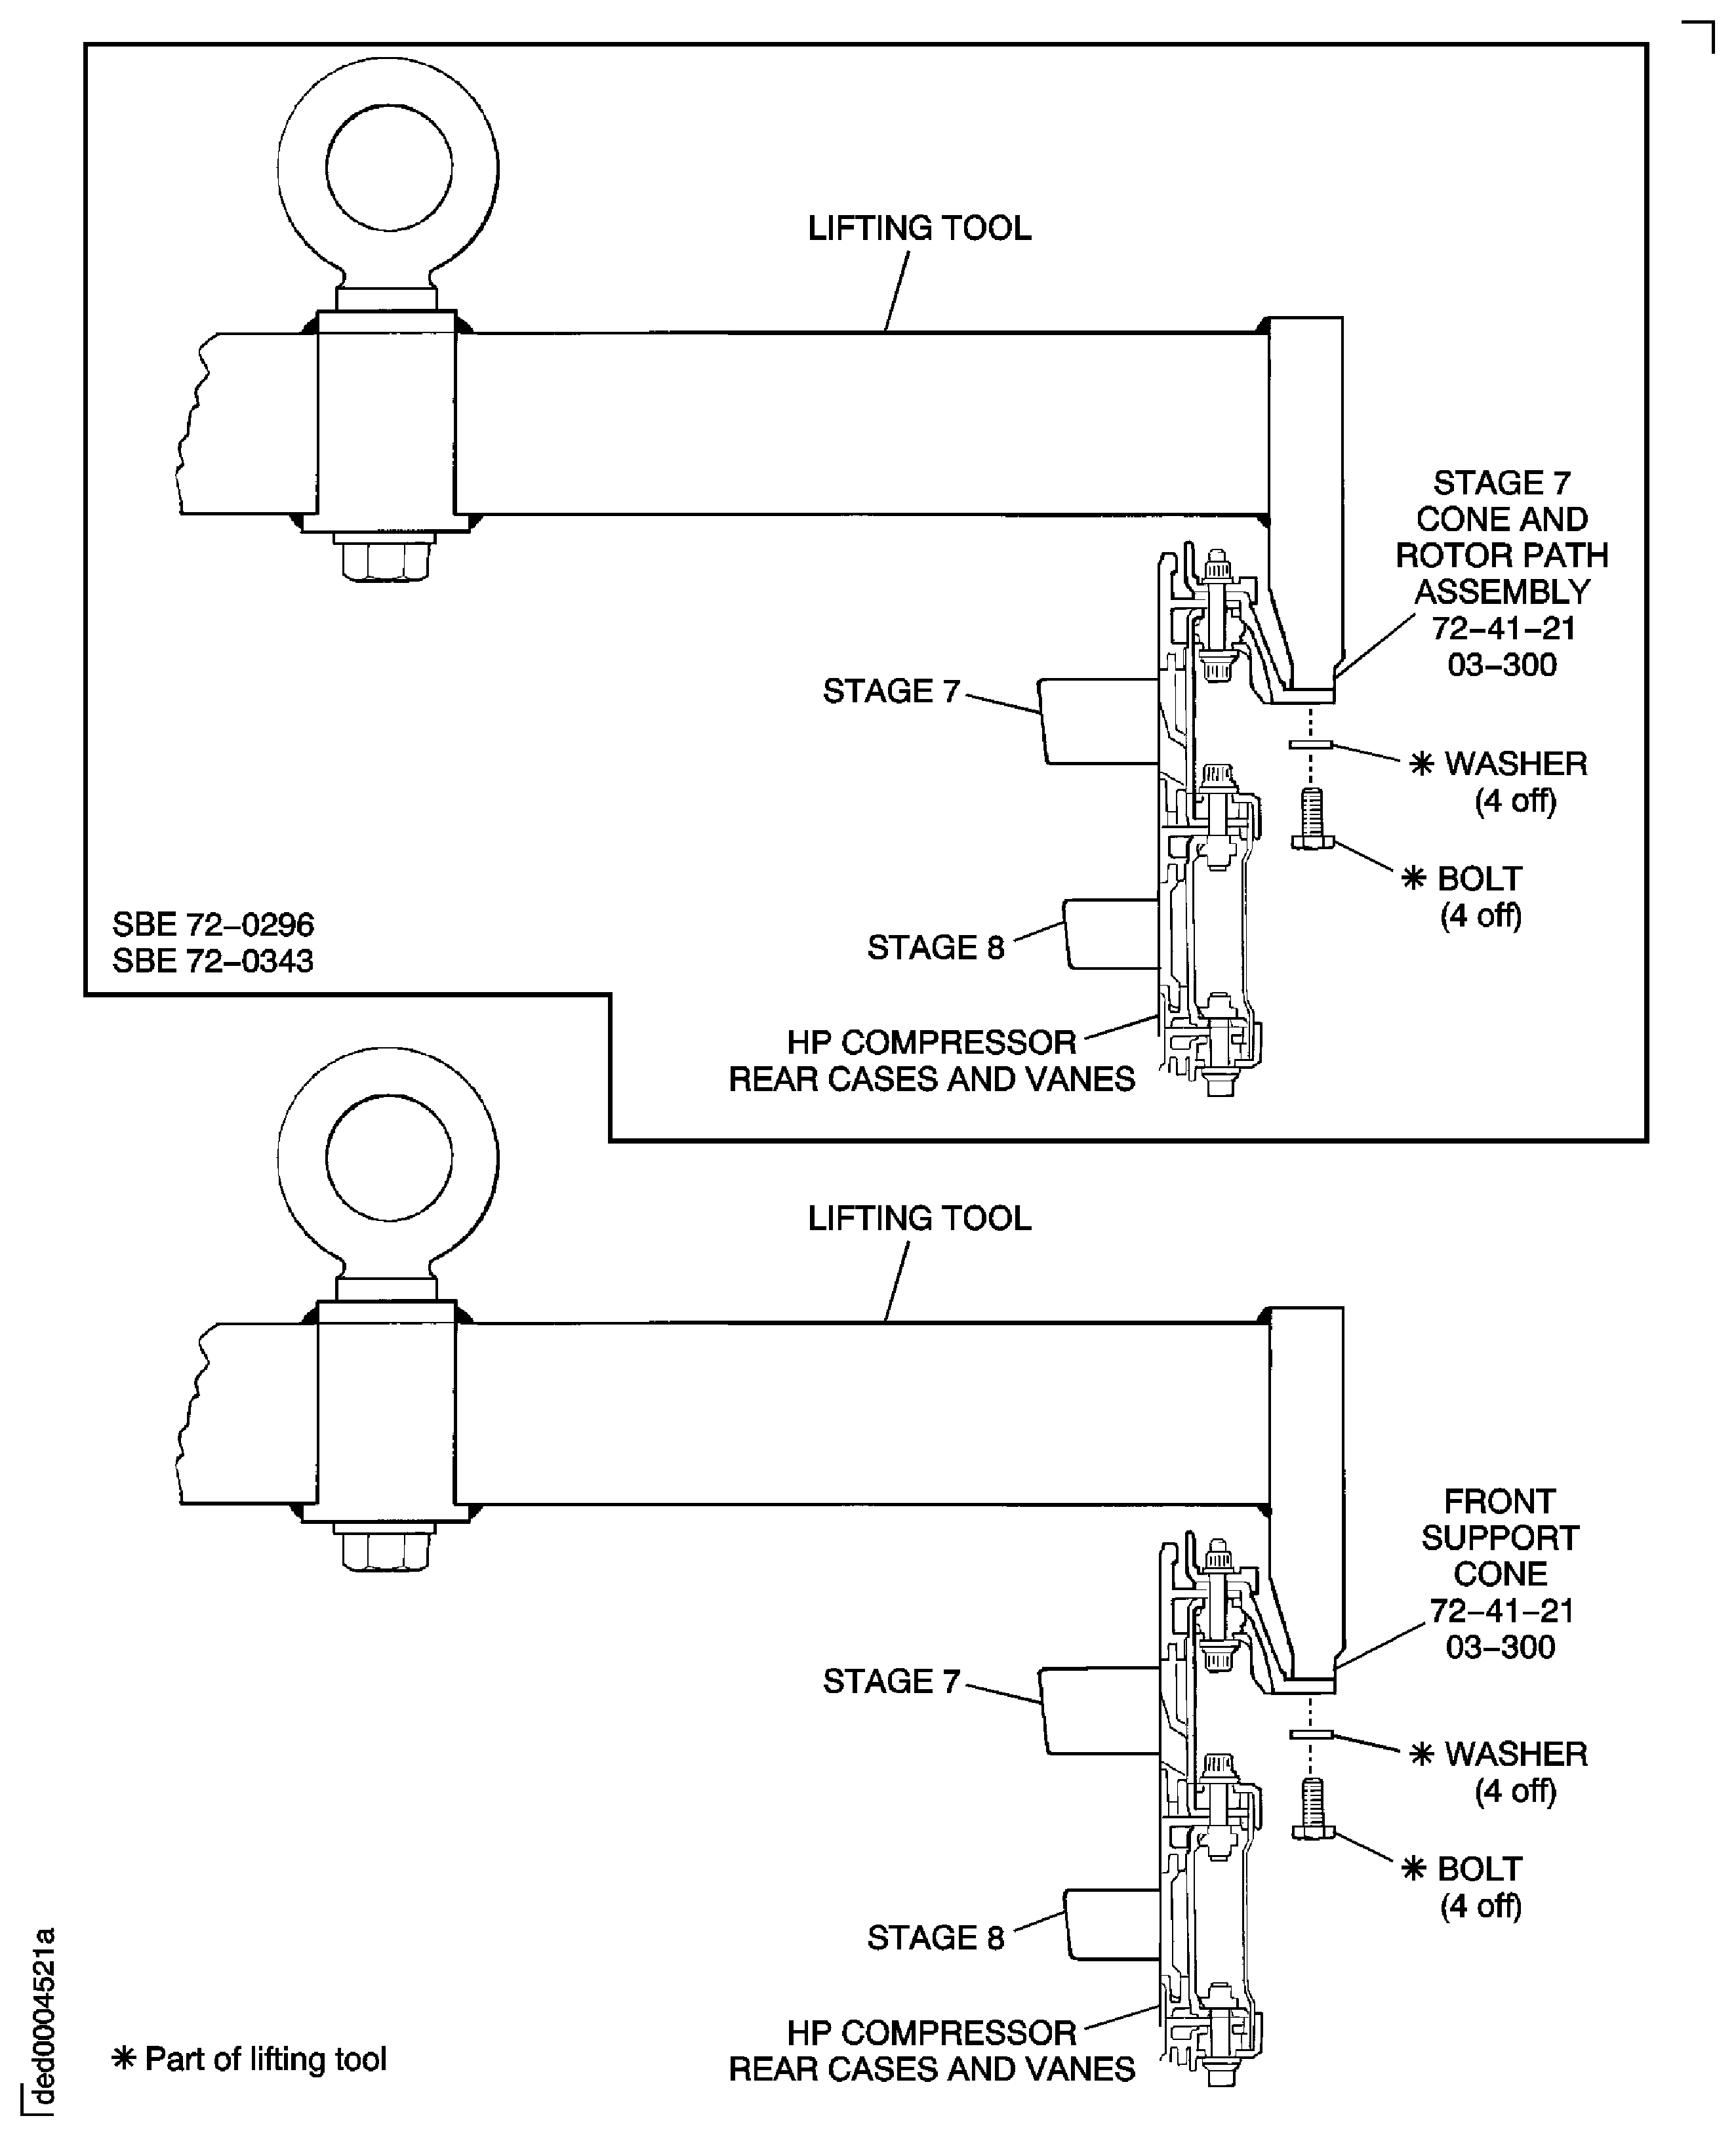
Figure: Install the HP Compressor Rear Cases and Vanes into the Turning Fixture
Install the HP Compressor Rear Cases and Vanes into the Turning Fixture
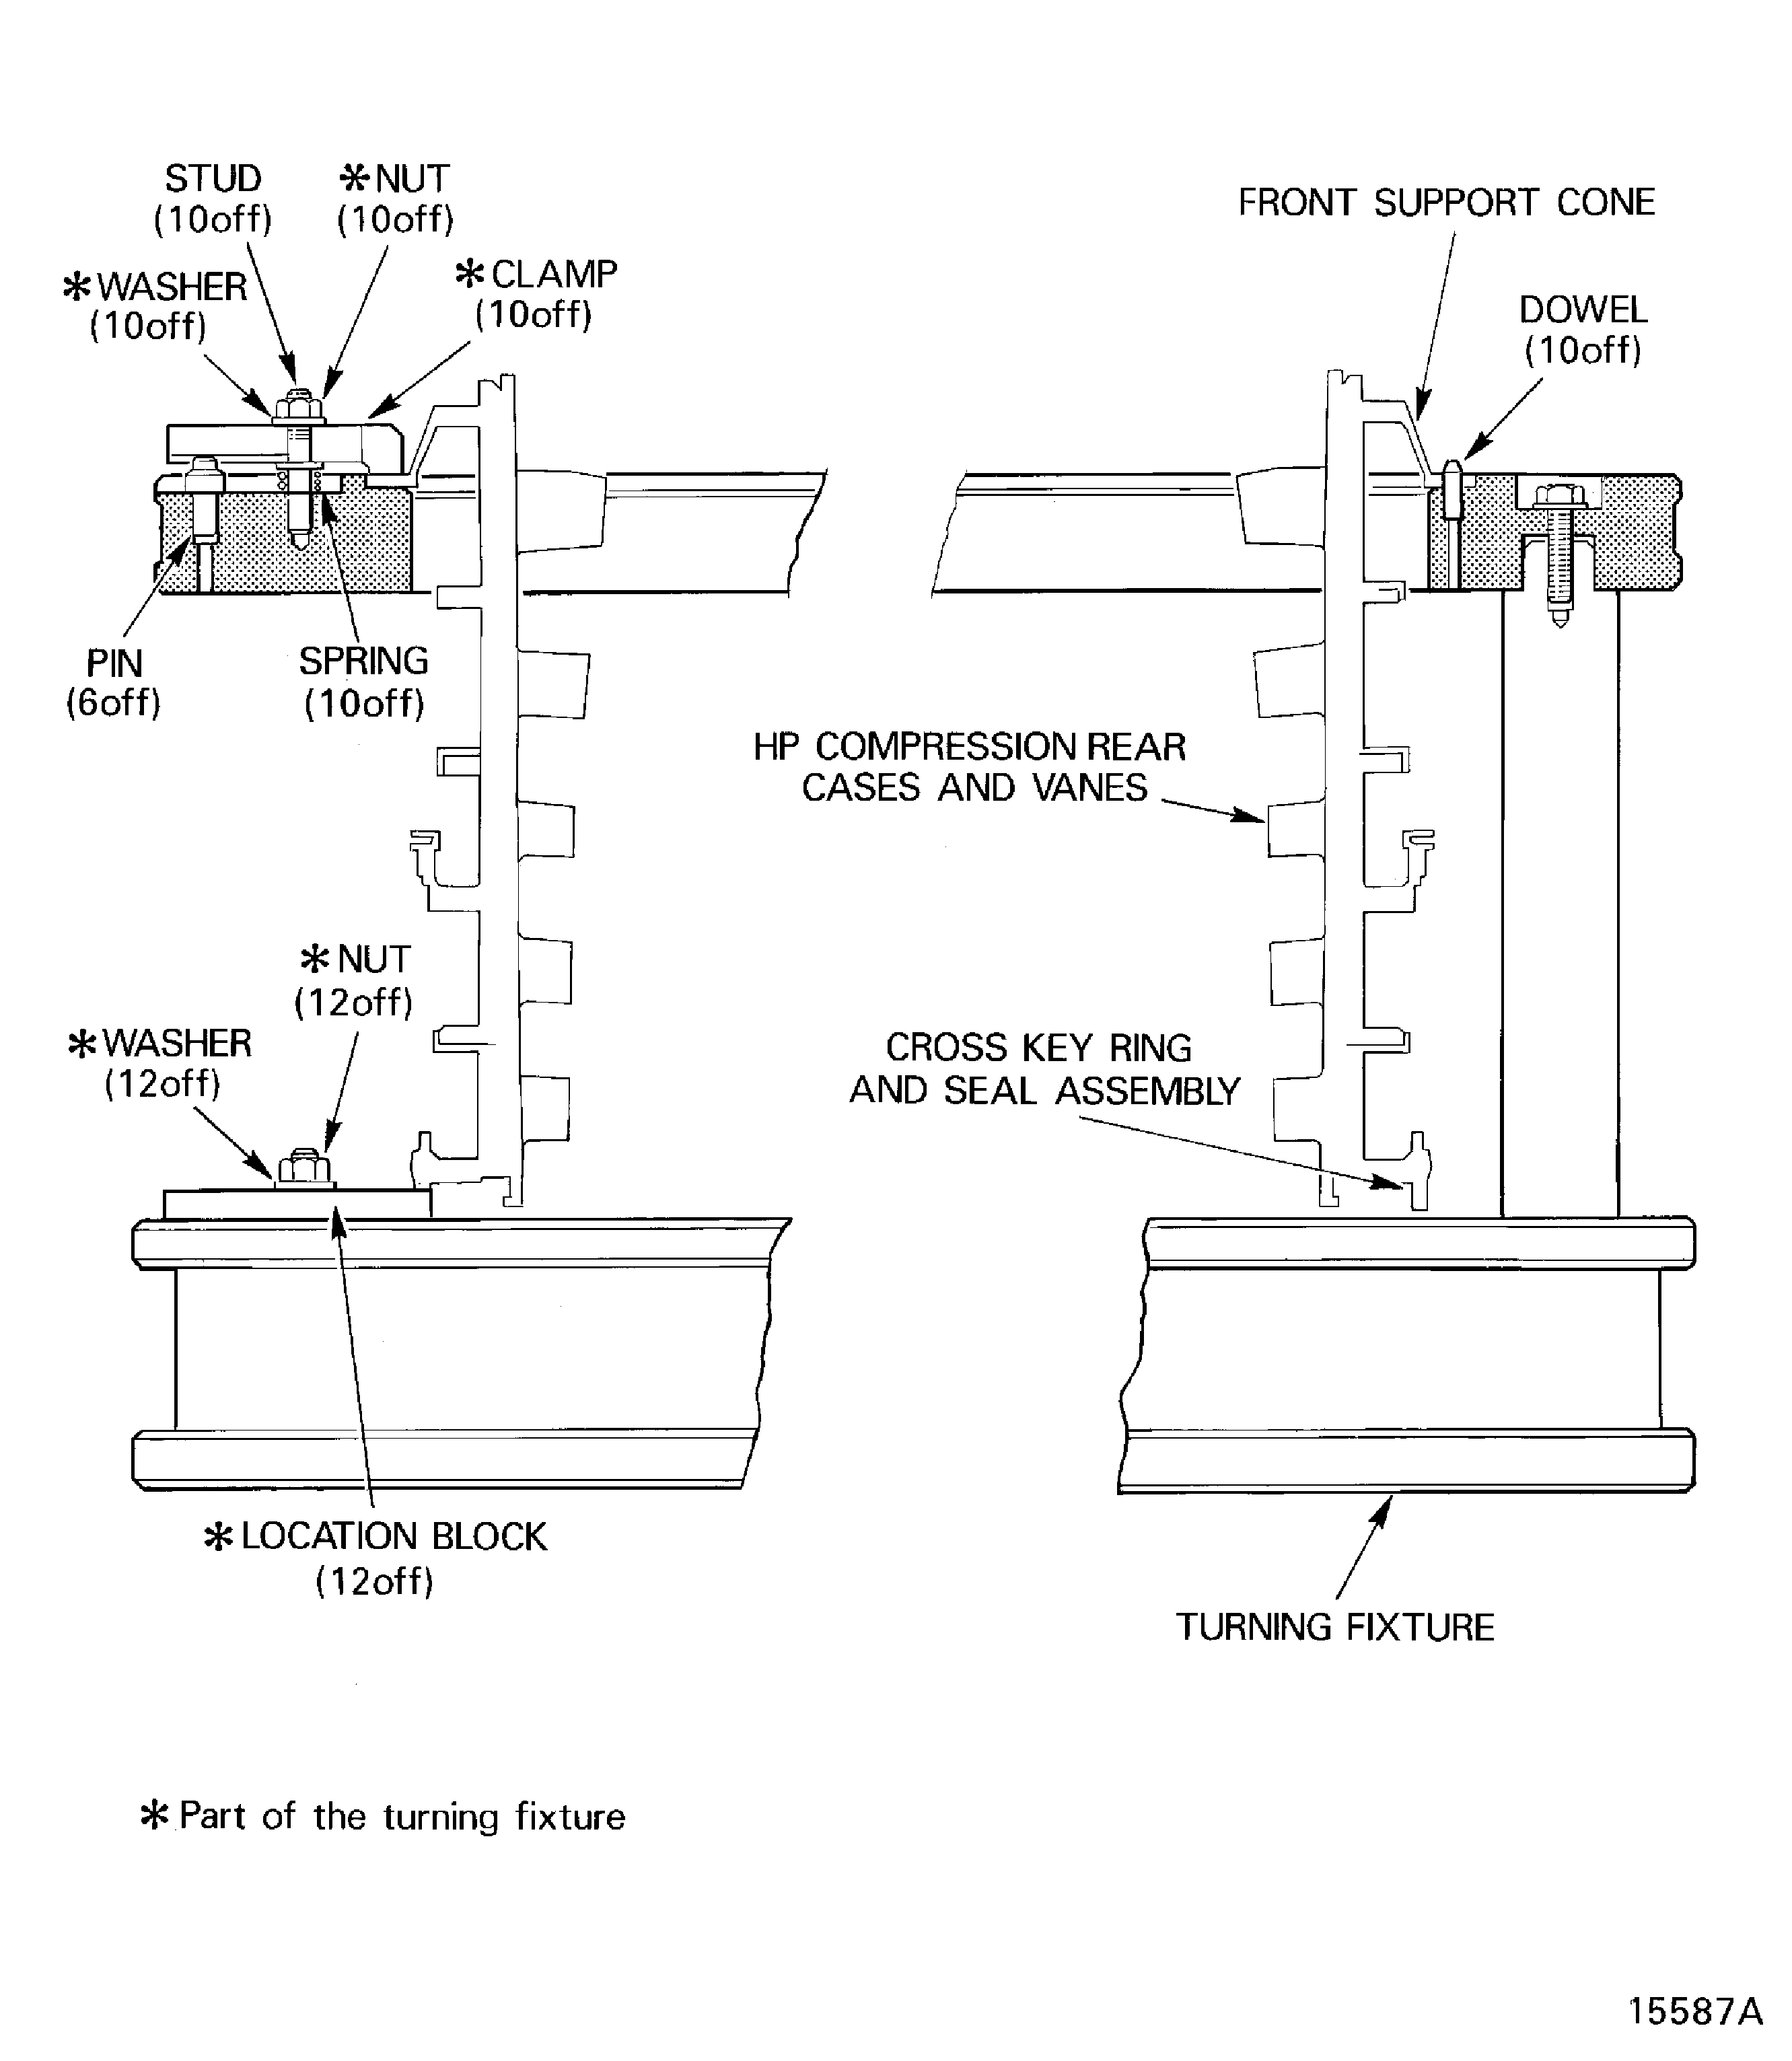
Figure: Move the HP Compressor Rear Cases and Vanesfrom the Turnover Stand to the Pallet
Move the HP Compressor Rear Cases and Vanesfrom the Turnover Stand to the Pallet
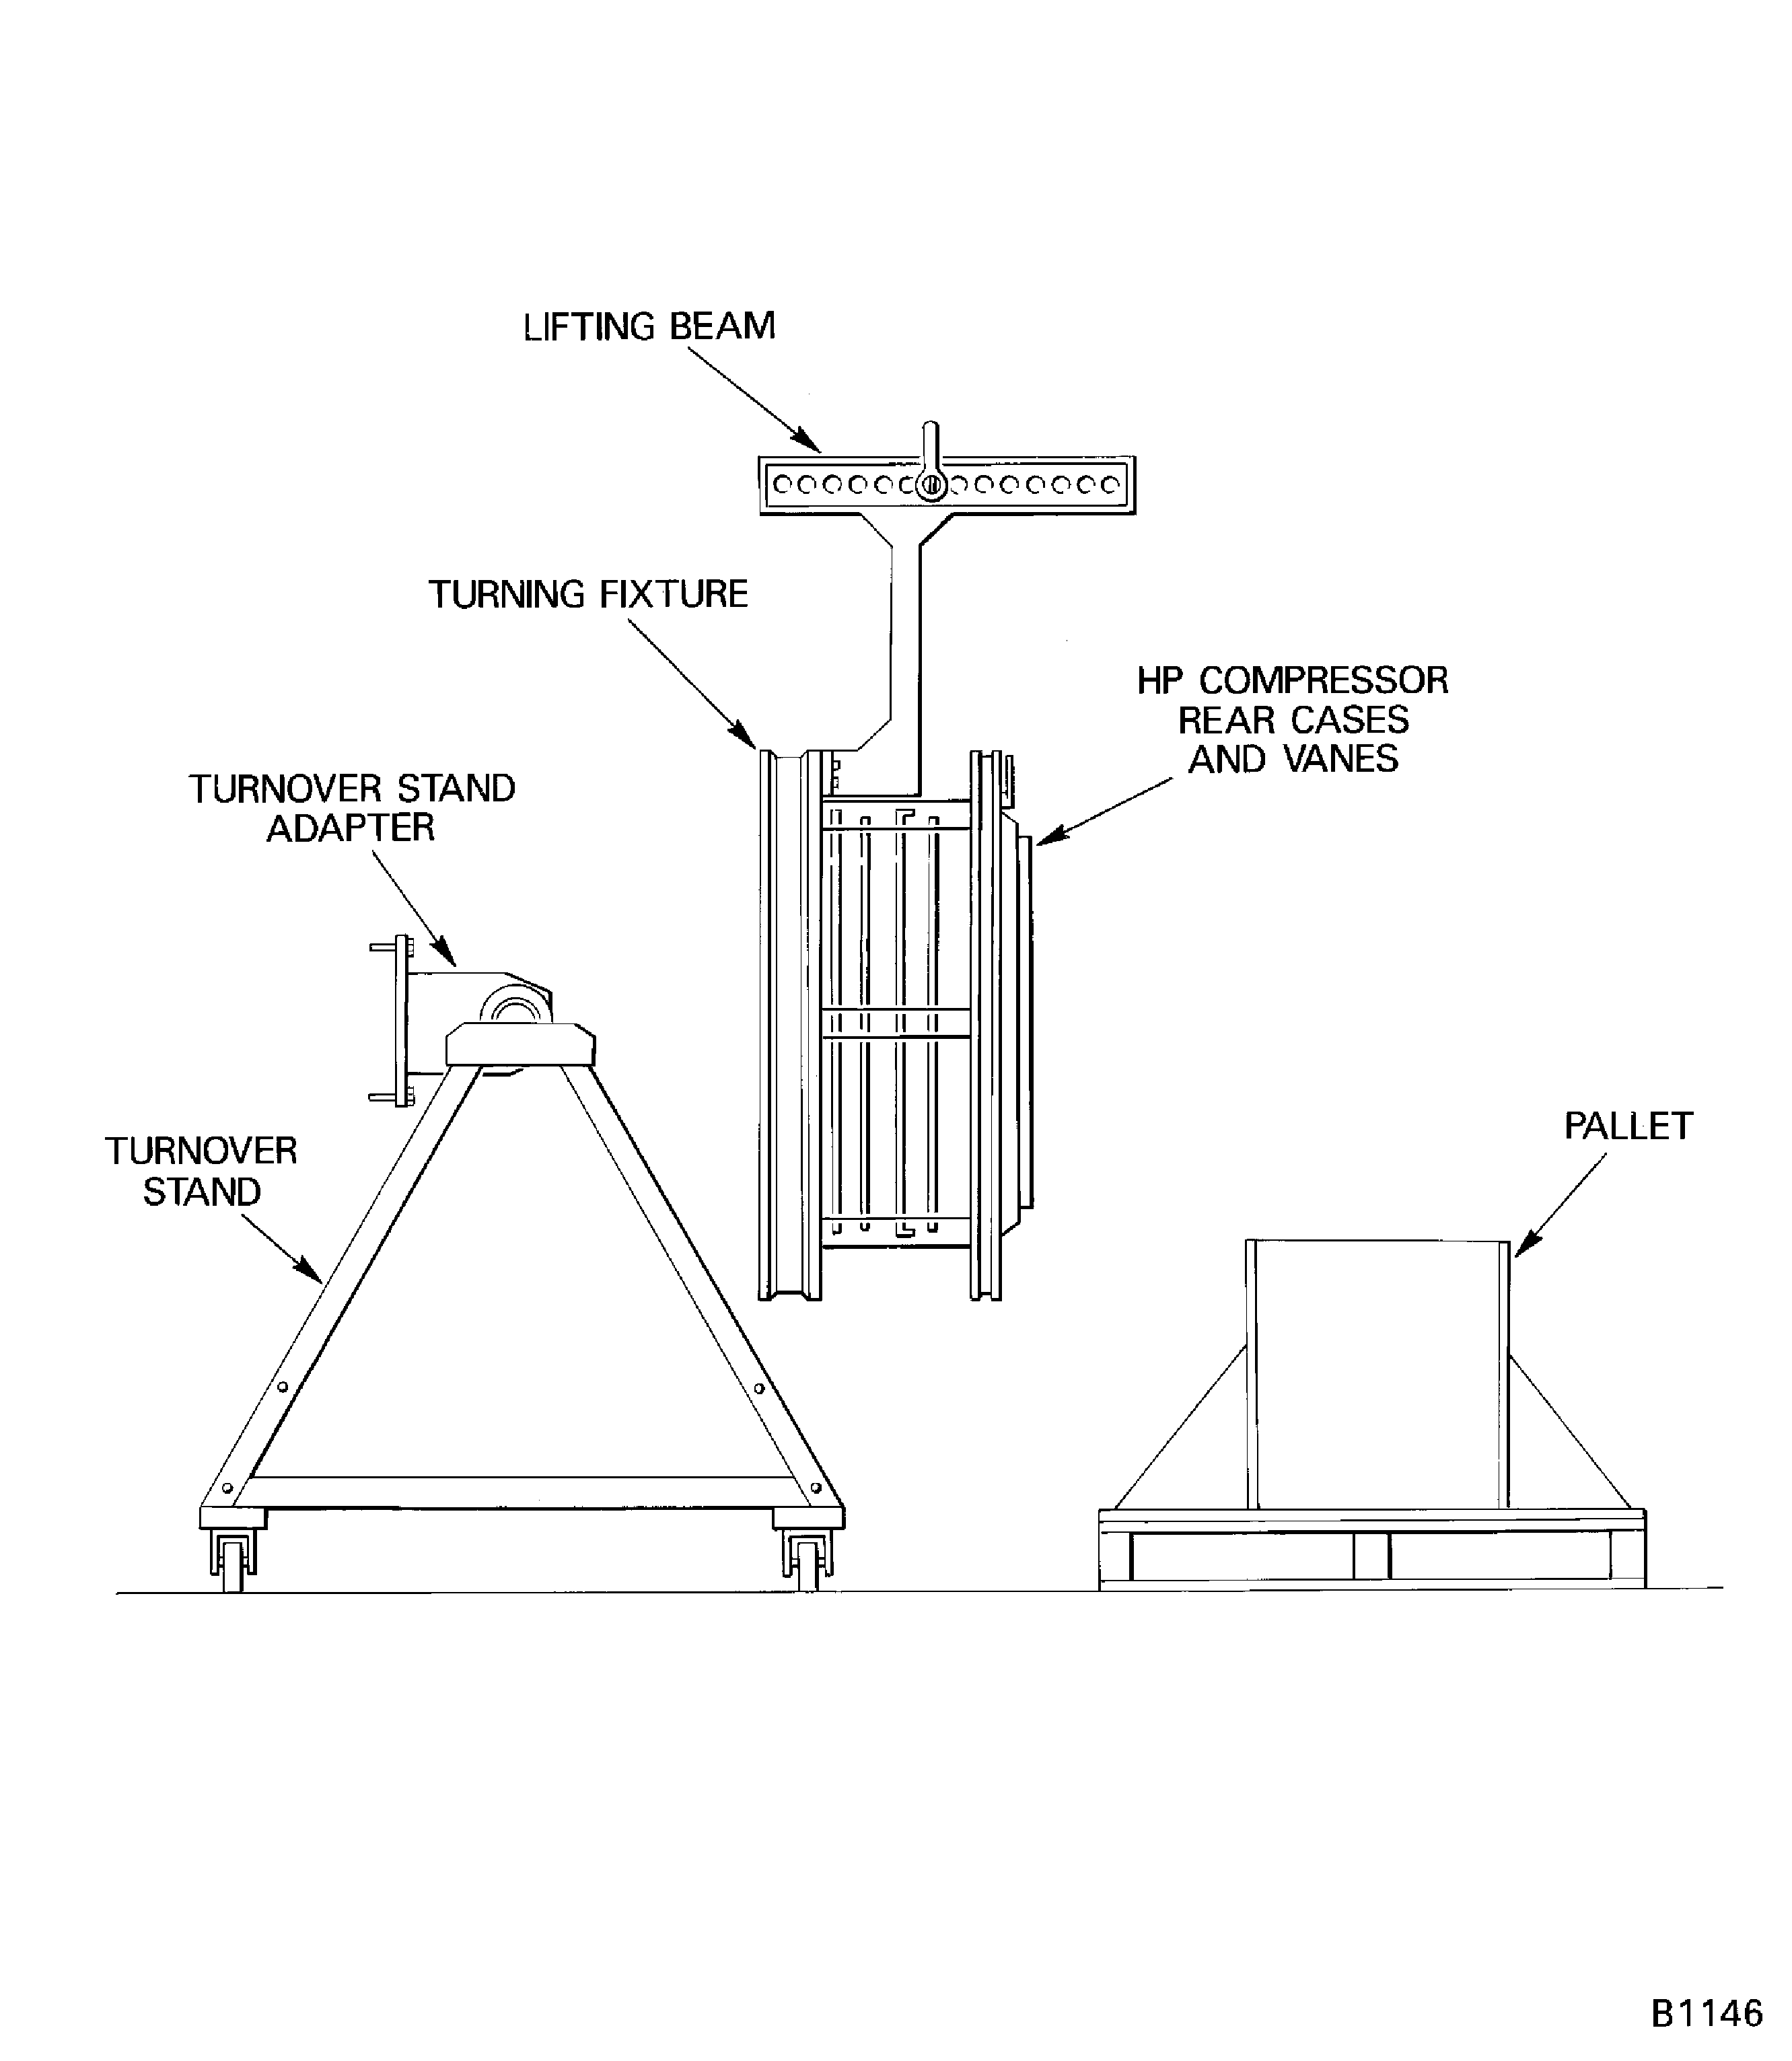
Figure: Machine the stator vane tips
Machine the stator vane tips
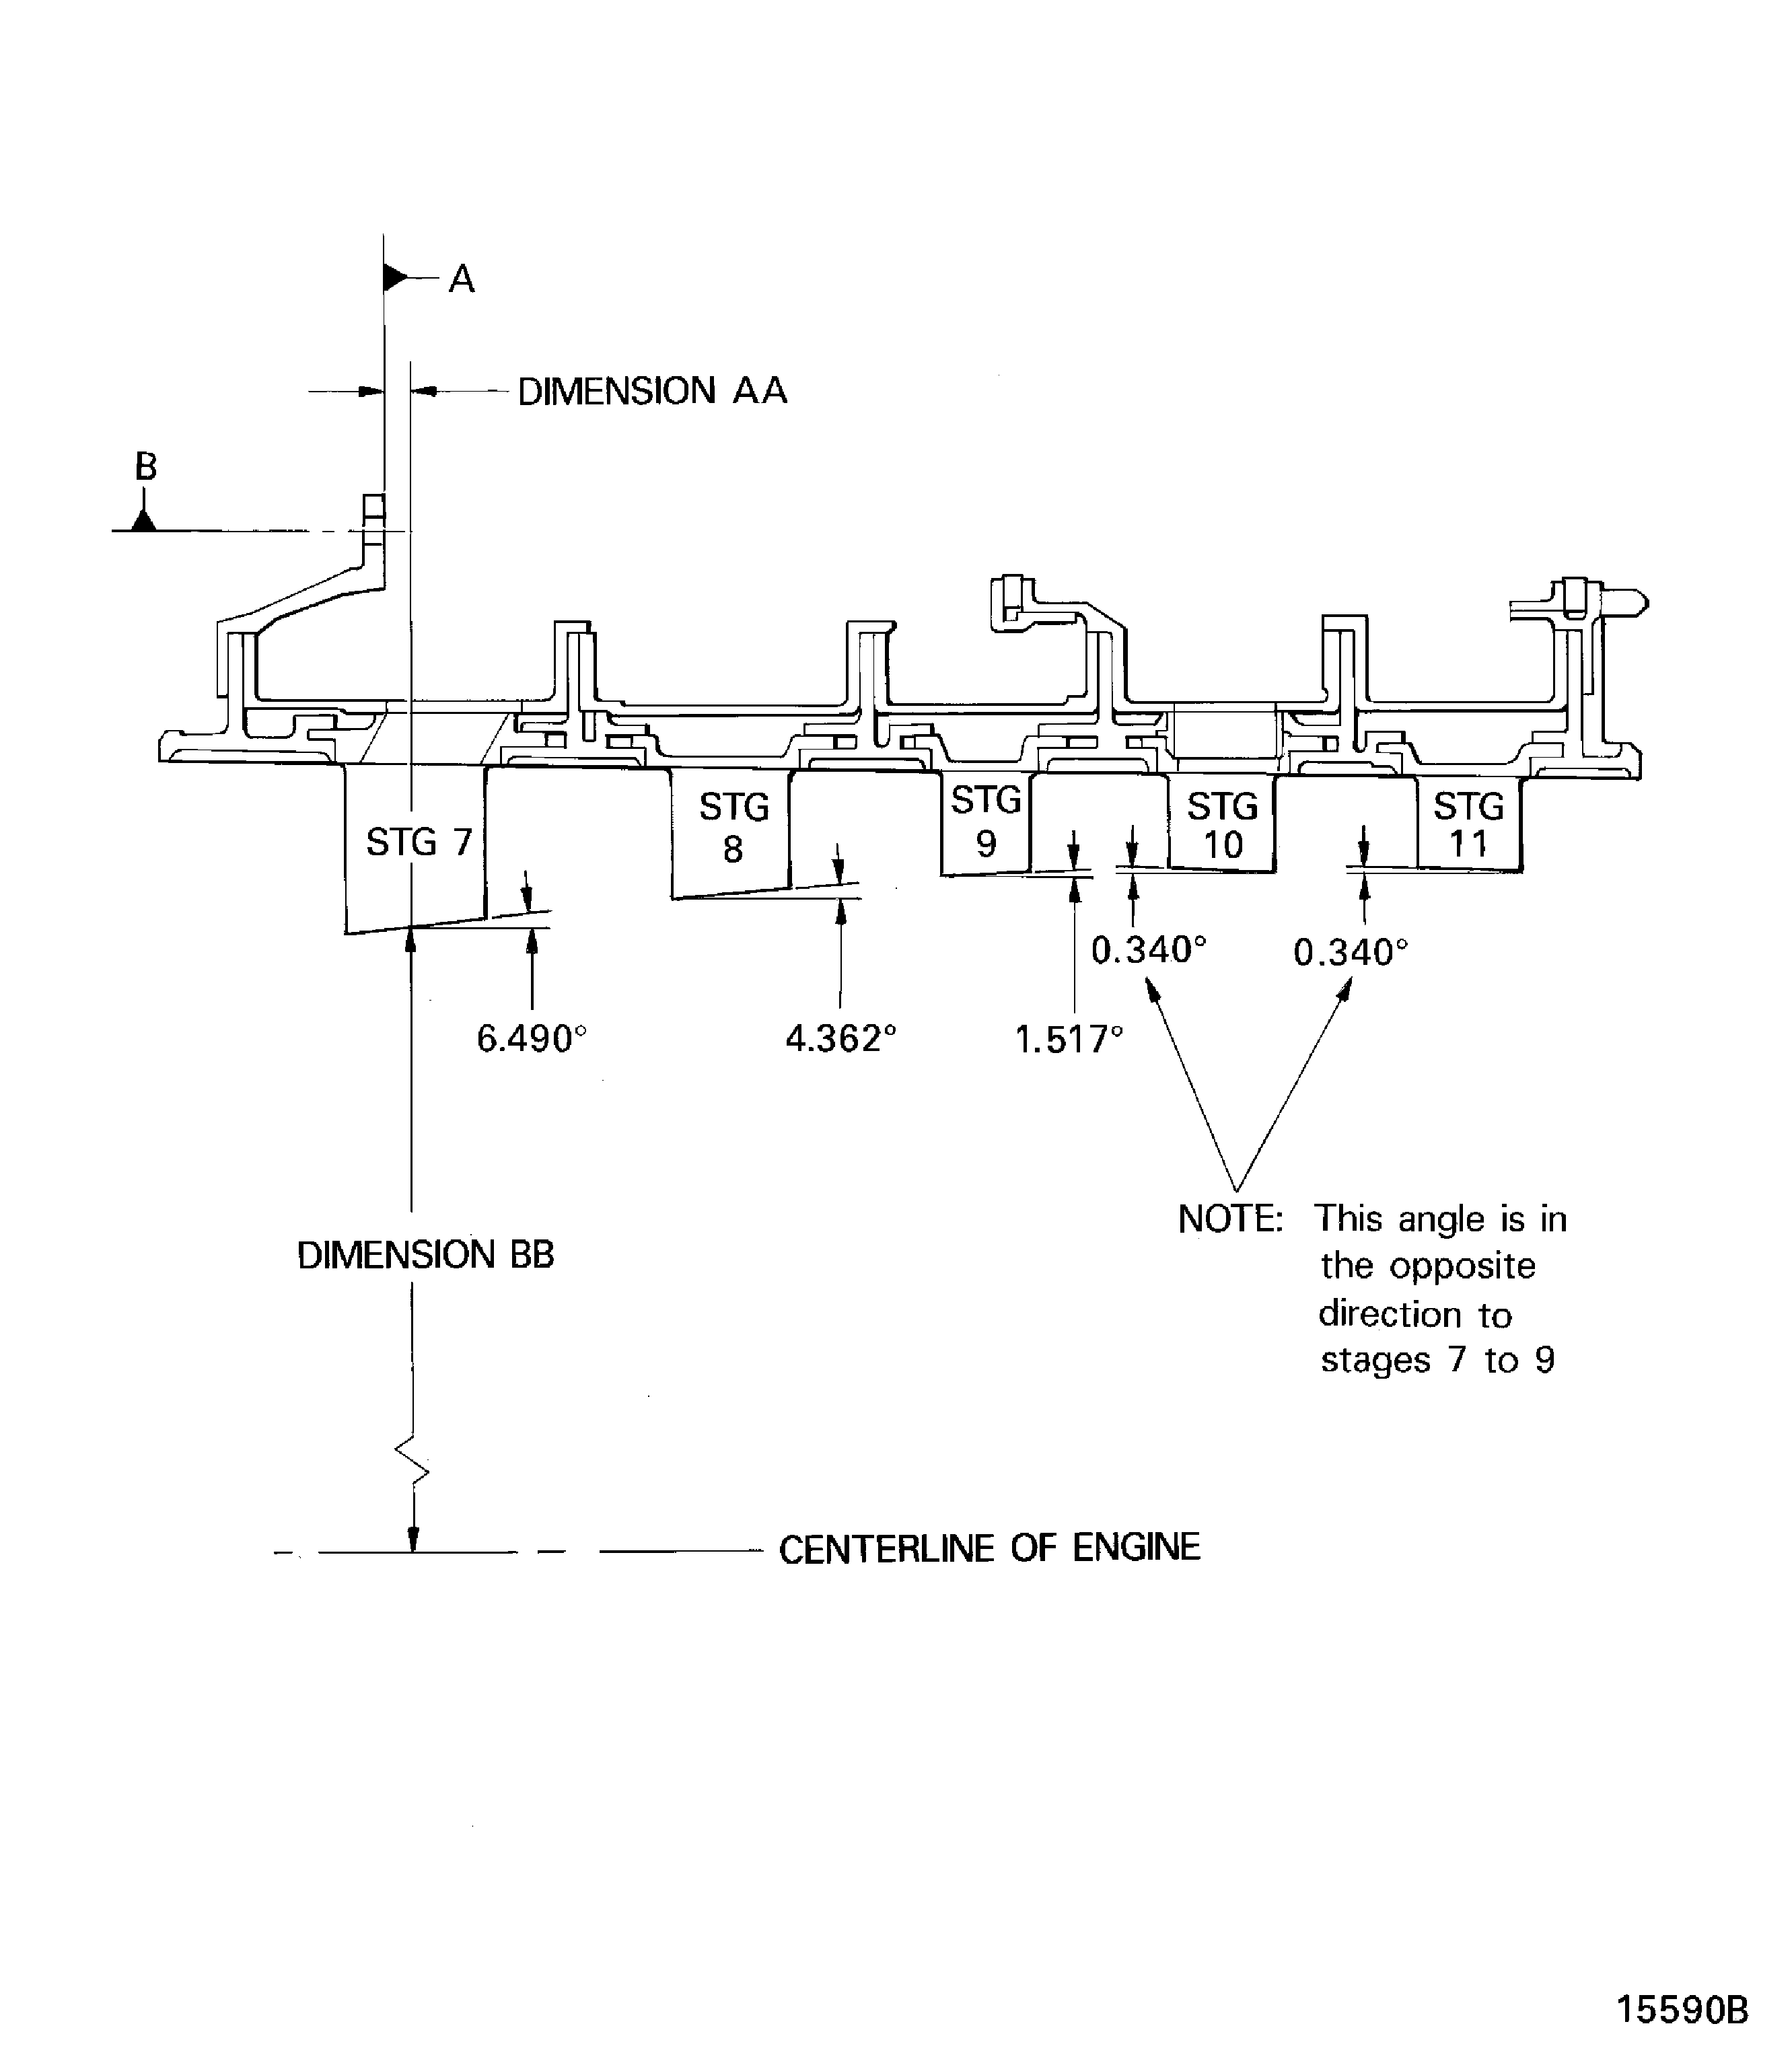
Figure: Machine the stator vane tips
Machine the stator vane tips
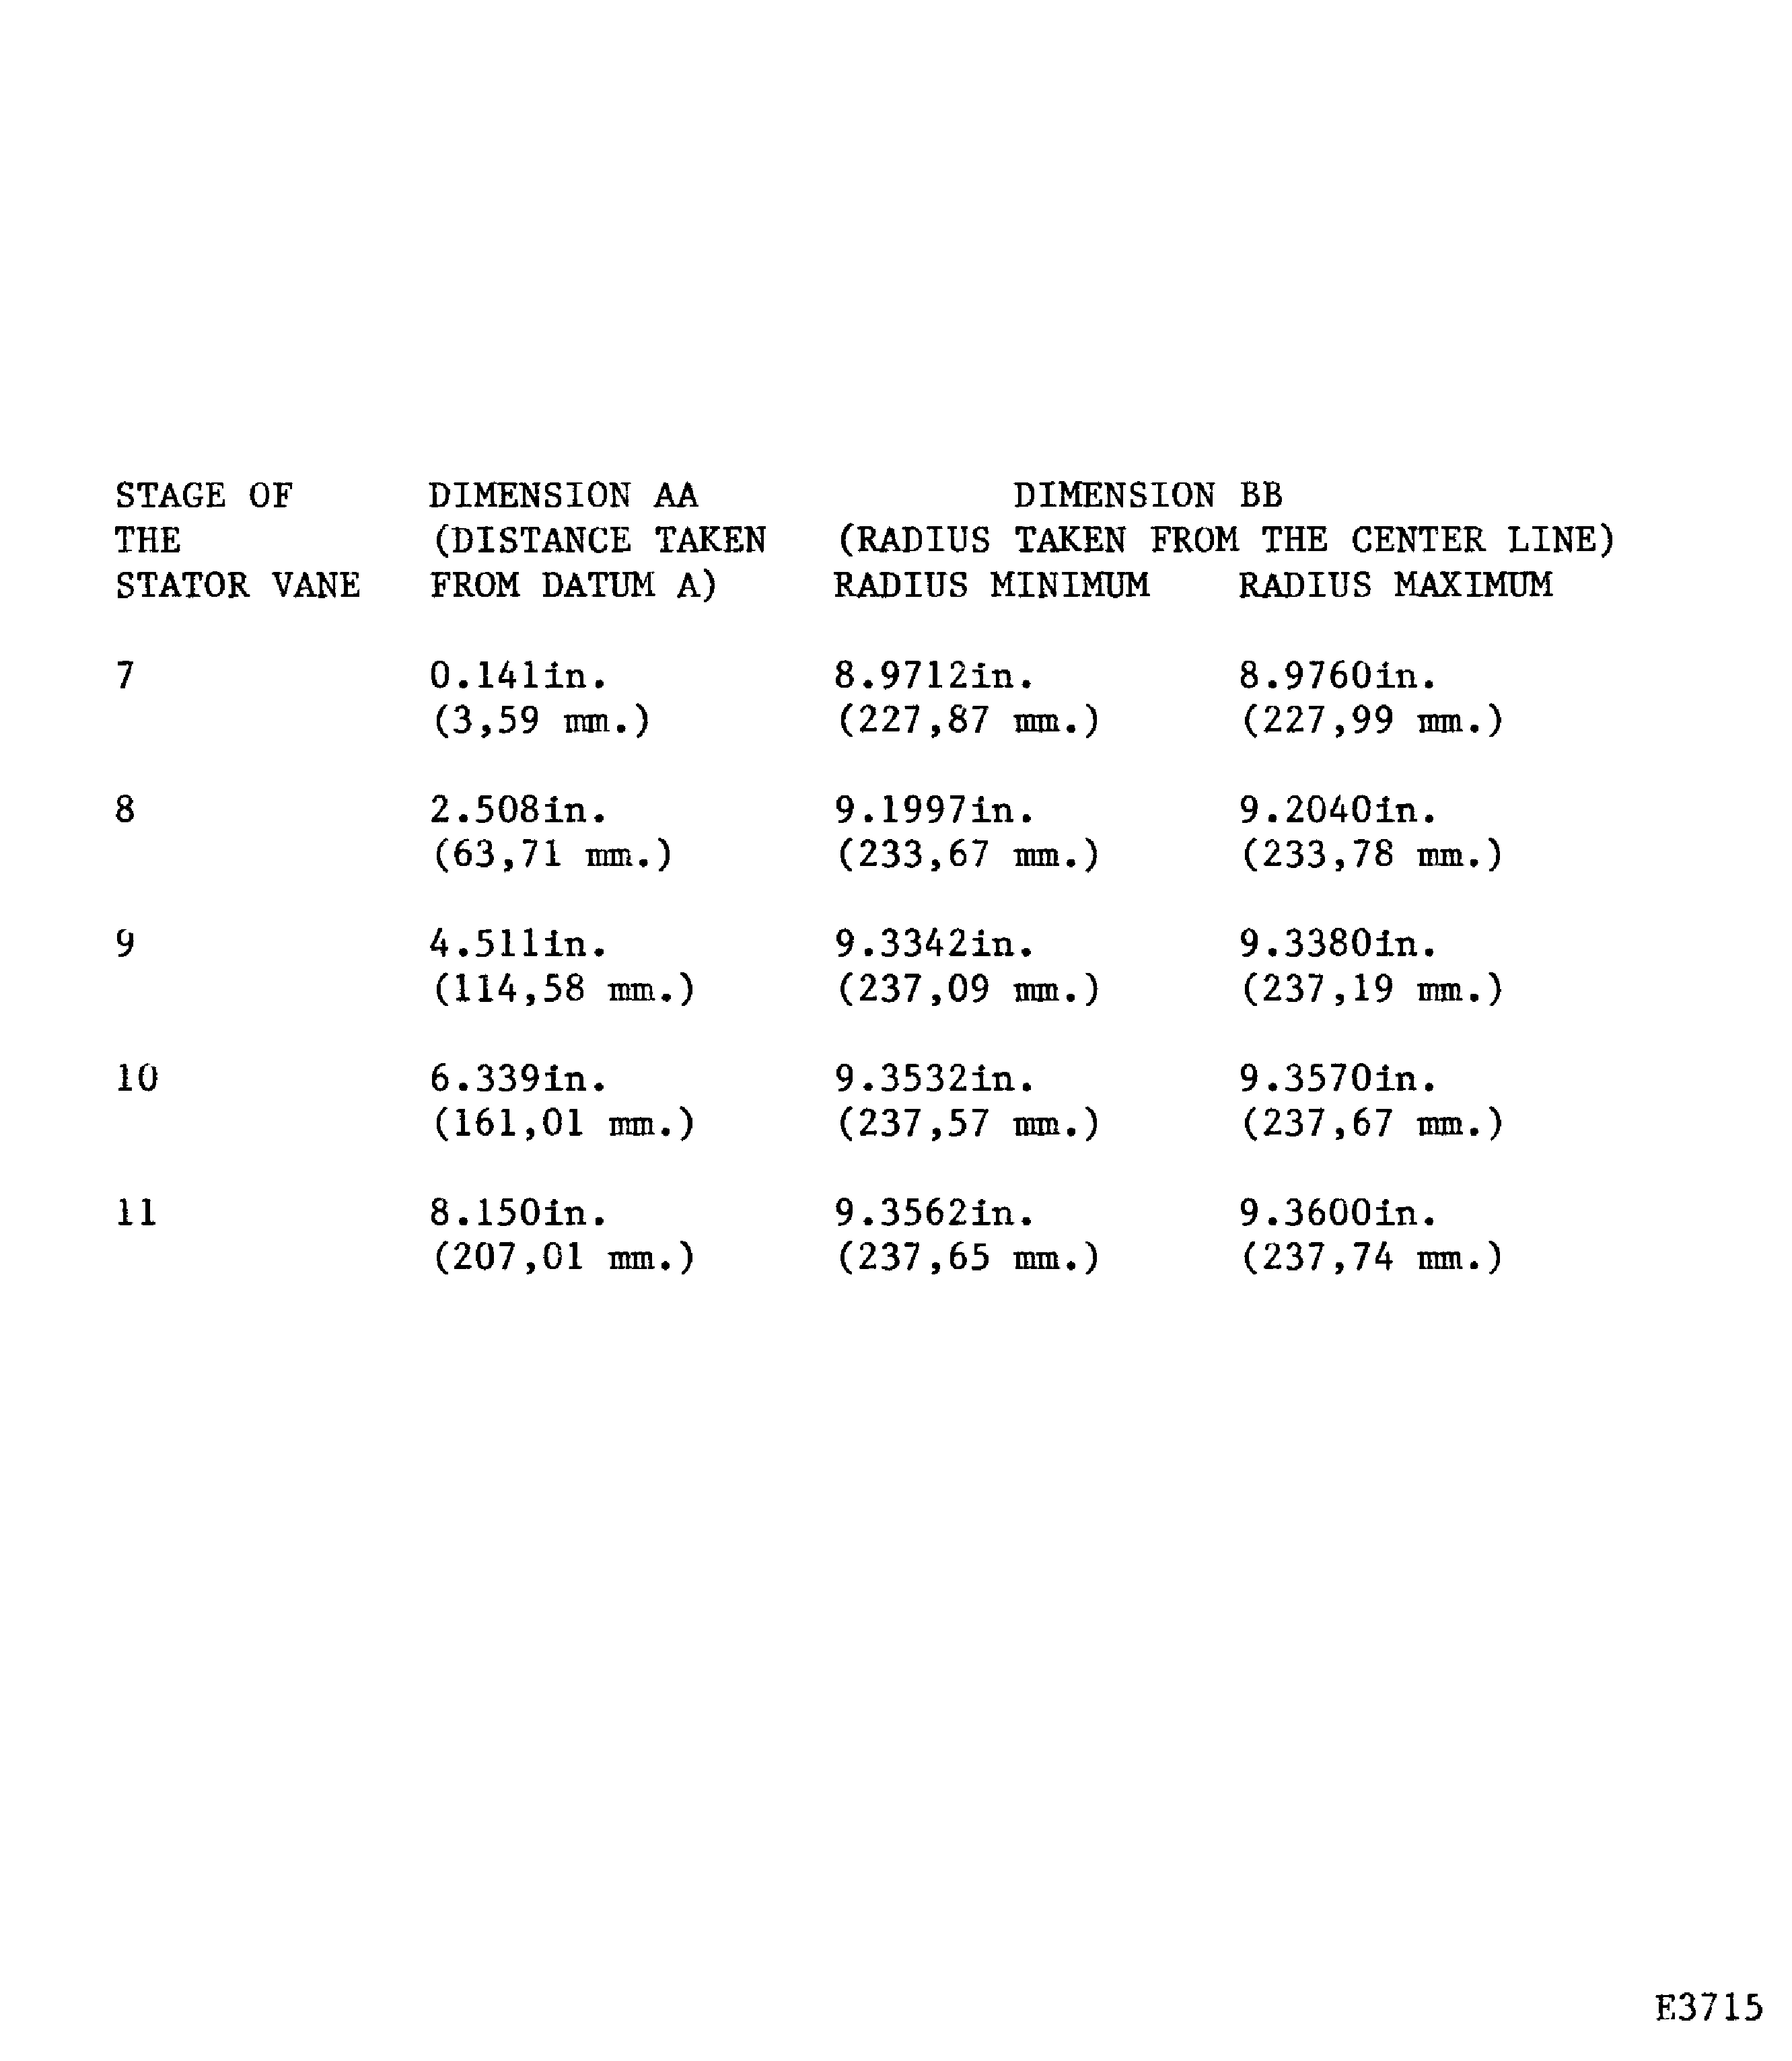
Figure: Machine the Rotor Path Ring Liners
Machine the Rotor Path Ring Liners
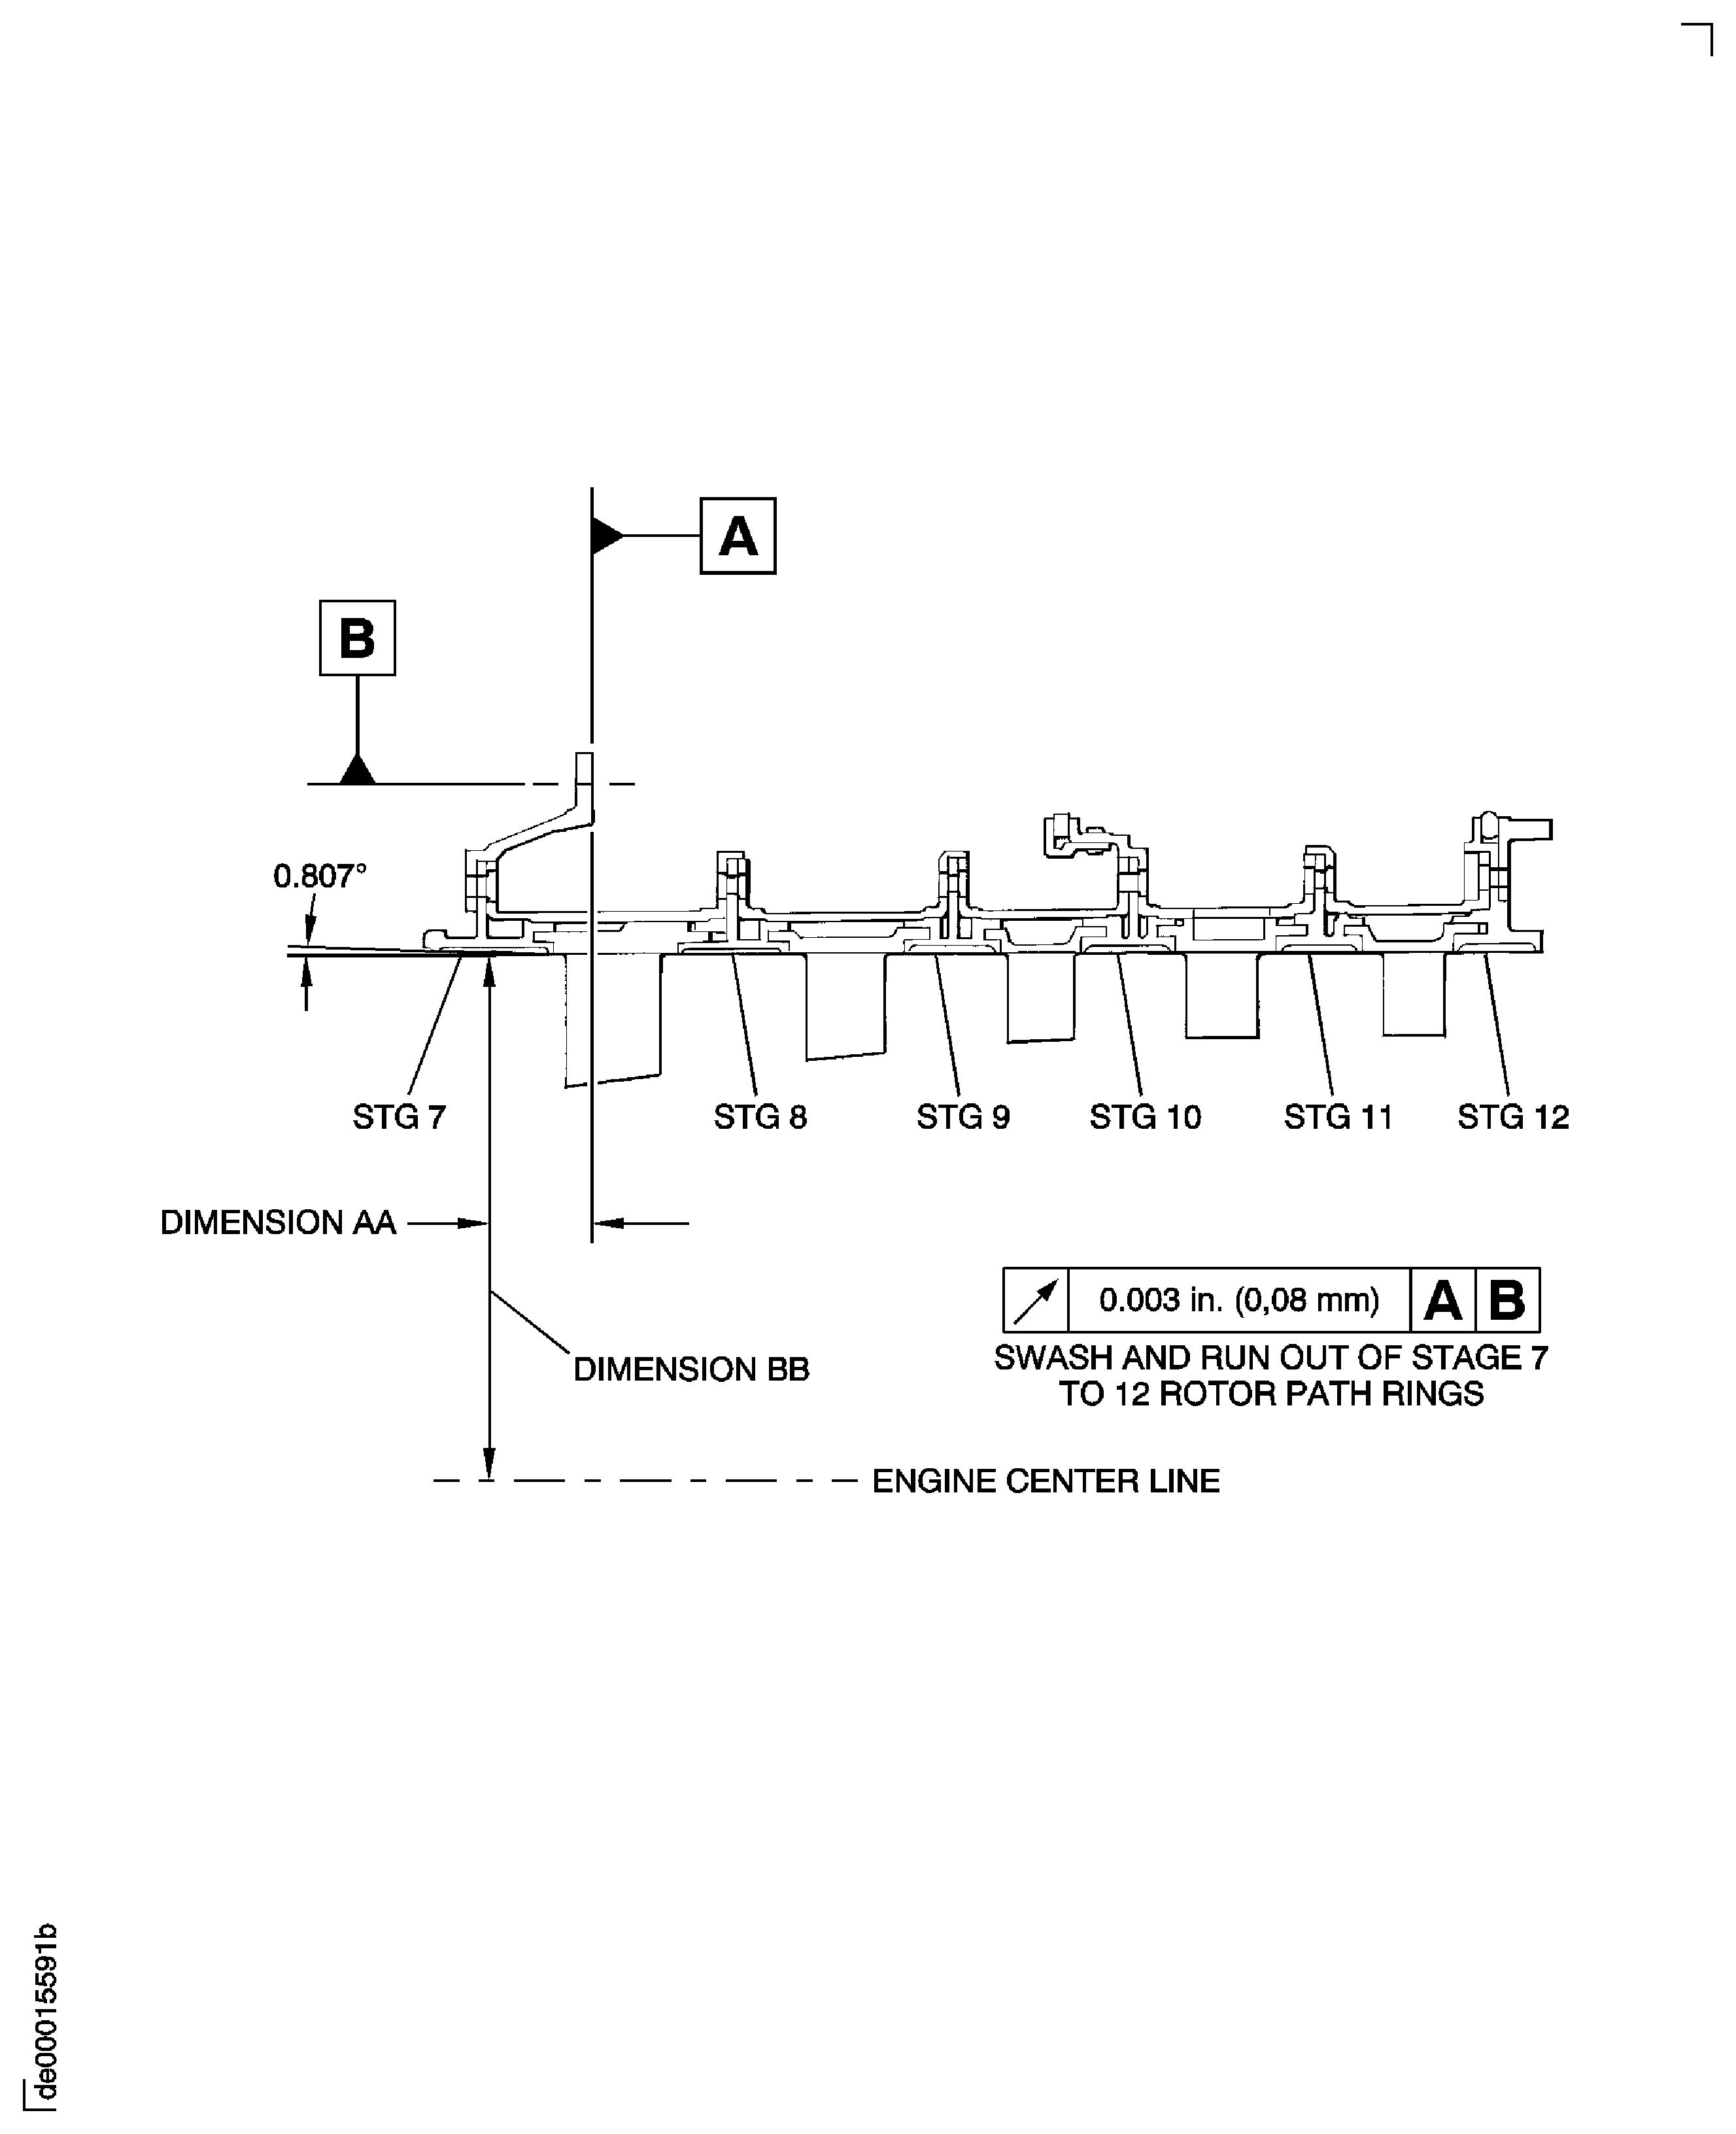
Figure: Pre SBE 72-0463: Machine the rotor path ring liners
Pre SBE 72-0463: Machine the rotor path ring liners
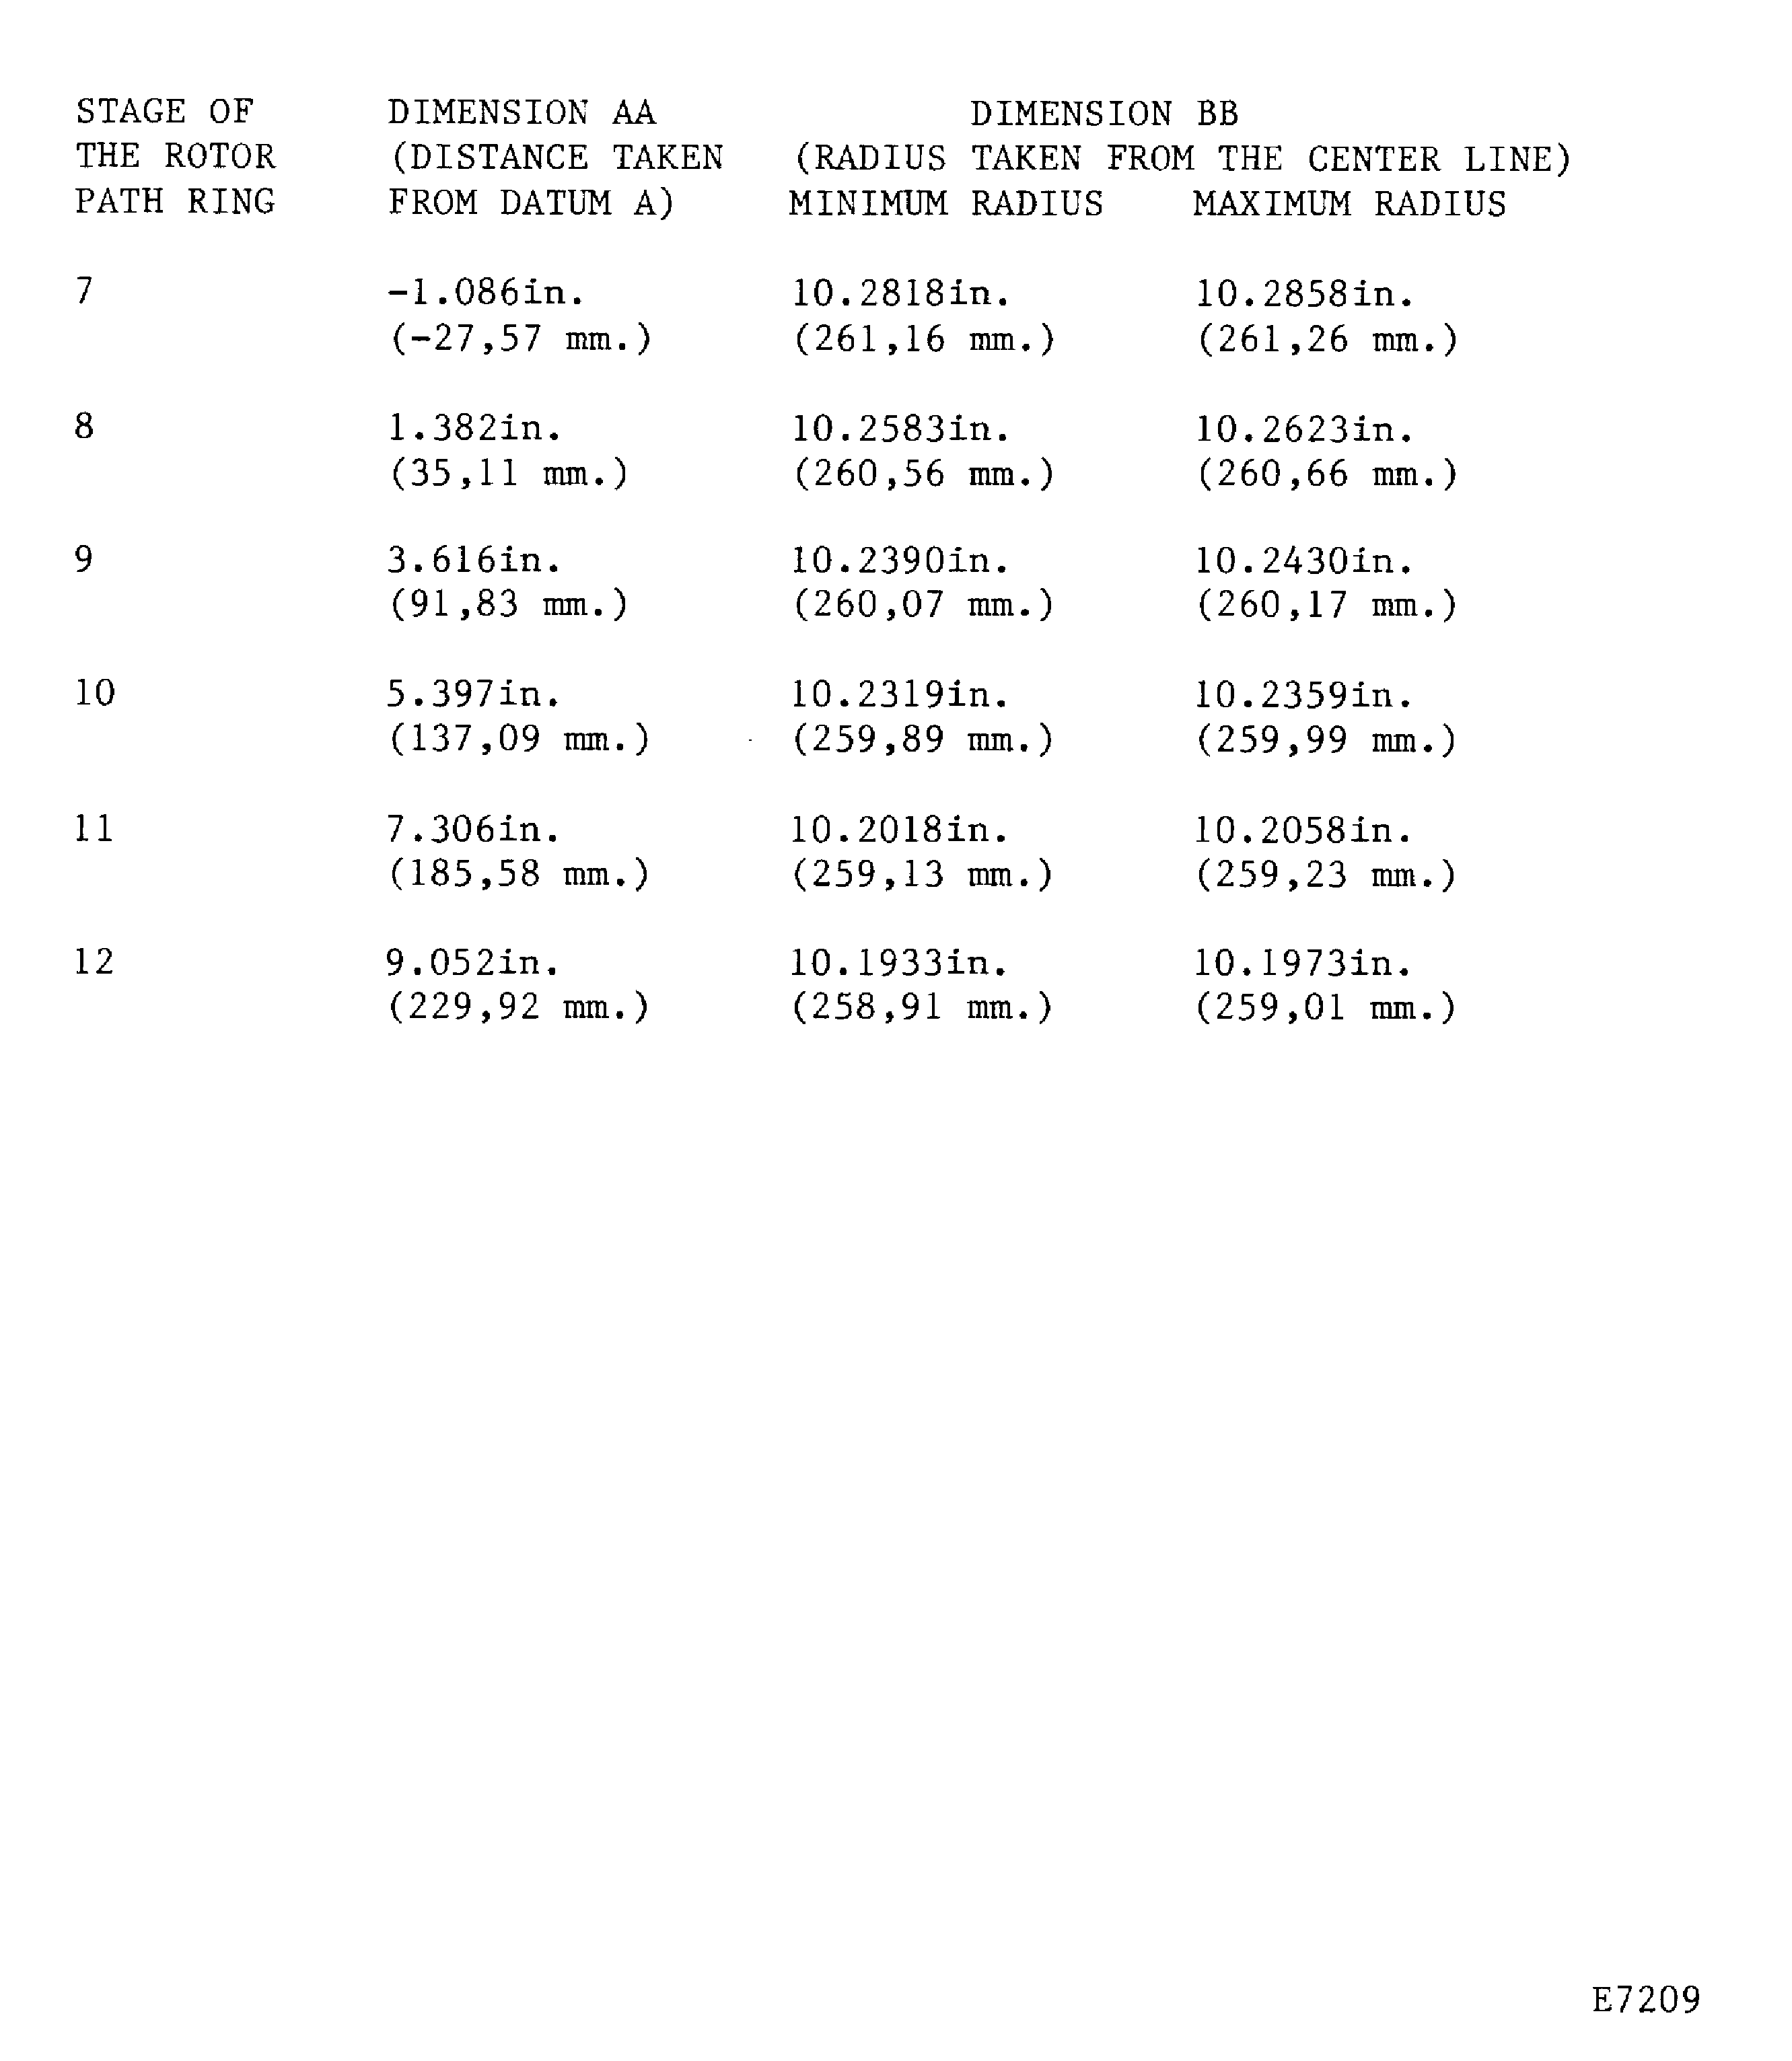
Figure: Machine the rotor path ring liners
Machine the rotor path ring liners
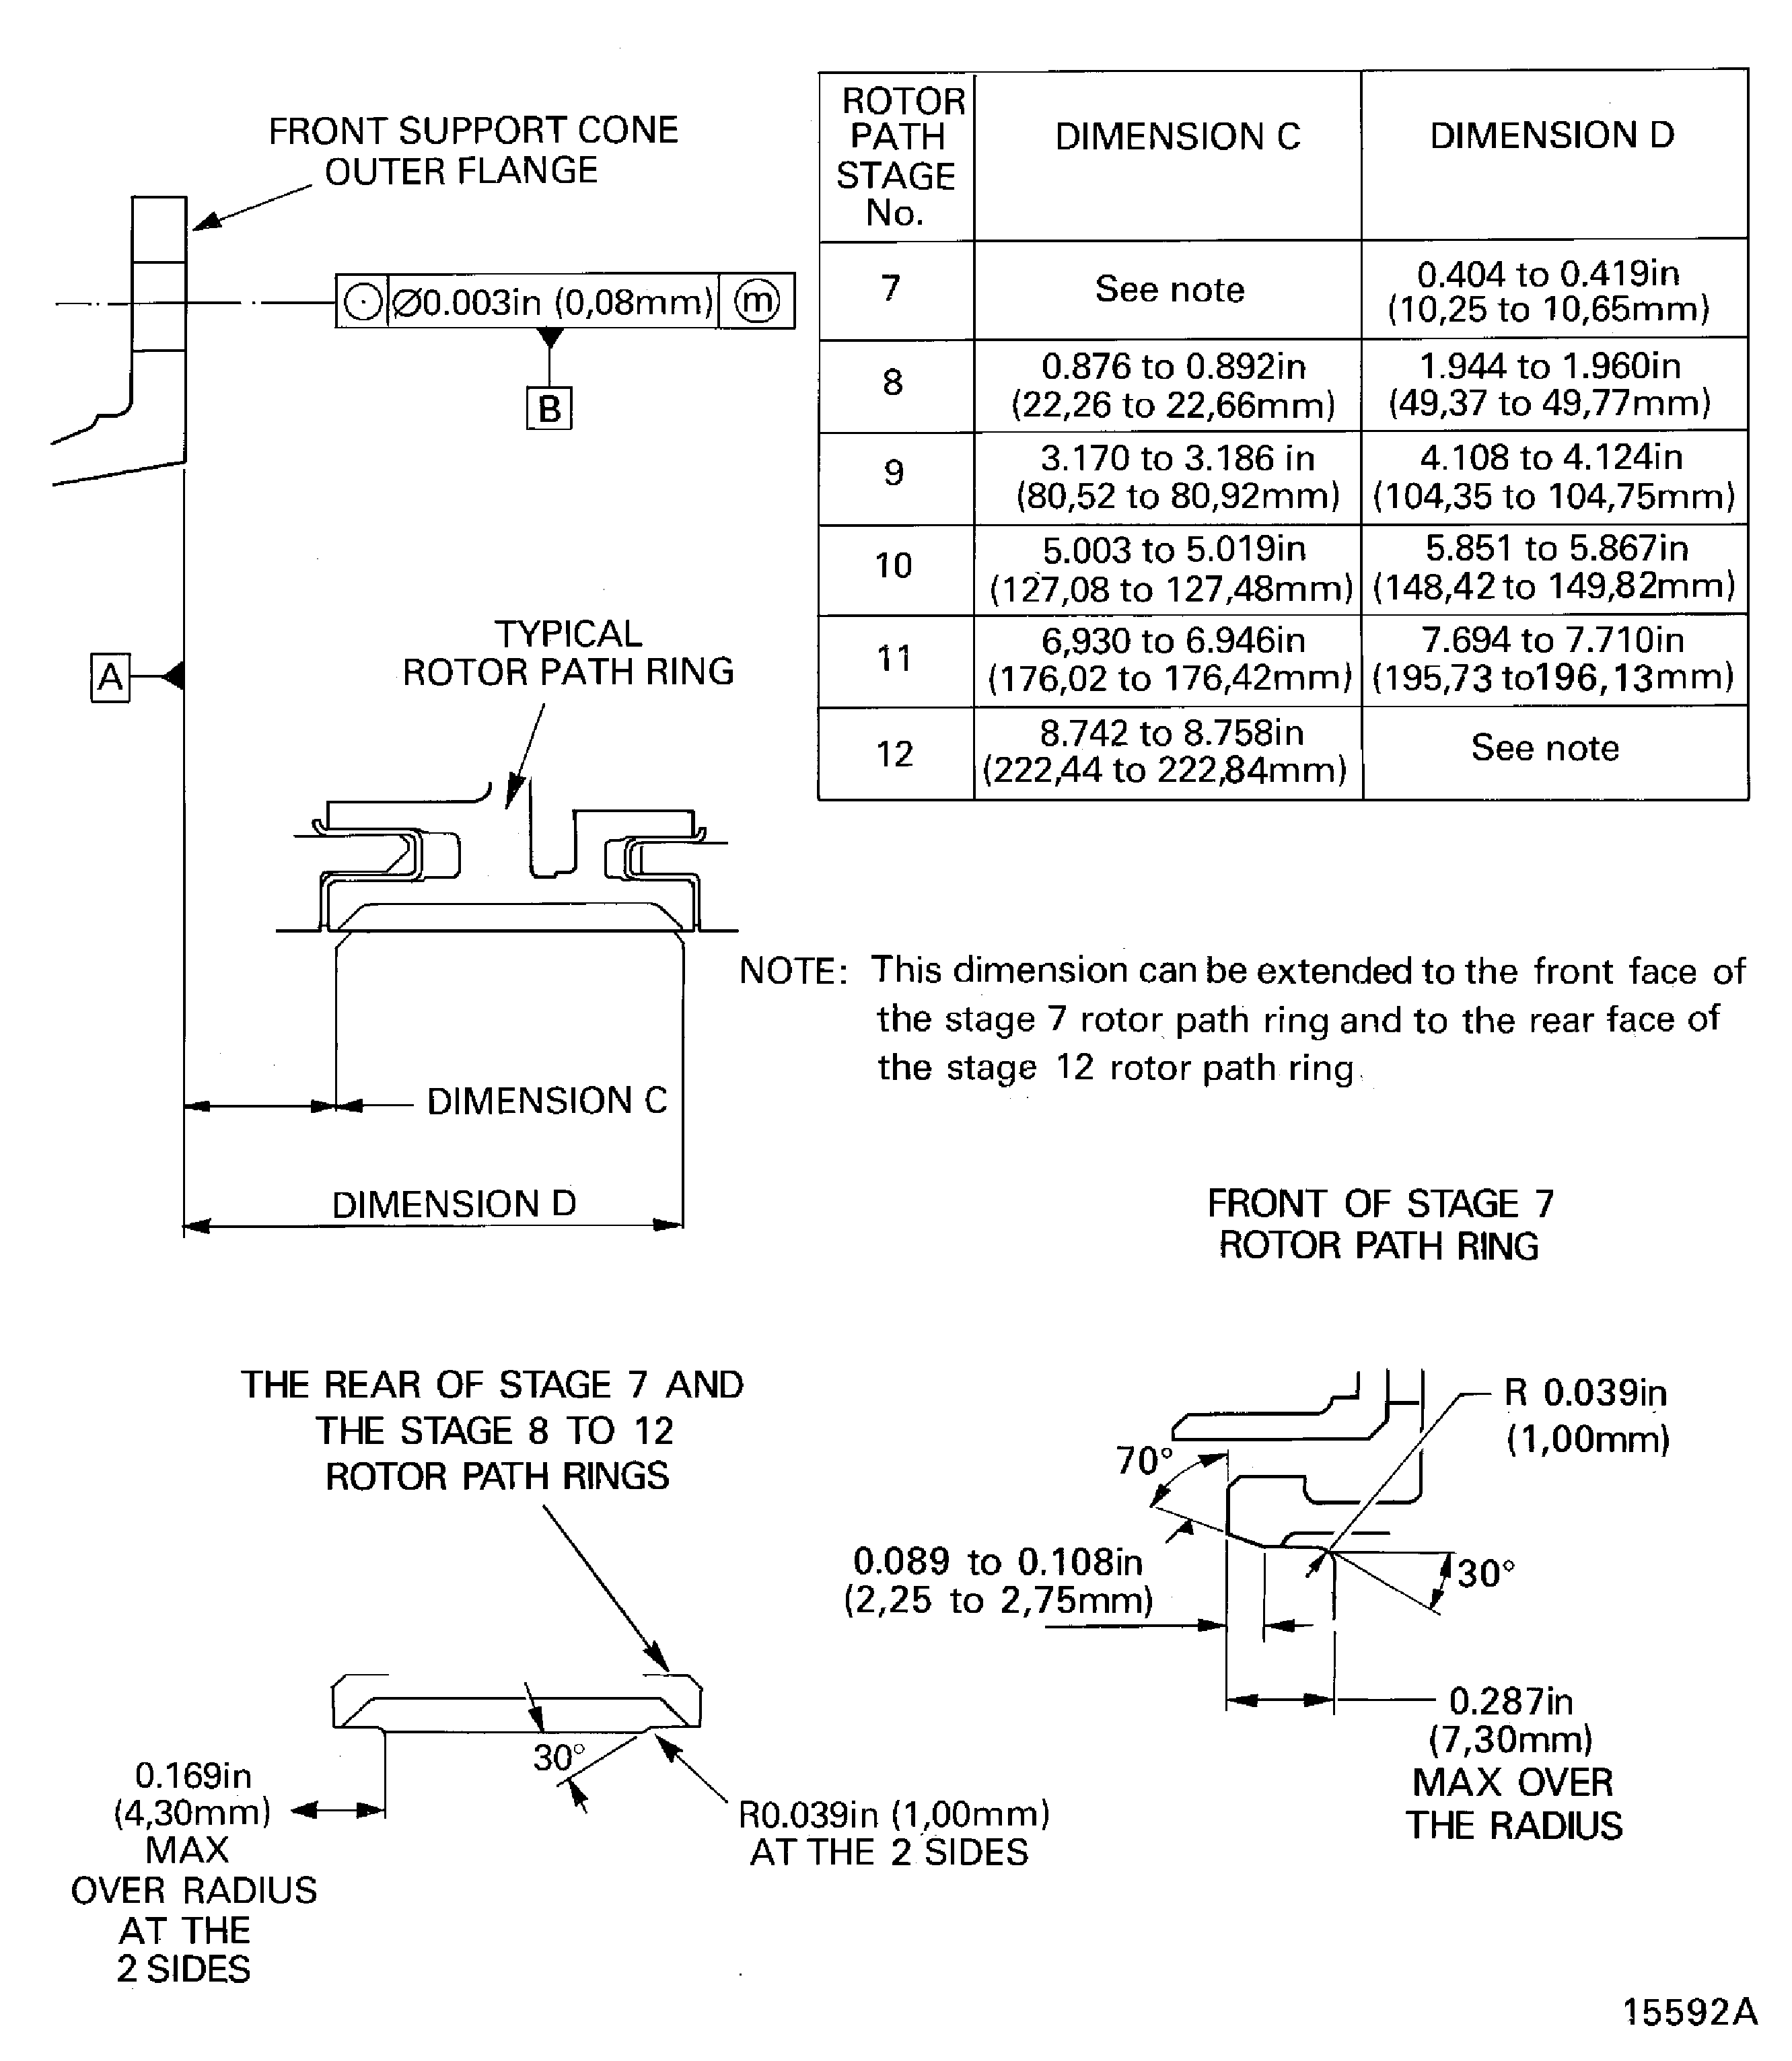
Figure: SBE 72-0463: Machine the rotor path ring liners
SBE 72-0463: Machine the rotor path ring liners
