TASK 72-00-00-200-003-B00 Engine General - Examine (Borescope) The Combustion Chamber And The HPT Stage 1 Vanes, Inspection-003

DMC:V2500-A5-72-00-0000-05B-312A-B|Issue No:003.00|Issue Date:2021-08-01

Export Control

EAR Export Classification: Not subject to the EAR per 15 C.F.R. Chapter 1, Part 734.3(b)(3), except for the following Service Bulletins which are currently published as EAR Export Classification 9E991: SBE70-0992, SBE72-0483, SBE72-0580, SBE72-0588, SBE72-0640, SBE73-0209, SBE80-0024 and SBE80-0025.

Copyright

© IAE International Aero Engines AG (2001, 2014 - 2021) The information contained in this document is the property of © IAE International Aero Engines AG and may not be copied or used for any purpose other than that for which it is supplied without the express written authority of © IAE International Aero Engines AG. (This does not preclude use by engine and aircraft operators for normal instructional, maintenance or overhaul purposes.).

Applicability

V2500-A5

Common Information

TASK 72-00-00-200-003-B00 Engine General - Examine (Borescope) The Combustion Chamber And The HPT Stage 1 Vanes, Inspection-003

General

All Fig/item numbers in the procedure agree with those used in the IPC. Only the primary Fig/item numbers are used. For the service bulletin alpha variants refer to the IPC.

For all parts identified in a different Chapter/Section/Subject, the applicable Chapter/Section/Subject comes before the Fig/item number.

For standard torque data and procedures refer to SPM TASK 70-41-00-400-501 and SPM TASK 70-41-02-400-501.

Special torque data is identified with the symbol * after the torque value.

Assembly tolerances are included in this procedure.

Lubricate all threads and abutment faces of nuts and bolts with CoMat 10-077 APPROVED ENGINE OILS approved engine oils, unless other lubricants are referred to in the procedure.

The number for each radial location must be identified in a clockwise direction. These start at the engine top position when you look from the rear of the engine, unless stated differently in the procedure.

Definitions and General Information

Six borescope ports and two igniter ports give access to the combustion chamber and the Stage 1 HPT vanes for Figure, Figure, Figure and Figure.

The names of the different parts and dimensional references of the combustion chamber and the Stage 1 HPT vanes are shown in Figure, Figure, Figure, Figure, Figure, Figure, Figure, Figure, Figure and Figure. Use these names when identifying borescope inspection limits.

Use these terms when you identify a combustion chamber condition seen during borescope inspection:

BURN: A local area of liner segment surface that has changed colour, has a rough surface texture or shows thinner material because of high temperatures. Burns can be located all around but more are found downstream of combustion holes in the burner liner segment.

BURN-THROUGH HOLE: A local burn area that has continued through the base material and does not extend to the leading or trailing edge of the segment, Figure.

EDGE BURNBACK: Full thickness liner segment burns that start at an edge, occur more at the segment trailing edge location but have also occurred at the leading edge. Burnback is segment material that is missing. Complete edge burnback is when segment material is missing from the trailing edge to the leading edge, Figure.

RADIAL BURNBACK: Full thickness burning on deflector edge continuing radially inward toward the fuel nozzle.

THROUGH CRACK: A crack on the surface of the segment material that has penetrated beyond the surface into and past the parent material. Typically the crack will be black in color and liner segment separation will be visible at the crack location.

NON-THROUGH CRACK: An indication/crack on the segment material which does not extend beyond segment material. Non-through cracks are acceptable as-is and should not be added to the measurement of the through crack.

General inspection guidelines:

Give the results of decreased time inspections to your IAE representative.

If a piece of combustion chamber material breaks off between inspection times, a borescope inspection of the high pressure turbine is necessary. If the high pressure turbine is not damaged after the material breaks off you can continue the combustion chamber borescope inspections at the times given by other limits.

All spalled ceramic coating on the combustor segments, the bulkhead segments or the bulkhead deflectors is acceptable without a degreased borescope inspection time.

Use these terms when you identify an HPT 1st stage vane condition seen during borescope inspection:

BURNS: A local area of 1st stage vane surface that has changed colour, has a rough surface texture or shows thinner material because of high temperatures. Burns can be located all round.

BURN-THROUGH: A local burn area that has continued through the airfoil surface. Cracks that have burned to more than 0.050 in. (1.269 mm) separation are also considered burn-through.

TRAILING EDGE BURNS: Burns or burn-through that starts at the airfoil trailing edge and continue forward to the airfoil leading edge.

LIFT UP: An area where the surface on one side of a crack is higher than the surface on the other side of the crack.

COATING DAMAGE: Chips, spalling, flakes, blisters, peeling or oxidation that is confined to the coating.

CONNECTED LOOP CRACK: A crack or a group of cracks that show an isolated area of vane metal.

LEADING EDGE: The area from the first row of cooling holes on the concave side of the vane to the first row of cooling holes on the convex side of the vane.

ONE QUARTER CORD LENGTH: The length from the trailing edge to the second row of cooling holes or 0.50 in. (12.7 mm).

ONE HALF CORD LENGTH: The length from the trailing edge to the fifth row of cooling holes or 1.00 in. (25.4 mm).

THREE QUARTER CORD LENGTH: The length equal to 1.50 in. (38.1 mm).

General inspection guidelines:

Give the results of decreased time inspections to your IAE representative.

All ceramic coating damage is acceptable without a decreased borescope inspection time. Extended operation with a large quantity of ceramic coating not there can possibly cause the vane to be out of time limits and cannot be repaired at overhaul.

NOTE

Range of torque must be between 62.00 lbf in. and 900.00 lbf in. (0.70 mdaN and 10.00 mdaN).

NOTE

To identify the consumable materials refer to the PCI.

Preliminary Requirements

Pre-Conditions

NONE

Support Equipment

NameManufacturerPart Number / IdentificationQuantityRemark
Cover (eye)LOCALCover (eye)
Flexible borescope (probe dia. 0.24 to 0.31 in. (6.0 to 8.0 mm) with view capability of 180 degrees up and down)LOCALFlexible Borescope
Rigid borescopeLOCALRigid borescope
Torque Wrench - 0 to 1000 lbf.in rangeLOCALTorque Wrench

Consumables, Materials and Expendables

NameManufacturerPart Number / IdentificationQuantityRemark
CoMat 10-077 APPROVED ENGINE OILSX333XCoMat 10-077
CoMat 10-094 ANTI-SEIZE COMPOUND, PURE Ni-SPECIALK2147CoMat 10-094
CoMat 10-129 ANTI-SEIZE PASTE34568CoMat 10-129
CoMat 02-141 LOCKWIRELOCALCoMat 02-141

Spares

NameManufacturerPart Number / IdentificationQuantityRemark
GasketLOCALGasket6

Safety Requirements

CAUTION

THE LIMITS THAT FOLLOW ARE APPLICABLE ON A CONTINUE IN SERVICE BASIS ONLY. EACH LIMIT IS BASED ON WHAT THE STRUCTURE OF THE VANE MUST BE AND DOES NOT INDICATE THAT THERE WILL NOT BE DETERIORATION OF THE ENGINE PERFORMANCE, STABILITY, OPERATING LIMITS OR PART REPAIRABILITY.

Procedure

    1. SUBTASK 72-00-00-020-069 Get Access to the Combustion Chamber and the Stage 1 Turbine Nozzle Vanes through the B1 to B6 and IP1 and IP2 Ports

    2. Refer to Figure, Figure, Figure, Figure.

    3. For B1 to B6 ports, remove the 5 plugs and gaskets at locations shown.

      NOTE

      Do not remove the igniter insert.
    4. For IP1 and IP2 ports, remove the igniter plugs.

    1. SUBTASK 72-00-00-220-105 Examine the Combustion Chamber and the Stage 1 HPT Vanes for Damage

    2. CAUTION

      THE LIMITS THAT FOLLOW ARE APPLICABLE ON A CONTINUE-IN-SERVICE BASIS ONLY. EACH LIMIT IS BASED ON WHAT THE STRUCTURE OF THE VANE MUST BE AND DOES NOT INDICATE THAT THERE WILL NOT BE DETERIORATION OF THE ENGINE PERFORMANCE, STABILITY, OPERATING LIMITS OR PART REPAIRABILITY.

      Refer to Figure.

      NOTE

      A cover for the eye which is not used will decrease eye tension.
    3. Put the borescope into the ports and examine the combustion chamber fuel injectors and the Stage 1 HPT vanes for damage.

    4. If the damage seen is not listed, contact your IAE representative.

    1. SUBTASK 72-00-00-220-106 Convex and Concave Surface Cracks/Burns

      NOTE

      1. All cracks or sections of cracks burned to a width of more than 0.050 in. (1.270 mm) are burn-through holes. Use the applicable burn limits.

      2. If a convex or concave burn extends to the leading edge, you must use leading edge criteria.

    2. Refer to Figure and Figure.

      1. Accept with an inspection each 600 hours if:

      2. There are many axial cracks three-quarters of a chord length long or longer. Axial and radial cracks can go through each other.

      3. There are many radial cracks that are more than 1.500 in. (38.100 mm) in length. Axial cracks can go through radial cracks.

      4. There is a burn that has caused a burn hole that is between 0.050 and 0.100 in. (1.270 and 2.450 mm) at its shortest dimension.

      1. Accept with an inspection each 300 hours if:

      2. There is a burn that has caused a burn-through that is between 0.100 and 0.300 in. (2.540 and 7.620 mm) at its shortest dimension.

      1. Reject if:

      2. There is axial or radial crack lift up of more than 0.050 in. (12.7 mm).

      3. There are connected loop cracks that show a piece of vane metal that is calculated to be more than 0.500 in. (12.7 mm) in length.

      4. There is a crack that is three-quarters of a cord length long or longer that also goes into a leading edge or a convex surface burn-through.

      5. There is a burn that has caused a burn-through that is more than 0.300 in. (7.62 mm) at its shortest dimension.

    1. SUBTASK 72-00-00-220-107 Leading Edge Cracks, Leading Edge Burns

      NOTE

      There is no limit to the number of leading edge tight cracks permitted without decreased inspection times.
    2. Refer to Figure and Figure.

      1. Accept with an inspection each 600 hours if:

      2. There are leading edge and/or convex surface cracks, or burns that have caused a burn-through that is less than 0.100in. (2.540 mm) in length radially.

      1. Accept with an inspection each 300 hours if:

      2. There is leading edge burn-through that is located less than 0.20 in. (5.08 mm) beyond the first row of cooling holes and the total length of the burn-through is less than 0.65 in. (16.51 mm) in length axially and 0.85 in. (21.59 mm) in length radially.

      1. Accept with an inspection each 75 hours if:

      2. There is leading edge burn-through that is less than 0.25 in. (6.35 mm) beyond the first row of cooling holes and the total length of the burn-through is less than 0.65 in. (16.51 mm) in length axially and 0.85 in. (21.59 mm) in length radially.

      1. Reject if:

      2. There is leading edge burn-through that extends 0.25 in. (6.35 mm) beyond the first row of cooling holes on either the convex or concave surfaces.

      3. Radial leading edge burning extends beyond 0.85 in. (21.59 mm).

      4. Axial leading edge burning extends beyond 0.65 in. (16.51 mm).

      5. On one vane, the total axial length of burn-through from the leading edge plus a crack and/or burn-through from the trailing edge is more than three-quarters of the chord in length.

      6. There is baffle burn-through.

      7. There is baffle cracking.

    1. SUBTASK 72-00-00-220-108 Trailing Edge Burns

    2. Refer to Figure and Figure.

      1. Accept with an inspection each 600 hours if:

        NOTE

        0.500in. (12.700 mm) is equal to five trailing edge cooling air slots.
      2. There is a burn-through that goes between one quarter and one half of the chord length from the trailing edge and is more than 0.500in. (12.700 mm) in width at the trailing edge.

      1. Accept with an inspection each 300 hours if:

        NOTE

        0.500in. (12.700 mm) is equal to five trailing edge cooling air slots.
      2. There is a burn-through that goes between one half and three quarters of the chord length from the trailing edge and is more than 0.500in. (12.700 mm) in width at the trailing edge.

      1. Reject if:

        NOTE

        0.50 in. (12.70 mm) is equal to five trailing edge cooling air slots.
      2. There is a burn-through that goes more than three quarters of the chord length from the trailing edge and is more than 0.50 in. (12.70 mm) in width at the trailing edge.

      3. There are signs of burning on the inner platform within 0.50 in. (12.70 mm) of the trailing edge and trailing edge burning through inboard of the first cooling slots at the inner diameter.

    1. SUBTASK 72-00-00-220-109 Cracks on Inner and Outer Platforms

    2. Refer to Figure.

      1. Accept with an inspection each 600 hours if:

      2. There is a crack that is more than 0.500in. (12.700 mm) in length.

      1. Accept with an inspection each 300 hours if:

      2. There is a crack that is more than 1.000in. (25.400 mm) in length.

      1. Reject if:

      2. There is a crack that is parallel to the airfoil fillet radius, that goes around the airfoil leading edge and that is more than 1.50 in. (38.10 mm) in length.

    1. SUBTASK 72-00-00-220-110 Cracks on the Inner and Outer Platform Airfoil Fillet Radii

    2. Refer to Figure.

      1. Accept with an inspection each 600 hours if:

      2. There is a crack that is more than 1.000in. (25.400 mm) in length and that goes from the fillet on to the airfoil.

      1. Reject if:

      2. There is a crack that is more than 1.00 in. (25.40 mm) in length and a part of the length is eroded to a width of more than 0.03 in. (0.76 mm).

      3. There is a crack in the fillet radius that is more than 1.50 in. (38.10 mm) in length and that goes around the airfoil leading edge.

    1. SUBTASK 72-00-00-220-111 Burns on the Inner and Outer Platforms

    2. Refer to Figure.

      1. Accept with an inspection each 600 hours if:

      2. There are burns that go from the edge of the platform to the platform airfoil fillet.

      1. Accept with an inspection each 300 hours if:

      2. There are burns that have caused a burn-through that is less than 0.250 in. (6.350 mm) in length.

      1. Reject if:

      2. There are burns that have caused a burn-through that is more than 0.25 in. (6.35 mm) in length.

    1. SUBTASK 72-00-00-220-112 Burner Liner Segment Cracks

      1. Accept burner liner segments that have combustion holes without a decreased borescope inspection time if:

      2. There are two cracks completely through a segment in the axial direction and each crack goes through combustion holes that are separated by a combustion hole without a crack.

      3. There are two cracks completely through a segment in the axial direction and one of the cracks goes through a combustion hole and the other crack is separated by a combustion hole and is not less than 0.700 in. (17.78 mm) from a circumferential edge.

      1. Accept burner liner segments that do not have combustion holes without a decreased borescope inspection time if:

      2. There is one crack that is completely through axially and that is more than 0.700 in. (17.78 mm) from a circumferential edge.

      1. Accept burner liner segments that have combustion holes with an inspection each 600 hours if:

      2. There are two or more cracks downstream of a combustion hole and one of the cracks goes from the combustion hole to the trailing edge. No other crack goes more than half the distance to the same hole or trailing edge.

      1. Accept burner liner segments that do not have combustion holes with an inspection each 600 hours if:

      2. There are two or more axial cracks, one crack is completely through the segment and is more than 0.700 in. (17.78 mm) from a circumferential edge. No other crack is more than half the axial length of the segment or nearer than 0.700 in. (17.78 mm) to a circumferential edge.

        NOTE

        You must also do a borescope inspection of the Stage 1 HPT blades (TASK 72-00-00-200-004-B00) each 300 hours if liner segments are on a 300 hour repeat borescope inspection for segment cracking.
      1. Accept burner liner segments that have combustion holes with an inspection each 300 hours if:

        1. There are 2, 3, or 4 cracks completely through axially and the following requirements are met:

        2. Each crack goes through a combustion hole.

        3. At least two cracks go through adjacent combustion holes.

        1. There are two or more cracks downstream of a combustion hole and the following requirements are met:

        2. One crack goes from a combustion hole to the trailing edge.

        3. No other crack goes more than two thirds of the distance to the same combustion hole or trailing edge.

      2. There are cracks that can cause a piece of segment material not more than 0.25 sqin. (161.29 sqmm) in area to break off.

        NOTE

        You must also do a borescope inspection of the Stage 1 HPT blades (TASK 72-00-00-200-004-B00) each 300 hours if liner segments are on a 300 hour repeat borescope inspection for segment cracking.
      1. Accept segments that do not have combustion holes with an inspection each 300 hours if:

        1. There are two or more axial cracks and the following conditions are met:

        2. One crack is completely through the segment and more than 0.700 in. (17.78 mm) from a circumferential edge.

        3. No other crack is more than two thirds the axial length of the segment or nearer than 0.700 in. (17.78 mm) to a circumferential edge.

      2. There are cracks that can cause a piece of segment material not more than 0.25 sqin. (161.29 mm) in area to break off.

      1. Reject all segments if:

      2. There are cracks that can cause a piece of segment material that is more than 0.25 sqin. (161.29 sqmm) in area to break off.

    1. SUBTASK 72-00-00-220-113 Segment Edge Burnback

    2. Refer to Figure, Figure and Figure.

      1. Accept burner liner segments without a decreased borescope inspection if:

        1. There is trailing edge burnback less than 0.70 in. (17.78 mm) and the following conditions are met:

        2. There is no liner shell damage (burn-through or cracks).

        3. There is damage to the rails around the igniter holes on the row 1 igniter segment less than 135 degrees.

        4. You must not be able to see an attachment post.

      1. Accept burner liner segments with an inspection each 600 hours if:

        1. The trailing edge burnback is between 0.700 and 0.900 in. (17.78 and 22.86 mm) and the following conditions are met:

        2. There is no liner shell damage (burn-through or cracks).

        3. There is damage to the rails around the igniter holes on the row 1 igniter segment less than 135 degrees.

        4. You must not be able to see an attachment post.

      1. Accept burner liner segments with an inspection each 300 hours if:

        NOTE

        A maximum of three liner shell damage locations for each burner assembly is allowed.
        1. The trailing edge burnback is more than 0.90 in. (22.86 mm) and the following conditions are met:

        2. Liner shell damage (burn-through or cracks) must not have an area of more than 0.50 sqin. (322.58 sqmm).

        3. There is damage to the rails around the igniter holes on the row 1 igniter segment less than 135 degrees.

        4. You must not be able to see an attachment post.

      2. If the trailing edge burnback is more than 1.00 in. (25.40 mm) you must do a borescope inspection of the Stage 1 HPT blades (TASK 72-00-00-200-004-B00) each 300 hours.

      1. Reject if:

      2. There is one area of complete edge burnback on one segment and another area of edge burnback is more than 1.00 (25.40 mm) on the same segment.

      3. There are two or more segments with complete edge burnback.

      4. There is damage to the rails around the igniter holes on the row 1 igniter segment more than 135 degrees.

      5. There is trailing edge burnback that shows an attachment post or an attachment post is missing.

      6. There is liner shell damage (burn-through or cracks) that is more than 0.50 sqin. (322.58 sqmm) in area or there are more than three locations of liner shell damage less than 0.50 sqin. (322.58 sqmm) in all the burner assembly.

    1. SUBTASK 72-00-00-220-114 Surface Burns and Burn-Through Holes in Liner Segments

      1. Accept segments (with or without combustion holes), Figure without a decreased borescope inspection time if:

      2. As much as all the surface is burned.

        1. There are segment burn-through holes that are less than 0.350 in. (8.890 mm) in length and the following conditions are met:

        2. There must be no liner shell damage (burn-through or cracks).

        3. There is damage to the rails around the igniter holes on the row 1 igniter segment less than 135 degrees.

        4. You must not be able to see an attachment post.

      1. Accept segments (with or without combustion holes), Figure with an inspection each 600 hours if:

        1. There is a segment burn-through hole that is between 0.350 and 0.650 in. (8.890 and 16.510 mm) in length and the following conditions are met:

        2. There must be no liner shell damage (burn-through or cracks).

        3. There is damage to the rails around the igniter holes on the row 1 igniter segment less than 135 degrees.

        4. You must not be able to see an attachment post.

      1. Accept segments (with or without combustion holes), Figure with an inspection each 300 hours if:

        1. There is a segment burn-through hole that is between 0.650 and 1.000 in. (16.51 and 25.40 mm) in length and the following conditions are met:

        2. Liner shell damage (burn-through, cracks) must not have an area of more than 0.50 sqin. (322.58 sqmm).

        3. Liner shell damage (burn-through, cracks) must not occur in more than three locations.

        4. There is damage to the rails around the igniter holes on the row 1 igniter segment less than 135 degrees.

        5. You must not be able to see an attachment post.

      2. There are segment burns or cracks that can cause a piece of segment material more than 0.50 in. (12.70 mm) in length to break off.

      1. Reject if:

      2. There is a segment burn-through hole that is more than 1.00 in. (25.40 mm) in length.

      3. There is damage to the rails around the igniter holes on the row 1 igniter segment more than 135 degrees.

      4. There are segment burn-through holes that show an attachment post.

      5. There is liner shell damage (burn-through, cracks) that is more than 0.50 sqin. (322.58 sqmm) in area or occurs in more than three locations that are less than 0.50 sqin. (322.58 sqmm) in area.

    1. SUBTASK 72-00-00-220-115 Bulkhead Segment Cracks

    2. Refer to Figure.

      1. Accept all bulkhead segments without a decreased inspection time if:

      2. There is no more than one crack on each side of the bulkhead segment. There is no limit to the length of the crack.

      3. There are two or more cracks on the same side of the bulkhead segment, as long as only one crack exceeds the 0.375 in. (9.52 mm) and the remaining cracks are less than 0.375 in. (9.52 mm).

      1. Accept all bulkhead segments with a 600 hour repeat borescope inspection if:

      2. There are two or more cracks more than 0.375 in. (9.53 mm) on the same side of one bulkhead segment.

        NOTE

        You must also do a borecope inspection of the Stage 1 HPT blades (Ref. TASK 72-00-00-200-004-B00) each 300 hours if the combustor is on a 300 hour repeat borescope inspection for bulkhead segment cracking.
      1. Accept all bulkhead segments with 300 hour repeat borescope inspection if:

      2. There are cracks that can liberate a piece of material equal to or less than 0.25 sqin. (161.29 sqmm).

      3. There are two or more cracks on the same side of one bulkhead segment. At least one crack extends from the edge of the bulkhead segment under the fuel nozzle guide or to the inner rim of the bulkhead segment and another at least 0.375 in. (9.53 mm). These cracks must be separated by less than 0.50 in. (12.70 mm).

      1. Reject if:

      2. There are cracks that can liberate a piece of material more than 0.25 sqin. (161.29 sqmm).

      3. There are two or more cracks on the same side of one bulkhead segment. At least one crack extends from the edge of the bulkhead segment under the fuel nozzle guide or to the inner rim of the bulkhead segment, and another at least 0.375 in. (9.53 mm). These cracks are separated by more than 0.50 in. (12.70 mm).

    1. SUBTASK 72-00-00-220-116 Bulkhead Segment Burns and Burn-Through Holes

      1. Accept all bulkhead segments without a decreased borescope inspection time if:

      2. As much as all the surface is burned.

        1. There is one bulkhead segment burn-through hole less than 2.000 in. (50.8 mm) in length and the following conditions are met:

        2. There must be no damage to the bulkhead liner below.

        3. A bulkhead segment attachment post must not be visible.

        1. There are multiple bulkhead segment burn-through holes less than 1.000 in. (25.4 mm) in length and the following conditions are met:

        2. There must be no damage to the bulkhead liner below.

        3. A bulkhead segment attachment post must not be visible.

      1. Accept all bulkhead segments with an inspection each 600 hours if:

        1. There is one bulkhead segment burn-through hole more than 2.000 in. (50.8 mm) but less than 3.000 in. (76.2 mm) in length and the following conditions are met:

        2. There must be no damage to the bulkhead liner below.

        3. A bulkhead segment attachment post must not be visible.

        1. There are multiple bulkhead segment burn-through holes more than 1.000 in. (25.4 mm) but less than 1.500 in. (38.1 mm) in length and the following conditions are met:

        2. There must be no damage to the bulkhead liner below.

        3. A bulkhead segment attachment post must not be visible.

      1. Reject if:

      2. There is one bulkhead segment burn-through hole that is more than 3.00 in. (76.20 mm) in length.

      3. There are multiple bulkhead segment burn-through holes that are more than 1.50 in. (38.10 mm) in length.

      4. There is a bulkhead liner burn-through hole that is more than 0.50 sqin. (322.58 sqmm) in area.

      5. There is a bulkhead liner segment attachment post visible.

    1. SUBTASK 72-00-00-220-117 Bulkhead Deflector Cracks

      1. Accept all bulkhead deflectors, Figure and Figurewithout a decreased borescope inspection time if:

      2. There are cracks that are not circumferential.

      3. There are circumferential cracks that can cause less than 0.500 in. (12.7 mm) in length to break off.

      1. Reject if:

      2. There is a circumferential crack that can cause material more than 0.50 in. (12.70 mm) in length to break off.

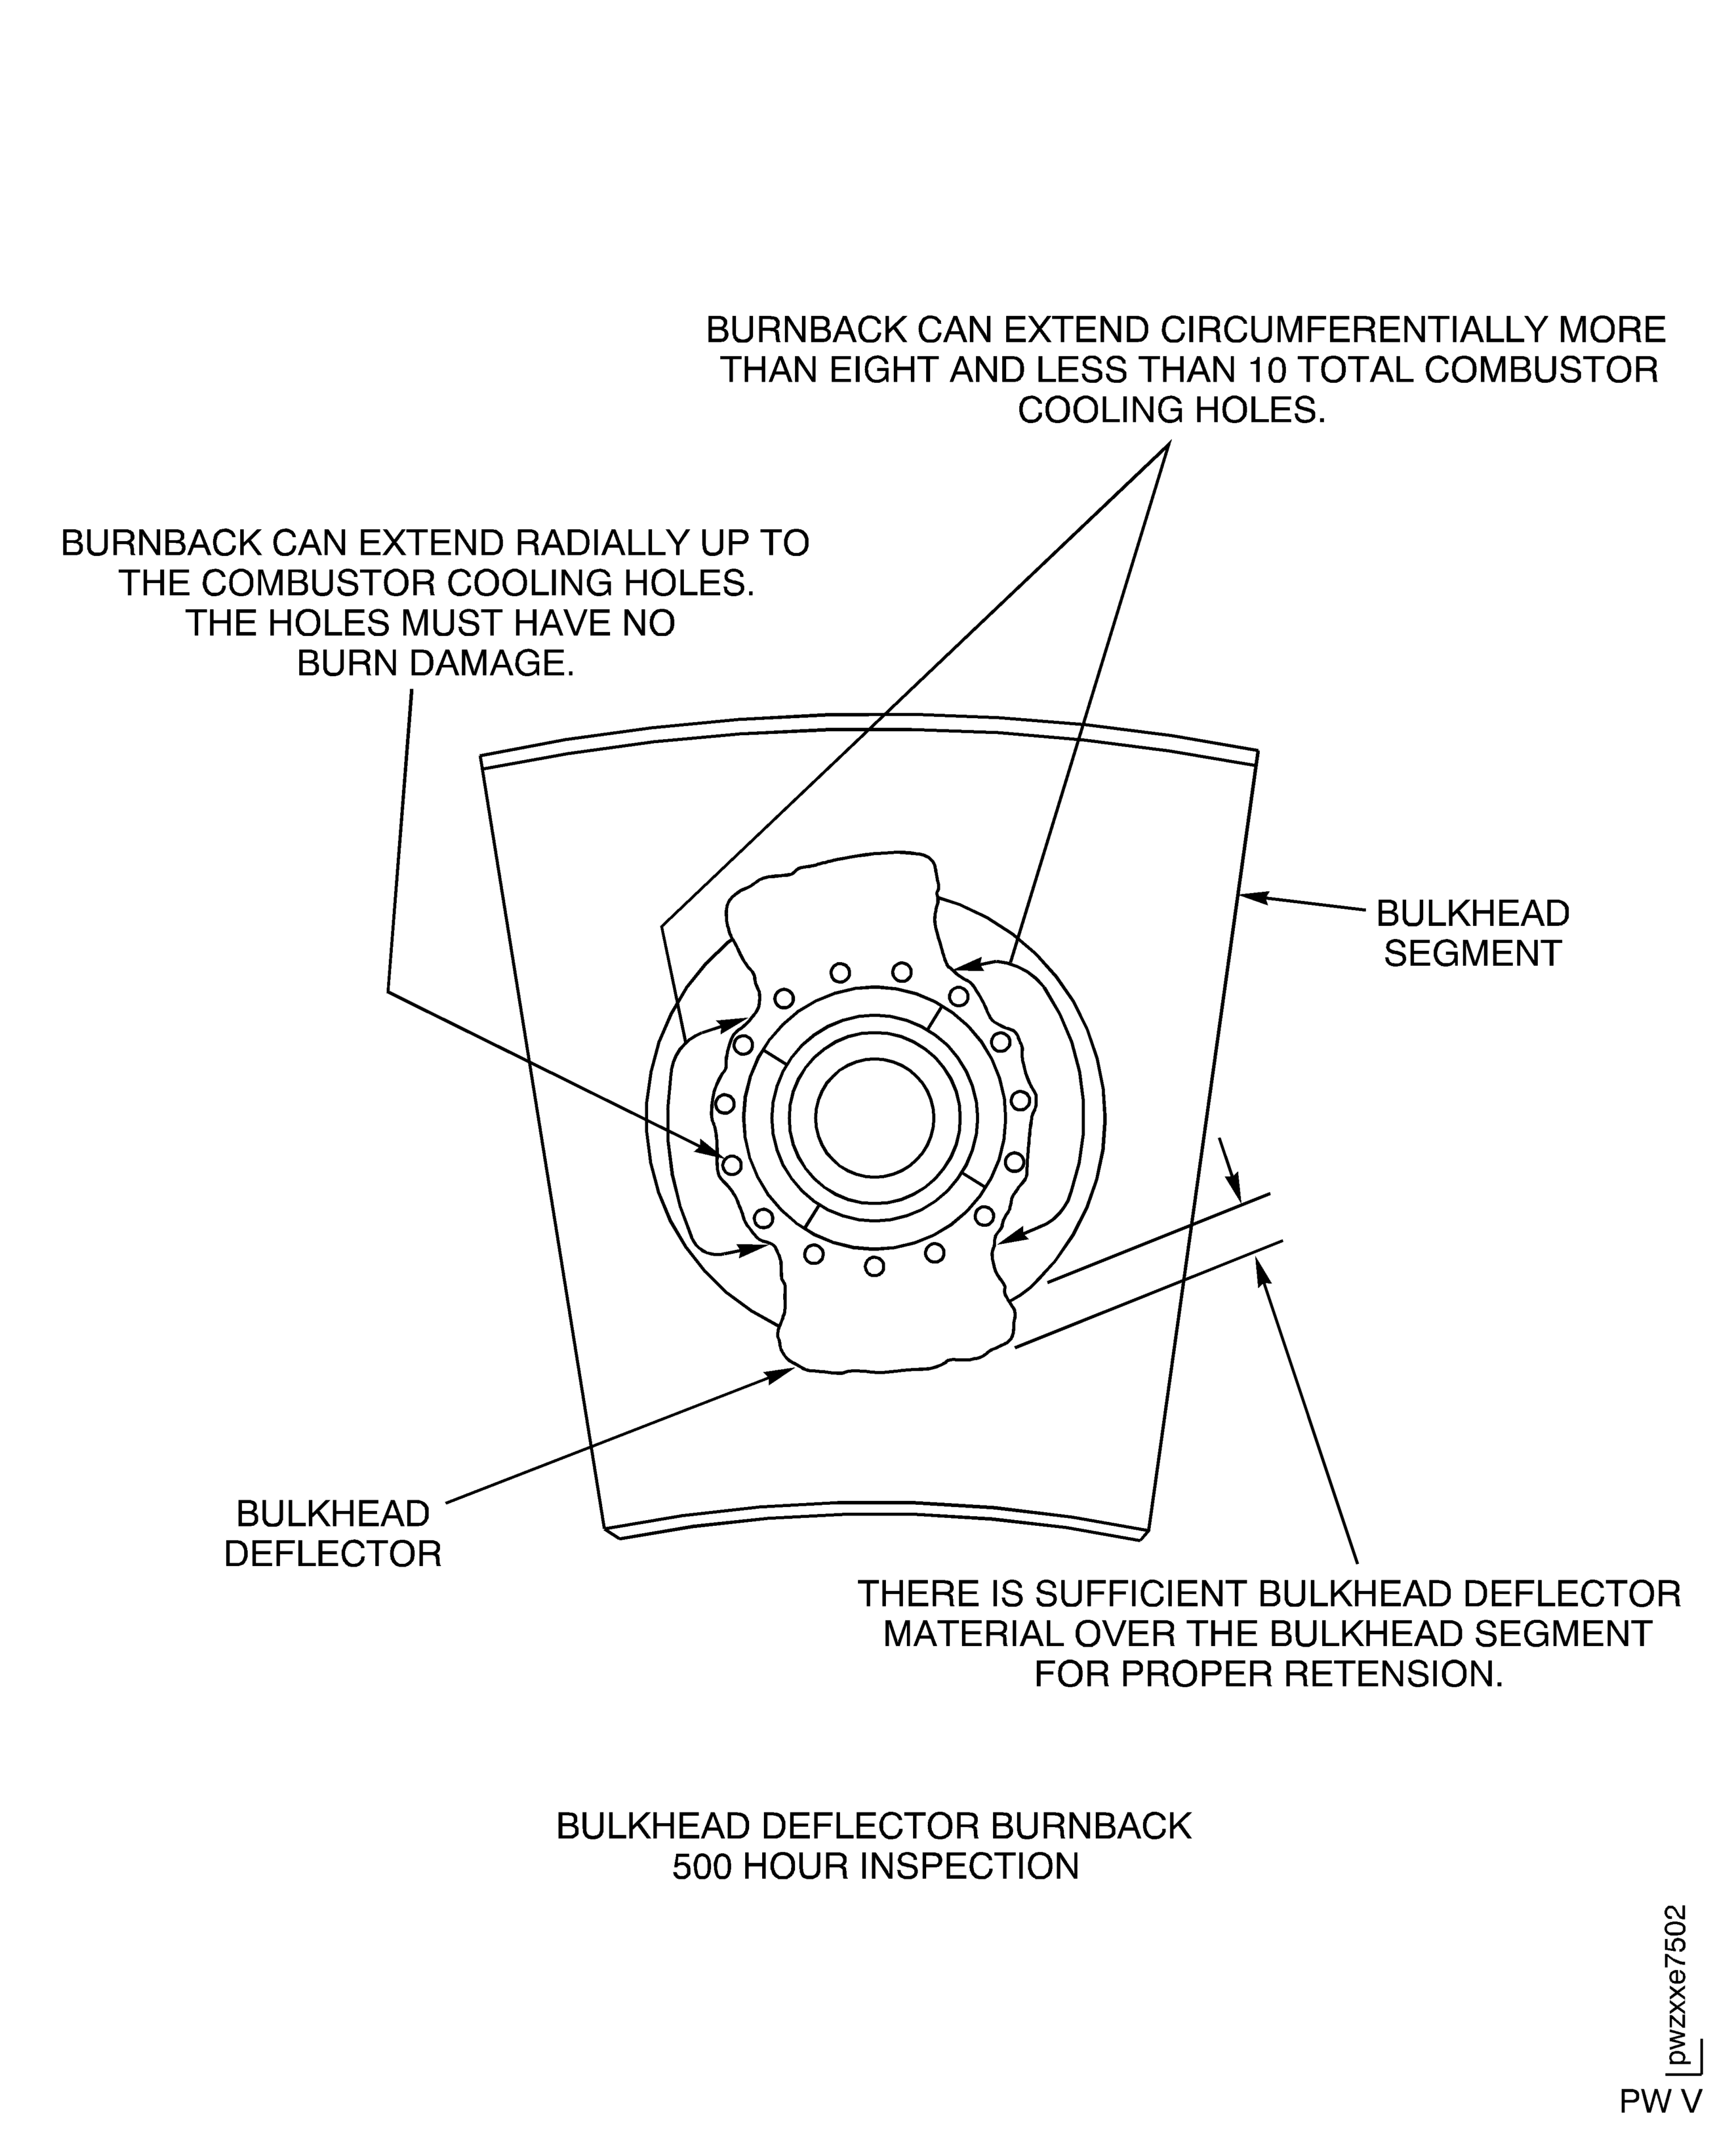
    1. SUBTASK 72-00-00-220-118 Bulkhead Deflector Burns

      1. Accept all bulkhead deflectors without a decreased borescope inspection time if:

      2. There are surface burns or base material burns that are less than the full deflector thickness.

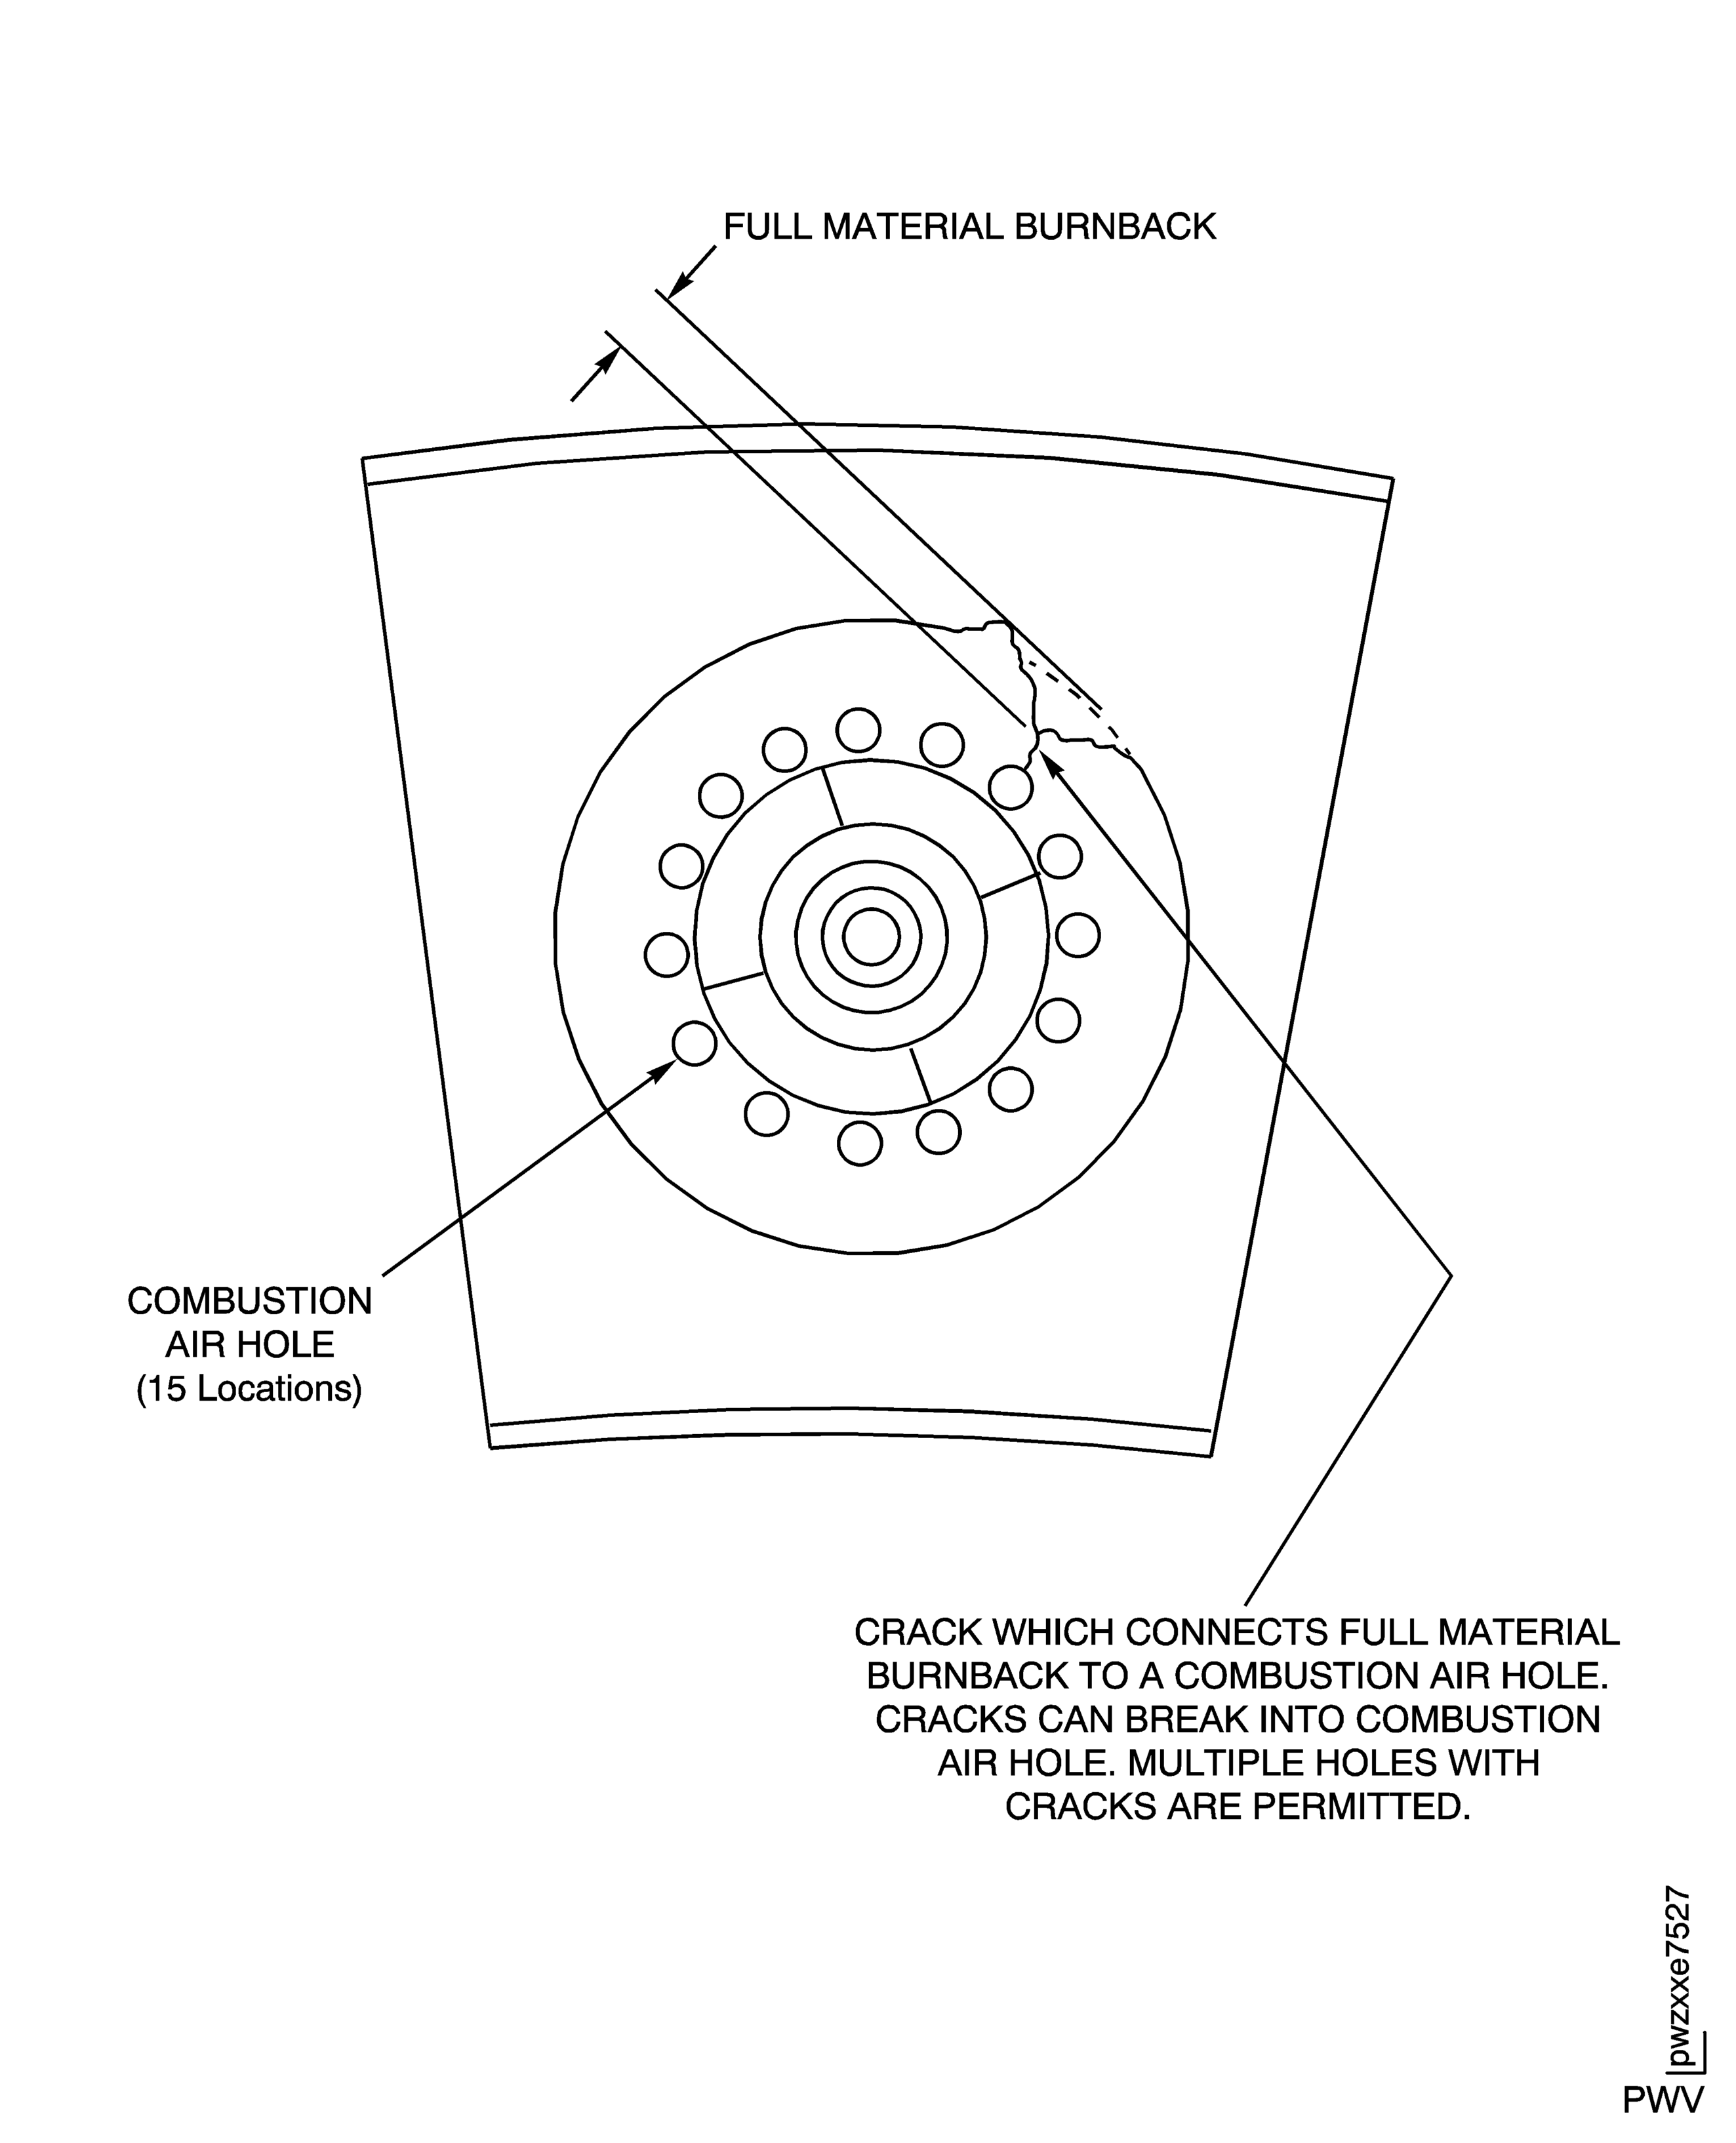
        1. There is full material thickness edge burnback that extends circumferentially to the outer diameter of a total of eight combustion air holes.

        2. Burnback can extend radially back to combustion air holes. Cracks which connect full material burnback to the combustion air holes are permitted. Cracks can break into combustion air holes.

        3. There must be sufficient bulkhead deflector material over the bulkhead segment for correct retention.

      1. Accept all bulkhead deflectors with an inspection each 600 hours if:

        1. There is full material thickness edge burnback that extends circumferentially to the outer diameter of more than eight and less than 10 total combustion air holes.

        2. Burnback can extend radially back to combustion air holes. Cracks which connect full material burnback to the combustion air holes are permitted. Cracks can break into combustion air holes.

        3. The remaining material must be on opposite sides of the deflector.

        4. There must be sufficient bulkhead deflector material over the bulkhead segment for correct retention.

        5. Surface burns are unlimited circumferentially.

      1. Accept all bulkhead deflectors with an inspection each 300 hours if:

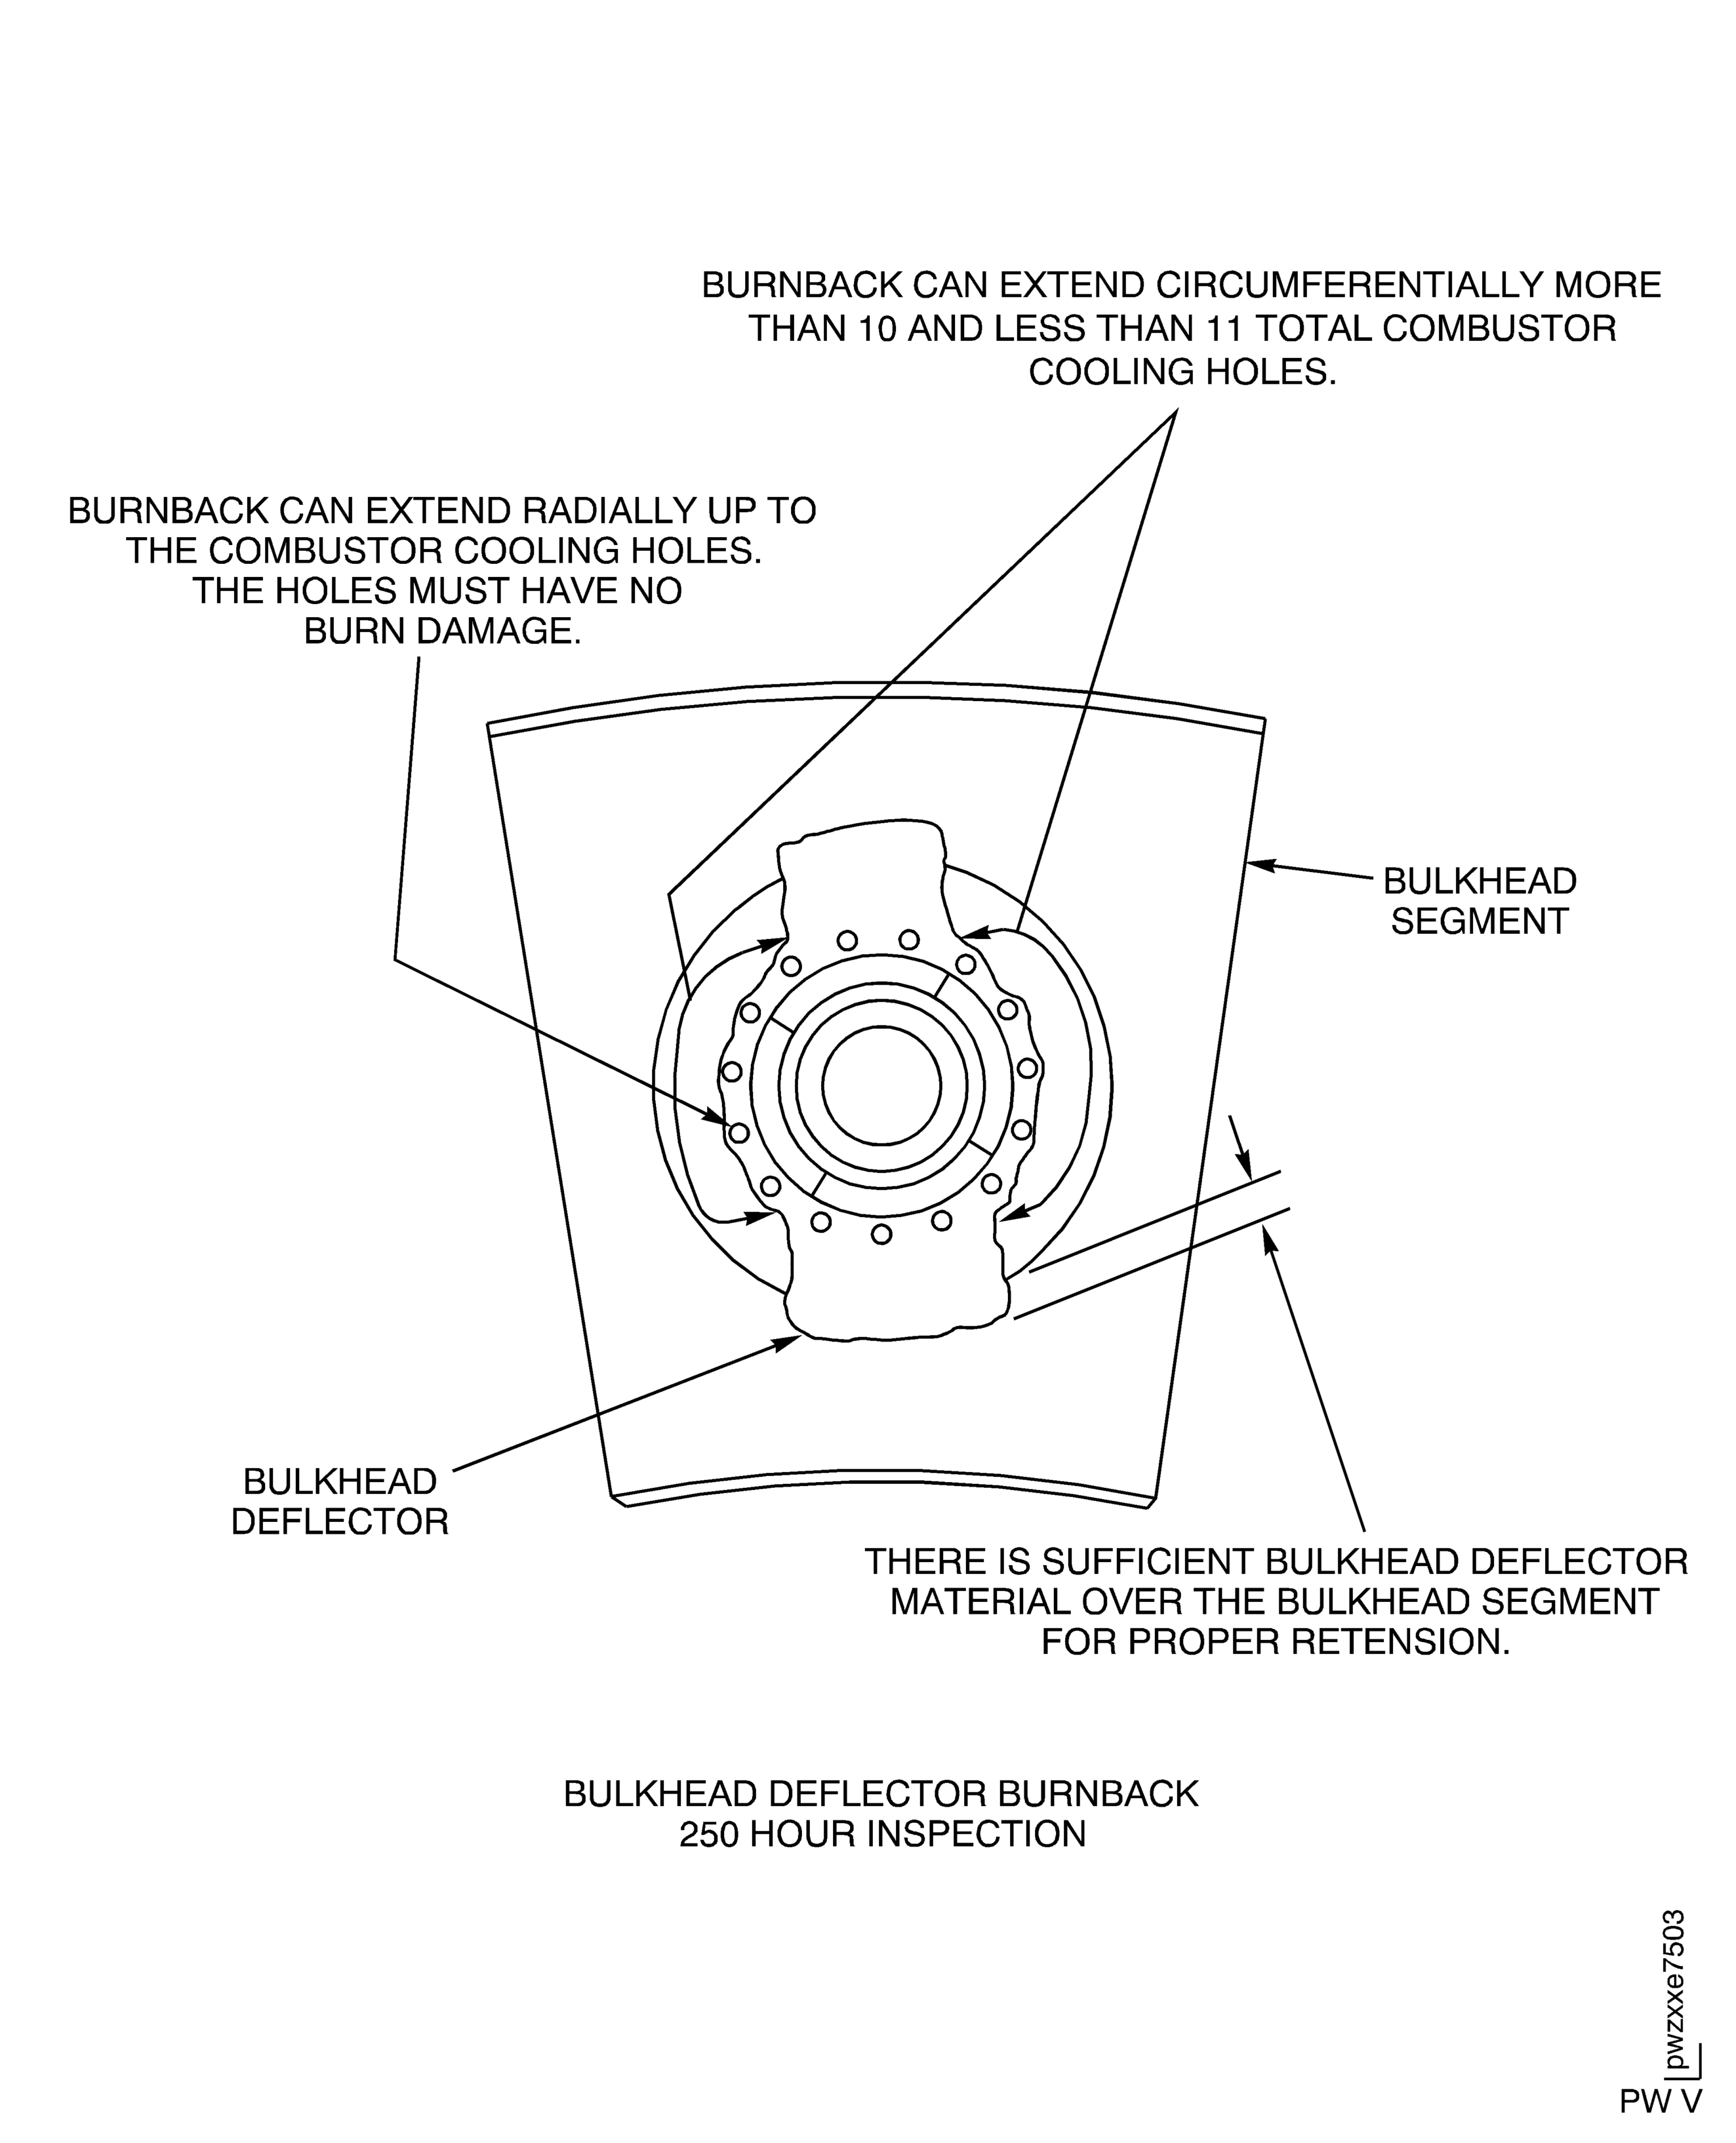
        1. There is full material thickness edge burnback that extends circumferentially to the outer diameter of 10 and less than 11 total combustion air holes. Surface burns are unlimited circumferentially.

        2. Burnback can extend radially back to combustion air holes. Full material burnback can break into one combustion air hole, but must not be larger than 25% of the combustion air hole circumference.

        3. The remaining material must be on opposite sides of the deflector.

        4. There must be sufficient bulkhead deflector material over the bulkhead segment for correct retention.

      1. Reject if:

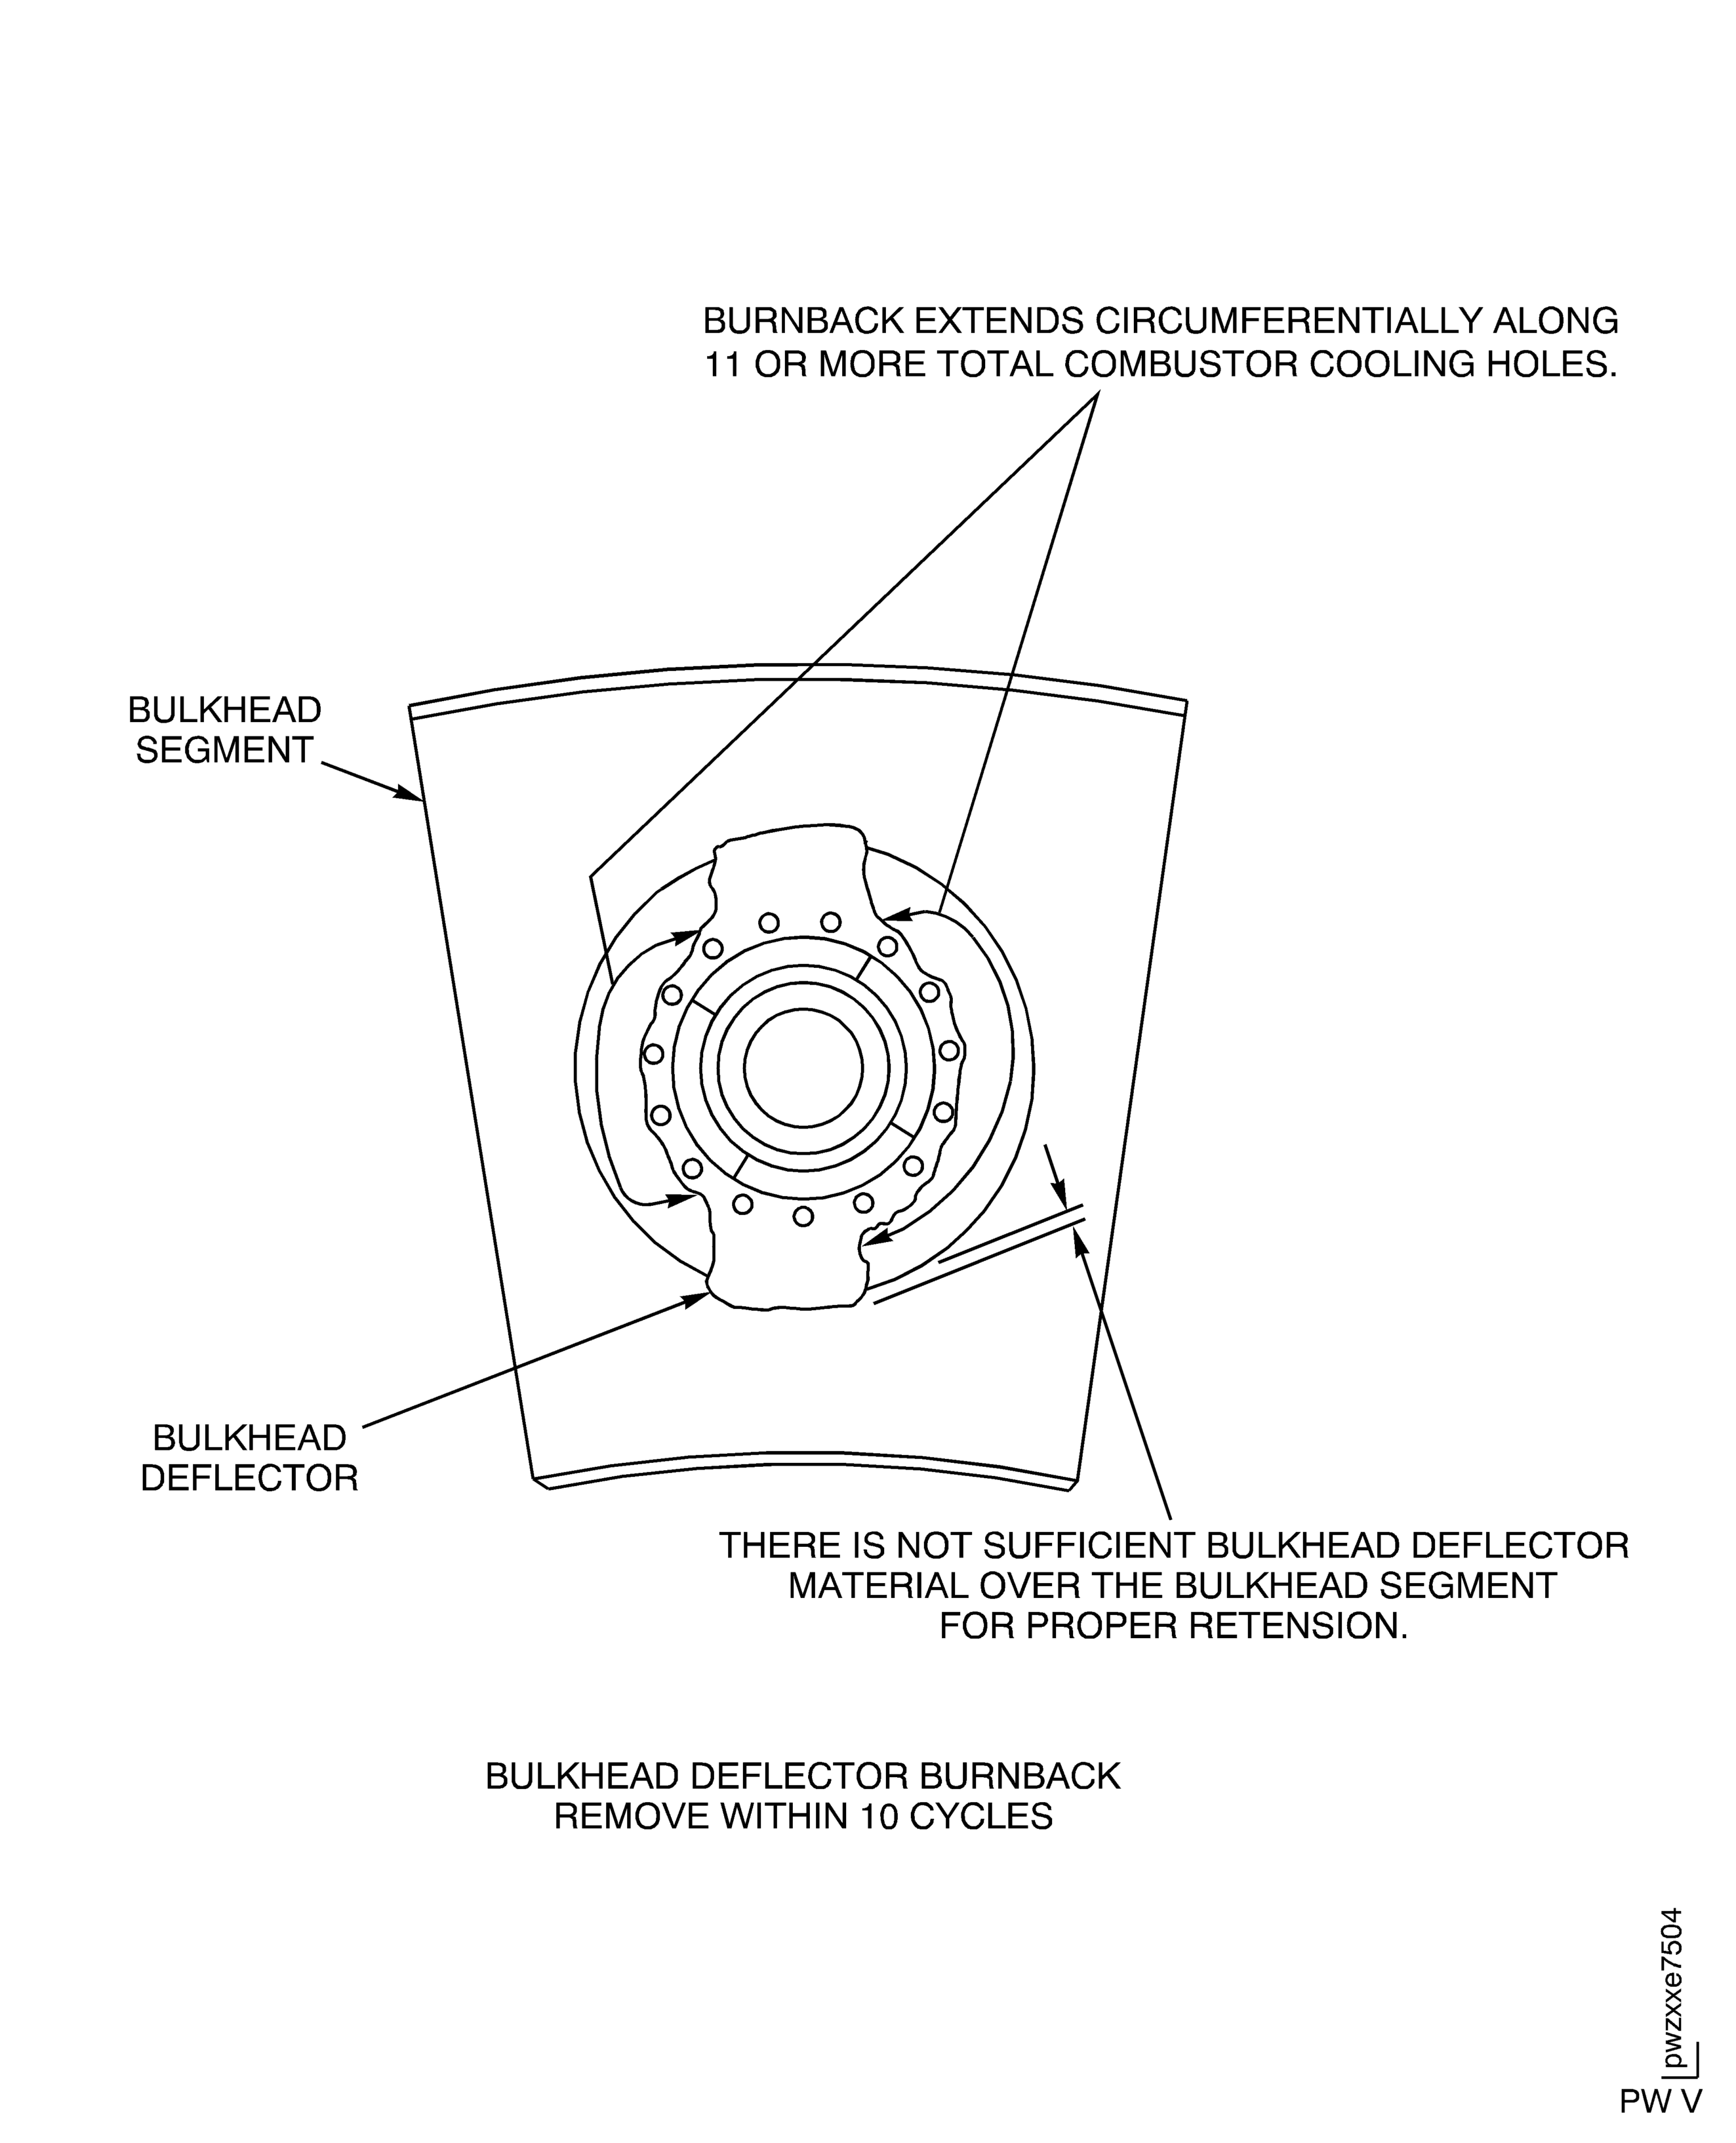
      2. There is full material thickness edge burnback that extends radially back to combustion air holes and extends circumferentially along the outer diameter of 11 or more total combustion air holes. Surface burns are unlimited cicumferentially.

      3. There is full material thickness edge burnback that extends into one combustion air hole and is more than 25 per cent of the combustion air hole circumference.

      4. There is full material thickness edge burnback that extends through the outer diameter of more than one combustion air hole for each bulkhead deflector.

      5. Remaining material is not located on the opposite sides of the deflector.

      6. Sufficient bulkhead deflector material does not exist over the bulkhead segment for correct retention.

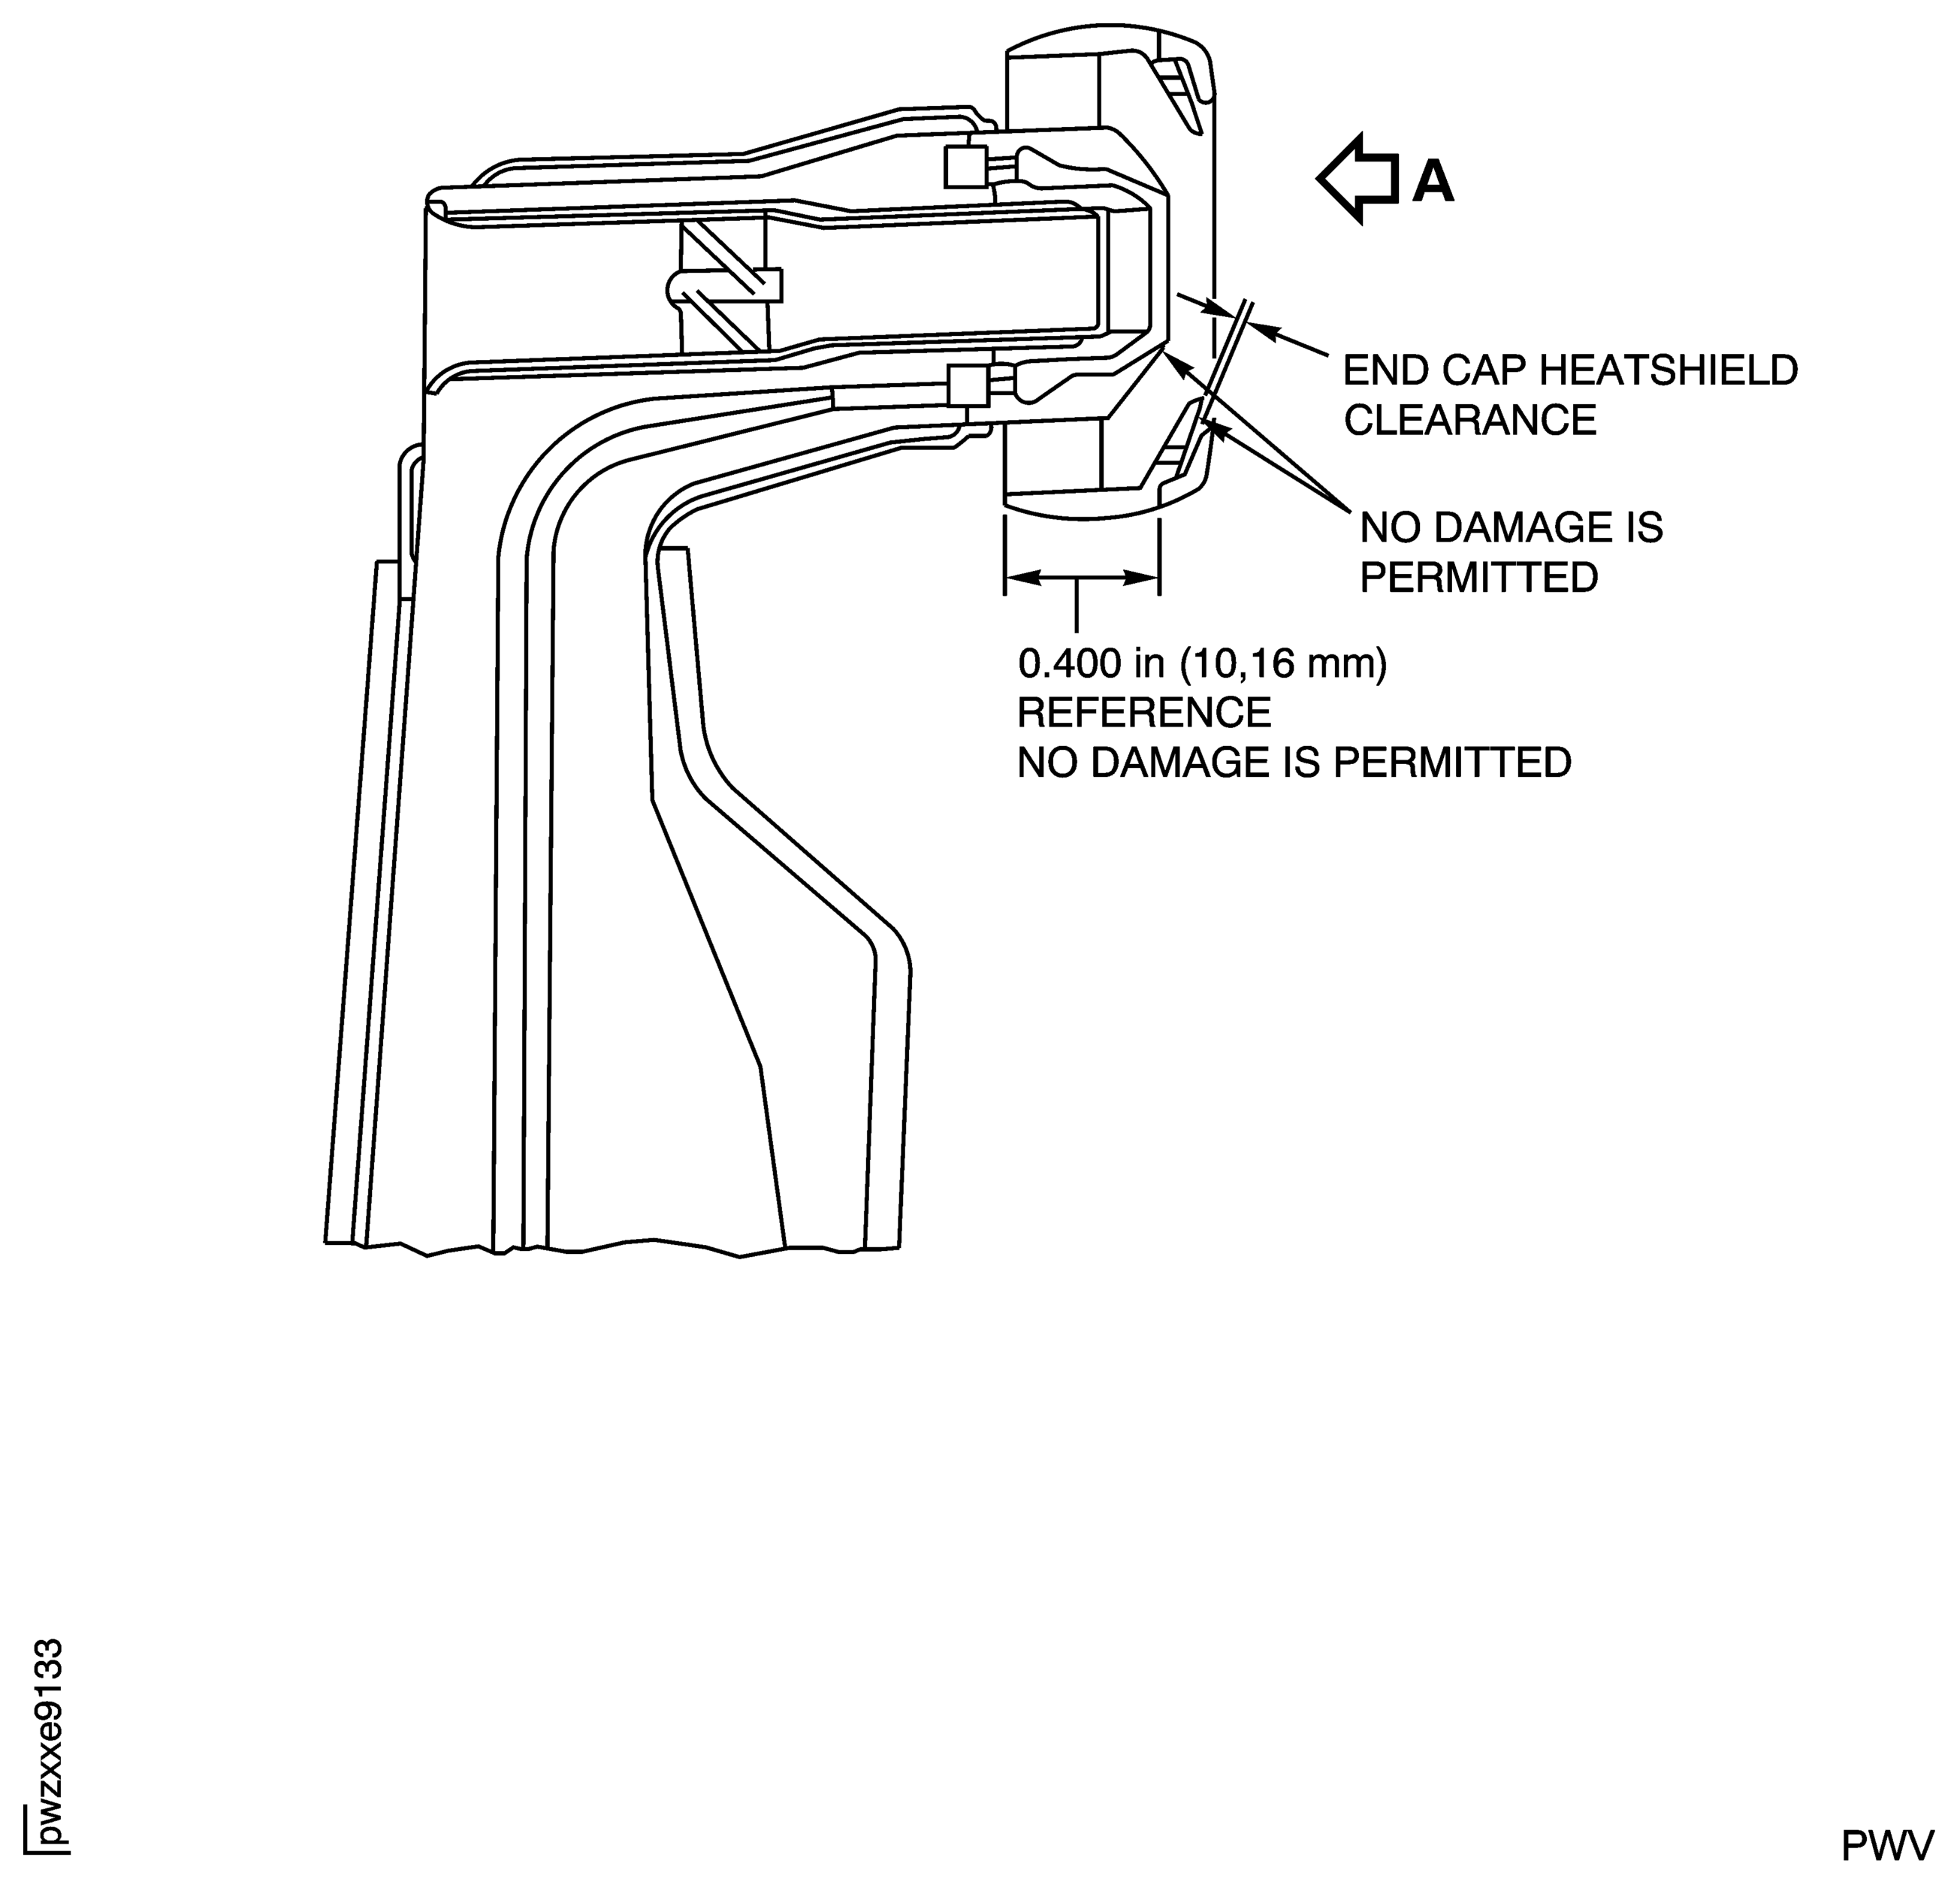
    1. SUBTASK 72-00-00-220-171 End Cap Damage on the Fuel Nozzles

    2. Refer to Figure, Figure and Figure.

      1. Accept the fuel nozzle if:

      2. The clearance between the end cap and the nozzle is fully closed.

      3. There is no limit to the number of radial and circumferential cracks in the end cap.

      4. Some or all of the end cap segments are broken away.

      1. Replace the fuel nozzle if:

      2. There are cracks, distortion, erosion or other damage on the areas adjacent to the end cap.

    1. SUBTASK 72-00-00-020-070 Remove the Borescope Equipment from the Borescope Inspection Ports

    2. Remove the borescope equipment from the borescope inspection ports.

    1. SUBTASK 72-00-00-420-078 Close the Borescope Inspection Ports, after the Borescope Inspection is completed, as follows

      1. For the B1 through B6 ports:

        NOTE

        It is permissible to correct minor thread damage to the threaded hole with a 0.5625-18UNJF-3B tap.
      2. Install the plugs Diffuser Case Assembly And Fittings and (72-42-10, 01-010) gaskets six locations, Figure and Figure. Remove the unwanted paste.

      3. Torque the plugs to 70 to 80 lbfin (7.91 to 9.04 Nm).

      4. Safety the plugs with CoMat 02-141 LOCKWIRE.

        1. For the IP1 and IP2 ports:

        2. Install the igniter plugs.

  1. Figure: Borescope Ports for Inspection of the Combustion Chamber Liners and First Stage Vanes (Left Side)

    Borescope Ports for Inspection of the Combustion Chamber Liners and First Stage Vanes (Left Side)
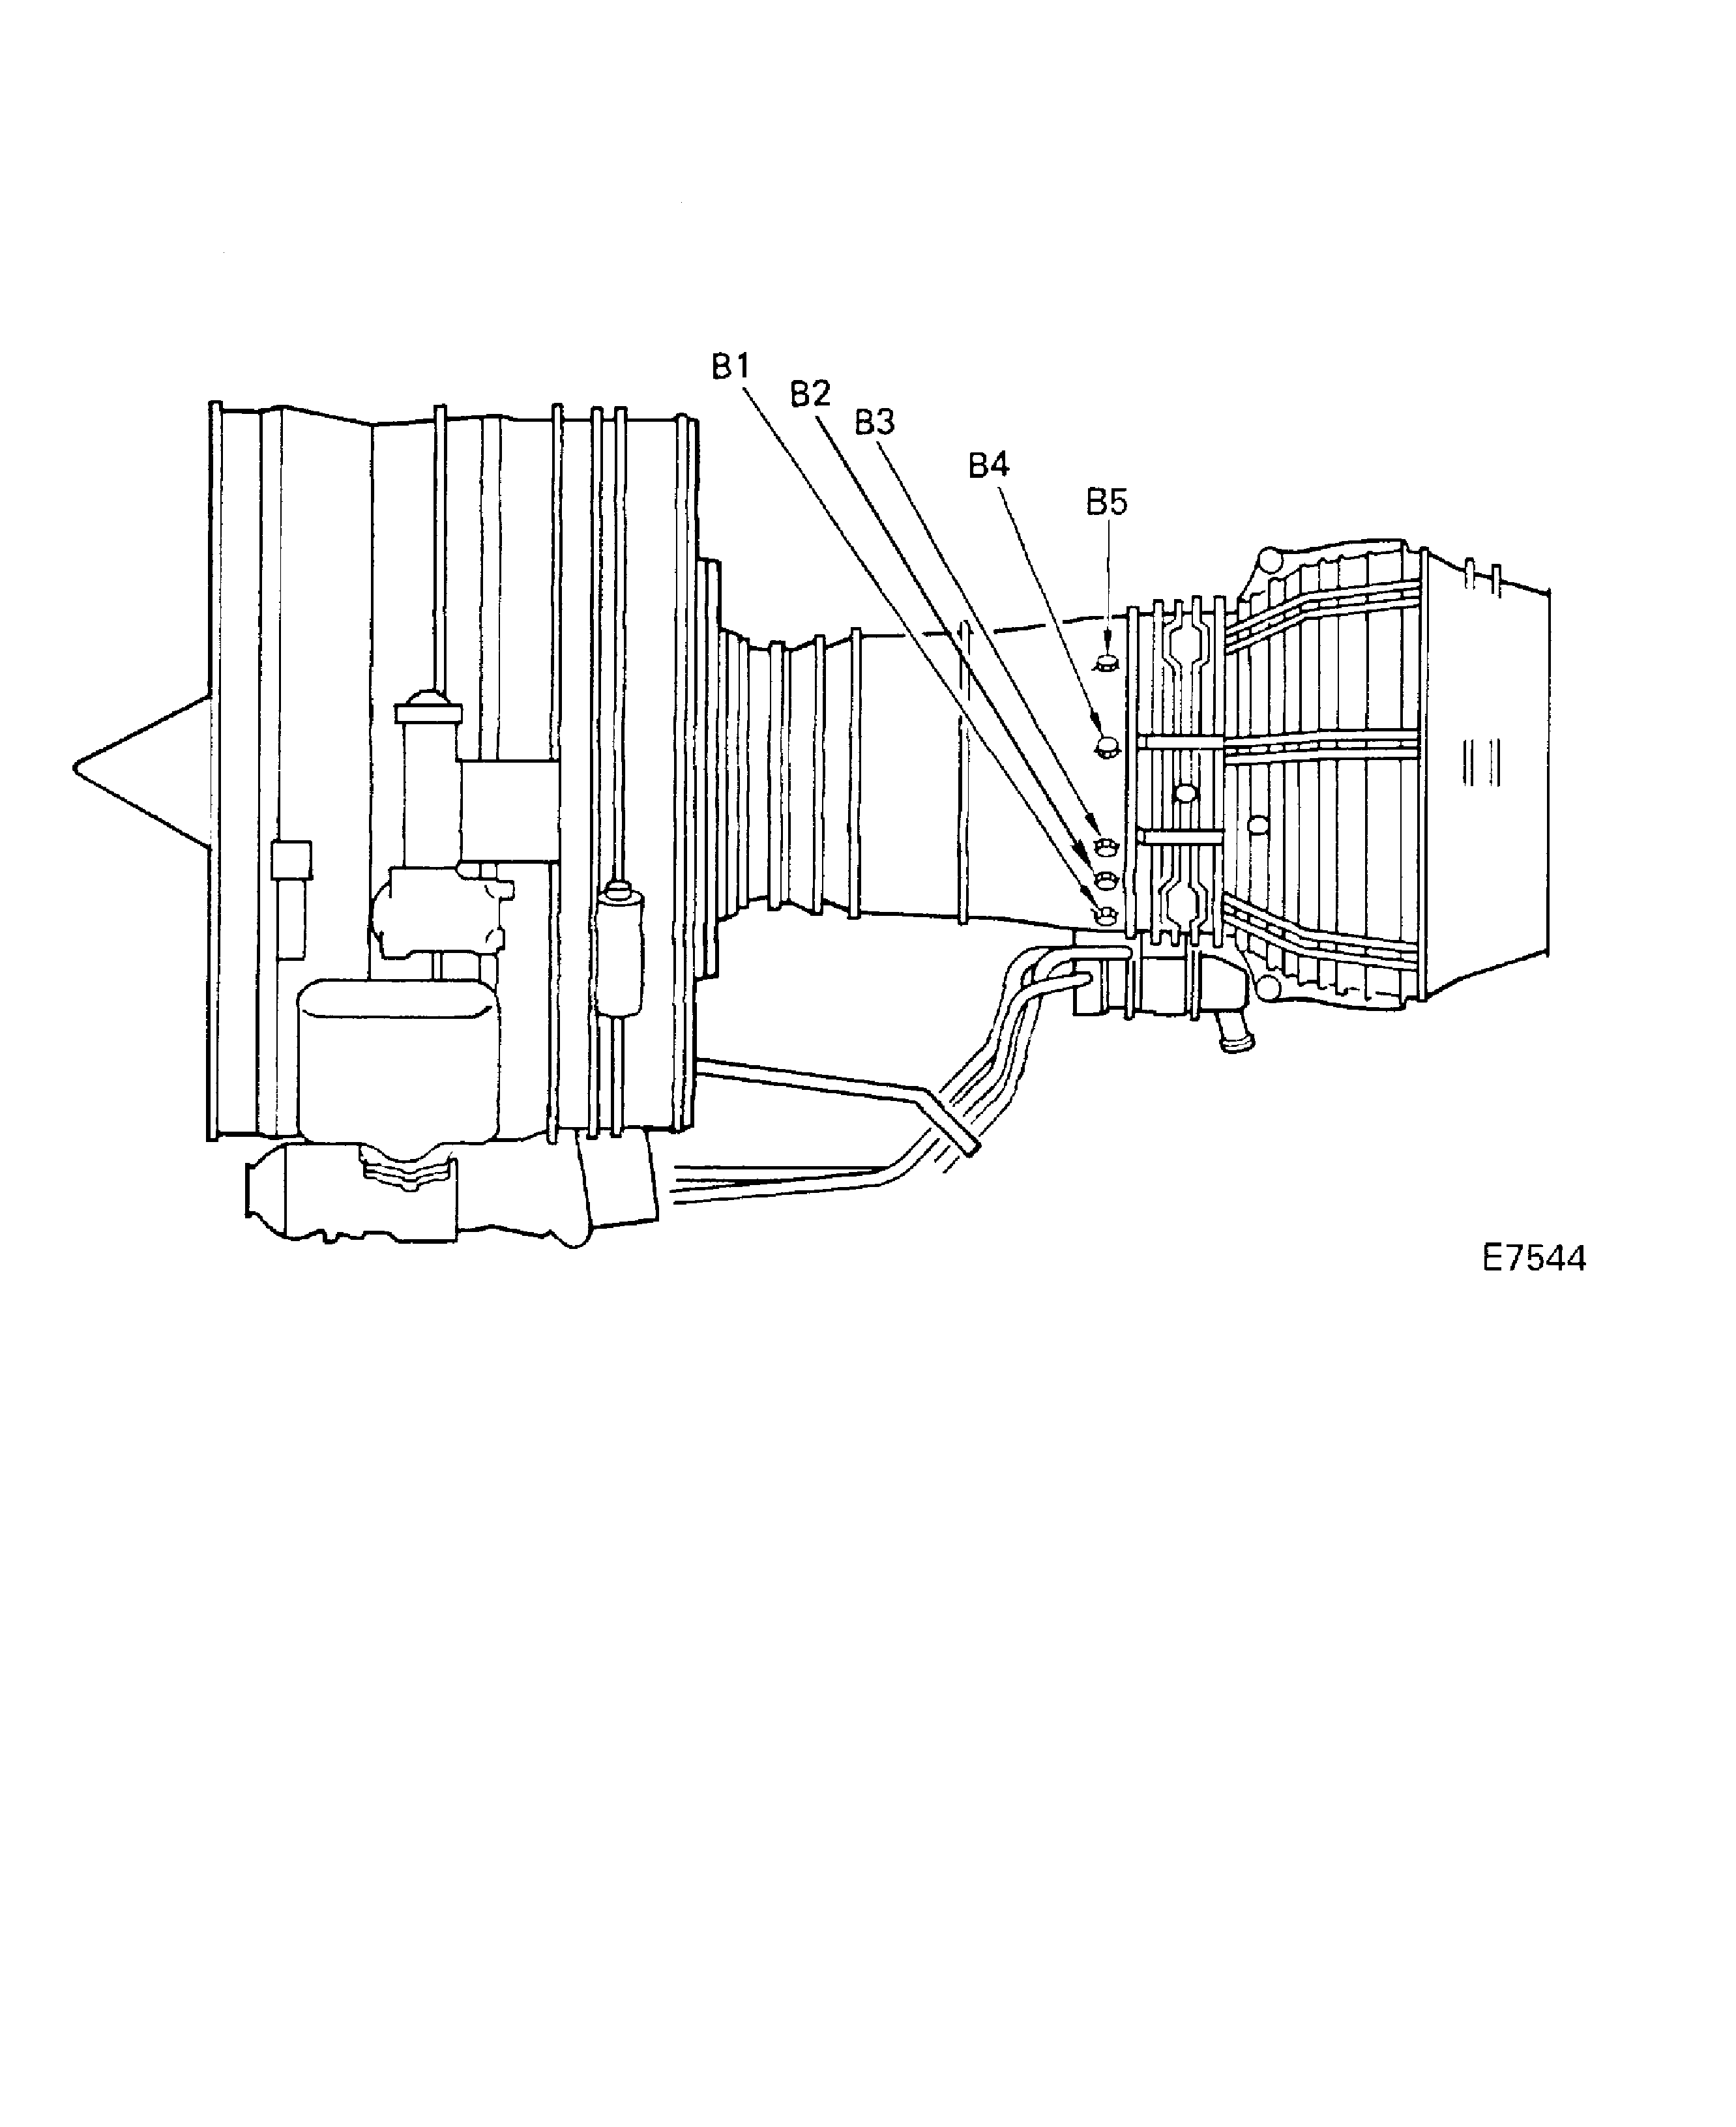
    Figure: Borescope Ports for Inspection of the Combustion Chamber Liners and First Stage Vanes (Right Side)
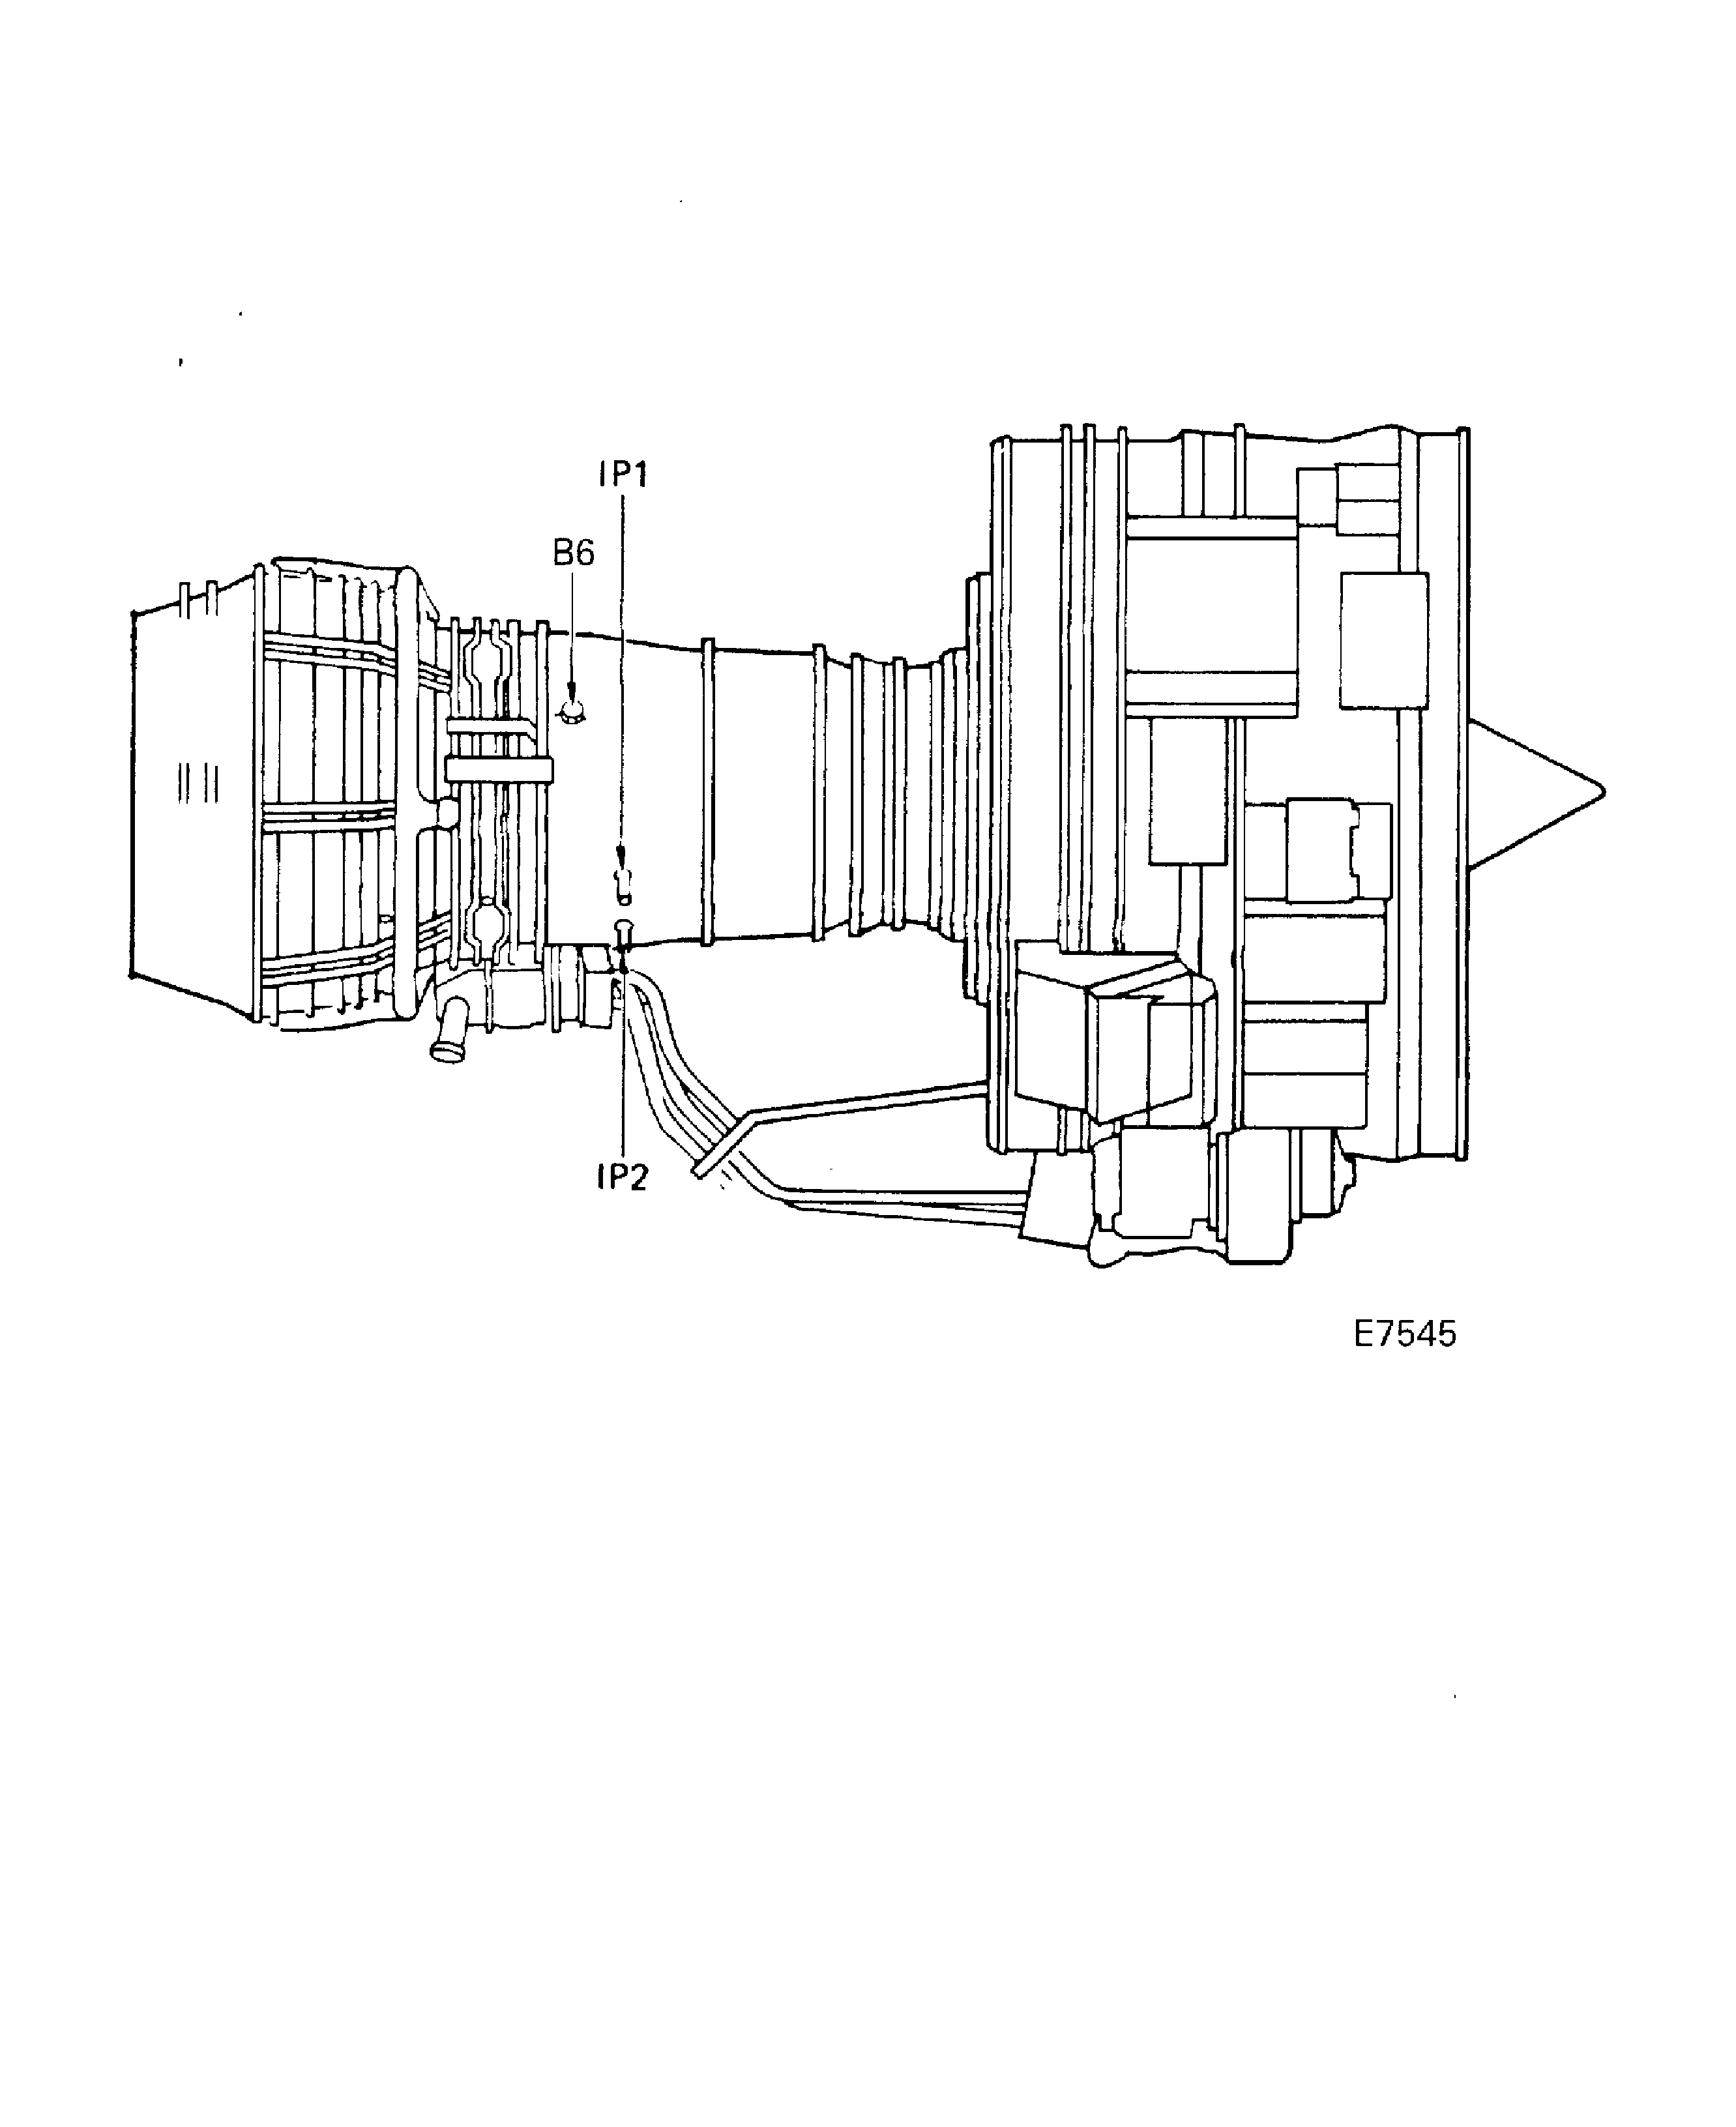
    Borescope Ports for Inspection of the Combustion Chamber Liners and First Stage Vanes (Right Side)

    Figure: Borescope Ports

    Borescope Ports

    Figure: Borescope Inspection Ports for the First Stage Vanes and the Combustion Chamber Liner

    Borescope Inspection Ports for the First Stage Vanes and the Combustion Chamber Liner

    Figure: HPT 1st Stage Vane Area Names and Dimensional References

    HPT 1st Stage Vane Area Names and Dimensional References
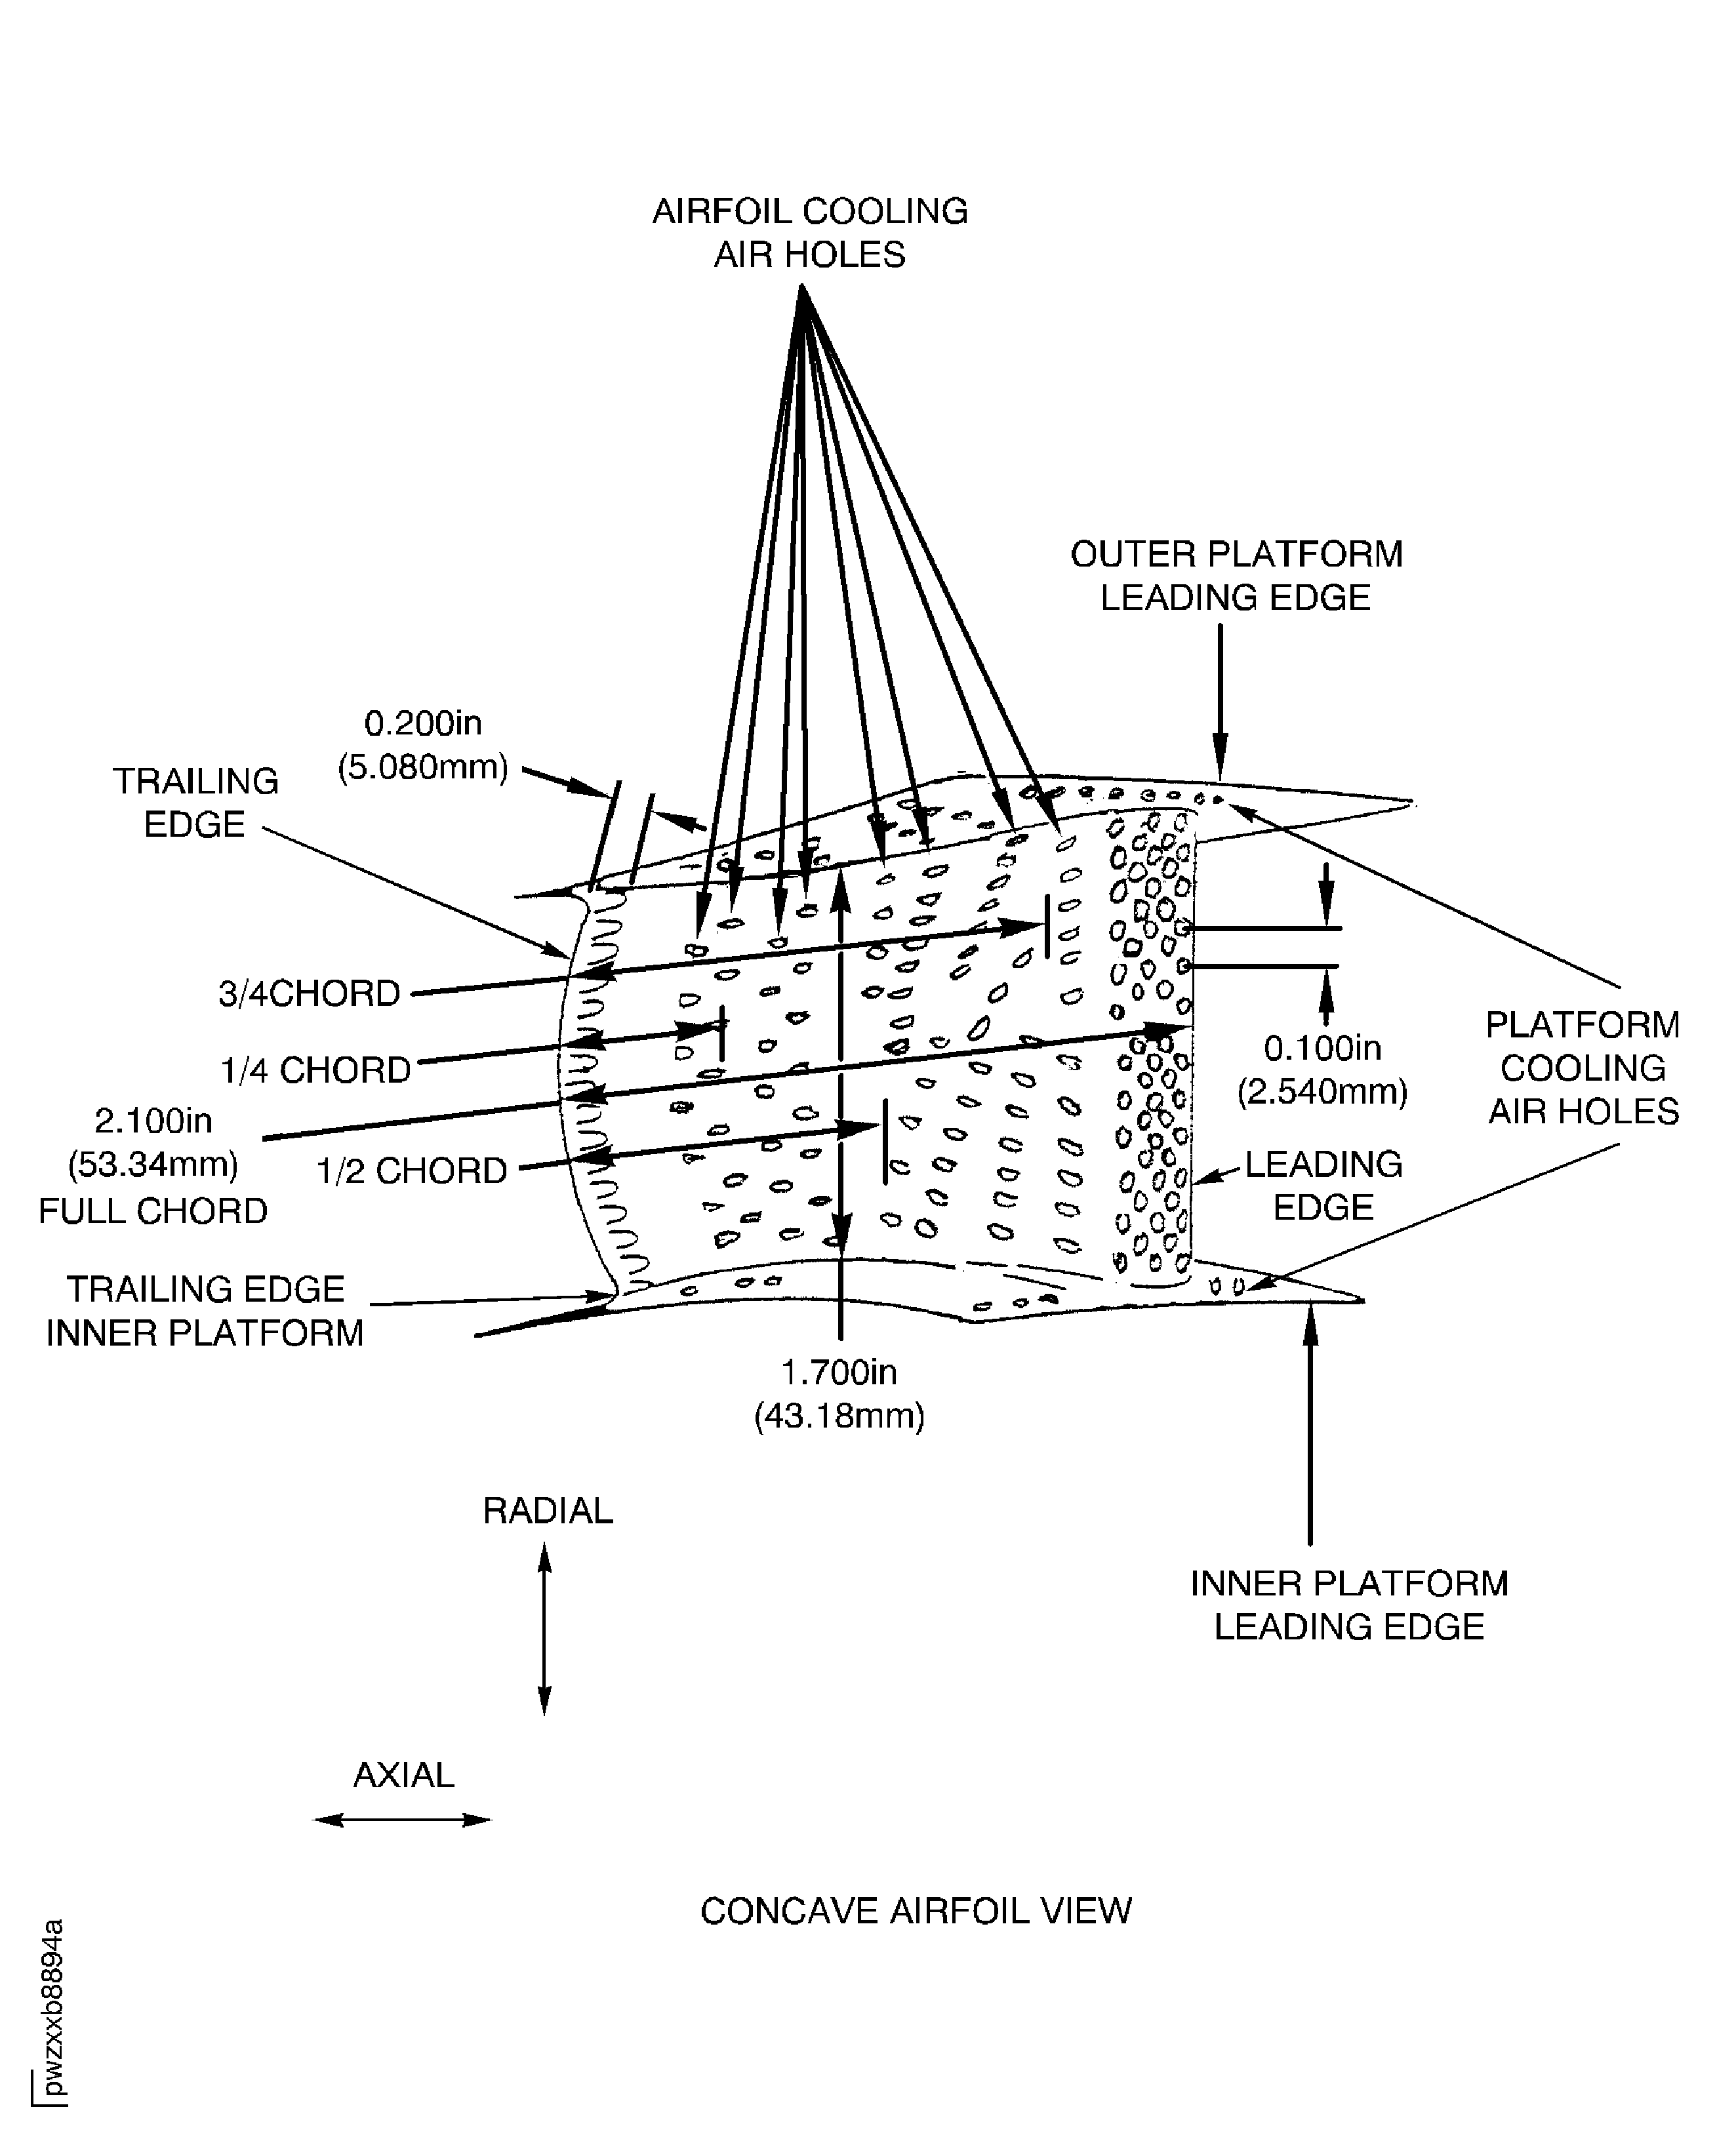
    Figure: HPT 1st Stage Vane Area Names and Dimensional References

    HPT 1st Stage Vane Area Names and Dimensional References
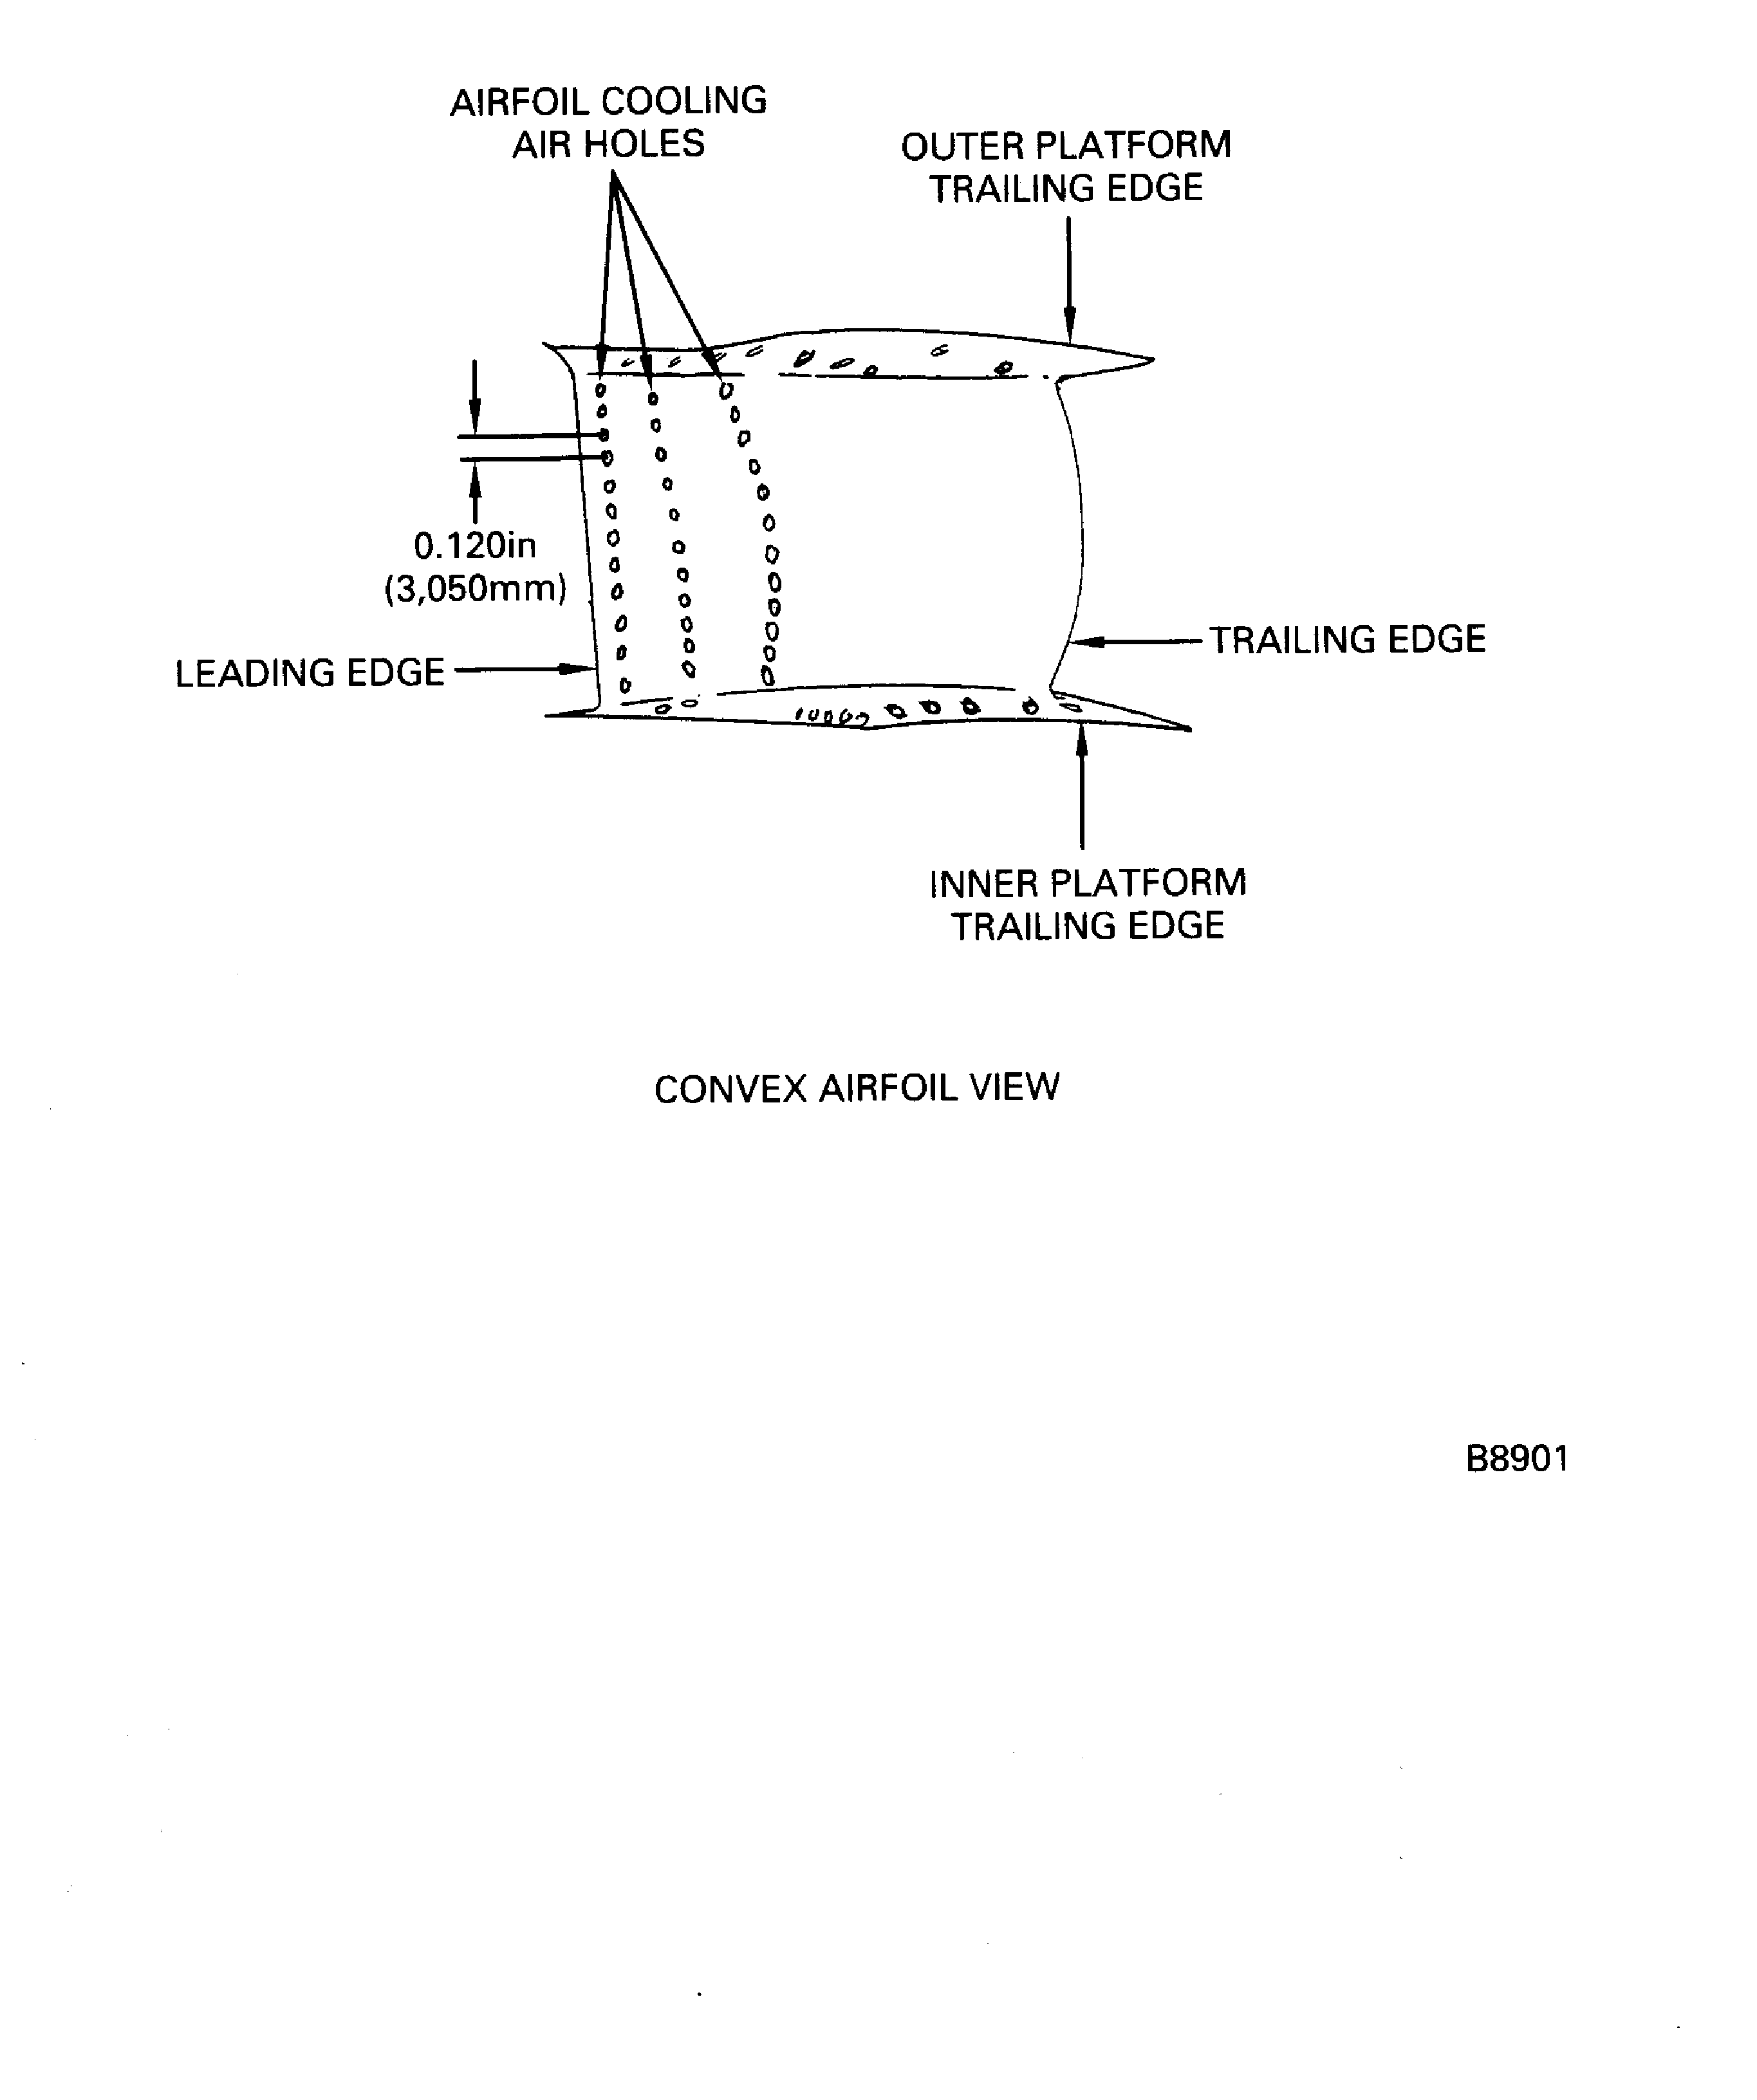
    Figure: HPT 1st Stage Vane Area Names and Dimensional References

    HPT 1st Stage Vane Area Names and Dimensional References

    Figure: HPT 1st Stage Vane Area Names and Types of Damage

    HPT 1st Stage Vane Area Names and Types of Damage

    Figure: HPT 1st Stage Vane Area Names and Types of Damage

    HPT 1st Stage Vane Area Names and Types of Damage

    Figure: HPT 1st Stage Vane Area Names and Burn Conditions

    HPT 1st Stage Vane Area Names and Burn Conditions
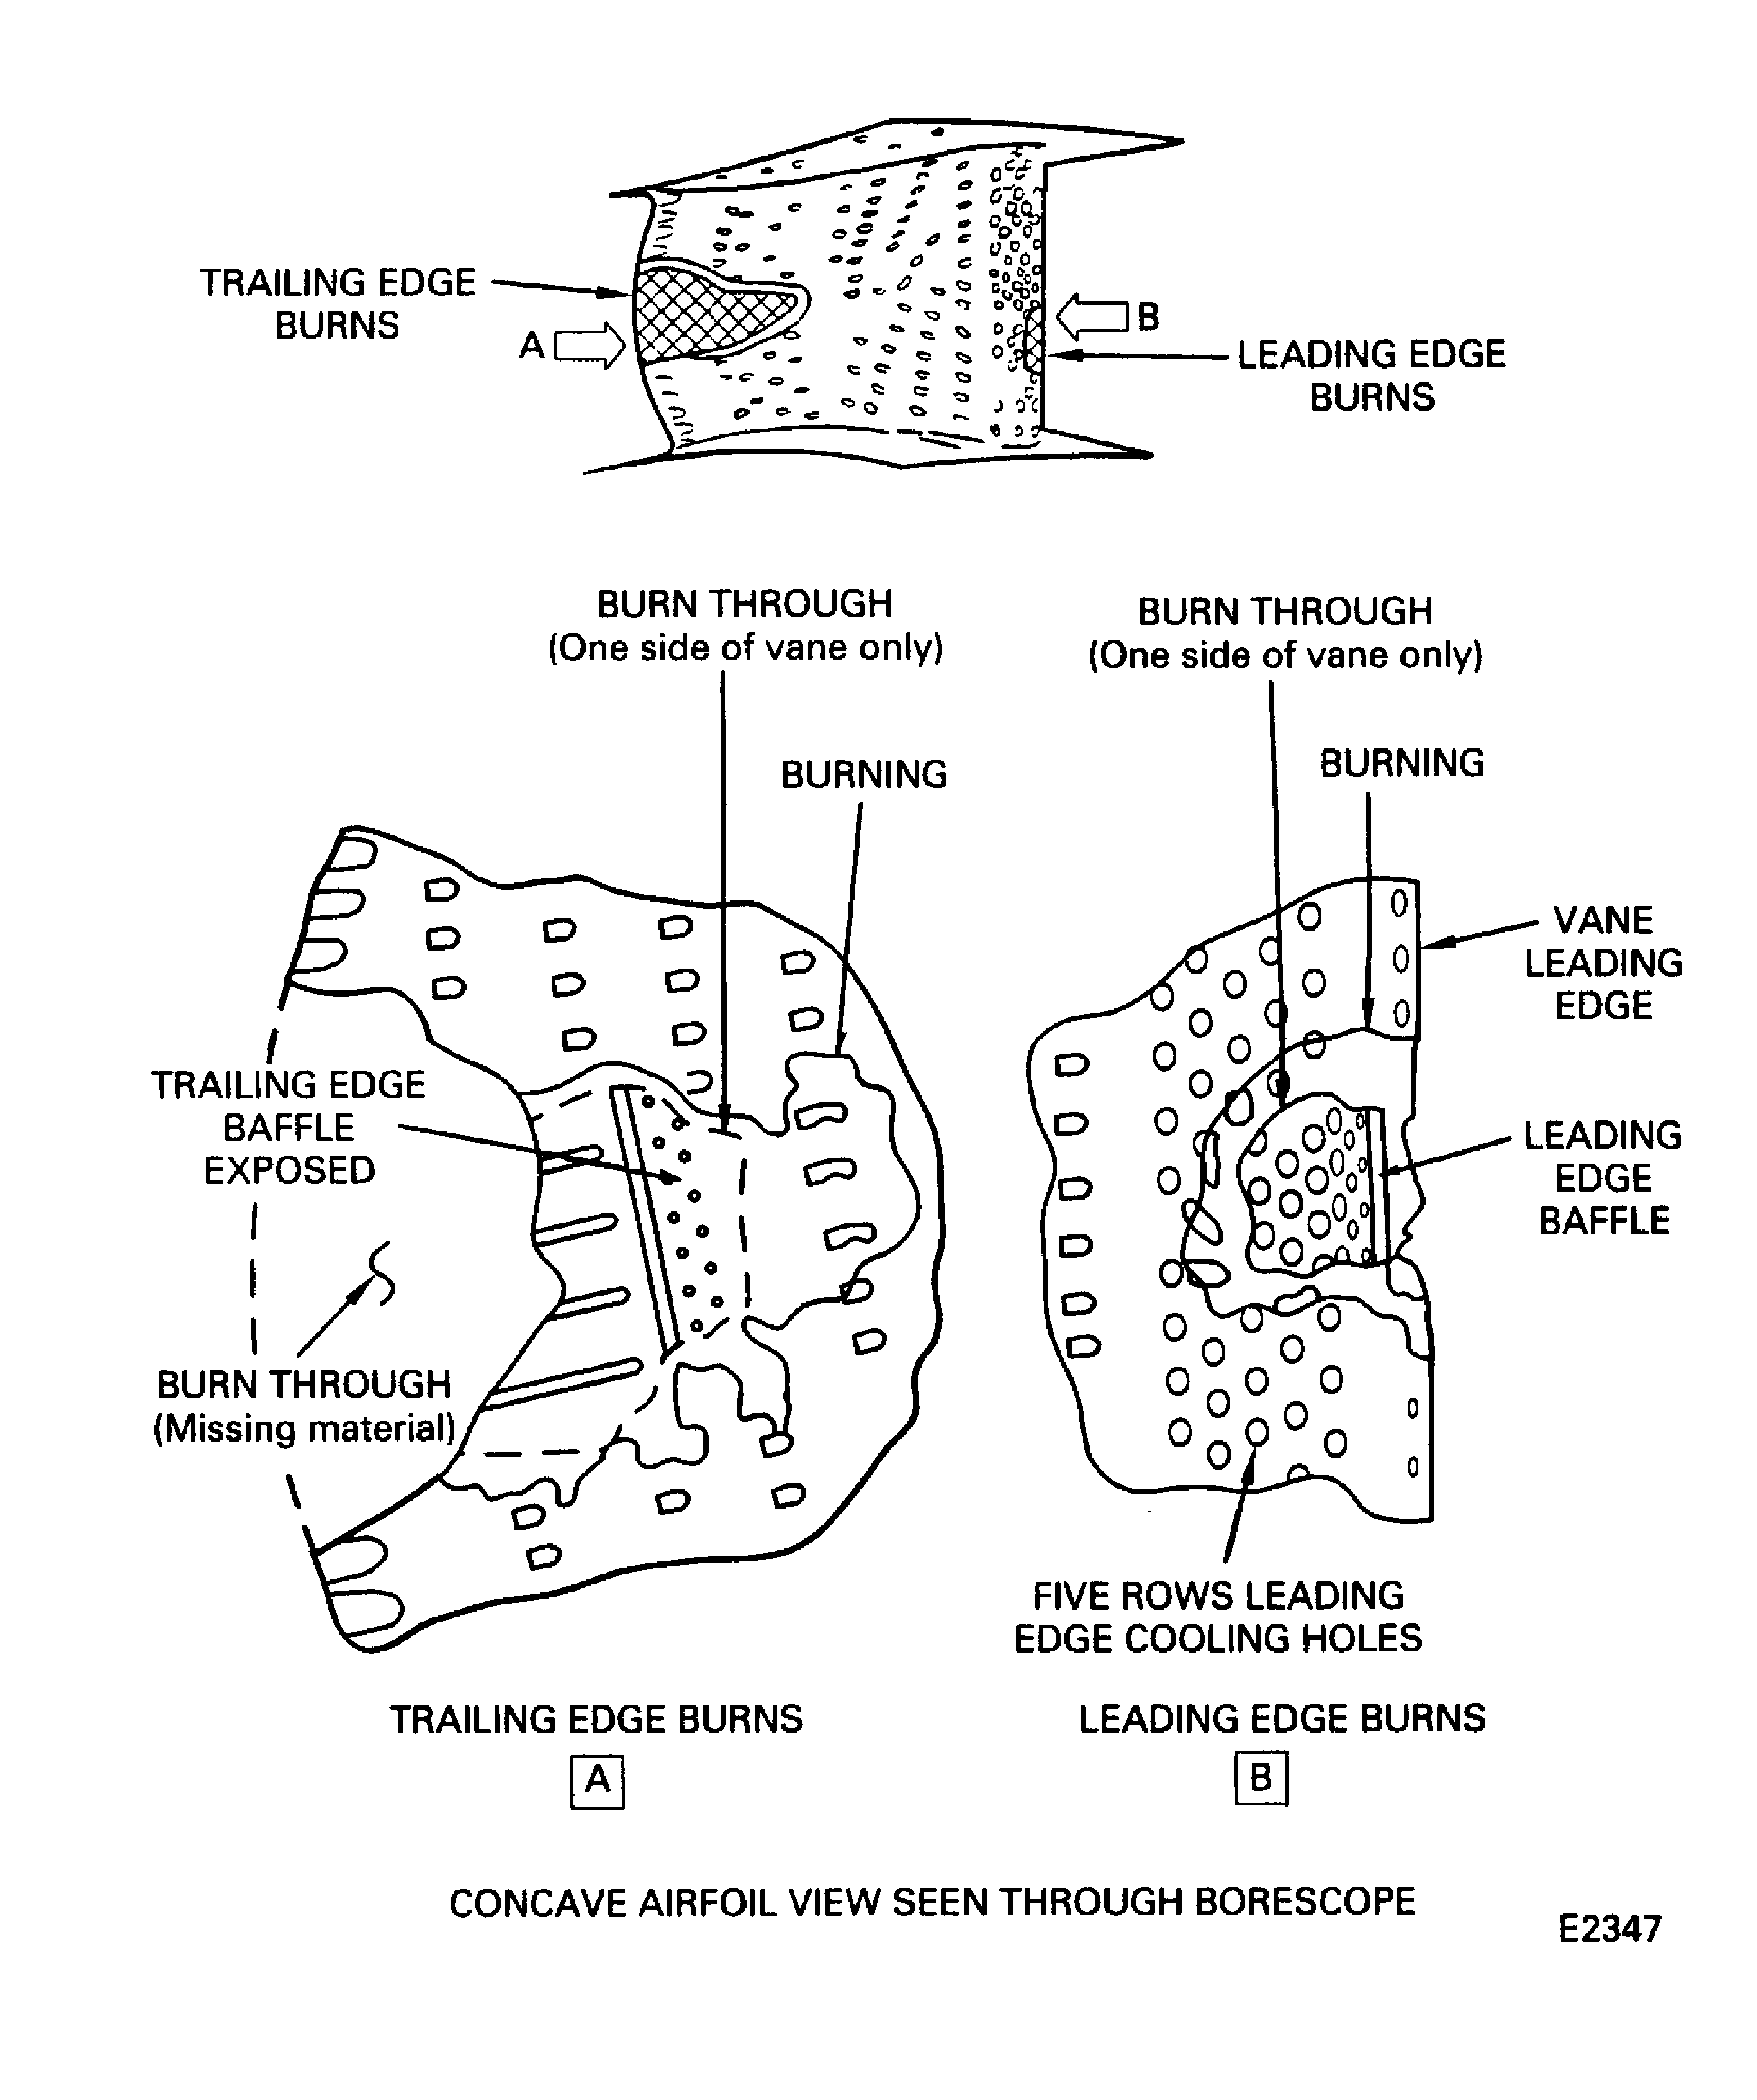
    Figure: HPT 1st Stage Vane Area Names and Types of Damage

    HPT 1st Stage Vane Area Names and Types of Damage

    Figure: Combustion Chamber Area Names

    Combustion Chamber Area Names
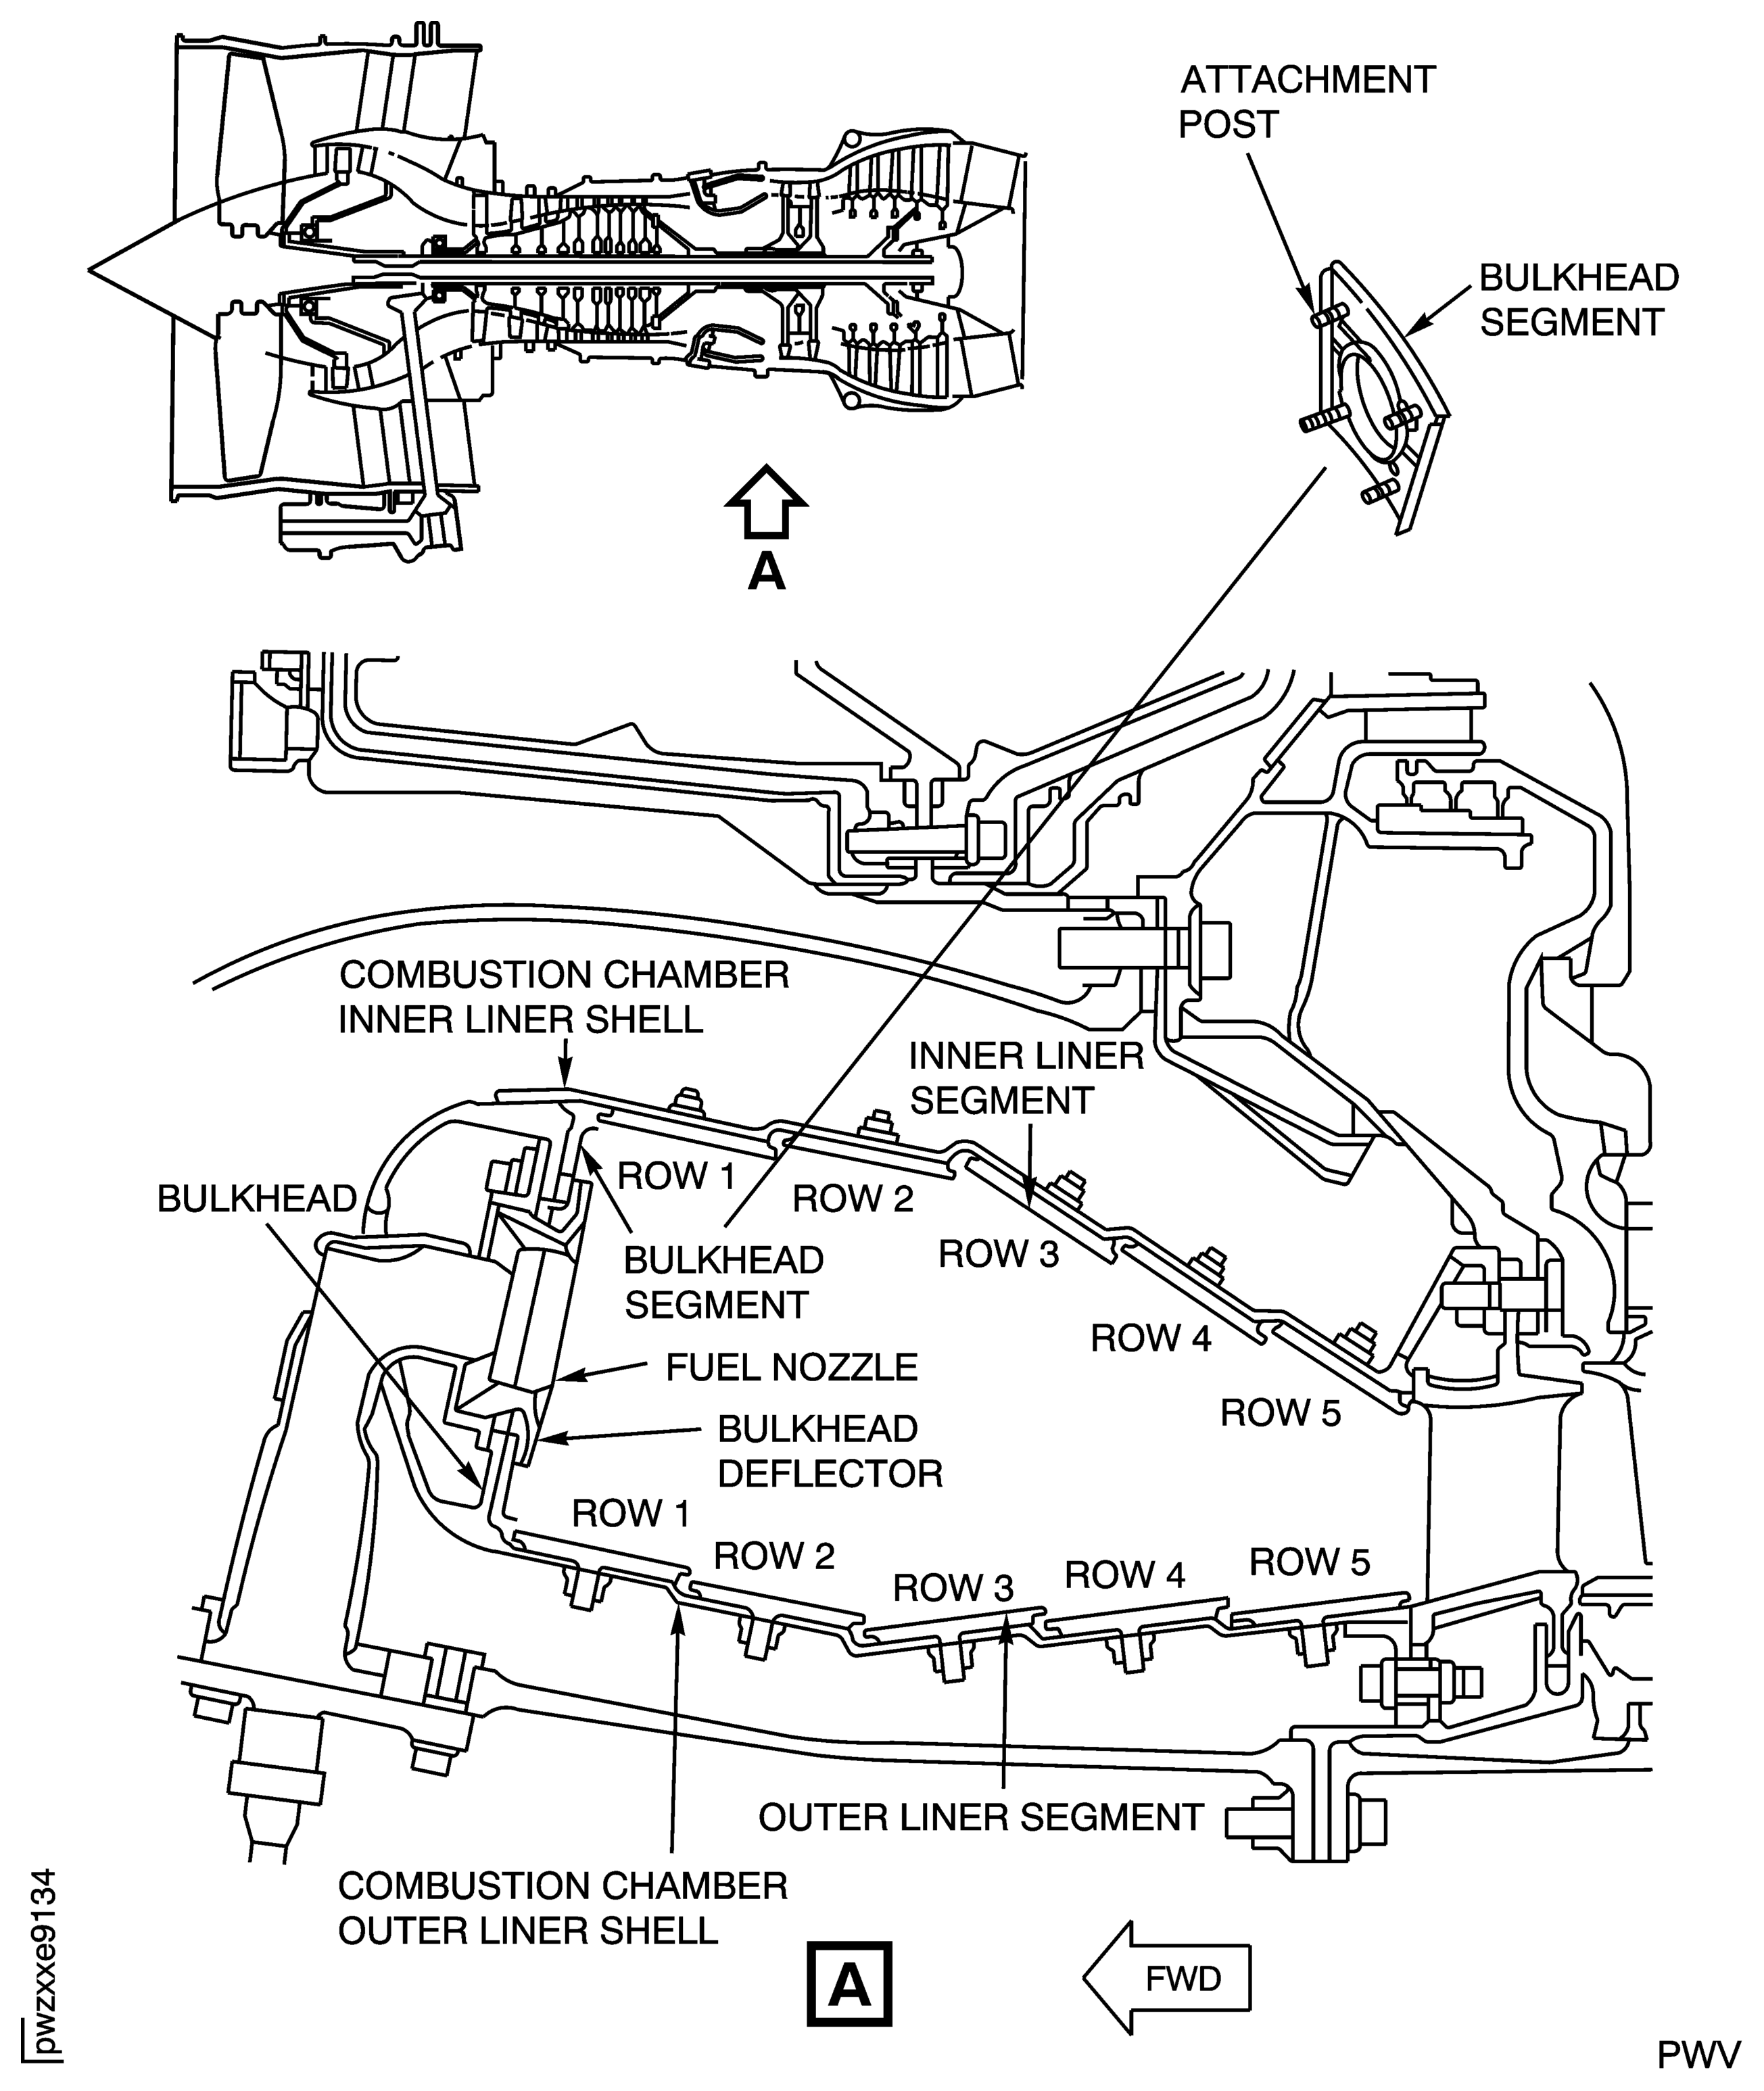
    Figure: Inner Combustion Chamber Liner Segments Dimensions References

    Inner Combustion Chamber Liner Segments Dimensions References

    Figure: Outer Combustion Chamber Liner Segments Dimensions References

    Outer Combustion Chamber Liner Segments Dimensions References

    Figure: Combustion Chamber Liner Segments Borescope Inspection Guidelines

    Combustion Chamber Liner Segments Borescope Inspection Guidelines

    Figure: Combustion Chamber Liner Segment Crack Limits

    Combustion Chamber Liner Segment Crack Limits

    Figure: Combustion Chamber Liner Segment Crack Limits

    Combustion Chamber Liner Segment Crack Limits

    Figure: Combustion Chamber Liner Segment Burn Limits

    Combustion Chamber Liner Segment Burn Limits

    Figure: Liner (Bulkhead) Segment Inspection Area and Cracks

    Liner (Bulkhead) Segment Inspection Area and Cracks

    Figure: Combustion Chamber Bulkhead Segment Burn Hole

    Combustion Chamber Bulkhead Segment Burn Hole

    Figure: Combustion Chamber Bulkhead Deflector Cracks and Burnback

    Combustion Chamber Bulkhead Deflector Cracks and Burnback
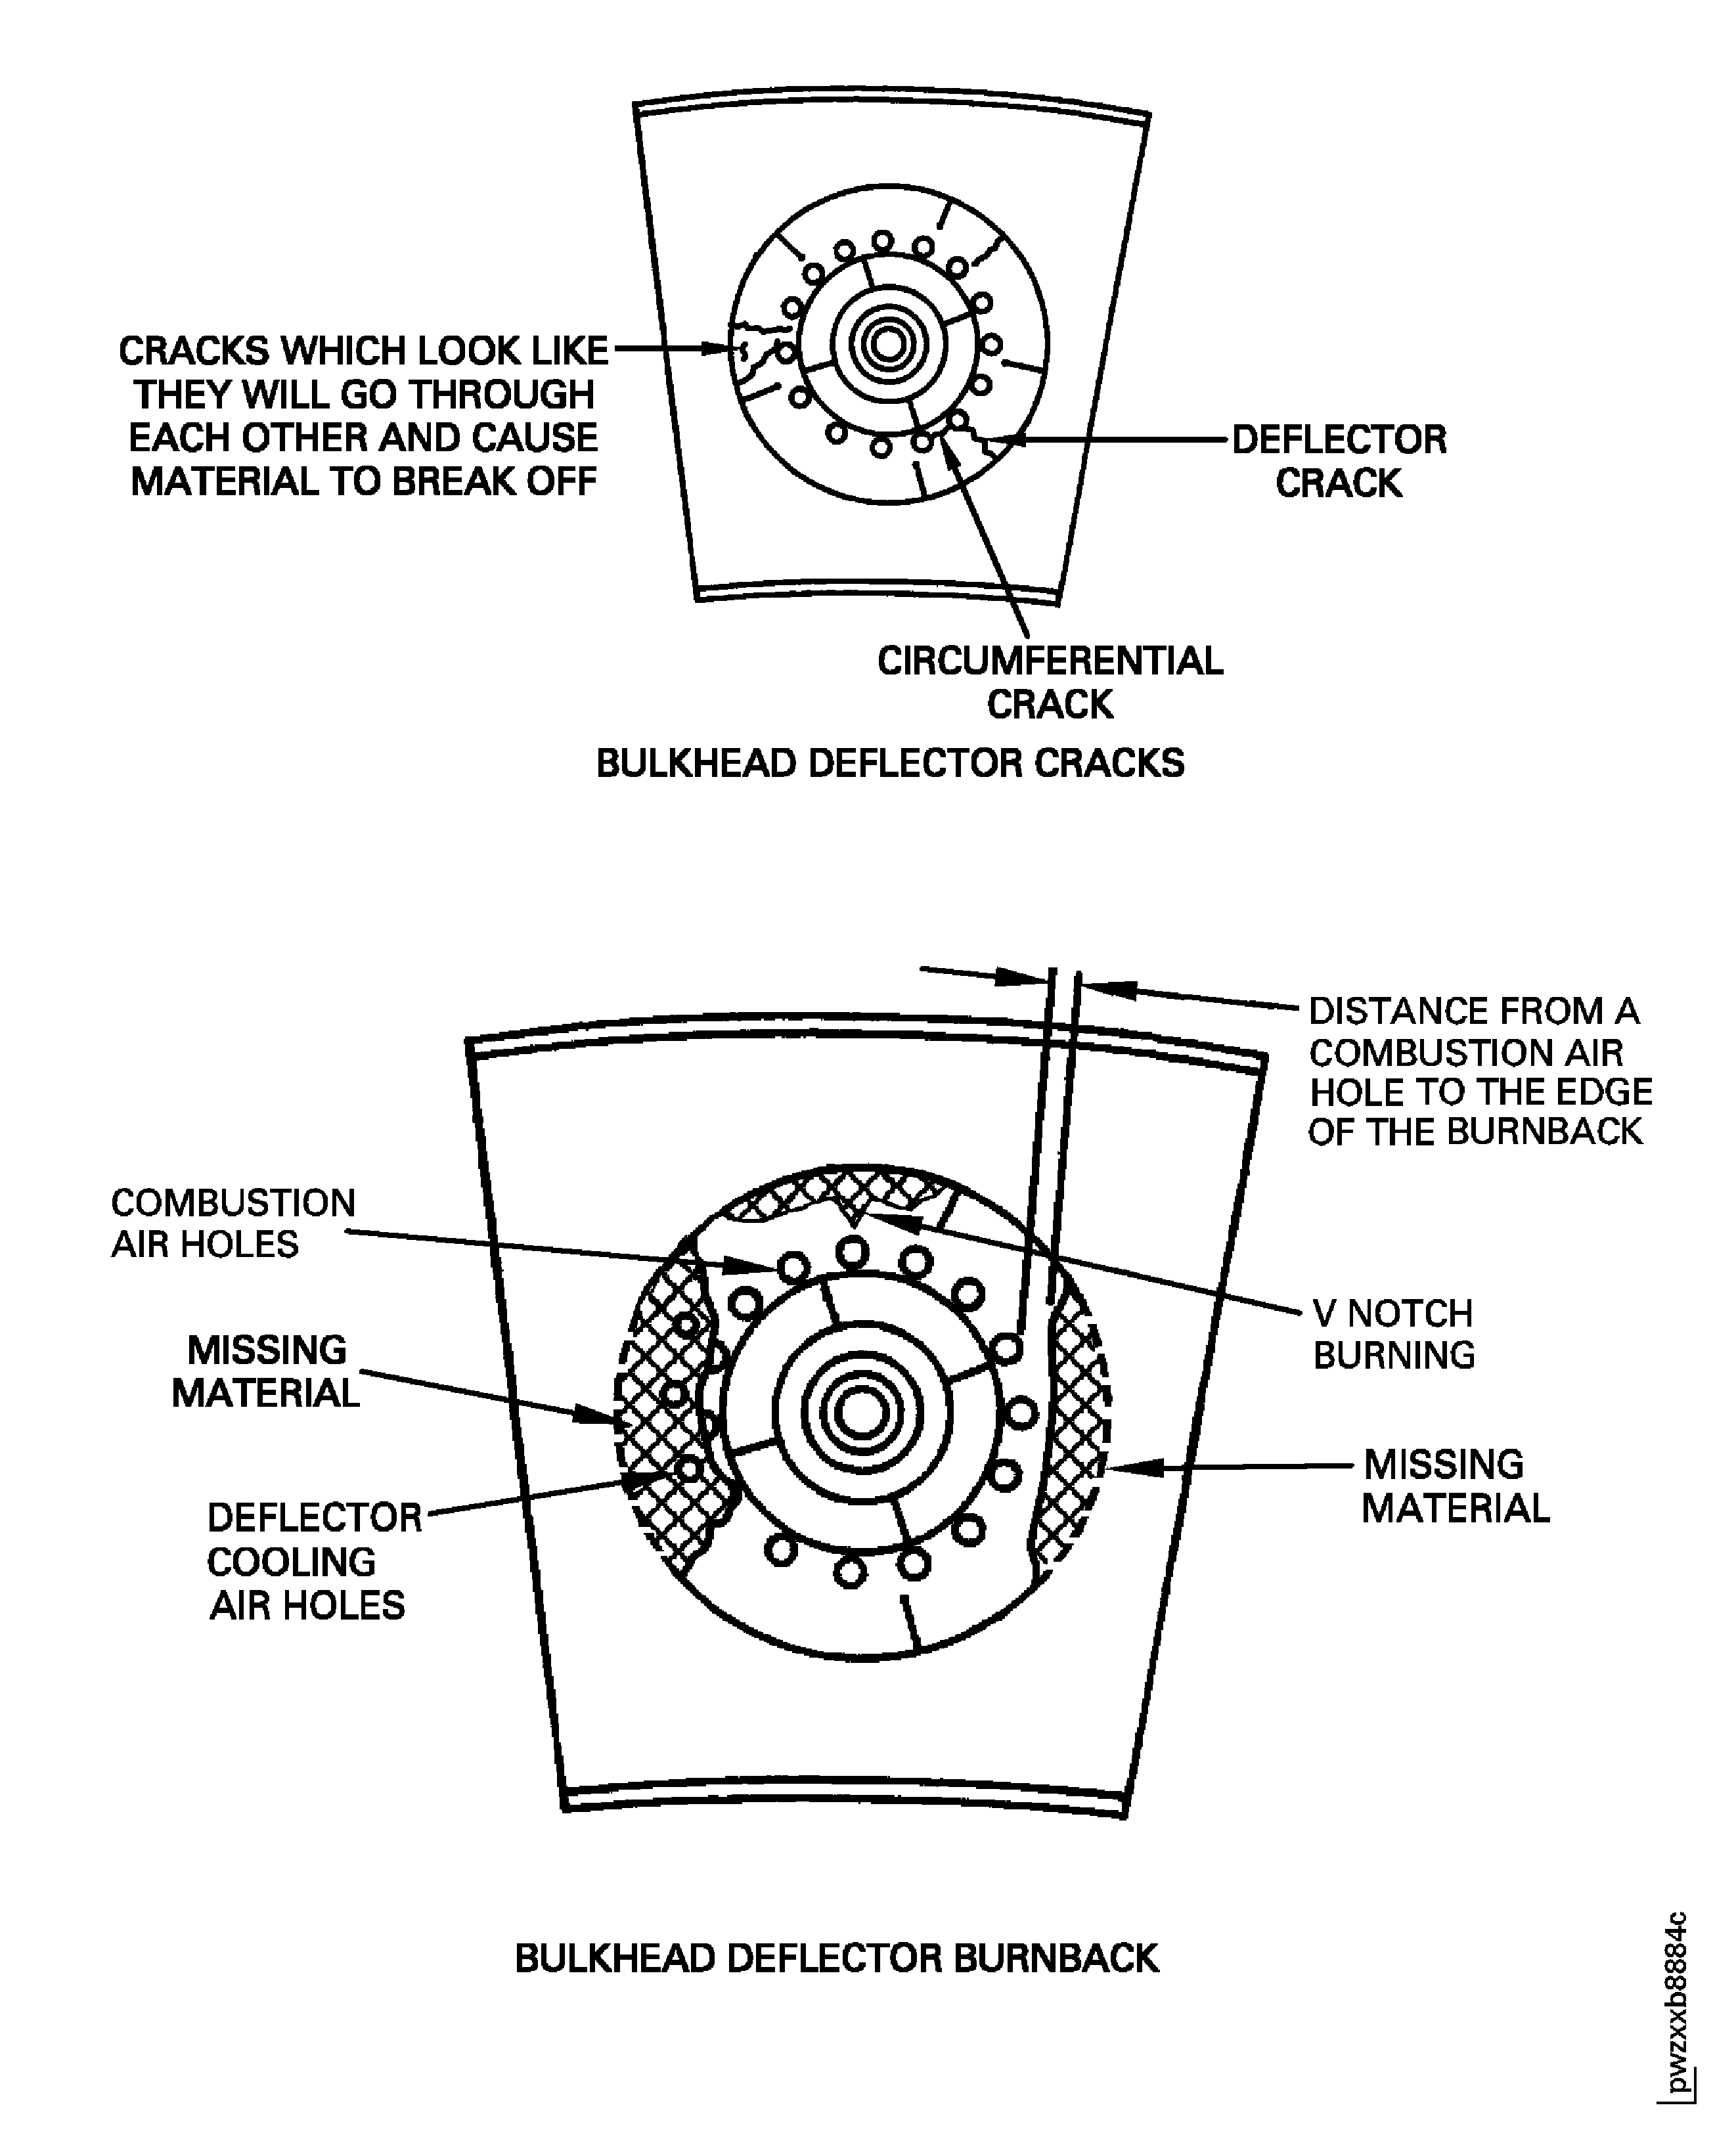
    Figure: Bulkhead Deflector Burnback

    Sheet 1

    Legend
    Bulkhead Deflector Burnback

    Sheet 1

    Close

    Figure: Bulkhead Deflector Burnback

    Sheet 2
    Legend
    Bulkhead Deflector Burnback

    Sheet 2

    Close

    Figure: Bulkhead Deflector Burnback

    Sheet 3
    Legend
    Bulkhead Deflector Burnback

    Sheet 3

    Close

    Figure: Bulkhead Deflector Burnback

    Sheet 4
    Legend
    Bulkhead Deflector Burnback

    Sheet 4

    Close

    Figure: Bulkhead Deflector Burnback

    Sheet 5
    Legend
    Bulkhead Deflector Burnback

    Sheet 5

    Close

    Figure: Bulkhead Deflector Burnback

    Sheet 6

    Legend
    Bulkhead Deflector Burnback

    Sheet 6

    Close

    Figure: Bulkhead Deflector Burnback

    Sheet 7

    Legend
    Bulkhead Deflector Burnback

    Sheet 7

    Close

    Figure: Burnback Limits for Combustion Chamber Rejection

    Burnback Limits for Combustion Chamber Rejection

    Figure: Burnback Limits for 300 Hour Inspection

    Burnback Limits for 300 Hour Inspection

    Figure: Combustion Chamber Outer Liner Row 1 (with Igniter Holes)

    Combustion Chamber Outer Liner Row 1 (with Igniter Holes)

    Figure: Combustion Chamber Outer Liner Row 2

    Combustion Chamber Outer Liner Row 2
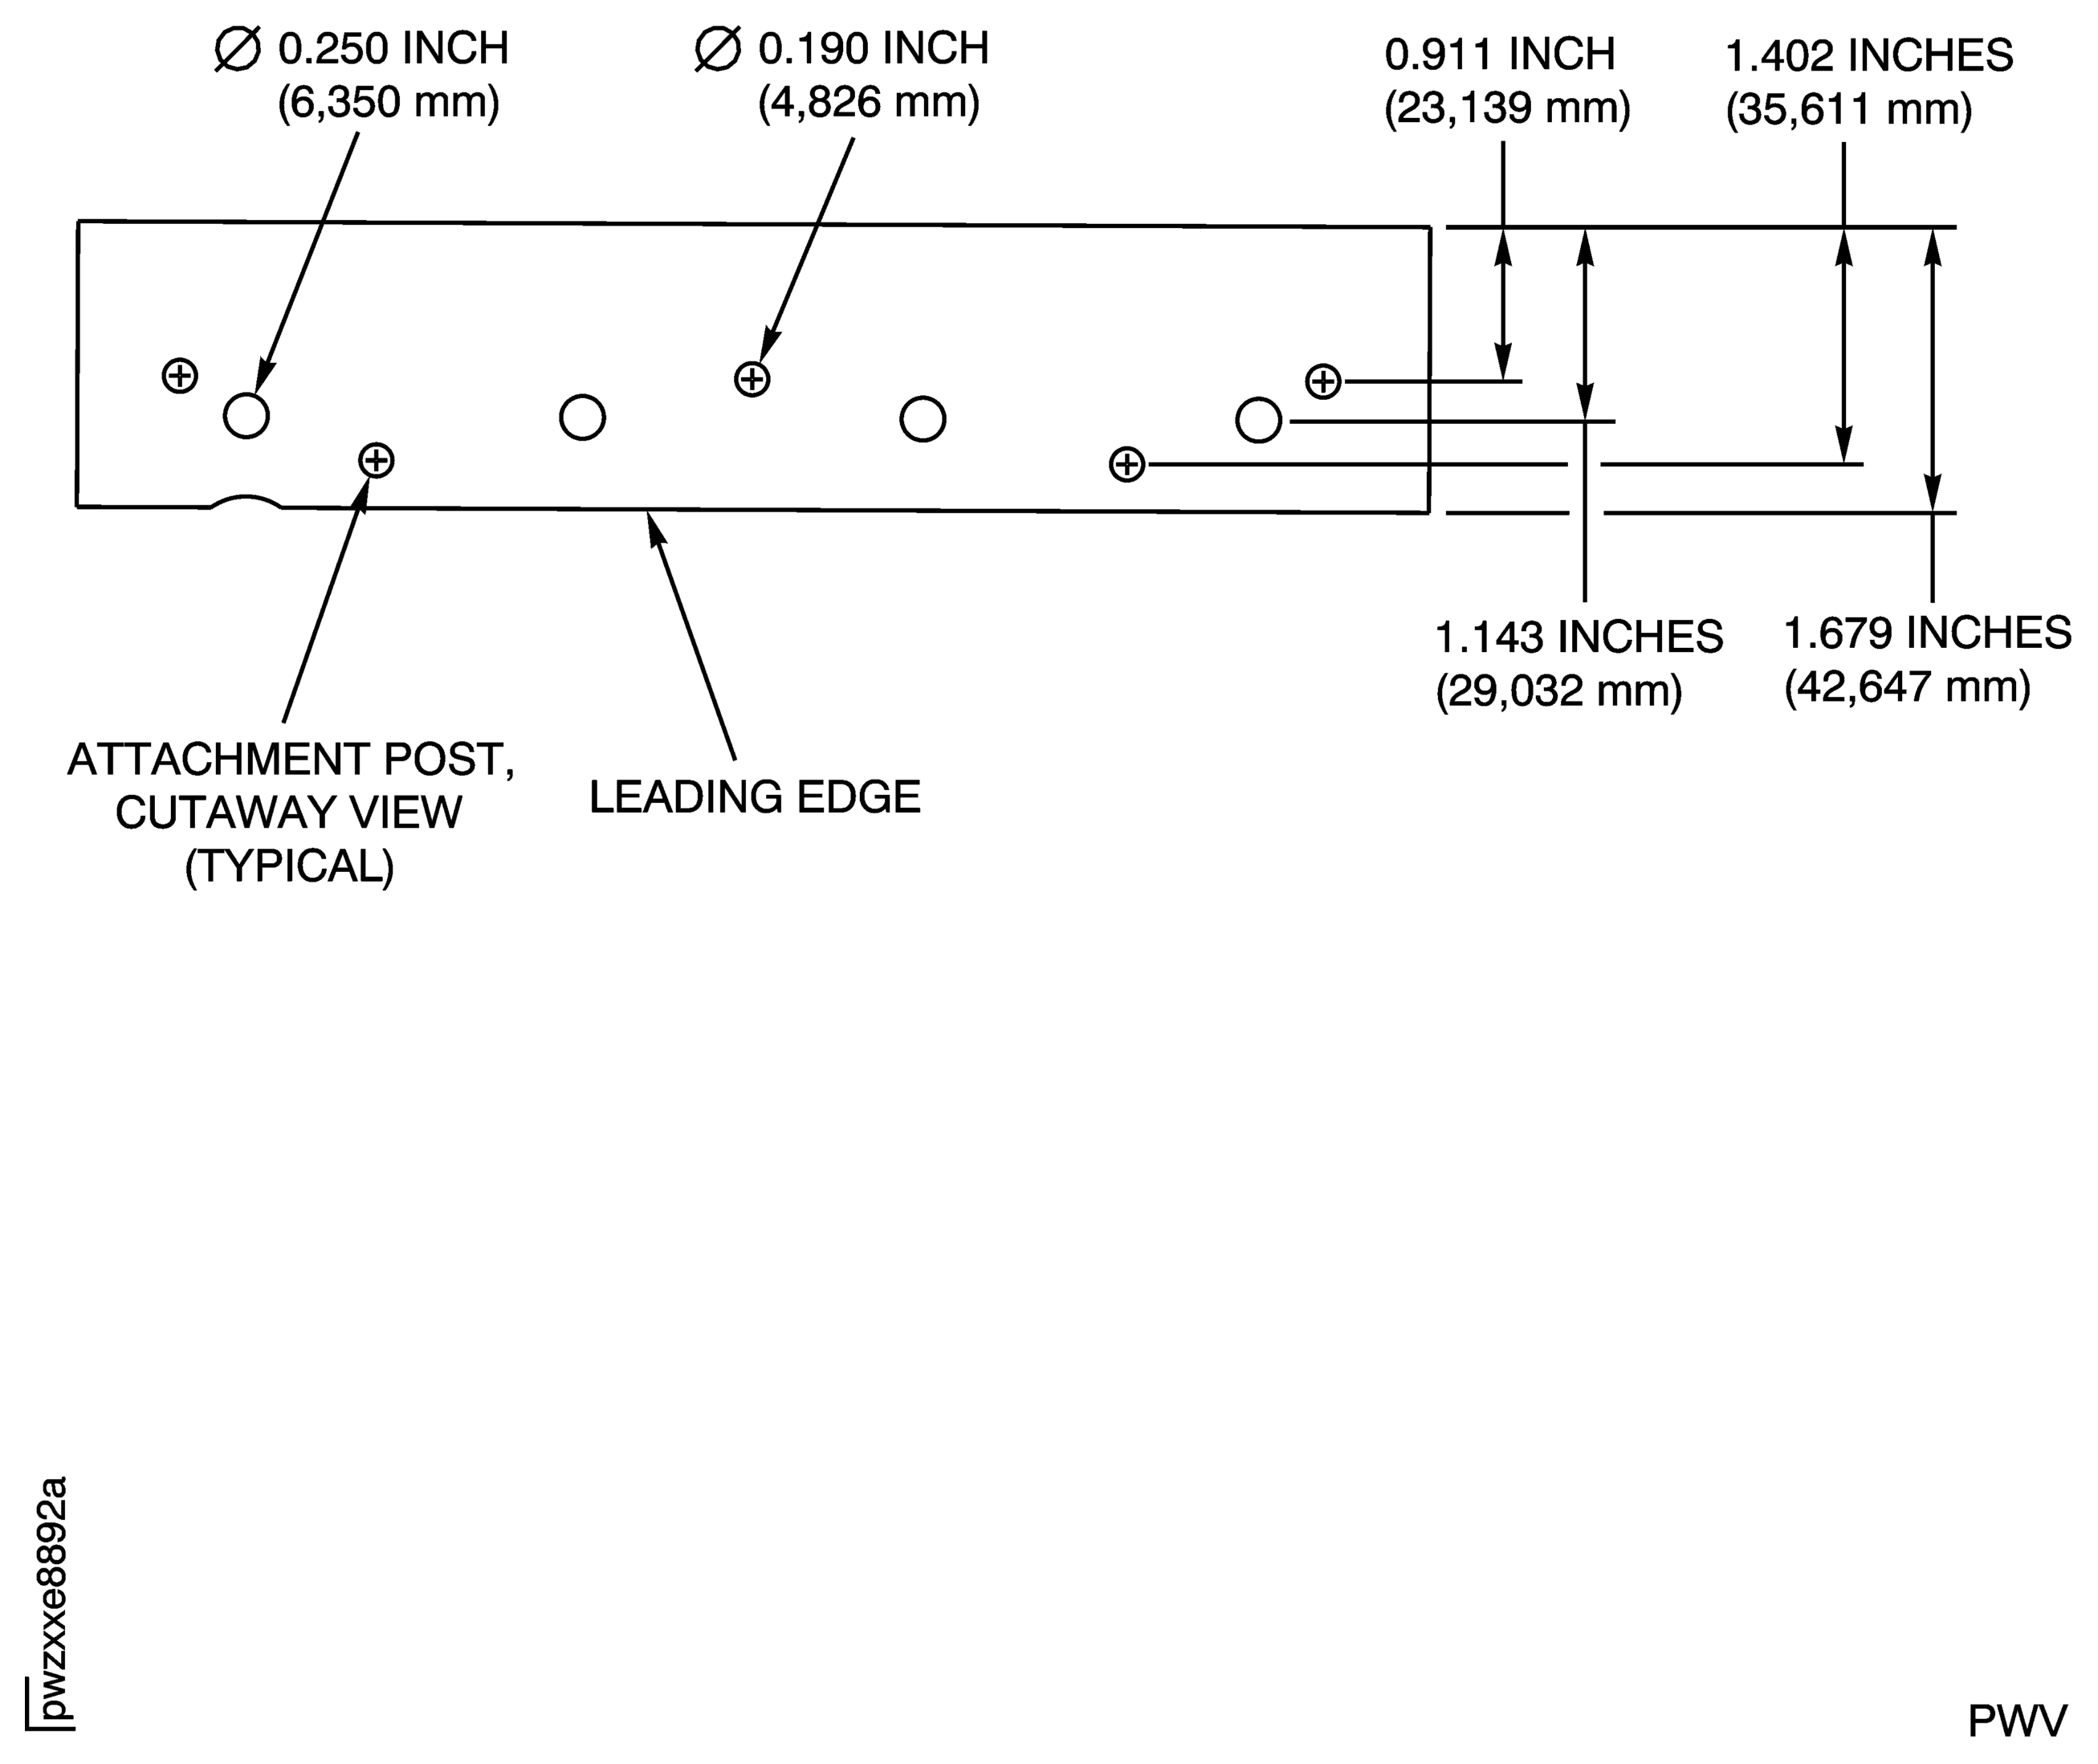
    Figure: Combustion Chamber Outer Liner Row 3

    Combustion Chamber Outer Liner Row 3
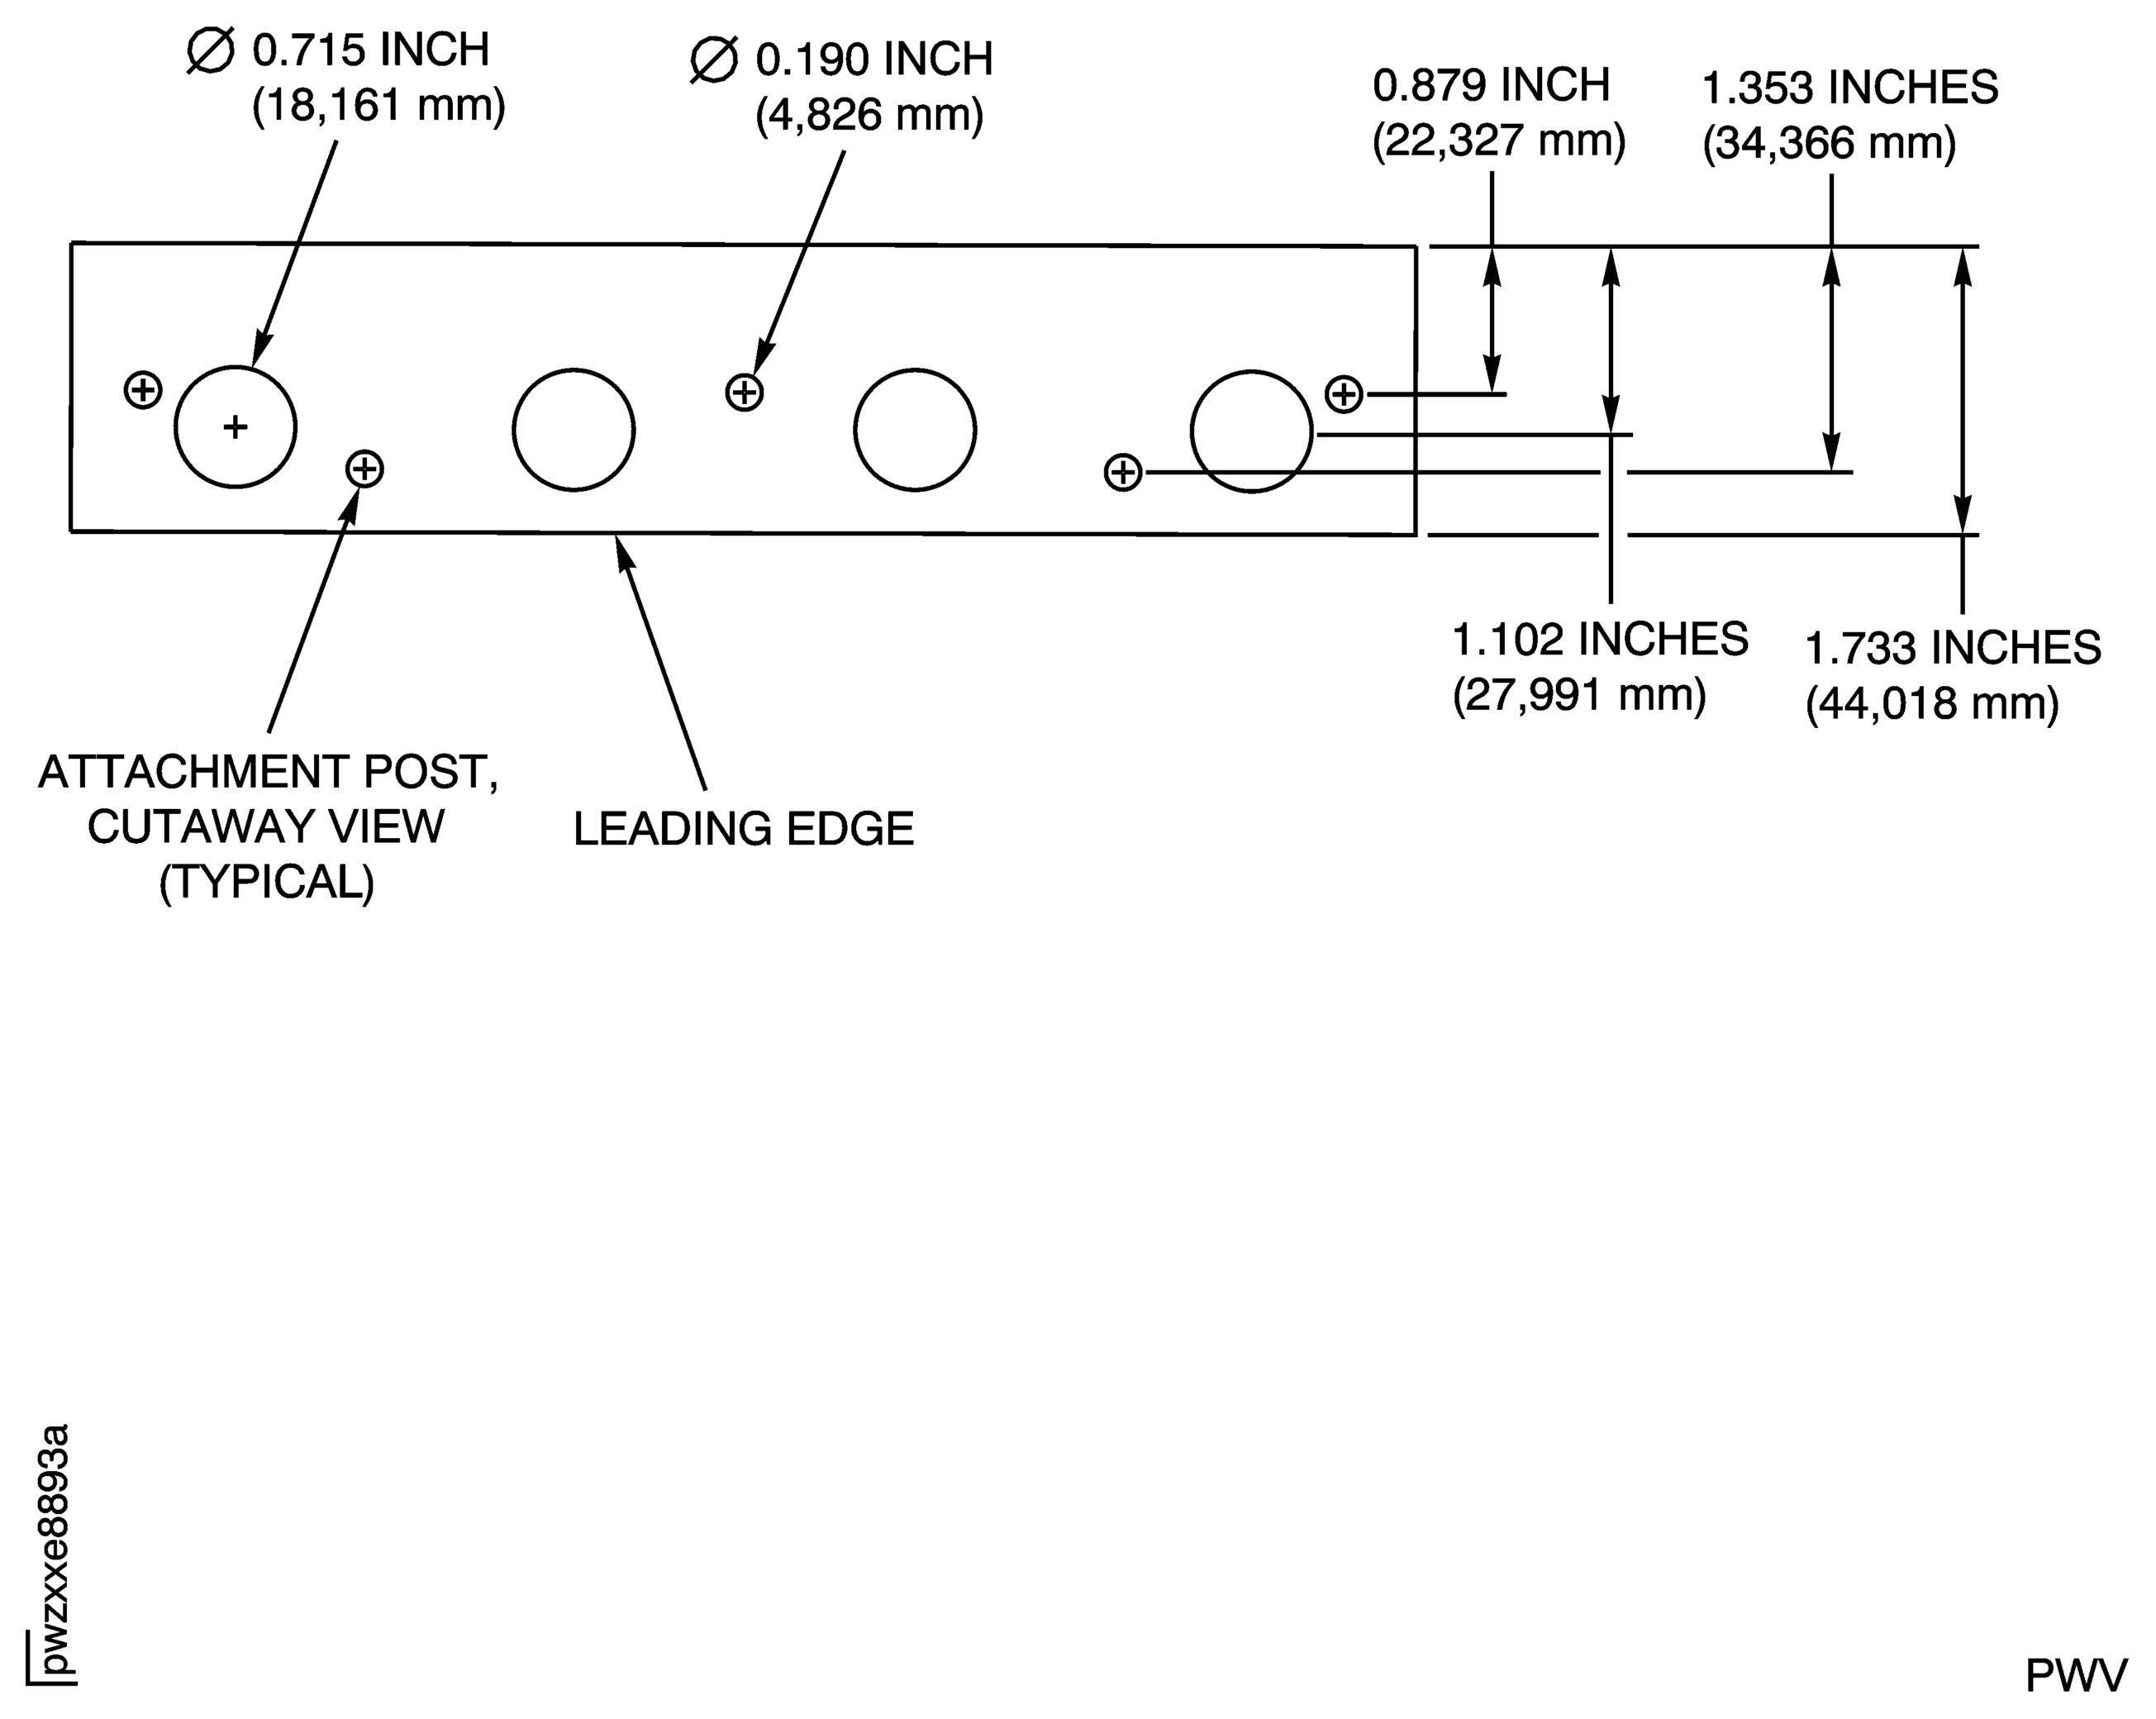
    Figure: Combustion Chamber Outer Liner Row 4

    Combustion Chamber Outer Liner Row 4
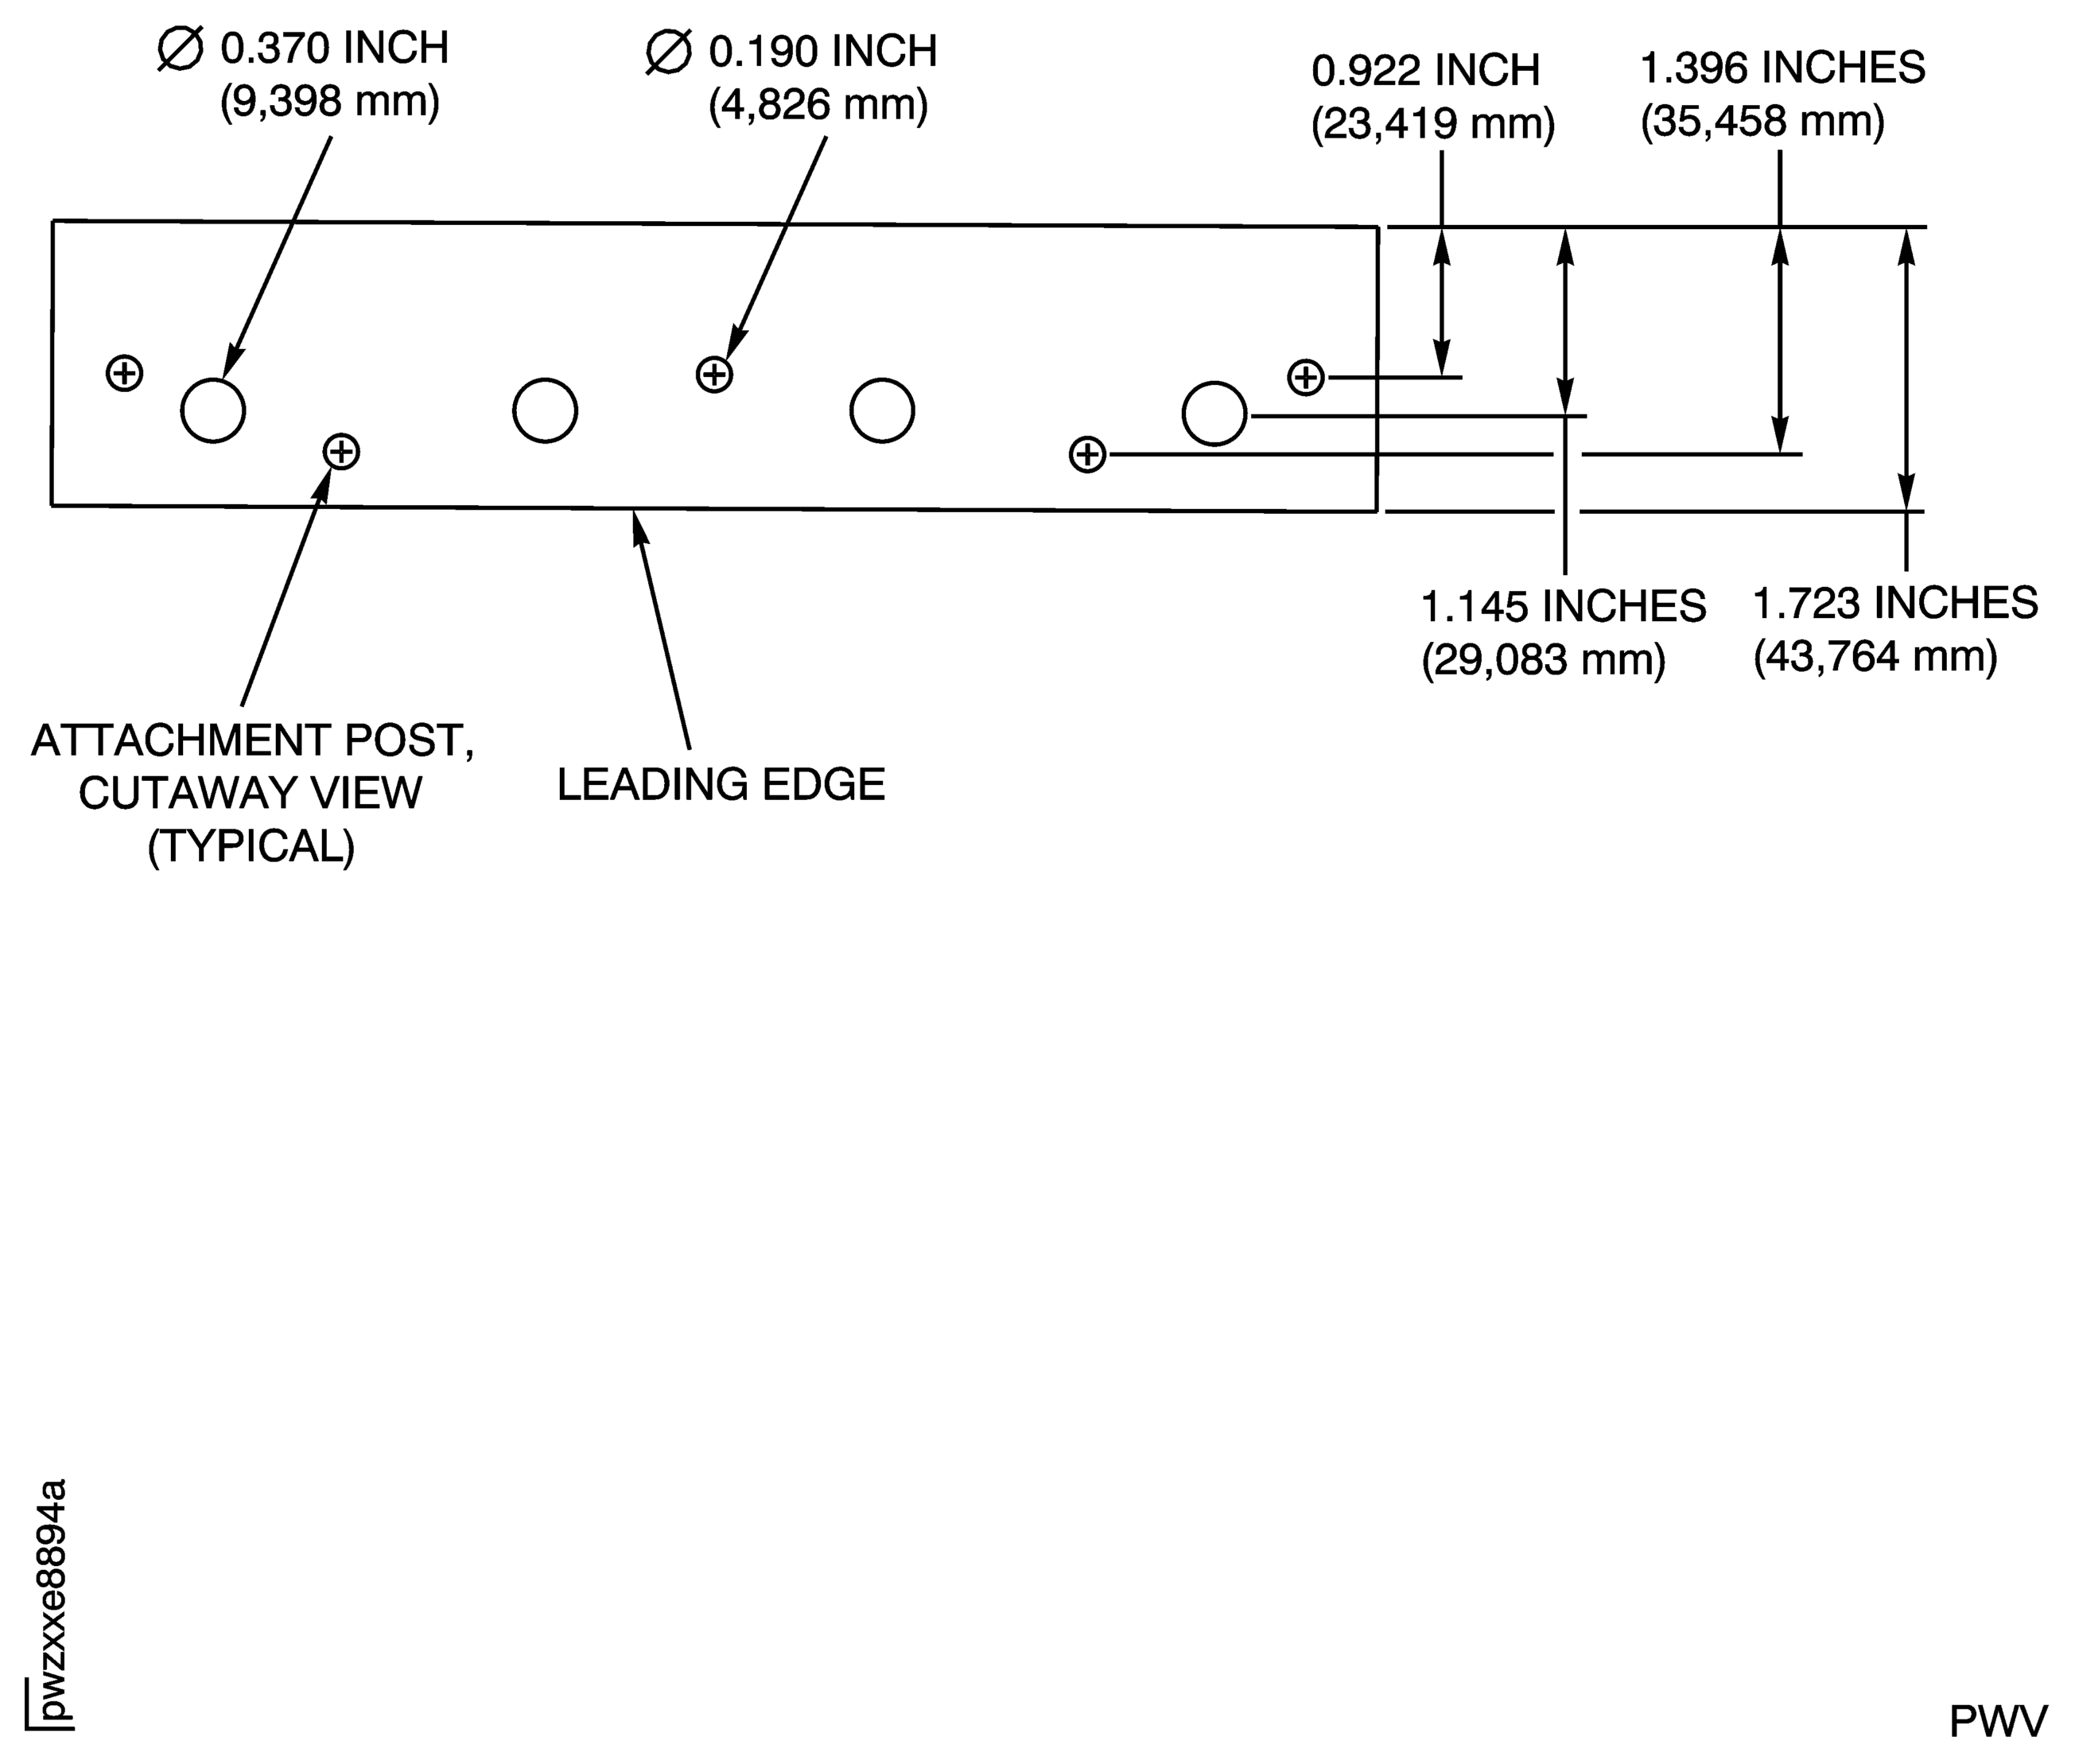
    Figure: Combustion Chamber Inner Liner Row 2

    Combustion Chamber Inner Liner Row 2
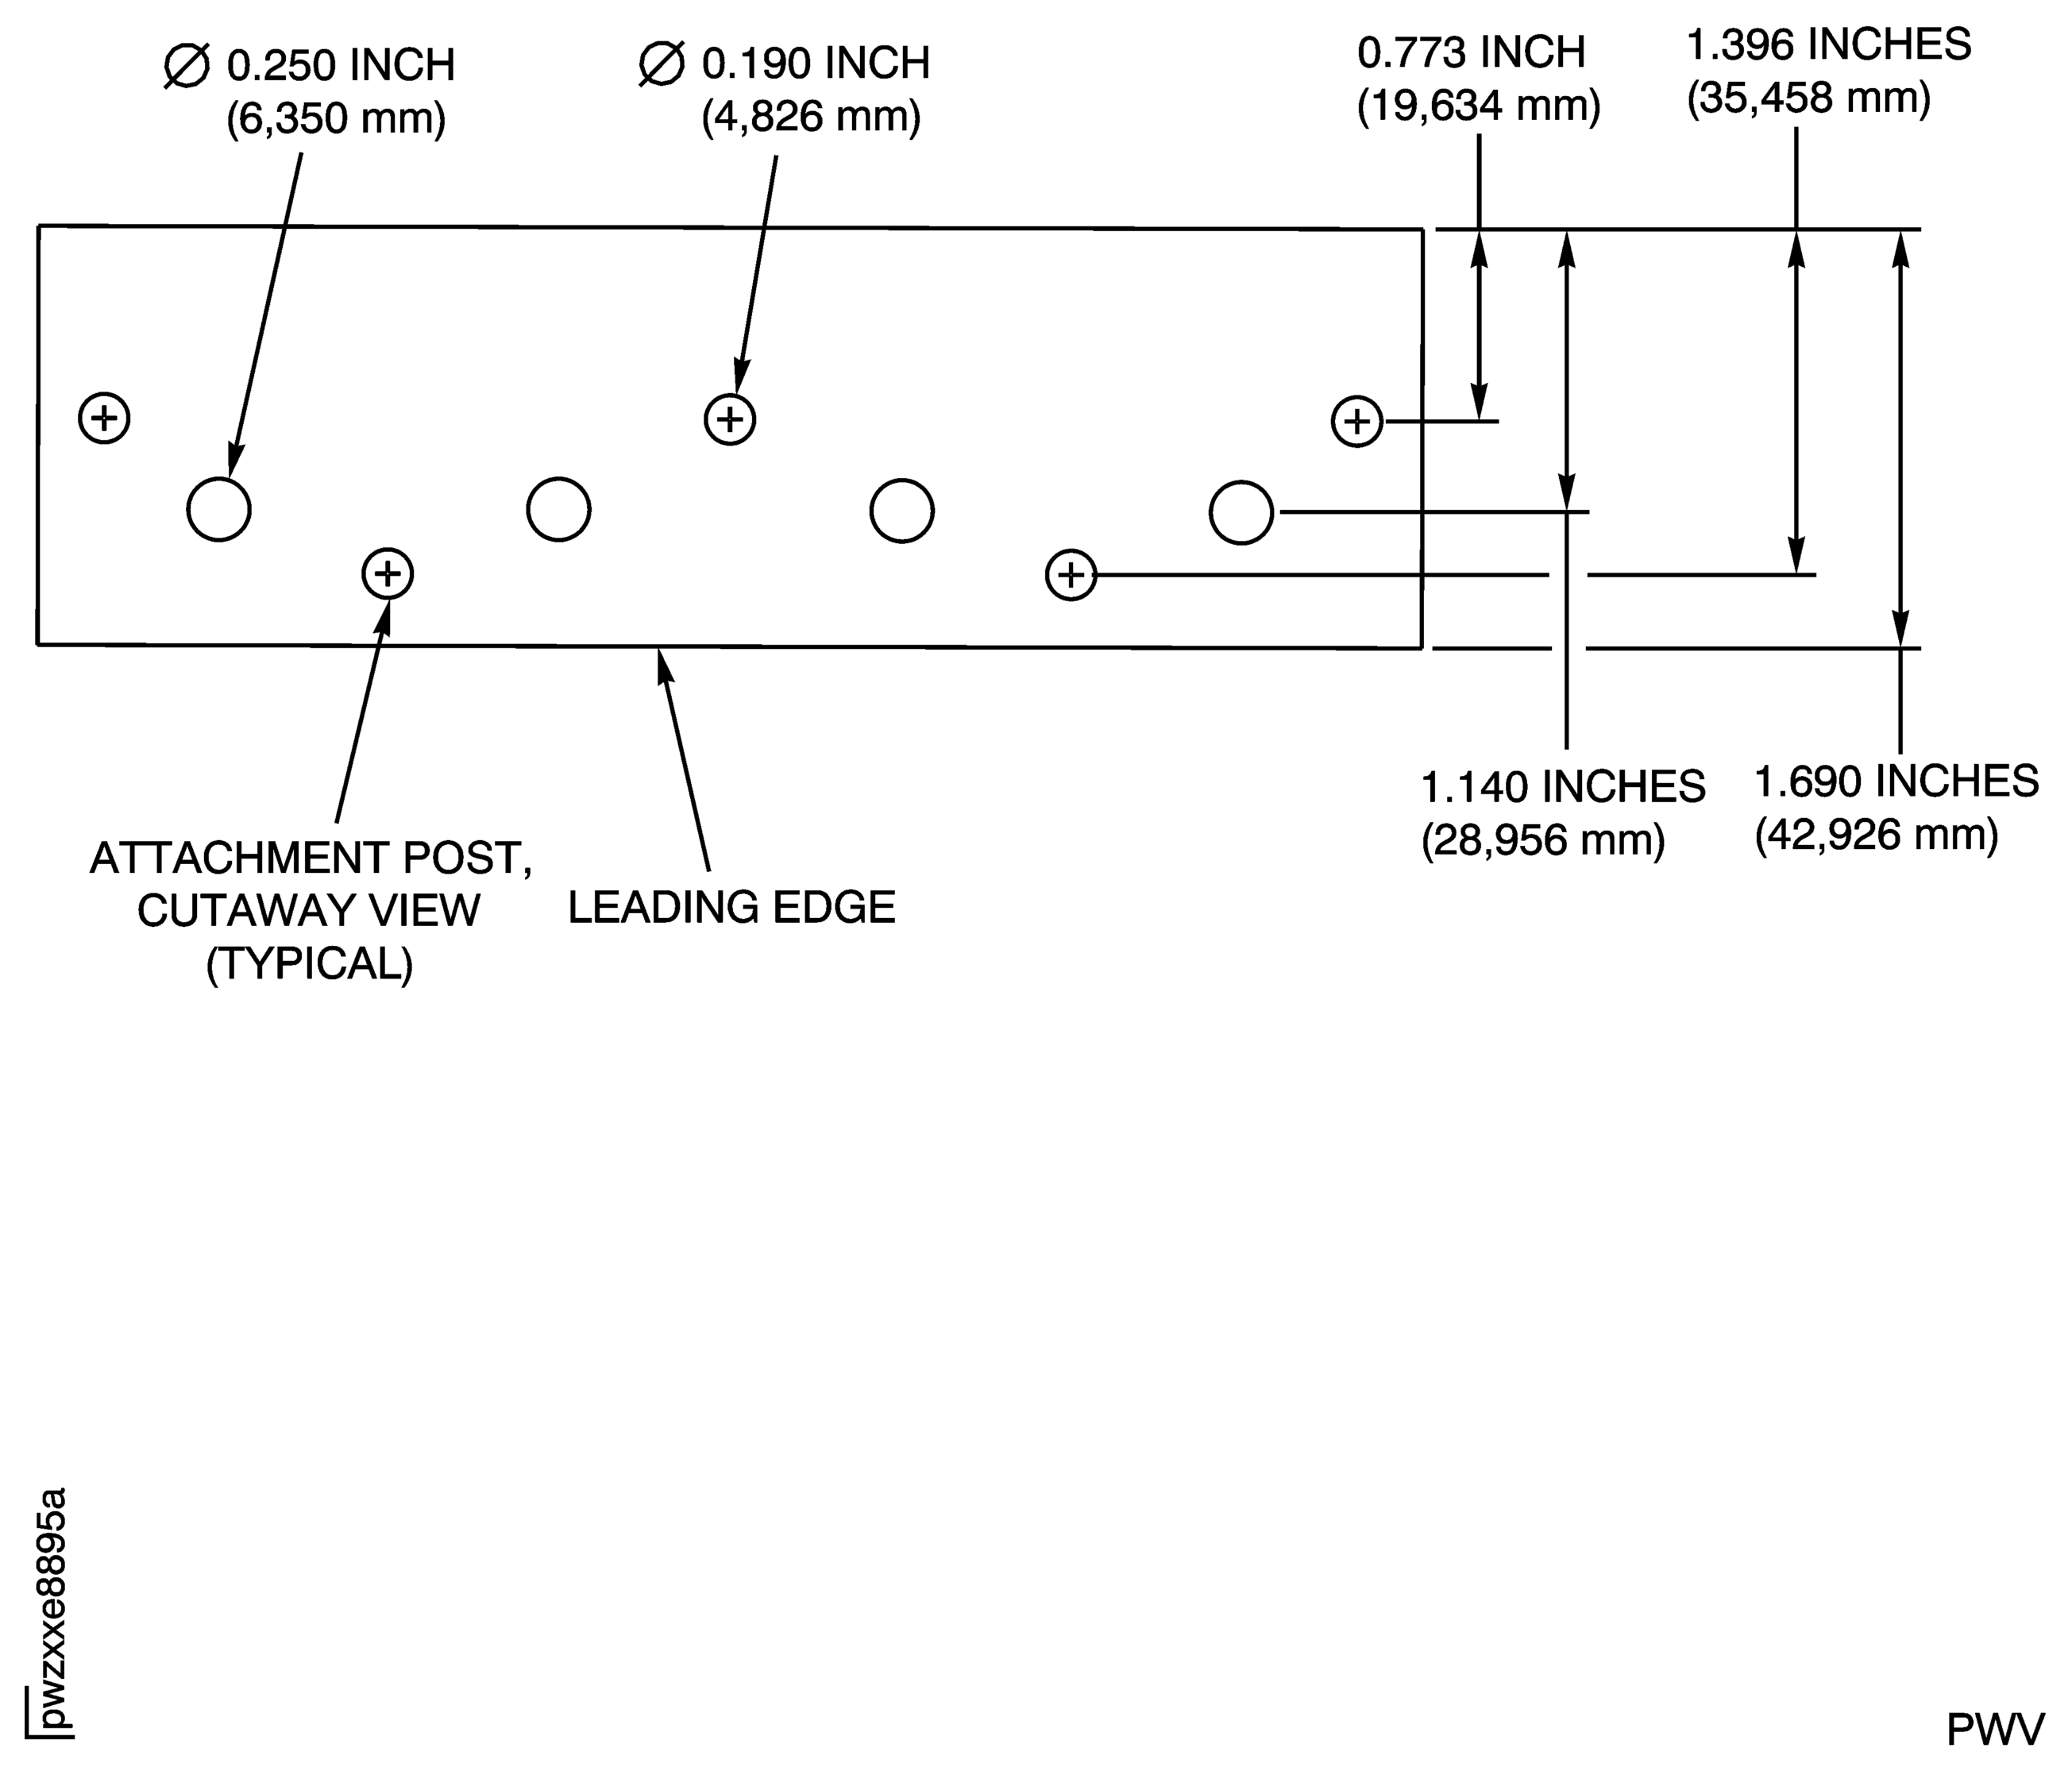
    Figure: Combustion Chamber Inner Liner Row 3

    Combustion Chamber Inner Liner Row 3

    Figure: Combustion Chamber Inner Liner Row 4

    Combustion Chamber Inner Liner Row 4

    Figure: Fuel Nozzle Types of Damage

    Fuel Nozzle Types of Damage
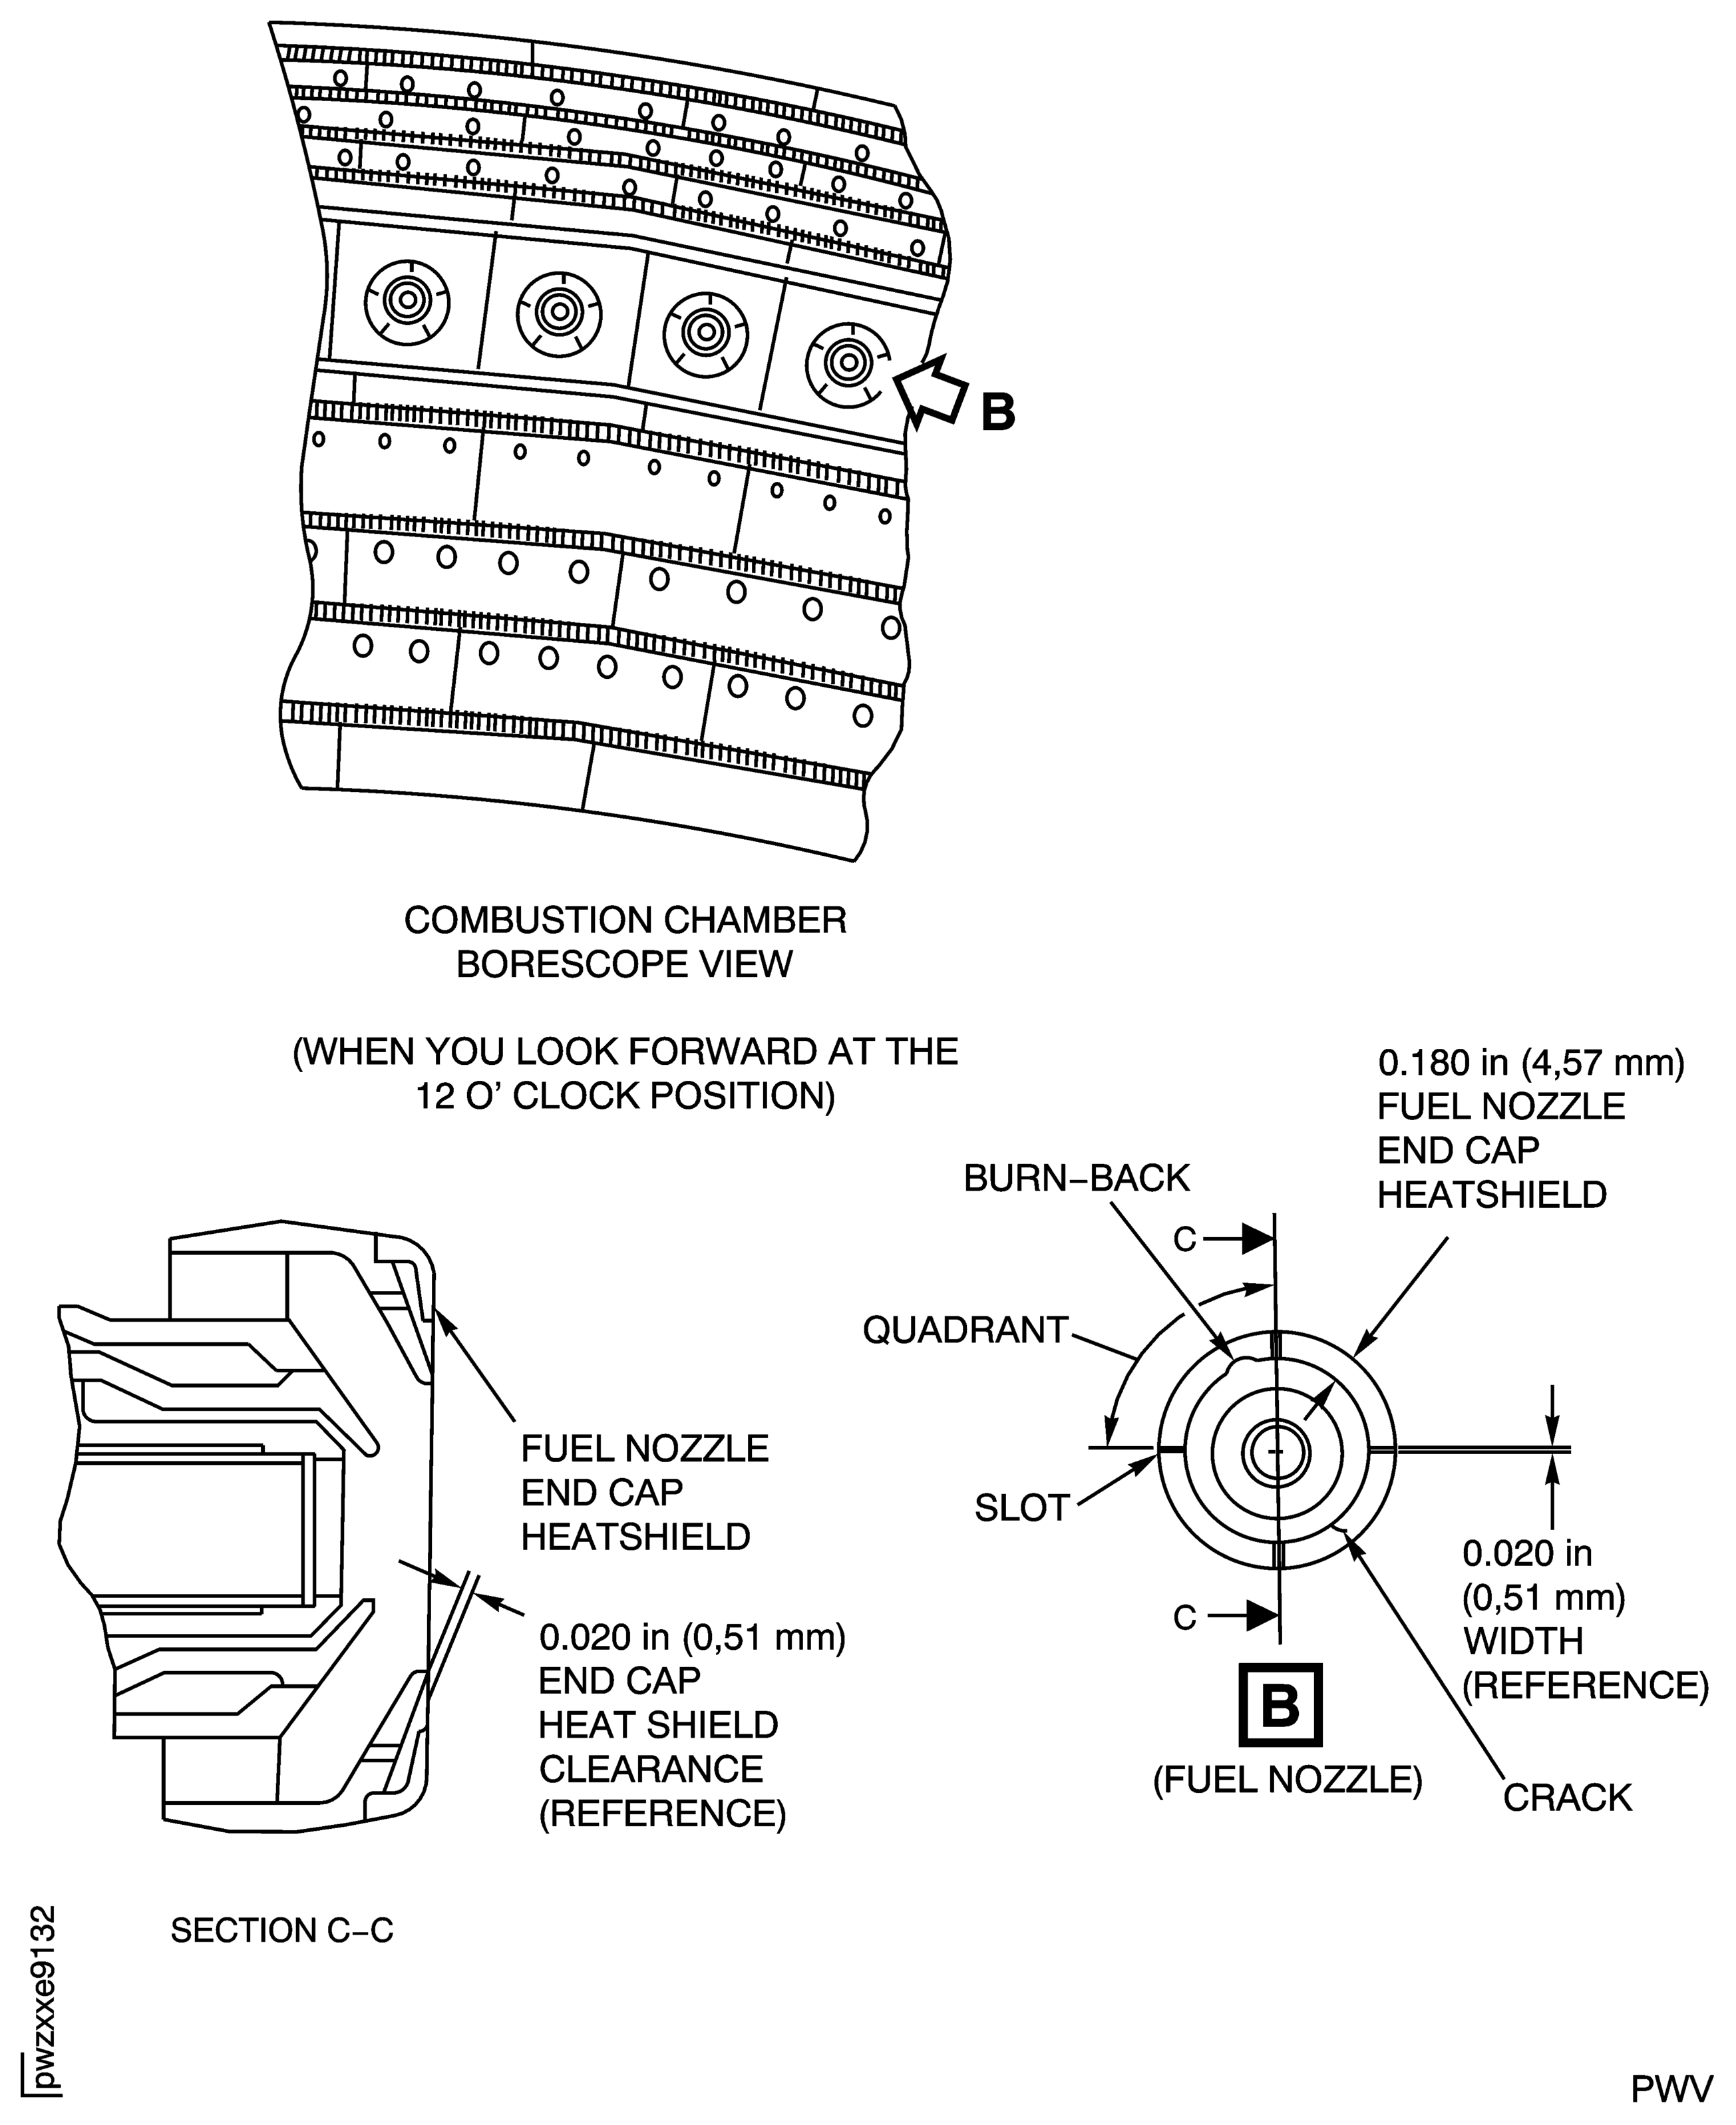
    Figure: Fuel Nozzle End Cap Inspection Area

    Sheet 1
    Legend
    Fuel Nozzle End Cap Inspection Area

    Sheet 1

    Close

    Figure: Fuel Nozzle End Cap Inspection Area

    Sheet 2

    Legend
    Fuel Nozzle End Cap Inspection Area

    Sheet 2

    Close

Requirements After Job Completion

Follow-On Conditions

NONE
Change Type:

Revised the procedural steps. (21VC089)

Manufacturer Code:34568
Enterprise Name:TIODIZE CO., INC.
BU Name:TIODIZE CO., INC.
Street:5858 ENGINEER DRIVE
City:HUNTINGTON BEACH
State:CA
Zip Code:92649
Country:USA
Phone Number:1-714-898-4377
Fax Number:1-714-891-7467
Internet:www.tiodize.com
Manufacturer Code:K2147
Enterprise Name:BOSTIC FINDLEY
BU Name:BOSTIC FINDLEY
Street:COMMON ROAD
City:STAFFORD
Zip Code:ST16 3EH
Country:UNITED KINGDOM
Phone Number:44-1785-272727
Fax Number:44-1162-689283
Manufacturer Code:LOCAL
Enterprise Name:LOCALLY SUPPLIED
Manufacturer Code:X333X
Enterprise Name:REFER TO V2500 SB ENG-79-0108
Link not Found
Manufacturer Code:LOCAL
Supply Number:CoMat 02-141
Type:sp01
Supply Short Name:CoMat 02-141 LOCKWIRE
Supply Name:CoMat 02-141 LOCKWIRE
Specification Groups:
Doc NumberType
AS3214-02 (0.8 mm)AMS 5689
Suppliers:
ManufacturerRemarks
LOCAL
81343
IE508
58401
Manufacturer Code:X333X
Supply Number:CoMat 10-077
Type:sp01
Supply Short Name:CoMat 10-077 APPROVED ENGINE OILS
Supply Name:CoMat 10-077 APPROVED ENGINE OILS
Specification Groups:
Doc NumberType
For V2500-A1/A5/D5 models - Refer to V2500 Service Bulletin ENG-79-0108
For V2500-E5 model - Refer to Service Bulletin E5-79-0001
Suppliers:
ManufacturerRemarks
X333X
Manufacturer Code:K2147
Supply Number:CoMat 10-094
Type:sp01
Supply Short Name:CoMat 10-094 ANTI-SEIZE COMPOUND, PURE Ni-SPECIAL
Supply Name:CoMat 10-094 ANTI-SEIZE COMPOUND, PURE Ni-SPECIAL
Specification Groups:
Doc NumberType
BOSTIK NEVER-SEEZ PURE NICKEL SPECIAL
Suppliers:
ManufacturerRemarks
K2147
K6835
5W425
Manufacturer Code:34568
Supply Number:CoMat 10-129
Type:sp01
Supply Short Name:CoMat 10-129 ANTI-SEIZE PASTE
Supply Name:CoMat 10-129 ANTI-SEIZE PASTE
Specification Groups:
Doc NumberType
TIODIZE T8E PASTE
Suppliers:
ManufacturerRemarks
34568
Manufacturer Code:LOCAL
Tool Number:Cover (eye)
Tool Name:Cover (eye)
Manufacturer Code:LOCAL
Tool Number:Flexible Borescope
Tool Name:Flexible borescope (probe dia. 0.24 to 0.31 in. (6.0 to 8.0 mm) with view capability of 180 degrees up and down)
Manufacturer Code:LOCAL
Tool Number:Rigid borescope
Tool Name:Rigid borescope
Manufacturer Code:LOCAL
Tool Number:Torque Wrench
Tool Name:Torque Wrench - 0 to 1000 lbf.in range