DMC:V2500-A5-72-00-4500-00B-300A-B|Issue No:003.00|Issue Date:2020-11-01
Export Control
EAR Export Classification: Not subject to the EAR per 15 C.F.R. Chapter 1, Part 734.3(b)(3), except for the following Service Bulletins which are currently published as EAR Export Classification 9E991:
SBE70-0992, SBE72-0483, SBE72-0580, SBE72-0588, SBE72-0640, SBE73-0209, SBE80-0024 and SBE80-0025.
Copyright
© IAE International Aero Engines AG (2001, 2014 - 2021)
The information contained in this document is the property of © IAE International Aero Engines AG and may not be copied or used for any purpose other than that for which it is supplied without the express written authority of © IAE International Aero Engines AG. (This does not preclude use by engine and aircraft operators for normal instructional, maintenance or overhaul purposes.).
Common Information
TASK 72-00-45-220-001-B00 HPT Assembly - Examine The HP System Module At Interface D-45, Inspection-001
General
The word 'reject' is used after an interface inspection statement to show that a higher level inspection and possible repair to the damaged part is necessary.
Do the higher lever inspection procedure as found in the applicable Chapter/Section/Subject of this manual on the damaged part(s). It is not necessary to do the higher level inspection on parts that are serviceable to the interface inspection standard.
Refer to TASK 72-00-00-200-000 (INSPECTION/CHECK-000) (examine the modular/non-modular interfaces) before you do this TASK.
The policy that is necessary for inspection is given in SPM TASK 70-20-01-200-001.
Decreased module run time will result if you install modules again that are near the maximum interface limits.
All parts must be visually examined for damage, corrosion and wear. All defects (distress, missing hardware etc.) that are not identified in the procedure must be documented and referred to IAE Technical Services.
NOTE
Special tools are identified in the procedure by the tool primary number.
Preliminary Requirements
Pre-Conditions
NONESupport Equipment
| Name | Manufacturer | Part Number / Identification | Quantity | Remark |
|---|
| IAE 1P16142 Stiffener | 0AM53 | IAE 1P16142 | 1 | |
Consumables, Materials and Expendables
NONESpares
NONESafety Requirements
NONEProcedure
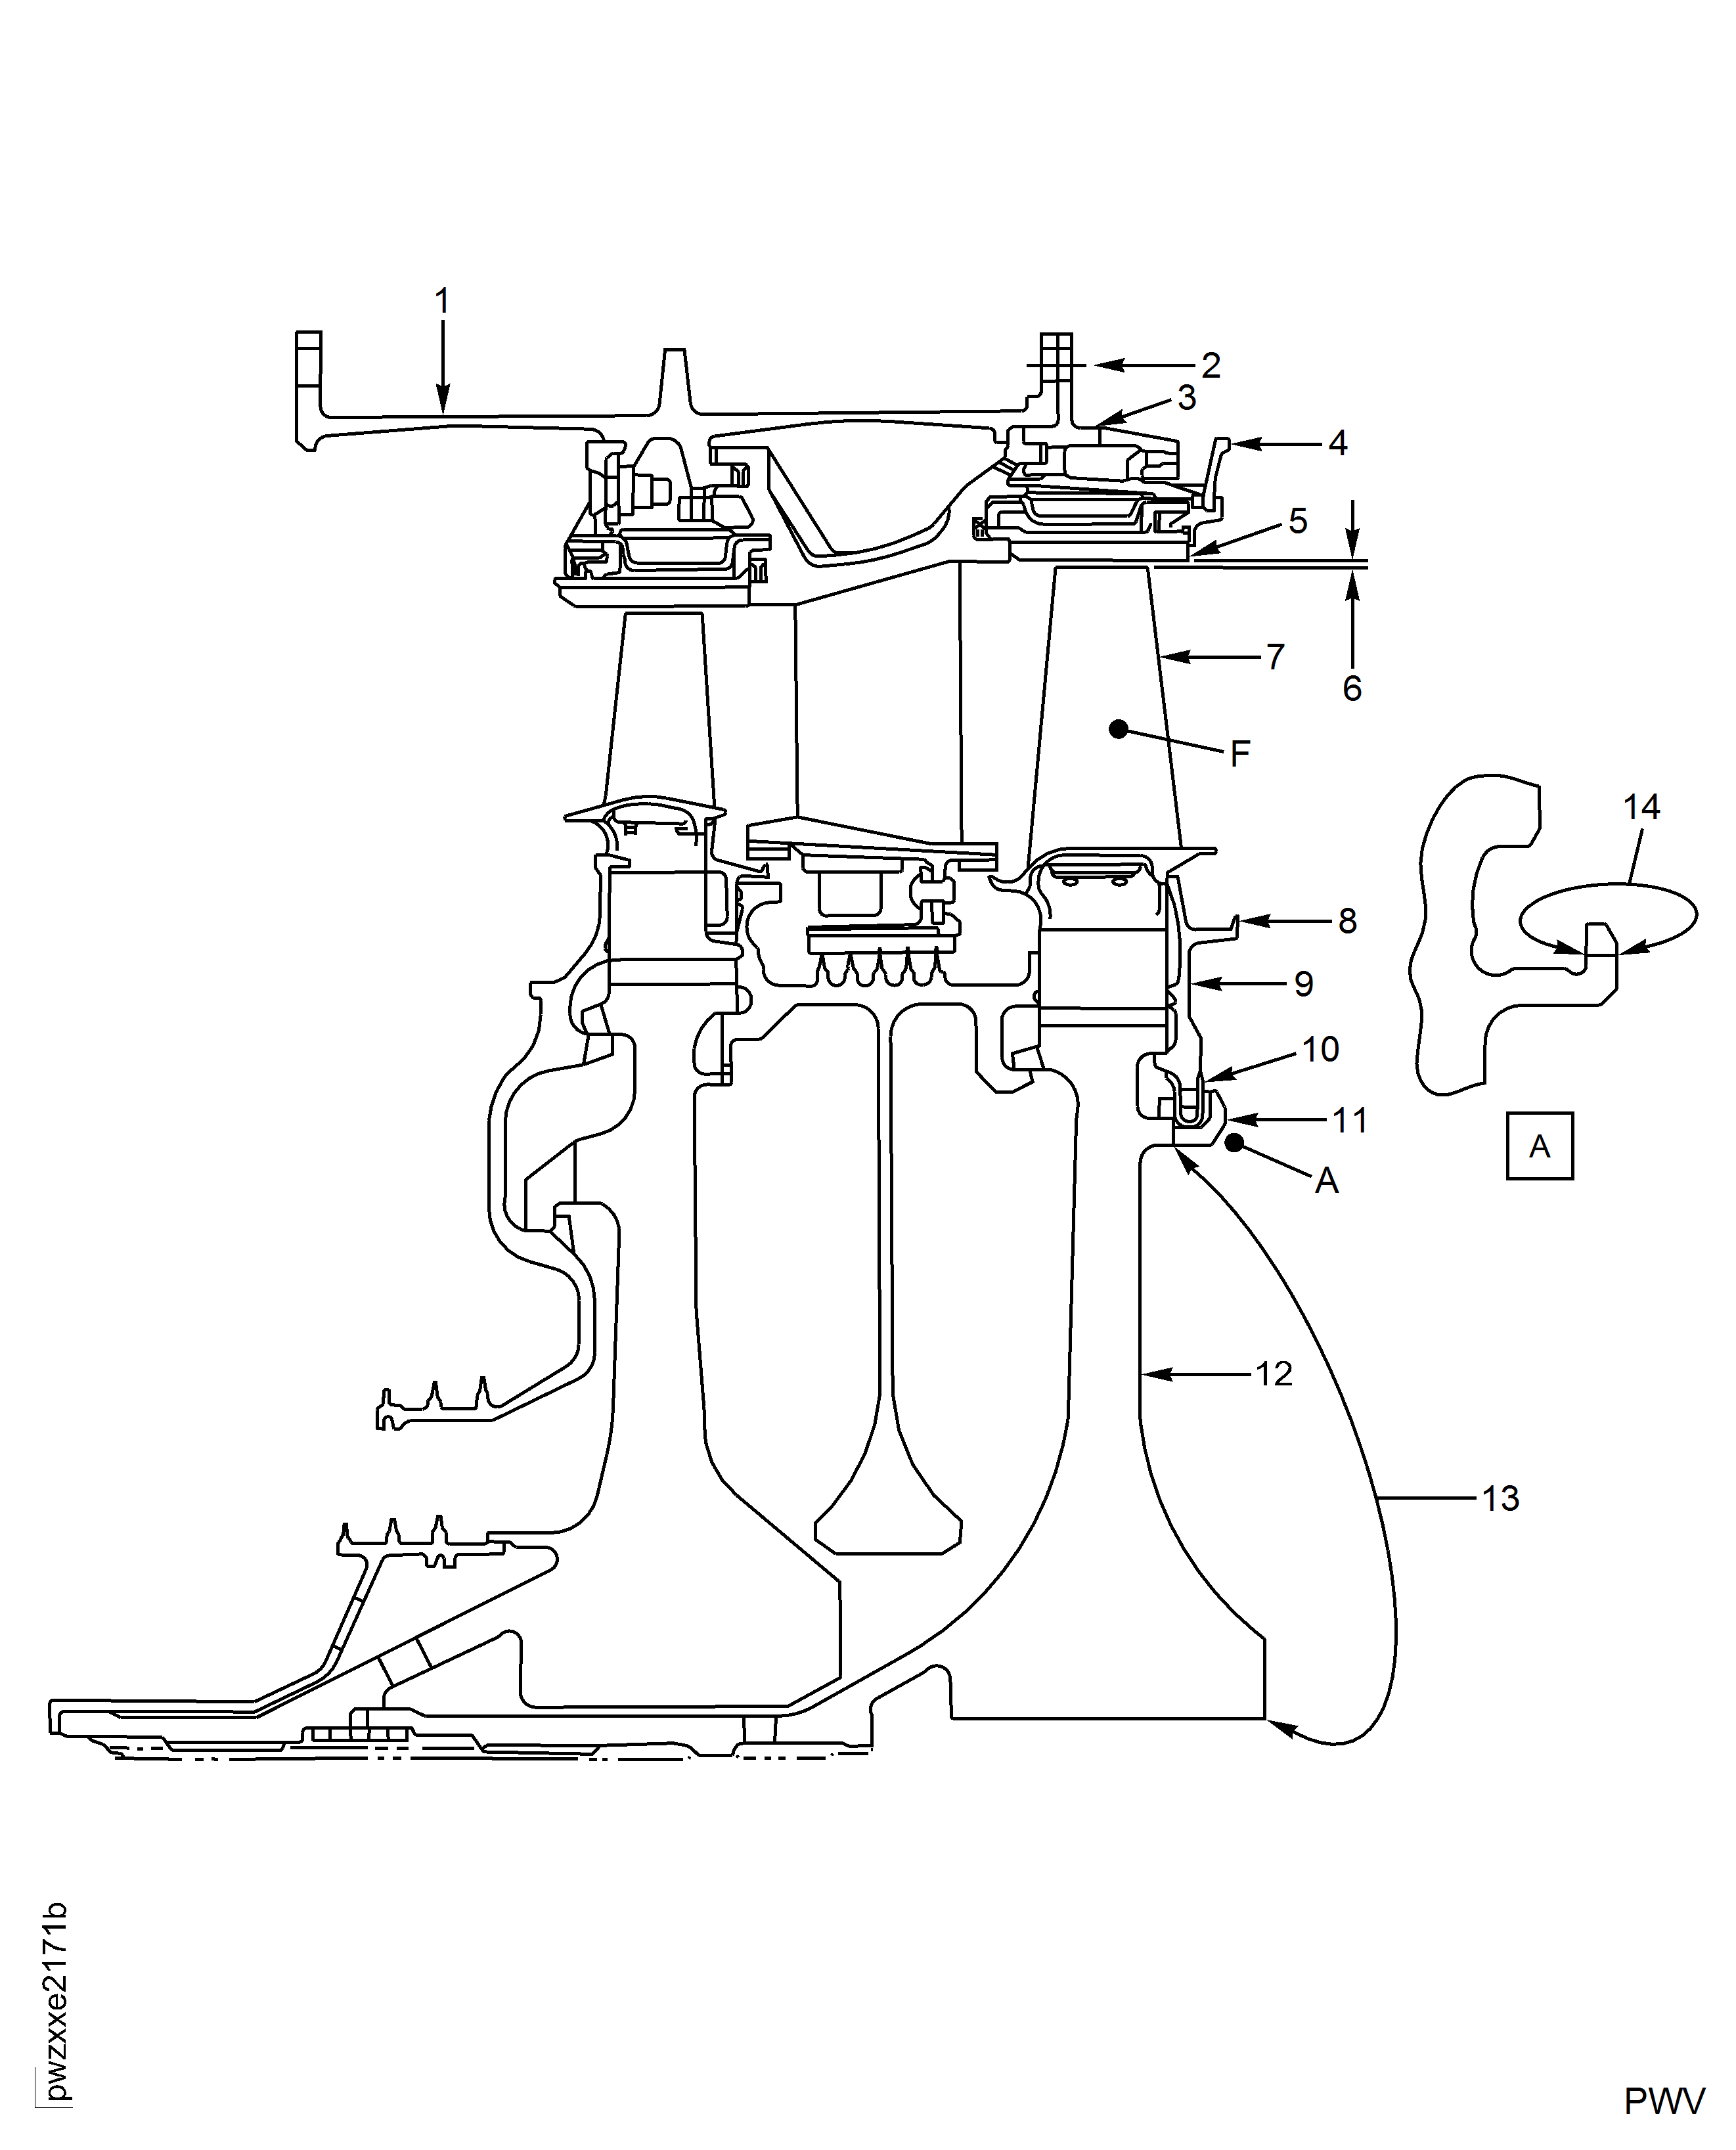
SUBTASK 72-00-45-220-117 Visually Examine the Case Surface at Location 1
Surface damage, dents, scratches, burrs and round-bottom nicks up to 0.010 in. (0.254 mm) in depth with no sharp edges.
SUBTASK 72-00-45-220-118 Visually Examine the Bolt Holes of the Case and Support at Location 2
Surface damage, dents, scratches, burrs and round-bottom nicks up to 0.010 in. (0.254 mm) in depth with no sharp edges
SUBTASK 72-00-45-220-119 Visually Examine the Diameter of the Support Flange at Location 3
Round-bottom dents up to 0.250in. (6.35 mm) in diameter and 0.010in. (0.254 mm) in depth
Wear up to 25 percent of the contact surface
SUBTASK 72-00-45-220-120 Visually Examine the Rear Seal of the HP Turbine at Location 4
Hardface is missing from more than 10 percent of the circumference
SUBTASK 72-00-45-220-121-A00 Visually Examine the Stage 2 Ceramic Outer Airseals at Location 5 (Pre SBE 72-0364)
There is metal from the blades on the airseals
Any segment that has spalling or chipping down to the metal layer (dark color layer) for up to:
50 percent of the ceramic
75 percent of the ceramic
Accept, but can result in EGT margin loss at pass off and a reduction in the repairability of the duct segment at the next overhaul
Cracks in the ceramic (white layer of the coating)
There is a maximum of two cracks up to 0.250 in. (6.35 mm) in length in the metal (gray) layer of the coating
SUBTASK 72-00-45-220-121-B00 Visually Examine the Stage 2 Ceramic Outer Airseals at Location 5 (SBE 72-0364)
There is metal from the blades on the airseals
Any segment that has spalling or chipping down to the metal layer (dark color layer) for up to:
50 percent of the ceramic
75 percent of the ceramic
Accept, but can result in EGT margin loss at pass off and a reduction in the repairability of the duct segment at the next overhaul
Cracks in the ceramic (white layer of the coating)
There is a maximum of two cracks up to 0.250 in. (6.35 mm) in length in the metal (gray) layer of the coating
SUBTASK 72-00-45-220-122 Measure the Stage 2 Turbine Blade Tip Clearance at Location 6
NOTE
This stiffener is required to do this inspection. The HP turbine case assembly and the stage 2 HPT seal must be held for this inspection.
Measure at eight equally spaced locations in the axial center of the rub groove. Do not rotate the rotor.
More than 0.096 in. (2.438 mm) (average of eight measurements)
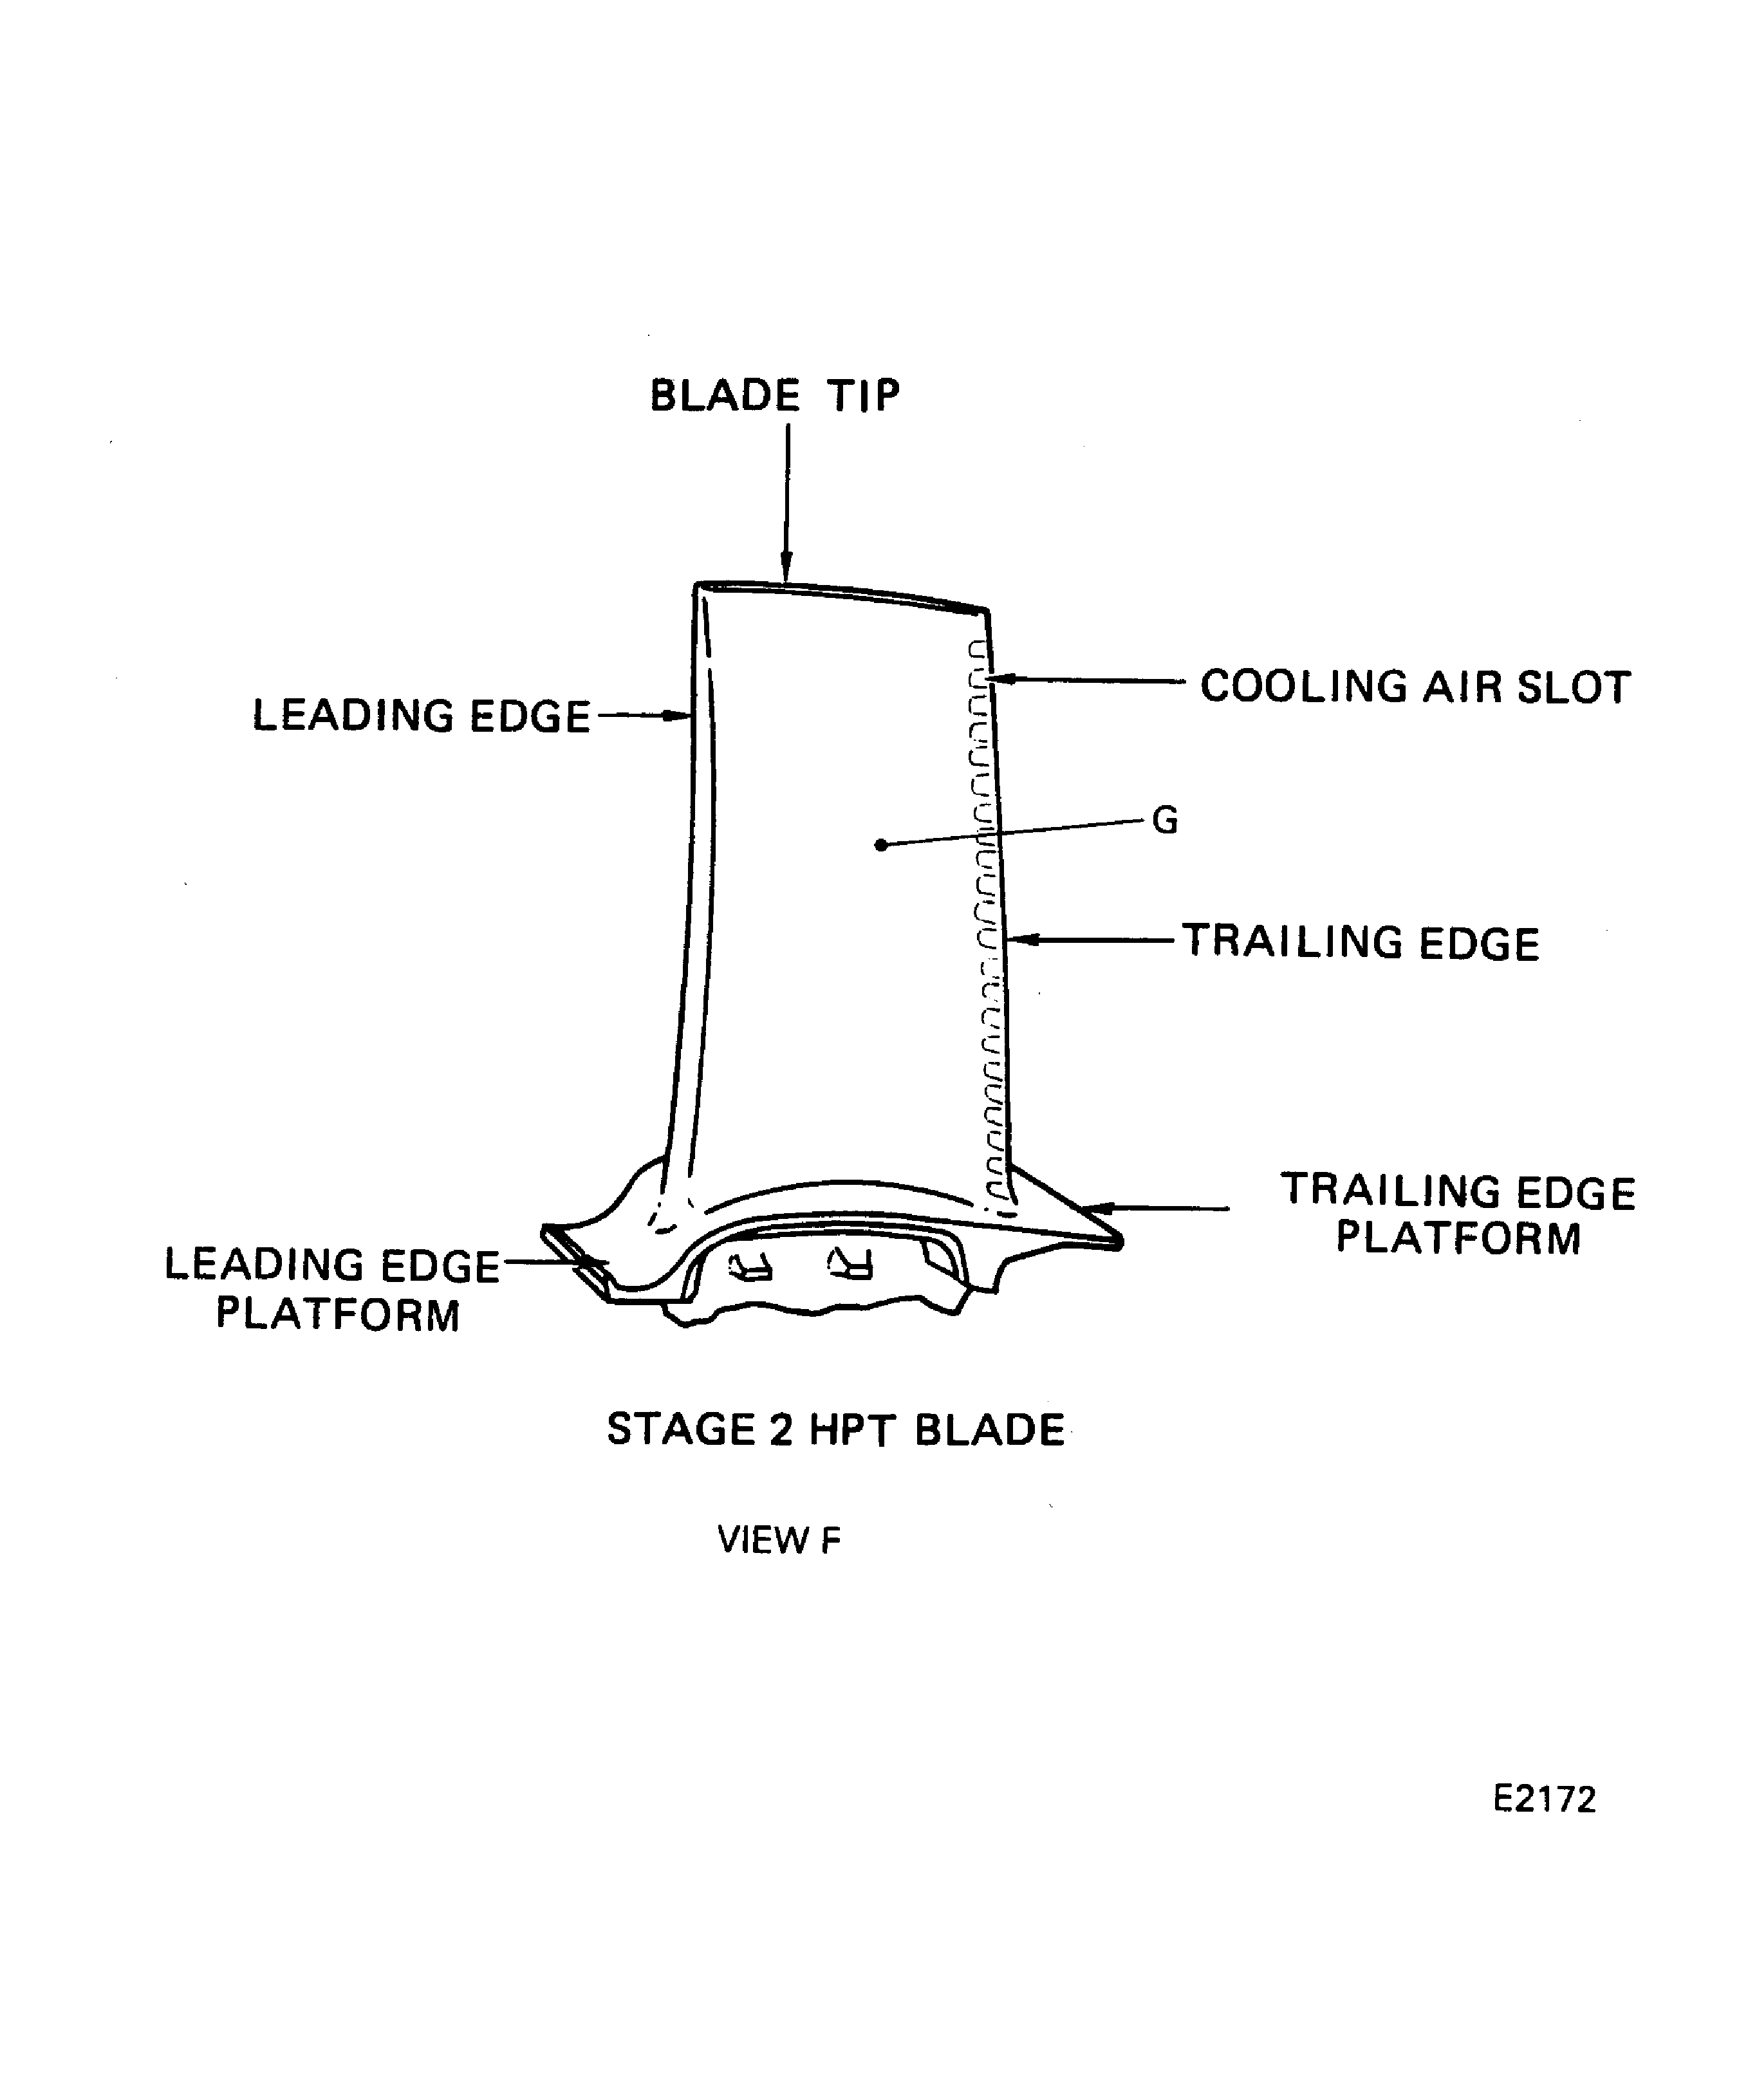
SUBTASK 72-00-45-220-123 Visually Examine the Stage 2 Turbine Blades at Location 7
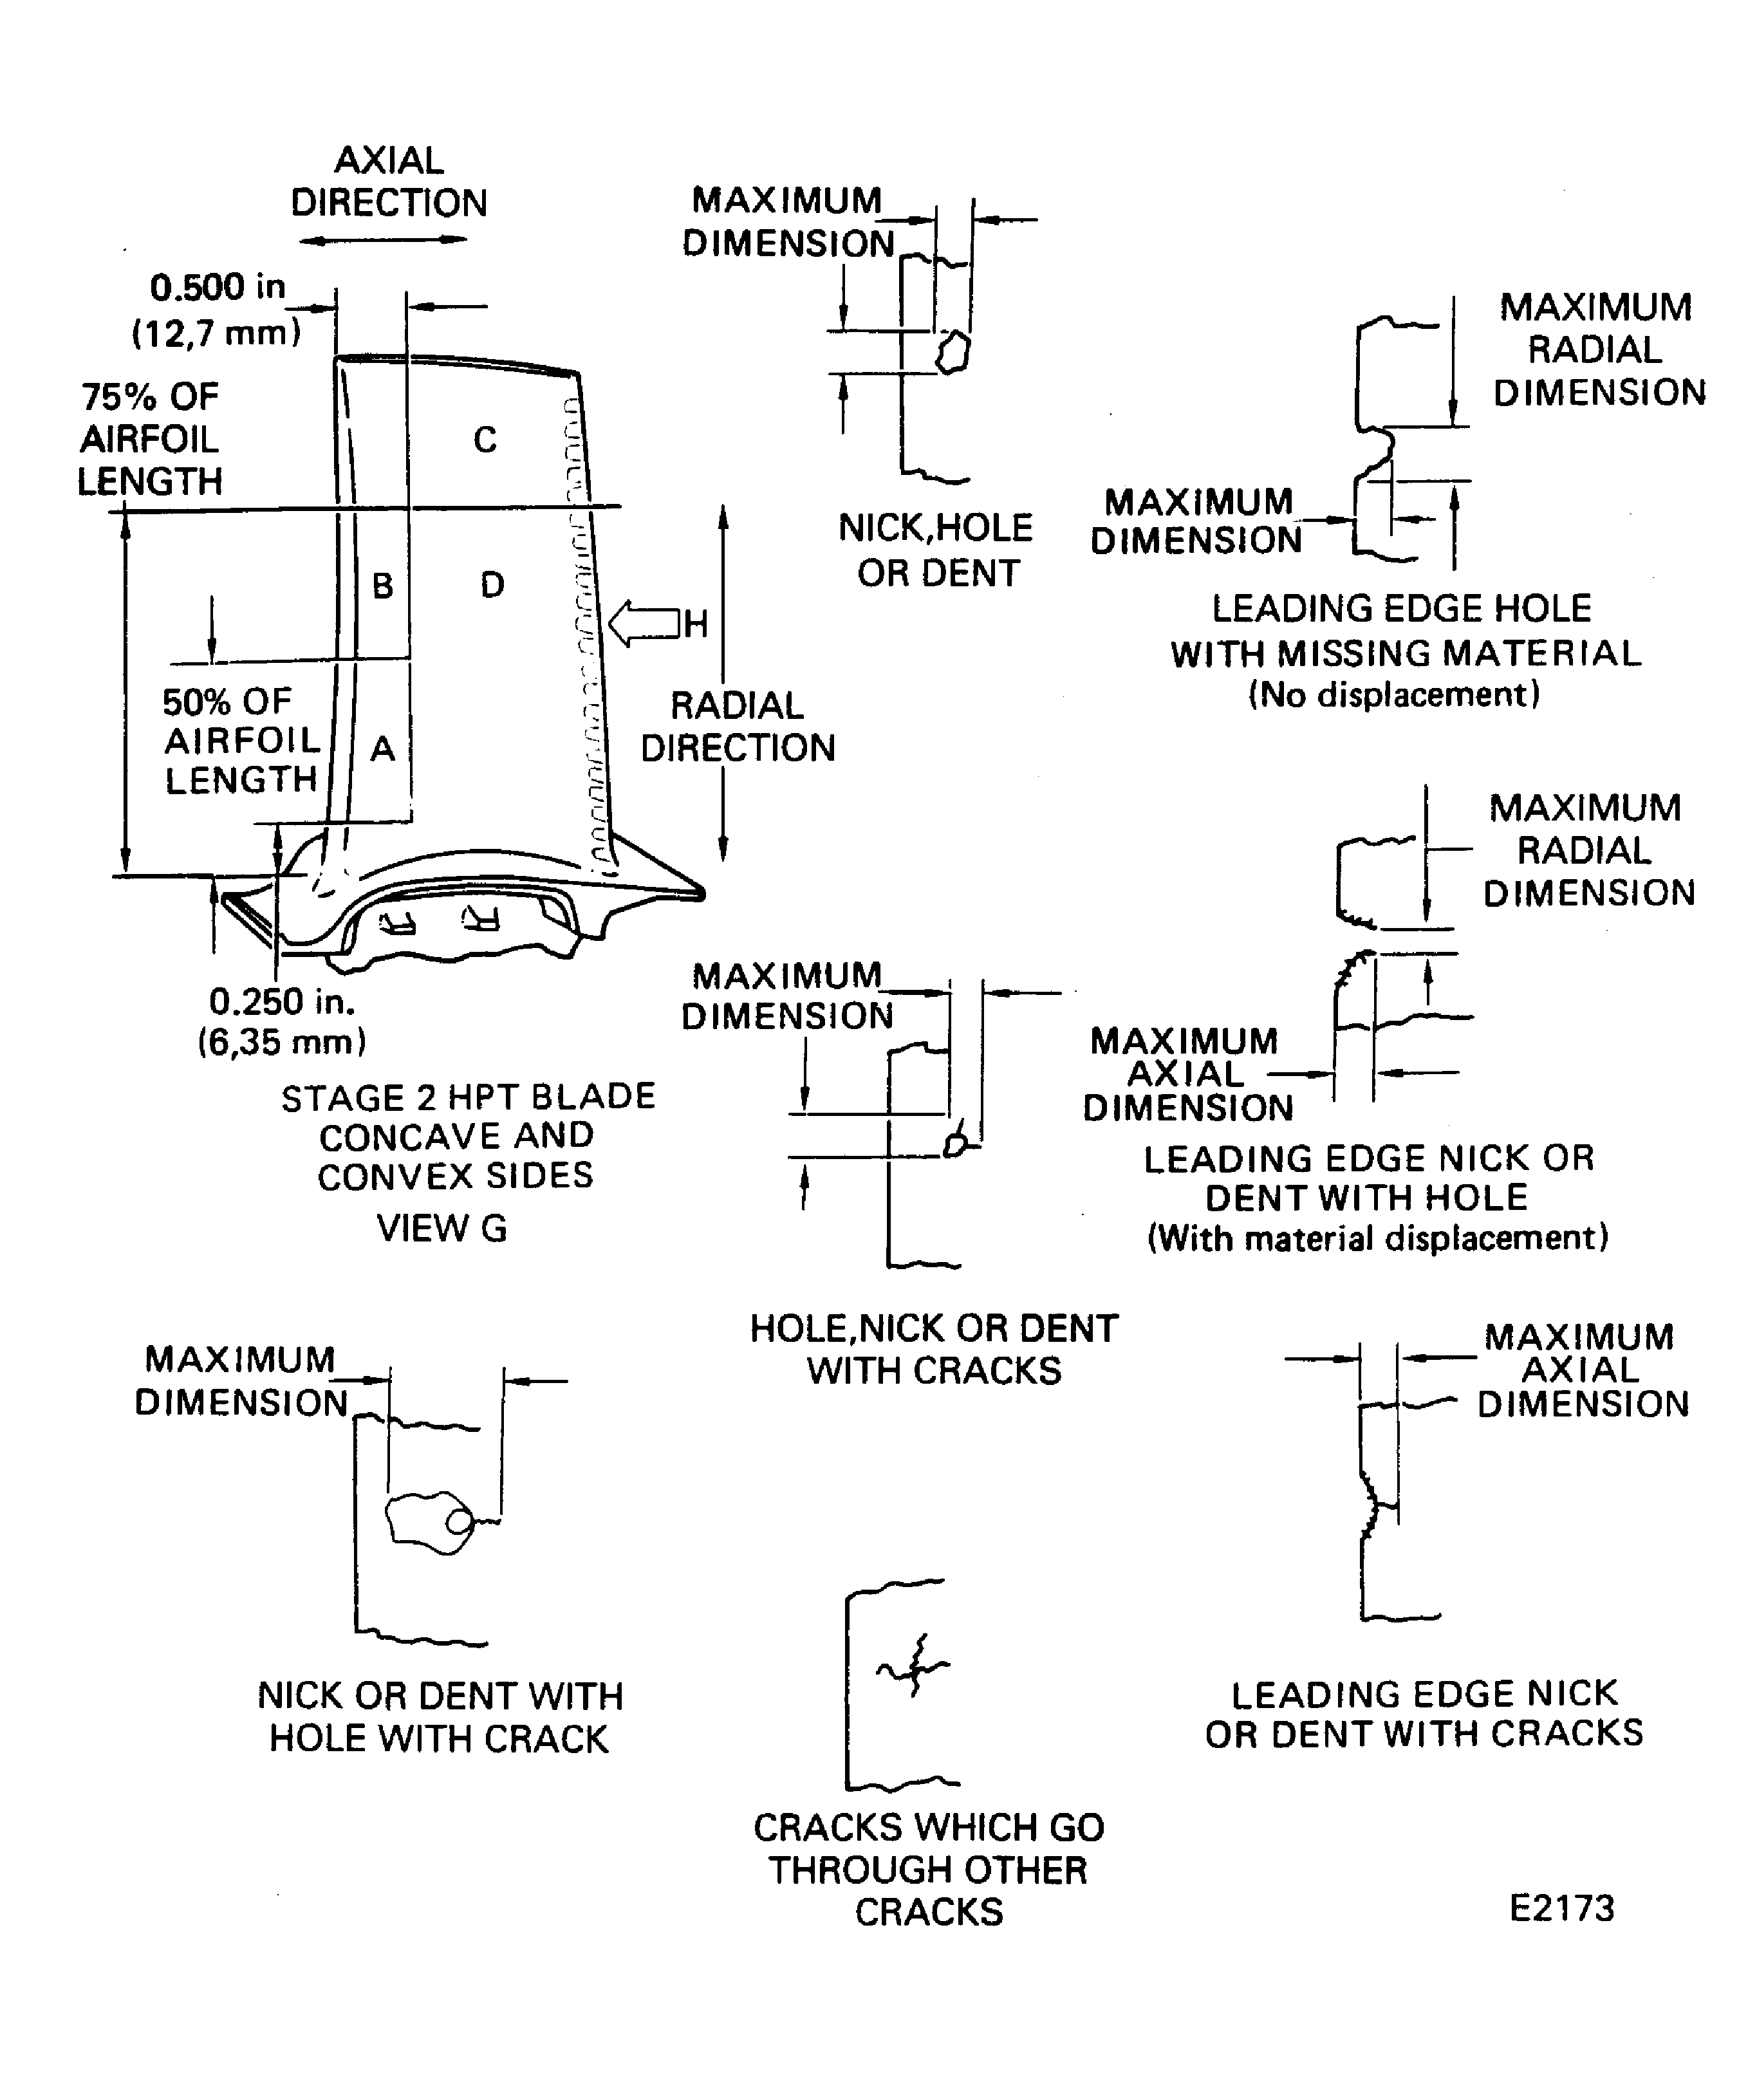
Nicks, dents and holes on the airfoil.
If the nick or dent is in Area B or C, has cracks and the combination of the nick or dent plus the crack is more than 0.080 in. (2.03 mm) long axially and/or more than 0.150 in. (3.81 mm) long radially
If the nick or dent is in Area B or C, has a hole or a hole with cracks, and the combination of the nick or dent plus the hole or hole with a crack is more than 0.080 in. (2.03 mm) long axially and/or 0.150 in. (3.81 mm) long radially
If the hole is in Area B or C and is more than 0.030 in. (0.76 mm) long axially and/or more than 0.040 in. (1.02 mm) long radially
If the nick or dent is in Area A, has cracks, and the combination of the nick or dent plus the crack is more than 0.040 in. (1.02 mm) long axially and/or more than 0.070 in. (1.78 mm) long radially
If the nick or dent is in Area A, has a hole or a hole with cracks, and the combination of the nick or dent plus the hole or hole with a crack is more than 0.080 in. (2.03 mm) long axially and/or 0.150 in. (3.81 mm) long radially
If there is more than one hole (not including the chaplet (manufacturing) holes)).
The dent is in Area D and has a depth greater than 0.015 in. (0.38 mm) or does not have a smooth bottom, or has cracks.
If the dent is within 0.050 in. (1.27 mm) of the trailing edge and has a depth greater than 0.005 in. (0.13 mm).
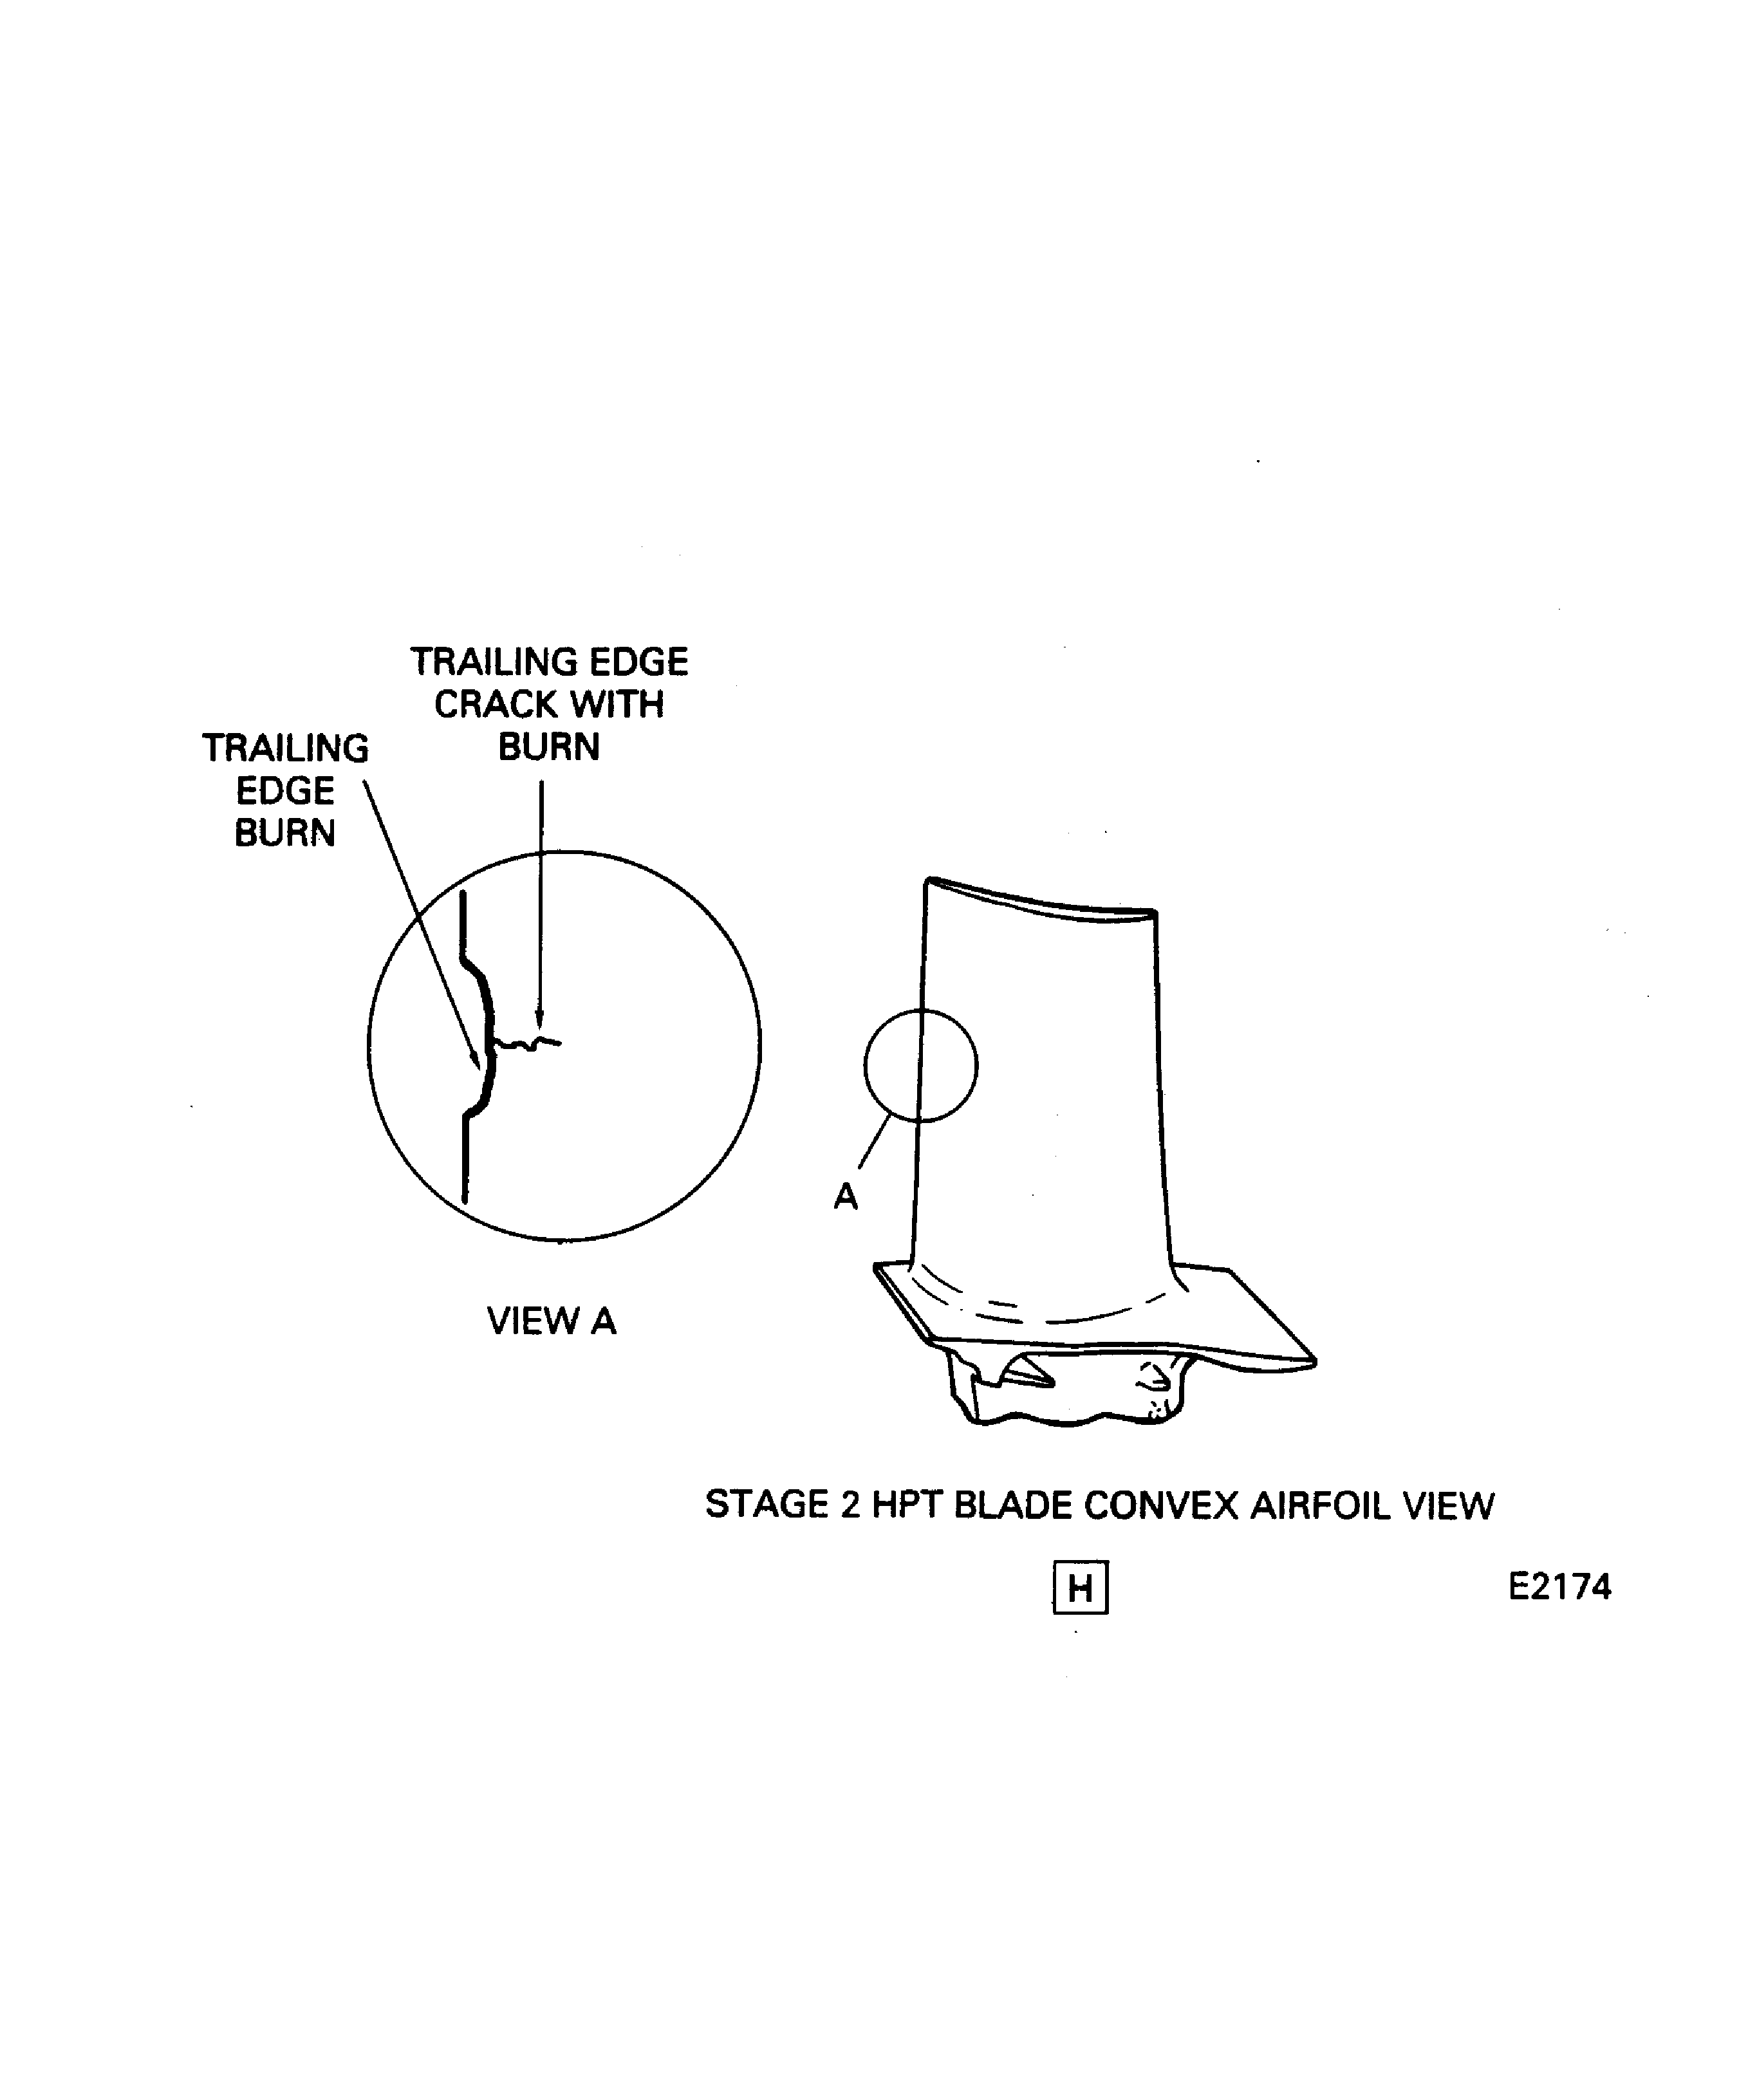
Erosion or burns on the airfoil or platforms.
If the erosion or burn is on the airfoil trailing edge in Area D.
If the erosion or burn is on the airfoil trailing edge in Area C and is longer than 0.070 in. (1.78 mm) axially or 0.150 in. (3.81 mm) radially
If the erosion or burn is on the airfoil leading edge and extends more than 20 percent of the airfoil radial length
If the erosion or burn on the leading edge has changed the shape of the airfoil
If the erosion or burn on the airfoil or the platform has gone through the coating. This does not include burns on the leading edge
If the erosion or burn has an adjacent area which shows signs of cracks
If the erosion or burn on the airfoil or platform permits internal areas to show. The internal areas are where the air goes that is used to cool the blade
If the burn on the airfoil changes the shape of the airfoil. This does not include burns on the leading edge
If the burn on the platform increases the gap with the adjacent platform to more than 0.040 in. (1.02 mm)
If the burn on the platform has gone into the airfoil/platform fillet
If the crack is on the trailing edge
If the crack is in Area B or C and is more than 0.070 in. (1.78 mm) long axially and/or more than 0.150 in. (3.81 mm) long radially
If the crack is in Area A and is more than 0.040 in. (1.02 mm) long axially and/or more than 0.070 in. (1.78 mm) long radially
If the crack in the airfoil goes through or touches other cracks
If there are cracks which are longer than 0.100 in. (2.54 mm)
If there is a crack which goes through the platform to the airfoil fillet radius
Discolouration or particles on the airfoil or platform
SUBTASK 72-00-45-220-124 Visually Examine the Knife-Edge of the Retaining Plate at Location 8
SUBTASK 72-00-45-220-125 Visually Examine the Surface of the Retaining Plate at Location 9
Surface damage, dents, scratches, burrs and round-bottom nicks up to 0.004 in. (0.102 mm) in depth with no sharp edges
SUBTASK 72-00-45-220-126 Visually Examine the Stage 2 Rear Sideplate Sheetmetal Lock and Key Assemblies at Location 10
SUBTASK 72-00-45-220-127 Visually Examine the Stage 2 Rear Sideplate Tabs and the Stage 2 Disk Rear Retaining Lugs at Location 11
SUBTASK 72-00-45-220-128 Visually Examine the Disk Surface at Location 12
SUBTASK 72-00-45-220-211 Visually Examine the Disk Surface at Location 13
Ink marking only or no marking
Marking of part number that penetrates below disk surface
Repair, VRS3704 TASK 72-45-31-300-013 (REPAIR-013)
SUBTASK 72-00-45-220-263 Examine the Stage 2 Turbine Hub for Damage at Location 14
Examine the Stage 2 Turbine Hub for dents, nicks and scratches that occurred during the disassembly process.
Dents, nicks and scratches
Requirements After Job Completion
Follow-On Conditions
NONE


