Export Control
EAR Export Classification: Not subject to the EAR per 15 C.F.R. Chapter 1, Part 734.3(b)(3), except for the following Service Bulletins which are currently published as EAR Export Classification 9E991: SBE70-0992, SBE72-0483, SBE72-0580, SBE72-0588, SBE72-0640, SBE73-0209, SBE80-0024 and SBE80-0025.Copyright
© IAE International Aero Engines AG (2001, 2014 - 2021) The information contained in this document is the property of © IAE International Aero Engines AG and may not be copied or used for any purpose other than that for which it is supplied without the express written authority of © IAE International Aero Engines AG. (This does not preclude use by engine and aircraft operators for normal instructional, maintenance or overhaul purposes.).Applicability
All
Common Information
TASK 72-45-31-300-001 HPT Stage 2 Hub - Blend Repair, Repair-001 (VRS3238)
General
Damage not more than 0.001 in. (0.025 mm) is permitted without a repair unless specified differently.
The maximum rotary equipment speed is 18,000 RPM.
The practices and processes referred to in the procedure by TASK number are in the SPM.
Preliminary Requirements
Pre-Conditions
| Action/Condition | Data Module/Technical Publication |
|---|---|
| Make sure that all the necessary cleaning and inspection procedures are done before the repair. |
Support Equipment
NONEConsumables, Materials and Expendables
NONESpares
NONESafety Requirements
CAUTION
Procedure
The Source Demonstration requirements of this repair mean that any facility not authorized to accomplish this repair either utilize the Authorized Repair Vendors listed below or contact IAE Manager Maintenance Operations to determine if a qualification program can be initiated at their facility.
IAE International Aero Engines AG
400 Main Street
M/S 121-10
East Hartford CT 06118
U.S.A.
Attn: Manager Technical Services
Authorized Repair Vendors for the Shot Peen section of Repair VRS3238 are listed below:
Pratt and Whitney Global Service Partners
East Hartford Repair Operations (GSP-EHRO)
400 Main Street, Well No.14 - Mail Stop 117-62
East Hartford, CT 06108
USA
Tel: (860) 557-2646
Fax: (860) 557-2647
Metal Improvements Company Inc. (MIC)
145 Addison Road
P. O. Box 487
Windsor, CT 06095
USA
Tel: (860) 688-6201
Fax: (860) 285-8809
MTU MAINTENANCE HANNOVER GmbH
Flughafen Hannover
Muenchner Strasse 31
D-30855 Langenhagen
Germany
Tel: 49 511 7806 0
Fax: 49 511 7806 111
IHI Corporation
229 Tonogaya,
Mizuho-Machi Nishitama-Gun
Tokyo 190 - 1297
Japan
Tel: 81-42-568-7362
Fax: 81-42-568-7566
ATTN: Program Manager, V2500
Metal Improvements Company Inc. (MIC)
Ascot Drive
Derby DE24 8ST
ENGLAND
Attn: Program Manager, V2500
Christchurch Engine Centre - CHCEC
115 Orchard Road
Christchurch 8051
New Zealand
The designation by IAE of an authorized repair vendor indicates that the repair vendor has demonstrated the necessary capability to enable it to carry out the listed repair work. However, IAE makes no warranties or representations concerning the qualifications or quality standards of the repair vendors to carry out the repair work, and accepts no responsibility whatsoever for any work that may be carried out by a repair vendor, other than when IAE is listed as the repair vendor. Authorized repair vendors do not act as agents or representatives of IAE.
Repair Facilities
Refer to Figure.
Do not blend the spline root radius and the spline loaded face areas.
The minimum blend length to depth is 15 to 1.
Remove all the lifted material.
A maximum of ten splines can be repaired with a maximum blended length of 0.500 in. (12.70 mm) or less on each spline.
A maximum of five splines can be repaired if the blended length is more than 0.500 in. (12.70 mm) on each spline.
The maximum blend depth in Area 1 is 0.005 in. (0.13 mm).
The maximum blend depth in Area 2 is 0.010 in. (0.25 mm).
All the blend finish marks must follow the lay of the original machining marks.
Break the spline tip edges to between 0.003 and 0.005 in. (0.08 and 0.13 mm).
Break the spline end profile edges to between 0.003 and 0.015 in. (0.08 and 0.38 mm).
Blend by SPM TASK 70-35-03-300-501.
Blend the surface damage such as dents, nicks, scratches and corrosion pits on the splines.
SUBTASK 72-45-31-350-067 Blend the Splines
The finish marks must follow the lay of the original tool marks.
The minimum blend length to depth ratio is 15 to 1.
The minimum blend radius to depth ratio is 30 to 1.
Blend by SPM TASK 70-35-03-300-501.
Blend the hub surface damage such as dents, nicks, scratches, wear, fretting, galling and corrosion pits.
The maximum blend depth is 0.010 in. (0.25 mm).
The maximum blend depth in Zone A which is shown in View B within Location 2 that is shown in View A is 0.025 in. (0.635 mm).
Blend all the areas at Location 1 to remove the surface damage that is more than 0.004 in. (0.10 mm) but 0.010 in. (0.25 mm) or less. Surface damage of 0.004 in. (0.10 mm) or less is acceptable without a repair.
The maximum blend depth is 0.010 in. (0.25 mm).
The maximum blended area is one third of the circumference of the hole.
If the damage or blend goes through the edge of the hole blend the hole radius by the procedures given in the SPM TASK 70-35-19-350-501. Round the edges of the hole to between 0.010 and 0.030 in. (0.25 and 0.76 mm) radius (flats not include) when no part of the edge has a radius of the curvature that is less than 0.010 in. (0.25 mm) radius.
Blend the areas at Location 6 to remove the surface damage.
The maximum repair depth is 0.004 in. (0.10 mm).
A minimum blend length to depth ratio of 10 to 1 must be maintained on the flat surface area of Location 15 defined by 0.160 in. (4.06 mm) stay way zone from both edges of the slot.
A minimum blend radius to depth ratio of 20 to 1 must be maintained on the flat surface area of Location 15 defined by 0.160 in. (4.06 mm) stay way zone from both edges of the slot.
No mismatch is allowed.
Shot peen all repaired surfaces using a minimum intensity of 6A or equivalent per authorized repair vendor.
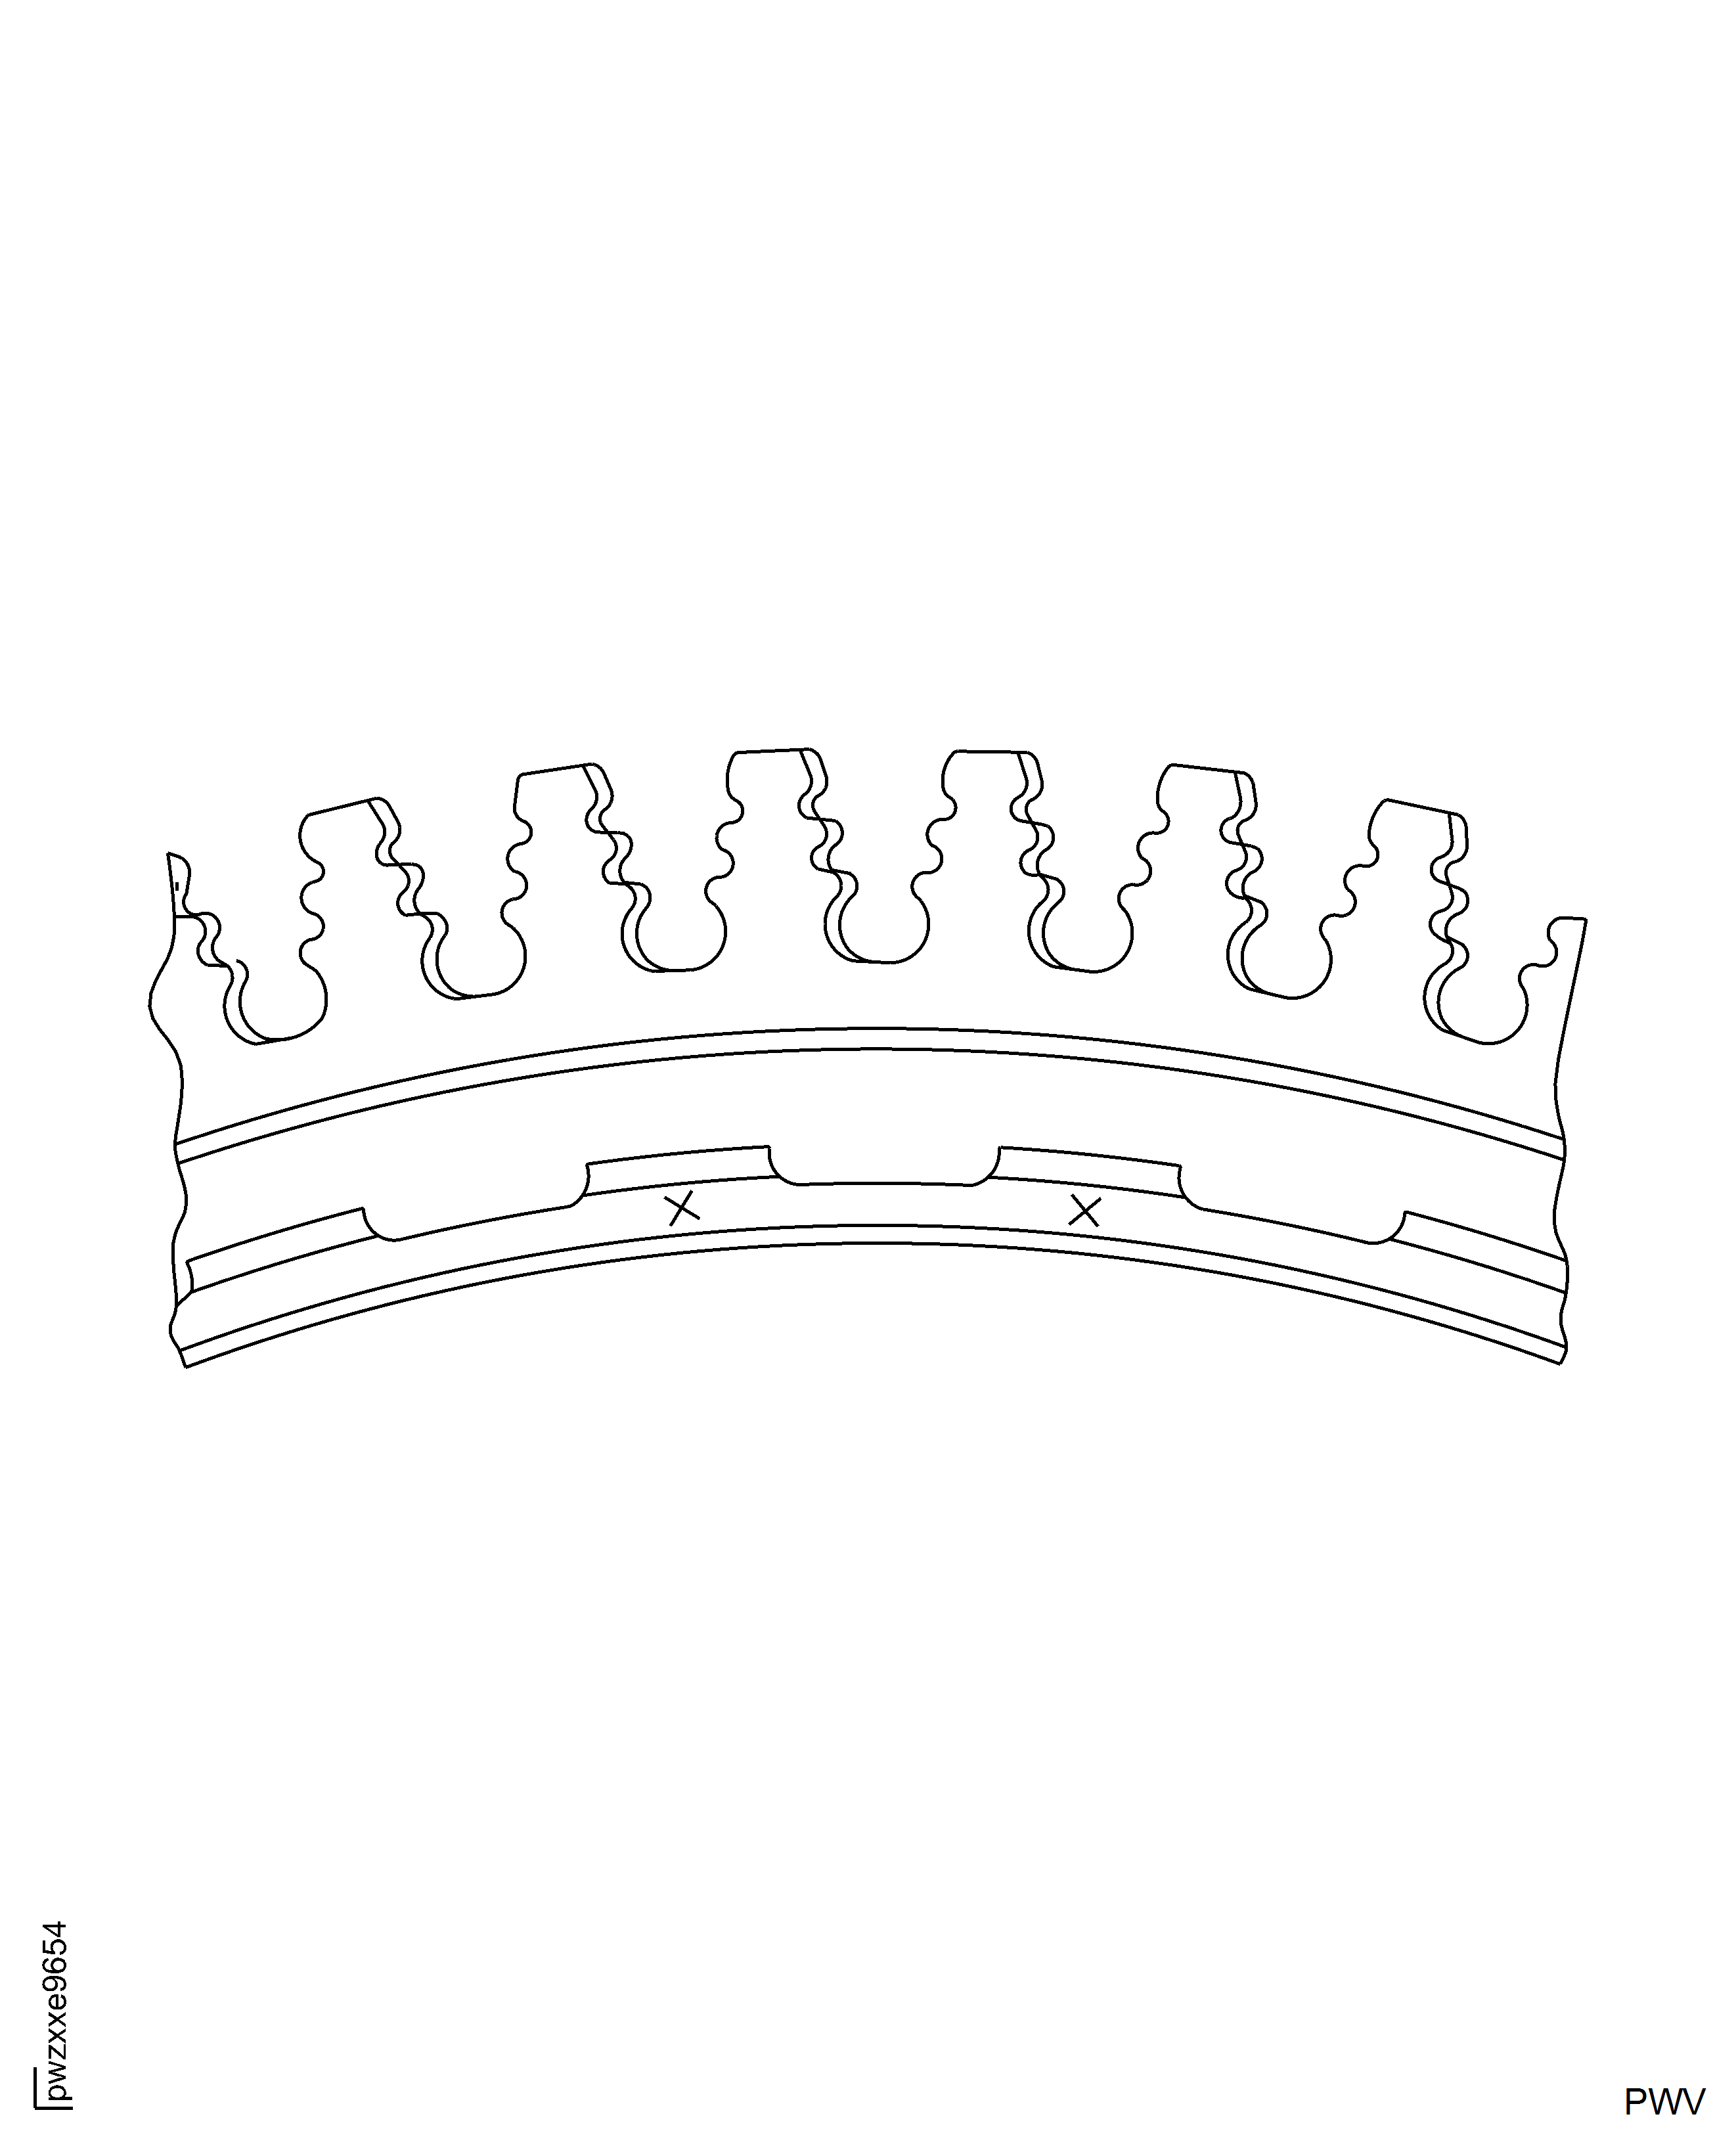
Mark "X" in center of the tab and keep distance of 0.060 in. (1 .52 mm) from all of the edges. See Figure.
Mark "X" height 0.076 in. (1.93 mm) max.
Use either dot peen intermediate method 0.0015 in. (0.04 mm) maximum depth, electrolytic etch deep 0.002 in. (0.05 mm) max or vibration peen 0.006 in. (0.15 mm).
If slot is repaired by blending, mark adjacent tabs with "X" on each side of the slot. Refer to V2500 SPM TASK 70-09-00-400-501:
Blend the area at Location 15 to remove surface damage.
The maximum blend depth is 0.007 in. (0.177 mm).
A minimum blend length to depth ratio of 15 to 1 is required along the circumferential direction only.
Blend should not extend into the forward fillet face.
No mismatch is allowed.
Shotpeen the repaired area(s) using an intensity of 6A or equivalent per authorized repair vendor.
Mark "X" in center of the tab and keep distance of 0.060 in. (1.524 mm) from all of the edges. See Figure.
Mark "X" height 0.076 in. (1.930 mm) maximum.
Use either dot peen intermediate method 0.0015 in. (0.0381 mm) maximum depth, electrolytic etch deep 0.002 in. (0.050 mm) maximum or vibration peen 0.006 in. (0.152 mm).
If slot is repaired by blending, mark adjacent tabs with "X" on each side of the slot. Refer to SPM TASK 70-09-00-400-501.
Blend the area at Location X to remove the surface damage that is more than 0.001 in. (0.025 mm) but 0.004 in. (0.101 mm) or less. Surface damage of 0.001 in. (0.025 mm) or less is acceptable without repair.
SUBTASK 72-45-31-350-068 Blend the Hub
Refer to Figure.
No cracks are permitted.
Do the procedure given in the SPM TASK 70-23-04-230-501.
Fluorescent penetrant inspect all of the repaired surfaces for cracks.
SUBTASK 72-45-31-230-066 Fluorescent Penetrant the Repair Areas
Shotpeen the repaired area(s) by SPM TASK 70-38-13-380-501.
Use S-170, CW-20 or SCW-20 shot size.
SUBTASK 72-45-31-380-056 Shotpeen the Hub Repaired Areas (Local Application)
The repaired area(s) at Locations 2, 3, 6, 7, 8, 11, 15 and X require shotpeen by a vendor who has source qualification. The repair facilities authorized to do the source demonstration portion of this repair are listed in Step of this repair.
SUBTASK 72-45-31-380-058 Shotpeen the Hub Repaired Areas (Source Demonstration Necessary)
Refer to Figure.
SUBTASK 72-45-31-220-124 Examine the Repair
Make a permanent mark by the procedures given in the SPM TASK 70-09-00-400-501.
Mark VRS3238 adjacent to the part number. Use the vibration peen method.
SUBTASK 72-45-31-350-069 Identify the Repair
Figure: Stage 2 Turbine Hub Blend Repair Areas (PN 2A0902)
Stage 2 Turbine Hub Blend Repair Areas (PN 2A0902)
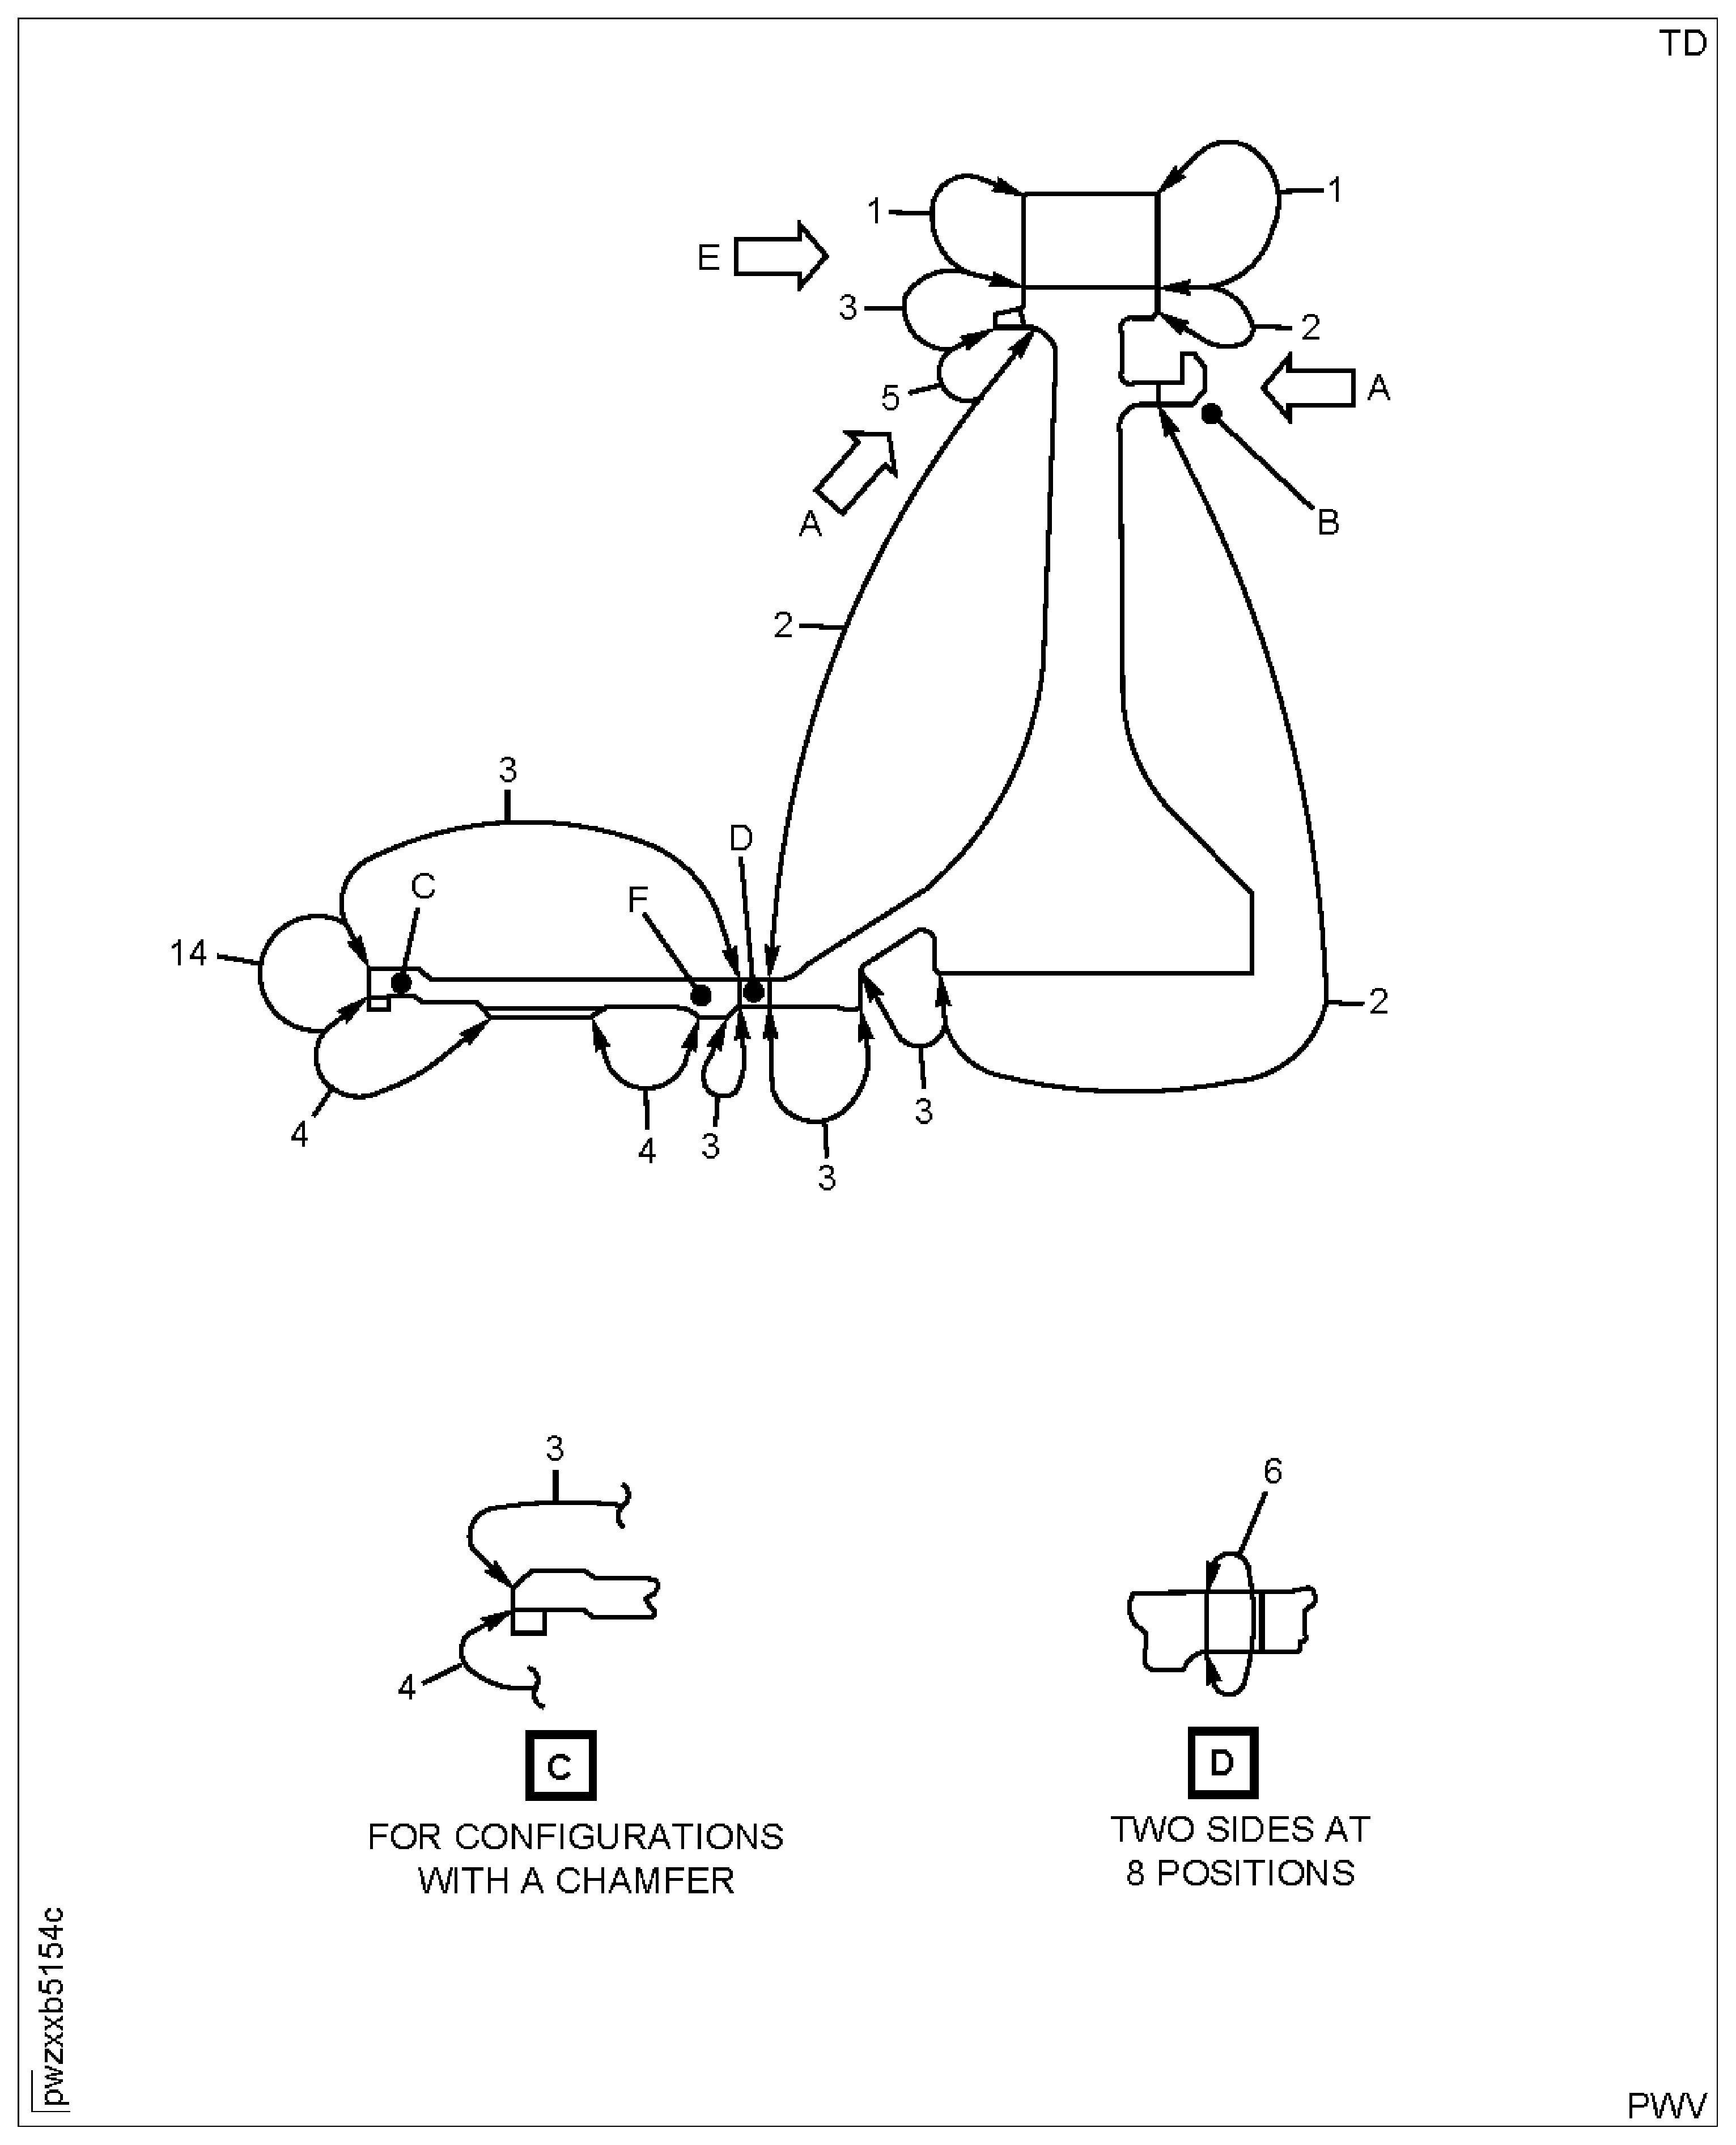
Figure: Stage 2 Turbine Hub Blend Repair Areas (PN 2A0902)
Stage 2 Turbine Hub Blend Repair Areas (PN 2A0902)
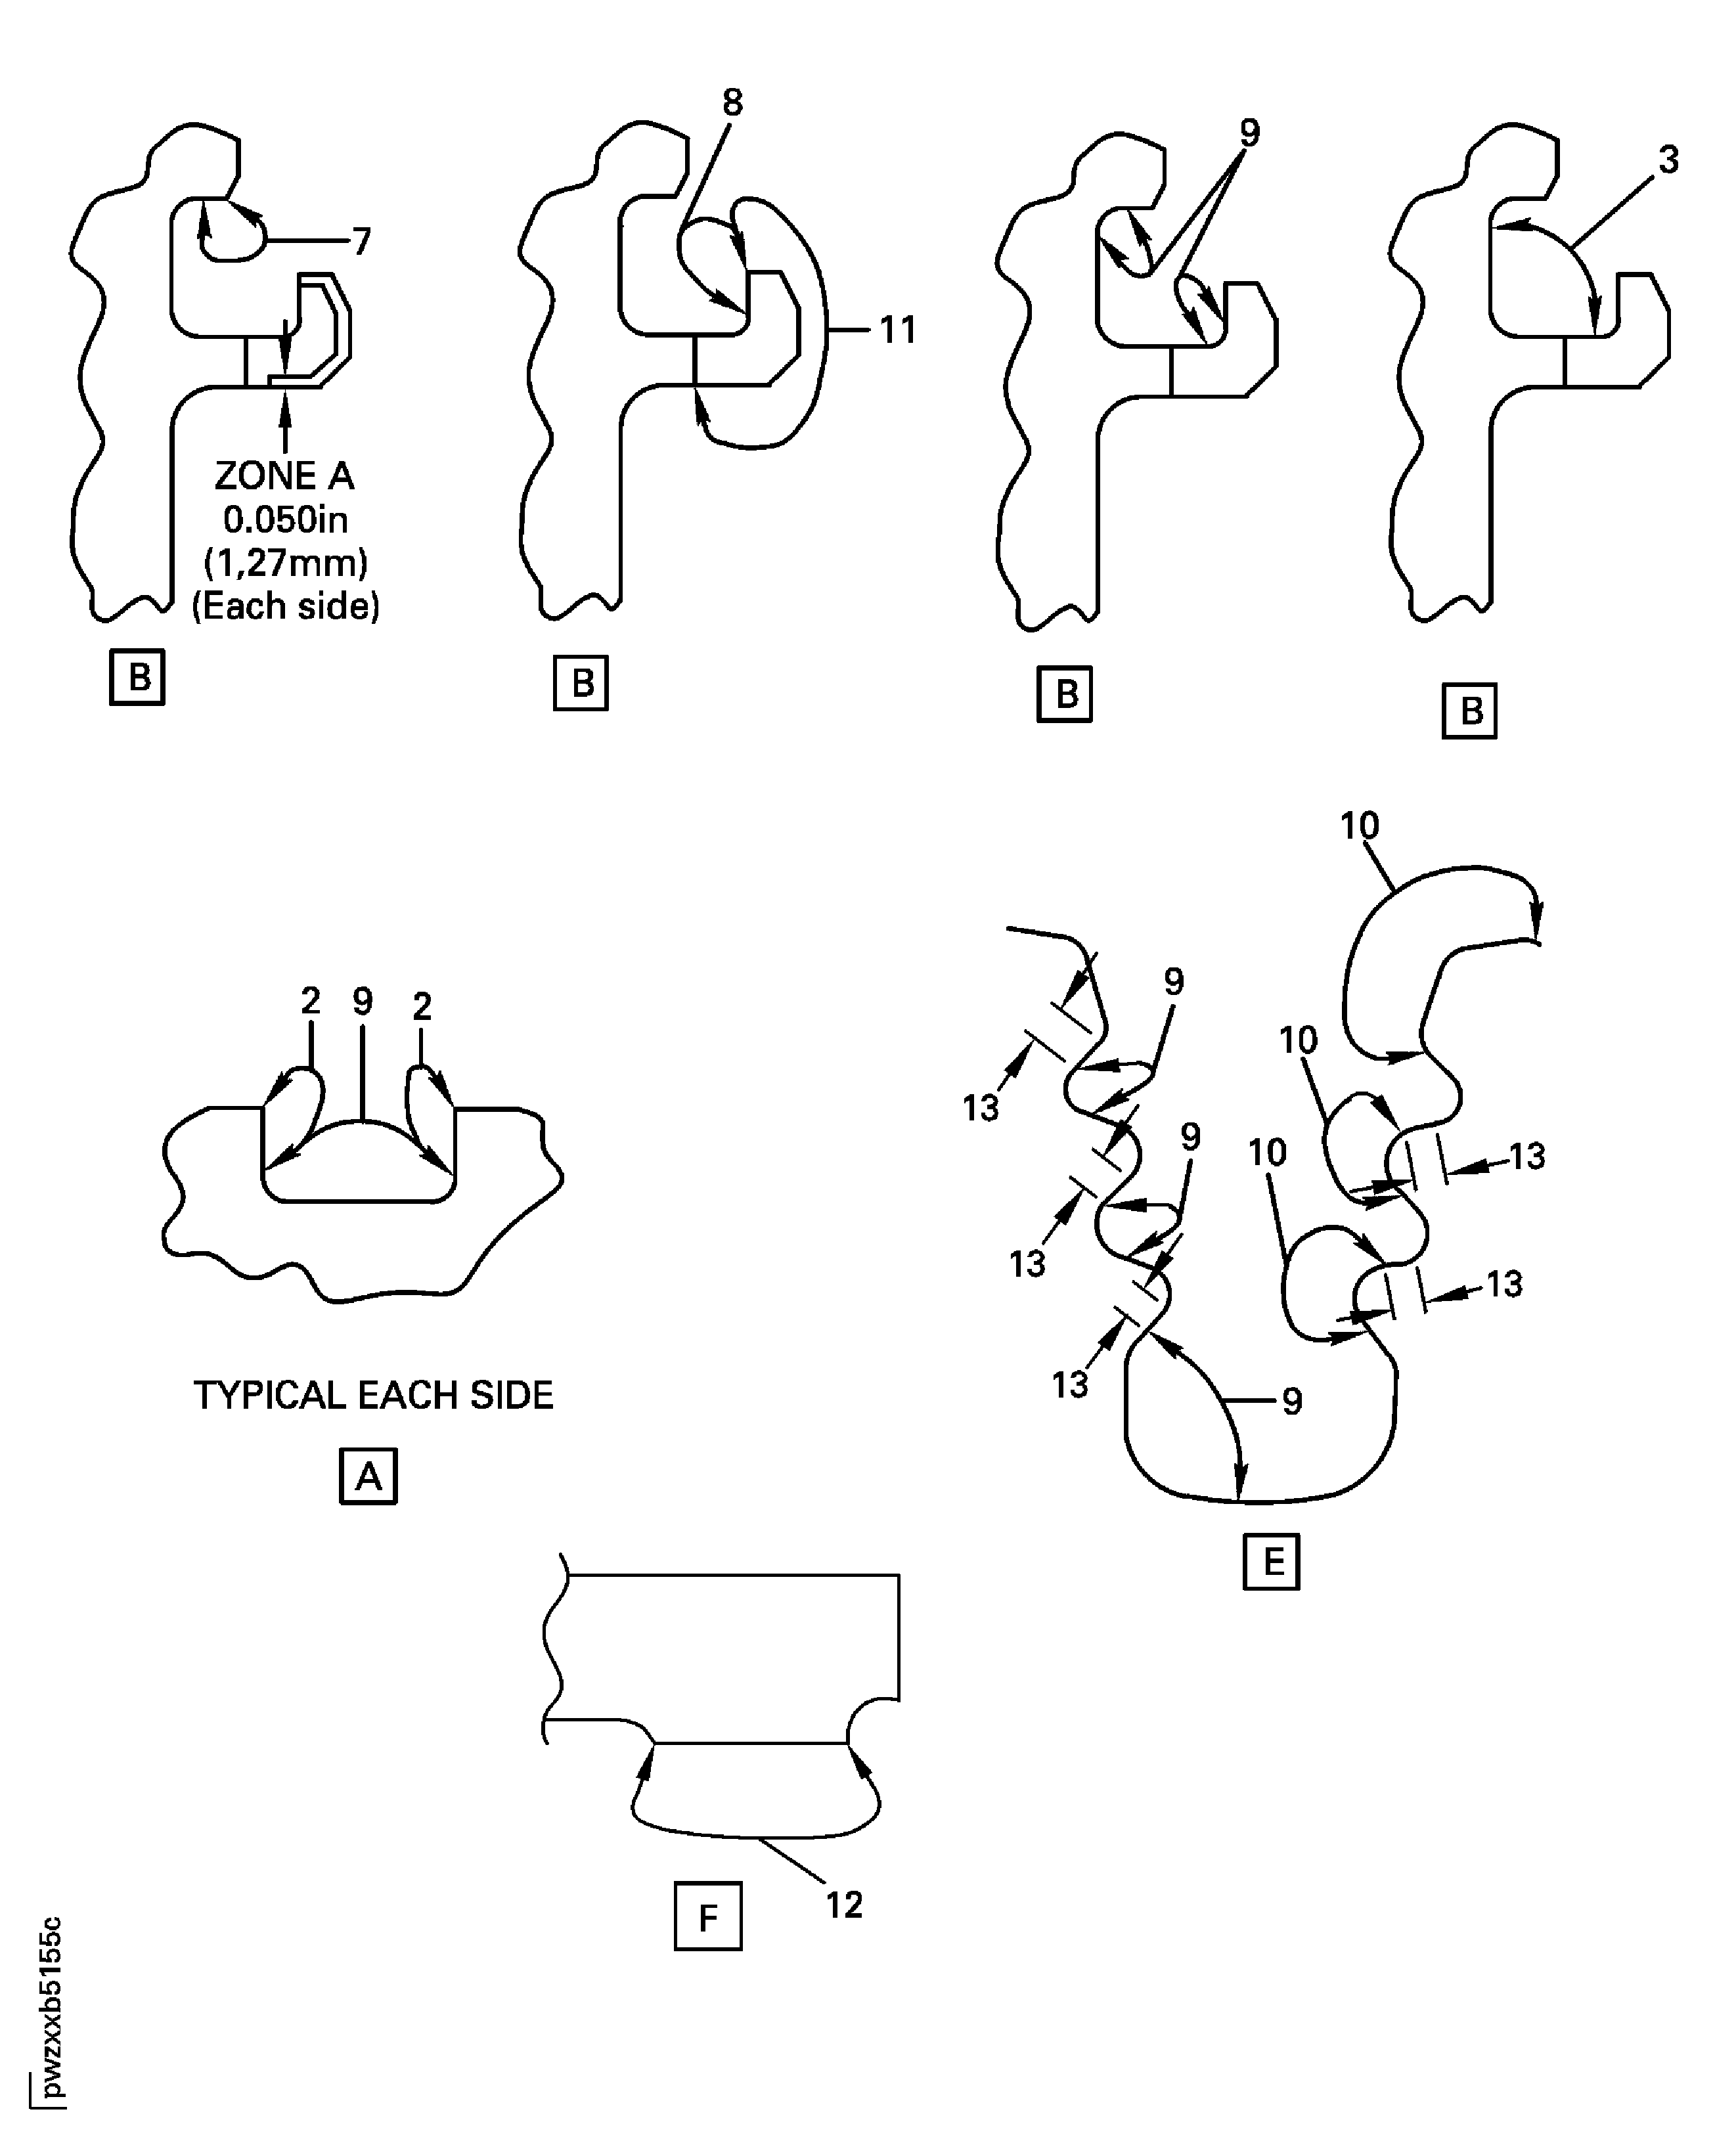
Figure: Stage 2 Turbine Hub Blend Repair Areas (PNs 2A1202, 2A2302, 2A3002, 2A4802)
Stage 2 Turbine Hub Blend Repair Areas (PNs 2A1202, 2A2302, 2A3002, 2A4802)
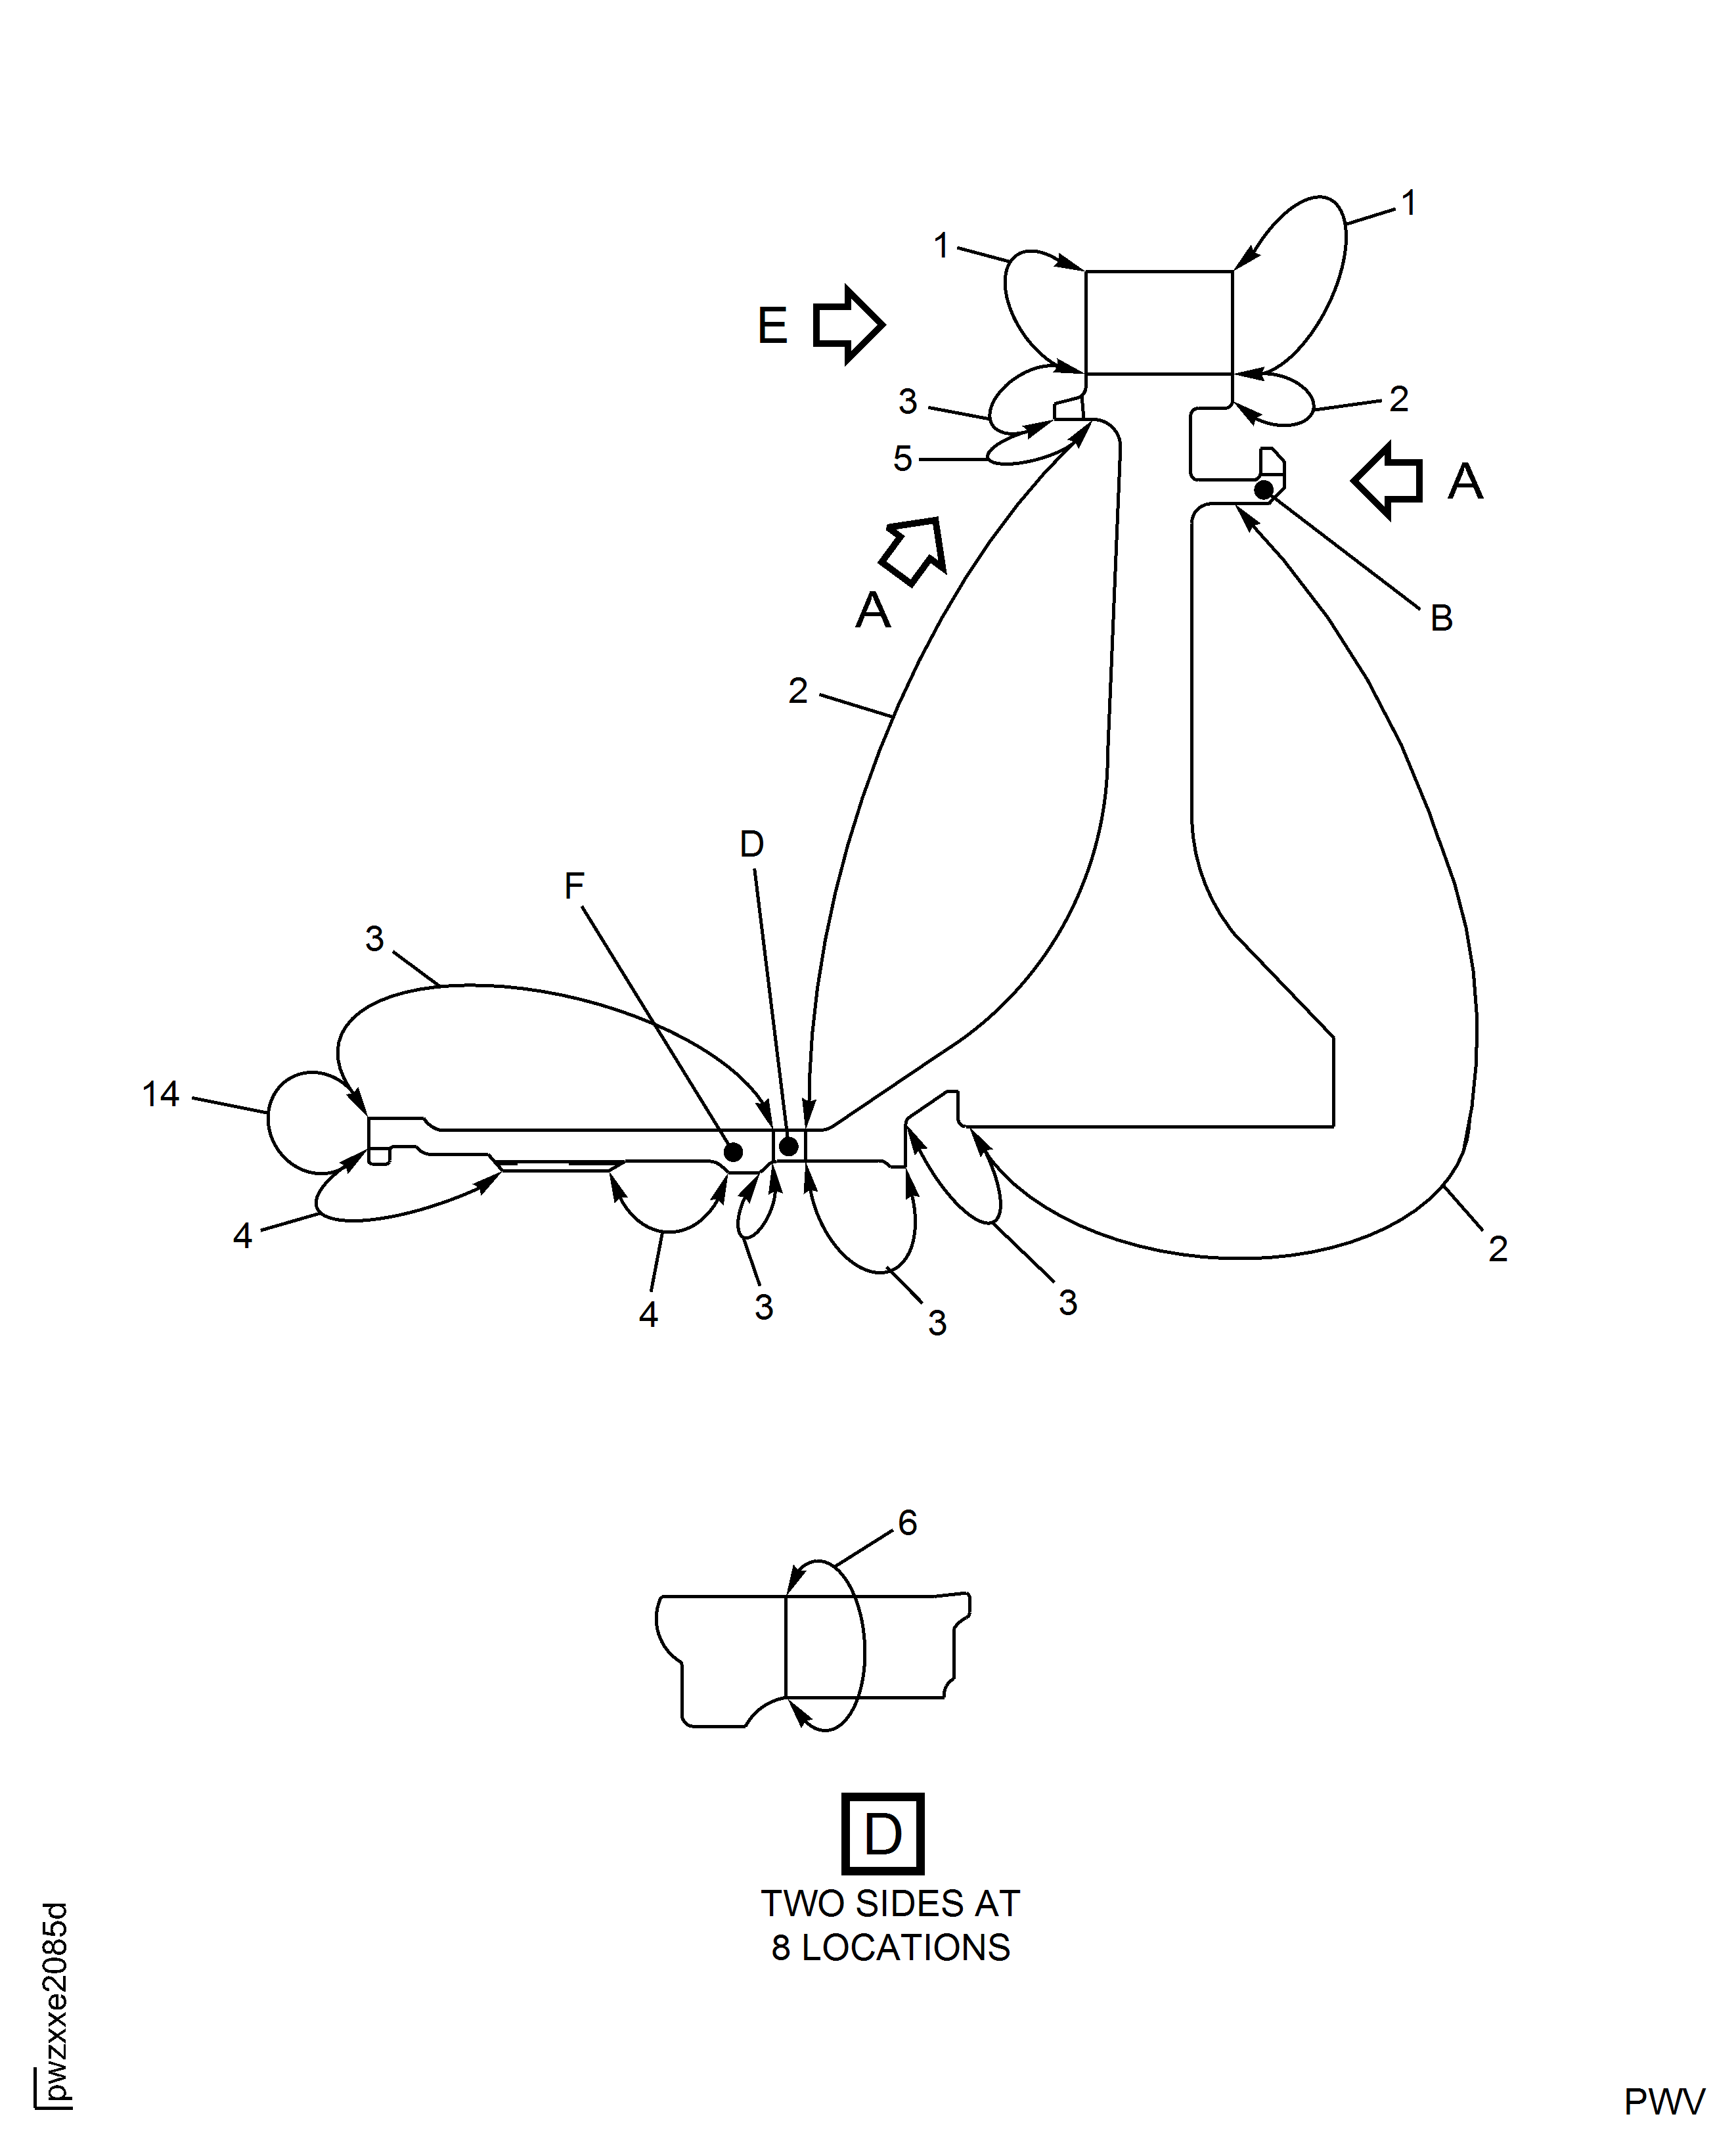
Figure: Stage 2 Turbine Hub Blend Repair Areas (PN 2A1202, 2A2302, 2A3002, 2A4802)
Stage 2 Turbine Hub Blend Repair Areas (PN 2A1202, 2A2302, 2A3002, 2A4802)
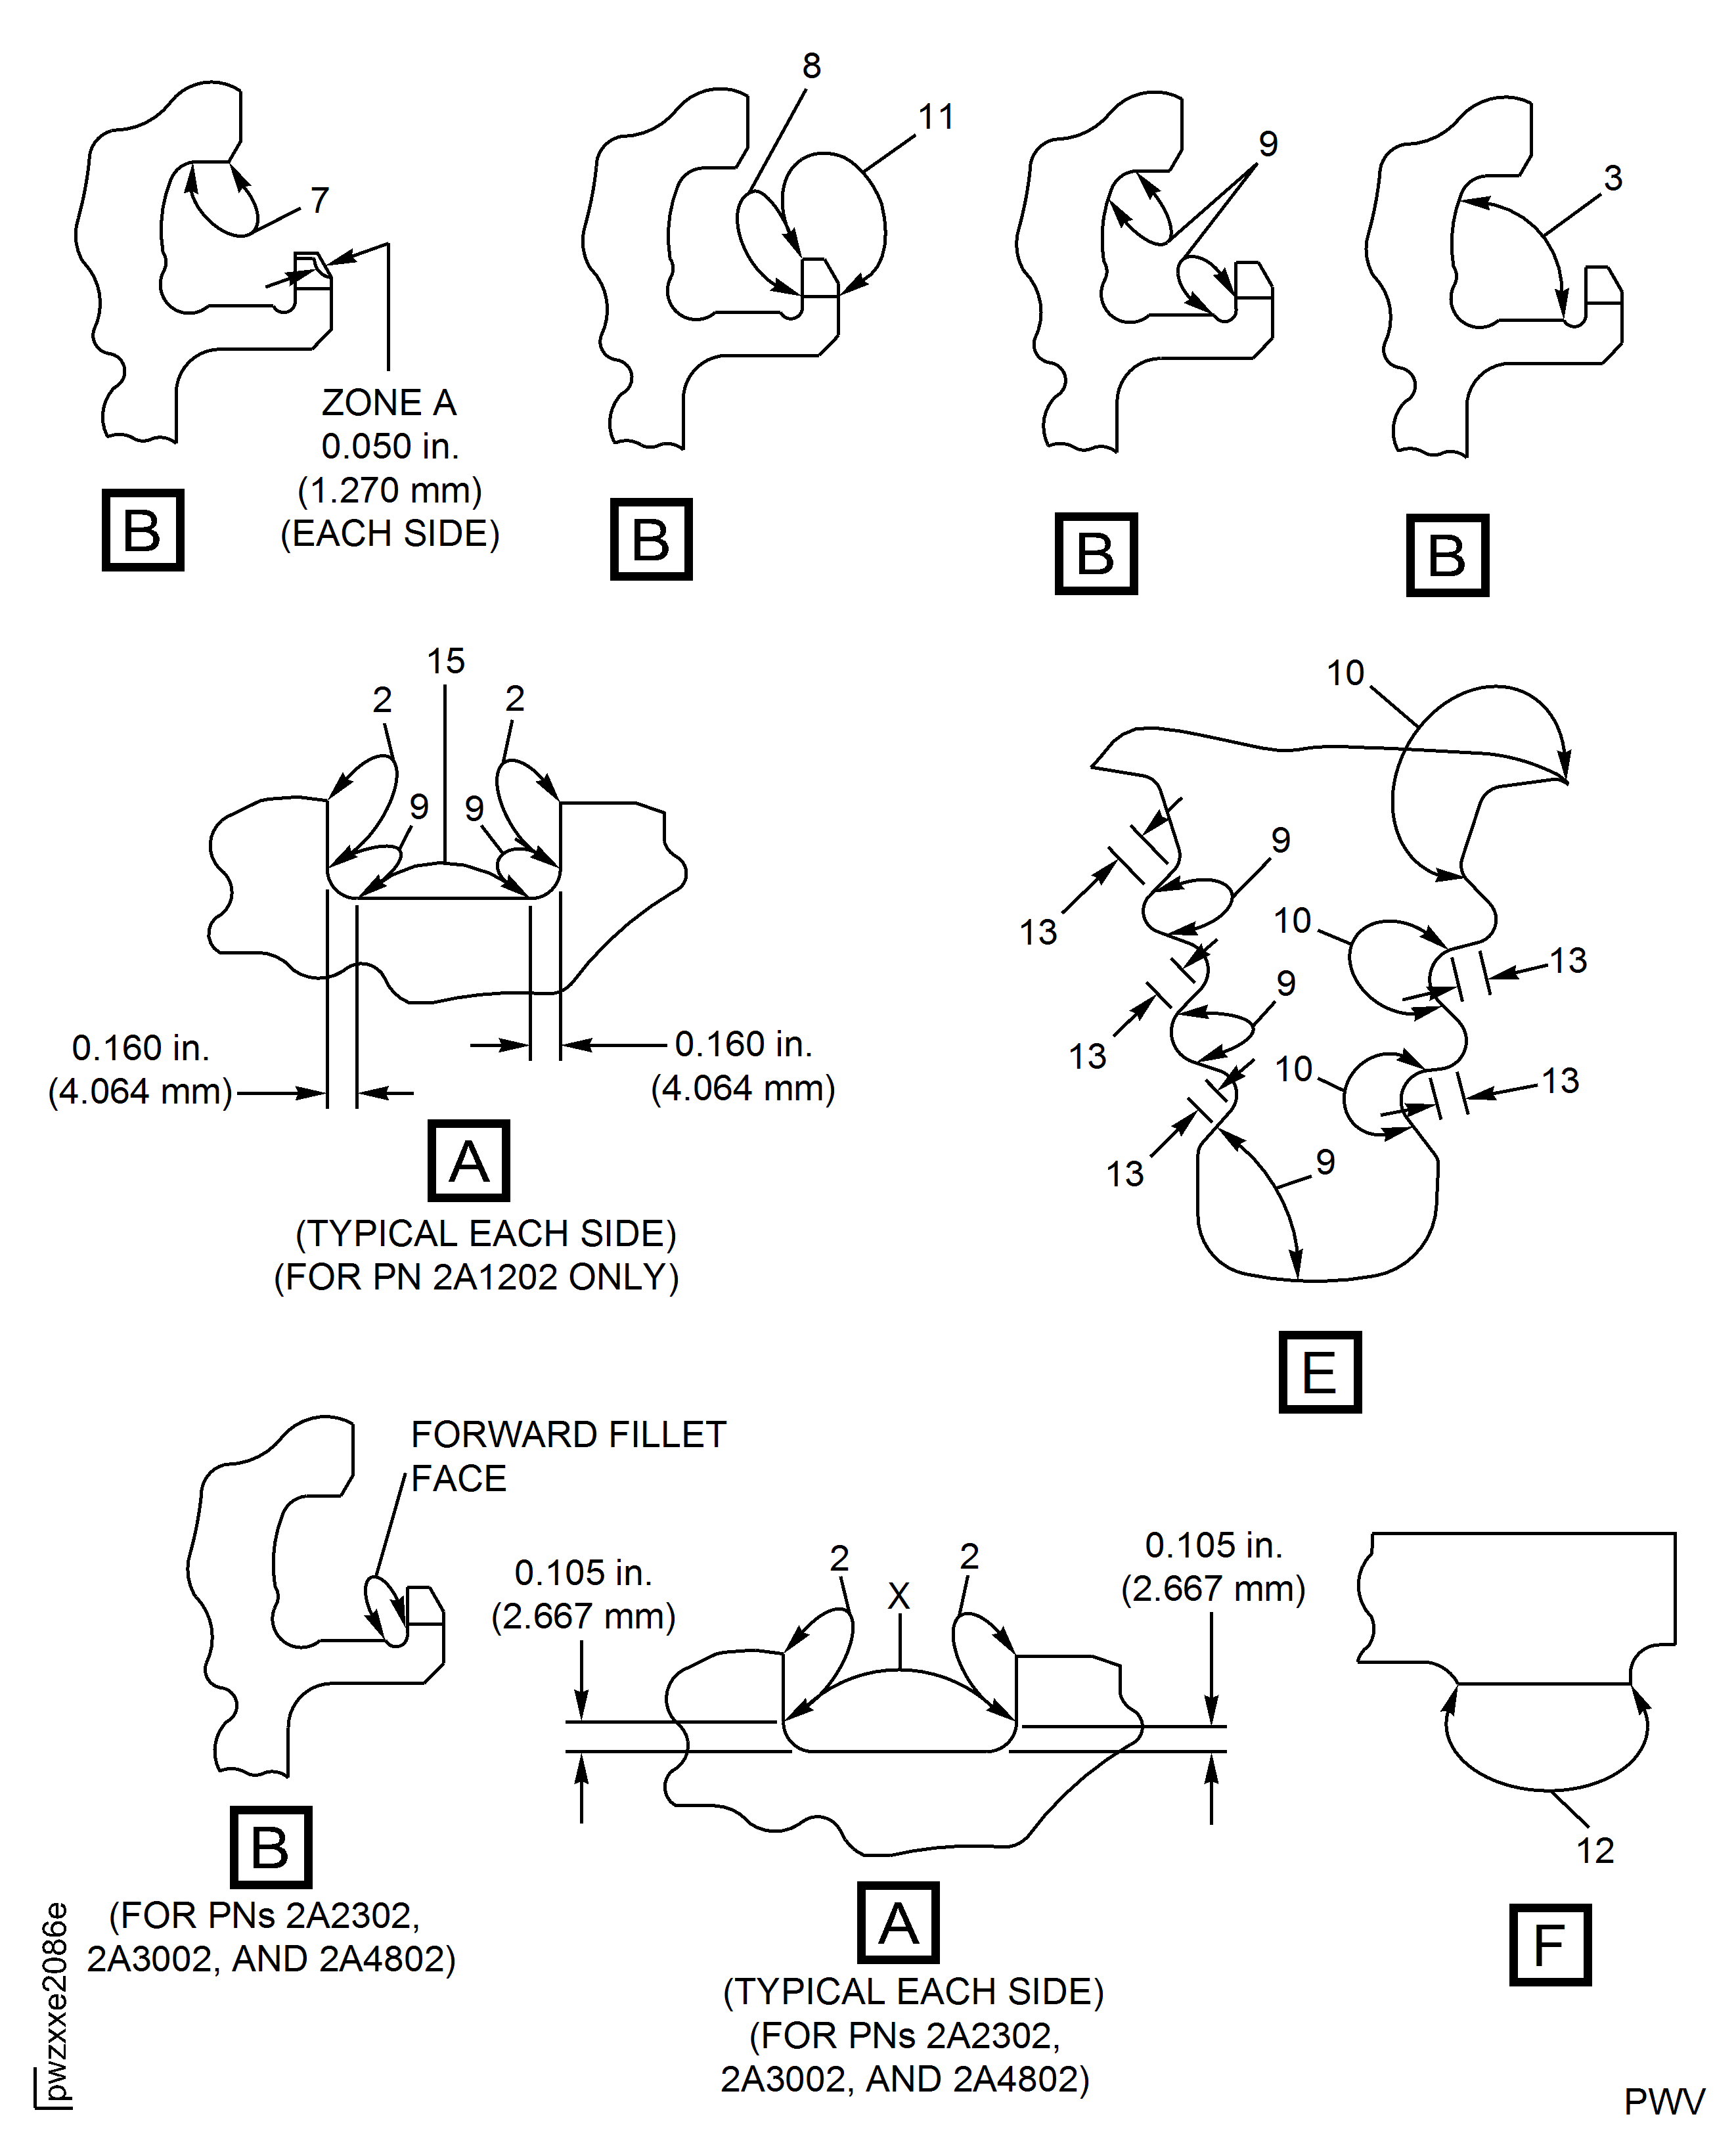
Figure: Repair Details and Dimensions
Repair Details and Dimensions
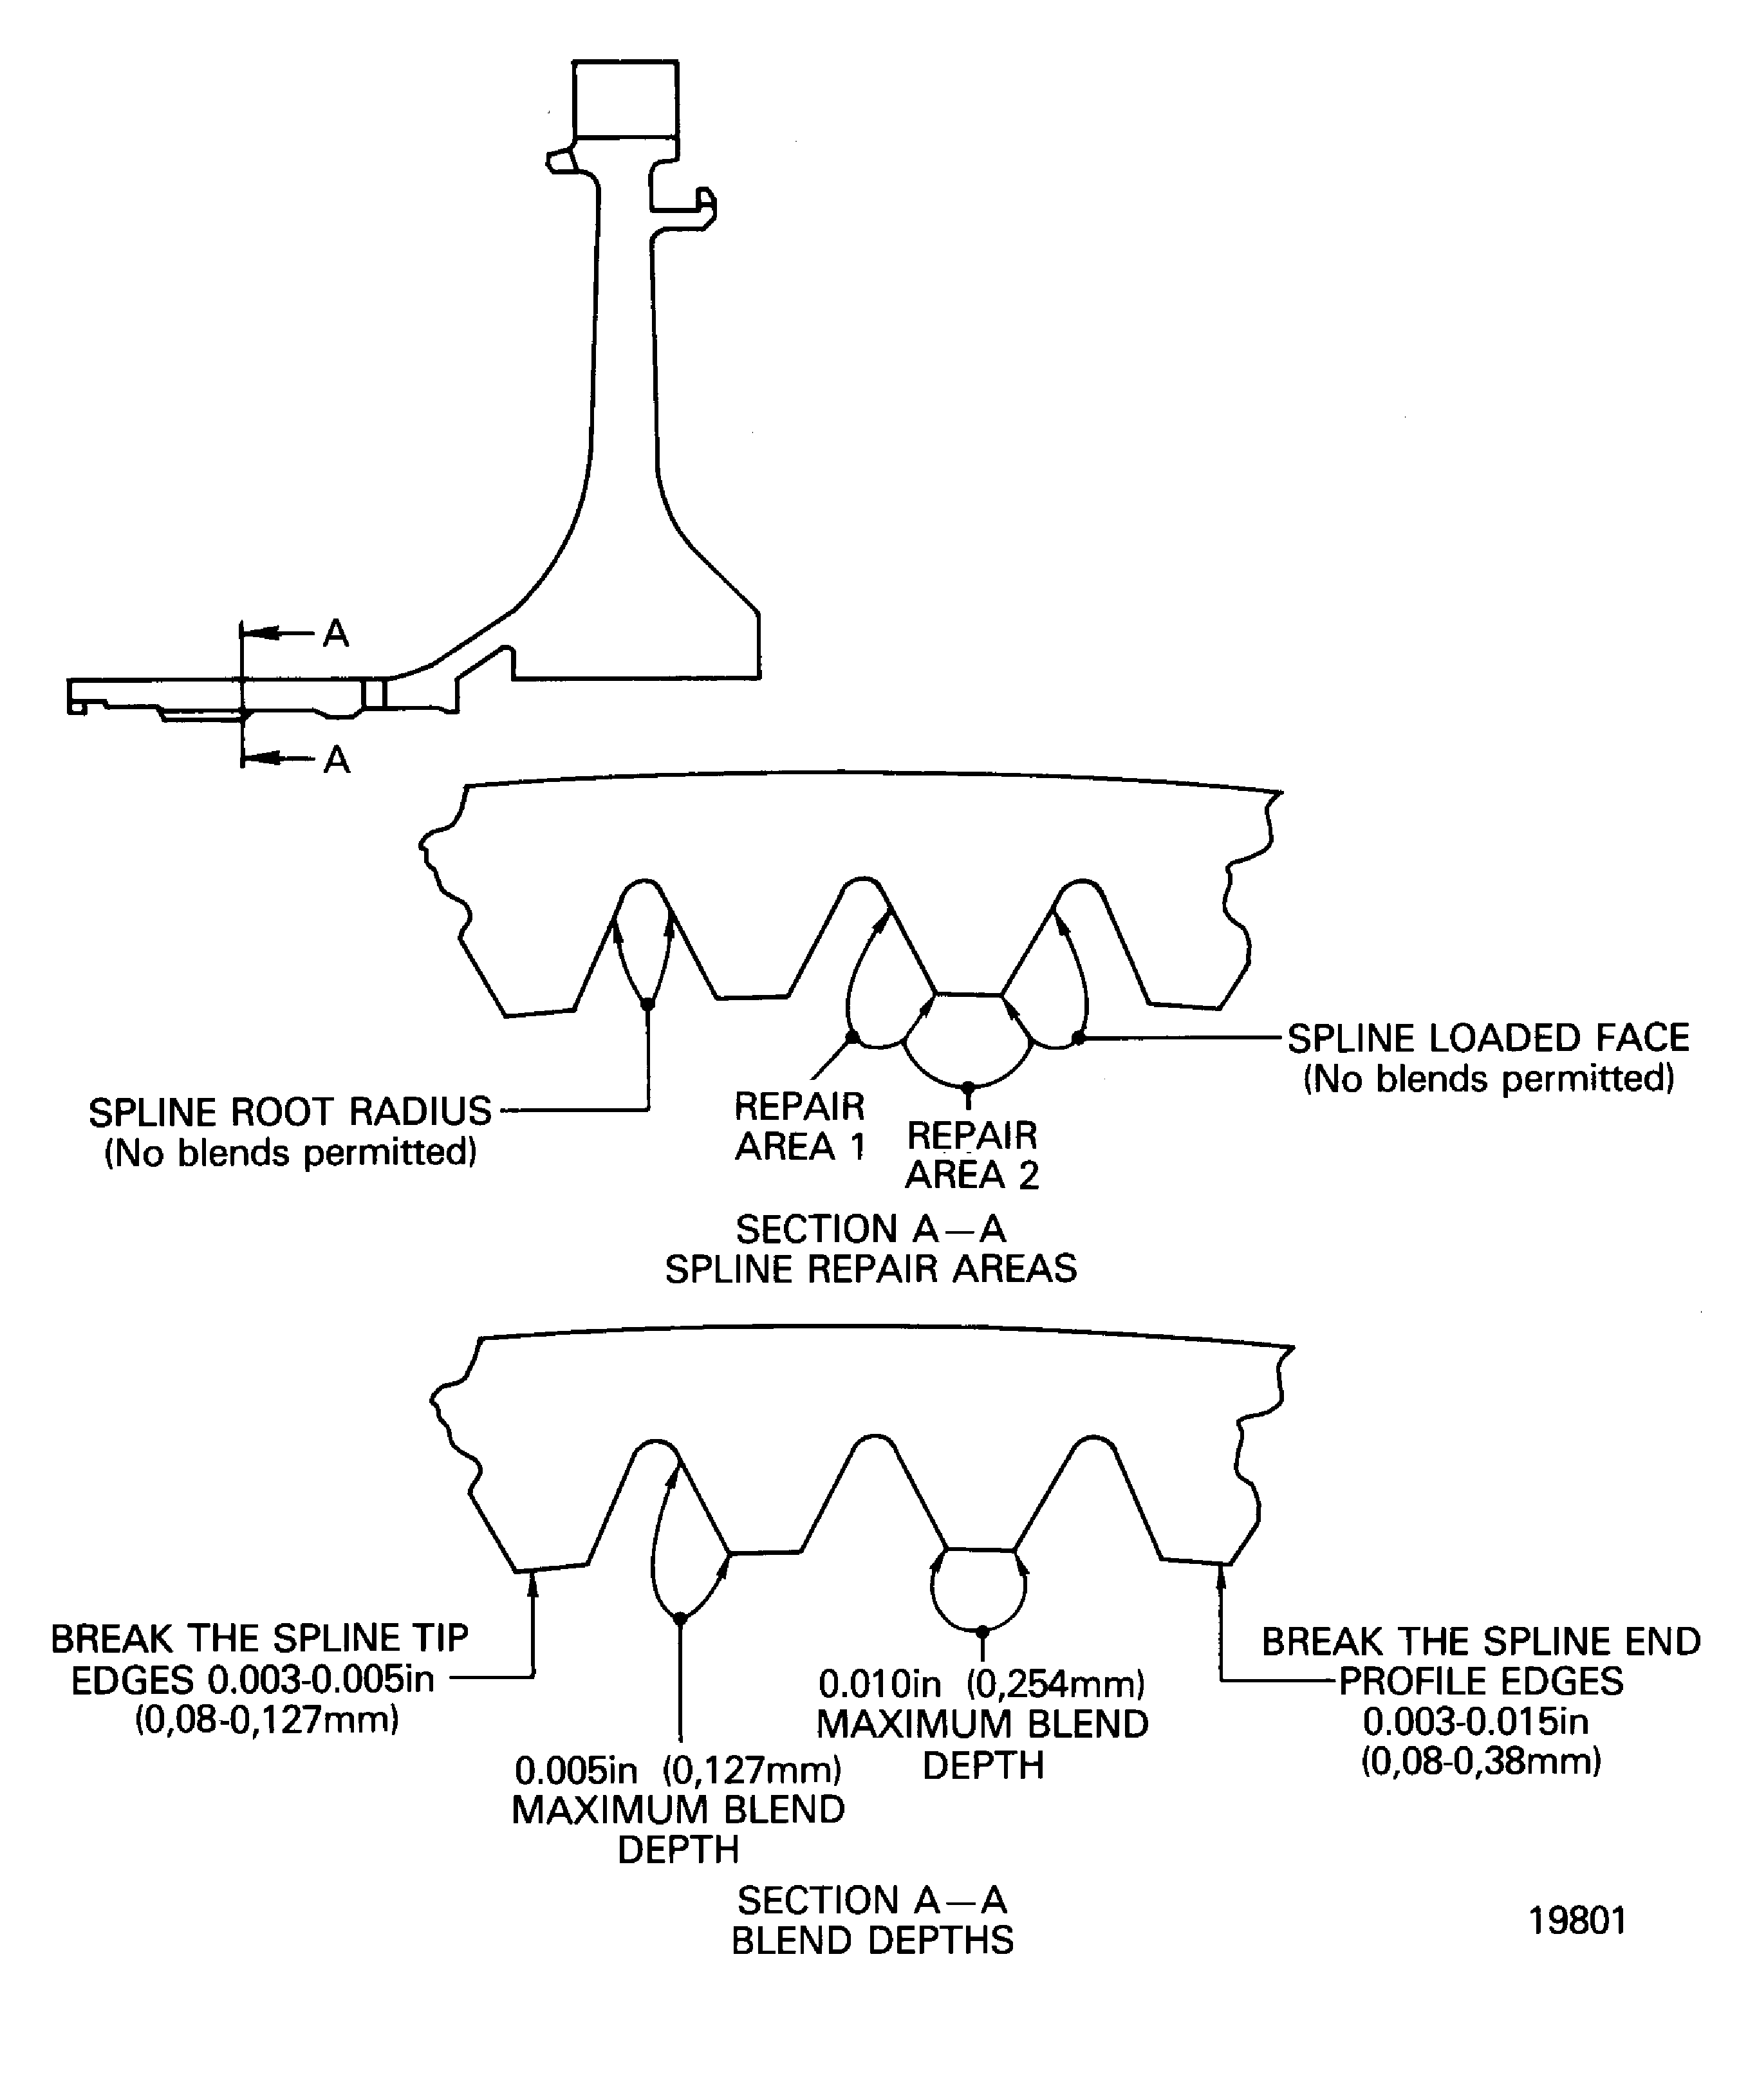
Figure: Repair Marking
Repair Marking
