Export Control
EAR Export Classification: Not subject to the EAR per 15 C.F.R. Chapter 1, Part 734.3(b)(3), except for the following Service Bulletins which are currently published as EAR Export Classification 9E991: SBE70-0992, SBE72-0483, SBE72-0580, SBE72-0588, SBE72-0640, SBE73-0209, SBE80-0024 and SBE80-0025.Copyright
© IAE International Aero Engines AG (2001, 2014 - 2021) The information contained in this document is the property of © IAE International Aero Engines AG and may not be copied or used for any purpose other than that for which it is supplied without the express written authority of © IAE International Aero Engines AG. (This does not preclude use by engine and aircraft operators for normal instructional, maintenance or overhaul purposes.).Applicability
All
Common Information
TASK 72-32-80-200-002 LPC/Intermediate Case Module - Examine The LPC Cases At Module, Inspection-002
Material of component
PART IDENT | SYMBOL | MATERIAL |
|---|---|---|
LPC Rotor assembly | - | Aluminum alloy - LPC front case and LPC rear case |
General
The word Reject is used after an interface inspection statement to show that a higher level inspection and possible repair to the damaged part is necessary.
Do the higher level inspection procedure as found in the applicable Chapter/Section/Subject of this manual on the damaged part(s). It is not necessary to do the higher level inspection on parts that are serviceable to the interface inspection standard.
The policy that is necessary for inspection is given in the SPM TASK 70-20-01-200-501.
NOTE
Preliminary Requirements
Pre-Conditions
NONESupport Equipment
NONEConsumables, Materials and Expendables
NONESpares
NONESafety Requirements
NONEProcedure
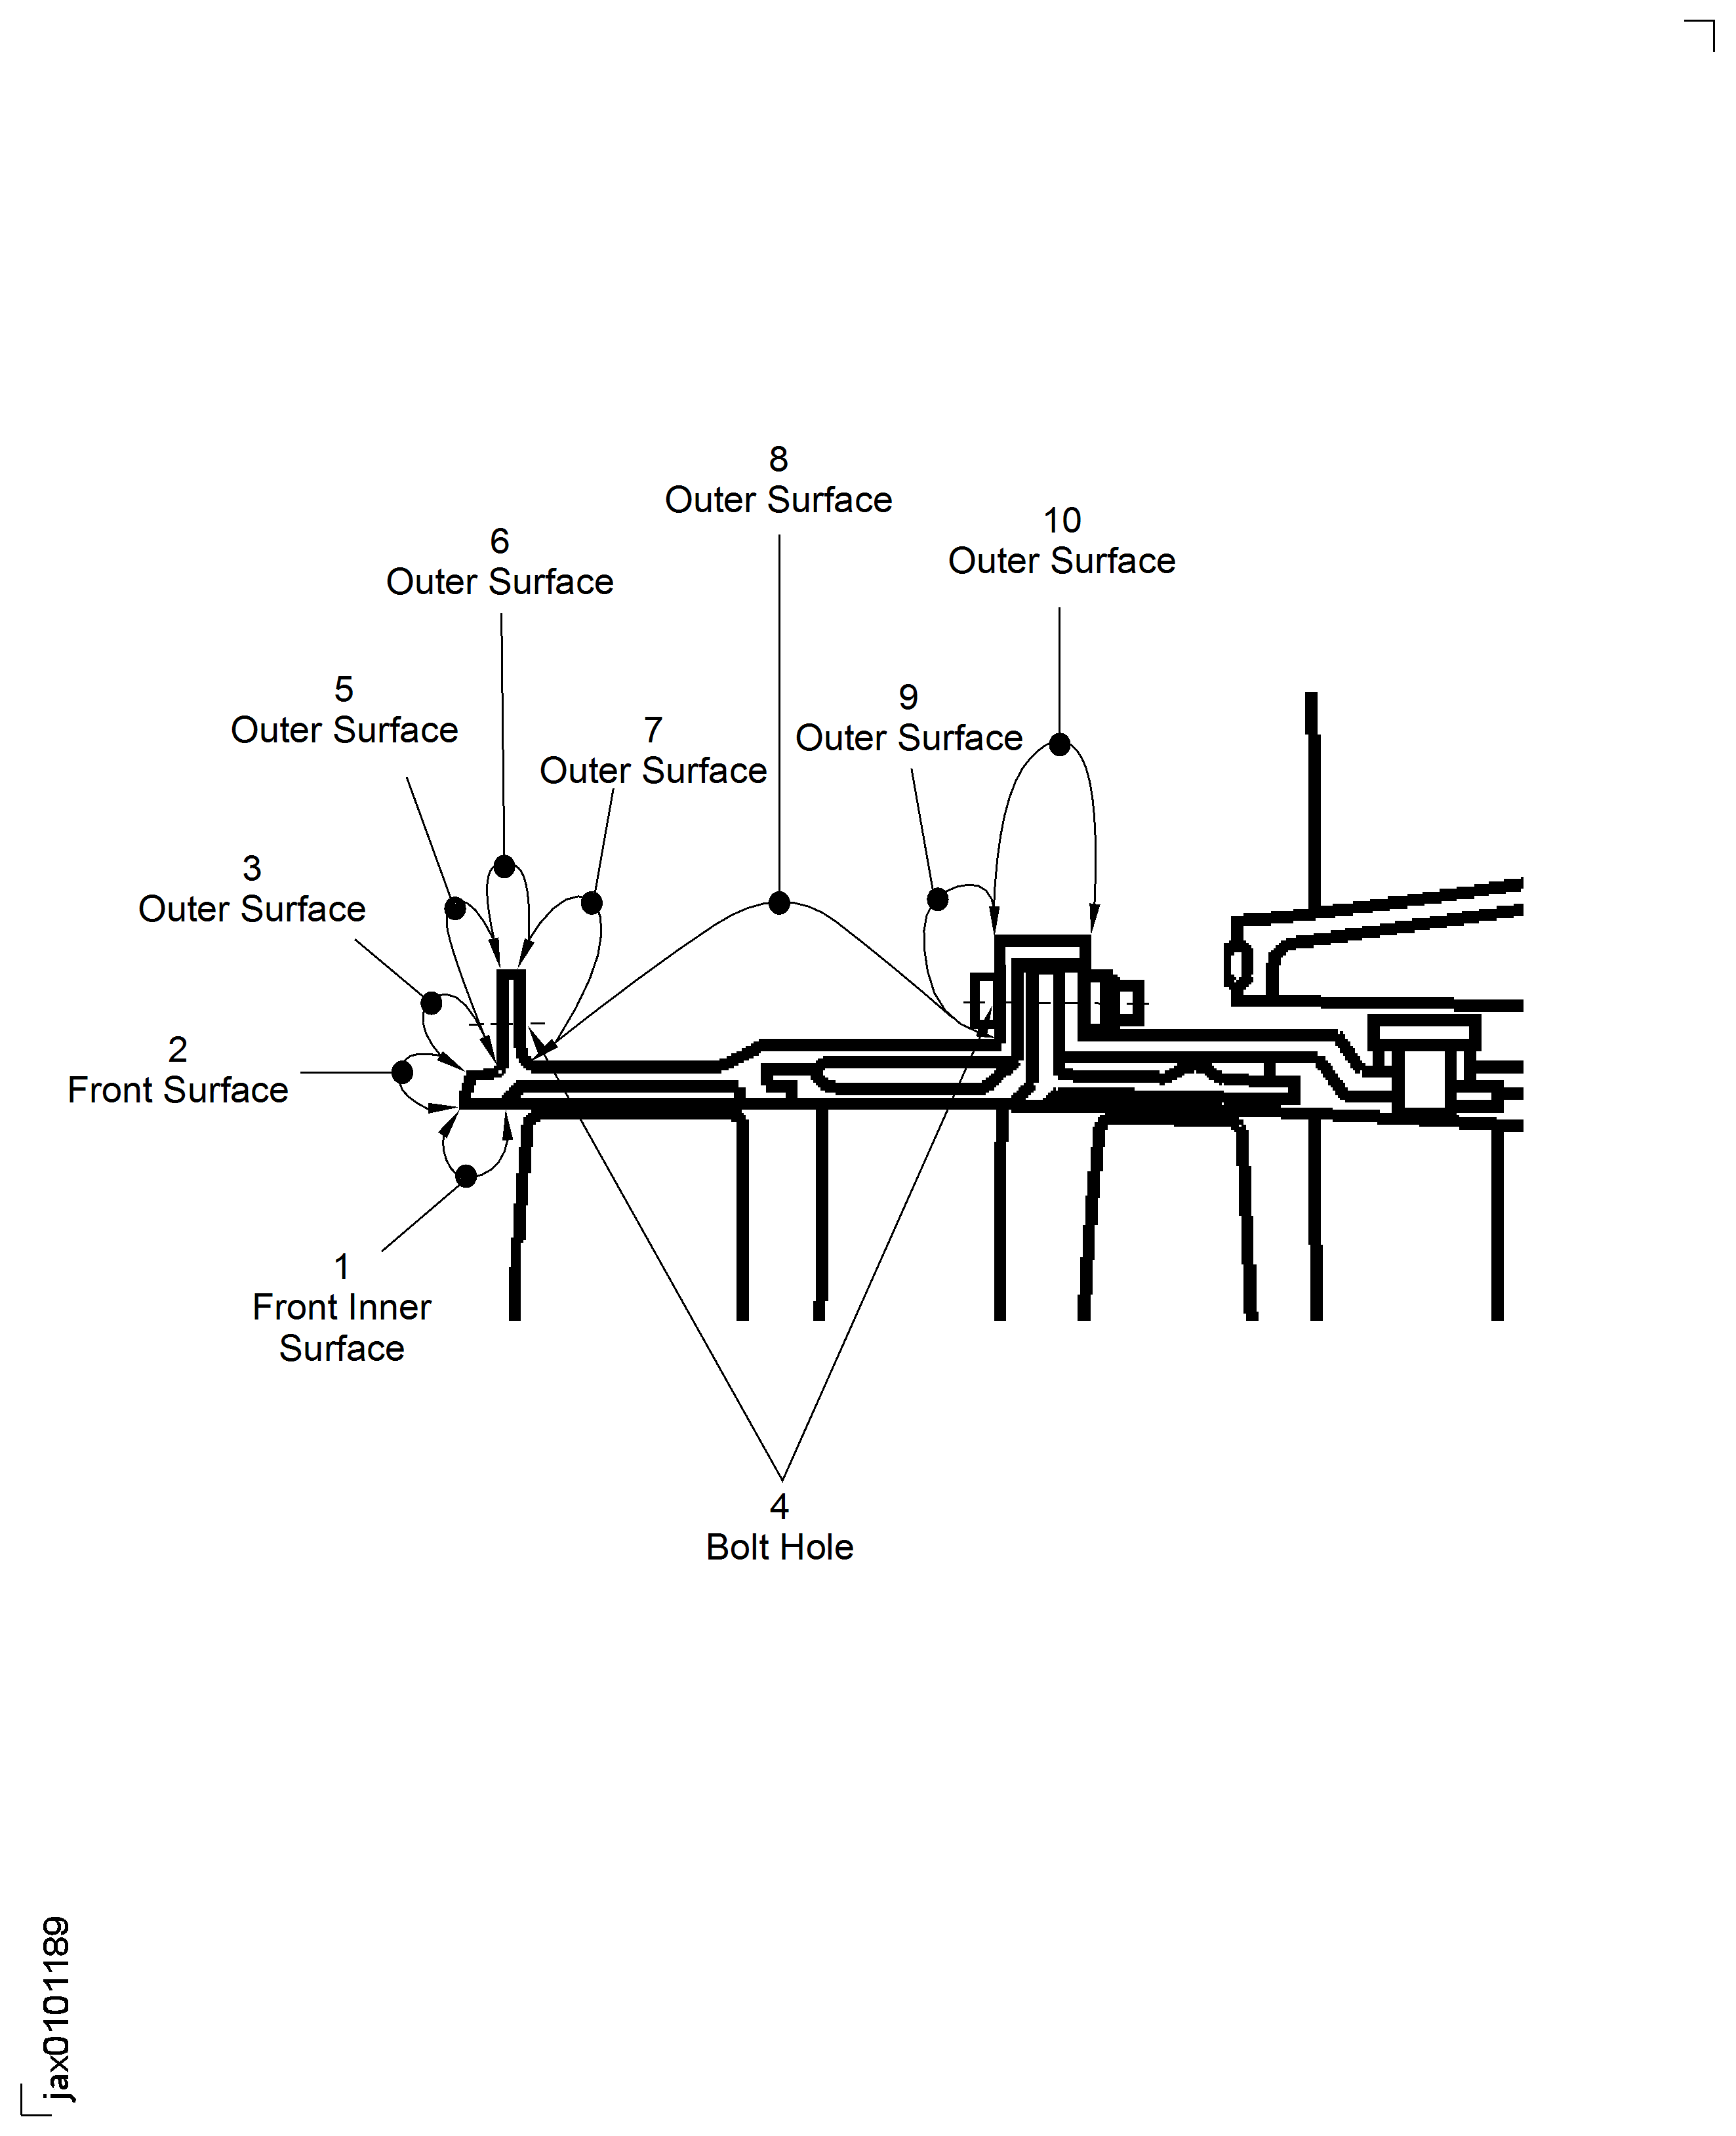
Refer to Figure.
Reject.
Cracked.
Accept.
Not more than 0.008 in. (0.203 mm) in depth.
Reject.
More than 0.008 in. (0.203 mm) in depth.
Nicked, scratched and dented.
Accept.
Not more than 0.008 in. (0.203 mm) in depth.
Reject.
More than 0.008 in. (0.203 mm) in depth.
Rubbed and gouged.
Reject.
Corroded and pitted.
SUBTASK 72-32-80-220-058 Visually Examine the Front Inner Surface at Location 1
Refer to Figure.
Reject.
Cracked.
Accept.
Not more than 0.008 in. (0.203 mm) in depth.
Repair, VRS1997 TASK 72-32-80-300-001 (REPAIR-001).
More than 0.008 in. (0.203 mm) in depth.
Nicked, scratched and dented.
Repair, VRS1997 TASK 72-32-80-300-001 (REPAIR-001).
Corroded and pitted.
SUBTASK 72-32-80-220-059 Visually Examine the Front Surface at Location 2
Reject.
Cracked.
Repair, VRS1997 TASK 72-32-80-300-001 (REPAIR-001).
Nicked, scratched, dented and worn.
Repair, VRS1997 TASK 72-32-80-300-001 (REPAIR-001).
Corroded and pitted.
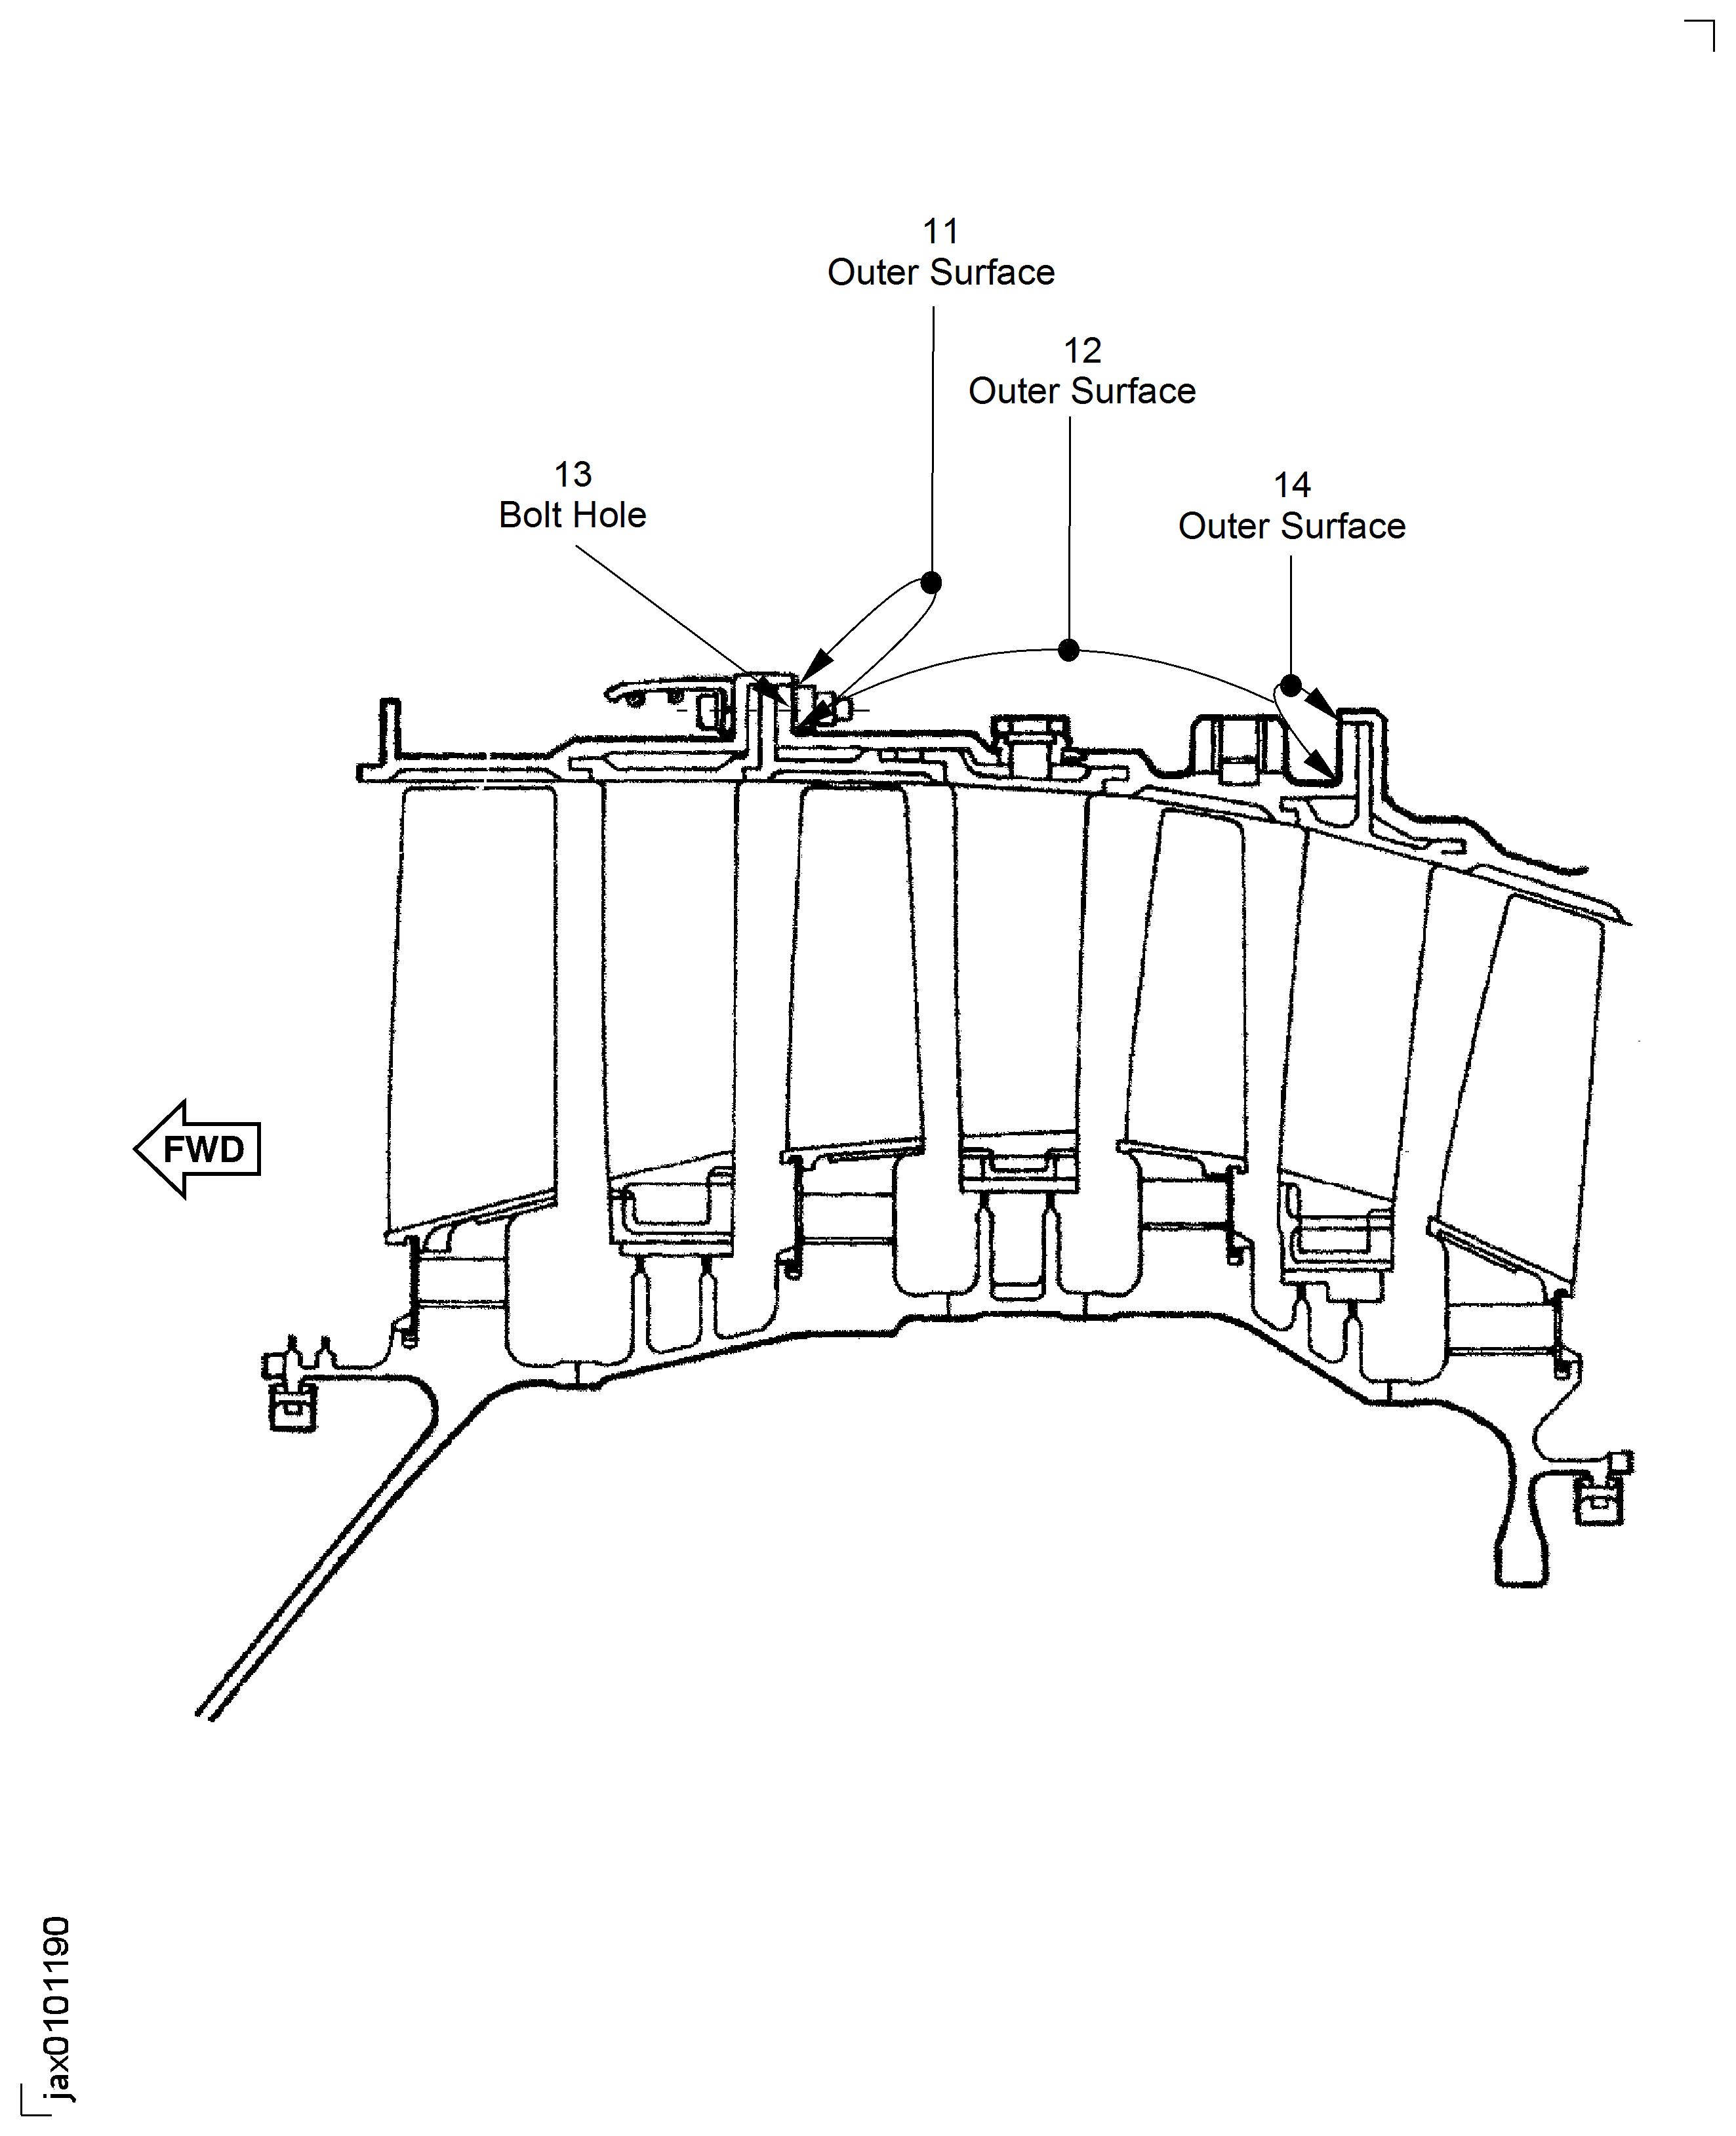
SUBTASK 72-32-80-220-060 Visually Examine the Outer Surface at Location 3, Location 5, Location 7, Location 9, Location 10, Location 11 and Location 14
Reject.
Cracked.
Accept.
Not more than 0.008 in. (0.203 mm) in depth.
Repair, VRS1997 TASK 72-32-80-300-001 (REPAIR-001).
More than 0.008 in. (0.203 mm) in depth.
Nicked, scratched and dented.
Repair, VRS1997 TASK 72-32-80-300-001 (REPAIR-001).
Corroded and pitted.
SUBTASK 72-32-80-220-061 Visually Examine the Outer Surface at Location 6, Location 8 and Location 12
Reject.
Cracked.
Repair, VRS1997 TASK 72-32-80-300-001 (REPAIR-001).
Nicked, scratched, dented and worn.
Repair, VRS1997 TASK 72-32-80-300-001 (REPAIR-001).
Corroded and pitted.
SUBTASK 72-32-80-220-062 Visually Examine the Bolt Hole at Location 4 and Location 13
NOTE
Remove the bolt one by one position. Do not remove the bolts at two positions or more at the same time.
Figure: LPC Front Case At Module
LPC Front Case At Module

Figure: LPC Rear Case At Module
LPC Rear Case At Module

