Export Control
EAR Export Classification: Not subject to the EAR per 15 C.F.R. Chapter 1, Part 734.3(b)(3), except for the following Service Bulletins which are currently published as EAR Export Classification 9E991: SBE70-0992, SBE72-0483, SBE72-0580, SBE72-0588, SBE72-0640, SBE73-0209, SBE80-0024 and SBE80-0025.Copyright
© IAE International Aero Engines AG (2001, 2014 - 2021) The information contained in this document is the property of © IAE International Aero Engines AG and may not be copied or used for any purpose other than that for which it is supplied without the express written authority of © IAE International Aero Engines AG. (This does not preclude use by engine and aircraft operators for normal instructional, maintenance or overhaul purposes.).Applicability
All
Common Information
TASK 70-31-07-310-501 The Brazing Of Honeycomb Abradable Seal Structures
Contents
Equipment and Material | ||
Safety Precautions | ||
Preparation | ||
Filler Metal | ||
Brazing Atmosphere | ||
Procedure | ||
The Quantity of Braze Filler Necessary | ||
The Quality of Brazing | ||
Microstructural Analysis of too Much Braze on Honeycomb Parts | ||
Inspection of Brazed Honeycomb (Gravity Leak Test or Video Inspection System) | ||
Visual Inspection of Honeycomb Details and Brazed Assemblies Used for Abradable Rubstrips. | ||
Deburring of Honeycomb After Grinding to Size | ||
Nickel Plating Thickness | ||
Filler Metal | ||
Brazing Atmosphere | ||
Brazing Temperature | ||
Limits for Unbonded Cells in Full Ring Assemblies | ||
Limits for Unbonded Peripheral Cells in Segmented Assemblies | ||
Limits for Unbonded Center Cells in Segmented Assemblies | ||
Limits for Filled Cells | ||
Limits for Deformed Cells, Separated Walls |
Safety Precautions
Preliminary Requirements
Pre-Conditions
NONESupport Equipment
| Name | Manufacturer | Part Number / Identification | Quantity | Remark |
|---|---|---|---|---|
| Brazing furnace | LOCAL | Brazing furnace | ||
| Metallurgical mounting and polishing equipment | LOCAL | Metallurgical mounting and polishing equipment | ||
| Metallurgical microscope | LOCAL | Metallurgical microscope |
Consumables, Materials and Expendables
| Name | Manufacturer | Part Number / Identification | Quantity | Remark |
|---|---|---|---|---|
| CoMat 01-183 WETTING AGENT FOR ACIDCLEANER | 1XY28 | CoMat 01-183 | ||
| CoMat 01-208 CORROSION INHIBITOR | 0AM53 | CoMat 01-208 | ||
| CoMat 02-142 WETTING AGENT | 08340 | CoMat 02-142 | ||
| CoMat 03-114 BRAZE FILLER METAL 82Au-18Ni | 0AM53 | CoMat 03-114 | ||
| CoMat 03-115 BRAZE FILLER METAL 82Au-18Ni | 64972 | CoMat 03-115 | ||
| CoMat 03-116 BRAZE FILLER METAL 82Au-18Ni | 00628 | CoMat 03-116 | ||
| CoMat 03-151 HIGH TEMP. BRAZING FILLERPOWDER | LOCAL | CoMat 03-151 | ||
| CoMat 03-154 BRAZING FILLER POWDER | LOCAL | CoMat 03-154 | ||
| CoMat 03-163 HIGH TEMP. BRAZING FILLERPOWDER | LOCAL | CoMat 03-163 | ||
| CoMat 03-164 HIGH TEMP. BRAZING FILLERPOWDER | LOCAL | CoMat 03-164 | ||
| CoMat 03-176 BRAZING FILLER METAL | 64972 | CoMat 03-176 | ||
| CoMat 03-178 BRAZING ALLOY, NICKELBASE | 00628 | CoMat 03-178 | ||
| CoMat 03-179 BRAZING FILLER METAL,NICKEL BASE | LOCAL | CoMat 03-179 | ||
| CoMat 03-249 BRAZING FILLER MATERIAL,Ni-BASE | LOCAL | CoMat 03-249 | ||
| CoMat 03-253 COMPOUND, BRAZING STOP-OFF | 63585 | CoMat 03-253 | ||
| CoMat 10-061 STODDARD SOLVENT | LOCAL | CoMat 10-061 | ||
| CoMat 10-097 CORROSION INHIBITOR,(NON-NITRITE) | LOCAL | CoMat 10-097 | ||
| CoMat 10-099 CORROSION INHIBITOR,WATER SOLUBLE | 71410 | CoMat 10-099 |
Spares
NONESafety Requirements
WARNING
Procedure
Surfaces to be brazed must be cleaned before the parts are assembled. Refer to the SPM TASK 70-31-20-310-501. There must be no dirt, grit, oil, grease or other unwanted material on the surface.
Clean the surface.
Joints must be prepared by nickel plating as given in the SPM TASK 70-33-05-300-503 or SPM TASK 70-33-06-300-503 as applicable (Refer to Step).
Nickel plating.
SUBTASK 70-31-07-310-001 Preparation

CAUTION
DO NOT USE ALUMINUM OXIDE TYPE ABRASIVES, SUCH AS ORDINARY EMERY CLOTH, FOR THIS OR ANY OPERATION ON SURFACES TO BE BRAZED. ALUMINUM IN ANY FORM HAS HARMFUL EFFECTS ON MOLTEN BRAZE METAL FLOW.Refer to Step.
SUBTASK 70-31-07-310-002 Filler Metal
CoMat 03-253 COMPOUND, BRAZING STOP-OFF can be used on parts and fixtures to prevent the flow of brazing alloy into areas that are not approved for brazing alloy.
SUBTASK 70-31-07-310-003 Brazing Atmosphere

CAUTION
WHEN PROCESS 4 IS SPECIFIED, ALL THERMAL TREATMENTS ABOVE 1225 DEG F (663 DEG C) AFTER THE BRAZING OPERATION, MUST BE DONE IN A PROTECTIVE ATMOSPHERE FURNACE (SEE Step).Time at temperature starts when the lowest recording load thermocouple is at the low end of the tolerance band below the selected brazing temperature. Brazing time ends when the lowest recording load thermocouple is below the low end of the selected brazing tolerance band during the cool-down part of the cycle.
NOTE
Lagging thermocouples are load thermocouples which are below the selected temperature range but which still increase in temperature.Load thermocouplese are those thermocouples that directly monitor (check) part temperature.The brazing temperature range is the range of temperature from the low end of the tolerance band below the selected brazing temperature to the maximum permitted brazing temperature.If a brazing load has lagging thermocouples, you can hold the load within the selected brazing temperature range while the lagging thermocouples increase in temperature. Pre-braze hold time within the brazing temperature range must not be more than 30 minutes after 75 percent of the recording load thermocouples are within the brazing temperature range.

CAUTION
COOLING RATES SPECIFIED BY THE ENGINE MANUAL MAY BE DIFFERENT FROM THE STANDARD PRACTICES/PROCEDURE MANUAL (SPM). ADHERENCE TO ENGINE MANUAL REPAIR INSTRUCTIONS SUPERSEDES THE SPM REPAIR INSTRUCTIONS.After brazing but before you touch the parts, decrease the temperature of the assemblies for a sufficient time to permit the filler metal to become a solid at a rate which will prevent cracks and minimize internal stress, distortion, oxidation, decarburization, and scaling.
Lower the temperature of alloys hardened by heat treatment at a rate not less than 35 deg F (19 deg C)/ minute to 1100 deg F (593 deg C) and not less than 15 deg F (8 deg C)/minute from 1100 deg F (593 deg C) to 1000 deg F (538 deg C). (When you use a vacuum furnace, you can add pure argon to get this rate.) Use any rate below 1000 deg F (538 deg C).
SUBTASK 70-31-07-310-004 Procedure
Refer to Step for coverage requirements.
SUBTASK 70-31-07-310-005 The Quantity of Braze Filler Necessary
Refer to Step for the acceptance limits for conditions that are a result of the brazing process and for conditions that are a result of the handling and processing of detail parts and finish machining.
SUBTASK 70-31-07-310-006 The Quality of Brazing
Refer to: Figure
NOTE
On test pieces, where four segments are not necessary to make sure that the brazing is constant, one thru four segments can be used as determined by supervision.Four segments equally spaced around a part must be marked so that it can be cut. This mark must be done so that a view of the part to be inspected is at 90 degrees to the ribbon direction. (Refer to Figure.).
Cut a segment with a thin abrasive wheel (AW-797, Manhattan 544 or equivalent), flush with Solution Code 177 to prevent chipping and burning. Refer to SPM TASK 70-32-08-320-501.

CAUTION
DO NOT POLISH TOO MUCH AS EDGE ROUNDING, INCLUSION PULL-OUT, PORE EXAGGERATION AND OTHER DEFECTS COULD OCCUR.Polish the segment on medium-hard surfaced, non-napped cloth with 1.0 micron diamond paste and an oil lubricant such as CoMat 10-061 STODDARD SOLVENT. Ultrasonic clean by the applicable procedure.
Mount and polish the segment as follows:
Preparation.
SUBTASK 70-31-07-310-007 Microstructural Analysis of too Much Braze on Honeycomb Parts
NOTE
The inspection standards that follow can be used to make an analysis of the honeycomb microstructure if necessary.This procedure is only for the inspection of new honeycomb installed by a repair, not for engine-run honeycomb.
In this procedure, there are two methods of inspection which are alternates to one another: Method 1 - Gravity Leak Test and Method 2 - Video Inspection System. If the Engine Manual repair specifies the gravity leak check, it is permitted to use either method.
200:1 mixture of tap water to CoMat 02-142 WETTING AGENT or a 2500:1 mixture of tap water to CoMat 01-183 WETTING AGENT FOR ACIDCLEANER.
Fiber optic probe: 0.028 or 0.051 inch (0.71 or 1.30 mm) diameter, as applicable to the size of the honeycomb for inspection.
NOTE
The video inspection system is available from the source that follows:Hi-Scope Systems Company, 10 McKinley Street, Closter, NJ 07624 USA. TEL: (877)-HISCOPE (in USA) or (201) 768-2810 (outside USA) Fax: (210) 768-3944.
Water-based test fluid.
NOTE
It is necessary to add one percent of CoMat 10-097 CORROSION INHIBITOR,(NON-NITRITE) or CoMat 01-208 CORROSION INHIBITOR or CoMat 10-099 CORROSION INHIBITOR,WATER SOLUBLE to the solution or the material will corrode when put in the solution.
Materials and equipment.
CENTER CELLS - Any cells that are not peripheral cells. Unbonded center cells are the number of cells that the light source illuminates to determine the maximum number of unbonded cells permitted. Cell wall holes, braze line holes, split cell walls, and separated walls that agree with approved limits are not included.
Definitions.
Clean the brazed part, if necessary. Refer to the SPM TASK 70-11-03-300-503.
Refer to the Engine Manual repair section for any additional inspection requirements.
NOTE
For inspection of vanes only, this light probe inspection can be an alternate to the gravity leak test. If you use the light probe inspection method, it is necessary to probe every second row of cells either vertically or horizontally, as shown in Figure.
Examine the honeycomb cells for remaining solution. A drop in fluid level in the cell(s) is the result of leakage from one cell to another through an unbrazed joint or hole.
If necessary, apply corrosion inhibitor. Refer to the SPM TASK 70-38-37-300-503.
Method 1: The Gravity Leak Test.
Evaluate the honeycomb areas to see if the areas agree with the requirements of the applicable Inspection Standard (Step).
Method 2: The Video Inspection System (Alternate Inspection Method).
Procedure.
SUBTASK 70-31-07-310-008 Inspection of Brazed Honeycomb (Gravity Leak Test or Video Inspection System)
NOTE
The visual acceptance standards in the SPM TASK 70-21-01-220-501 do not apply to this procedure; but, the General Instructions in the SPM TASK 70-21-01-220-501 do apply.
NOTE
This section specifies acceptance limits for unbonded brazed honeycomb cells along the braze line usually evaluated by a gravity leak test or video inspection method. Refer to Step.All imperfections above the braze line must be evaluated to the limits in Steps D. and E.
Acceptance limits.
PERIPHERAL CELLS: The outer most continuous boundary of whole hexagonal cells. Overhanging/incomplete cells or cells affected by a chamfer are not to be included. See Figure.
CENTER CELLS: All remaining whole cells not defined as peripheral cells. See Figure.
NOTE
The limits that follow apply after a visual inspection occurs for the braze condition (such as, braze stain and line of braze) between the honeycomb and the mating part.
Definitions.
Braze line holes less than half the face width must be ignored. See Figure.
Three braze line holes greater than half the face width but less than the full face width are permitted in any linear inch (25.4 mm). See Figure.
General limits peripheral cells (applicable to all parts, full rings and segments).
For the maximum number of unbonded peripheral cells permitted in any 5 inches (127 mm) of peripheral length, see Step.
Local disbond, minor pin hole voids, or loss of bond at the peripheral cells, up to 50 percent of any honeycomb segment (if the disbond does not exceed half of the cell width), is permitted. See Figure.
NOTE
Unbonded center cells are expressed as "numbers of cells" and are based on an 85 percent minimum bond.It is permitted to do inspection to limits other than "number of cells", if you follow the limits of this standard.
Peripheral cells.
For the maximum number of unbonded center cells permitted in any 2 square inch (12.9 square centimeter) area, see Step.
Center cells.
Full ring assemblies.
Figure is for narrow segments that have a width of five staggered rows or less. For these narrow segments, unbonded cells are only permitted along the top and bottom lengths. Unbonded cells are not permitted on the ends. Therefore, to calculate peripheral lengths, use only the top and bottom lengths.
Figure is for wide segments that have a width of more than five staggered rows. For these wide segments, unbonded cells are permitted along all four sides. Therefore, use all four sides to calculate peripheral lengths.
Limits for unbonded peripheral cells are given in Step and are based on the peripheral length of the examined part. To calculate the peripheral length, see Figure and Figure and the instructions that follow.
Special instructions.
For assemblies with at least 5 inches (127 mm) of peripheral length, see Step.
For assemblies with less than 5 inches (127 mm) of peripheral length, use Step to calculate (prorate) the maximum number of unbonded cells.
For segments that have a total width of five staggered rows or less, no unbonded cells are permitted on either segment side. To calculate the peripheral length, use only the top and bottom honeycomb lengths. In Figure the total peripheral length is 4.000 inches (101.6 mm).
For segments that have a total width of more than five staggered rows, use all four sides to calculate the peripheral length. In Figure, the total peripheral length is 12 inches (304.8 mm).
Apply Step limits for unbond of peripheral cells as follows:
Local disbond, minor pin hole voids, or loss of bond at the peripheral cells, up to 50 percent of any honeycomb segment (if the disbond does not exceed half of the cell width), is permitted. See Figure.
Peripheral cells.
For all segmented parts: Within a 0.500 inch (12.700 mm) zone on each segment end, at least 50 percent of the center cells must be bonded. See Figure.
Where the center area is at least 2 square inches (12.9 square centimeters), the maximum number of permitted unbonded center cells is given in Step.
Where the center area is less than 2 square inches (12.9 square centimeters), calculate (prorate) the maximum number of unbonded center cells based on Step.
Center cells.
Segmented assemblies.
Braze coverage.
NOTE
The definitions that follow apply to this inspection.FILLED CELLS: Honeycomb cells in which the brazing alloy fill exceeds the lesser of one half the final cell height or 0.060 inch (1.524 mm).
EXAMPLE: If cell heights are 0.120 inch (3.048 mm) or less, braze fill over one half of the cell height are filled cells.
EXAMPLE: If cell heights are over 0.120 inch (3.048 mm), braze fill over 0.060 inch (1.524 mm) are filled cells.
Definitions.
Cell wall holes are permitted on 50 percent of peripheral cells if there is no more than one hole in a cell and they are no larger than one-half the face width. See Figure.
Exception: For 0.031 inch (0.787 mm) cell sizes, cell wall hole sizes are waived. It is permitted to evaluate holes as deformed cells (incomplete or damaged walls).
Three cell wall holes greater than the half face width but less than the full face width are permitted in any linear inch (25.4 mm) if 50 percent of the peripheral cells are not affected and there is no more than one hole in each cell. See Figure.
Cell wall holes.
Where the total honeycomb area is at least 4 square inches (25.8 square centimeters), see Step for the total number of permitted filled cells for each part.
Where the total honeycomb area is less than 4 square inches (25.8 square centimeters), see Step to calculate (prorate) the total number of permitted filled cells in a part.
NOTE
Section II gives acceptance limits for conditions that are a result of the handling and processing of detail parts and finish machining. These limits must be used to accept assemblies and/or detail parts.
For acceptance limits for the maximum number of filled cells permitted for each part, see Step.
Filled cells.
After braze inspection of honeycomb above the braze line - Section I.
NOTE
The definitions that follow apply to this inspection.For honeycomb that has a total width of five staggered rows or less, the maximum number of cells is two for each linear inch (25.4 mm) with a maximum size not to extend across the full width. See Figure.
Where the total honeycomb area is at least 4 square inches (25.8 square centimeters), see Step.
Where the total honeycomb area is less than 4 square inches (25.8 square centimeters), see Step to calculate (prorate) the maximum number of permitted incomplete cells for each part.
For honeycomb that has a total width greater than five staggered rows, see the applicable step that follows:
Deformed cells, separated walls, and split cell walls.
After braze inspection of honeycomb above the braze line - Section II.
NOTE
The definitions that follow apply to this inspection.
SUBTASK 70-31-07-310-009 Visual Inspection of Honeycomb Details and Brazed Assemblies Used for Abradable Rubstrips
NOTE
This procedure is only for the inspection of new honeycomb installed by a repair, not for engine-run honeycomb.Use clean gloves when you touch the part to prevent injury from sharp edges.
If wet grinding was done, clean by the SPM TASK 70-11-03-300-503; then, dry the part.
If dry grinding was done, blow out any remaining material before blasting.
Wire brush the honeycomb surface by the installation of a wire brush in the spindle of a machine used for grinding and permit the wire wheel to freewheel touch the honeycomb to deburr. Wire brushing can be done while grinding on a two-spindle machine. Clean by the SPM TASK 70-11-03-300-503.
Wet abrasive blast. Refer to the SPM TASK 70-12-08-300-503. Use a power spray to flush the part with water to remove the blasting slurry; then, dry the part.
Dry abrasive blast. Refer to the SPM TASK 70-12-11-300-503.
Dry plastic blast. Refer to the SPM TASK 70-12-07-120-501.
Dry abrasive blast. Refer to the SPM TASK 70-12-09-120-501. Blow out any remaining grit.
After final grinding, deburr the honeycomb by one or more of the methods that follow:
SUBTASK 70-31-07-310-010 Deburring of Honeycomb After Grinding to Size
NOTE
SUBTASK 70-31-07-310-011 Nickel Plating Thickness
Alloy
Vacuum
Argon and/or Hydrogen
Precipitation Hardened Iron Base Alloys
Optional
(0.0006 inch max.)
(0.015 mm max.)
0.0004 - 0.0006 inch
(0.010 - 0.015 mm)
Precipitation Hardened Nickel Base Alloys (Minimum Ti + Al content less than 4%)
Optional
(0.0006 inch max.)
(0.015 mm max.)
0.0004 - 0.0006 inch
(0.010 - 0.015 mm)
Precipitation Hardened Nickel Base Alloys (Minimum Ti + Al content 4% or greater)
Optional
(0.0006 inch max.)
(0.015 mm max.)
0.0008 - 0.0012 inch
(0.020 - 0.030 mm)
All other alloys
Optional
(0.0006 inch max.)
(0.015 mm max.)
Optional
(0.0006 inch max.)
(0.015 mm max.)
Nickel plating in areas other than joints is optional and is not always complete.
SUBTASK 70-31-07-310-013 Brazing Atmosphere
Type
Dew Point Maximum
(See Note 1)
Pressure/Purity
Application
Vacuum
-
5x10⁻⁴ torr (0.5 micron Hg) or better.
(See Notes 2 and 3)
Furnace Brazing
Argon
-35 deg F (-37 deg C) or Better.
99.99 percent minimum
Induction or Furnace Brazing and Vacuum Furnace Back-Fill
Hydrogen
-35 deg F (-37 deg C) or Better.
99.94 percent minimum
Furnace Brazing
Argon + Hydrogen
(see Note 4)
(See Note 5)
(See Note 5)
Furnace Brazing
Notes:
1. When possible, use the brazing chamber exhaust gas to calculate the dew point.
2. The maximum leak rate is 60 microns Hg/hr measured at room temperature after pumping down to 1 micron Hg or at a lower pressure and blocking pumps.
3. Partial pressure of argon is permitted if you back-fill with argon after you have the necessary vacuum.
4. The mixture can be in any proportion.
5. The purity or dew point of argon and hydrogen in the mixture must be as shown above.
SUBTASK 70-31-07-310-014 Brazing Temperature
Identification
Stabilized Temperature and Pressure
Brazing Temperature Maximum (See Note)
Process 1
1675 - 1750 deg F
(913 - 954 deg C)
1975 deg F
(1079 deg C)
Process 2
1675 - 1750 deg F
(913 - 954 deg C)
1950 deg F
(1066 deg C)
Process 3
1875 - 1925 deg F
(1024 - 1052 deg C)
2175 deg F
(1191 deg C)
Process 4
1400 - 1650 deg F
(760 - 899 deg C)
1850 deg F
(1010 deg C)
Process 5
1400 - 1450 deg F
(760 - 788 deg C)
1850 deg F
(1010 deg C)
The part temperature must not be more than the maximum temperature during the brazing cycle.
Segments with less than 5 inch (127 mm) peripheral length:
Cell Size
Maximum number of unbonded cells/inch (25.4 mm) of peripheral length
0.031 inch (0.787 mm)
4 (See Note)
0.062 inch (1.575 mm)
2 (See Note)
Non-metric example: If a part has 0.062 inch cells and the periperal length is calculated to be 4.5 inches, the total number of unbonded cells/part is 9 (4.5x2).
Metric example: If a part has 1.575 mm cells and the periperal length is calculated to be 114.3 mm, the total number of unbonded cells/part is 9 (2x114.3/25.47).
SUBTASK 70-31-07-310-016 Limits for Unbonded Peripheral Cells in Segmented Assemblies
Limits for segments less than 2 square inches (12.9 sq. cm) in area:
Cell Size
Maximum number of unbonded cells in any 1 sq. in. (6.45 sq. cm) area
0.031 inch (0.787 mm)
135 (See Note)
0.062 inch (1.575 mm)
35 (See Note)
0.125 inch (3.175 mm)
9 (See Note)
Non-metric example: If a part has 0.062 inch cells and 1.5 square inches of center area, the total number of unbonded cells/part is 52 (1.5 x 35).
Metric example: If a part has 1.575 mm cells and 9.675 square centimeters of center area, the total number of unbonded cells/part is 52 (35 x 9.675/6.45).
SUBTASK 70-31-07-310-017 Limits for Unbonded Center Cells in Segmented Assemblies
Limits for parts less than 4 square inches (25.8 sq. cm) in area:
Cell Size
Maximum number of filled cells in any 1 sq. in. (6.45 sq. cm) area.
0.031 inch (0.787 mm)
50 (See Note)
0.062 inch (1.575 mm)
13 (See Note)
0.125 inch (3.175 mm)
3 (See Note)
Non-metric example: If a part has 0.062 inch cells and 2.5 square inches of area, the total number of filled cells/part is 32 (2.5 x 13).
Metric example: If a part has 1.575 mm cells and 16.125 square centimeters of area, the total number of filled cells/part is 32 (13 x 16.125/6.45).
SUBTASK 70-31-07-310-018 Limits for filled cells
Limits for parts less than 4 square inches (25.8 sq. cm) in area:
Cell Size
Maximum Number of Filled Cells in Any 1 sq. in. (6.45 sq. cm) Area.
0.031 inch (0.787 mm)
20 (See Note)
0.062 inch (1.575 mm)
5 (See Note)
0.125 inch (3.175 mm)
2 (See Note)
Non-metric example: If a part has 0.062 inch cells and 2.5 square inches of area, the total number of incomplete cells/part is 12 (2.5 x 5).
Metric example: If a part has 1.575 mm cells and 16.125 square centimeters of center area, the total number of incomplete cells/part is 12 (5 x 16.125/6.45).
SUBTASK 70-31-07-310-019 Limits for Deformed Cells, Separated Walls for parts with a Total Honeycomb Width greater than five staggered rows.
Figure: Nickel plating Fig. 70-31-07-990-001
Nickel plating Fig. 70-31-07-990-001

Figure: Filler metal Fig. 70-31-07-990-002
Filler metal Fig. 70-31-07-990-002

Figure: Brazing atmosphere Fig. 70-31-07-990-003
Brazing atmosphere Fig. 70-31-07-990-003

Figure: Brazing temperatures Fig. 70-31-07-990-004
Brazing temperatures Fig. 70-31-07-990-004

Figure: Microstructural analysis of too much braze on honeycomb parts
Microstructural analysis of too much braze on honeycomb parts
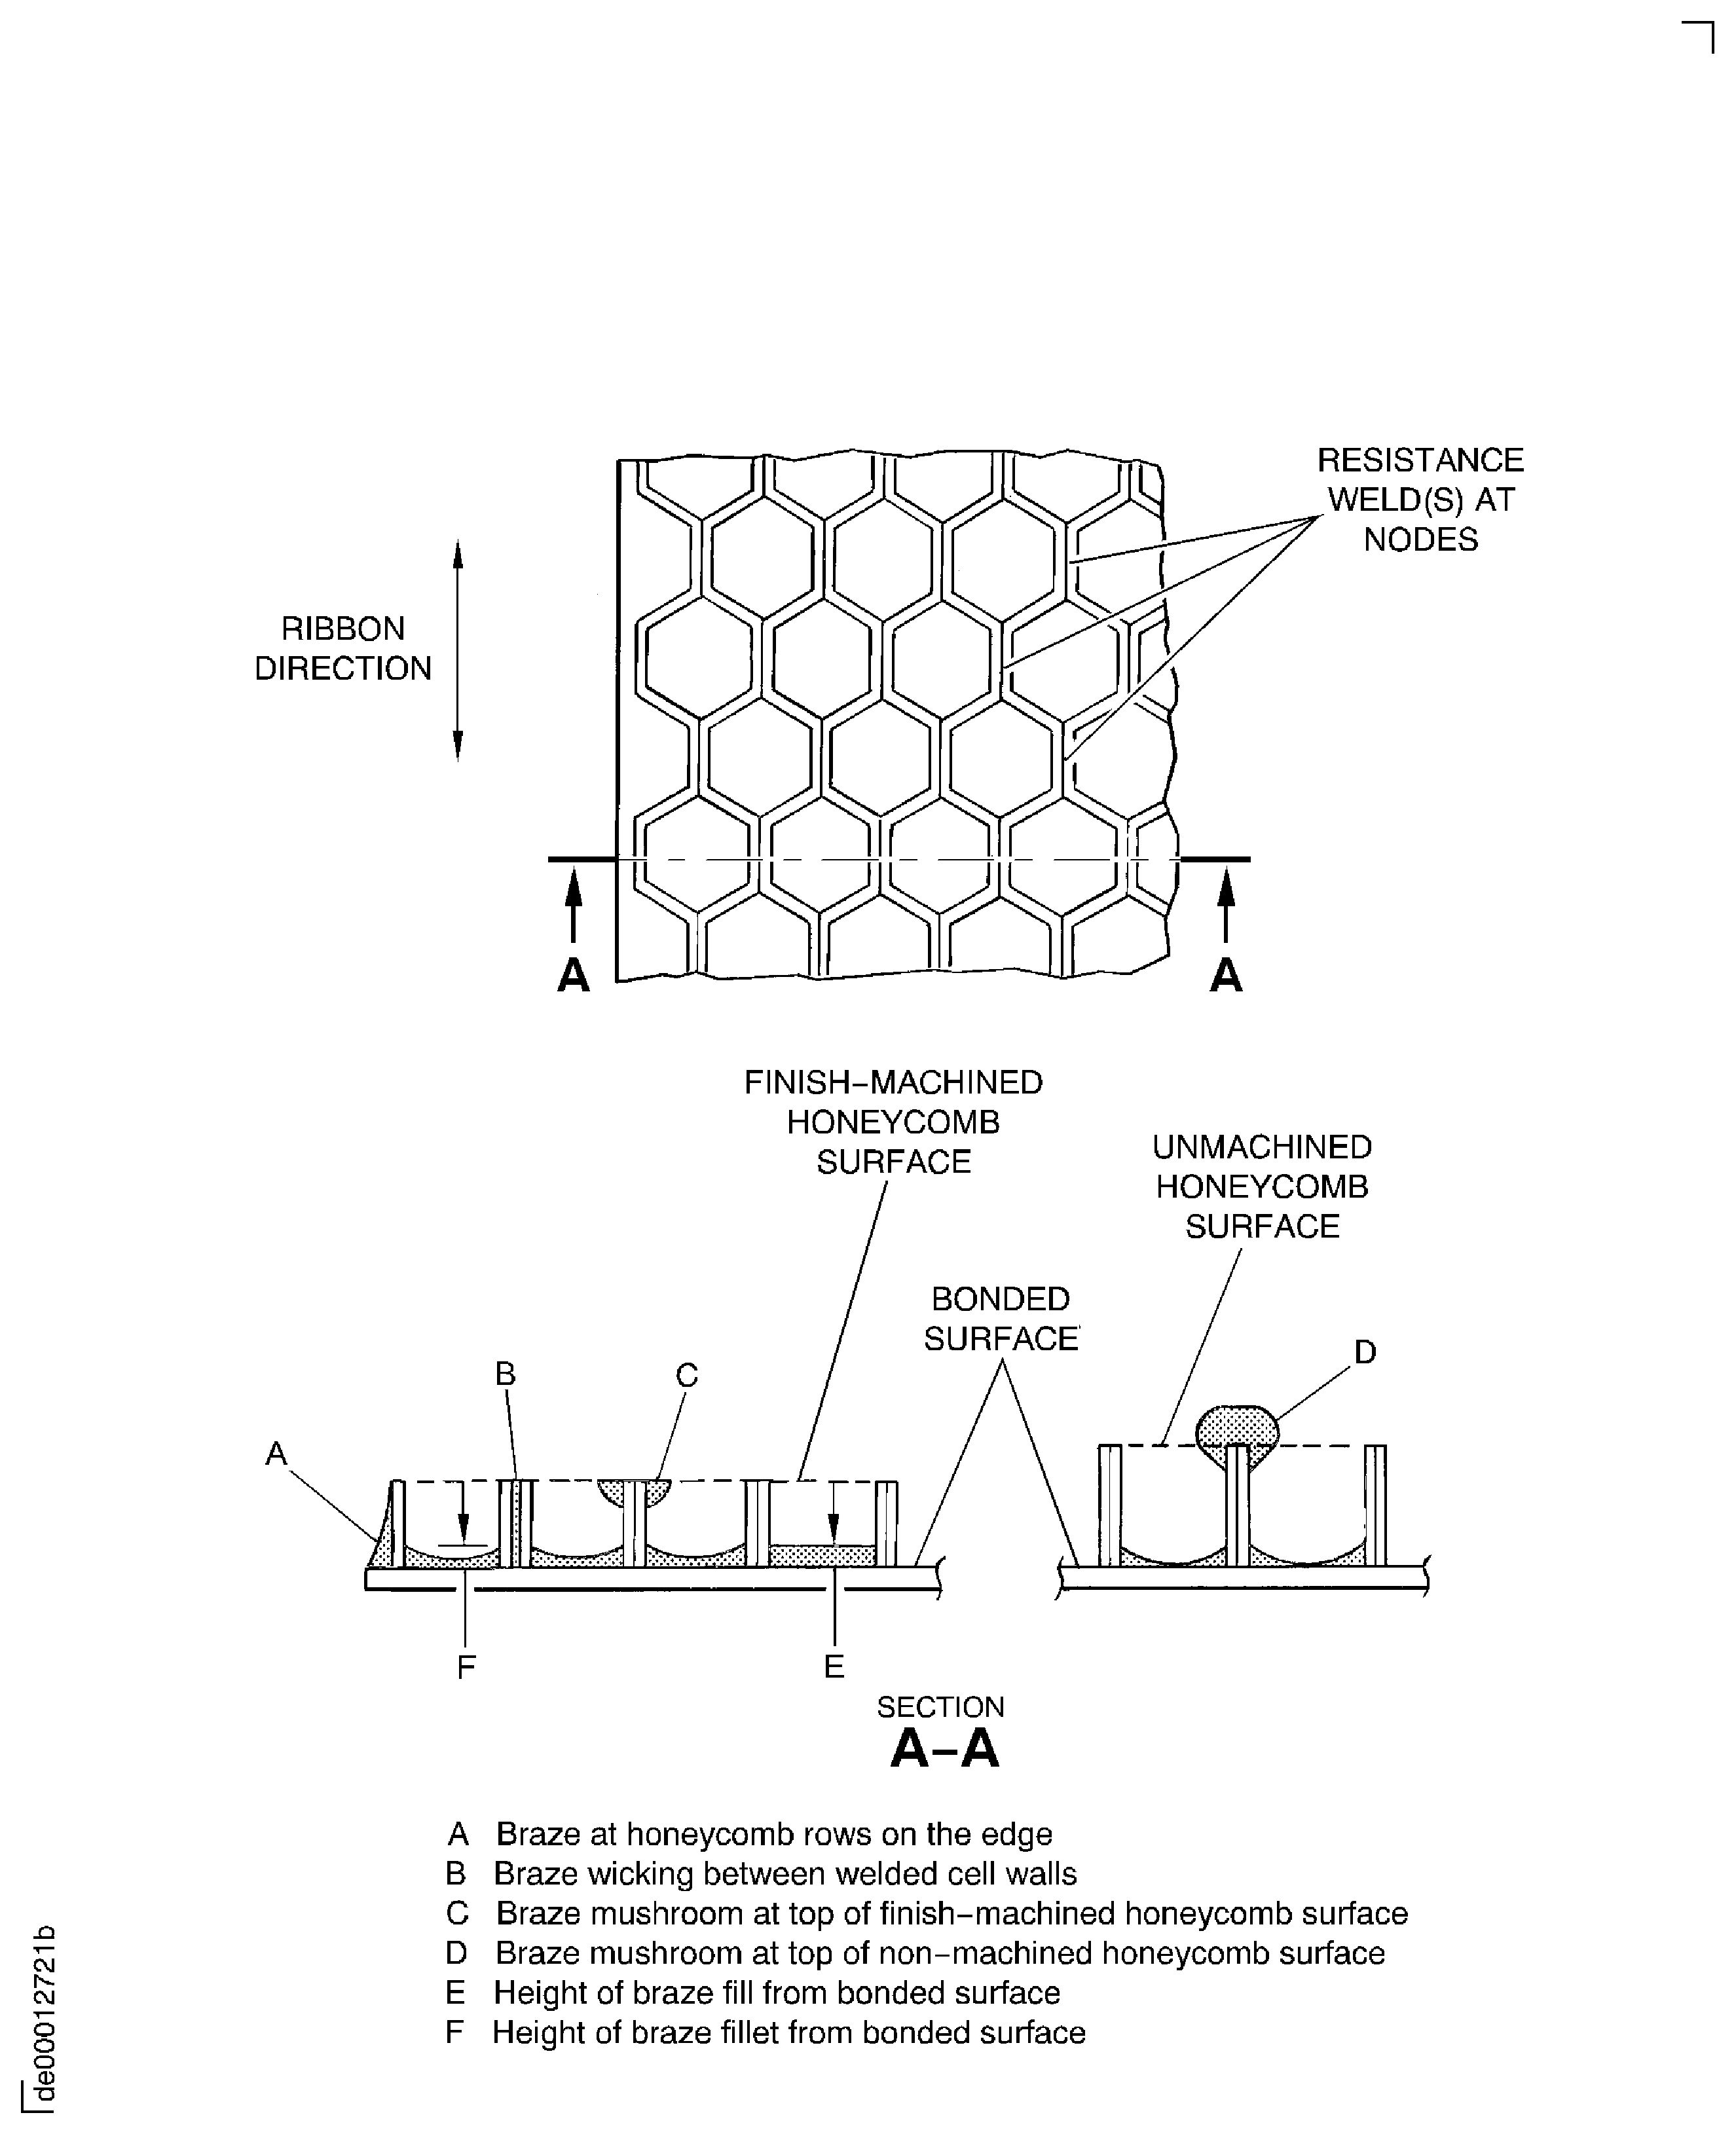
Figure: Inspection pattern for light probe inspection of vanes (only) as an alternative to the gravity leak test
Inspection pattern for light probe inspection of vanes (only) as an alternative to the gravity leak test
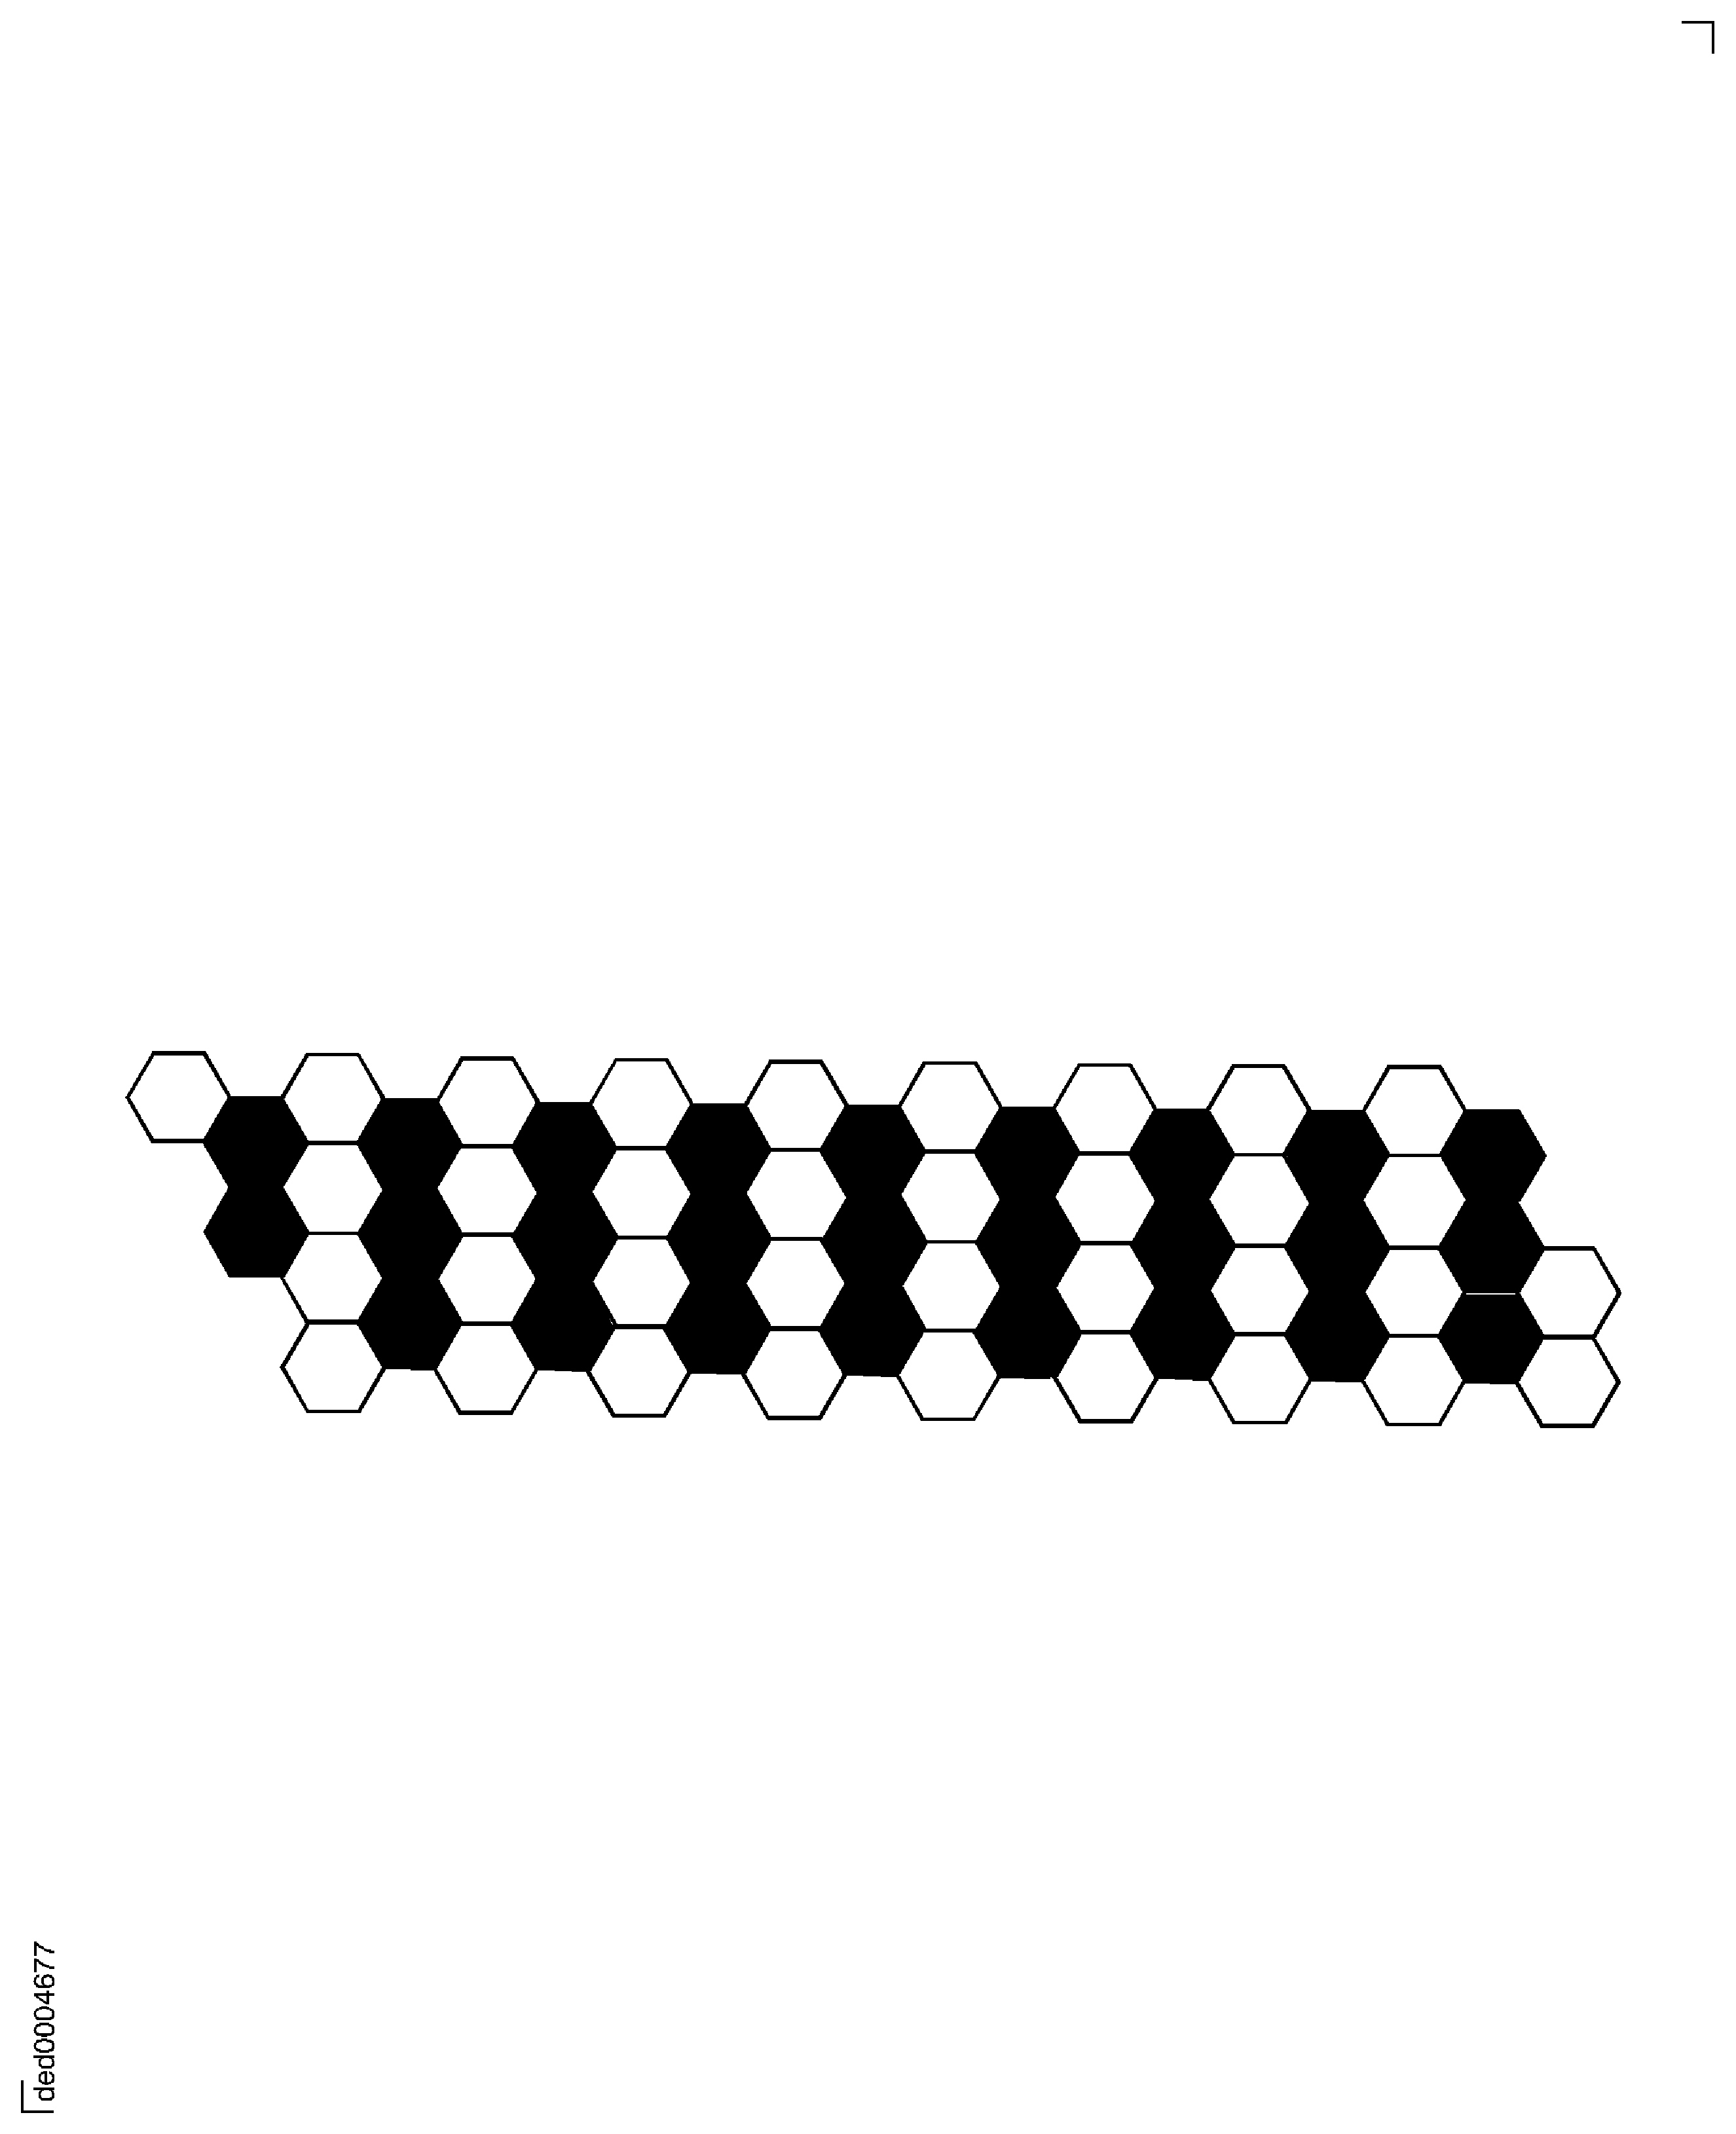
Figure: Peripheral and center cells
Peripheral and center cells
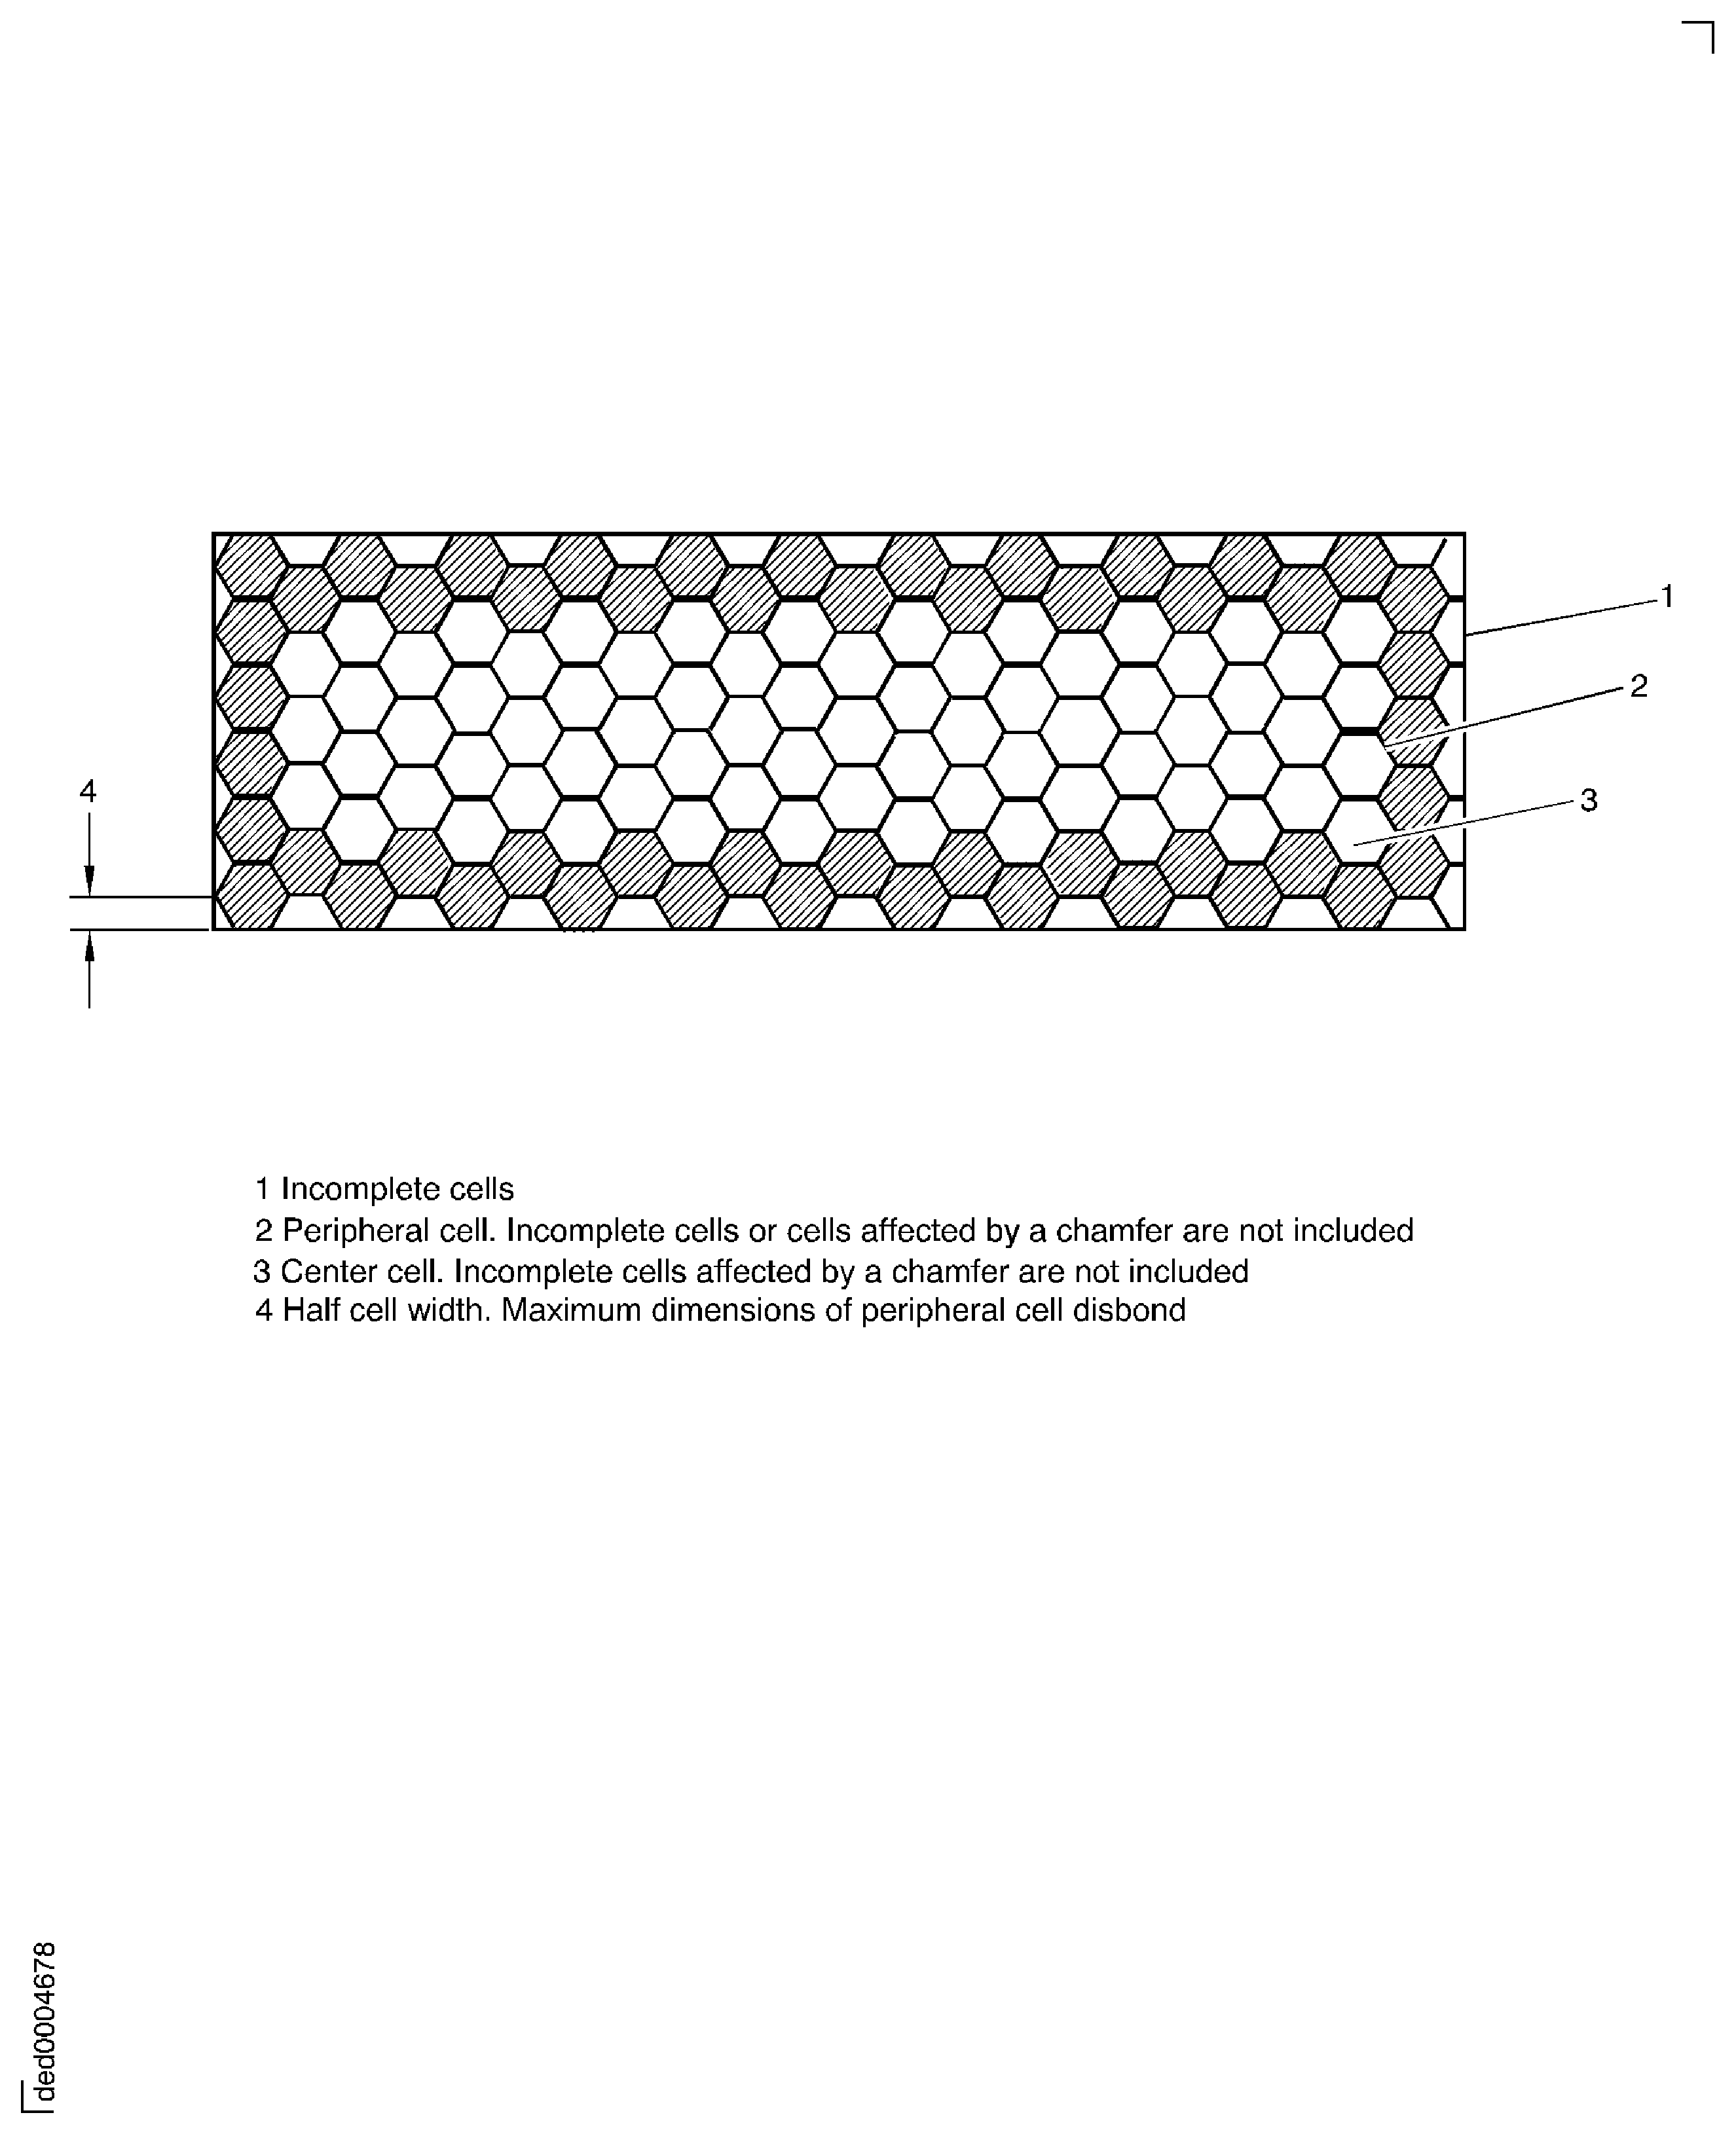
Figure: Peripheral cell with braze line hole
Peripheral cell with braze line hole
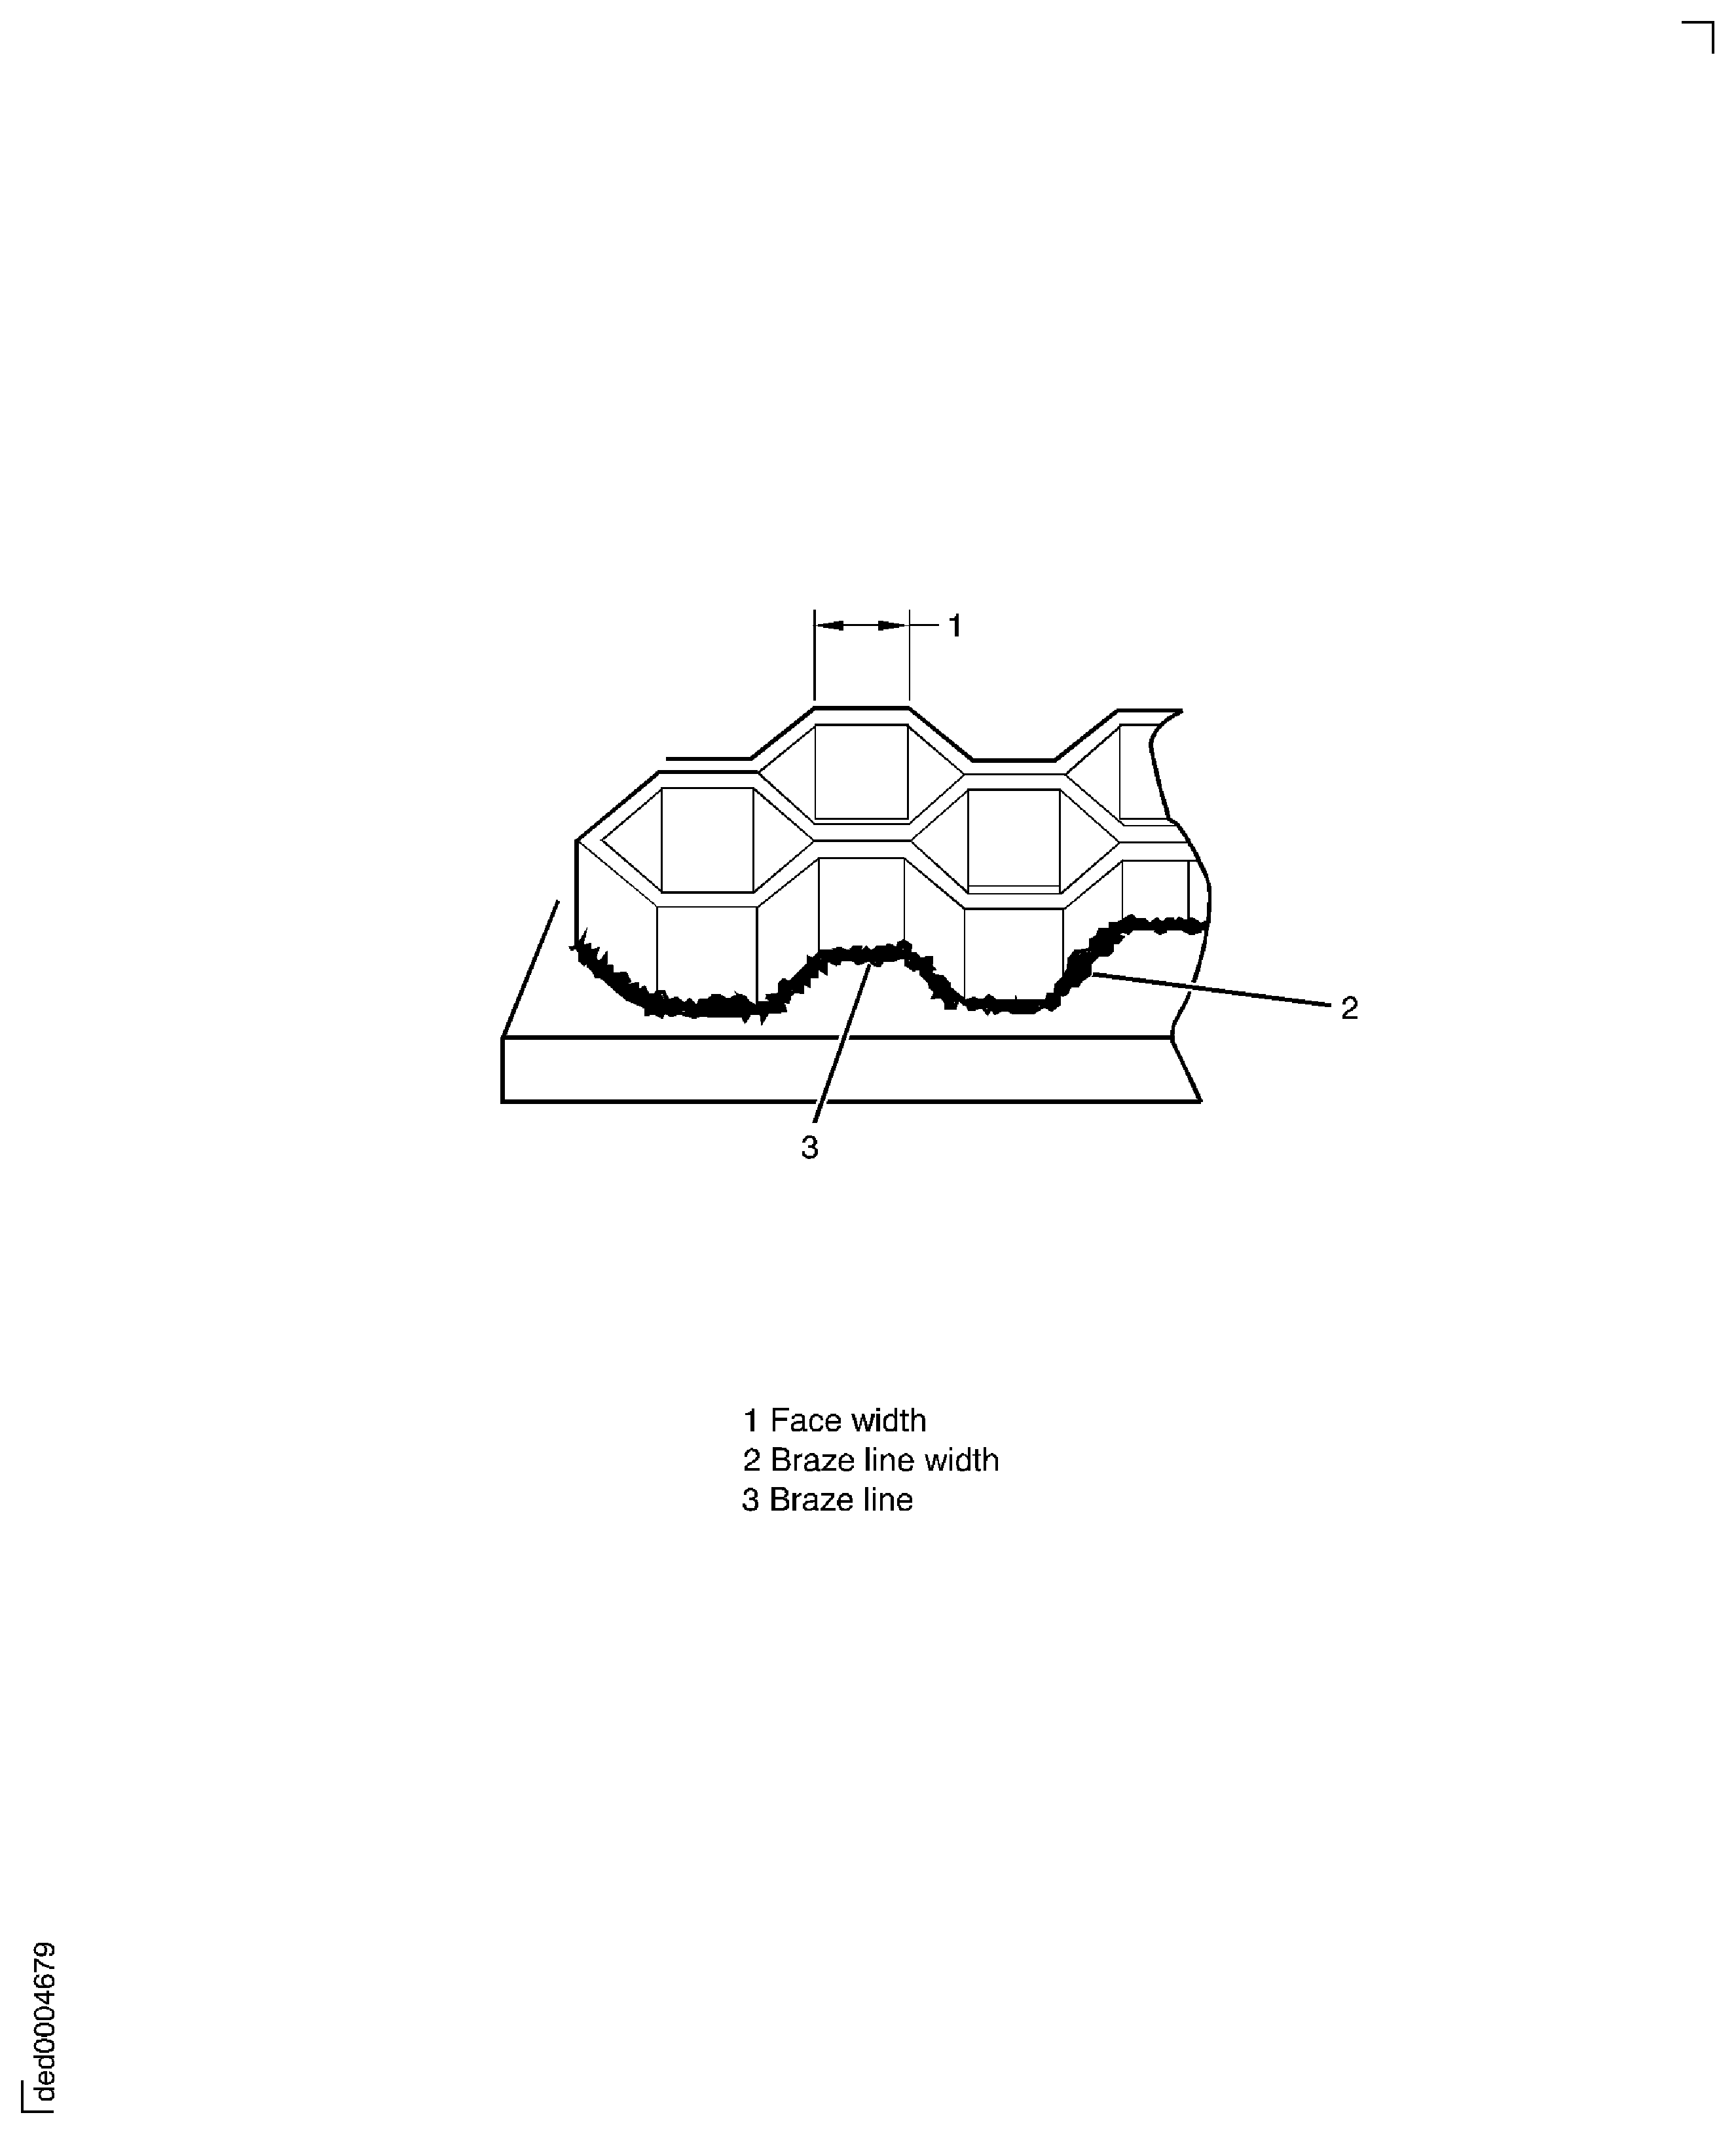
Figure: Determination of peripheral length for segments up to five staggered rows wide
Determination of peripheral length for segments up to five staggered rows wide
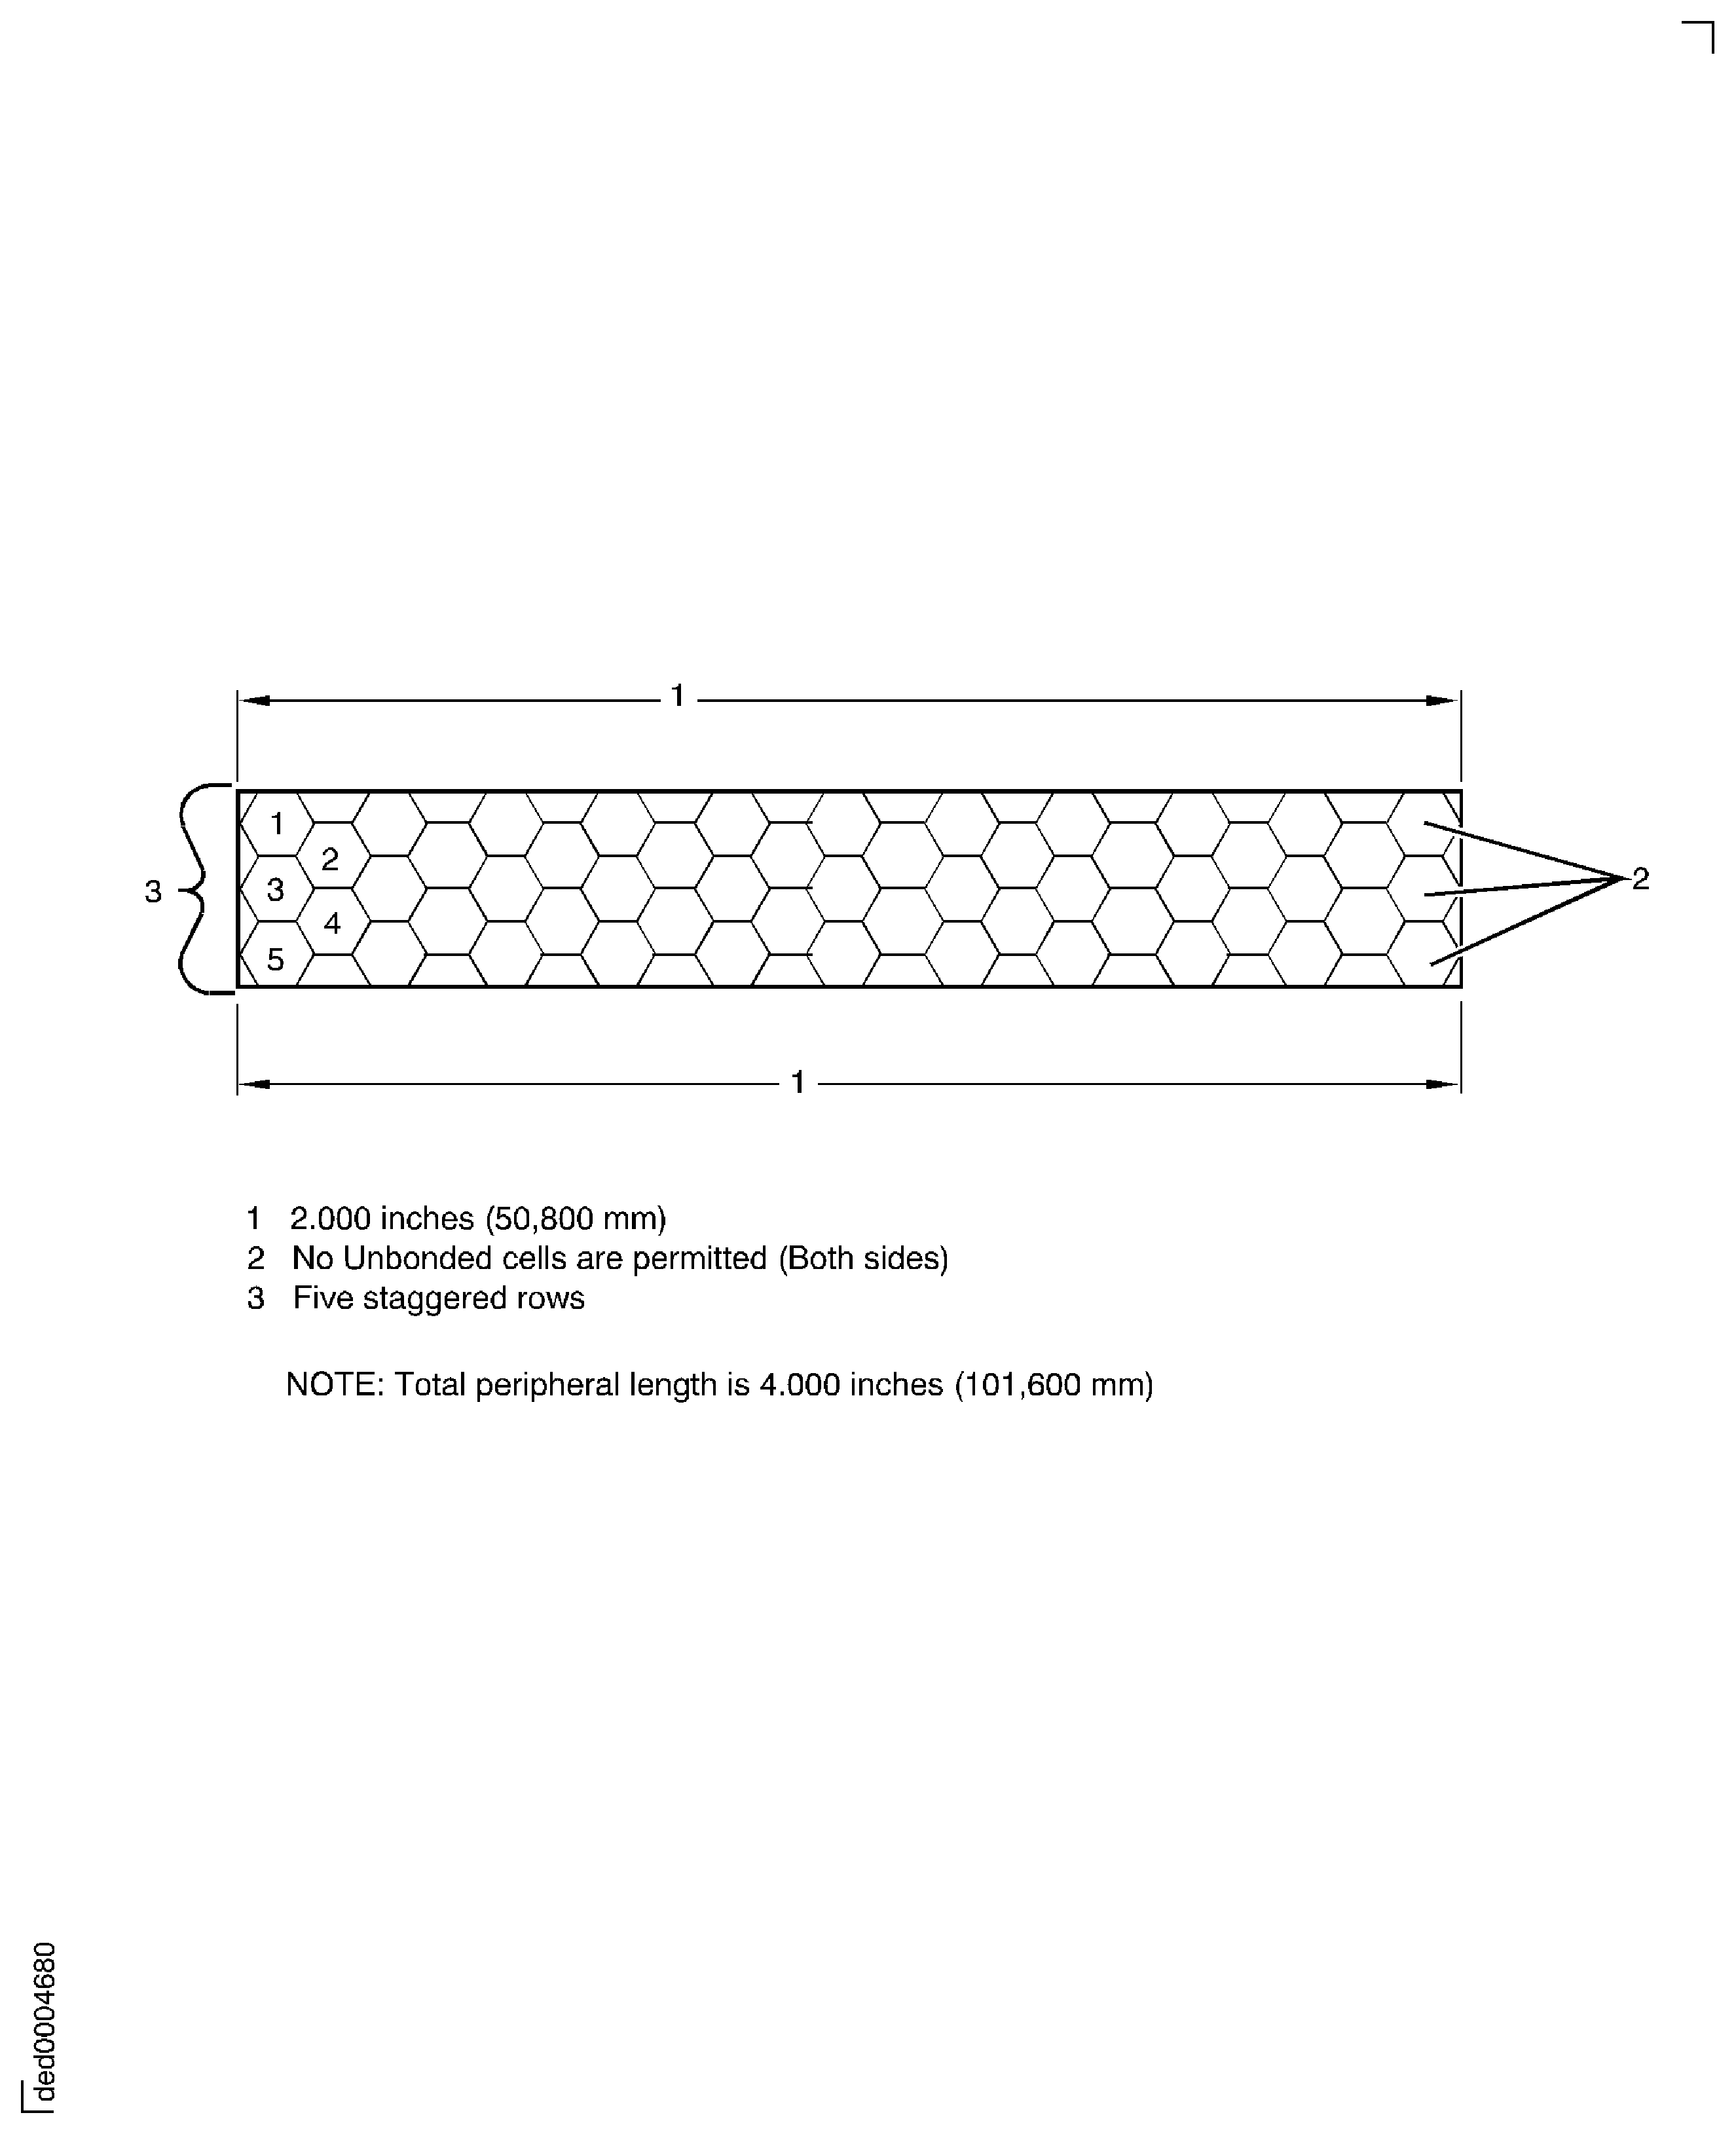
Figure: Determination of peripheral length for segments greater than five staggered rows wide
Determination of peripheral length for segments greater than five staggered rows wide
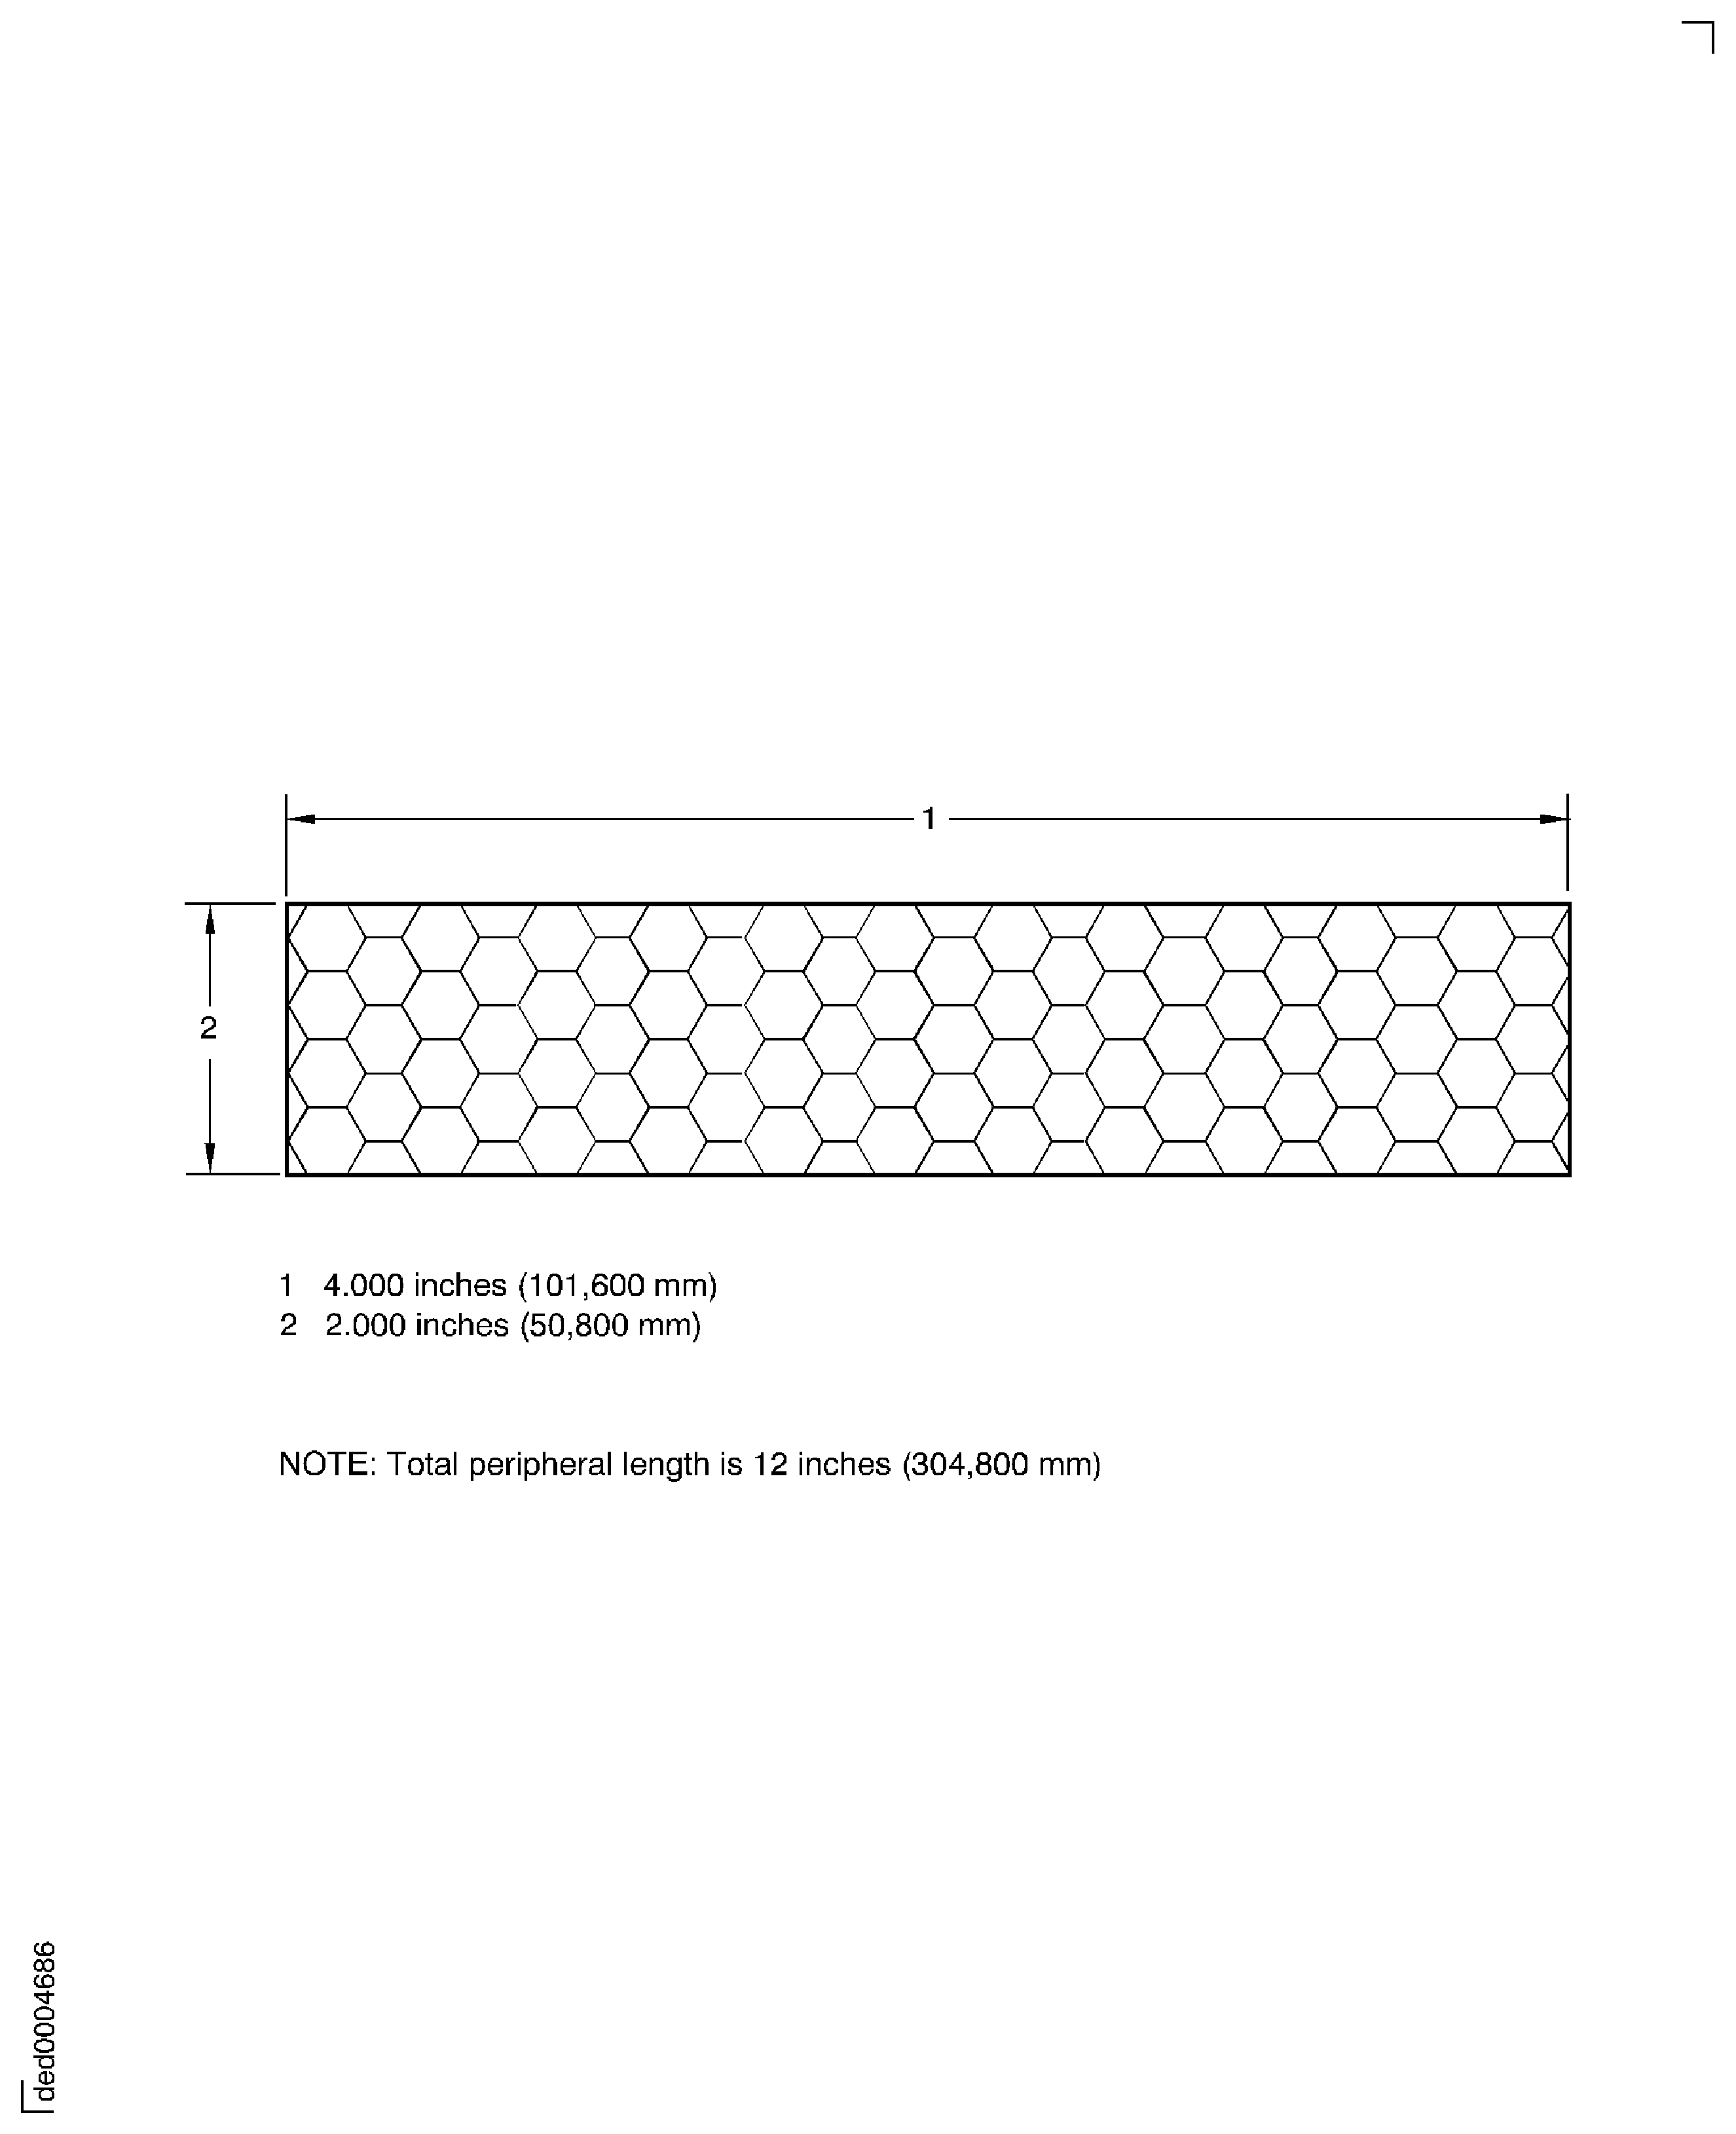
Figure: Inspection limits for center cells of segmented parts
Inspection limits for center cells of segmented parts
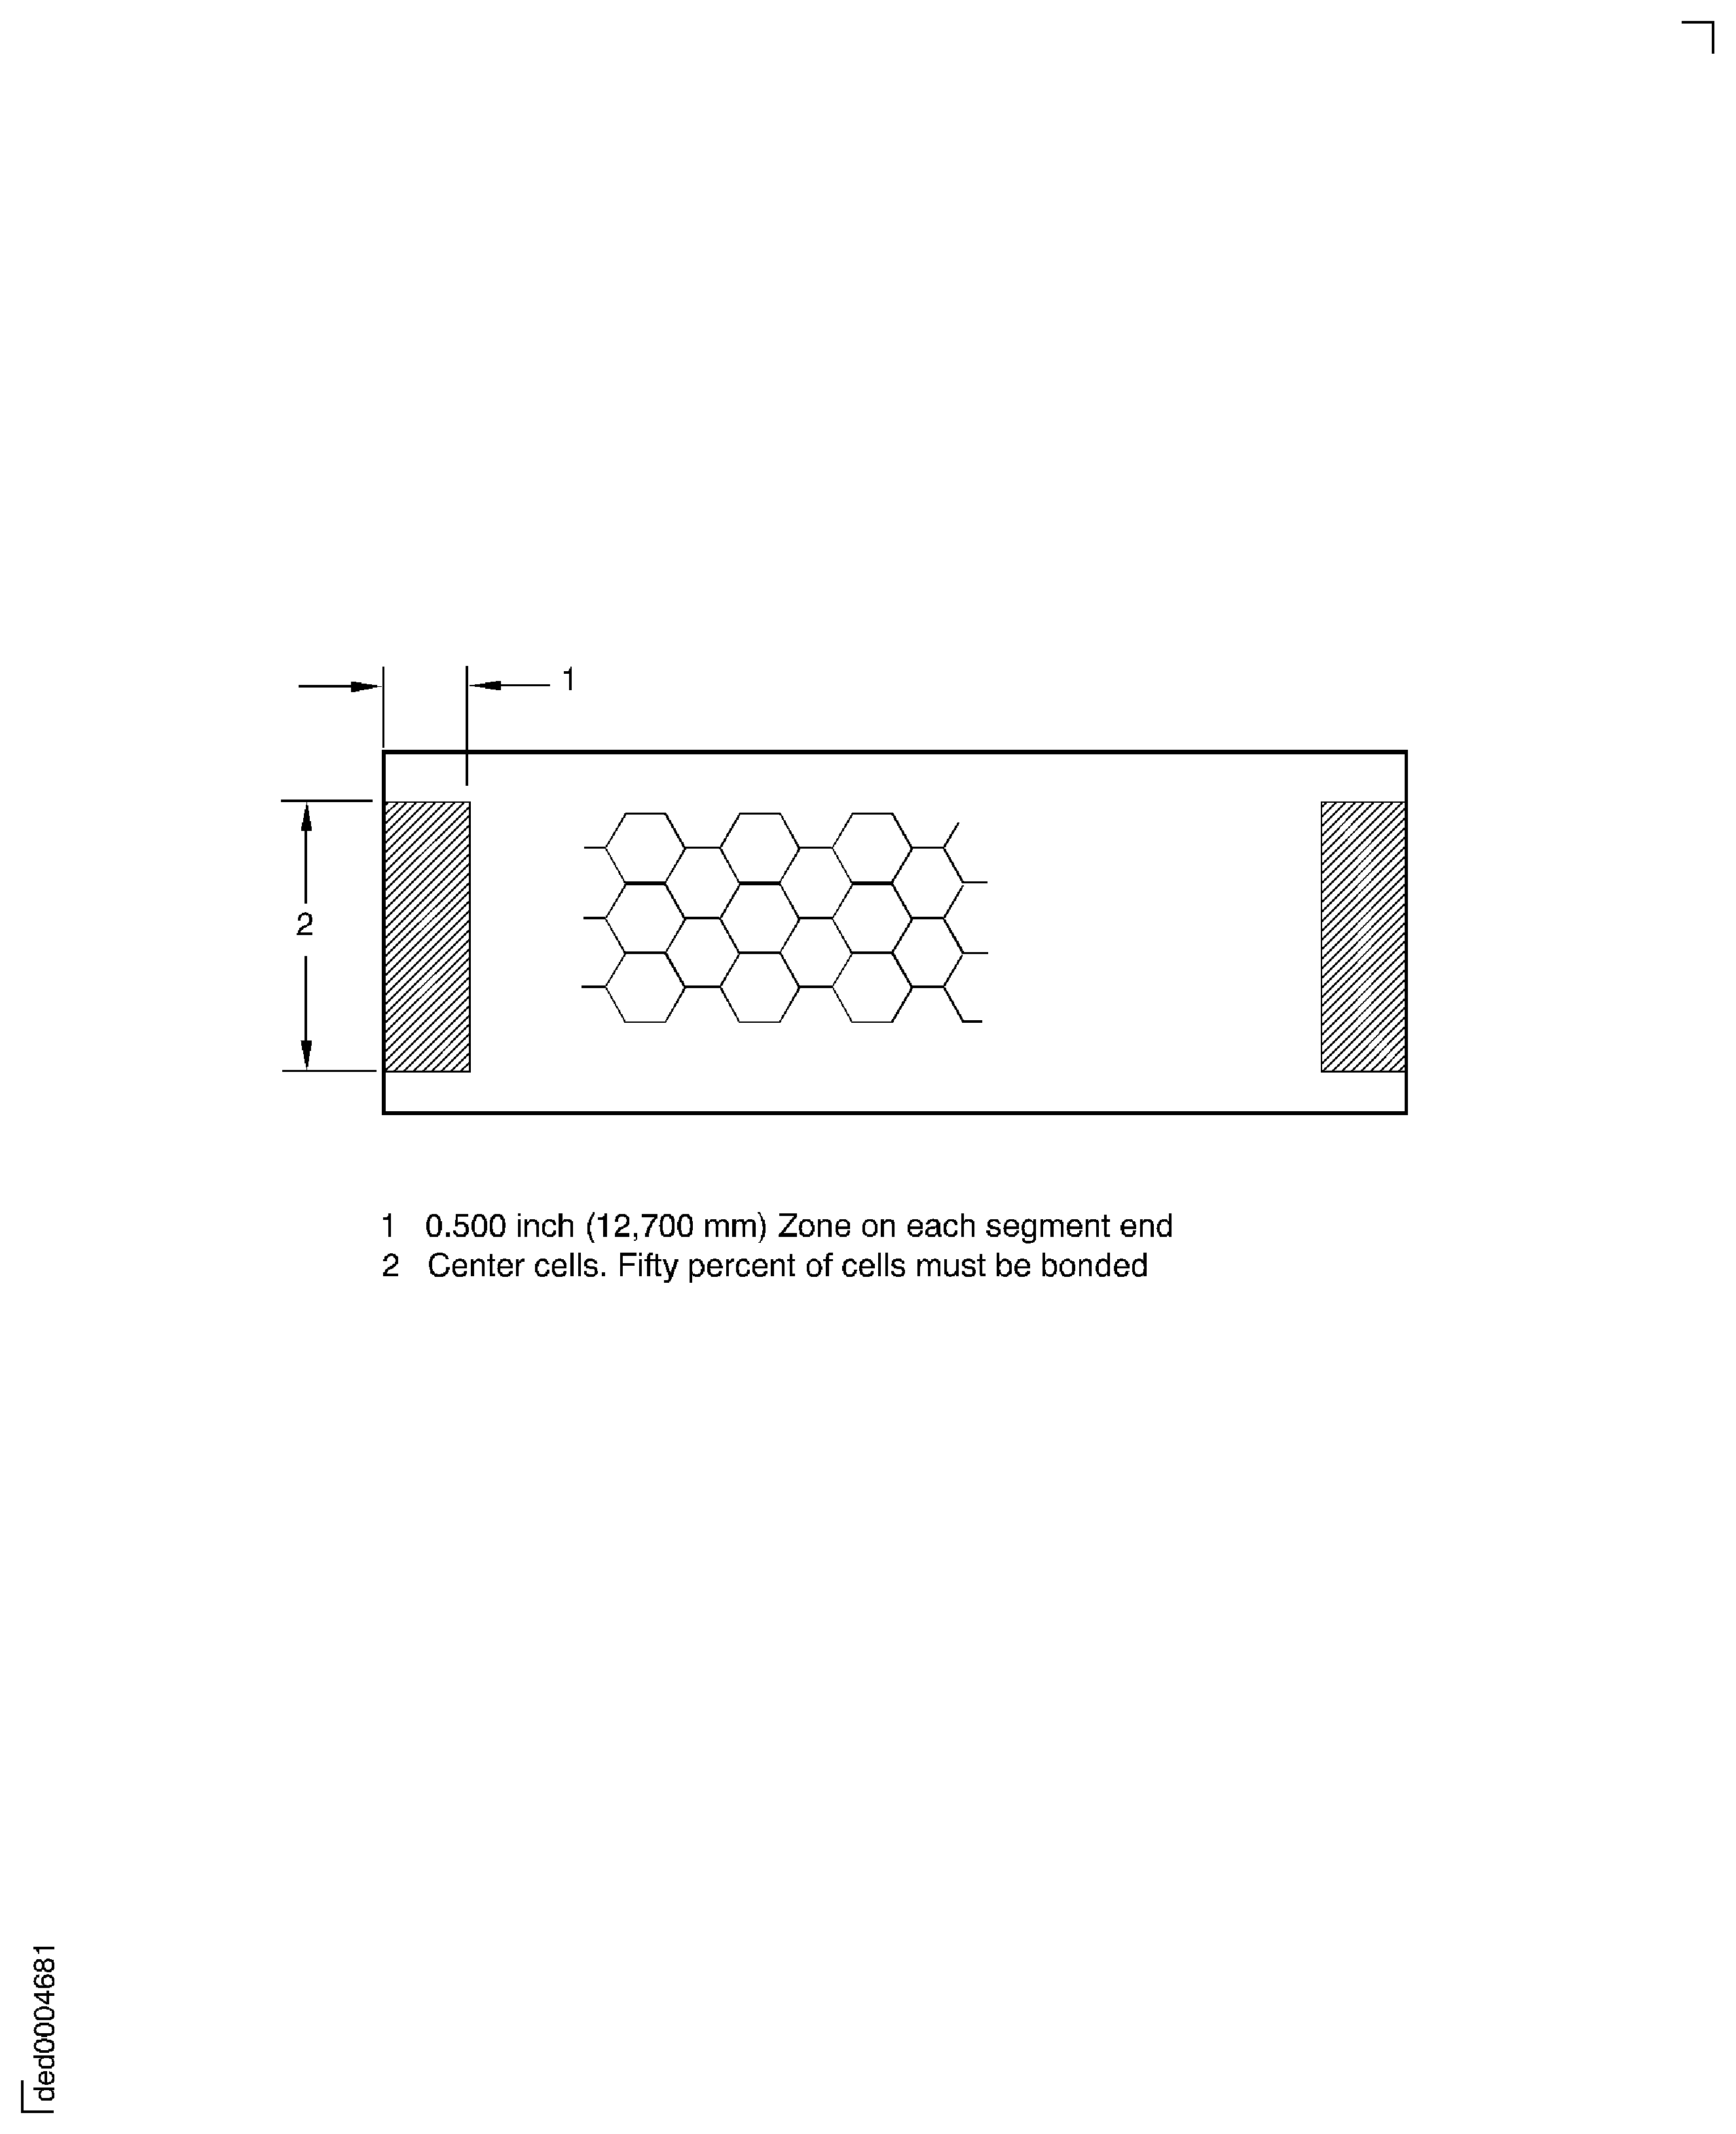
Figure: Example of a cell wall hole above the braze line
Example of a cell wall hole above the braze line
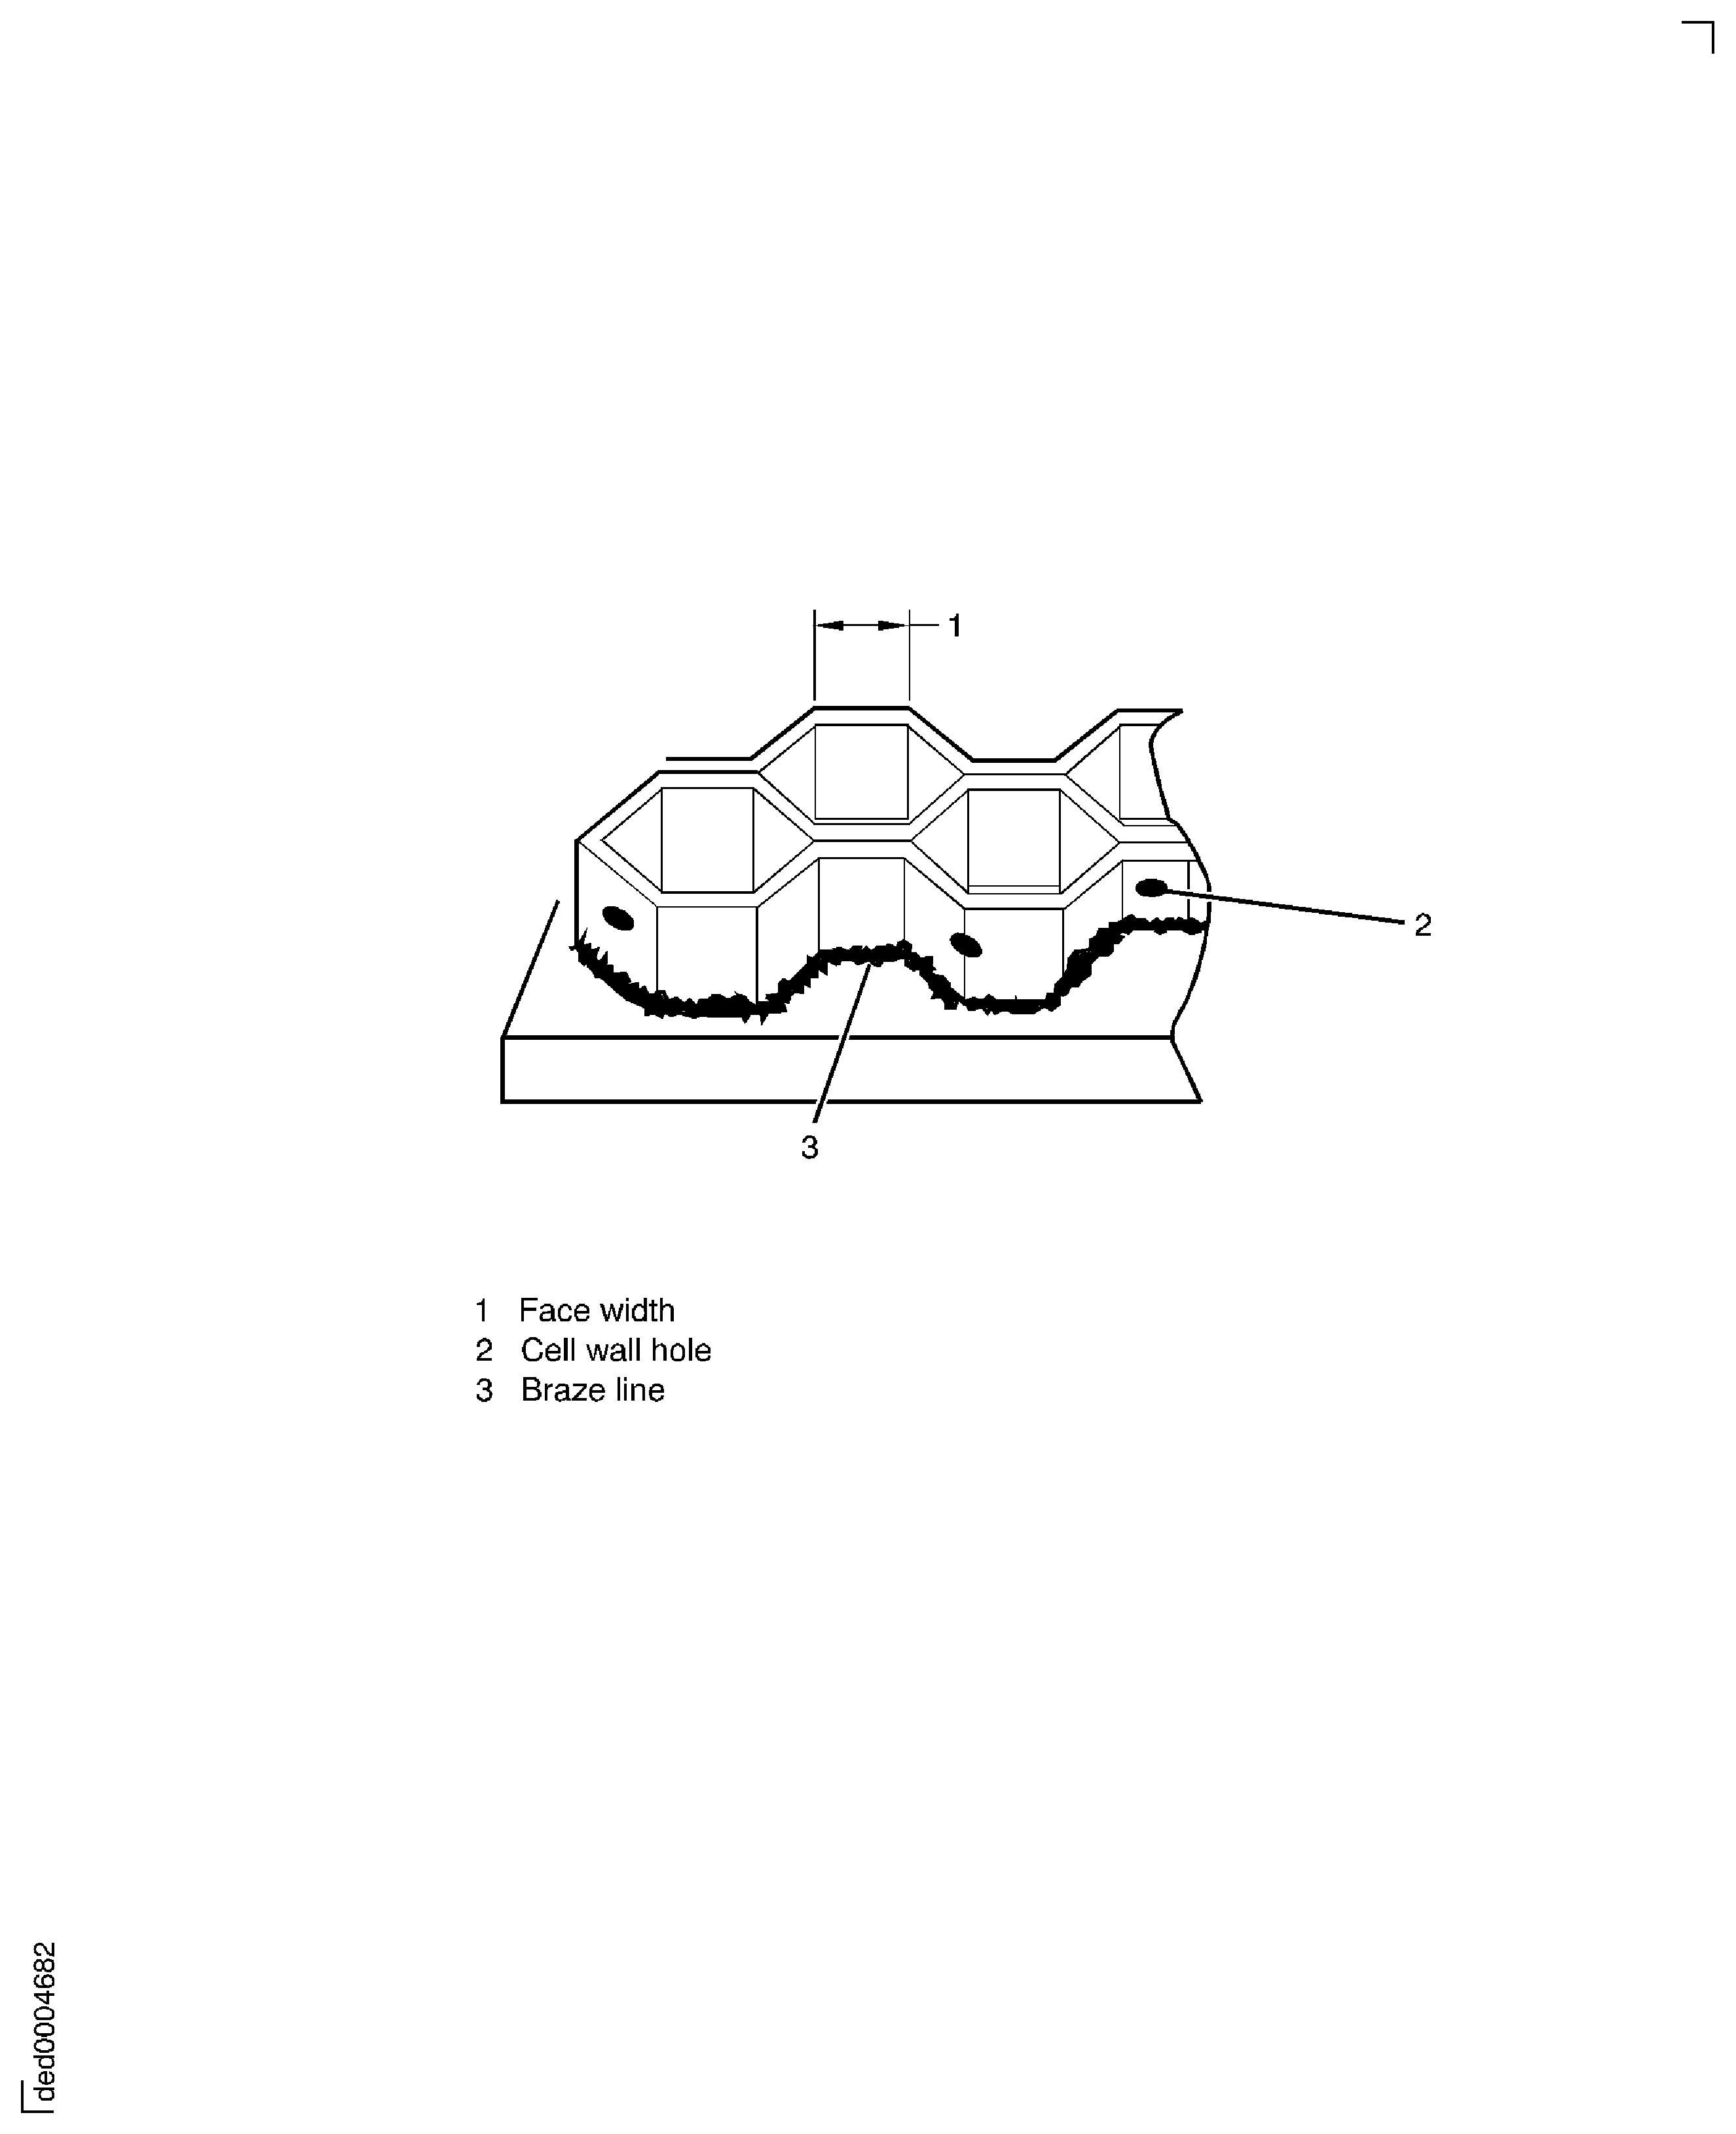
Figure: Example of a cell wall fracture
Example of a cell wall fracture
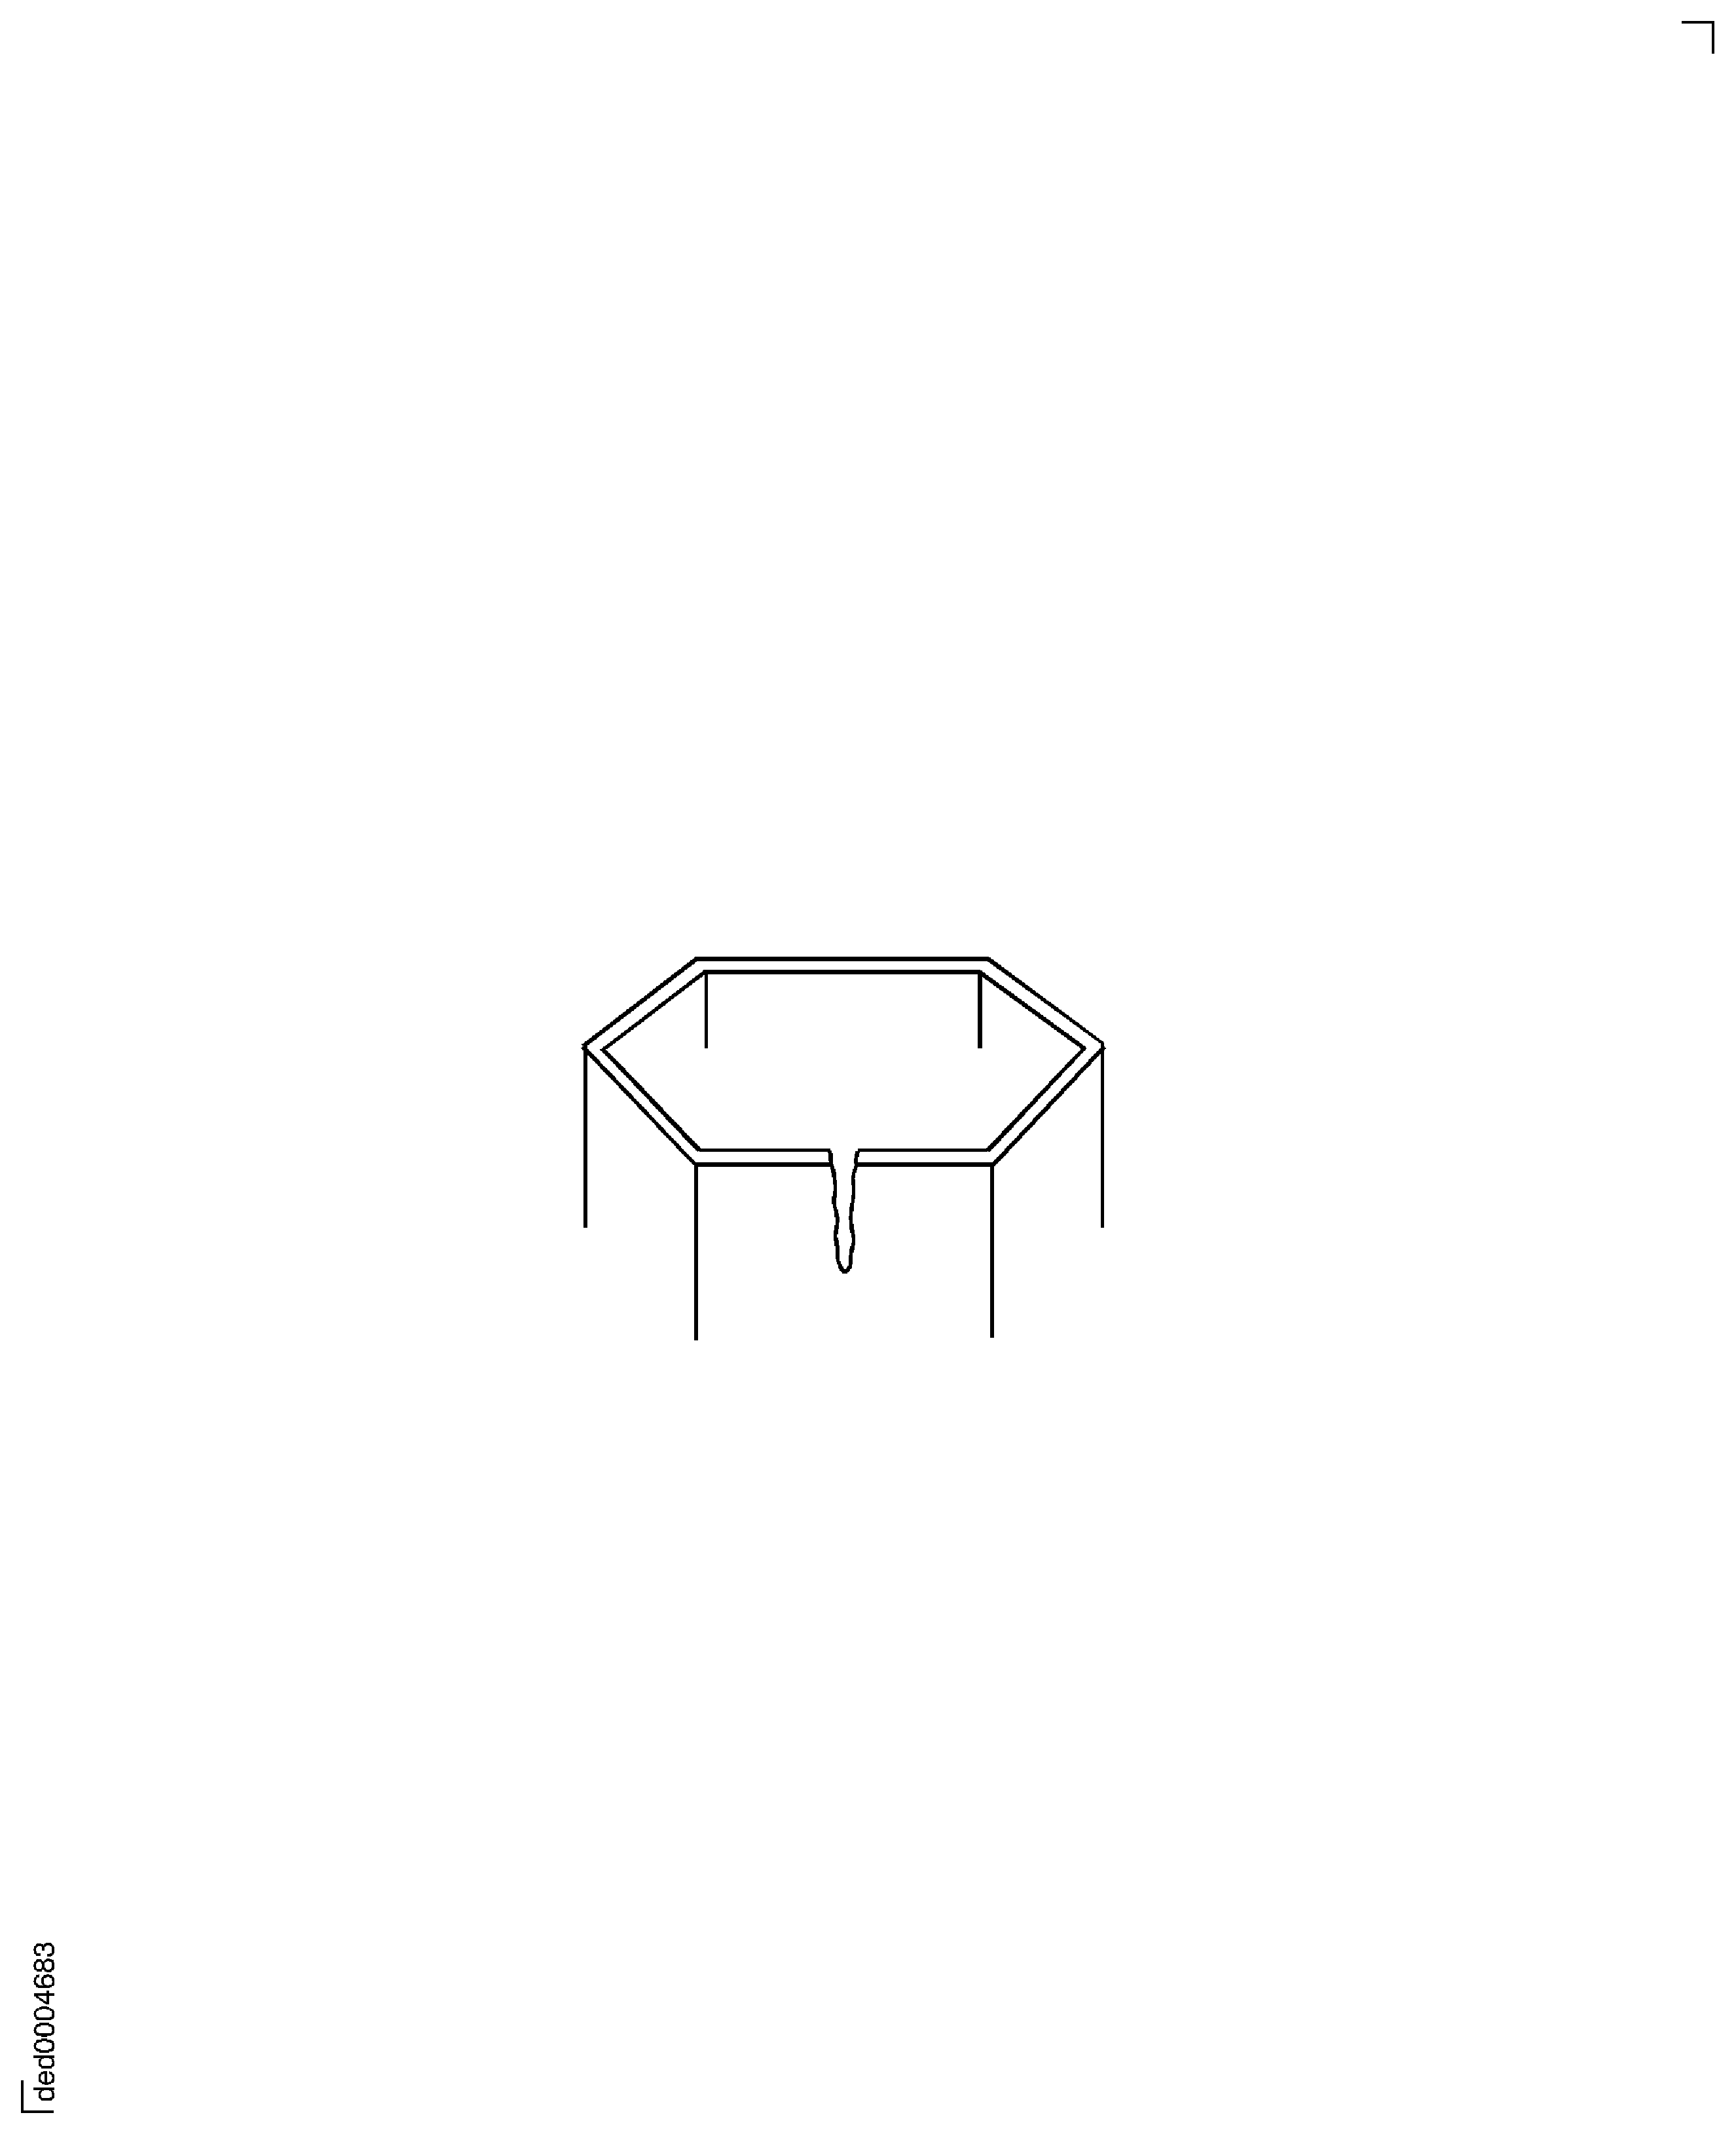
Figure: Typical redeposit remelt
Typical redeposit remelt
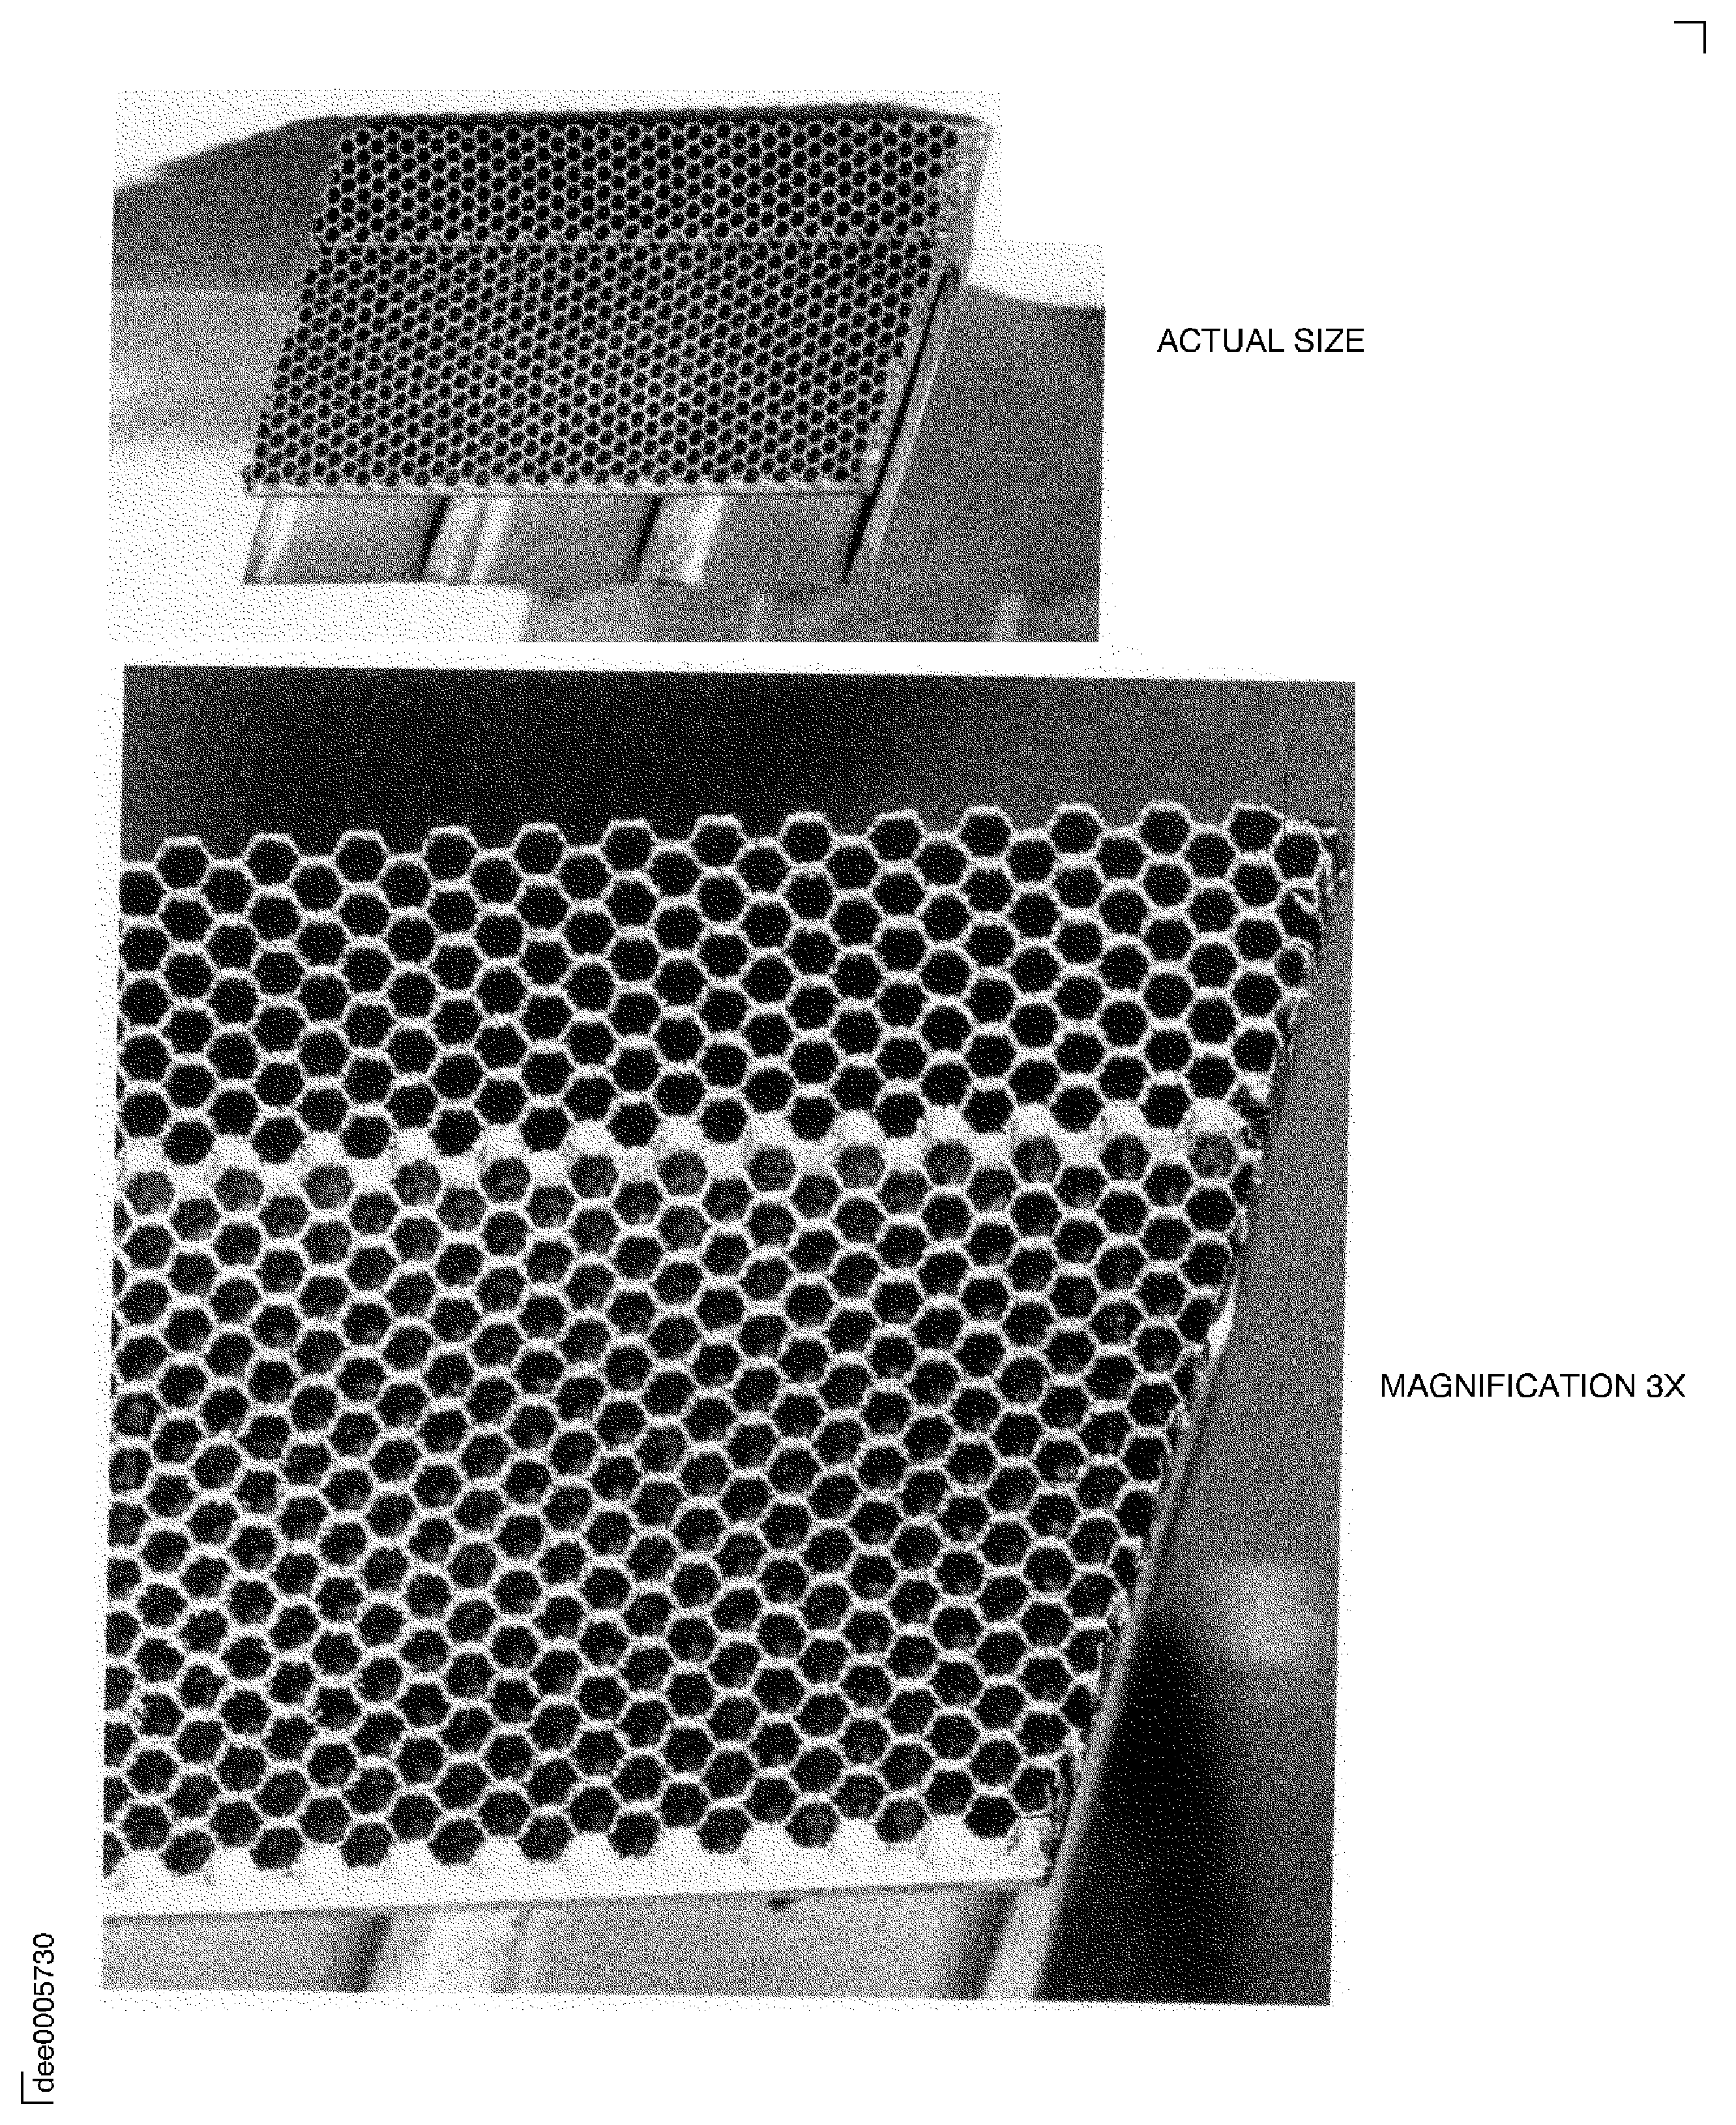
Figure: Typical redeposit remelt
Typical redeposit remelt
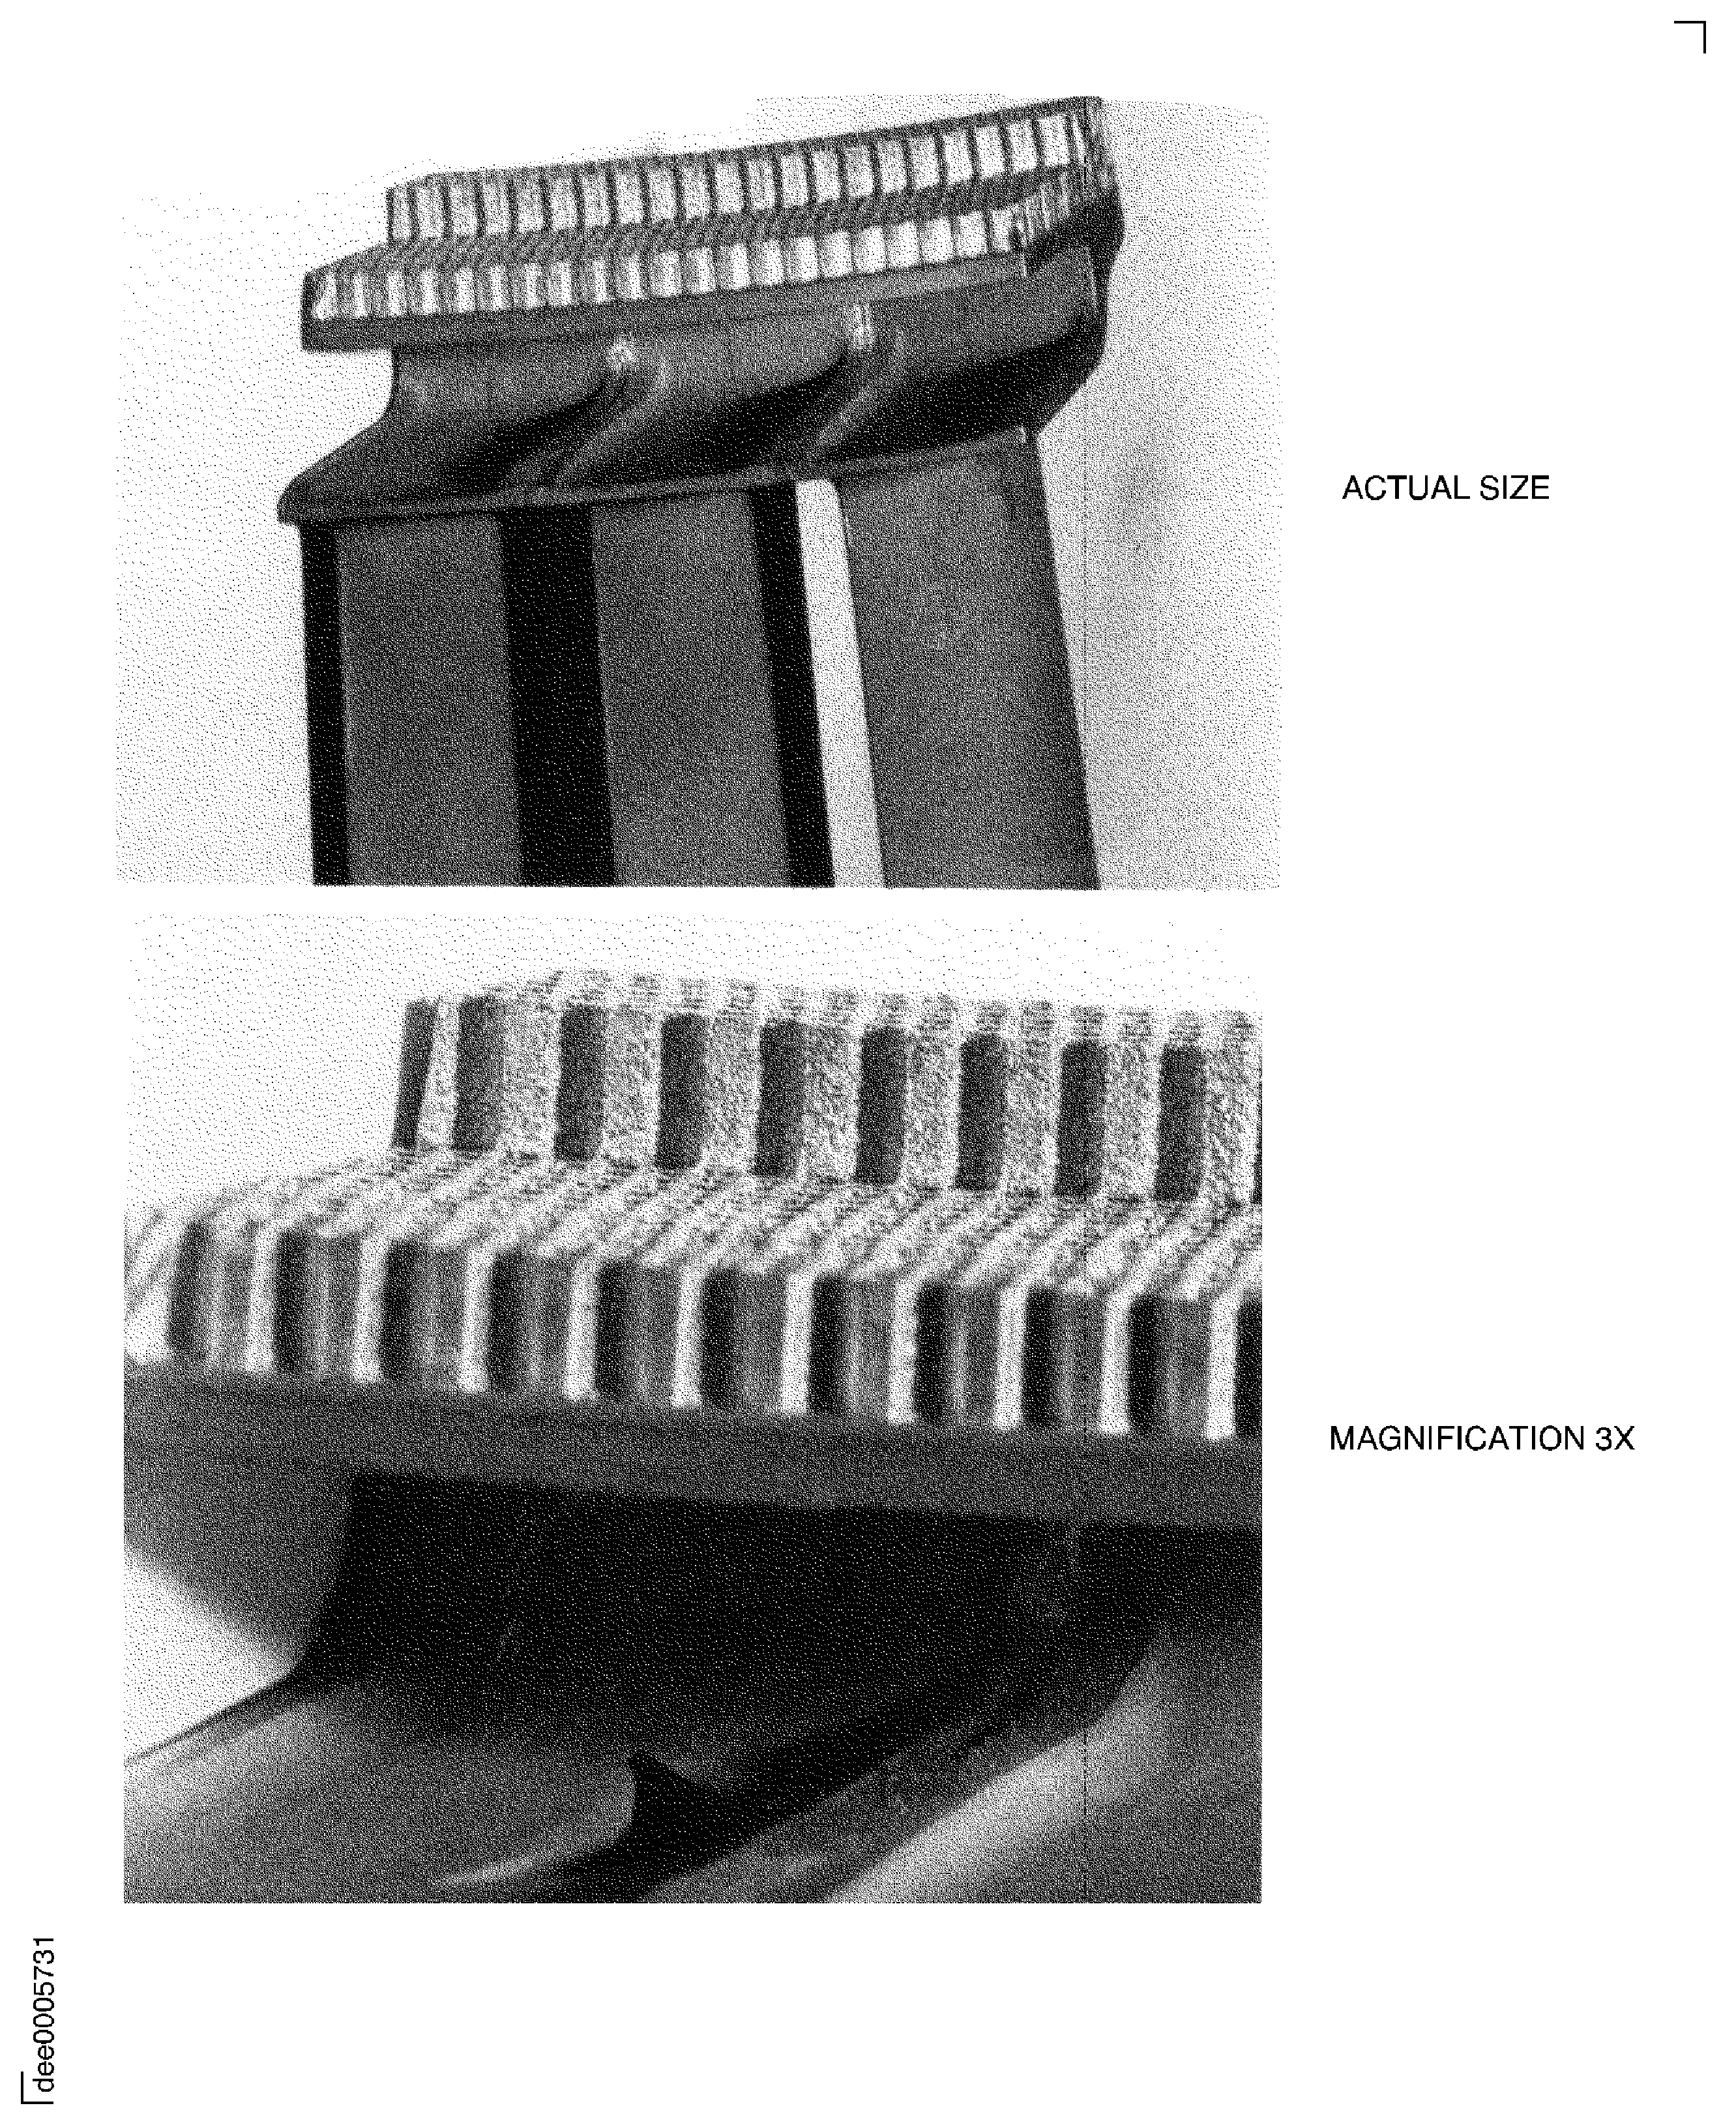
Figure: After braze inspection of honeycomb up to 5 staggered rows wide
After braze inspection of honeycomb up to 5 staggered rows wide
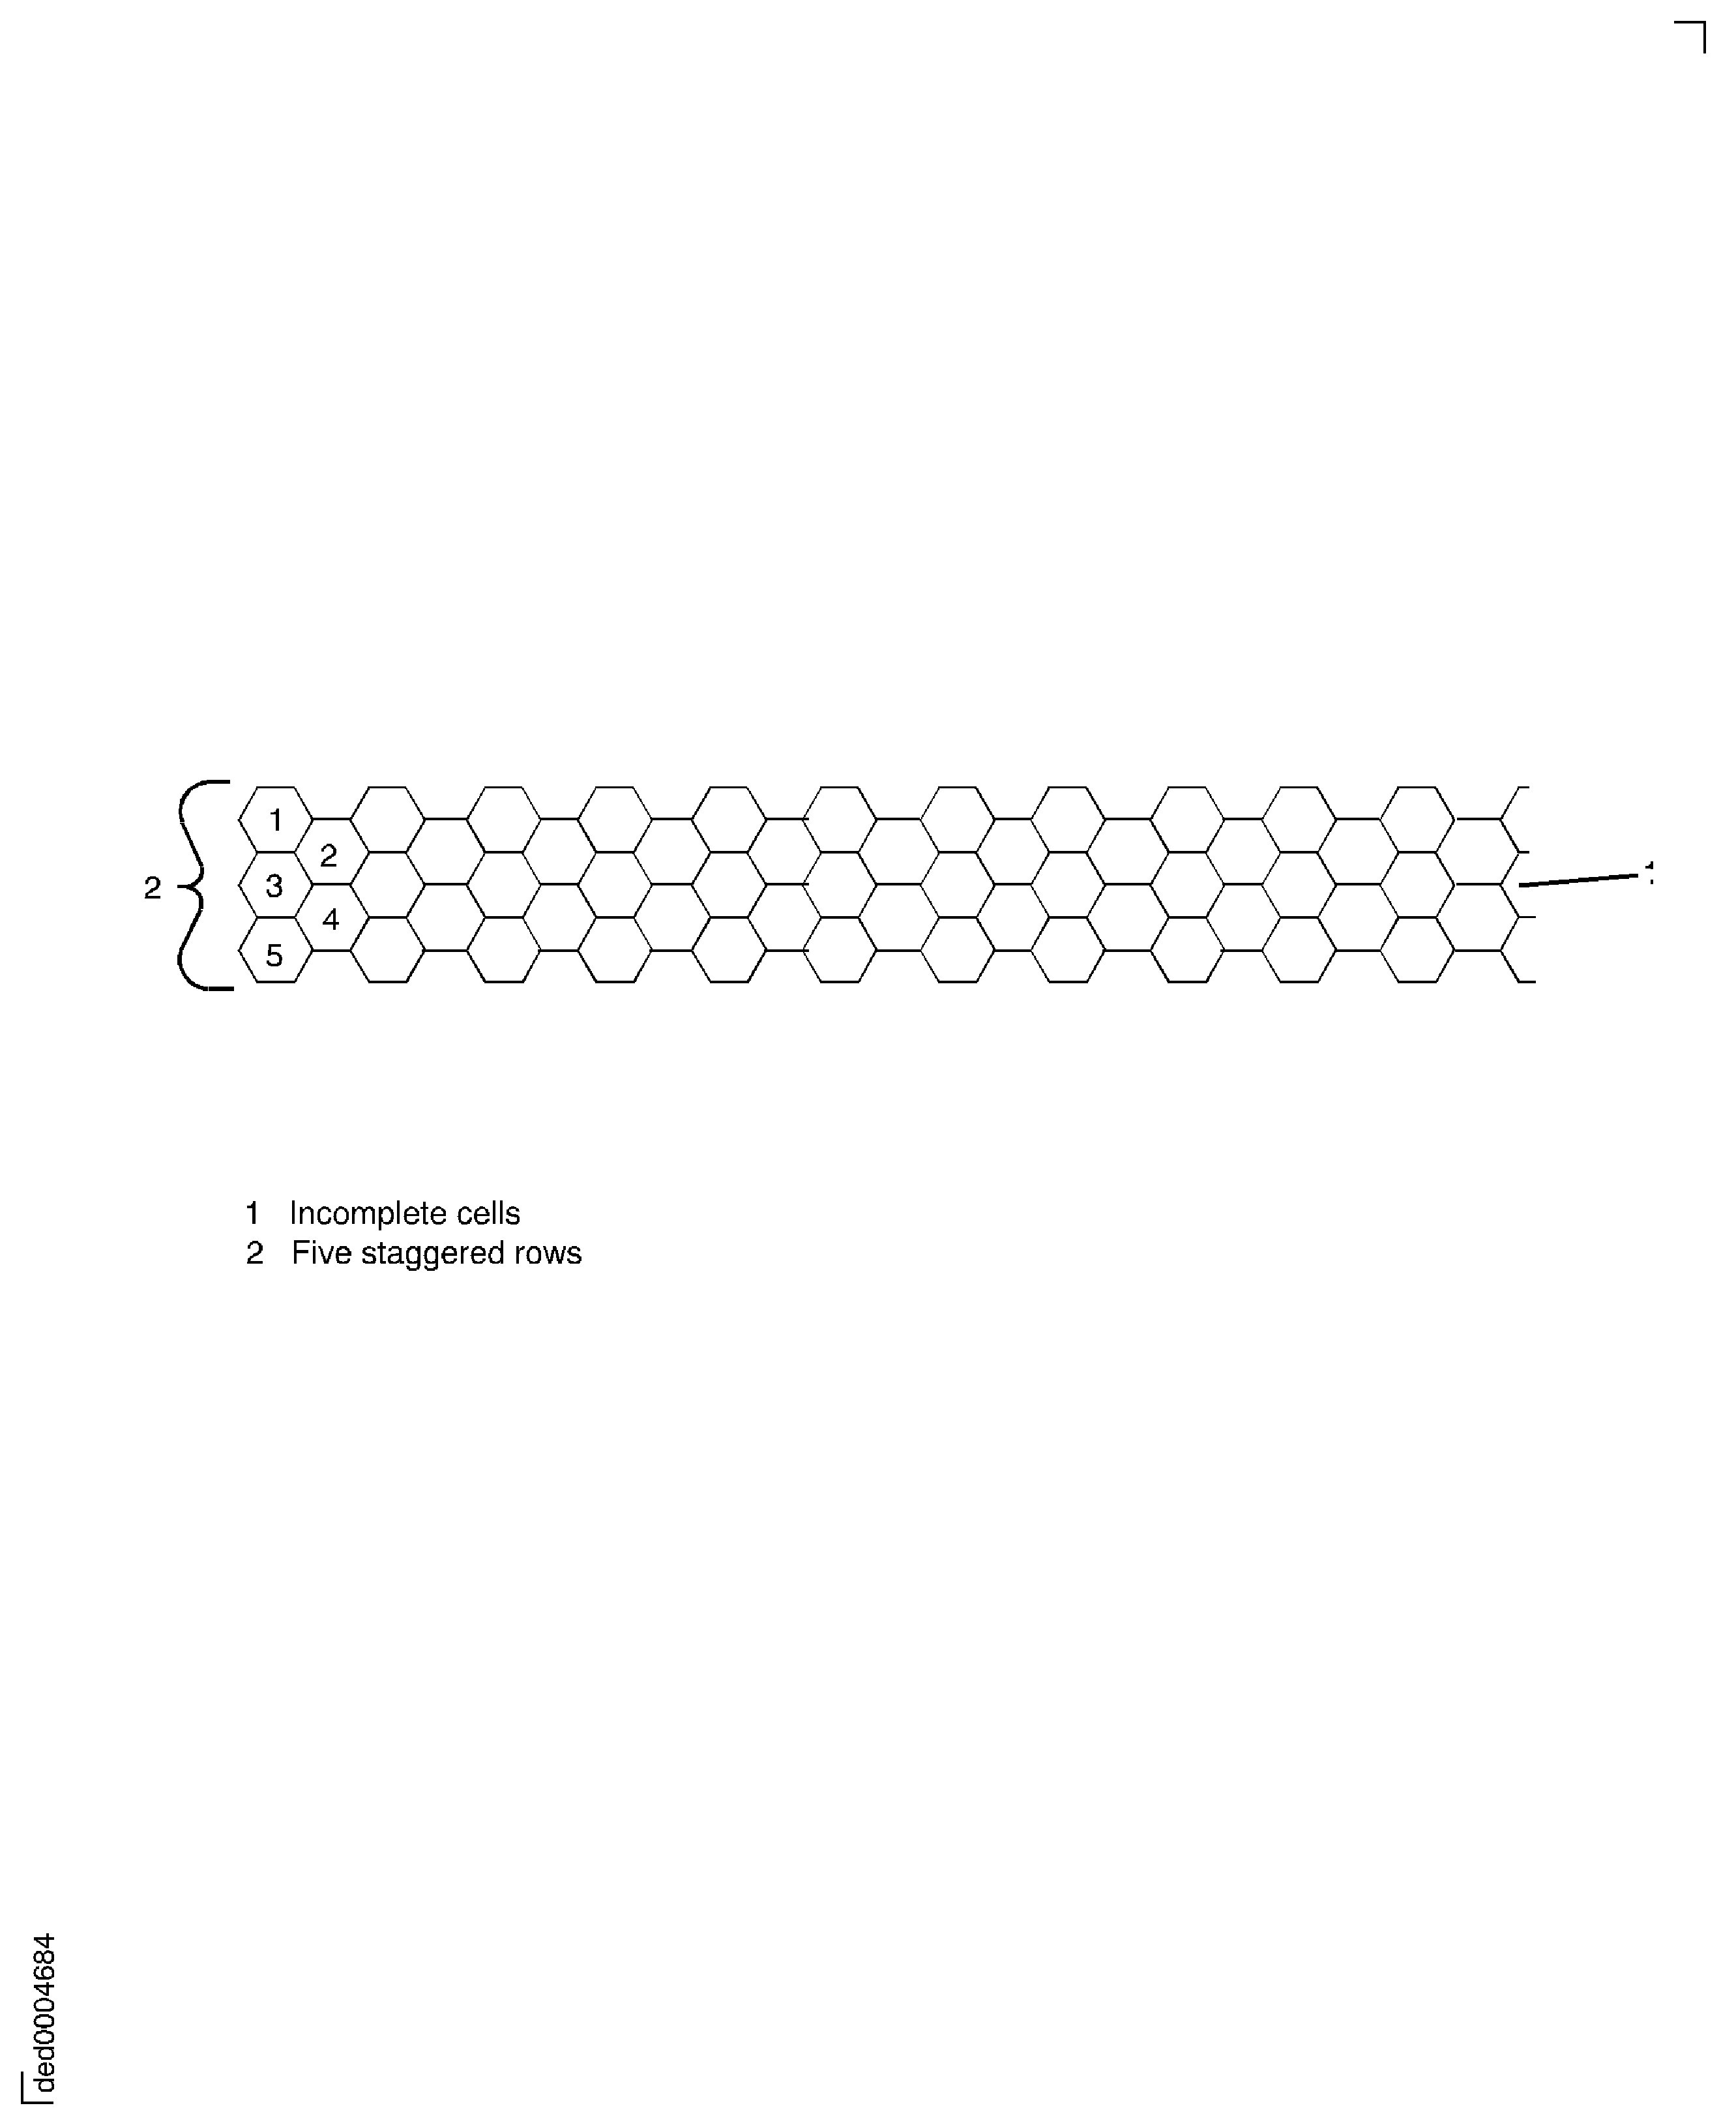
Figure: After braze inspection of honeycomb for layover/burrs
After braze inspection of honeycomb for layover/burrs
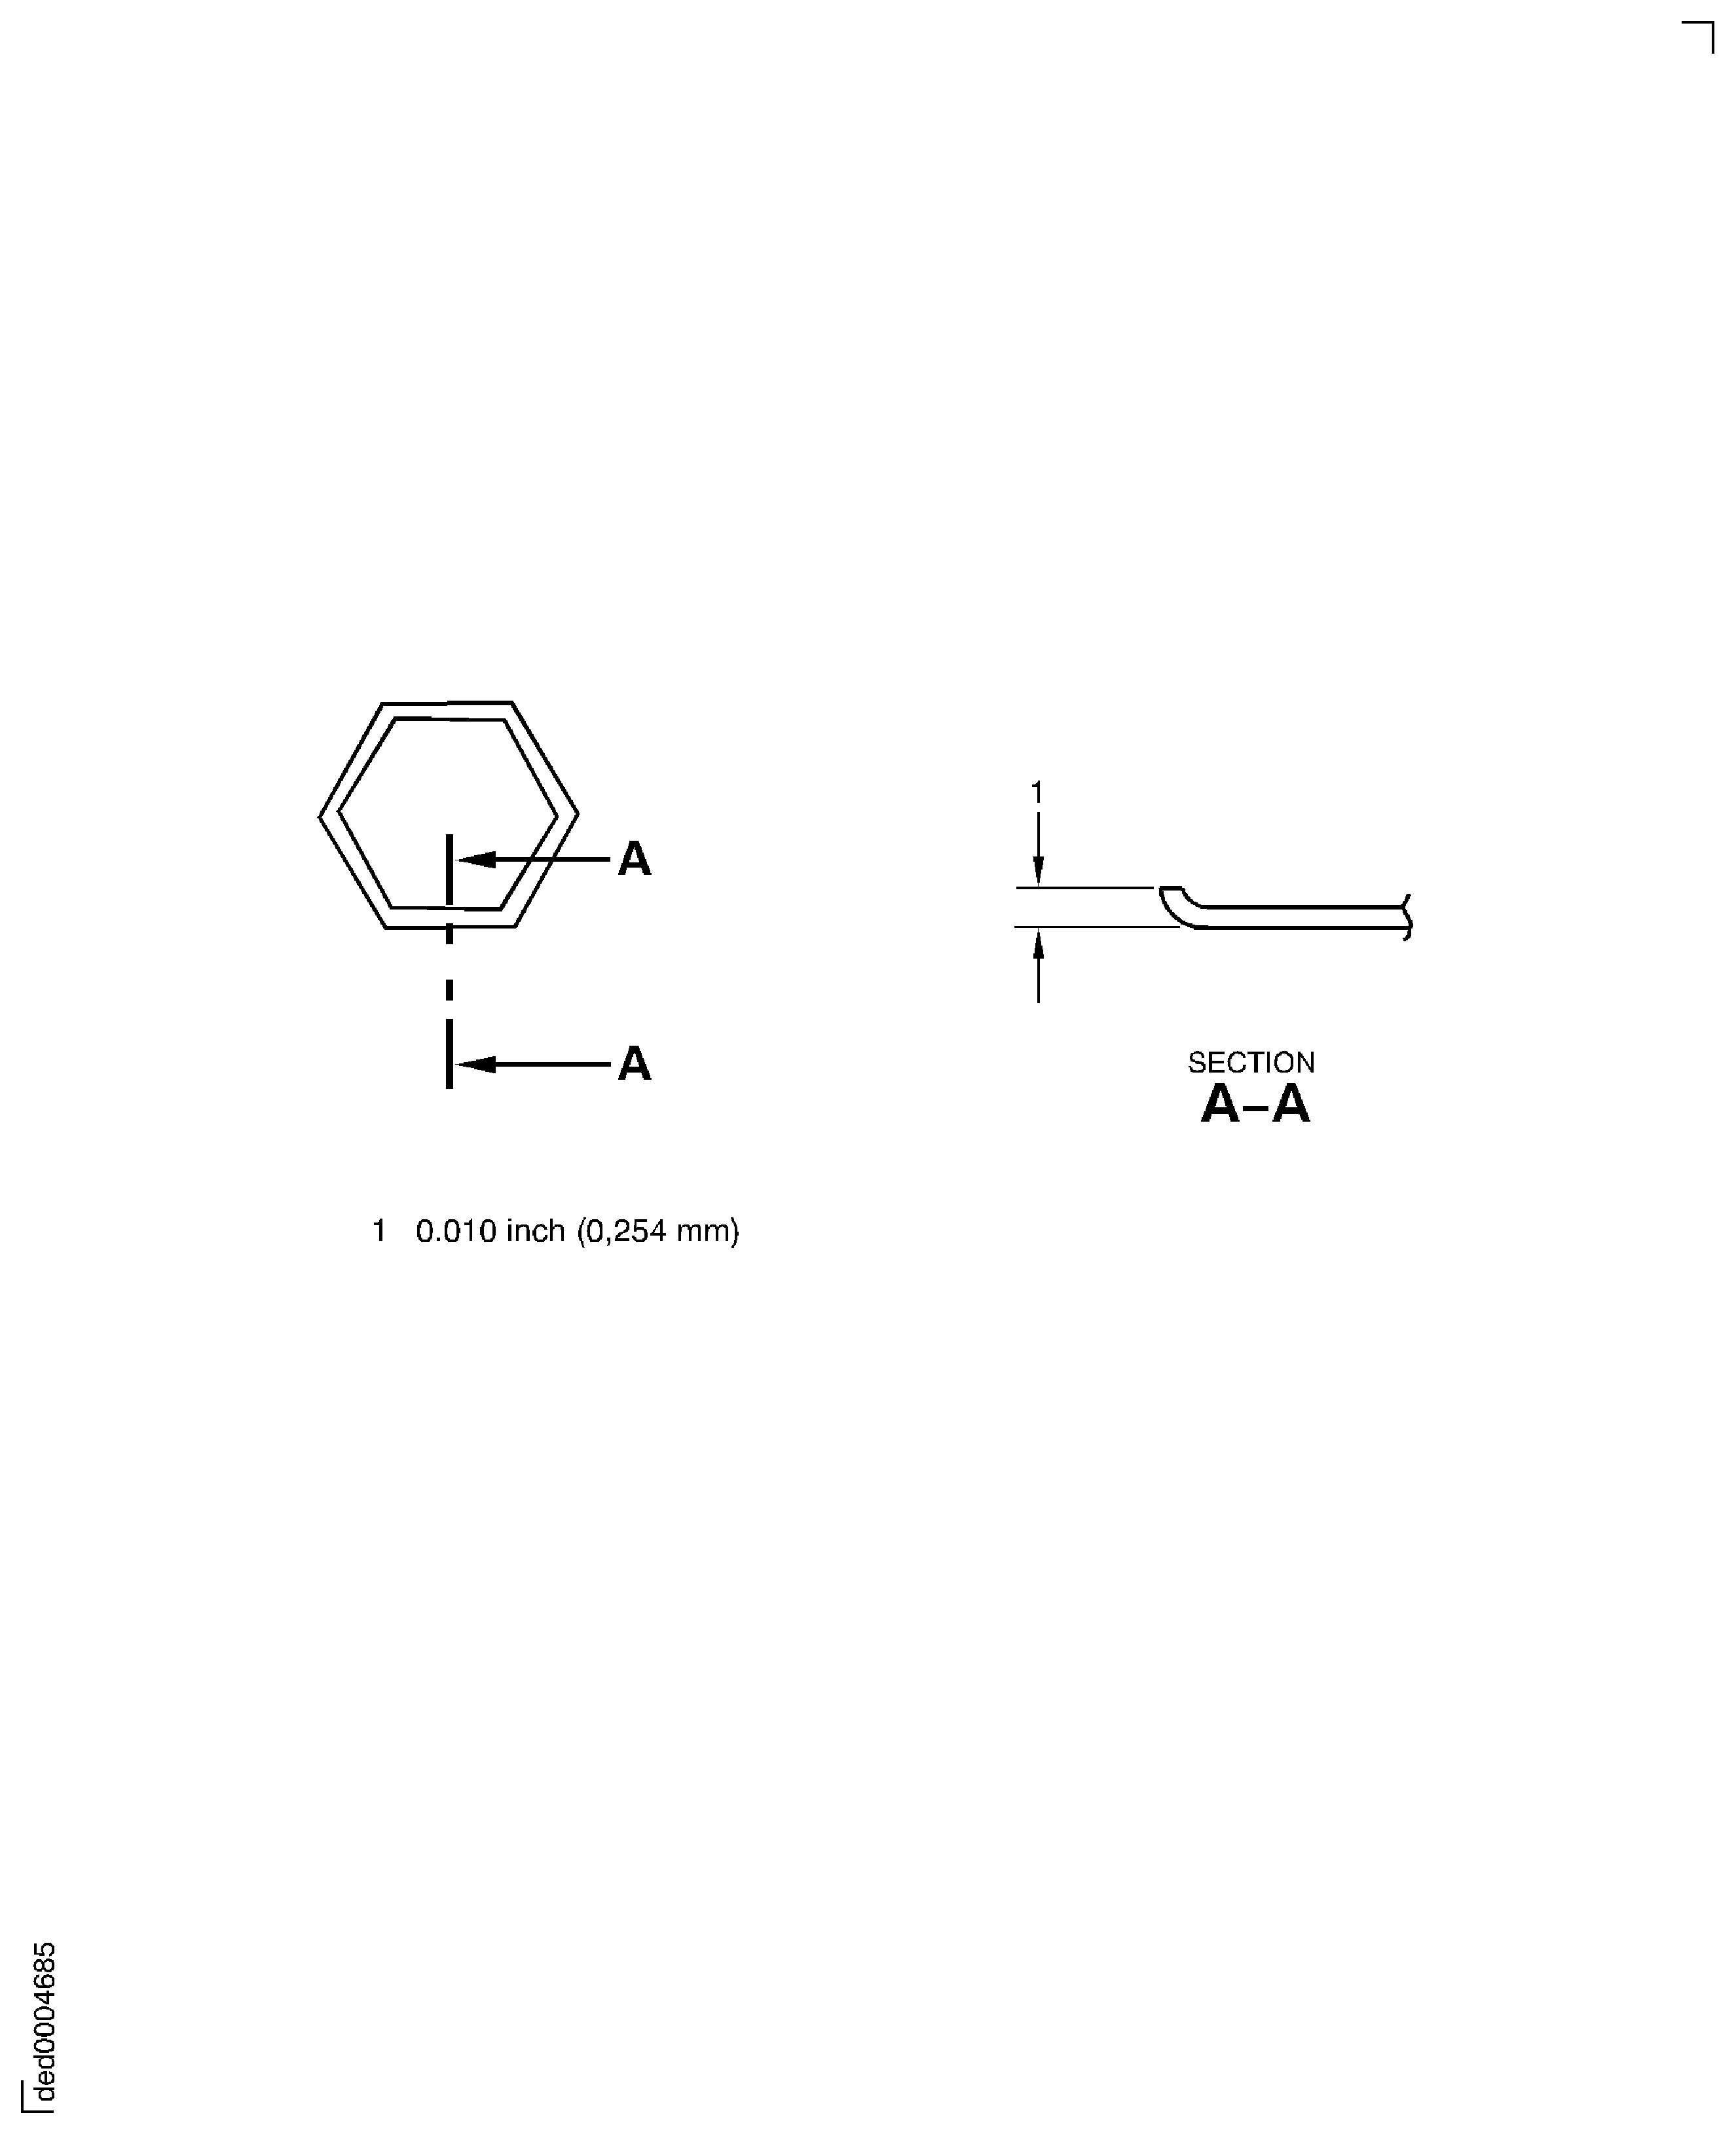
Figure: Typical example of clean cells with shiny bottoms
Typical example of clean cells with shiny bottoms
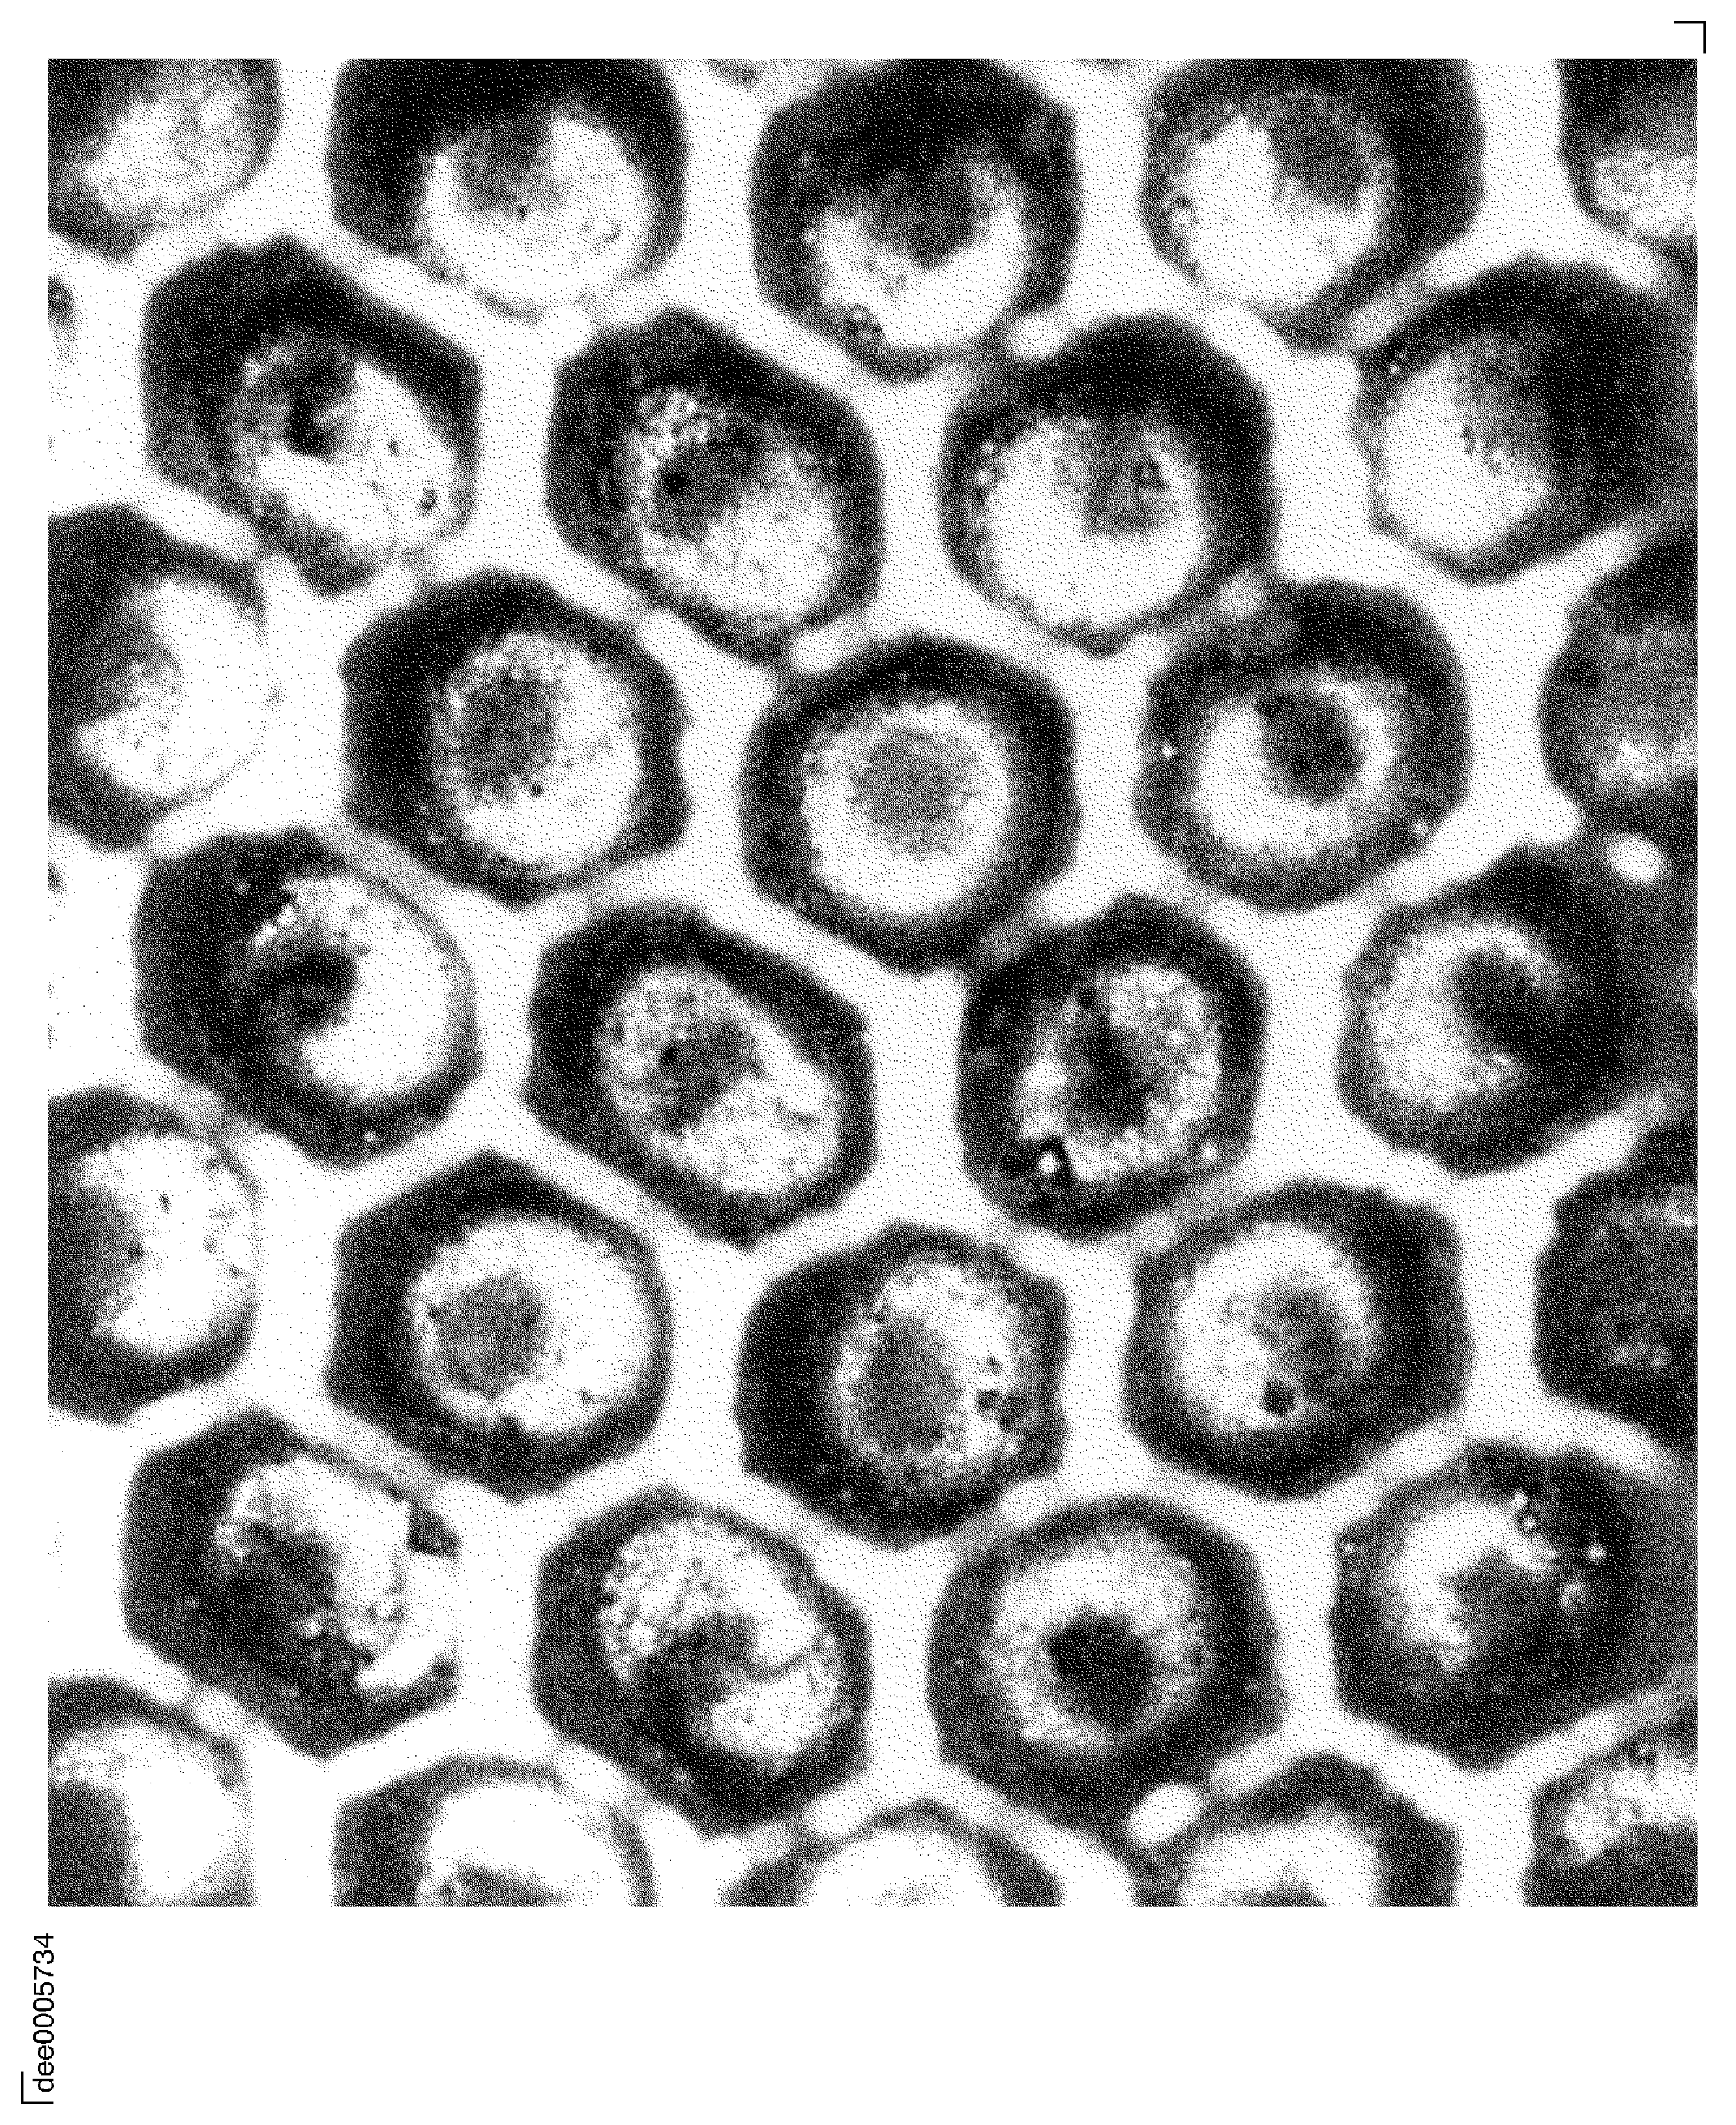
Figure: Typical example of cells with oxides on cell bottoms
Typical example of cells with oxides on cell bottoms
