Export Control
EAR Export Classification: Not subject to the EAR per 15 C.F.R. Chapter 1, Part 734.3(b)(3), except for the following Service Bulletins which are currently published as EAR Export Classification 9E991: SBE70-0992, SBE72-0483, SBE72-0580, SBE72-0588, SBE72-0640, SBE73-0209, SBE80-0024 and SBE80-0025.Copyright
© IAE International Aero Engines AG (2001, 2014 - 2021) The information contained in this document is the property of © IAE International Aero Engines AG and may not be copied or used for any purpose other than that for which it is supplied without the express written authority of © IAE International Aero Engines AG. (This does not preclude use by engine and aircraft operators for normal instructional, maintenance or overhaul purposes.).Applicability
All
Common Information
TASK 72-00-00-200-011 Engine General - Do An Ultrasonic Inspection For Root Debond On The LPC Fan Blades, Inspection-011
General
The TASK gives the procedure for the ultrasonic inspection of the LP Compressor fan blades. For the inspection of the other parts of the engine, refer to TASK 72-00-00-200-000 (INSPECTION/CHECK-000).
NOTE
Any blade rejected should be returned to the address that follows for further investigation:
Rolls Royce plc
NDT Laboratory
Sinfin 'A' Site
Victory Rd
Derby DE24 8BJ
England
ATTN: Product Support Manager - V2500
Normal procedures in accordance with TASK 72-31-11-200-002-B00 (INSPECTION/CHECK-002) must be followed prior to each blade.
After each inspection, the information that follows should be recorded and sent to IAE:
Engine number in which the blade had been installed.
Fan blade part number, serial number and life achieved since new in hours/cycles.
The inspection record can be copied for recording and reporting purposes and, as a T.A.P. test inspection is required in TASK 72-00-00-200-010 (INSPECTION/CHECK - 010) the reading obtained can be added to the inspection record, Figure.
NOTE
NOTE
Preliminary Requirements
Pre-Conditions
NONESupport Equipment
| Name | Manufacturer | Part Number / Identification | Quantity | Remark |
|---|---|---|---|---|
| Ultrasonic flaw detector | LOCAL | Ultrasonic Flaw Detector | ||
| IAE 2R18937 Shear wave ultrasonicprobe, type 45-4-FB | 0AM53 | IAE 2R18937 | ||
| IAE 2R18938 Compressionwave ultrasonic probe, type 0-5-FB | 0AM53 | IAE 2R18938 | ||
| IAE 2R18939 Ultrasonic calibration block | 0AM53 | IAE 2R18939 | ||
| IAE 2R18940 Perspexoverlay | 0AM53 | IAE 2R18940 | ||
| IAE 2R18941 Perspexoverlay | 0AM53 | IAE 2R18941 |
Consumables, Materials and Expendables
| Name | Manufacturer | Part Number / Identification | Quantity | Remark |
|---|---|---|---|---|
| CoMat 06-148 ULTRASONIC COUPLANT | LOCAL | CoMat 06-148 | ||
| CoMat 02-121 TEMPORARY MARKER PENCIL/CRAYON | IE304 | CoMat 02-121 |
Spares
NONESafety Requirements
NONEProcedure
Refer to Figure.
Connect IAE 2R18938 Compressionwave ultrasonic probe, type 0-5-FB 1 off to the instrument.
Apply CoMat 06-148 ULTRASONIC COUPLANT and put the probe on the IAE 2R18939 Ultrasonic calibration block 1 off and adjust gain to identify the signals produced by two side slots.
Adjust the range control to position the first signal from the top slot at 1.0 division of the time base 0.394 in. (10.0 mm.) and the first signal from the bottom slot should be at 1.8 division of the time base 0.709 in. (18.0 mm). Adjust the gain to bring the amplitude of both signals to 50 percent screen height.
SUBTASK 72-00-00-490-051 Calibrate the Ultrasonic Equipment for the Airfoil Inspection
Apply CoMat 06-148 ULTRASONIC COUPLANT to the area of the lower concave airfoil.
NOTE
It may be necessary to increase the gain to clearly see both backwall signals.
NOTE
If there is a gap between the solid backwall disappearing from the screen and the hollow backwall appearing after increasing the gain, move the probe out towards the leading edge until the solid backwall appears.
Move the probe left and right to equalize the two signals from the hollow and solid backwalls, the probe is now set exactly over the edge of the hollow section.
V2500-A1 On the fan blade the base of the cavity is under the root block and cannot be detected.
V2500-A5 On the fan blade continue to check and mark across the base of the cavity.
Move the probe 0.197 in. (5 mm) towards the root and repeat Step to Step. Repeat every 0.197 in. (5 mm) down the bottom of the blade.
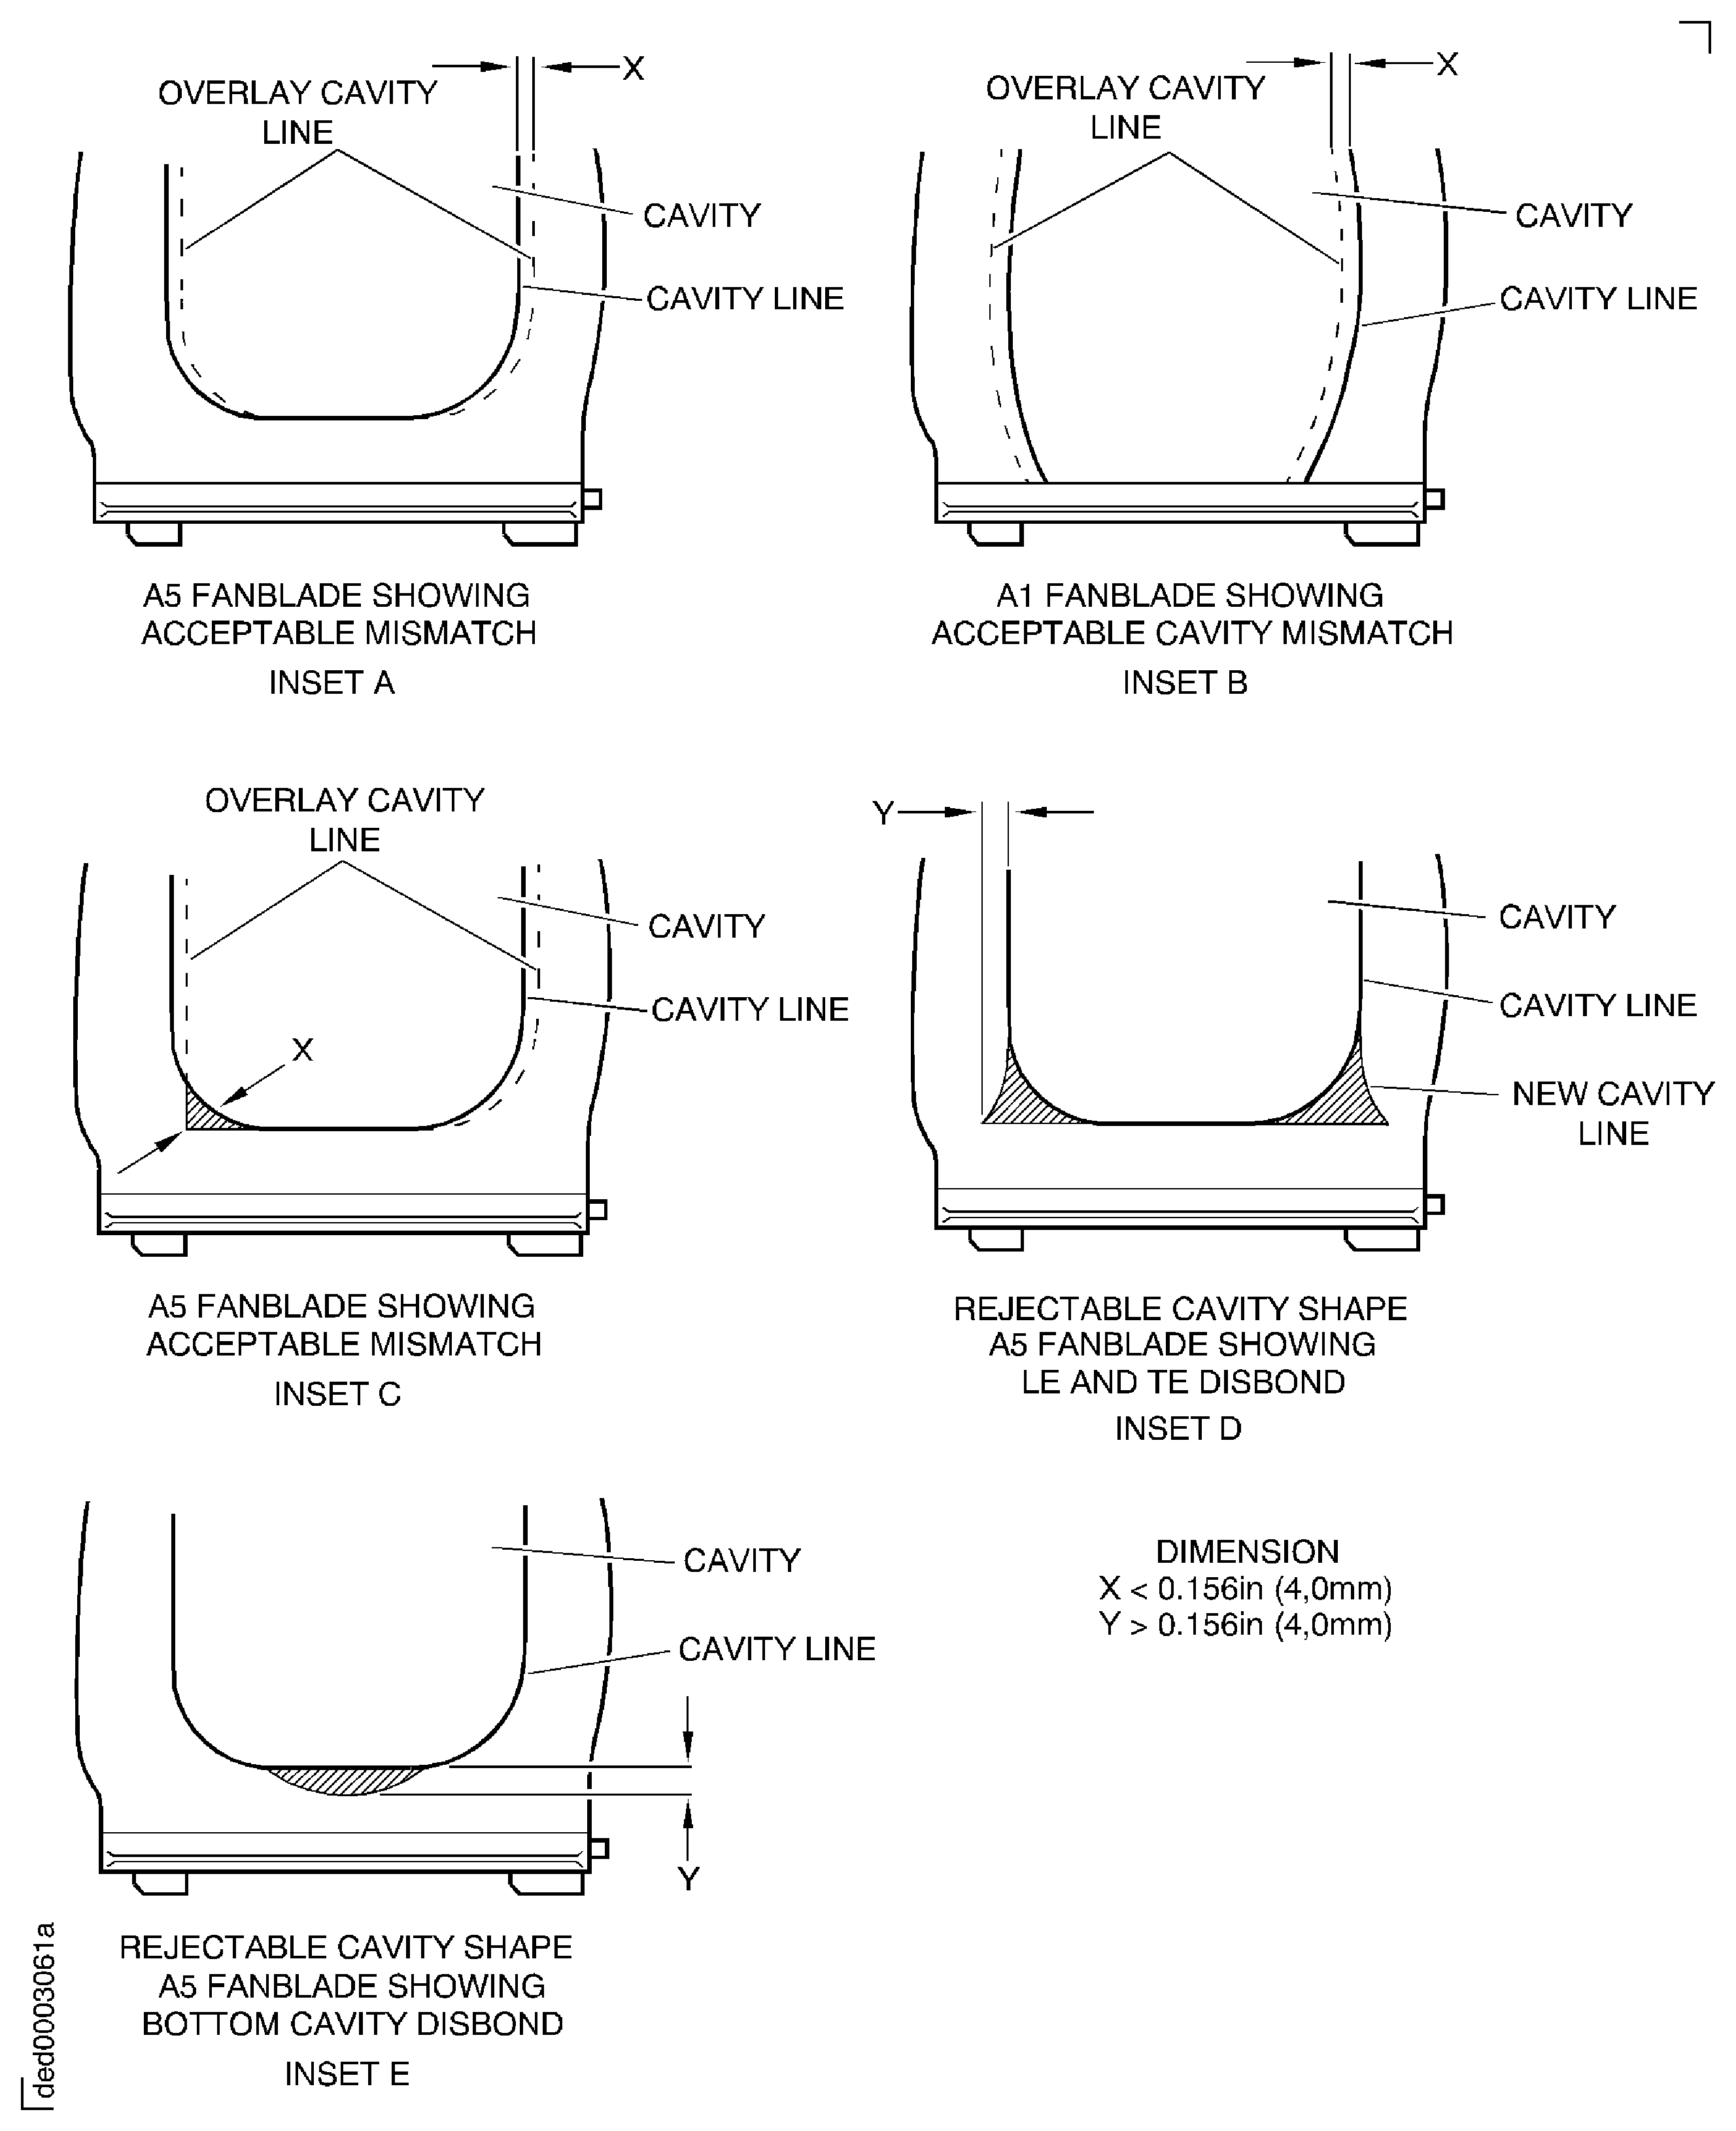
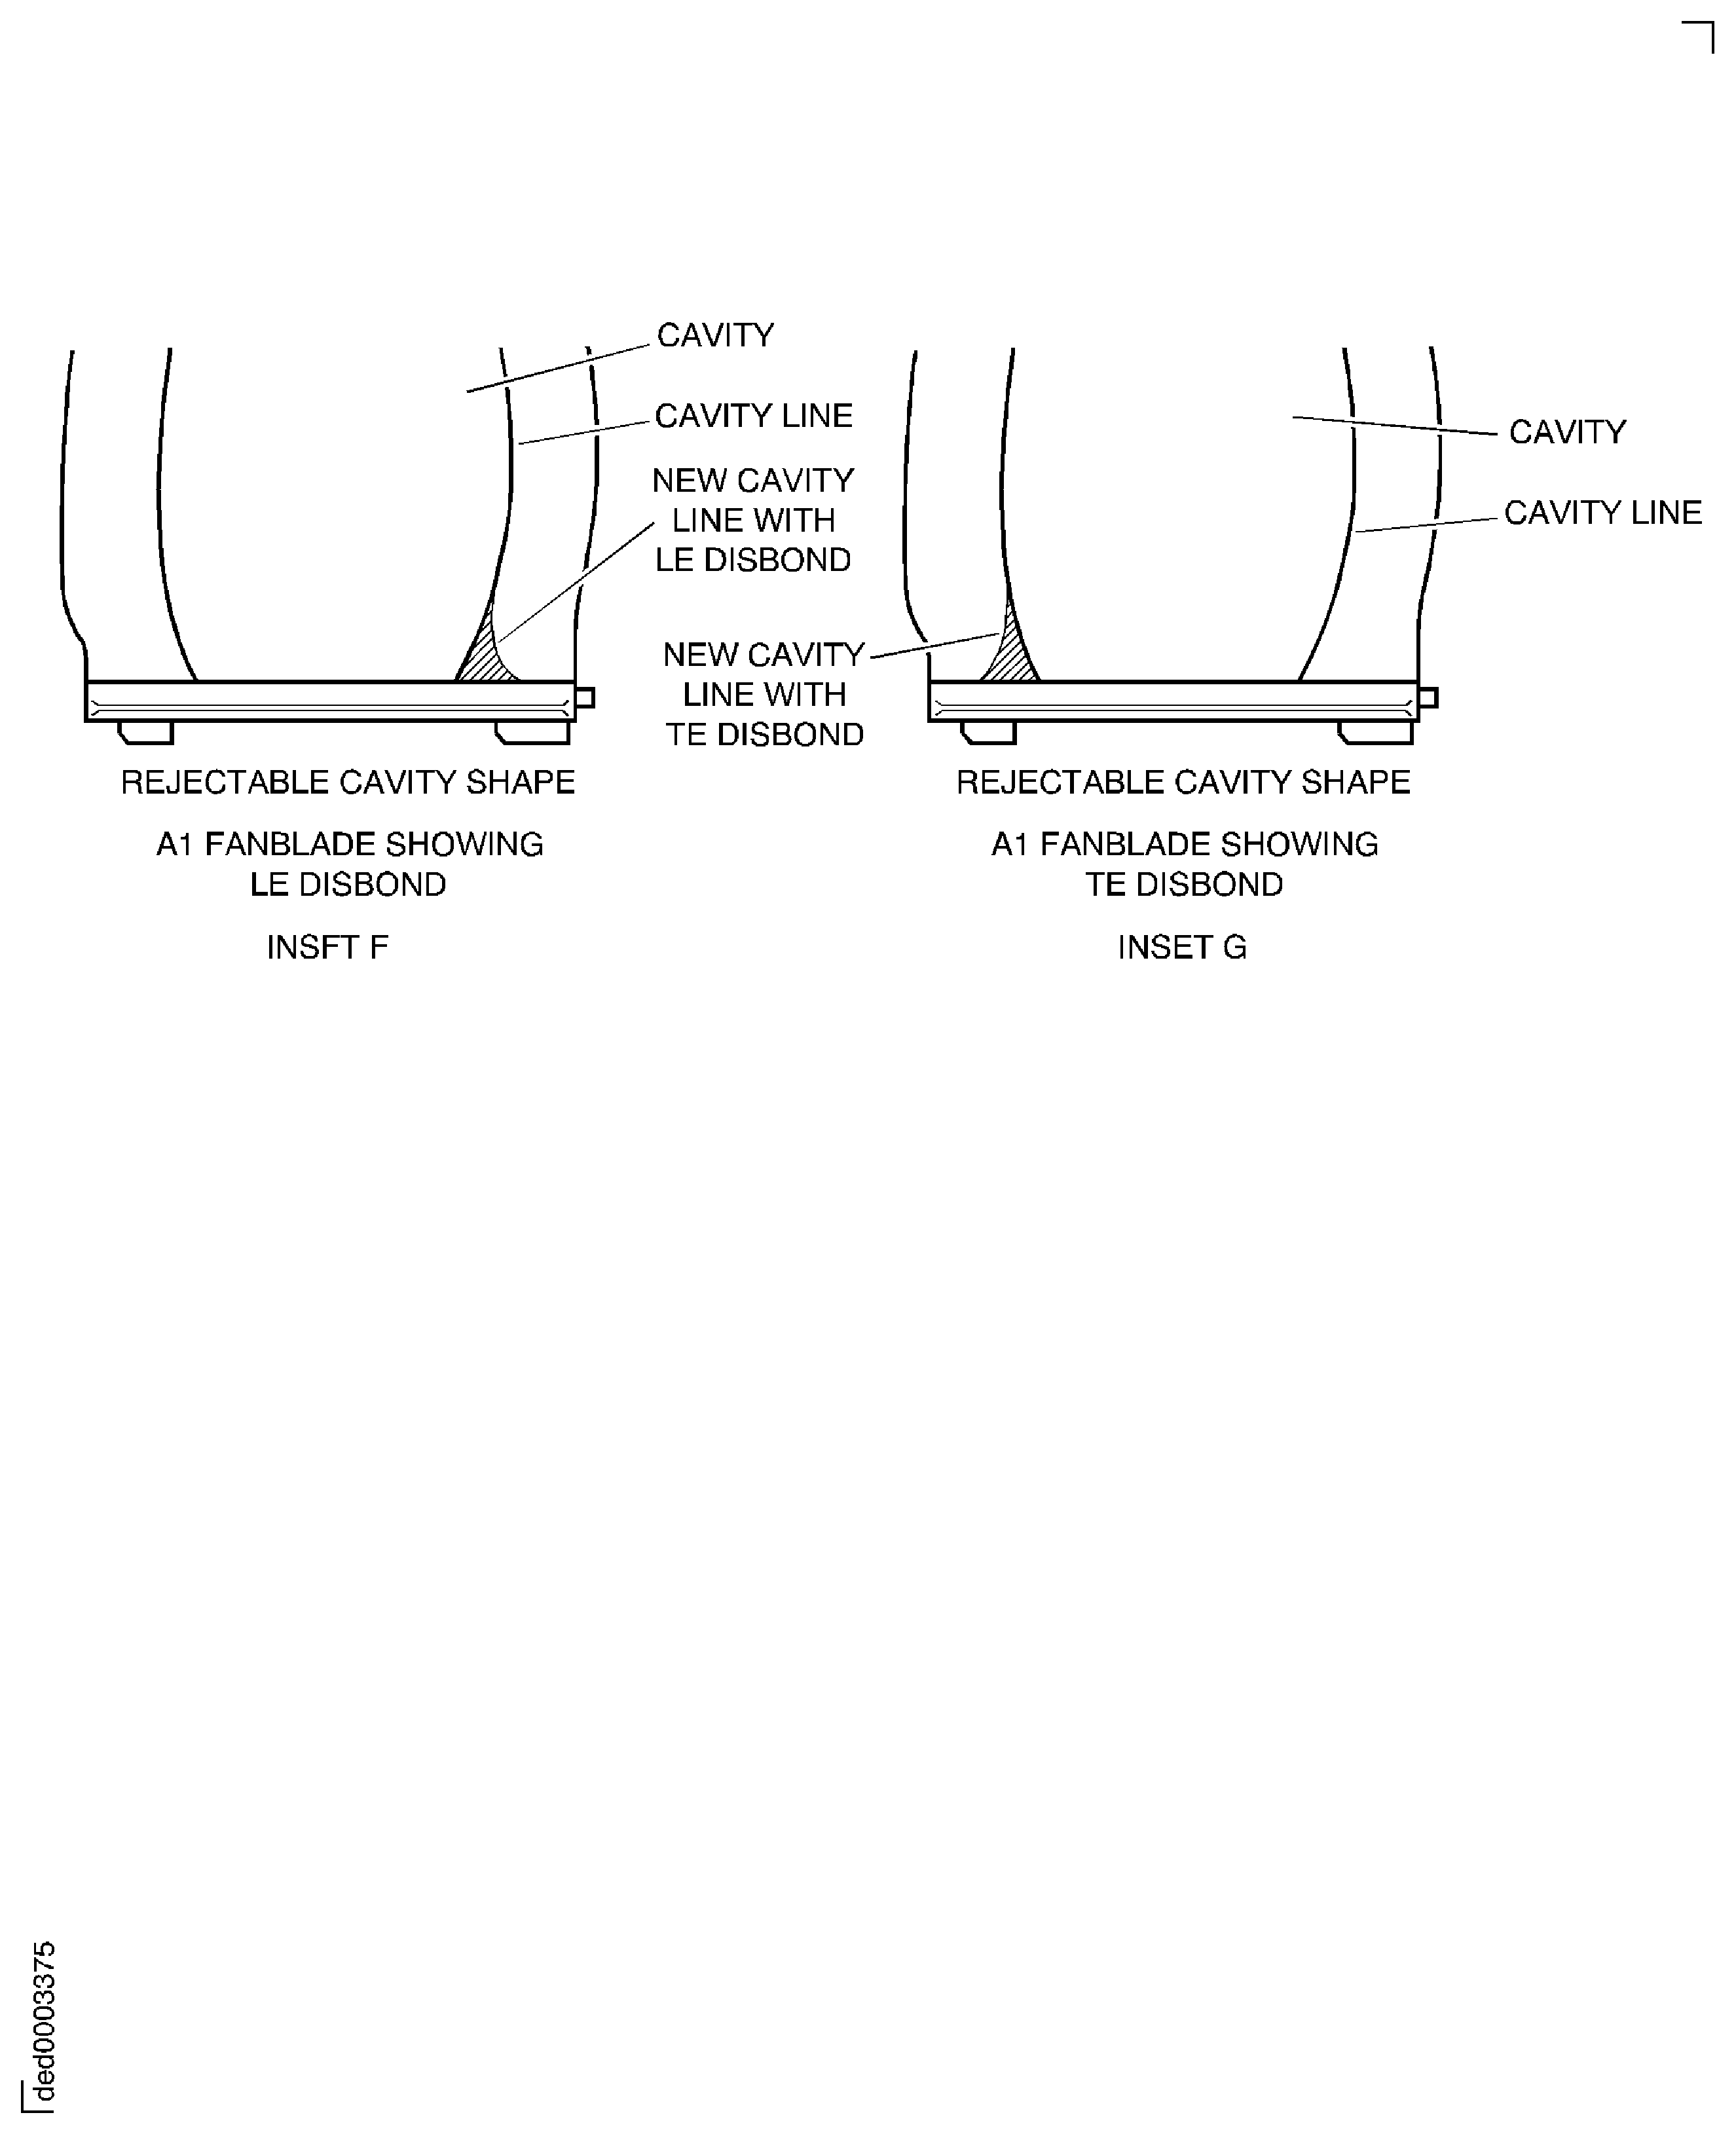
Put the IAE 2R18940 Perspexoverlay 1 off (V2500-A1) or the IAE 2R18941 Perspexoverlay 1 off (V2500-A5) on the airfoil. Compare the shape of the blade cavity with the cavity marked on the overlay. The cavity shape may not align fully with the cavity line marked on the overlay, but it must be the same shape. Movement of the blade cavity parallel to the overlay cavity line is acceptable. Refer to Figure and Figure for acceptable and unacceptable deviations. Because the relative position of the cavity and the external shape is not constant, a positional mismatch of 0.156 in. (4.00 mm) maximum is acceptable.
SUBTASK 72-00-00-270-051 Examine the Airfoil of the LP Compressor Fan Blades
Figure: Fan blade airfoil ultrasonic inspection, calibration of equipment
Fan blade airfoil ultrasonic inspection, calibration of equipment

Figure: Fan blade airfoil ultrasonic inspection
Sheet 1

Figure: Fan blade airfoil ultrasonic inspection
Sheet 2

Figure: Ultrasonic inspection record sheet
Ultrasonic inspection record sheet

