Export Control
EAR Export Classification: Not subject to the EAR per 15 C.F.R. Chapter 1, Part 734.3(b)(3), except for the following Service Bulletins which are currently published as EAR Export Classification 9E991: SBE70-0992, SBE72-0483, SBE72-0580, SBE72-0588, SBE72-0640, SBE73-0209, SBE80-0024 and SBE80-0025.Copyright
© IAE International Aero Engines AG (2001, 2014 - 2021) The information contained in this document is the property of © IAE International Aero Engines AG and may not be copied or used for any purpose other than that for which it is supplied without the express written authority of © IAE International Aero Engines AG. (This does not preclude use by engine and aircraft operators for normal instructional, maintenance or overhaul purposes.).Applicability
All
Common Information
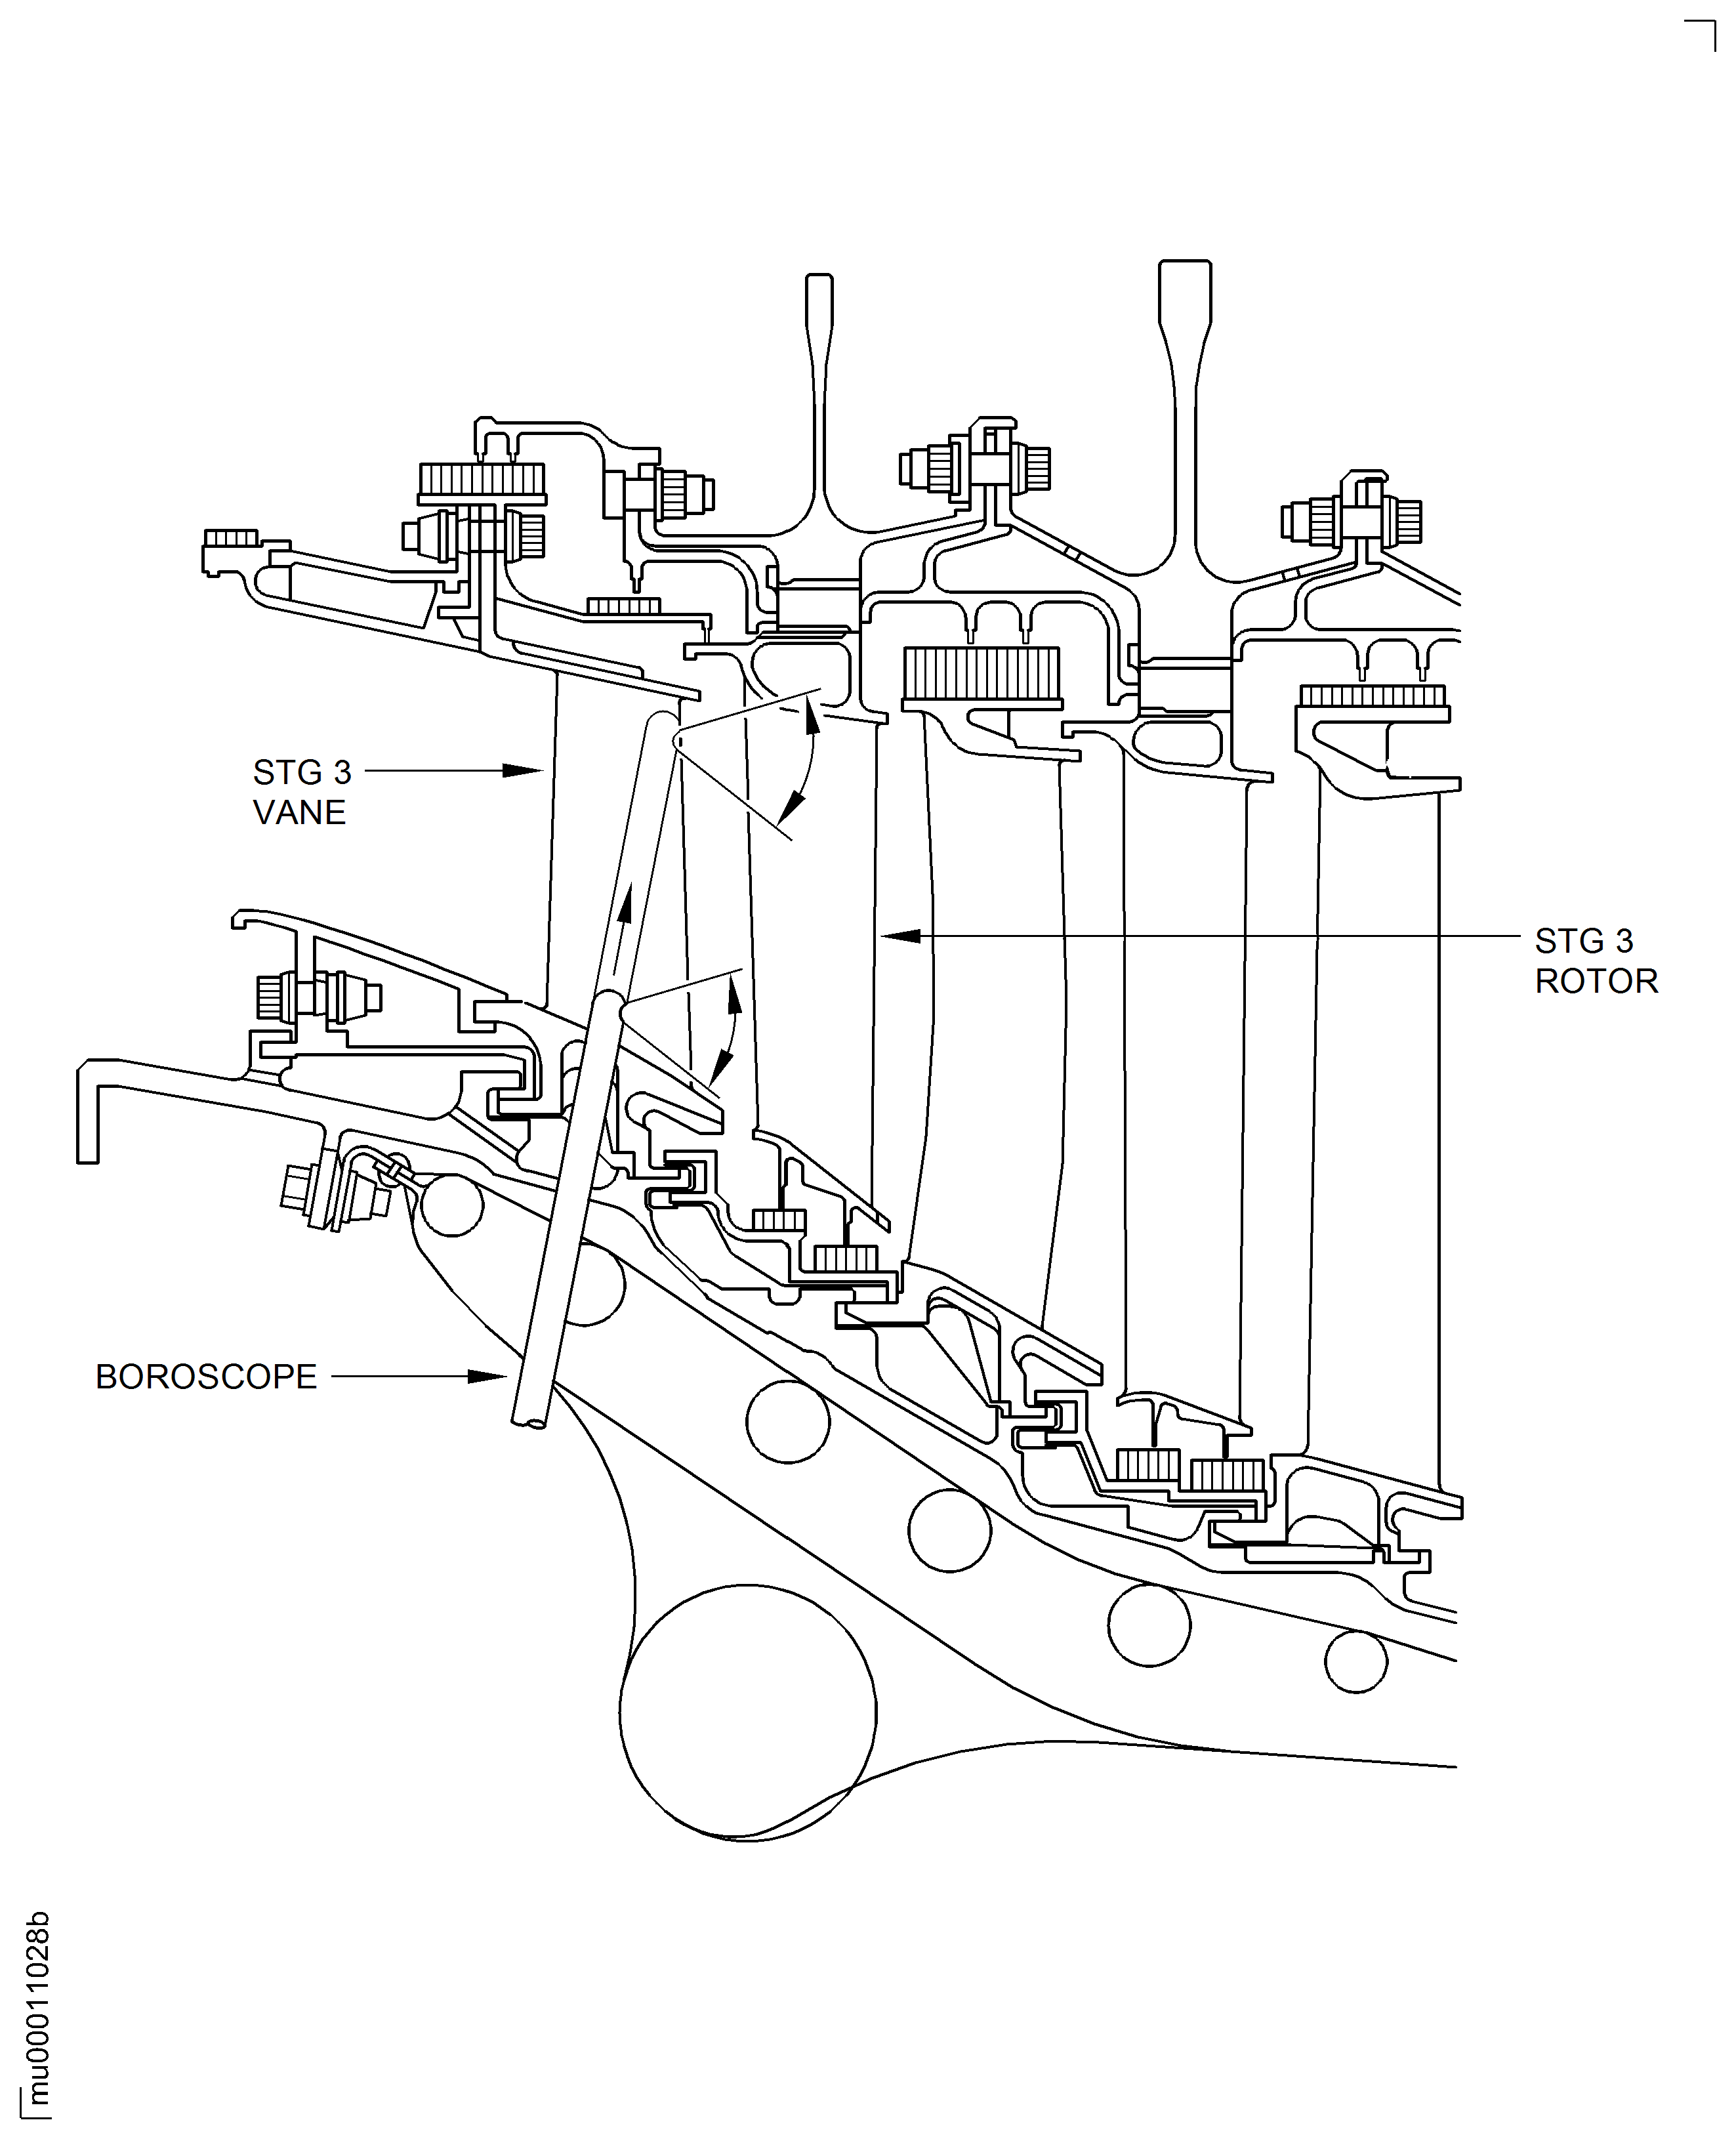
TASK 72-00-00-200-006 Engine General - Examine (Borescope) The LPT Stage 3 Blades and Vanes, Inspection-006
General
This TASK gives the procedure for the borescope inspection of the stage 3 turbine blades and vanes. For the stage 7 turbine blades and vanes, refer to TASK 72-00-00-200-007 (INSPECTION/CHECK-007).
All Fig/item numbers in parentheses in the procedure agree with those used in the EIPC.
A ** following a repair referenced in this inspection indicates that the repair is not yet published in the current revision of this manual and the part must be rejected. Contact IAE for additional information concerning FAA approved data.
For standard torque data and procedures refer to the SPM TASK 70-41-00-400-501.
Assembly tolerances are included in this procedure.
Lubricate all threads and abutment faces of nuts and bolts with CoMat 10-129A ANTI-SEIZE PASTE unless other lubricants are referred to in the procedure.
All parts must be visually examined for damage, corrosion and wear. Any defects that are not identified in the procedure must be referred to IAE.
The practices and processes referred to in the procedure by the TASK numbers are in the SPM.
References
Refer to the SPM for data on these items.
Definition of Damage SPM TASK 70-02-02-350-501
Inspection of Parts, SPM TASK 70-20-00-200-501
Some data on these items is contained in this TASK. For more data on these items refer to the SPM.
Method of Testing for Crack Indications
Chemical Processes
Surface Protection
NOTE
NOTE
Preliminary Requirements
Pre-Conditions
NONESupport Equipment
| Name | Manufacturer | Part Number / Identification | Quantity | Remark |
|---|---|---|---|---|
| IAE 6F10408 Borescope | 0AM53 | IAE 6F10408 | 1 |
Consumables, Materials and Expendables
| Name | Manufacturer | Part Number / Identification | Quantity | Remark |
|---|---|---|---|---|
| CoMat 02-119 LOCKWIRE | LOCAL | CoMat 02-119 | ||
| CoMat 10-129A ANTI-SEIZE PASTE | 71984 | CoMat 10-129A |
Spares
NONESafety Requirements
NONEProcedure
Refer to Figure.
Clean each borescope plug adjacent area before disassembly. Refer to the SPM TASK 70-11-26-300-503.

WARNING
DURING DISASSEMBLY DO NOT BREATHE DUST OF THE LOOSENED BOLTS. PREVENT SKIN AND EYE CONTACT WITH RELEASED DUST. THE DUST CONTAINS NICKEL PARTICLES WHICH CAN POSE A HEALTH HAZARD. BEFORE DISASSEMBLY LUBRICATE ACCESSIBLE BOLTS AND BOLT HEADS, NUTS AND EXPOSED THREADS WITH AN APPROVED, SUITABLE PENETRANT OIL. WEAR A FACE MASK AND GOGGLES. DO NOT REMOVE DUST DEPOSITS WITH COMPRESSED AIR. REMOVE ANY SURFACE DUST PARTICLES WITH A DISPOSABLE DAMP RAG OR SIMILAR. AFTER END OF THIS PROCEDURE CLEAN YOUR HANDS AND EXPOSED SKIN WHERE POSSIBLE.Loosen and remove the two bolts that attach each blanking plug.

WARNING
MAKE SURE THAT THE BLANKING PLUGS ARE SUFFICIENTLY COOL BEFORE REMOVAL, BECAUSE THE TEMPERATURE STAYS HIGH AFTER ENGINE SHUT DOWN.Remove the two blanking plugs from the LP turbine.
SUBTASK 72-00-00-020-063 Remove the Borescope Blanking Plugs

WARNING
DO NOT LET UNWANTED MATERIAL GET IN TO THE BORESCOPE LOCATION HOLES OR BOLT HOLES.
CAUTION
DO NOT PUT THE BORESCOPE PROBE MORE THAN 4.9 INCH (124 MM) INTO THE LP TURBINE.Refer to Figure.
Install the IAE 6F10408 Borescope.
SUBTASK 72-00-00-420-064 Install the Borescope Probe
Refer to Figure.
More than in Step
Examine the surface in area A1.
More than in Step
Examine the surface in area A2.
More than in Step
Examine the surface in area A3.1.
More than in Step
Examine the surface in area A4.1.
More than in Step
Examine the surface in area A3.2 and A4.2.
More than in Step
Examine the surface in area A3.3.
Other than in Step
Examine the surface in area A5 and A6.
More than in Step
Examine the surface in area A7.
More than in Step
Examine the surface in area A8.
More than in Step
Examine the surface in area A9.
SUBTASK 72-00-00-220-083 Examine the Stage 3 Turbine Blades for Nicks and Pits
Refer to Figure.
More than in Step
Examine the surface in area A1.
More than in Step
Examine the surface in area A2.
More than in Step
Examine the surface in area A3.1.
More than in Step
Examine the surface in area A4.1.
More than in Step
Examine the surface in area A3.2 and A4.2.
More than in Step
Examine the surface in area A3.3.
Other than in Step
Examine the surface in area A5 and A6.
More than in Step
Examine the surface in area A7.
More than in Step
Examine the surface in area A8.
More than in Step
Examine the surface in area A9.
SUBTASK 72-00-00-220-084 Examine the Stage 3 Turbine Blades for Dents
Refer to Figure.
SUBTASK 72-00-00-220-085 Examine the Stage 3 Turbine Blades for Tears
Other than in Step
Examine the stage 3 turbine blades in any area for build-up of deposits.
SUBTASK 72-00-00-220-087 Examine the Stage 3 Turbine Blades for Build-Up of Deposits
Refer to Figure.
SUBTASK 72-00-00-220-161 Visually Examine the Stage 3 Blades for Unlatching
Refer to Figure.
Reject
Shingled
Examine the stage 3 turbine blades for shingling
SUBTASK 72-00-00-220-001 Visually Examine the Stage 3 Blades for Shingling
Refer to Figure.
More than in Step
NOTE
This inspection is only applicable for brazed turbine vane clusters.NOTE
Inspection over the whole circumference (360 degree all around) is not requiredSeparated cluster bonds
More than in Step
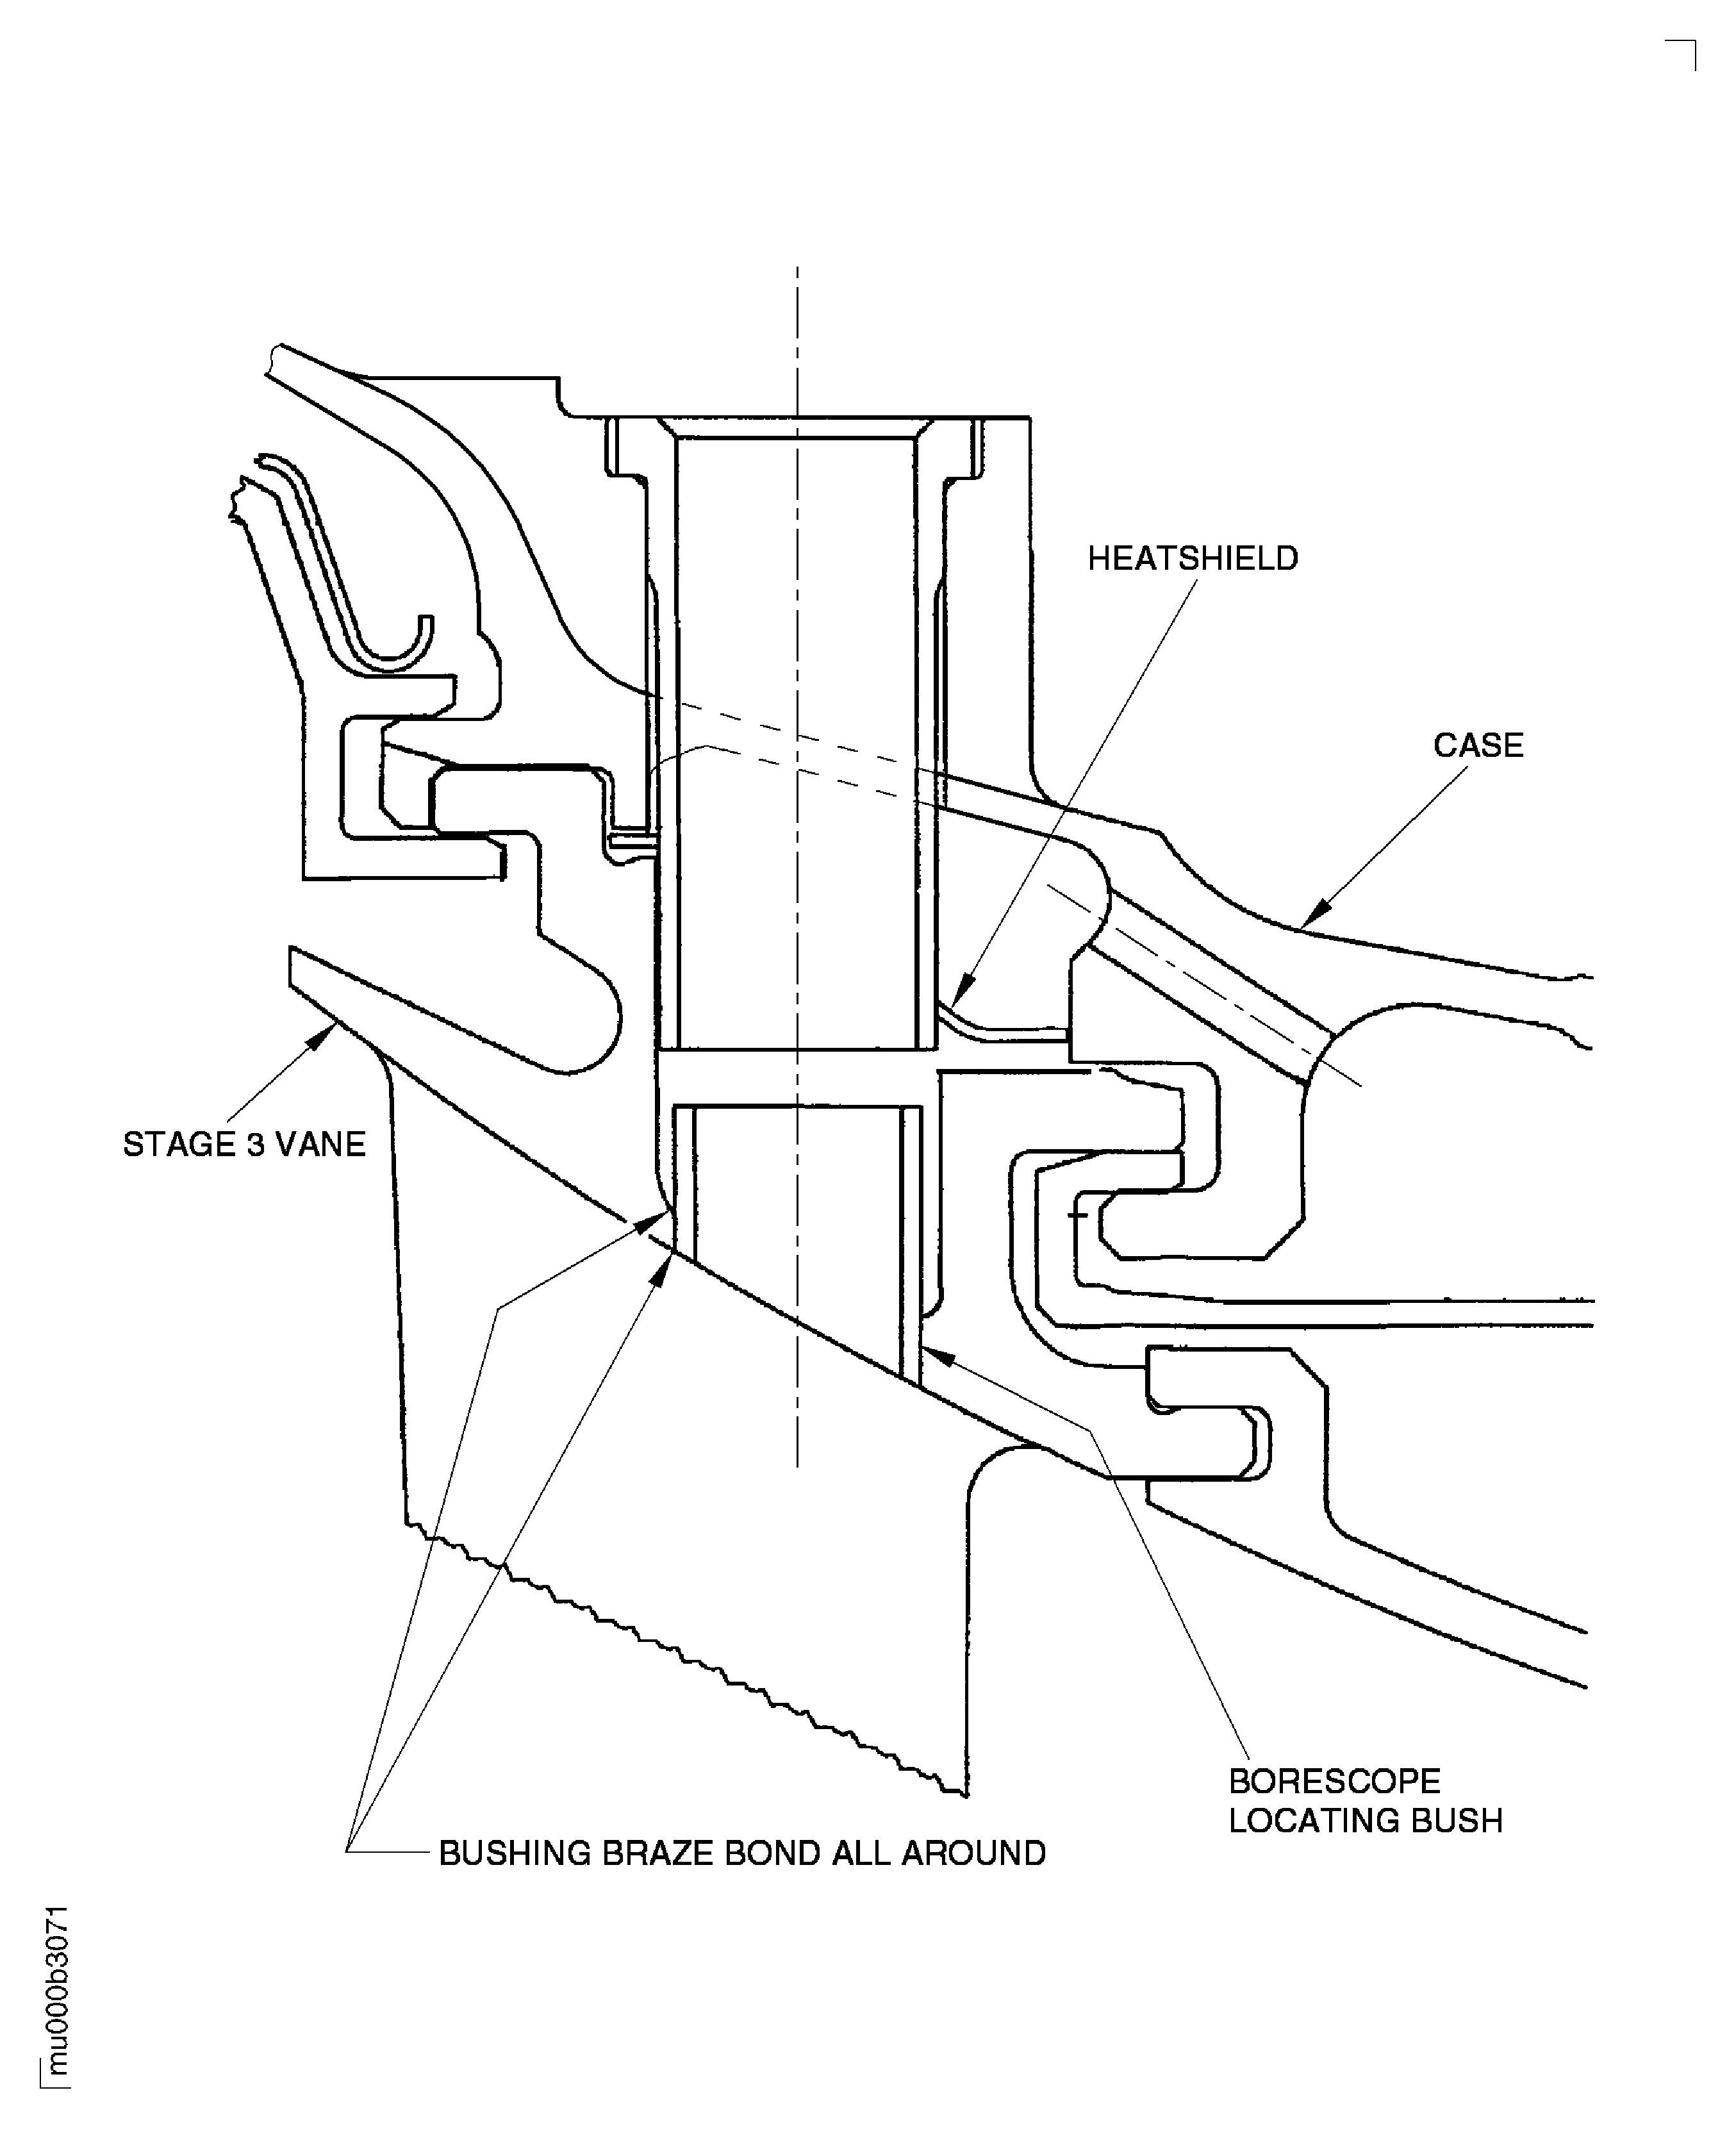
Borescope locating bushing
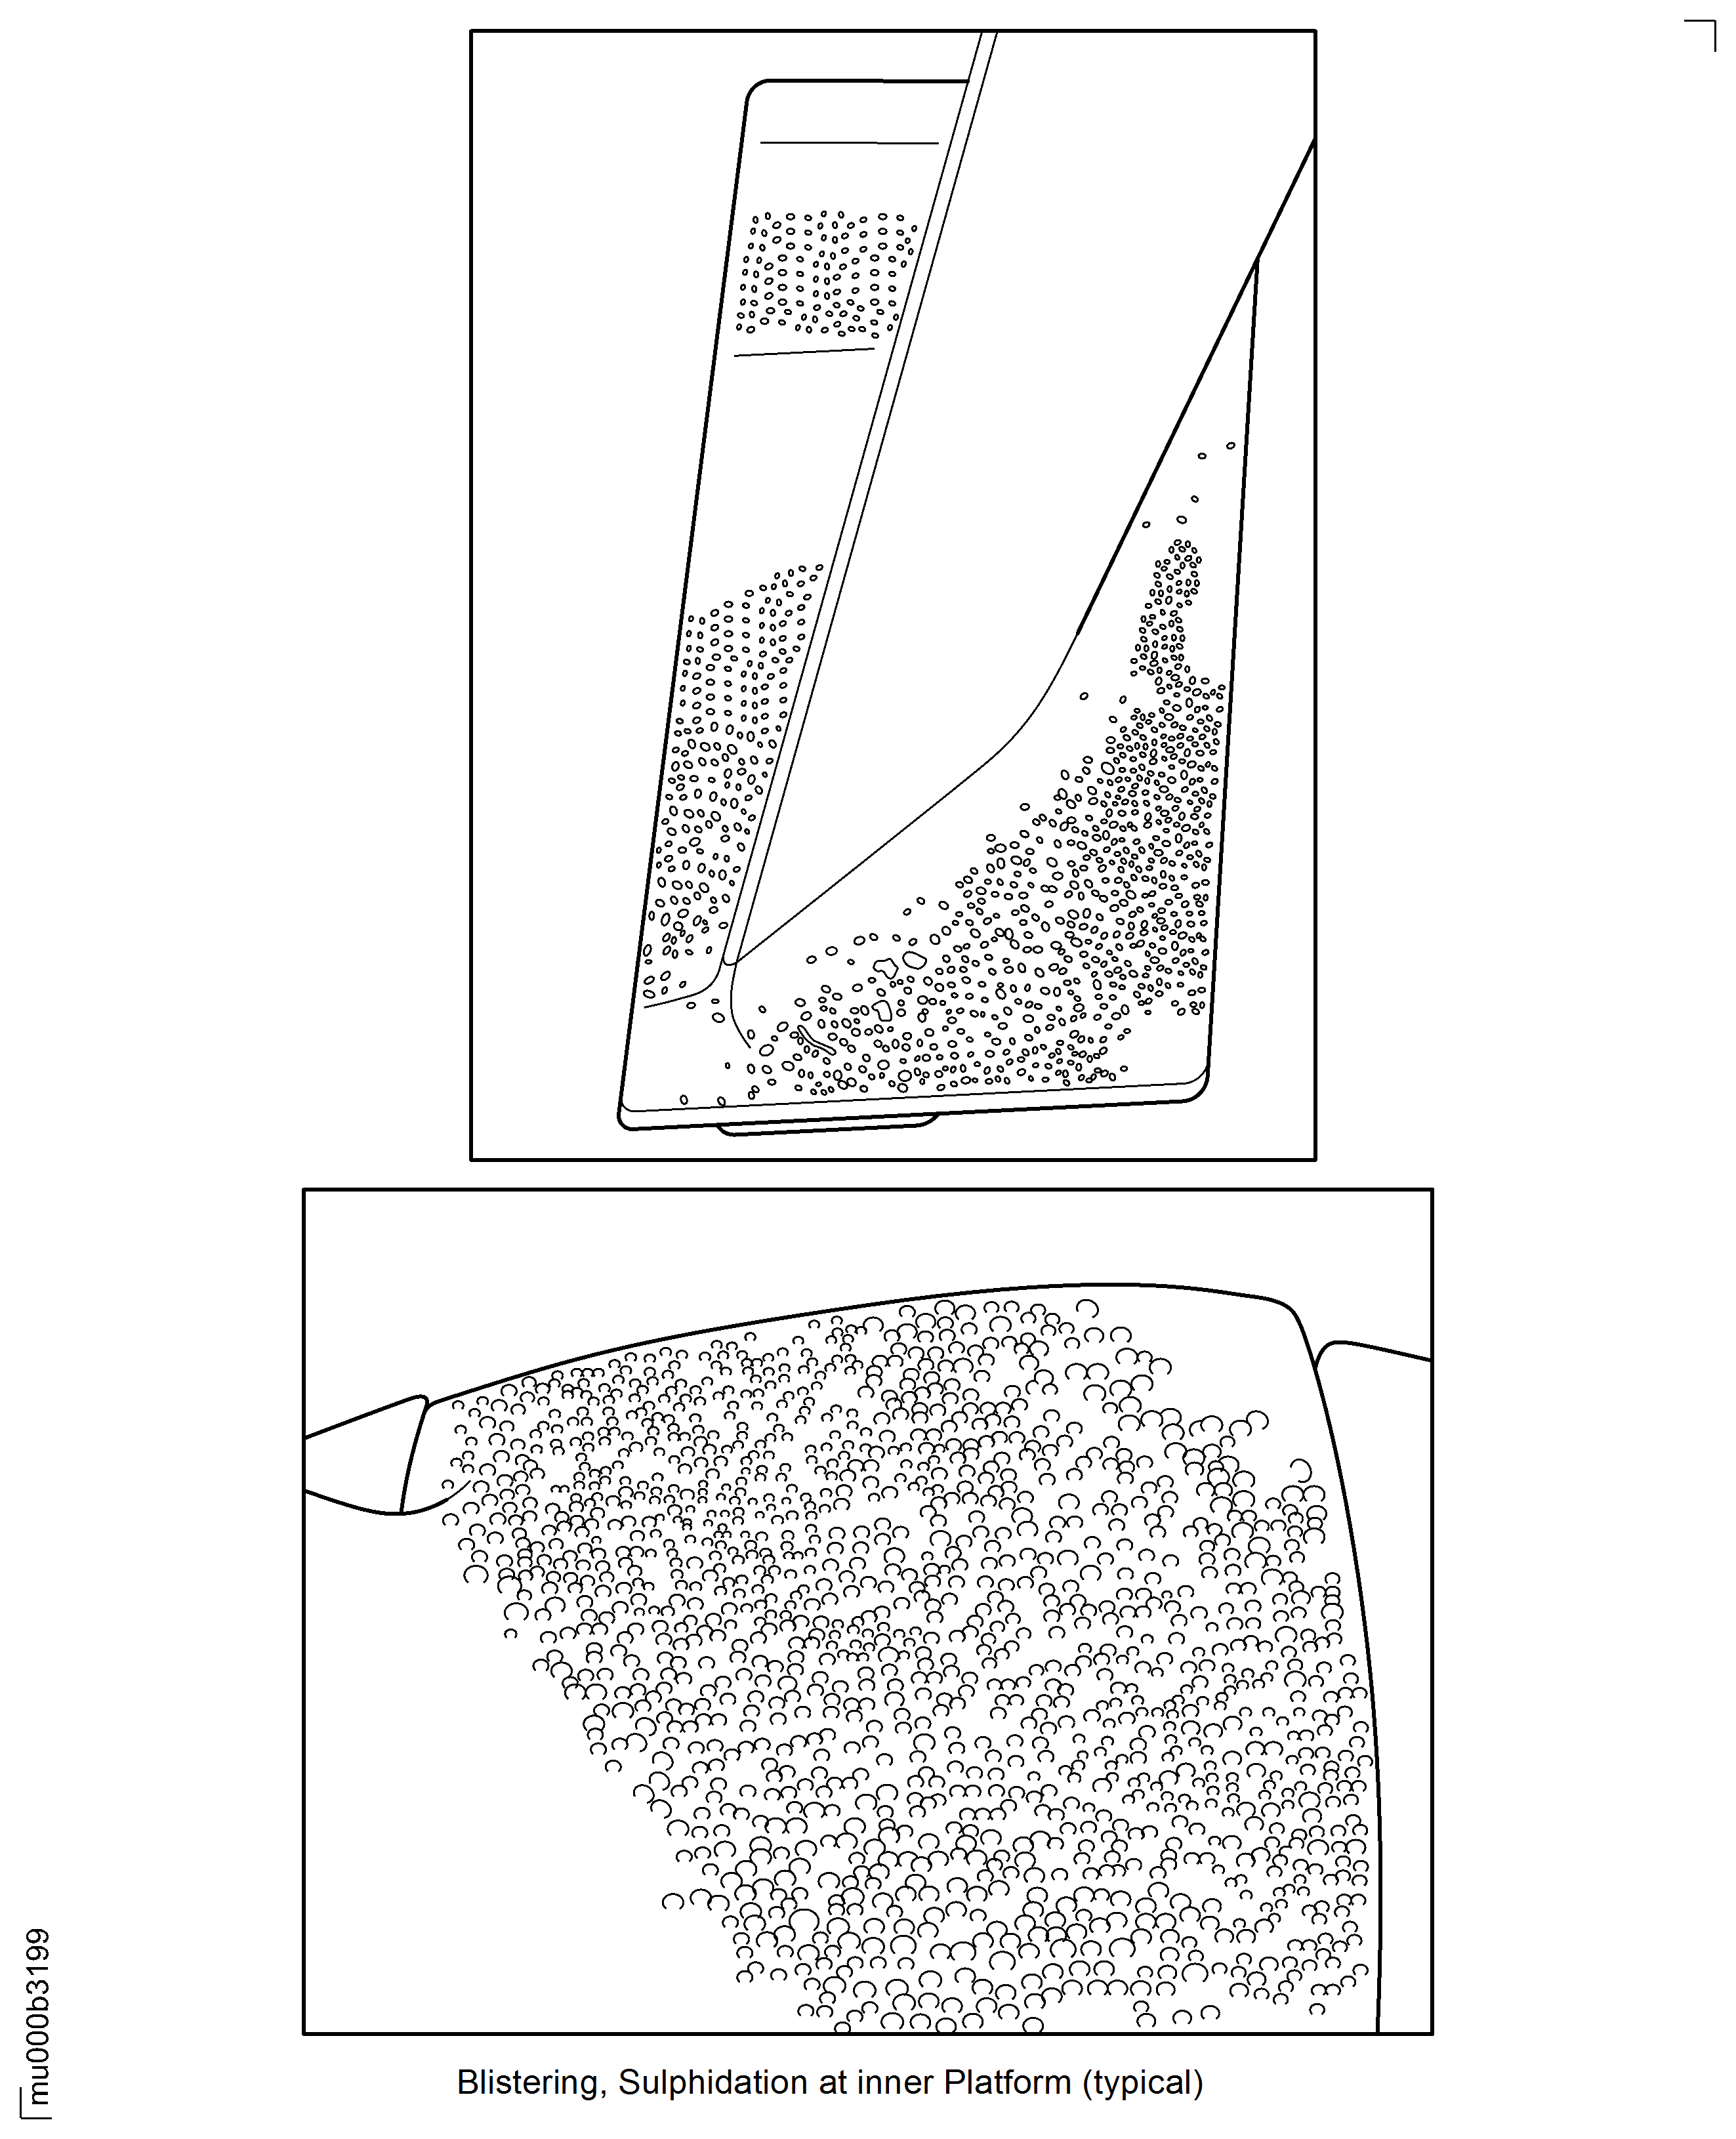
SUBTASK 72-00-00-220-157 Examine the Stage 3 Turbine Vane
Refer to Figure.

CAUTION
MAKE SURE THAT THE SLEEVE FLANGED BUSHINGS DO NOT FALL OUT. IF THE PARTS FALL THEY WILL BE DAMAGED.Clean the blanking plugs and the sleeve flanged bushings. Refer to TASK 72-50-10-100-000 (CLEANING-000).
Examine the blanking plugs and the sleeve flanged bushings. Refer to TASK 72-50-10-200-000 (INSPECTION/CHECK-000).
Install each sleeve flanged bushing LPT Case And Rotor Assembly(72-50-10,01-400).
NOTE
Usually one spacer plate is necessary.Install each blanking plug together with its applicable spacer plate(s) LPT Case And Rotor Assembly (72-50-10,01-410). The spacer plate makes sure that the blanking plug has continuous surface with the stage 3 vane outer platform. A maximum tolerance of minus 0.024 in. (0.6 mm) against the vane platform is permitted.

WARNING
DO NOT GET ANTI-SEIZE PASTE ON YOUR SKIN WHEN YOU LUBRICATE THREADS AND ABUTMENT FACES OF NUTS AND BOLTS. WEAR PROTECTIVE GLOVES.Apply CoMat 10-129A ANTI-SEIZE PASTE to the four bolts.
Install the four bolts LPT Case And Rotor Assembly (72-50-10,01-430) and torque to 62 to 72 lbfin (7.0 to 8.1 Nm). Safety with CoMat 02-119 LOCKWIRE.
Install the blanking plugs and the sleeve flanged bushings.
SUBTASK 72-00-00-420-065 Install the Two Blanking Plugs (72-50-10, 01-420) after Borescope Inspection
Figure: LPT Borescope Inspection
LPT Borescope Inspection

LPT Borescope Inspection

Figure: Stage 3 Turbine Blades Borescope Inspection
Stage 3 Turbine Blades Borescope Inspection

Stage 3 Turbine Blades Borescope Inspection

Figure: Stage 3 Turbine Blades - Borescope Inspection
Stage 3 Turbine Blades - Borescope Inspection

Stage 3 Turbine Blades - Borescope Inspection

Stage 3 Turbine Blades - Borescope Inspection

Stage 3 Turbine Blades - Borescope Inspection

Stage 3 Turbine Blades - Borescope Inspection

Stage 3 Turbine Blades - Borescope Inspection

Stage 3 Turbine Blades - Borescope Inspection

Stage 3 Turbine Blades - Borescope Inspection

Stage 3 Turbine Blades - Borescope Inspection

Figure: Stage 3 Turbine Blades Borescope Inspection
Stage 3 Turbine Blades Borescope Inspection

Figure: Stage 3 Turbine Blades Borescope Inspection
Stage 3 Turbine Blades Borescope Inspection

Figure: Stage 3 Turbine Vanes Borescope Inspection
Stage 3 Turbine Vanes Borescope Inspection

