TASK 72-31-12-200-002 LPC Fan Disk - Examine The LPC Fan Disk

DMC:V2500-A0-72-31-1201-00A-310A-C|Issue No:002.00|Issue Date:2015-08-01

Export Control

EAR Export Classification: Not subject to the EAR per 15 C.F.R. Chapter 1, Part 734.3(b)(3), except for the following Service Bulletins which are currently published as EAR Export Classification 9E991: SBE70-0992, SBE72-0483, SBE72-0580, SBE72-0588, SBE72-0640, SBE73-0209, SBE80-0024 and SBE80-0025.

Copyright

© IAE International Aero Engines AG (2001, 2014 - 2021) The information contained in this document is the property of © IAE International Aero Engines AG and may not be copied or used for any purpose other than that for which it is supplied without the express written authority of © IAE International Aero Engines AG. (This does not preclude use by engine and aircraft operators for normal instructional, maintenance or overhaul purposes.).

Applicability

All

Common Information

TASK 72-31-12-200-002 LPC Fan Disk - Examine The LPC Fan Disk

Effectivity

FIG/ITEM

PART NO.

01-200

5A0269

01-310

5A0271

01-200

5A0337

01-310

5A0338

01-200

5A1757

01-310

5A1758

01-200

5A1948

01-310

5A1949

General

This TASK gives the procedure for the inspection of the fan stage 1 disk assembly. For the other LP compressor disk and location ring parts, refer to TASK 72-31-12-200-000 (INSPECTION/CHECK-000).

Fig/item numbers in parentheses in the procedure agree with those used in the IPC.

The policy that is necessary for inspection is given in the SPM TASK 70-20-00-200-501.

All the parts must be cleaned before any part is examined. Refer to TASK 72-31-12-100-000 (CLEANING-000).

All the parts must be visually examined for damage, corrosion and wear. Any defects that are not identified in the procedure must be referred to IAE.

The procedure for those parts which must have a crack test is given in Step. Do the test before the part is visually examined.

Do not discard any part until you are sure there are no repairs available. Refer to the instructions in Repair before a discarded part is used again or oversize parts are installed.

Parts which should be discarded can be held although no repair is available. The repair of a discarded part could be shown to be necessary at a later date.

All the parts must be examined to make sure that all the repairs have been completed satisfactorily.

The practices and processes referred to in the procedure by the TASK numbers are in the SPM.

References

Refer to the SPM for data on these items.

Definition of Damages, the SPM TASK 70-02-02-350-501

Inspection of Parts, the SPM TASK 70-20-00-200-501

Some data on these items are contained in this TASK. For more data on these items refer to the SPM.

Method of Testing for Crack Indications

Chemical Processes

Surface Protection

NOTE

5A0271, 5A0338, 5A1758 and 5A1949 are part of the stage 1 fan disk assembly 5A0269, 5A0337, 5A1757 and 5A1948 respectively and correspond to the instructions for continued airworthiness in Time Limit Manual, publication reference NO. T-V2500-1IA.

NOTE

Special tools are identified in the procedure by the tool primary number.

Preliminary Requirements

Pre-Conditions

NONE

Support Equipment

NameManufacturerPart Number / IdentificationQuantityRemark
Fluorescent Penetrant Inspection EquipmentLOCALFluorescent penetrant inspection equipment
IAE 2J12609 Sling, FP inspection0AM53IAE 2J126091
IAE 2J12612 Fixture, Turnover0AM53IAE 2J126121
IAE 2J12613 Clamp, fixture0AM53IAE 2J126131

Consumables, Materials and Expendables

NONE

Spares

NONE

Safety Requirements

NONE

Procedure

    1. SUBTASK 72-31-12-230-054 Examine the Fan Stage 1 Disk Assembly (01-200) for Cracks

    2. Refer to Figure and Figure.

    3. Clean the parts. Refer to TASK 72-31-12-100-000 (CLEANING-000).

      1. Do the test for cracks on the part that is given below. Use the applicable penetrant inspection procedure.

        PART IDENT

        TASK/SUBTASK

        Fan stage 1 disk assembly

      2. Special attention should be given to the following areas during the Fluorescent Penetrant Inspection.

      3. Front flange, location 4, Refer to Figure.

      4. Inner diameter, location 7, Refer to Figure.

      5. Front face, location 8, refer to Figure.

      6. Rear face, location 9, Refer to Figure.

      7. Rear flange, location 19, Refer to Figure.

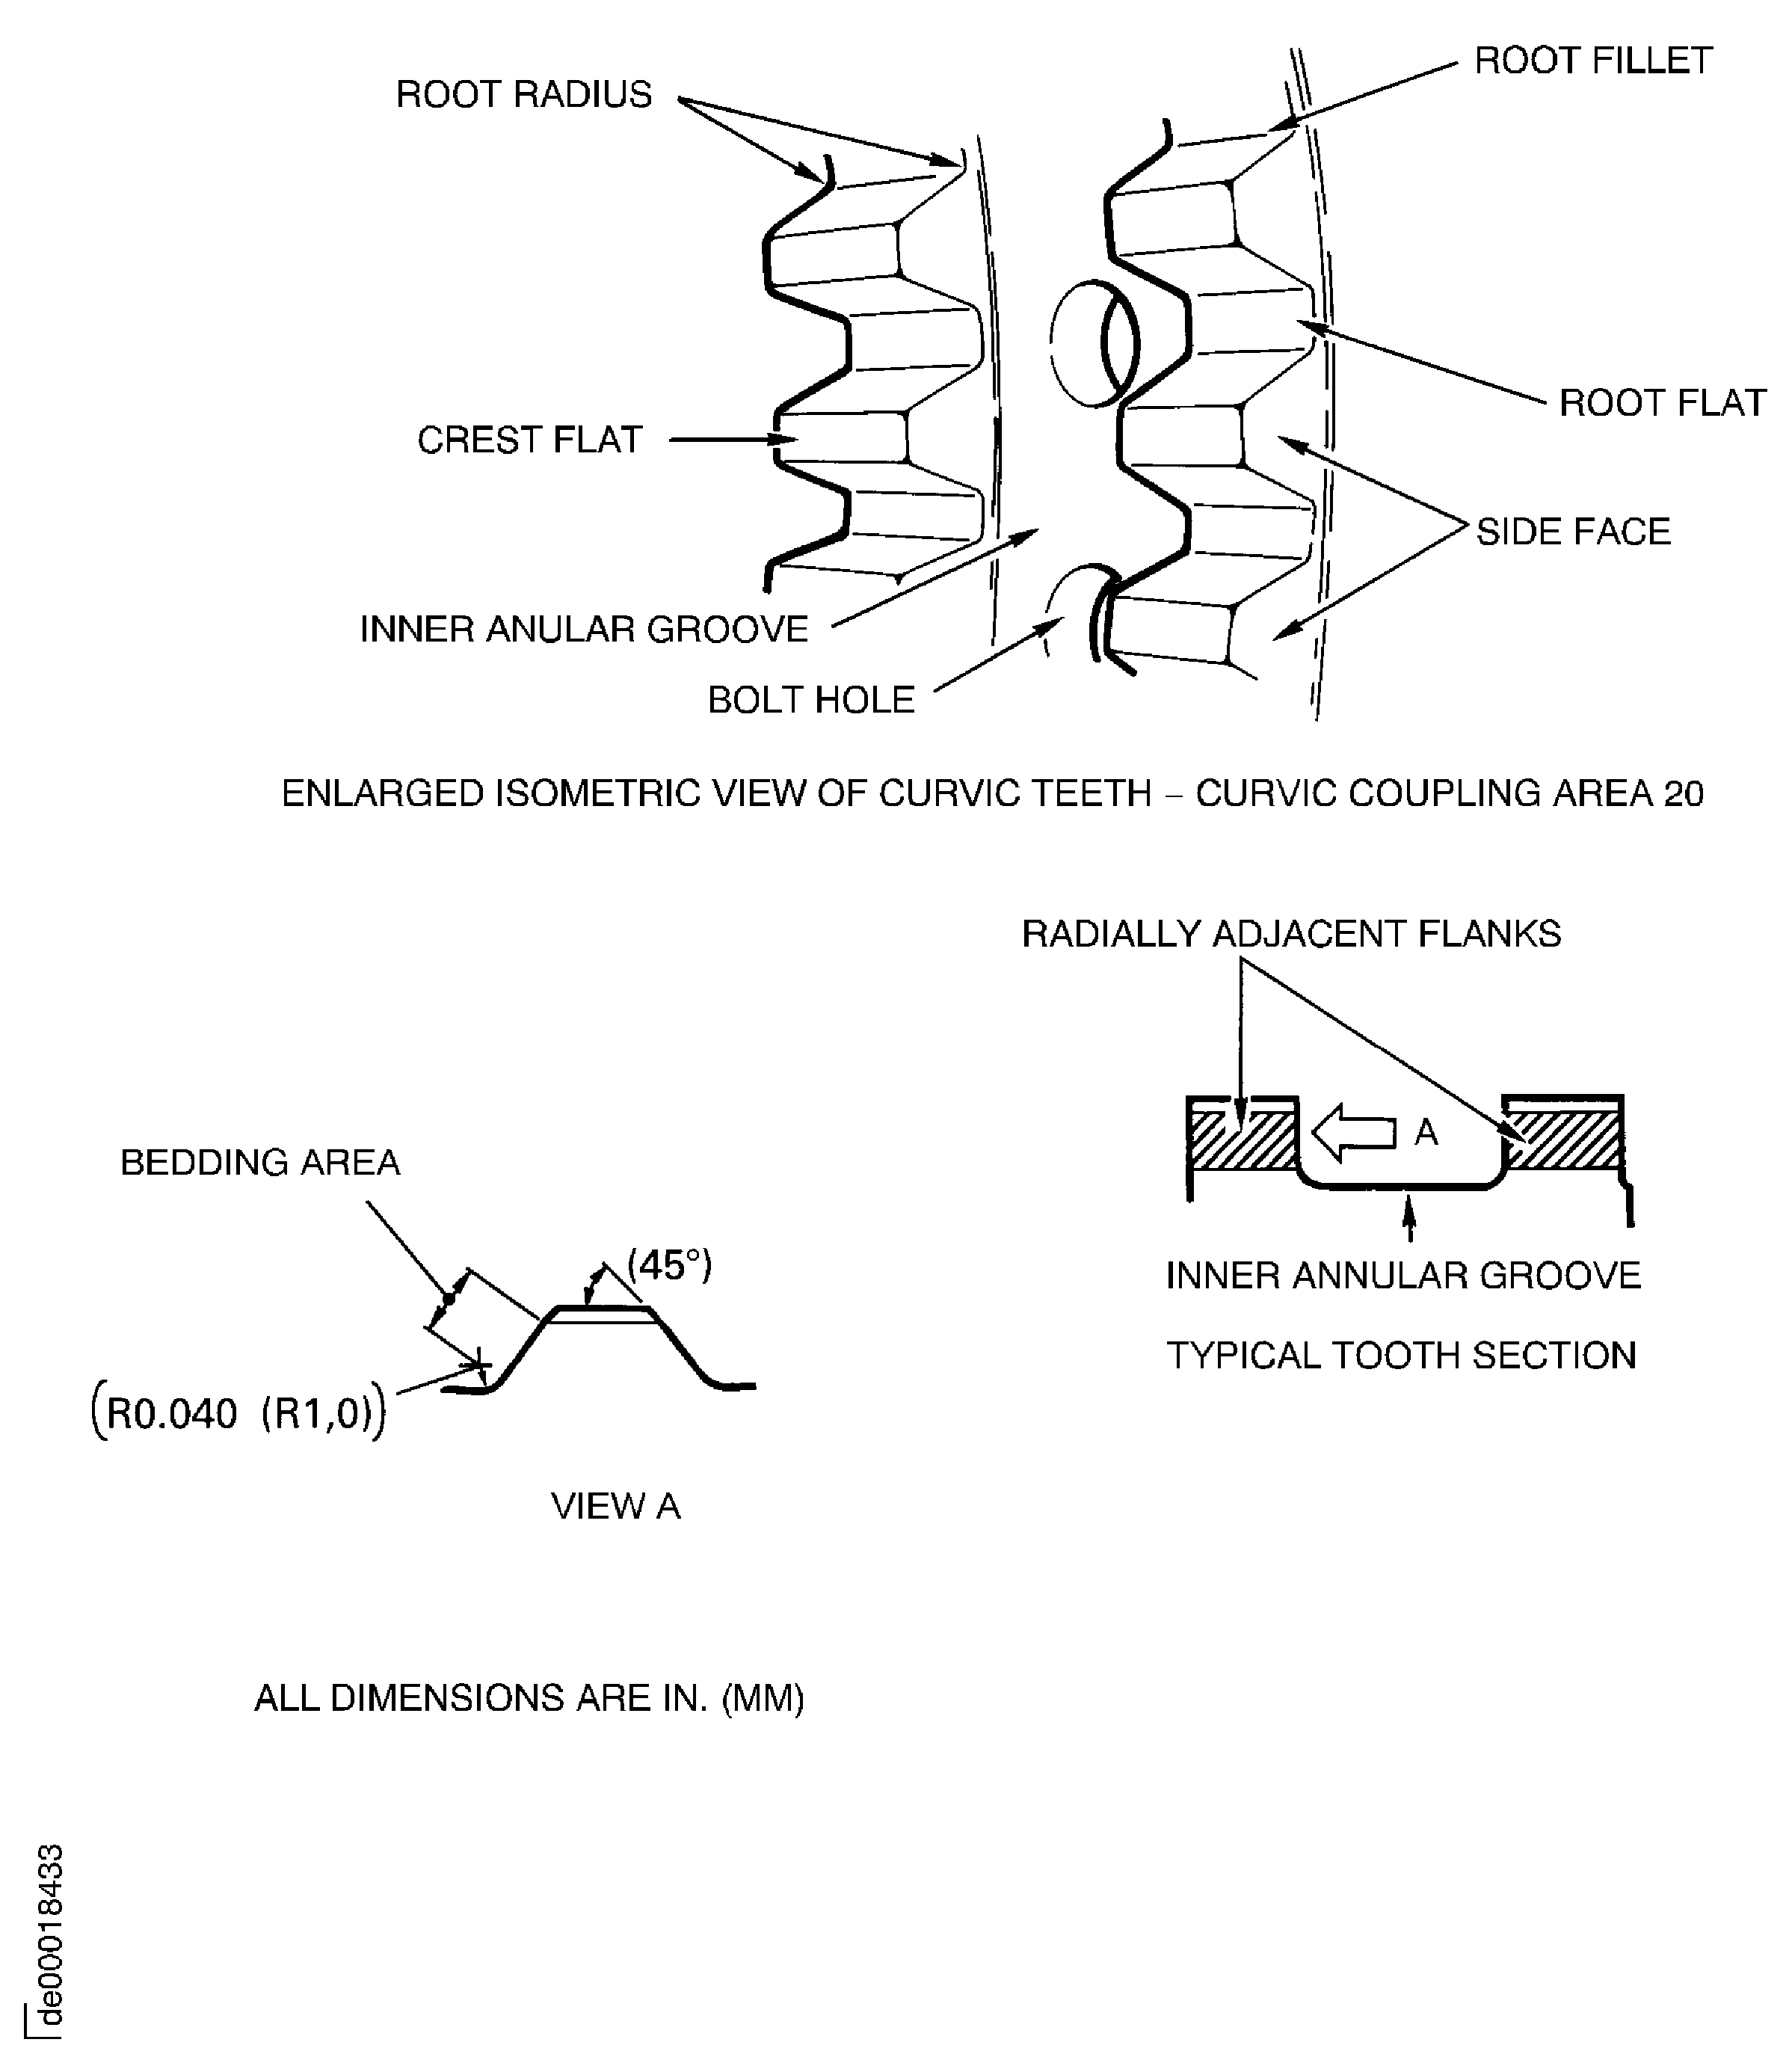
      8. Curvic Coupling area, location 20, Refer to Figure and Figure.

        1. Zone A (two positions each dovetail slot), Refer to Figure.

          1. Cracked

          2. Reject

    1. SUBTASK 72-31-12-220-060 Examine the Fan Stage 1 Disk Assembly (01-200) Dovetail Sides

    2. Refer to Figure.

      1. Examine the dovetail sides at location 1.

        1. Galled.

          1. Not more than 0.003 in. (0.076 mm) in depth

          2. Accept

          1. More than in Step

          2. Reject

        1. Scored

        2. Repair, VRS1152 TASK 72-31-12-300-001 (REPAIR-001)

        1. Missing dry film lubricant

        2. Repair, VRS1154 TASK 72-31-12-300-011 (REPAIR-011)

    1. SUBTASK 72-31-12-220-061 Examine the Fan Stage 1 Disk Assembly (01-200) Curvic Teeth

    2. Refer to Figure and Figure.

      1. Examine the curvic teeth at location 2.

        1. Galled

        2. Repair, VRS1155 TASK 72-31-12-300-005 (REPAIR-005)

        1. Dented

        2. Repair, VRS1155 TASK 72-31-12-300-005 (REPAIR-005)

        1. Corrosion pitting

          1. General corrosion pitting of tooth crest flats, root flats, root fillets and curvic side faces excluding working flanks not more than 0.005 in. (0.12 mm) in depth

          2. Accept

          1. More than 0.005 in. (0.12 mm) in depth

          2. Reject

          1. Isolated pits not more than 0.008 in. (0.20 mm) deep on tooth crest flats

          2. Accept

          1. More than 0.008 in. (0.20 mm) in depth

          2. Reject

          1. Light staining only, working flanks

          2. Accept

          1. More than in Step

          2. Reject

    1. SUBTASK 72-31-12-220-062 Examine the Fan Stage 1 Disk Assembly (01-200) Bolt Holes

    2. Refer to Figure.

      1. Examine the bolt holes at location 3.

        1. Burred

        2. Repair, VRS1152 TASK 72-31-12-300-001 (REPAIR-001)

        1. Scored

        2. Repair, VRS1152 TASK 72-31-12-300-001 (REPAIR-001)

    1. SUBTASK 72-31-12-220-063 Examine the Fan Stage 1 Disk Assembly (01-200) Front Flange

    2. Refer to Figure.

      1. Examine the front flange at location 4.

        1. Burred

        2. Repair, VRS1152 TASK 72-31-12-300-001 (REPAIR-001)

        1. Nicked, dented, scratched amd scored.

          1. Not more than 0.002 in. (0.05 mm) in depth and there is no high metal

          2. Accept

          1. Other than in Step

          2. Repair, VRS1152 TASK 72-31-12-300-001 (REPAIR-001)

    1. SUBTASK 72-31-12-220-064 Examine the Fan Stage 1 Disk Assembly (01-200) Flange Diameter

    2. Refer to Figure.

      1. Examine the diameter at location 0103.

        1. Nicked, dented, scratched and scored.

          1. Not more than 0.002 in. (0.05 mm) in depth and there is no high metal

          2. Accept

          1. Other than in Step

          2. Repair, VRS1152 TASK 72-31-12-300-001 (REPAIR-001)

        1. Worn

          1. If the diameter is between 13.9001 and 13.9051 in. (353.062 and 353.190 mm)

          2. Accept

          1. Less than Step

          2. Repair, VRS1147 TASK 72-31-12-300-012 (REPAIR-012)

          3. Write down the dimension of the diameter.

    1. SUBTASK 72-31-12-220-065 Examine the Fan Stage 1 Disk Assembly (01-200) Hub

    2. Refer to Figure.

      1. Examine the inner wall at location 6.

        1. Nicked

        2. Repair, VRS1152 TASK 72-31-12-300-001 (REPAIR-001)

        1. Scored

        2. Repair, VRS1152 TASK 72-31-12-300-001 (REPAIR-001)

      1. Examine the inner diameter at location 7.

        1. Nicked

        2. Repair, VRS1152 TASK 72-31-12-300-001 (REPAIR-001)

        1. Scored

        2. Repair, VRS1152 TASK 72-31-12-300-001 (REPAIR-001)

    1. SUBTASK 72-31-12-220-066 Examine the Fan Stage 1 Disk Assembly (01-200) Front and Rear Face

    2. Refer to Figure.

      1. Examine the front face at location 8, and the rear face at location 9.

        1. Nicked, dented, scratched and scored.

          1. Not more than 0.002 in. (0.05 mm) in depth and there is no high metal

          2. Accept

          1. Other than in Step

          2. Repair, VRS1152 TASK 72-31-12-300-001 (REPAIR-001)

        1. Galled

        2. Repair, VRS1152 TASK 72-31-12-300-001 (REPAIR-001)

    1. SUBTASK 72-31-12-220-067 Examine the Fan Stage 1 Disk Assembly (01-200) Shank Nuts

    2. Refer to Figure.

      1. Examine the shank nuts at location 10.

        1. Loose

        2. Repair, VRS1157 TASK 72-31-12-300-007 (REPAIR-007)

        1. Damaged

        2. Repair, VRS1157 TASK 72-31-12-300-007 (REPAIR-007)

      1. Do the torque check for reuse of the shank nuts. Refer to the SPM TASK 70-42-01-400-501.

        1. If the locking torque is between 6.5 and 60 lbfin (0.735 and 6.780 Nm)

        2. Accept

        1. Other than in Step

        2. Repair, VRS1157 TASK 72-31-12-300-007 (REPAIR-007)

    1. SUBTASK 72-31-12-220-068 Examine the Fan Stage 1 Disk Assembly (01-200) Bonding

    2. Refer to Figure.

      1. Examine the bonding to washer plates at location 11.

        1. Peeled

        2. Repair, VRS1159 TASK 72-31-12-300-008 (REPAIR-008)

      1. Examine the bonding to rear ramp at location 12.

        1. Peeled

        2. Repair, VRS1164 TASK 72-31-12-300-009 (REPAIR-009)

    1. SUBTASK 72-31-12-220-069 Examine the Fan Stage 1 Disk Assembly (01-200) Pins

    2. Refer to Figure.

      1. Examine the pins at locations 13 and 14.

        1. Loose

        2. Repair, VRS1158 TASK 72-31-12-300-010 (REPAIR-009)

        1. Worn

          1. If the diameter of pins is between 0.2367 and 0.2372 in. (6.012 and 6.024 mm)

          2. Accept

          1. Less than 0.2367 in. (6.012 mm)

          2. Repair, VRS1158 TASK 72-31-12-300-010 (REPAIR-010)

      1. Examine the pins at locations 15 and 16.

        1. Loose

        2. Repair, VRS1158 TASK 72-31-12-300-010 (REPAIR-010)

        1. Galled

          1. Not more than 0.020 in. (0.50 mm) in depth

          2. Accept

          1. More than 0.020 in. (0.50 mm) in depth

          2. Repair, VRS1158 TASK 72-31-12-300-010 (REPAIR-010)

    1. SUBTASK 72-31-12-220-076 Examine the Fan Stage 1 Disk Assembly (01-200) Washer Plate

    2. Refer to Figure.

      1. Examine the bolt hole at location 17.

        1. Galled.

          1. Not more than 0.012 in. (0.30 mm) in depth

          2. Accept

          1. More than in Step

          2. Repair, VRS1159 TASK 72-31-12-300-008 (REPAIR-008)

        1. Scored.

          1. Not more than 0.012 in. (0.30 mm) in depth

          2. Accept

          1. More than in Step

          2. Repair, VRS1159 TASK 72-31-12-300-008 (REPAIR-008)

    1. SUBTASK 72-31-12-220-093 Examine the Fan Stage 1 Disk Assembly (01-200) Outer Surface

    2. Refer to Figure.

      1. Examine the outer surface at Location 18.

        1. Nicked, dented, scratched and scored.

          1. Not more than 0.002 in. (0.05 mm) in depth and there is no high metal

          2. Accept

          1. Other than in Step

          2. Repair, VRS1152 TASK 72-31-12-300-001 (REPAIR-001)

        1. Galled

        2. Repair, VRS1152 TASK 72-31-12-300-001 (REPAIR-001)

    1. SUBTASK 72-31-12-220-094 Examine the Fan Stage 1 Disk Assembly (01-200) Rear Flange

    2. Refer to Figure.

      1. Examine the outer surface at Location 21.

        1. Nicked, dented, scratched and scored.

          1. Not more than 0.002 in. (0.05 mm) in depth and there is no high metal

          2. Accept

          1. Other than in Step

          2. Repair, VRS1152 TASK 72-31-12-300-001 (REPAIR-001)

        1. Galled

        2. Repair, VRS1152 TASK 72-31-12-300-001, (REPAIR-001)

    1. SUBTASK 72-31-12-220-085 Examine the Fan Stage 1 Disk Assembly (01-200) Outer Surface for the Engine Cycles of the Part

    2. Refer to Figure.

    3. NOTE

      You can get the new engine cycles from the engine operating records.

      Examine the outer surface at Location 18, for the total engine cycles written before (at each disassembly).

      1. Calculate the new total number of engine cycles for the fan stage 1 disk assembly.

      2. Add the new engine cycles since the last inspection, to the engine cycles written on the fan stage 1 disk assembly.

    4. Do not install the fan stage 1 disk assembly if the total number of engine cycles is more than the maximum cycles given in TIME LIMITS MANUAL (Pub Ref T-V2500-1IA) TASK 05-10-01-200-001-A00 (GROUP A PART LIVES, CONFIG-001) TASK 05-10-01-200-001-B00 (GROUP A PART LIVES, CONFIG-002) TASK 05-10-01-200-001-C00 (05-10-01 GROUP A PART LIVES, CONFIG-3).

      1. Write the new total number of engine cycles on the fan stage 1 disk assembly.

      2. Vibro-engrave the new total number at Location 18, refer to the SPM TASK 70-09-00-400-501.

  1. Figure: Locations on the Fan Stage 1 Disk Assembly
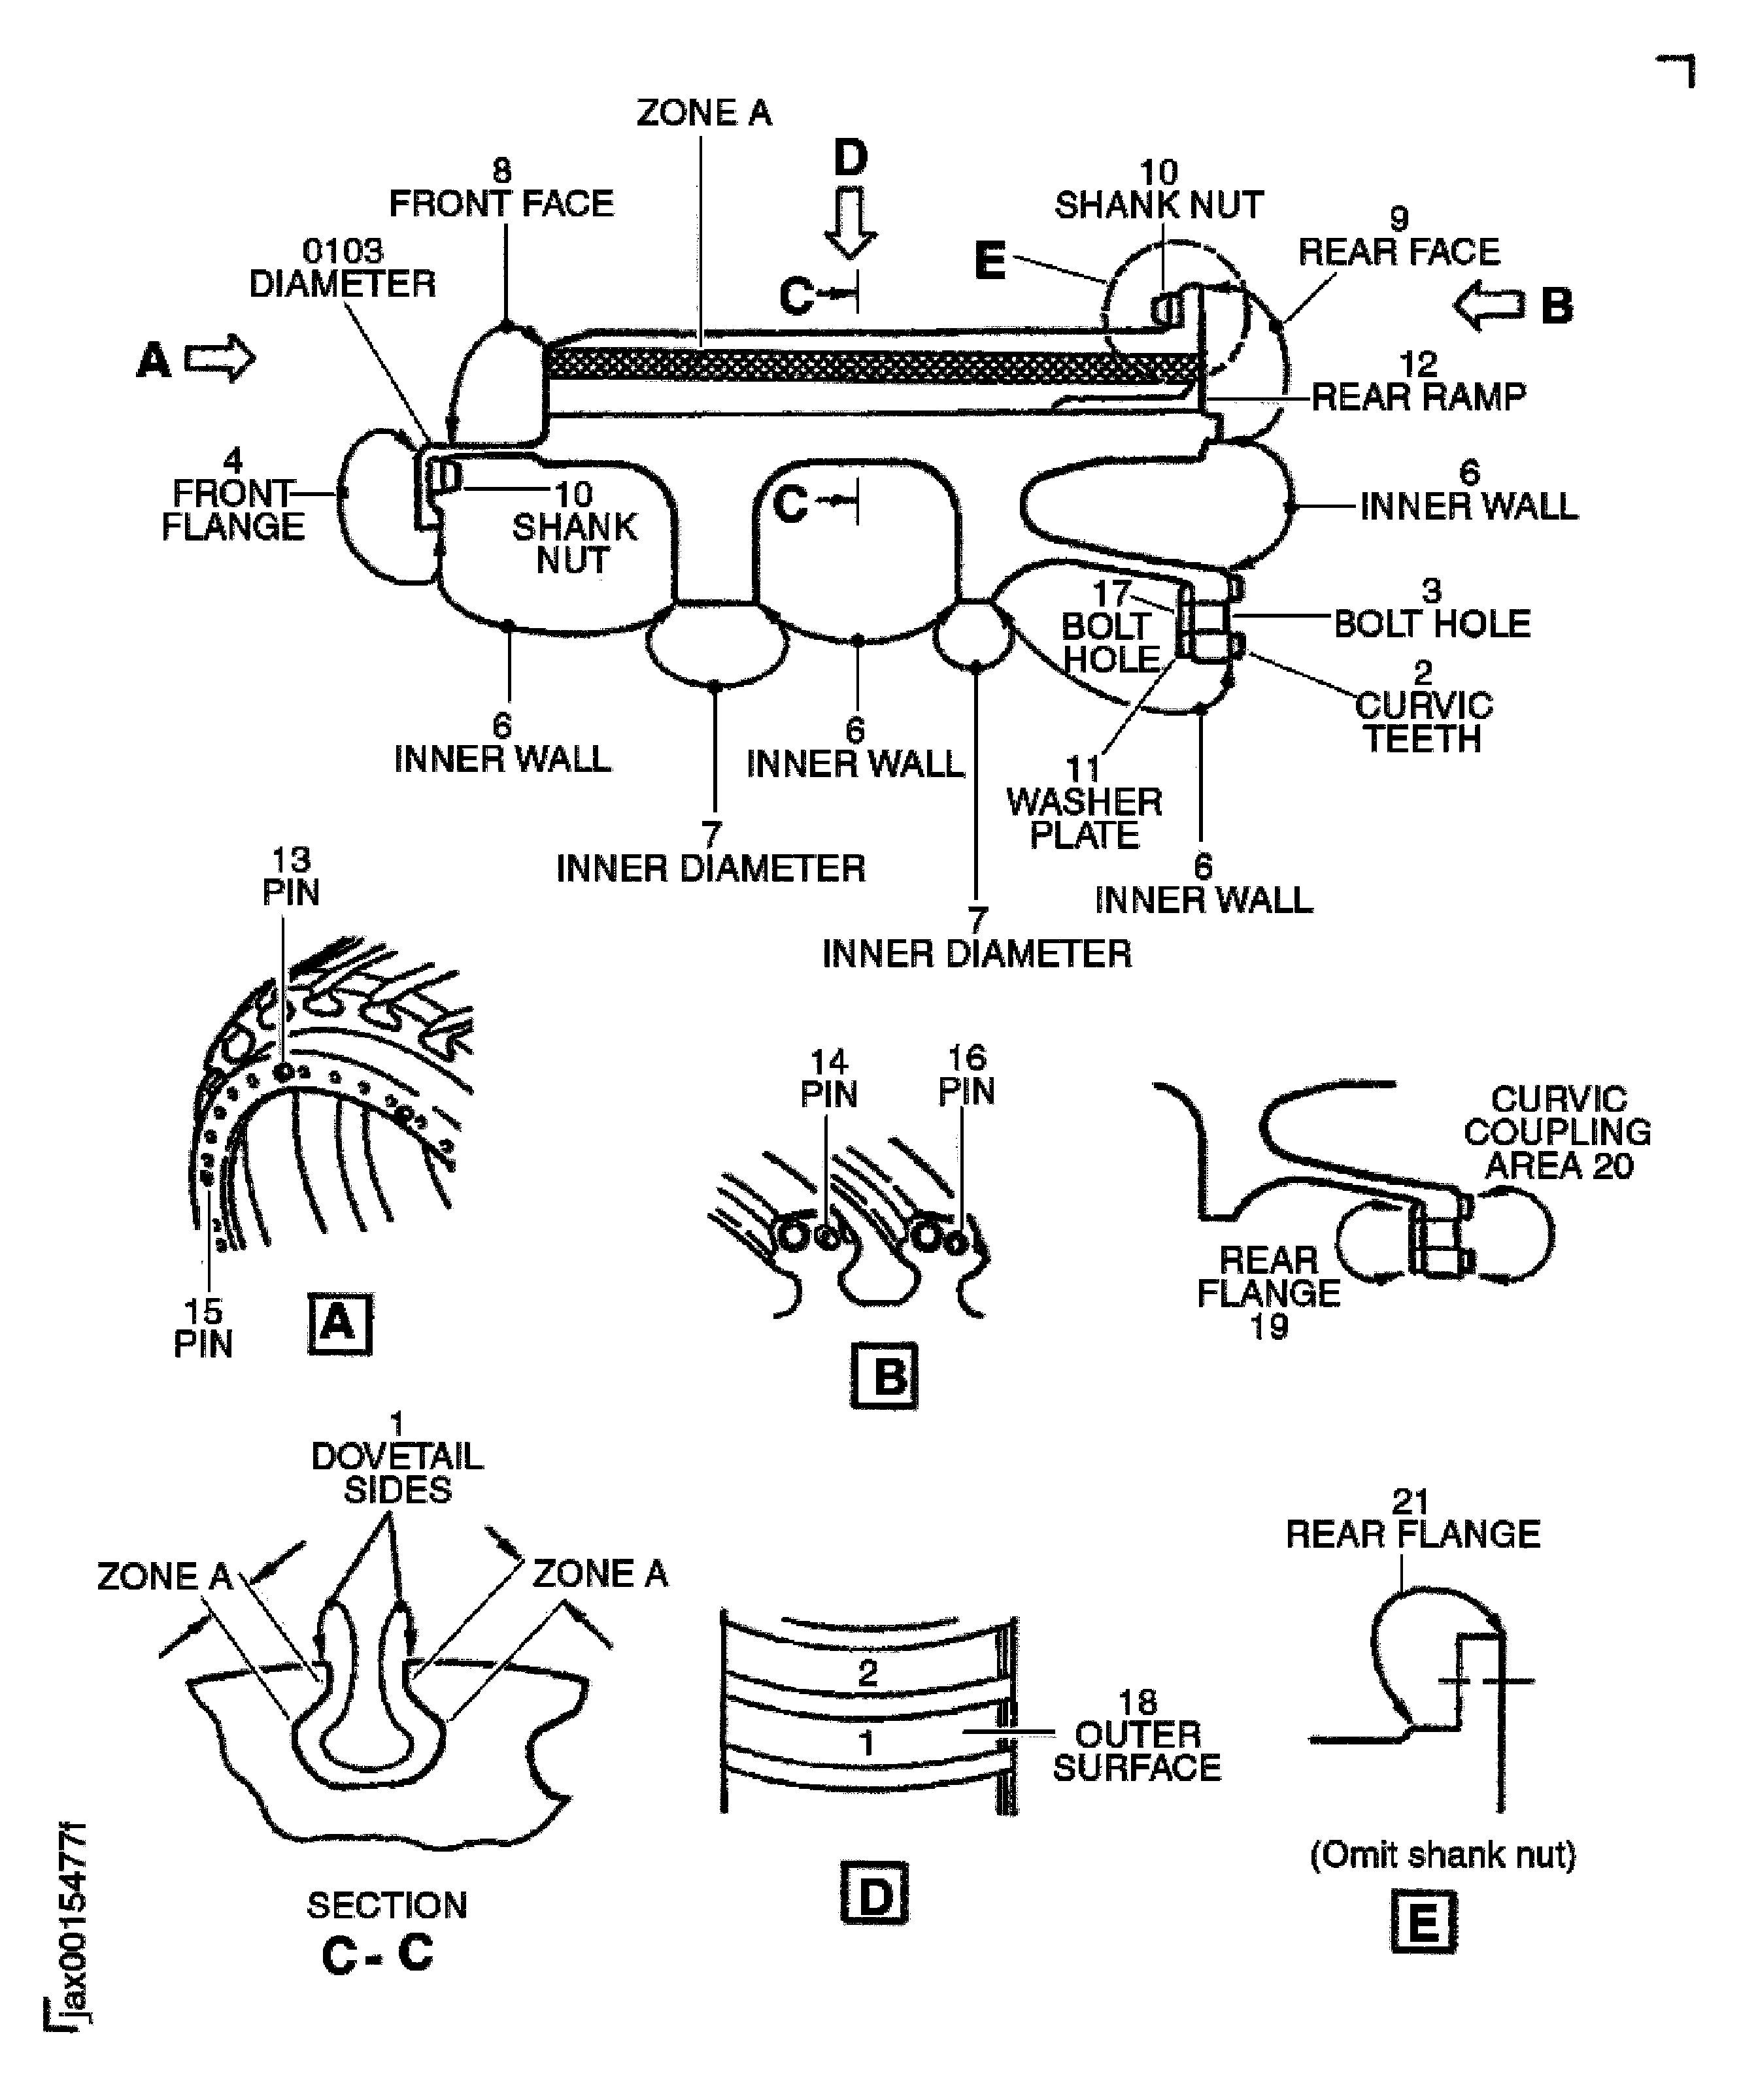
    Locations on the Fan Stage 1 Disk Assembly

    Figure: Details of the Fan Stage 1 Disk Assembly Curvic Teeth

    Details of the Fan Stage 1 Disk Assembly Curvic Teeth
Requirements After Job Completion

Follow-On Conditions

NONE
Change Type:

Added new part numbers. (88VJ495P)

Manufacturer Code:0AM53
Enterprise Name:IAE INTERNATIONAL AERO ENGINES AG
BU Name:NULL
Building:SUITE 400
Street:628 HEBRON AVENUE
City:GLASTONBURY
State:CT
Zip Code:06033
Country:USA
Manufacturer Code:LOCAL
Enterprise Name:LOCALLY SUPPLIED
Manufacturer Code:LOCAL
Tool Number:Fluorescent penetrant inspection equipment
Tool Name:Fluorescent Penetrant Inspection Equipment
Manufacturer Code:0AM53
Tool Number:IAE 2J12609
Tool Name:IAE 2J12609 Sling, FP inspection
Manufacturer Code:0AM53
Tool Number:IAE 2J12612
Tool Name:IAE 2J12612 Fixture, Turnover
Manufacturer Code:0AM53
Tool Number:IAE 2J12613
Tool Name:IAE 2J12613 Clamp, fixture