Export Control
EAR Export Classification: Not subject to the EAR per 15 C.F.R. Chapter 1, Part 734.3(b)(3), except for the following Service Bulletins which are currently published as EAR Export Classification 9E991: SBE70-0992, SBE72-0483, SBE72-0580, SBE72-0588, SBE72-0640, SBE73-0209, SBE80-0024 and SBE80-0025.Copyright
© IAE International Aero Engines AG (2001, 2014 - 2021) The information contained in this document is the property of © IAE International Aero Engines AG and may not be copied or used for any purpose other than that for which it is supplied without the express written authority of © IAE International Aero Engines AG. (This does not preclude use by engine and aircraft operators for normal instructional, maintenance or overhaul purposes.).Applicability
All
Common Information
TASK 72-32-00-430-006 LPC/Intermediate Case Module - Install The LP Shaft, No. 1 And No .2 Bearing Assembly, Assembly-006
General
This TASK gives the procedure to install the LP shaft, No. 1 and No. 2 bearing assembly.
Fig/item numbers in parentheses in the procedure agree with those used in the IPC. Only the primary Fig/item numbers are used. For the service bulletin alpha variants refer to the IPC.
For all parts identified in a different Chapter/Section/Subject, the applicable Chapter/Section/Subject comes before the Fig/item number.
For standard torque data and procedures, refer to the SPM TASK 70-41-00-400-501 and SPM TASK 70-41-02-400-501.
To identify, lubricate and install seal rings, refer to the SPM TASK 70-64-02-640-501.
Special torque data and assembly tolerances are included in the procedure.
Lubricate all threads and abutment faces of nuts and bolts with CoMat 10-077 APPROVED ENGINE OILS, unless other lubricants are referred to in the procedure.
The abbreviation Intf shows an interference or tight fit. This causes REJECT IF MORE THAN to become REJECT IF LESS THAN. The abbreviation Clear shows a clearance fit.
The number for each radial location must be identified in a clockwise direction. These start at the engine top position when you look from the rear of the engine, unless stated differently in the procedure.
The No. 1 strut, which is the top position strut of the fan frame assembly, is identified by the five pressure tubes on the No. 1 strut leading edge.
This TASK gives the procedure to install the LP shaft, No. 1 and No. 2 bearing assembly. For other parts of the LP compressor/intermediate case module, refer to TASK 72-32-00-430-000, ASSEMBLY-000).
NOTE
NOTE
Preliminary Requirements
Pre-Conditions
NONESupport Equipment
| Name | Manufacturer | Part Number / Identification | Quantity | Remark |
|---|---|---|---|---|
| Dial Caliper | LOCAL | Dial Caliper | ||
| IAE 1J12242 Mechanical pusher | 0AM53 | IAE 1J12242 | 1 | |
| IAE 1J12436 Vertical sling | 0AM53 | IAE 1J12436 | 1 | |
| IAE 1J12507 Guide pin | 0AM53 | IAE 1J12507 | 1 |
Consumables, Materials and Expendables
| Name | Manufacturer | Part Number / Identification | Quantity | Remark |
|---|---|---|---|---|
| CoMat 10-077 APPROVED ENGINE OILS | LOCAL | CoMat 10-077 |
Spares
NONESafety Requirements
NONEProcedure
Refer to Figure.
Reference dimensions at location 0114. If required, use the data written as a NOTE in TASK 72-32-19-200-000 (INSPECTION-000) and TASK 72-32-51-200-000 (INSPECTION-000).
Table 1. Fits and Clearances (all dimensions are in inches) NEW PART DIMENSIONS
WORN PART DIMENSIONS
REJECT IF MORE THAN
PART IDENT
Size
Clearance
(Non-select)
LOCATION 0114
Hydraulic seal ENGINE-HYDRAULIC SEAL ASSEMBLY (72-32-19, 01-100), inside diameter and
stub shaft ENGINE-LP STUB SHAFT AND ROTOR CENTRE(72-32-51,01-350), outside diameter
Hydraulic seal inside diameter
4.4107
Intf
4.4107
Intf
4.4095
0.0003
4.4095
0.0003
Stub shaft outside diameter
4.4117
0.0022
4.4117
0.0022
4.4110
Intf
4.4110
Intf
Table 2. Fits and Clearances (all dimensions are in millimeters) NEW PART DIMENSIONS
WORN PART DIMENSIONS
REJECT IF MORE THAN
PART IDENT
Size
Clearance
(Non-select)
LOCATION 0114
Hydraulic seal ENGINE-HYDRAULIC SEAL ASSEMBLY (72-32-19, 01-100), inside diameter and
stub shaft ENGINE-LP STUB SHAFT AND ROTOR CENTRE (72-32-51,01-350), outside diameter
Hydraulic seal inside diameter
112.032
Intf
112.032
Intf
112.000
0.005
112.000
0.005
Stub shaft outside diameter
112.059
0.059
112.059
0.059
112.037
Intf
112.037
Intf
SUBTASK 72-32-00-220-129 Reference Fits and Clearances of the Stub Shaft and the Hydraulic Seal at Location 0114
Refer to Figure.
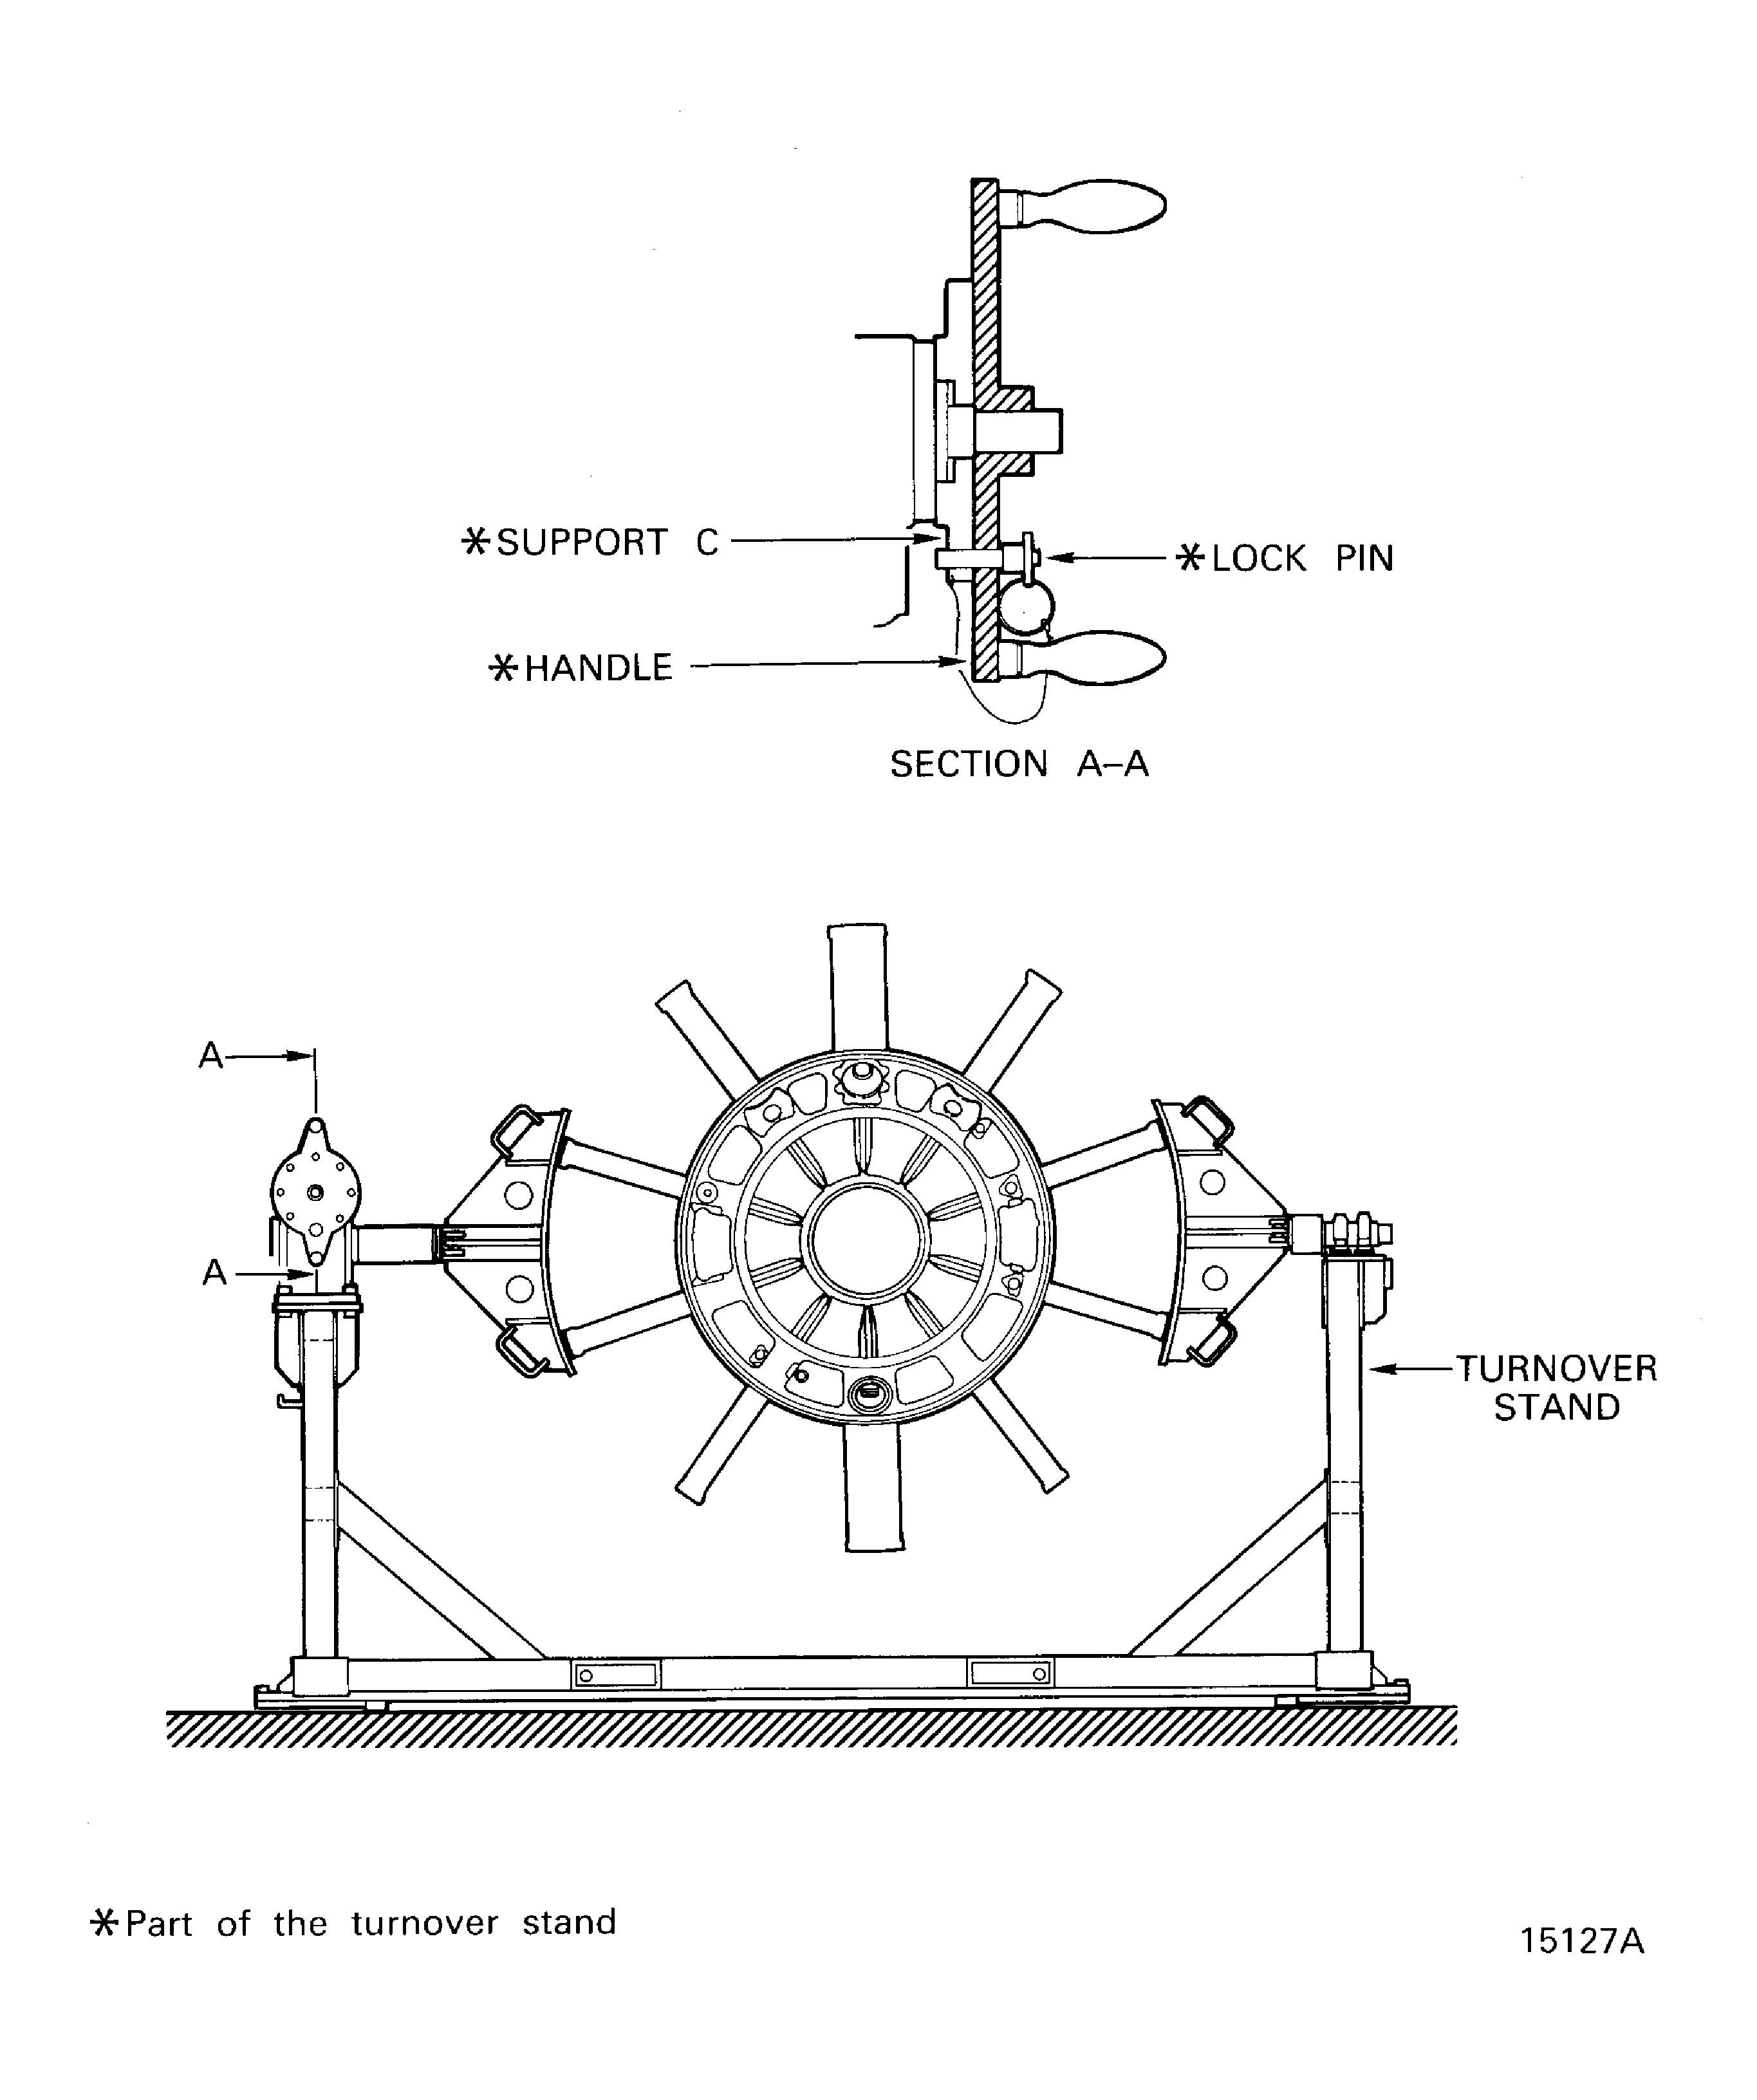
Make sure that the fan frame assembly is installed horizontally on the turnover stand. Refer to TASK 72-32-00-430-005 (ASSEMBLY-005).
SUBTASK 72-32-00-430-107 Turn the Fan Frame Assembly Vertical with the Front End Up
Install the two aligning pins (part of IAE 1J12507 Guide pin 1 off) in to two of the 18 threaded holes in the No. 1 bearing support front flange, Figure. The two aligning pins must be installed at 180 degrees apart from each other.
NOTE
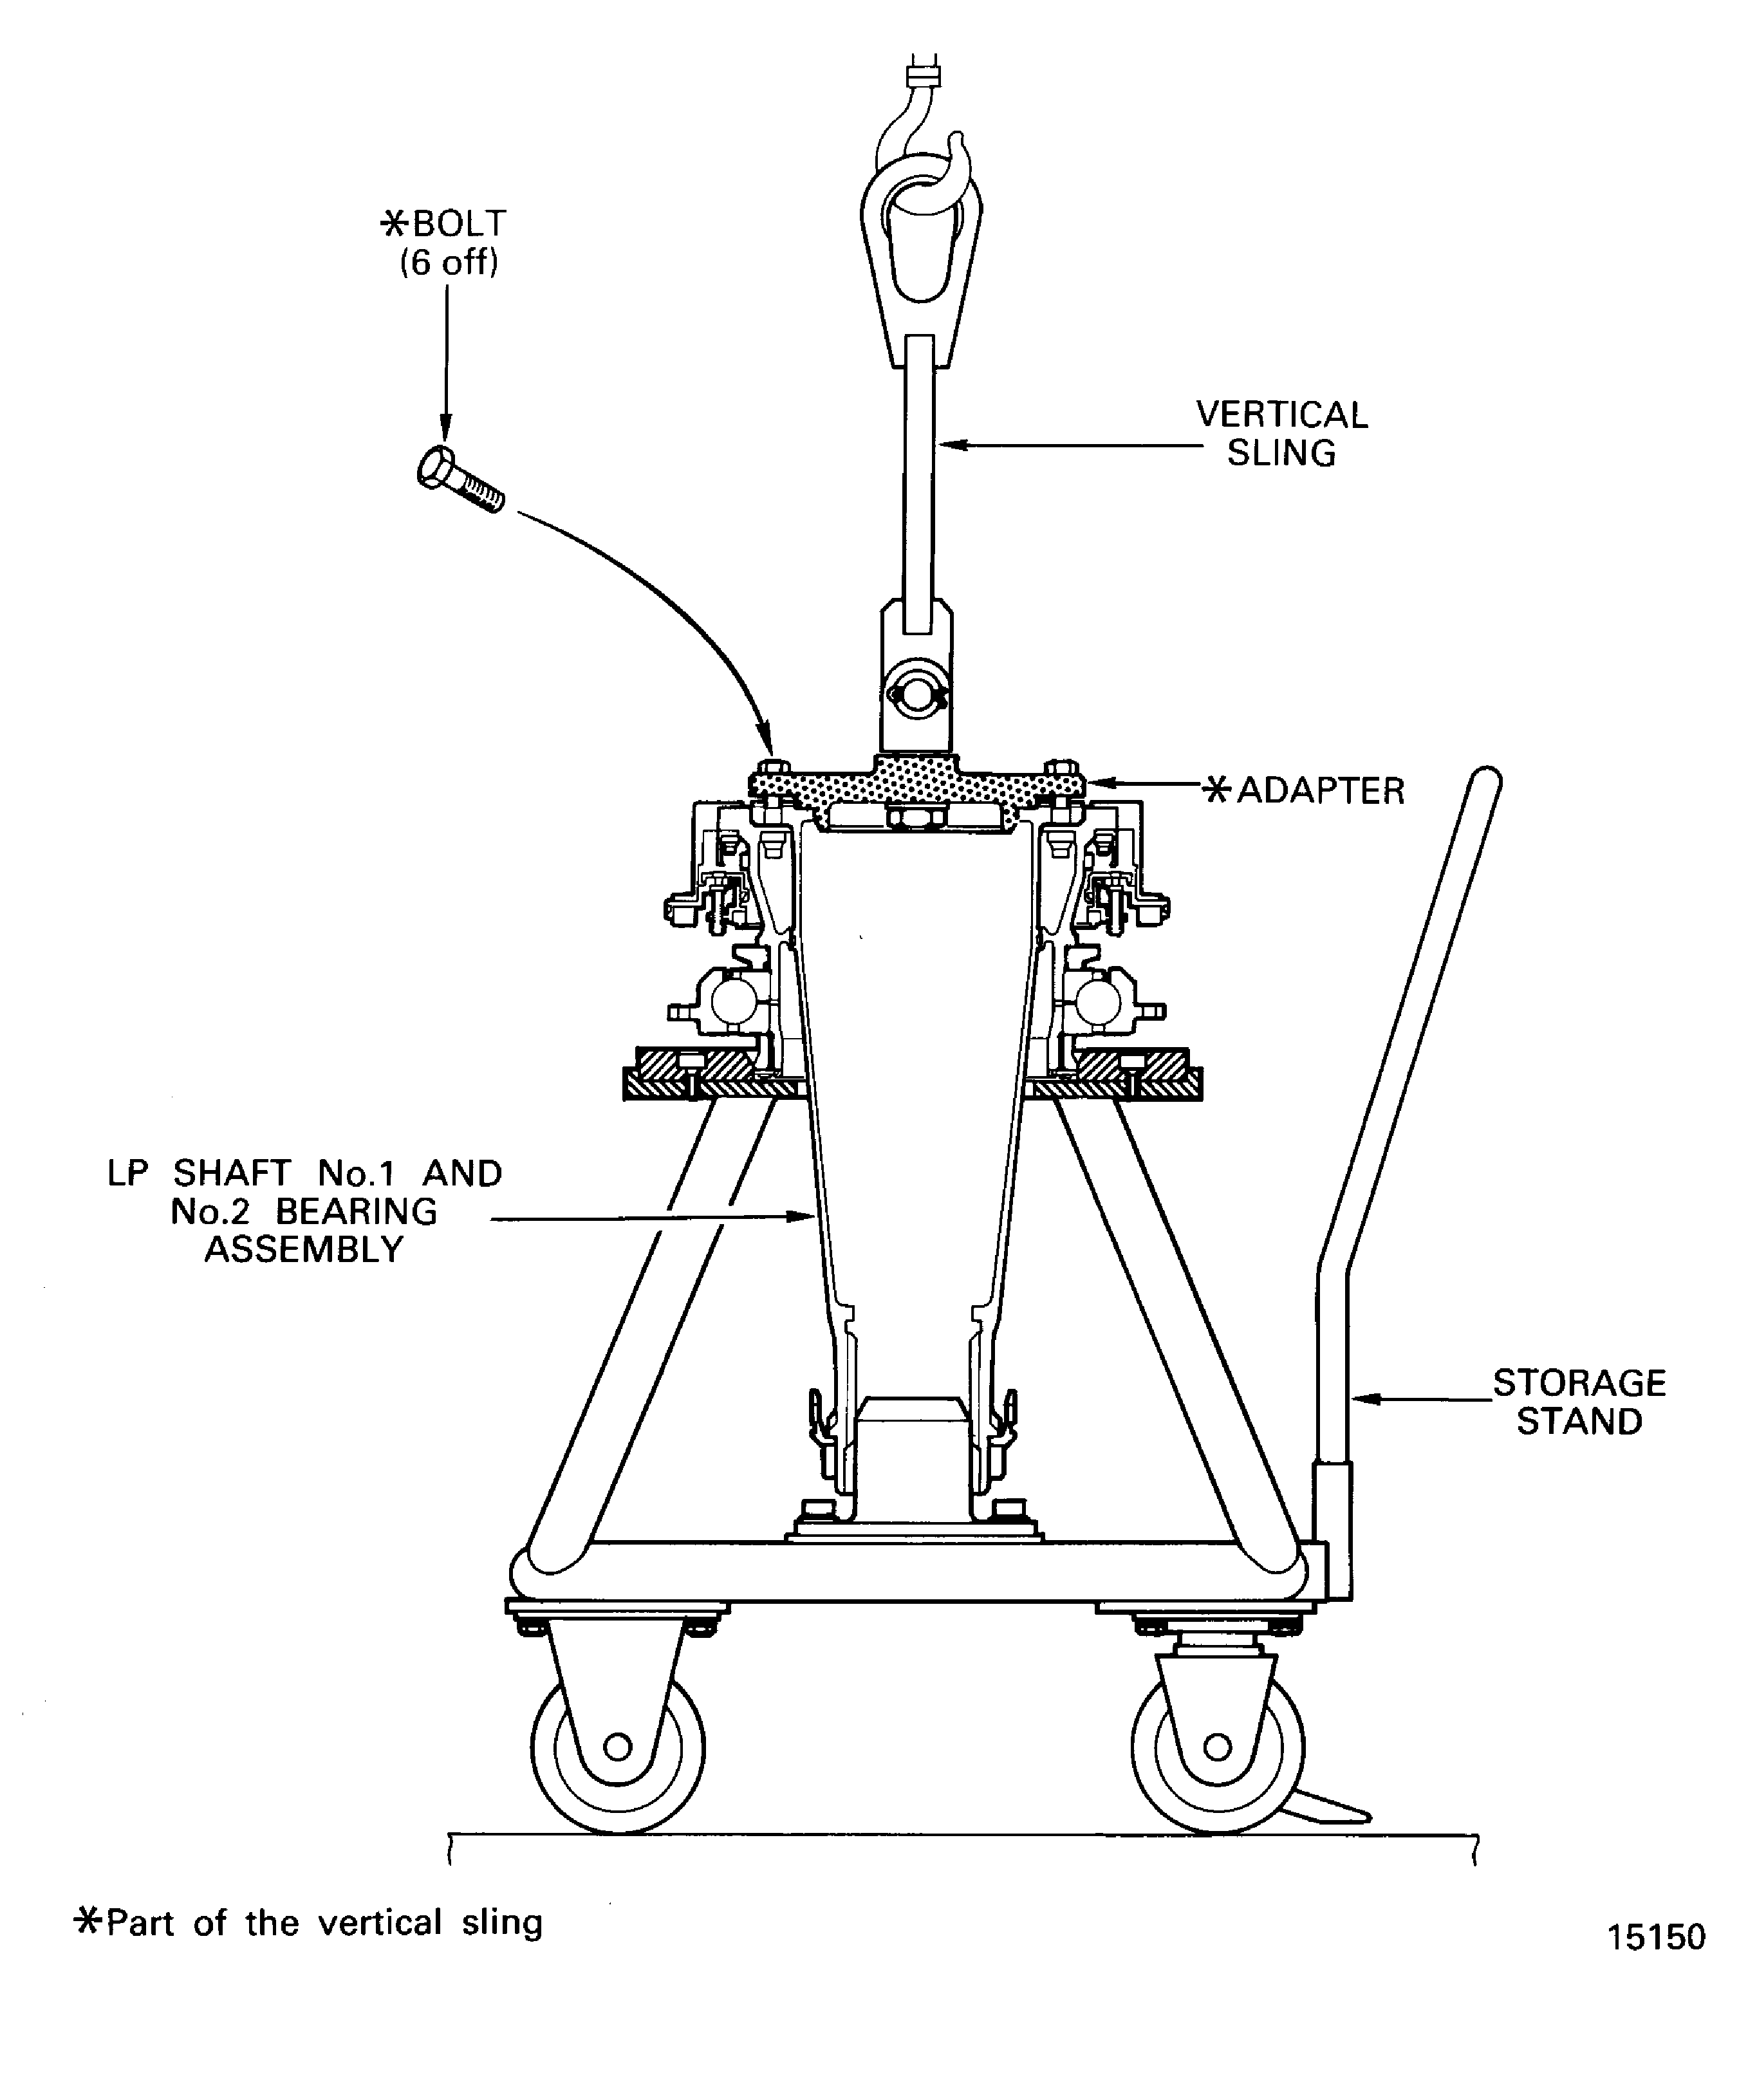
The shaft assembly is installed in the storage stand in TASK 72-32-50-440-001 (ASSEMBLY).Install IAE 1J12436 Vertical sling 1 off on to the shaft assembly, Figure.
Increase the temperature of the No. 1 bearing support front flange of the No. 1 bearing support assembly to 194 deg F (90 deg C) with a hot air gun, Figure.
SUBTASK 72-32-00-430-108 Install the LP Shaft, No. 1 and No. 2 Bearing Assembly (Shaft Assembly) in to the No. 1 Bearing Support Assembly
Refer to Figure.
SUBTASK 72-32-00-430-109 Turn the Fan Frame Assembly Horizontal with the No. 1 Strut Up
Refer to Figure.
Install the three plates (part of IAE 1J12242 Mechanical pusher 1 off) to hold the stub shaft.
Make sure that the nut, the two knurled knobs and the extension (part of IAE 1J12242 Mechanical pusher) are removed from the set bolt. If they are not removed from the set bolt, remove them from the set bolt. Refer to Step, Step and Step.
Install the set bolt and adapter assembly (part of IAE 1J12242 Mechanical pusher) in to hydraulic ring.
Install the puller handle (part of IAE 1J12242 Mechanical pusher 1 off) on to the set bolt.
Install the three screws, which were removed in Step, to the initial positions.
Remove the three plates from the short holder and the No. 1 bearing support.
SUBTASK 72-32-00-430-110 Engage the Hydraulic Seal Assembly with the Stub Shaft
Refer to Figure.
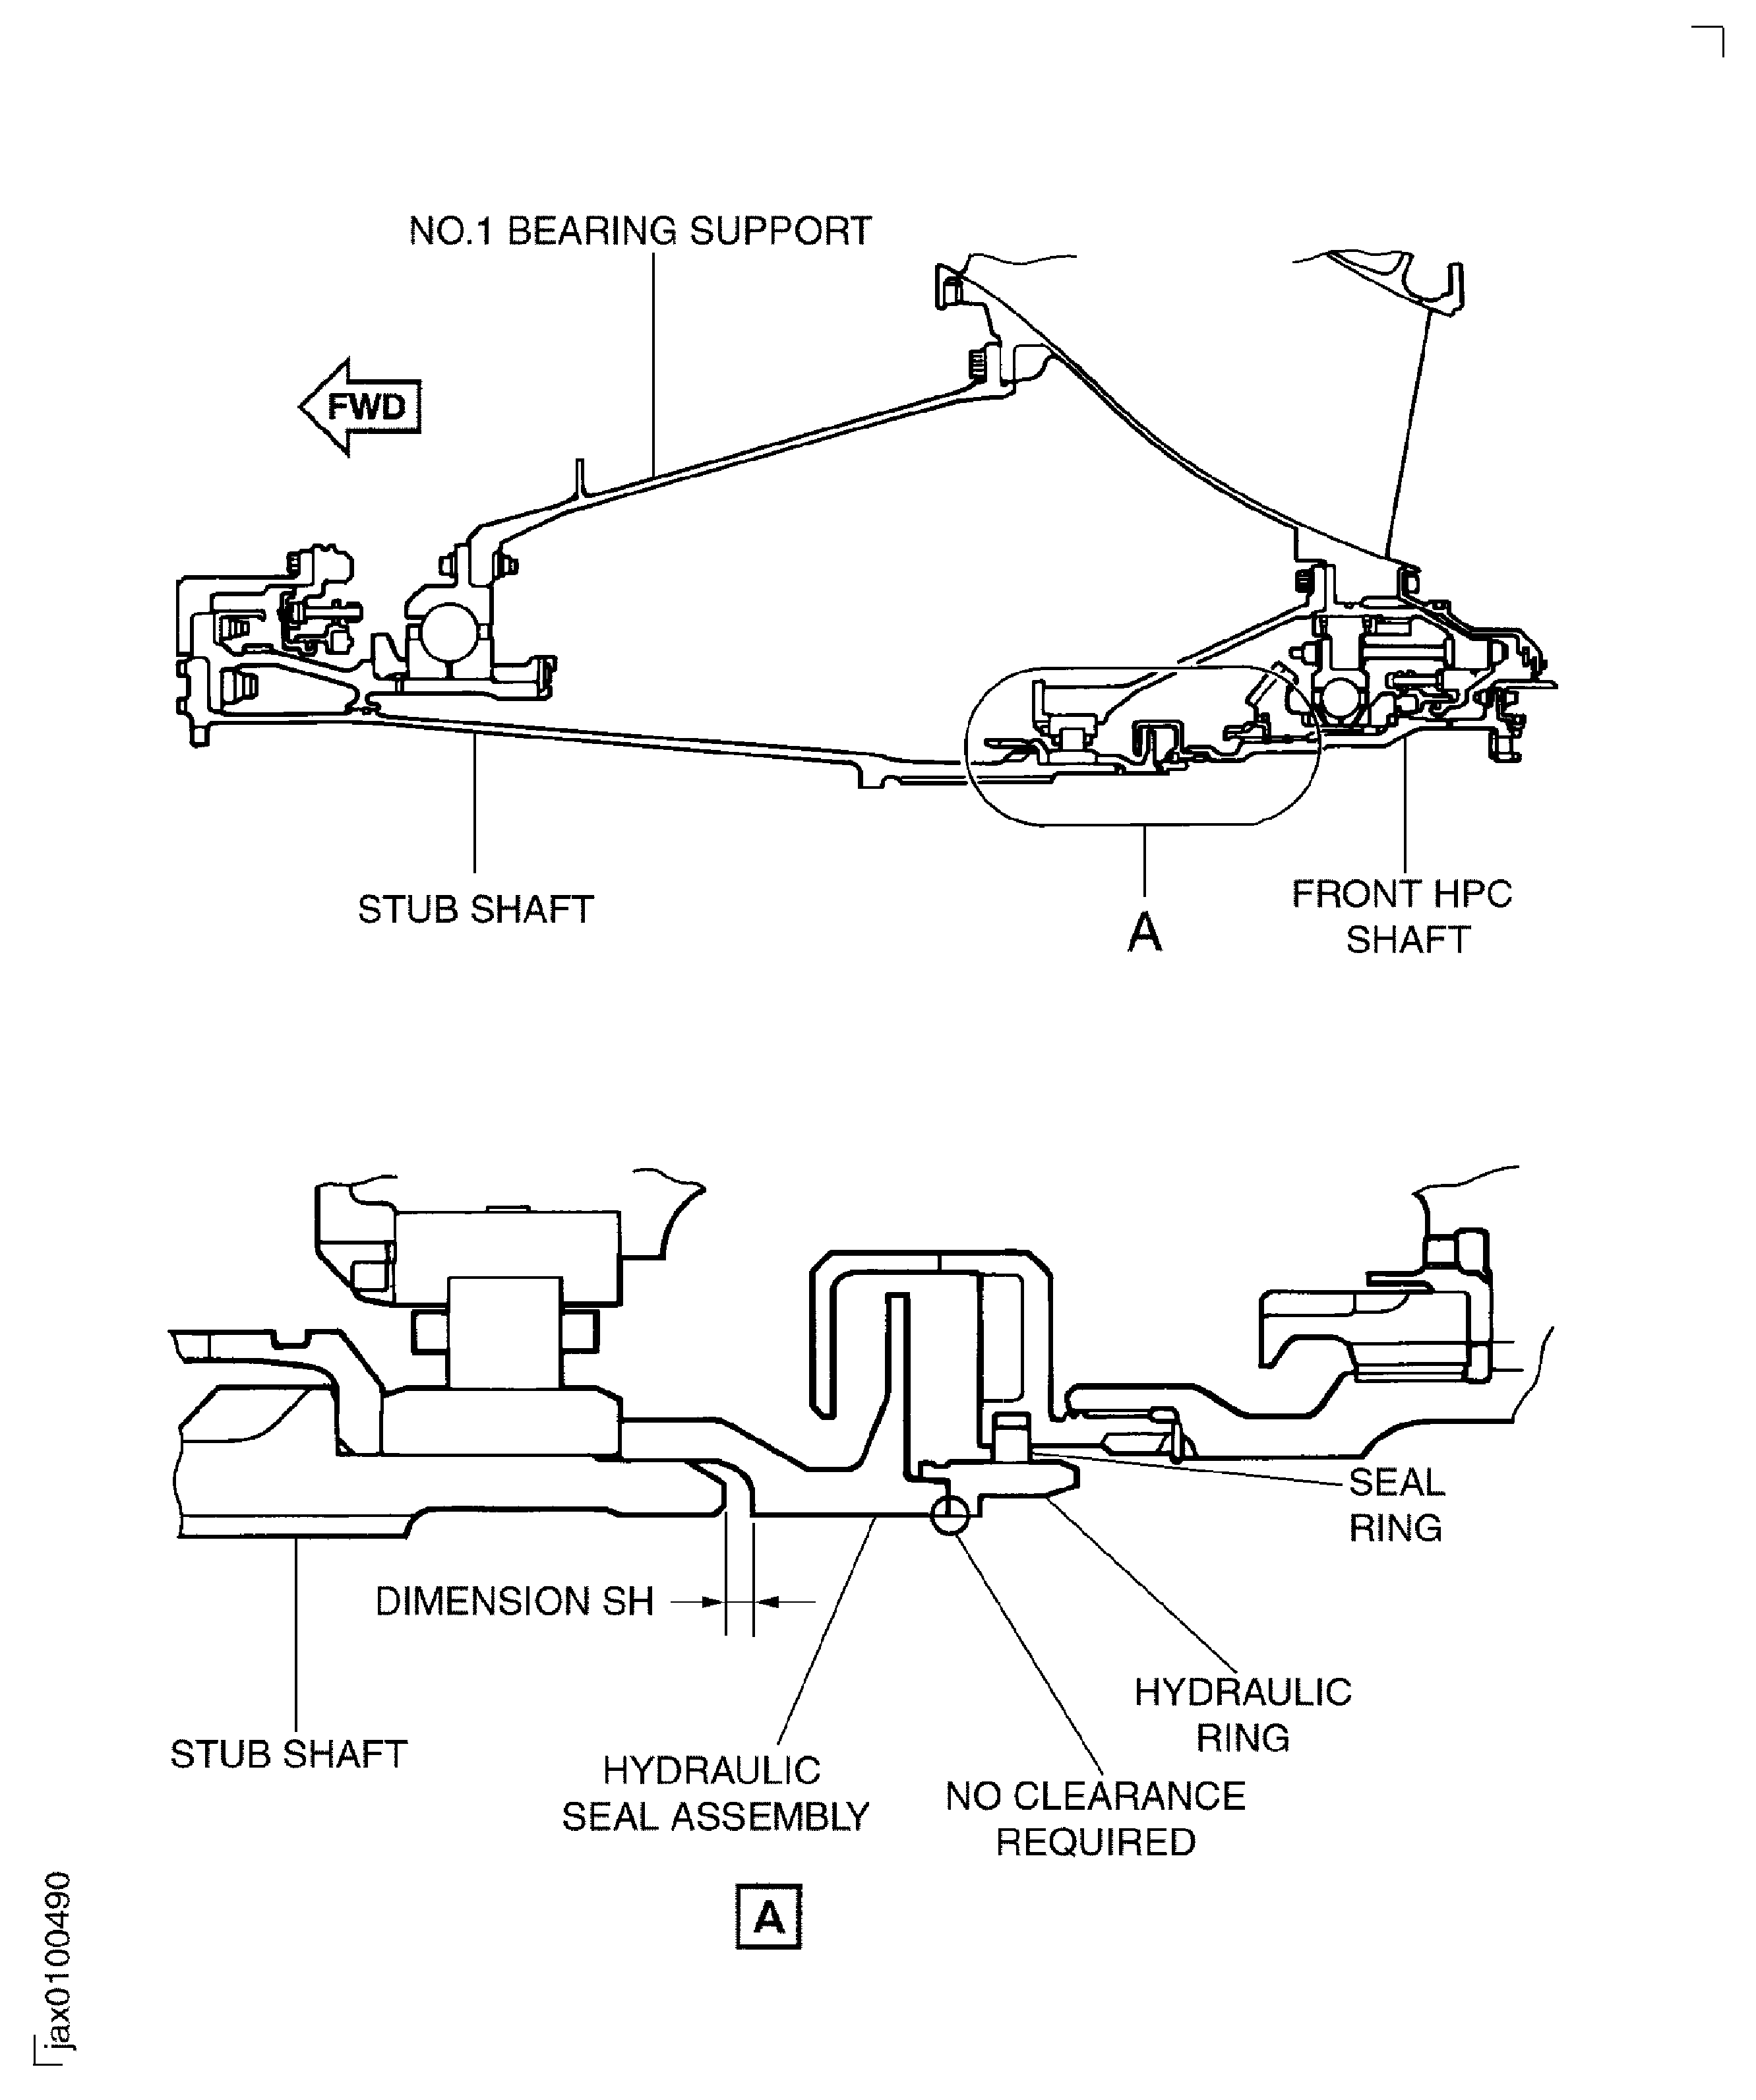
Make sure that the clearance SH between the stub shaft and the hydraulic seal assembly is no more than 0.131 in. (3.35 mm). Use vernier caliper or equivalent. If the clearance is more than 0.131 in. (3.35 mm), do Step again.
Make sure that there is no clearance between hydraulic ring and hydraulic seal assembly. If there is a clearance between hydraulic ring and hydraulic seal assembly, do Step again.
Make sure that seal ring is in hydraulic seal assembly. If seal ring is not in hydraulic seal assembly, install seal ring. Refer to TASK 72-32-10-440-001 (ASSEMBLY).
SUBTASK 72-32-00-430-330 Make sure that the Hydraulic Seal Assembly, the Hydraulic Ring and the Seal Ring are in the Correct Positions
Figure: Install the Lock Pin in to Position to Lock the Handle of the Turnover Stand
Install the Lock Pin in to Position to Lock the Handle of the Turnover Stand

Figure: Install the Vertical Sling on to the LP Shaft, No. 1 and No.2 Bearing Assembly
Install the Vertical Sling on to the LP Shaft, No. 1 and No.2 Bearing Assembly

Figure: Install the LP Shaft, No. 1 and No.2 Bearing Assembly in to the No. 1 Bearing Support
Install the LP Shaft, No. 1 and No.2 Bearing Assembly in to the No. 1 Bearing Support

Figure: Engage the Hydraulic Seal Assembly with the Stub Shaft
Engage the Hydraulic Seal Assembly with the Stub Shaft

Figure: Make Sure that Hydraulic Seal Assembly, Hydraulic Ring and Seal Ring are in the Correct Positions
Make Sure that Hydraulic Seal Assembly, Hydraulic Ring and Seal Ring are in the Correct Positions

Figure: The Stub Shaft and the Hydraulic Seal Fits and Clearances
The Stub Shaft and the Hydraulic Seal Fits and Clearances

