TASK 72-32-50-440-001 LP Shaft And Bearing Assembly - Assemble The LP Shafts, No. 1 Bearing, And No. 2 Bearing Assembly, Assembly-001

DMC:V2500-A0-72-32-5000-00A-710A-B|Issue No:004.00|Issue Date:2017-05-01

Export Control

EAR Export Classification: Not subject to the EAR per 15 C.F.R. Chapter 1, Part 734.3(b)(3), except for the following Service Bulletins which are currently published as EAR Export Classification 9E991: SBE70-0992, SBE72-0483, SBE72-0580, SBE72-0588, SBE72-0640, SBE73-0209, SBE80-0024 and SBE80-0025.

Copyright

© IAE International Aero Engines AG (2001, 2014 - 2021) The information contained in this document is the property of © IAE International Aero Engines AG and may not be copied or used for any purpose other than that for which it is supplied without the express written authority of © IAE International Aero Engines AG. (This does not preclude use by engine and aircraft operators for normal instructional, maintenance or overhaul purposes.).

Applicability

All

Common Information

TASK 72-32-50-440-001 LP Shaft And Bearing Assembly - Assemble The LP Shafts, No. 1 Bearing, And No. 2 Bearing Assembly, Assembly-001

General

This TASK gives the procedure to assemble the LP shaft, No. 1 and No. 2 Bearing Assembly.

Fig/item numbers in parentheses in the procedure agree with those used in the IPC. Only the primary Fig/item numbers are used. For the service bulletin alpha variants refer to the IPC.

For all parts identified in a different Chapter/Section/Subject, the applicable Chapter/Section/Subject comes before the Fig/item number.

For standard torque data and procedures, refer to the SPM TASK 70-41-00-400-501 and SPM TASK 70-41-02-400-501.

Special torque data and assembly tolerances are included in the procedure.

Special torque data is identified with the symbol * after the torque value.

Lubricate all threads and abutment faces of nuts and bolts with CoMat 10-077 APPROVED ENGINE OILS, unless other lubricants are referred to in the procedure.

To identify, lubricate and install seal rings, refer to the SPM TASK 70-44-01-400-501.

The number for each radial location must be identified in a clockwise direction. These start at the engine top position when you look from the rear of the engine, unless stated differently in the procedure.

For surface finish of balance lands refer to the SPM TASK 70-35-09-350-501.

Pre SBE 72-0132 V2500-A1: Refer to Figure for a sectional view of the LP shaft, No. 1 and No. 2 Bearing Assembly.

Post SBE 72-0132 V2500-A1 and V2500-A5: Refer to Figure for a sectional view of the LP shaft, No. 1 and No. 2 Bearing Assembly.

The practices and processes referred to in the procedure by the TASK numbers are in the SPM.

NOTE

To identify the consumable materials refer to the PCI.

NOTE

Special tools are identified in the procedure by the tool primary number.

Preliminary Requirements

Pre-Conditions

NONE

Support Equipment

NameManufacturerPart Number / IdentificationQuantityRemark
Horizontal Balancing MachineLOCALSchenck HL5U
Torque multiplierLOCALSWEENEY 8200
IAE 1J12106 Aligning pin set0AM53IAE 1J121061
IAE 1J12211 Storage stand0AM53IAE 1J122111
IAE 1J12335 Spanner wrench0AM53IAE 1J123351
IAE 1J12386 Restraint holder0AM53IAE 1J123861
IAE 1J12387 Work stand0AM53IAE 1J123871
IAE 1J12388 Hydraulic pusher0AM53IAE 1J123881
IAE 1J12392 Installation pusher0AM53IAE 1J123921
IAE 1J12394 Balance adapter0AM53IAE 1J123941
IAE 1J12395 Work stand0AM53IAE 1J123951
IAE 1J12397 Front sling0AM53IAE 1J123971
IAE 1J12398 PMI mandrel0AM53IAE 1J123981
IAE 1J12401 No.1 bearing holding plate0AM53IAE 1J124011
IAE 1J12473 Seal holder0AM53IAE 1J124731

(A1 Pre SBE 72-0132)

IAE 1J12499 Aligning pin set0AM53IAE 1J124991

(A1 Pre SBE 72-0132)

IAE 1J12500 Adapter0AM53IAE 1J125001

(A1 Pre SBE 72-0132)

IAE 1J12501 Turnover sling0AM53IAE 1J125011
IAE 1J12506 No.1 bearing guide0AM53IAE 1J125061
IAE 1J12462 Seal holder0AM53IAE 1J124621

(A1 SBE 72-0132 and A5)

Consumables, Materials and Expendables

NameManufacturerPart Number / IdentificationQuantityRemark
CoMat 01-124 ISOPROPYL ALCOHOLLOCALCoMat 01-124
CoMat 06-069 MARKERIE207CoMat 06-069
CoMat 10-077 APPROVED ENGINE OILSLOCALCoMat 10-077

Spares

NameManufacturerPart Number / IdentificationQuantityRemark
Seal ring1

Safety Requirements

NONE

Procedure

    1. SUBTASK 72-32-50-220-057 Identify the LP Shaft, No. 1 and No. 2 Bearing Assembly

    2. Refer to Figure.

      NOTE

      The sub-module number follows the letters "SUB MODULE". The serial number is adjacent to the sub-module number.
    3. Find the sub-module number and sub-module serial number written on the Stub Shaft Assembly.

    4. Make sure that the LP shaft, No. 1 and No. 2 Bearing Assembly is correctly identified with the sub module number and sub-module serial number.

    1. SUBTASK 72-32-50-220-054 Reference Fits and Clearances of the LP Stub Shaft and Rotor Centre at Location 0107

    2. Refer to Figure.

    3. Reference dimensions at location 0107. If required, use the data written as a note in TASK 72-32-51-200-000 (INSPECTION-000).

      Table 1. Fits and Clearances (all dimensions are in inches)

      NEW PART

      WORN PART

      DIMENSIONS

      DIMENSIONS

      PART IDENT

      Size

      Clearance

      Non-select

      REJECT IF

      MORE THAN

      LOCATION 0107

      Stub Shaft Assembly ENGINE-LP STUB SHAFT AND ROTOR CENTRE (72-32-51, 01-350)

      Rotor Center Shaft ENGINE-LP STUB SHAFT AND ROTOR CENTRE (72-32-51, 01-100)

      Stub Shaft Assembly Outside Diameter

      9.8065

      Intf

      9.8076

      0.0015

      Rotor Center Shaft Bore Diameter

      9.8032

      0.0045

      9.8049

      Table 2. Fits and Clearances (all dimensions are in millimeters)

      NEW PART

      WORN PART

      DIMENSIONS

      DIMENSIONS

      PART IDENT

      Size

      Clearance

      Non-select

      REJECT IF

      MORE THAN

      LOCATION 0107

      Stub Shaft Assembly ENGINE-LP STUB SHAFT AND ROTOR CENTRE (72-32-51, 01-350)

      Rotor Center Shaft ENGINE-LP STUB SHAFT AND ROTOR CENTRE (72-32-51, 01-100)

      Stub Shaft Assembly Outside Diameter

      249.084

      249.113

      Intf

      Rotor Center Shaft Bore Diameter

      249.000

      0.113

      249.046

    1. SUBTASK 72-32-50-220-055 Reference Fits and Clearances of the Rotor Center Shaft and the No. 1 Ball Bearing Inner Race at Location 0110

    2. Refer to Figure.

    3. Reference dimensions at location 0110. If required, use the data written as a note in TASK 72-32-51-200-000 (INSPECTION-000) and TASK 72-32-54-200-000 (INSPECTION-000).

      Table 3. Fits and Clearances (all dimensions are in inches)

      NEW PART

      WORN PART

      DIMENSIONS

      DIMENSIONS

      PART IDENT

      Size

      Clearance

      Non-select

      REJECT IF

      MORE THAN

      LOCATION 0110

      Rotor Center Shaft ENGINE-LP STUB SHAFT AND ROTOR CENTRE (72-32-51, 01-100)

      No. 1 Ball Bearing Inner Race ENGINE-NO.1 BEARING (72-32-54, 01-150)

      Rotor Center Shaft Bearing Journal Outside Diameter

      8.6664

      Intf

      8.6675

      0.0050

      No. 1 Ball Bearing Inner Race Bore Diameter

      8.6610

      0.0065

      8.6614

      Table 4. Fits and Clearances (all dimensions are in millimeters)

      NEW PART

      WORN PART

      DIMENSIONS

      DIMENSIONS

      PART IDENT

      Size

      Clearance

      Non-select

      REJECT IF

      MORE THAN

      LOCATION 0110

      Rotor Center Shaft ENGINE-LP STUB SHAFT AND ROTOR CENTRE (72-32-51, 01-100)

      No. 1 Ball Bearing Inner Race ENGINE-NO.1 BEARING (72-32-54, 01-150)

      Rotor Center Shaft Bearing Journal Outside Diameter

      220.126

      Intf

      220.156

      0.126

      No. 1 Ball Bearing Inner Race Bore Diameter

      219.988

      0.167

      220.000

    1. SUBTASK 72-32-50-220-056 Reference Fits and Clearances of the Stub Shaft Assembly and the No. 2 Roller Bearing Inner Race at Location 0113

    2. Refer to Figure.

    3. Reference dimensions at location 0113. If required, use the data written as a note in TASK 72-32-51-200-000 (INSPECTION-000) and TASK 72-32-52-200-000 (INSPECTION-000).

      Table 5. Fits and Clearances (all dimensions are in inches)

      NEW PART

      WORN PART

      DIMENSIONS

      DIMENSIONS

      PART IDENT

      Size

      Clearance

      Non-select

      REJECT IF

      MORE THAN

      LOCATION 0113

      Stub Shaft Assembly ENGINE-LP STUB SHAFT AND ROTOR CENTRE (72-32-51, 01-350)

      No. 2 Roller Bearing Inner Race No. 2 Bearing (72-32-52, 01-160)

      Stub Shaft Assembly Bearing Journal Outside Diameter

      4.4491

      Intf

      4.4494

      0.0002

      No. 2 Roller Bearing Inner Race Bore Diameter

      4.4485

      0.0009

      4.4488

      Table 6. Fits and Clearances (all dimensions are in millimeters)

      NEW PART

      WORN PART

      DIMENSIONS

      DIMENSIONS

      PART IDENT

      Size

      Clearance

      Non-select

      REJECT IF

      MORE THAN

      LOCATION 0113

      Stub Shaft Assembly ENGINE-LP STUB SHAFT AND ROTOR CENTRE (72-32-51, 01-350)

      No. 2 Roller Bearing Inner Race No. 2 Bearing (72-32-52, 01-160)

      Stub Shaft Assembly Bearing Journal Outside Diameter

      113.005

      Intf

      113.015

      0.005

      No. 2 Roller Bearing Inner Race Bore Diameter

      112.992

      0.023

      113.000

    1. SUBTASK 72-32-50-440-077 Prepare the Rotor Center Shaft, No. 1 Bearing Seal Seat and No. 1 Bearing

    2. Refer to Figure.

    3. Make sure that the No. 1 Bearing outer race, cage, balls and the No. 1 Bearing inner race are a serialized set which must be kept together as a set in each engine build.

      1. Measure and record the following dimensions.

      2. Dimension A of the rotor center shaft ENGINE-LP STUB SHAFT AND ROTOR CENTRE (72-32-51, 01-100).

      3. Dimension C of the No. 1 Bearing seat No. 1 Bearing Front Face Seal Assembly (72-32-53, 01-450).

      4. Dimension E of the inner race front half of the No. 1 Bearing ENGINE-NO.1 BEARING (72-32-54, 01-150).

      5. Dimension D of the inner race rear half of the No. 1 Bearing No. 1 Bearing Front Face Seal Assembly (72-32-53, 01-150).

    1. SUBTASK 72-32-50-440-051 Install the Stub Shaft Assembly to the Holder

    2. Refer to Figure.

    3. Install IAE 1J12386 Restraint holder 1 off on to IAE 1J12387 Work stand 1 off with the eight bolts (part of the restraint holder).

      1. Install the Stub Shaft Assembly ENGINE-LP STUB SHAFT AND ROTOR CENTRE (72-32-51, 01-350) on to the restraint holder.

      2. Make sure that there are no burrs and unwanted material on the mating faces of the Stub Shaft Assembly and the restraint holder.

      3. Align the top position of the Stub Shaft Assembly to one of the two holes in the restraint holder.

      4. Put the Stub Shaft Assembly on the restraint holder with the front flange down.

    1. SUBTASK 72-32-50-440-052 Prepare to Install the Rotor Center Shaft on to the Stub Shaft Assembly

    2. Refer to Figure and Figure.

    3. Lubricate the threads of the two aligning pins (part of IAE 1J12106 Aligning pin set 1 off) with CoMat 10-077 APPROVED ENGINE OILS.

    4. Make sure that there are no burrs and unwanted material on the mating face of the Stub Shaft Assembly.

      1. Install two aligning pins in the rotor center shaft.

      2. Make sure the location of the correlation mark on the rotor center shaft.

      3. Install one aligning pin in the thread at the location of the correlation mark.

      4. Install the other aligning pin in the thread 180 degrees apart from the installed aligning pin.

    5. Put the rotor center shaft in an oven. Increase the temperature in the oven to 302 deg F (150 deg C) and keep the same temperature for 20 minutes.

    1. SUBTASK 72-32-50-440-053 Install the Rotor Center Shaft (72-32-51, 01-100) on to the Stub Shaft Assembly

      WARNING

      BE CAREFUL BECAUSE THE ROTOR CENTER SHAFT IS HOT. USE APPROVED GLOVES WHEN YOU REMOVE IT FROM THE OVEN.
    2. Refer to Figure, Figure and Figure.

    3. Lubricate the new ENGINE-LP STUB SHAFT AND ROTOR CENTRE ( 72-32-51, 01-110) seal ring 1 off with CoMat 10-077 APPROVED ENGINE OILS.

    4. Install the seal ring in to the groove in the Stub Shaft Assembly.

    5. Make sure that there is no twist of the seal ring.

    6. Find the headless pin of the Stub Shaft Assembly.

    7. Remove the rotor center shaft from the oven with the approved gloves.

    8. Align the correlation mark of the rotor center shaft with the top position of the Stub Shaft Assembly. Install the locating hole in the rotor center shaft on to the headless pin of the Stub Shaft Assembly.

    9. Install IAE 1J12388 Hydraulic pusher 1 off to the rotor center shaft.

    10. Attach a hydraulic pump to the cylinder (part of the hydraulic pusher).

      1. Operate the hydraulic pump and apply a load of 1428 psi (9853 kPa) to the hydraulic pusher until the flange of the rotor center shaft touches the Stub Shaft Assembly.

      2. Operate the hydraulic pump and apply the oil pressure to the cylinder.

      3. Increase the oil pressure until the flange of the rotor center shaft touches the Stub Shaft Assembly.

    11. Continue to push the hydraulic pusher until the rotor center shaft becomes cool.

    12. Release the oil pressure of the hydraulic pump and disconnect it from the cylinder.

    13. Remove the hydraulic pusher from the rotor center shaft.

    1. SUBTASK 72-32-50-440-055 Prepare the LP Stub Shaft and Rotor Center for Installation of PMI Mandrel

    2. Refer to Figure and Figure.

    3. Put the LP stub shaft and rotor center on a work bench.

      1. Attach IAE 1J12394 Balance adapter 1 off to the Stub Shaft Assembly.

      2. Put the spline of adapter A (part of the balance adapter) in to the internal spine of the Stub Shaft Assembly fully to the bottom.

      3. Turn the teeth of the spline a half pitch (approximately 6 degrees) to prevent adapter A from removing.

      4. Put the splines of the adapter B (part of the balance adapter) in to the internal spline of the Stub Shaft Assembly.

      5. Safety the adapter B with the U-nut and the washer.

    4. Turn the LP stub shaft and rotor center and put on IAE 1J12395 Work stand 1 off with the rear end down.

    5. Remove the two aligning pins from the LP stub shaft and rotor center.

    1. SUBTASK 72-32-50-440-056 Attach the PMI Mandrel to the LP Stub Shaft and Rotor Center

    2. Refer to Figure, Figure, Figure, Figure and Figure.

    3. Install the three guide pins (part of IAE 1J12398 PMI mandrel 1 off) to the LP stub shaft and rotor center.

      1. Install the guide pin (part of IAE 1J12397 Front sling) in the guide pin hole of the PMI mandrel. Put the guide in the PMI mandrel.

      2. Align the guide pin hole of the guide (part of the front sling) with the guide pin on the PMI mandrel.

      3. Install the guide on the PMI mandrel.

      4. Put the adapter, the fork end and the eye (part of IAE 1J12397 Front sling) in the slot of the guide.

      5. Align the lock pin hole of the adapter with the lock pin hole of the guide.

      6. Install the lock pin (part of IAE 1J12397 Front sling) in the lock pin hole of the guide through the lock pin thread hole of the adapter.

    4. Install the dowel pin (part of the front sling) in the dowel pin hole of the guide.

    5. Attach a hoist to the front sling.

    6. Lift the PMI mandrel up with the hoist.

    7. Clean the curvic teeth of the PMI mandrel with CoMat 01-124 ISOPROPYL ALCOHOL.

    8. Put the PMI mandrel on to the stub shaft and rotor center on the work stand.

    9. Align the three boltholes in the PMI mandrel with the three guide pins on the LP stub shaft and rotor centre.

      1. Install the PMI mandrel on the LP stub shaft and rotor center with the 24 bolts (part of the PMI mandrel).

      2. Lubricate the threads of the 24 bolts with CoMat 10-077 APPROVED ENGINE OILS.

      3. Install the 21 bolts.

      4. Remove the three guide pins. Install the three bolts.

      5. Torque the 24 bolts to 443 lbfin to 566 lbfin (50 Nm to 64 Nm) in the sequence given on Figure. Then torque the same bolts to 885 lbfin to 1133 lbfin (100 Nm to 128 Nm) in the sequence.

    1. SUBTASK 72-32-50-440-078 Prepare the Balancing Machine for Use

    2. Refer to Figure.

      NOTE

      The bolts that attach the end drive to the balancing machine must all have the same weight.
    3. Attach the Schenck 022748 end drive to the balancing machine.

    4. Install the balancing machine rollers on to the pedestals.

    5. Set the distance between the No. 1 and No. 2 pedestals. This distance must be sufficient so that the rotor center shaft touches the No. 2 pedestal and the Stub Shaft Assembly touches the No. 1 pedestal.

    1. SUBTASK 72-32-50-440-057 Install the LP Stub Shaft, Rotor Center and PMI Mandrel Assembly (LP Shaft and Mandrel Assembly) on to the Balancing Machine

    2. Refer to Figure, Figure, Figure and Figure.

    3. Move the LP shaft and Mandrel Assembly to the balance area.

    4. Lift the LP shaft and Mandrel Assembly with the hoist.

    5. Make the LP shaft and Mandrel Assembly horizontally.

    6. CAUTION

      DO NOT ATTACH THE NYLON SLING AROUND THE BEARING MATING FACE. THE NYLON SLING CAN CAUSE DAMAGE TO THE BEARING MATING FACE.

      Attach a nylon sling across the rear part (No. 2 Bearing side) of the LP shaft and Mandrel Assembly.

    7. Attach the other hoist to the nylon sling.

    8. Make the LP shaft and Mandrel Assembly horizontally with two hoists.

      NOTE

      Do not put the oil port of the rotor center shaft on the balancing machine rollers of the pedestal.
    9. Carefully lower the LP shaft and Mandrel Assembly on to the balancing machine. Make sure that the No. 2 Bearing location diameter (diameter ER) touches the No. 1 pedestal and the No. 1 Bearing location diameter EF) touches the No. 2 pedestal.

      NOTE

      Do not loosen the hoist until you have safetied the balancing machine upper roller of the No. 1 pedestal.
    10. Attach and safety the balancing machine upper roller of the No. 1 pedestal so that the LP shaft and Mandrel Assembly does not lift up.

    11. Align the zero degrees reading of the protractor wheel with the correlation mark of the rotor center shaft.

    12. Connect the balance adapter and the end drive of the balancing machine and safety with the six screws (part of the balance adapter).

      1. Remove the front sling from the PMI mandrel.

      2. Remove the lock pin from the guide through the adapter.

      3. Turn the adapter and remove the adapter from the PMI mandrel.

      4. Remove the guide from the PMI mandrel.

    1. SUBTASK 72-32-50-220-051 Measure the Runouts of the PMI Mandrel and the LP Stub Shaft and Rotor Center Assembly

    2. Refer to Figure.

      1. Measure the runouts of the diameter A, the face B and the diameter C.

      2. Attach the three magnet bases and the three dial indicators to the balancing machine.

      3. Set the reading of the dial indicators to zero degrees.

      4. Turn the protractor of the balancing machine by hand and measure the runouts.

      5. The runouts of the diameter A and the face B must be less than 0.0019 in. (0.050 mm).

      6. The runout of the diameter C must be less than 0.0022 in. (0.056 mm).

    1. SUBTASK 72-32-50-440-058 Measure the Unbalance of the LP Shaft and Mandrel Assembly

    2. Refer to Figure and Figure.

      1. Set the balancing machine.

      2. Measure and write the dimensions of a, b, c, r1 and r2.

      3. Input the data measured in Step into the balancing machine.

    3. Start the balancing machine and run at the minimum of 600 rpm.

    4. Measure the amounts and the angles of the unbalance F1 on the planes F and R and write them on the record sheet.

    1. SUBTASK 72-32-50-440-059 Remove the PMI Mandrel

    2. Refer to Figure, Figure, Figure and Figure.

      1. Install the front sling in to the PMI mandrel.

      2. Install the guide pin in the guide pin hole of the PMI mandrel. Put the guide in the PMI mandrel.

      3. Align the guide pin hole of the guide with the guide pin on the PMI mandrel.

      4. Install the guide on the PMI mandrel.

      5. Put the adapter, the fork end and the eye in the slot of the guide.

      6. Align the lock pin hole of the adapter with the lock pin hole of the guide.

      7. Install the lock pin in the lock pin hole of the guide through the lock pin thread hole of the adapter.

      8. Install the dowel pin in the dowel pin hole of the guide.

    3. Attach a hoist on the front sling.

    4. Remove the balancing machine upper roller of the No. 1 pedestal from the LP shaft and Mandrel Assembly.

    5. Attach a nylon sling across the rear part (No. 2 Bearing side) of the LP shaft and Mandrel Assembly.

    6. Attach the nylon sling to a hoist.

    7. Remove the six screws which connect the end drive of the balancing machine and the balance adapter.

    8. Remove the end drive of the balancing machine from the balance adapter with the handle.

    9. Lift the LP shaft and Mandrel Assembly up from the balancing machine with the two hoists and move to the work area.

    10. Lift the front sling up and make the LP shaft and Mandrel Assembly vertical.

    11. Put the LP shaft and Mandrel Assembly in to IAE 1J12395 Work stand 1 off.

      1. Remove the front sling from the PMI mandrel.

      2. Remove the lock pin from the guide through the adapter.

      3. Turn the adapter and remove the adapter from the PMI mandrel.

      4. Remove the guide from the PMI mandrel.

    12. Remove one of the 24 bolts which connect the stub shaft and rotor center and the PMI mandrel.

    13. Lubricate the threads of the two guide pins (part of the PMI mandrel) with CoMat 10-077 APPROVED ENGINE OILS.

    14. Install the guide pin in the bolt hole at which the bolt was removed.

    15. Make a temporary mark on the PMI mandrel to show the location of the guide pin with CoMat 06-069 MARKER.

    16. Make another temporary mark on the PMI mandrel at the location 180 degrees apart from the guide pin.

    17. Remove the bolt at the marked location.

    18. Install another guide pin in the bolt hole at which the bolt was removed.

    19. Remove the 22 remaining bolts which connect the LP stub shaft and rotor center and the PMI mandrel.

    20. Attach the front sling in to the PMI mandrel.

    21. Attach the front sling to a hoist.

    22. Lift up and remove the PMI mandrel.

    1. SUBTASK 72-32-50-440-061 Turn the PMI Mandrel 180 Degrees

    2. Refer to Figure.

    3. Make sure the location of the temporary mark on the PMI mandrel.

    4. Attach a hoist to the front sling.

    5. Lift the PMI mandrel up and move above the LP stub shaft and rotor center.

    6. Clean the curvic teeth of the PMI mandrel with CoMat 01-124 ISOPROPYL ALCOHOL.

    7. Make sure the location of the temporary mark 180 degrees apart on the opposite side from the first aligning pin on the LP stub shaft and rotor center.

    8. Turn the PMI mandrel 180 degrees in its plane and put on the LP stub shaft and rotor center shaft.

    9. Attach the 22 bolts to the LP stub shaft and rotor center and safety by hand.

    10. Remove the two guide pins. Attach the two bolts and safety by hand.

    11. Torque the 24 bolts to 443 lbfin to 566 lbfin (50 Nm to 64 Nm) in the sequence given on Figure. Then torque the same bolts to 885 lbfin to 1133 lbfin (100 Nm to 128 Nm) in the sequence.

    1. SUBTASK 72-32-50-440-062 Install the Balance Stub Shaft Assembly on to the Balance Machine

    2. Refer to Figure, Figure, Figure and Figure.

    3. Move the LP shaft and Mandrel Assembly with the work stand to the balance area.

    4. Lift the LP shaft and Mandrel Assembly up with the front sling.

    5. Attach a nylon sling across the rear part (No. 2 Bearing side) of the balance Stub Shaft Assembly. Lift the LP shaft and Mandrel Assembly with a hoist and make it horizontal.

    6. CAUTION

      DO NOT ATTACH THE NYLON SLING AROUND THE BEARING MATING FACE. THE NYLON SLING CAN CAUSE DAMAGE TO THE BEARING MATING FACE.

      Carefully lower the LP shaft and Mandrel Assembly on to the balancing machine.

      NOTE

      Do not put the oil port of the rotor center shaft on the balancing machine rollers of the pedestal.
    7. Make sure that the No. 2 Bearing location diameter (diameter ER) touches the No. 1 pedestal and the No. 1 Bearing location diameter (diameter EF) touches the No. 2 pedestal.

      NOTE

      Do not loosen the hoist until you have safetied the balancing machine upper roller of the No. 1 pedestal.
    8. Attach and safety the balancing machine upper roller of the No. 1 pedestal so that the LP shaft and Mandrel Assembly does not lift up.

    9. Align the zero degrees reading of the protractor wheel with the top of the PMI mandrel.

    10. Connect the balance adapter and the end drive of the balancing machine and safety with the six screws (part of the balance adapter).

    11. Remove the front sling from the mandrel.

    1. SUBTASK 72-32-50-220-052 Measure the Runouts of the PMI Mandrel Again

    2. Refer to Figure.

      1. Measure the runouts of the diameter A, the surface B and the diameter C.

      2. Attach the three magnet bases and the three dial indicators to the balancing machine.

      3. Set the reading of the dial indicators to zero degrees.

      4. Turn the protractor of the balancing machine by hand and measure the runouts.

      5. The runouts of the diameter A and the surface B must be less than 0.0019 in. (0.050 mm).

      6. The runout of the diameter C must be less than 0.0022 in. (0.056 mm).

    1. SUBTASK 72-32-50-440-063 Measure the Unbalance after You Turn the LP Shaft Assembly 180 Degrees to the PMI Mandrel

    2. Refer to Figure.

    3. Start the balancing machine and run at the minimum of 600 rpm.

    4. Measure the amounts and the angles of the unbalances F2 on the planes F and R and write them on the record sheet.

    1. SUBTASK 72-32-50-440-064 Calculate the Amounts of the Unbalances on the Planes F and R

    2. Refer to Figure and Figure.

    3. Find the vector of the balance indication on the plane F.

    4. Find the vector of the balance indication on the plane R.

      1. Make sure the amounts of the initial unbalances of the LP stub shaft and rotor center are in the limits and record them. The initial unbalance limits are:

      2. Plane F: 20.13 oz in. (14500 gmm).

      3. Plane R: 7.08 oz in. (5100 gmm).

    5. If the initial unbalance values are more than the limits, the LP stub shaft and rotor center must be rejected.

    6. Write the amounts and the phase angles of the unbalances on the planes F and R the record sheet.

    1. SUBTASK 72-32-50-440-065 Correct the Unbalances on the Planes F and R

    2. Refer to Figure, Figure and Figure.

      NOTE

      The amount and phase angle of unbalance are identified in Step.
      1. Find the amount of the metal to be removed from the rotor center shaft to correct the unbalance on the plane F.

        NOTE

        It is better to underestimate the position of the intersection point.
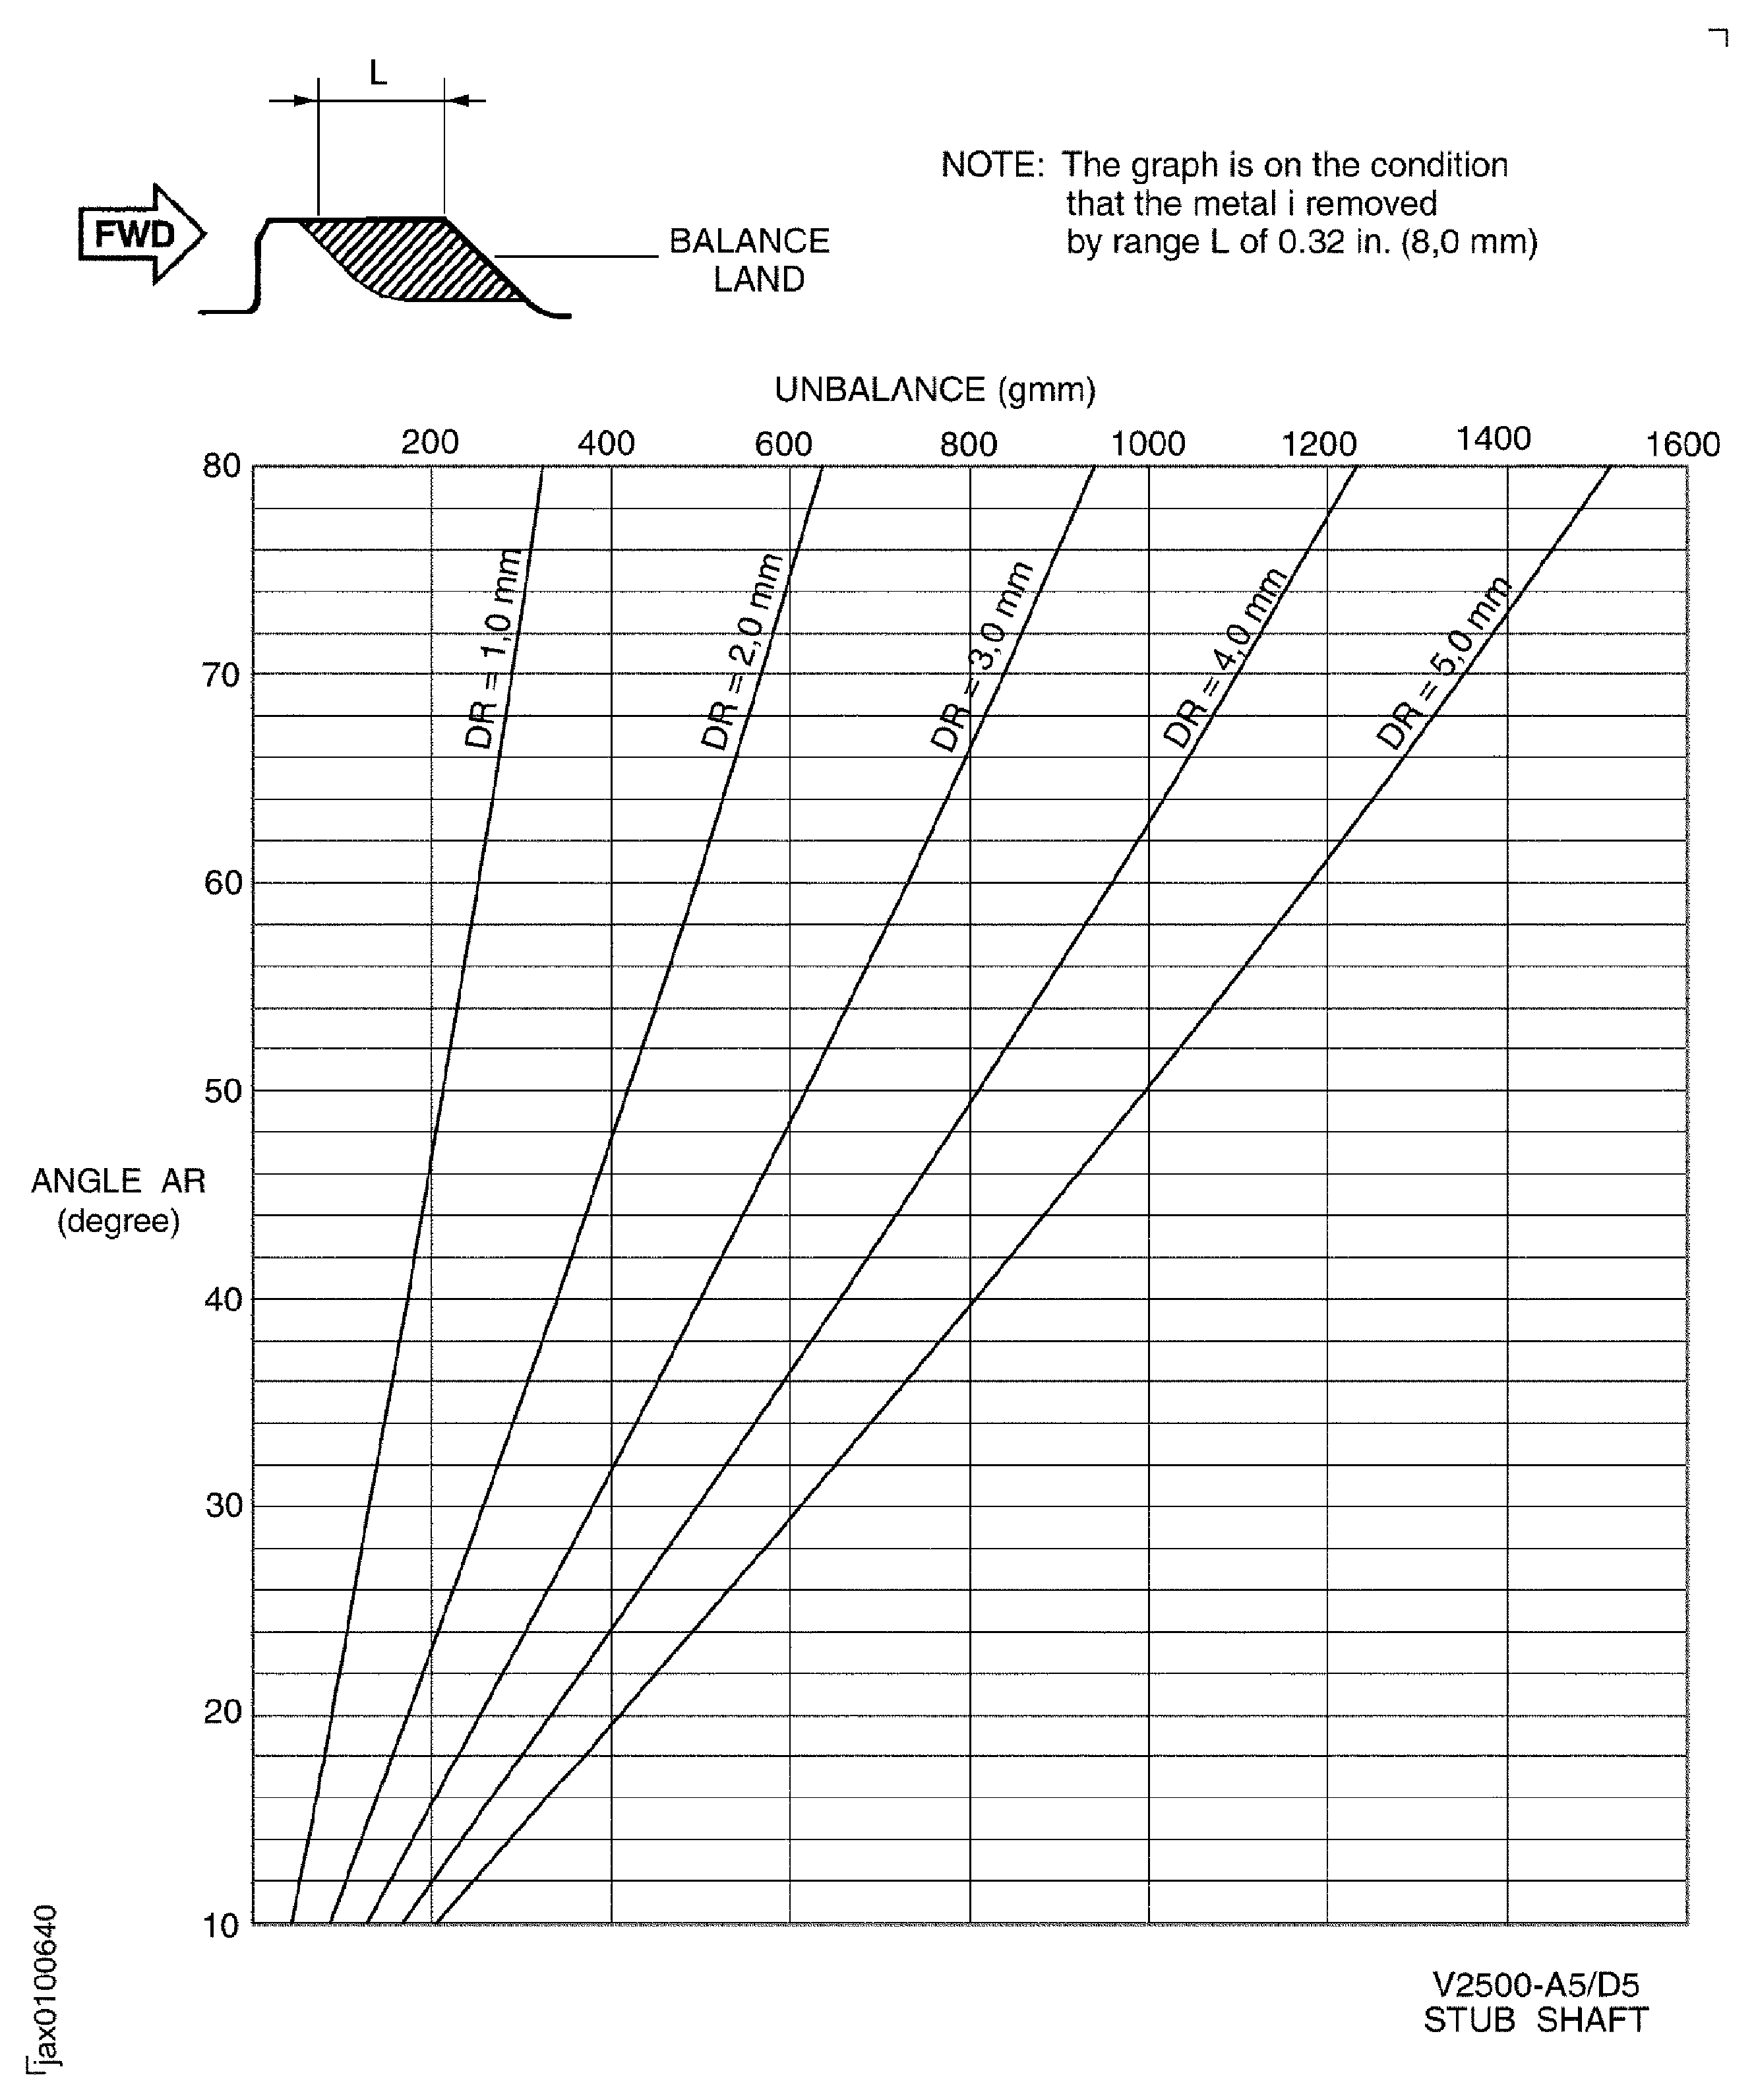
      2. Use the graph and find the angle AF and dimension DF to be removed from the land LF. Record the angle AF and the dimension DF.

        NOTE

        If you consider correcting the unbalance many times at overhaul hereafter, it is better smaller angle AF.
        1. Example.

        2. Initial unbalance = 2500 gmm.

        3. If you decide that the dimension DF is 4.00 mm, the angle AF is about 31 degrees.

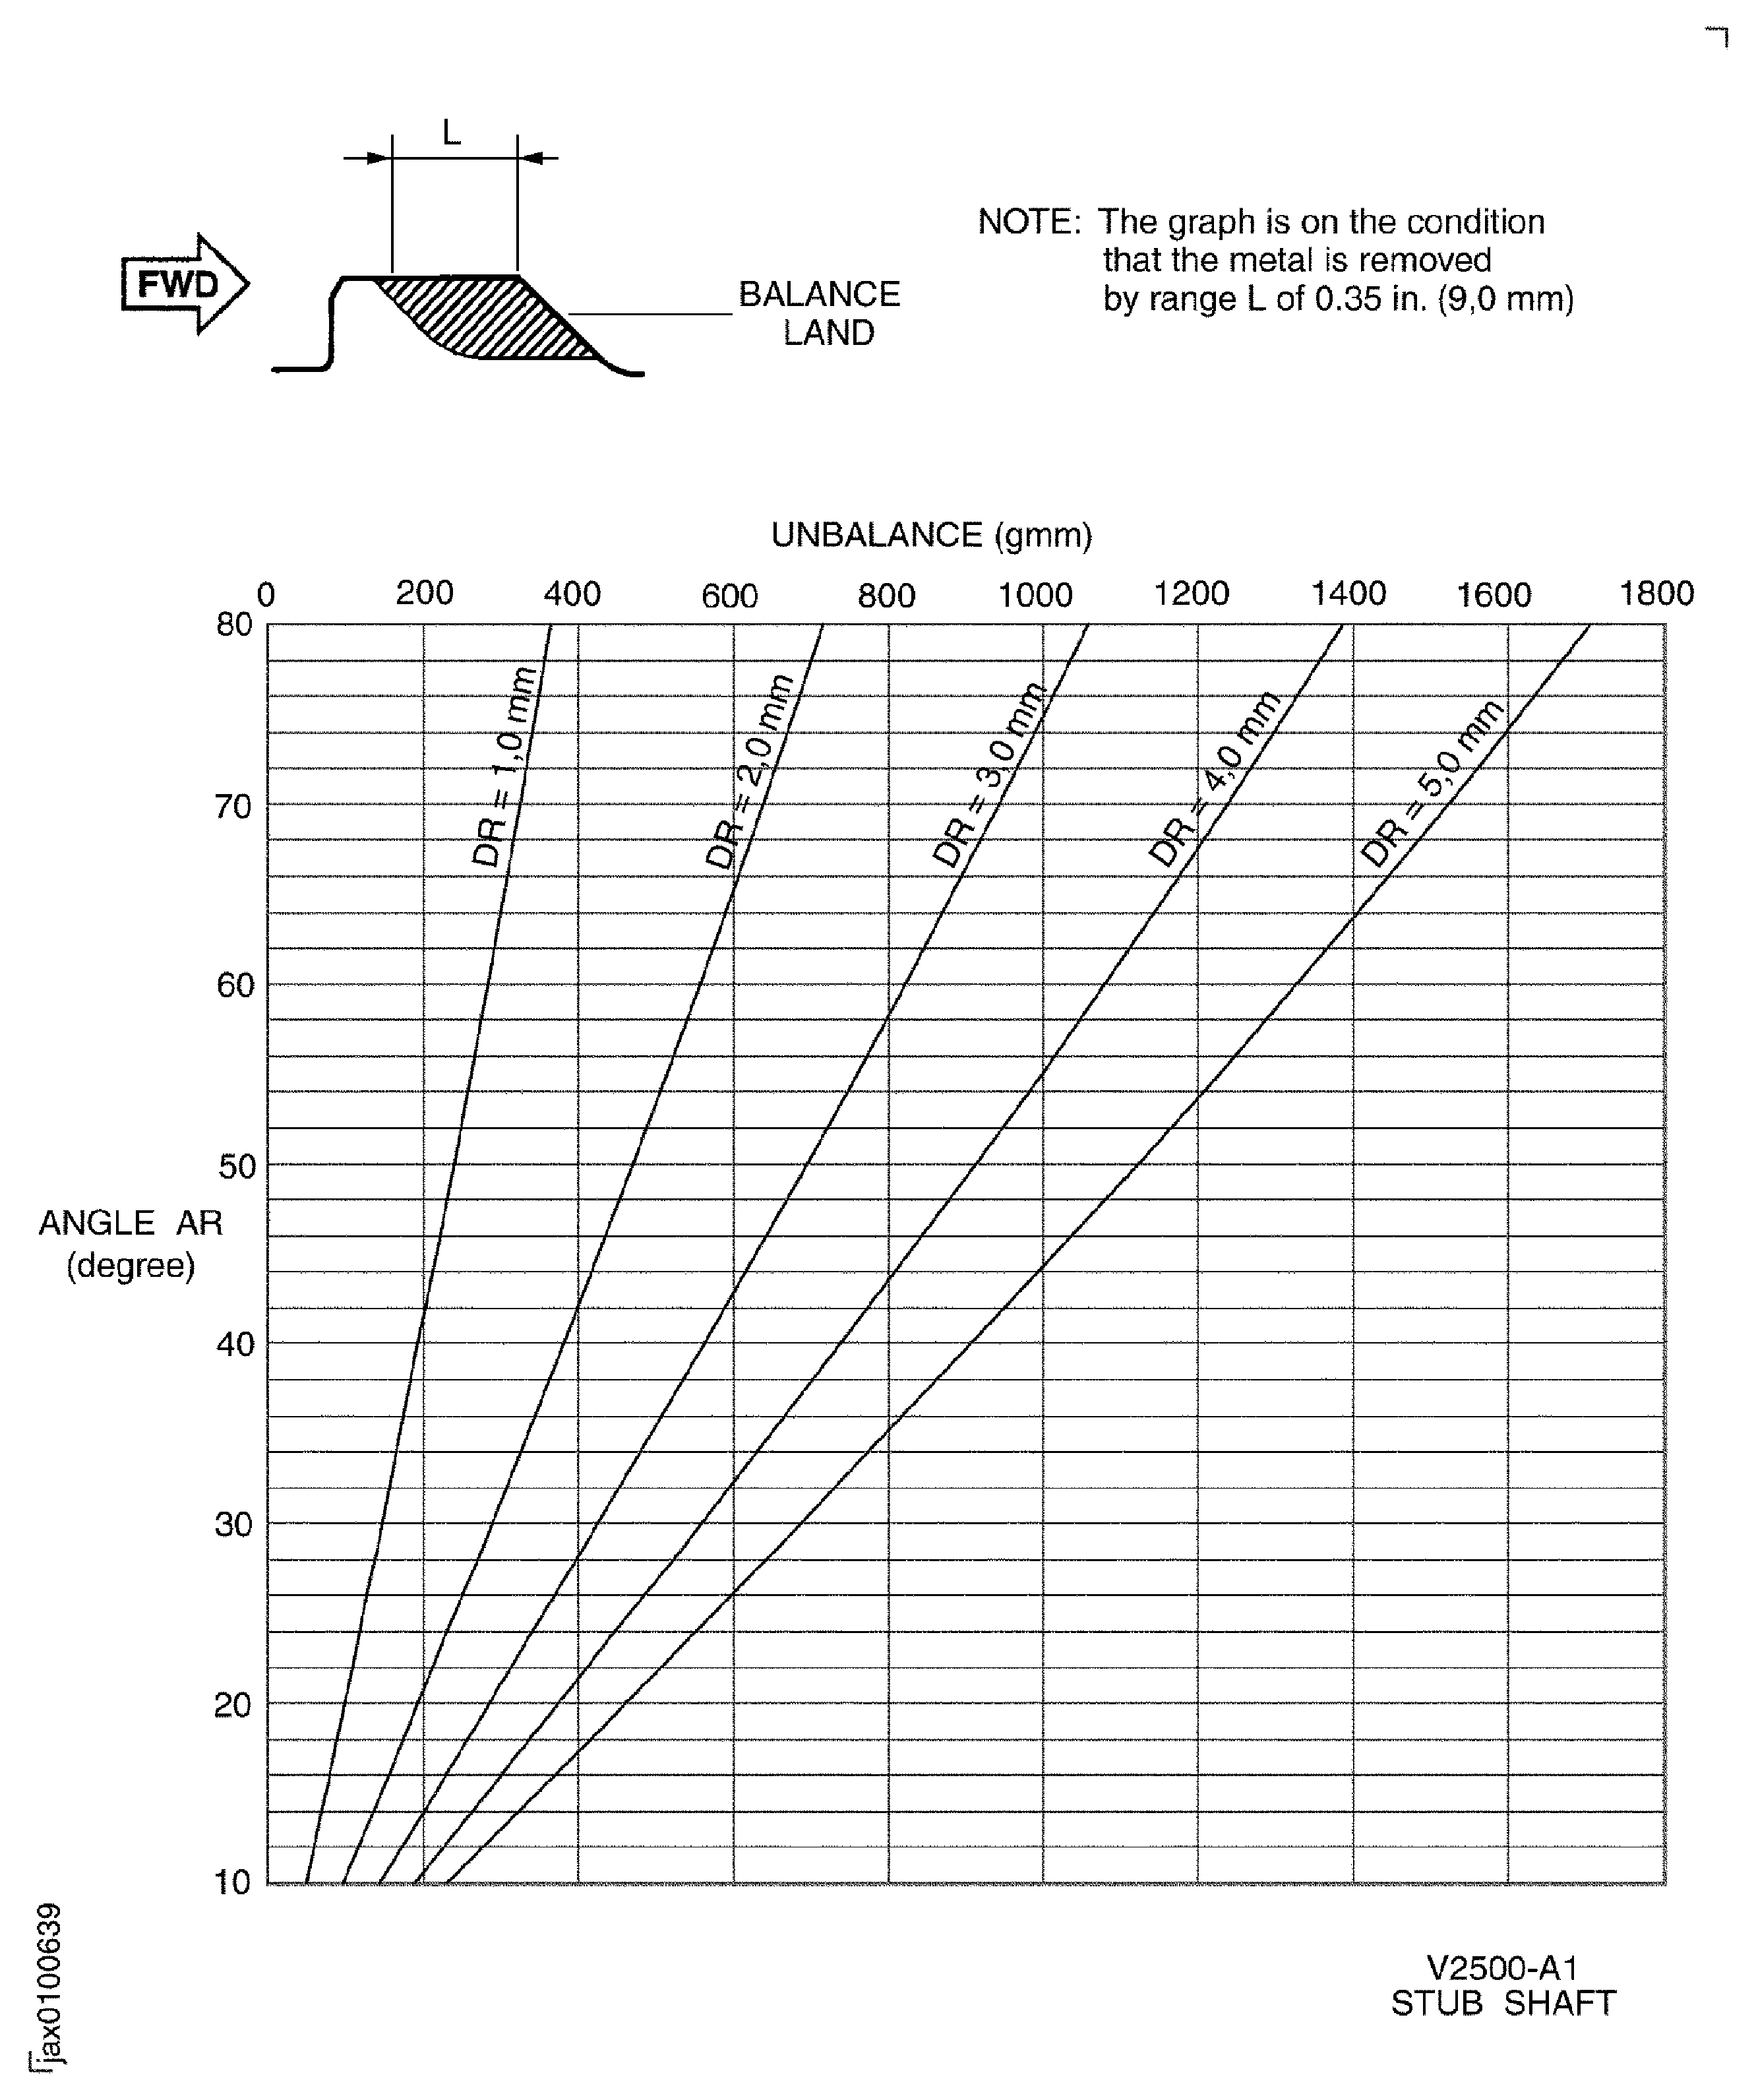
      1. V2500-A1: Find the amount of the metal to be removed from the Stub Shaft Assembly to correct the unbalance on the plane R.

        NOTE

        It is better to underestimate the position of the intersection point.
      2. Use the graph and find the angle AR and dimension DR to be removed from the land LR. Record the angle AR and the dimension DR.

        NOTE

        If you consider correcting the unbalance many times at overhaul hereafter, it is better smaller angle AR.
        1. Example.

        2. Initial unbalance = 900 gmm.

        3. If the dimension DR is 5.0 mmm, the angle AR is about 40 degrees.

      1. V2500-A5: Find the amount of the metal to be removed from the Stub Shaft Assembly to correct the unbalance on the plane R.

        NOTE

        It is better to underestimate the position of the intersection point.
      2. Use the graph and find the angle AR and dimension DR to be removed from the land LR. Record the angle AR and the dimension DR.

        NOTE

        If you consider correcting the unbalance many times at overhaul hereafter, it is better smaller angle AR.
        1. Example.

        2. Initial unbalance = 1100 gmm.

        3. If the dimension DR is 5.0 mmm, the angle AR is about 56 degrees.

    3. CAUTION

      DO NOT USE A HAND TOOL TO REMOVE THE METAL. HAND GRINDING CAN CAUSE MATERIAL DAMAGE.

      Attach the clean cloth on the bearing journal of the Stub Shaft Assembly.

    4. Machine off the metal of the lands LF and LR.

    5. The surface finish of the planes F and R after blend must be 200 micro in. (5.08 micrometer). Refer to the SPM TASK 70-35-09-350-501 for the surface finish.

    1. SUBTASK 72-32-50-440-066 Measure the Amounts of the Final Unbalance after the Correction of the Balance

    2. Refer to Figure.

    3. Measure the amounts and the angles of the final unbalances on the planes F and R. Refer to Step, Step and Step.

    4. Find the vectors of the balance indications on the planes F and R.

      1. Make sure the amounts of the unbalances of the LP stub shaft and rotor center are in the limits and record them. The unbalance limits are:

      2. Plane F: 0.22 oz in. (160 gmm).

      3. Plane R: 0.10 oz in. (72 gmm).

      1. If the unbalance is more than the limits, do the following steps until the unbalance in both planes is less than limits.

      2. Do Step to correct unbalance in plane/s F and/or R.

      3. Do Step, Step and Step to measure the amount of the unbalance.

    1. SUBTASK 72-32-50-440-067 Remove the LP Stub Shaft Assembly from the Balancing Machine

    2. Refer to Figure, Figure, Figure and Figure.

    3. Attach front sling to the inside of the PMI mandrel. Pull the front sling with a hoist.

    4. Remove the balancing machine upper roller of the No. 1 pedestal.

    5. Attach a nylon sling across the rear part (No. 2 Bearing side) of the LP shaft and Mandrel Assembly.

    6. Attach the nylon sling to a hoist.

    7. Remove the six screws which connect the end drive of the balancing machine and the balance adapter.

    8. Turn in the end drive of the balancing machine by handle.

    9. Lift the LP shaft and Mandrel Assembly up from the balancing machine with the two hoists and move to the work area.

    10. Lift the front sling up and make the LP shaft and Mandrel Assembly vertical.

    11. Put the LP shaft and Mandrel Assembly in to the work stand.

      1. Remove the front sling from the PMI mandrel.

      2. Remove the lock pin from the guide through the adapter.

      3. Turn the adapter and remove the adapter from the PMI mandrel.

      4. Remove the guide from the PMI mandrel.

    1. SUBTASK 72-32-50-440-068 Remove the PMI Mandrel from the LP Stub Shaft and Rotor Center

    2. Refer to Figure and Figure.

    3. Remove the two bolts (part of the PMI mandrel) which are 180 degrees apart. Install the two guide pins (part of the PMI mandrel) in to the nut of the Stub Shaft Assembly.

    4. Remove the 22 remaining bolts (part of the PMI mandrel).

    5. Install and safety the front sling in to the PMI mandrel.

    6. Lift the PMI mandrel up with a hoist and put on the work bench.

      1. Remove the front sling from the PMI mandrel.

      2. Remove the lock pin from the guide through the adapter.

      3. Turn the adapter and remove the adapter from the PMI mandrel.

      4. Remove the guide from the PMI mandrel.

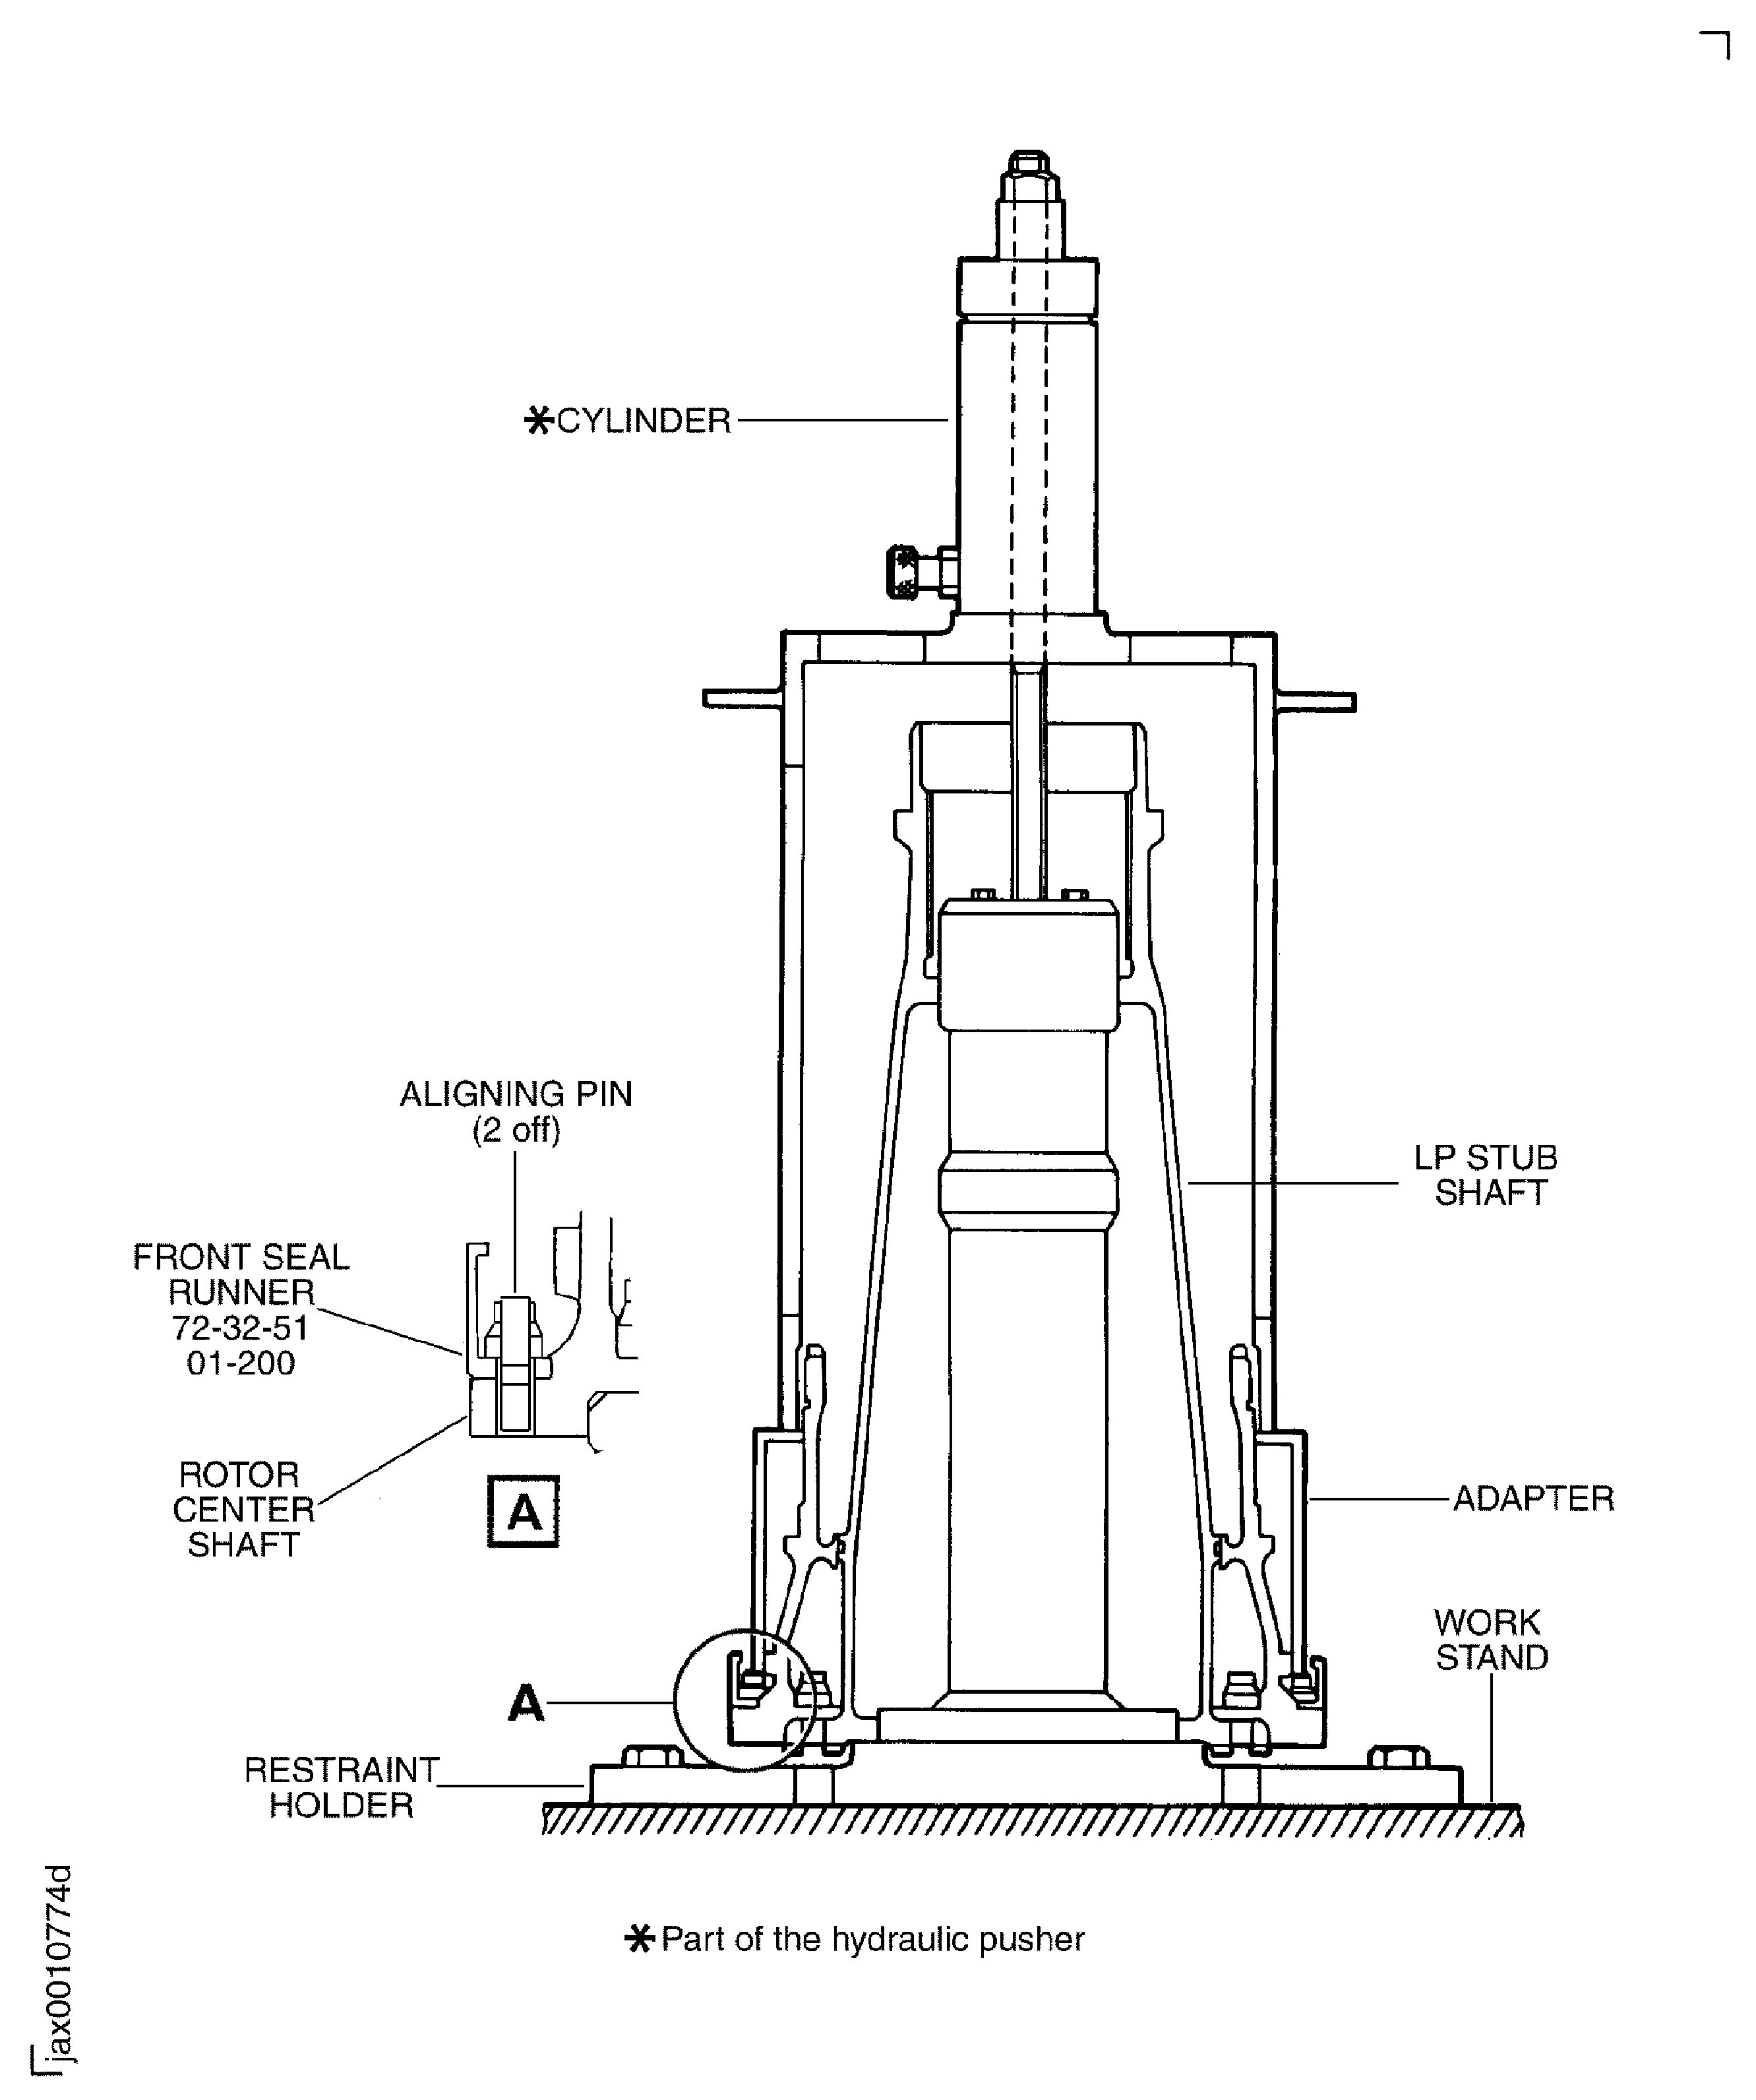
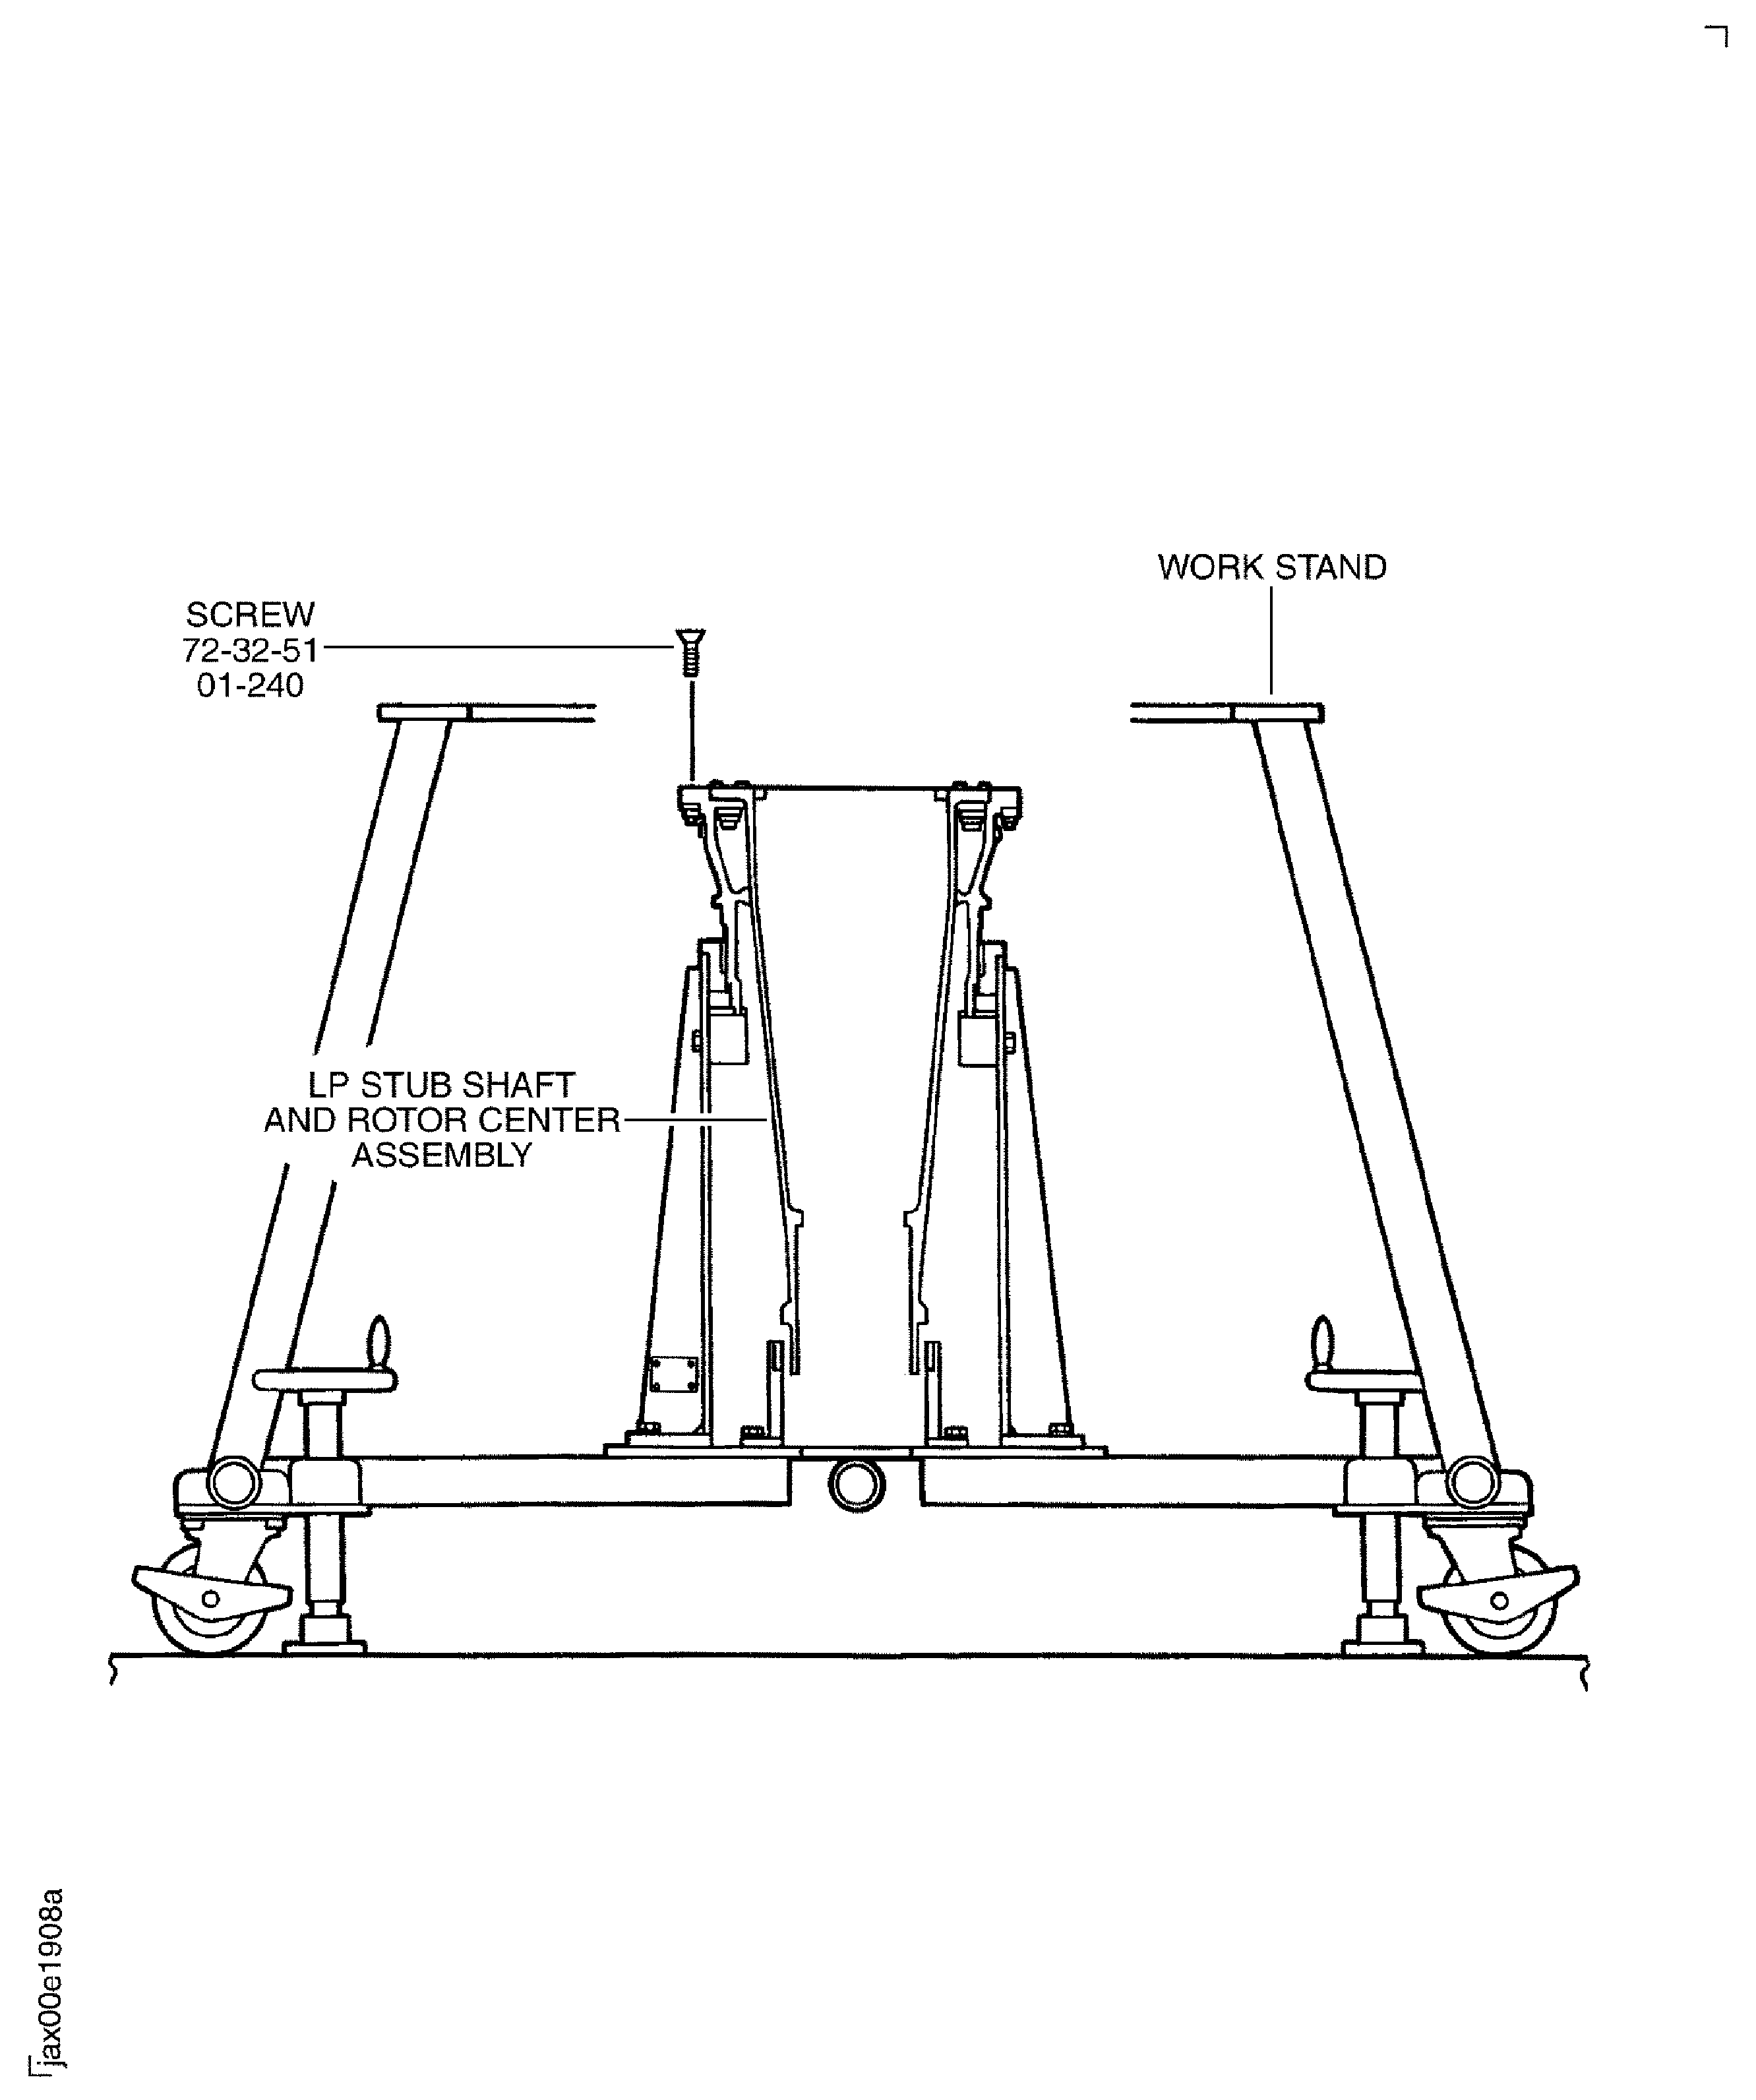
    1. SUBTASK 72-32-50-440-070-A00 V2500-A1: Install the Front Seal Runner (72-32-51, 01-200) on to the LP Stub Shaft and Rotor Center (Pre SBE 72-0132)

    2. Refer to Figure and Figure.

    3. Install the two aligning pins (part of IAE 1J12499 Aligning pin set 1 off) 180 degrees apart from each other in to the anchor nuts of the front seal runner.

    4. Put the front seal runner and the aligning pins assembly in an oven. Increase the temperature in the oven to 266 deg F (130 deg C) and keep the same temperature for 15 minutes.

      1. WARNING

        BE CAREFUL BECAUSE THE FRONT SEAL RUNNER IS HOT. USE APPROVED GLOVES WHEN YOU REMOVE IT FROM THE OVEN.

        Remove the front seal runner and the aligning pins assembly from the oven. Install the front seal runner and the aligning pins assembly to the rotor center shaft immediately after removal of the front seal runner and the aligning pins assembly from the oven.

        NOTE

        Installation of the screws ENGINE-LP STUB SHAFT AND ROTOR CENTRE (72-32-51, 01-240) in to the two threads is done in Step.
      2. Align the two aligning pins with the two holes of the 24 boltholes on the rotor center shaft and align the two small threads in the front seal runner with the two small holes in the rotor center shaft.

      3. Attach the front seal runner and the aligning pins assembly to the rotor center shaft.

    5. Put IAE 1J12500 Adapter 1 off on to the front seal runner.

    6. Install IAE 1J12388 Hydraulic pusher 1 off to the adapter.

    7. Attach a hydraulic pump to the cylinder (part of the hydraulic pusher).

      1. Operate the hydraulic pump and apply a load to the hydraulic pusher until the front seal runner and the aligning pins assembly touches the rotor center shaft.

      2. Operate the hydraulic pump and apply the oil pressure to the cylinder.

      3. Increase the oil pressure until the front seal runner and the aligning pins assembly touches the rotor center shaft.

    8. Continue to push the hydraulic pusher until the front seal runner and the aligning pins assembly becomes cool.

    9. Release the oil pressure of the hydraulic pump and disconnect it from the cylinder.

    10. Remove the hydraulic pusher from the adapter.

    11. Remove the adapter from the rotor center shaft.

    12. Remove the Stub Shaft Assembly from the restraint holder. Install the Stub Shaft Assembly on to IAE 1J12395 Work stand 1 off with the rear end of the assembly down.

    13. Safety the front seal runner and the aligning pins assembly with the two screws ENGINE-LP STUB SHAFT AND ROTOR CENTRE (72-32-51, 01-240). Torque the bolt to 40 lbfin (4.52 Nm).

    14. Remove the aligning pins (part of IAE 1J12499 Aligning pin set) from the front seal runner and the aligning pins assembly.

    15. Make sure that there is no clearance between the front seal runner and the rotor center shaft.

    16. Make sure that the heads of the screws ENGINE-LP STUB SHAFT AND ROTOR CENTRE (72-32-51, 01-240) are under the surface of the rotor center shaft flange.

    1. SUBTASK 72-32-50-440-070-B00 V2500-A1: Install the Nut Ring (72-32-51, 01-200) on to the LP Stub Shaft and Rotor Center Assembly (SBE 72-0132)

    2. Refer to Figure.

      1. Install the nut ring to the rotor center shaft.

      2. Put the rotor center shaft with the end up on to the work stand.

      3. Put the nut ring to the rotor center shaft.

        NOTE

        Installation of the screws ENGINE-LP STUB SHAFT AND ROTOR CENTRE (72-32-51, 01-240) in to the threads is done in Step.
      4. Align the two threads in the nut ring with the two small threads in the rotor center shaft.

      5. Attach the nut ring to the rotor center shaft.

    3. Safety the nut ring with the two screws ENGINE-LP STUB SHAFT AND ROTOR CENTRE (72-32-51, 01-240). Torque the bolt to 40 lbfin (4.52 Nm).

    4. Make sure that there is no clearance between the nut ring and the rotor center shaft.

    5. Make sure that the heads of the screws ENGINE-LP STUB SHAFT AND ROTOR CENTRE (72-32-51, 01-240) are under the surface of the rotor center shaft flange.

    1. SUBTASK 72-32-50-440-070-C00 V2500-A5: Install the Nut Ring (72-32-51, 01-200) on to the LP Stub Shaft and Rotor Center

    2. Refer to Figure.

      1. Install the nut ring to the rotor center shaft.

      2. Put the rotor center shaft with the end up on to the work stand.

      3. Put the nut ring to the rotor center shaft.

        NOTE

        Installation of the screws ENGINE-LP STUB SHAFT AND ROTOR CENTRE (72-32-51, 01-240) in to the threads is done in Step.
      4. Align the two threads in the nut ring with the two small threads in the rotor center shaft.

      5. Attach the nut ring to the rotor center shaft.

    3. Safety the nut ring with the two screws ENGINE-LP STUB SHAFT AND ROTOR CENTRE (72-32-51, 01-240). Torque the bolt to 40 lbfin (4.52 Nm).

    4. Make sure that there is no clearance between the nut ring and the rotor center shaft.

    5. Make sure that the heads of the screws ENGINE-LP STUB SHAFT AND ROTOR CENTRE(72-32-51, 01-240) are under the surface of the rotor center shaft flange.

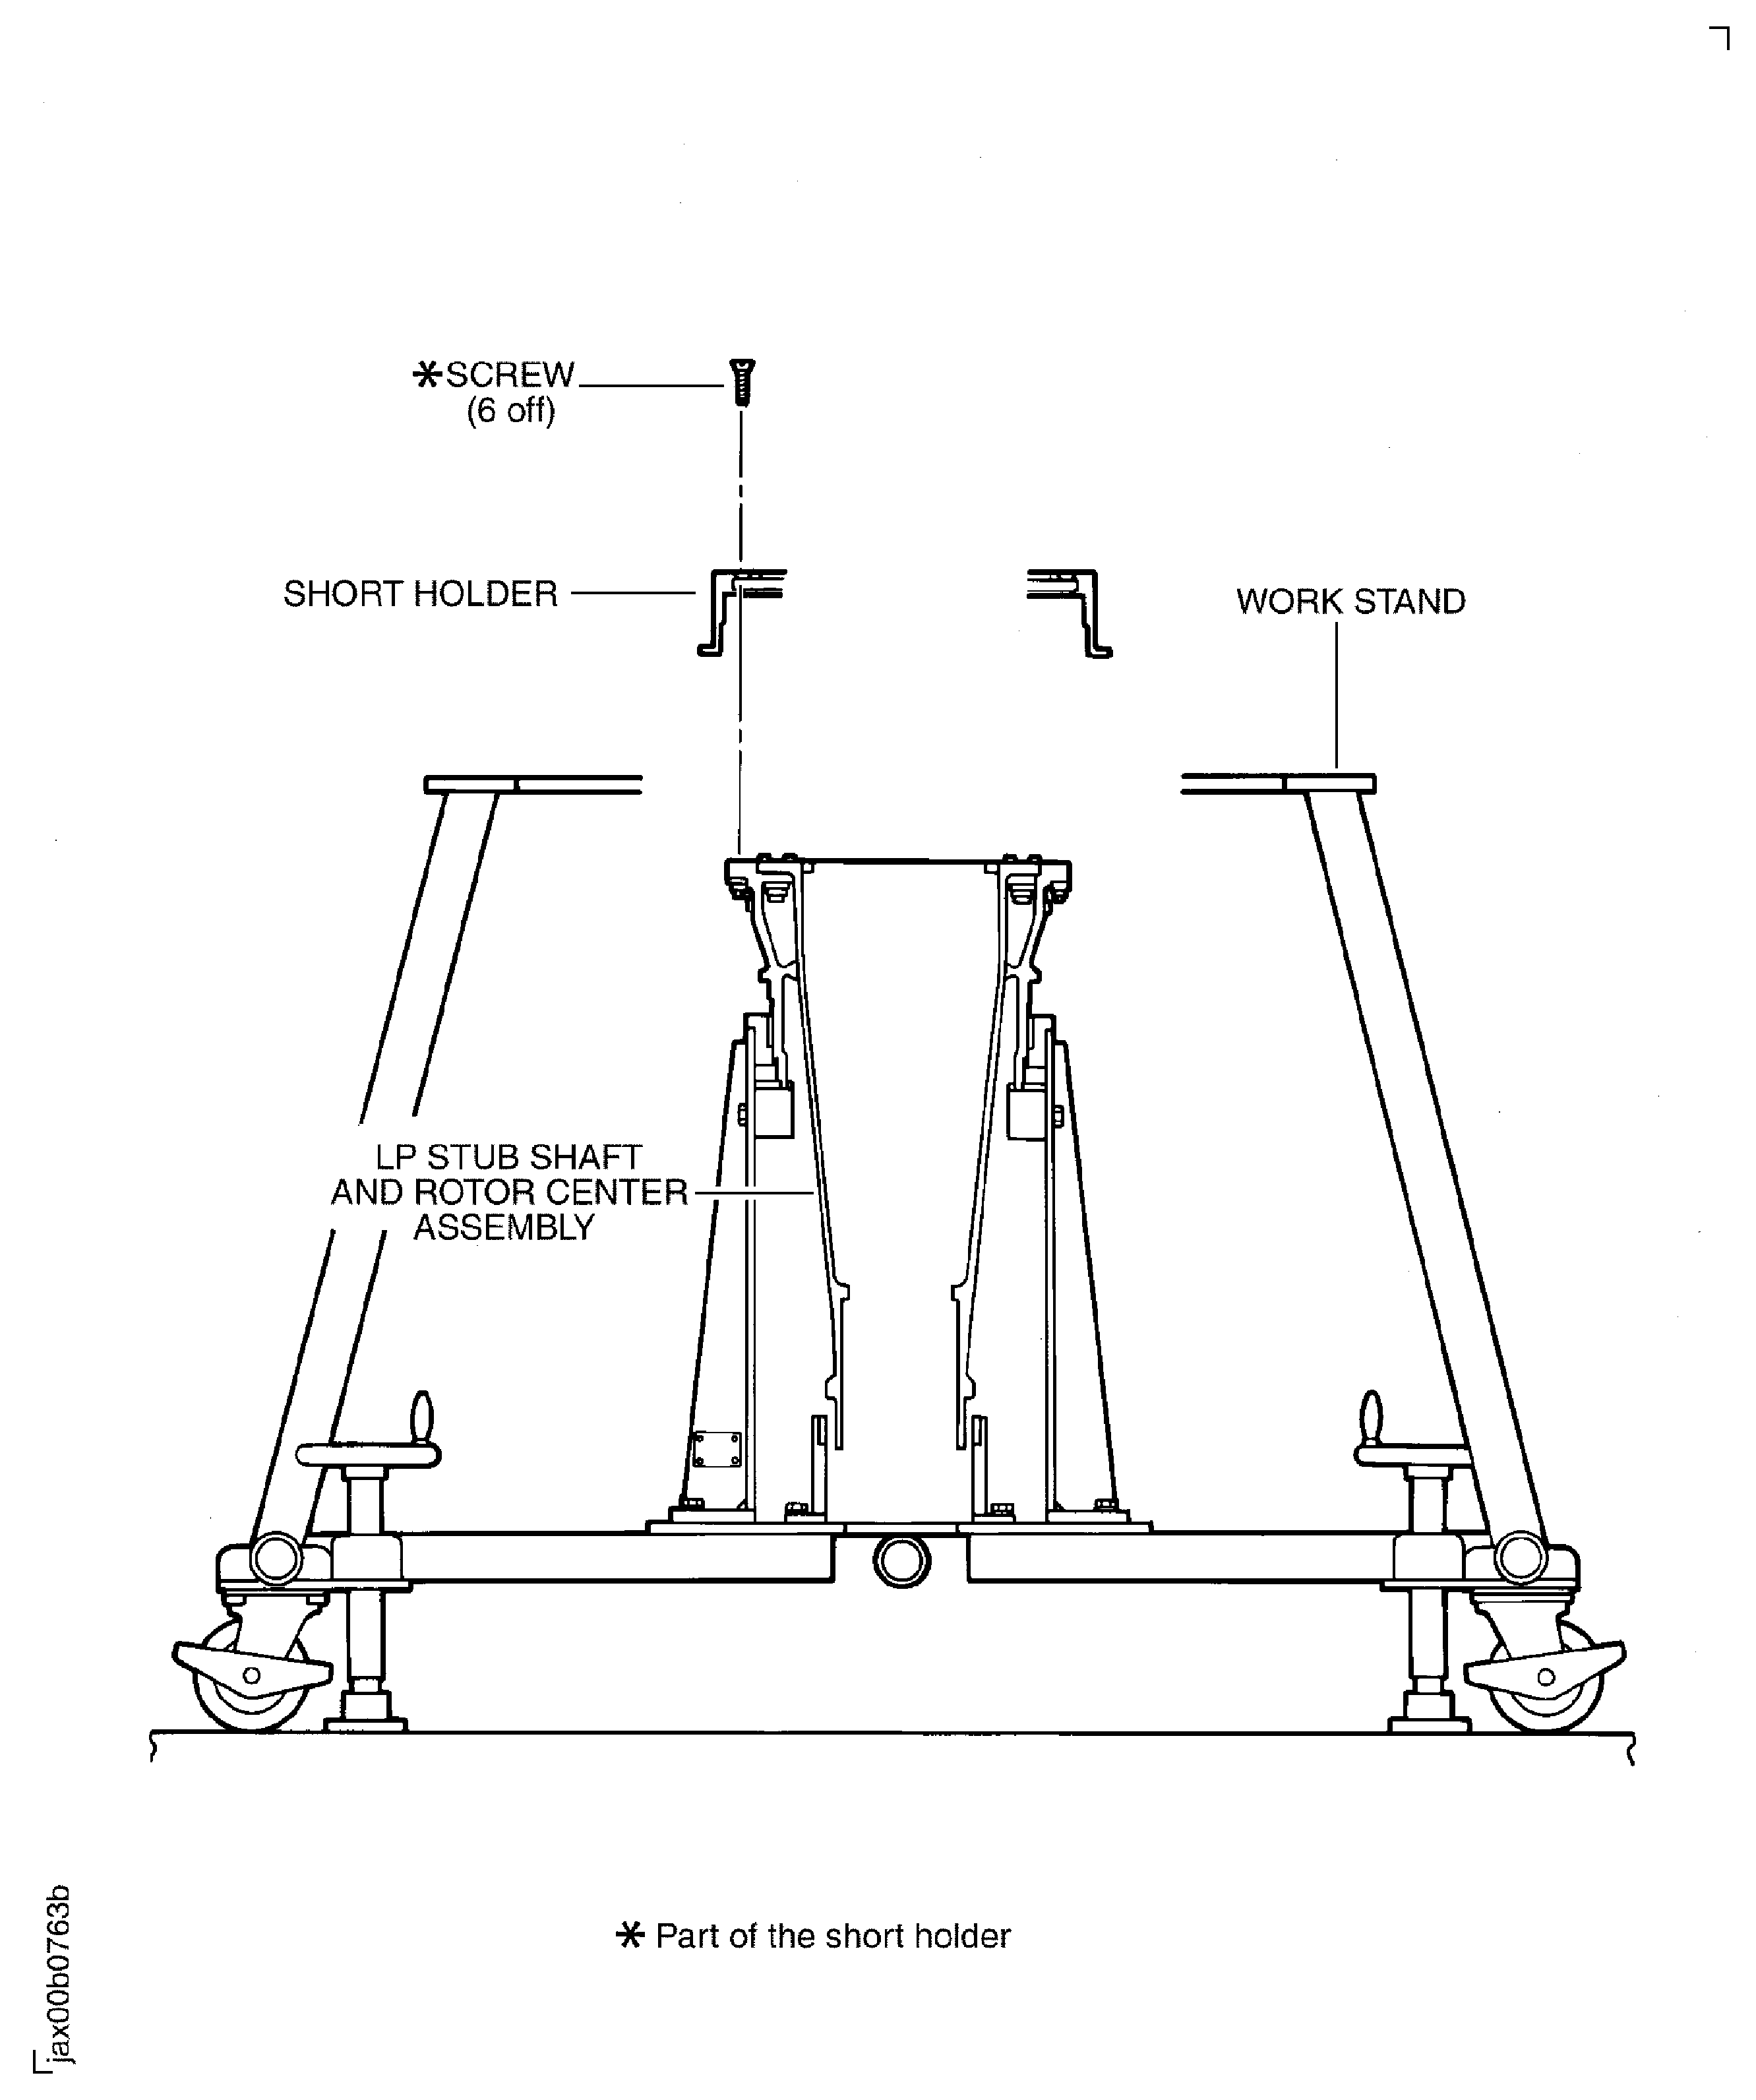
    1. SUBTASK 72-32-50-440-071 Install the No. 1 Bearing Seal Assembly (72-32-53, 01-105) on to the Rotor Center Shaft

    2. V2500-A1 Pre SBE 72-0132: Install IAE 1J12473 Seal holder 1 off to the rotor center shaft with the six screws.

    3. V2500-A1 SBE 72-0132 and V2500-A5: Install IAE 1J12462 Seal holder 1 off to the rotor center shaft with the six screws.

      NOTE

      These pins are parts for preventing the rotation of the LP stub shaft and Rotor Center Assembly when you tighten the No. 1 Bearing plain nut in Step.
    4. Install the six pins (part of the restraint holder) in the threaded holes of the short holder.

    5. Lift the LP stub shaft and Rotor Center Assembly until it is clear of the work stand.

    6. Turn the assembly vertically with its front end down.

    7. Align the six holes of the holder (part of the restraint holder) with the heads of the six pins that were installed in the short holder in the Step.

    8. Install the assembly on to the restraint holder.

    9. Align the nuts H of the No. 1 Bearing Seal Assembly with the three holes in the short holder. Safety the assembly with the three screws and washers.

    10. Make sure that there are no burrs and unwanted material on all the mating faces.

    11. Install the No. 1 Bearing Seal Seat on to the rotor center shaft.

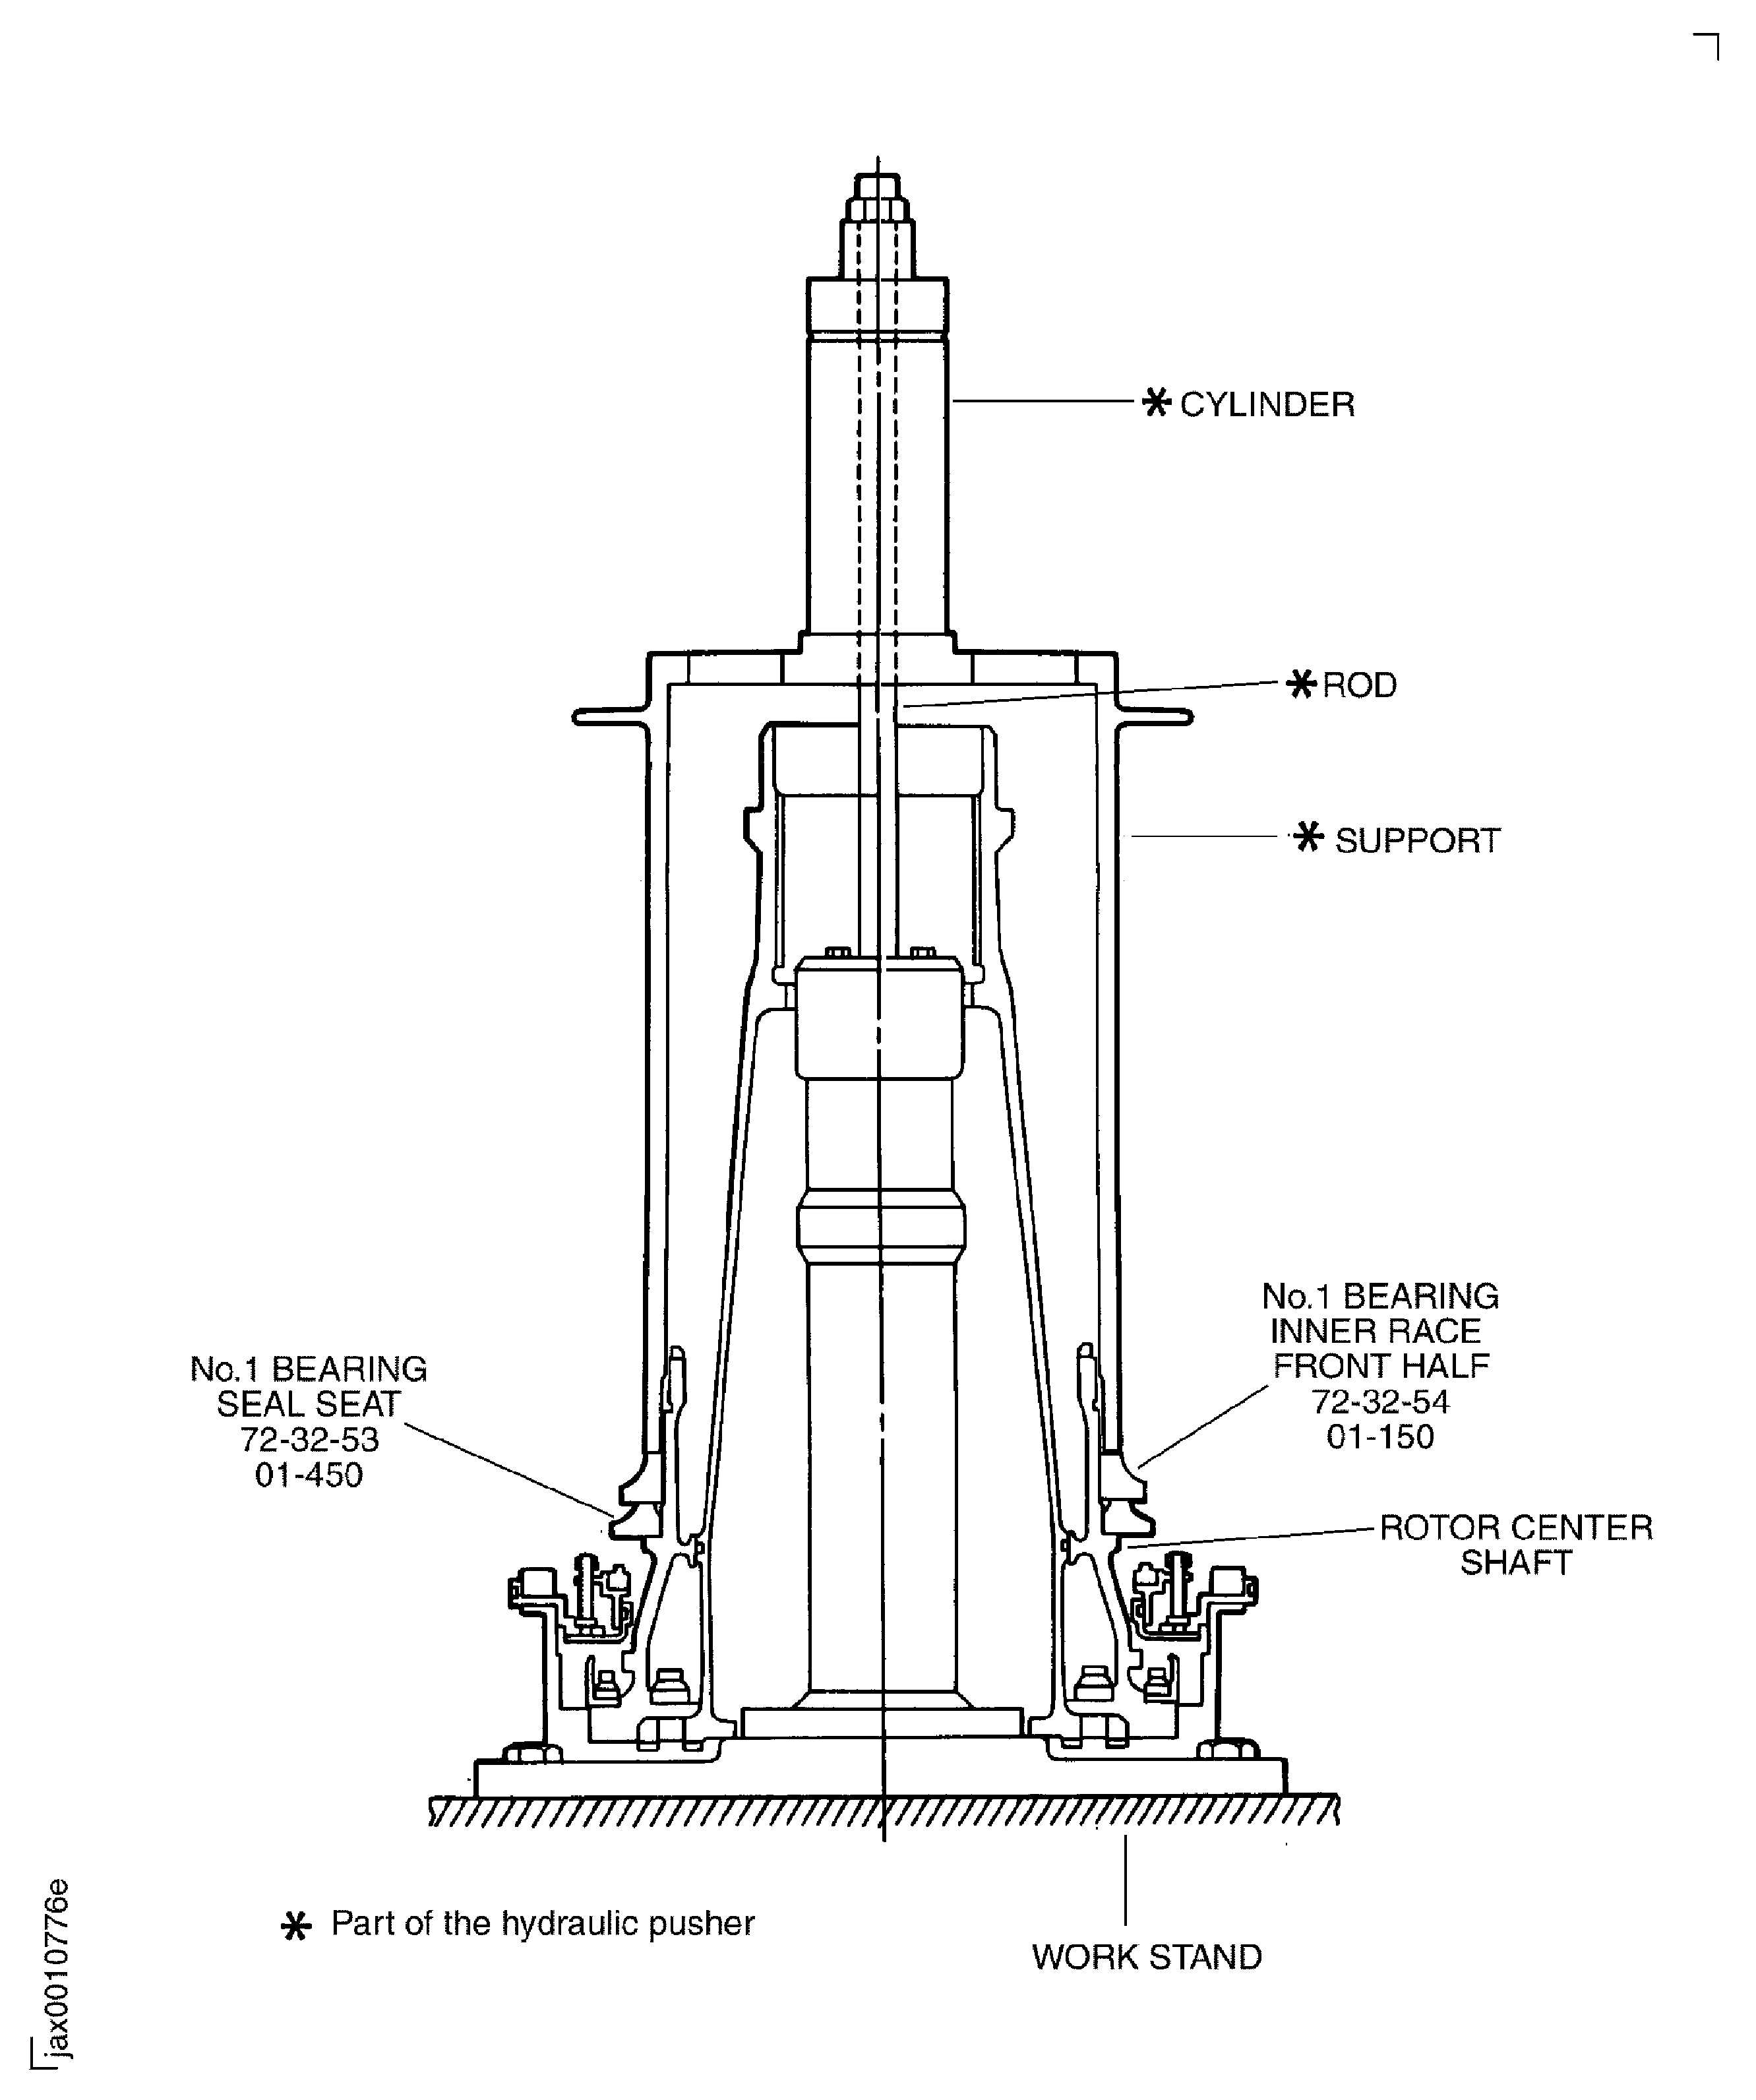
    1. SUBTASK 72-32-50-440-072 Install the No. 1 Bearing on to the Rotor Center Shaft

    2. Refer to Figure, Figure, Figure and Figure.

    3. Put the No. 1 Bearing inner race front half in an oven. Increase the temperature in the oven to 302 deg F (150 deg C) and keep the same temperature for 20 minutes.

    4. WARNING

      DO NOT TOUCH THE NO. 1 BEARING INNER RACE FRONT HALF WITHOUT THE APPROVED GLOVES.

      Remove the No. 1 Bearing inner race front half from the oven and install on to the rotor center shaft.

    5. Install IAE 1J12388 Hydraulic pusher 1 off to the Stub Shaft Assembly.

    6. Attach a hydraulic pump to the cylinder.

      1. Operate the hydraulic pump and apply a load of 1422 psi (9.81 MPa) to the pusher until the No. 1 Bearing inner race front half touches the No. 1 Bearing Seal Seat.

      2. Operate the hydraulic pump and apply the oil pressure to the hydraulic cylinder (part of the hydraulic pusher).

      3. Increase the oil pressure until the No. 1 Bearing inner race front half touches the No. 1 Bearing Seal Seat.

        NOTE

        If you can find the oil hole of the rotor center shaft, No. 1 Bearing inner race front half is in the correct position.
    7. Make sure that the No. 1 Bearing inner race front half is in the correct position.

    8. Release the oil pressure of the hydraulic pump and disconnect it from the cylinder.

    9. Remove the hydraulic pusher from the Stub Shaft Assembly.

      1. Install the outer race, and the cage and balls of the No. 1 Bearing to the rotor center shaft.

      2. Install IAE 1J12506 No.1 bearing guide 1 off on to the rotor center shaft.

        1. Attach IAE 1J12401 No.1 bearing holding plate 1 off to the No. 1 Bearing outer race, cage and balls.

        2. Make sure that the stoppers (part of the No. 1 Bearing holding plate) are attached to the stopper plates with the retaining rings.

        3. Attach them to the outer race, the balls and the cage and safety with the screws.

      3. Lubricate the balls with CoMat 10-077 APPROVED ENGINE OILS.

      4. Install the No. 1 Bearing outer race, the cage and the balls on to the rotor center shaft through the No. 1 Bearing guide.

      5. Remove the No. 1 Bearing holding plate.

      6. Remove the No. 1 Bearing guide.

    10. CAUTION

      YOU MUST MAKE SURE THAT THE NO. 1 BEARING BALL IN THE CORRECT POSITION BEFORE YOU INSTALL THE NO. 1 BEARING INNER RACE REAR HALF. INCORRECT POSITION CAN CAUSE DAMAGE TO THE BALLS WHEN YOU PUSH THE NO. 1 BEARING INNER RACE REAR HALF.

      Put the No. 1 Bearing inner race rear half in an oven. Increase the temperature in the oven to 302 deg F (150 deg C) and keep the same temperature for 20 minutes.

    11. WARNING

      DO NOT TOUCH THE NO. 1 BEARING INNER RACE REAR HALF WITHOUT THE APPROVED GLOVES.

      Remove the No. 1 Bearing inner race rear half from the oven and install on to the rotor center shaft.

    12. Install IAE 1J12388 Hydraulic pusher 1 off to the Stub Shaft Assembly.

    13. Attach a hydraulic pump to the cylinder.

      1. Operate the hydraulic pump and apply a load of 1422 psi (9.81 MPa) to the pusher until the No. 1 Bearing inner race rear half touches the No. 1 Bearing inner race front half.

      2. Operate the hydraulic pump and apply the oil pressure to the hydraulic cylinder (part of the hydraulic pusher).

      3. Increase the oil pressure until the No. 1 Bearing inner race front half touches the No. 1 Bearing inner race front half.

    14. Continue to push the rear half until the rear half becomes cool.

    15. Release the oil pressure of the hydraulic pump and disconnect it from the cylinder.

    16. Remove the hydraulic pusher from the rotor center shaft.

    1. SUBTASK 72-32-50-220-053 Examine the the LP Stub Shaft, the Rotor Center and No. 1 Bearing Assembly (LP Shaft and No. 1 Bearing Assembly)

    2. Refer to Figure.

      1. Calculate X1 by the subsequent formula from the measured values A, C, D and E and write it.

      2. X1 = A - C - D - E.

    3. Measure the four dimensions of X2. Calculate the average and write it.

      1. Make sure that the difference between X1 and X2 is in the subsequent limit. If the difference is not in the limit, repeat from the SUBTASK 72-32-50-440-071-A00, SUBTASK 72-32-50-440-071-B00 or SUBTASK 72-32-50-440-071-C00.

      2. Limit: 0.0008 in. (0.020 mm).

    1. SUBTASK 72-32-50-440-073 Install the Plain Nut (72-32-54, 01-120) on to the Rotor Center Shaft

    2. Refer to Figure and Figure.

    3. Lubricate the thread of the plain nut with CoMat 10-077 APPROVED ENGINE OILS.

    4. Install the plain nut on to the rotor center shaft. Tighten the nut by hand.

      1. Tighten the plain nut with IAE 1J12335 Spanner wrench 1 off.

      2. Engage the stop holder (part of the spanner wrench) with the slots in the rotor center shaft rear end.

      3. Engage the wrench with the slot in the plain nut.

      4. Lift the Torque multiplier up with a hoist.

      5. Set the indicator of the sweeney wrench at zero degrees. Put the sweeney wrench on the wrench.

      6. Safety the sweeney wrench to the wrench with the stopper and the bolt.

      7. Torque the plain nut to 17700* lbfin (2000* Nm).

      8. Release the torque to 0 lbfin (0 Nm).

      9. Torque the plain nut again to 17700 lbfin (2000 Nm).

      10. Make a temporary mark on the sweeney wrench to show the turn angle of the plain nut.

      11. Release the torque again to 0 lbfin (0 Nm).

      12. Torque the plain nut again to 17700 lbfin (2000 Nm).

      13. Make sure that the plain nut is at the same angle as in Step or turned more clockwise within one degree.

      14. If the turn angle of the plain nut is not in the limits specified in Step, do Step thru Step. If the turn angle is in the limits, go the Step.

      1. Install the lock ring.

      2. Torque the plain nut to maximum 22100 lbfin (2500 Nm) until the groove of the rotor center shaft is in line with the groove of the plain nut.

      3. Remove the sweeney wrench and the spanner wrench from the Stub Shaft Assembly.

      4. Put the tab of the lock ring ENGINE-NO.1 BEARING (72-32-54, 01-110) in the grooves in the plain nut and the rotor center shaft.

      5. Put the retaining ring ENGINE-NO.1 BEARING (72-32-54, 01-100) in the groove in the plain nut.

    1. SUBTASK 72-32-50-440-074 Install the NF Probe Phonic Wheel (72-32-51, 01-250) and No. 2 Inner Roller Bearing (72-32-52, 01-160) on to the Stub Shaft Assembly

    2. Refer to Figure.

    3. Measure the dimension "c" of the NF probe phonic wheel and the dimension "d" of the Stub Shaft Assembly and write them on an applicable record sheet.

    4. Align the pin at the top of the NF probe phonic wheel with the slot in the Stub Shaft Assembly. Install the NF probe phonic wheel on the Stub Shaft Assembly with IAE 1J12392 Installation pusher 1 off.

    5. Measure the dimension "b" of the No. 2 inner roller bearing and write it on the record sheet.

    6. Put the No. 2 inner roller bearing in an oven. Increase the temperature in the oven to 302 deg F (150 deg C) and keep the same temperature for 20 minutes.

    7. WARNING

      DO NOT TOUCH THE ROLLER BEARING WITHOUT THE APPROVED GLOVES.

      Remove the No. 2 inner roller bearing from the oven. Immediately attach the roller bearing to the Stub Shaft Assembly with the installation pusher.

    8. Remove the installation pusher when the roller bearing becomes cool. Measure the dimension "a" of the Stub Shaft Assembly and write it on the record sheet.

      1. Make sure the correctly assembled condition of the No. 2 inner roller bearing by the subsequent formula.

      2. d-(b+c)-0.00059 in. (0.015 mm) EQUAL TO OR LESS THAN "a" EQUAL TO OR LESS THAN "d"-(b+c)+0.00059 in. (0.015 mm).

    1. SUBTASK 72-32-50-440-075 Move the LP Shaft, No. 1 and No. 2 Bearing Assembly from the Restraint Holder to the Storage Stand

    2. Refer to Figure, Figure and Figure.

      1. Install IAE 1J12501 Turnover sling 1 off to the assembly.

      2. Install the two brackets (part of the turnover sling) to the assembly with the eight screws (part of the turnover sling), 16 washers (part of the turnover sling) and eight nuts (part of the turnover sling).

      3. Safety the hook plates to the pins (part of the turnover sling) with the two lock pins (part of the turnover sling).

    3. Lift the assembly until it is clear of the restraint holder.

    4. Turn the assembly vertically with its rear end down.

    5. CAUTION

      CAREFULLY LOWER THE ASSEMBLY SO THAT THE NO.2 ROLLER INNER BEARING DOES NOT TOUCH THE STORAGE STAND. THE STORAGE STAND CAN CAUSE DAMAGE TO THE BEARING.

      Slowly lower the assembly and install it in to IAE 1J12211 Storage stand 1 off.

      1. Remove the turnover sling from the assembly.

      2. Release the two lock pins which attach the hook plates to the two pins and remove the hook plates from the two pins.

      3. Remove the eight screws, 16 washers and eight nuts which attach the two brackets to the assembly.

    6. Remove the six pins (part of the restraint holder) from the short holder.

    7. Remove the eight bolts and remove the restraint holder from the work stand.

  1. Figure: Reference Fits and Clearances

    Reference Fits and Clearances

    Figure: V2500-A1 Pre SBE 72-0132: Sectional View of the LP Shaft, No. 1 and No. 2 Bearing Assembly

    V2500-A1 Pre SBE 72-0132: Sectional View of the LP Shaft, No. 1 and No. 2 Bearing Assembly
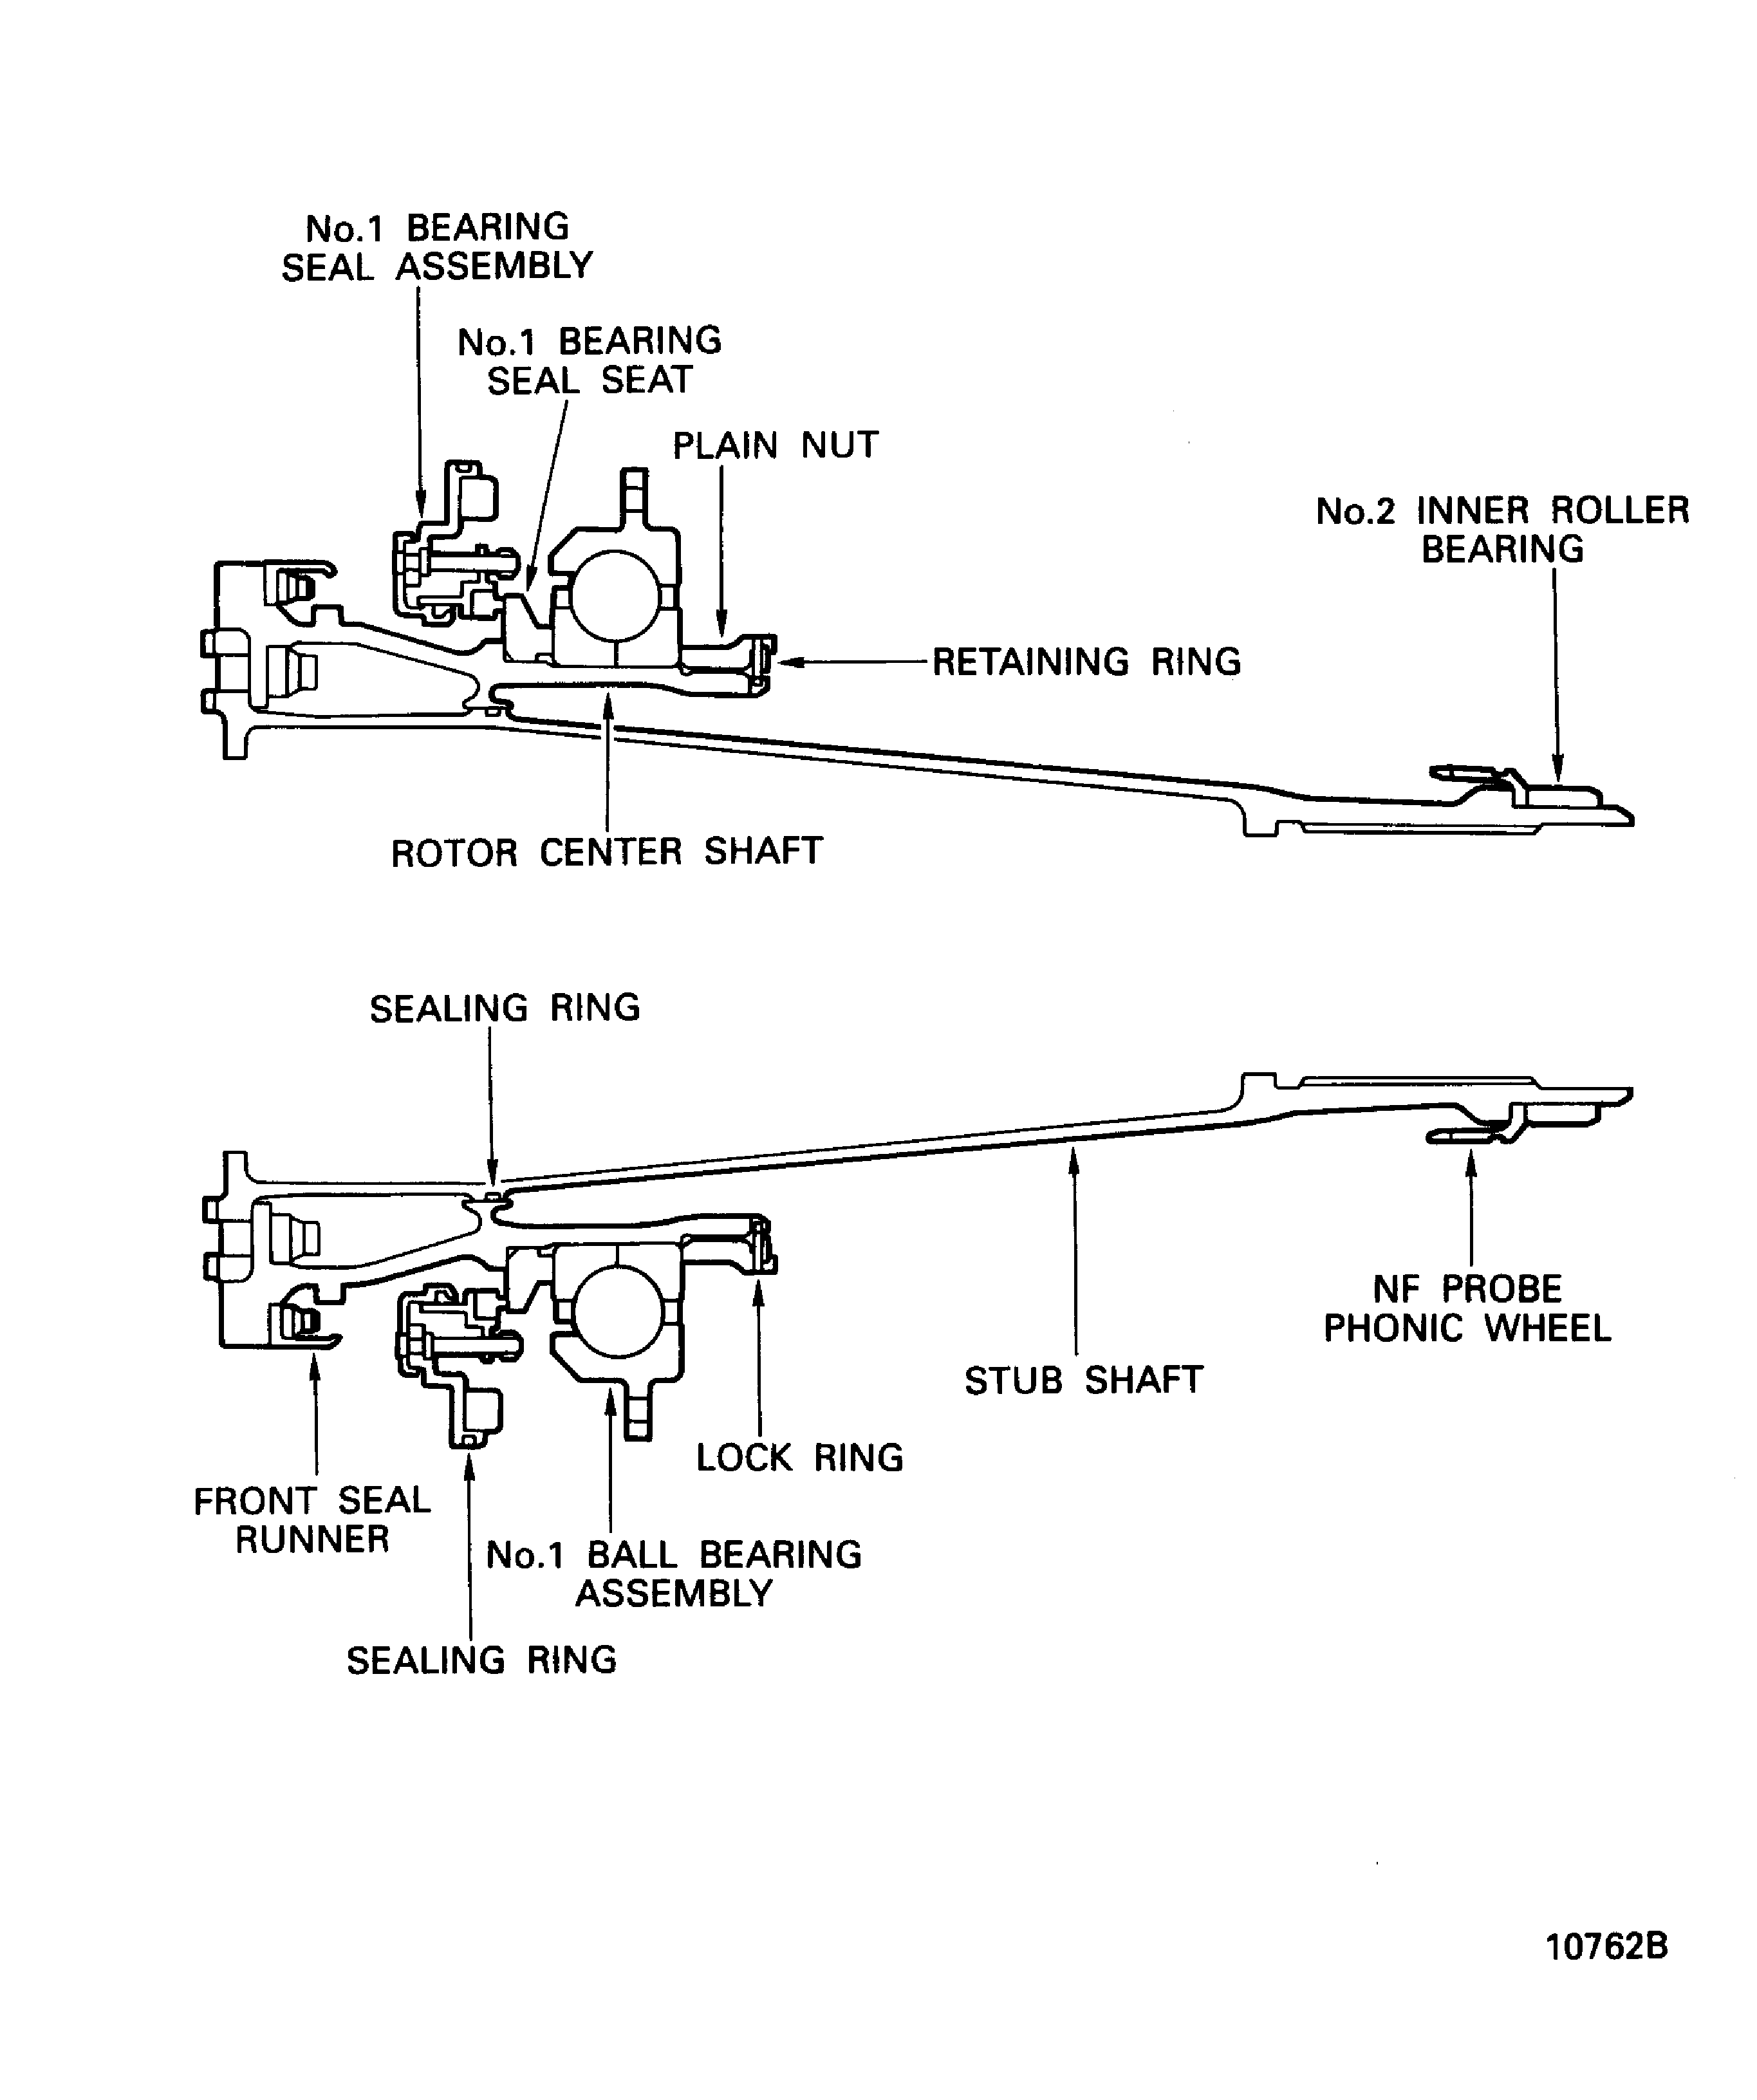
    Figure: V2500-A1, SBE 72-0132 and V2500-A5: Sectional View of the LP Shaft, No. 1 and No. 2 Bearing Assembly

    V2500-A1, SBE 72-0132 and V2500-A5: Sectional View of the LP Shaft, No. 1 and No. 2 Bearing Assembly

    Figure: Install the Stub Shaft Assembly to the Restraint Holder

    Install the Stub Shaft Assembly to the Restraint Holder

    Figure: V2500-A1 Pre SBE 72-0132: Install the Rotor Center Shaft on to the Stub Shaft Assembly

    V2500-A1 Pre SBE 72-0132: Install the Rotor Center Shaft on to the Stub Shaft Assembly
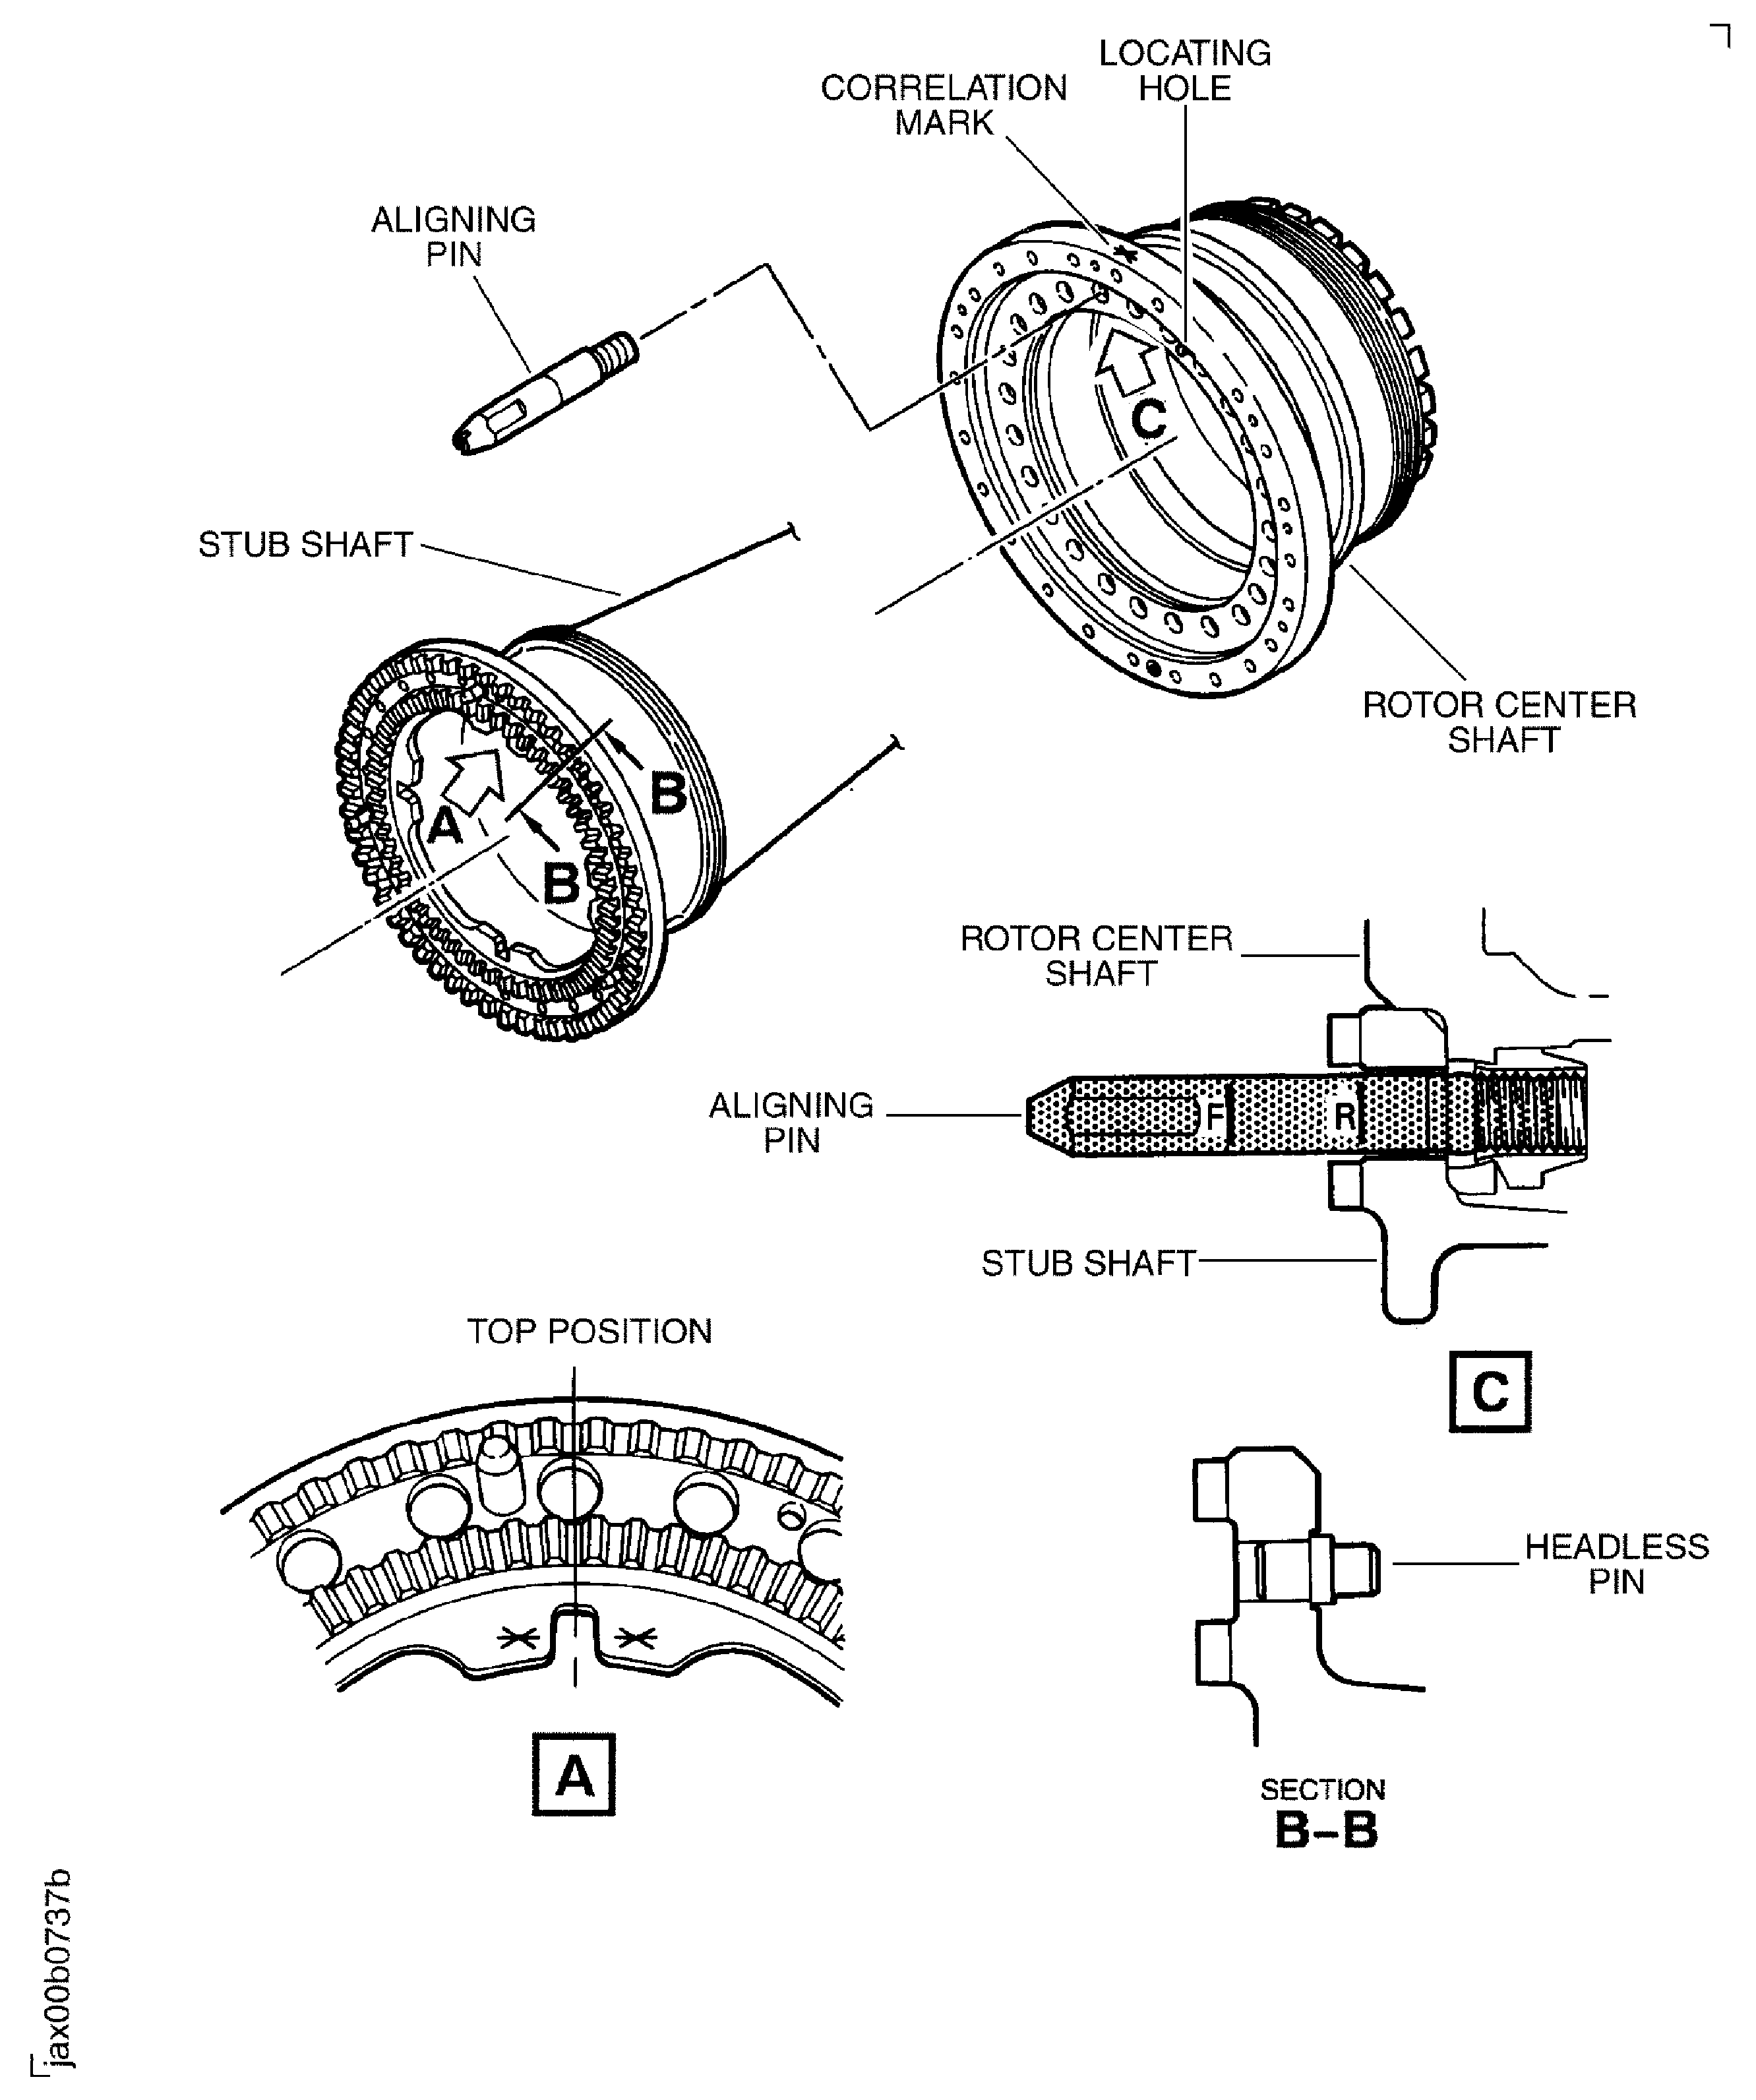
    Figure: V2500-A1 SBE 72-0132 and V2500-A5: Install the Rotor Center Shaft on to the Stub Shaft Assembly

    V2500-A1 SBE 72-0132 and V2500-A5: Install the Rotor Center Shaft on to the Stub Shaft Assembly

    Figure: Install the Rotor Center Shaft on to the Stub Shaft Assembly

    Install the Rotor Center Shaft on to the Stub Shaft Assembly
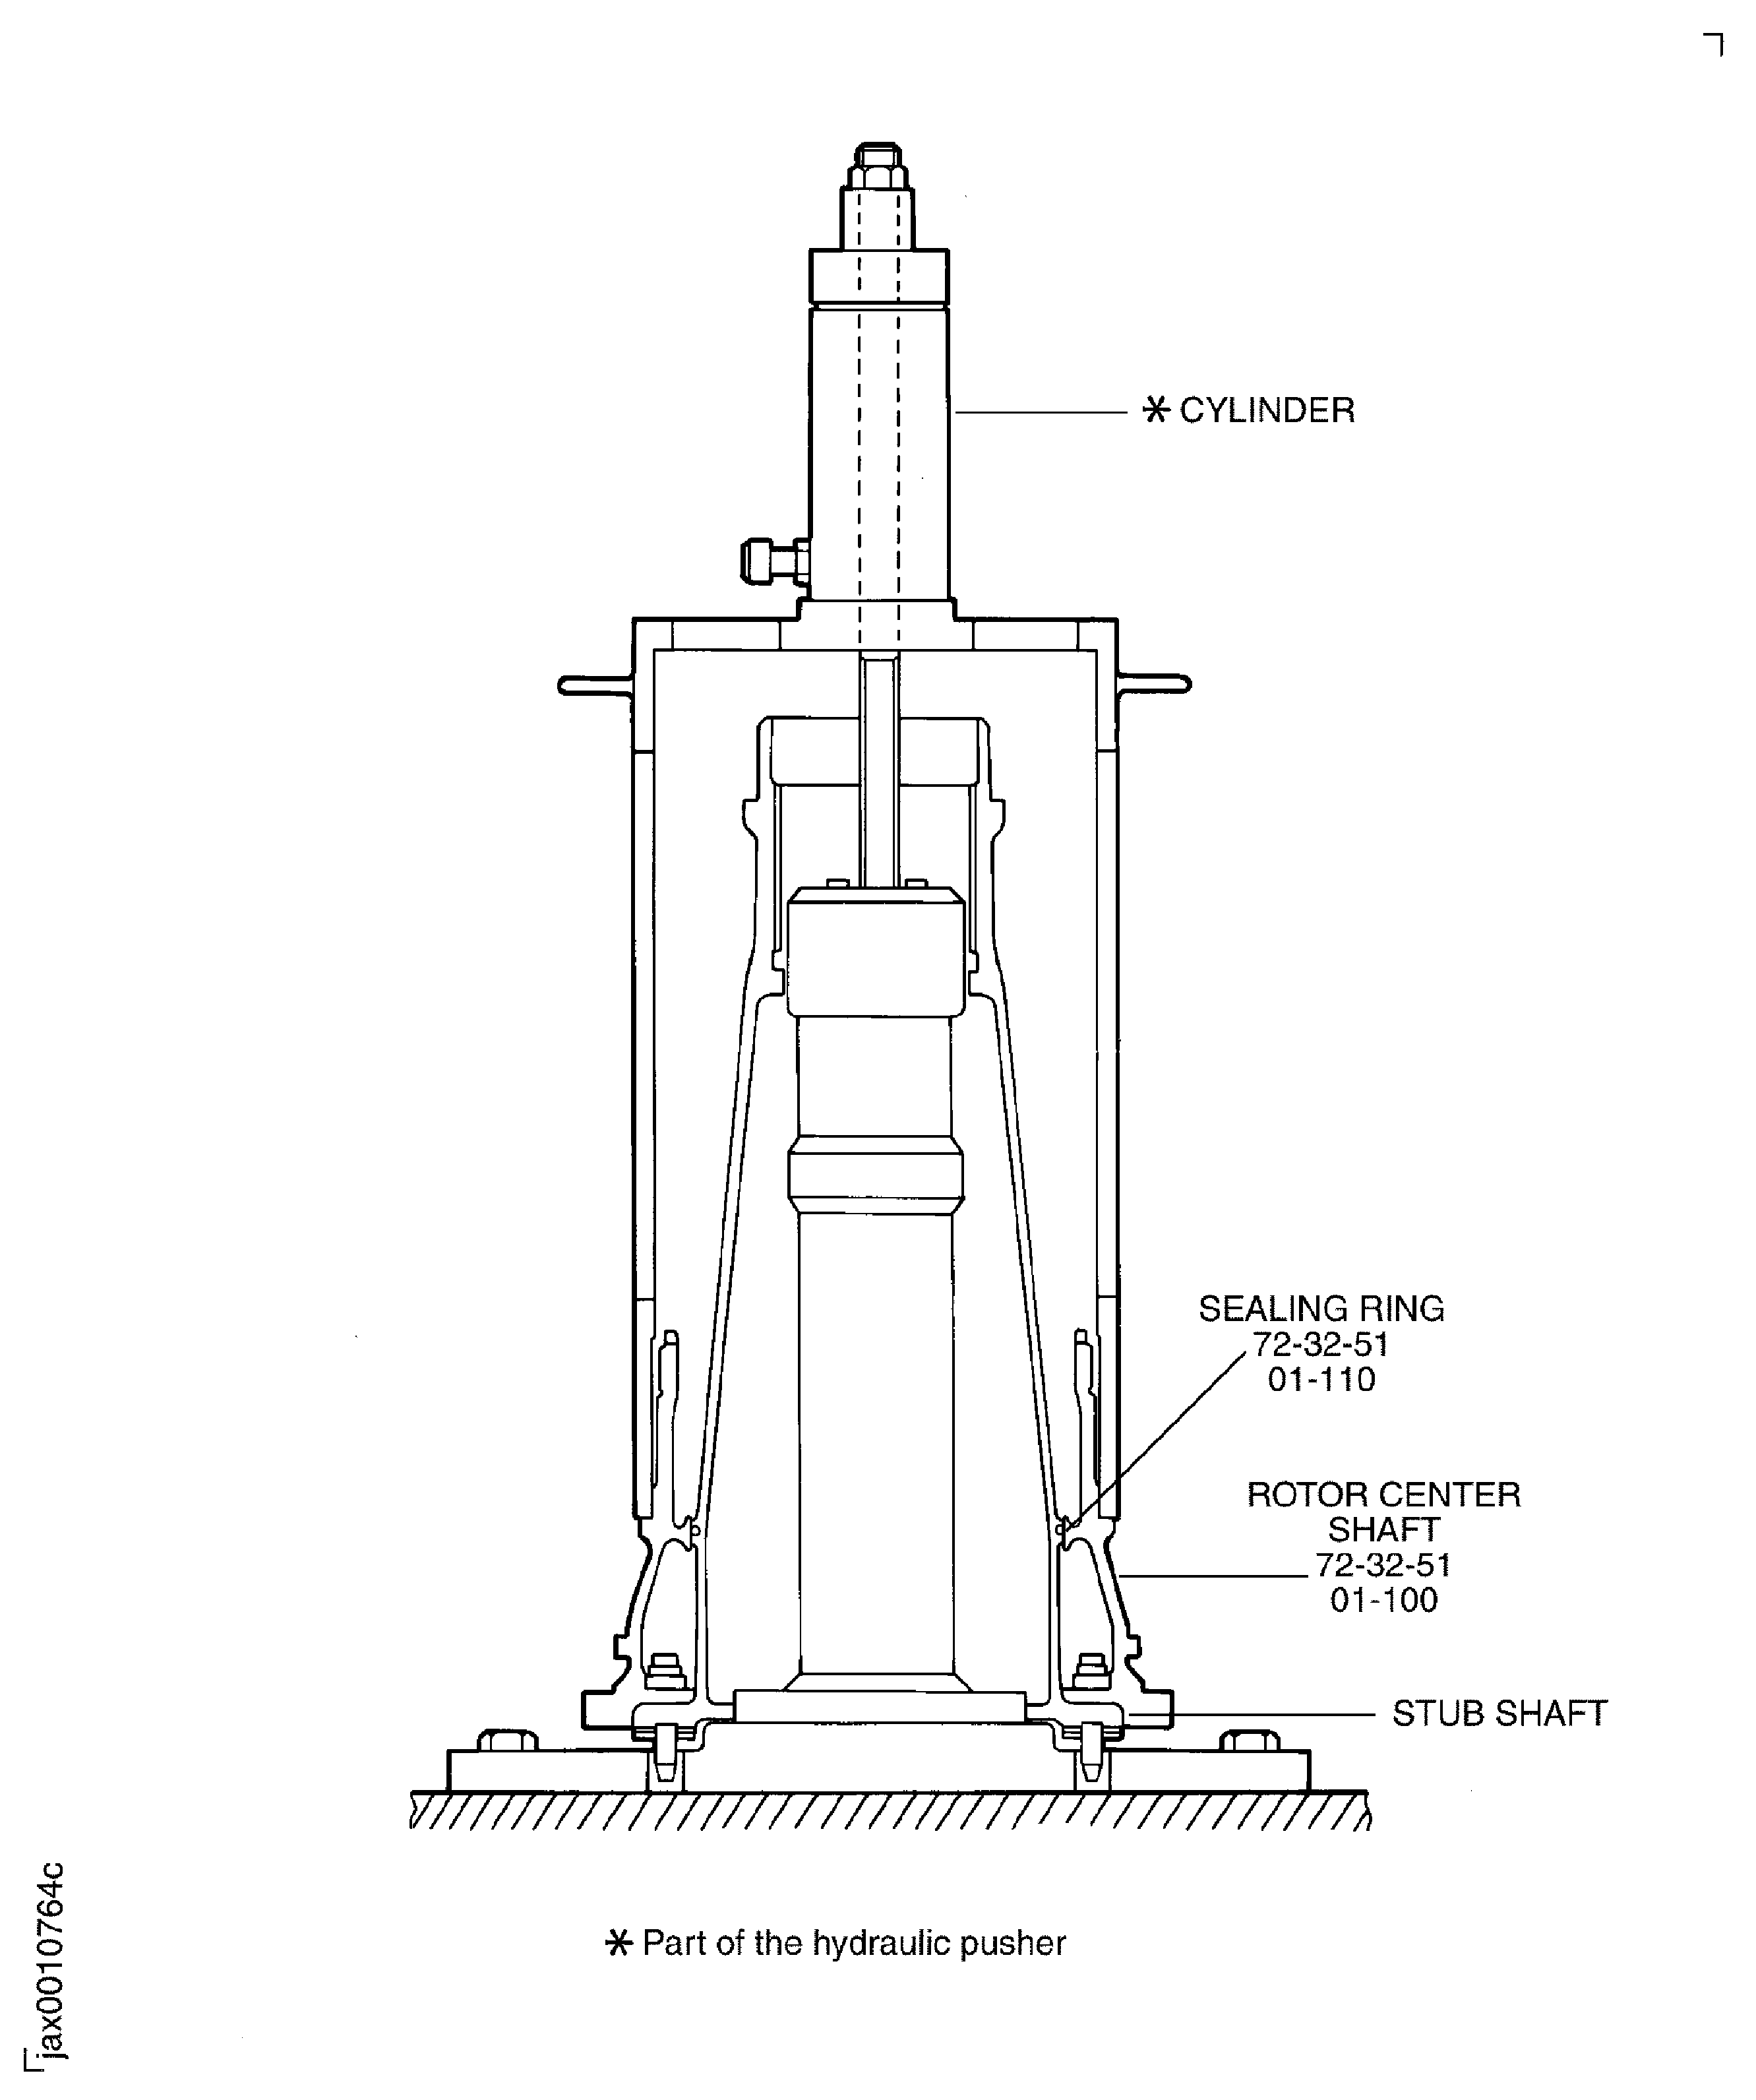
    Figure: Prepare the LP Stub Shaft and Rotor Center for Installation of PMI Mandrel

    Sheet 1

    Legend
    Prepare the LP Stub Shaft and Rotor Center for Installation of PMI Mandrel

    Sheet 1

    Close

    Figure: Prepare the LP Stub Shaft and Rotor Center for Installation of PMI Mandrel

    Sheet 2

    Legend
    Prepare the LP Stub Shaft and Rotor Center for Installation of PMI Mandrel

    Sheet 2

    Close

    Figure: Attach the PMI Mandrel to the LP Stub Shaft and Rotor Center

    Sheet 3

    Legend
    Attach the PMI Mandrel to the LP Stub Shaft and Rotor Center

    Sheet 3

    Close

    Figure: Attach the PMI Mandrel to the LP Stub Shaft and Rotor Center

    Sheet 4

    Legend
    Attach the PMI Mandrel to the LP Stub Shaft and Rotor Center

    Sheet 4

    Close

    Figure: Prepare the LP Stub Shaft and Rotor Center for Installation of PMI Mandrel

    Prepare the LP Stub Shaft and Rotor Center for Installation of PMI Mandrel
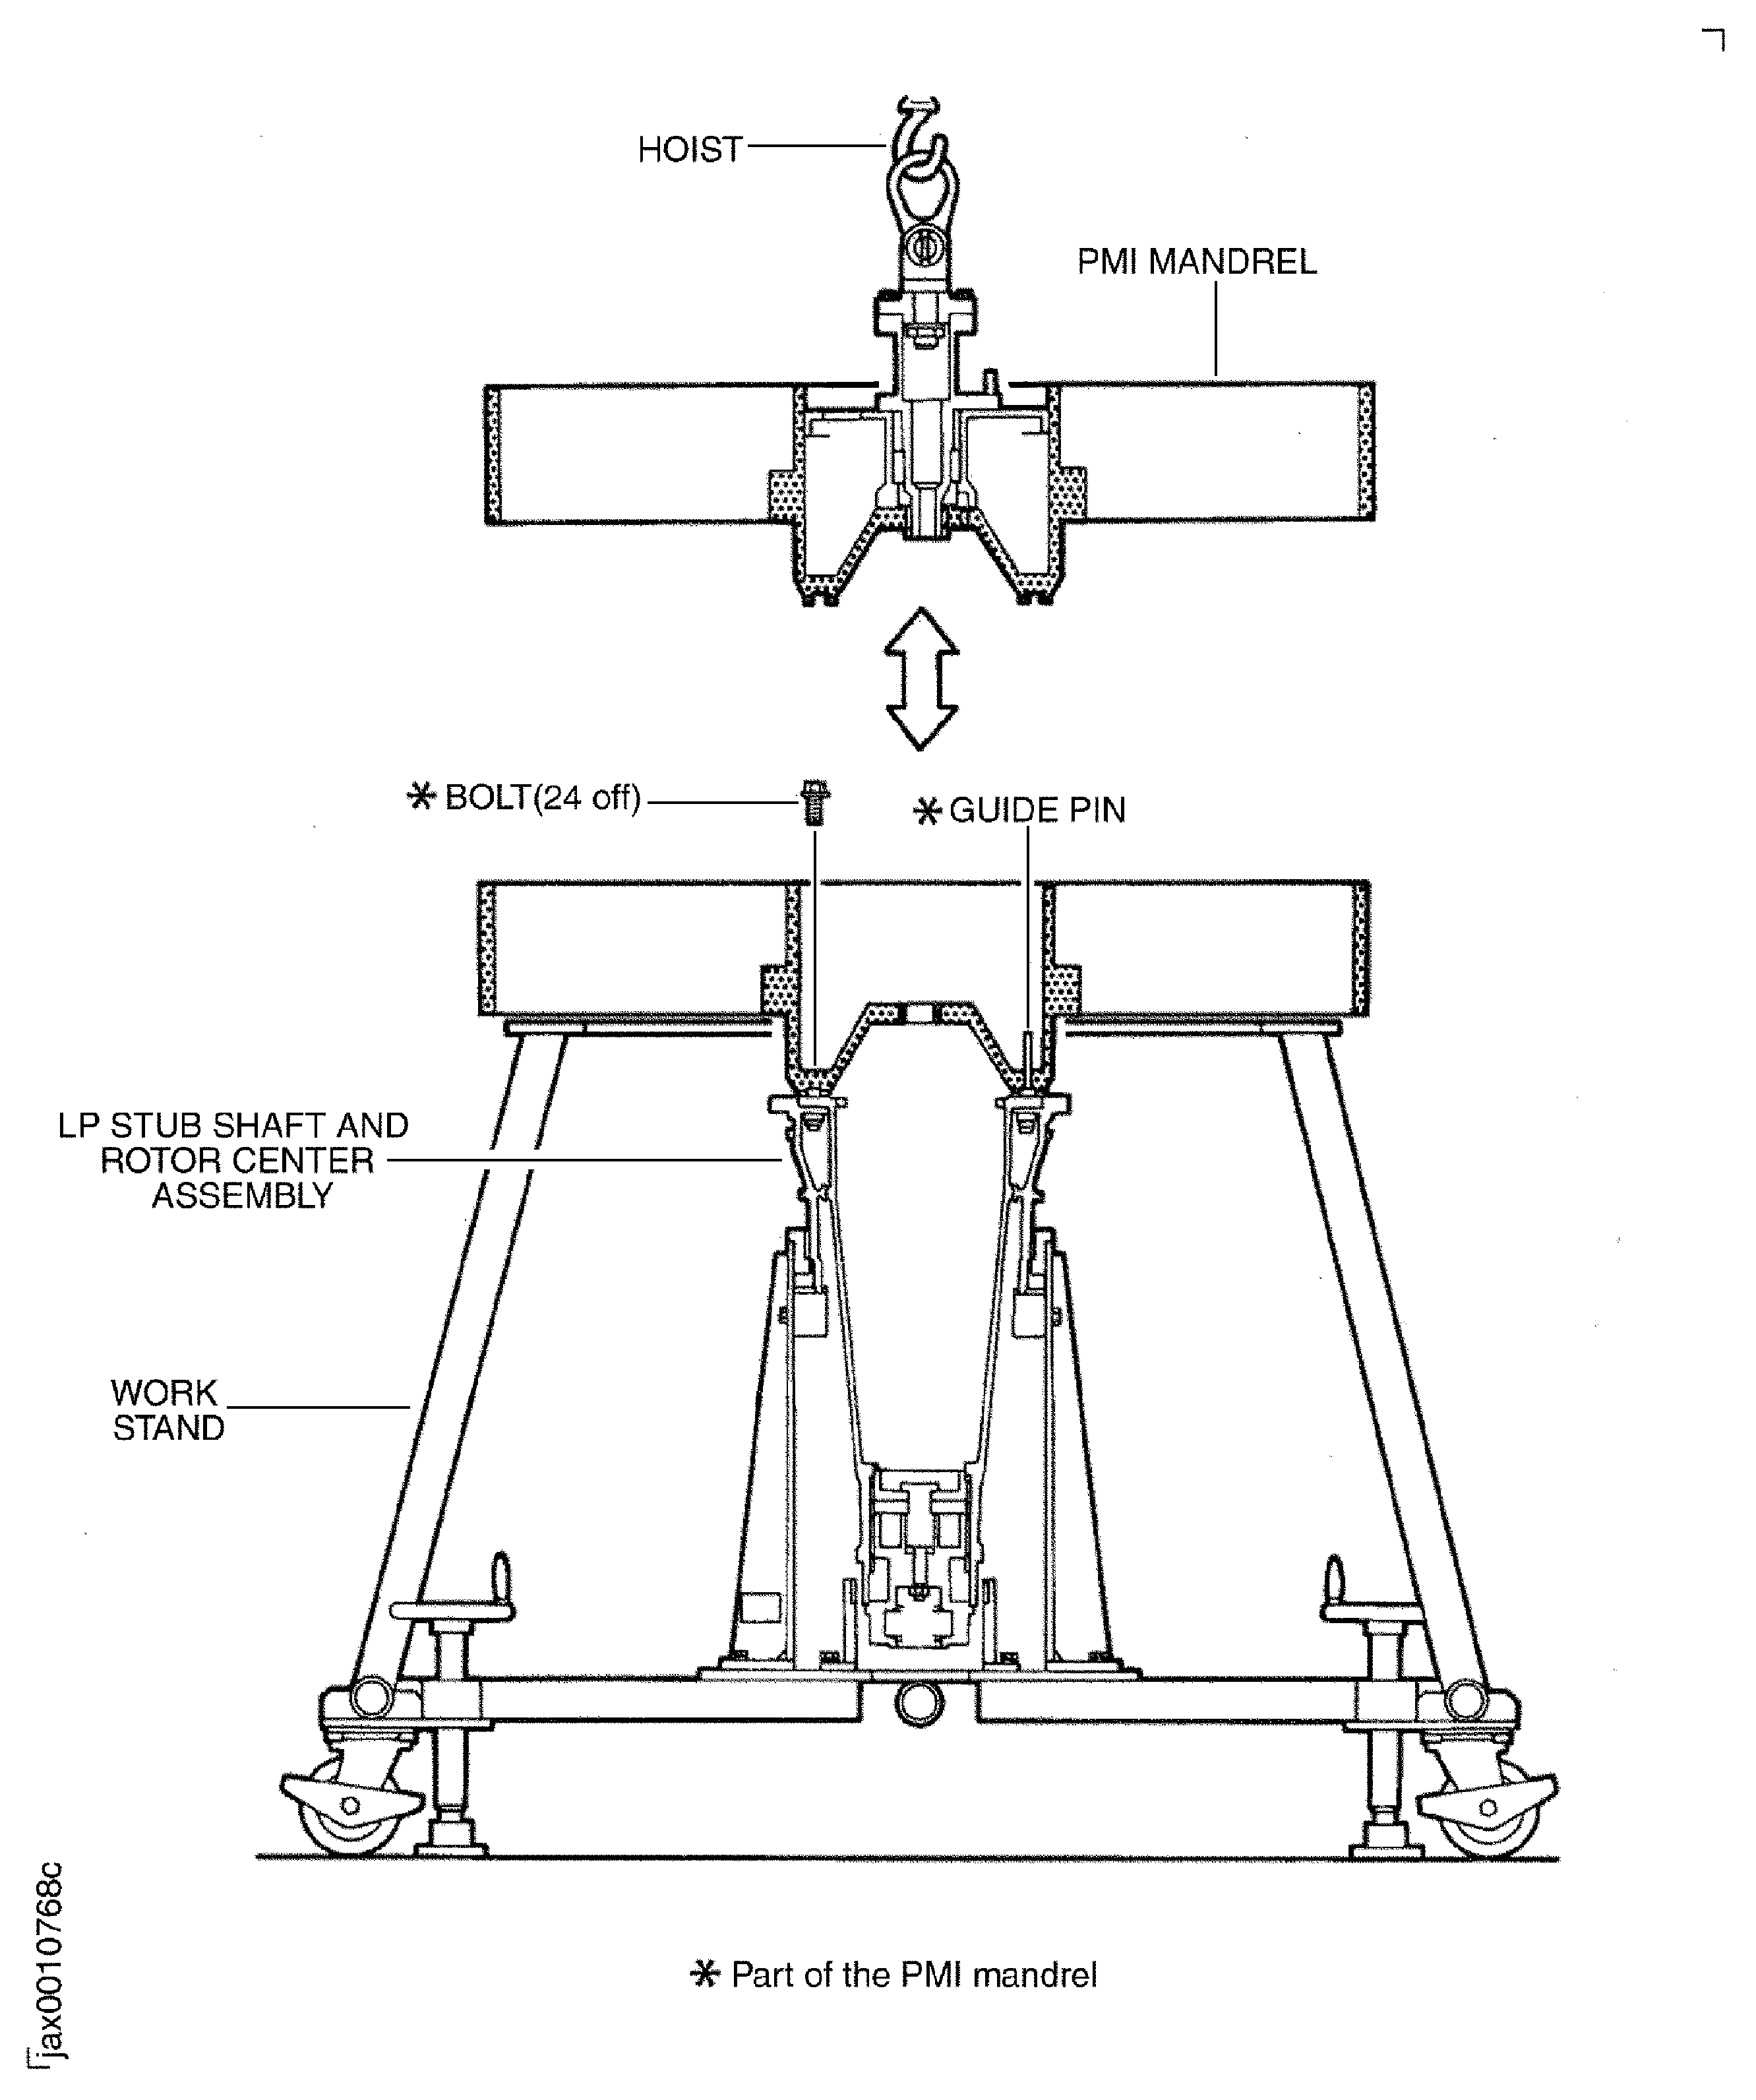
    Figure: The Torque Tightening Sequence for the PMI Mandrel Bolts

    The Torque Tightening Sequence for the PMI Mandrel Bolts

    Figure: Lift the LP Shaft and Mandrel Assembly

    Lift the LP Shaft and Mandrel Assembly
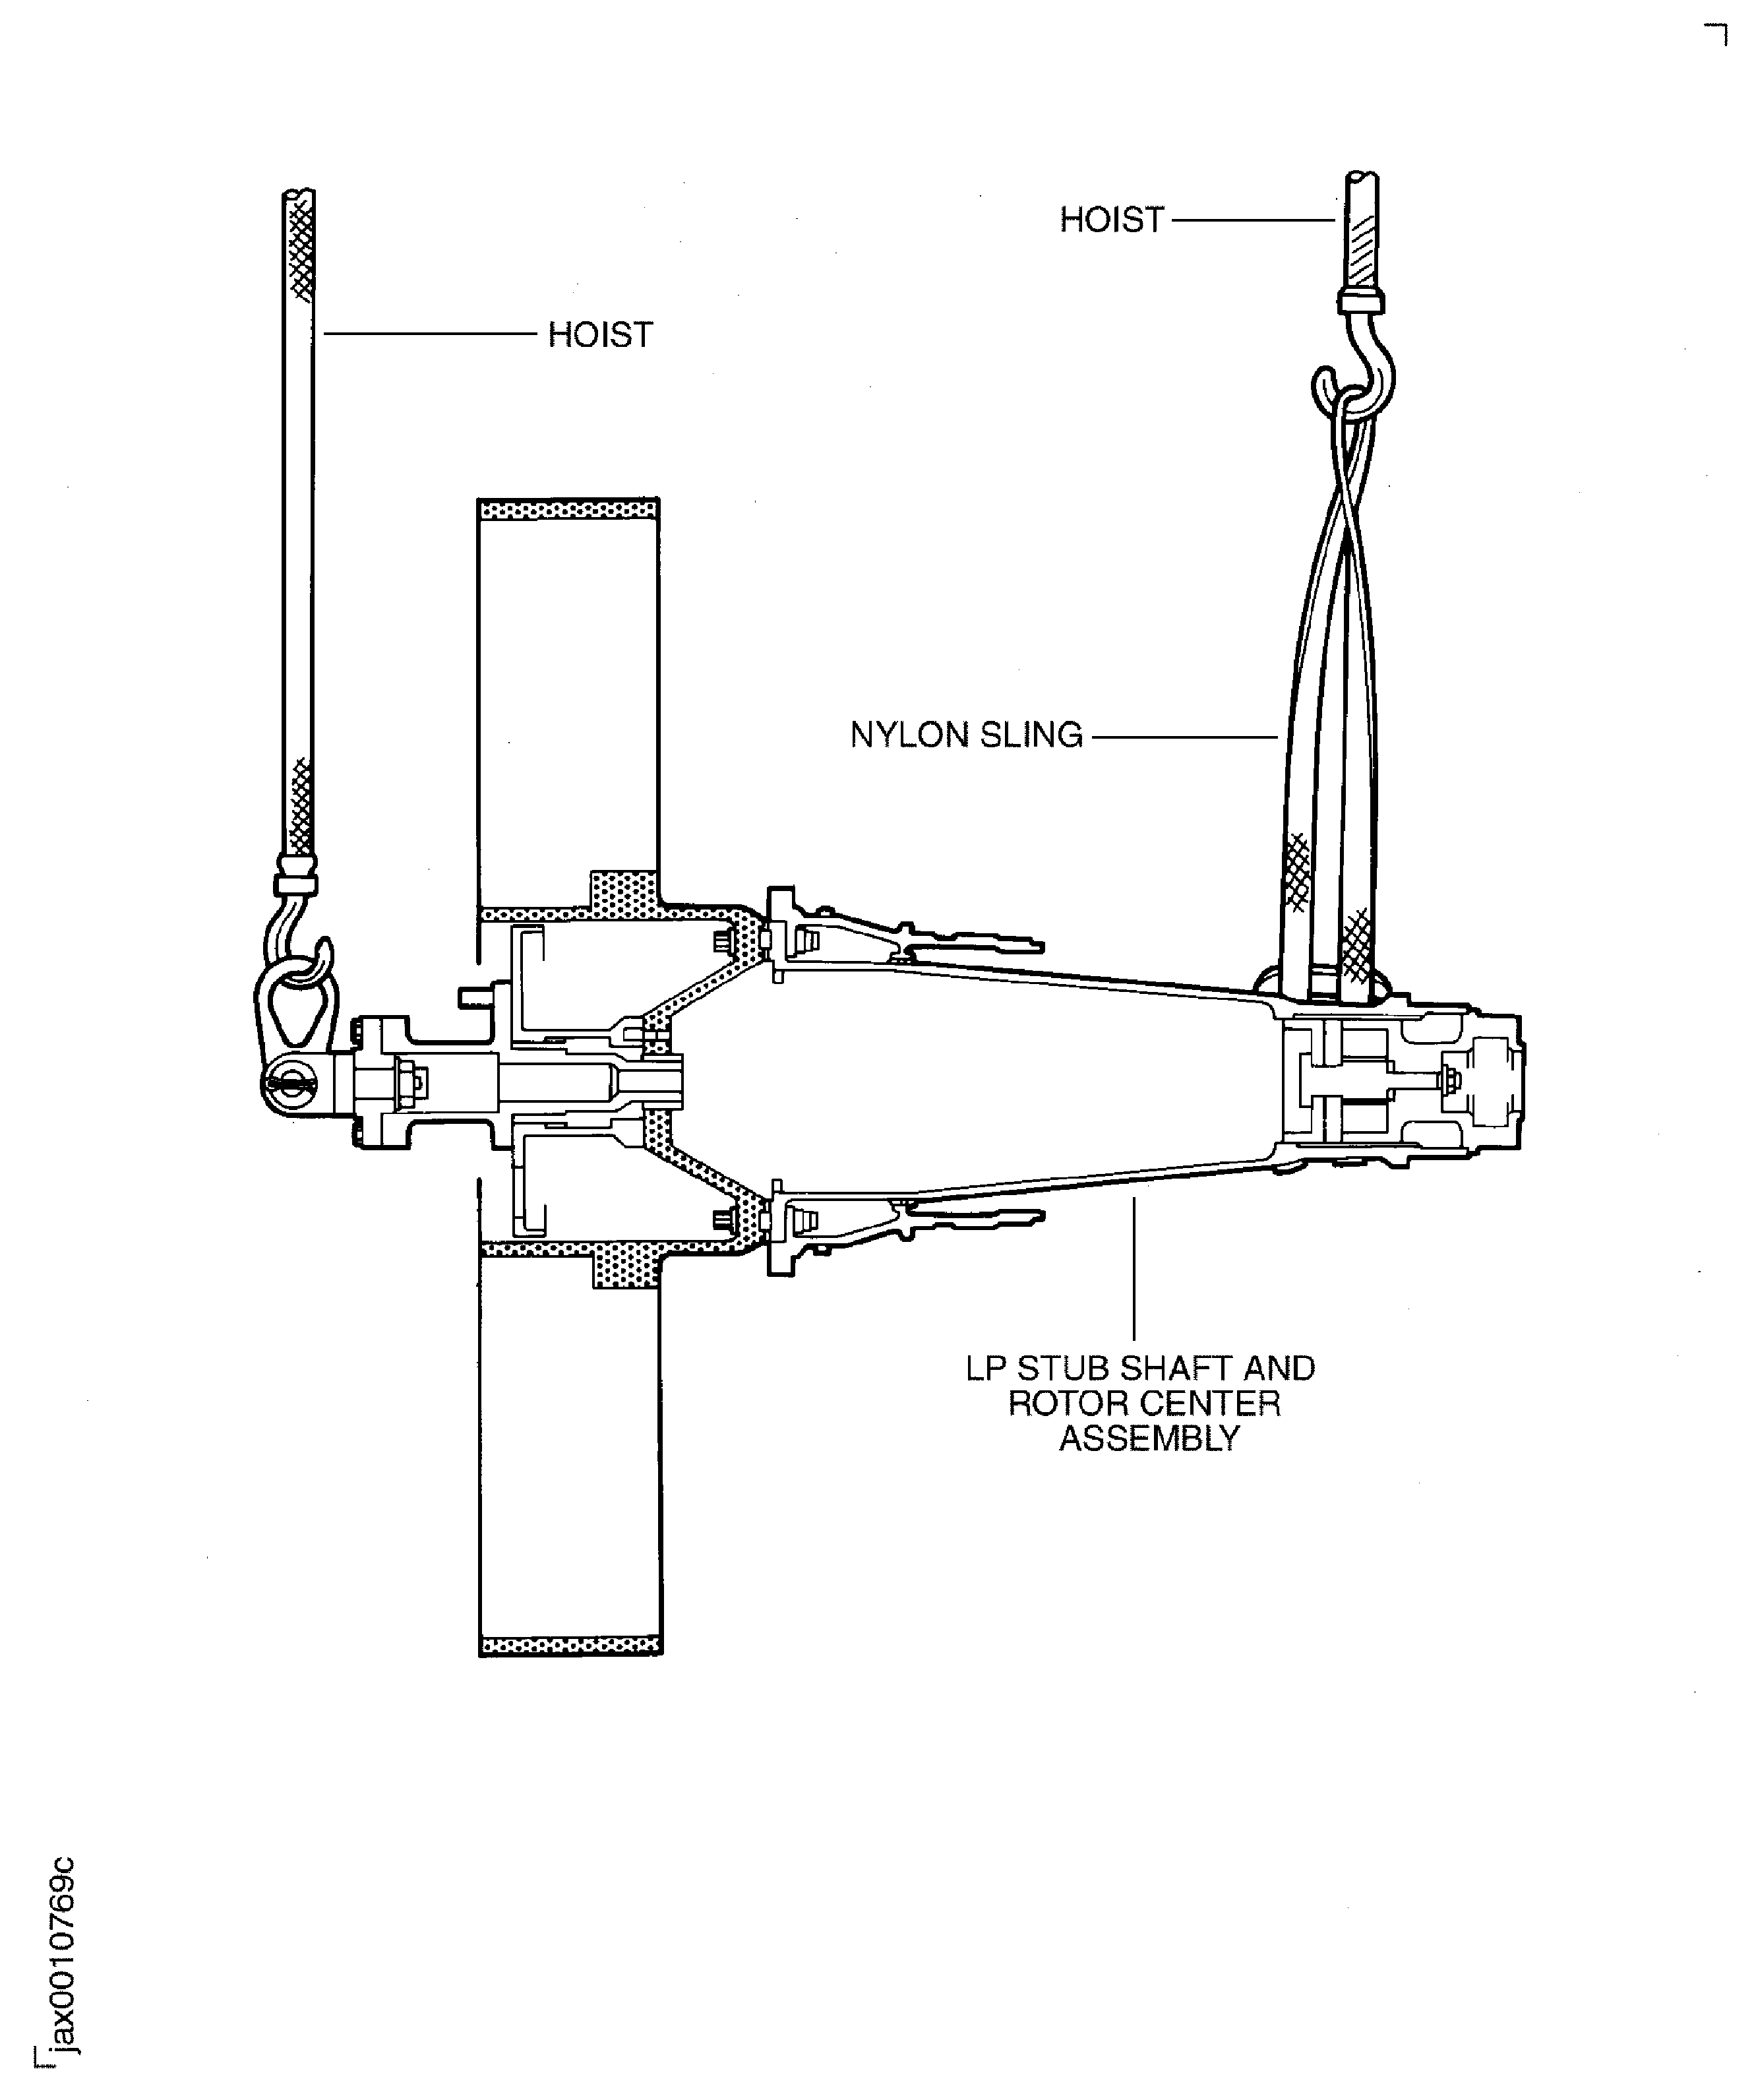
    Figure: Put the LP Shaft and Mandrel Assembly on to the Balancing Machine

    Put the LP Shaft and Mandrel Assembly on to the Balancing Machine

    Figure: Vector Plot

    Vector Plot
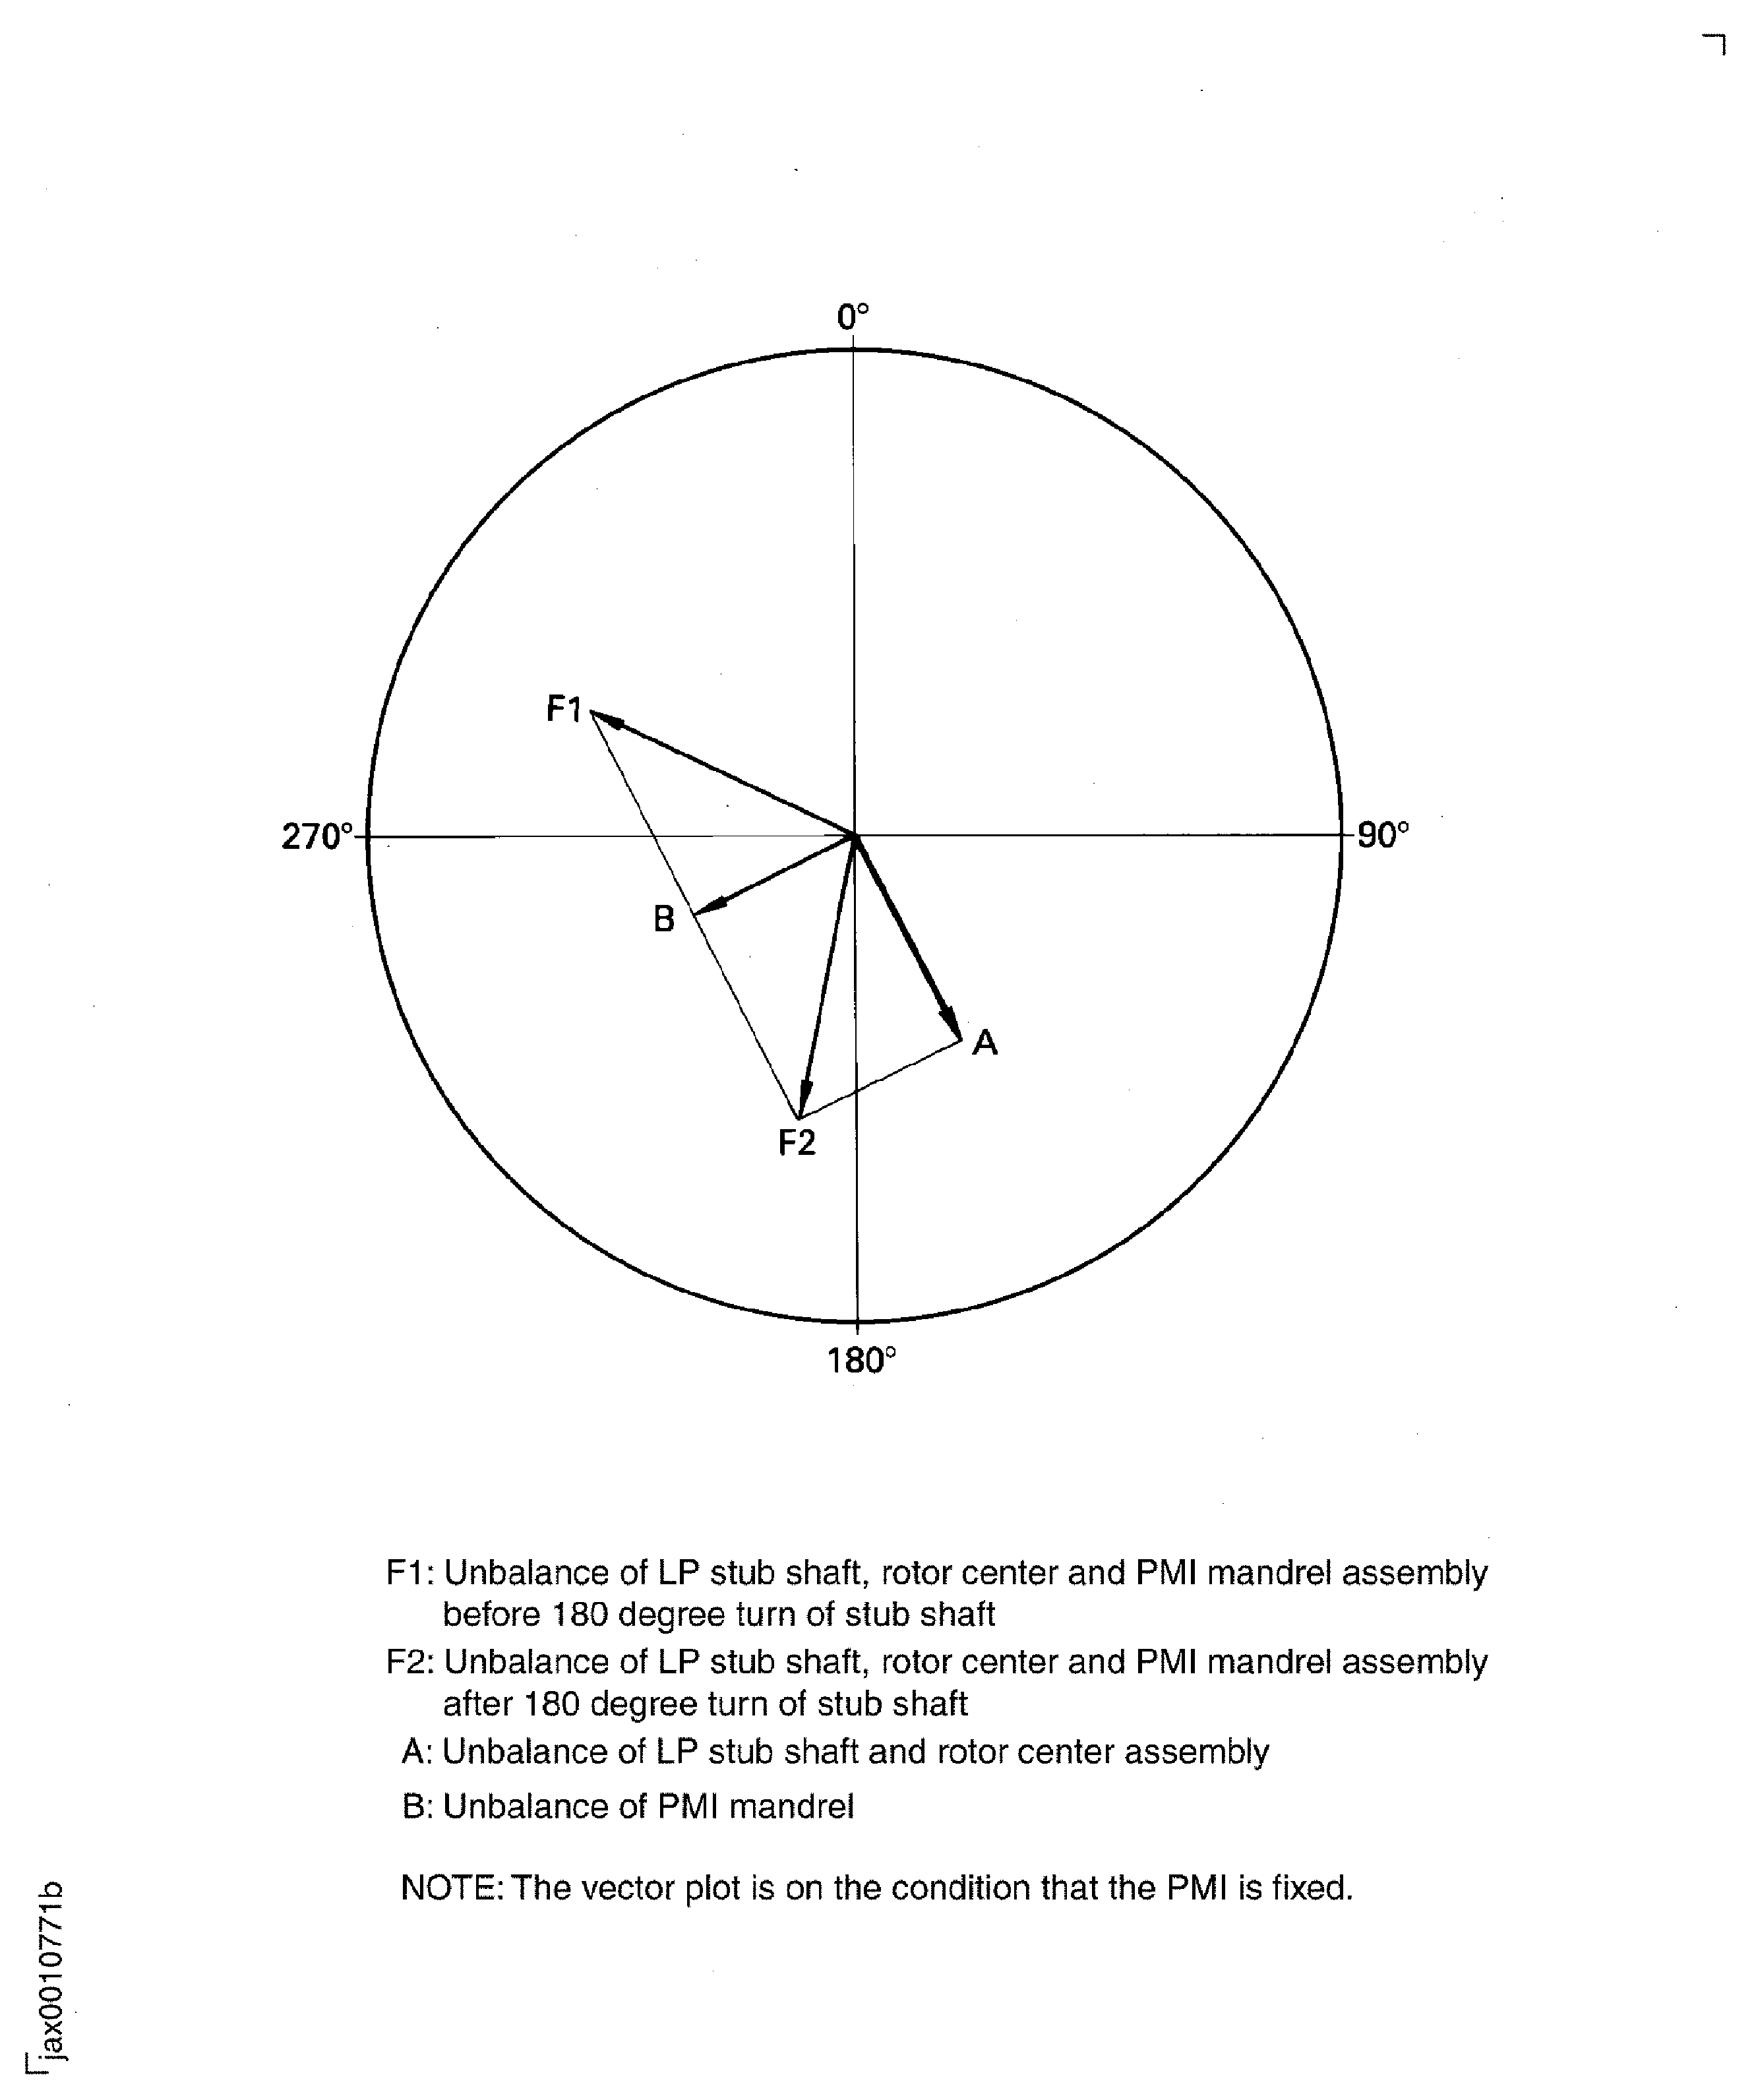
    Figure: Correct the Unbalance of the LP Stub Shaft and Rotor Center

    Correct the Unbalance of the LP Stub Shaft and Rotor Center
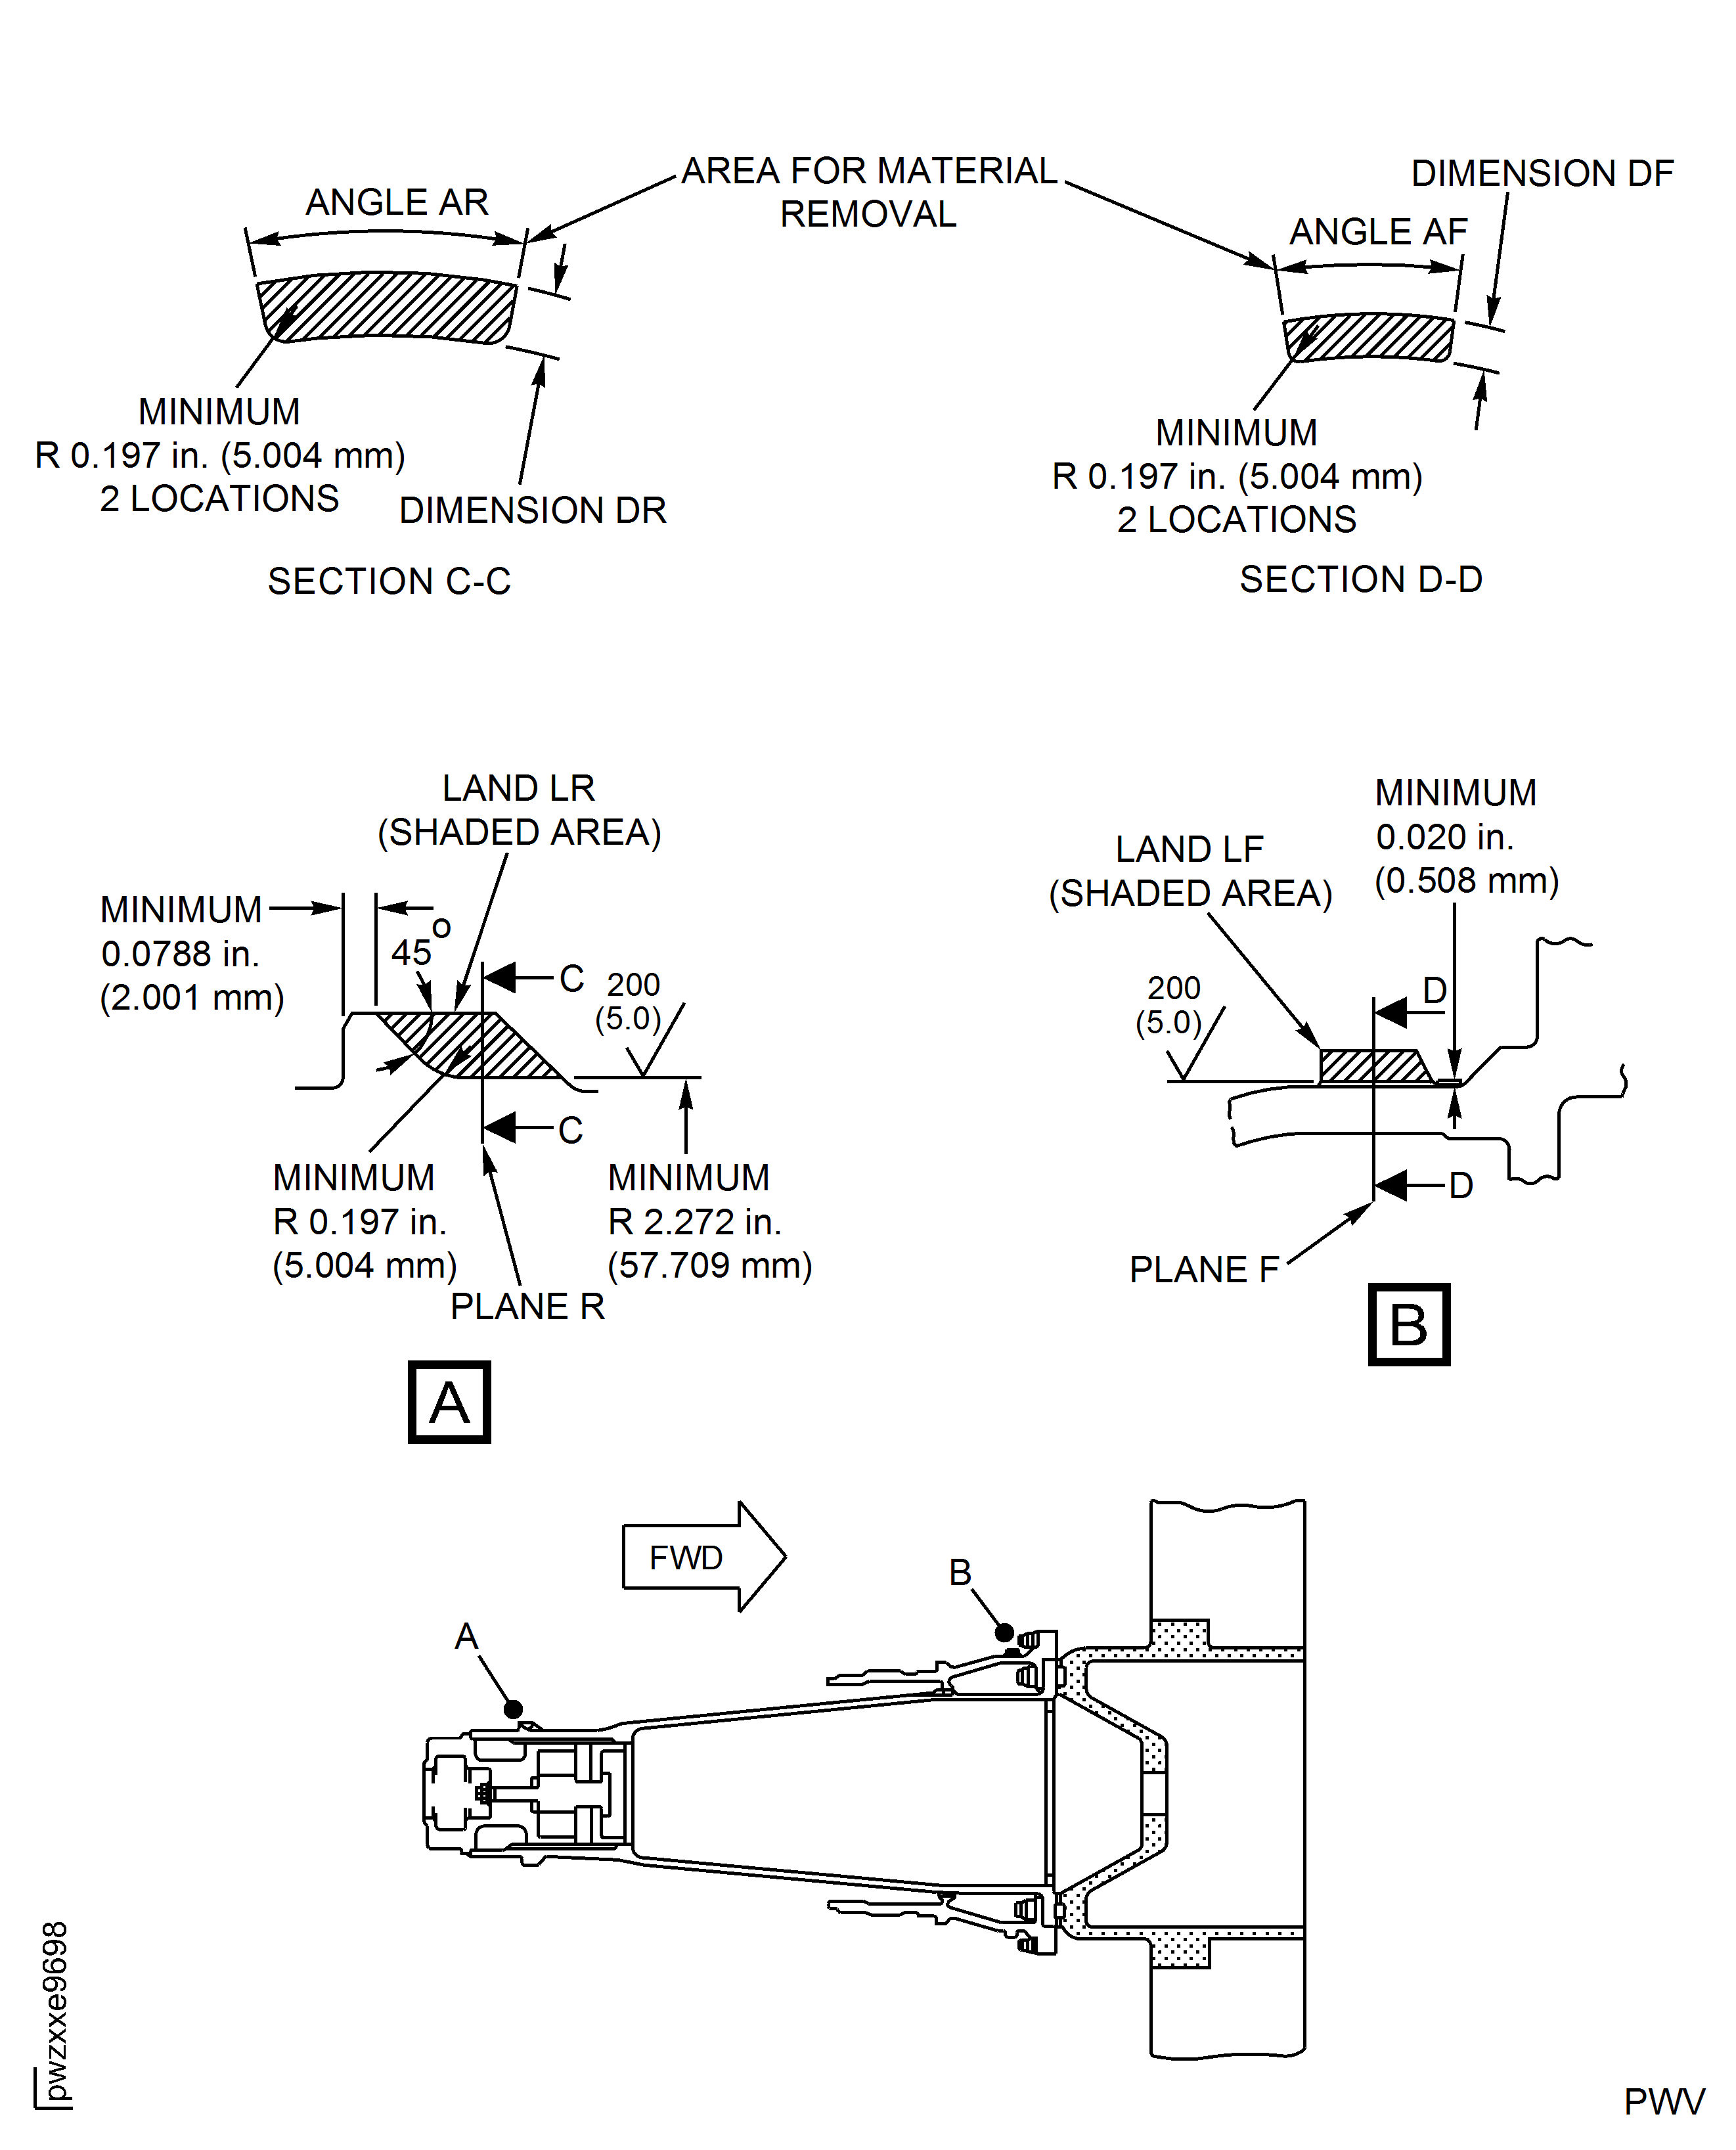
    Figure: Graph for Finding Angle and Dimension of Metal to be Removed from the Rotor Center Shaft

    Sheet 2

    Legend
    Graph for Finding Angle and Dimension of Metal to be Removed from the Rotor Center Shaft

    Sheet 2

    Close

    Figure: V2500-A1: Graph for Finding Angle and Dimension of Metal to be Removed from the Stub Shaft Assembly

    Sheet 3
    Legend
    V2500-A1: Graph for Finding Angle and Dimension of Metal to be Removed from the Stub Shaft Assembly

    Sheet 3

    Close

    Figure: V2500-A5: Graph for Finding Angle and Dimension of Metal to be Removed from the Stub Shaft Assembly

    Sheet 4
    Legend
    V2500-A5: Graph for Finding Angle and Dimension of Metal to be Removed from the Stub Shaft Assembly

    Sheet 4

    Close

    Figure: V2500-A1 Pre SBE 72-0132: Install the Front Seal Runner on to the LP Stub Shaft and Rotor Center

    Sheet 1
    Legend
    V2500-A1 Pre SBE 72-0132: Install the Front Seal Runner on to the LP Stub Shaft and Rotor Center

    Sheet 1

    Close

    Figure: V2500-A1 Pre SBE 72-0132: Install the Front Seal Runner on to the LP Stub Shaft and Rotor Center

    Sheet 2
    Legend
    V2500-A1 Pre SBE 72-0132: Install the Front Seal Runner on to the LP Stub Shaft and Rotor Center

    Sheet 2

    Close

    Figure: V2500-A1 SBE 72-0132 and V2500-A5: Install the Nut Ring on to the LP Stub Shaft and Rotor Center

    V2500-A1 SBE 72-0132 and V2500-A5: Install the Nut Ring on to the LP Stub Shaft and Rotor Center

    Figure: Install the Short Holder on to the Stub Shaft and Rotor Center

    Sheet 1
    Legend
    Install the Short Holder on to the Stub Shaft and Rotor Center

    Sheet 1

    Close

    Figure: Install the Six Pins in the Threaded Holes of the Short Holder

    Sheet 2

    Legend
    Install the Six Pins in the Threaded Holes of the Short Holder

    Sheet 2

    Close

    Figure: Align the Six Holes of the Restraint Holder with the Six Pins

    Sheet 3

    Legend
    Align the Six Holes of the Restraint Holder with the Six Pins

    Sheet 3

    Close

    Figure: V2500-A1 Pre SBE 72-0132: Install the No. 1 Bearing Seal Assembly on to the Rotor Center Shaft

    V2500-A1 Pre SBE 72-0132: Install the No. 1 Bearing Seal Assembly on to the Rotor Center Shaft
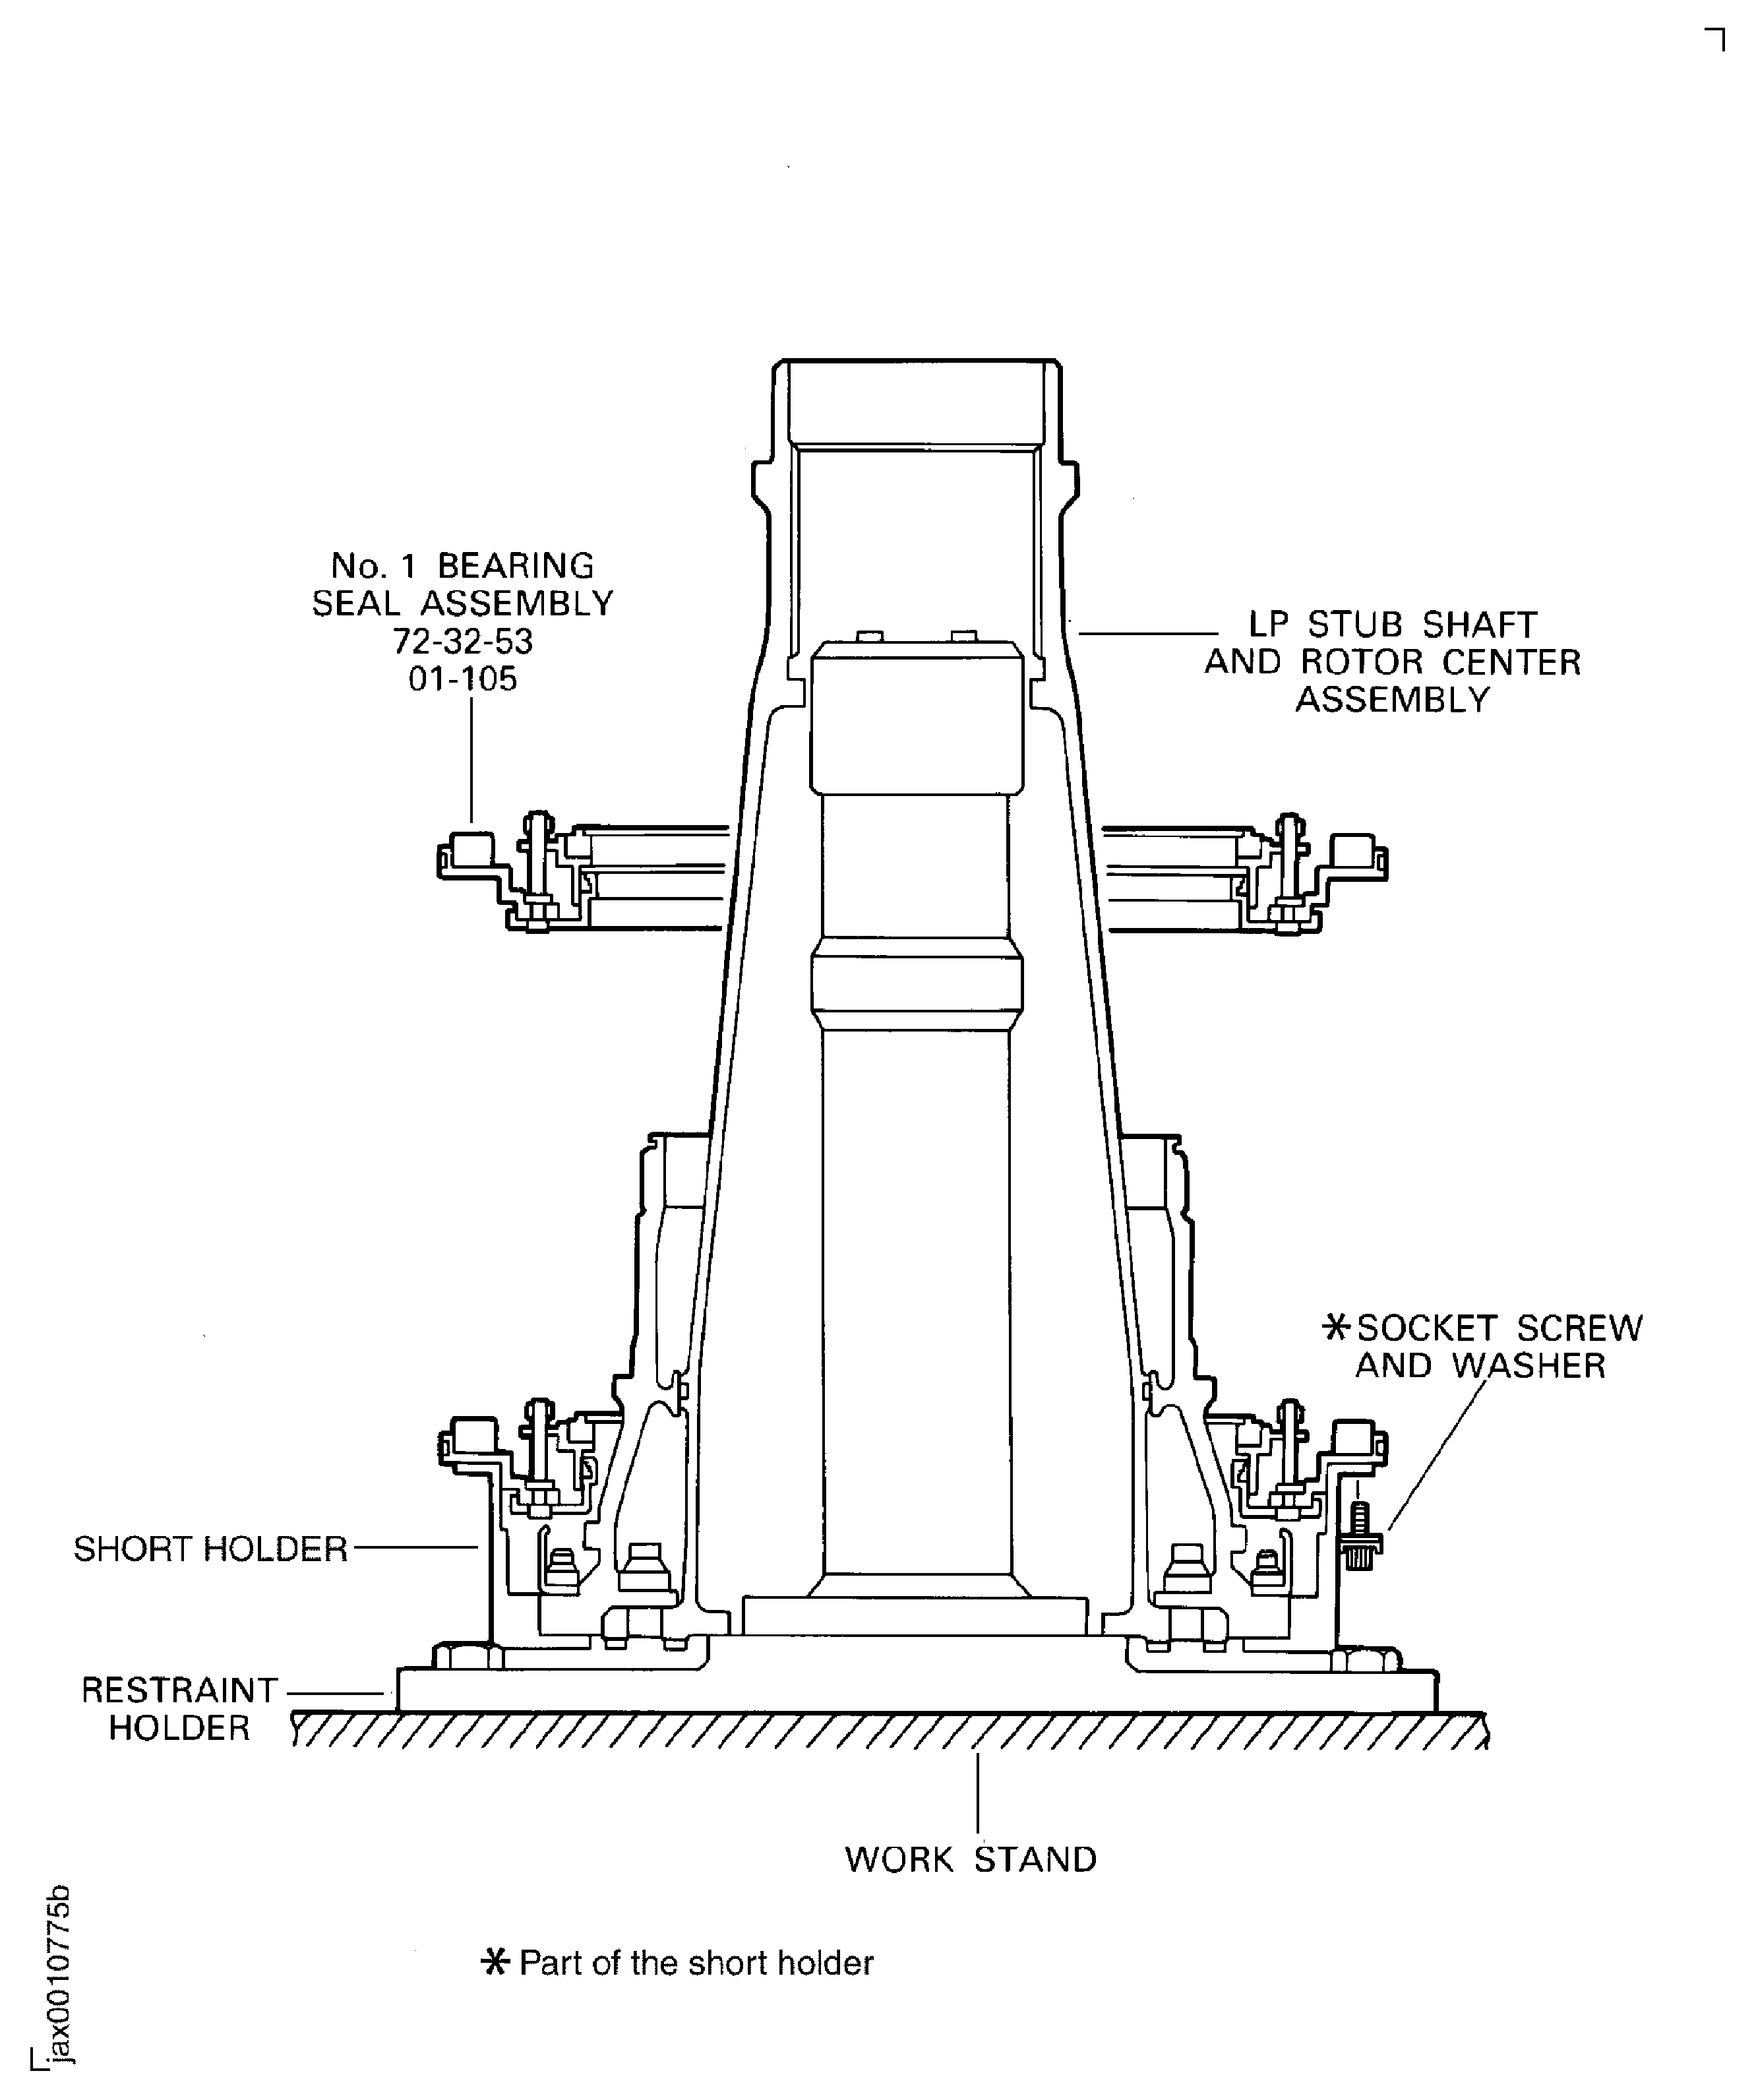
    Figure: V2500-A1 SBE 72-0132 and V2500-A5: Install the No. 1 Bearing Seal Assembly on to the Rotor Center Shaft

    V2500-A1 SBE 72-0132 and V2500-A5: Install the No. 1 Bearing Seal Assembly on to the Rotor Center Shaft

    Figure: Install the No. 1 Bearing Seal Assembly on to the Rotor Center Shaft

    Install the No. 1 Bearing Seal Assembly on to the Rotor Center Shaft
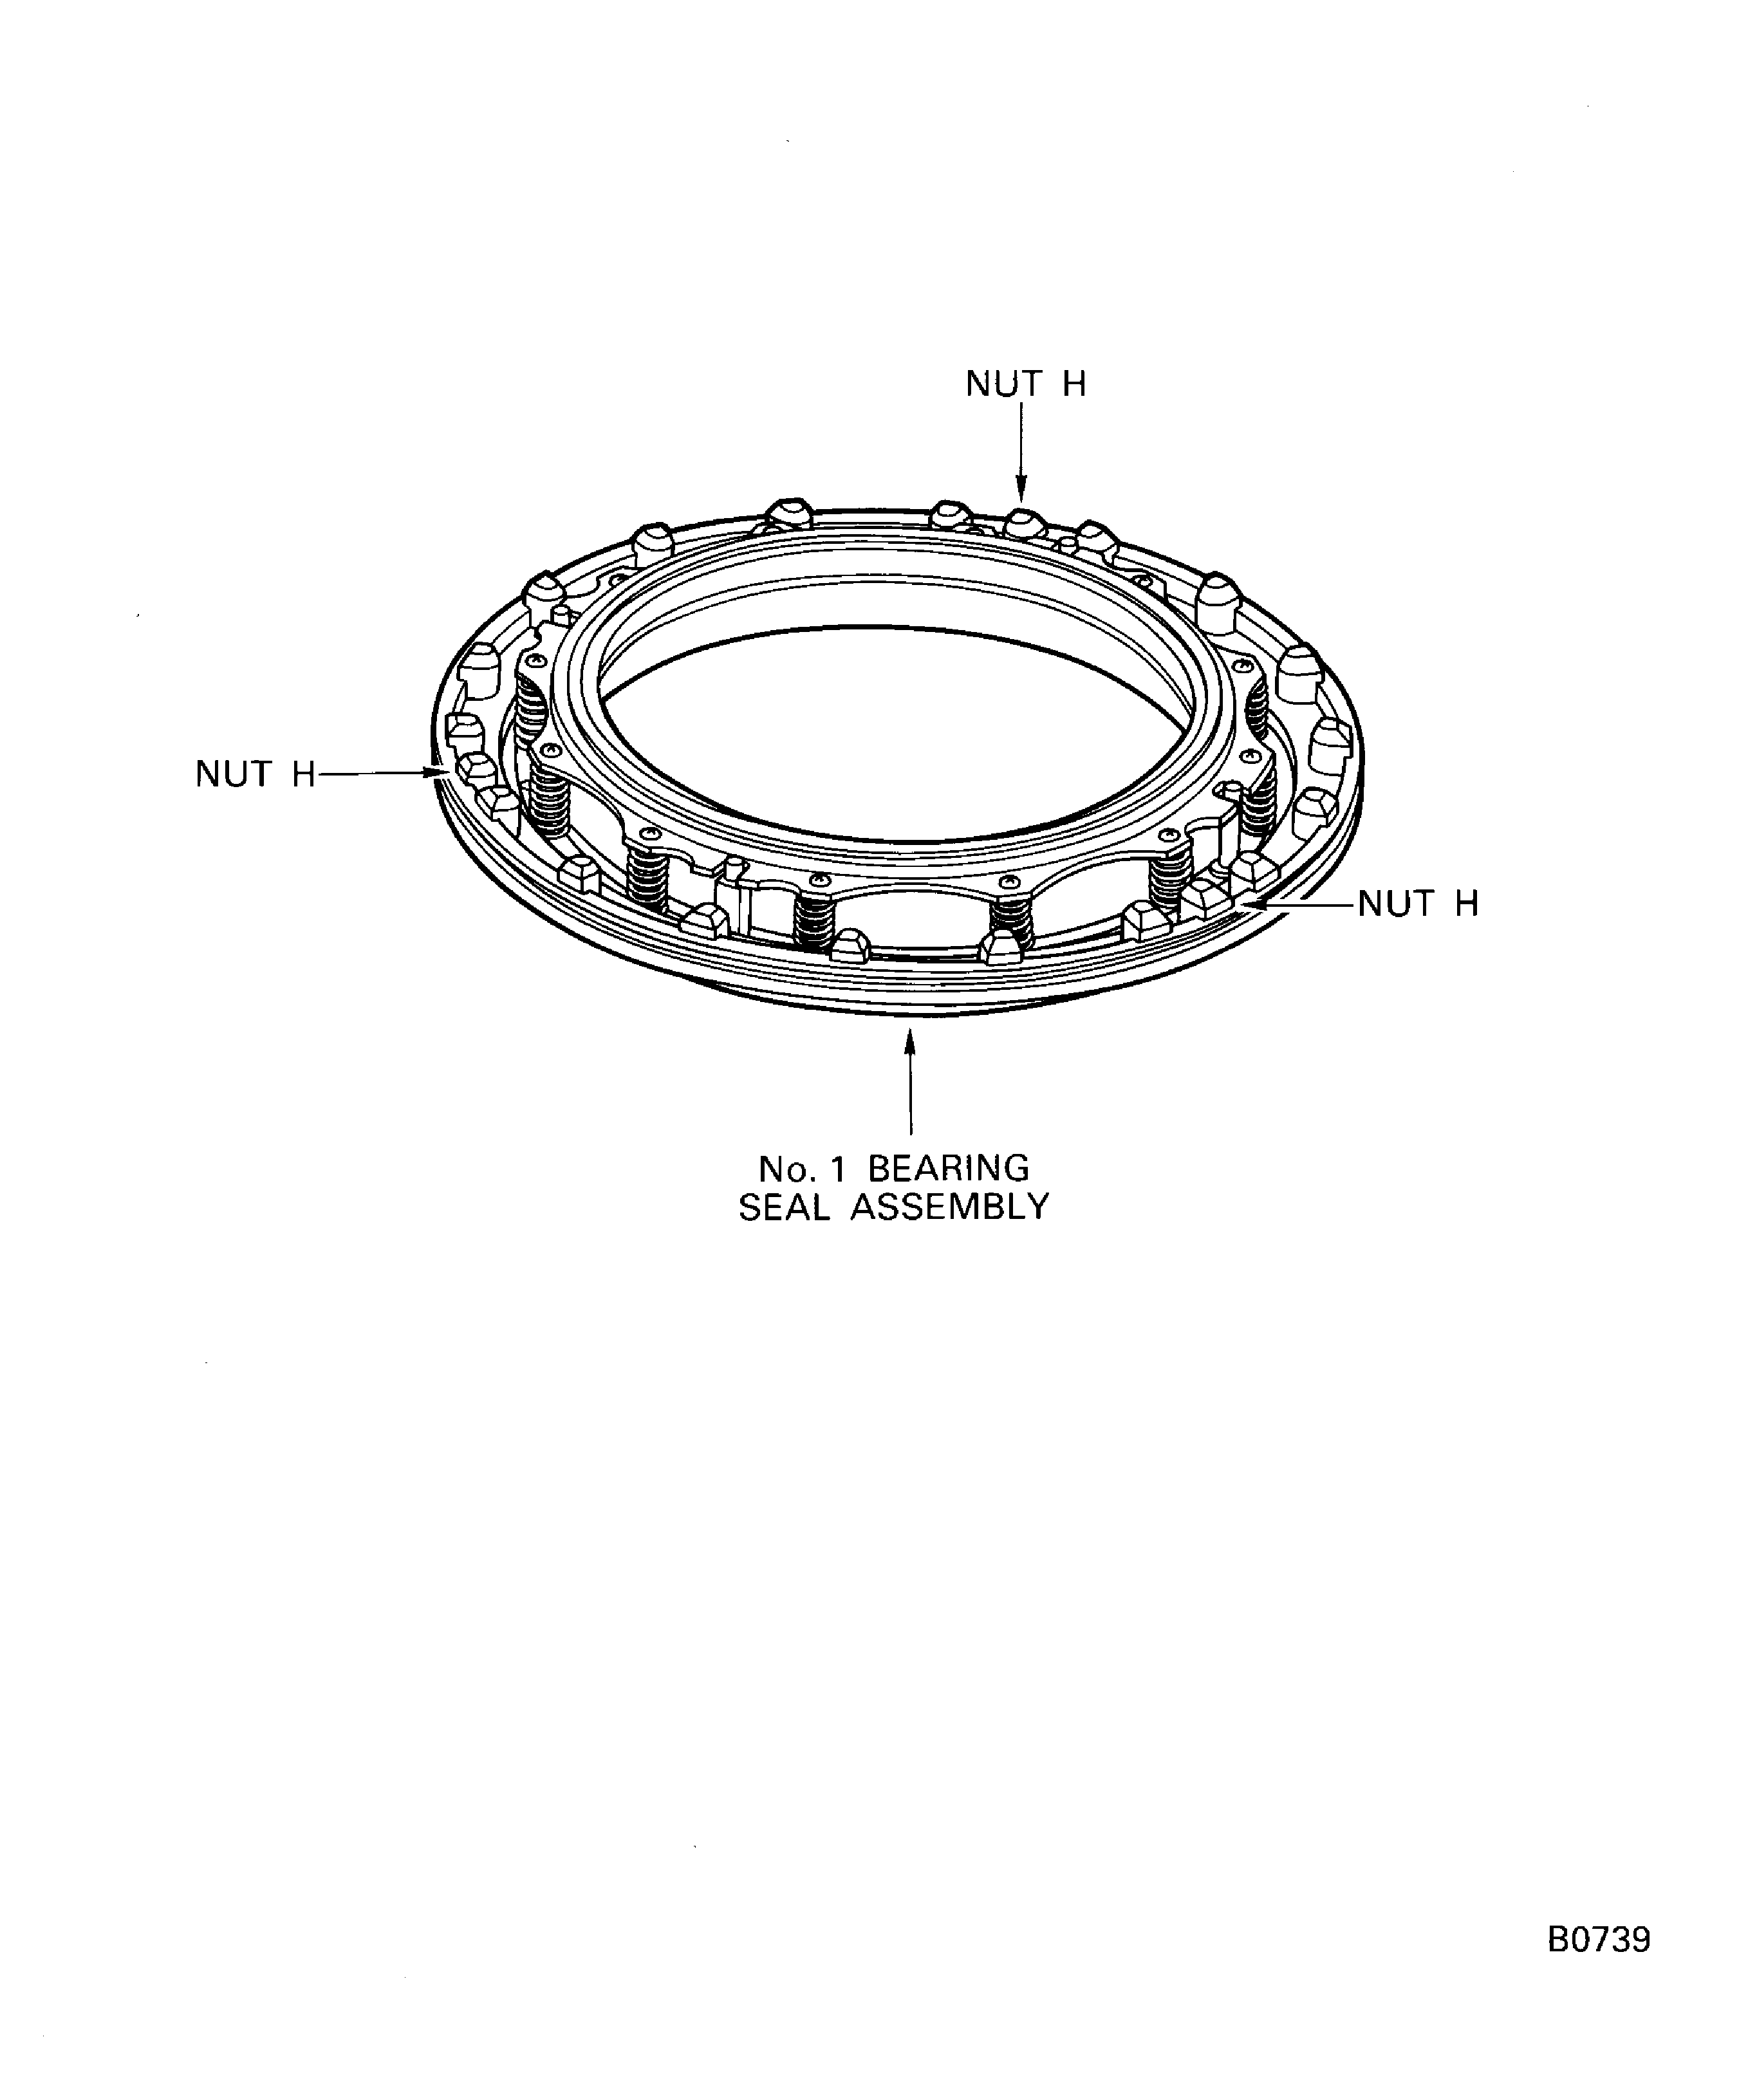
    Figure: Install the No. 1 Bearing and Seal Seat on to the Rotor Center Shaft

    Sheet 1
    Legend
    Install the No. 1 Bearing and Seal Seat on to the Rotor Center Shaft

    Sheet 1

    Close

    Figure: Install the No. 1 Bearing and Seal Seat on to the Rotor Center Shaft

    Sheet 2

    Legend
    Install the No. 1 Bearing and Seal Seat on to the Rotor Center Shaft

    Sheet 2

    Close

    Figure: Install the No. 1 Bearing and Seal Seat on to the Rotor Center Shaft

    Sheet 3

    Legend
    Install the No. 1 Bearing and Seal Seat on to the Rotor Center Shaft

    Sheet 3

    Close

    Figure: Prepare the Rotor Center Shaft, No. 1 Bearing Seal Seat and No. 1 Bearing

    Prepare the Rotor Center Shaft, No. 1 Bearing Seal Seat and No. 1 Bearing
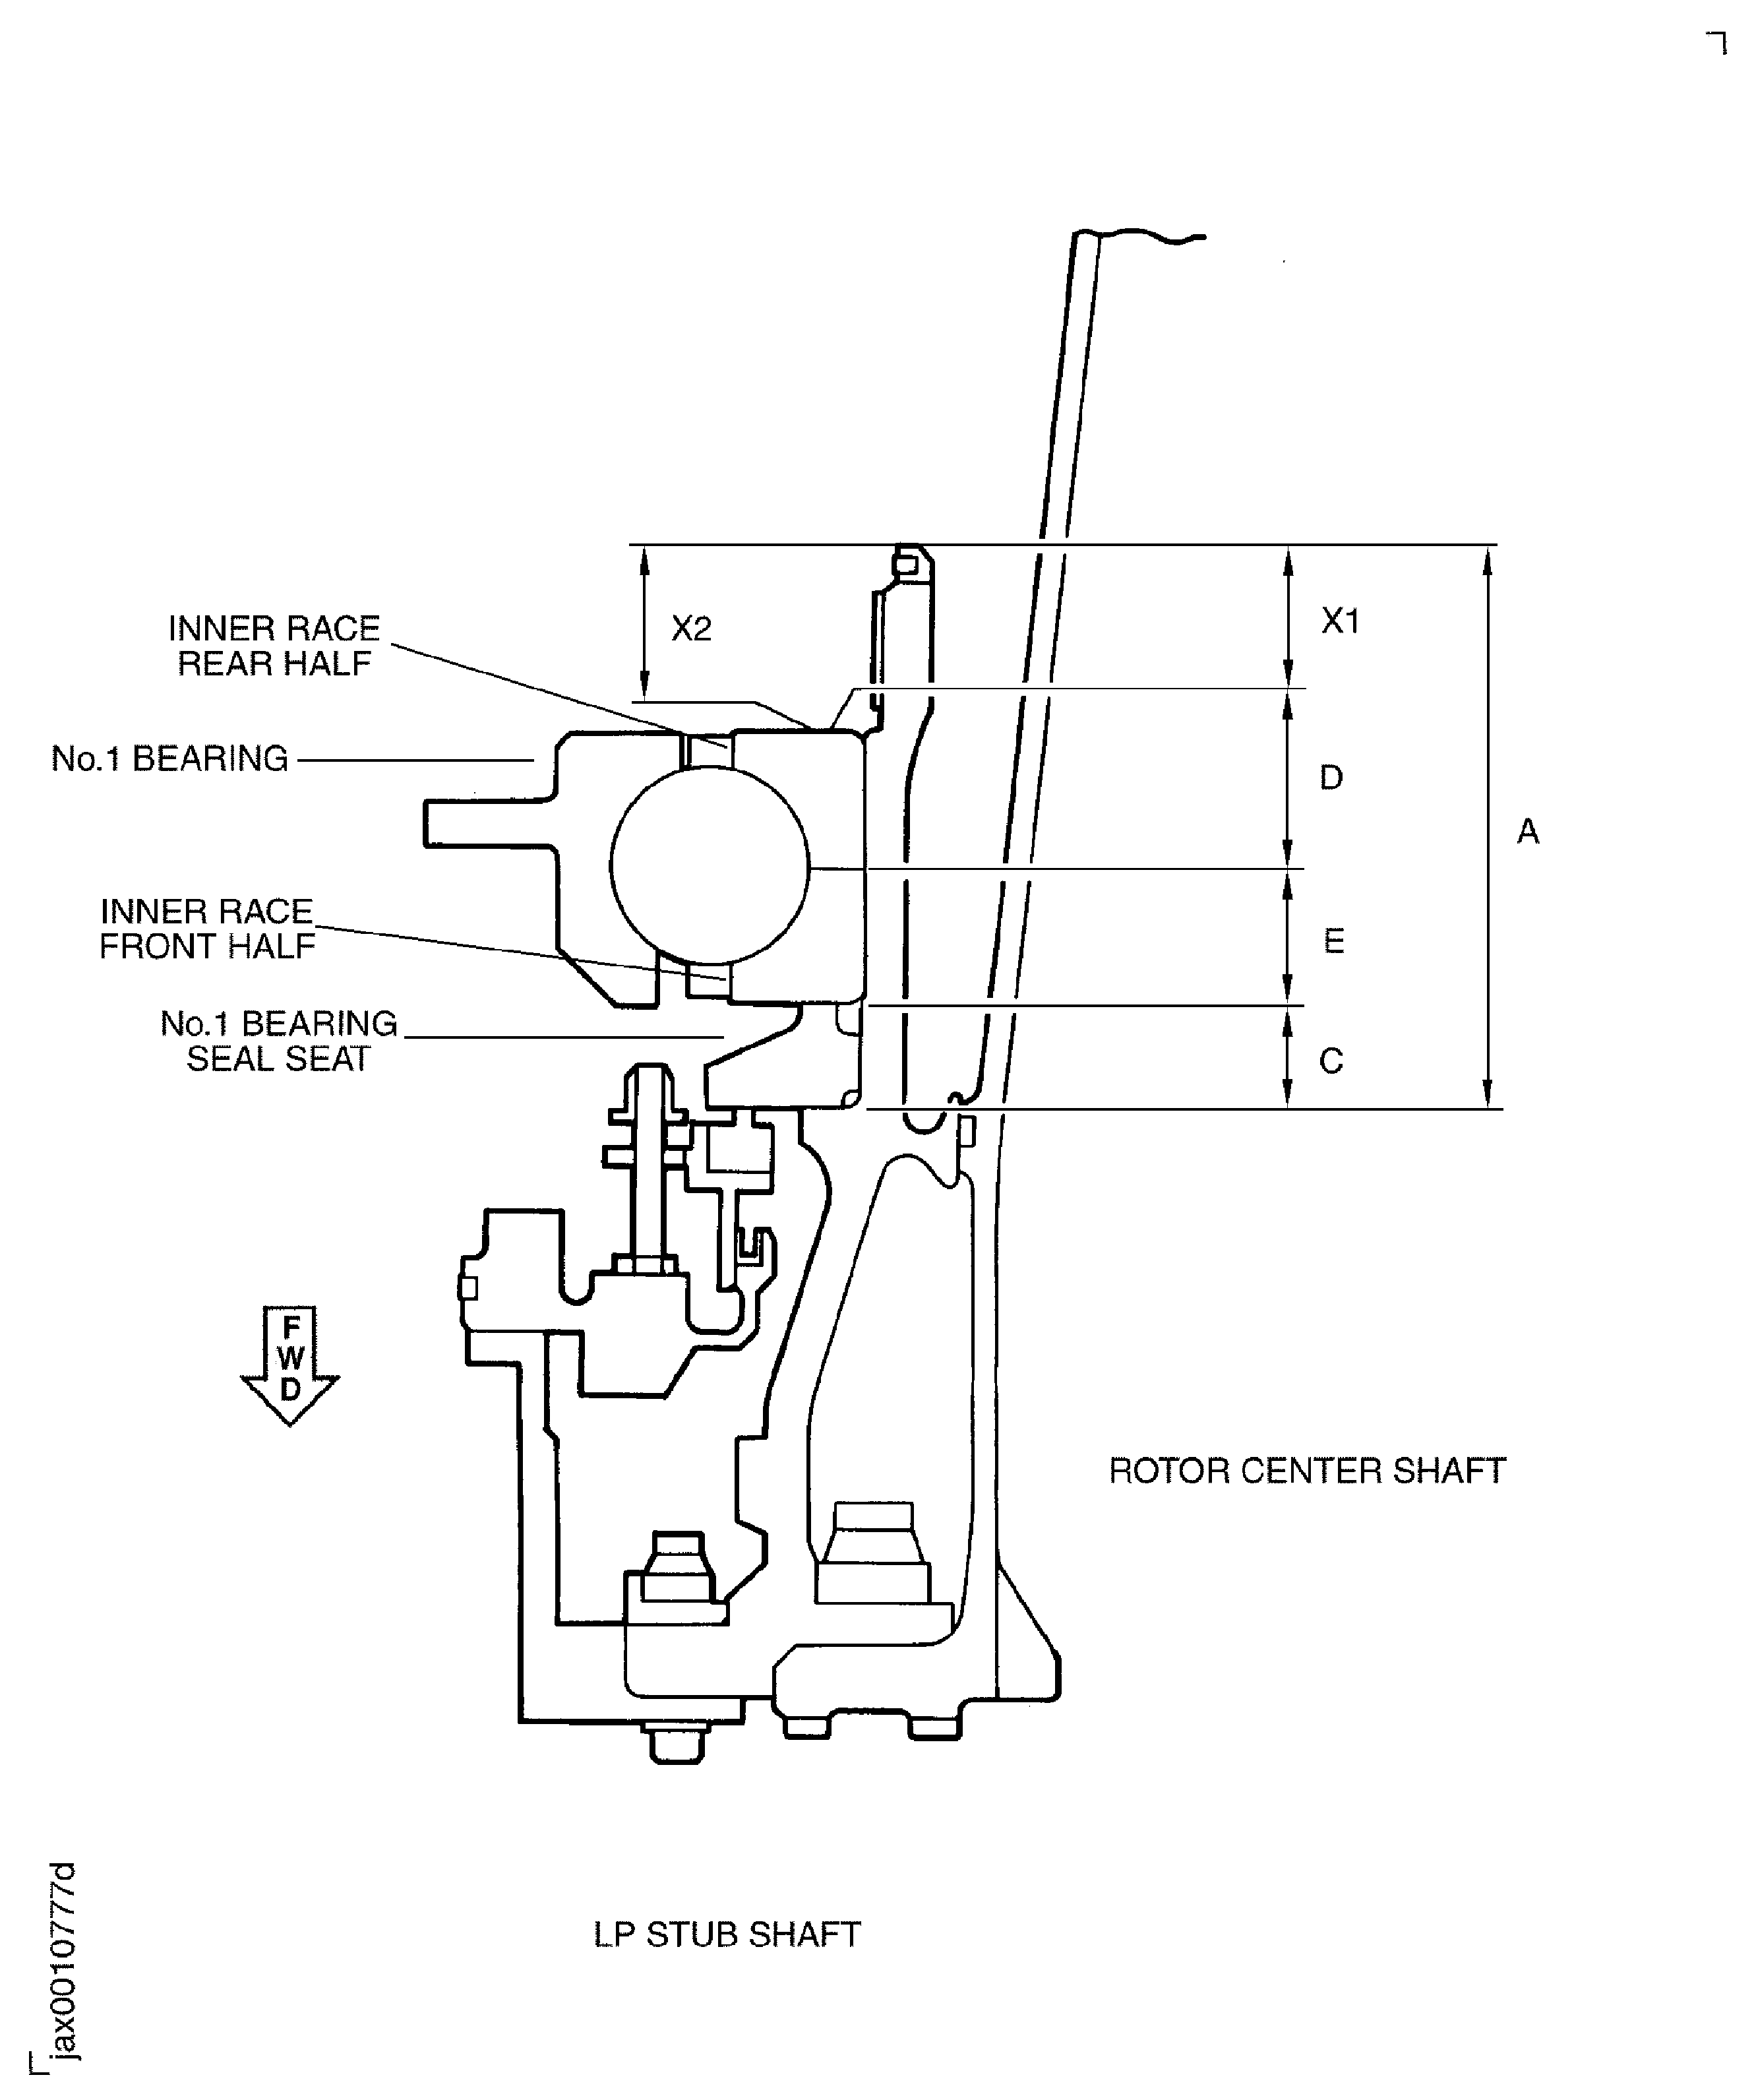
    Figure: Install the Plain Nut on to the Rotor Center Shaft

    Install the Plain Nut on to the Rotor Center Shaft

    Figure: Install the Plain Nut on to the Center Shaft

    Install the Plain Nut on to the Center Shaft

    Figure: Install the NF Probe Phonic Wheel and No. 2 Inner Roller Bearing on to the Stub Shaft Assembly

    Install the NF Probe Phonic Wheel and No. 2 Inner Roller Bearing on to the Stub Shaft Assembly

    Figure: Move the LP Shaft, No. 1 and No. 2 Bearing Assembly from the Restraint Holder to the Storage Stand
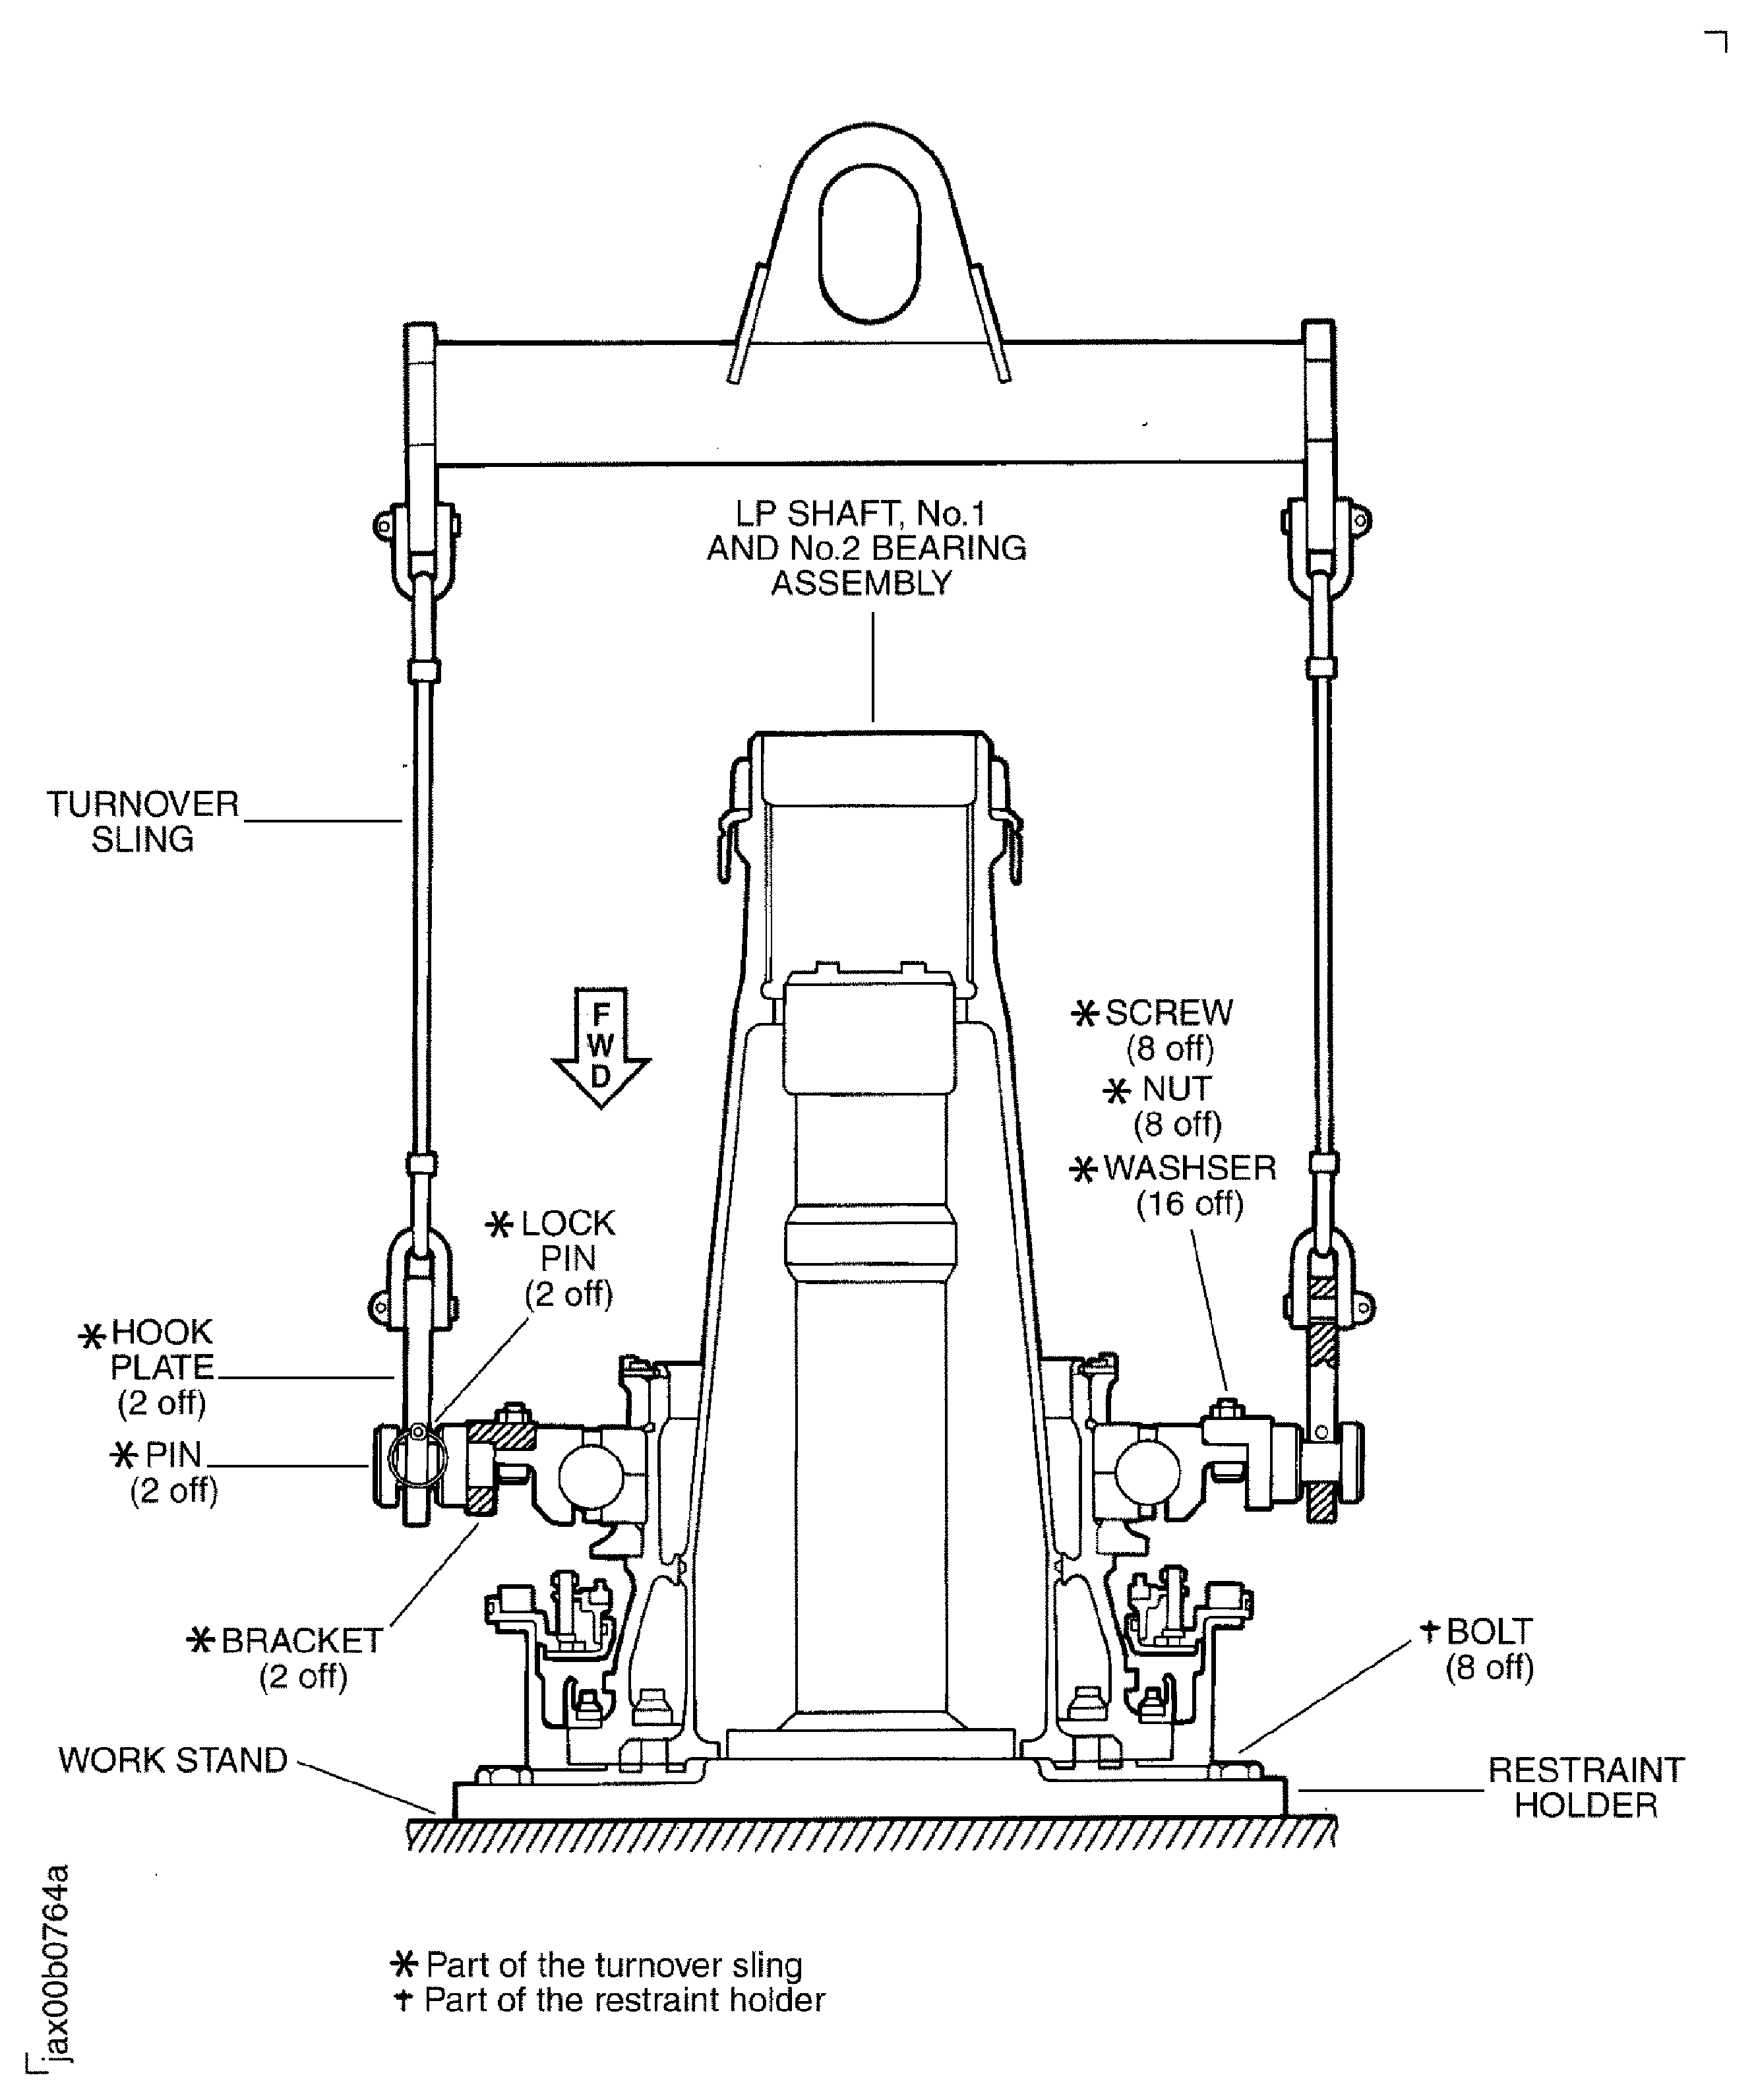
    Move the LP Shaft, No. 1 and No. 2 Bearing Assembly from the Restraint Holder to the Storage Stand

    Figure: Move the LP Shaft No. 1 and No. 2 Bearing Assembly from the Restraint Holder to the Storage Stand

    Sheet 1
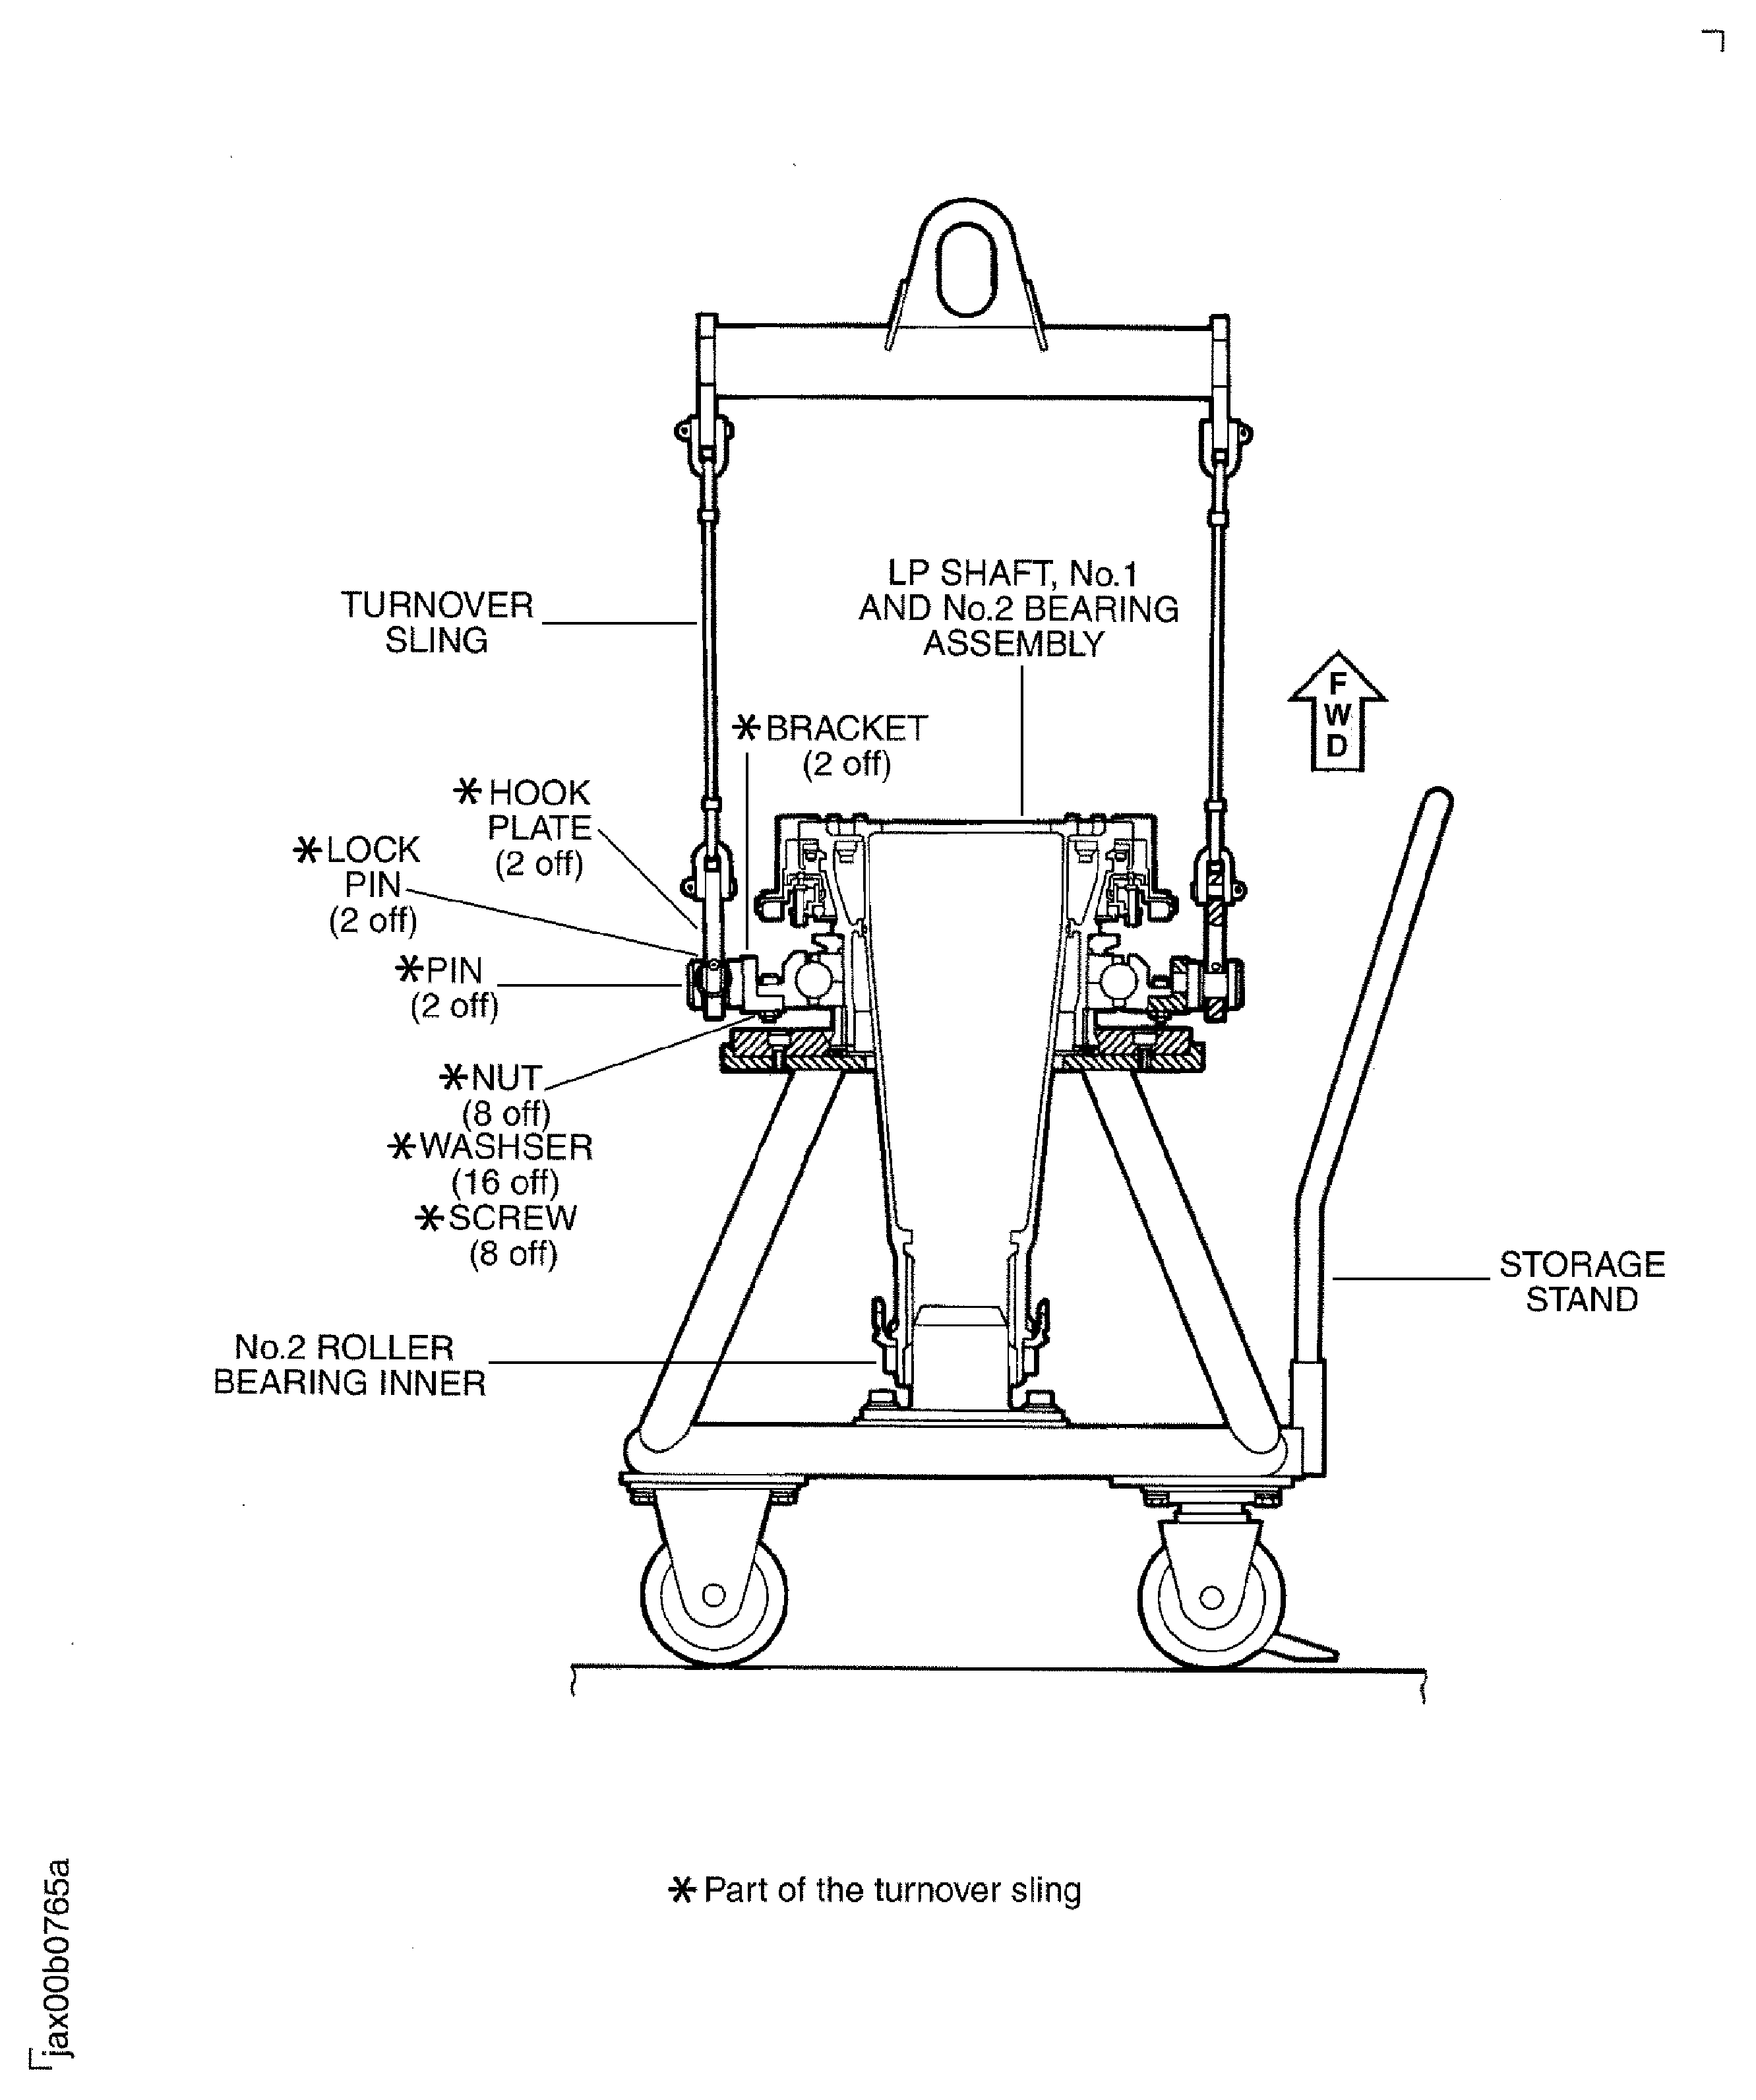
    Legend
    Move the LP Shaft No. 1 and No. 2 Bearing Assembly from the Restraint Holder to the Storage Stand

    Sheet 1

    Close

    Figure: Remove the Six Pins from the Short Holder

    Sheet 2

    Legend
    Remove the Six Pins from the Short Holder

    Sheet 2

    Close

    Figure: Identify the LP Shaft, No. 1 and No. 2 Bearing Assembly

    Identify the LP Shaft, No. 1 and No. 2 Bearing Assembly

Requirements After Job Completion

Follow-On Conditions

NONE
Change Type:

Updated procedure, fits and clearances tables to standard format. (Editorial)

Link not Found
Manufacturer Code:0AM53
Enterprise Name:IAE INTERNATIONAL AERO ENGINES AG
BU Name:NULL
Building:SUITE 400
Street:628 HEBRON AVENUE
City:GLASTONBURY
State:CT
Zip Code:06033
Country:USA
Manufacturer Code:IE207
Enterprise Name:DELETED, REFER TO 16956
Manufacturer Code:LOCAL
Enterprise Name:LOCALLY SUPPLIED
Link not Found
Manufacturer Code:LOCAL
Supply Number:CoMat 01-124
Type:sp01
Supply Short Name:CoMat 01-124 ISOPROPYL ALCOHOL
Supply Name:CoMat 01-124 ISOPROPYL ALCOHOL
Specification Groups:
Doc NumberType
OMAT:1/40GPR TECHNICAL GRADE
PMC 9094GPR TECHNICAL GRADE
JCR-011GPR TECHNICAL GRADE
Suppliers:
ManufacturerRemarks
LOCAL
U1185
24853
K6835
Manufacturer Code:IE207
Supply Number:CoMat 06-069
Type:sp01
Supply Short Name:CoMat 06-069 MARKER
Supply Name:CoMat 06-069 MARKER
Specification Groups:
Doc NumberType
OMAT:262TMARKS-A-LOT
JCR-085MARKS-A-LOT
Suppliers:
ManufacturerRemarks
IE207
Manufacturer Code:X333X
Supply Number:CoMat 10-077
Type:sp01
Supply Short Name:CoMat 10-077 APPROVED ENGINE OILS
Supply Name:CoMat 10-077 APPROVED ENGINE OILS
Specification Groups:
Doc NumberType
For V2500-A1/A5/D5 models - Refer to V2500 Service Bulletin ENG-79-0108
For V2500-E5 model - Refer to Service Bulletin E5-79-0001
Suppliers:
ManufacturerRemarks
X333X
Manufacturer Code:0AM53
Tool Number:IAE 1J12106
Tool Name:IAE 1J12106 Aligning pin set
Manufacturer Code:0AM53
Tool Number:IAE 1J12211
Tool Name:IAE 1J12211 Storage stand
Manufacturer Code:0AM53
Tool Number:IAE 1J12335
Tool Name:IAE 1J12335 Spanner wrench
Manufacturer Code:0AM53
Tool Number:IAE 1J12386
Tool Name:IAE 1J12386 Restraint holder
Manufacturer Code:0AM53
Tool Number:IAE 1J12387
Tool Name:IAE 1J12387 Work stand
Manufacturer Code:0AM53
Tool Number:IAE 1J12388
Tool Name:IAE 1J12388 Hydraulic pusher
Manufacturer Code:0AM53
Tool Number:IAE 1J12392
Tool Name:IAE 1J12392 Installation pusher
Manufacturer Code:0AM53
Tool Number:IAE 1J12394
Tool Name:IAE 1J12394 Balance adapter
Manufacturer Code:0AM53
Tool Number:IAE 1J12395
Tool Name:IAE 1J12395 Work stand
Manufacturer Code:0AM53
Tool Number:IAE 1J12397
Tool Name:IAE 1J12397 Front sling
Manufacturer Code:0AM53
Tool Number:IAE 1J12398
Tool Name:IAE 1J12398 PMI mandrel
Manufacturer Code:0AM53
Tool Number:IAE 1J12401
Tool Name:IAE 1J12401 No.1 bearing holding plate
Manufacturer Code:0AM53
Tool Number:IAE 1J12462
Tool Name:IAE 1J12462 Seal holder
Manufacturer Code:0AM53
Tool Number:IAE 1J12473
Tool Name:IAE 1J12473 Seal holder
Manufacturer Code:0AM53
Tool Number:IAE 1J12499
Tool Name:IAE 1J12499 Aligning pin set
Manufacturer Code:0AM53
Tool Number:IAE 1J12500
Tool Name:IAE 1J12500 Adapter
Manufacturer Code:0AM53
Tool Number:IAE 1J12501
Tool Name:IAE 1J12501 Turnover sling
Manufacturer Code:0AM53
Tool Number:IAE 1J12506
Tool Name:IAE 1J12506 No.1 bearing guide
Manufacturer Code:LOCAL
Tool Number:SWEENEY 8200
Tool Name:Torque multiplier
Manufacturer Code:LOCAL
Tool Number:Schenck HL5U
Tool Name:Horizontal Balancing Machine