Export Control
EAR Export Classification: Not subject to the EAR per 15 C.F.R. Chapter 1, Part 734.3(b)(3), except for the following Service Bulletins which are currently published as EAR Export Classification 9E991: SBE70-0992, SBE72-0483, SBE72-0580, SBE72-0588, SBE72-0640, SBE73-0209, SBE80-0024 and SBE80-0025.Copyright
© IAE International Aero Engines AG (2001, 2014 - 2021) The information contained in this document is the property of © IAE International Aero Engines AG and may not be copied or used for any purpose other than that for which it is supplied without the express written authority of © IAE International Aero Engines AG. (This does not preclude use by engine and aircraft operators for normal instructional, maintenance or overhaul purposes.).Applicability
All
Common Information
TASK 72-38-11-200-001-A00 Inlet Cone Fairing - Examine, Inspection-001
General
This TASK gives the procedure for the inspection of the inlet cone fairing. For the other parts of the inlet cone fairing, refer to TASK 72-38-11-200-000 (INSPECTION-000).
Fig/item numbers in parentheses in the procedure agree with those used in the IPC. Only the primary Fig/item numbers are used. For the service bulletin alpha variants refer to the IPC.
The policy that is necessary for Inspection is given in the SPM TASK 70-20-01-200-501.
All the parts must be cleaned before any part is examined. Refer to the SPM TASK 70-11-14-300-503
All parts must be visually examined for damage, corrosion and wear. Any defects that are not identified in the procedure must be referred to IAE.
The procedure for those parts which must have a crack test is given in Step. Do the test before the part is visually examined. Limits for cracks are given in the SUBTASK for each part.
Do not discard any part until you are sure there are no repairs available. Refer to the instructions in Repair before a discarded part is used again or oversize parts are installed.
Parts which should be discarded can be held although no repair is available. The repair of a discarded part could be shown to be necessary at a later date.
All parts must be examined to make sure that all the repairs have been completed satisfactorily.
The practices and processes referred to in the procedure by the TASK numbers are in the SPM.
References
Refer to the SPM for data on these items.
Definitions of Damage SPM TASK 70-02-02-350-501
Record and Control of the Lives of Parts, SPM TASK 70-05-00-220-501
Inspection of Parts, SPM TASK 70-20-01-200-501
Some data on these items is contained in this TASK. For more data on these items refer to the SPM.
Method of Testing for Crack Indications
Chemical Processes
Surface Protection
Preliminary Requirements
Pre-Conditions
NONESupport Equipment
NONEConsumables, Materials and Expendables
NONESpares
NONESafety Requirements
NONEProcedure
Clean the parts. Refer to TASK 72-38-11-100-000 (CLEANING-000).
SUBTASK 72-38-11-230-051 Examine the Inlet Cone Fairing (01-100) for Cracks
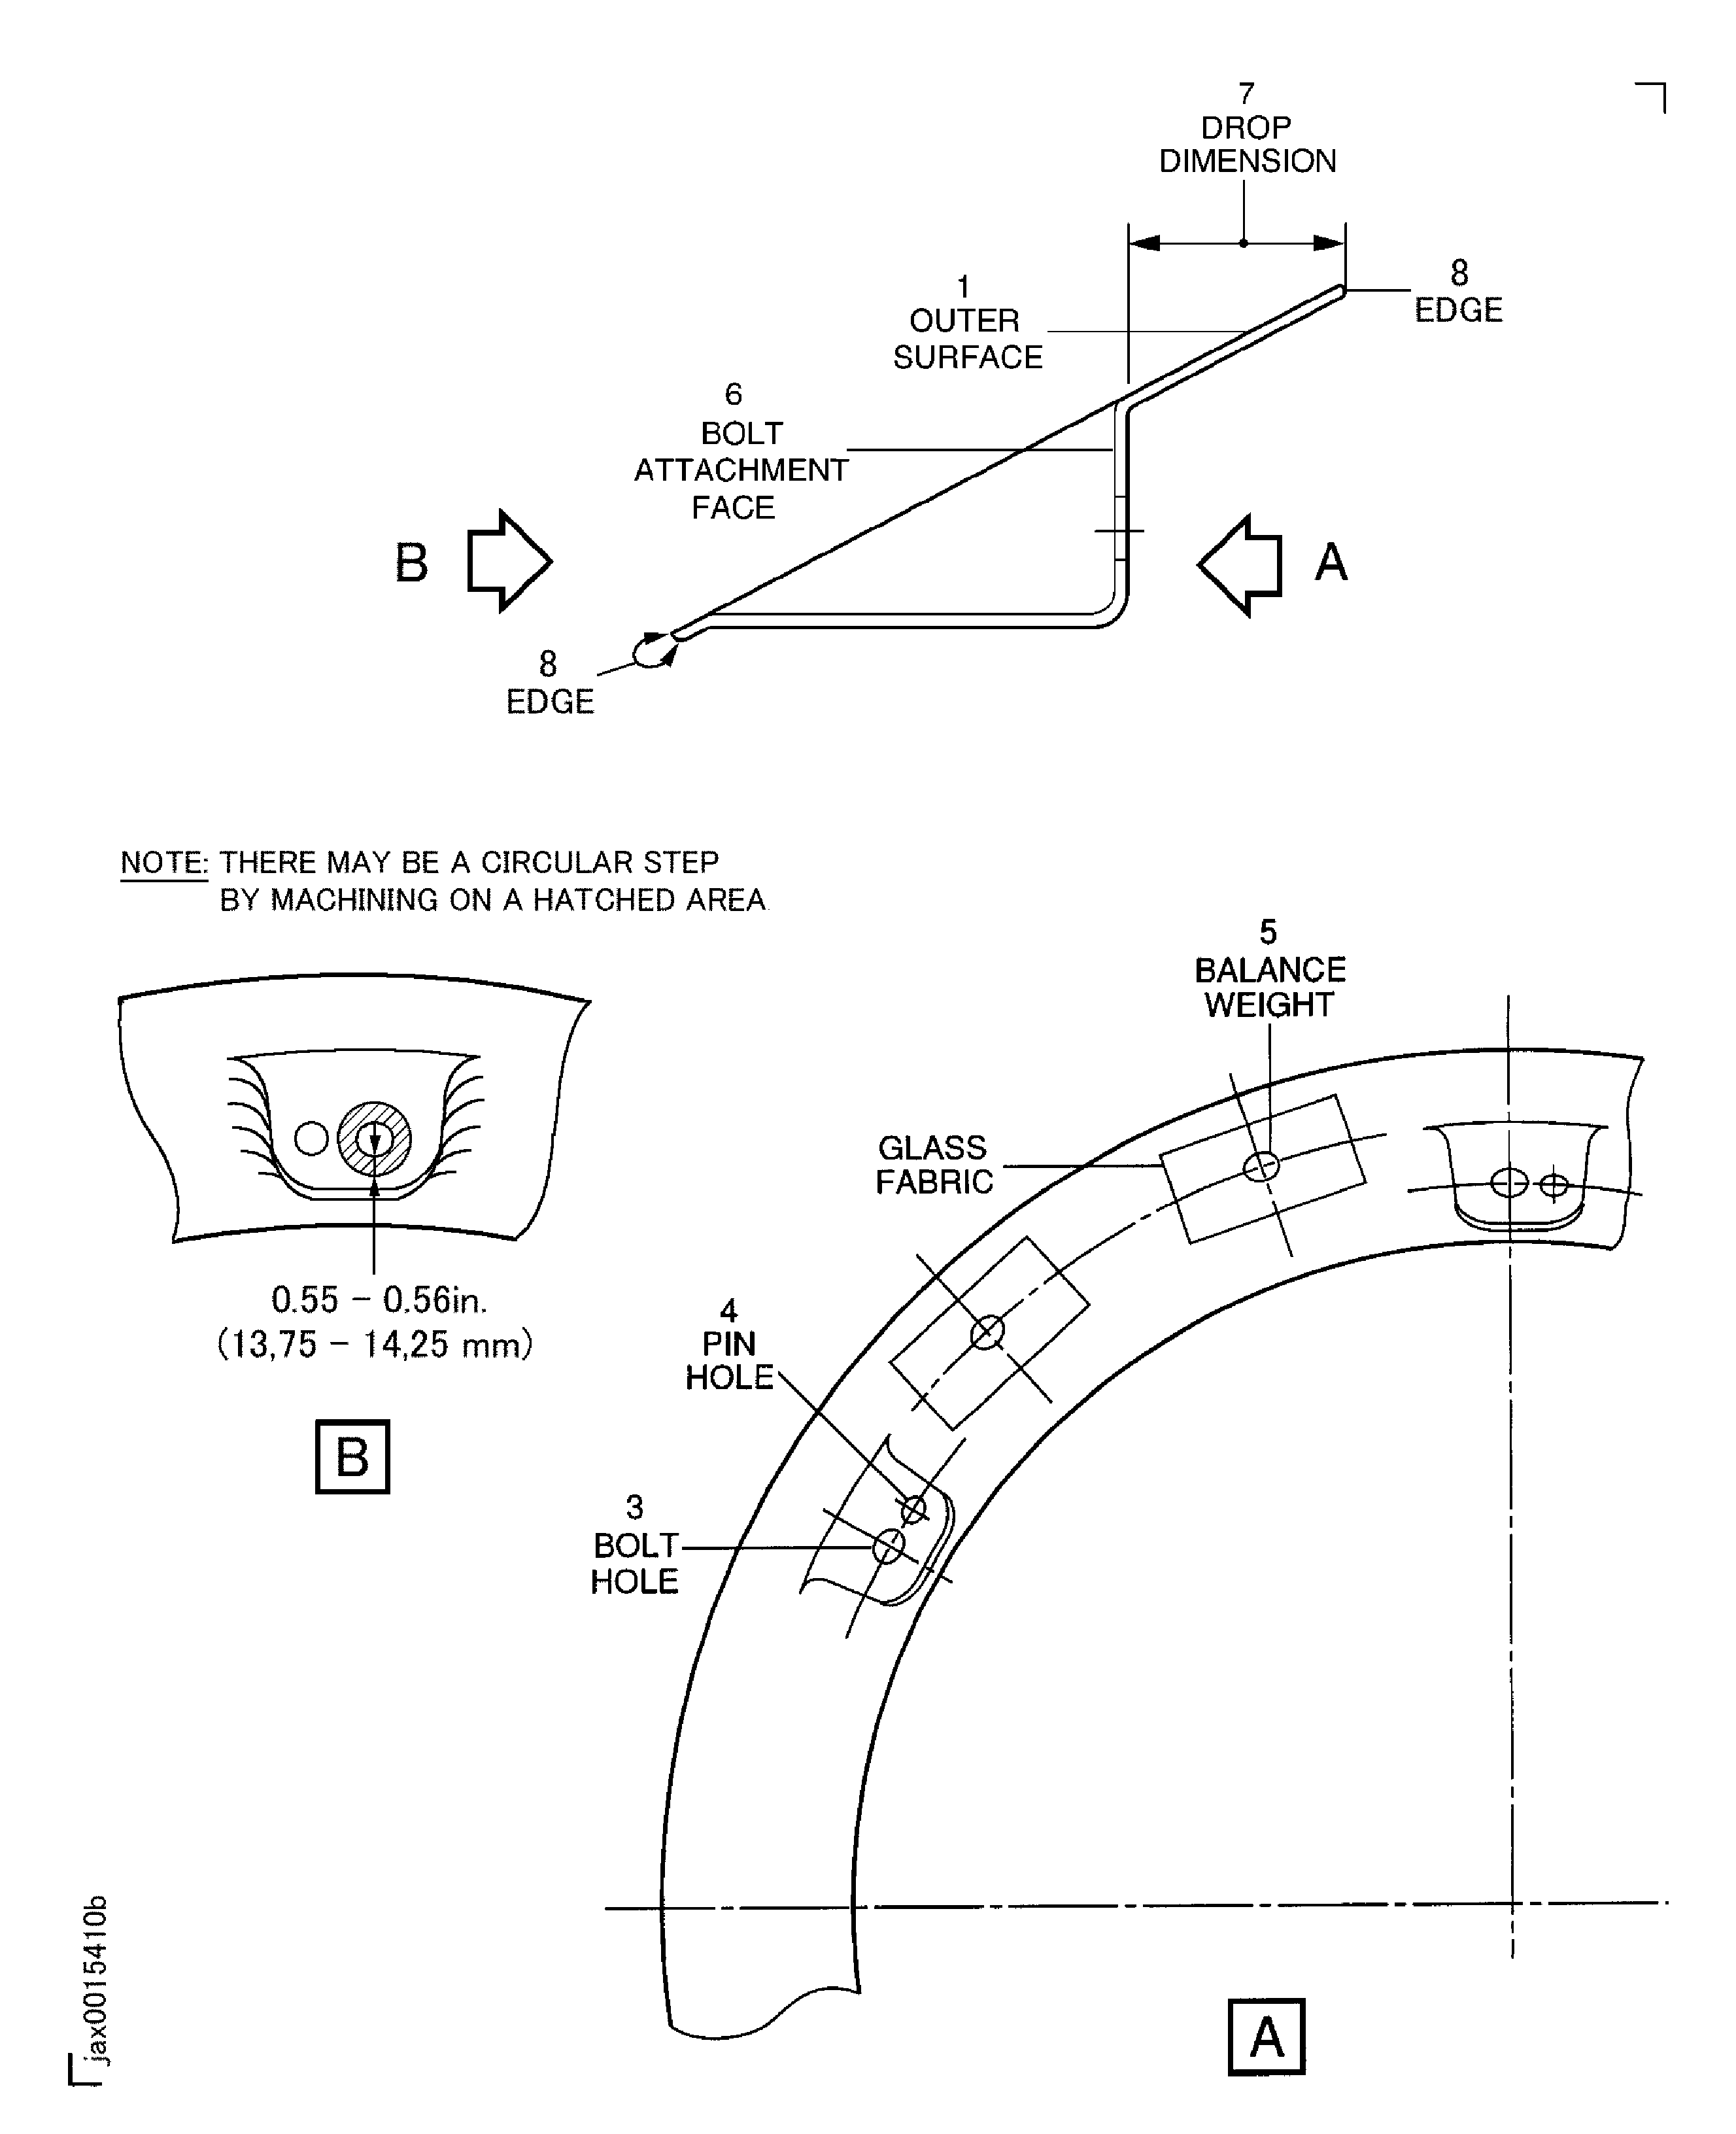
Refer to Figure.
Repair, VRS1460 TASK 72-38-11-300-006 (REPAIR-006)
Edges burred
Examine the bolt holes at location 3.
SUBTASK 72-38-11-220-059 Examine the Inlet Cone Fairing (01-100) Bolt Holes
Refer to Figure.
Repair, VRS1460 TASK 72-38-11-300-006 (REPAIR-006)
Edges burred
Examine the pin holes at location 4.
SUBTASK 72-38-11-220-060 Examine the Inlet Cone Fairing (01-100) Pin Holes
Refer to Figure.
Repair, VRS1459 TASK 72-38-11-300-007 (REPAIR-007)
Delamination of glass fabric
Repair, VRS1459 TASK 72-38-11-300-007 (REPAIR-007)
Disengagement of balance weights
Examine the balance weights at location 5.
SUBTASK 72-38-11-220-061 Examine the Inlet Cone Fairing (01-100) Balance Weight
Refer to Figure.
More than Step
Galled.
NOTE
There may be a circular step around a bolt hole which was machined in the production process. If the area inside step is uniform and surface texture is as smooth as adjacent surface, the area is not worn but the machined area. The machined area is to obtain the seating surface of the bolts.Examine the bolt attachment face at location 6.
SUBTASK 72-38-11-220-062 Examine the Inlet Cone Fairing (01-100) Bolt Attachment Face
Refer to Figure.
Repair, VRS1460 TASK 72-38-11-300-006 (REPAIR-006)
Up to 0.015 in. (0.38 mm) in depth
Nicked, dented or scratched.
Examine the edge at location 8.
SUBTASK 72-38-11-220-180 Examine the Inlet Cone Fairing (01-100) Edge
Figure: Locations on the inlet cone fairing
Locations on the inlet cone fairing

