Export Control
EAR Export Classification: Not subject to the EAR per 15 C.F.R. Chapter 1, Part 734.3(b)(3), except for the following Service Bulletins which are currently published as EAR Export Classification 9E991: SBE70-0992, SBE72-0483, SBE72-0580, SBE72-0588, SBE72-0640, SBE73-0209, SBE80-0024 and SBE80-0025.Copyright
© IAE International Aero Engines AG (2001, 2014 - 2021) The information contained in this document is the property of © IAE International Aero Engines AG and may not be copied or used for any purpose other than that for which it is supplied without the express written authority of © IAE International Aero Engines AG. (This does not preclude use by engine and aircraft operators for normal instructional, maintenance or overhaul purposes.).Applicability
All
Common Information
TASK 72-41-11-300-016 HPC Stage 3 - 8 Drum Disk - Blend Repair To Restore The Surface Condition On The Stages 3 To 5 Dovetail Slots, Repair-016 (VRS6300)
Effectivity
FIG/ITEM | PART NO. |
|---|---|
01-200 | 6A3508 |
01-200 | 6A3648 |
01-200 | 6A3934 |
01-200 | 6A3936 |
01-200 | 6A4189 |
01-200 | 6A4900 |
01-200 | 6A5594 |
01-200 | 6A5467 |
01-200 | 6A5592 |
01-200 | 6A5659 |
01-200 | 6A6473 |
01-200 | 6A7379 |
01-200 | 6A7380 |
01-200 | 6A7382 |
01-200 | 6A7383 |
01-200 | 6A7384 |
01-200 | 6A7385 |
01-200 | 6A7401 |
01-200 | 6A7705 |
01-200 | 6A8236 |
01-200 | 6A8316 |
01-200 | 6A8318 |
01-200 | 6A8350 |
01-200 | 6B1379 |
01-200 | 6B1380 |
01-200 | 6B1381 |
01-200 | 6B1382 |
01-200 | 6B1383 |
01-200 | 6B1384 |
01-200 | 6B1385 |
01-200 | 6B1386 |
01-200 | 6B1387 |
01-200 | 6B1391 |
01-200 | 6B1392 |
01-200 | 6B1393 |
01-200 | 6B1401 |
01-200 | 6B1402 |
01-200 | 6B1403 |
01-200 | 6B1404 |
01-200 | 6B1405 |
01-200 | 6B1406 |
Material of component
PART IDENT | MATERIAL |
|---|---|
HP Compressor Stage 3 to 8 Disks Shaft Assembly | Titanium Alloy |
General
This Repair must only be done when the instruction to do so is given in the relevant inspection procedures (identified by the applicable part number) located in section 72-41-11.
This repair permits the removal of damaged material from those areas of the axial dovetail slots, stages 3, 4 and 5, specified Zone B and Zone C only.
The practices and processes referred to in the procedures by the TASK/SUBTASK numbers, are in the SPM.
To put back the surface condition it is necessary to shot peen surfaces where the total depth of material, including damage, removed is more than 0.002 in. (0.05 mm) in depth.
The shot peened part of this repair requires to be source demonstrated and can only be done by approved vendors.
The shot peened part of this repair can only be done four times on any one dovetail stage and must be shot peened after damaged material has been removed.
CAUTION
For Zone A if the damage is galling only, up to 0.002 in. (0.051 mm) maximum, you must do Step.
Local areas of damage (nicks, dents, scores and frettage) may be removed from Zone B and Zone C on all Stage 3, 4 and 5 dovetail posts, provided there are not more than two in number in any Zone for each dovetail post and they are not less than 0.250 in. (6.35 mm) apart.
The maximum depth permitted after damaged material (nicks, dents, scores and/or frettage) is removed, to leave a smooth surface finish in Zone B only, is 0.010 in. (0.254 mm).
If the damage is nicks, dents or scores the maximum depth of damage before material removal, in Zone B only, is 0.005 in. (0.127 mm) and you must remove the damage to 2X depth, to a maximum depth of 0.010 in. (0.254 mm).
If the damage is frettage the maximum depth of damage before material removal, in Zone B only, is 0.010 in. (0.254 mm) and you must remove the damage to depth, to a maximum depth of 0.010 in. (0.254 mm).
The maximum depth permitted after damaged material (nicks, dents, scores and/or frettage) is removed, to leave smooth surface finish in Zone C only, is 0.020 in. (0.508 mm).
Material removal may overlap into other Zones. If this occurs you must use the limit with the least material removal.
TASKS identified by SPM TASK are in the Standard Practices and Manual (SPM).
Price and availability
Refer to International Aero Engines
Related repairs - none
NOTE
NOTE
NOTE
NOTE
NOTE
Preliminary Requirements
Pre-Conditions
NONESupport Equipment
| Name | Manufacturer | Part Number / Identification | Quantity | Remark |
|---|---|---|---|---|
| Penetrant Crack Test Equipment | LOCAL | Penetrant crack test equipment | ||
| Standard workshop equipment | LOCAL | Standard workshop equipment | ||
| Chemical cleaning equipment | LOCAL | Chemical cleaning equipment | ||
| Binoculars | LOCAL | Binoculars | 10X | |
| Glass bead peening equipment | LOCAL | Glass bead peening equipment | ||
| Vibrating marking pencil | LOCAL | Vibrating marking pencil | ||
| Shot peening equipment | LOCAL | Shot peening equipment | Controlled | |
| IAE 3R19465 Shot Peen Fixture | 0AM53 | IAE 3R19465 | 1 | |
| IAE 3R19466 Almen Plate Carrier | 0AM53 | IAE 3R19466 | 1 | |
| IAE 3R19468 Almen Plate Holder | 0AM53 | IAE 3R19468 | 1 |
Consumables, Materials and Expendables
| Name | Manufacturer | Part Number / Identification | Quantity | Remark |
|---|---|---|---|---|
| CoMat 02-003 ADHESIVE TAPE BLACK WATERPROOF | LOCAL | CoMat 02-003 | ||
| CoMat 05-020 WATERPROOF SILICON CARBIDE | LOCAL | CoMat 05-020 | ||
| CoMat 05-021 WATERPROOF SILICON CARBIDE | 44197 | CoMat 05-021 | ||
| CoMat 05-028 METALLIC SHOT (CAST STEEL), S230 | IE249 | CoMat 05-028 | ||
| CoMat 05-106 ABRASIVE STONE | K6835 | CoMat 05-106 | ||
| CoMat 06-022 FLUORESCENT PENETRANT (POST-EMULSIFIED ULTRA HIGH SENSITIVITY) | LOCAL | CoMat 06-022 |
Spares
NONESafety Requirements
NONEProcedure
Only the shot peening part of this Repair requires Source Demonstration. This means that any facility not authorized to shot peen, either utilize the Authorized Repair Vendors listed below or contact the IAE Repair Services Group to determine if a qualification program can be initiated at their facility.
IAE - INTERNATIONAL AERO ENGINES AG
C/O ROLLS-ROYCE PLC.
PO BOX 31
DERBY DE24 8BJ
ENGLAND
ATTN: MANAGER TECHNICAL SERVICES
Authorized Repair Vendors for the shot peening portion of VRS6300 are listed below:
METAL IMPROVEMENT COMPANY INC.
DERBY DIVISION (UK)
ASCOT DRIVE
DERBY DE2 8ST
ENGLAND
ATTN: DIVISION MANAGER
METAL IMPROVEMENT COMPANY INC.
145 ADDISION ROAD
WINDSOR
CONNECTICUT
CT06095
USA
ATTN: DIVISION MANAGER
MTU MAINTENACE GMBH
FLUGHAFEN HANNOVER
MUNCHNER STRASSE 31
POSTFACH 1720
3012 LANGENHAGEN
GERMANY
ATTN. MANAGER, QUALITY ASSURANCE
ISHIKAWAJIMA-HARIMA HEAVY INDUSTRIES CO. LTD.
229 TONOGAYA, MIZUHO-MACHI
NISHITAMA-GUN
TOKYO 190-1292
JAPAN
LUFTHANSA TECHNIK AG
WEB BEIM JAGER 193
D-22335 HAMBURG
GERMANY
The designation by IAE of an Authorized Repair Vendor indicates that the Repair Vendor has demonstrated the necessary capability to enable it to carry out the listed repair work. However, IAE makes no warranties or representations concerning the qualifications or quality standards of the Repair Vendors to carry out the repair work, and accepts no responsibility whatsoever for any work that may be carried out by a Repair Vendor other than when IAE is listed as the Repair Vendor. Authorized Repair Vendors do not act as agents or representatives of IAE.
Repair Facilities
Refer to SPM TASK 70-23-05-230-501.
No cracks are permitted.
Do a local penetrant crack test of the damaged area.
SUBTASK 72-41-11-230-068 Do a Crack Test

CAUTION
TITANIUM COMPONENTS - YOU MUST USE SILICON CARBIDE TYPE ABRASIVE WHEELS, STONES AND PAPERS TO DRESS, BLEND AND POLISH THIS COMPONENT.
CAUTION
TITANIUM COMPONENTS- MAXIMUM SPEED FOR MECHANICAL TOOLS MUST NOT EXCEED 1000 REVOLUTIONS PER MINUTE.
CAUTION
TITANIUM COMPONENTS - YOU MUST MAKE SURE THAT WHEN YOU REMOVE MATERIAL, BLEND AND POLISH, TO MAKE SMOOTH, THAT NO SPARKS ARE PRODUCED.
CAUTION
TITANIUM COMPONENTS - IF THE MATERIAL SHOWS A CHANGE IN COLOR, TO A DARKER THAN A LIGHT STRAW COLOR, THE COMPONENT IS TO BE REJECTED.
CAUTION
TITANIUM COMPONENTS - AVOID BUILD UP OF HEAT BY APPLYING ONLY GENTLE PRESSURE AND KEEPING THE TOOL SPEED AS LOW AS POSSIBLE. USE TECHNIQUES WHICH ALLOW FOR PROGRESSIVE OF THE DRESSING MEDIA TO PRESENT A CONTINUALLY FRESH CUTTING SURFACE TO THE WORK PIECE.
CAUTION
DO NOT DWELL ON ONE AREA OF THE COMPONENT.
CAUTION
DRESS, WHERE POSSIBLE, IN A CIRCULAR MOTION; TAKING LIGHT CUTS TO AVOID OVERHEATING.Refer to SPM TASK 70-35-03-300-501.
Use CoMat 05-106 ABRASIVE STONE and CoMat 05-021 WATERPROOF SILICON CARBIDE, as necessary.
Remove no more material than is necessary.
If you use mechanical tools do not exceed 1000 rpm.
You must restore corner radii.
Remove damaged material, as necessary.
Remove sharp corners.
If you use mechanical tools do not exceed 1000 rpm.
You must restore corner radii.
Refer to SPM TASK 70-35-03-300-501.
Make smooth the cut away area.
Refer to SPM TASK 70-35-03-300-501.
Polish to give a surface finish the same as the adjacent material.
If you use mechanical tools do not exceed 1000 rpm.
You must restore corner radii.
Polish the cut away area.
SUBTASK 72-41-11-350-068 Remove Damaged Area(s), Zone B Only

CAUTION
TITANIUM COMPONENTS - YOU MUST USE SILICON CARBIDE TYPE ABRASIVE WHEELS, STONES AND PAPERS TO DRESS, BLEND AND POLISH THIS COMPONENT.
CAUTION
TITANIUM COMPONENTS- MAXIMUM SPEED FOR MECHANICAL TOOLS MUST NOT EXCEED 1000 REVOLUTIONS PER MINUTE.
CAUTION
TITANIUM COMPONENTS - YOU MUST MAKE SURE THAT WHEN YOU REMOVE MATERIAL, BLEND AND POLISH, TO MAKE SMOOTH, THAT NO SPARKS ARE PRODUCED.
CAUTION
TITANIUM COMPONENTS - IF THE MATERIAL SHOWS A CHANGE IN COLOR, TO A DARKER THAN A LIGHT STRAW COLOR, THE COMPONENT IS TO BE REJECTED.
CAUTION
TITANIUM COMPONENTS - AVOID BUILD UP OF HEAT BY APPLYING ONLY GENTLE PRESSURE AND KEEPING THE TOOL SPEED AS LOW AS POSSIBLE. USE TECHNIQUES WHICH ALLOW FOR PROGRESSIVE OF THE DRESSING MEDIA TO PRESENT A CONTINUALLY FRESH CUTTING SURFACE TO THE WORK PIECE.
CAUTION
DO NOT DWELL ON ONE AREA OF THE COMPONENT.
CAUTION
DRESS, WHERE POSSIBLE, IN A CIRCULAR MOTION; TAKING LIGHT CUTS TO AVOID OVERHEATING.Refer to SPM TASK 70-35-03-300-501.
Remove no more material than is necessary.
If you use mechanical tools do not exceed 1000 rpm.
You must restore corner radii.
NOTE
Material removal may overlap into other Zones. If this occurs you must use the limit with the least material removal.
Remove frettage, nicks, dents and/or scores, as necessary, to a maximum depth of 0.020 in. (0.508 mm).
Refer to SPM TASK 70-35-03-300-501.
Remove sharp corners.
If you use mechanical tools do not exceed 1000 rpm.
You must restore corner radii.
Make smooth the cut away area(s).
Refer to SPM TASK 70-35-03-300-501.
Polish to give a surface finish the same as the adjacent material.
If you use mechanical tools do not exceed 1000 rpm.
You must restore corner radii.
Polish the cut away area(s).
SUBTASK 72-41-11-350-079 Remove Damaged Area(s), Zone C Only
Refer to SPM TASK 70-11-08-300-503, SUBTASK 70-11-08-300-001.
Chemically clean.
SUBTASK 72-41-11-110-063 Do a Swab Etch
Refer to SPM TASK 70-23-05-230-501.
No cracks are permitted.
Do a local penetrant crack test of the repaired area.
SUBTASK 72-41-11-230-069 Do a Crack Test
Refer to SPM TASK 70-11-26-300-503.
Chemically clean the repaired area to remove fluorescent penetrant.
SUBTASK 72-41-11-110-079 Chemically Clean
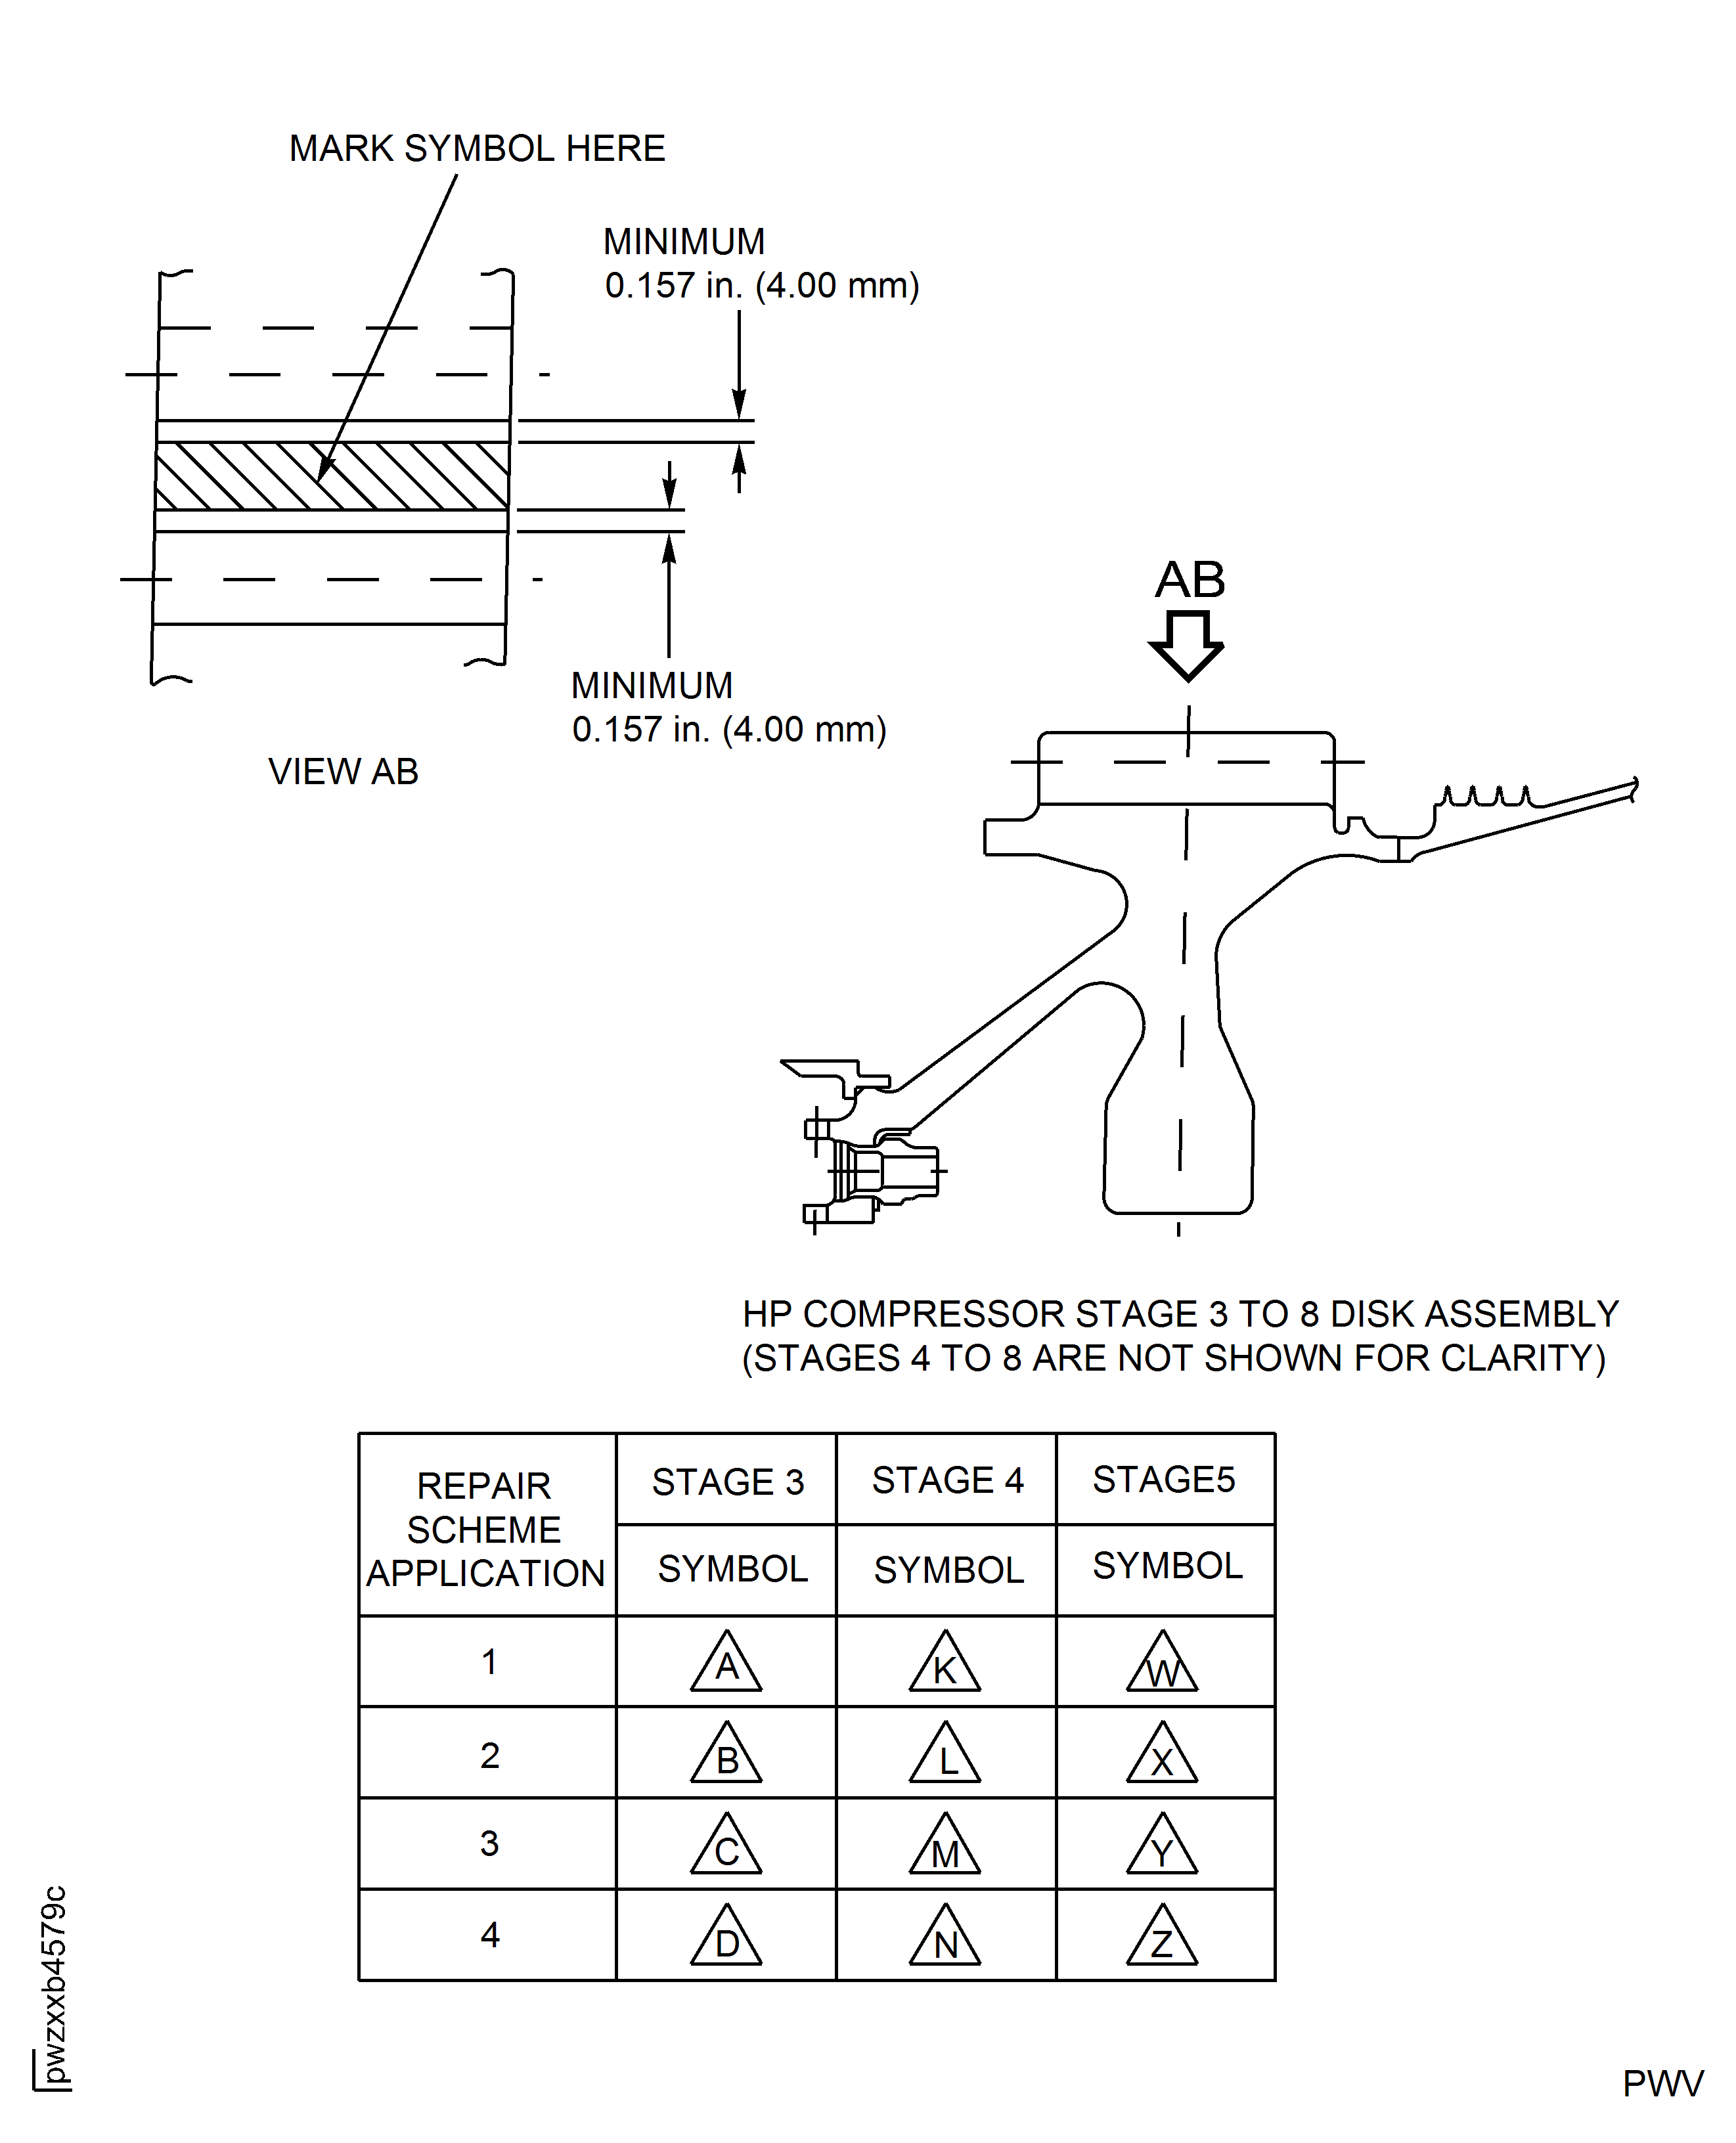
Refer to Figure.
Refer to SPM TASK 70-09-00-400-501, SUBTASK 70-09-00-400-001.
NOTE
The letter inside the code symbol shows the number of times this area has been shot peened.
Vibro engrave a code symbol on any dovetail of the stage or stages which have been repaired.
SUBTASK 72-41-11-350-069 Identify the Repair
NOTE
This SUBTASK is required when the damaged material removed is more than 0.002 in. (0.05 mm), in depth.NOTE
This SUBTASK shows which stages of dovetails have been repaired and require to be shot peened.NOTE
This SUBTASK is only required to put back the surface condition, when the depth of material removal is more than 0.002 in. (0.052 mm).NOTE
Shot peen the dovetail slots in areas identified AD, on stage 3, 4 and/or 5.NOTE
Unwanted shot peen spray is permitted into the dovetail slots and on to the outer diameter of each stage of dovetail posts, to get a continuous fade-out surface condition away from the repaired area.Refer to Step.
Find the area to be shot peened.
Use CoMat 02-003 ADHESIVE TAPE BLACK WATERPROOF or mechanical seal.
Patch mask all identification marks and symbols.
Seal the full assembly but for the stage or stages which have to be shot peened.
Refer to SPM TASK 70-38-04-300-503, SUBTASK 70-38-04-300-002.
Use IAE 3R19465 Shot Peen Fixture 1 off, IAE 3R19466 Almen Plate Carrier 1 off, IAE 3R19468 Almen Plate Holder 1 off, and/or approved vendors in Step.
Use CoMat 05-028 METALLIC SHOT (CAST STEEL), S230 to get an Almen intensity of 0.006 in to 0.010 in. (0.15 mm to 0.25 mm) on 'A' type test strip.
Shot-peening Data
Machine type
Metal shot-peen
Process type/mode
Dry/auto
Shot-type
Shot size
0.024 in. to 0.40 in. (0.600 mm to 1.016 mm)
Shot hardness
450 Hv to 600 Hv
Coverage
200 percent
Number of nozzles
4 or 8
Almen intensity
0.006 in. to 0.010 in. (0.15 mm to 0.25 mm) using
an "A" type test strip
NOTE
For information the, table speed, oscillation height, type, air pressure, nozzle type/diameter and work distance may change if different equipment is being used. You must achieve full coverage and Almen intensity,
Shot peen the area(s) identified AD, as necessary.
Refer to approved vendors in Step and/or SPM TASK 70-38-04-300-503, SUBTASK 70-38-04-300-002.
Use wet or dry glass beads, with Glass bead peening equipment.
Remove iron contamination after you have shot-peened, as necessary.
SUBTASK 72-41-11-380-054 Shot Peen the Dovetail Slot
Figure: Repair Details and Dimensions
Repair Details and Dimensions
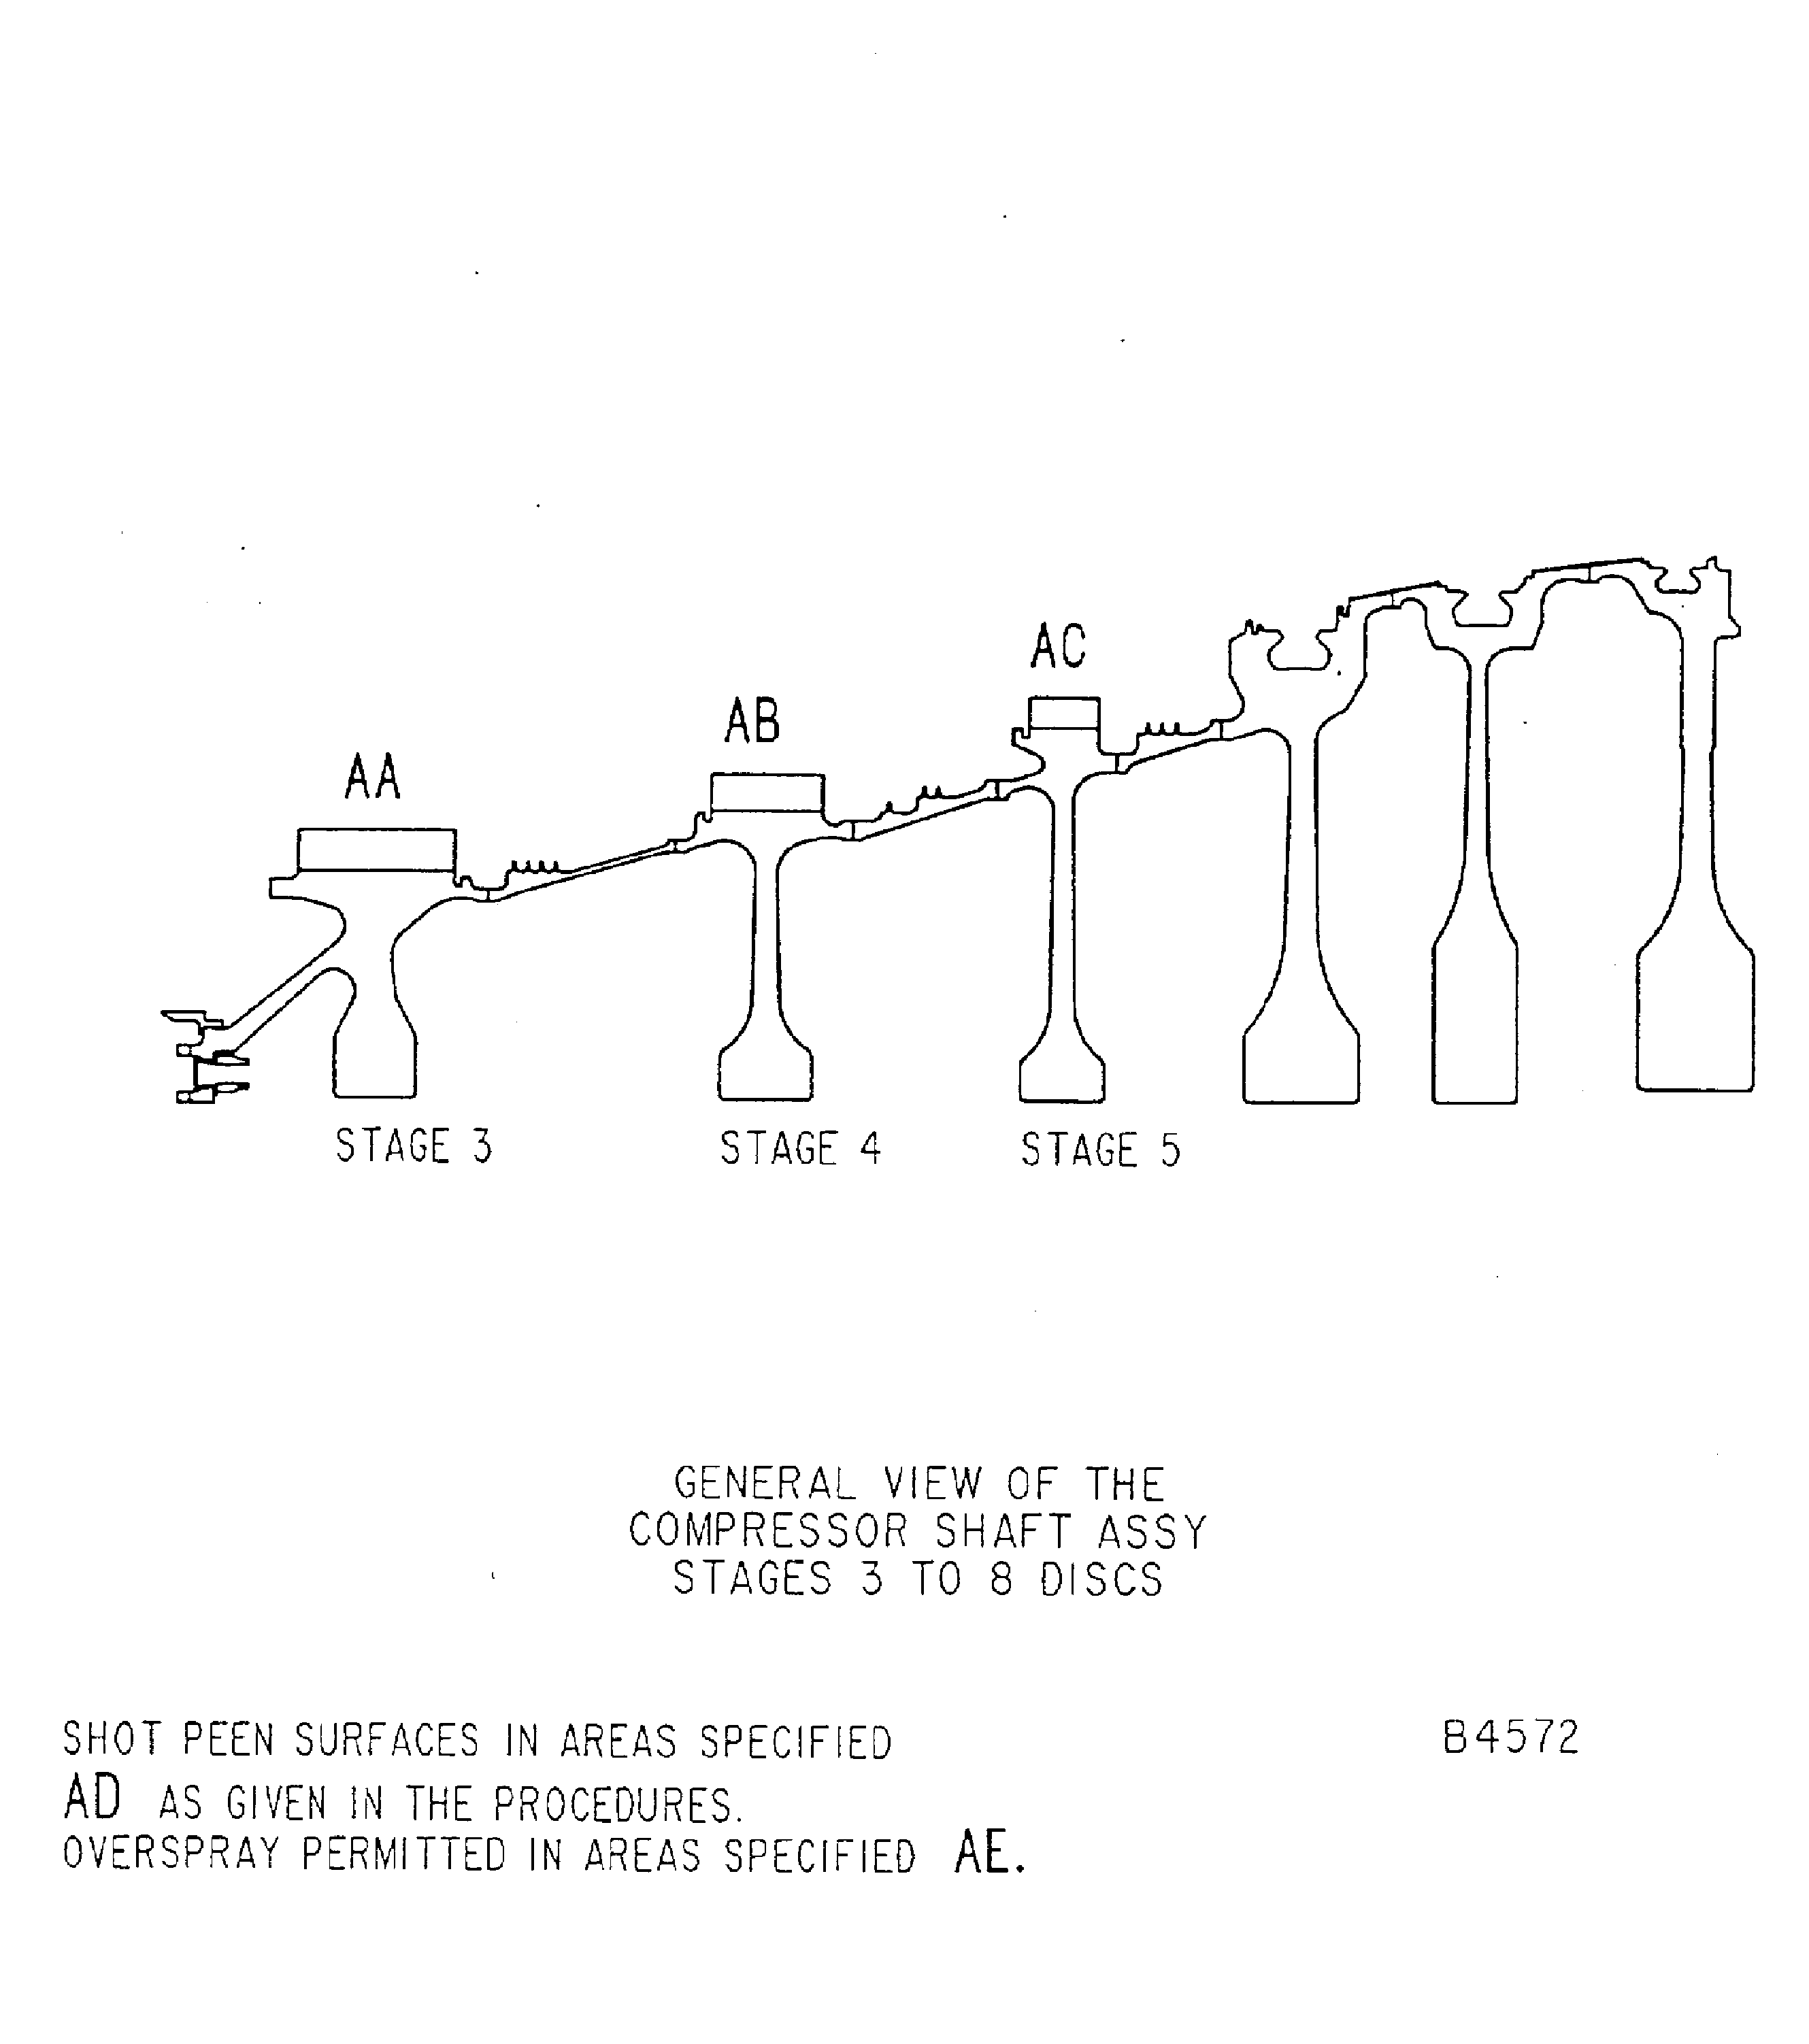
Figure: Repair Details and Dimensions
Repair Details and Dimensions
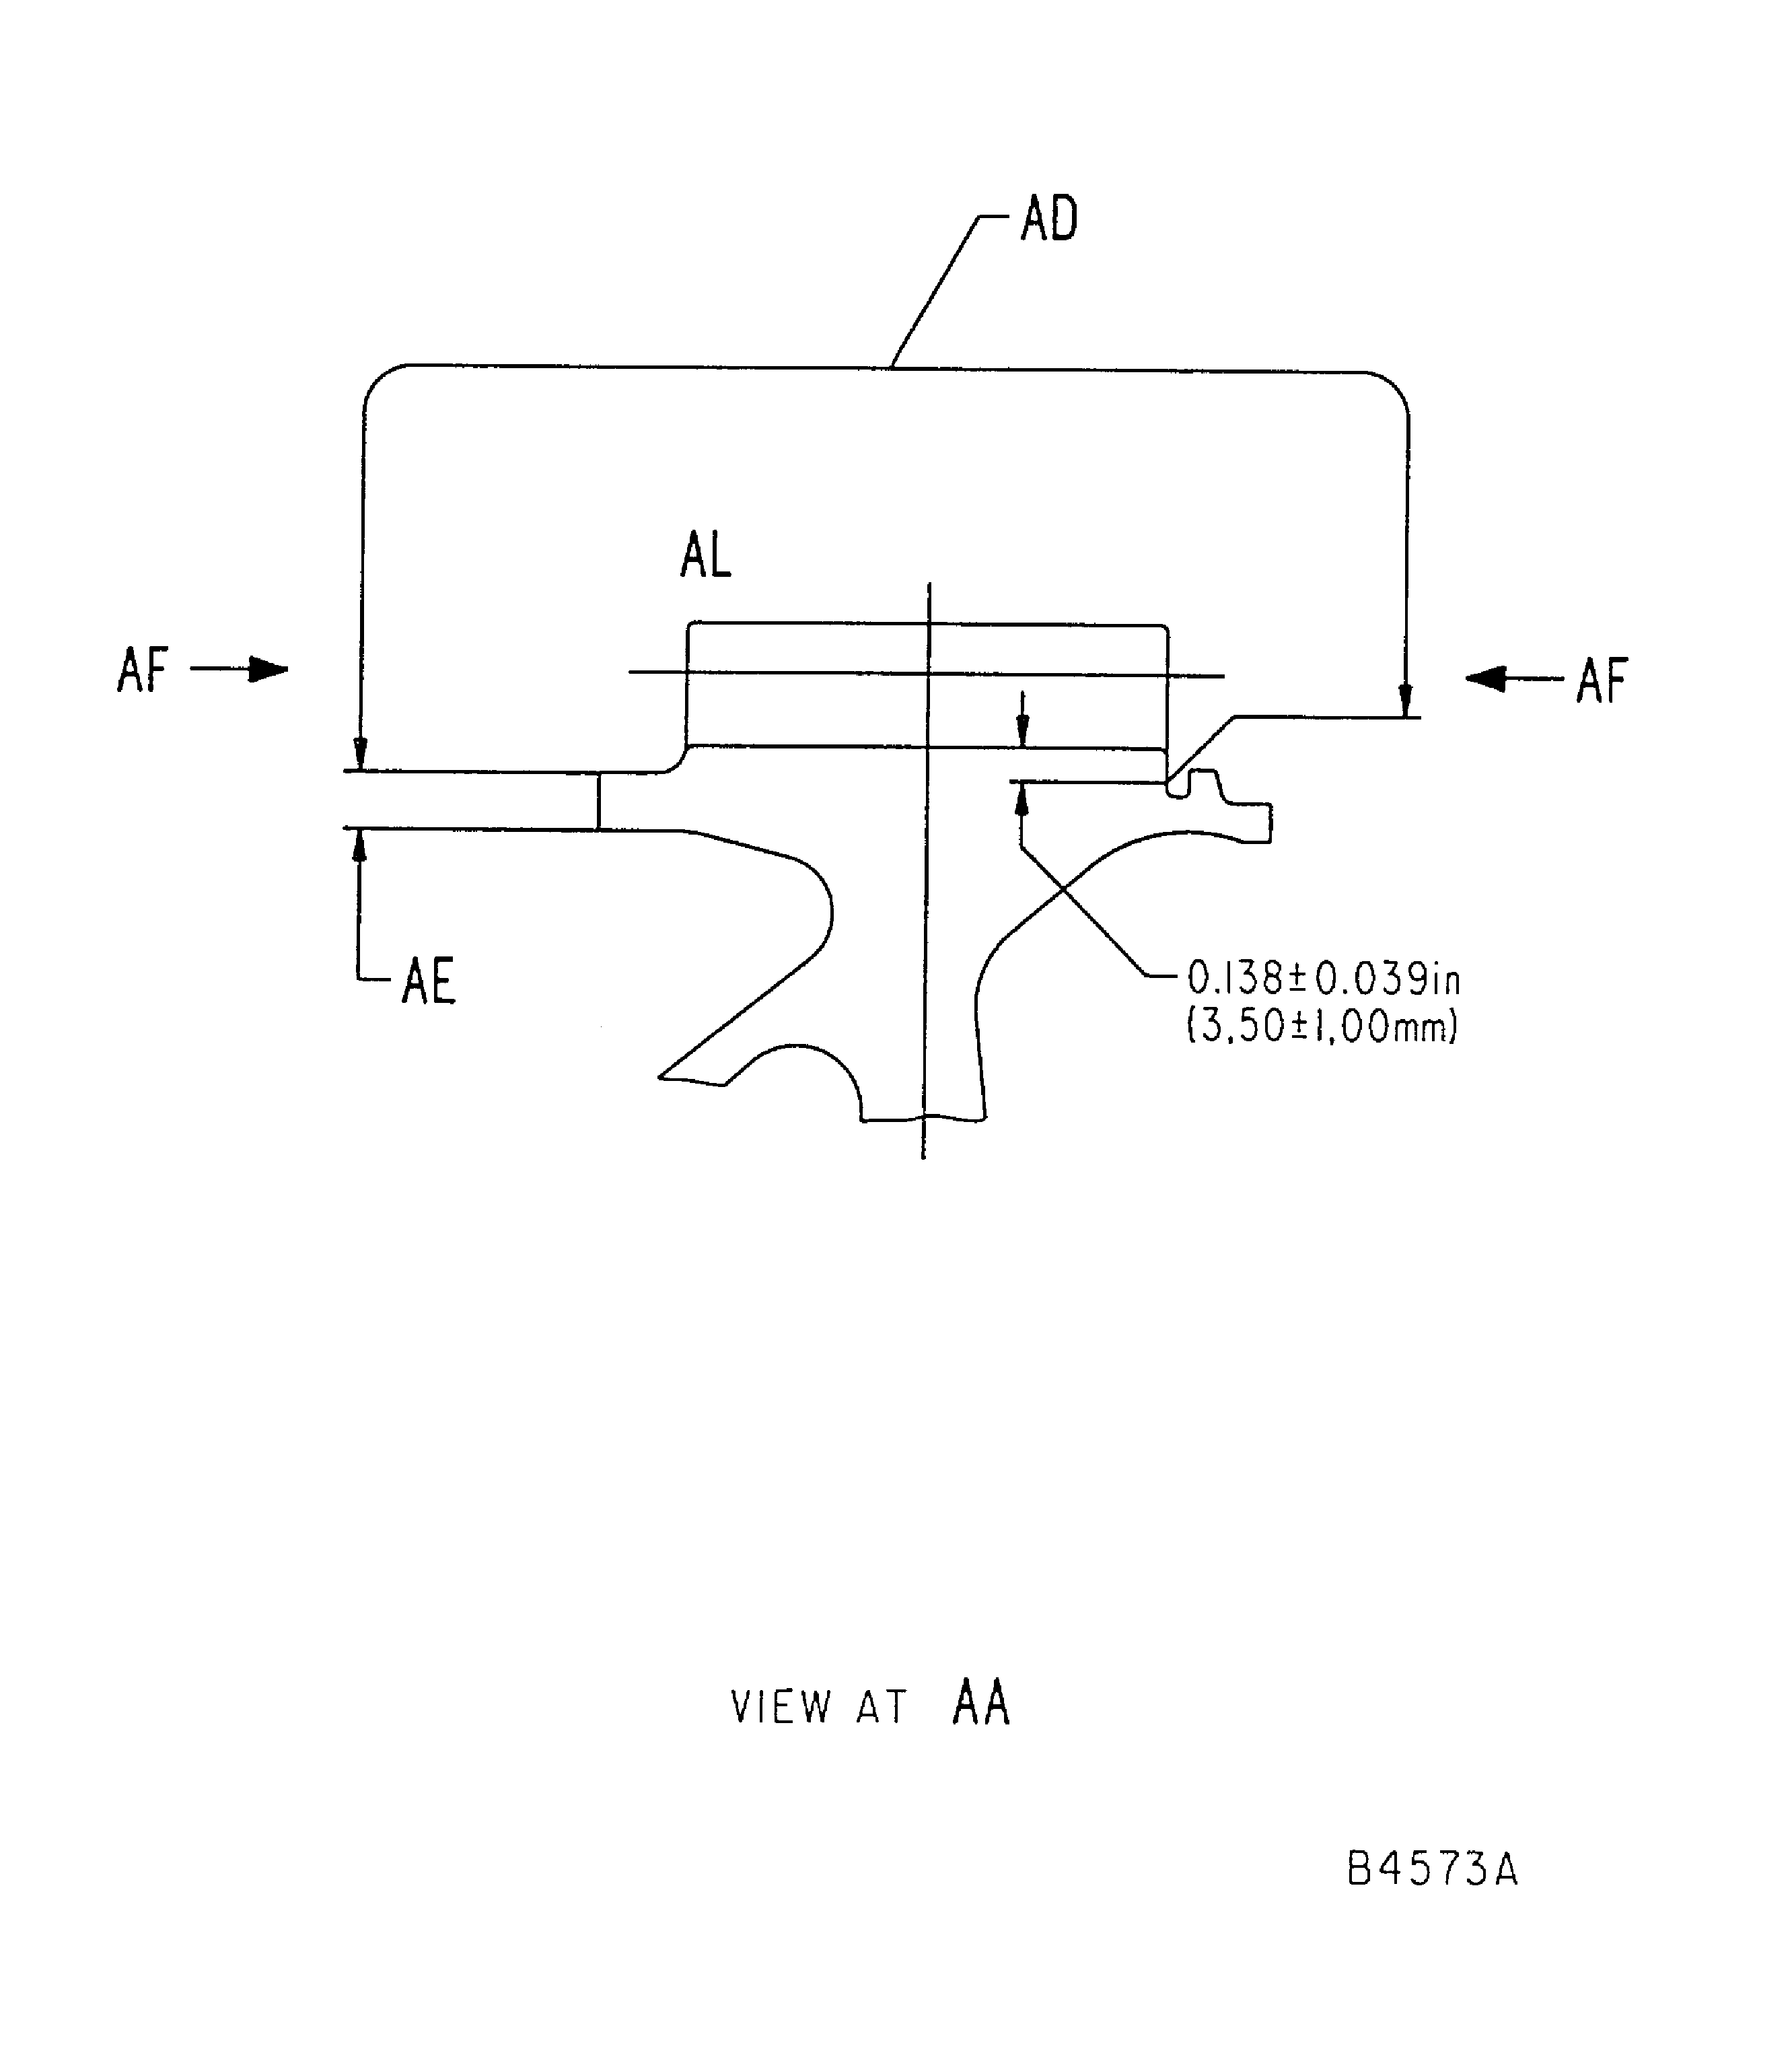
Figure: Repair Details and Dimensions
Repair Details and Dimensions
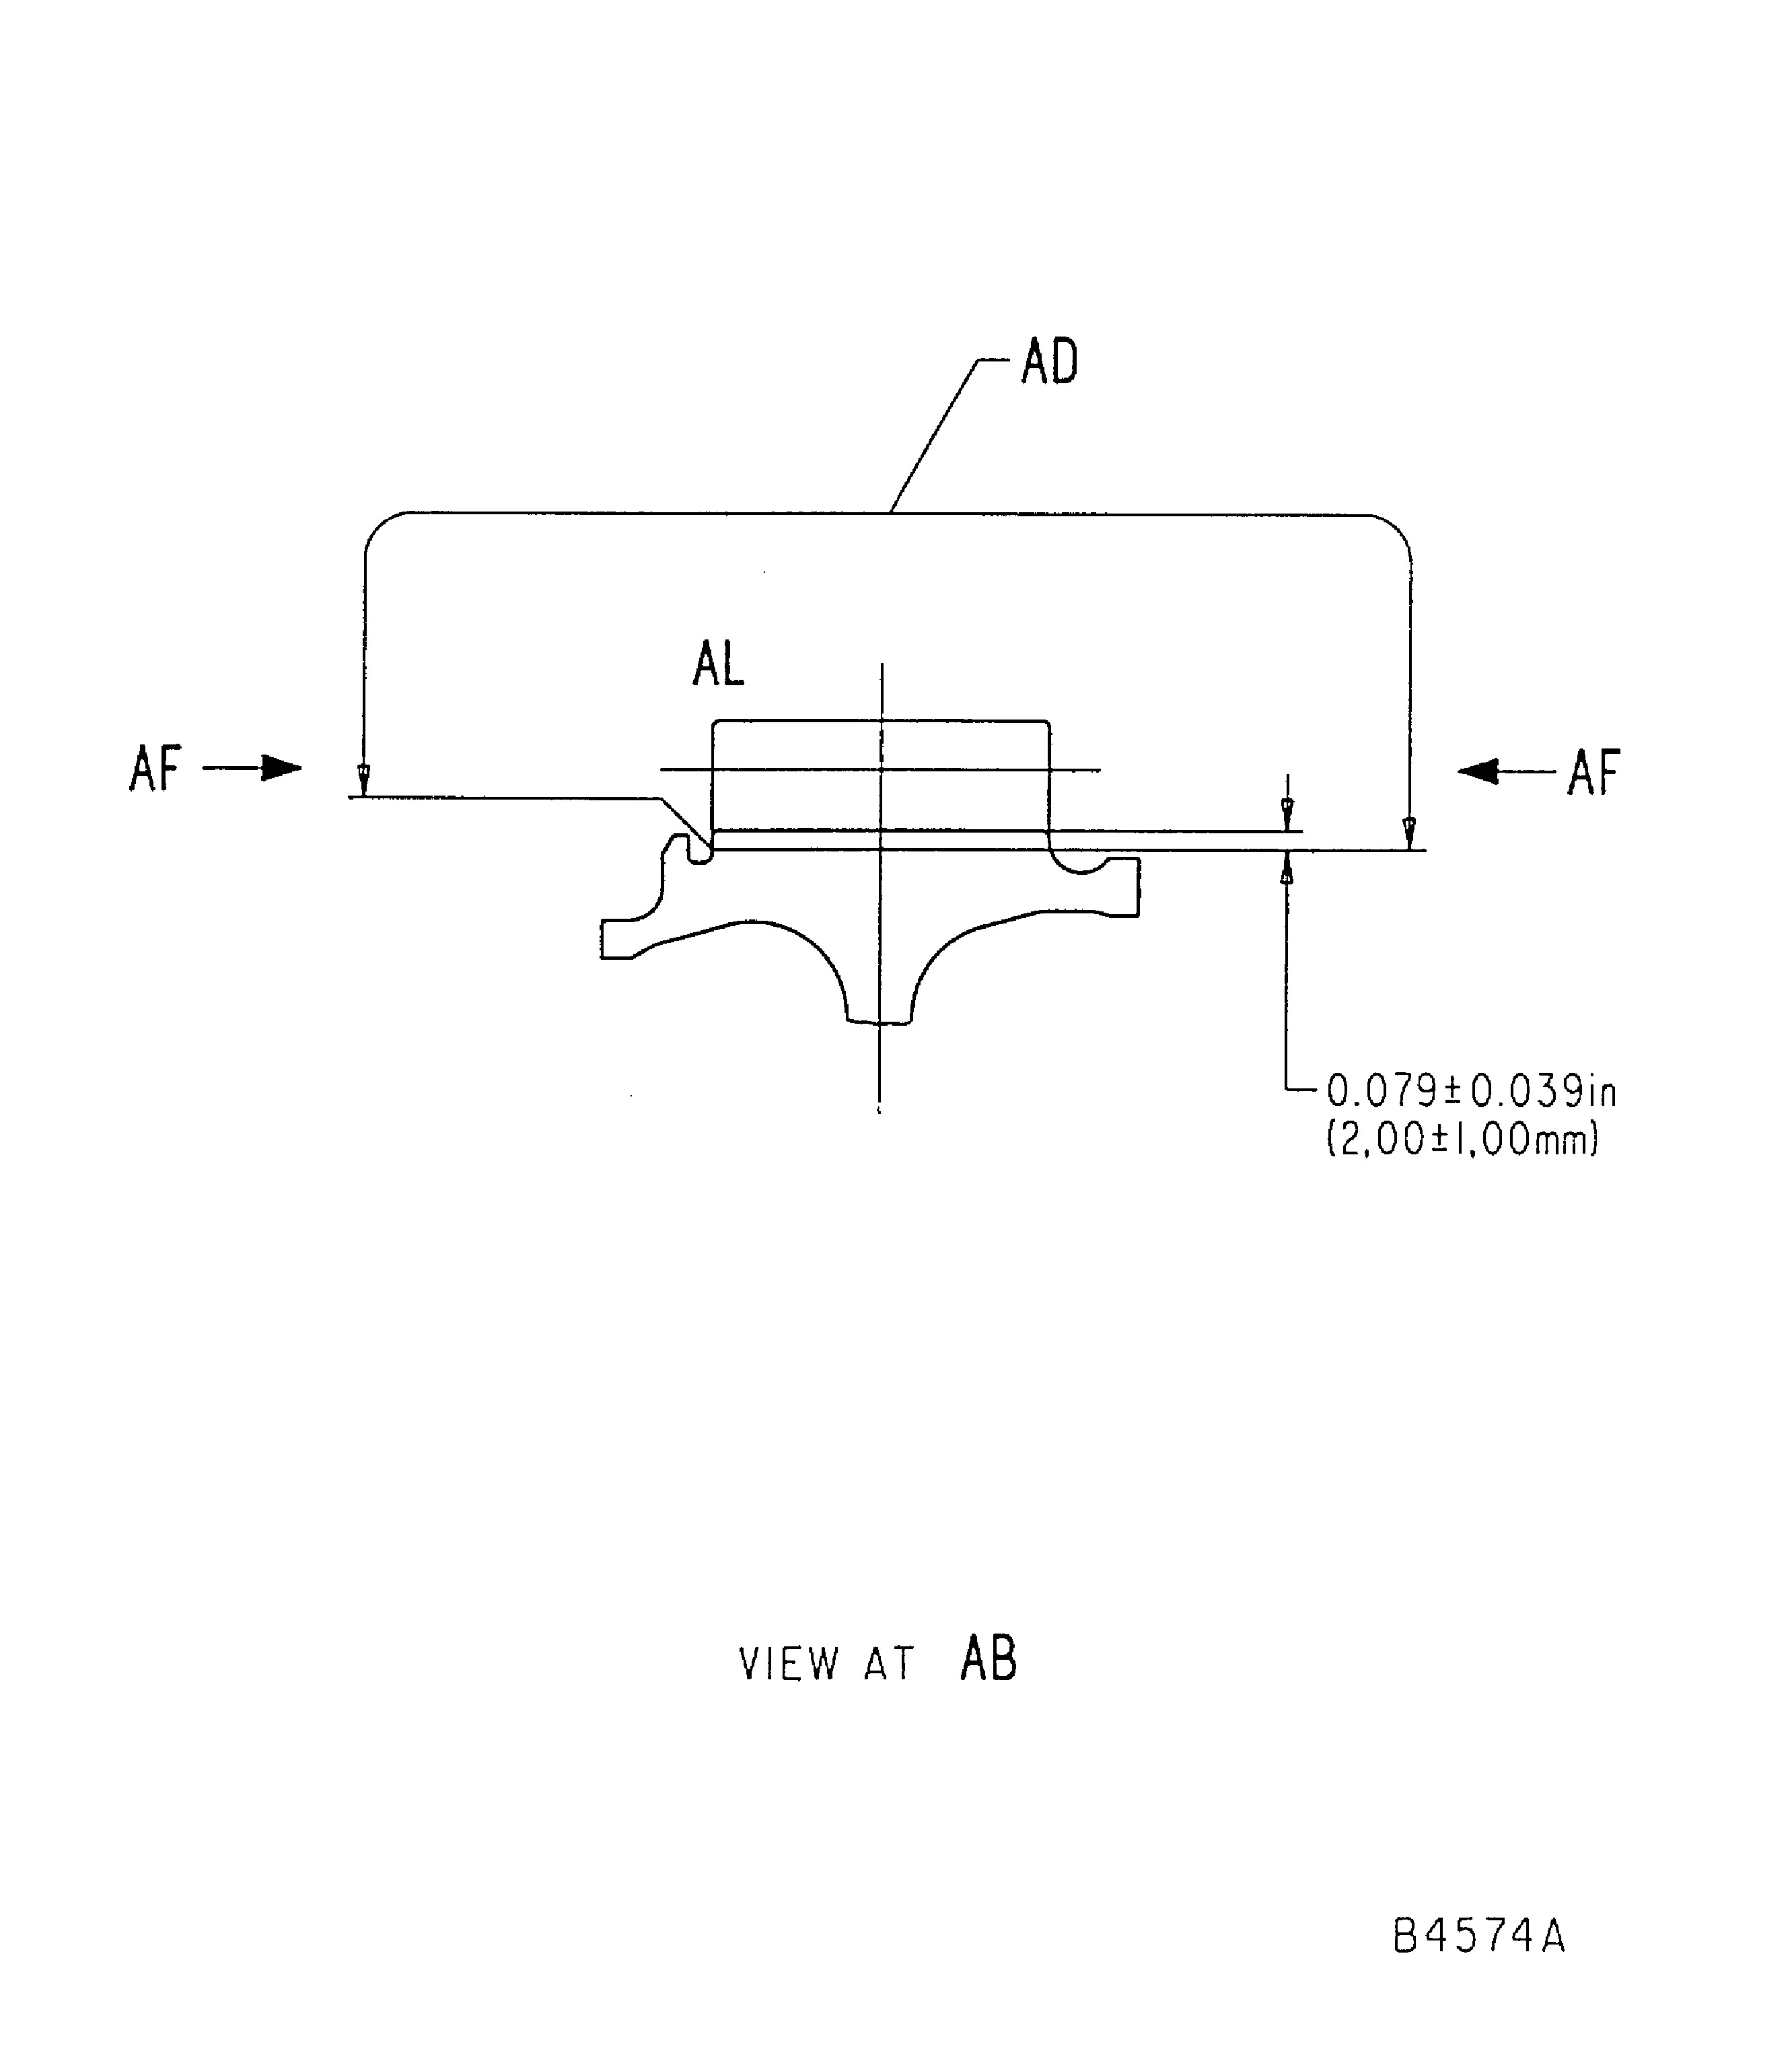
Figure: Repair Details and Dimensions
Repair Details and Dimensions
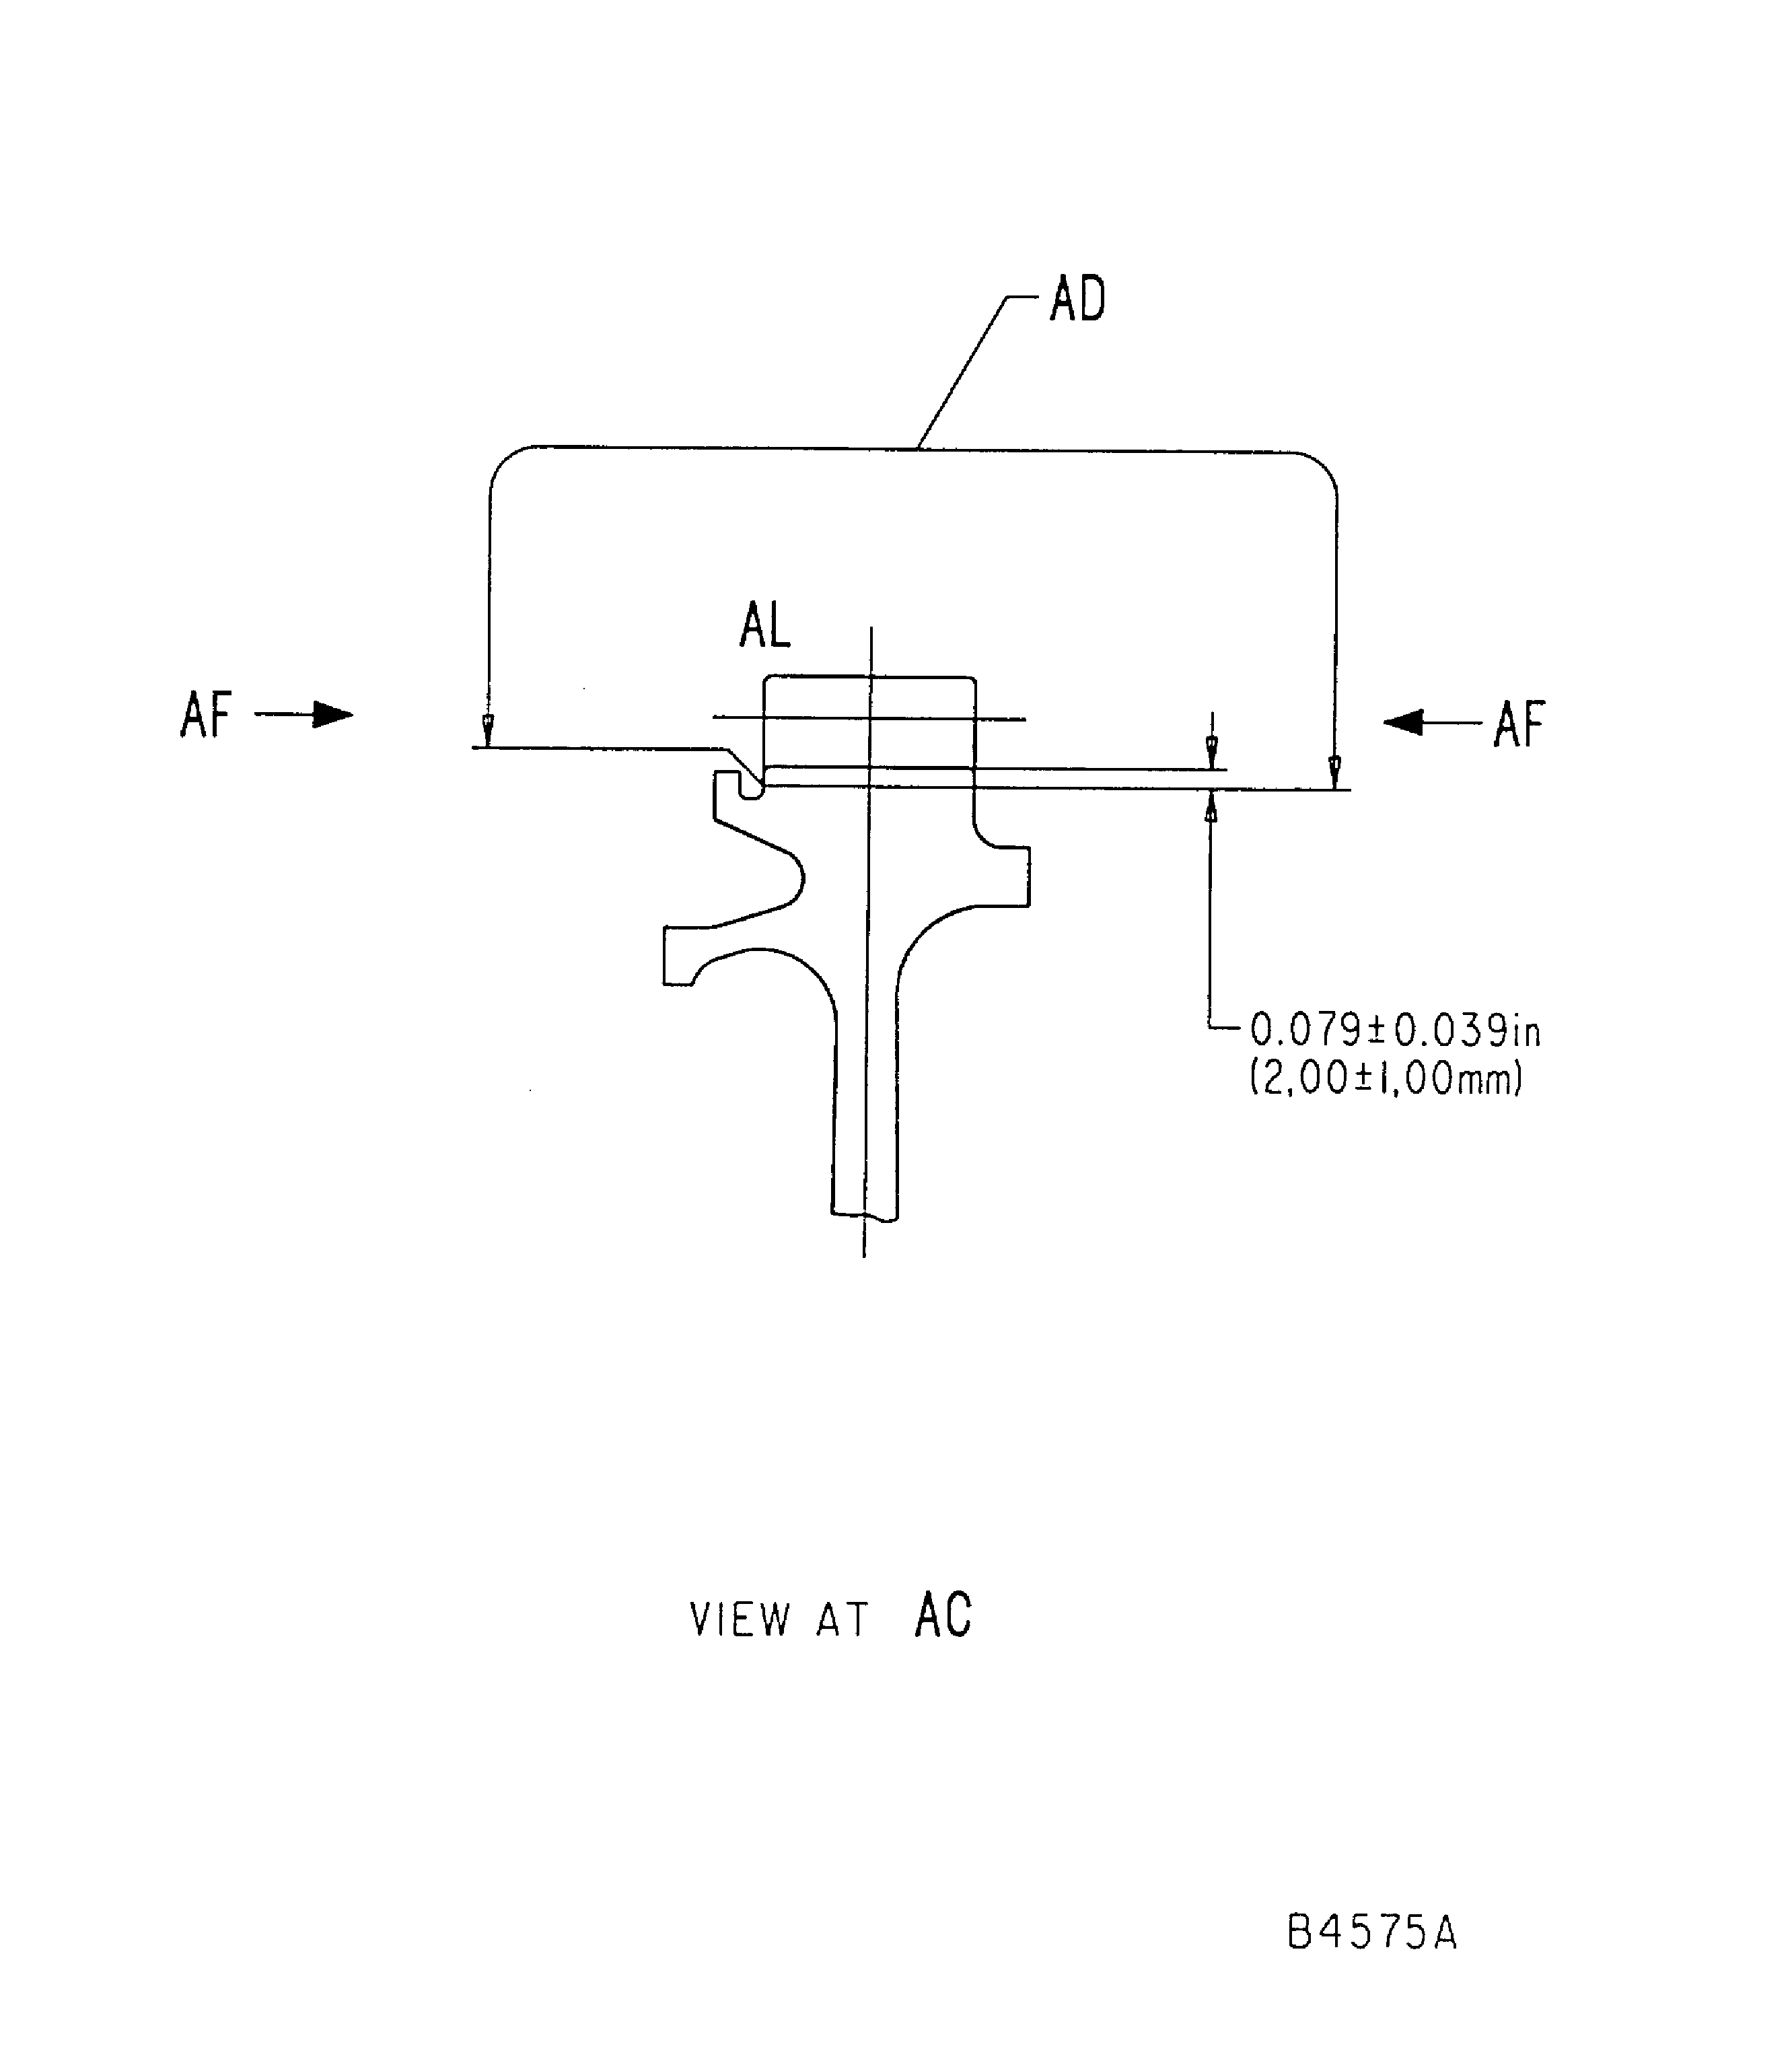
Figure: Repair Details and Dimensions
Repair Details and Dimensions
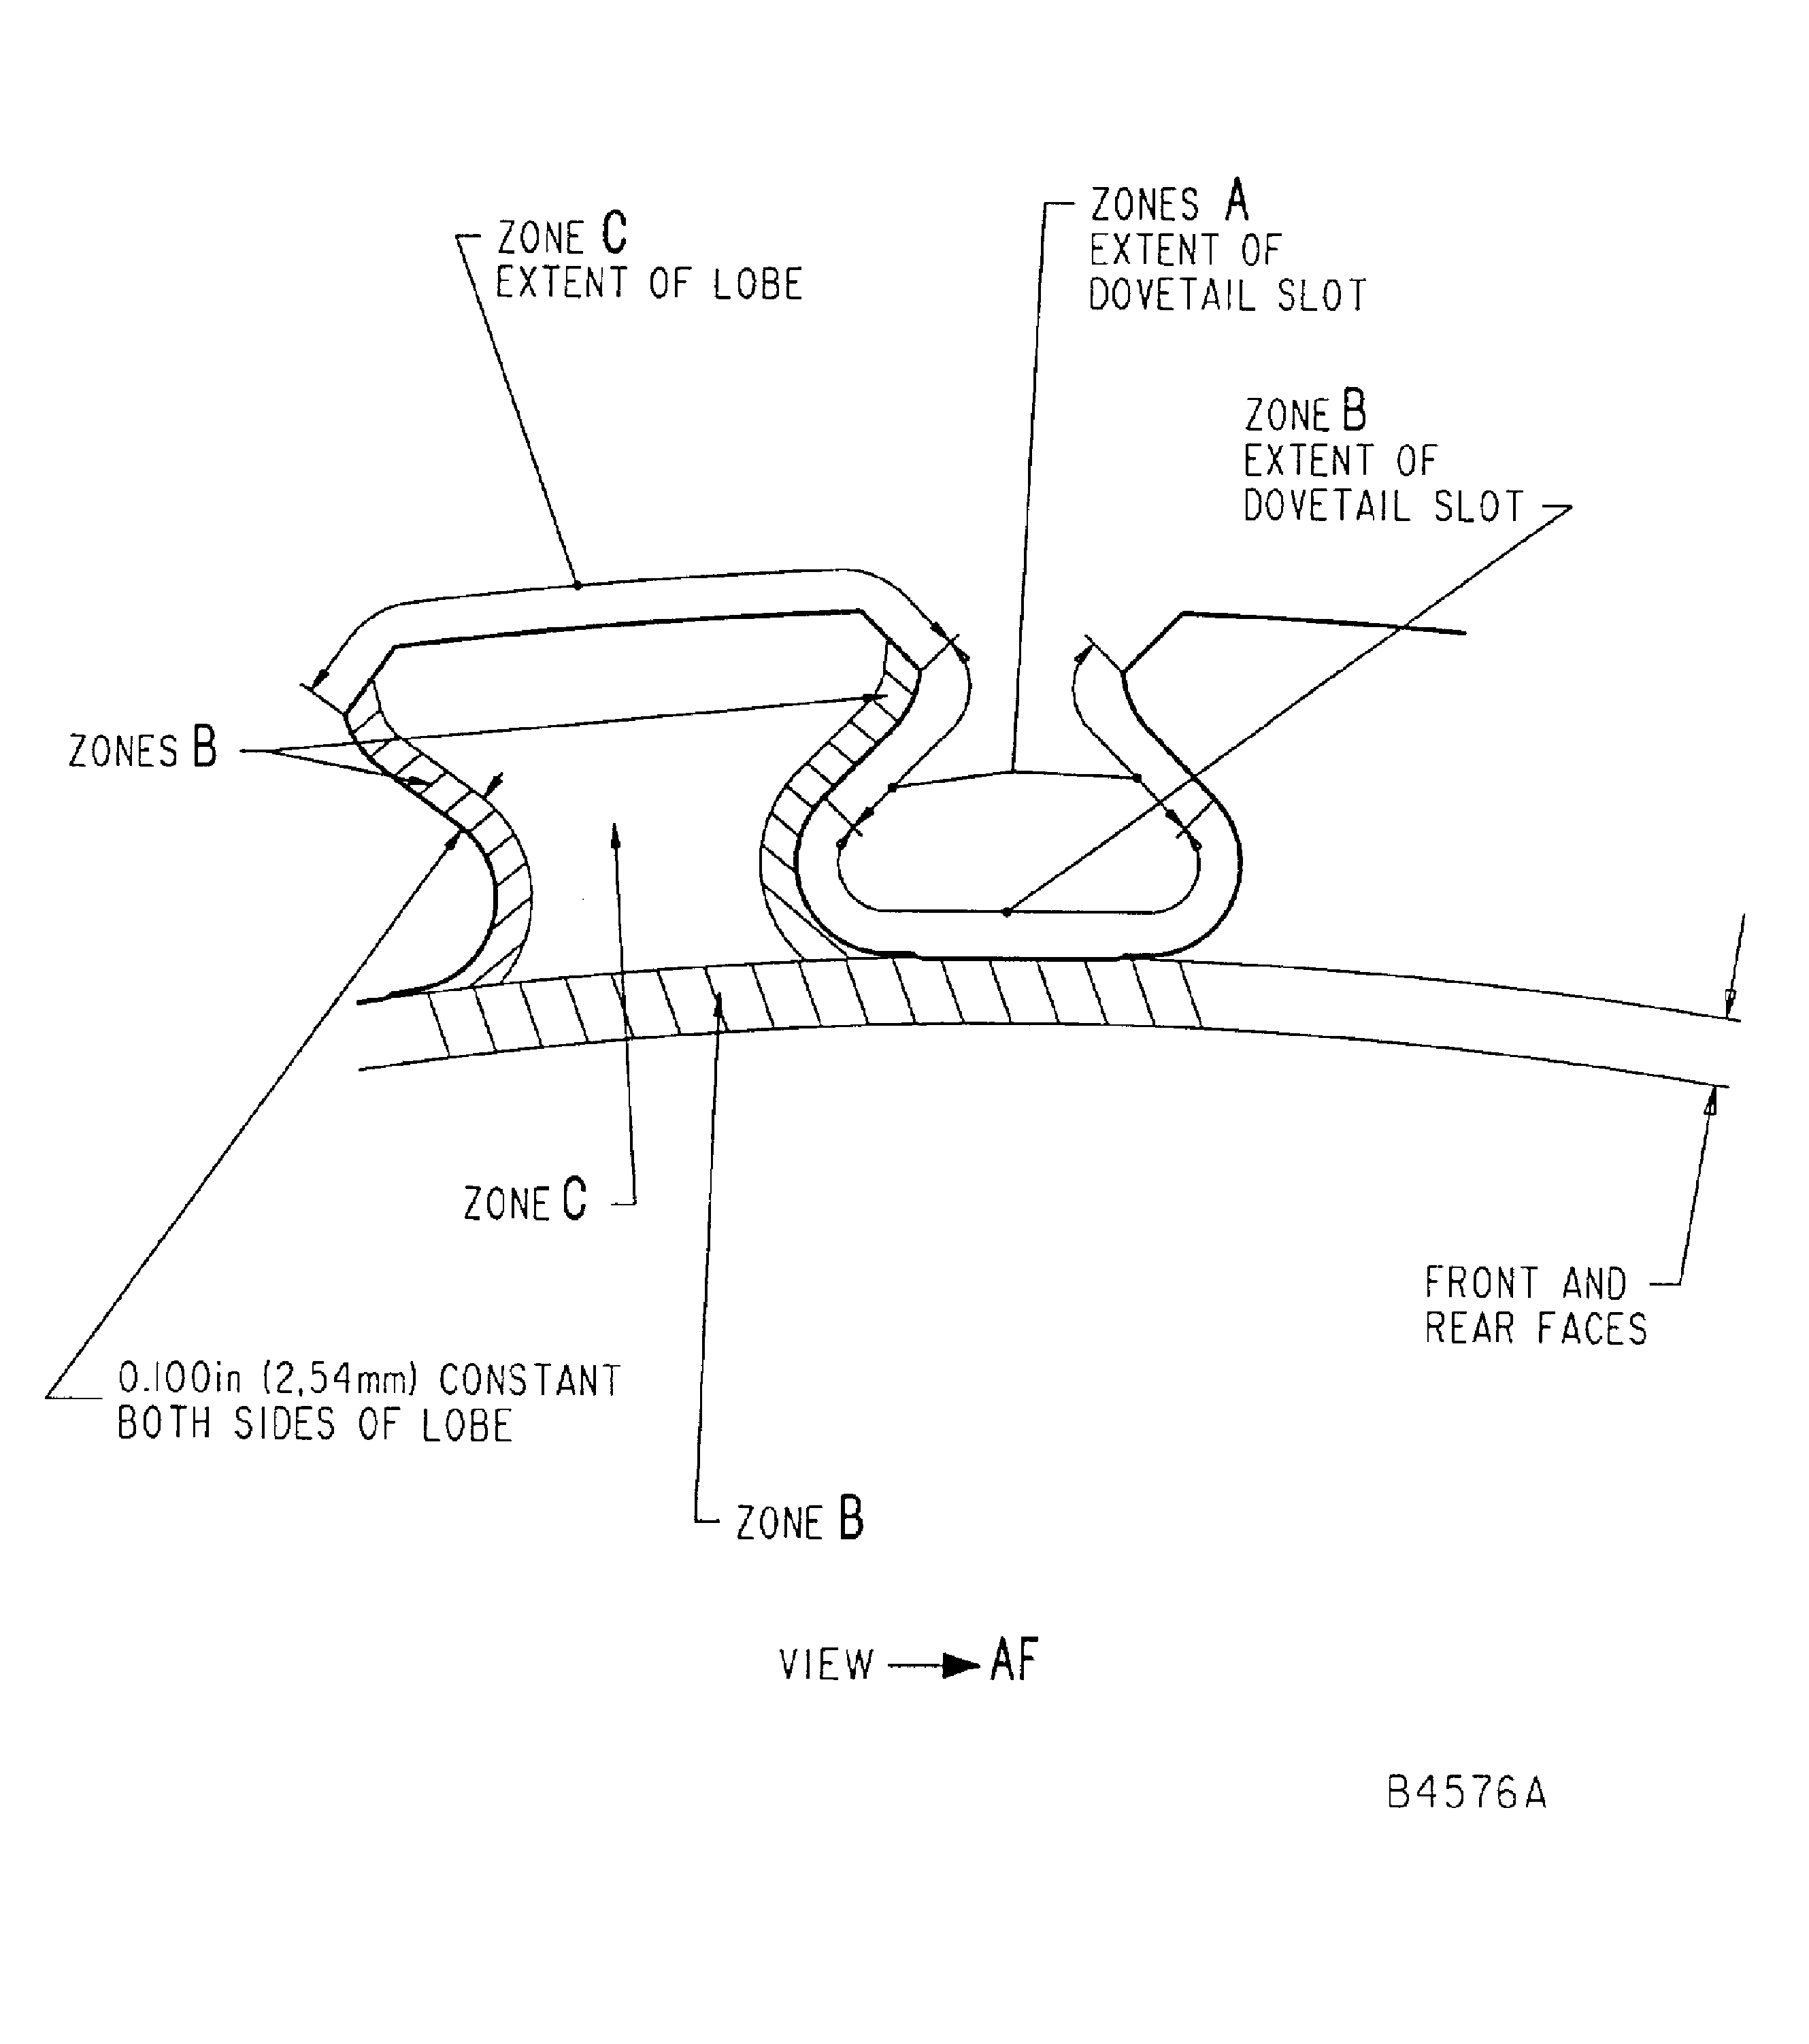
Figure: Repair Details and Dimensions
Repair Details and Dimensions

Figure: Repair Details and Dimensions
Repair Details and Dimensions
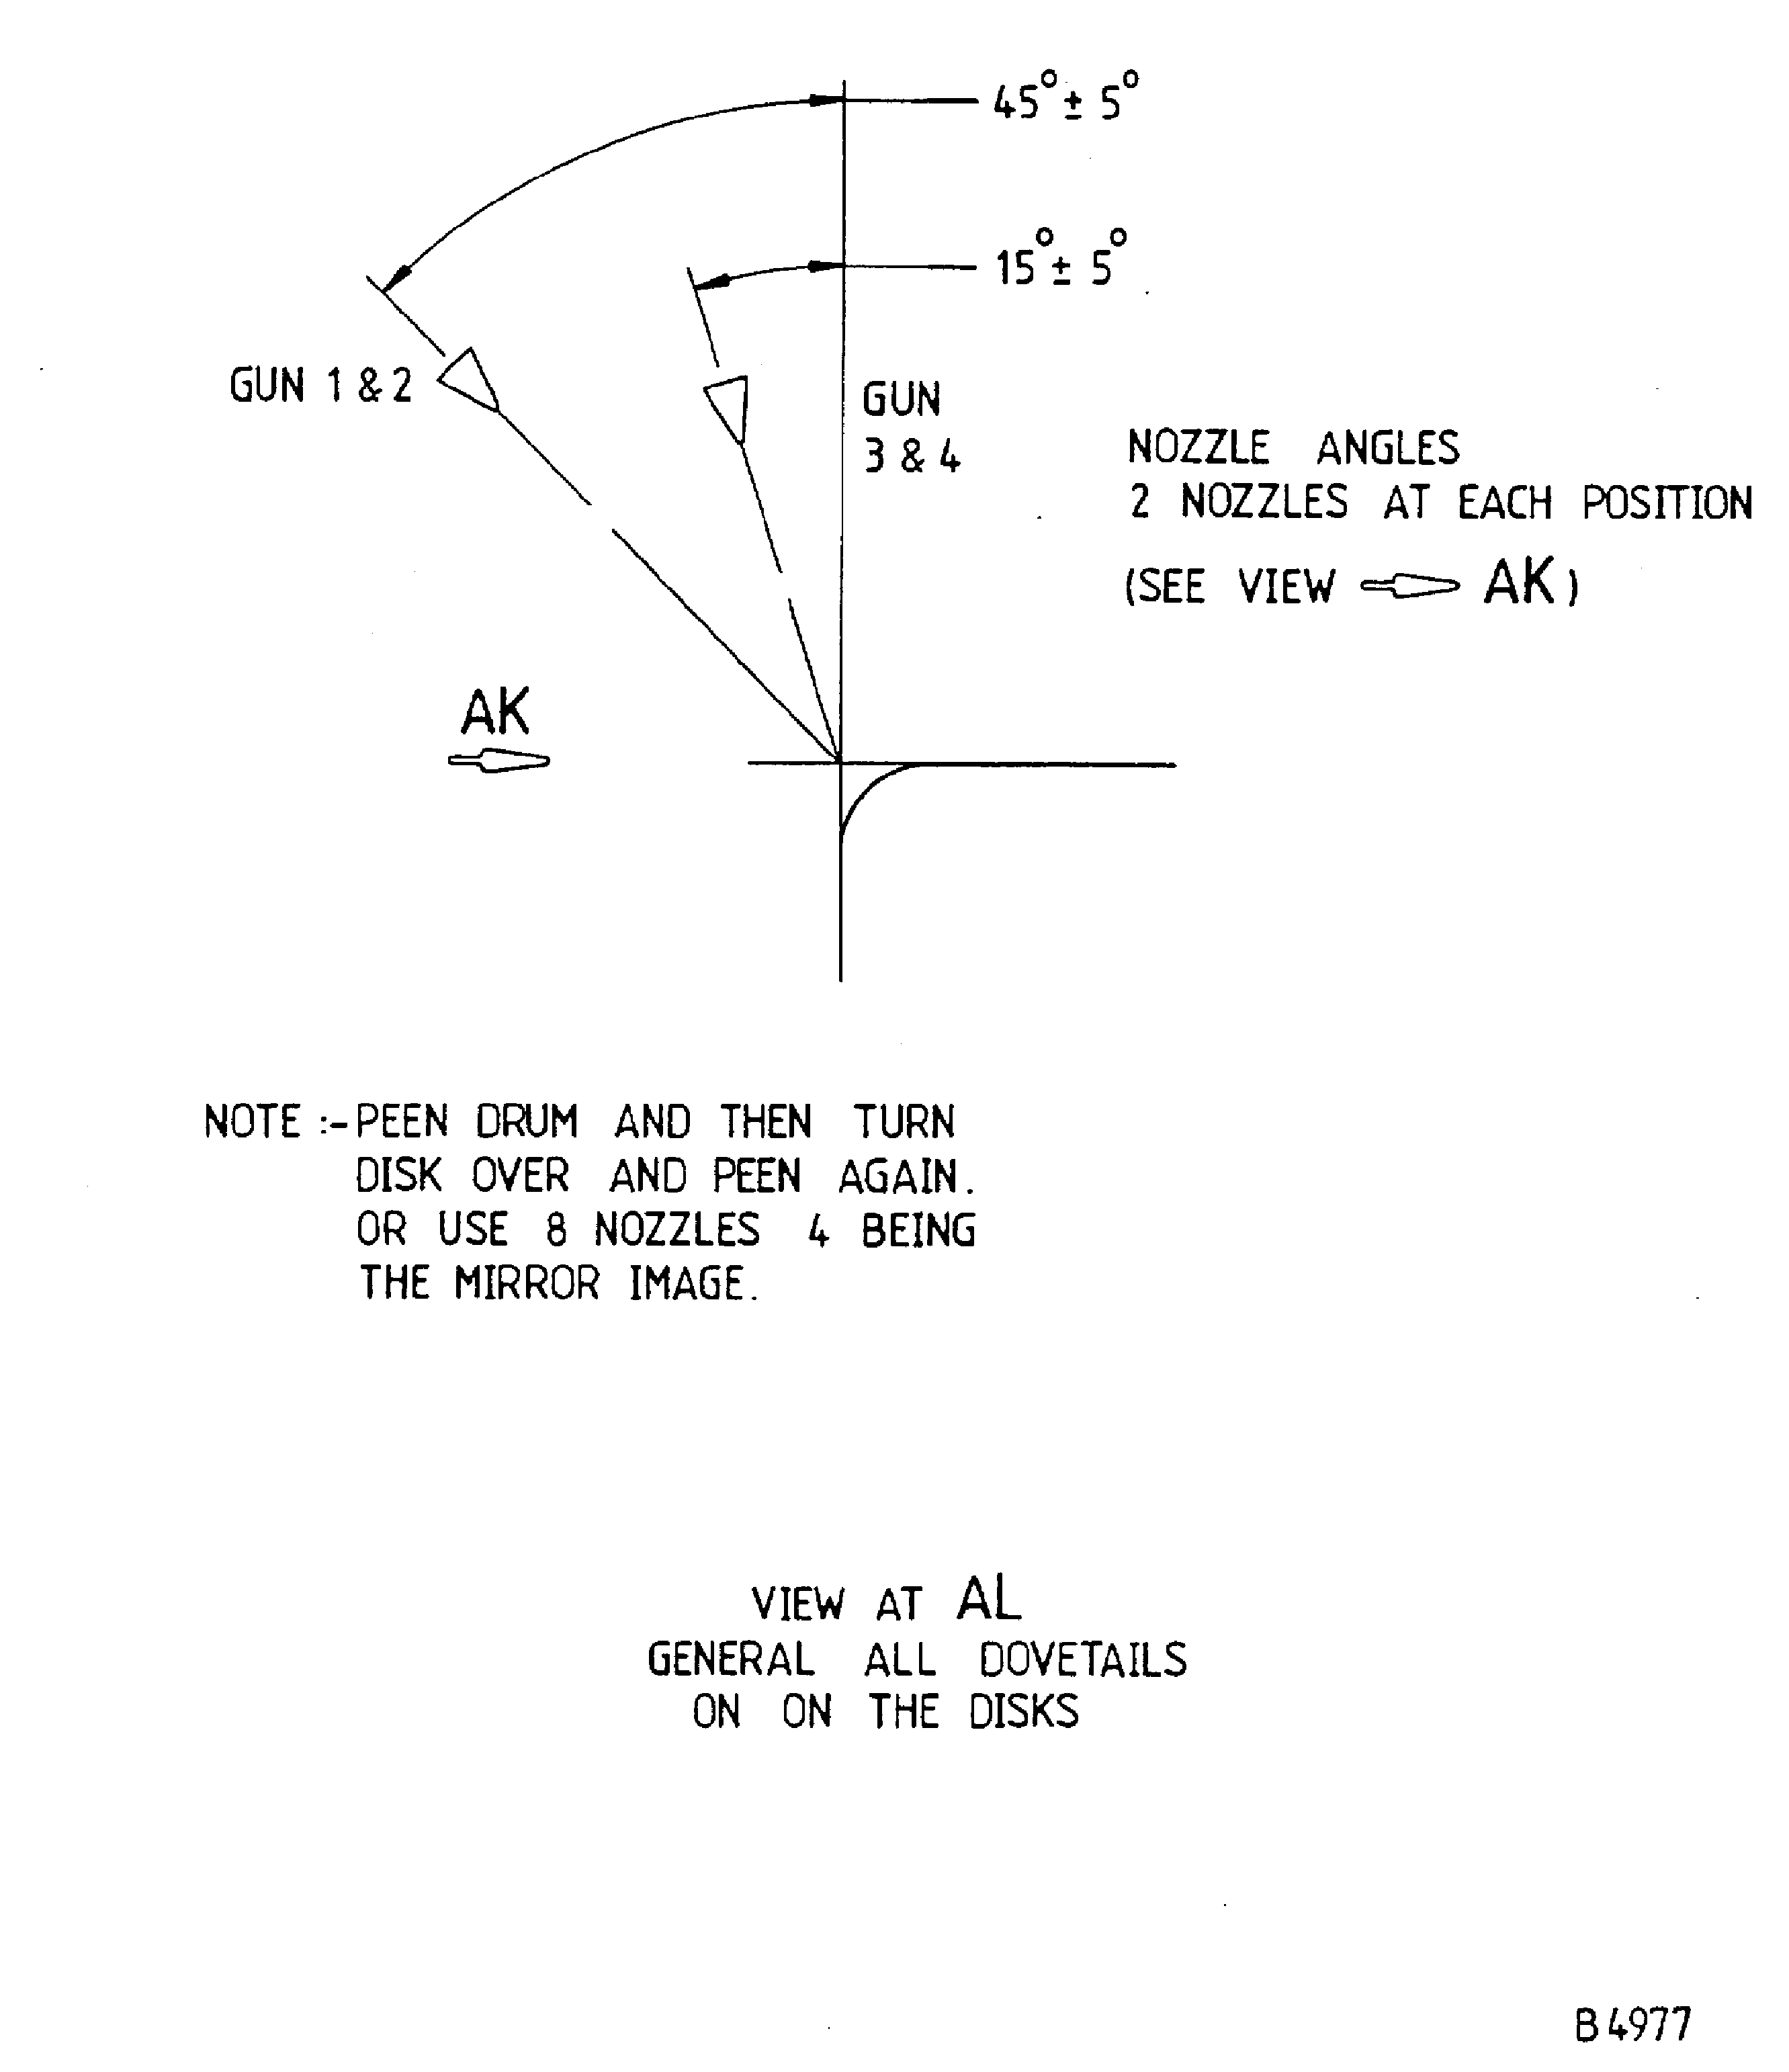
Figure: Repair Details and Dimensions
Repair Details and Dimensions
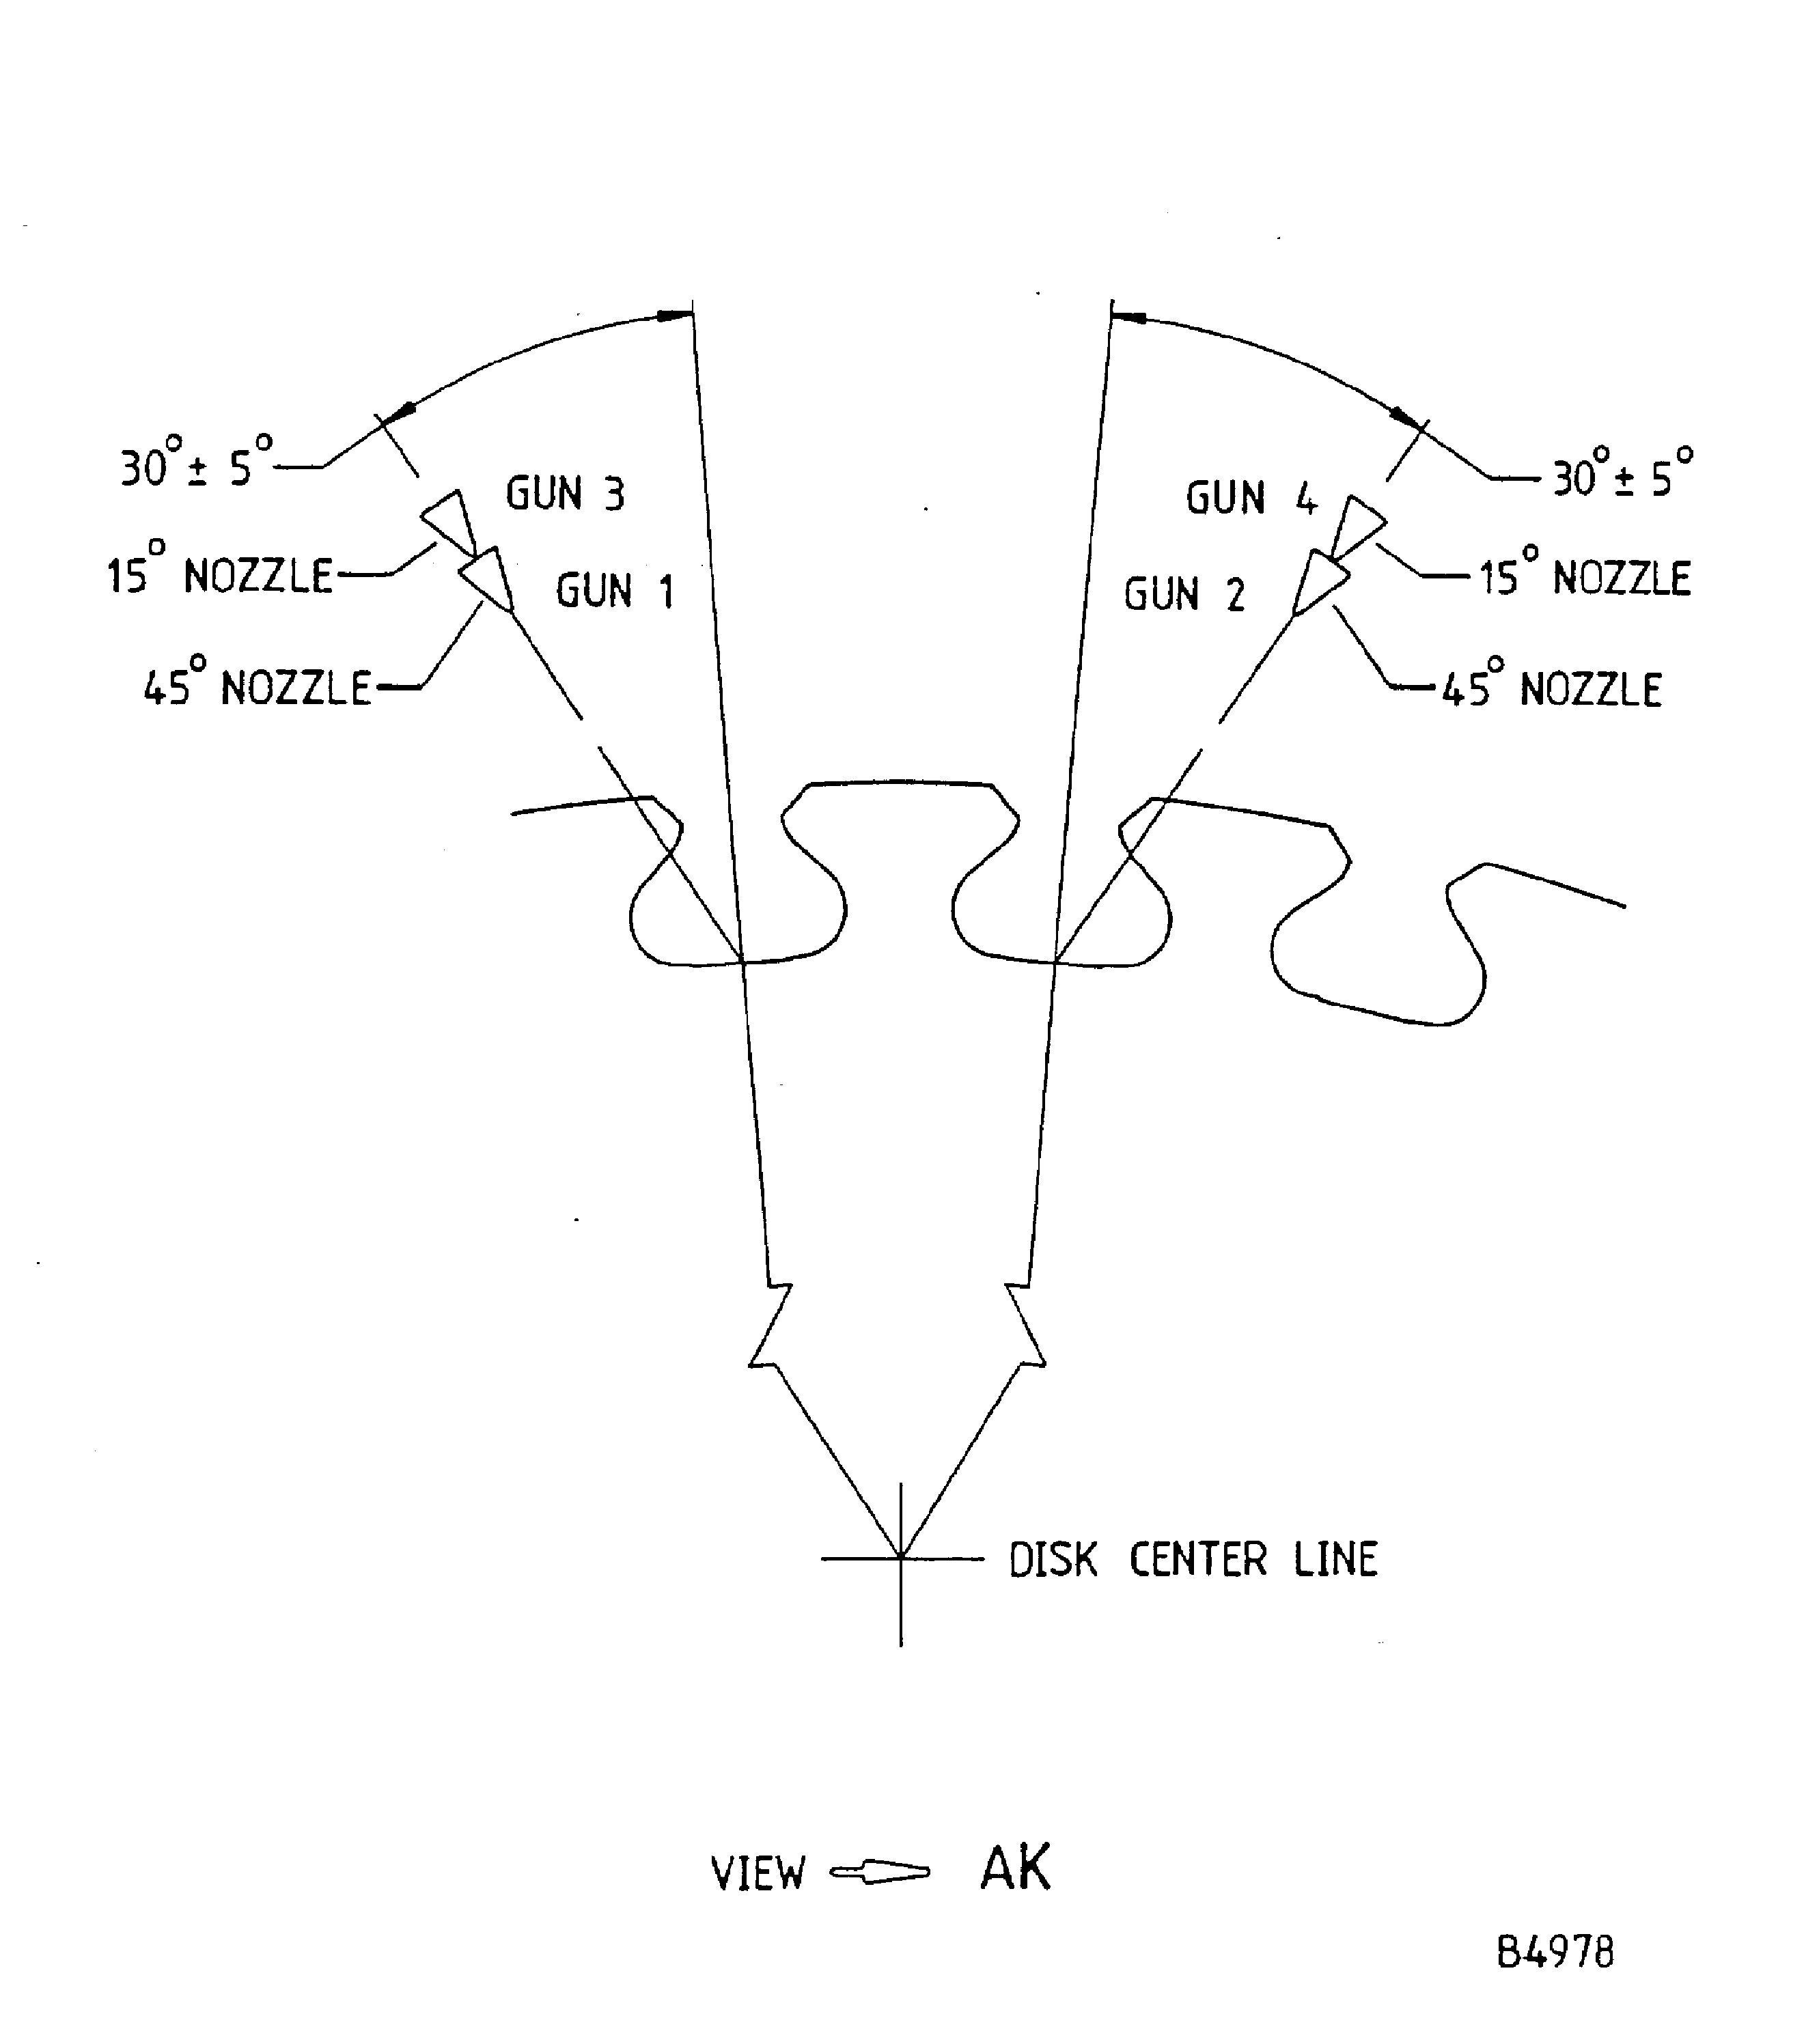
Figure: Repair Details and Dimensions
Repair Details and Dimensions
