Export Control
EAR Export Classification: Not subject to the EAR per 15 C.F.R. Chapter 1, Part 734.3(b)(3), except for the following Service Bulletins which are currently published as EAR Export Classification 9E991: SBE70-0992, SBE72-0483, SBE72-0580, SBE72-0588, SBE72-0640, SBE73-0209, SBE80-0024 and SBE80-0025.Copyright
© IAE International Aero Engines AG (2001, 2014 - 2021) The information contained in this document is the property of © IAE International Aero Engines AG and may not be copied or used for any purpose other than that for which it is supplied without the express written authority of © IAE International Aero Engines AG. (This does not preclude use by engine and aircraft operators for normal instructional, maintenance or overhaul purposes.).Applicability
All
Common Information
TASK 72-41-14-300-007 HPC Rear Rotating Airseal - Repair Damaged Seal Fins By Welding, Repair-007 (VRS6492)
Material of component
PART IDENT | SYMBOL | MATERIAL |
|---|---|---|
HP Compressor Rear Rotating Airseal | QDY | Waspaloy - heat resistant alloy vacuum melted |
General
This Repair must only be done when the instruction to do so is given in inspection procedures (identified by the applicable part number) located in section 72-41-14.
This repair gives the instruction to repair damage on the HP Compressor Rear Rotating Airseal Seal Fins by pulsed plasma welding.
This is a source demonstration repair which can only be done by Approved Vendors.
This repair can only be applied 3 times, subject to the seal not having more than 3 post-weld heat treatment cycles during its service life.
The practices and processes referred to in the procedure by the TASK/SUBTASK numbers are in the SPM.
Price and availability
Refer to International Aero Engines
Related repairs - none
NOTE
NOTE
Preliminary Requirements
Pre-Conditions
NONESupport Equipment
| Name | Manufacturer | Part Number / Identification | Quantity | Remark |
|---|---|---|---|---|
| Lathe | LOCAL | Lathe | ||
| Standard workshop equipment | LOCAL | Standard workshop equipment | ||
| Dial test indicators | LOCAL | Dial test indicators | ||
| Workshop inspection equipment | LOCAL | Workshop inspection equipment | ||
| Fluorescent penetrant inspection equipment | 0AM53 | Fluorescent penetrant inspection equipment | ||
| Penetrant Crack Test Equipment | LOCAL | Penetrant crack test equipment | ||
| Chemical cleaning equipment | LOCAL | Chemical cleaning equipment | ||
| Pulsed plasma welding equipment | LOCAL | Pulsed plasma welding equipment | ||
| Vibrating marking pencil | LOCAL | Vibrating marking pencil |
Consumables, Materials and Expendables
| Name | Manufacturer | Part Number / Identification | Quantity | Remark |
|---|---|---|---|---|
| CoMat 03-192 WELDING WIRE | LOCAL | CoMat 03-192 | ||
| CoMat 05-140 ABRASIVE STONE SILICON CARBIDE | LOCAL | CoMat 05-140 | ||
| CoMat 06-022 FLUORESCENT PENETRANT (POST-EMULSIFIED ULTRA HIGH SENSITIVITY) | LOCAL | CoMat 06-022 | ||
| CoMat 03-248 METAL SPRAY POWDER | LOCAL | CoMat 03-248 |
Spares
NONESafety Requirements
NONEProcedure
The Source Demonstration requirements of this repair means that any facility not authorized to accomplish this repair either, utilize the Authorized Repair Vendors listed below or contact the IAE Repair Services Group to determine if a qualification program can be initiated at their facility.
IAE International Aero Engines AG
400 Main Street
M/S 121-10
East Hartford CT 06118
U.S.A.
Attn: Manager Technical Services
The designation by IAE of an Authorized Repair Vendor indicates that the Repair Vendor has demonstrated the necessary capability to enable it to carry out the listed repair work. However, IAE makes no warranties or representations concerning the qualifications or quality standards of the Repair Vendors to carry out the repair work, and accepts no responsibility whatsoever for any work that may be carried out by a Repair Vendor other than when IAE is listed as the Repair Vendor. Authorized Repair Vendors do not act as agents or representatives of IAE.
Repair Facilities
For Assembly B refer to Figure.
Strip the coating. The coating material is CoMat 03-248 METAL SPRAY POWDER.
Refer to SPM TASK 70-33-59-300-503.
Use chemical cleaning equipment.
If repair scheme number VRS6144 is marked on the component:
Continue with the repair.
If the repair scheme number VRS6144 is not marked on the component:
Examine the identity marking location for the repair scheme number VRS6144.
Visually examine the HP Compressor Rear Rotating Airseal to determine if the repair has been applied previously.
SUBTASK 72-41-14-220-098 Inspect for Previous Applications of VRS6144
Use a lathe with standard workshop equipment.
Refer to Step. repair facilities for approved vendor equipment.
Install the turning fixture into the lathe.
Use a dial test indicator and standard workshop equipment.
Make sure that Datums A and B are set to turn correctly.
Refer to Step. repair facilities for approved vendor equipment.
Install the HP Compressor Rear Rotating Airseal into the turning fixture and set to turn correctly.
Use standard workshop equipment and/or CoMat 05-140 ABRASIVE STONE SILICON CARBIDE.
Remove burrs.
SUBTASK 72-41-14-325-052 Machine the Seal Fins
Repeat the repair from Step.
If there is any remaining evidence of damage:
Continue with the repair.
If all damage has been removed from the seal fins:
Make sure that all damage has been removed from the seal fins.
Visually inspect the machined HP Compressor Rear Rotating Airseal.
Reject.
If the diameter of any of the seal fins are below the minimum dimension:
Record the dimensions for use with Step and continue with the repair.
If the diameter of all of the seal fins are within the acceptable limits:
Use workshop inspection equipment.
Dimensionally inspect seal fins on the machined HP Compressor Rear Rotating Airseal.
SUBTASK 72-41-14-220-086 Visually and Dimensionally Inspect the HP Compressor Rear Rotating Airseal
Use chemical cleaning equipment.
Refer to SPM TASK 70-11-39-300-503, SUBTASK 70-11-39-300-001.
Swab etch the repaired areas.
SUBTASK 72-41-14-110-059 Cold Ferric Chloride Etch
Refer to SPM TASK 70-23-05-230-501.
Reject.
If cracking is detected:
Continue with the repair.
If no cracking is detected:
Use fluorescent penetrant inspection equipment.
Inspect for cracking at the repair area on the HP Compressor Rear Rotating Airseal using fluorescent penetrant inspection.
SUBTASK 72-41-14-230-061Fluorescent Penetrant Inspect
Use chemical cleaning equipment.
Refer to SPM TASK 70-11-03-300-503 or SPM TASK 70-11-34-300-503.
Chemically clean the HP Compressor Rear Rotating Airseal.
SUBTASK 72-41-14-110-060 Chemically Clean
Use pulsed plasma welding equipment with standard workshop equipment.
Refer to Step. Repair Facilities for approved vendor equipment.
Install the weld fixture on to the table.
Use standard workshop equipment and a dial test indicator.
Make sure that datums A and B are set to turn correctly.
Refer to Step. Repair Facilities for approved vendor equipment.
Install the HP Compressor Rear Rotating Airseal on to the weld fixture and set to turn correctly.
Use CoMat 03-192 WELDING WIRE with pulsed plasma welding equipment.
Refer to approved vendor data cards for equipment and parameters to be used.
Make sure sufficient weld material is applied to allow for the machining of the seal fins to the required size.
Refer to SPM TASK 70-31-04-310-501.
Pulsed plasma weld the seal fins.
SUBTASK 72-41-14-310-051 Pulsed Plasma Weld the Repair Area(s)
Use workshop inspection equipment.
Refer to SPM TASK 70-31-02-310-501-001, SUBTASK 70-31-02-220-001.
Visually examine the welded areas.
SUBTASK 72-41-14-220-087 Visually Examine the HP Compressor Rear Rotating Airseal
Refer to SPM TASK 70-37-00-370-501.
Heat the HP Compressor Rear Rotating Airseal in a vacuum or controlled atmosphere.
SUBTASK 72-41-14-370-051 Heat Treat the HP Compressor Rear Rotating Airseal
Continue the repair from Step.
If Dim D1 is larger than the given dimension:
Measure Dim D1 and measure and record Dim D2 (Inner Diameter).
Dimensionally inspect the inner and outer diameters of the HP Compressor Rear Rotating Airseal Spigot.
SUBTASK 72-41-14-220-099 Dimensionally Inspect the Spigot
Use a grinding machine with a locally manufactured grinding fixture.
NOTE
If tooling exists for application of the repair scheme VRS6144 the same tooling can be used.
Install the grinding fixture into the grinding machine.
Set Datums A and C to turn correctly.
Use a dial test indicator.
Install the HP Compressor Rear Rotating Airseal into the turning fixture and set to turn correctly.
Machine to restore Dim D1 and the forward chamfer to within the specified dimensions.
Remove the minimum amount of material necessary to restore the spigot diameter and chamfer.
Machine Dim D1 on the spigot diameter of the HP Compressor Rear Rotating Airseal.
Remove burrs and raised material produced by the machining process.
SUBTASK 72-41-14-320-002 Machine the Spigot Diameter
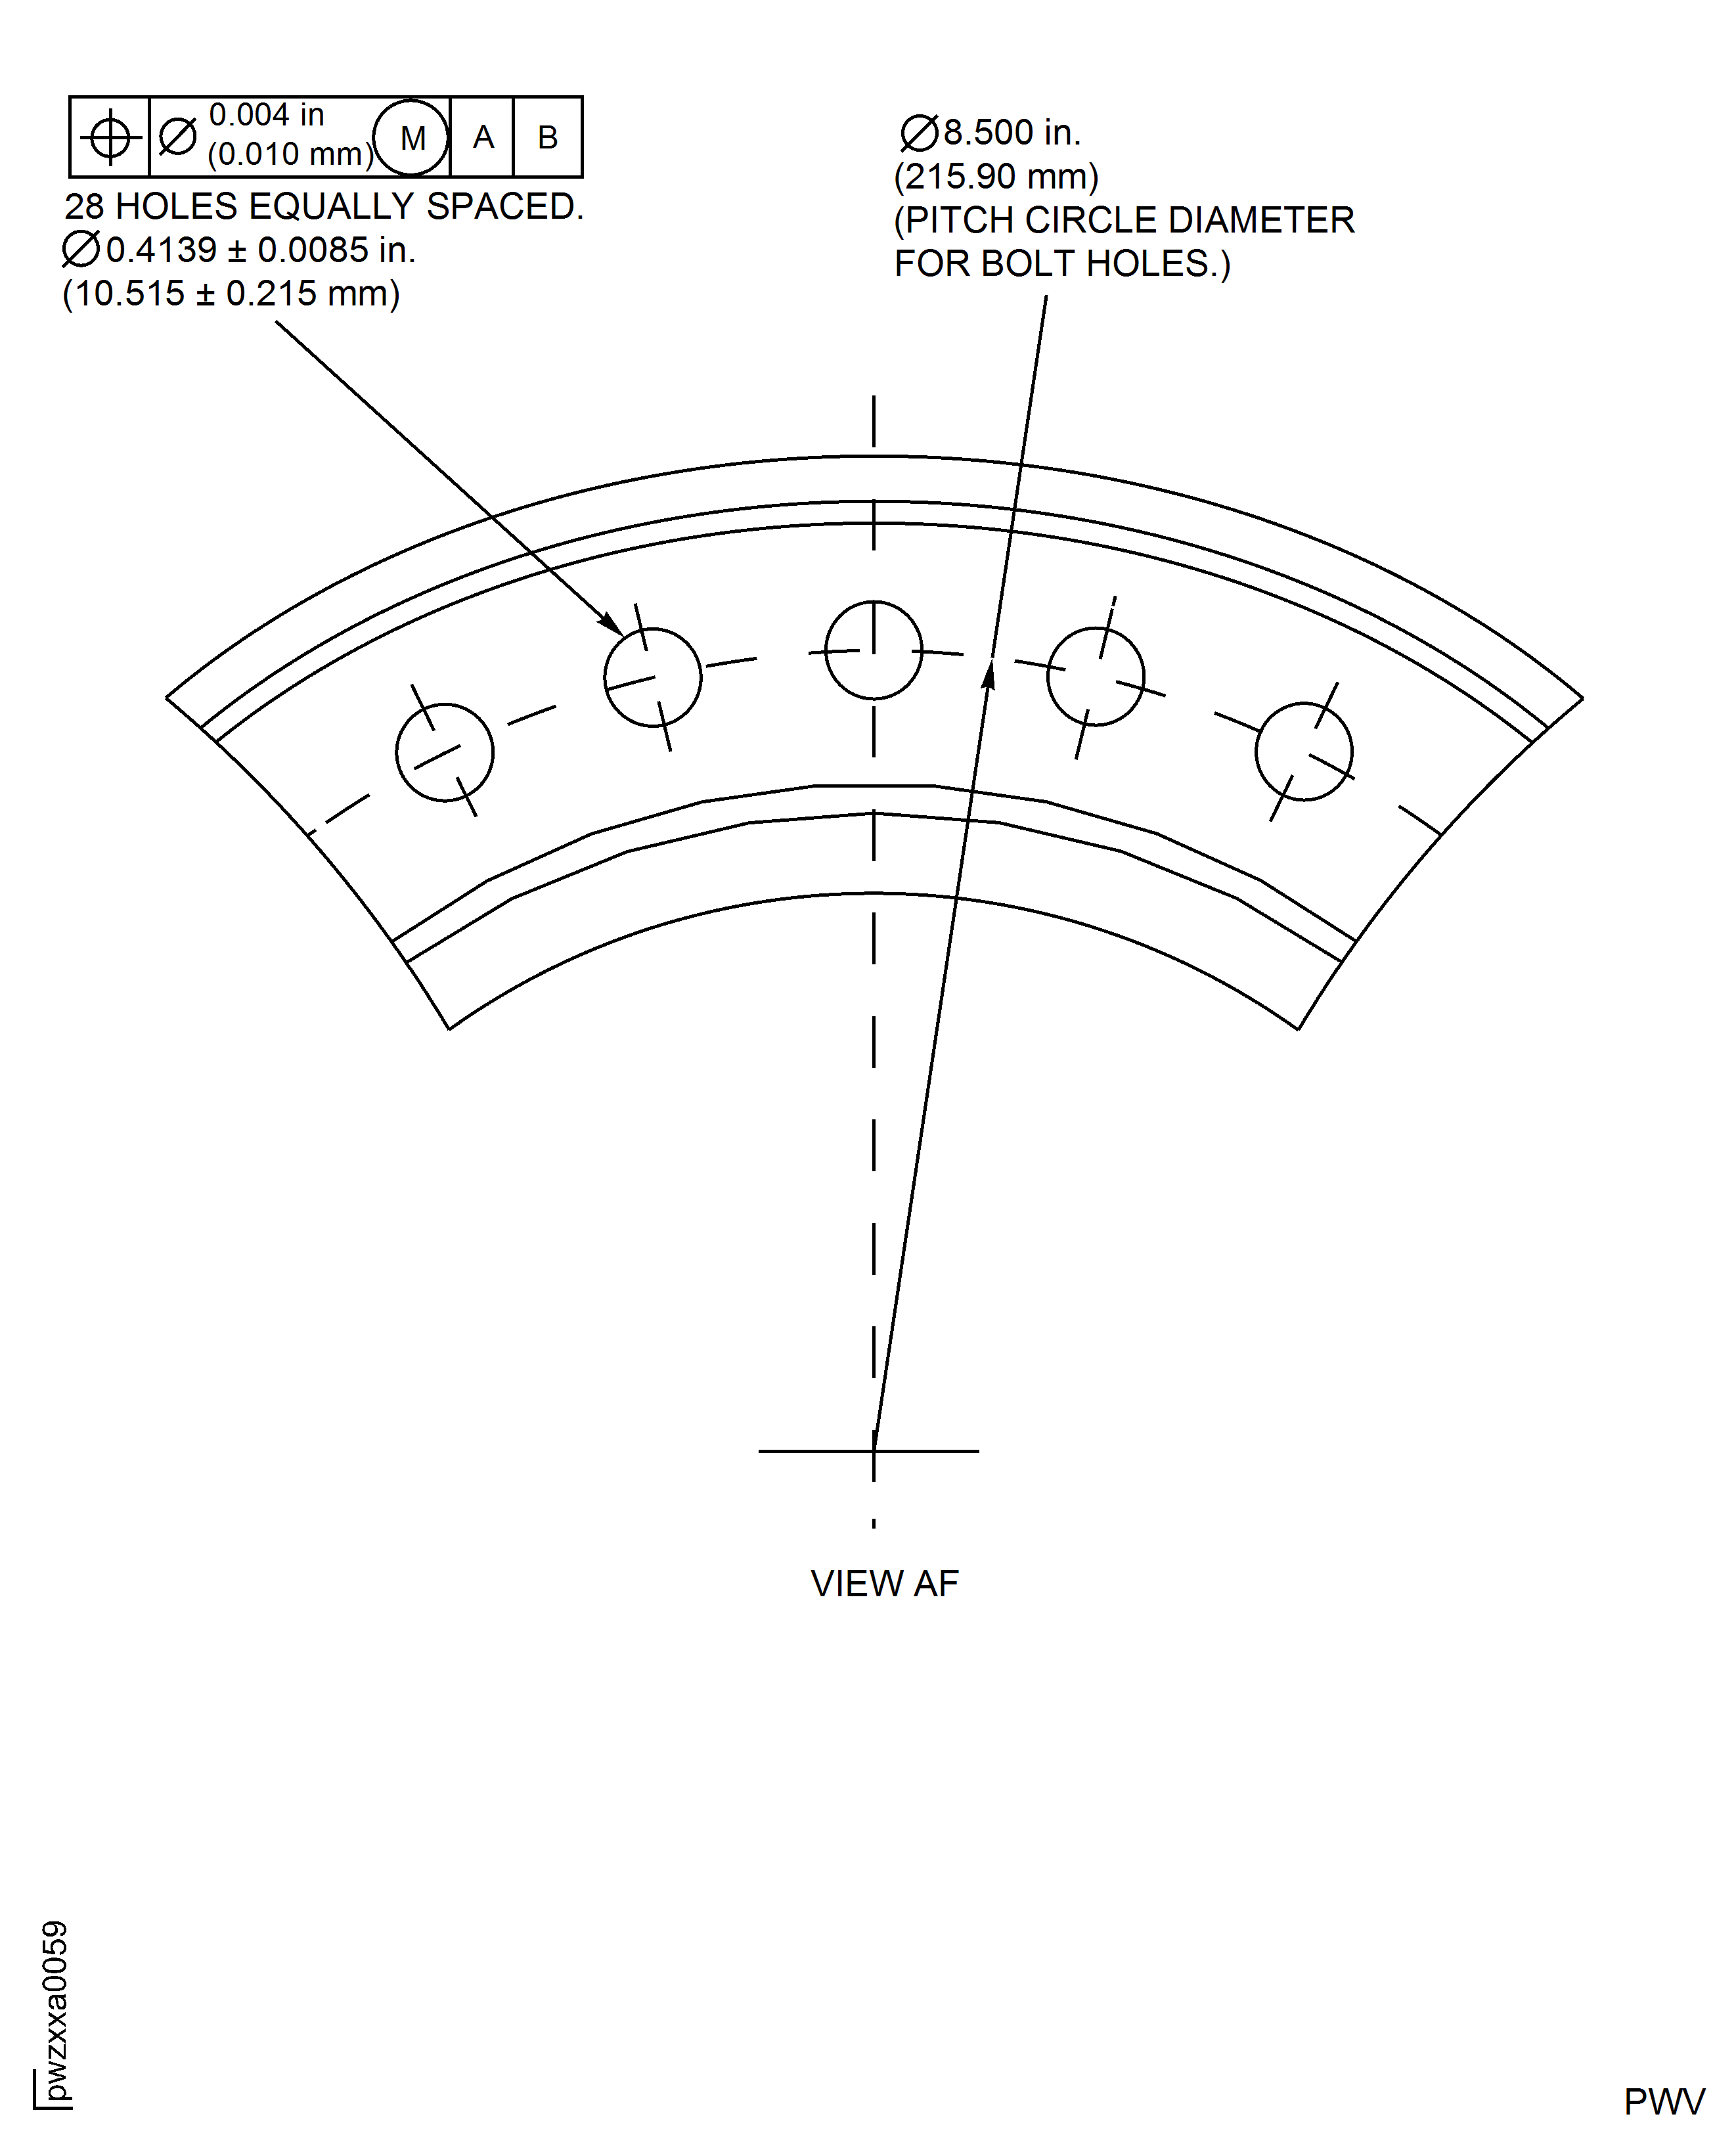
Make sure that the wall thickness on the spigot and the position of the boltholes are within the acceptable limits.
Reject.
If (Dim D1 - Dim D2) divided by 2 is less than the minimum wall thickness:
Reject.
If the position of the boltholes are not within the limits:
Continue with the repair.
If (Dim D1 - Dim D2) divided by 2 is greater than or equal to the minimum wall thickness and the position of the boltholes are within the given limits:
Measure Dim D1 after machining and use value for Dim D2 as recorded in Step.
Dimensionally inspect the spigot on the HP Compressor Rear Rotating Airseal.
SUBTASK 72-41-14-220-100 Dimensionally Inspect the Machined Component
Use a lathe with standard workshop equipment.
Refer to Step. Repair Facilities for approved vendor equipment.
Install the turn fixture into the lathe.
Use a dial test indicator and standard workshop equipment.
Make sure that datums A and B are set to turn correctly.
Refer to Step. Repair Facilities for approved vendor equipment.
Install the HP Compressor Rear Rotating Airseal into the turn fixture and set to turn correctly.
Use standard workshop equipment and/or CoMat 05-140 ABRASIVE STONE SILICON CARBIDE.
Remove burrs.
SUBTASK 72-41-14-325-053 Machine the Welded Seal Fins
Use chemical cleaning equipment.
Refer to SPM TASK 70-11-39-300-503, SUBTASK 70-11-39-300-001.
Swab etch the repair area on the HP Compressor Rear Rotating Airseal.
SUBTASK 72-41-14-110-061 Cold Ferric Chloride Etch
Reject.
If cracking is detected:
Continue with the repair.
If no cracking is detected:
Use fluorescent penetrant inspection equipment.
Refer to SPM TASK 70-23-05-230-501.
Inspect for cracking at the repair area on the HP Compressor Rear Rotating Airseal using fluorescent penetrant inspection.
SUBTASK 72-41-14-230-062 Fluorescent Penetrant Inspect
Refer to SPM TASK 70-09-00-400-501, SUBTASK 70-09-00-400-001.
Use vibro-peen equipment.
NOTE
If the HP Compressor Rear Rotating Airseal is already identified with the repair scheme number VRS6492 then only the post weld heat treatment reference number needs to the updated.
Make a mark VRS6492 adjacent to part number at the identified location.
Refer to SPM TASK 70-09-00-400-501, SUBTASK 70-09-00-400-001.
If this is the first post weld heat treatment on the seal, then vibro-peen HT/1 adjacent to the scheme number.
If this is the second post weld heat treatment on the seal, then vibro-peen HT/2 adjacent to the scheme number.
If this is the third post weld heat treatment on the HP Compressor Rear Rotating Airseal, then vibro-peen HT/3 adjacent to the repair scheme number.
Use vibro-peen equipment.
Mark the heat treatment reference number adjacent to the part number at the identified location:
Remove all raised material and burrs created by the vibro-peen marking process.
SUBTASK 72-41-14-350-066 Identify the Repair
Reapply the coating, refer to VRS6144, TASK 72-41-14-300-002 (REPAIR-002).
Make sure there is sufficient remaining wall thickness to allow for the application of VRS6144, use the results obtained in Step.
Re-apply the coating to the location diameter of the HP Compressor Rear Rotating Airseal if required.
NOTE
This SUBTASK only applies to Assemblies B and C and to component that had the coating removed in Step.
SUBTASK 72-41-14-340-053 Re-apply the Flame Spray Coating (if required)
Figure: Repair Details and Dimensions - Assembly A
Repair Details and Dimensions - Assembly A
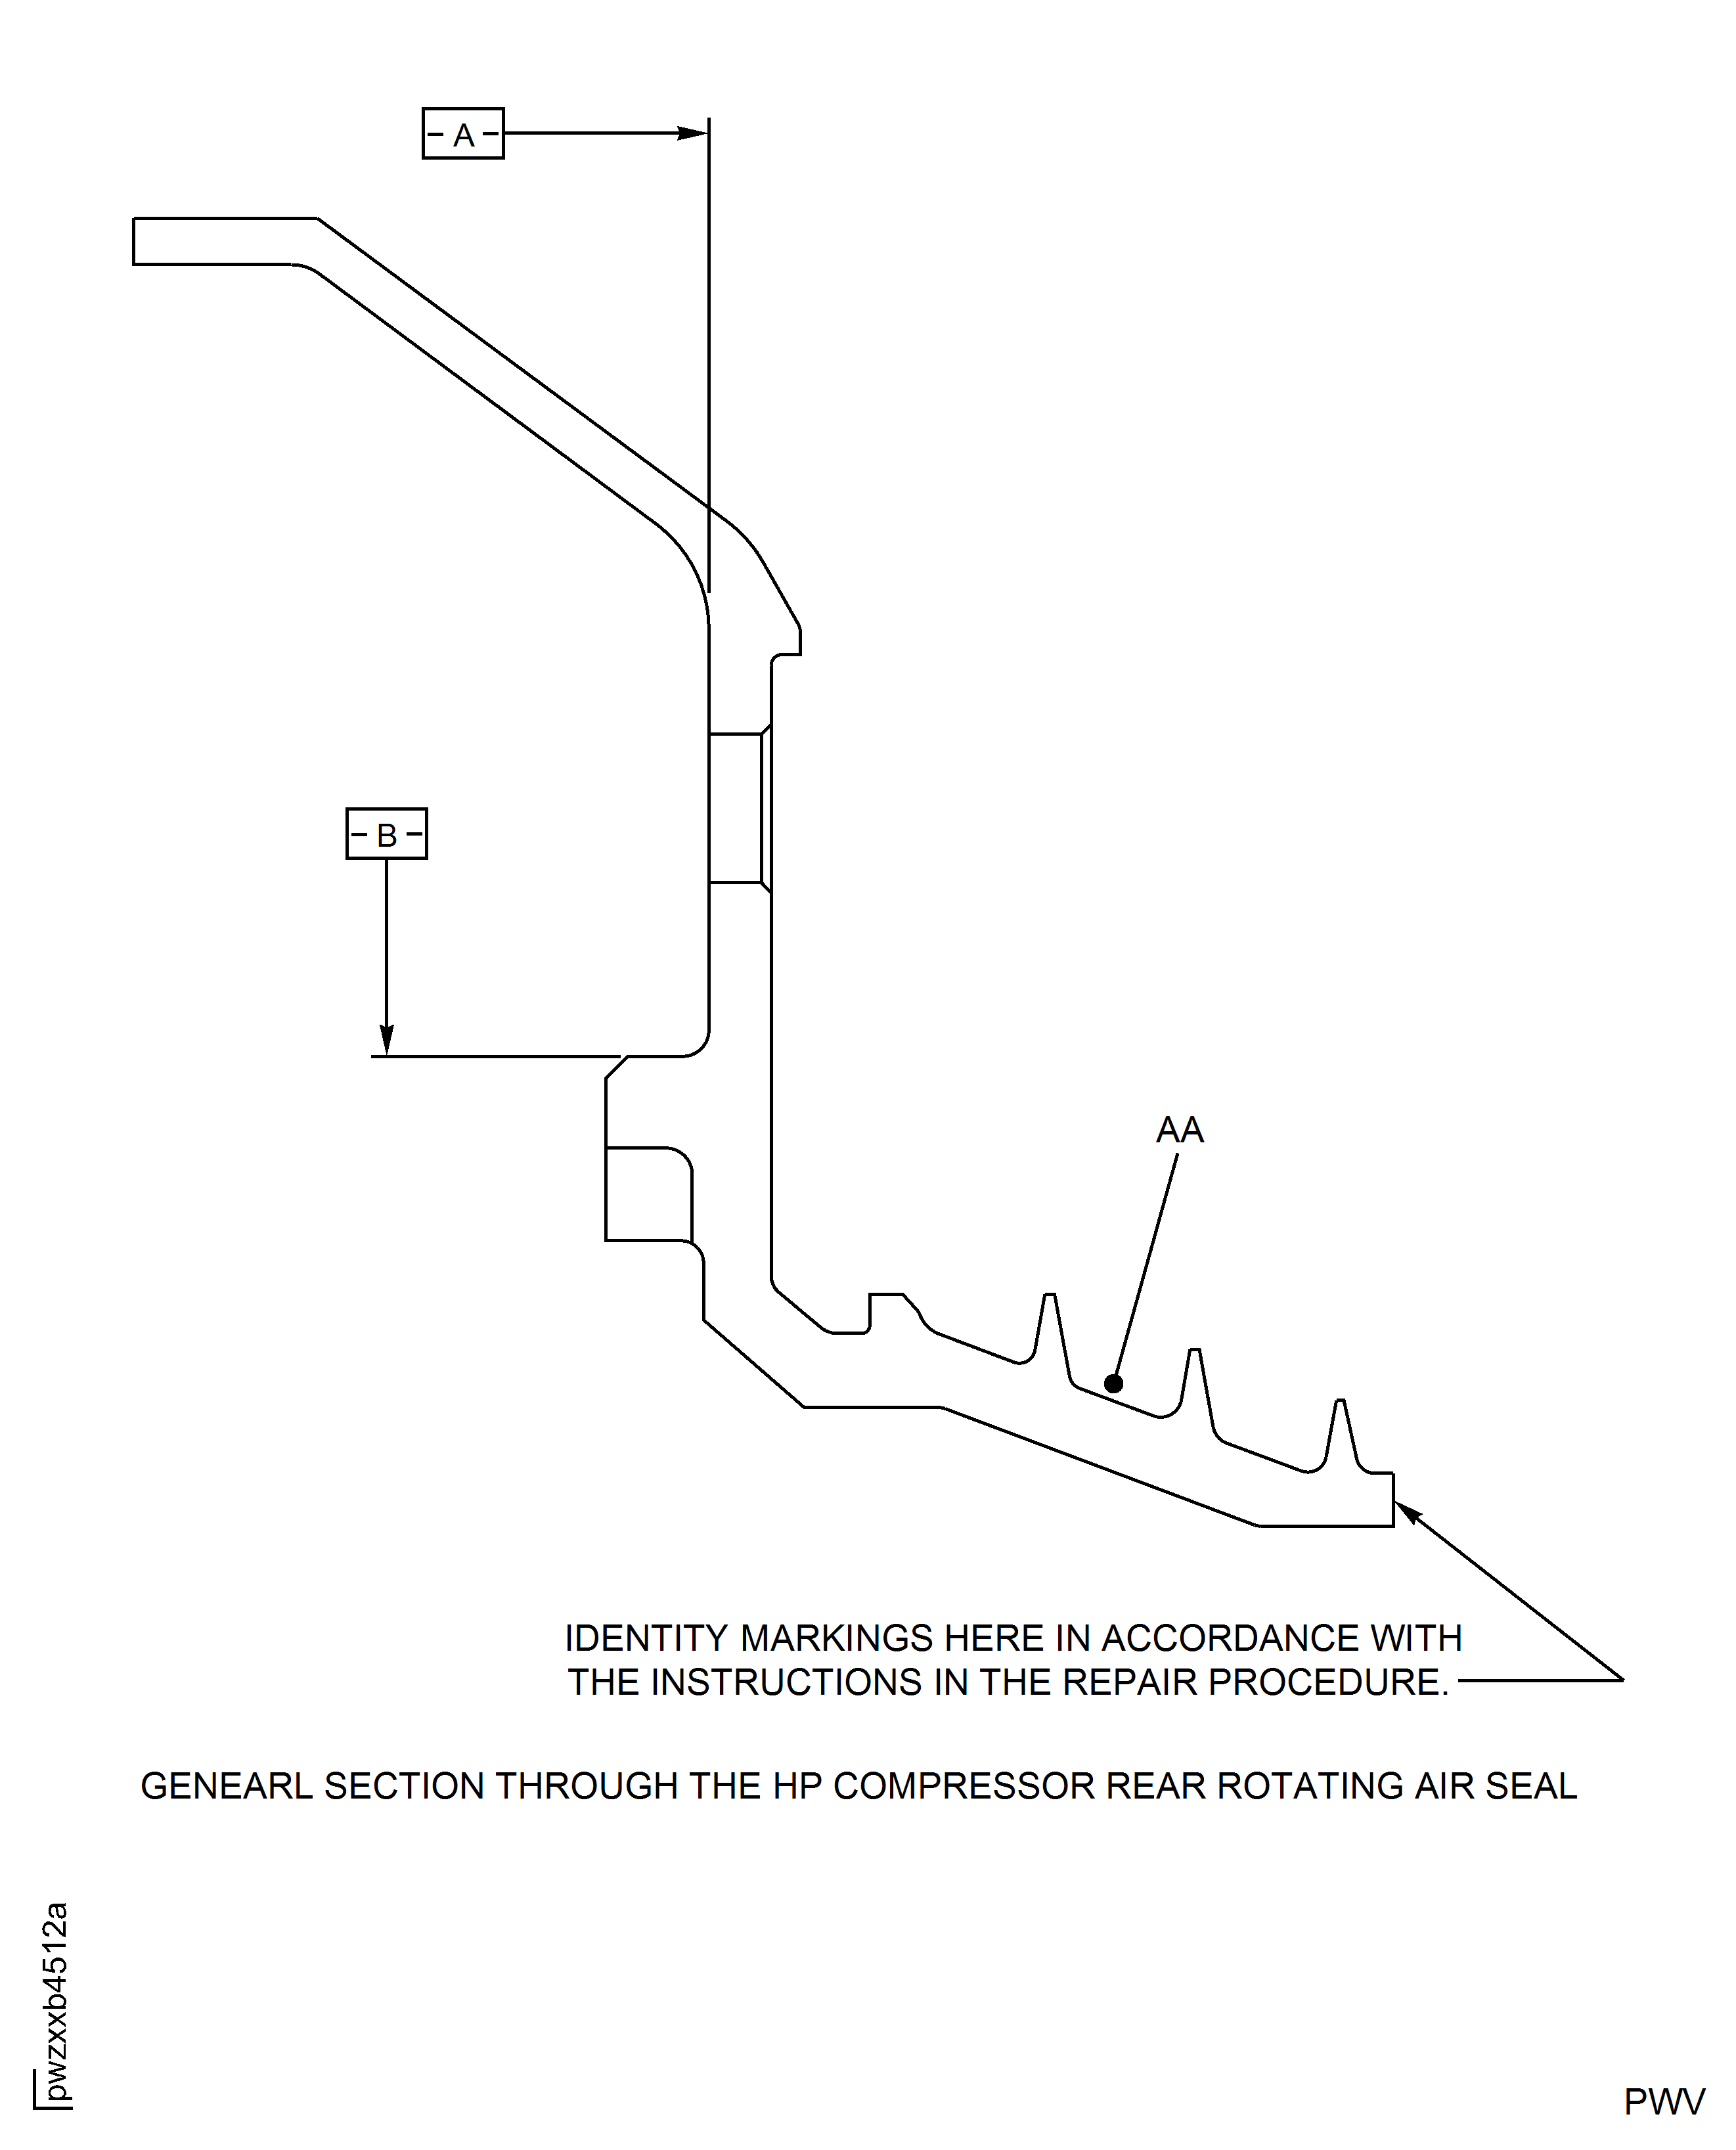
Figure: Repair Details and Dimensions - Assembly A
Repair Details and Dimensions - Assembly A
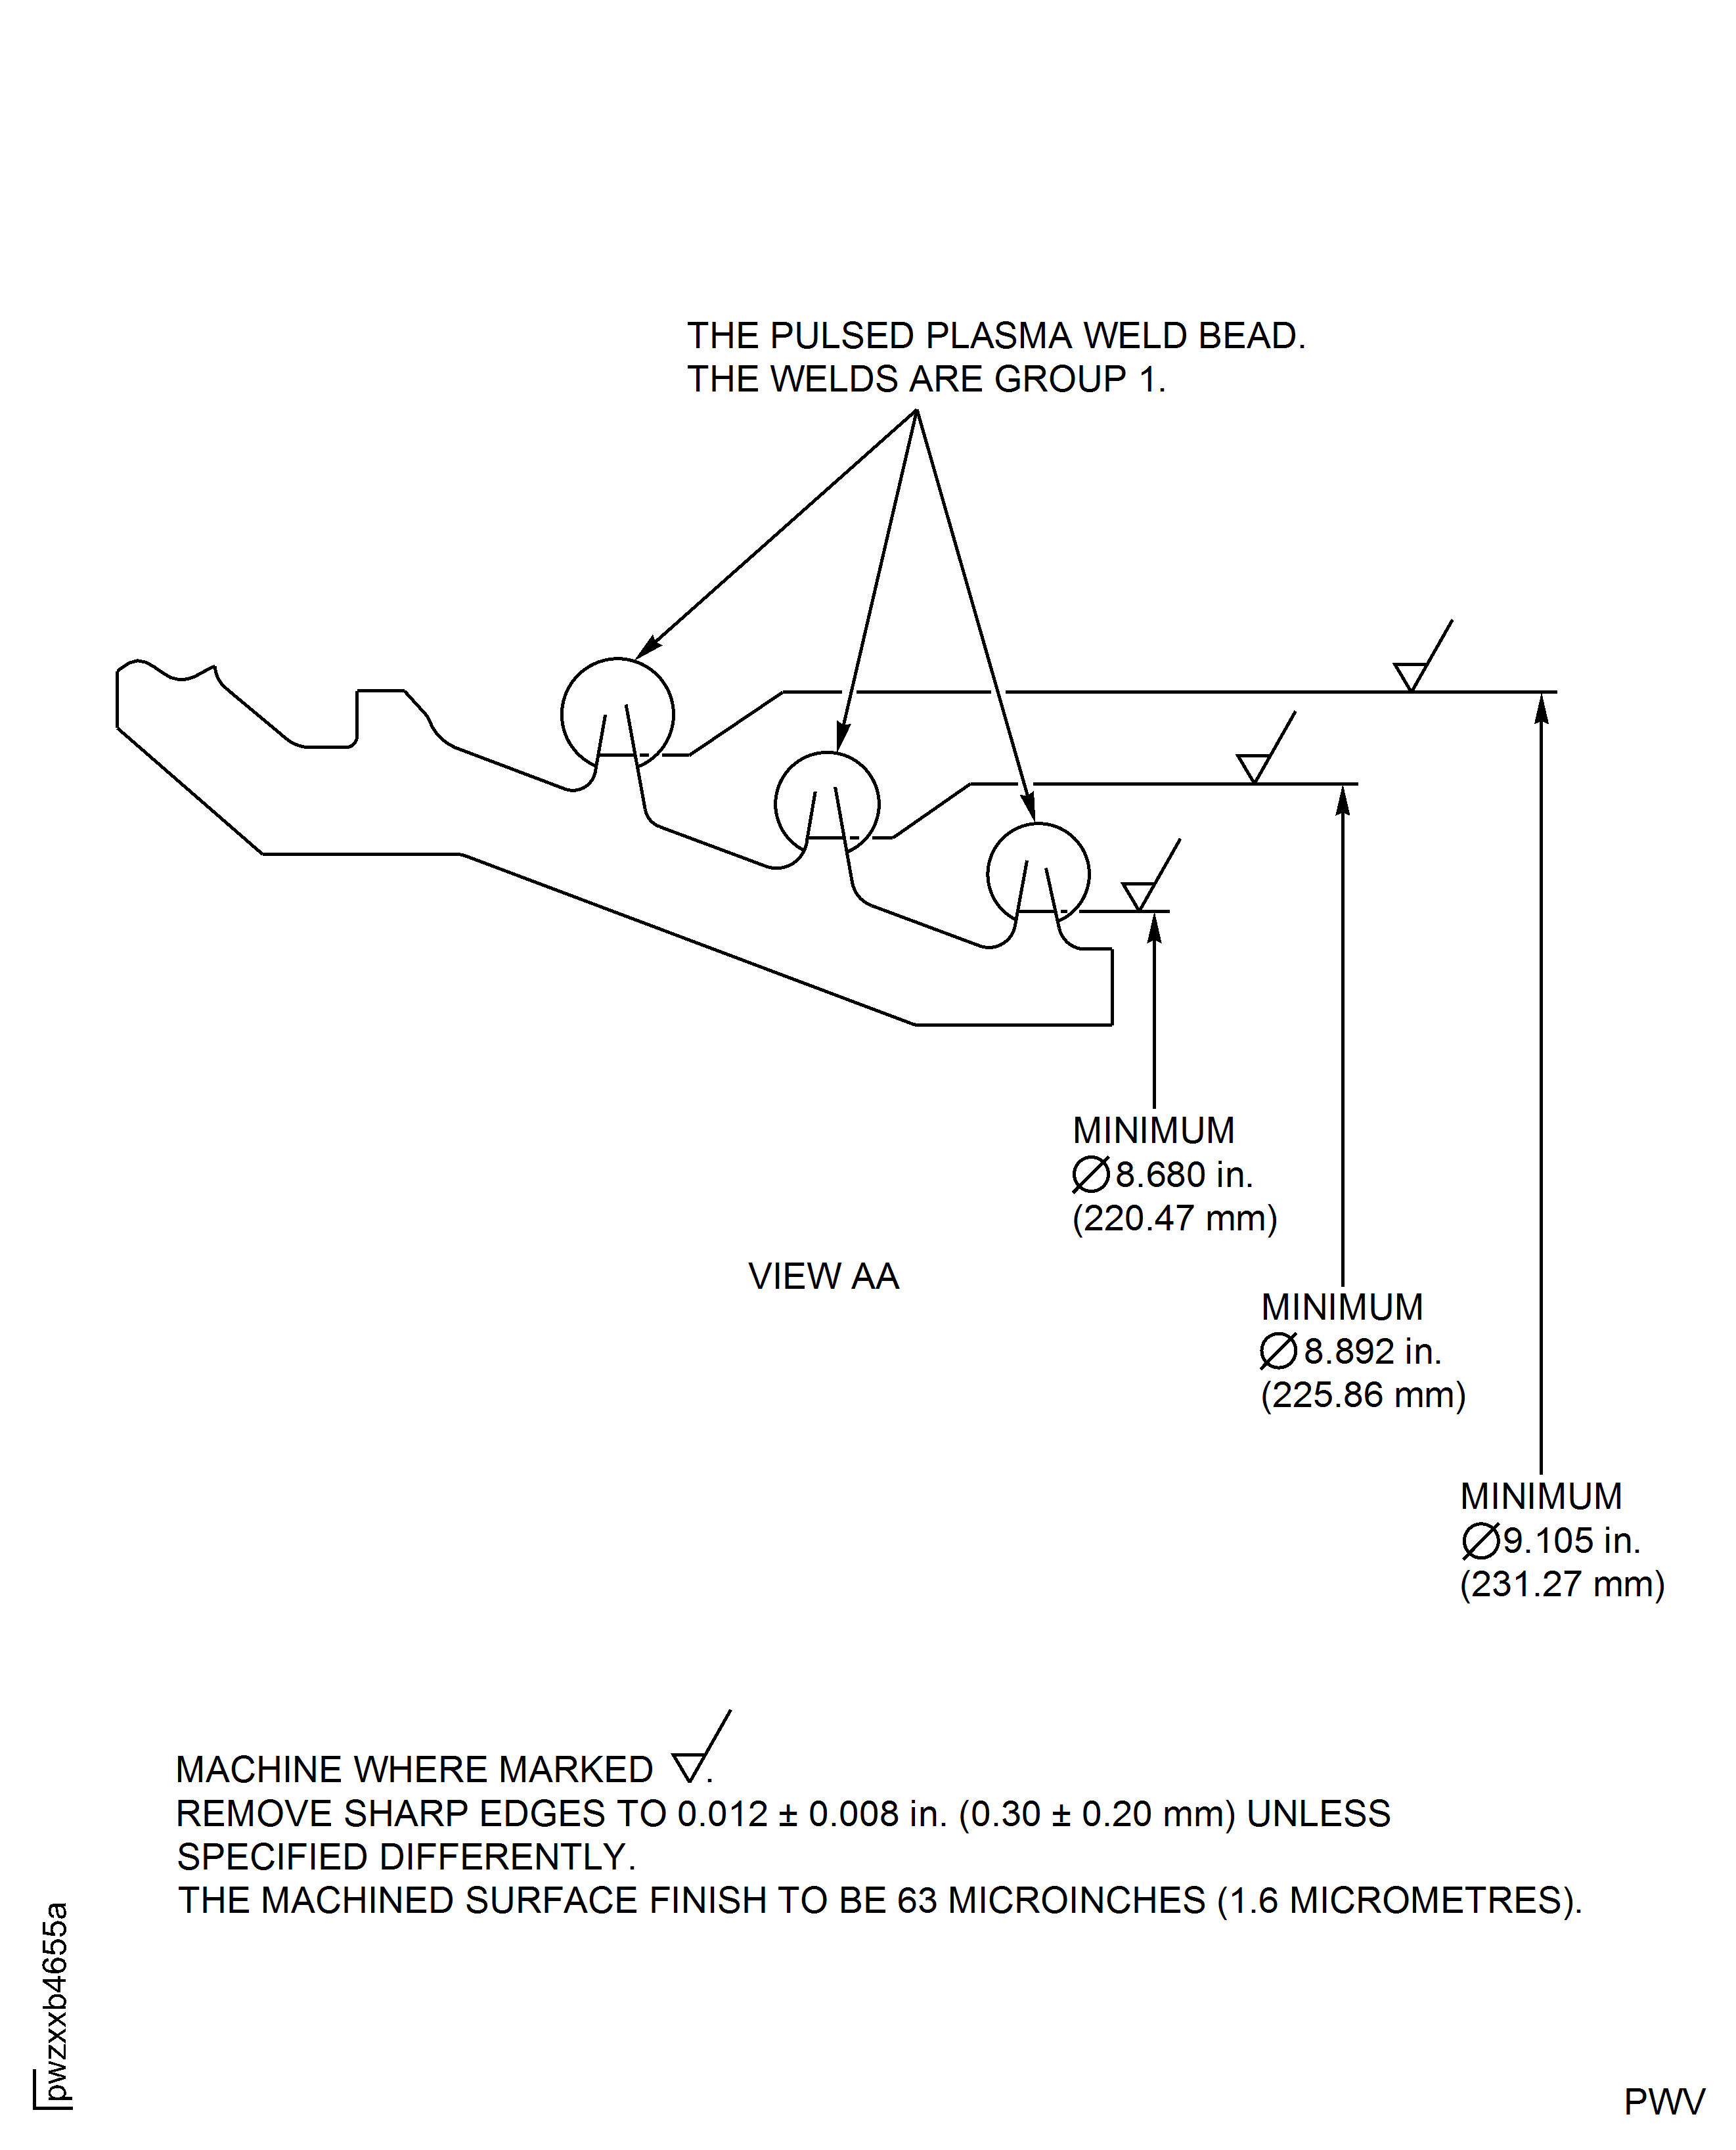
Figure: Repair Details and Dimensions - Assembly A
Repair Details and Dimensions - Assembly A
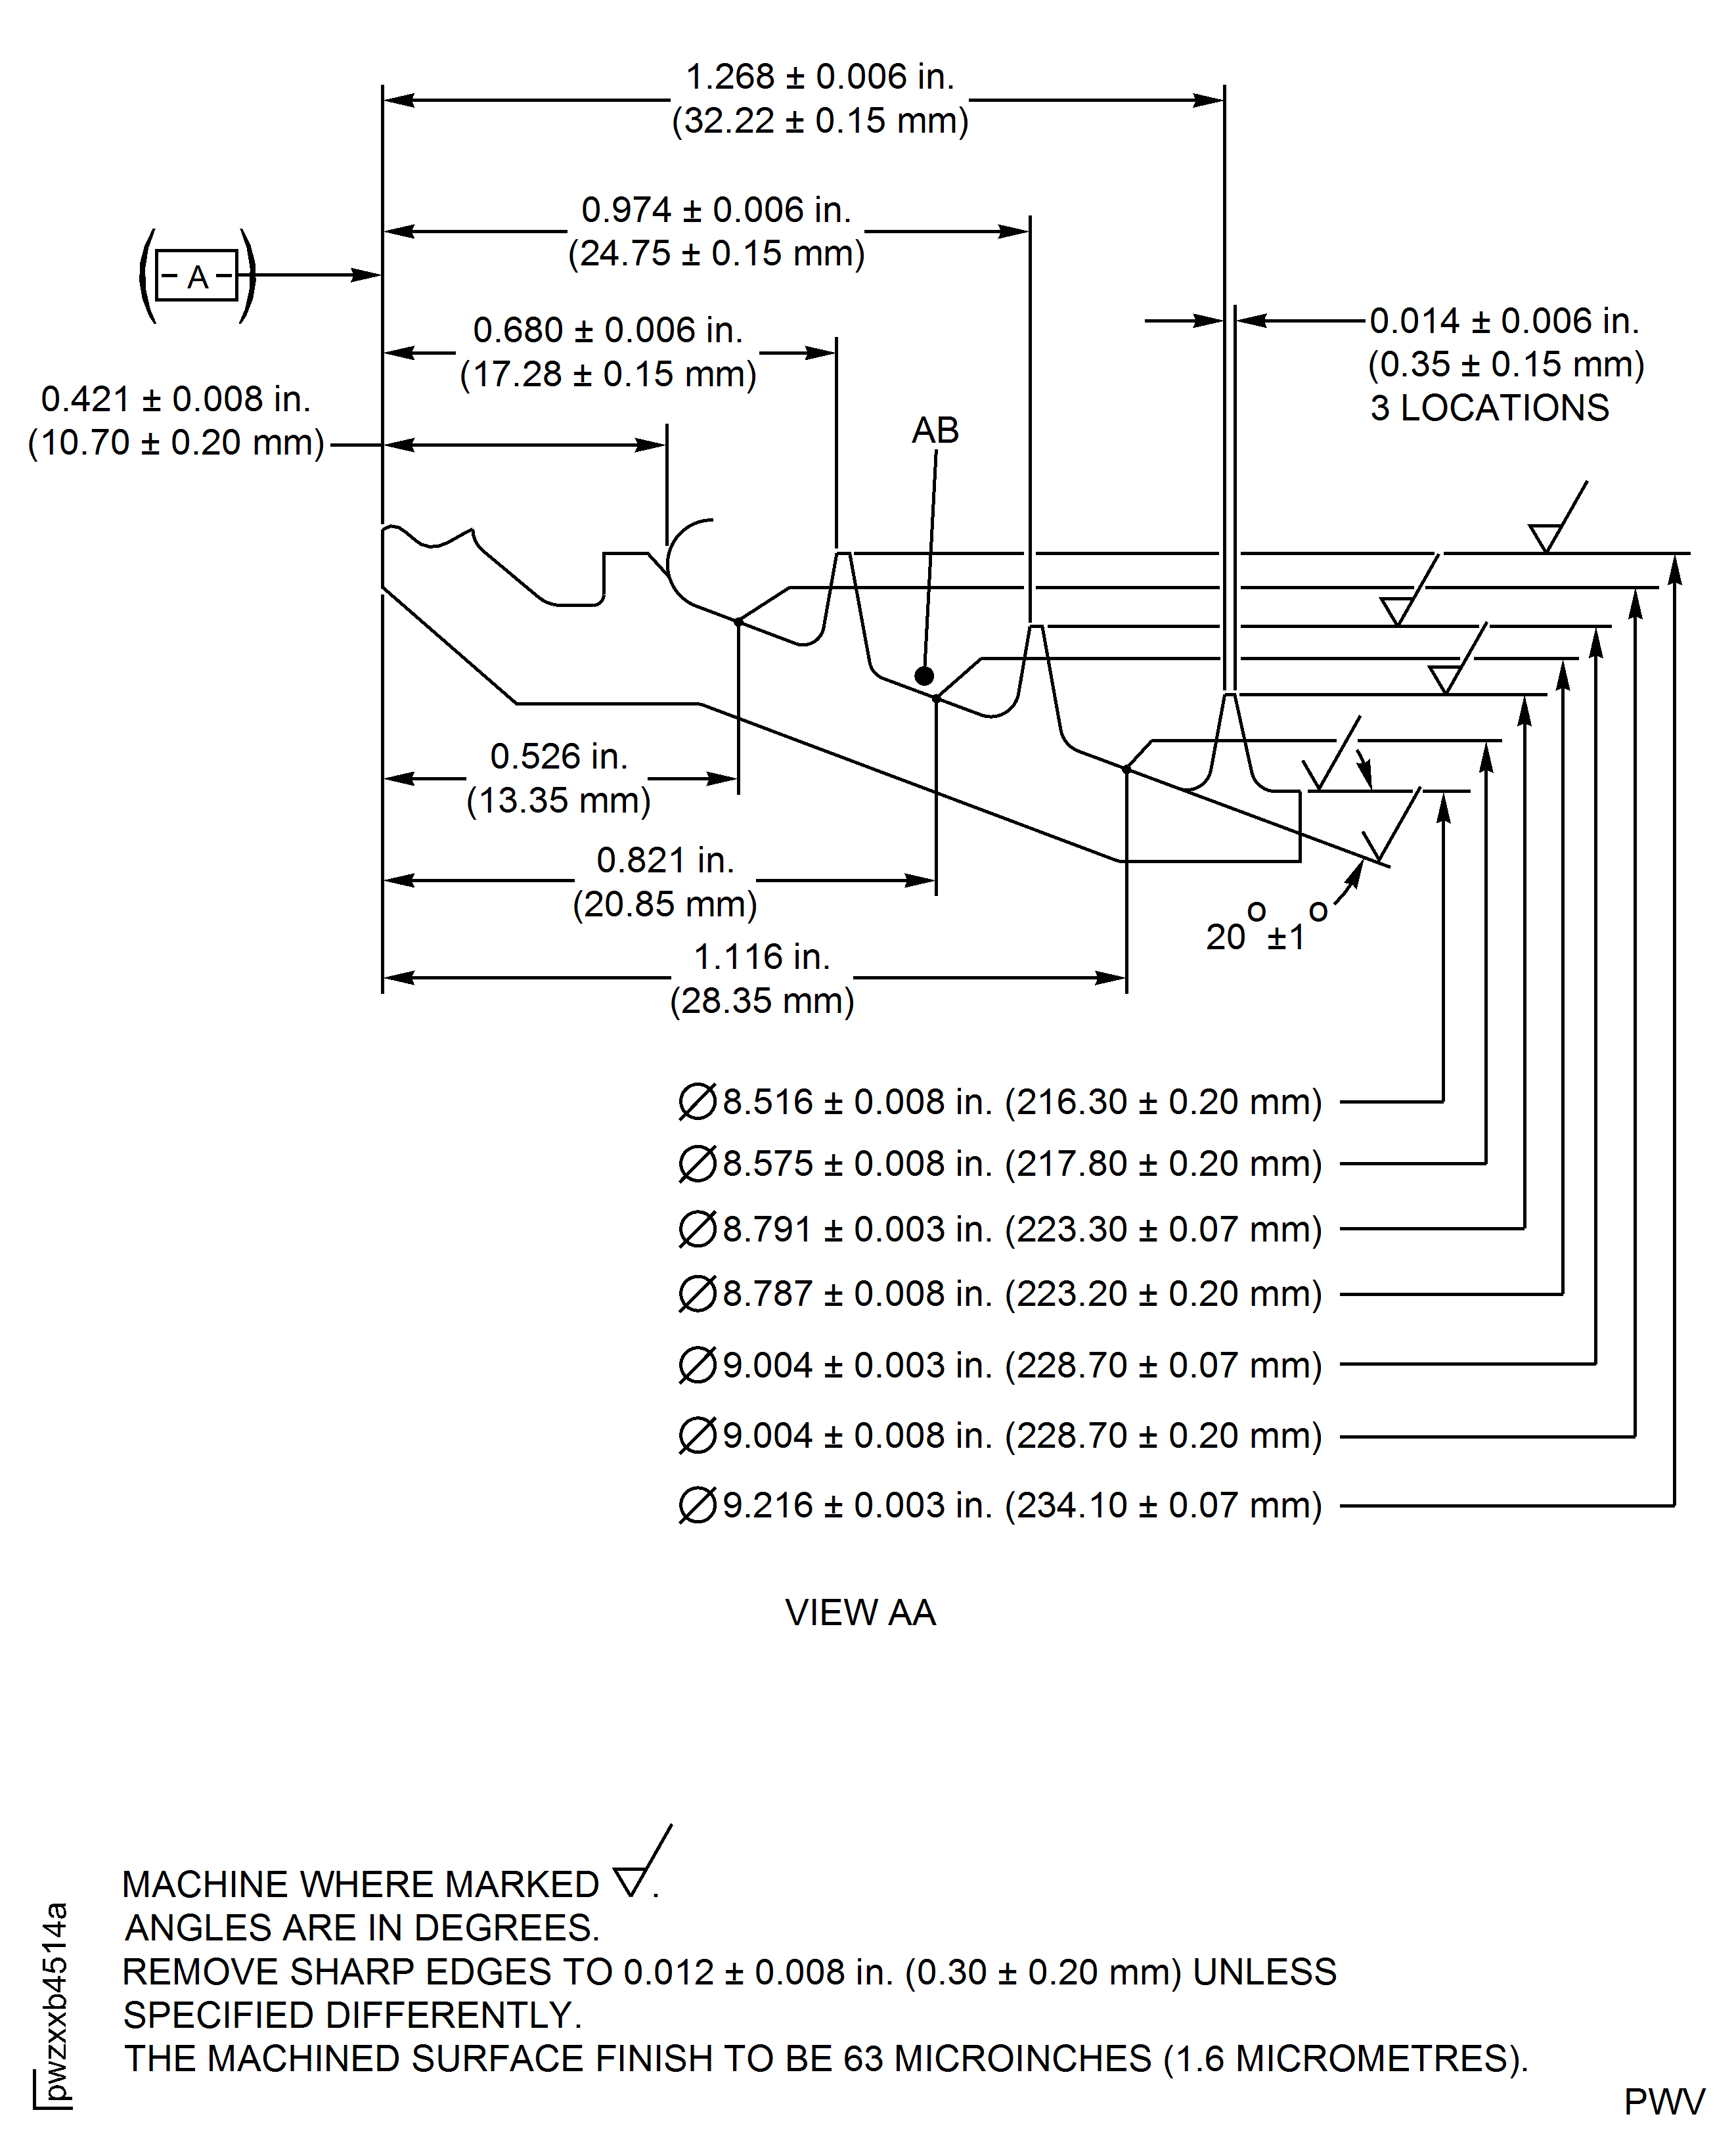
Figure: Repair Details and Dimensions - Assembly B and Assembly C
Repair Details and Dimensions - Assembly B and Assembly C
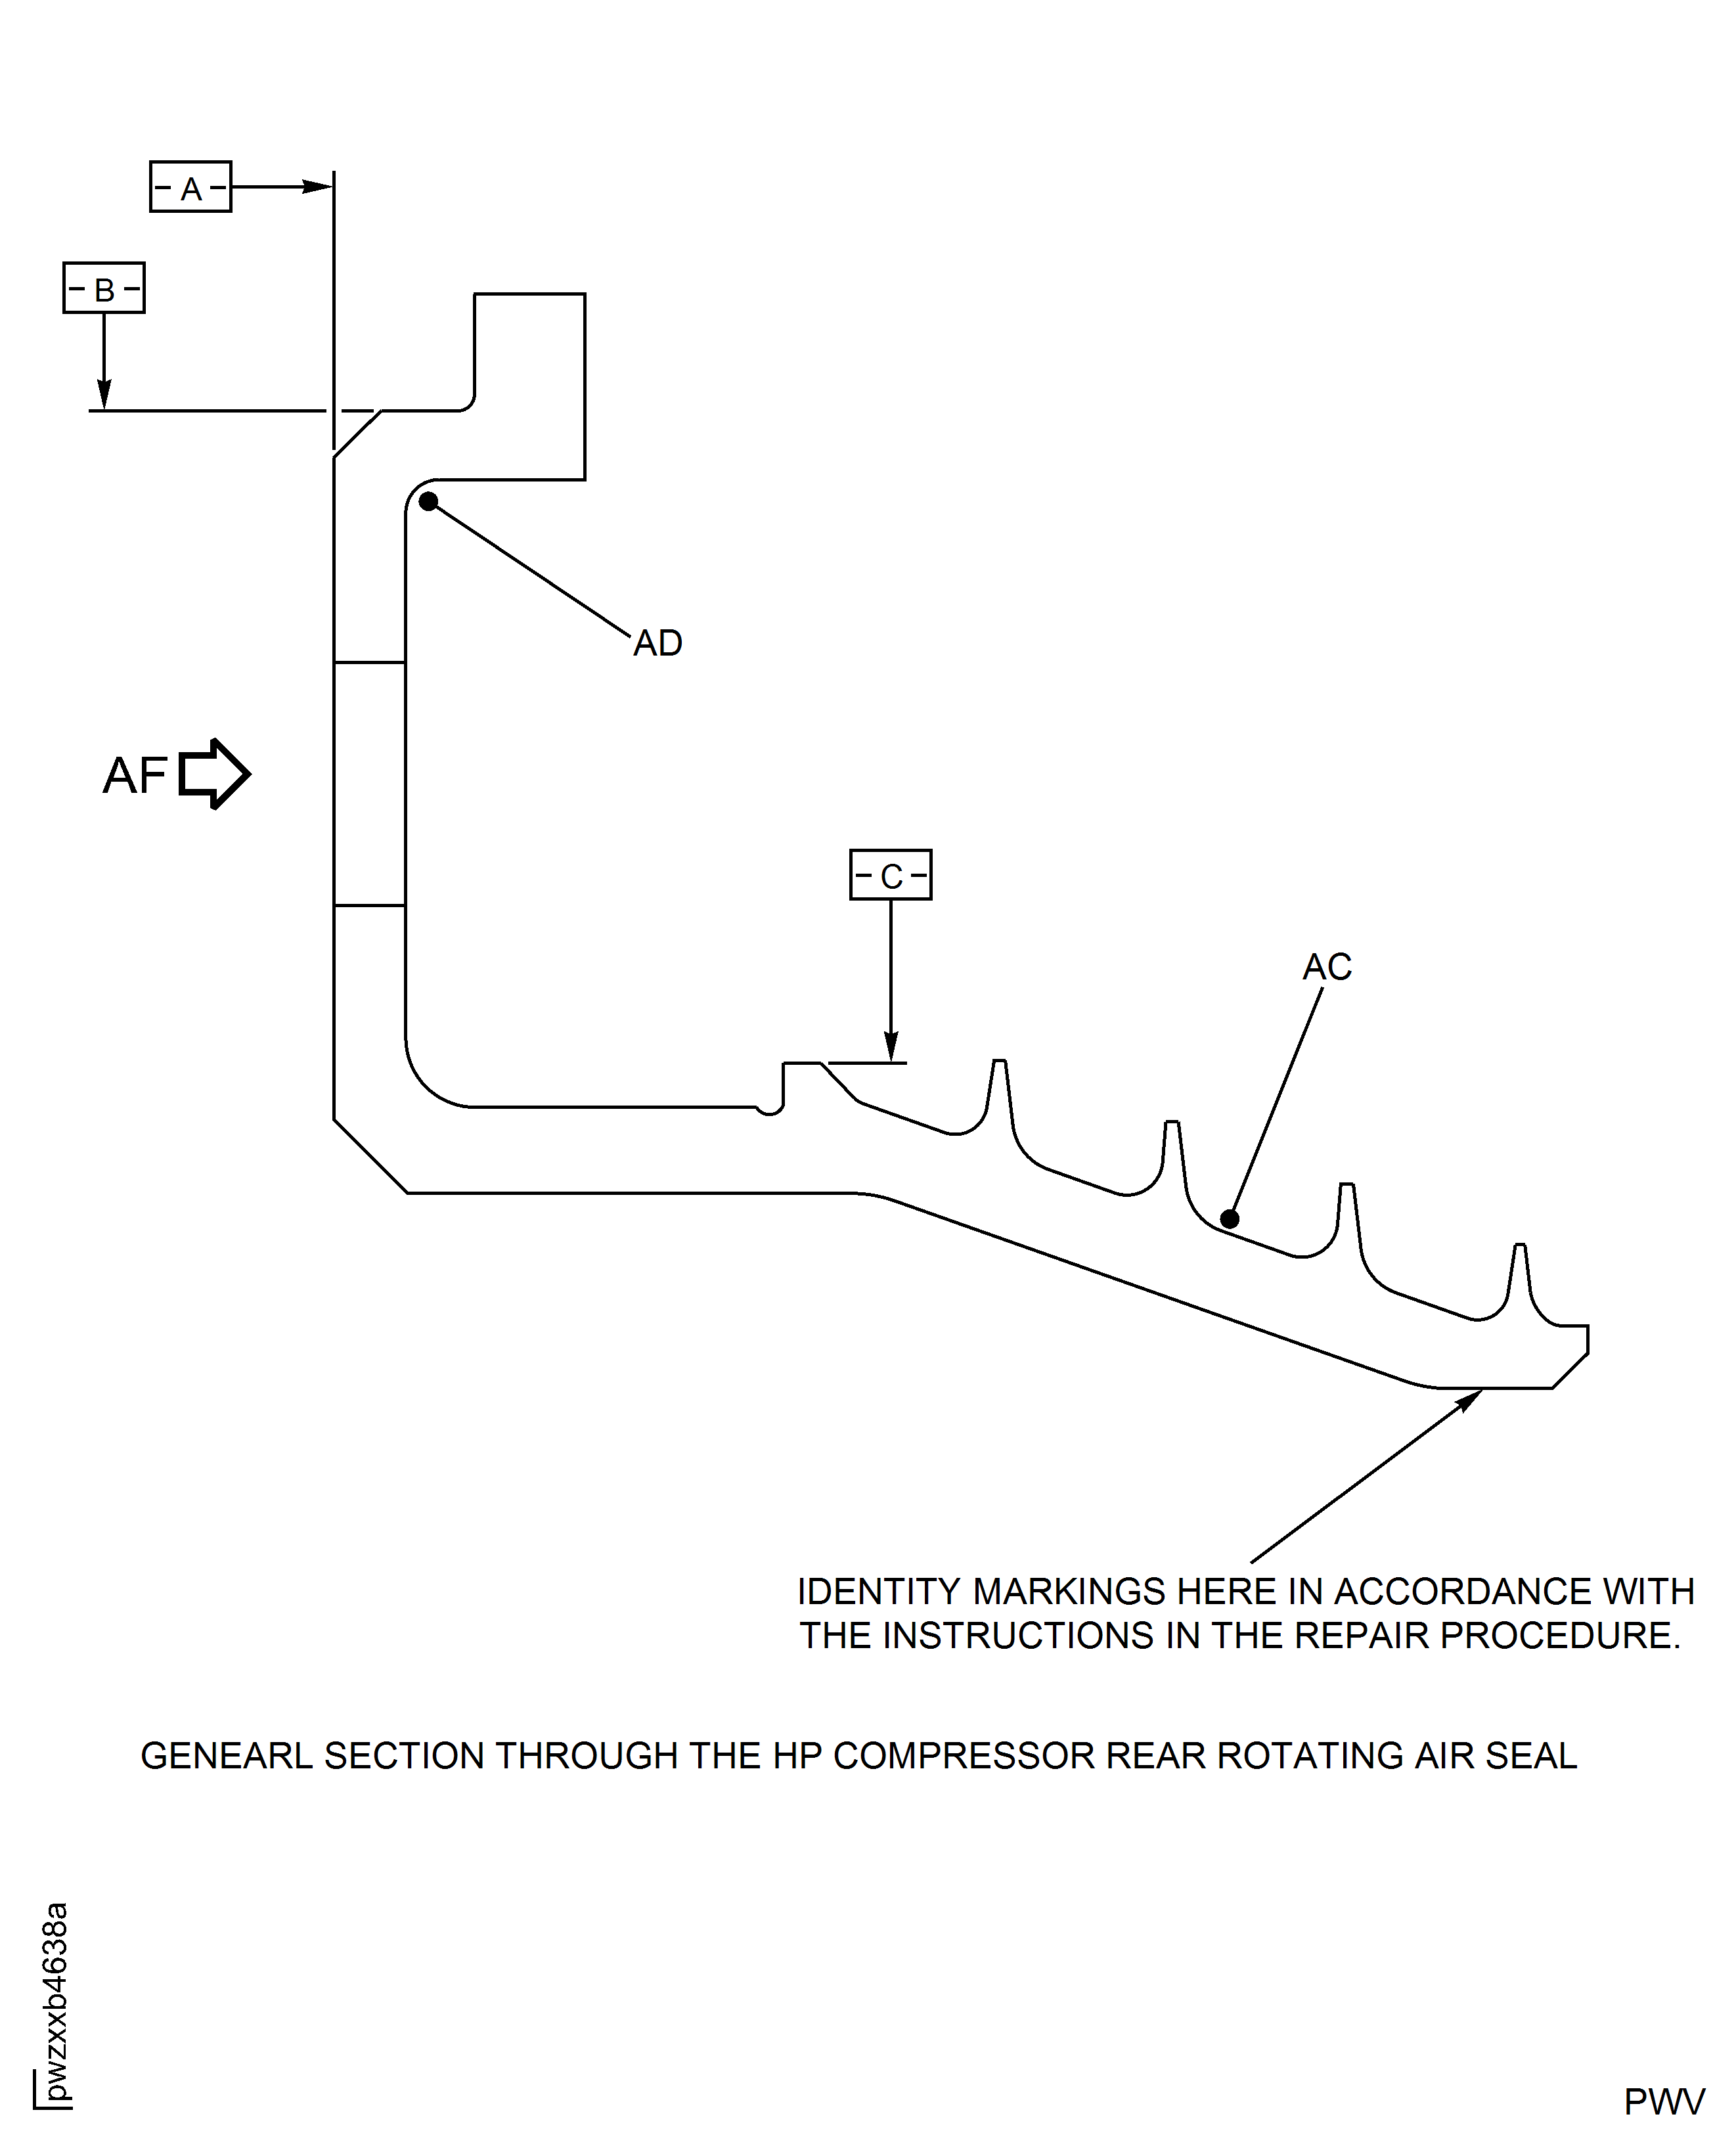
Figure: Repair Details and Dimensions - Assembly B and Assembly C
Repair Details and Dimensions - Assembly B and Assembly C
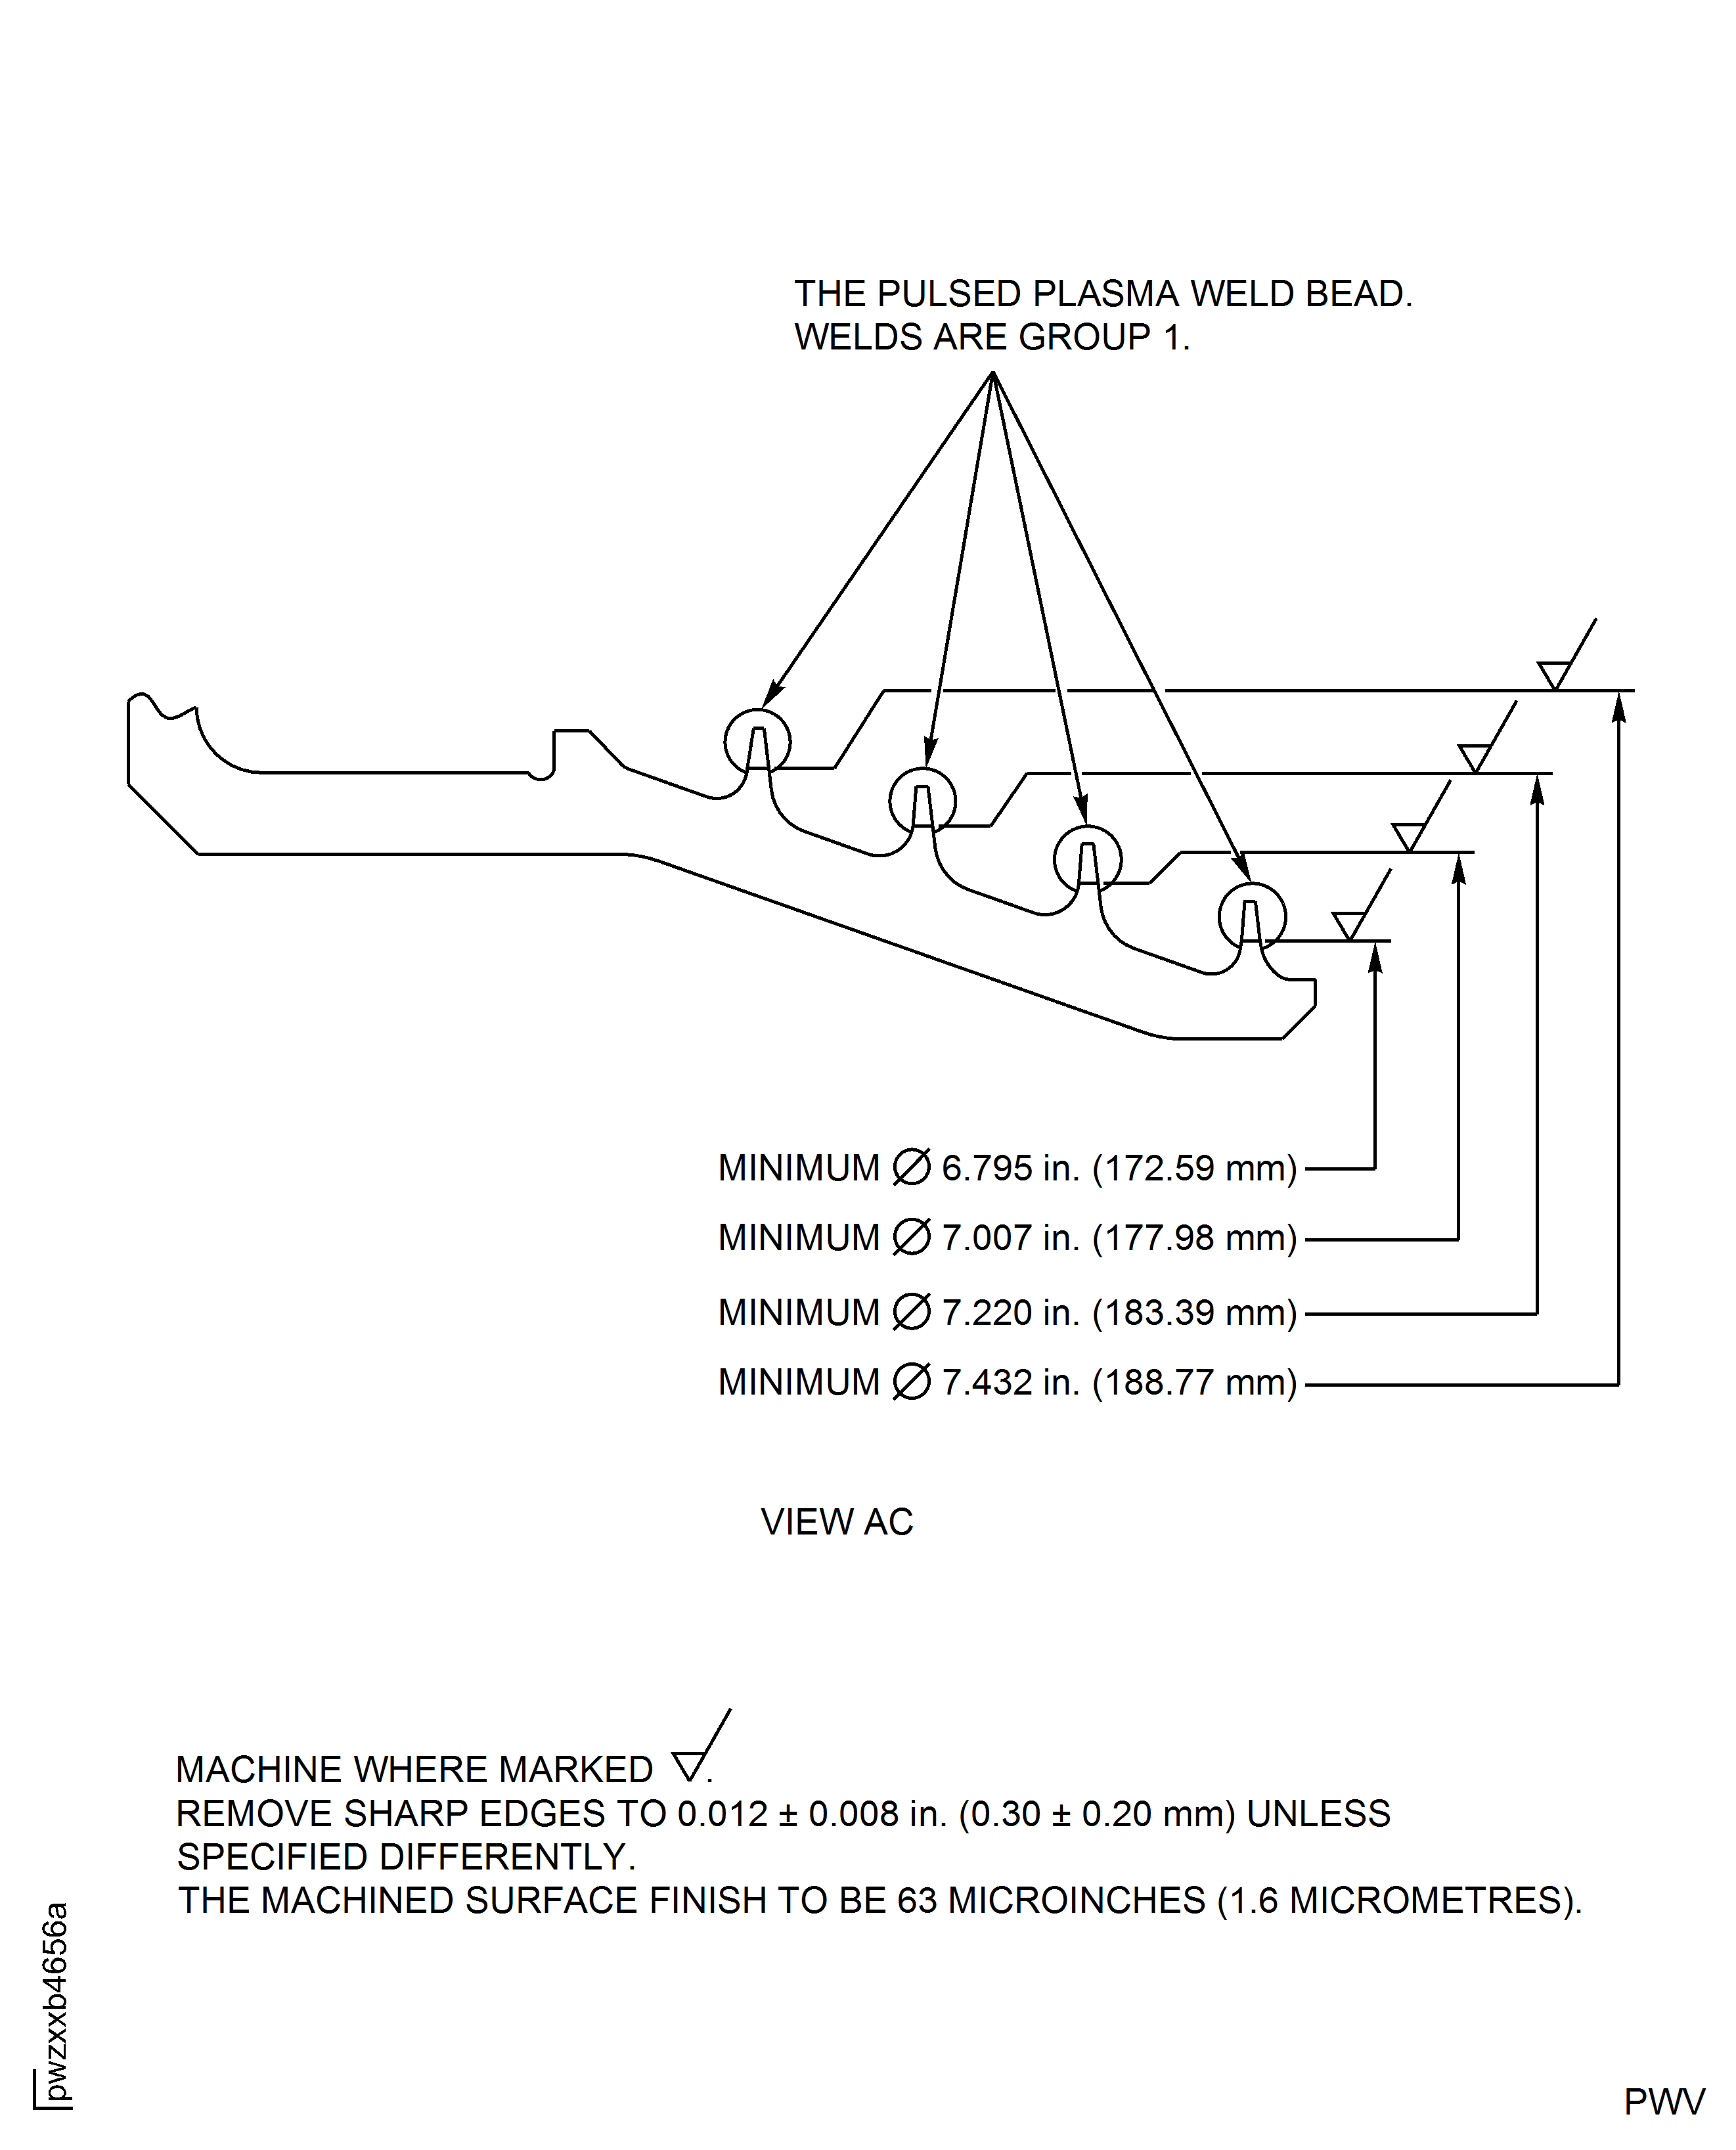
Figure: Repair Details and Dimensions - Assembly B
Repair Details and Dimensions - Assembly B
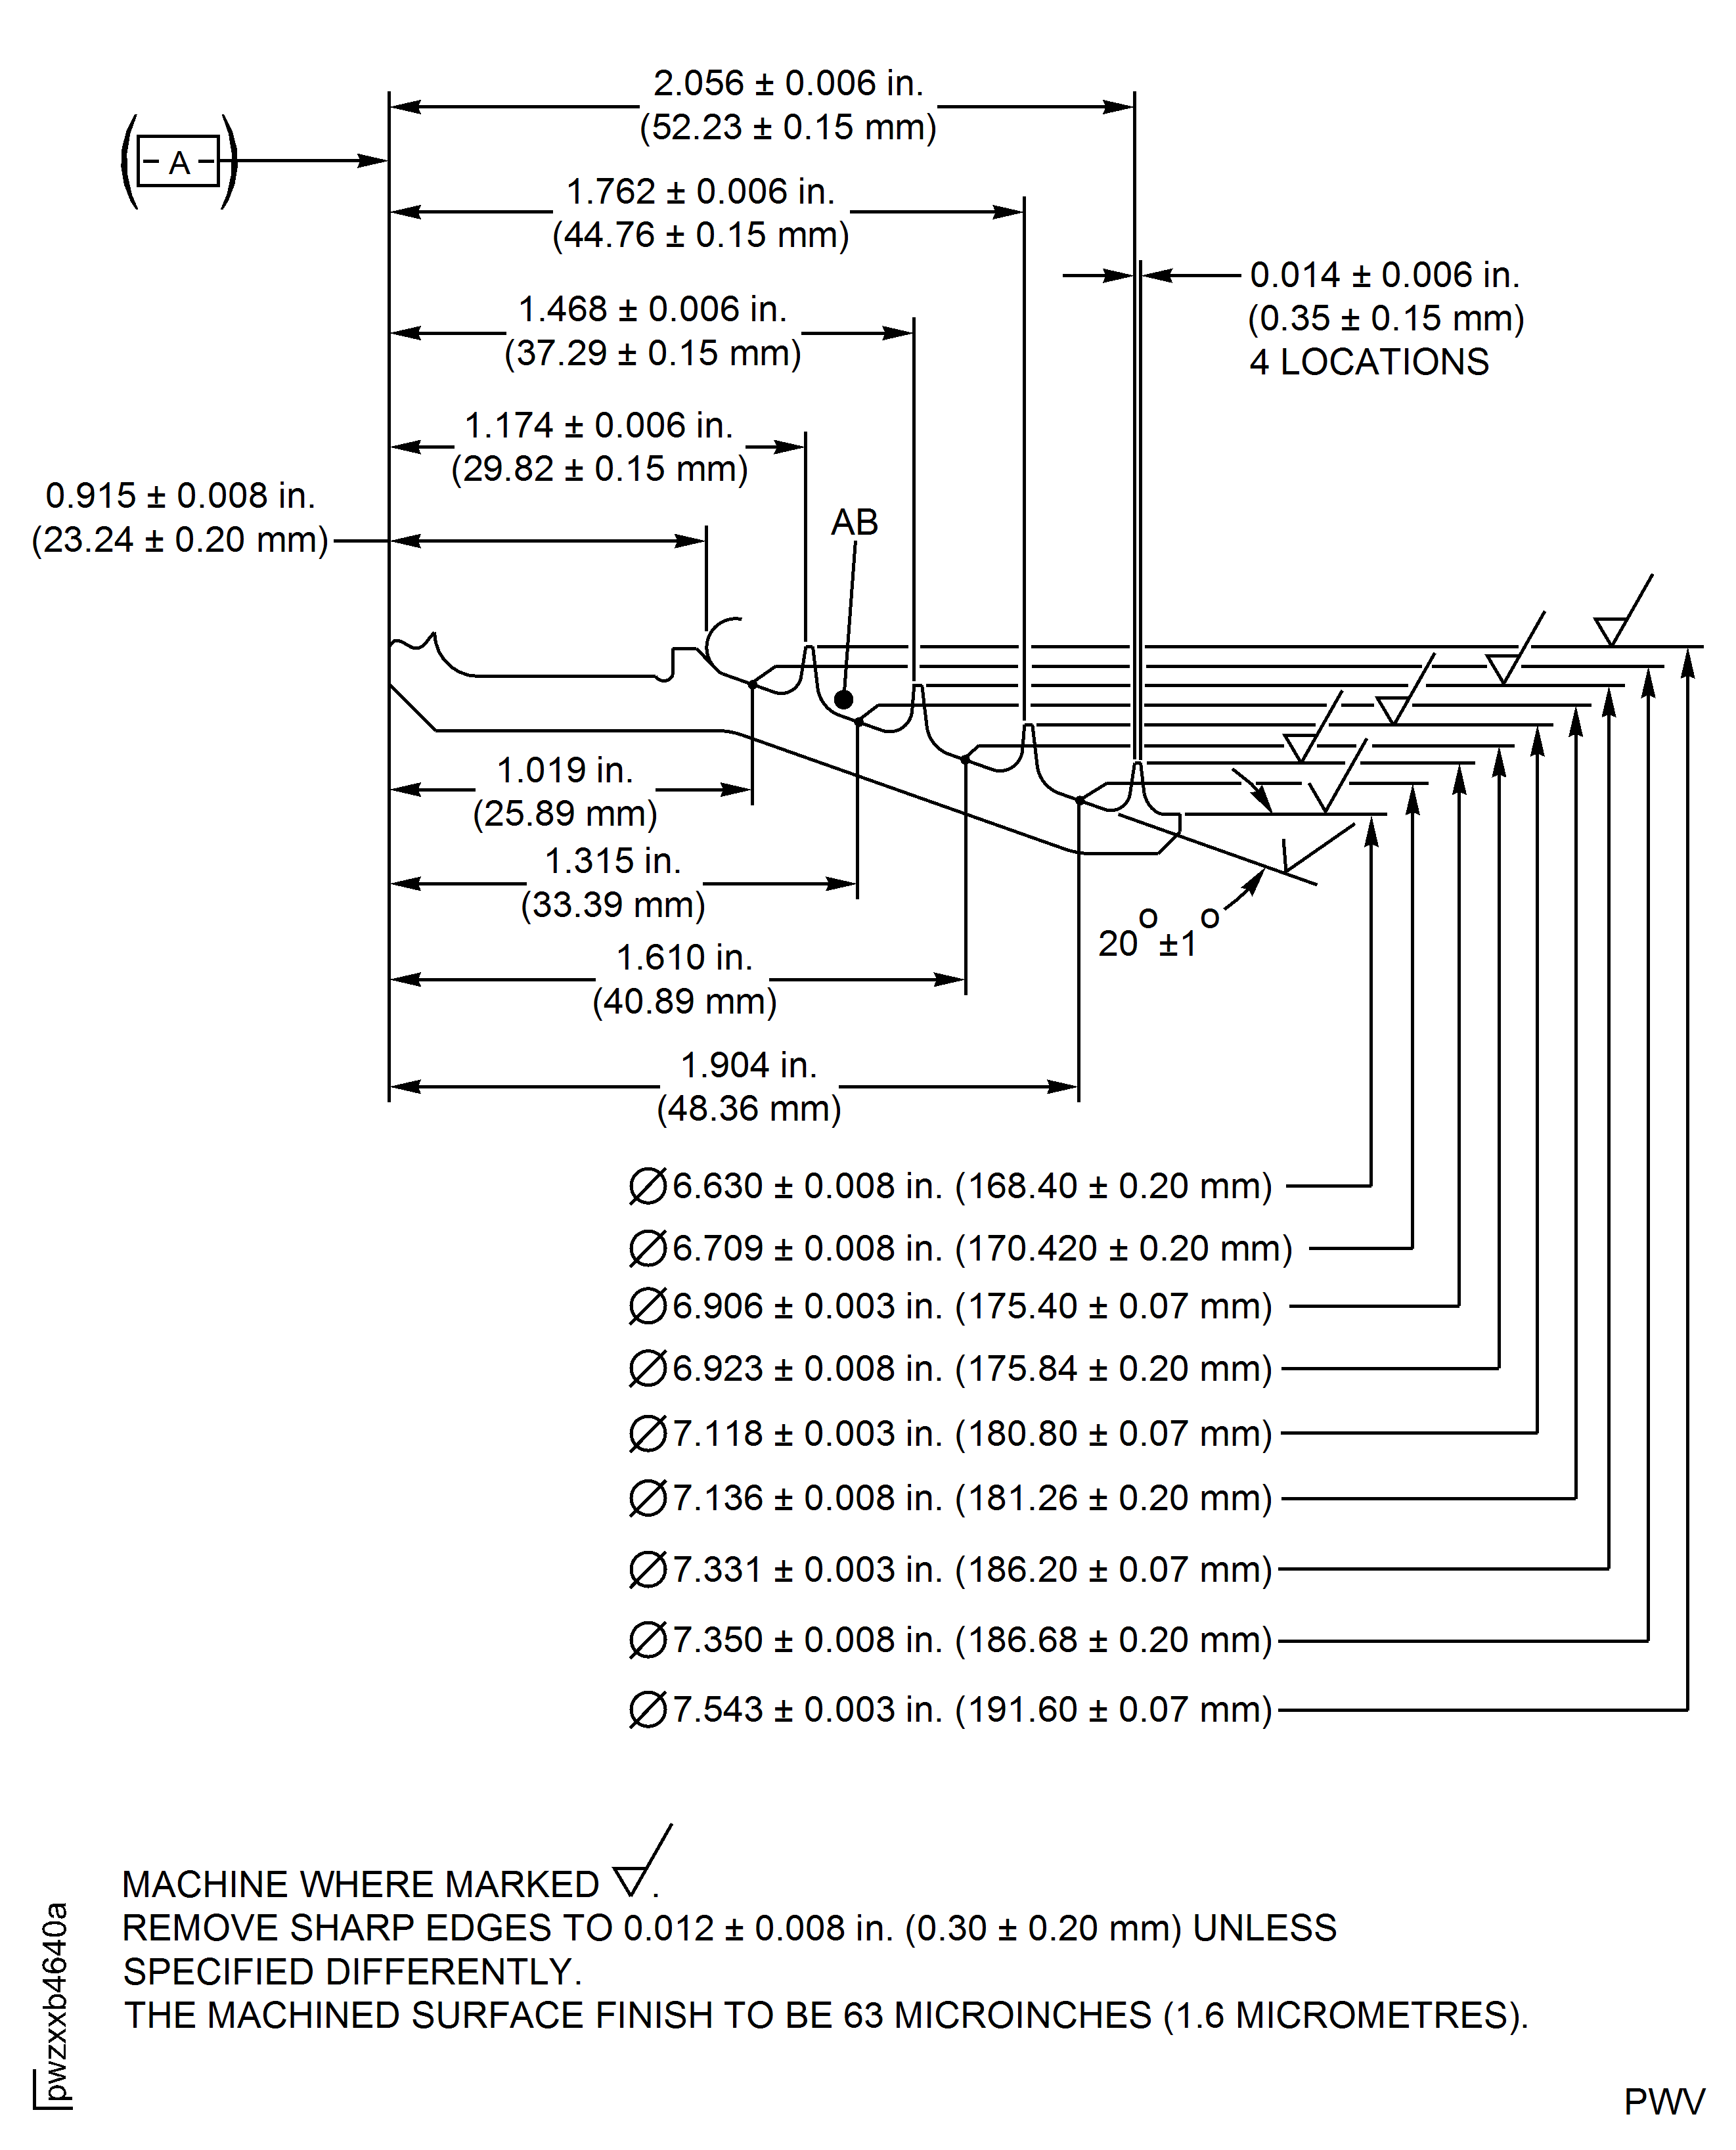
Figure: Repair Details and Dimensions - Assembly C
Repair Details and Dimensions - Assembly C
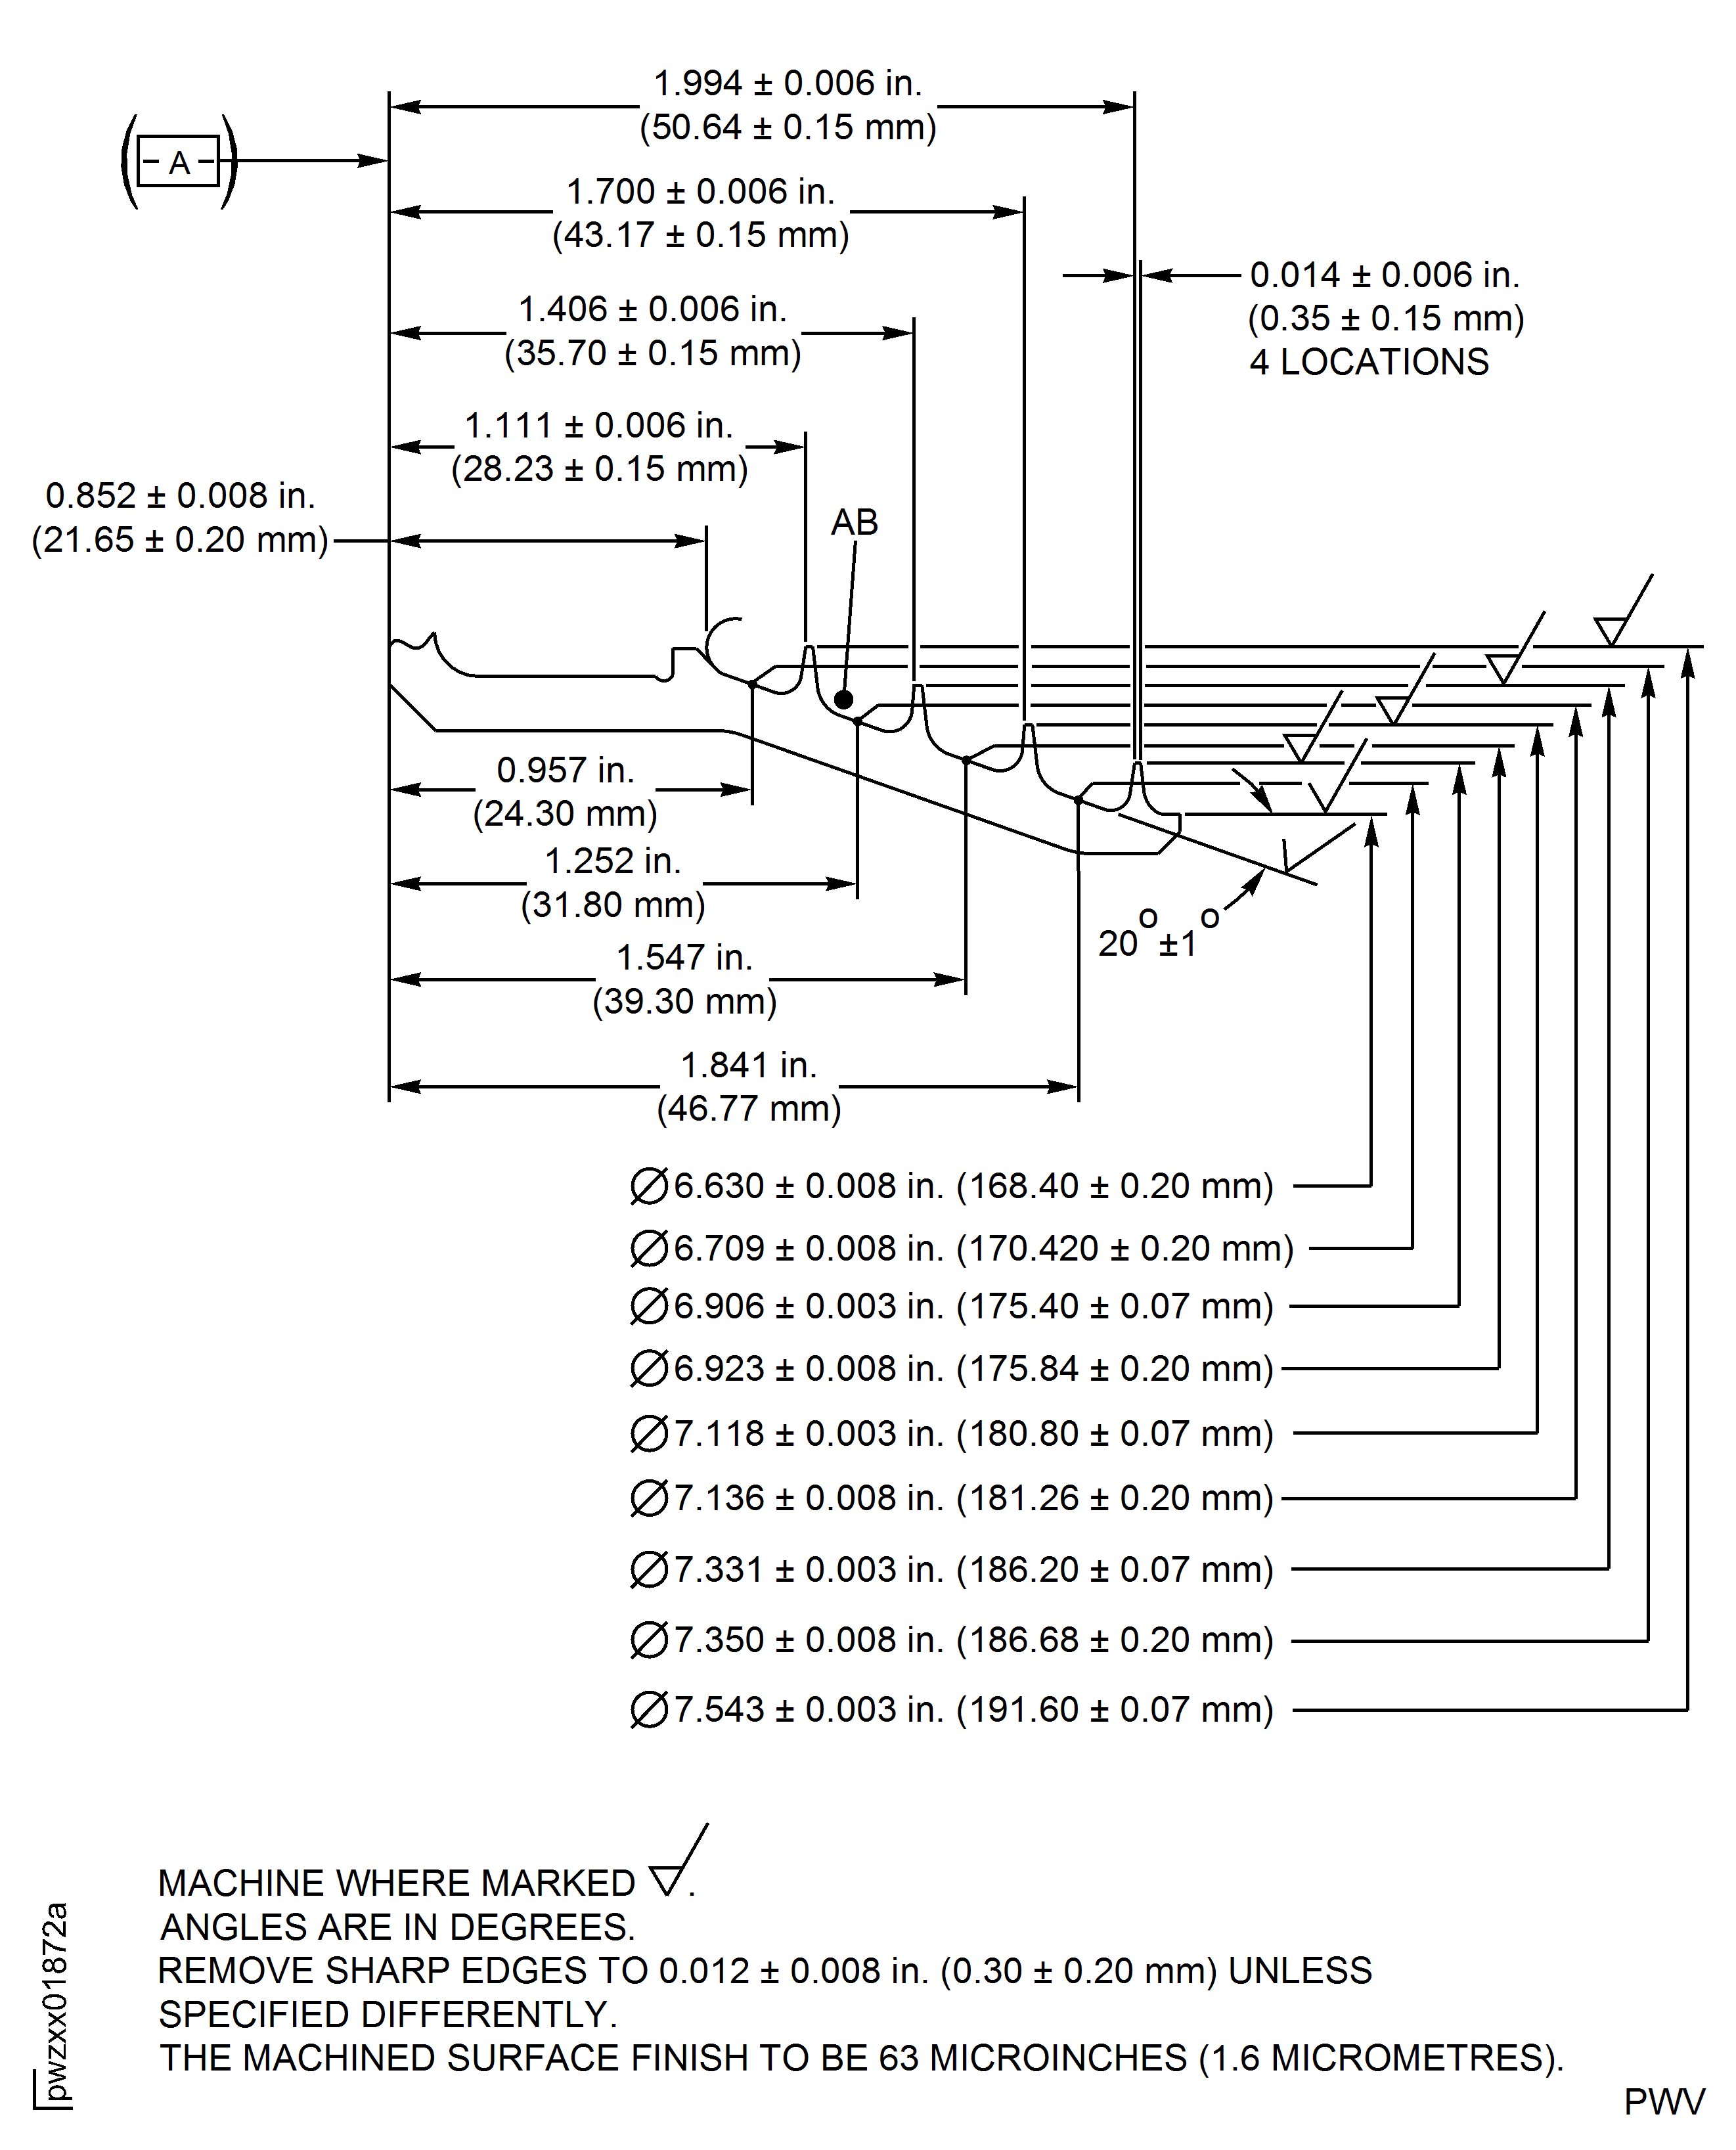
Figure: Repair Details and Dimensions - Assembly A, Assembly B and Assembly C
Repair Details and Dimensions - Assembly A, Assembly B and Assembly C
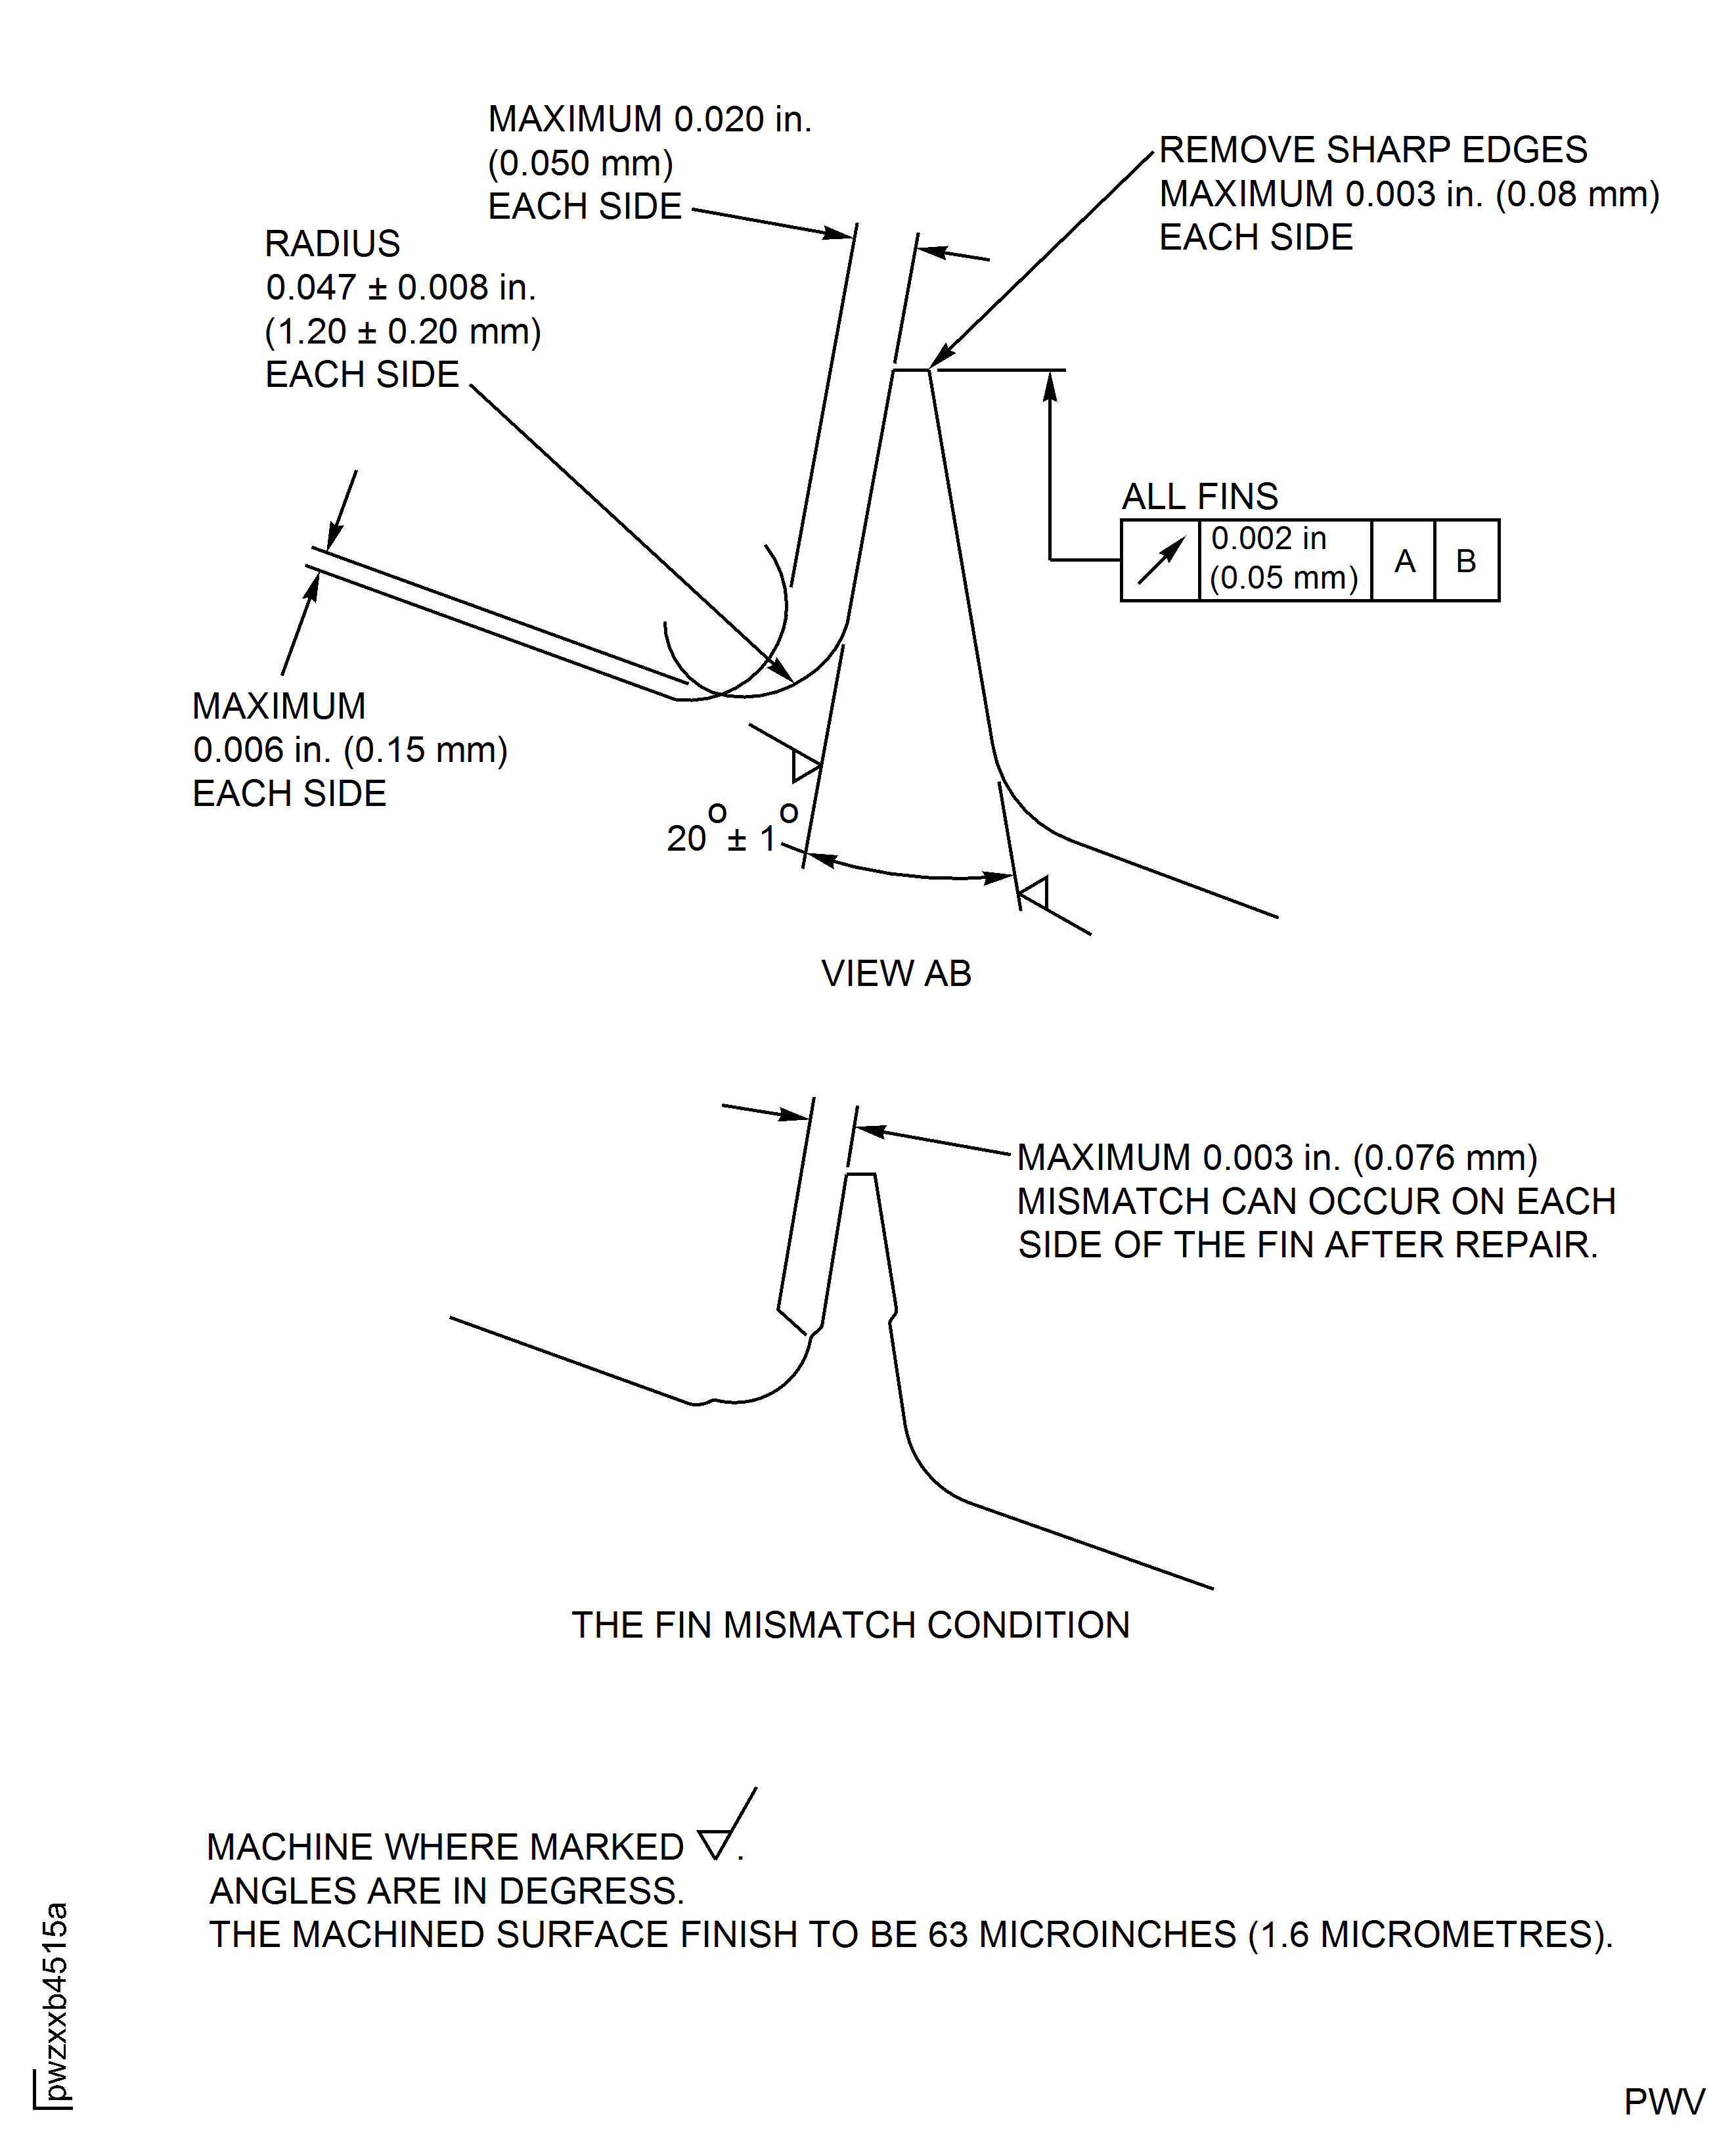
Figure: Rear Spigot Machining Mismatch - Assembly B and Assembly C
Rear Spigot Machining Mismatch - Assembly B and Assembly C
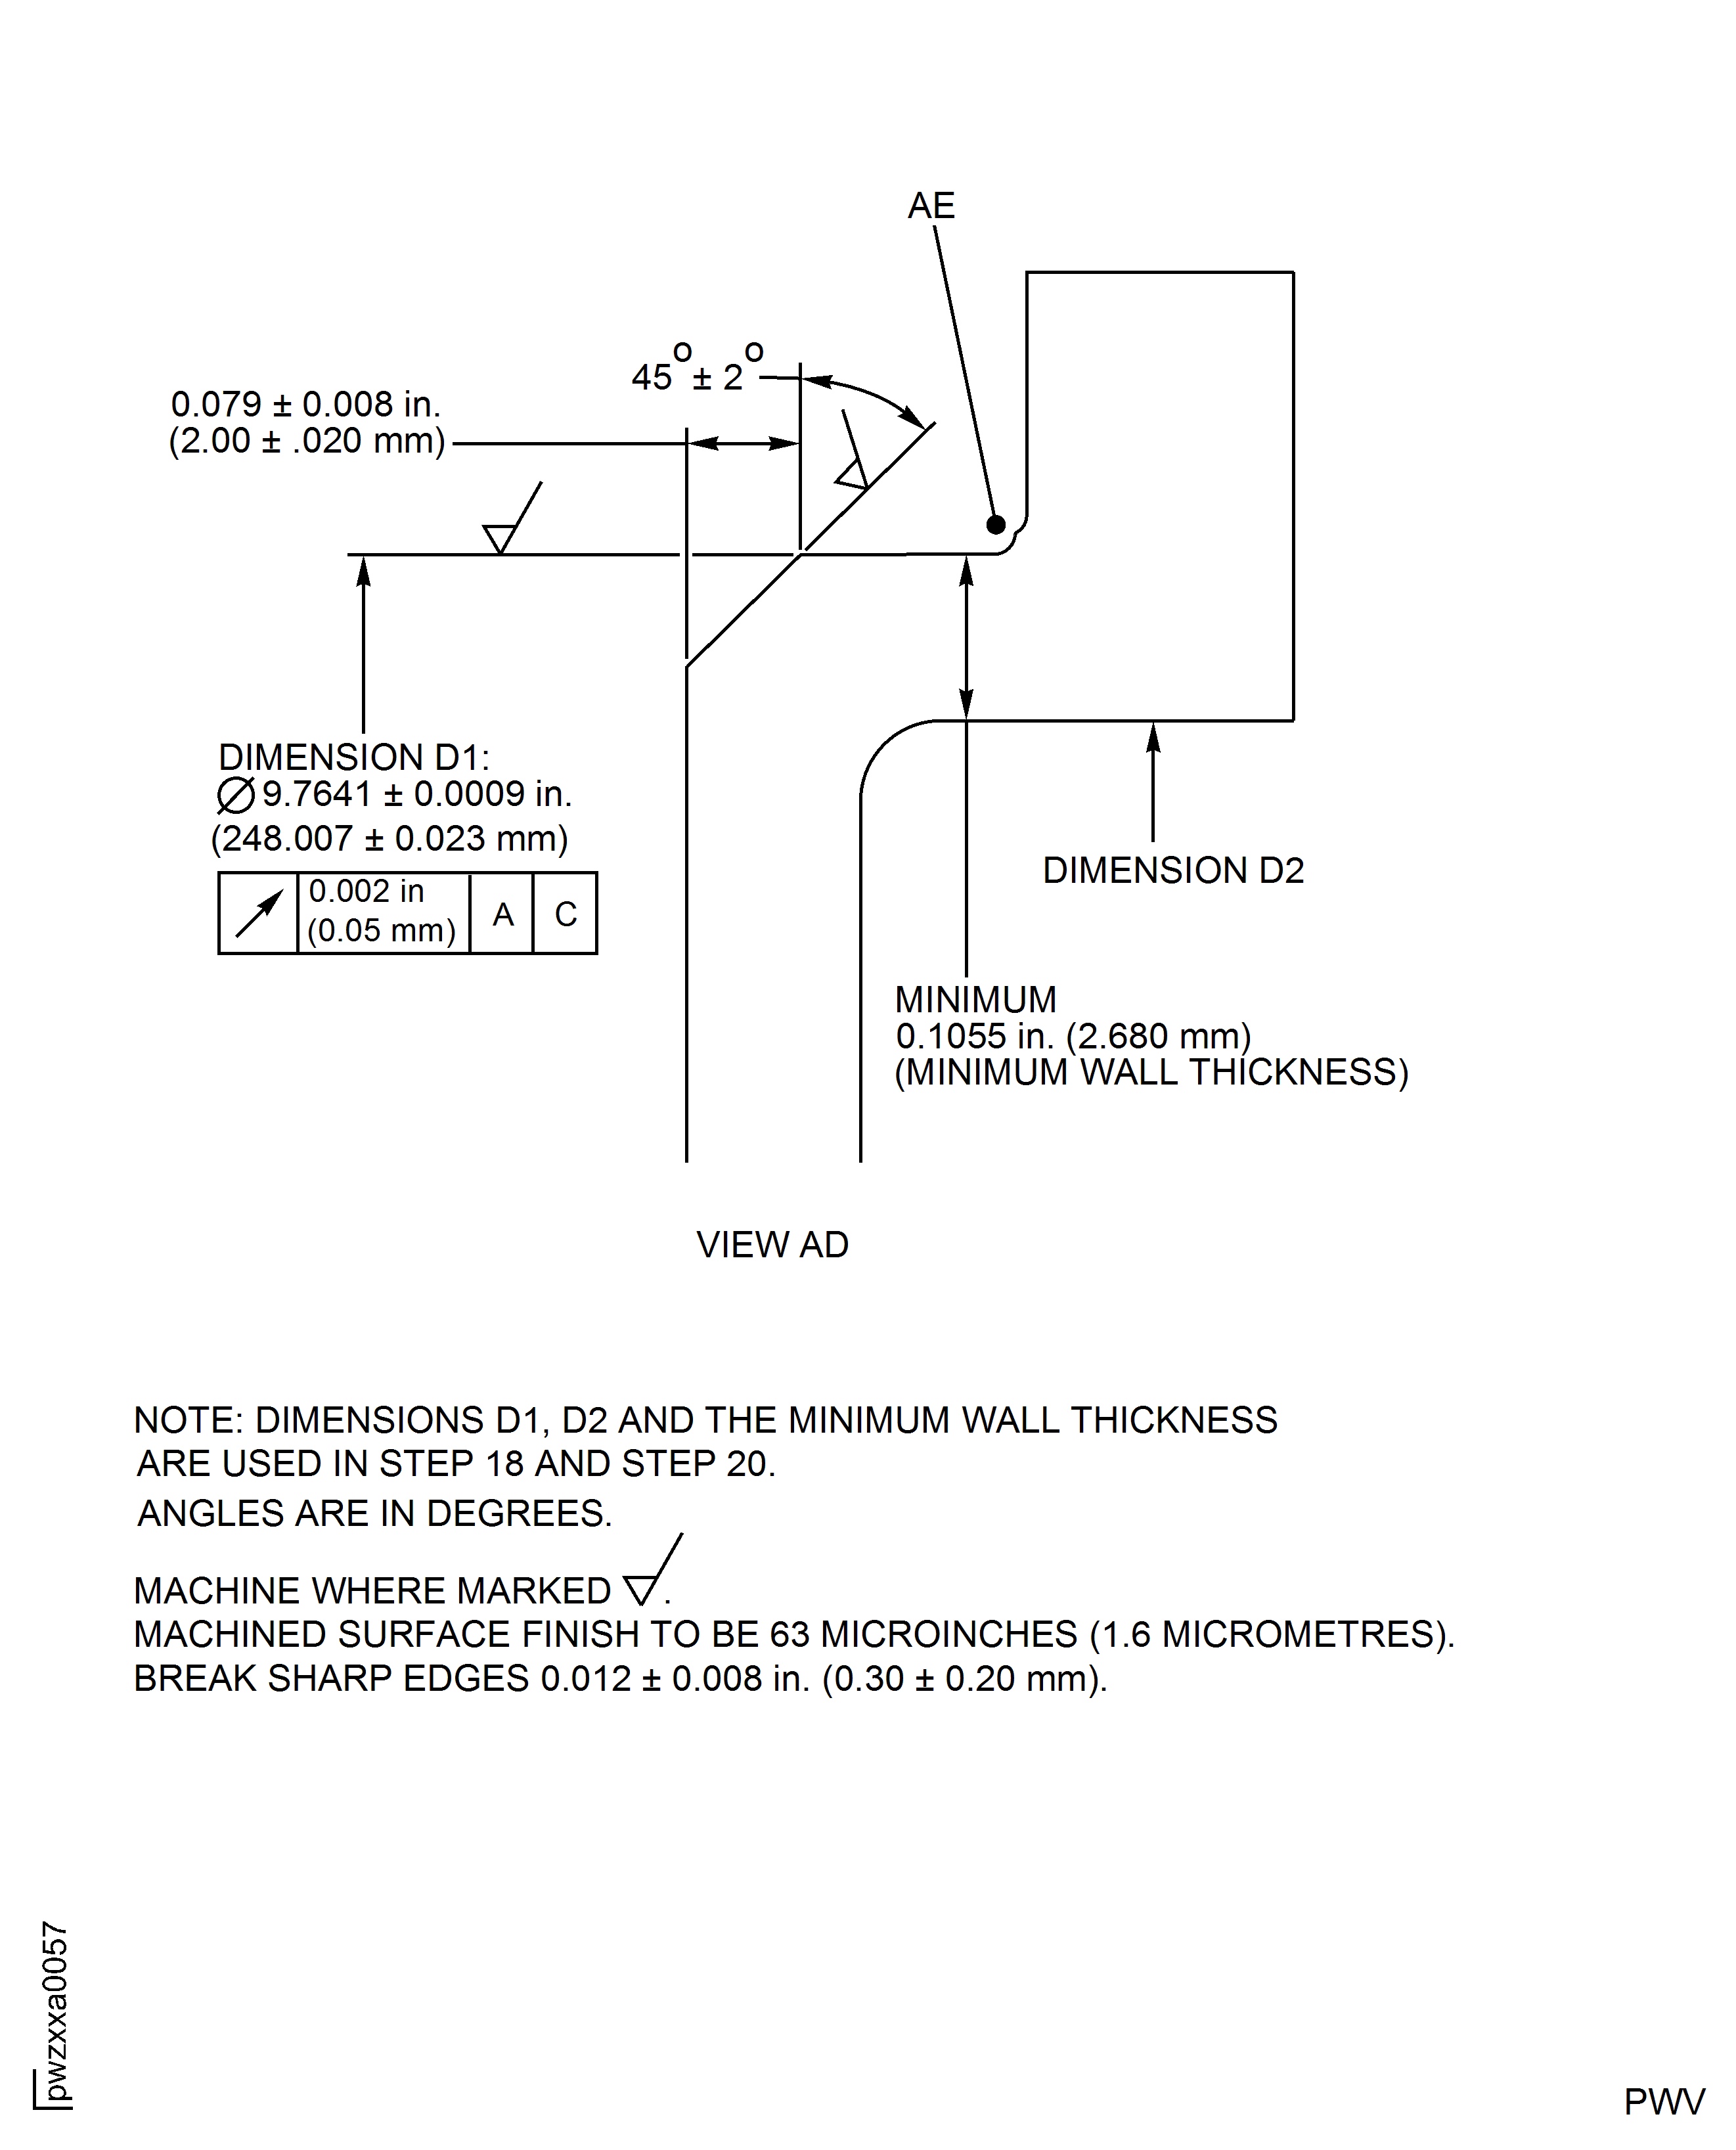
Figure: Rear Spigot Machining Mismatch - Assembly B and Assembly C
Rear Spigot Machining Mismatch - Assembly B and Assembly C
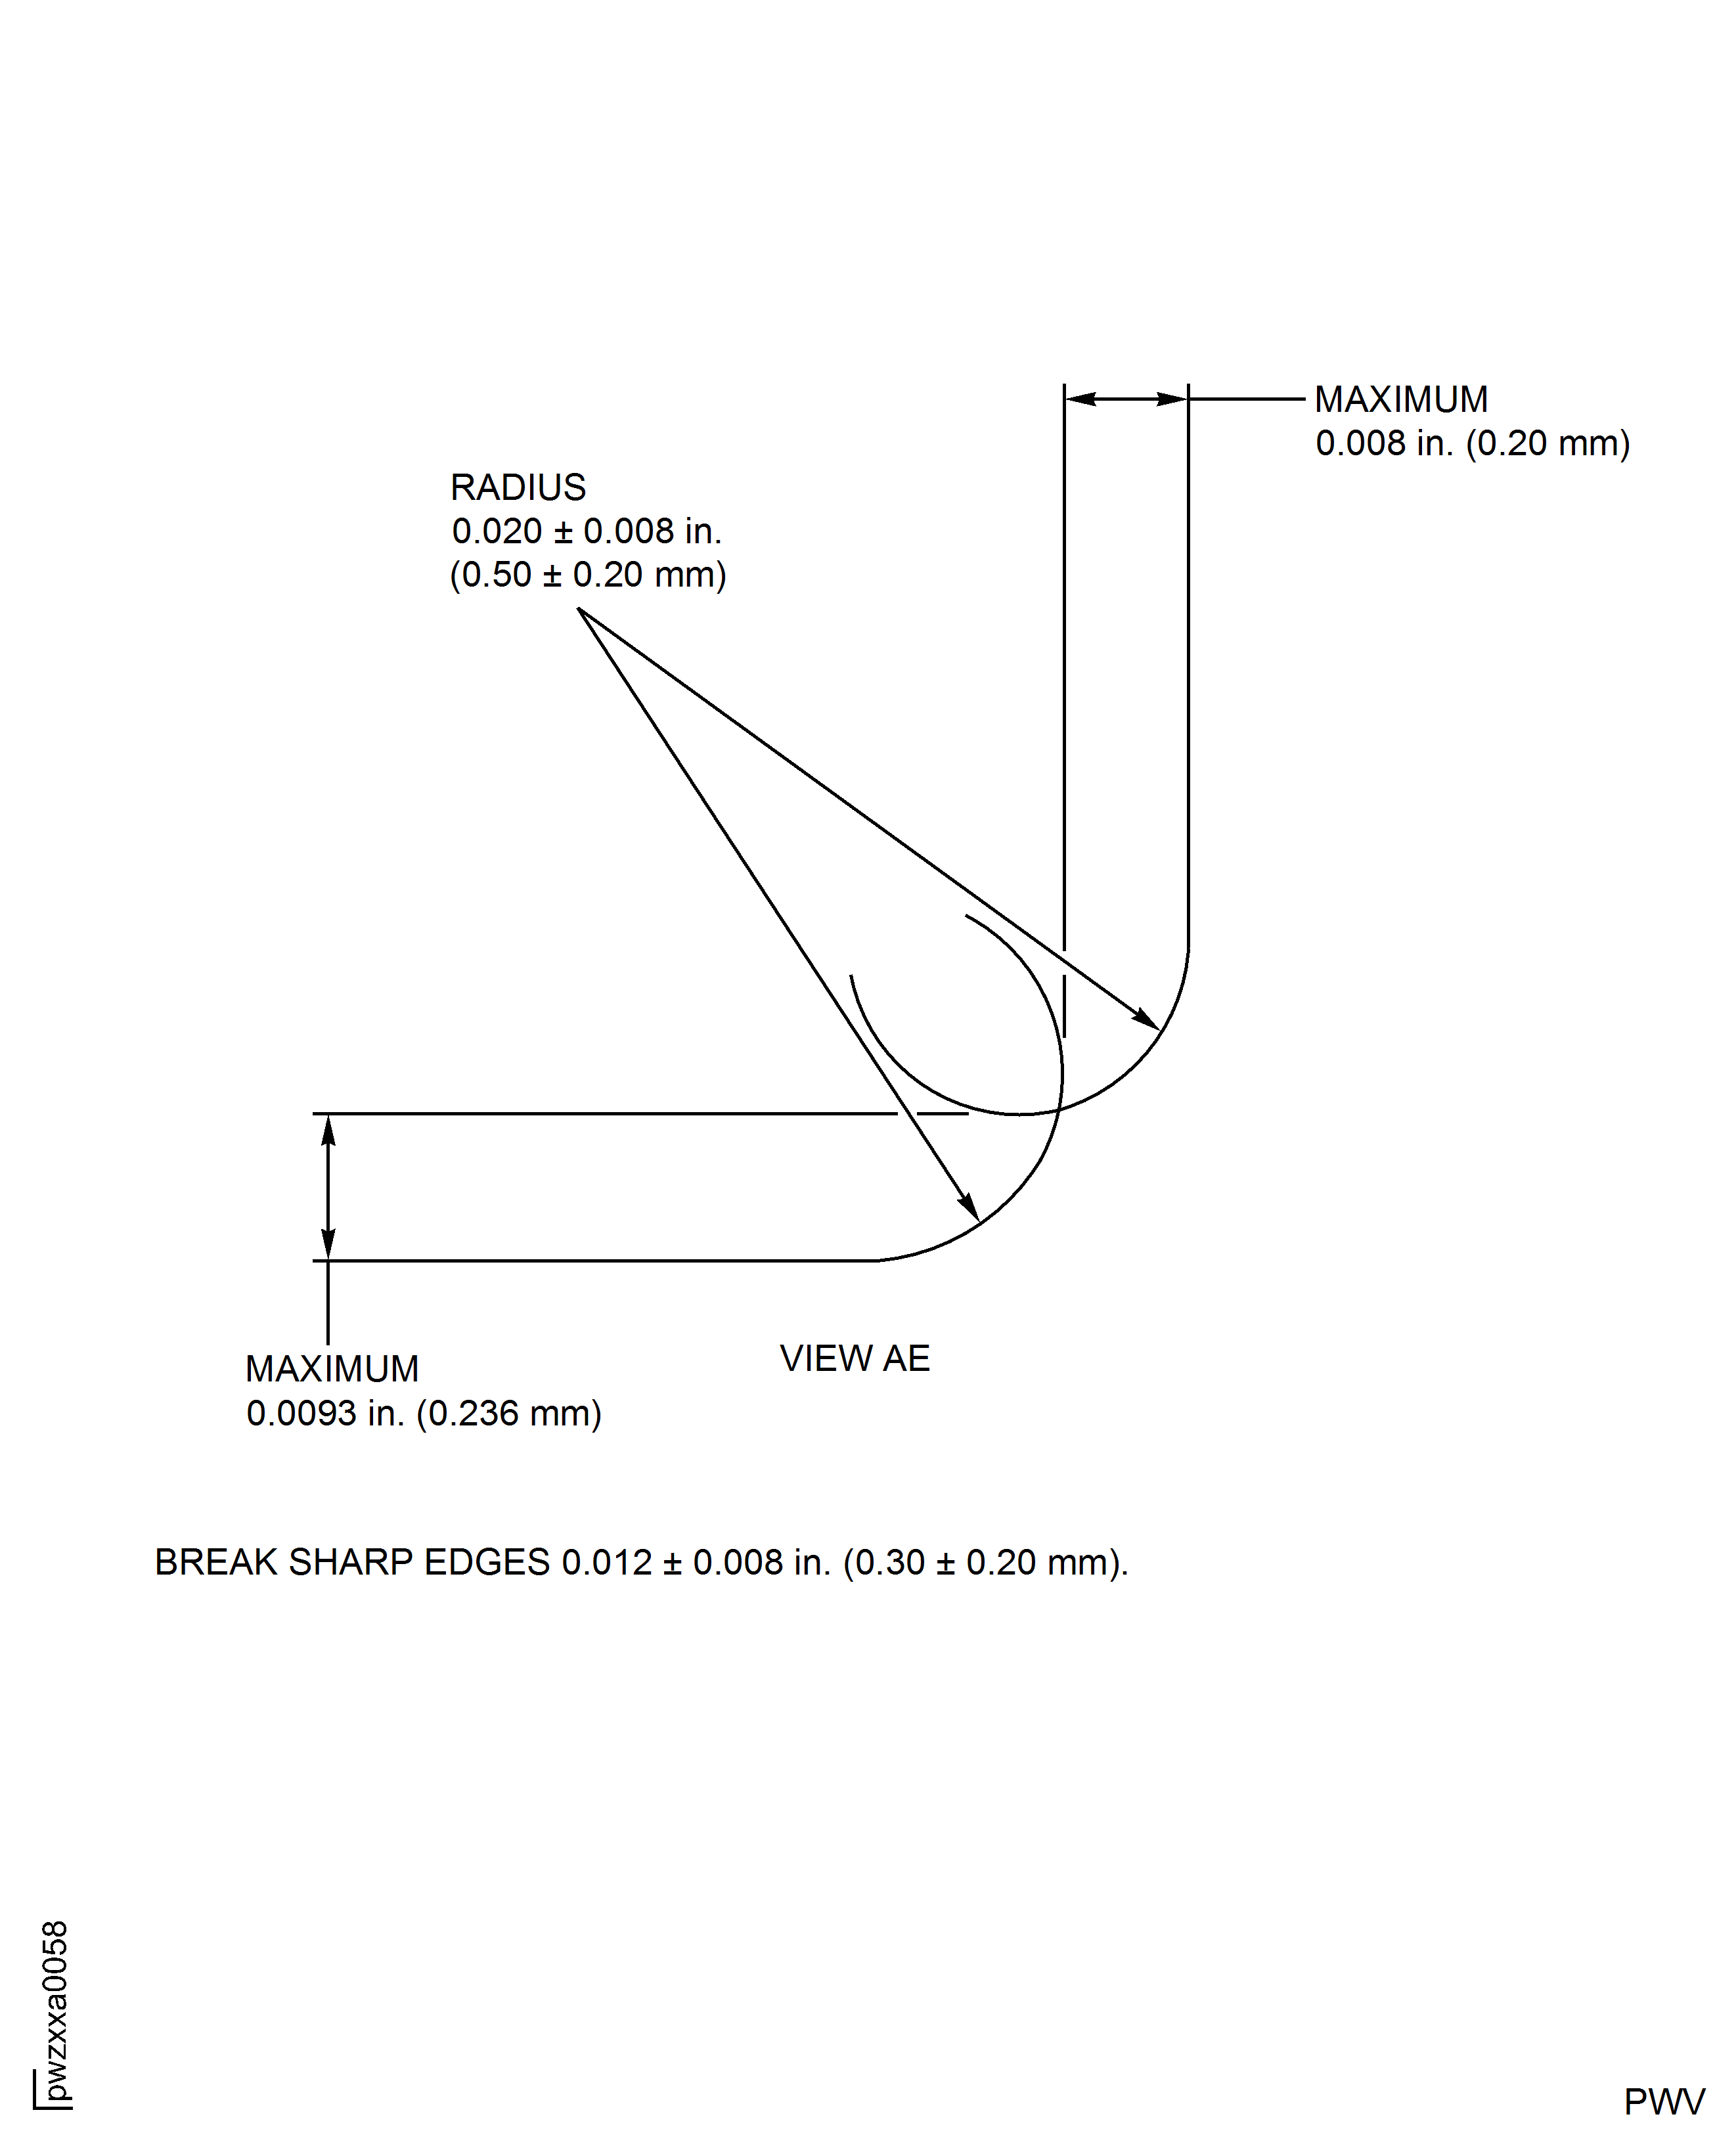
Figure: HP Compressor Rear Rotating Airseal Bolthole Locations - Assembly B and Assembly C
HP Compressor Rear Rotating Airseal Bolthole Locations - Assembly B and Assembly C
