Export Control
EAR Export Classification: Not subject to the EAR per 15 C.F.R. Chapter 1, Part 734.3(b)(3), except for the following Service Bulletins which are currently published as EAR Export Classification 9E991: SBE70-0992, SBE72-0483, SBE72-0580, SBE72-0588, SBE72-0640, SBE73-0209, SBE80-0024 and SBE80-0025.Copyright
© IAE International Aero Engines AG (2001, 2014 - 2021) The information contained in this document is the property of © IAE International Aero Engines AG and may not be copied or used for any purpose other than that for which it is supplied without the express written authority of © IAE International Aero Engines AG. (This does not preclude use by engine and aircraft operators for normal instructional, maintenance or overhaul purposes.).Applicability
All
Common Information
TASK 72-41-15-300-053 HPC Stage 3 Rotor Blade - Remove The Clapper Coating, Repair-053 (VRS6635)
Effectivity
FIG/ITEM | PART NO. | ASSEMBLY |
|---|---|---|
01-200 | 6A3513 | A |
01-200 | 6A3938 | A |
Deleted | Deleted | Deleted |
Deleted | Deleted | Deleted |
Deleted | Deleted | Deleted |
01-200 | 6A8353 | D |
Deleted | Deleted | Deleted |
01-200 | 6A8688 | E |
NOTE
General
This repair must only be done when the instructions to do so is given in 72-41-15, INSPECTION.
This Repair removes the tungsten carbide coating on the clapper abutment faces of the HP compressor stage 3 rotor blades. The tungsten carbide 15 percent cobalt metal spray coating is applied by flame detonation deposition process or high velocity oxy-fuel deposition process.
The practices and processes are referred to in the procedure by the TASK/SUBTASK numbers in the SPM.
Price and Availability
Refer to International Aero Engines
Related Repairs
HP Compressor Rotor Blade - Stage 3 - Repair Damaged or Worn Clapper Abutment Face by Weld, refer to Repair, VRS6616 TASK 72-41-15-300-052 (REPAIR-052).
HP Compressor Stage 3 Rotor Blade - Replace Clapper Coating, refer to Repair, VRS6236 TASK 72-41-15-300-035 (REPAIR-035) or Repair, VRS9297 TASK 72-41-15-300-058 (REPAIR-058).
NOTE
NOTE
Preliminary Requirements
Pre-Conditions
| Action/Condition | Data Module/Technical Publication |
|---|---|
| Make sure that all the necessary cleaning and inspection procedures are done before this repair. |
Support Equipment
| Name | Manufacturer | Part Number / Identification | Quantity | Remark |
|---|---|---|---|---|
| Degreasing equipment | LOCAL | Degreasing equipment | ||
| Rochelle carbonate tank | LOCAL | Rochelle carbonate tank | ||
| Penetrant Crack Test Equipment | LOCAL | Penetrant crack test equipment | ||
| Abrasive Blast Equipment | LOCAL | Abrasive Blast Equipment | ||
| IAE 3R19363 Inspection fixture | 0AM53 | IAE 3R19363 | 1 | |
| IAE 3R19366 Inspection Block | 0AM53 | IAE 3R19366 | 1 | |
| IAE 3R19367 Inspection block | 0AM53 | IAE 3R19367 | 1 | |
| IAE 3R19372 Stop block | 0AM53 | IAE 3R19372 | 2 | |
| IAE 3R19777 Inspection kit | 0AM53 | IAE 3R19777 | 1 | |
| IAE 3R19815 Clapper width checking fixture | 0AM53 | IAE 3R19815 | 1 | |
| IAE 3R19816 Inspection jaws | 0AM53 | IAE 3R19816 | 1 | |
| IAE 3R19817 Master blade | 0AM53 | IAE 3R19817 | 1 |
Consumables, Materials and Expendables
| Name | Manufacturer | Part Number / Identification | Quantity | Remark |
|---|---|---|---|---|
| CoMat 02-017 WAX | LOCAL | CoMat 02-017 | ||
| CoMat 05-003 ABRASIVE MEDIUM ALUMINUM OXIDE, 120/220 GRADE | X222X | CoMat 05-003 |
Spares
NONESafety Requirements
NONEProcedure
Refer to the SPM TASK 70-11-03-300-503.
Use degreasing equipment.
Remove the grease.
SUBTASK 72-41-15-110-153 Clean the Blade
Refer to Figure.
Use CoMat 02-017 WAX.
Put the blade fully into hot wax.
SUBTASK 72-41-15-330-056 Mask the Blade
Refer to Figure.
Refer to the SPM TASK 70-33-59-300-503, SUBTASK 70-33-59-300-006.
Hang the blade from the tip with a clamp to make electrical contact.
Use rochelle carbonate tank.
Remove hard facings by anodically etching the blade.
SUBTASK 72-41-15-330-057 Remove Hard Facings
Refer to the SPM TASK 70-23-04-230-501.
Cracks are not permitted.
Use penetrant crack test equipment.
Do a penetrant crack test on clapper abutment faces.
SUBTASK 72-41-15-230-121 Do a Crack Test
Refer to the SPM TASK 70-12-02-120-501.
Use CoMat 05-003 ABRASIVE MEDIUM ALUMINUM OXIDE, 120/220 GRADE with abrasive blast equipment.
Lightly abrasive blast struts and airfoil to remove staining.
SUBTASK 72-41-15-120-071 Abrasive Blast
Use IAE 3R19777 Inspection kit 1 off, with IAE 3R19363 Inspection fixture 1 off, IAE 3R19366 Inspection Block 1 off, IAE 3R19367 Inspection block 1 off and IAE 3R19372 Stop block 2 off.
Measure the dimensions of the clapper abutment faces in relation to the blade.
Do Repair, VRS6616 TASK 72-41-15-300-052 (REPAIR-052).
Blades that are not to the limits in A.
Do Repair, VRS6236 TASK 72-41-15-300-035 (REPAIR 035) or Repair, VRS9297 TASK 72-41-15-300-058 (REPAIR-058).
Blades that are to the limits in A.
SUBTASK 72-41-15-220-406-A00 Examine the Repair, Assembly A
Use IAE 3R19815 Clapper width checking fixture 1 off, IAE 3R19816 Inspection jaws 1 off, and IAE 3R19817 Master blade 1 off.
Measure the dimensions of the clapper abutment faces in relation to the blade.
Do Repair, VRS6616 TASK 72-41-15-300-052 (REPAIR-052).
Blades that are not to the limits in A.
Do Repair, VRS6236 TASK 72-41-15-300-035 (REPAIR-035) or Repair, VRS9297 TASK 72-41-15-300-058 (REPAIR-058).
Blades that are to the limits in A.
SUBTASK 72-41-15-220-406-B00 Examine the Repair, Assembly D and Assembly E
Refer to the SPM TASK 70-11-03-300-503.
Use degreasing equipment.
Remove the grease.
SUBTASK 72-41-15-110-156 Clean the Blade
Refer to Repair, VRS6616 TASK 72-41-15-300-052 (REPAIR-052).
Repair damaged or worn clapper abutment faces by weld, as necessary.
SUBTASK 72-41-15-310-062 Repair Damaged or Worn Clapper Abutment Faces by Weld
Refer to Repair, VRS6236 TASK 72-41-15-300-035 (REPAIR-035) or Repair, VRS9297 TASK 72-41-15-300-058 (REPAIR-058).
Replace the clapper coating.
SUBTASK 72-41-15-340-058 Replace the Clapper Coating
Figure: Repair Details And Dimensions - Assembly A, Assembly D And Assembly E
Repair Details And Dimensions - Assembly A, Assembly D And Assembly E
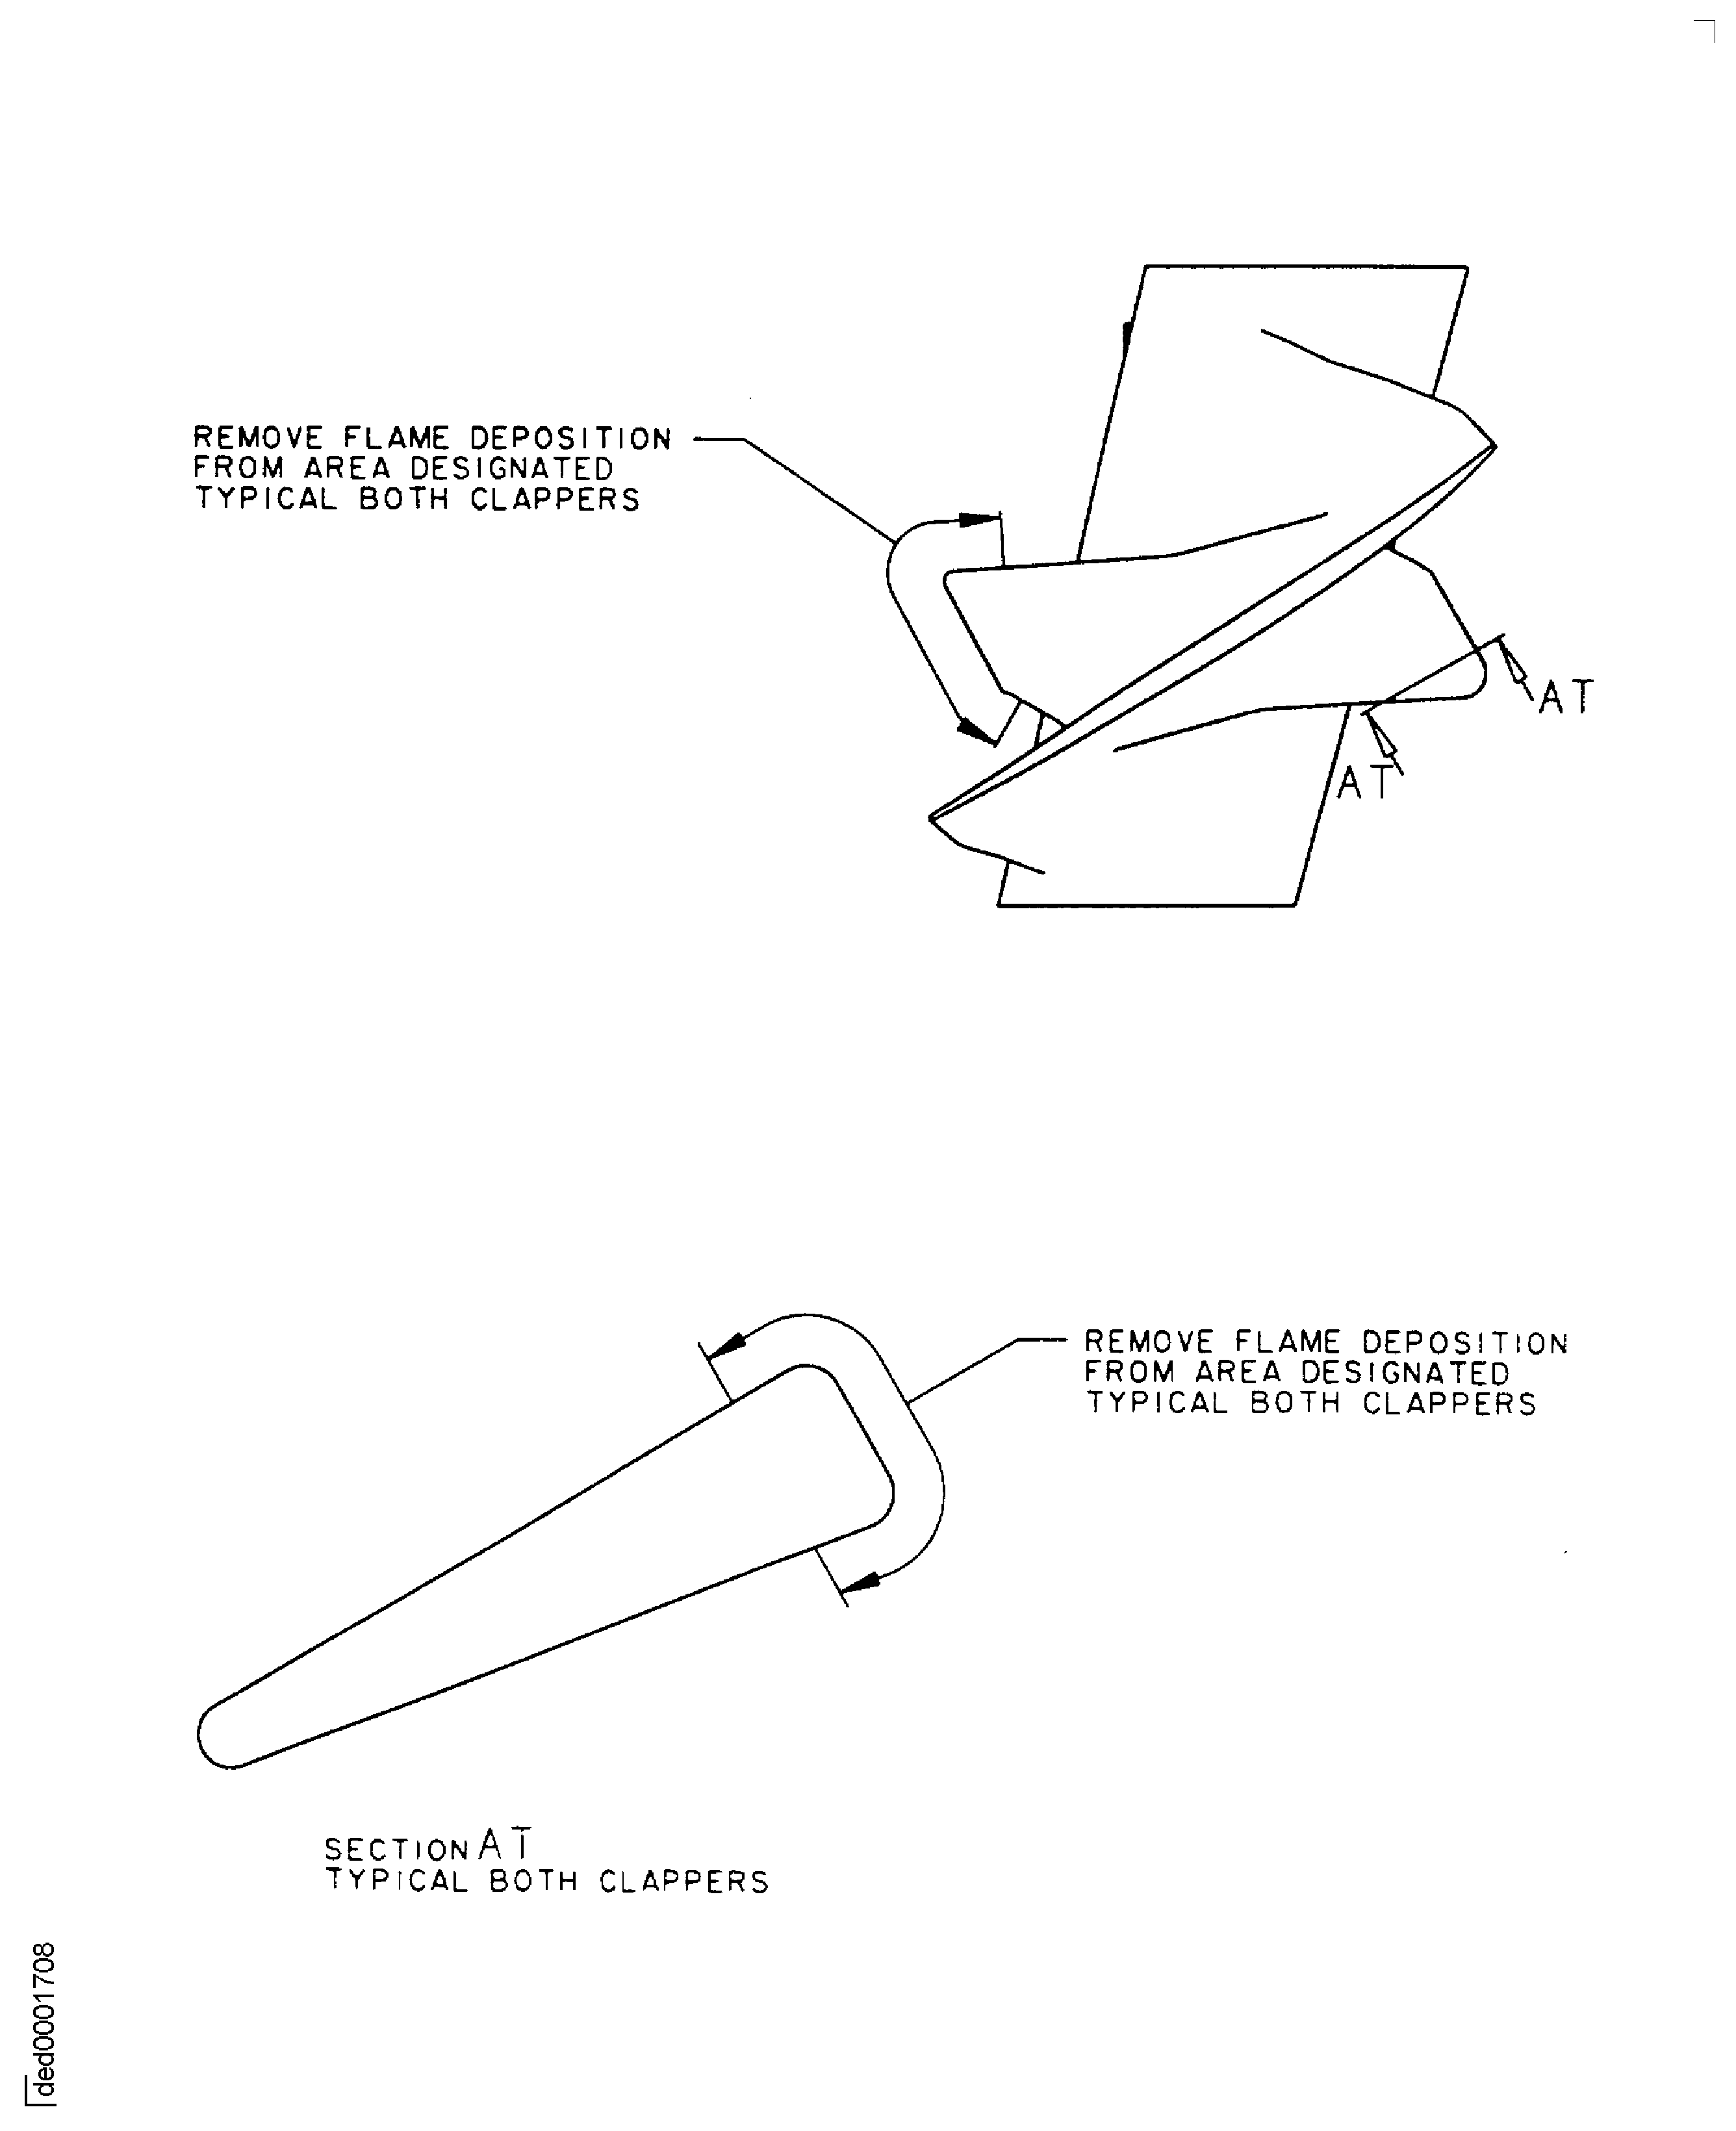
Figure: Repair Details And Dimensions - Assembly A
Repair Details And Dimensions - Assembly A
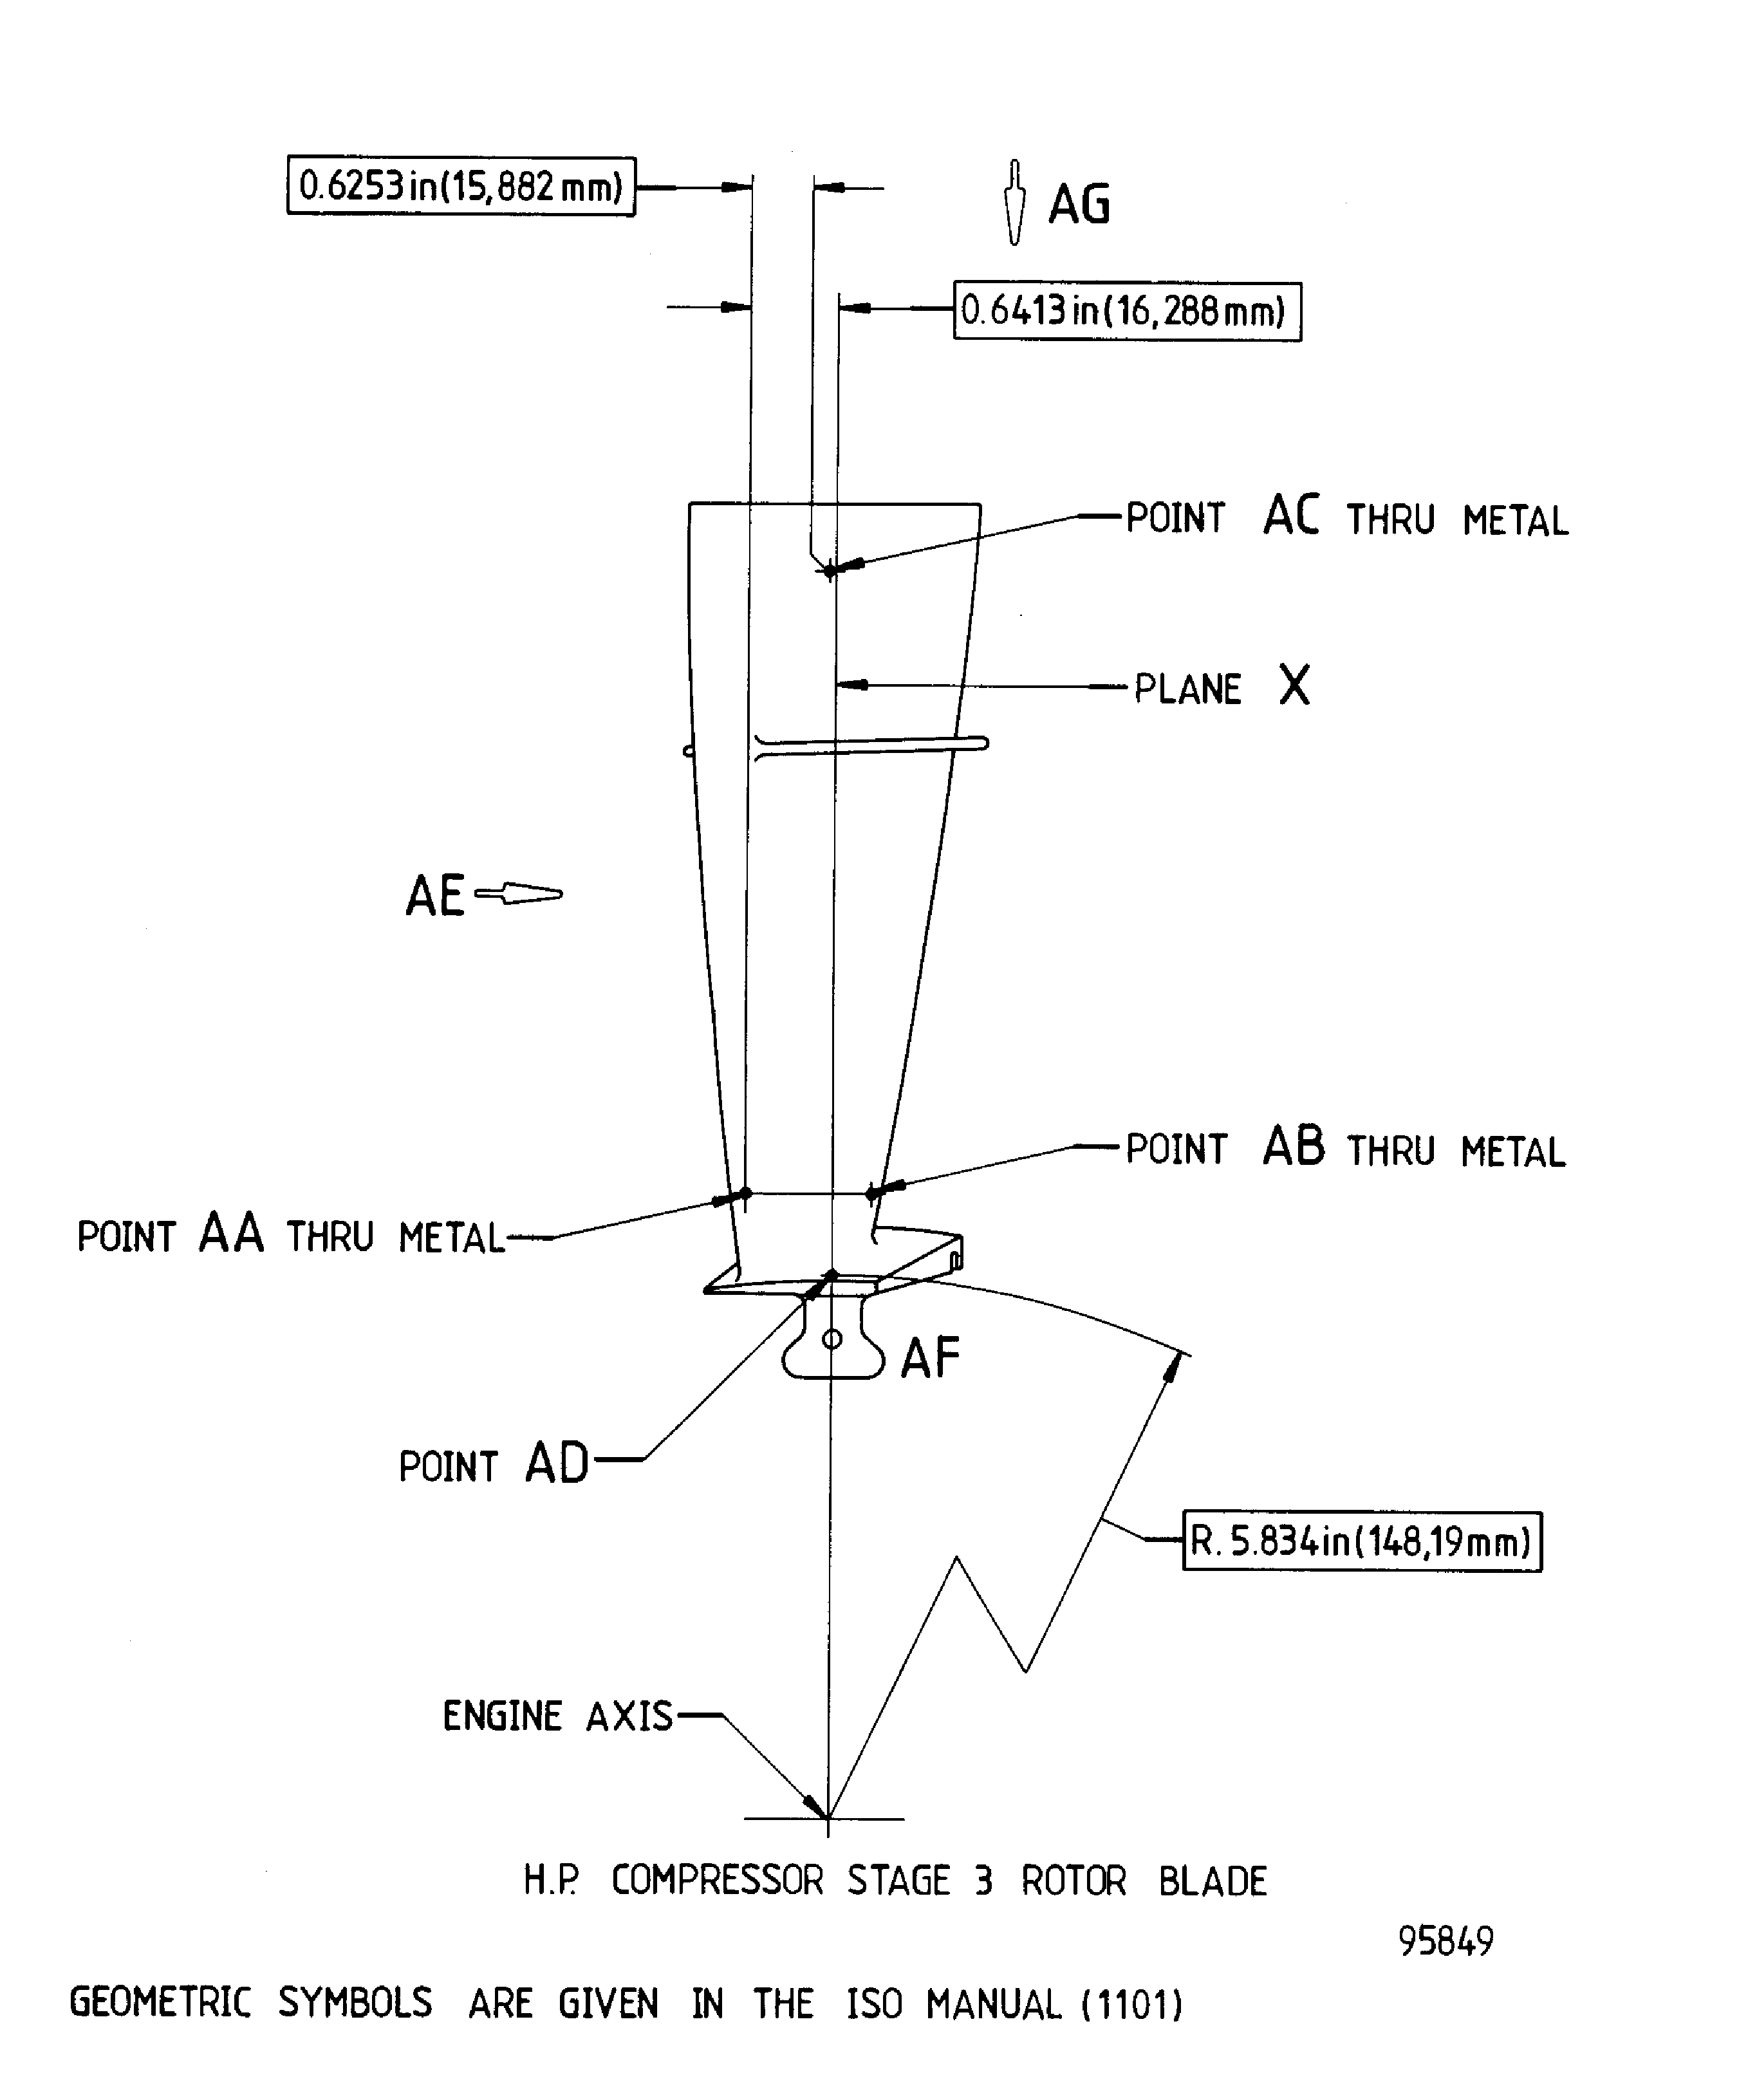
Figure: Repair Details And Dimensions - Assembly A
Repair Details And Dimensions - Assembly A
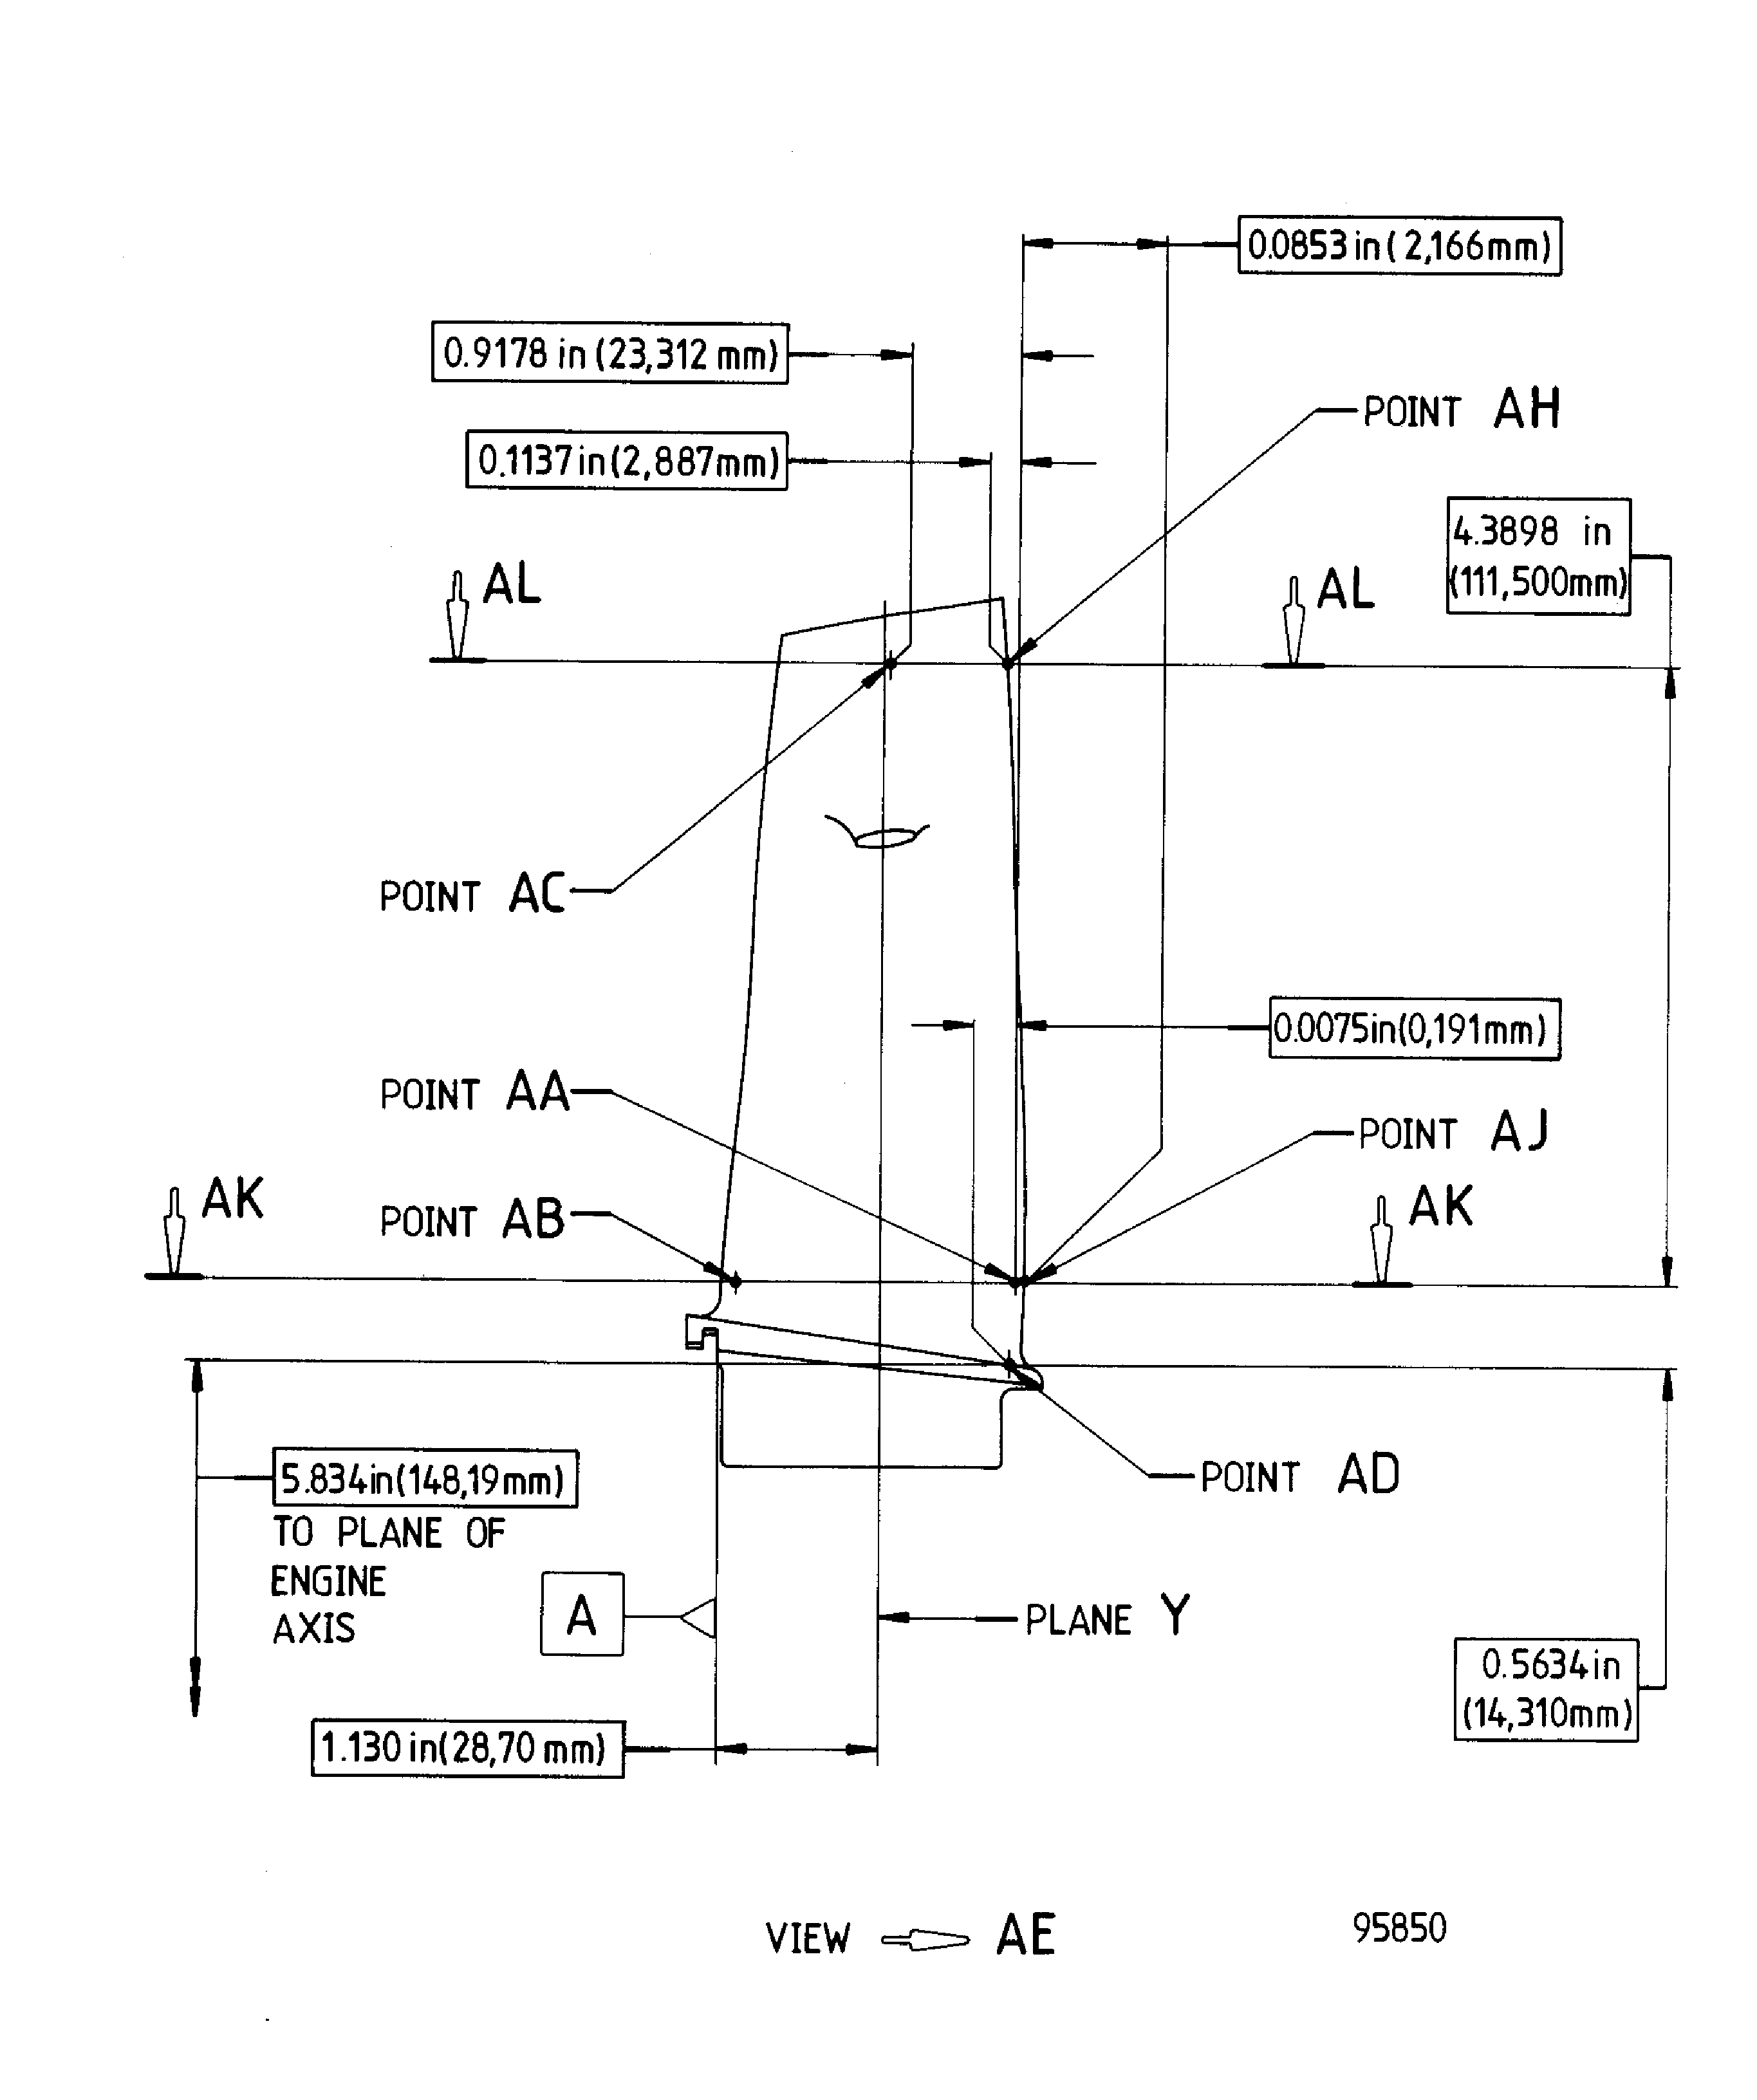
Figure: Repair Details And Dimensions - Assembly A
Repair Details And Dimensions - Assembly A
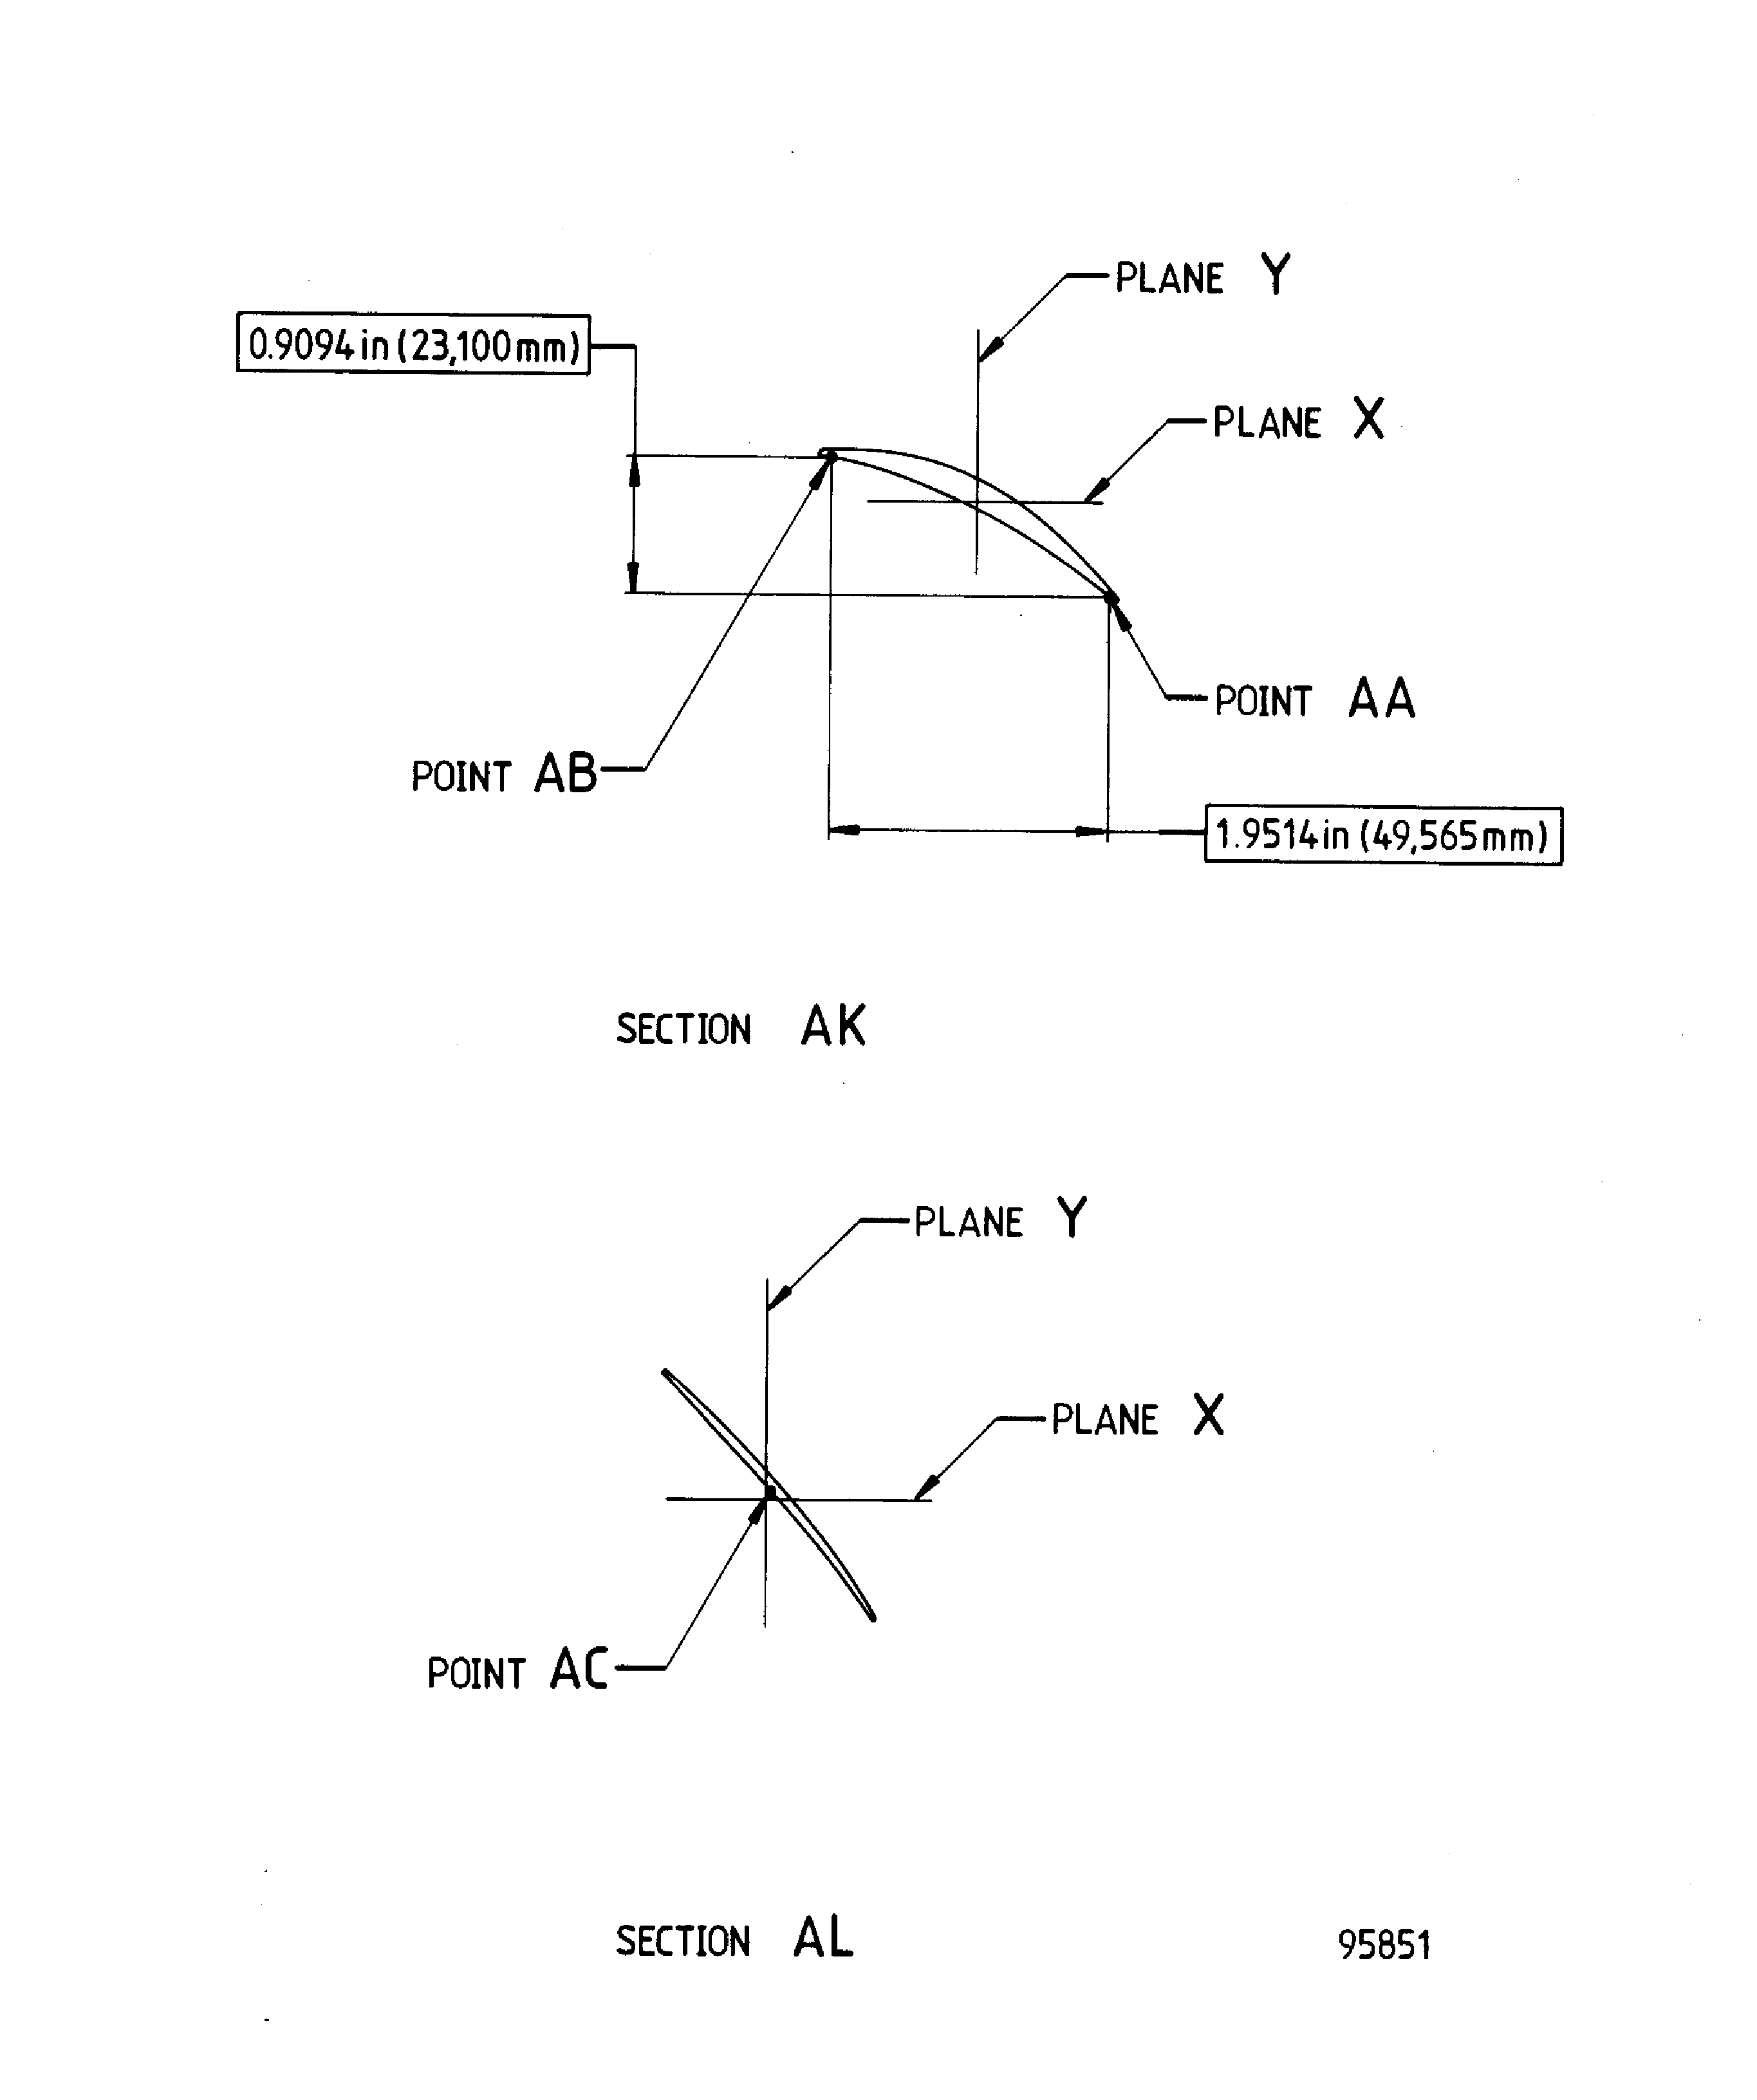
Figure: Repair Details And Dimensions - Assembly A, Assembly D And Assembly E
Repair Details And Dimensions - Assembly A, Assembly D And Assembly E
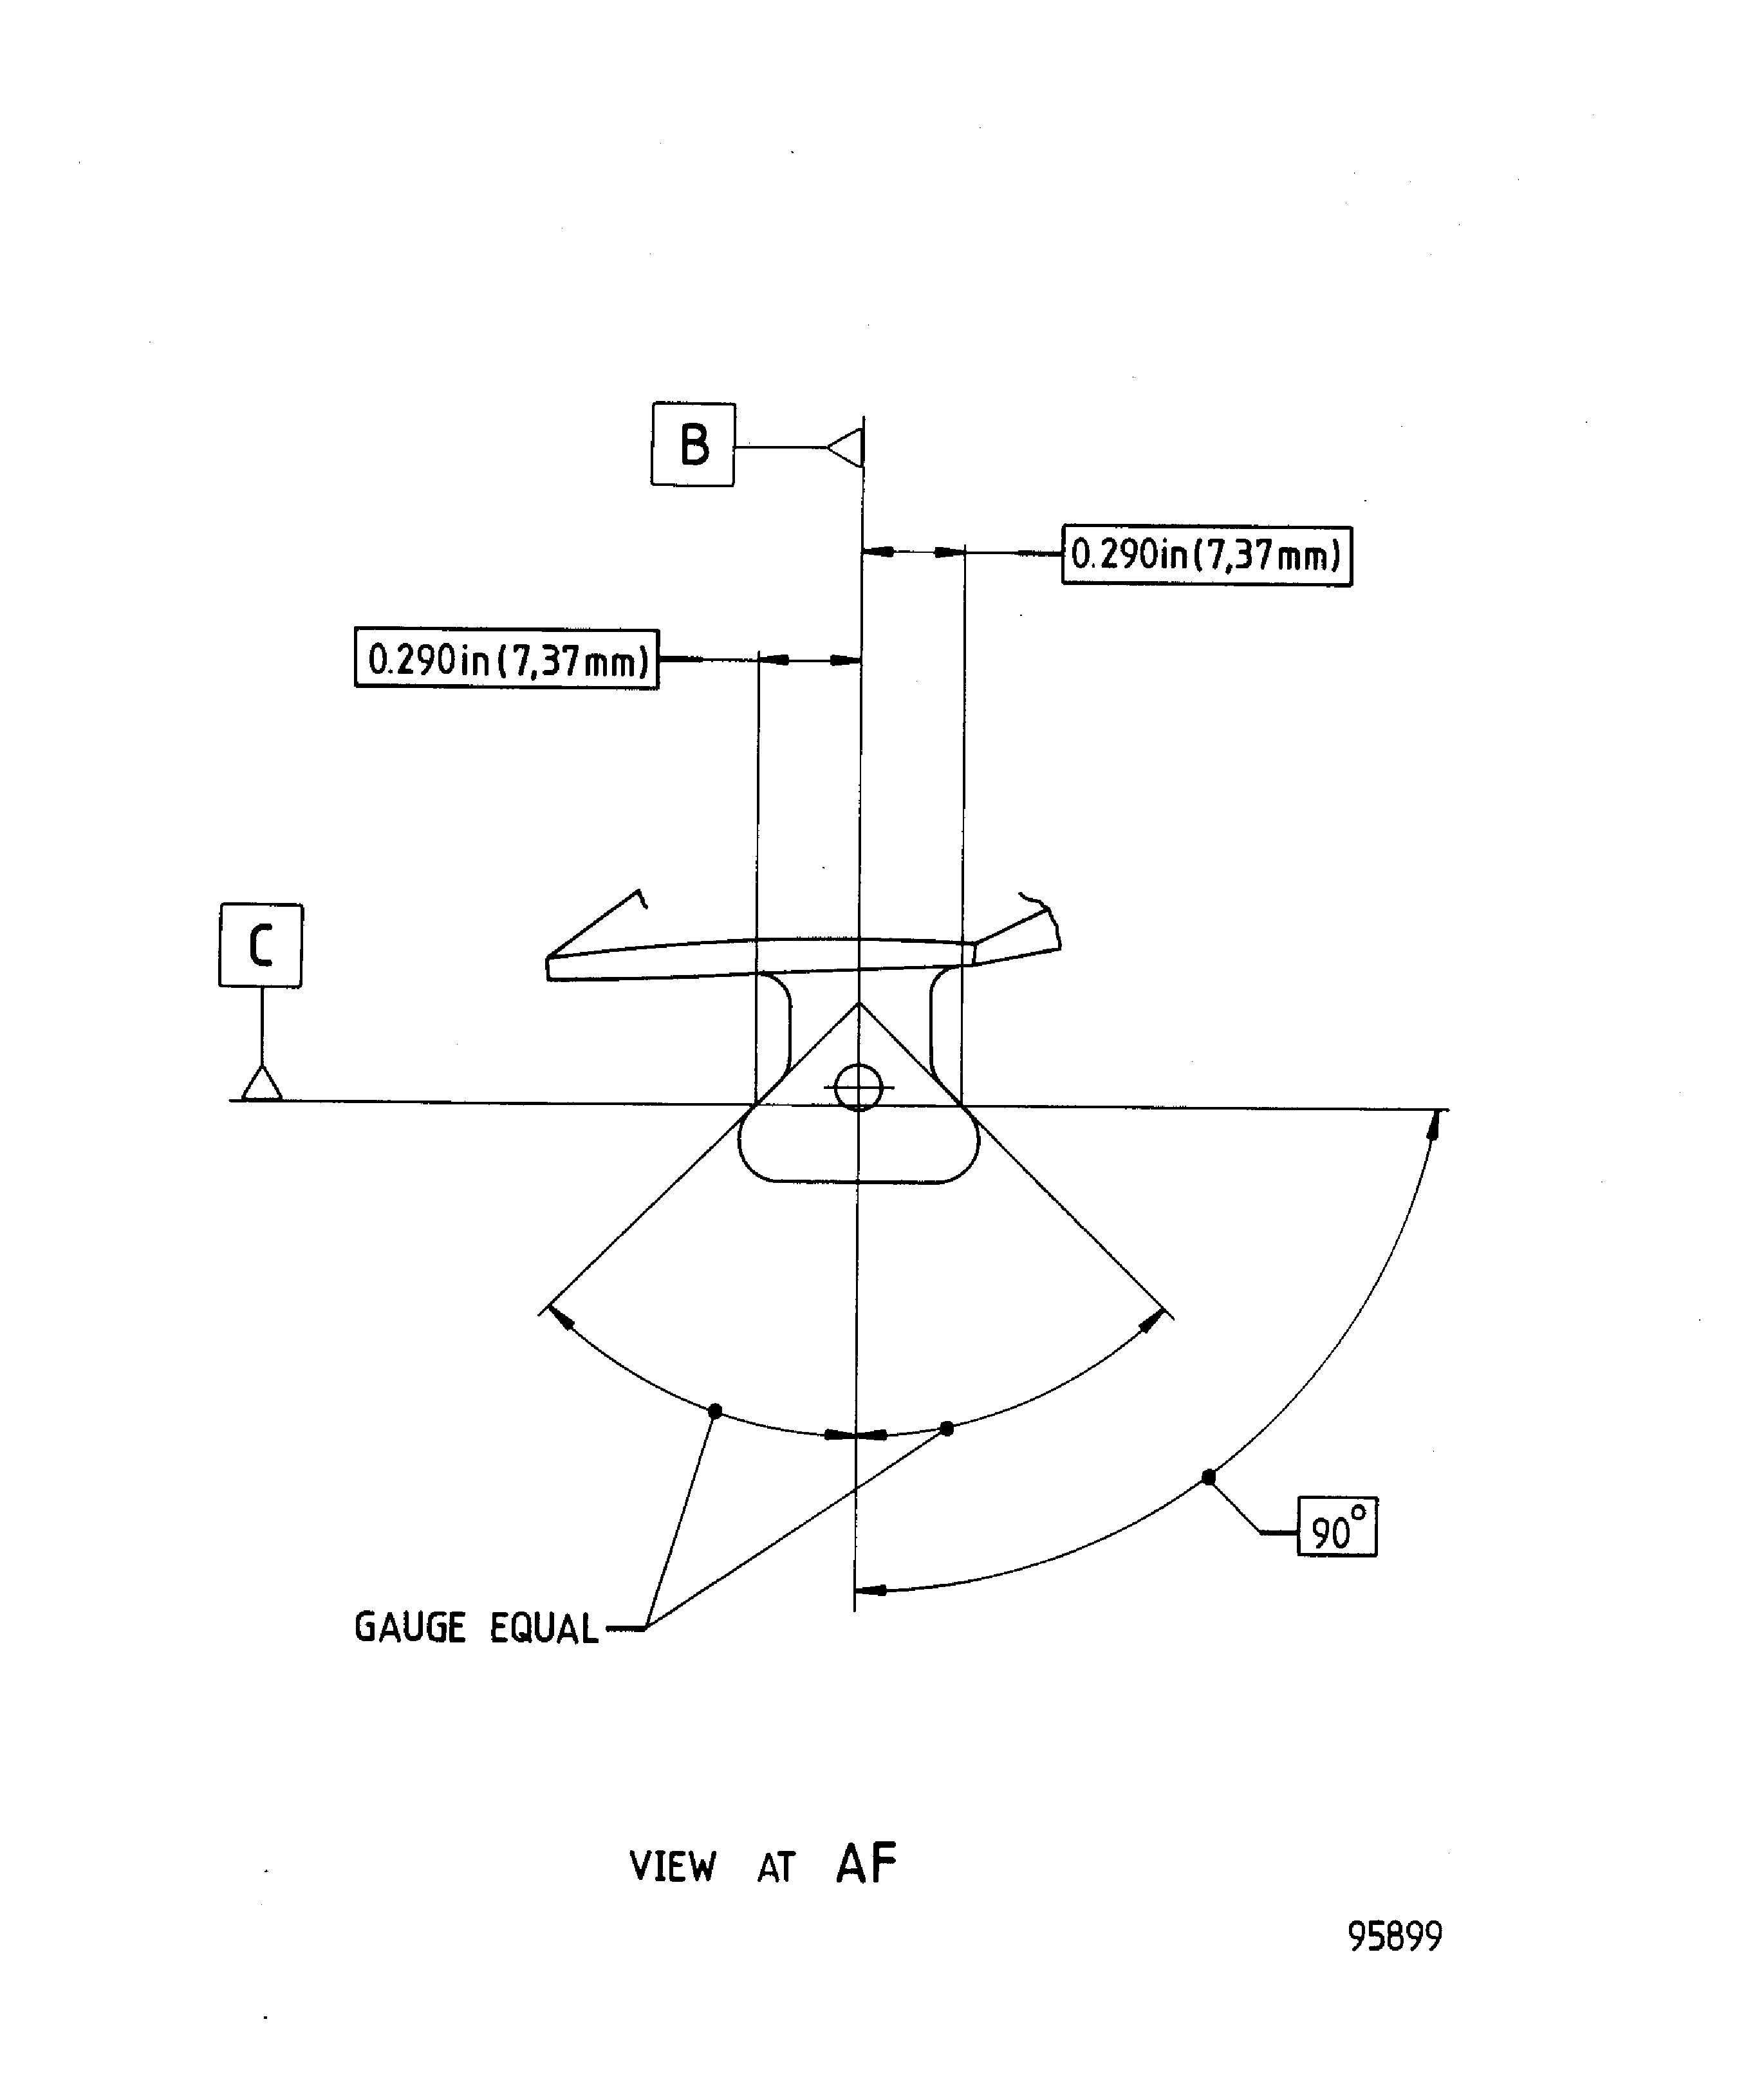
Figure: Repair Details And Dimensions - Assembly A
Repair Details And Dimensions - Assembly A
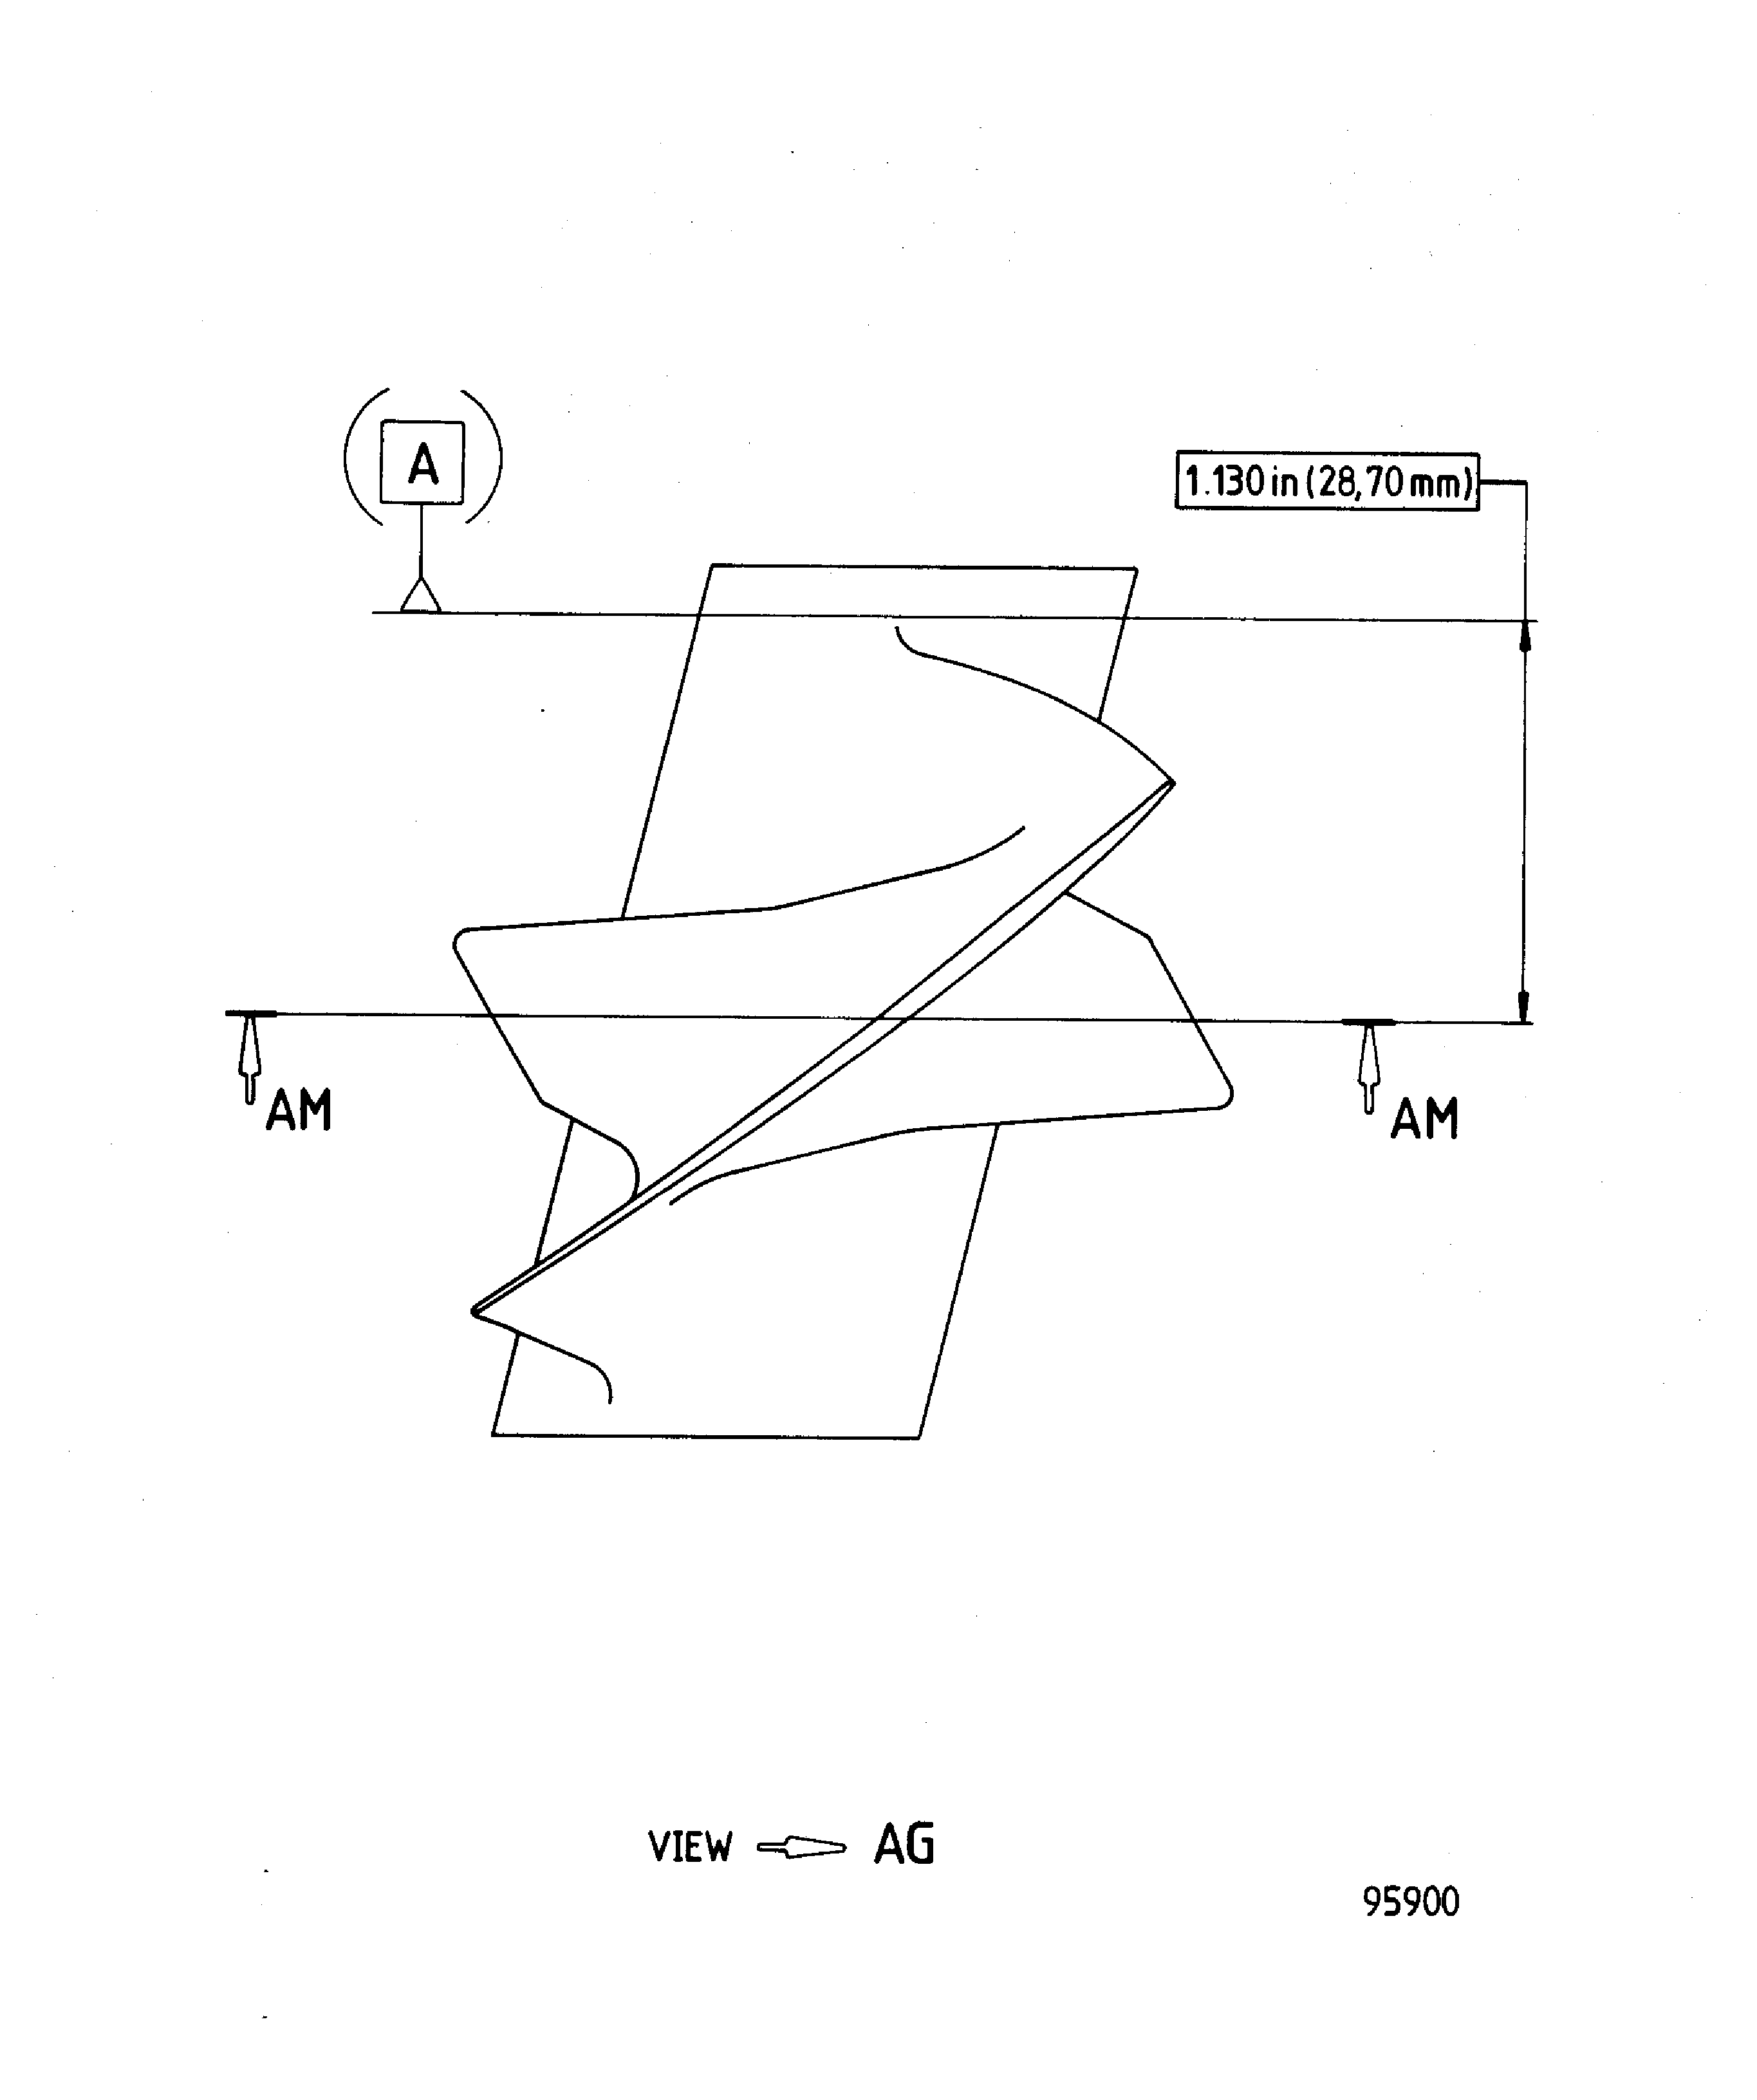
Figure: Repair Details And Dimensions - Assembly A
Repair Details And Dimensions - Assembly A
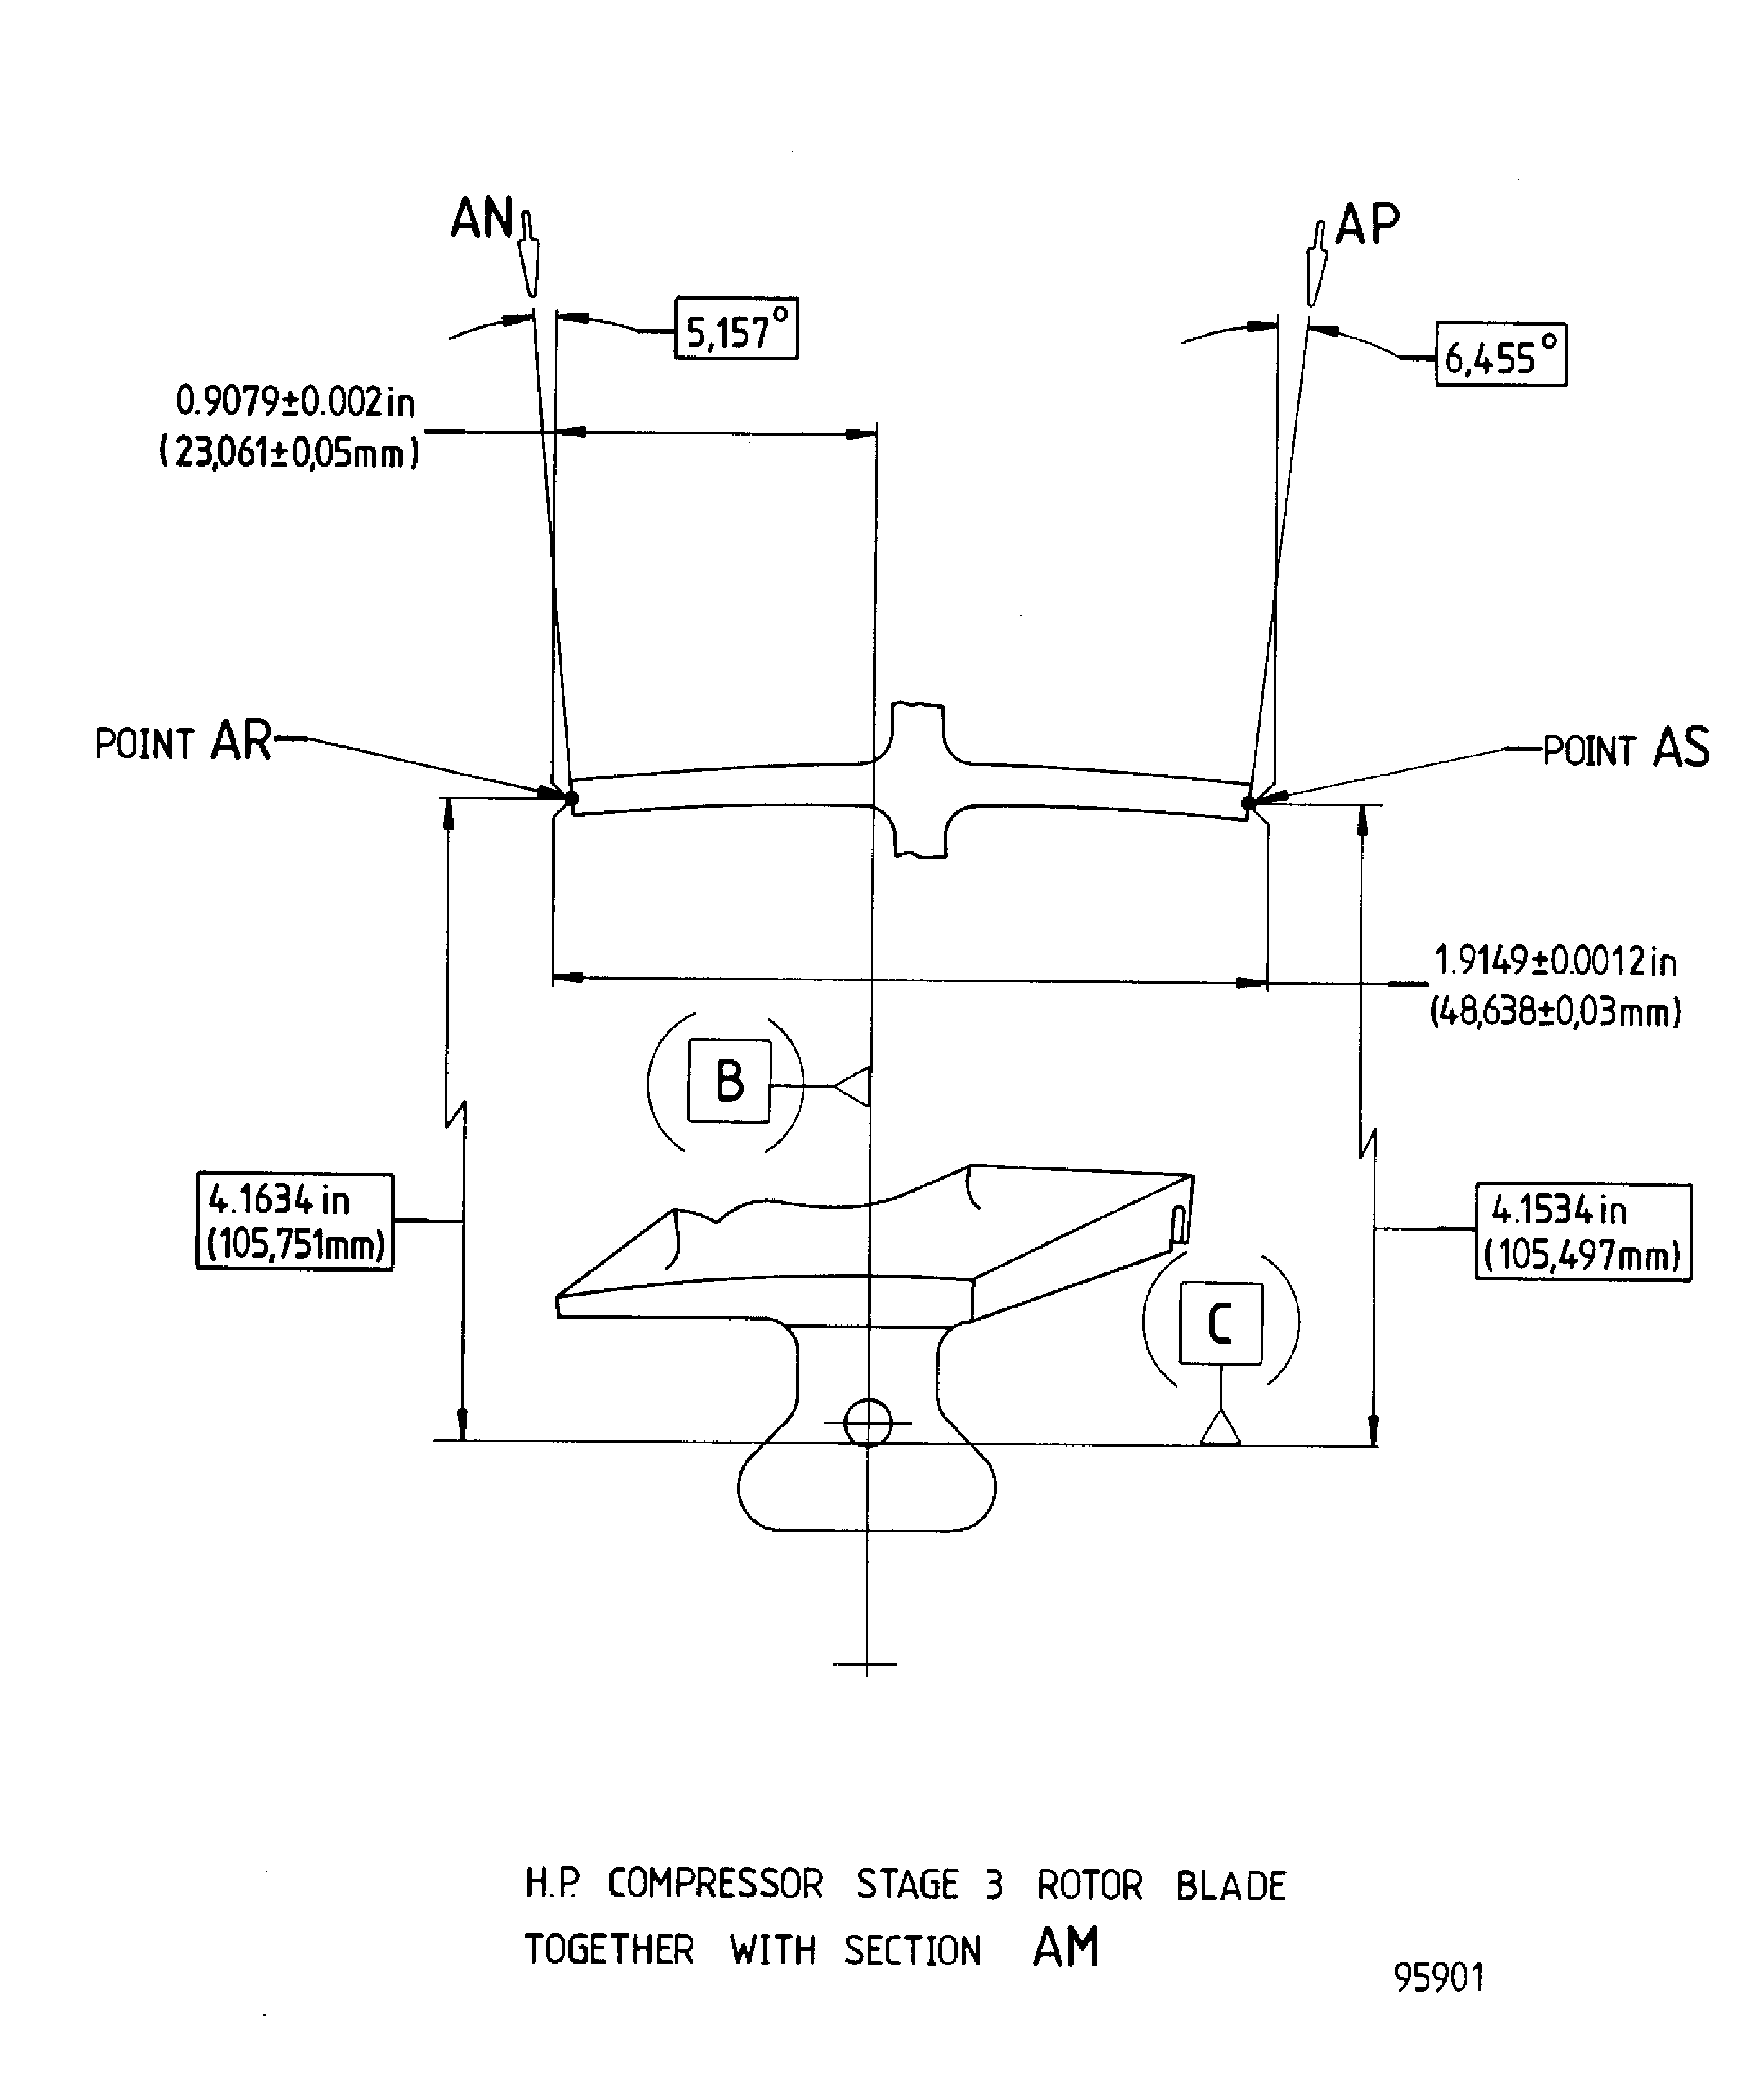
Figure: Repair Details And Dimensions - Assembly A, Assembly D And Assembly E
Repair Details And Dimensions - Assembly A, Assembly D And Assembly E
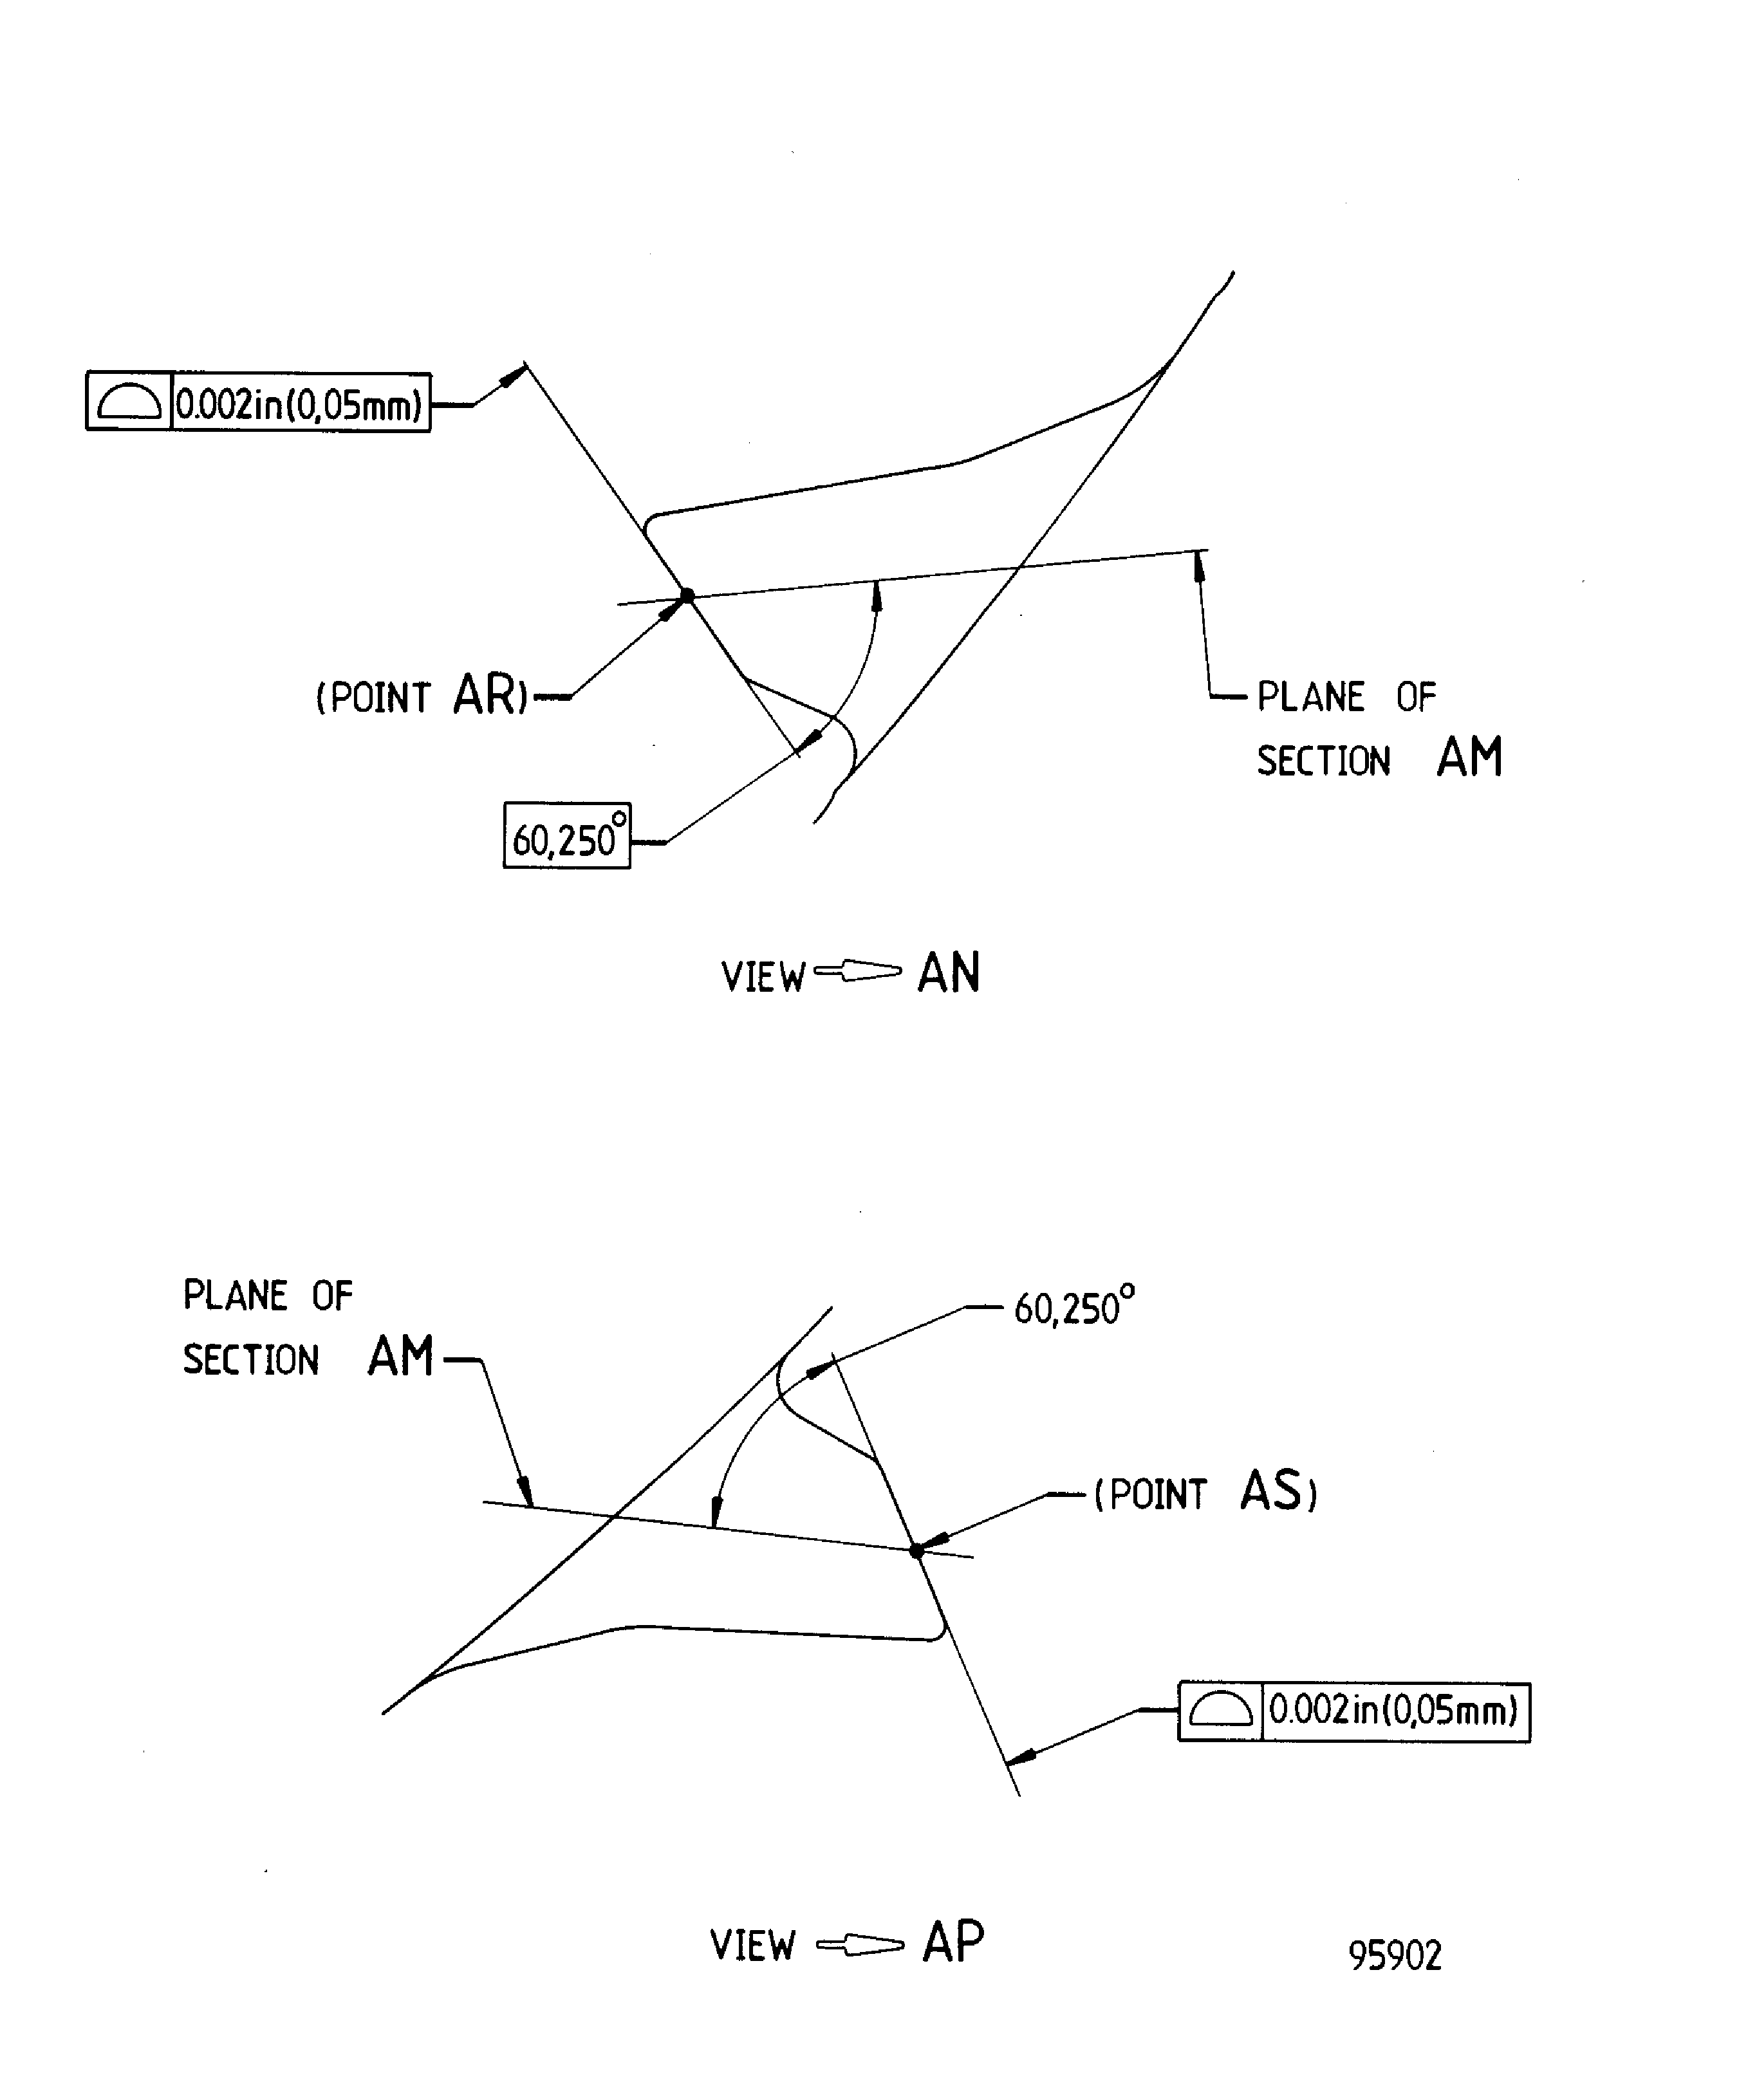
Figure: Repair Details And Dimensions - Assembly D And Assembly E
Repair Details And Dimensions - Assembly D And Assembly E
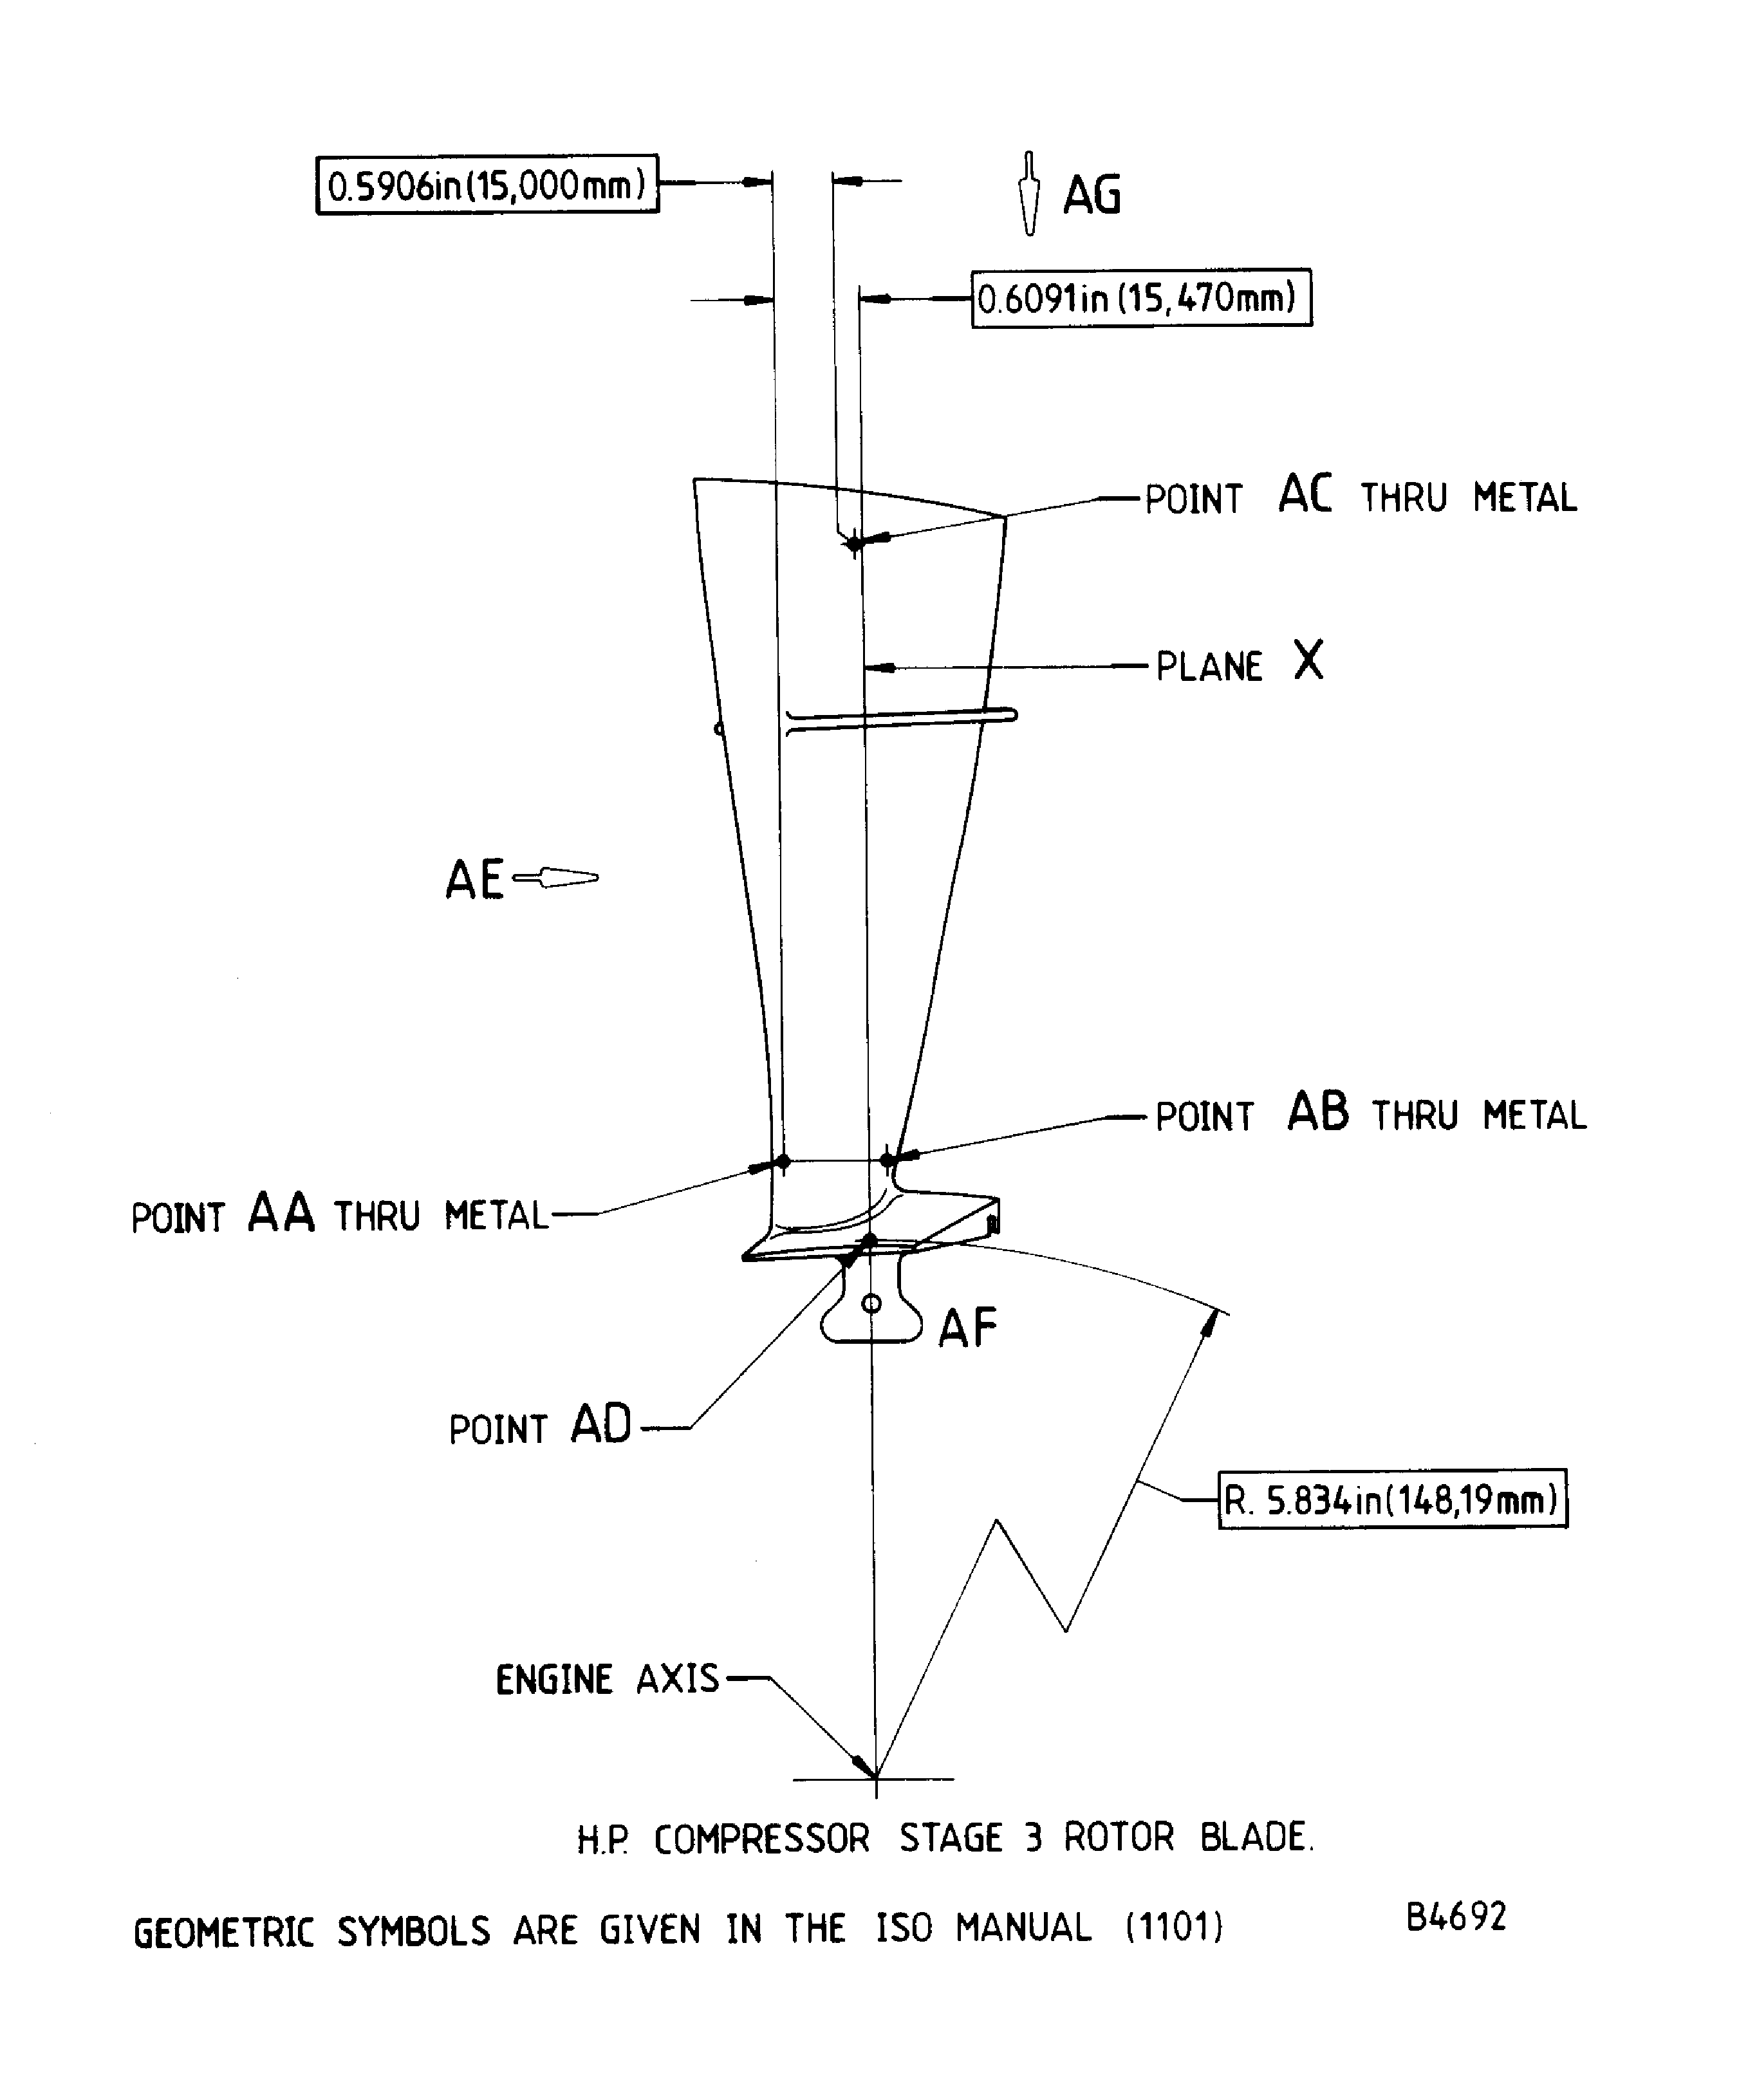
Figure: Repair Details And Dimensions - Assembly D And Assembly E
Repair Details And Dimensions - Assembly D And Assembly E
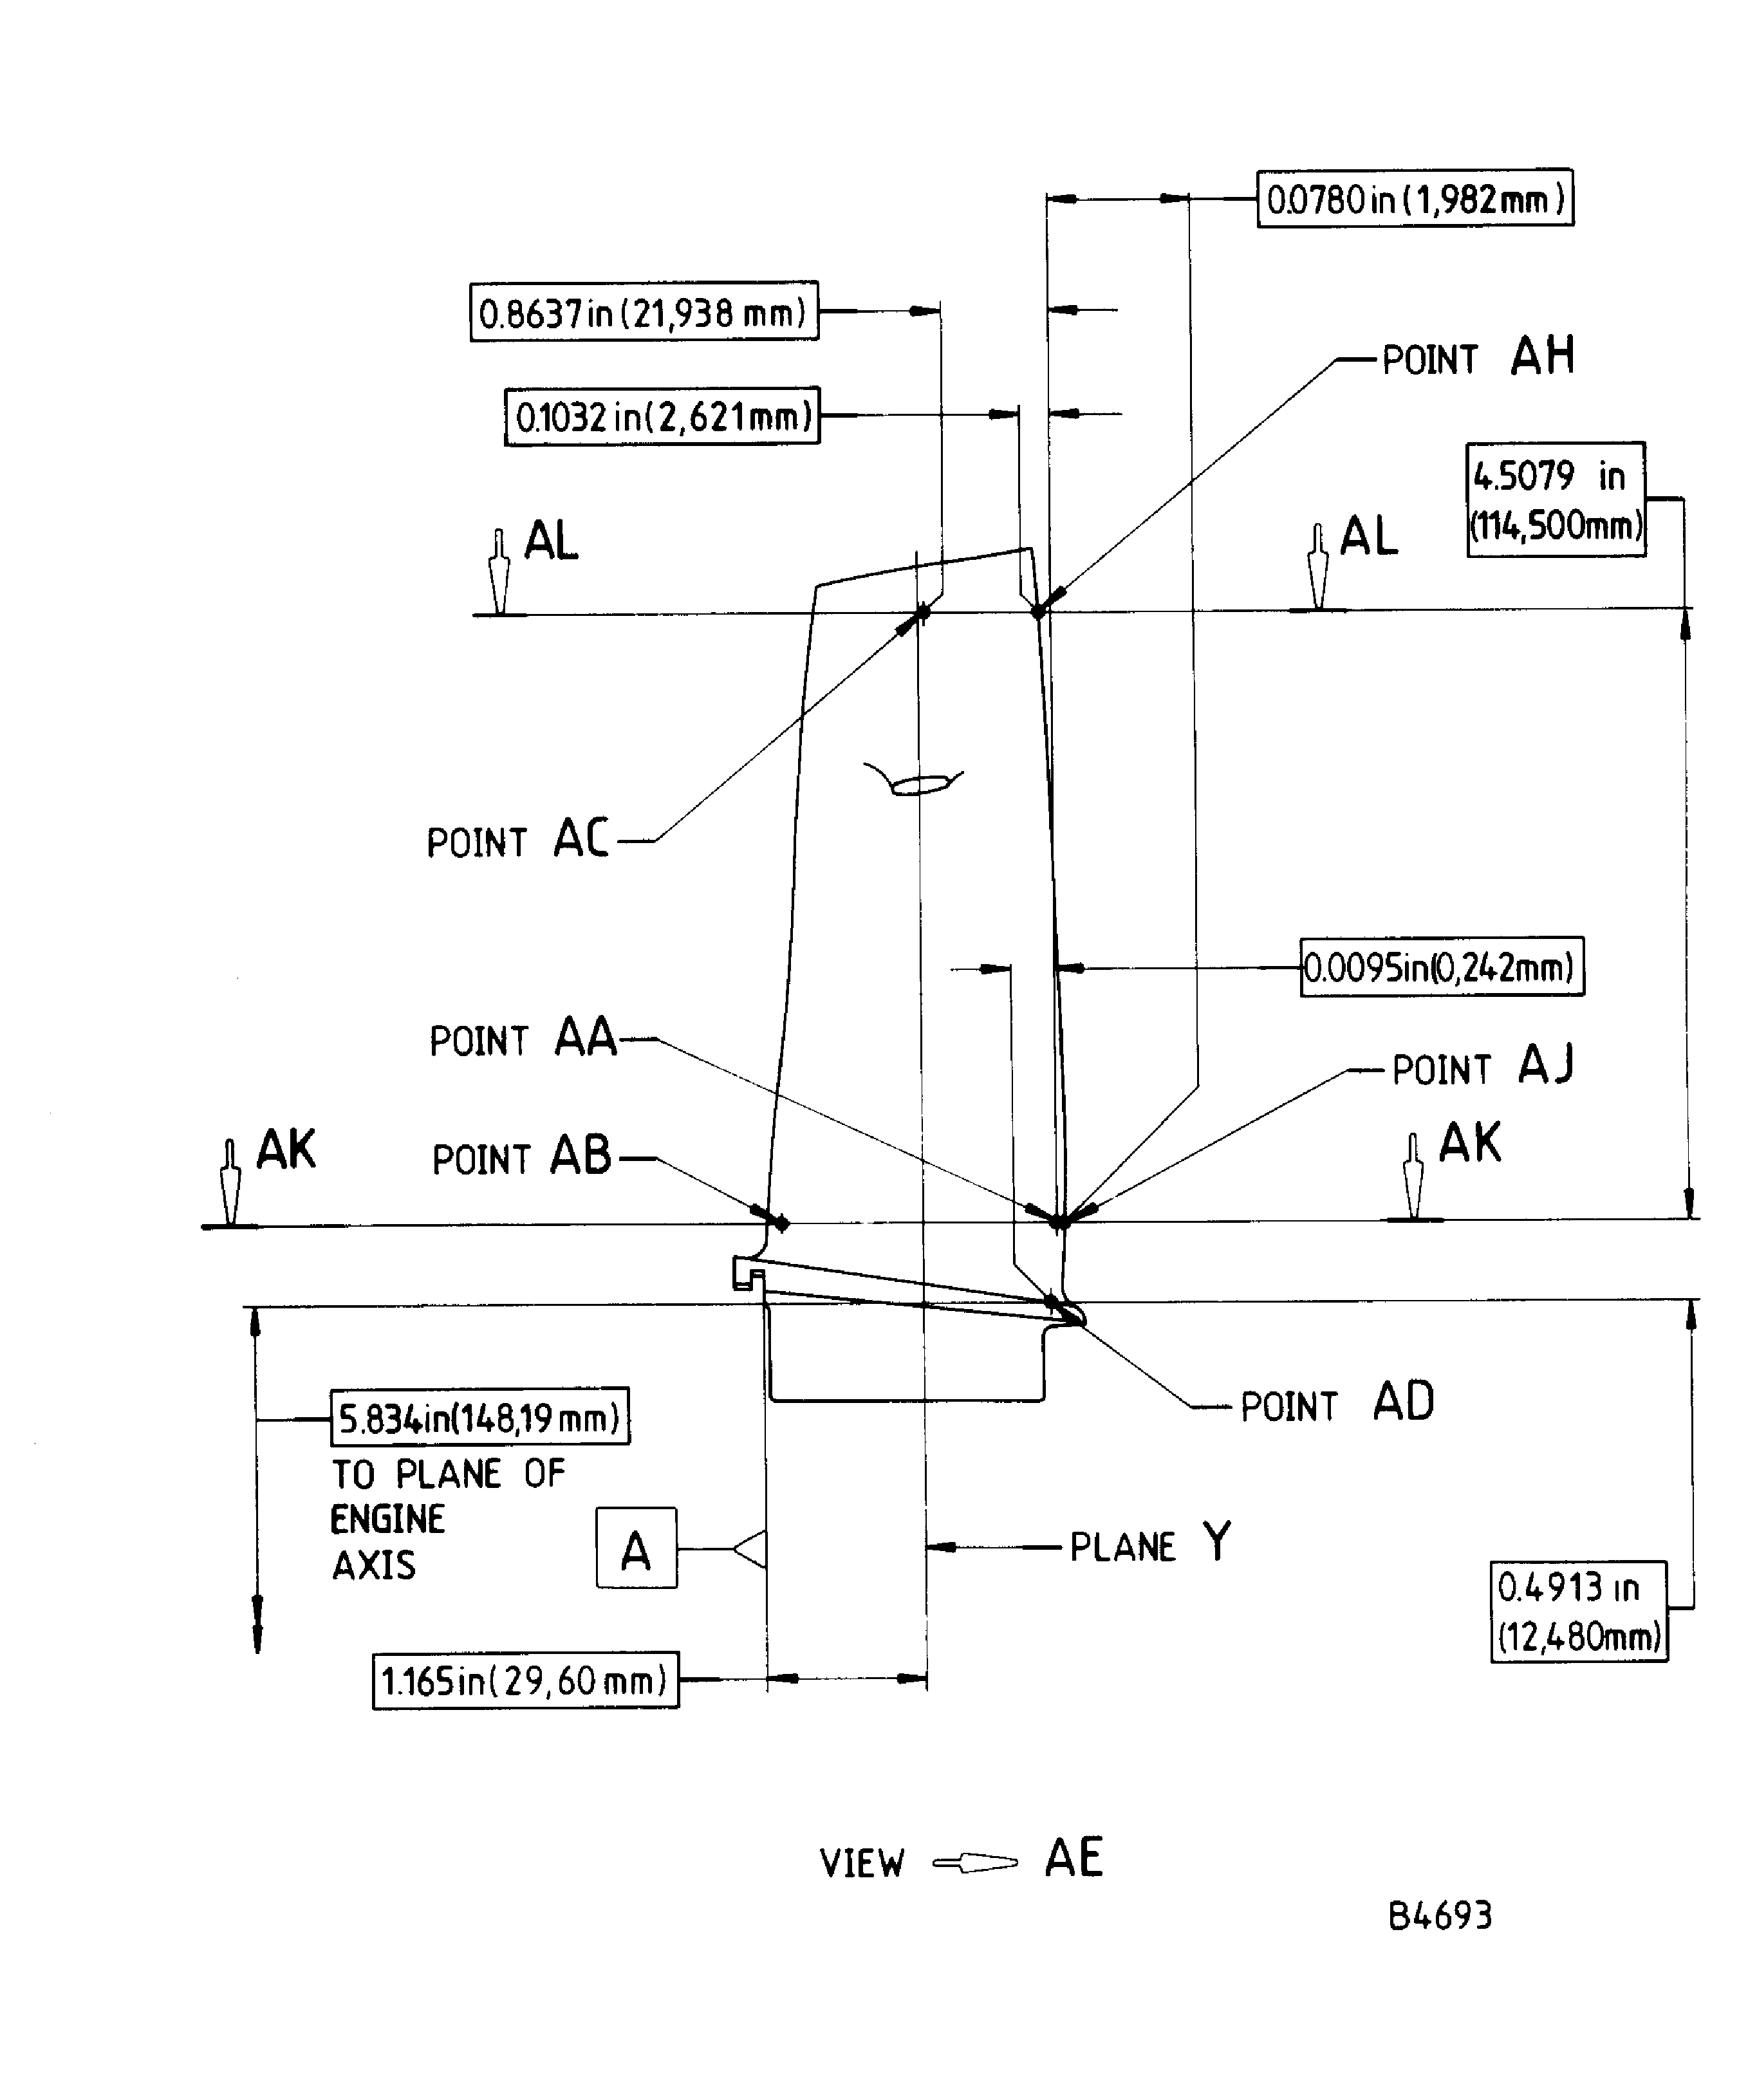
Figure: Repair Details And Dimensions - Assembly D And Assembly E
Repair Details And Dimensions - Assembly D And Assembly E
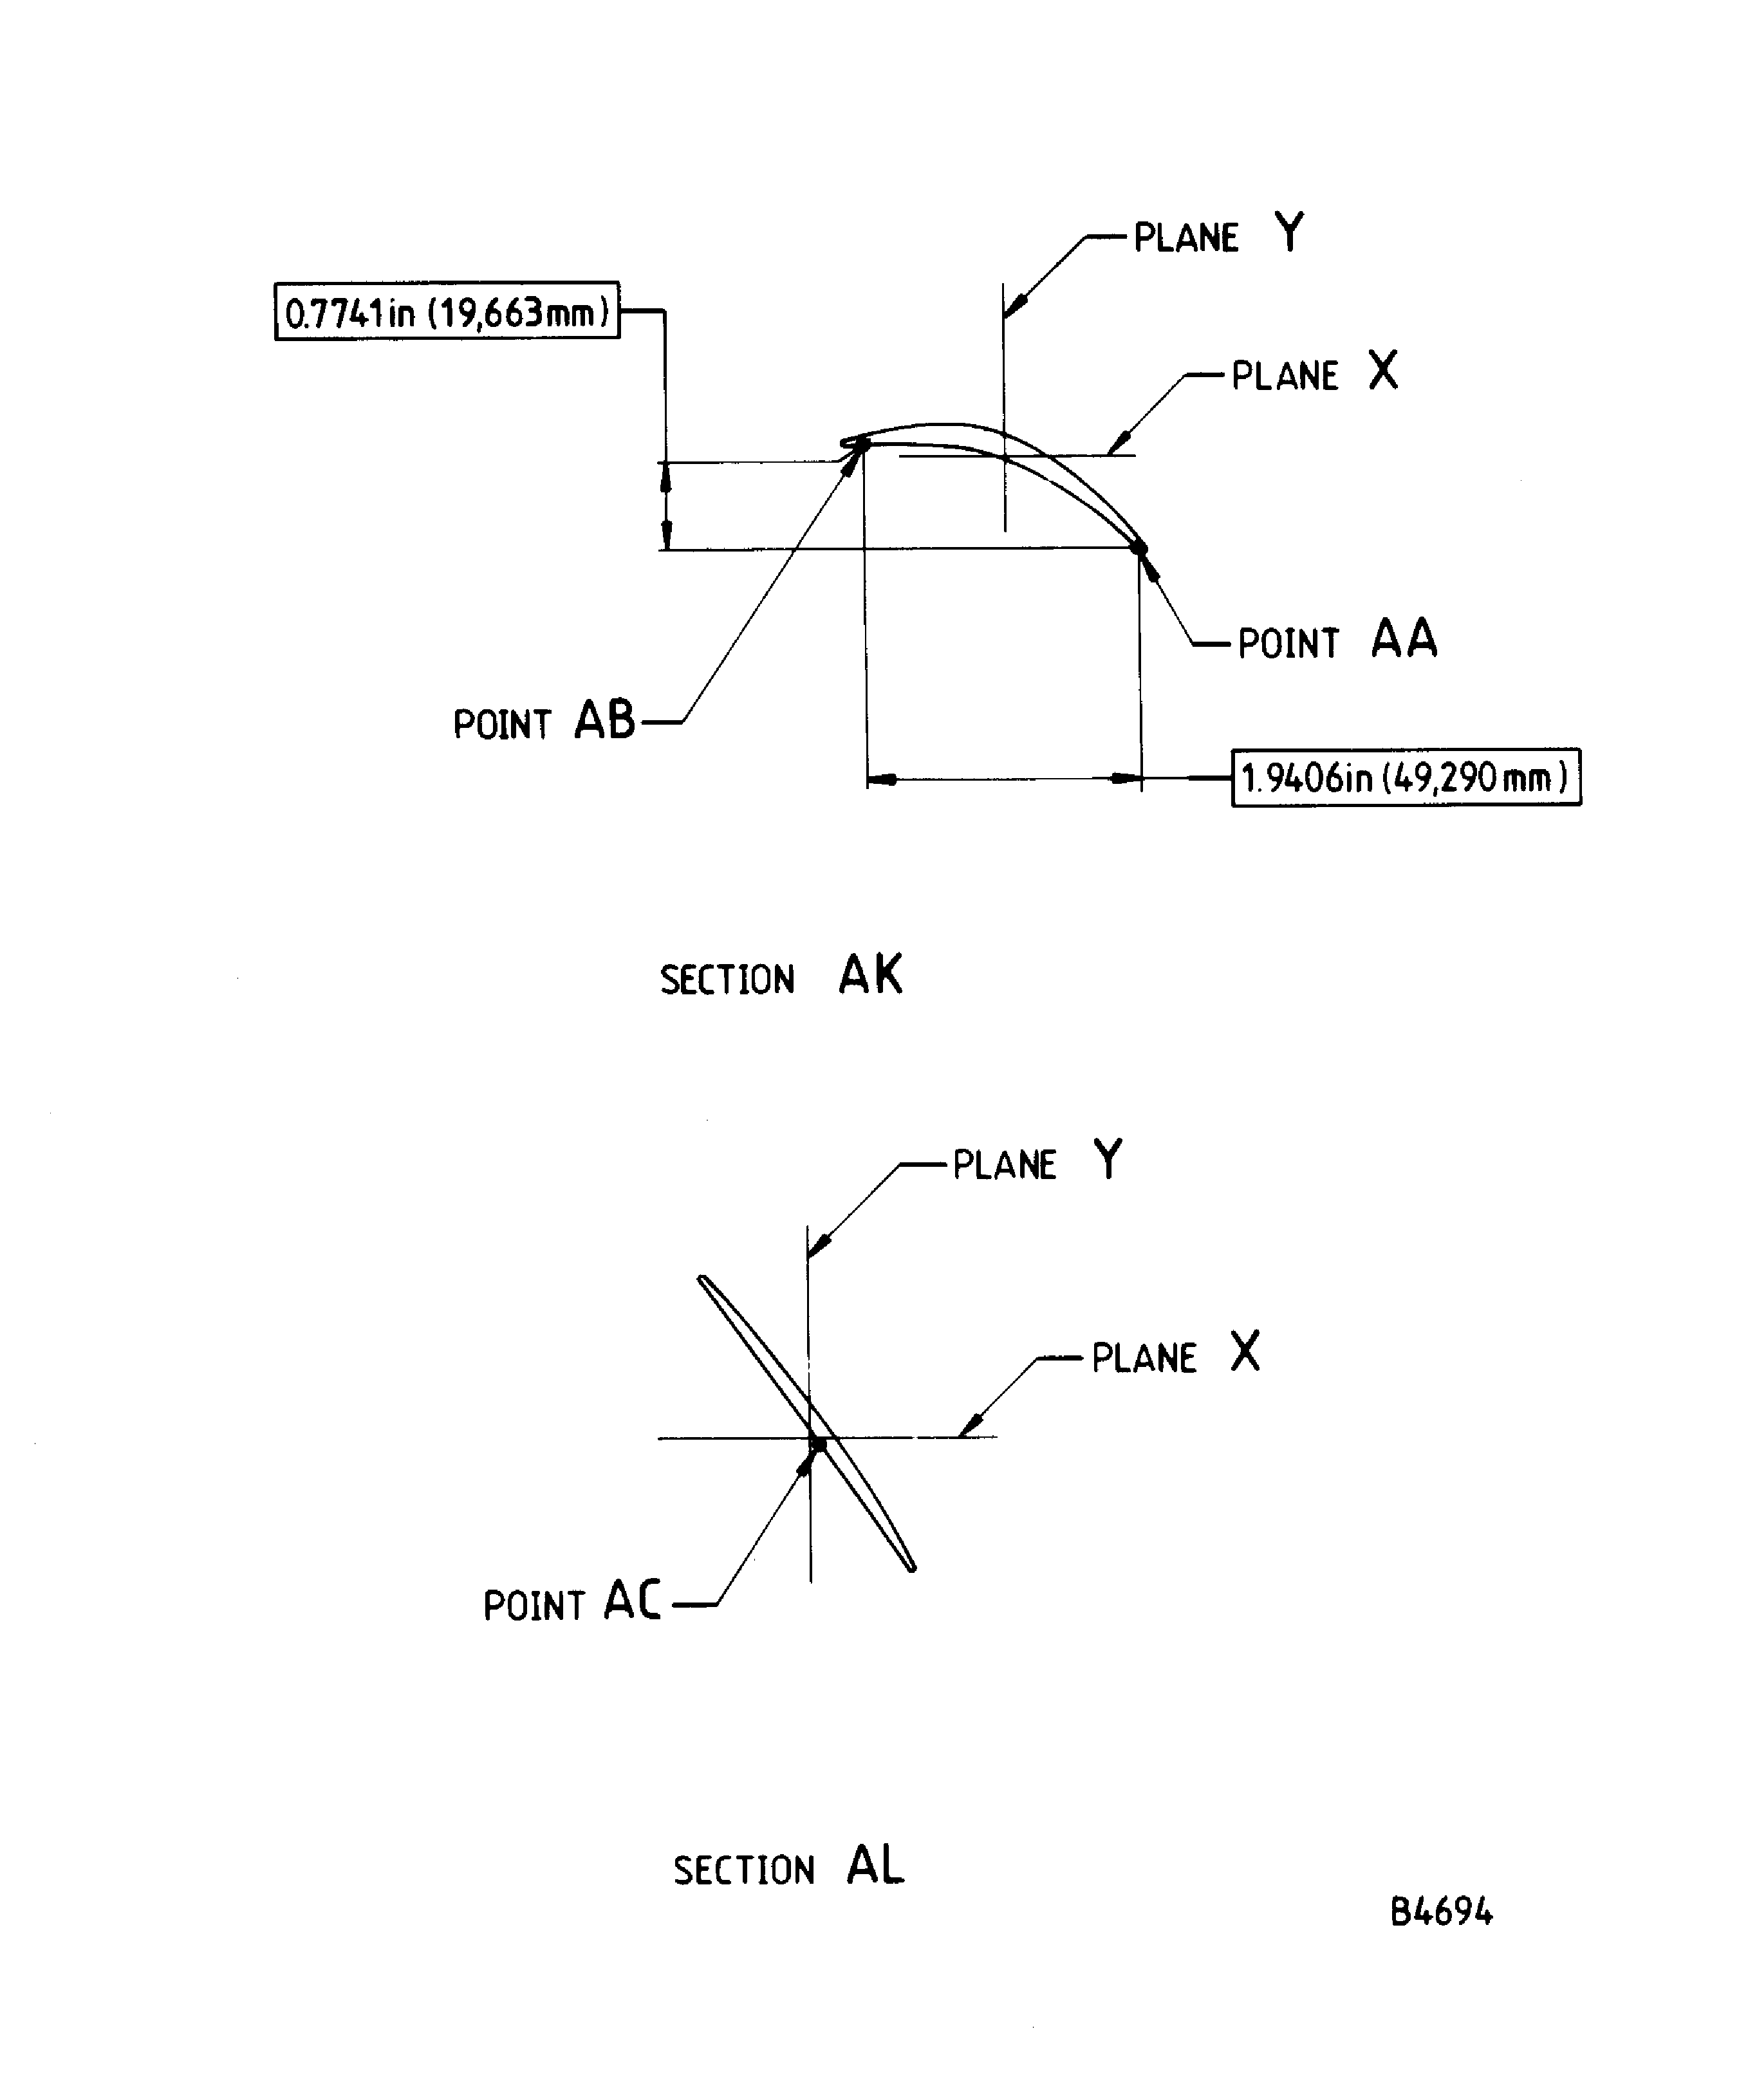
Figure: Repair Details And Dimensions - Assembly D And Assembly E
Repair Details And Dimensions - Assembly D And Assembly E
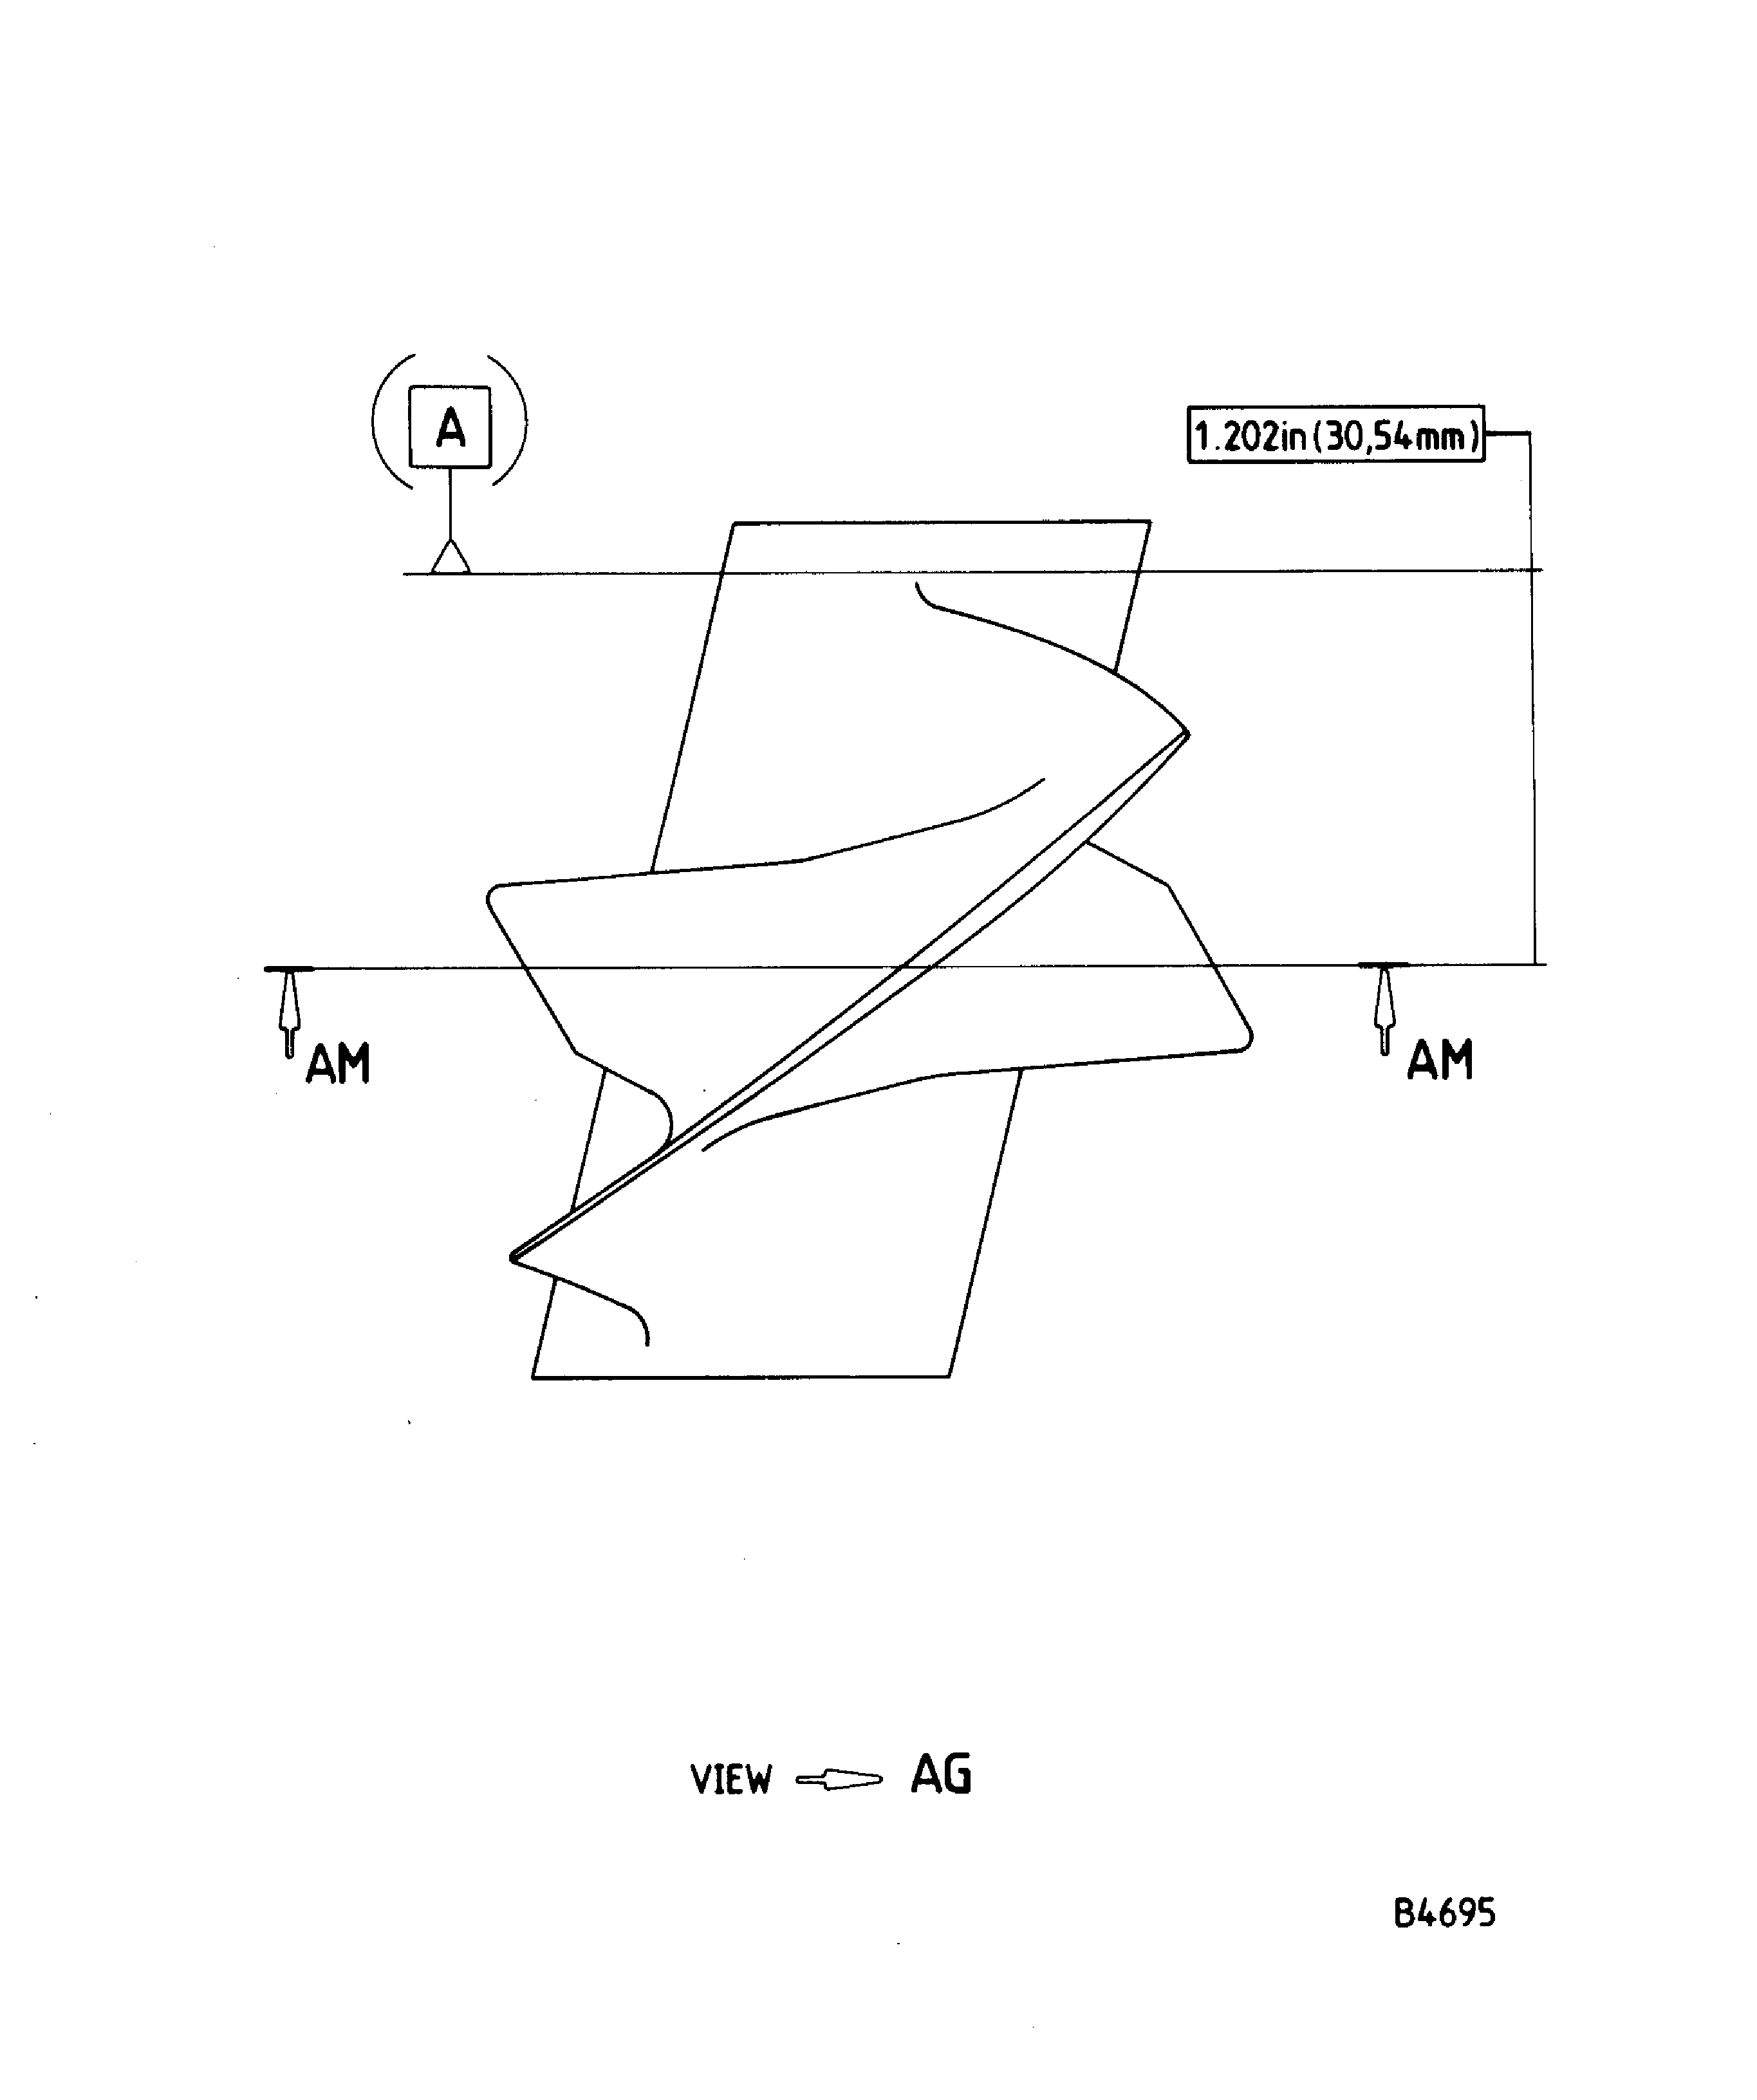
Figure: Repair Details And Dimensions - Assembly B And Assembly C (Deleted)
Repair Details And Dimensions - Assembly B And Assembly C (Deleted)

Figure: Repair Details And Dimensions - Assembly D And Assembly E
Repair Details And Dimensions - Assembly D And Assembly E

