Export Control
EAR Export Classification: Not subject to the EAR per 15 C.F.R. Chapter 1, Part 734.3(b)(3), except for the following Service Bulletins which are currently published as EAR Export Classification 9E991: SBE70-0992, SBE72-0483, SBE72-0580, SBE72-0588, SBE72-0640, SBE73-0209, SBE80-0024 and SBE80-0025.Copyright
© IAE International Aero Engines AG (2001, 2014 - 2021) The information contained in this document is the property of © IAE International Aero Engines AG and may not be copied or used for any purpose other than that for which it is supplied without the express written authority of © IAE International Aero Engines AG. (This does not preclude use by engine and aircraft operators for normal instructional, maintenance or overhaul purposes.).Applicability
All
Common Information
TASK 72-41-21-300-005 HPC Stage 7 Case - Blend Repair On The Stage 7 Case And Stage 8 Integrated Rotor Path Assembly, Repair-005 (VRS6093)
Effectivity
FIG/ITEM | PART NO. | ASSEMBLY |
|---|---|---|
03-500 | 6A3500 | A |
03-500 | 6A4310 | A |
03-500 | 6A4569 | D |
03-500 | 6A6548 | B |
03-500 | 6A7019 | E |
03-500 | 6A7529 | B |
03-500 | 6A7578 | B |
03-500 | 6A7624 | B |
03-500 | 6B1432 | C |
Material of component
PART IDENT | MATERIAL |
|---|---|
HP Compressor Stage 7 Case | Corrosion Resistant Steel |
HP Compressor Stage 8 Rotor Path Case Assembly | Corrosion Resistant Steel |
General
This repair must only be done when the instruction to do so is given.
Preliminary Requirements
Pre-Conditions
| Action/Condition | Data Module/Technical Publication |
|---|---|
| Make sure that all the cleaning and inspection procedures are done before this repair. |
Support Equipment
NONEConsumables, Materials and Expendables
| Name | Manufacturer | Part Number / Identification | Quantity | Remark |
|---|---|---|---|---|
| DELETED | LOCAL | DELETED |
Spares
NONESafety Requirements
NONEProcedure
Refer to the Repair, VRS6549 TASK 72-41-21-300-027 (REPAIR-027).
Remove the riveted location dowel, as required.
SUBTASK 72-41-21-350-255 Remove the Location Dowel - Assembly A, B, C, D and E
Machine only faces and diameters marked with machining tick.
Remove only the minimum amount of material to remove the damage.
Skim machine the corrosion pitting faces and diameter.
Remove sharp edges and/or burrs.
SUBTASK 72-41-21-350-256 Machine the Surface Damage on Front Flange Rear Face and Rear Flange Front Face Assembly A, D and E
Machine only faces and diameters marked with machining tick.
Remove only the minimum amount of material to remove the damage.
Skim machine the corrosion pitting on the faces and diameter.
Remove sharp edges and/or burrs.
SUBTASK 72-41-21-350-257 Machine the Surface Damage on Rear Flange Lip - Assembly A, D and E
Machine only damaged holes.
Remove only the minimum amount of material required to remove the damage, up to the maximum size.
Machine the damaged holes.
Re-establish hole chamfers.
Remove sharp edges and/or burrs.
SUBTASK 72-41-21-350-258 Machine the Surface Damage on Boltholes - Assembly A, D and E
Chemically clean the repaired area. Refer to TASK 70-11-03-300-503.
SUBTASK 72-41-21-110-259 Clean the Stage 7 Rotor Path Case - Assembly A, D and E
SUBTASK 72-41-21-220-758 Examine the Skim Machine Repaired Area(s) - Assembly A, D and E
Refer to SPM TASK 70-35-03-300-501.
The maximum depth of the repaired area(s) is to be 0.005 in. (0.13 mm).
The diameter of the area(s) removed is to be 50 times the depth.
Remove no more material than is necessary.
Remove area(s) of damage adjacent to Zones AC (and also other than the case wall and rear flange fillet radius and the front and rear edges of rotor path lining retaining recess), as necessary.
Refer to SPM TASK 70-35-03-300-501.
The maximum repair contour is to be 0.110 in. (2.80 mm) in axial depth and 0.217 in. (5.50 mm) in radial depth.
Minimum blend ratio of repair is to be five times the depth and can extend in adjacent Zones AD.
Remove no more material than is necessary.
Remove damage from Zones AC, as necessary.
Refer to SPM TASK 70-35-03-300-501.
The maximum blend depth allowed is 0.005 in. (0.13 mm).
The diameter of the area(s) removed is to be 50 times the depth.
Remove no more material than is necessary.
Remove damage from area around inner groove face (Location 1121), as necessary (only for Assembly D and E).
Refer to SPM TASK 70-35-03-300-501.
Make sure all damage marks are fully removed and the area(s) made smooth into the adjacent material.
Make the repaired area(s) smooth.
Refer to SPM TASK 70-35-03-300-501.
Polish the repaired area(s) to remove scratches and to give a surface finish the same as the adjacent material.
Polish the repaired area(s).
SUBTASK 72-41-21-350-071 Remove the Damaged Area(s) by Dressing and Blending - Assembly A, D and E
Chemically clean the repaired area. Refer to SPM TASK 70-11-03-300-503.
SUBTASK 72-41-21-110-268 Clean the HP Compressor Stage 7 Case - Assembly A, D and E
The maximum depth of material removal permitted on the outer case wall outside and inside surfaces is a total of 0.012 in. (0.305 mm).
The maximum depth of material removal permitted on the front and rear edge of rotor path lining retaining recess is 0.025 in. (0.635 mm).
The maximum depth of material removal in areas other than the outer case wall outside and inside surfaces, front and rear edges of the rotor path lining retaining recess, rear flange fillet radius, Location 1121 (only for Assembly D and E) and areas other than AC is 0.005 in. (0.13 mm).
Minimum blend ratio in areas other than area AC is to be 50 times the depth.
The maximum depth of material removal permitted in Zones AC is to be less than 0.110 in. (2.80 mm) in axial depth and 0.217 in. (5.50 mm) in radial depth.
Minimum blend ratio of repair is to be five times the depth and can extend in adjacent Zones AD.
If the surface damage is fully removed and material removal is in the limits, continue with Step.
If the surface damage is not fully removed, do the repair from Step again.
If the material removal is more than the limits, reject the part.
Visually examine and measure the dimensions of the repaired area(s).
SUBTASK 72-41-21-220-218 Examine the Blend Repaired Areas to the HP Compressor Stage 7 Case - Assembly A, D and E
Refer to Figure.
SUBTASK 72-41-21-350-249 Machine the Surface Damage on Front Flange Rear Face and Rear Flange Front Face - Assembly B
Chemically clean the repaired area. Refer to SPM TASK 70-11-03-300-503.
SUBTASK 72-41-21-110-271 Clean the Stage 8 Rotor Path Case - Assembly B
Refer to SPM TASK 70-35-03-300-501.
The maximum depth of the repaired area is to be less than 0.0120 in. (0.305 mm).
If the case wall outside and inside surfaces are repaired at the same location, then the limits apply to the total material removed.
The diameter of the area(s) removed is to be 50 times the depth.
Remove no more material than is necessary.
Remove area(s) of damage as necessary.
Refer to SPM TASK 70-35-03-300-501.
Make sure all damage marks are fully removed and the area(s) made smooth into the adjacent material.
Make the repaired area(s) smooth.
Refer to SPM TASK 70-35-03-300-501.
Polish the repaired area(s) to remove scratches and to give a surface finish the same as the adjacent material.
Polish the repaired area(s).
SUBTASK 72-41-21-350-253 Remove the Damage on the Outer Case Wall at Outside and Inside Surfaces and Rear Flange Fillet Radius by Dressing and Blending - Assembly B
Refer to SPM TASK 70-35-03-300-501.
The maximum depth of the repaired area is to be less than 0.0250 in. (0.635 mm).
This limit can be applied locally, in an axial or radial direction, but cannot extend around the circumference of the assembly.
The diameter of the area(s) removed is to be 50 times the depth.
Remove no more material than is necessary.
Remove area(s) of damage as necessary.
Refer to SPM TASK 70-35-03-300-501.
Make sure all the damage marks are fully removed and the area(s) made smooth into the adjacent material.
Make the repaired area(s) smooth.
Refer to SPM TASK 70-35-03-300-501.
Polish the repaired area(s) to remove scratches and to give a surface finish the same as the adjacent material.
Polish the repaired area(s).
SUBTASK 72-41-21-350-254 Remove the Damage on the Front and Rear Edge of Rotor Path Lining Retaining Recess by Dressing and Blending - Assembly B
Refer to SPM TASK 70-35-03-300-501.
The maximum depth of the repaired area(s) is to be 0.005 in. (0.13 mm).
The diameter of the area(s) removed is to be 50 times the depth.
Remove no more material than is necessary.
Remove damage from areas other than Zones AC, (and also other than the case wall and rear flange fillet radius and the front and rear edges of rotor path lining retaining recess), as necessary.
Refer to SPM TASK 70-35-03-300-501.
The maximum repair profile to be within 0.110 in. (2.80 mm) in axial depth and 0.217 in. (5.50 mm) in radial depth.
Minimum blend ratio of repair is to be 5 times the depth and can extend in adjacent Zones AD.
Remove no more material than is necessary.
Remove damage from Zones AC, as necessary
Refer to SPM TASK 70-35-03-300-501.
The maximum blend depth allowed is 0.005 in. (0.13 mm). The diameter of the area(s) removed is to be 50 times the depth.
Remove no more material than is necessary.
Remove damage from area around inner groove face (Location 1121), as necessary.
Refer to SPM TASK 70-35-03-300-501.
Make sure all damage marks are fully removed and the area(s) made smooth into the adjacent material.
Make the repaired area(s) smooth.
Refer to SPM TASK 70-35-03-300-501.
Polish the repaired area(s) to remove scratches and to give a surface finish the same as the adjacent material.
Polish the repaired area(s).
SUBTASK 72-41-21-350-260 Remove the Damaged Area(s) by Dressing and Blending - Assembly B
Chemically clean the repaired area(s). Refer to SPM TASK 70-11-03-300-503.
SUBTASK 72-41-21-110-205 Chemically Clean - Assembly B
The maximum depth of material removal permitted on the outer case wall outside and inside surfaces is a total of 0.012 in. (0.305 mm).
The maximum depth of material removal permitted on the front and rear edge of rotor path lining retaining recess is 0.0250 in. (0.635 mm).
The maximum depth of material removal in areas other than the outer case wall outside and inside surfaces, front and rear edges of the rotor path lining retaining recess, rear flange fillet radius, Location 1121 and areas other than AC is 0.005 in. (0.13 mm).
Minimum blend ratio in areas other than area AC is to be 50 times the depth. The maximum depth of material removal permitted in Zones AC is to be 0.110 in. (2.80 mm) in axial depth and 0.217 in. (5.50 mm) in radial depth.
Minimum blend ratio of repair is to be five times the depth and can extend in adjacent Zones AD.
If the surface damage is fully removed and material removal is in the limits, continue with Step.
If the surface damage is not fully removed, do the repair from Step again.
If the material removal is more than the limits, reject the part.
Visually examine and measure the dimensions of the repaired area(s).
SUBTASK 72-41-21-220-682 Examine the Repair to the HP Compressor Stage 8 Rotor Path Case - Assembly B
Refer to Figure.
Machine only faces and diameters marked with machining tick.
Remove only the minimum amount of material to remove the damage.
Skim machine the corrosion pitting faces and diameter.
Remove sharp edges and/or burrs.
SUBTASK 72-41-21-350-261 Machine the Surface Damage on Front Flange Rear Face and Rear Flange Front Face Assembly C
Machine only damaged holes.
Remove only the minimum amount of material required to remove the damage, up to the maximum size.
Machine the damaged holes.
Re-establish hole chamfers.
Remove sharp edges and/or burrs.
SUBTASK 72-41-21-350-262 Machine the Surface Damage on Boltholes - Assembly C
Chemically clean the repaired area. Refer to SPM TASK 70-11-03-300-503.
SUBTASK 72-41-21-110-196 Clean the Stage 8 Rotor Path Case - Assembly C
Refer to SPM TASK 70-35-03-300-501.
The maximum depth of the repaired area(s) to be within 0.012 in. (0.305 mm).
If the case wall outside and inside surfaces are repaired at the same location, then the limits apply to the total material removed.
The diameter of the area(s) removed is to be 50 times the depth.
Remove no more material than is necessary.
Remove area(s) of damage as necessary.
Refer to SPM TASK 70-35-03-300-501.
Make sure all damage marks are fully removed and the area(s) made smooth into the adjacent material.
Make the repaired area(s) smooth.
Refer to SPM TASK 70-35-03-300-501.
Polish the repaired area(s) to remove scratches and to give a surface finish the same as the adjacent material.
Polish the repaired area(s).
SUBTASK 72-41-21-350-263 Remove the Damage on the Outer Case Wall at Outside and Inside Surfaces and Rear Flange Fillet Radius by Dressing and Blending - Assembly C
Refer to SPM TASK 70-35-03-300-501.
The maximum depth of the repaired area(s) to be within 0.025 in. (0.635 mm).
The diameter of the area(s) removed is to be 50 times the depth.
Remove no more material than is necessary.
Remove area(s) of damage as necessary.
Refer to SPM TASK 70-35-03-300-501.
Make sure all damage marks are fully removed and the area(s) made smooth into the adjacent material.
Make the repaired area(s) smooth.
Refer to SPM TASK 70-35-03-300-501.
Polish the repaired area(s) to remove scratches and to give a surface finish same as the adjacent material.
Polish the repaired area(s).
SUBTASK 72-41-21-350-264 Remove the Damage on the Front and Rear Edge of Rotor Path Lining Retaining Recess by Dressing and Blending - Assembly C
Refer to SPM TASK 70-35-03-300-501.
The maximum depth of the repaired area(s) is to be 0.005 in. (0.13 mm).
The diameter of the area(s) removed is to be 50 times the depth.
Remove no more material than is necessary.
Remove damage from areas other than Zones AC, (and also other than the case wall and rear flange fillet radius and the front and rear edges of rotor path lining retaining recess), as necessary.
Refer to SPM TASK 70-35-03-300-501.
The maximum repair profile to be within 0.110 in. (2.80 mm) in axial depth and 0.217 in. (5.50 mm) in radial depth.
Minimum blend ratio of repair is to be 5 times the depth and can extend in adjacent Zones AD.
Remove no more material than is necessary.
Remove damage from Zones AC, as necessary.
Refer to SPM TASK 70-35-03-300-501.
The maximum blend depth allowed is 0.005 inch (0.13 mm). The diameter of the area(s) removed is to be 50 times the depth.
Remove no more material than is necessary.
Remove damage from area around inner groove face (Location 1121), as necessary.
Refer to SPM TASK 70-35-03-300-501.
Make sure all damage marks are fully removed and the area(s) made smooth into the adjacent material.
Make the repaired area(s) smooth.
Refer to SPM TASK 70-35-03-300-501.
Polish the repaired area(s) to remove scratches and to give a surface finish the same as the adjacent material.
Polish the repaired area(s).
SUBTASK 72-41-21-350-265 Remove the Damaged Area(s) by Dressing and Blending - Assembly C
Chemically clean the repaired area(s). Refer to SPM TASK 70-11-03-300-503.
SUBTASK 72-41-21-110-197 Chemically Clean - Assembly C
Make sure the surface finish is the same as the adjacent material.
The maximum depth of material removal permitted on the outer case wall outside and inside surfaces is a total of 0.012 in. (0.305 mm).
The maximum depth of material removal permitted on the front and rear edge of rotor path lining retaining recess is 0.025 in. (0.635 mm).
The maximum depth of material removal in areas other than the outer case wall outside and inside surfaces, front and rear edges of the rotor path lining retaining recess, rear flange fillet radius, Location 1121 and areas other than AC is 0.005 in. (0.13 mm).
Minimum blend ratio in areas other than area AC is to be 50 times the depth.
The maximum depth of material removal permitted in Zones AC is to be 0.110 in. (2.80 mm) in axial depth and 0.217 in. (5.50 mm) in radial depth.
Minimum blend ratio of repair in Area AC is to be 5 times the depth and can extend in adjacent Zones AD.
If the surface damage is fully removed and material removal is within the limits, continue with Step.
If the surface damage is not fully removed, do the Step onwards again.
If the material removal is more than the limits, reject the part.
Visually examine and measure the dimensions of the repaired area(s).
SUBTASK 72-41-21-220-760 Examine the Blend Repaired Area(s) to the HP Compressor Stage 8 Rotor Path Case - Assembly C
Chemically clean the repaired area(s). Refer to SPM TASK 70-11-26-300-503.
Refer to SPM TASK 70-11-39-300-503.
Swab etch the repaired area(s).
SUBTASK 72-41-21-110-227 Do a Swab Etch
Cracks are not permitted.
Reject the part, if cracked.
Do a fluorescent penetrant inspection of the repaired area(s) by TASK 72-41-21-200-000 and applicable part number.
Refer to SPM TASK 70-35-03-300-501.
Polish the repaired area(s) to remove scratches and to give a surface finish the same as the adjacent material.
Polish the repaired area(s).
SUBTASK 72-41-21-230-083 Do a Crack Test
Refer to the Repair, VRS6549 TASK 72-41-21-300-027 (REPAIR-027).
Install the riveted location dowel.
SUBTASK 72-41-21-350-266 Install the Location Dowel - Assembly A, B, C, D and E
Refer to SPM TASK 70-09-00-400-501, SUBTASK 70-09-00-400-001.
Vibro peen VRS6093 adjacent to the part number.
SUBTASK 72-41-21-350-210 Identify the Repair
Figure: High Pressure (HP) Compressor Stage 7 Case and Stage 8 path Case Assembly - Repair Details and Dimensions - Assembly A, B, C, D and E
High Pressure (HP) Compressor Stage 7 Case and Stage 8 path Case Assembly - Repair Details and Dimensions - Assembly A, B, C, D and E
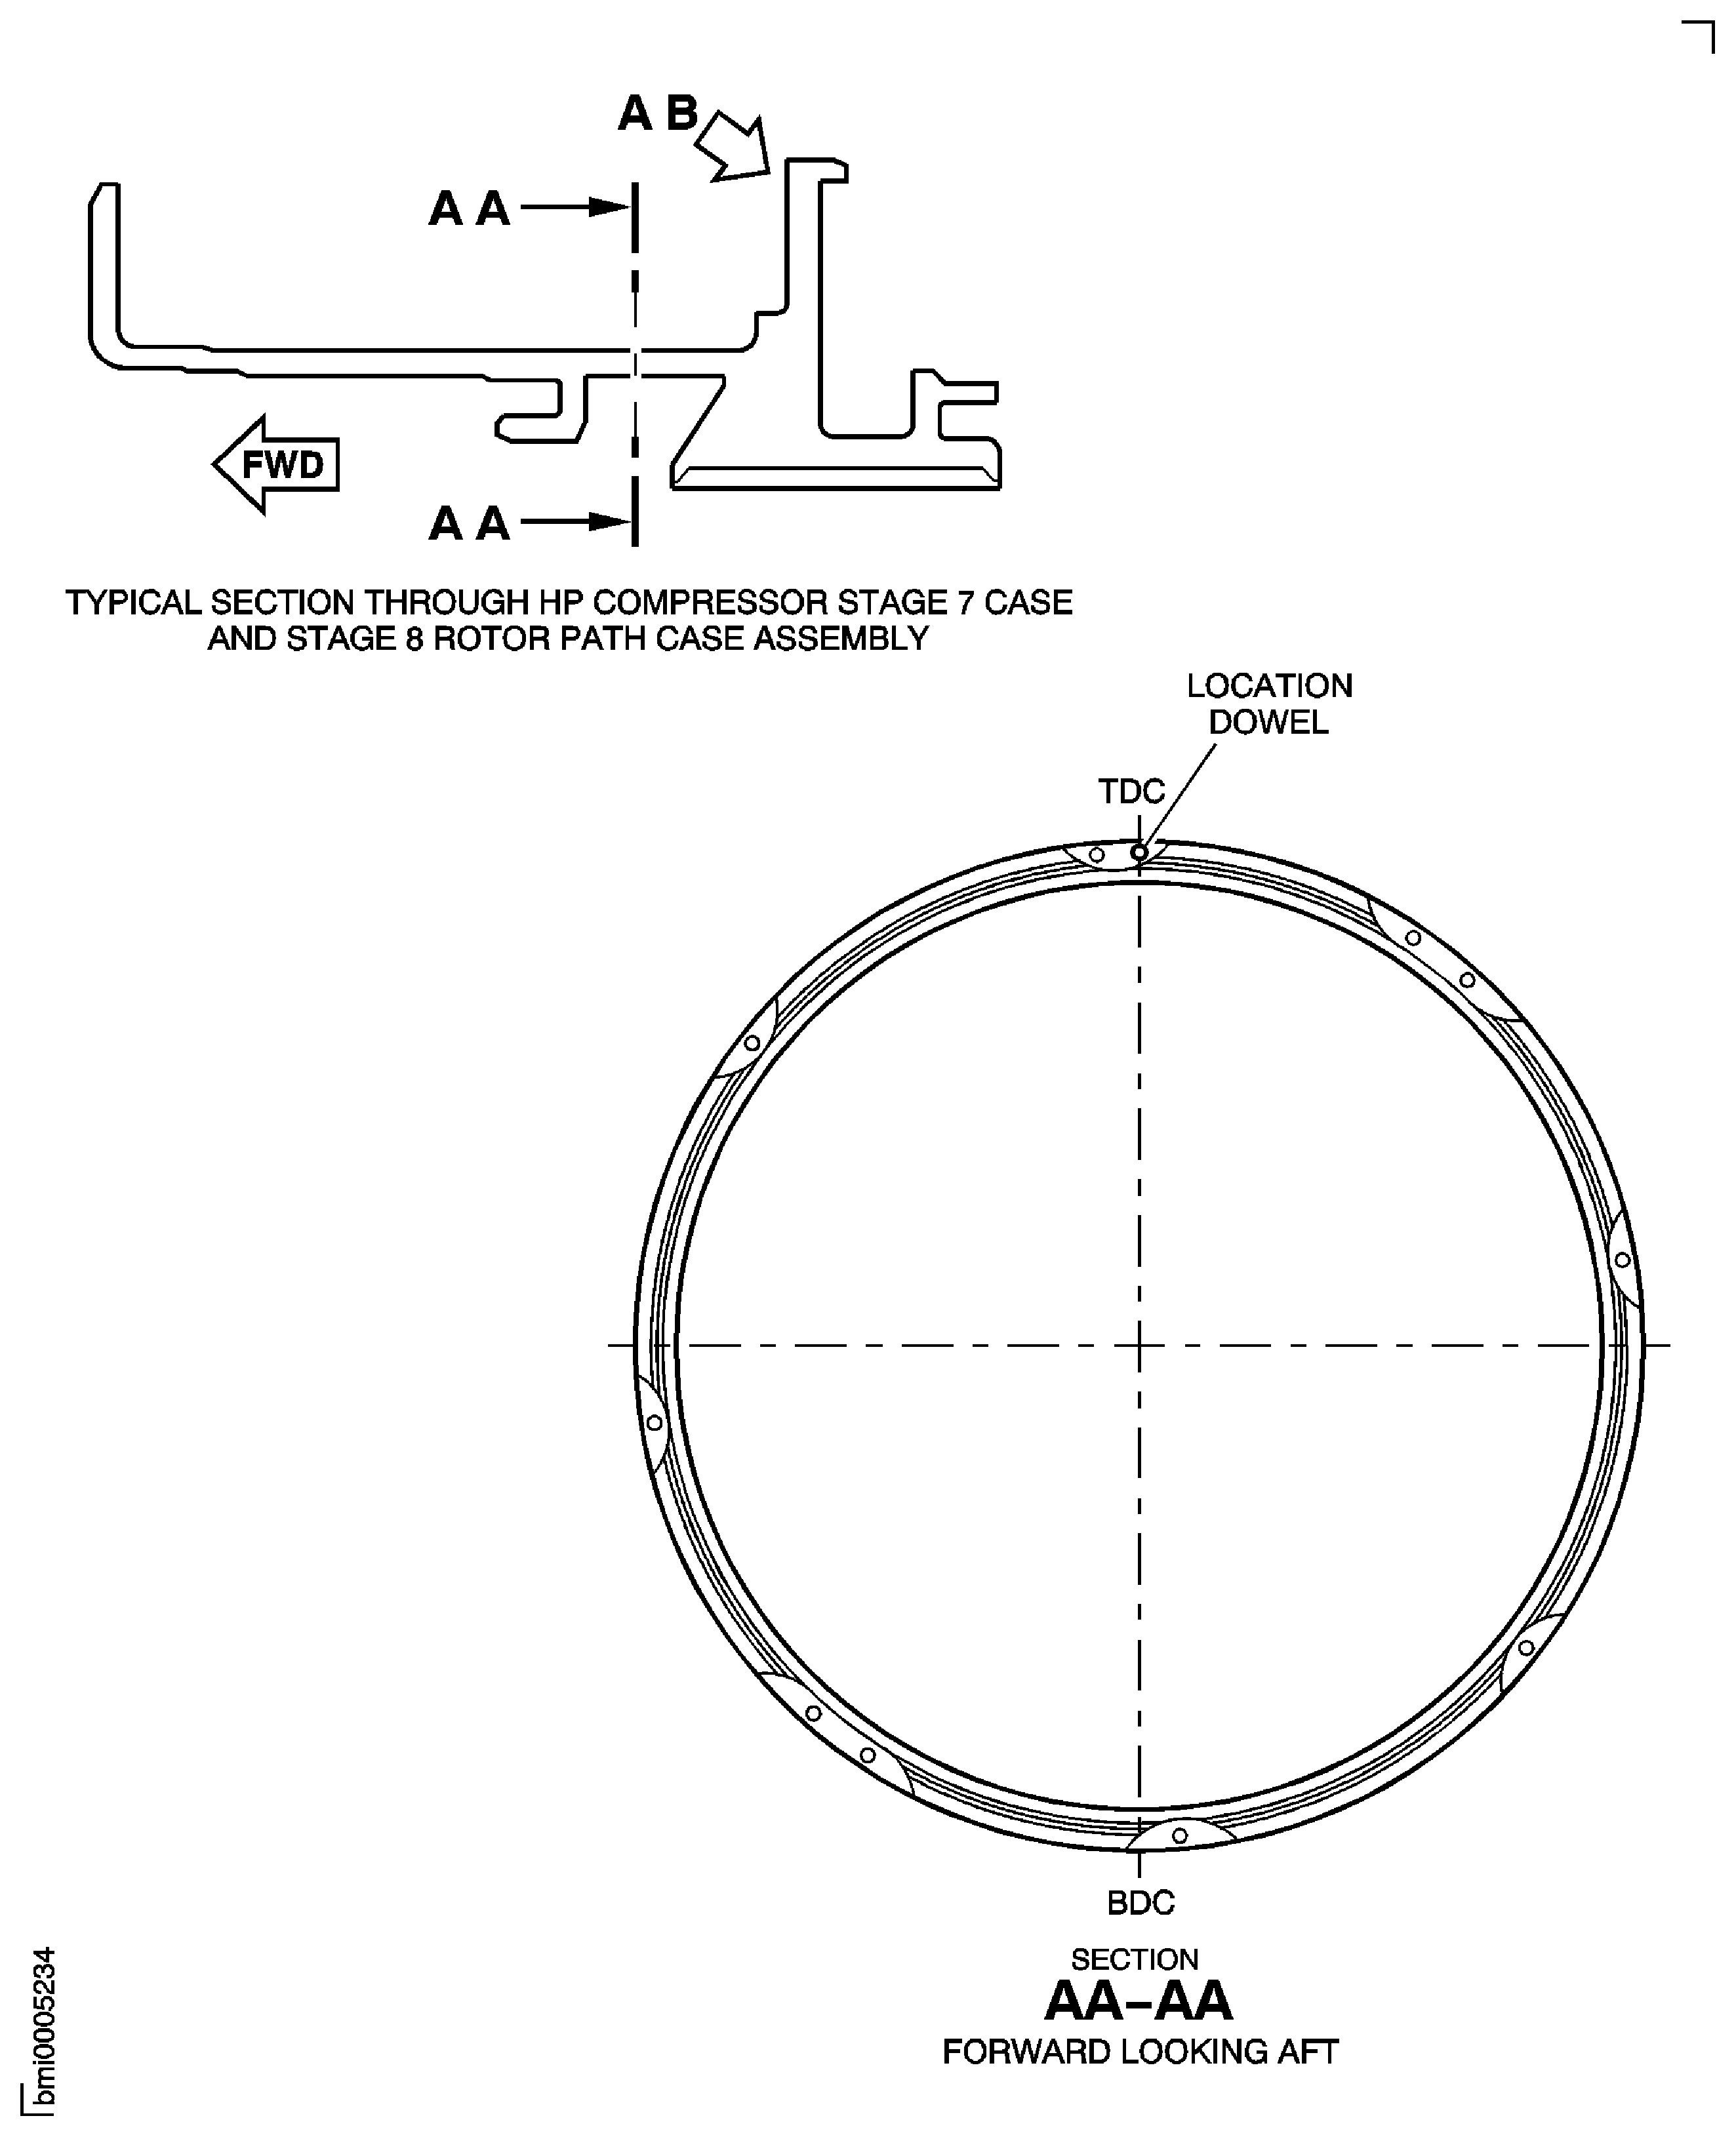
Figure: High Pressure (HP) Compressor Stage 7 Case and Stage 8 Rotor Path Case Assembly - Repair Details and Dimensions - Assembly A, B, C, D and E
High Pressure (HP) Compressor Stage 7 Case and Stage 8 Rotor Path Case Assembly - Repair Details and Dimensions - Assembly A, B, C, D and E
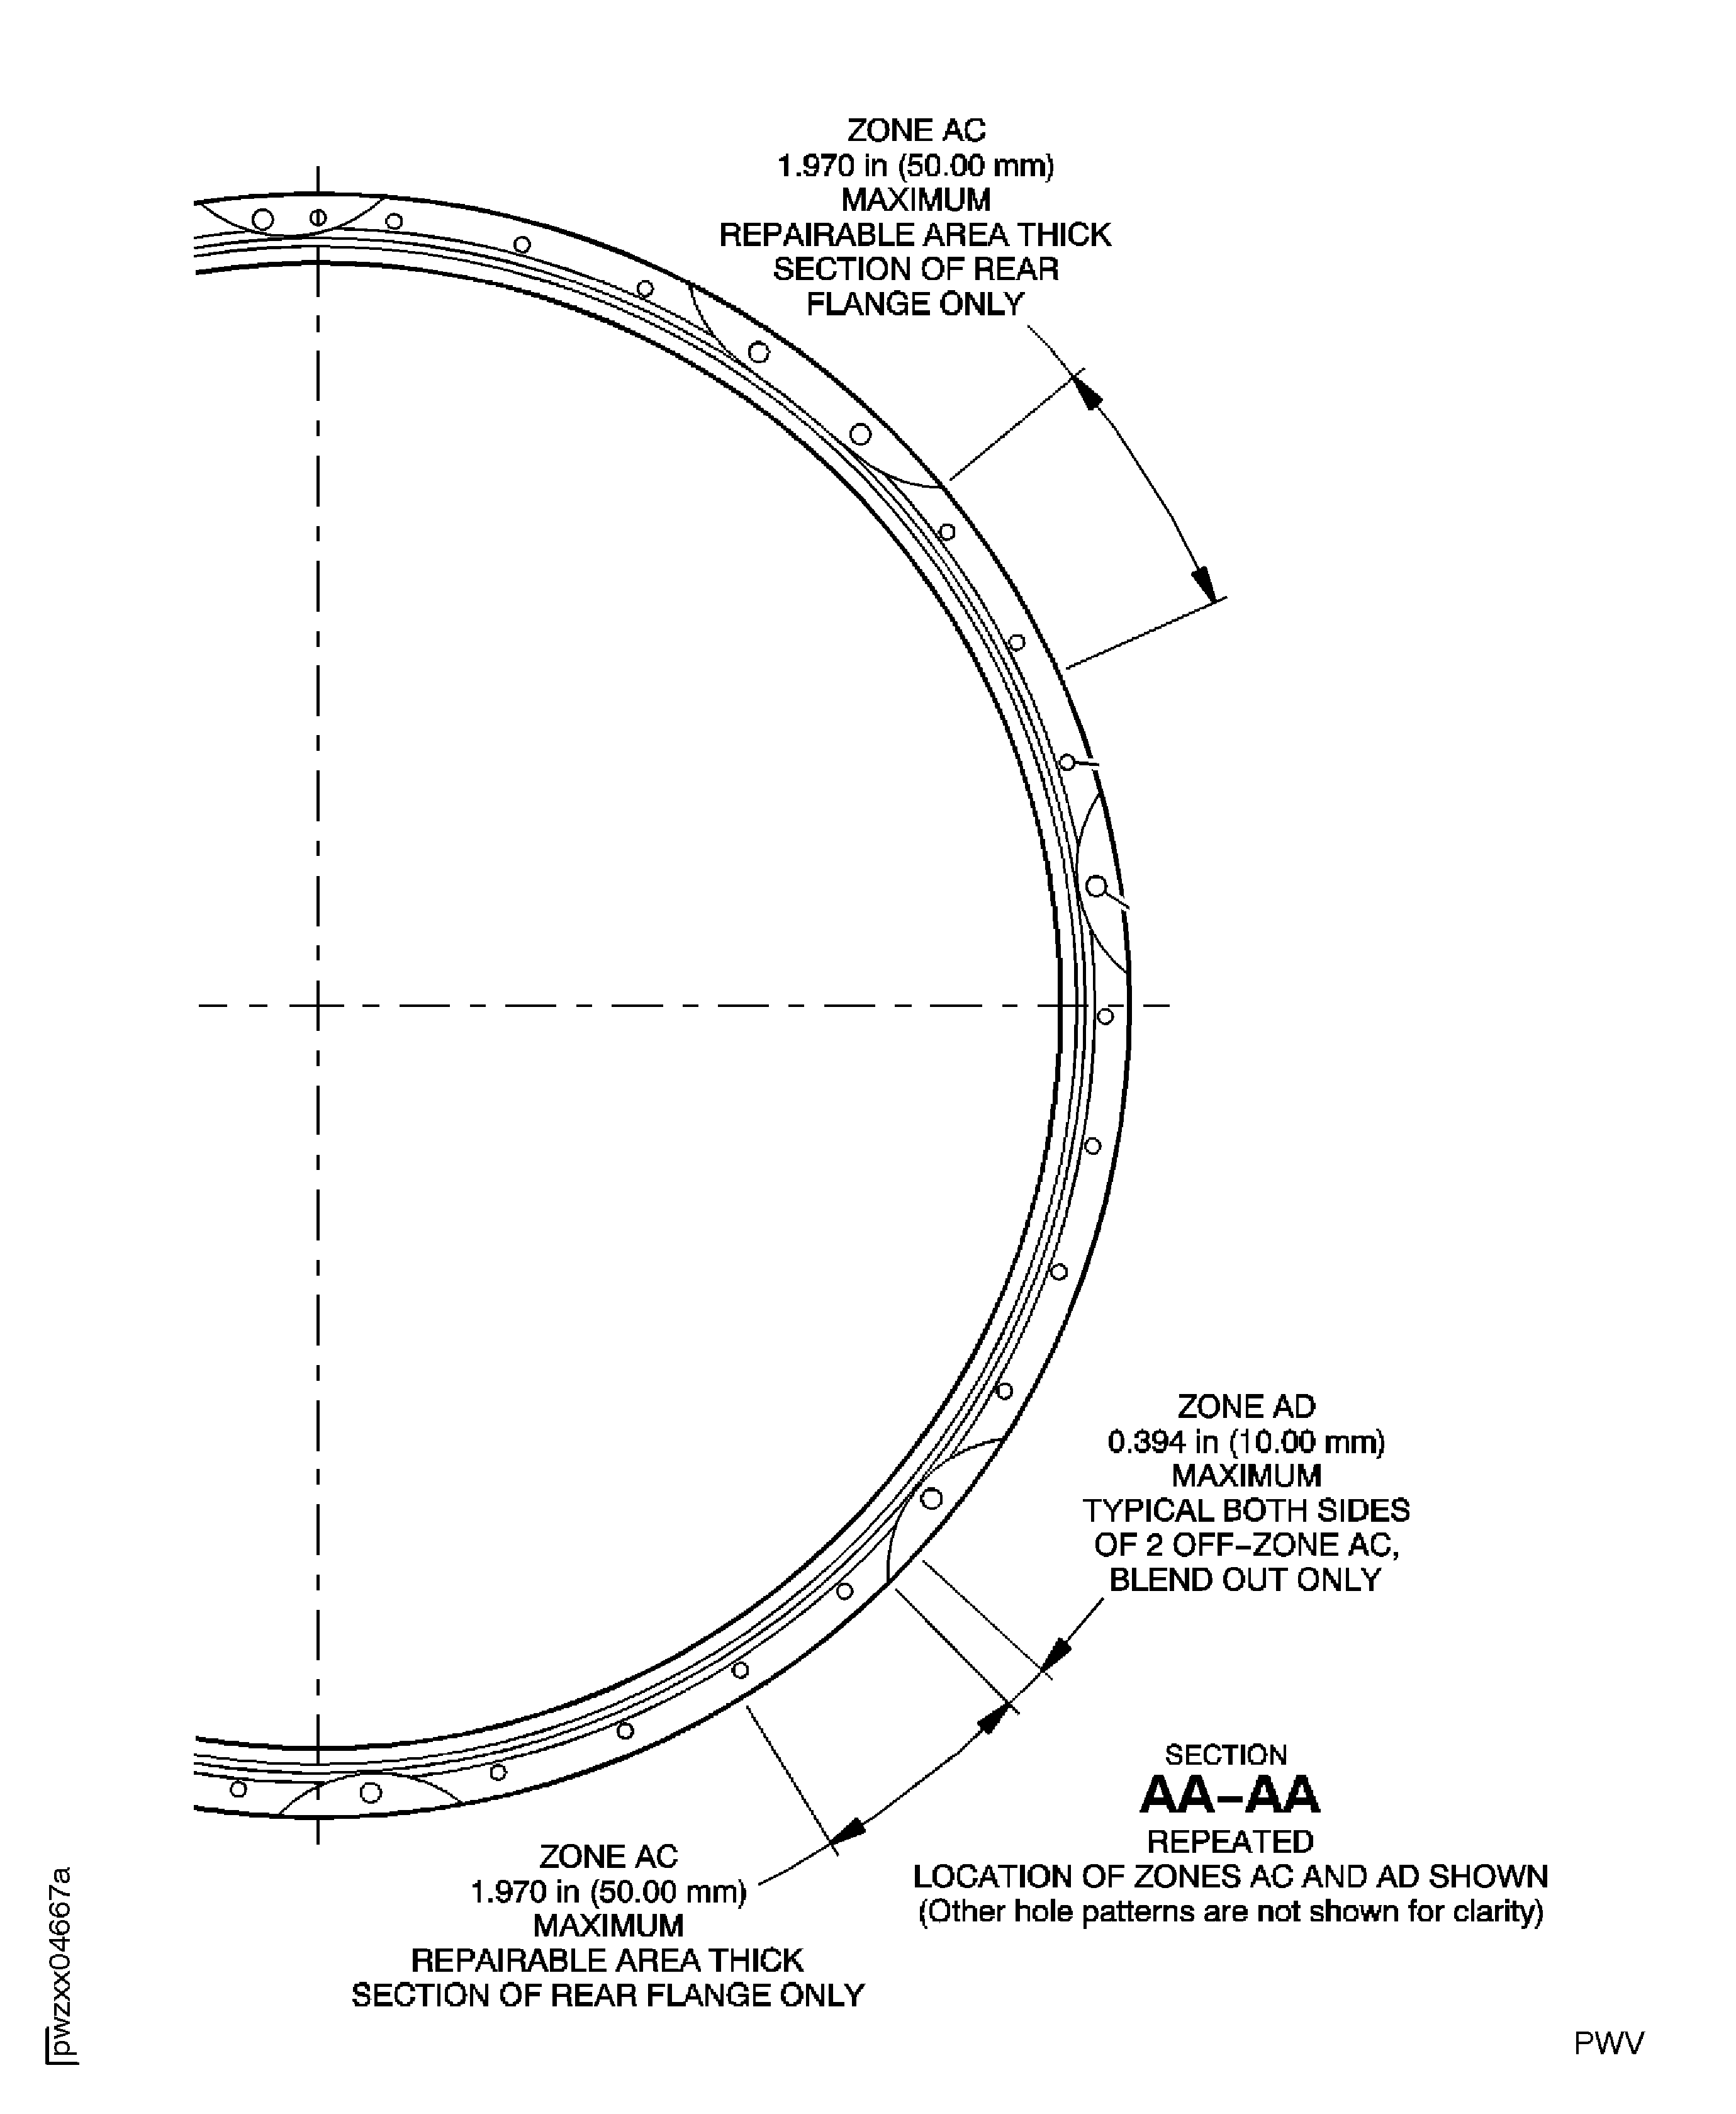
Figure: High Pressure (HP) Compressor Stage 7 Case and Stage 8 Rotor Path Case Assembly - Repair Details and Dimensions - Assembly A, B, D and E
High Pressure (HP) Compressor Stage 7 Case and Stage 8 Rotor Path Case Assembly - Repair Details and Dimensions - Assembly A, B, D and E
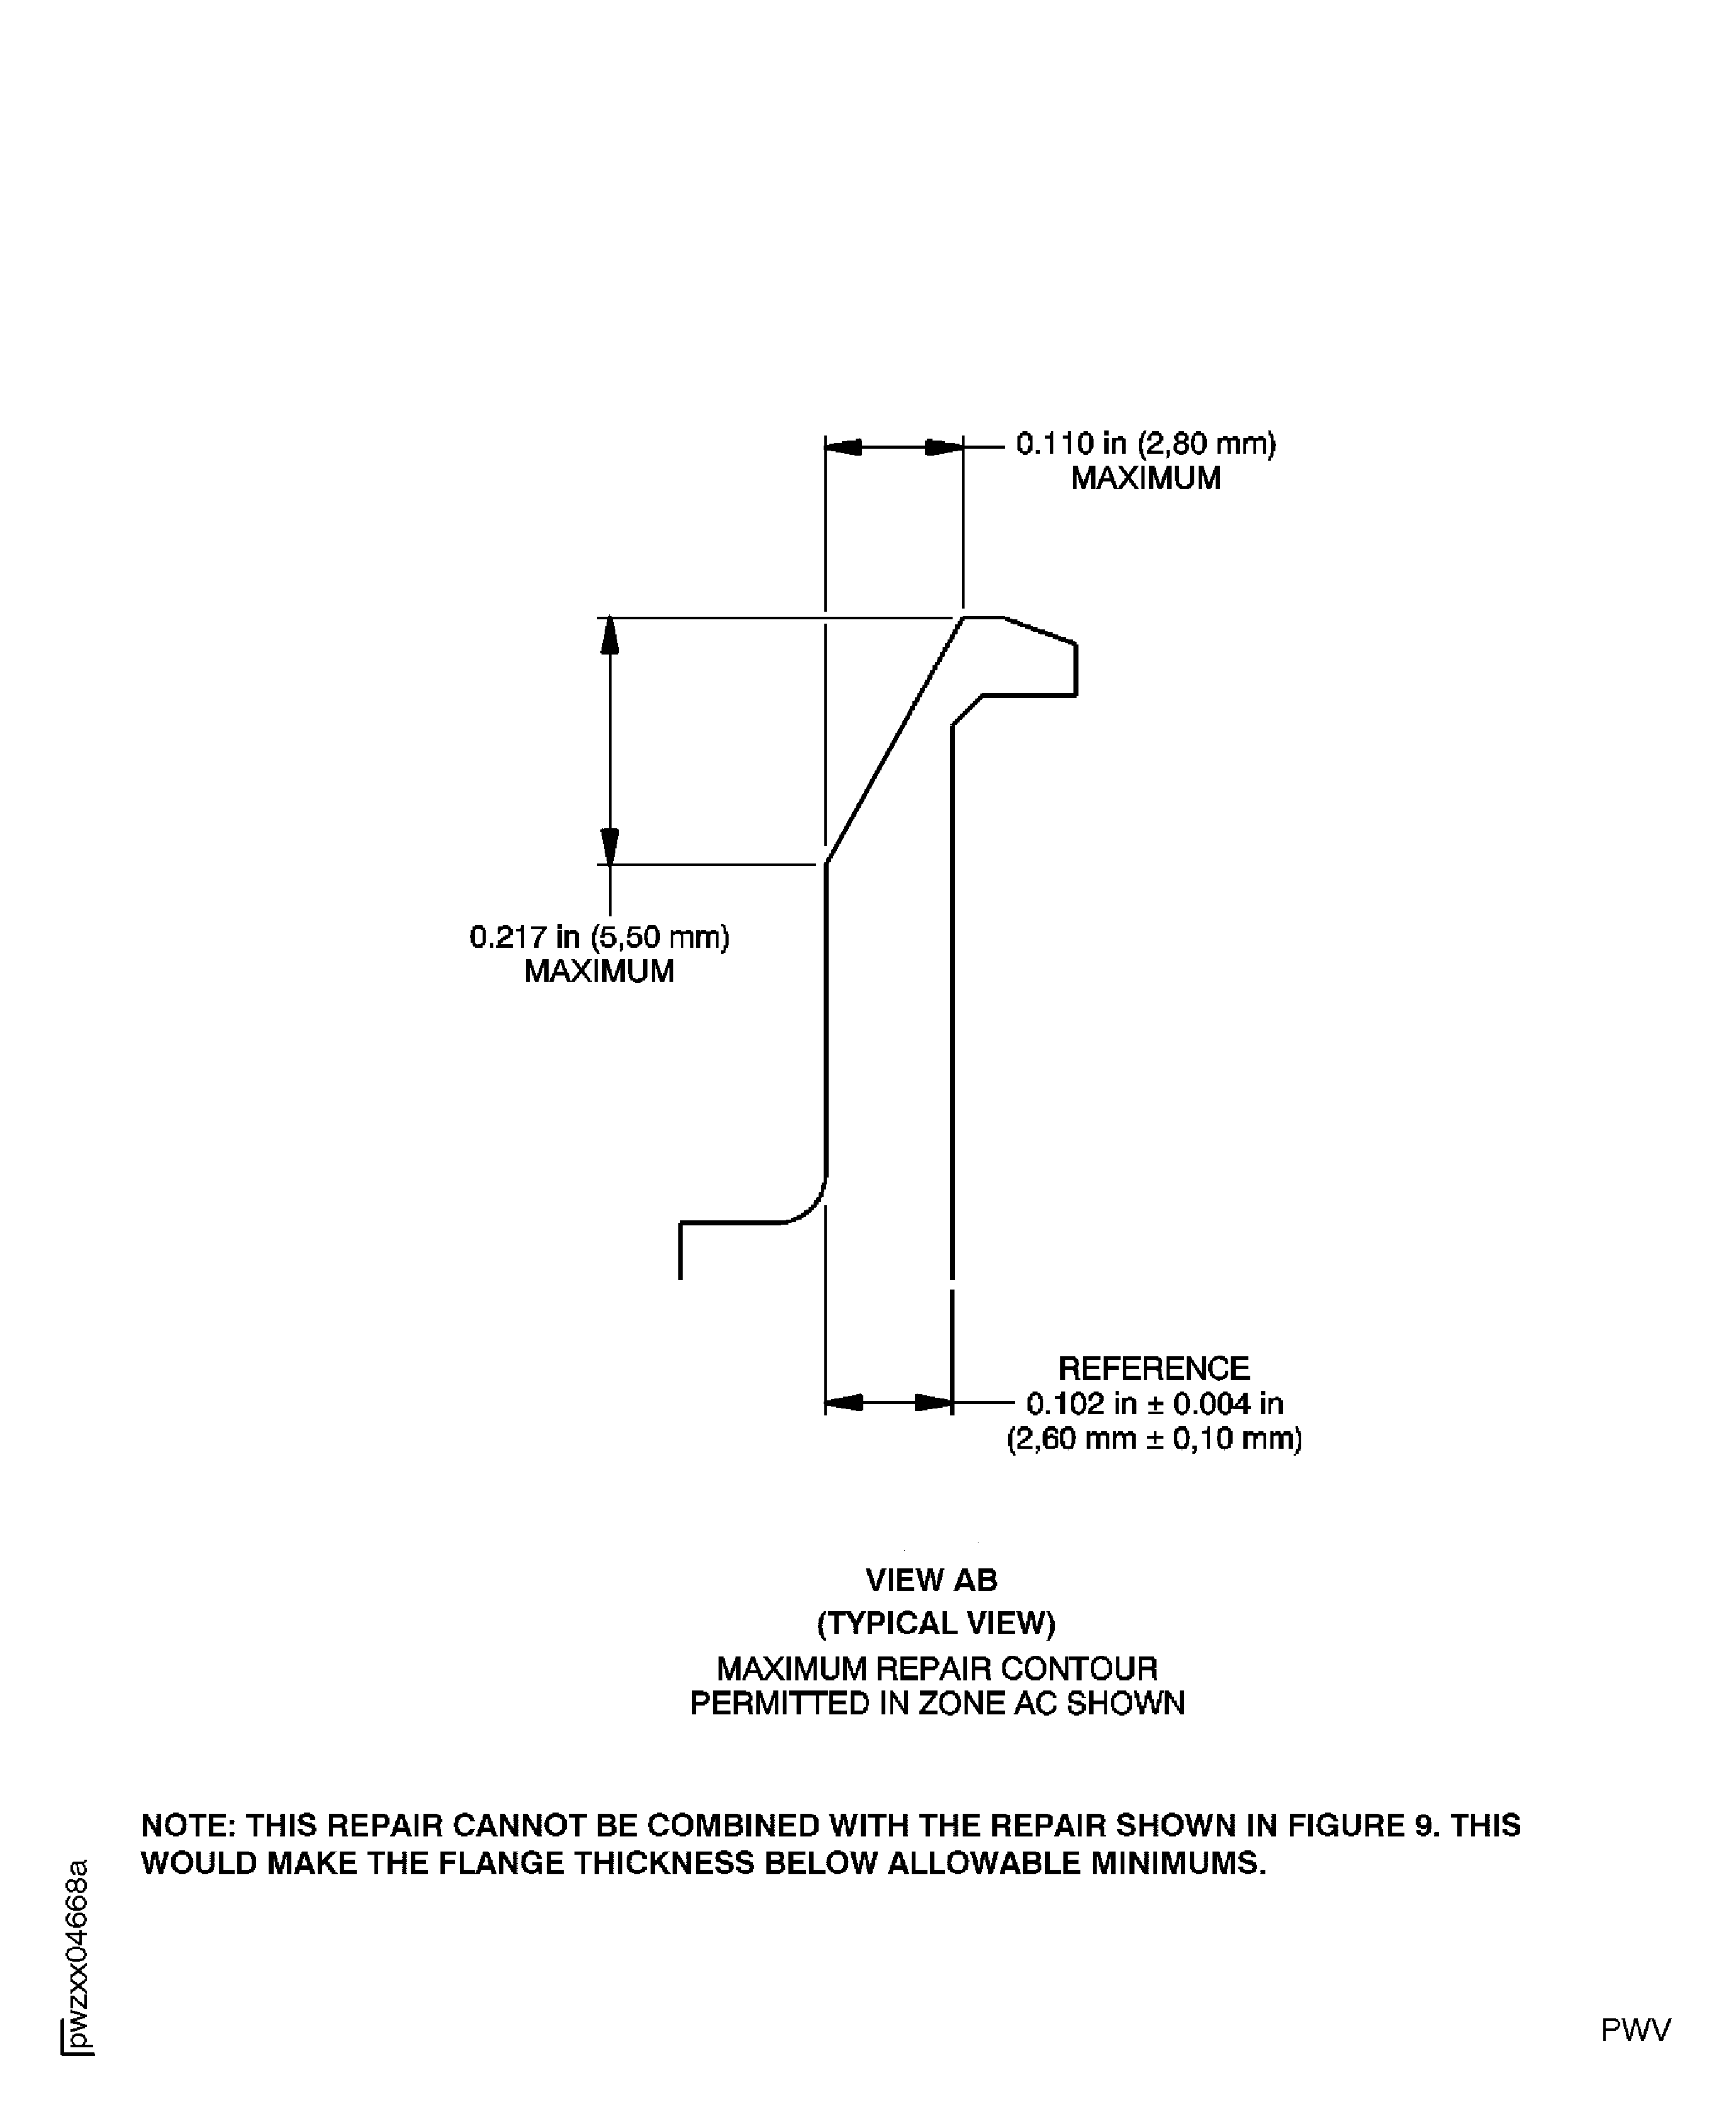
Figure: High Pressure (HP) Compressor Stage 7 Case and Stage 8 Rotor Path Case Assembly - Repair Details and Dimensions - Assembly A, B, C, D and E
High Pressure (HP) Compressor Stage 7 Case and Stage 8 Rotor Path Case Assembly - Repair Details and Dimensions - Assembly A, B, C, D and E
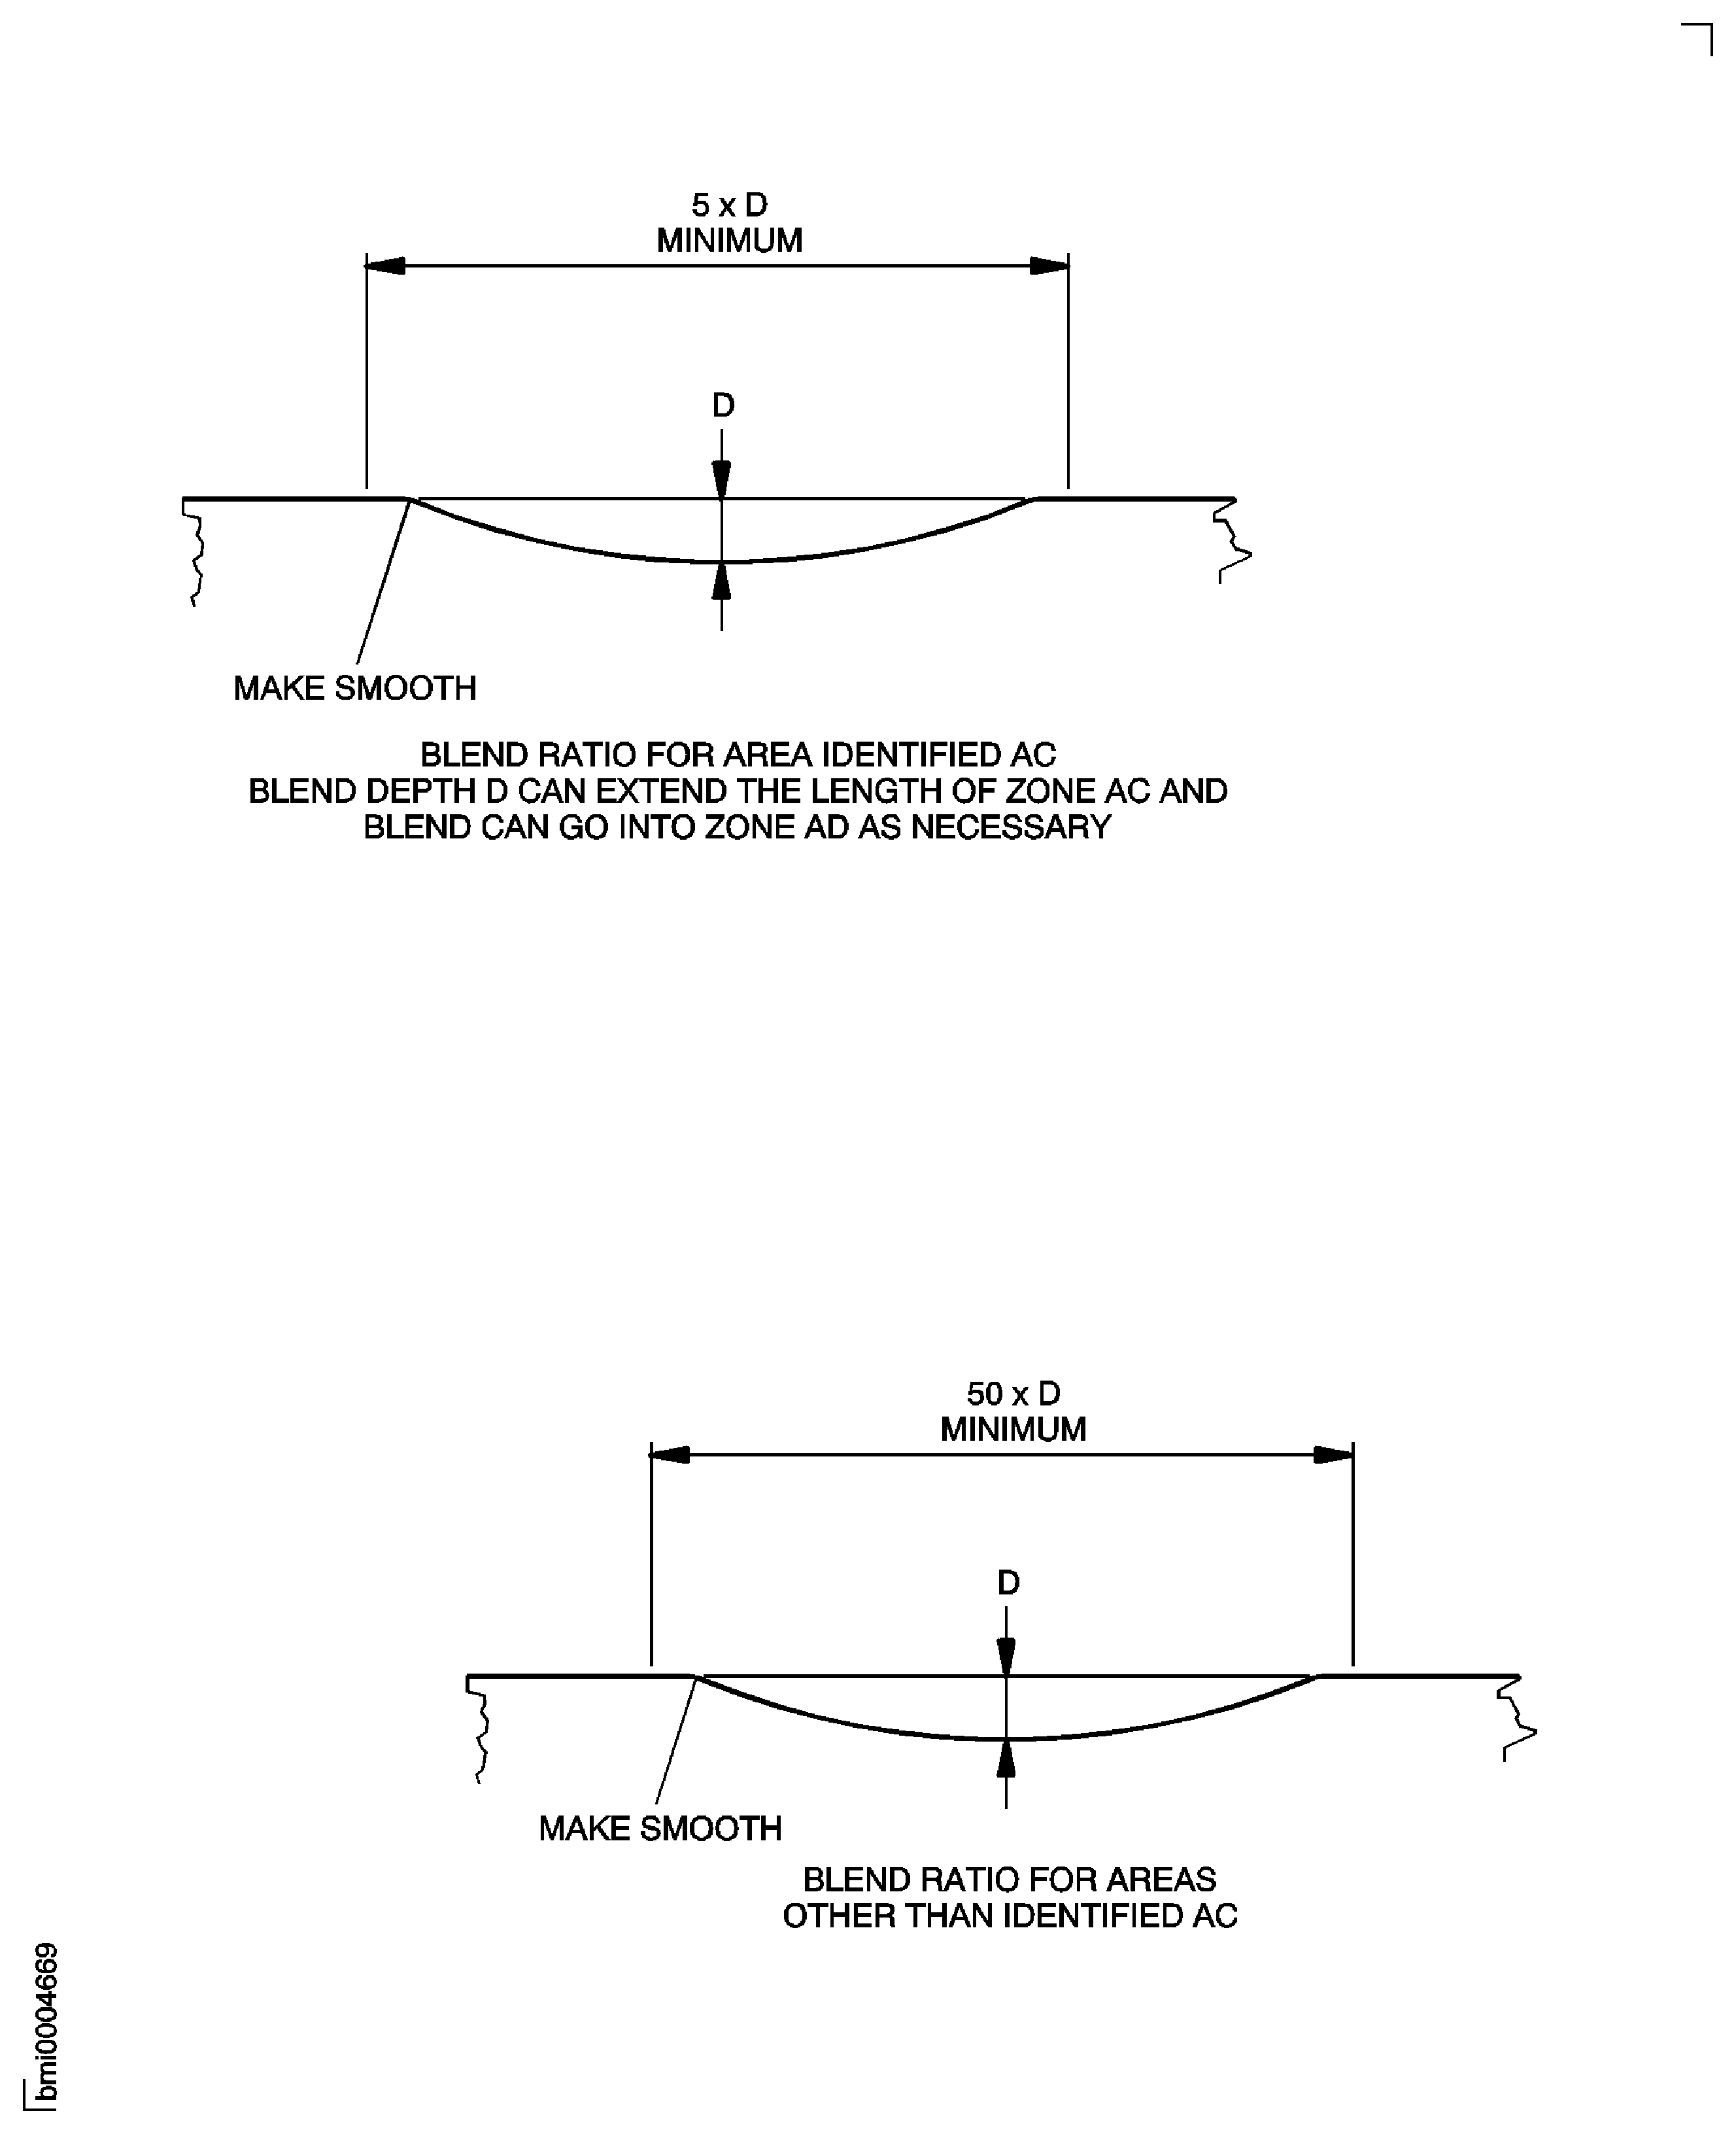
Figure: High Pressure (HP) Compressor Stage 8 Rotor Path Case Assembly - Repair Details and Dimensions - Assembly B
High Pressure (HP) Compressor Stage 8 Rotor Path Case Assembly - Repair Details and Dimensions - Assembly B
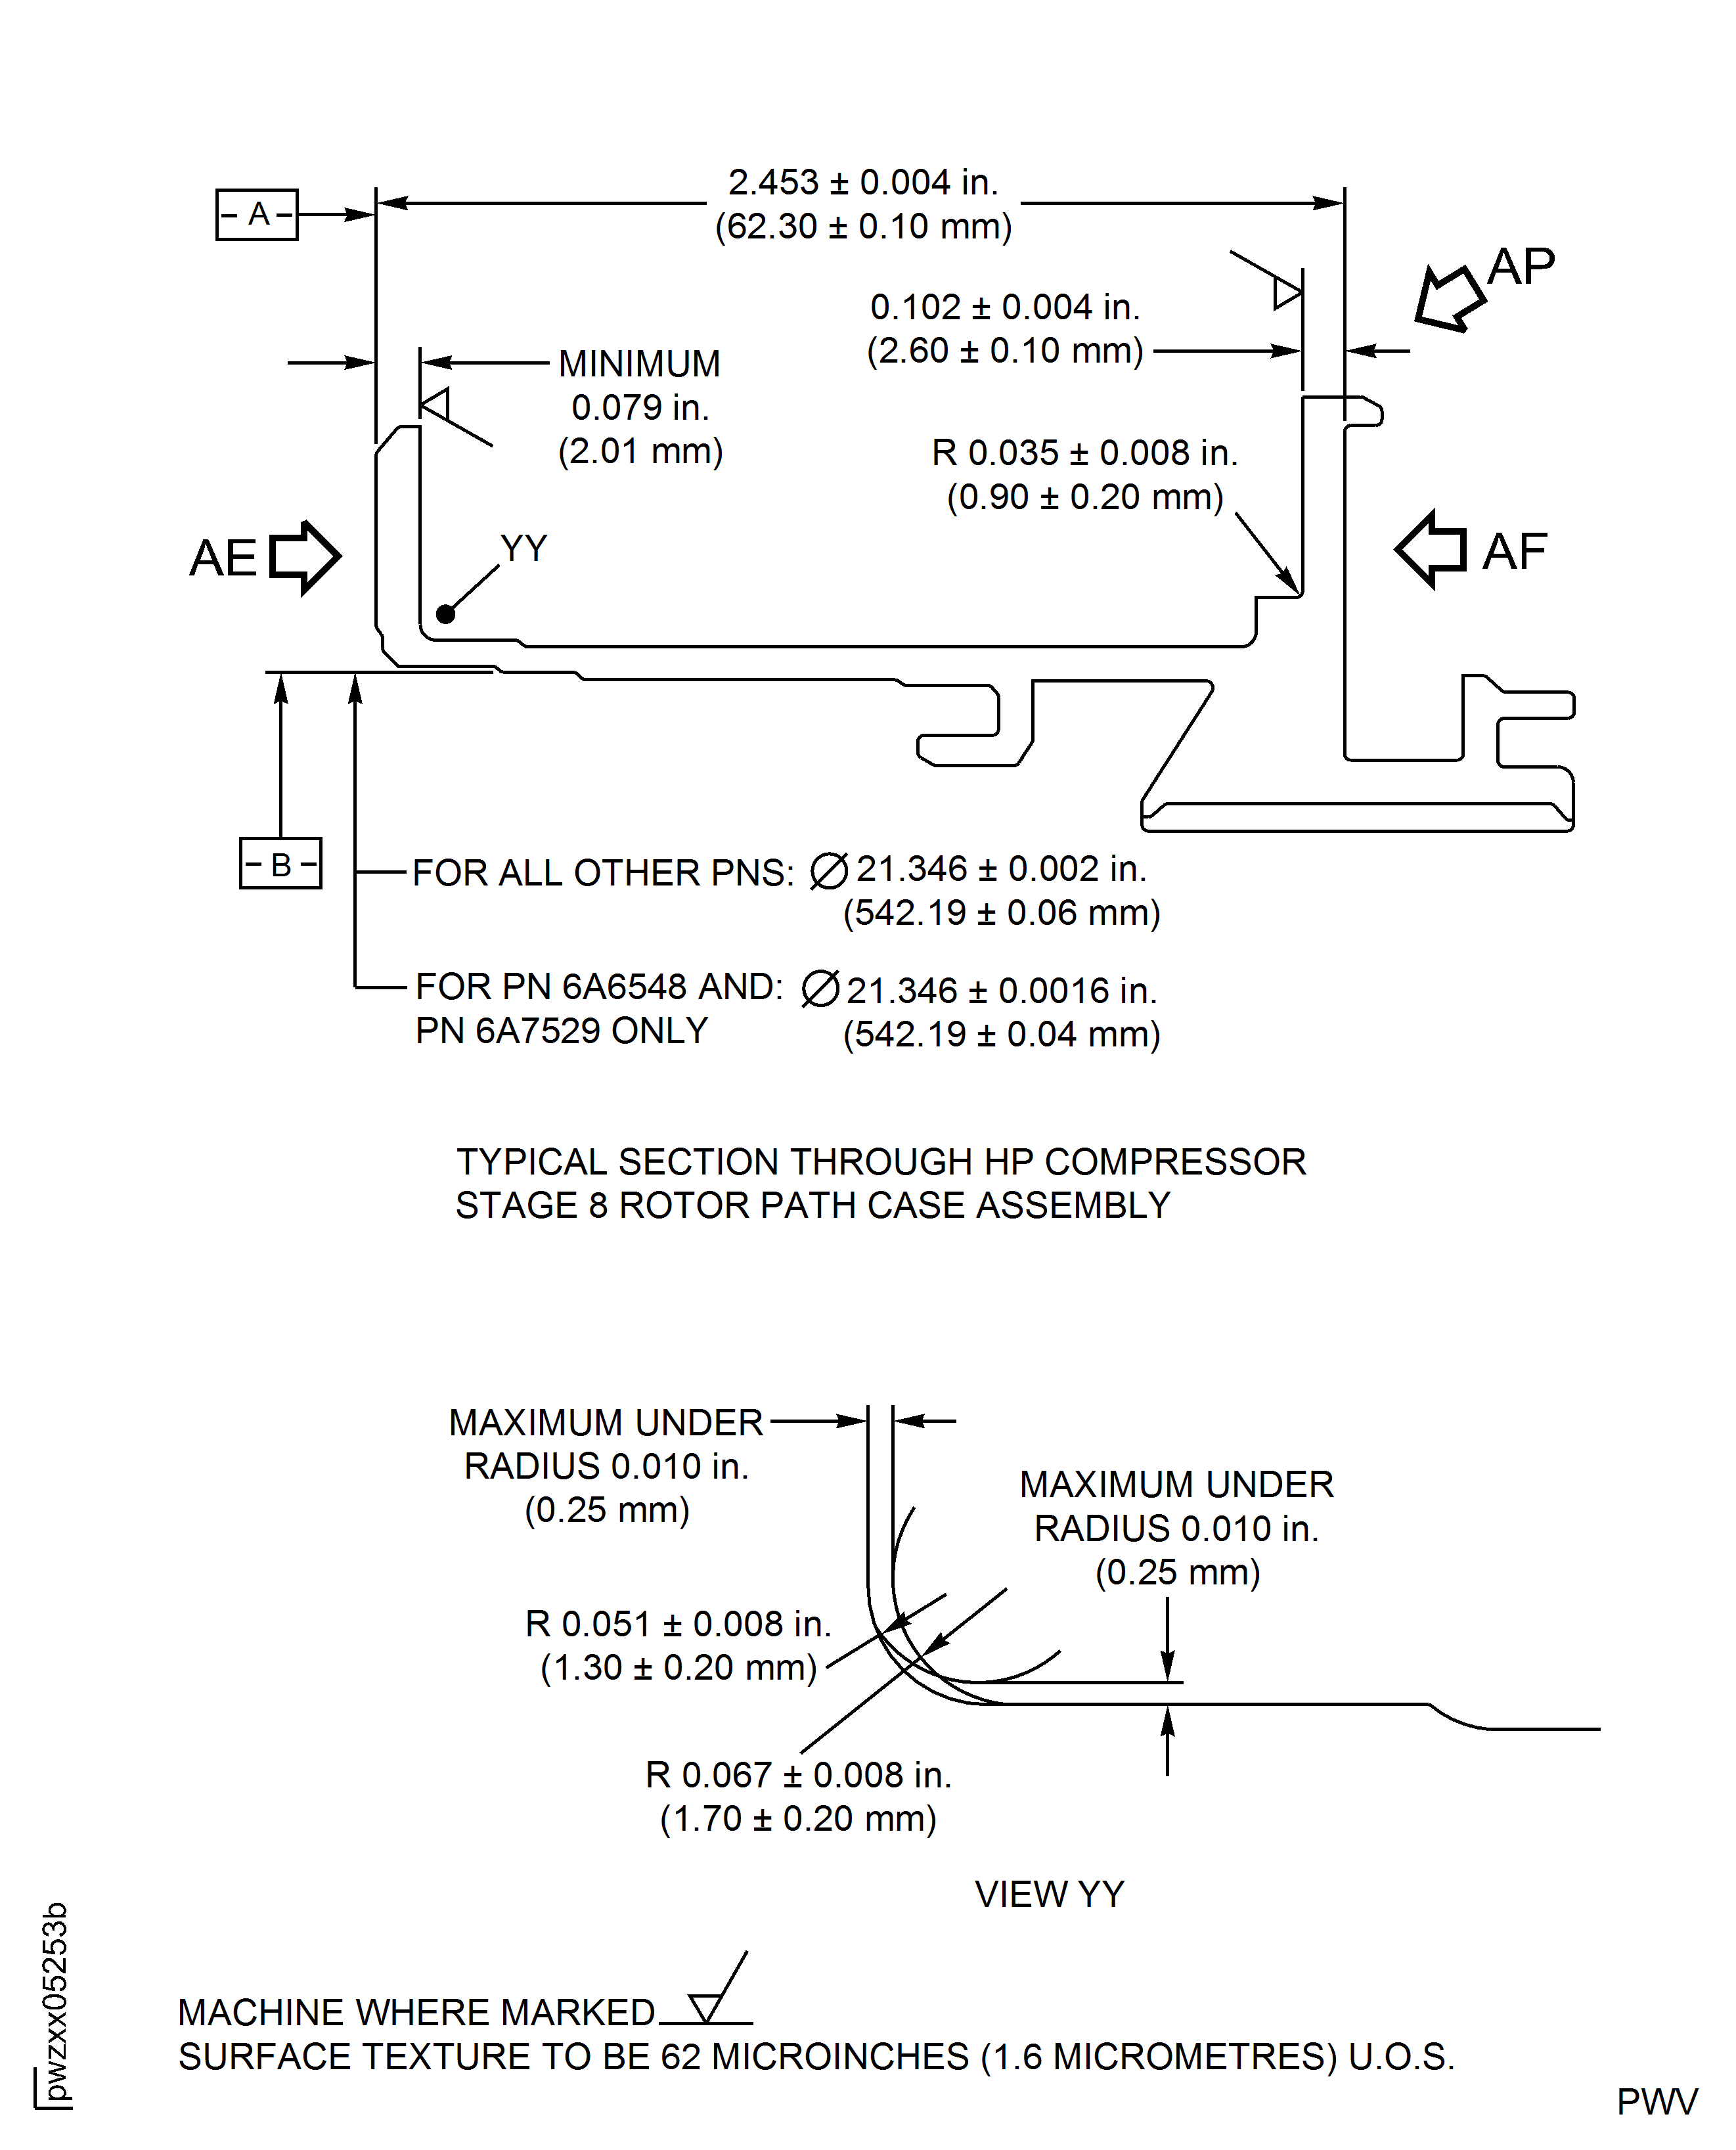
Figure: High Pressure (HP) Compressor Stage 8 Rotor Path Case Assembly - Repair Details and Dimensions - Assembly B
High Pressure (HP) Compressor Stage 8 Rotor Path Case Assembly - Repair Details and Dimensions - Assembly B
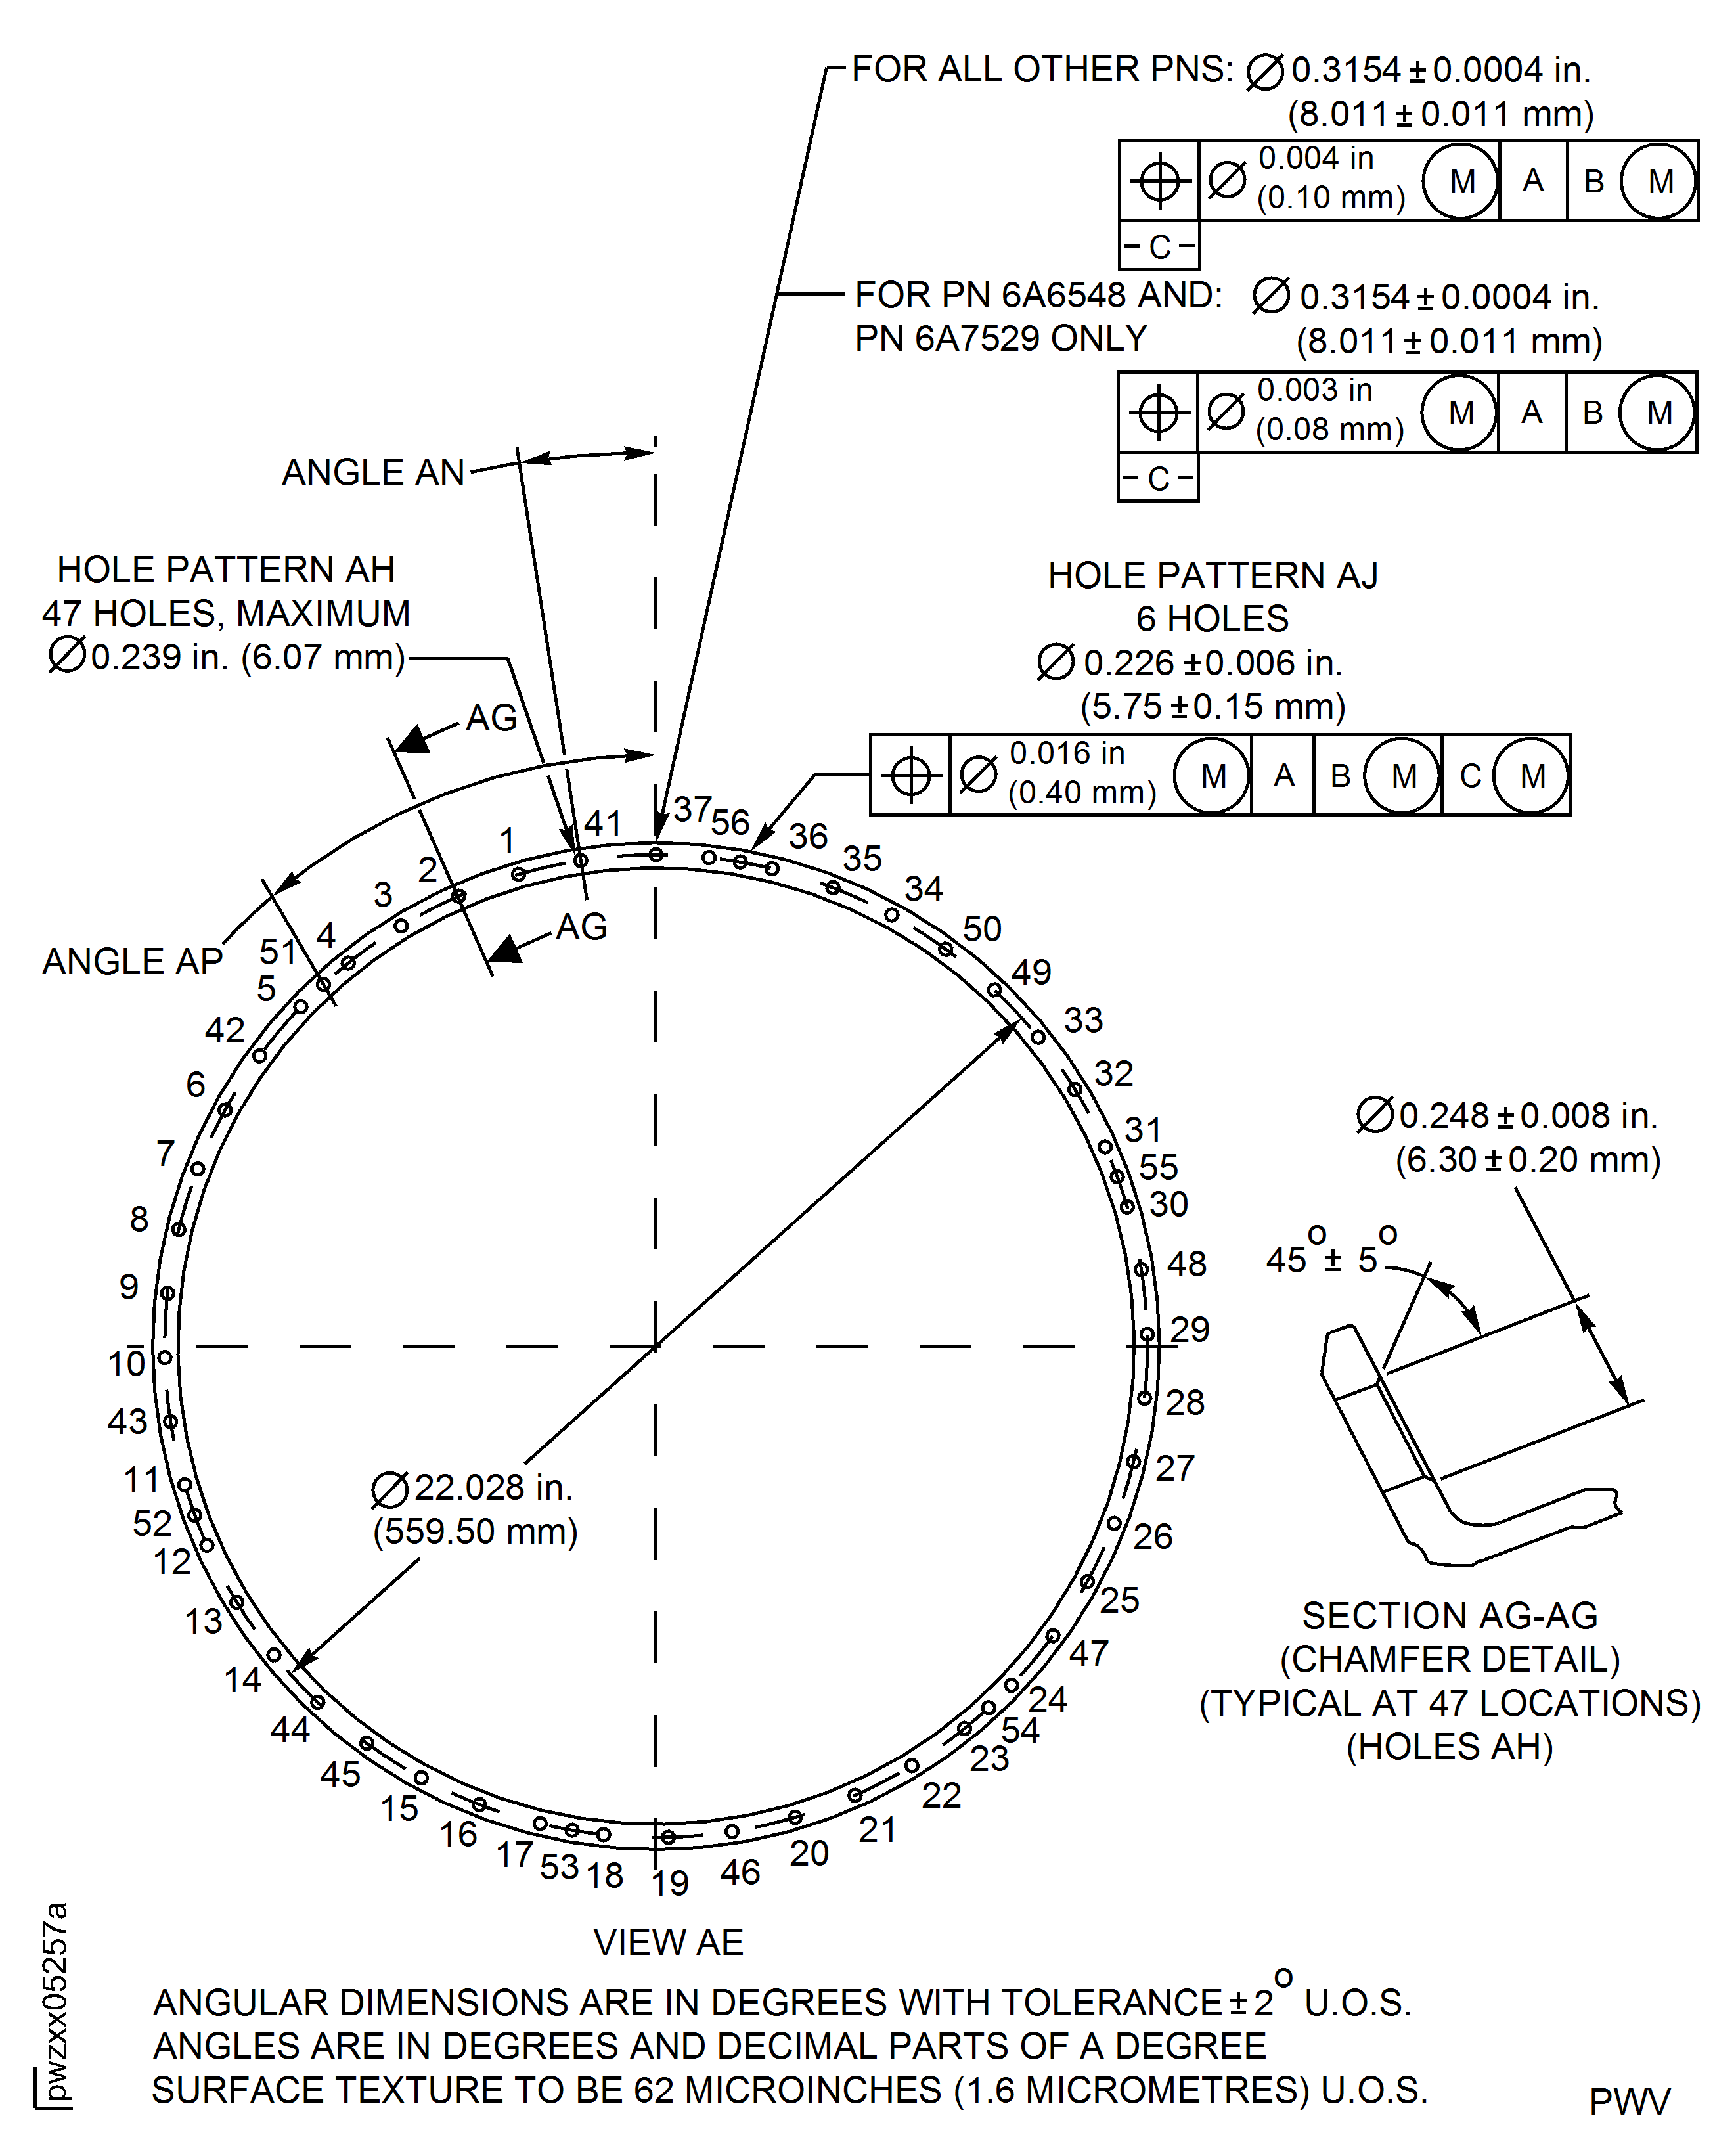
Figure: High Pressure (HP) Compressor Stage 8 Rotor Path Case Assembly - Repair Details and Dimensions - Assembly B
High Pressure (HP) Compressor Stage 8 Rotor Path Case Assembly - Repair Details and Dimensions - Assembly B
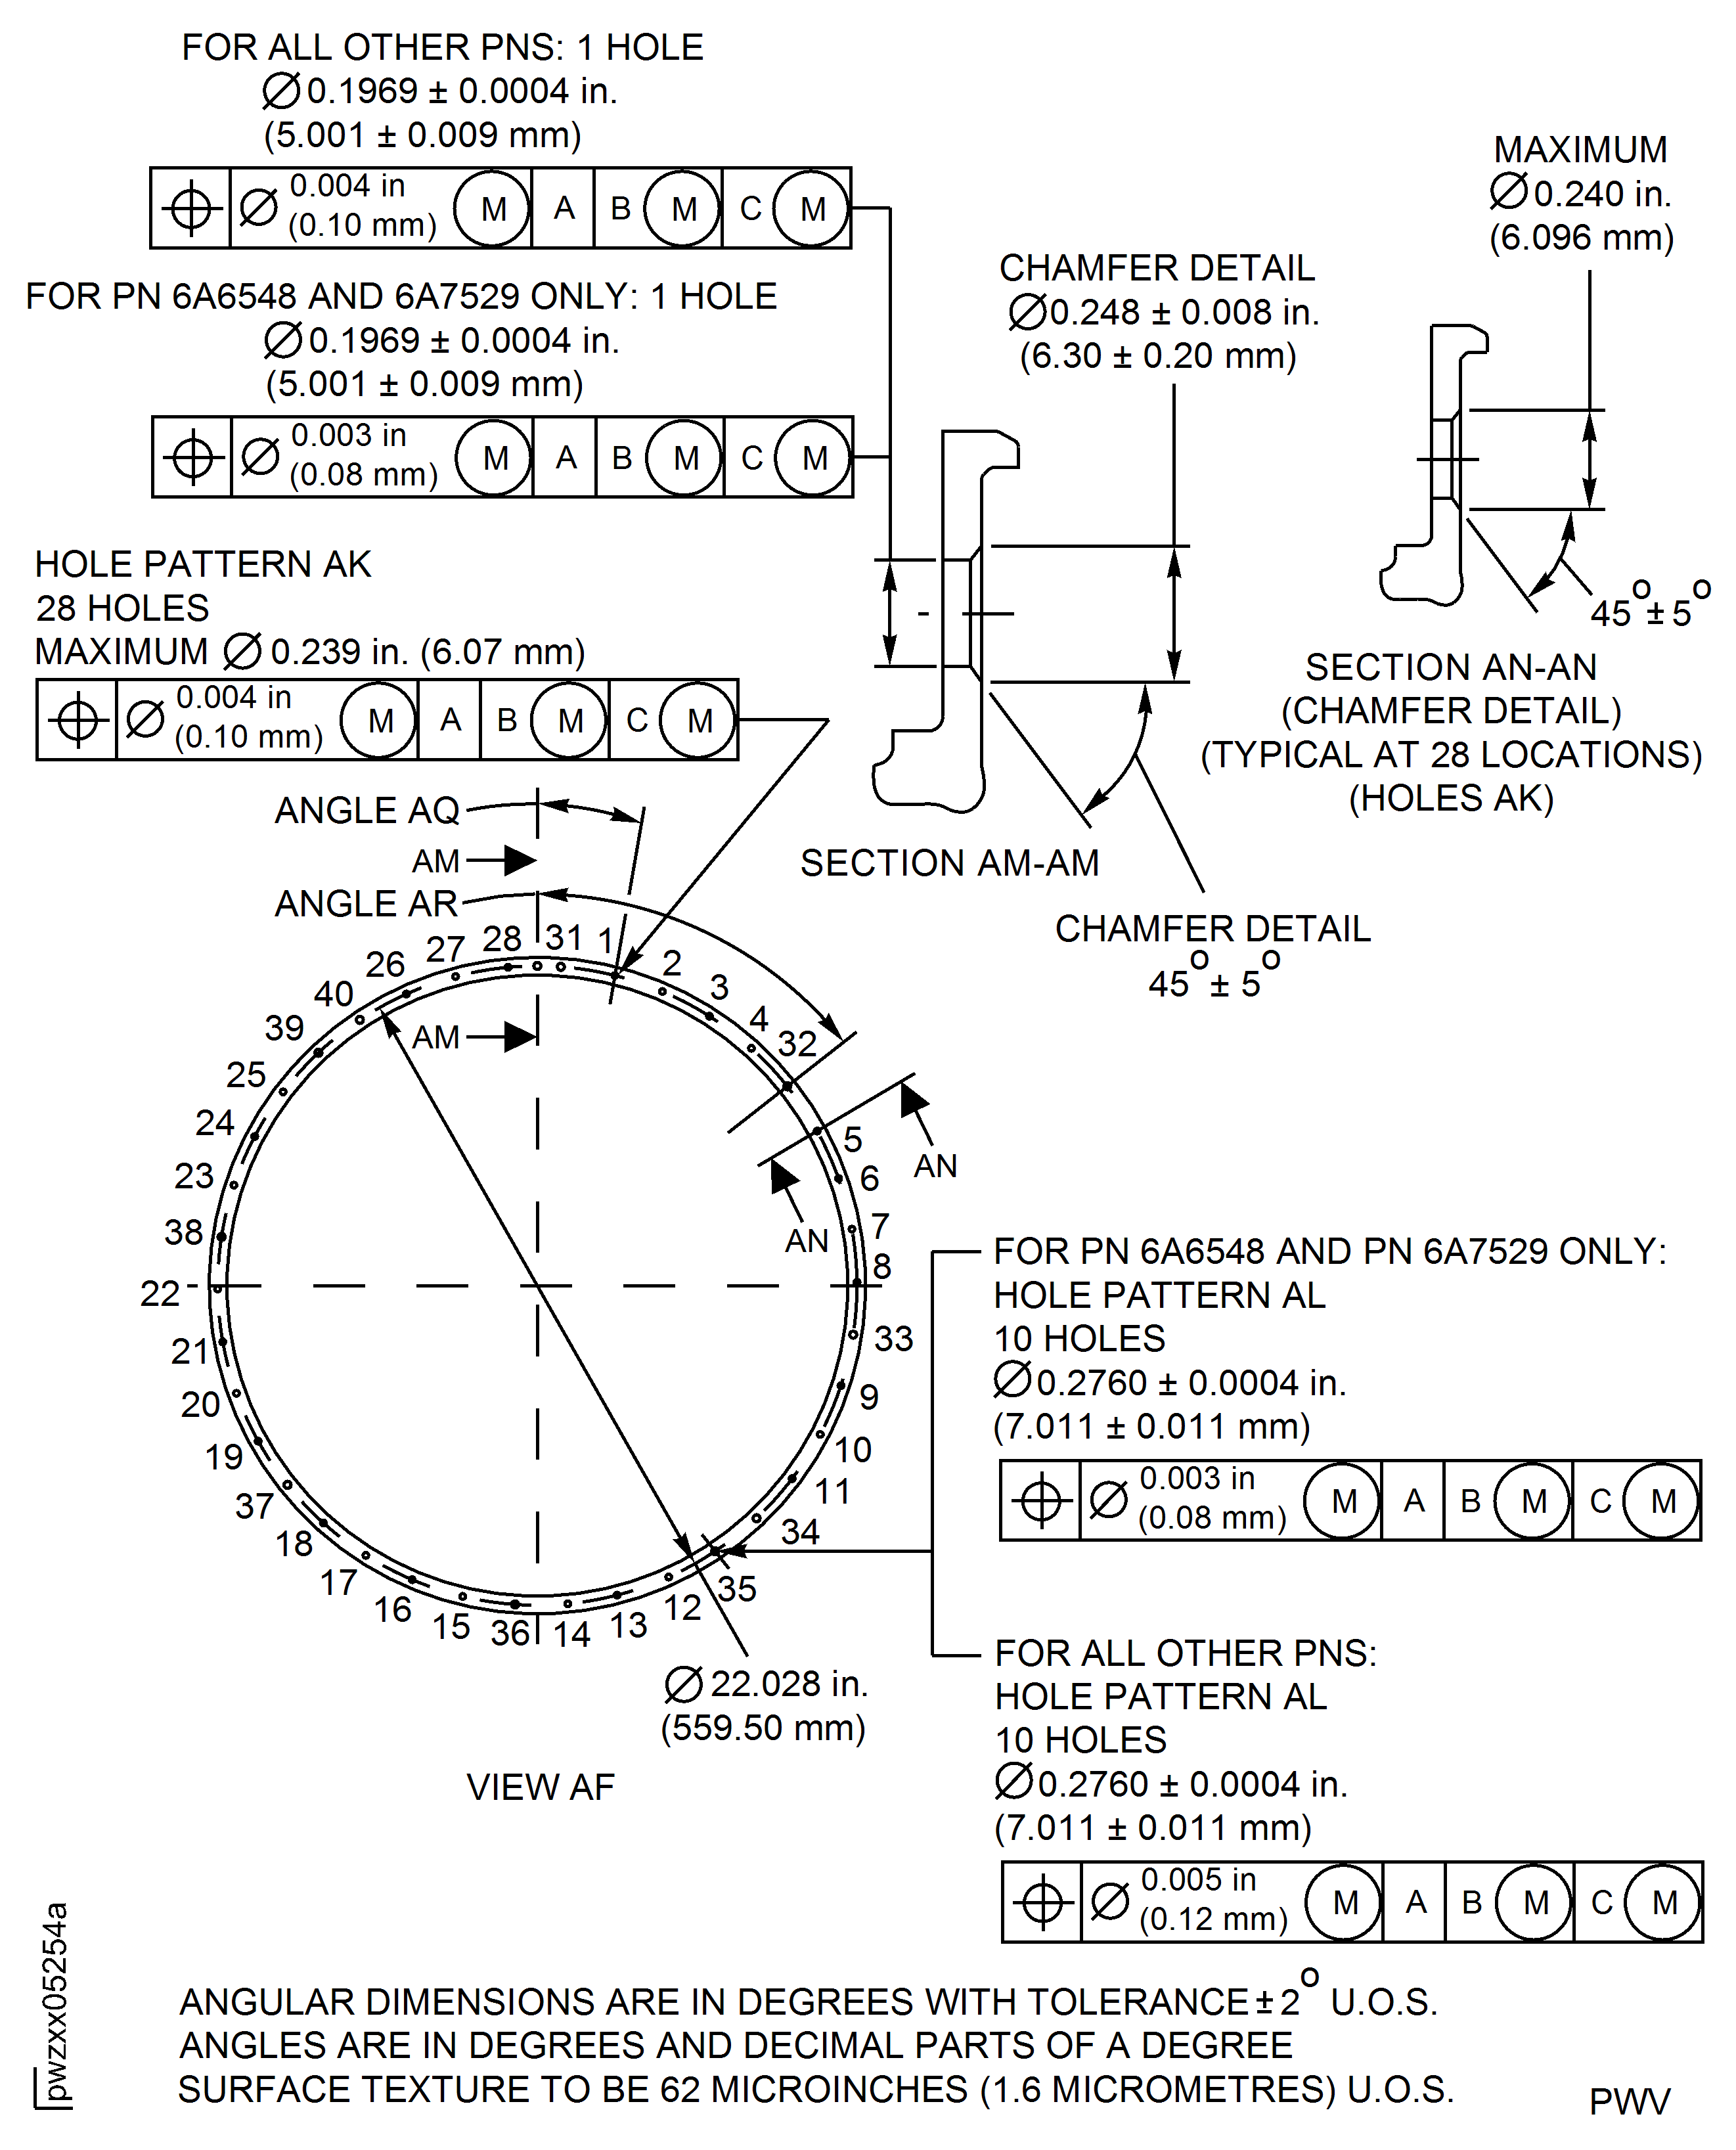
Figure: High Pressure (HP) Compressor Stage 8 Rotor Path Case Assembly - Repair Details and Dimensions - Assembly B
High Pressure (HP) Compressor Stage 8 Rotor Path Case Assembly - Repair Details and Dimensions - Assembly B
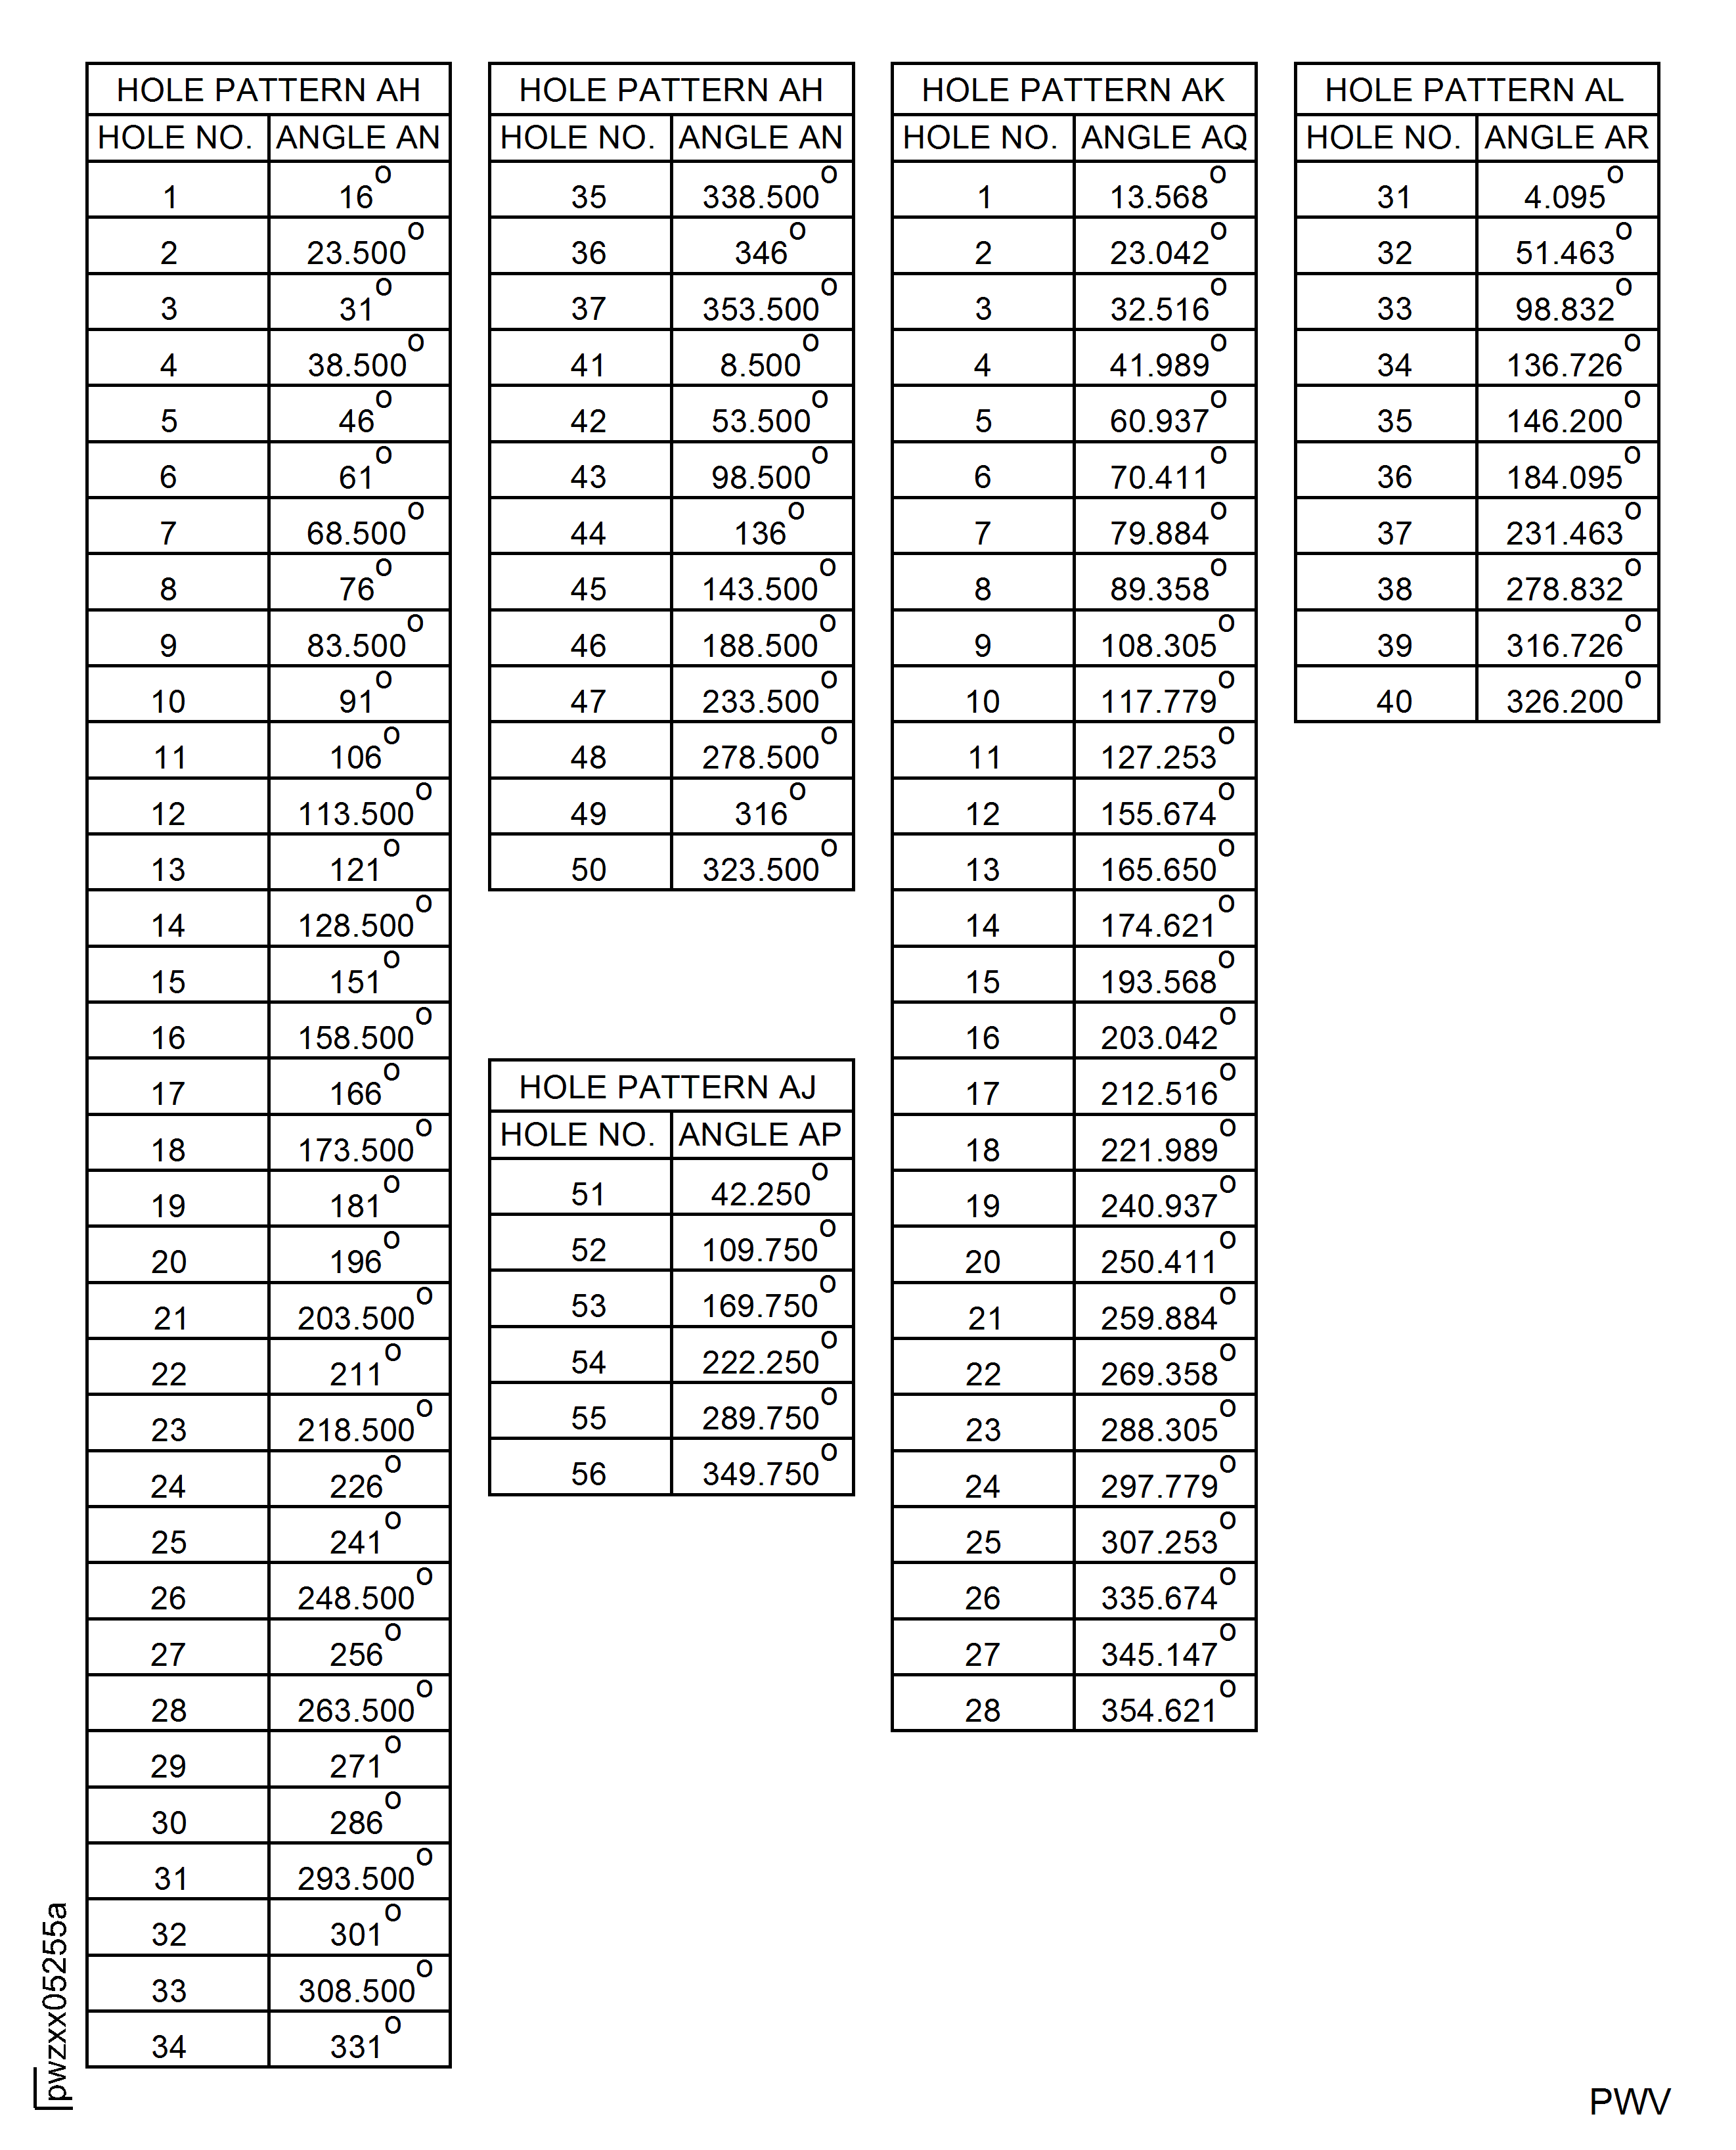
Figure: High Pressure (HP) Compressor Stage 7 Case and Stage 8 Rotor Path Case Assembly - Repair Details and Dimensions - Assembly A, B, D and E
High Pressure (HP) Compressor Stage 7 Case and Stage 8 Rotor Path Case Assembly - Repair Details and Dimensions - Assembly A, B, D and E
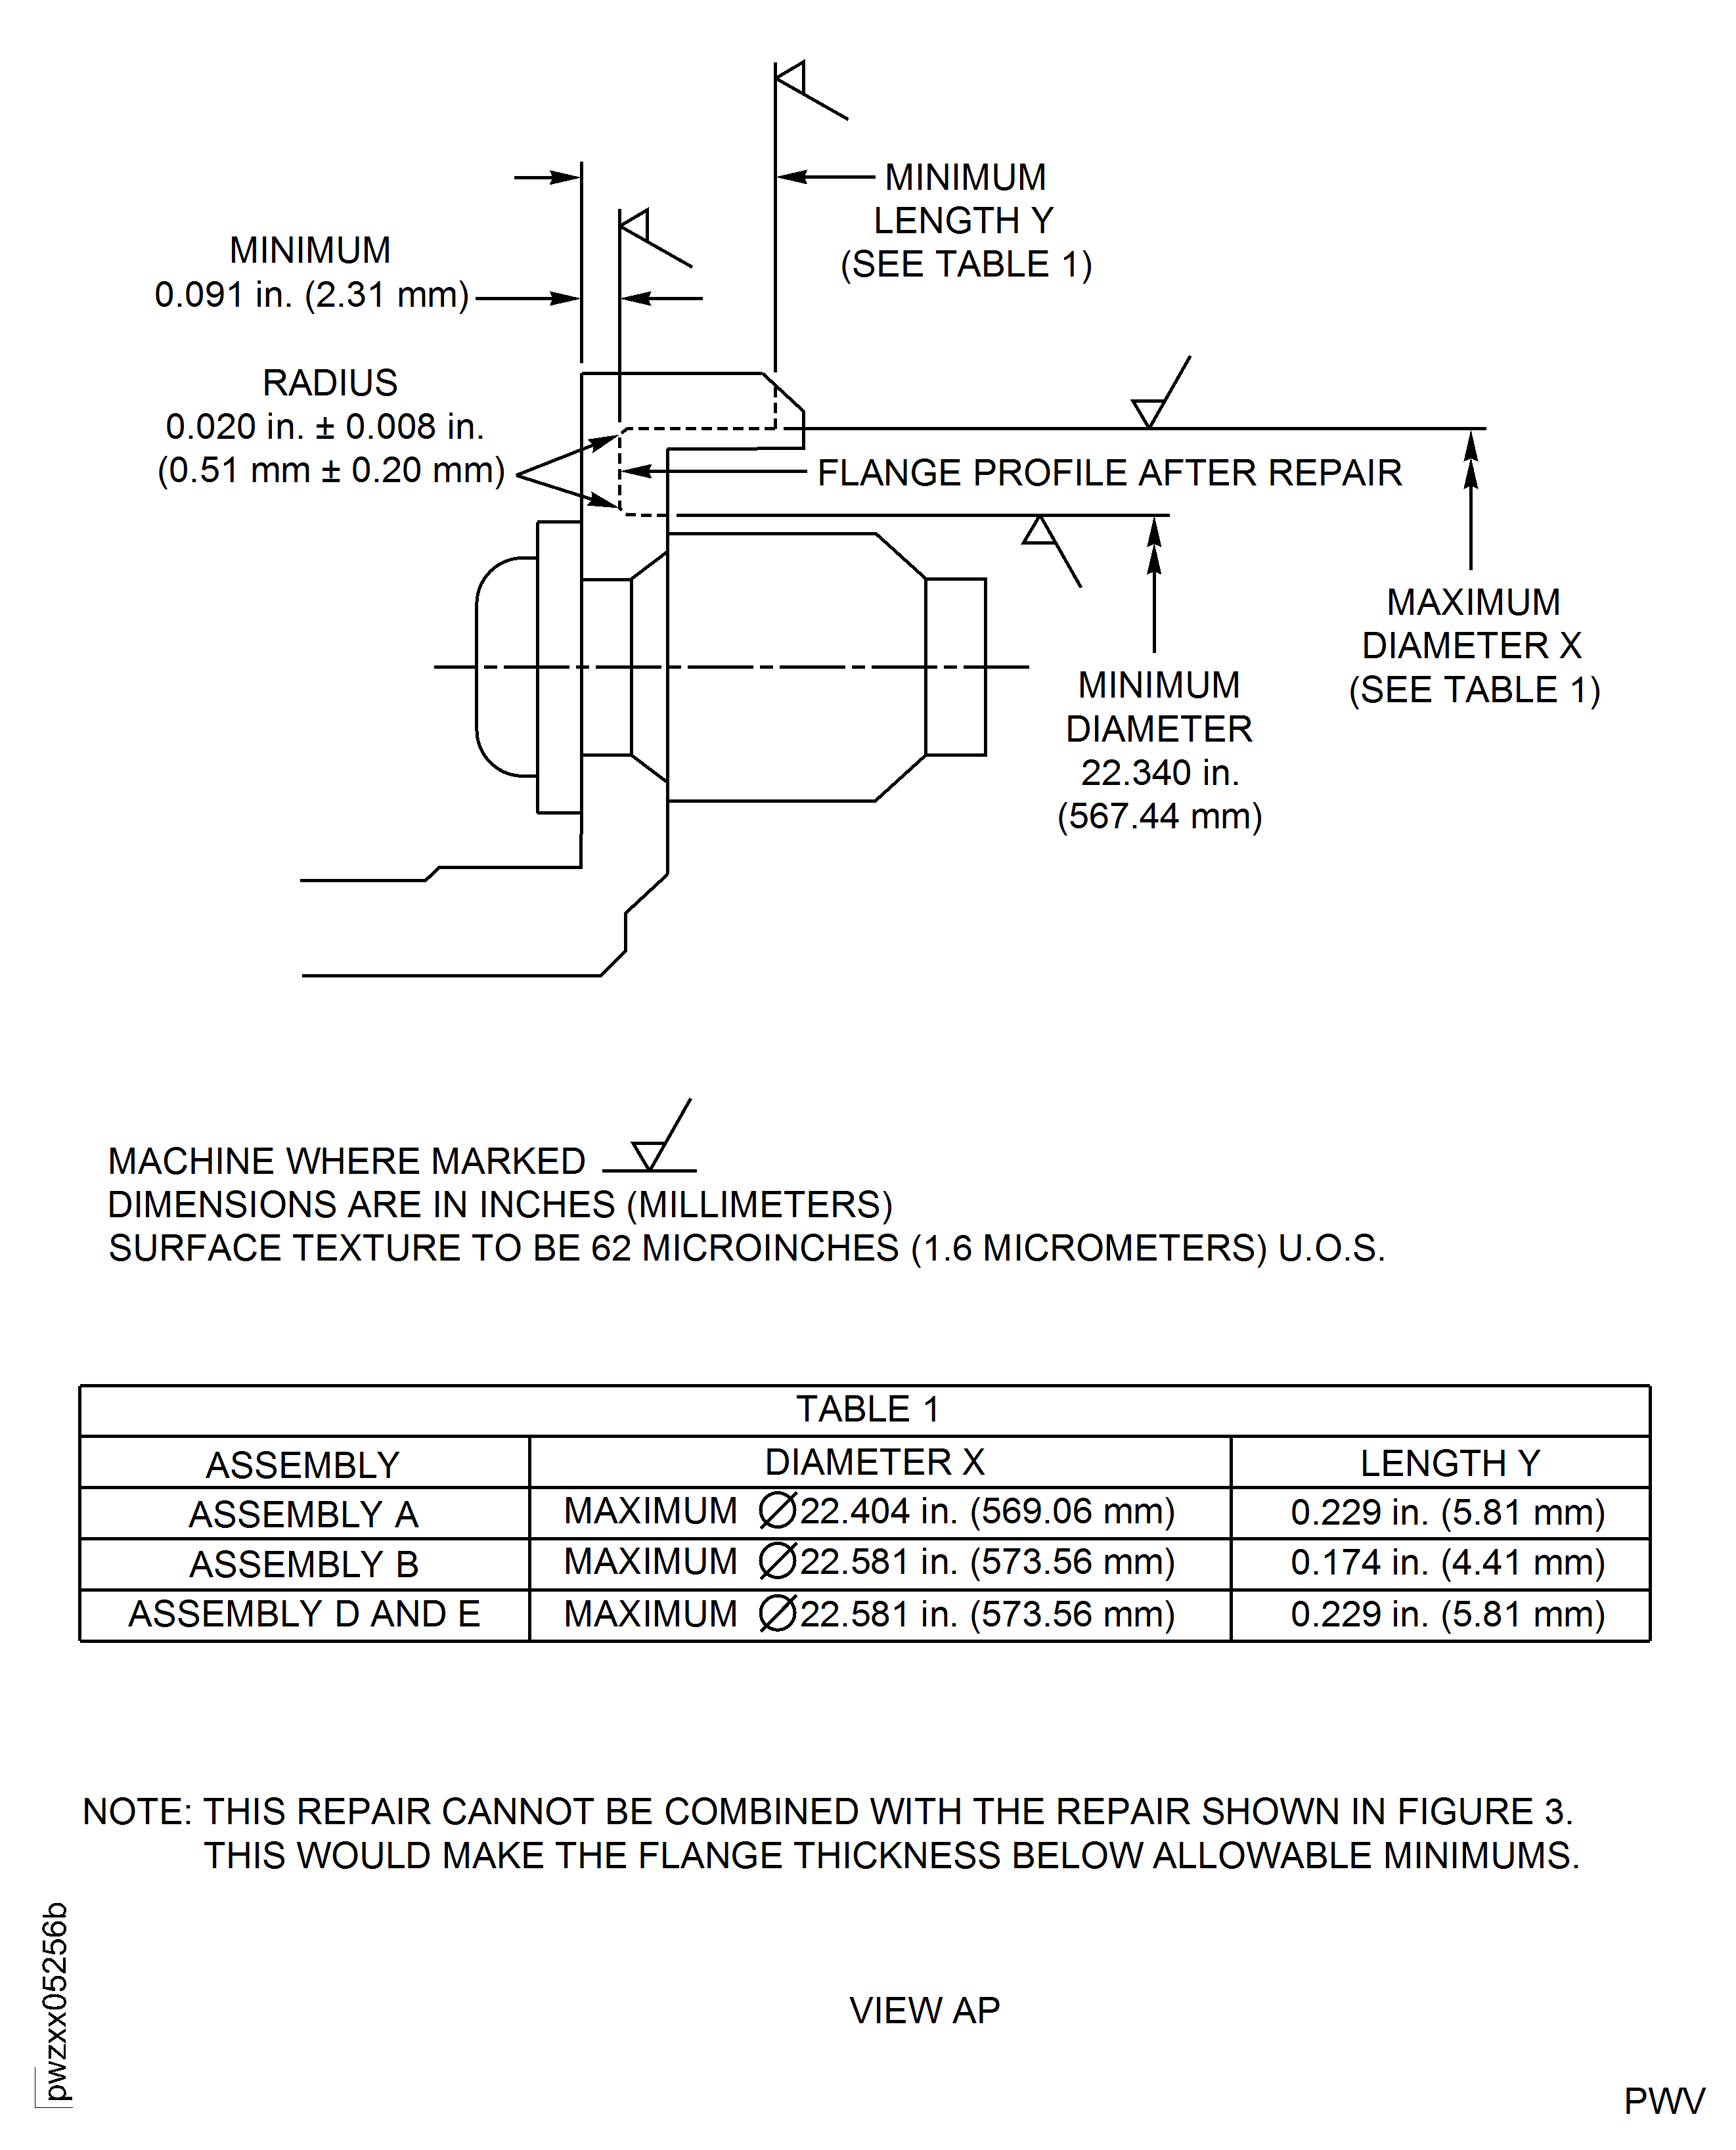
Figure: High Pressure (HP) Compressor Stage 7 Rotor Path Case Assembly - Repair Details and Dimensions - Assembly A
High Pressure (HP) Compressor Stage 7 Rotor Path Case Assembly - Repair Details and Dimensions - Assembly A
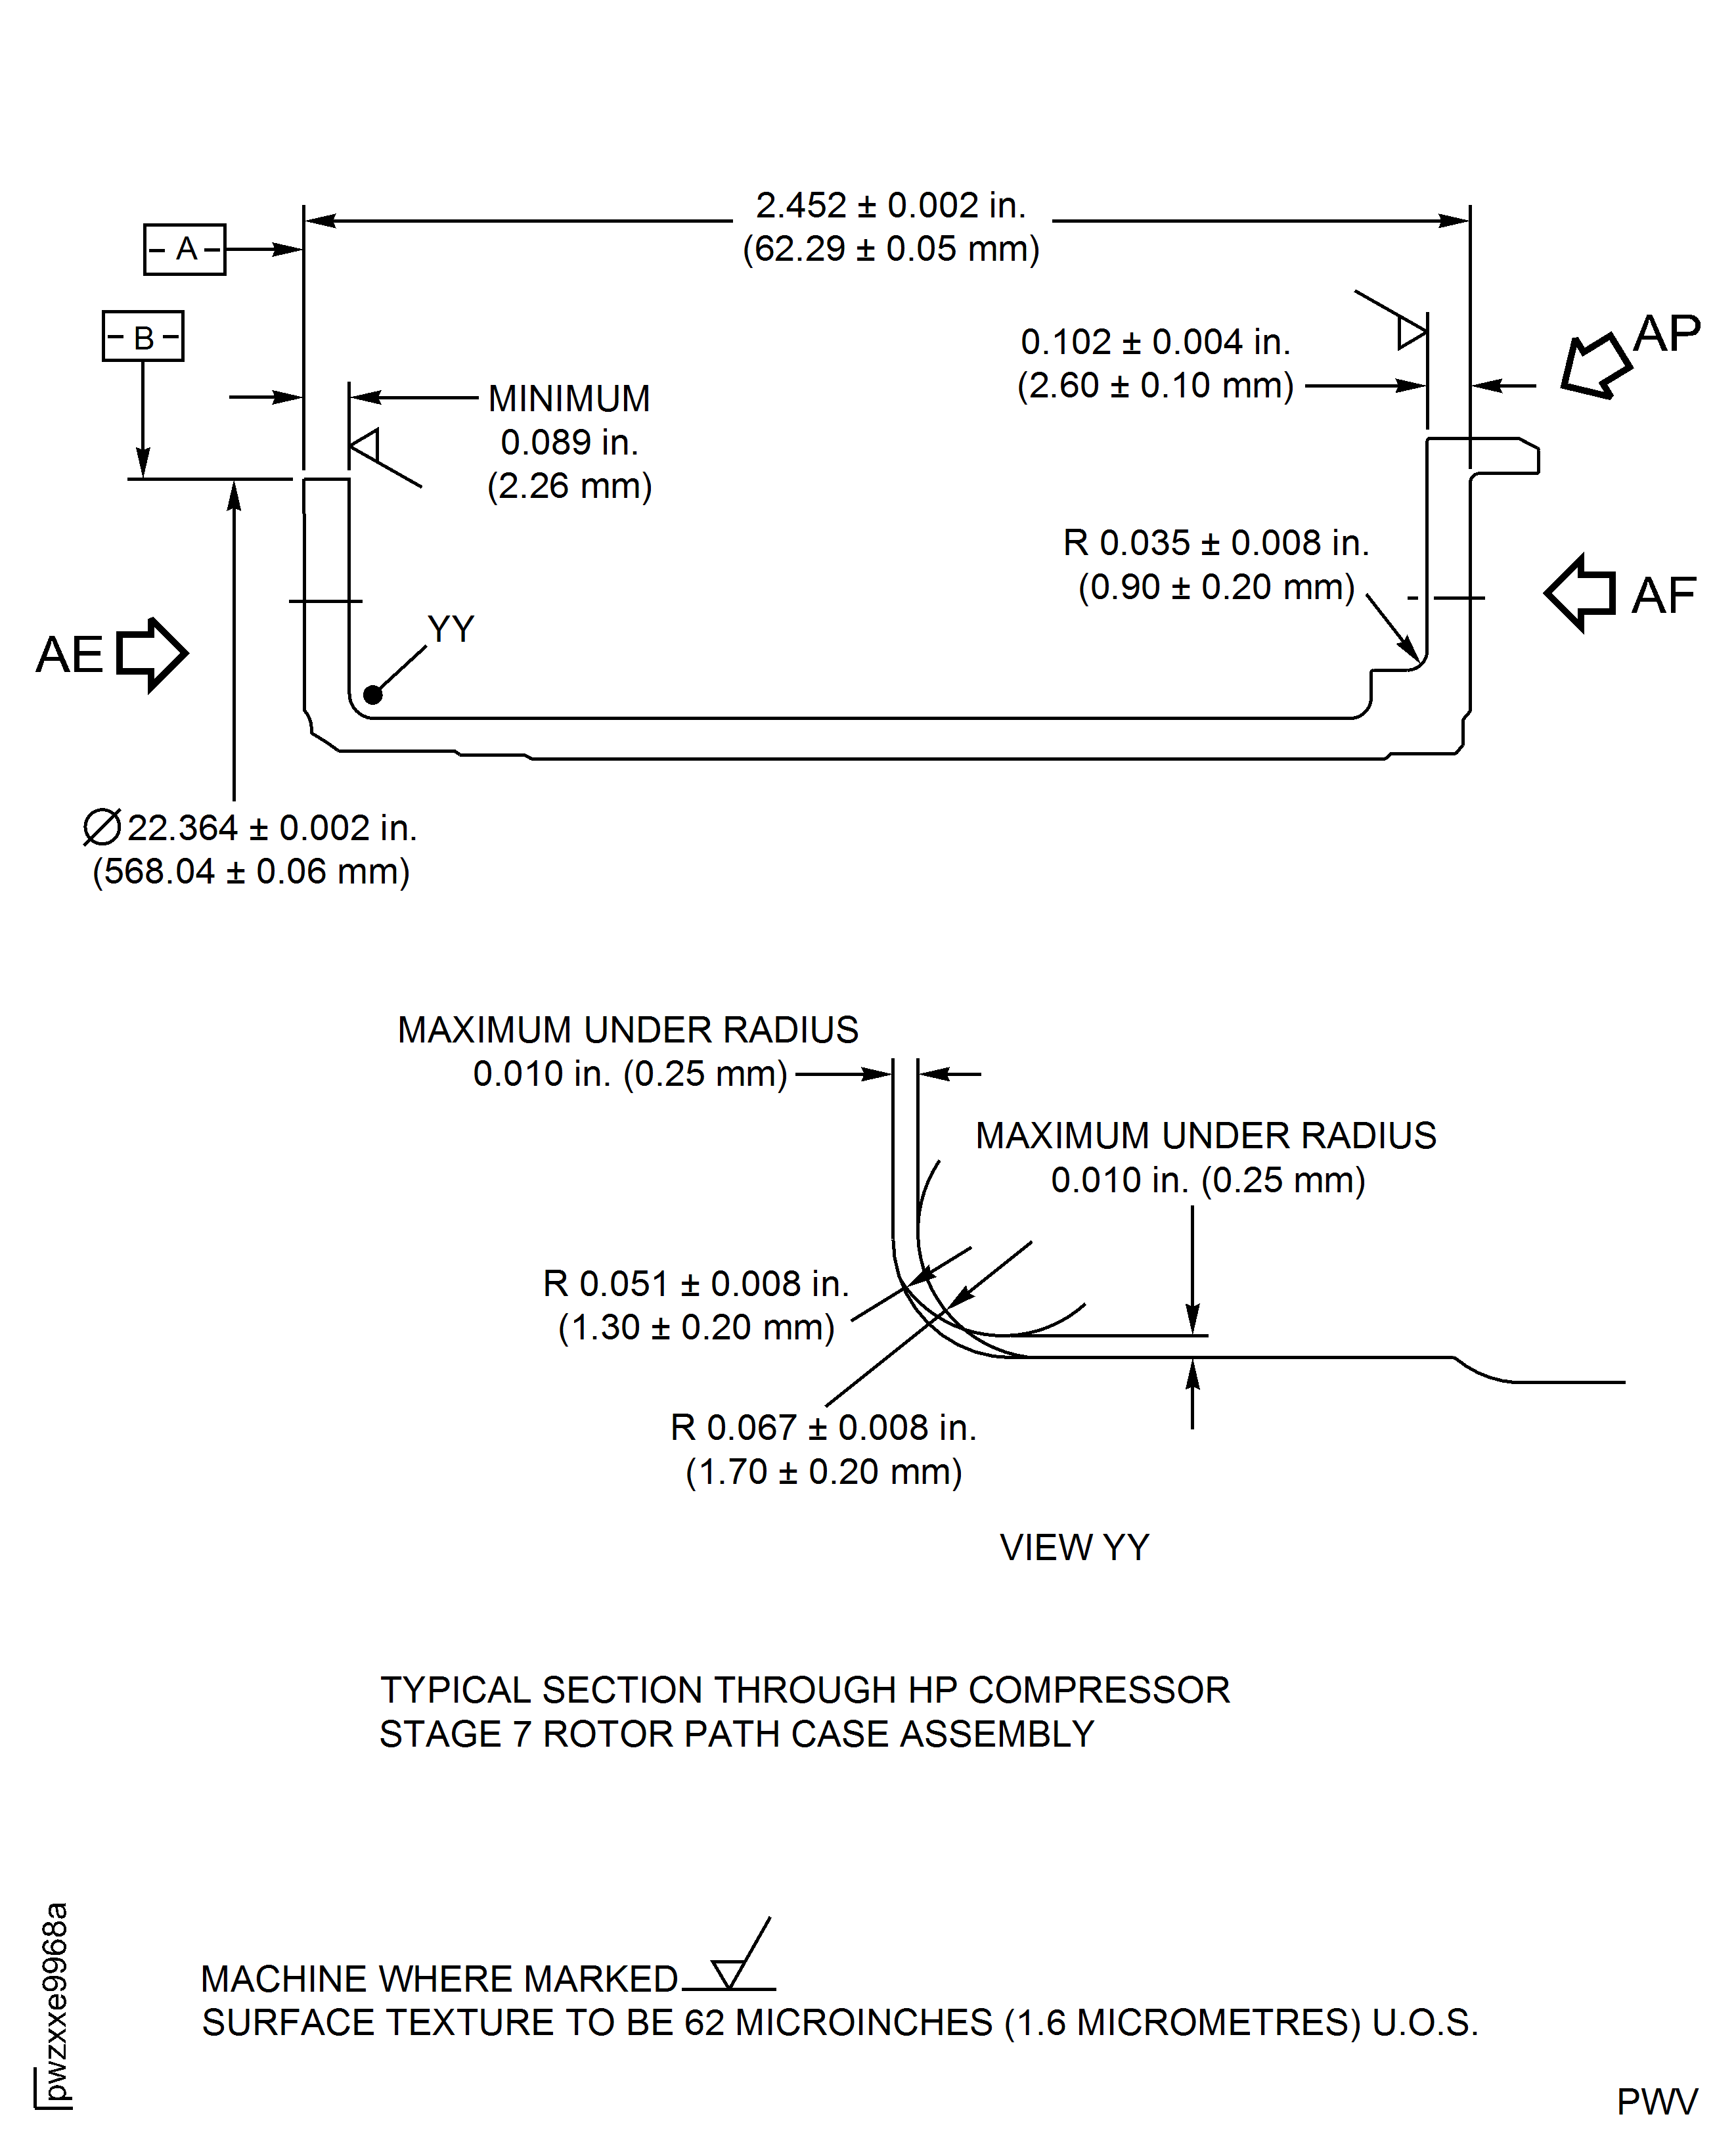
Figure: High Pressure (HP) Compressor Stage 7 Rotor Path Case Assembly - Repair Details and Dimensions - Assembly D
High Pressure (HP) Compressor Stage 7 Rotor Path Case Assembly - Repair Details and Dimensions - Assembly D

Figure: High Pressure (HP) Compressor Stage 7 Rotor Path Case Assembly - Repair Details and Dimensions - Assembly E
High Pressure (HP) Compressor Stage 7 Rotor Path Case Assembly - Repair Details and Dimensions - Assembly E
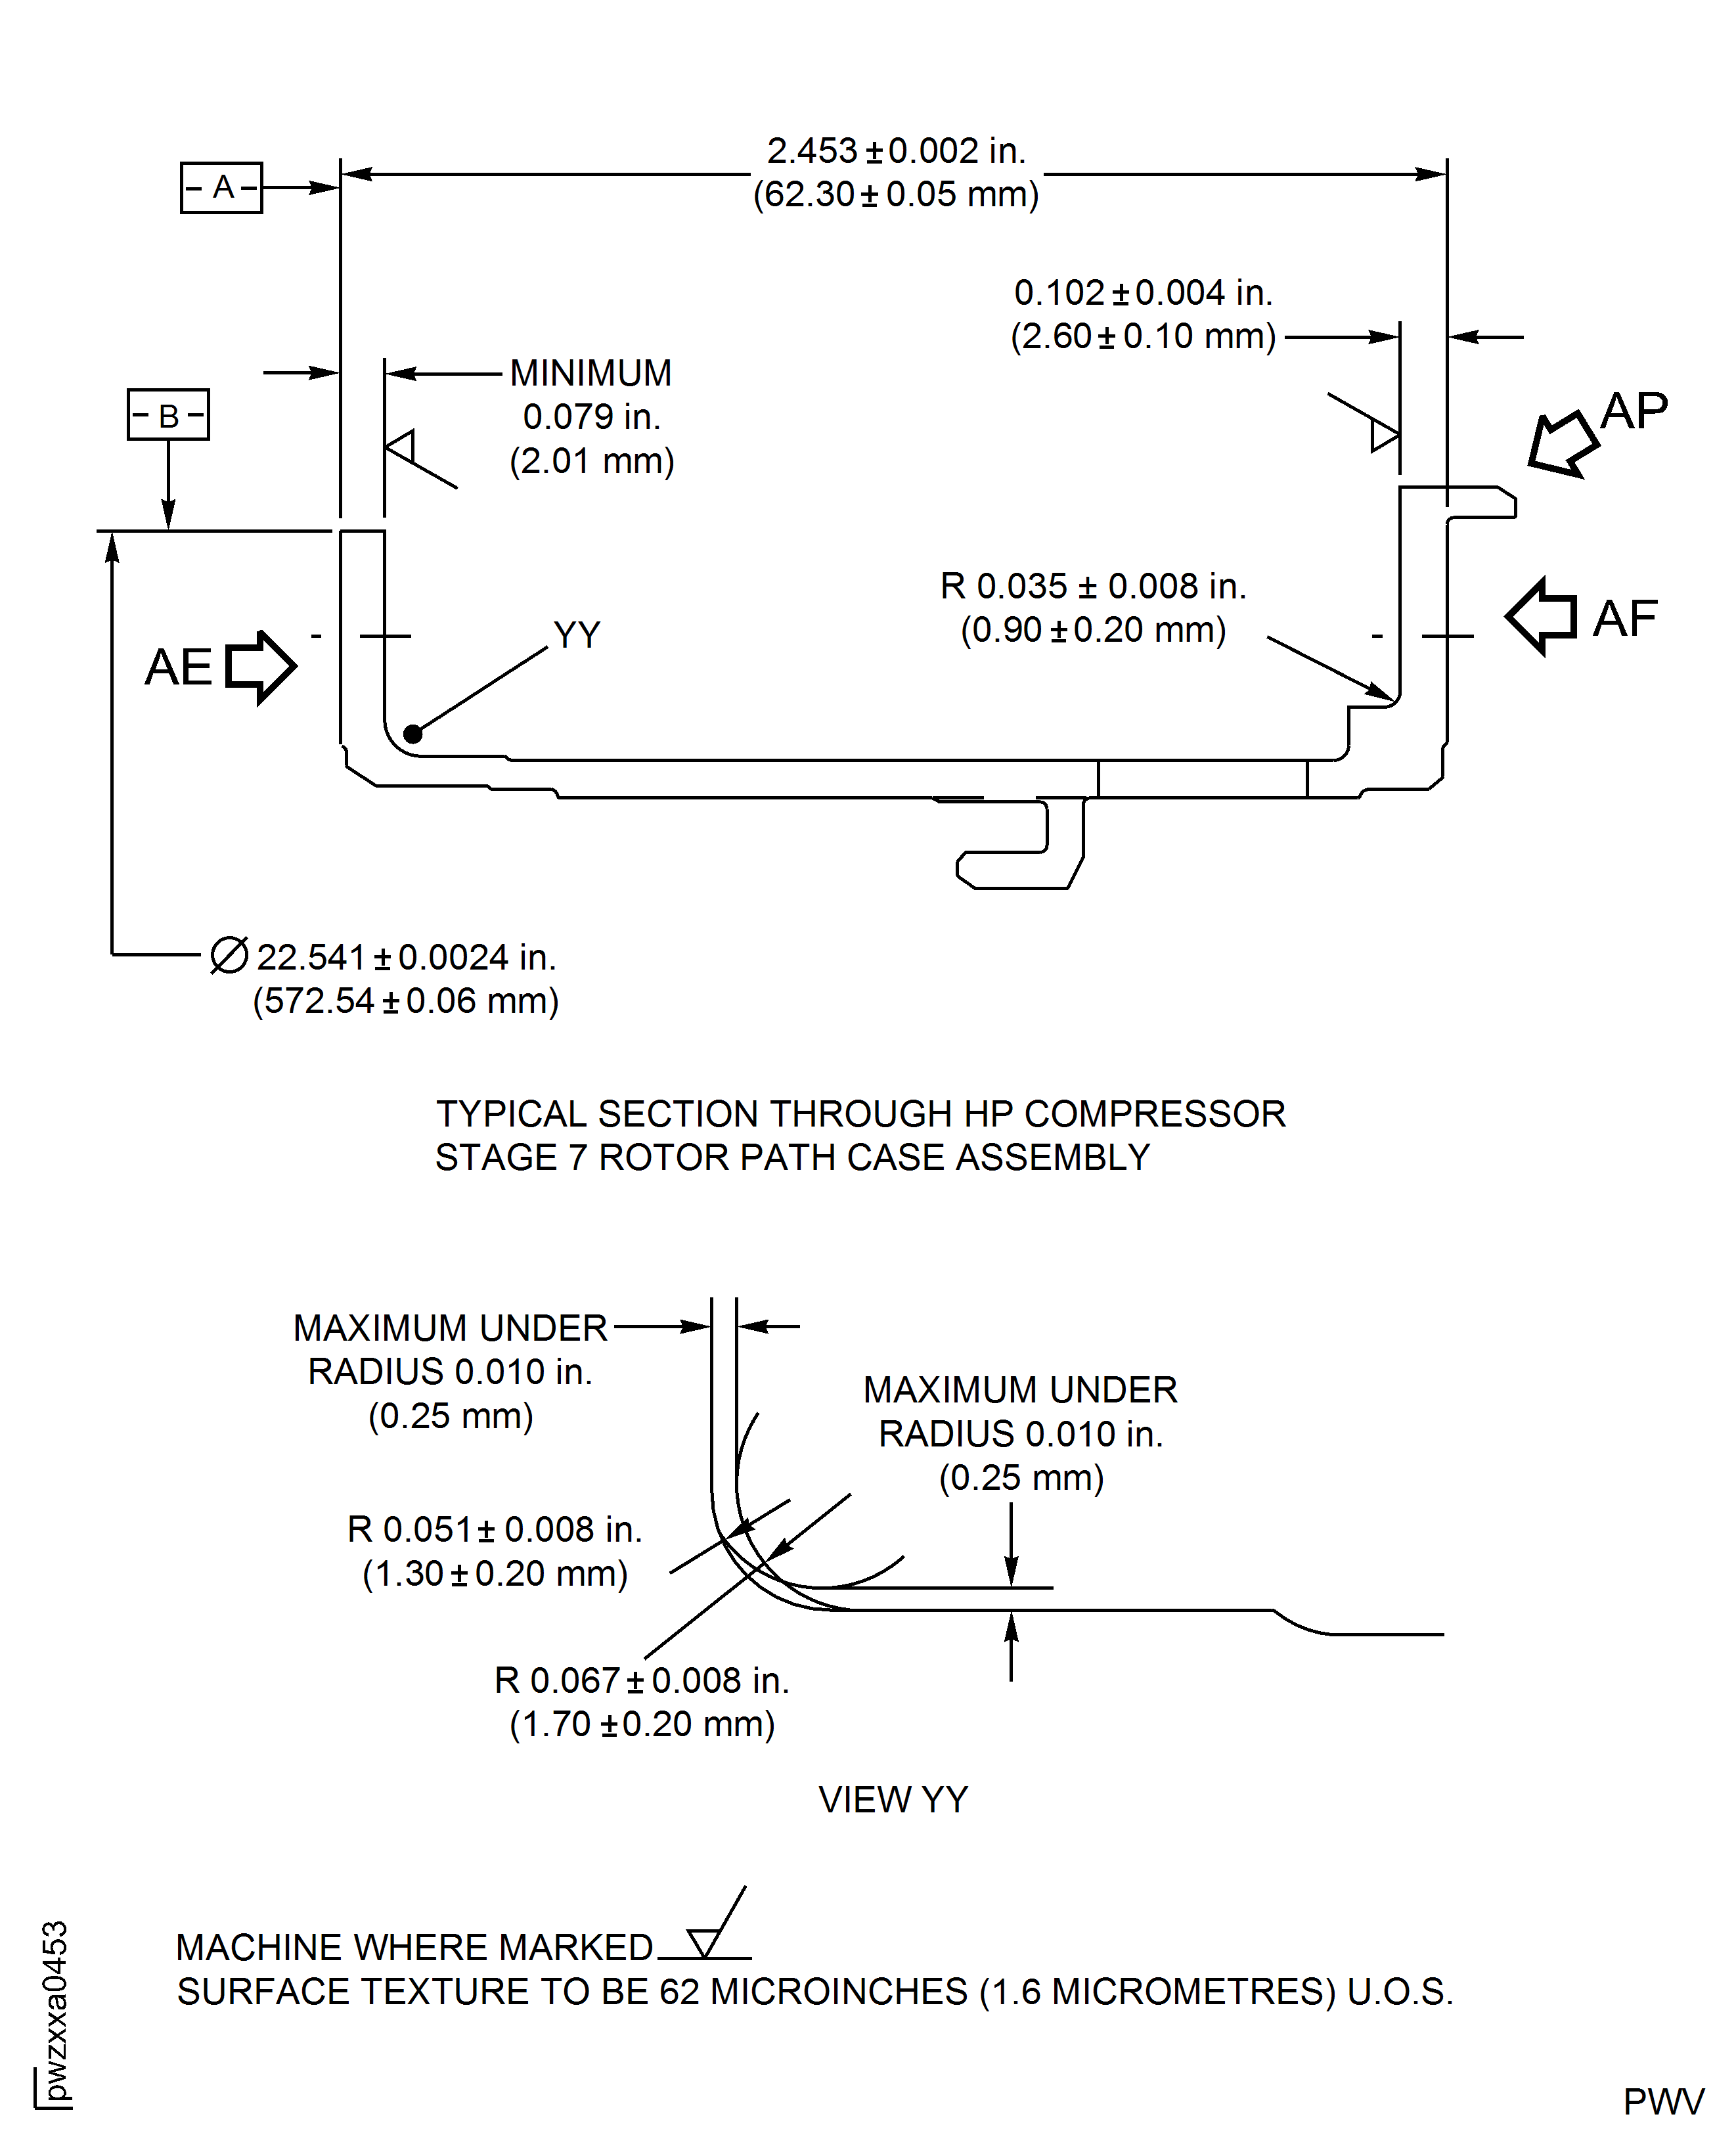
Figure: High Pressure (HP) Compressor Stage 7 Rotor Path Case Assembly - Repair Details and Dimensions - Assembly A
High Pressure (HP) Compressor Stage 7 Rotor Path Case Assembly - Repair Details and Dimensions - Assembly A
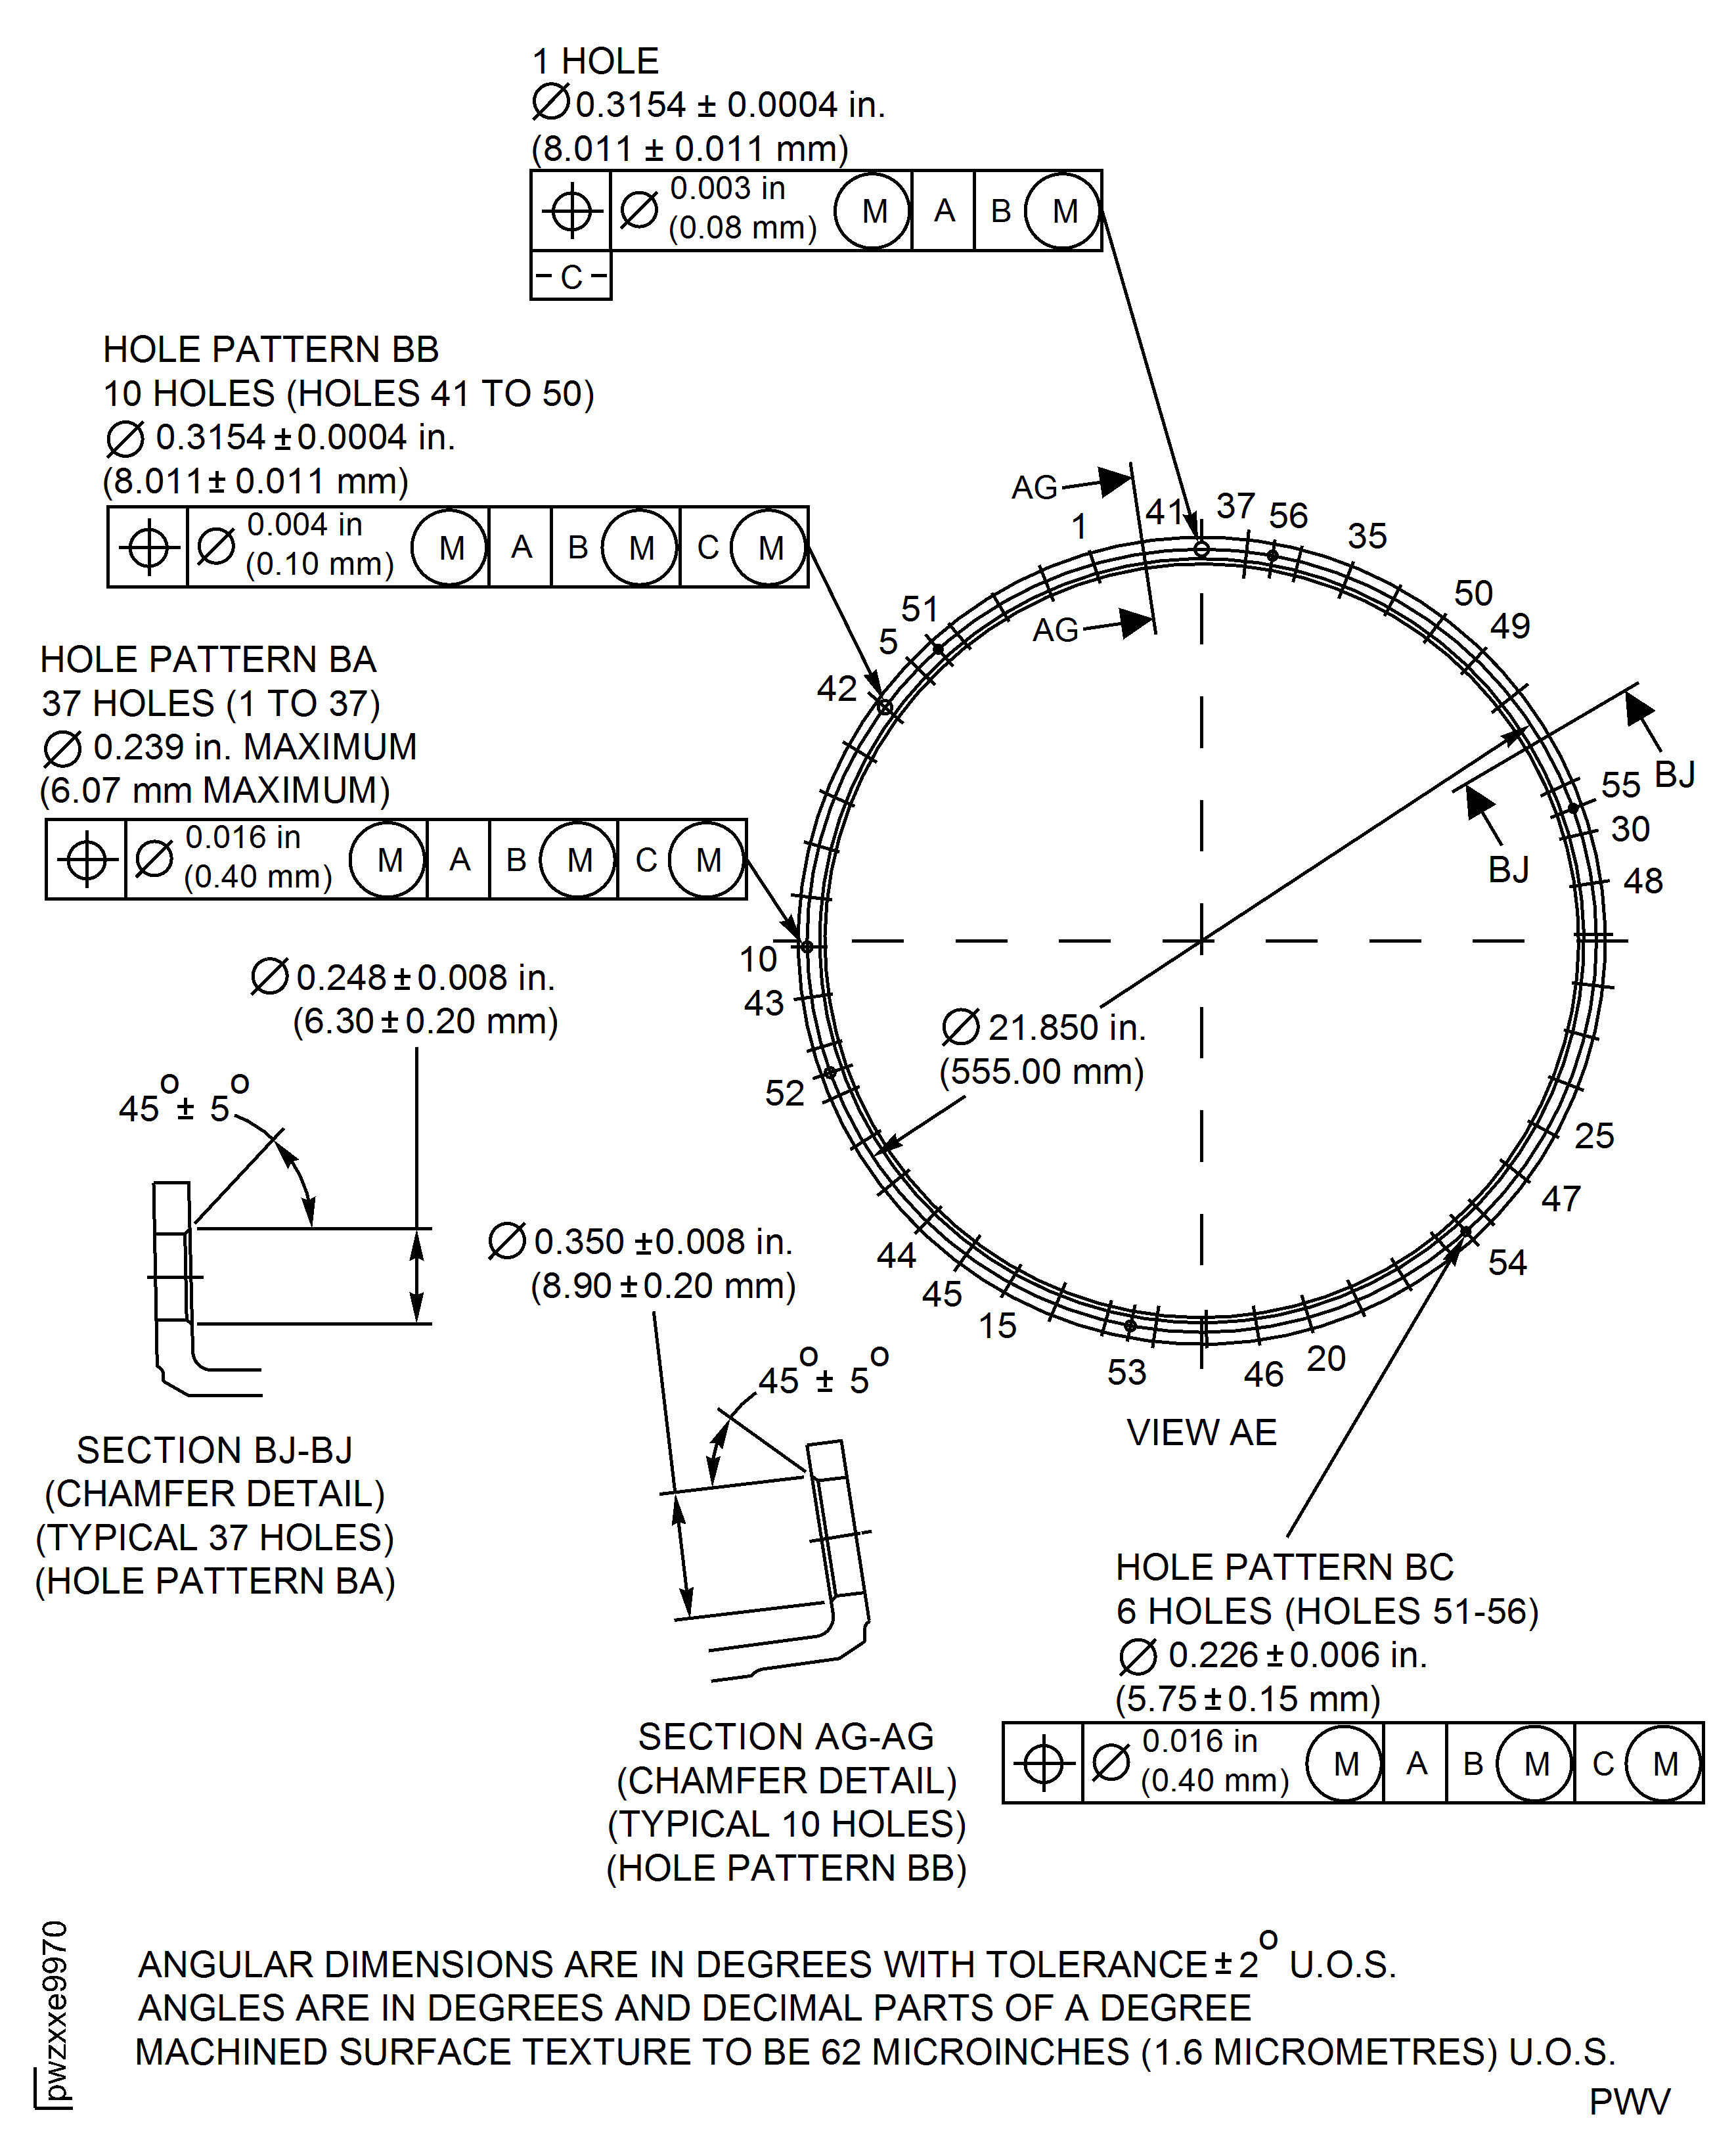
Figure: High Pressure (HP) Compressor Stage 7 Rotor Path Case Assembly - Repair Details and Dimensions - Assembly D
High Pressure (HP) Compressor Stage 7 Rotor Path Case Assembly - Repair Details and Dimensions - Assembly D
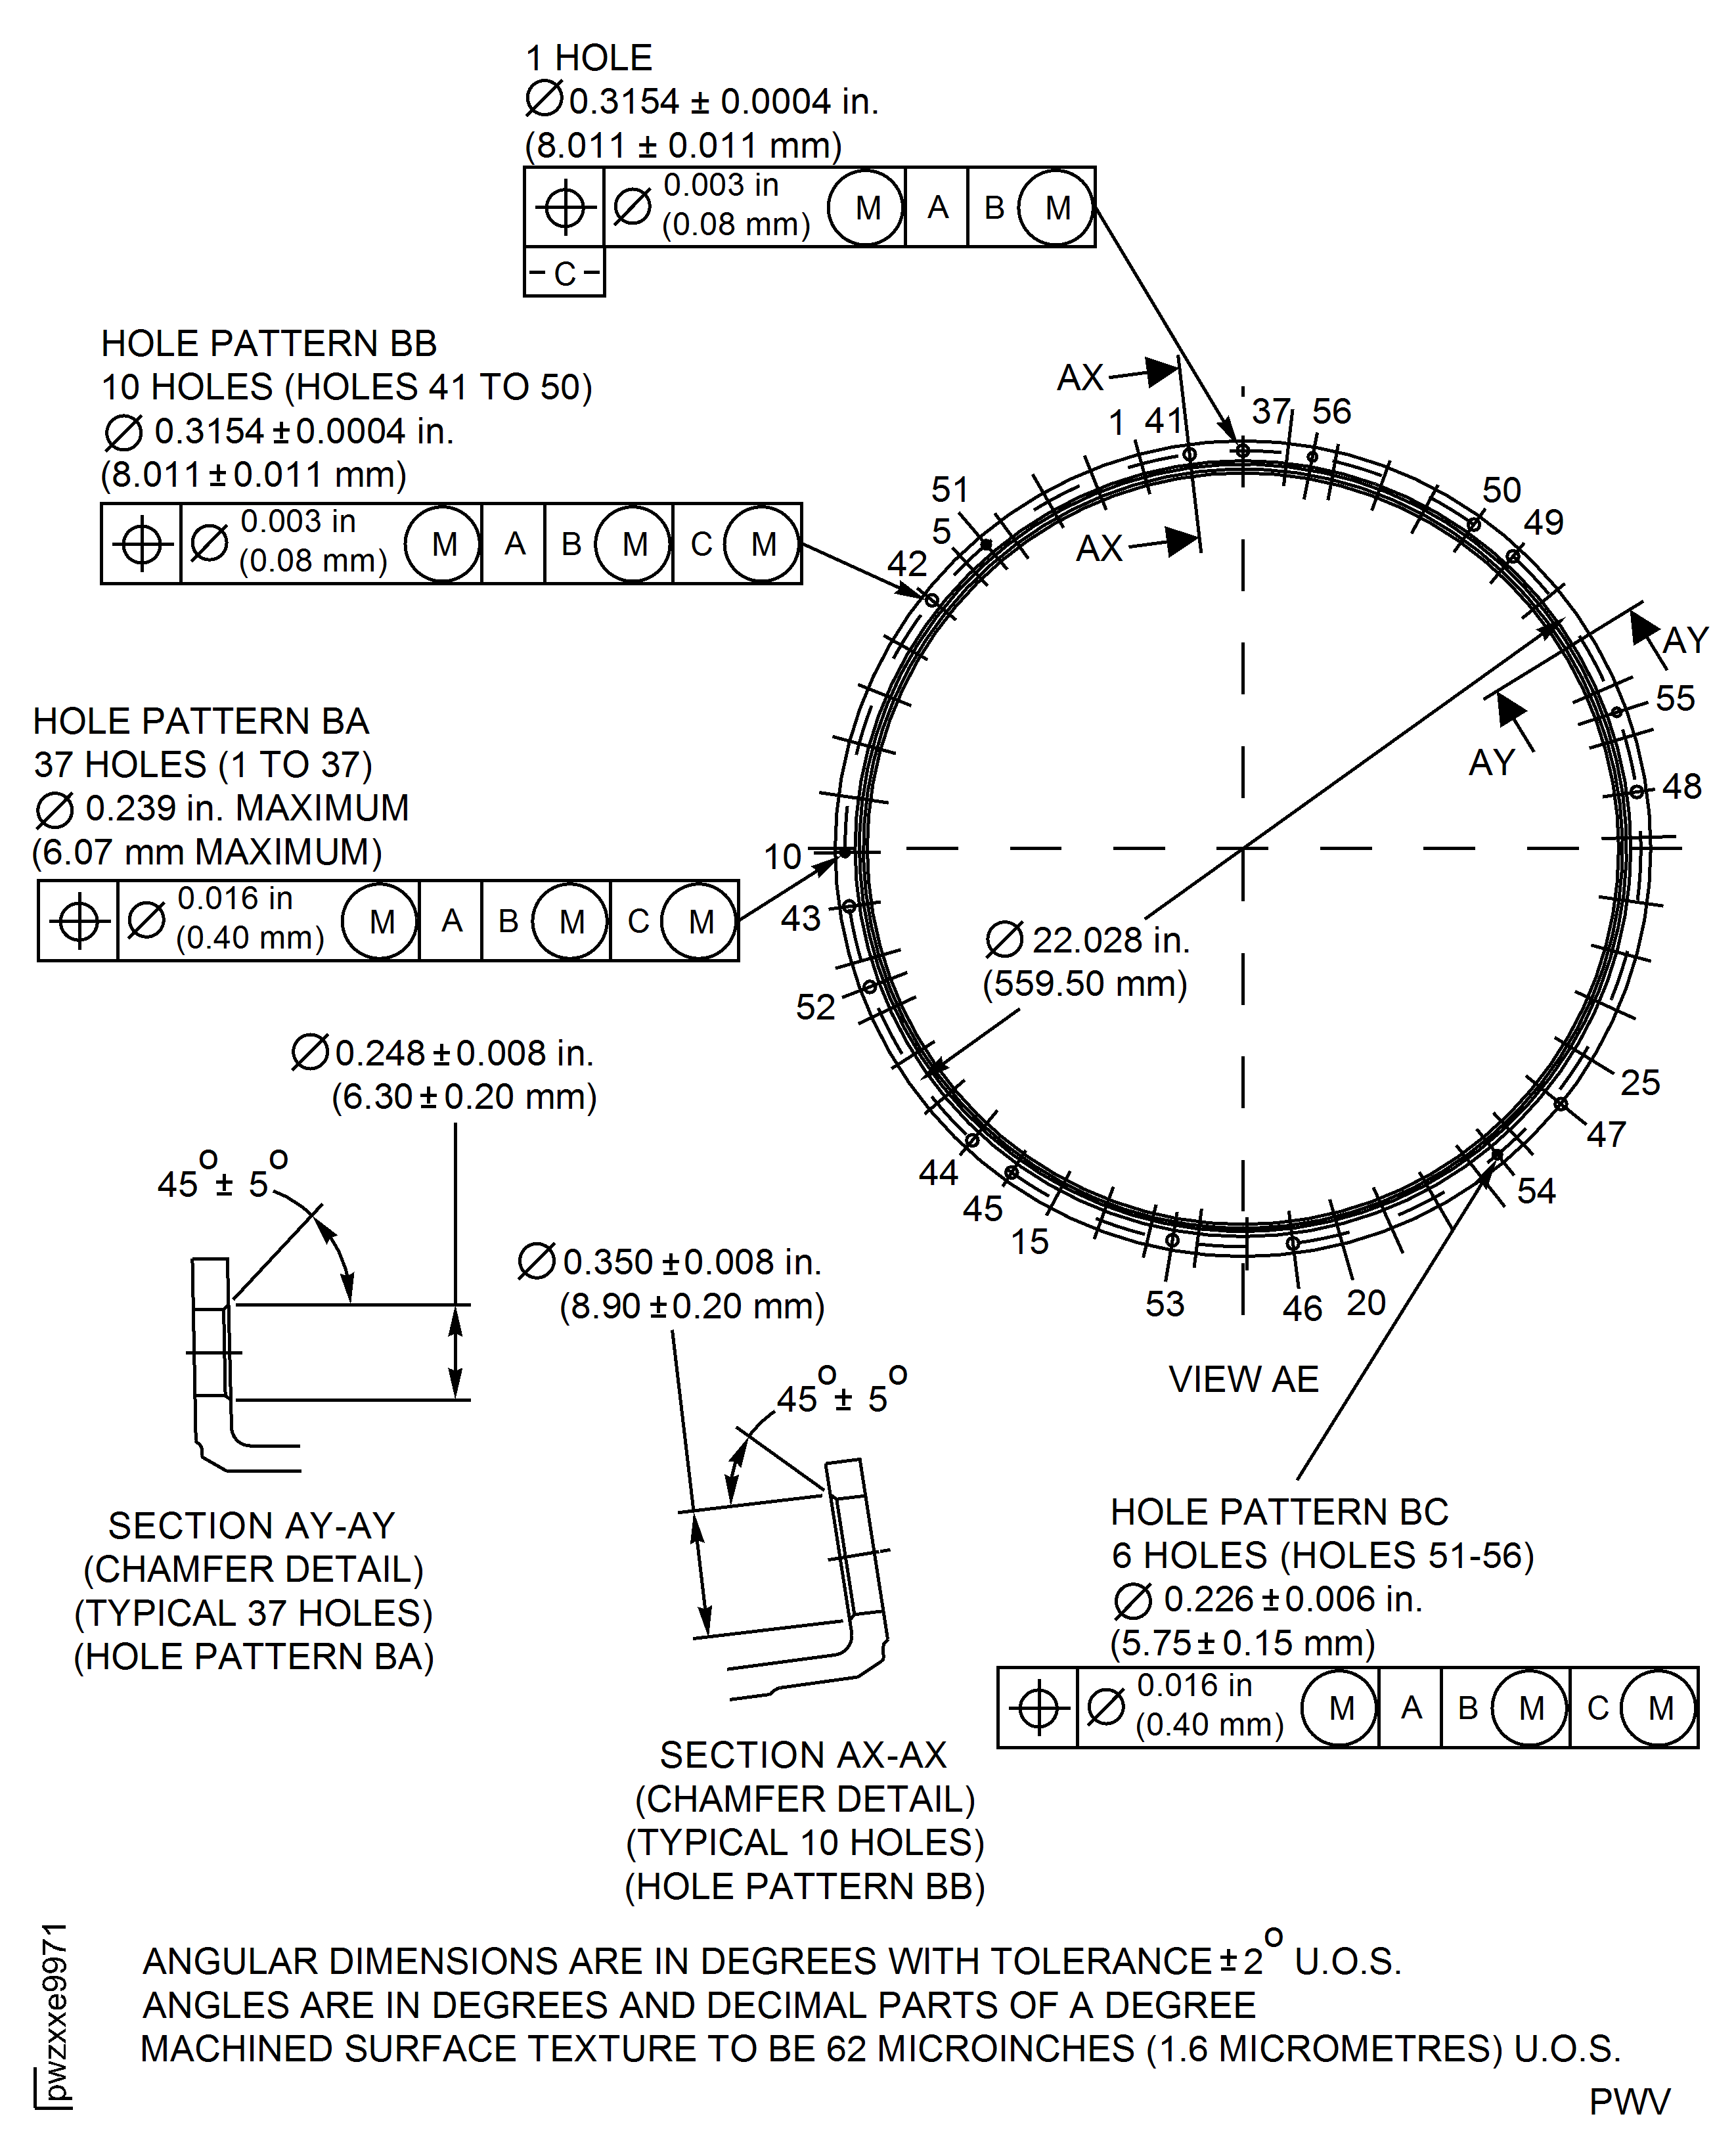
Figure: High Pressure (HP) Compressor Stage 7 Rotor Path Case Assembly - Repair Details and Dimensions - Assembly E
High Pressure (HP) Compressor Stage 7 Rotor Path Case Assembly - Repair Details and Dimensions - Assembly E
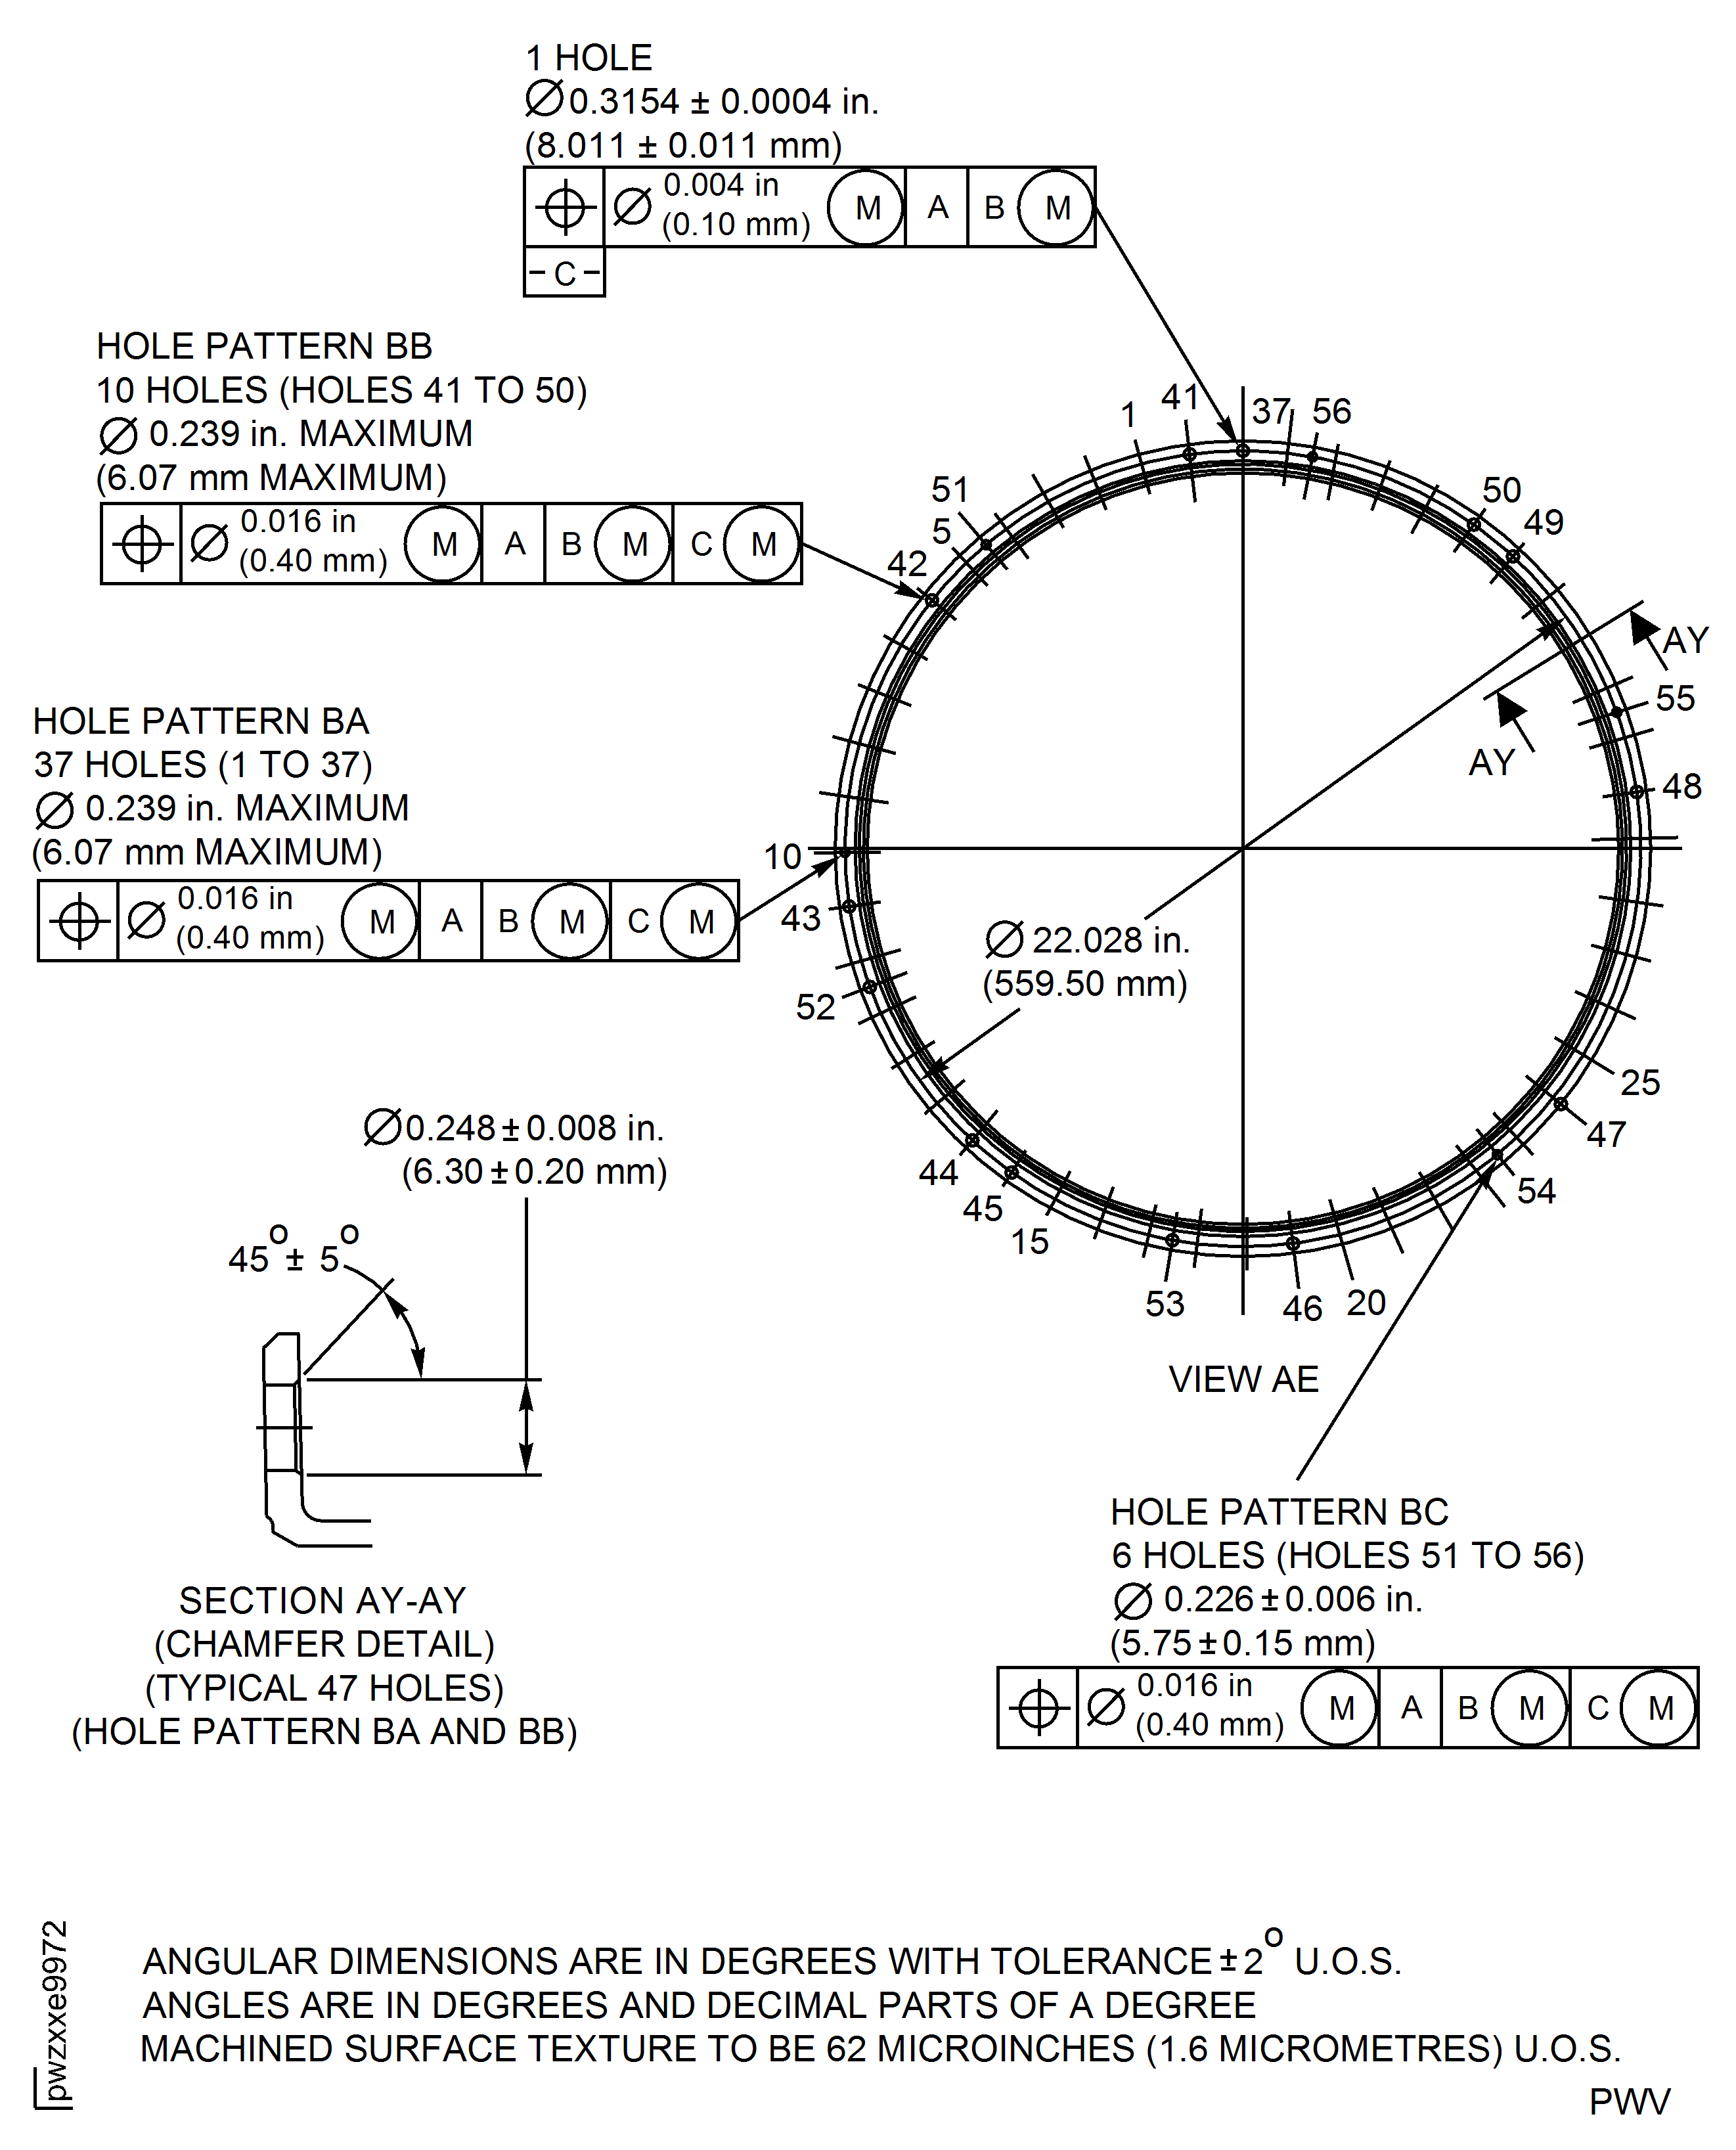
Figure: High Pressure (HP) Compressor Stage 7 Rotor Path Case Assembly - Repair Details and Dimensions - Assembly A
High Pressure (HP) Compressor Stage 7 Rotor Path Case Assembly - Repair Details and Dimensions - Assembly A
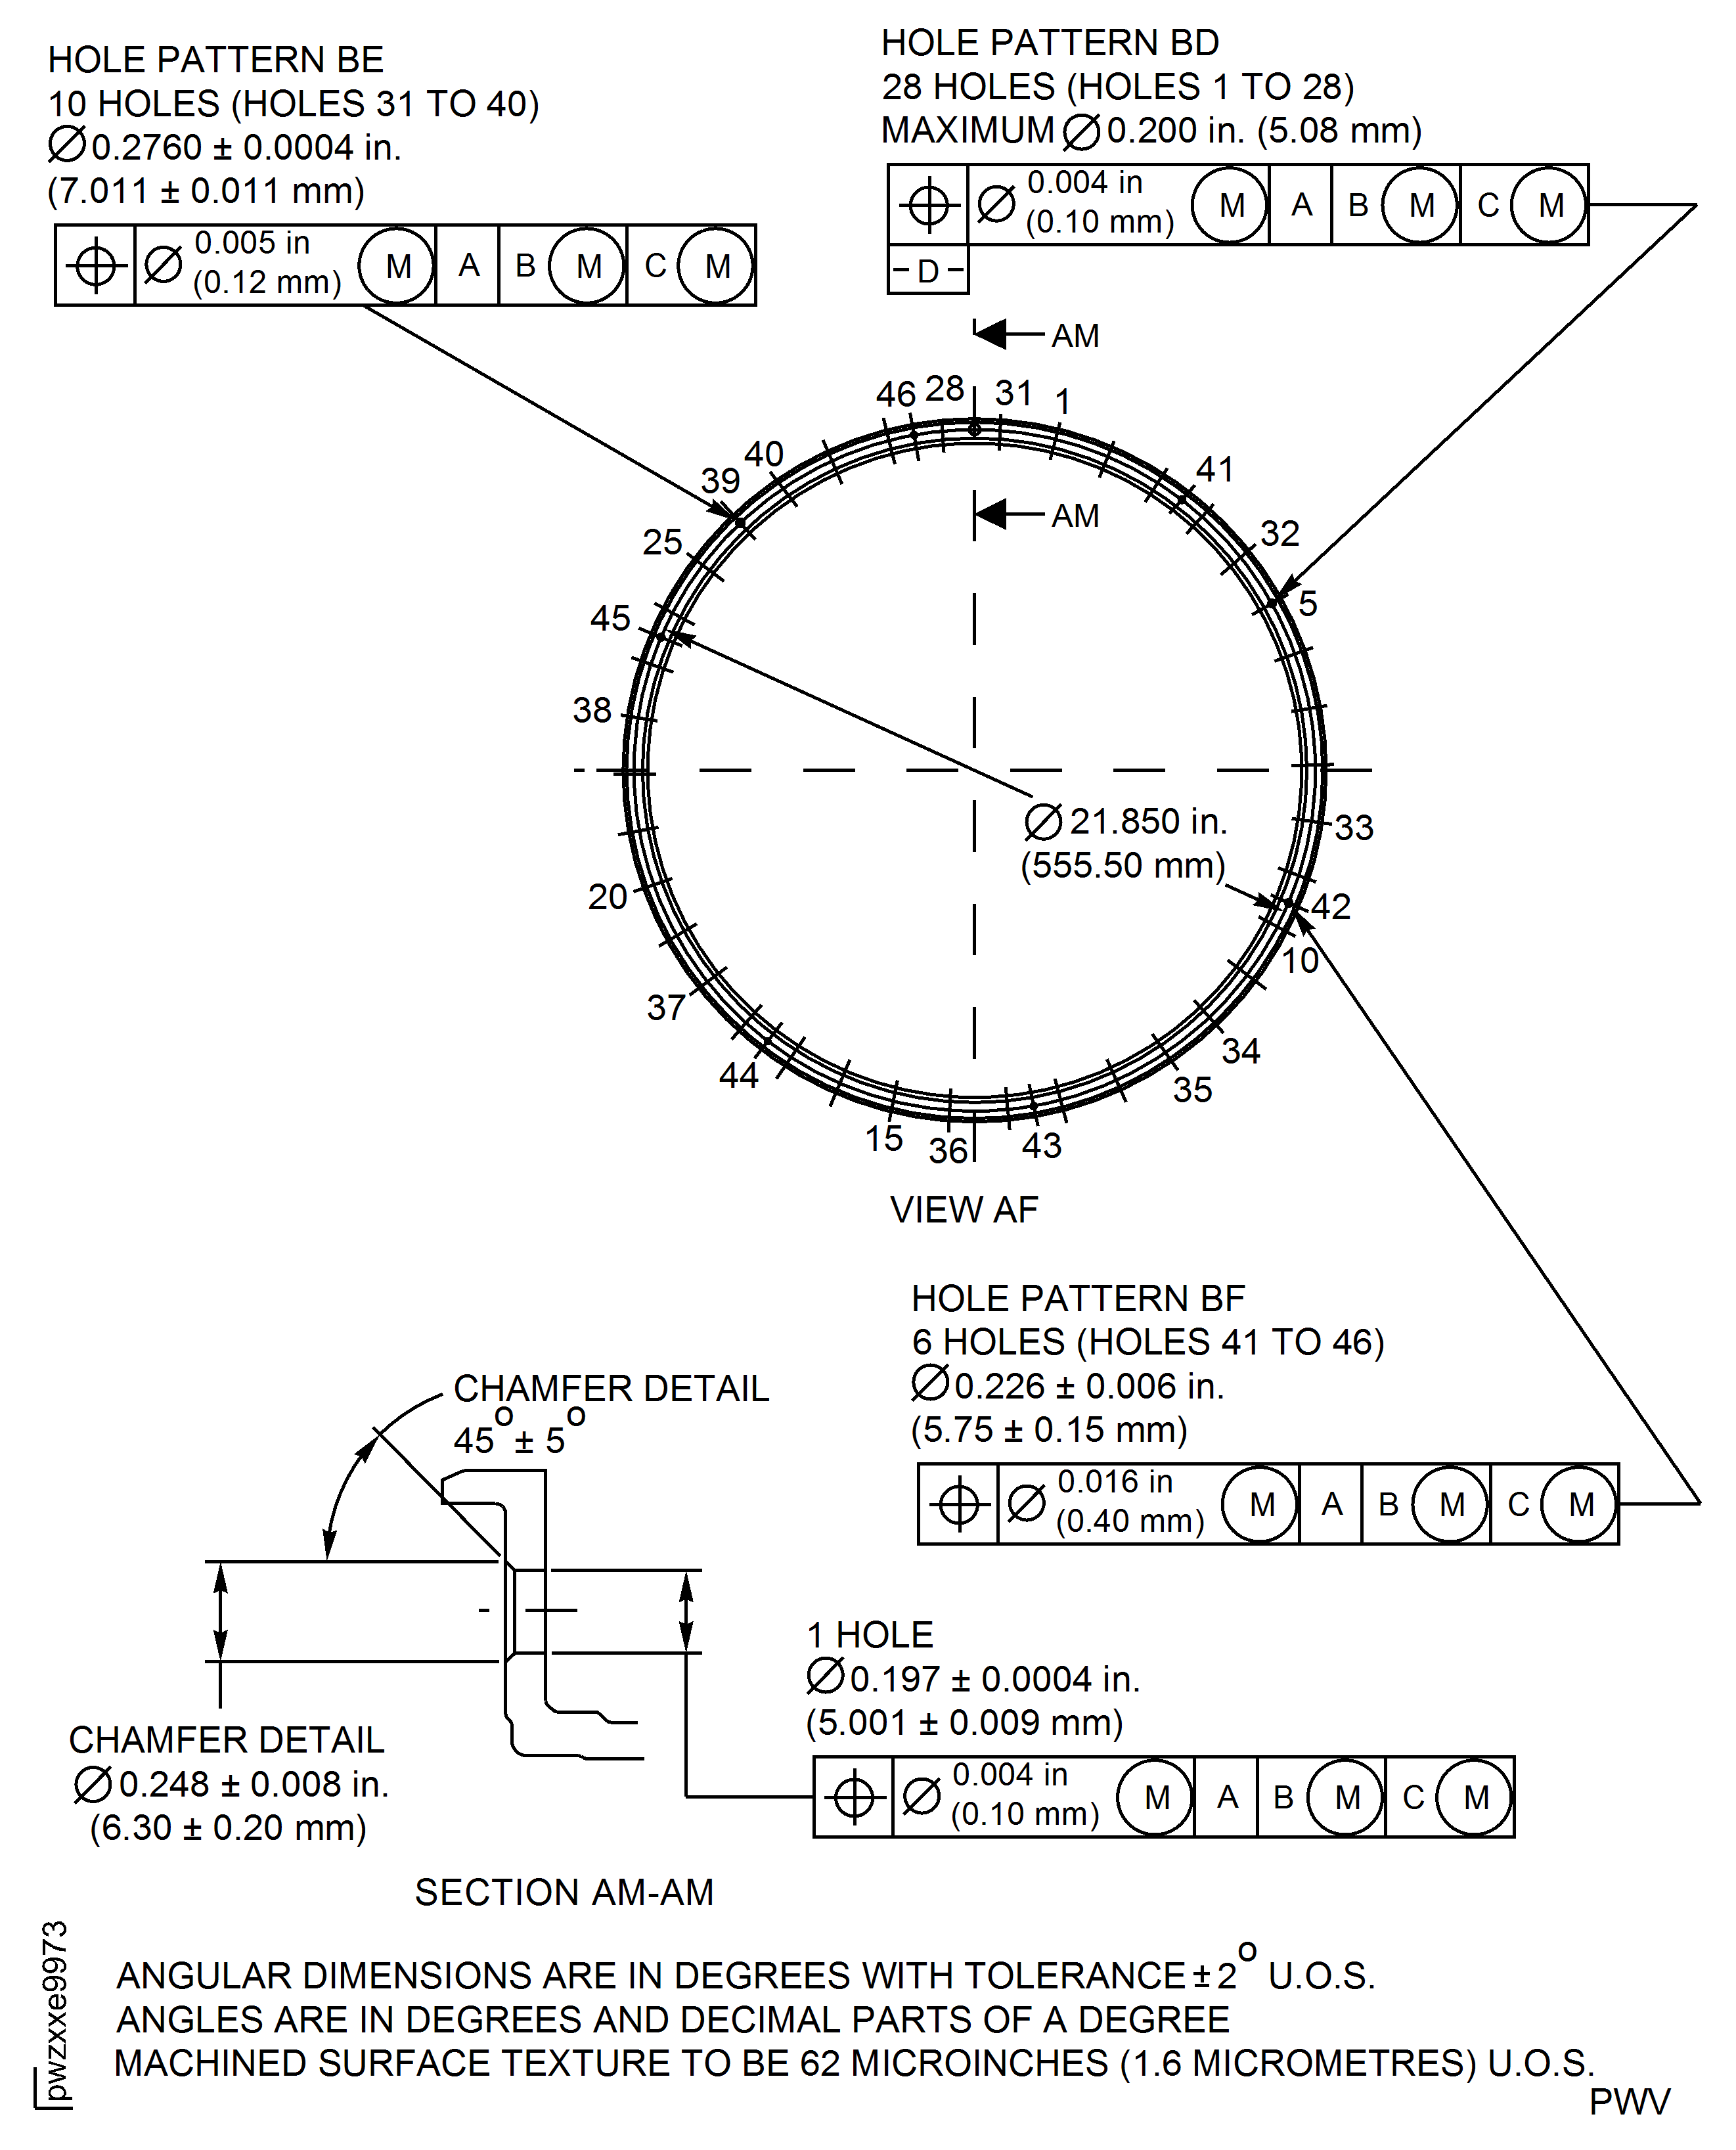
Figure: High Pressure (HP) Compressor Stage 7 Rotor Path Case Assembly - Repair Details and Dimensions - Assembly D and E
High Pressure (HP) Compressor Stage 7 Rotor Path Case Assembly - Repair Details and Dimensions - Assembly D and E
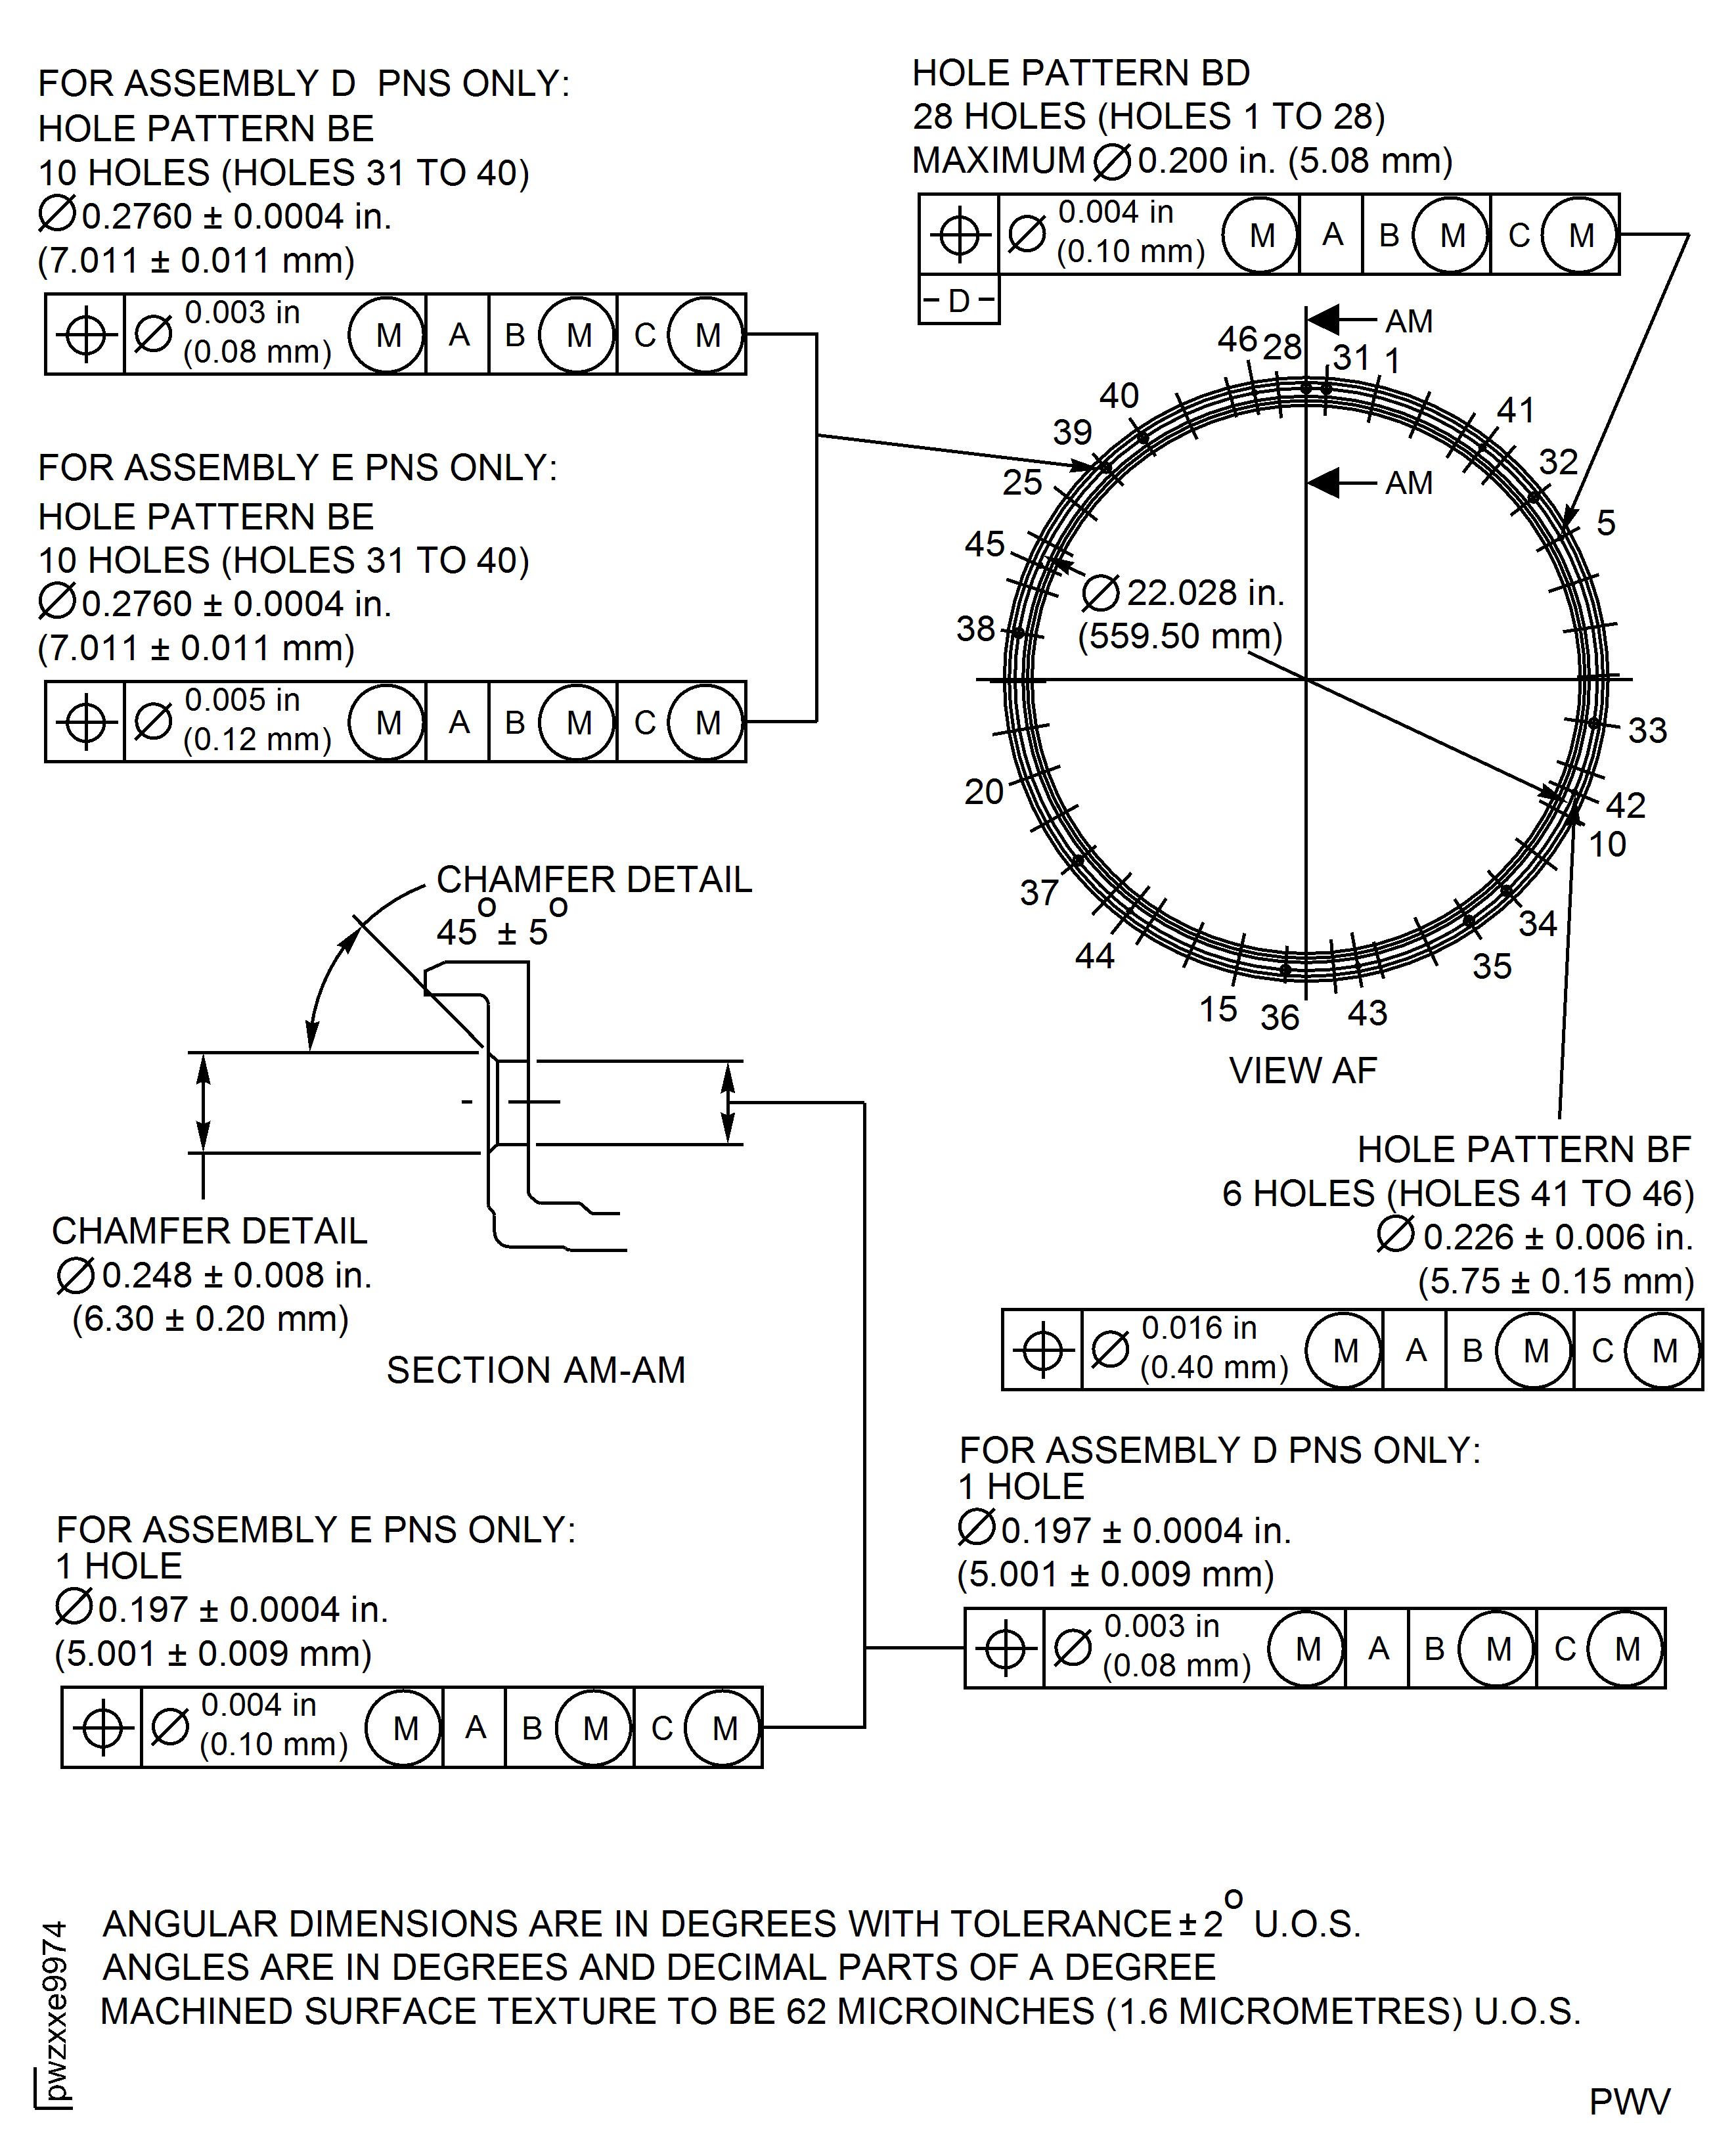
Figure: High Pressure (HP) Compressor Stage 7 Rotor Path Case Assembly - Repair Details and Dimensions - Assembly A, D and E
High Pressure (HP) Compressor Stage 7 Rotor Path Case Assembly - Repair Details and Dimensions - Assembly A, D and E
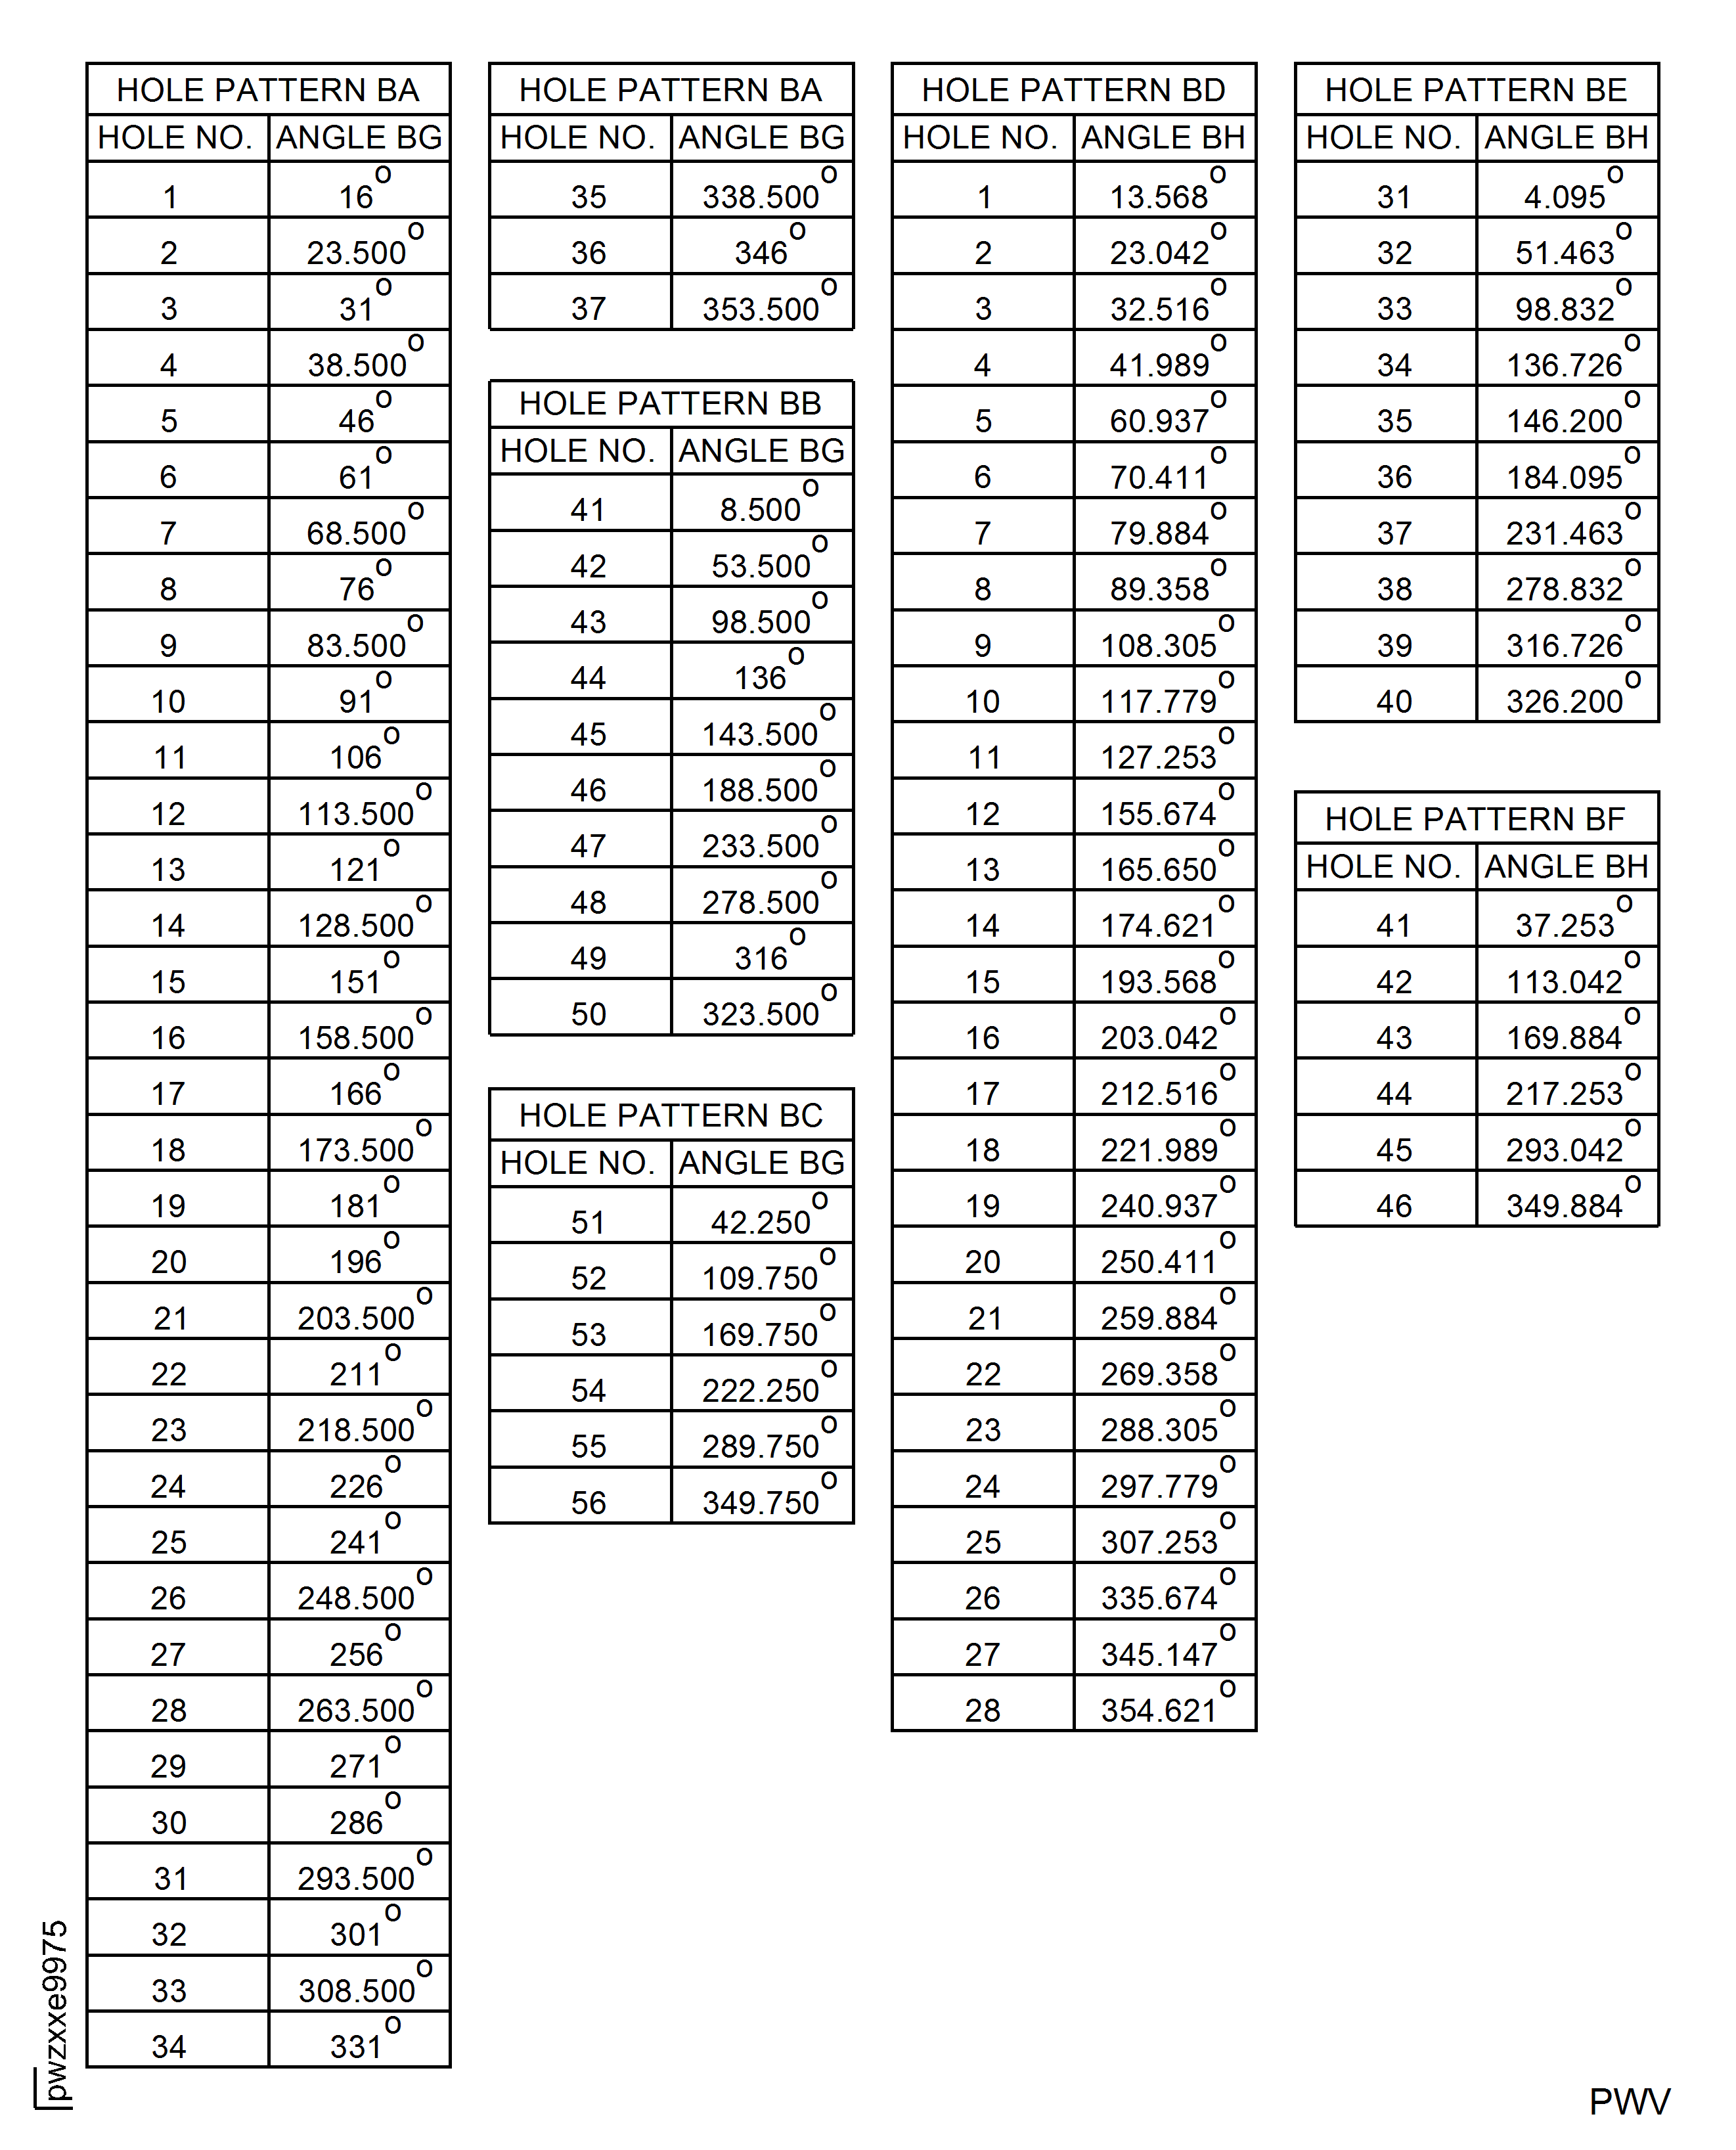
Figure: High Pressure (HP) Compressor Stage 8 Rotor Path Case Assembly - Repair Details and Dimensions - Assembly C
High Pressure (HP) Compressor Stage 8 Rotor Path Case Assembly - Repair Details and Dimensions - Assembly C
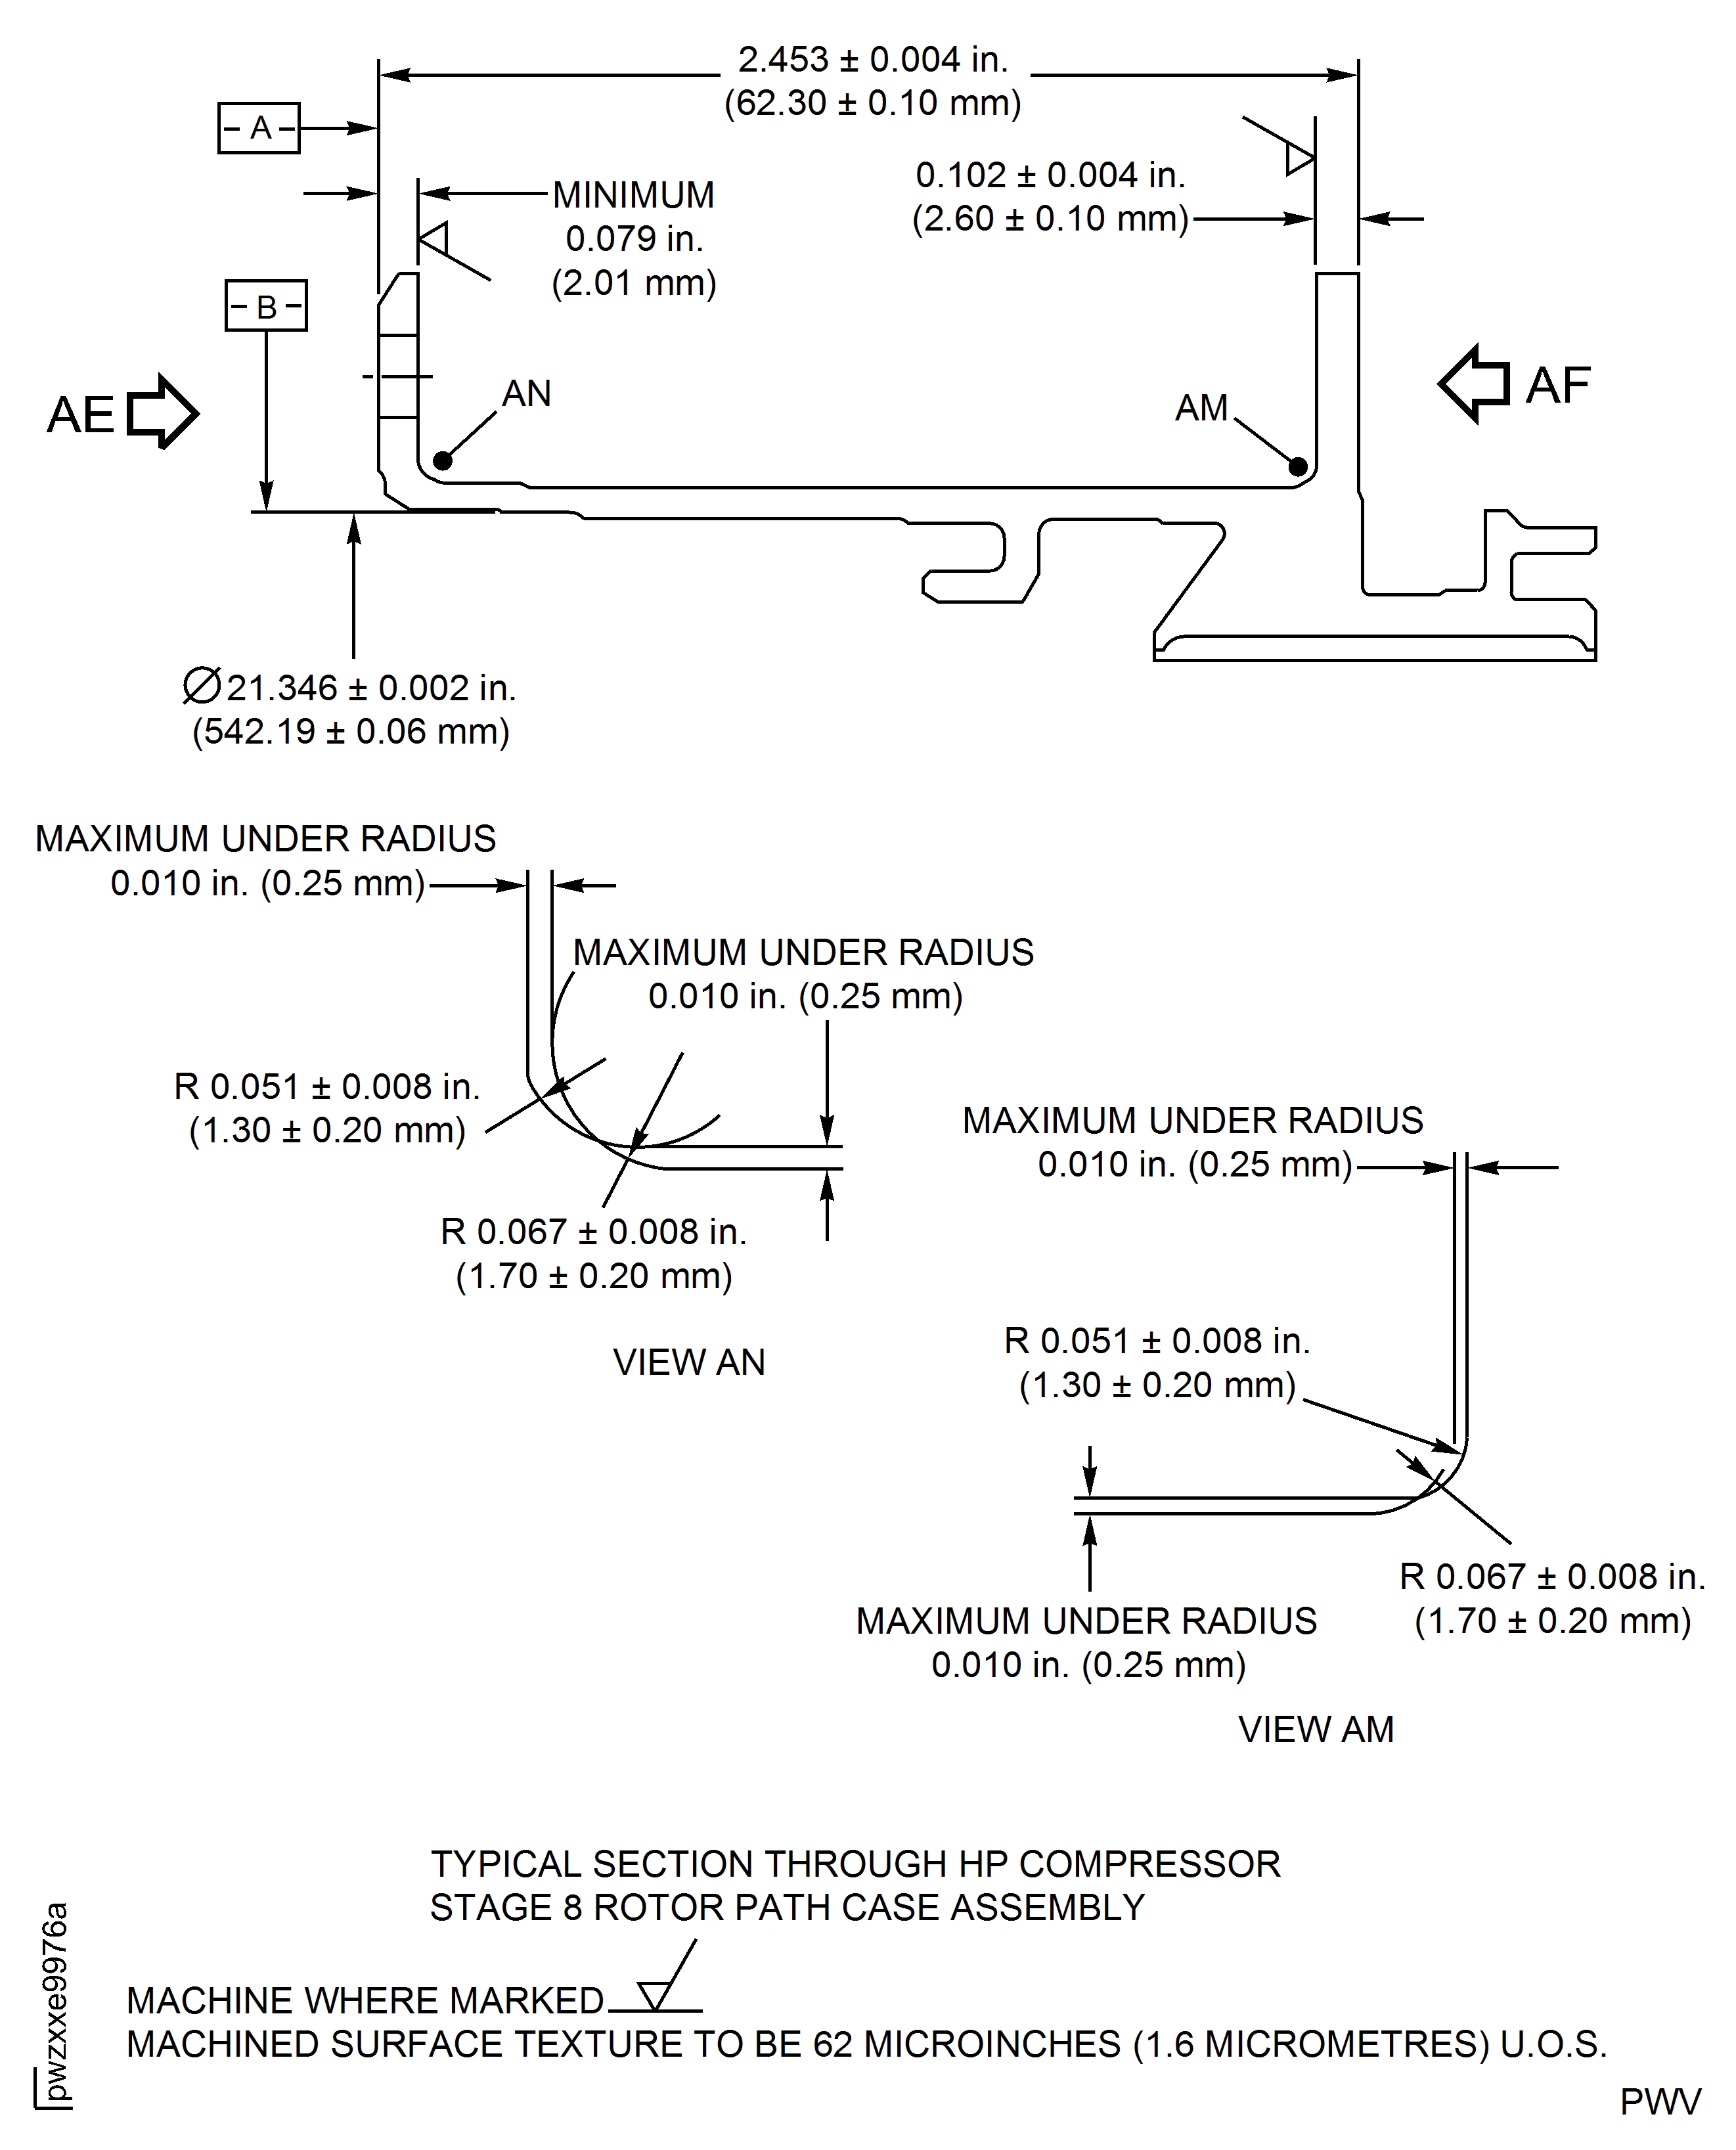
Figure: High Pressure (HP) Compressor Stage 8 Rotor Path Case Assembly - Repair Details and Dimensions - Assembly C
High Pressure (HP) Compressor Stage 8 Rotor Path Case Assembly - Repair Details and Dimensions - Assembly C
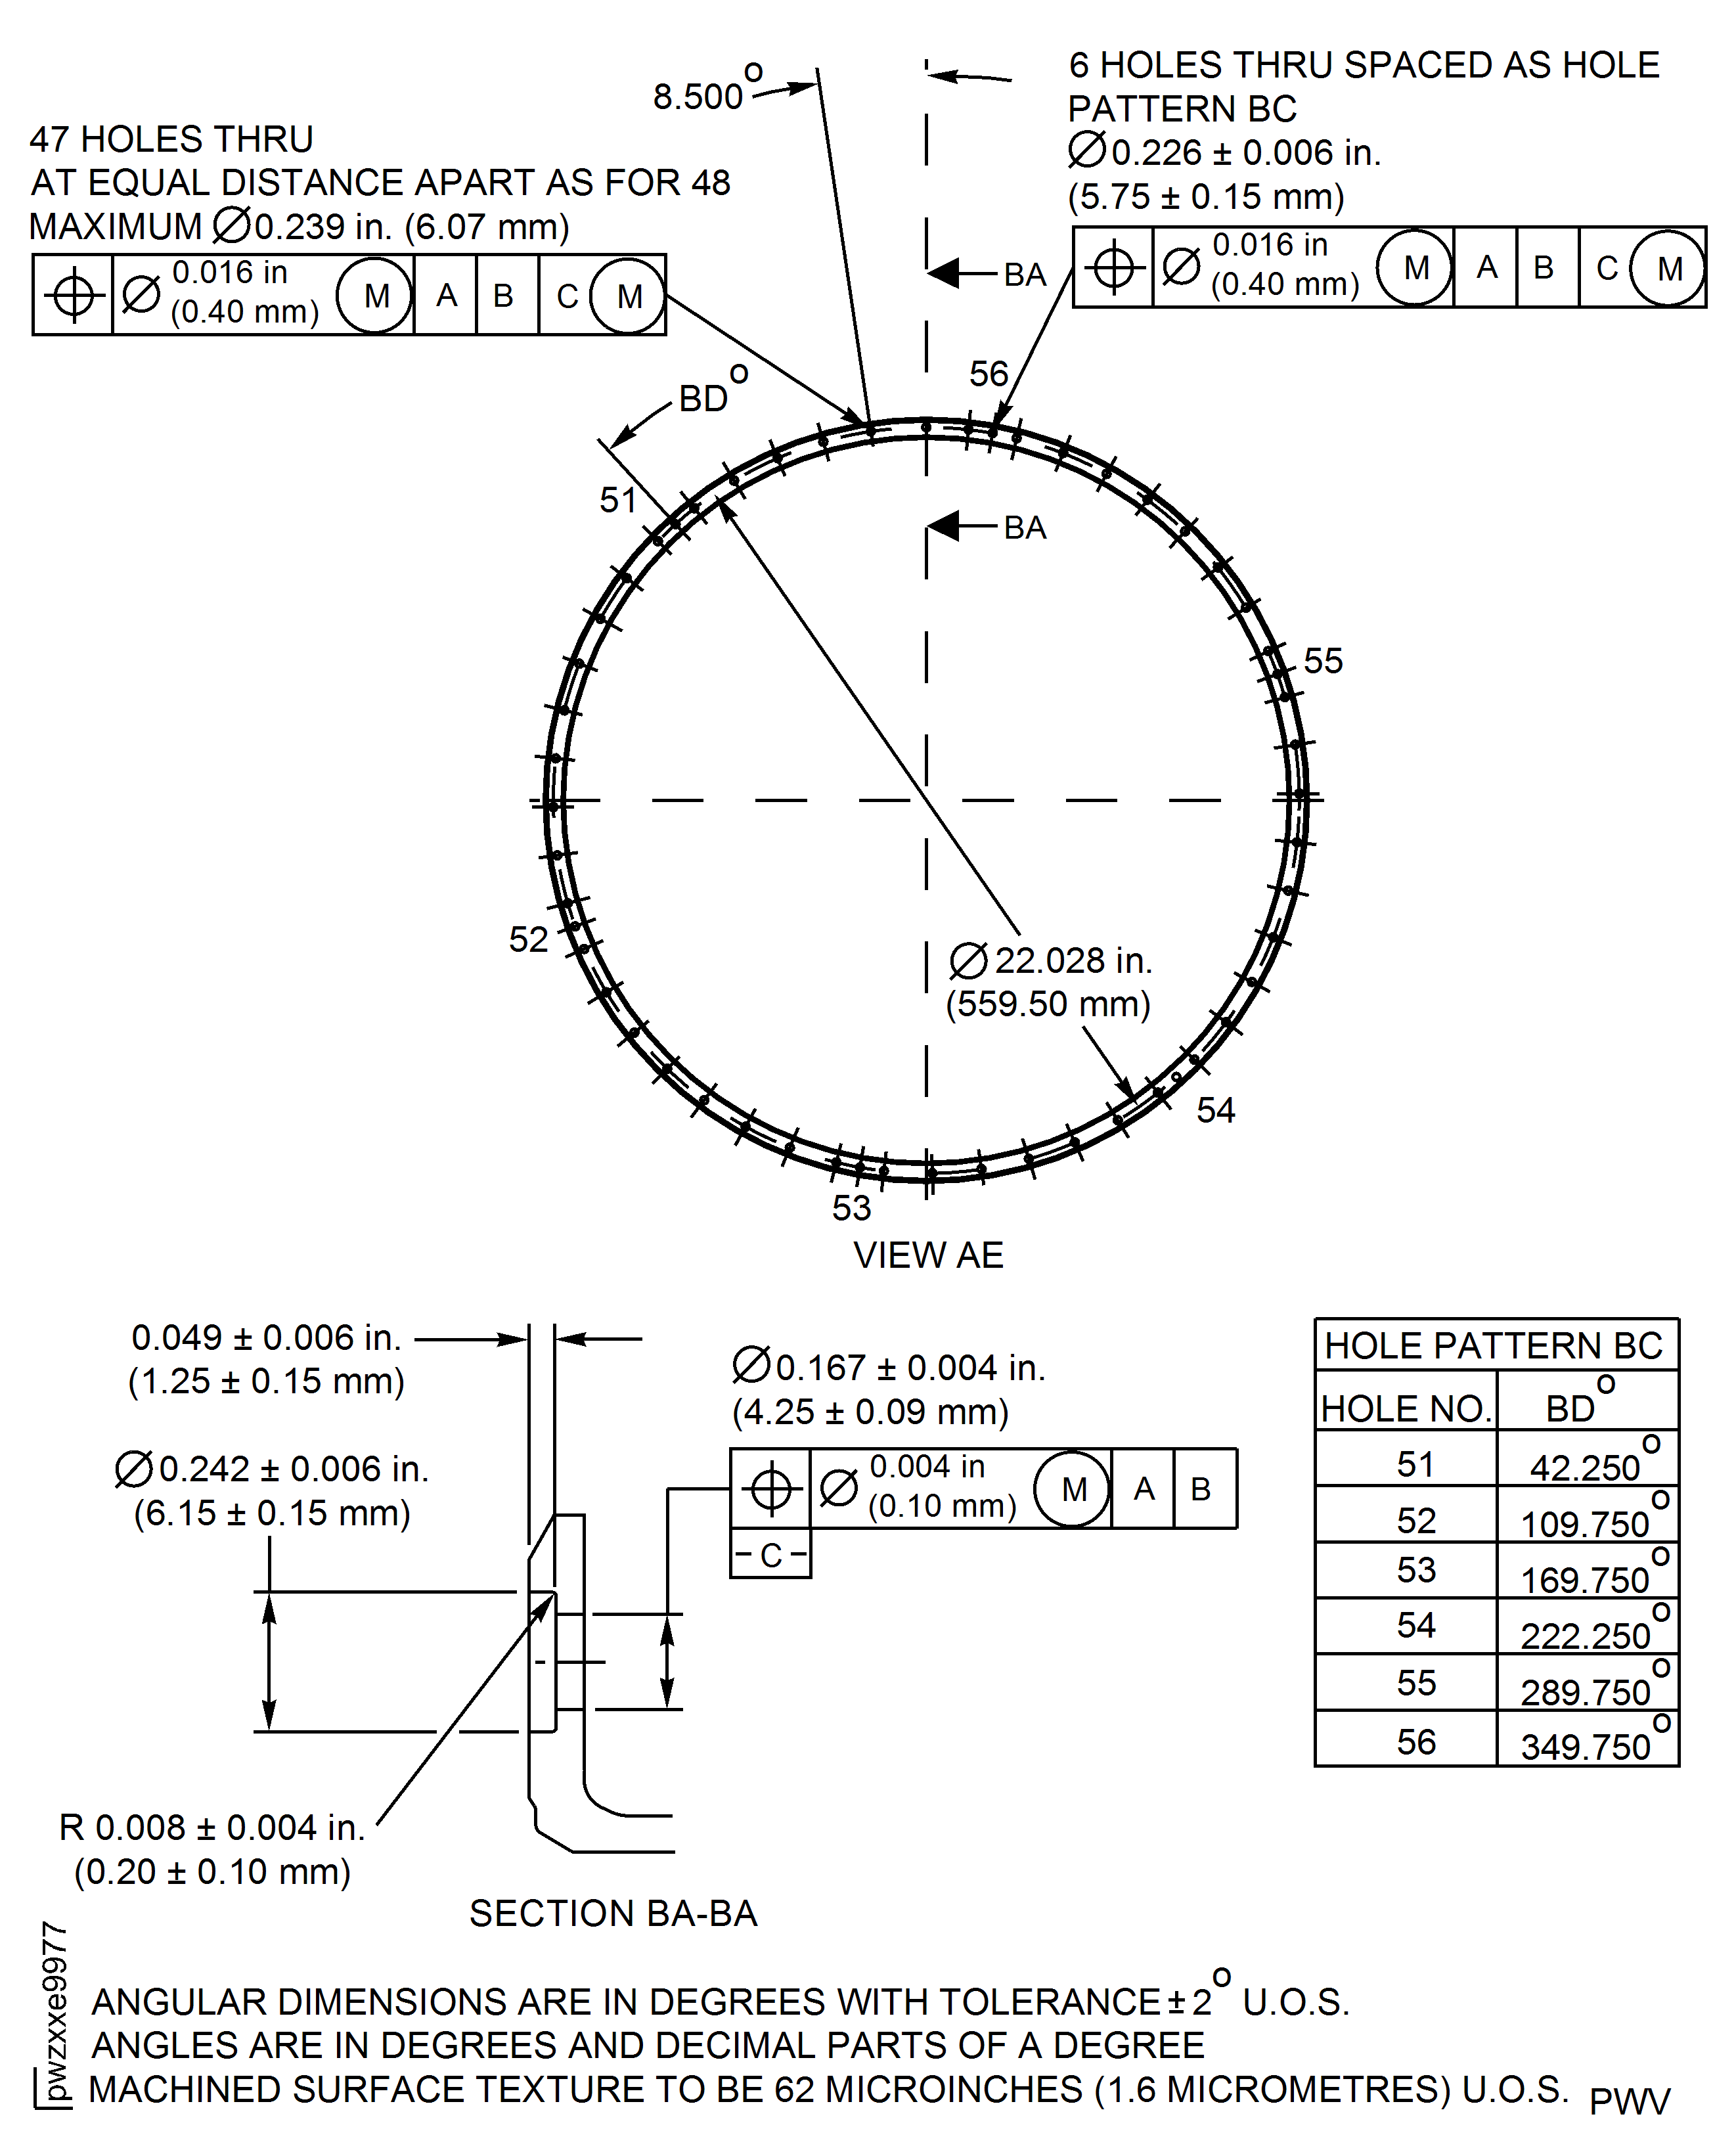
Figure: High Pressure (HP) Compressor Stage 8 Rotor Path Case Assembly - Repair Details and Dimensions - Assembly C
High Pressure (HP) Compressor Stage 8 Rotor Path Case Assembly - Repair Details and Dimensions - Assembly C
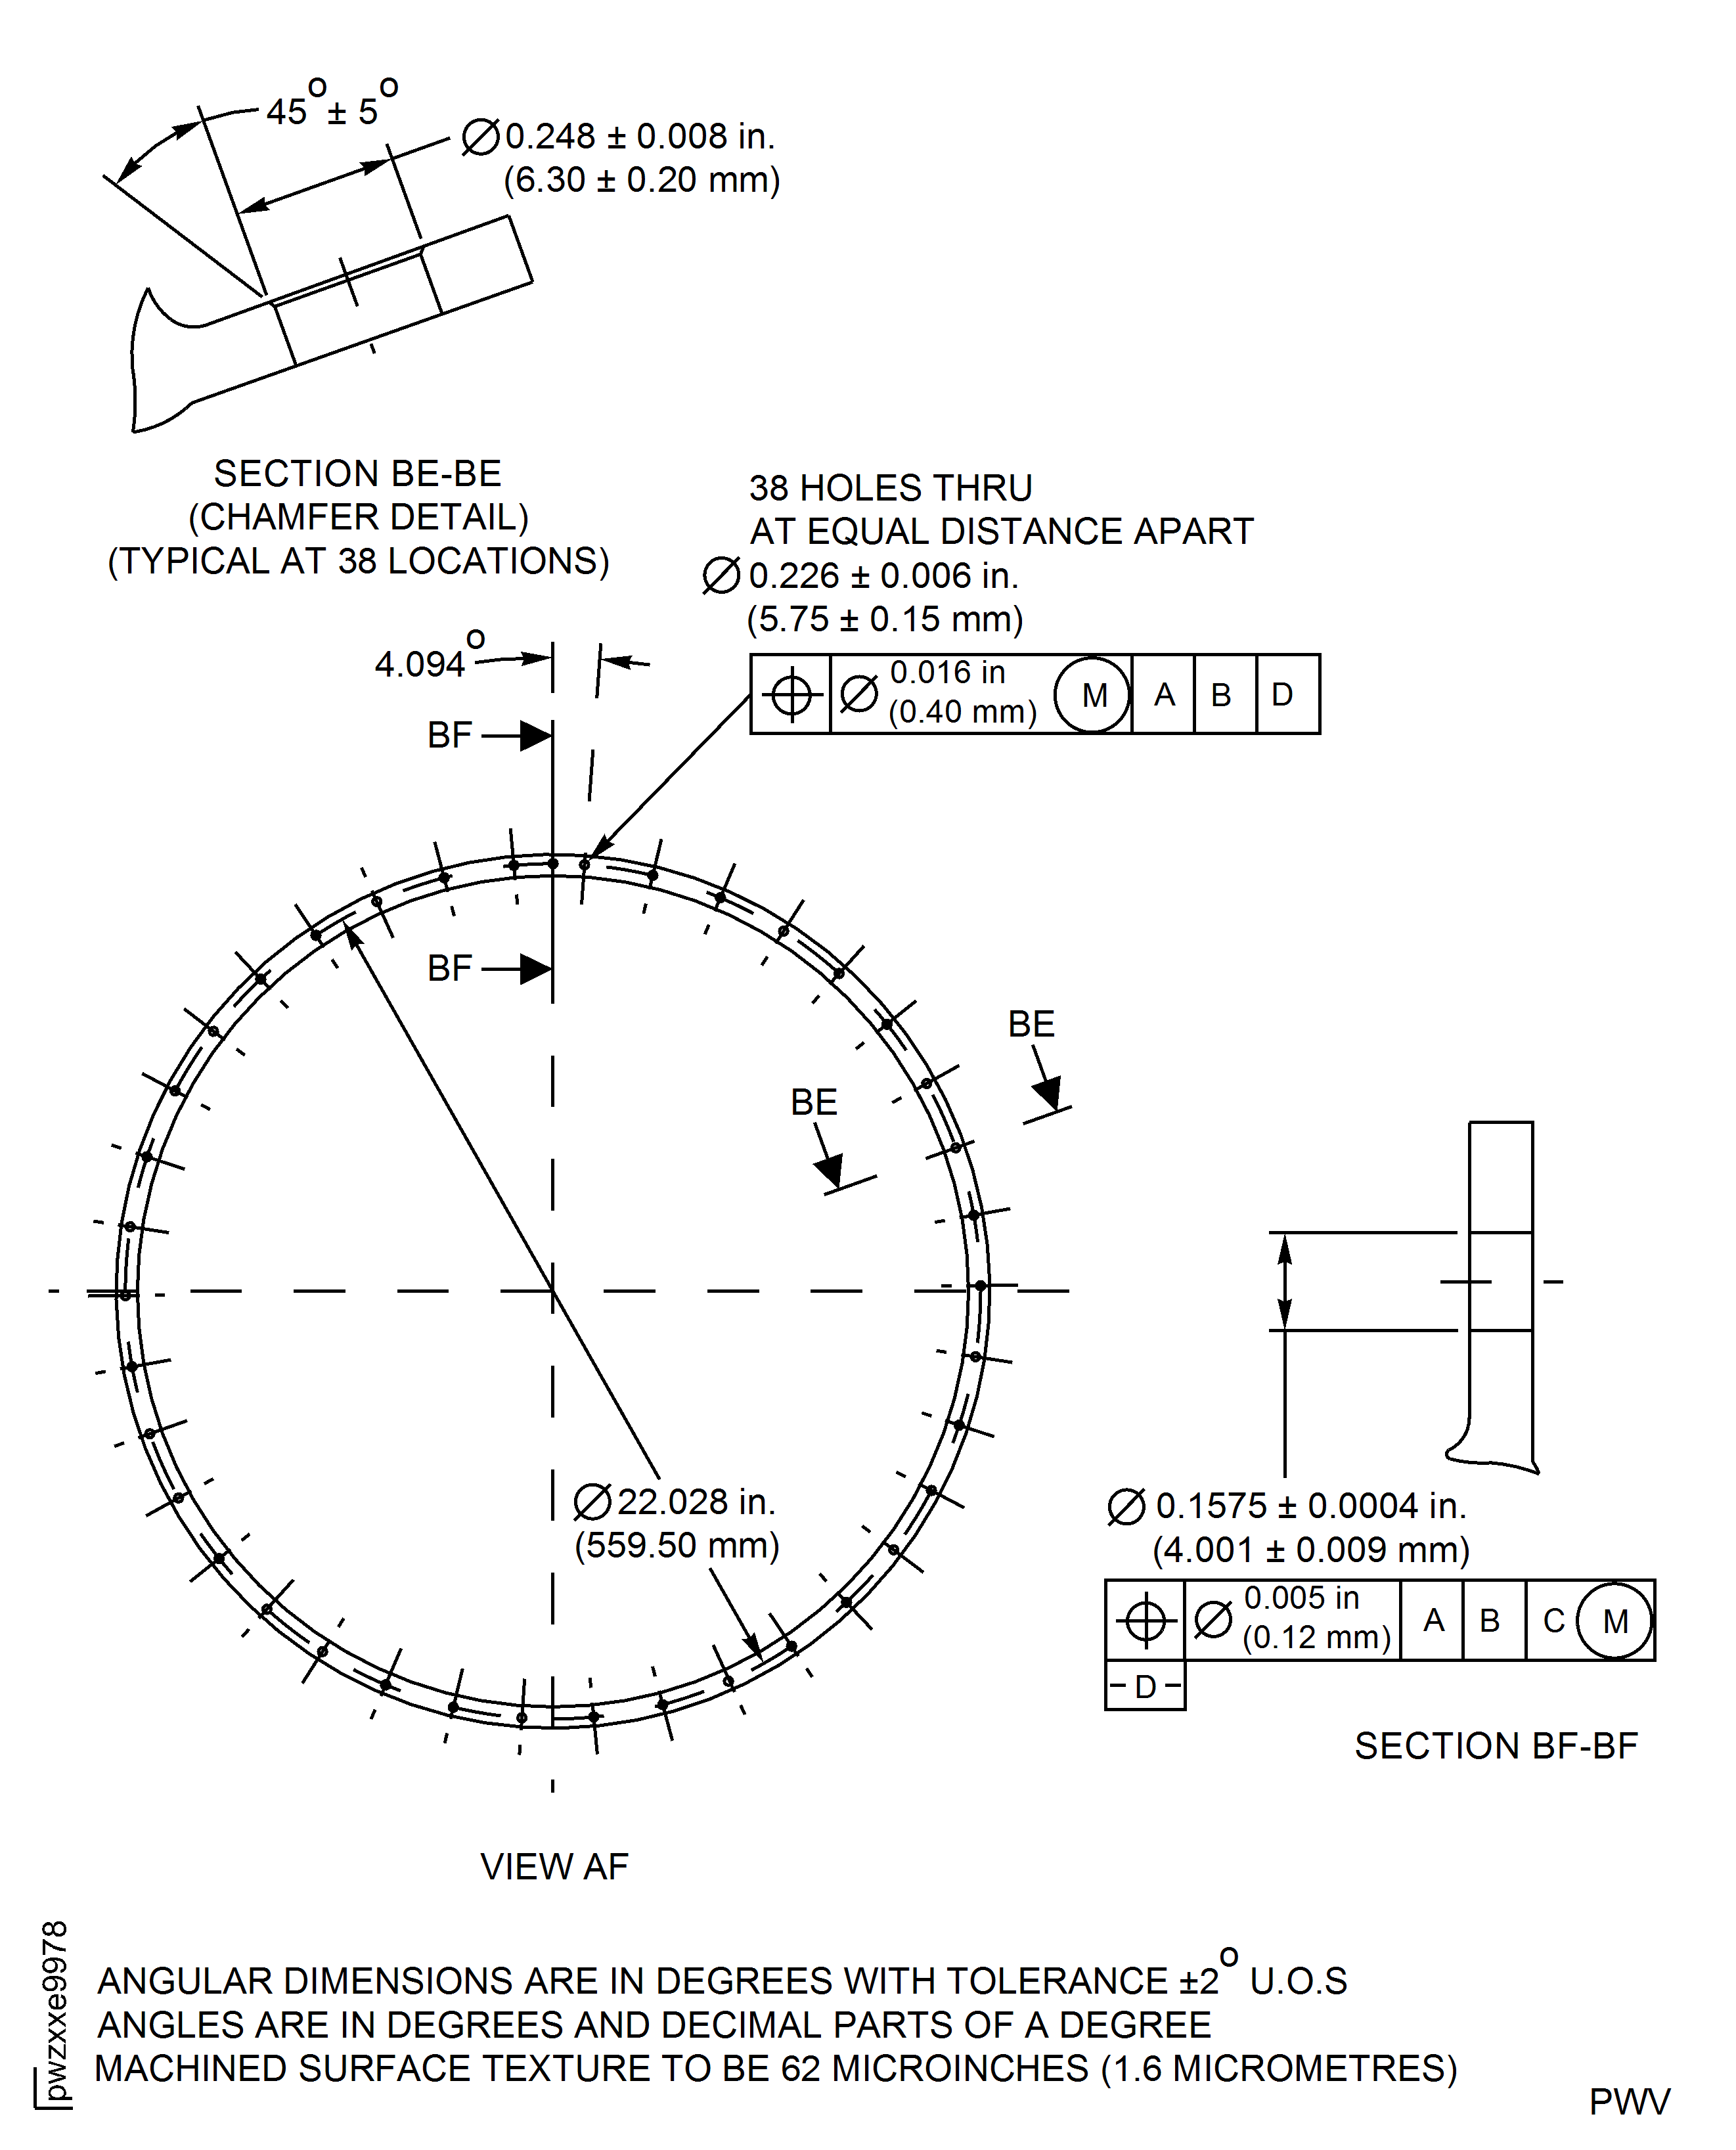
Figure: High Pressure (HP) Compressor Stage 8 Rotor Path Case Assembly - Repair Details and Dimensions - Assembly B, C, D and E
High Pressure (HP) Compressor Stage 8 Rotor Path Case Assembly - Repair Details and Dimensions - Assembly B, C, D and E
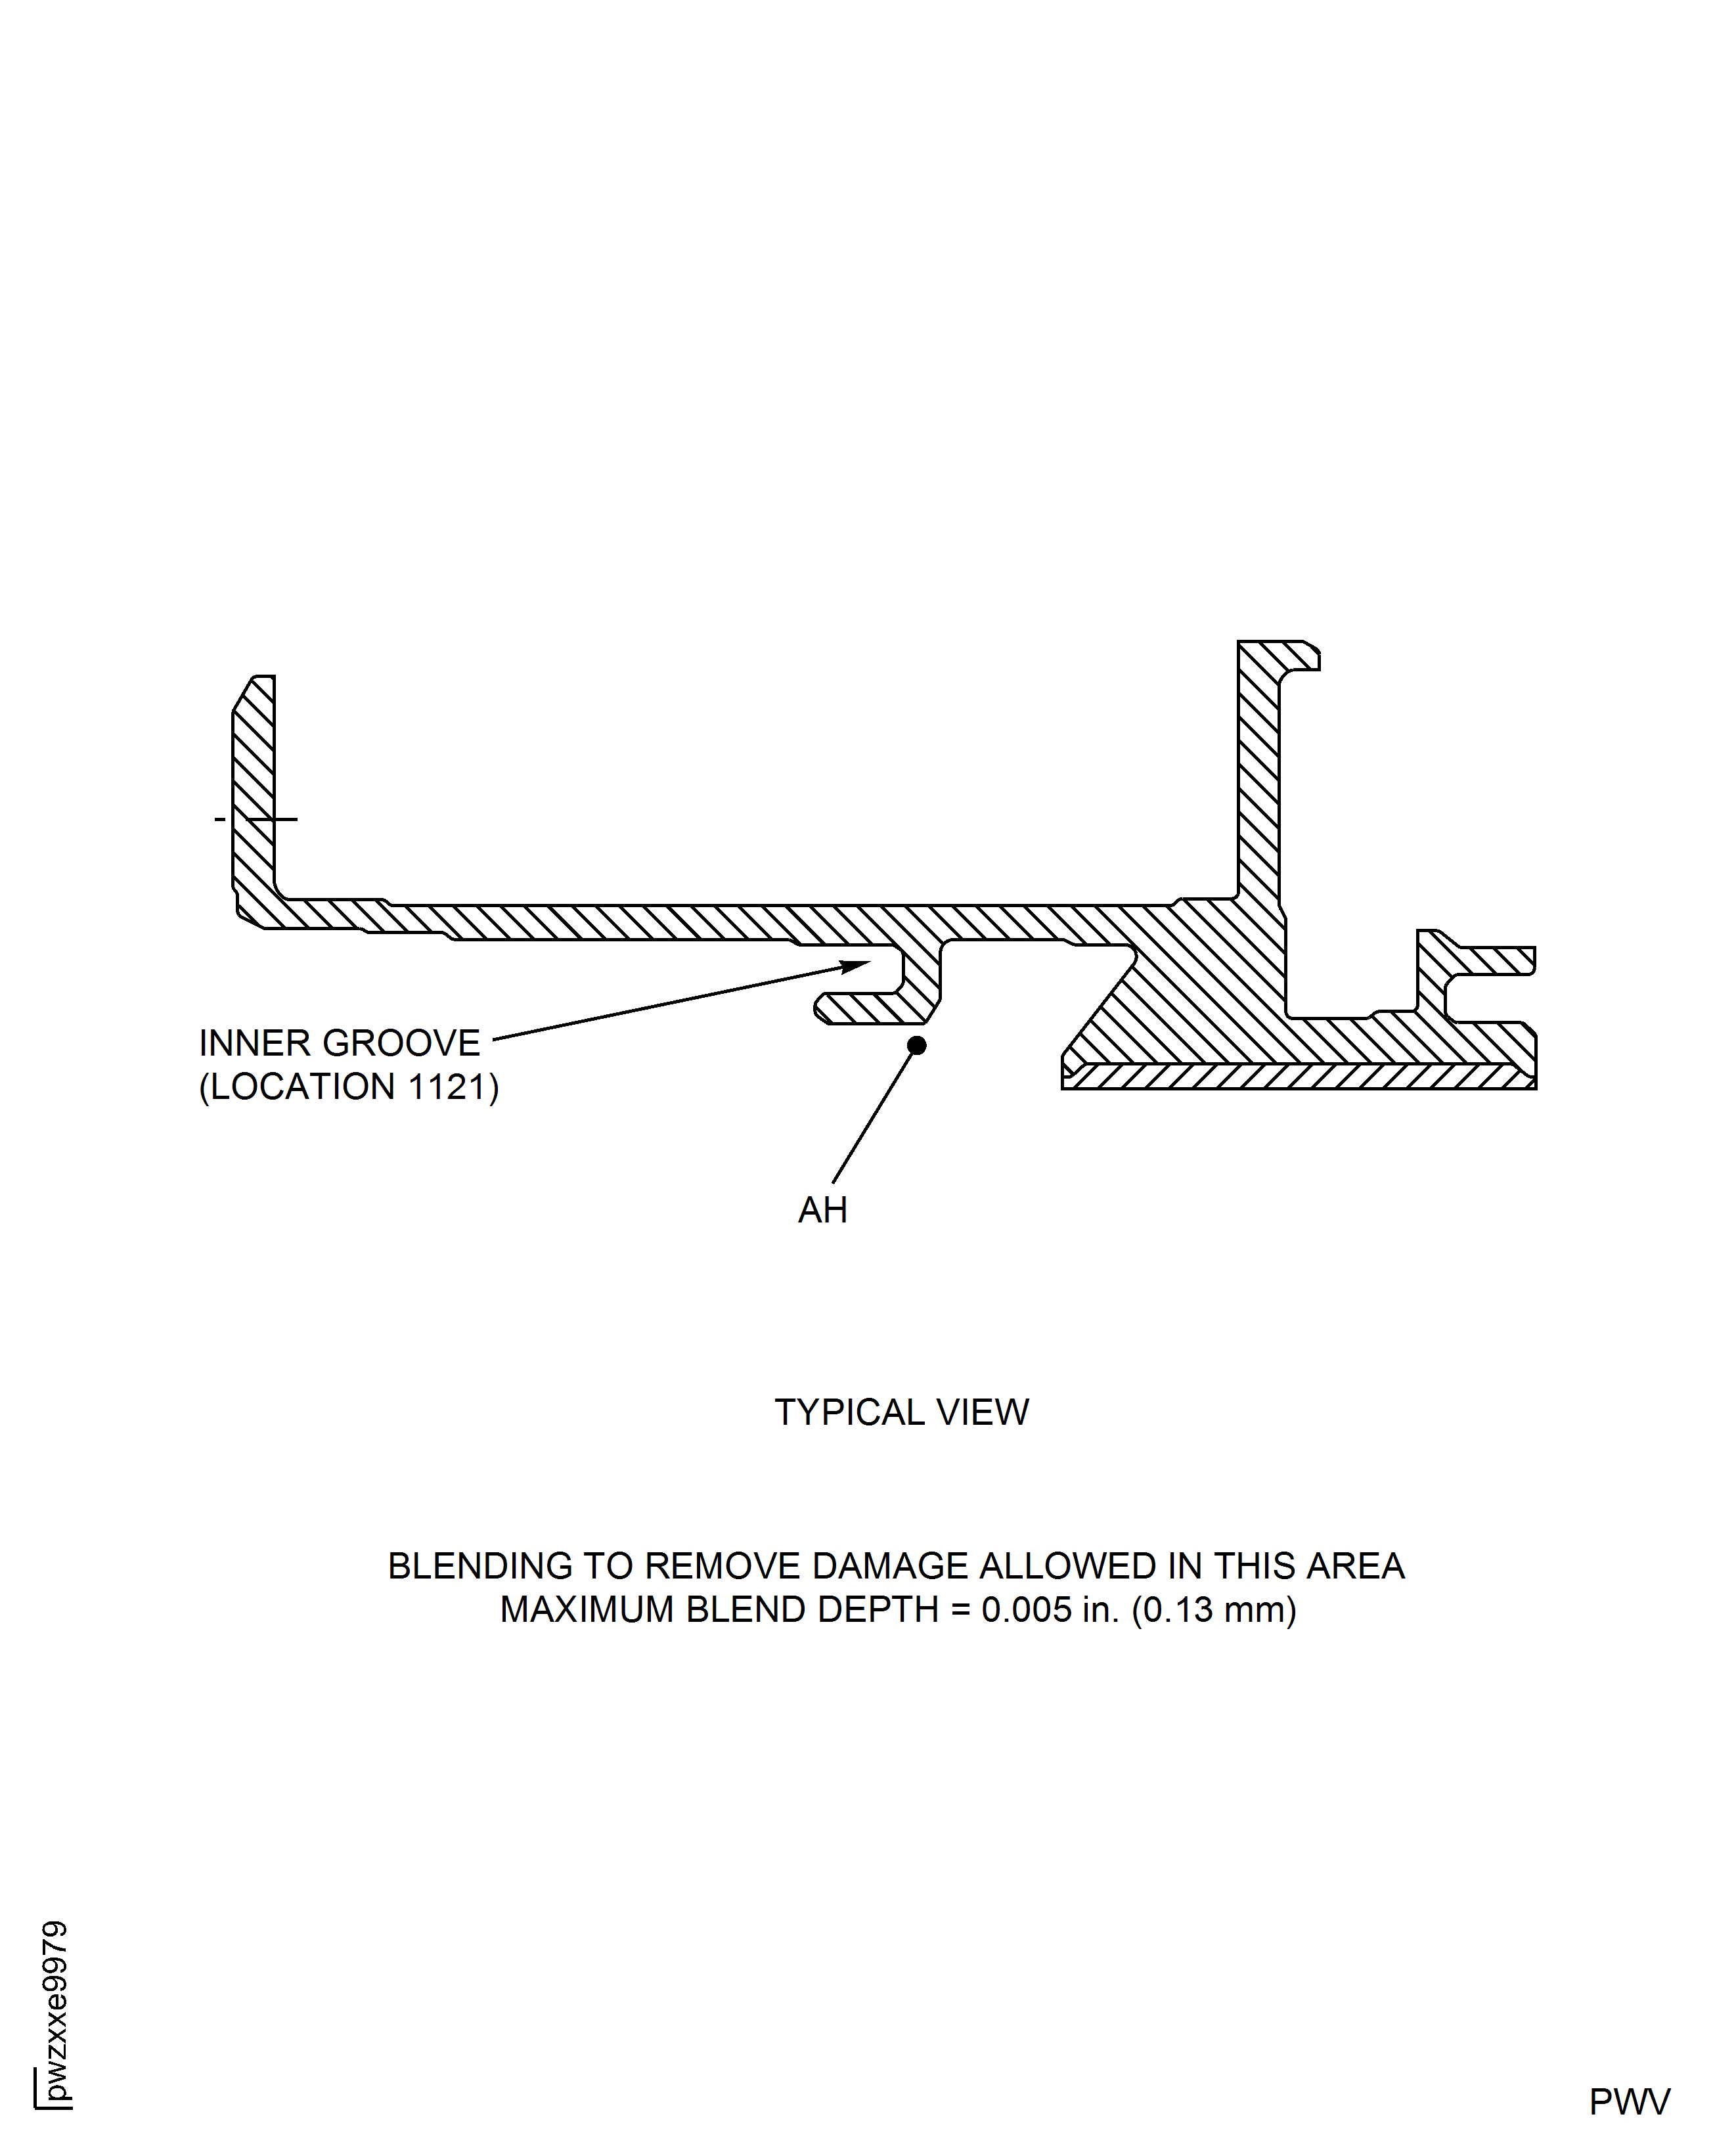
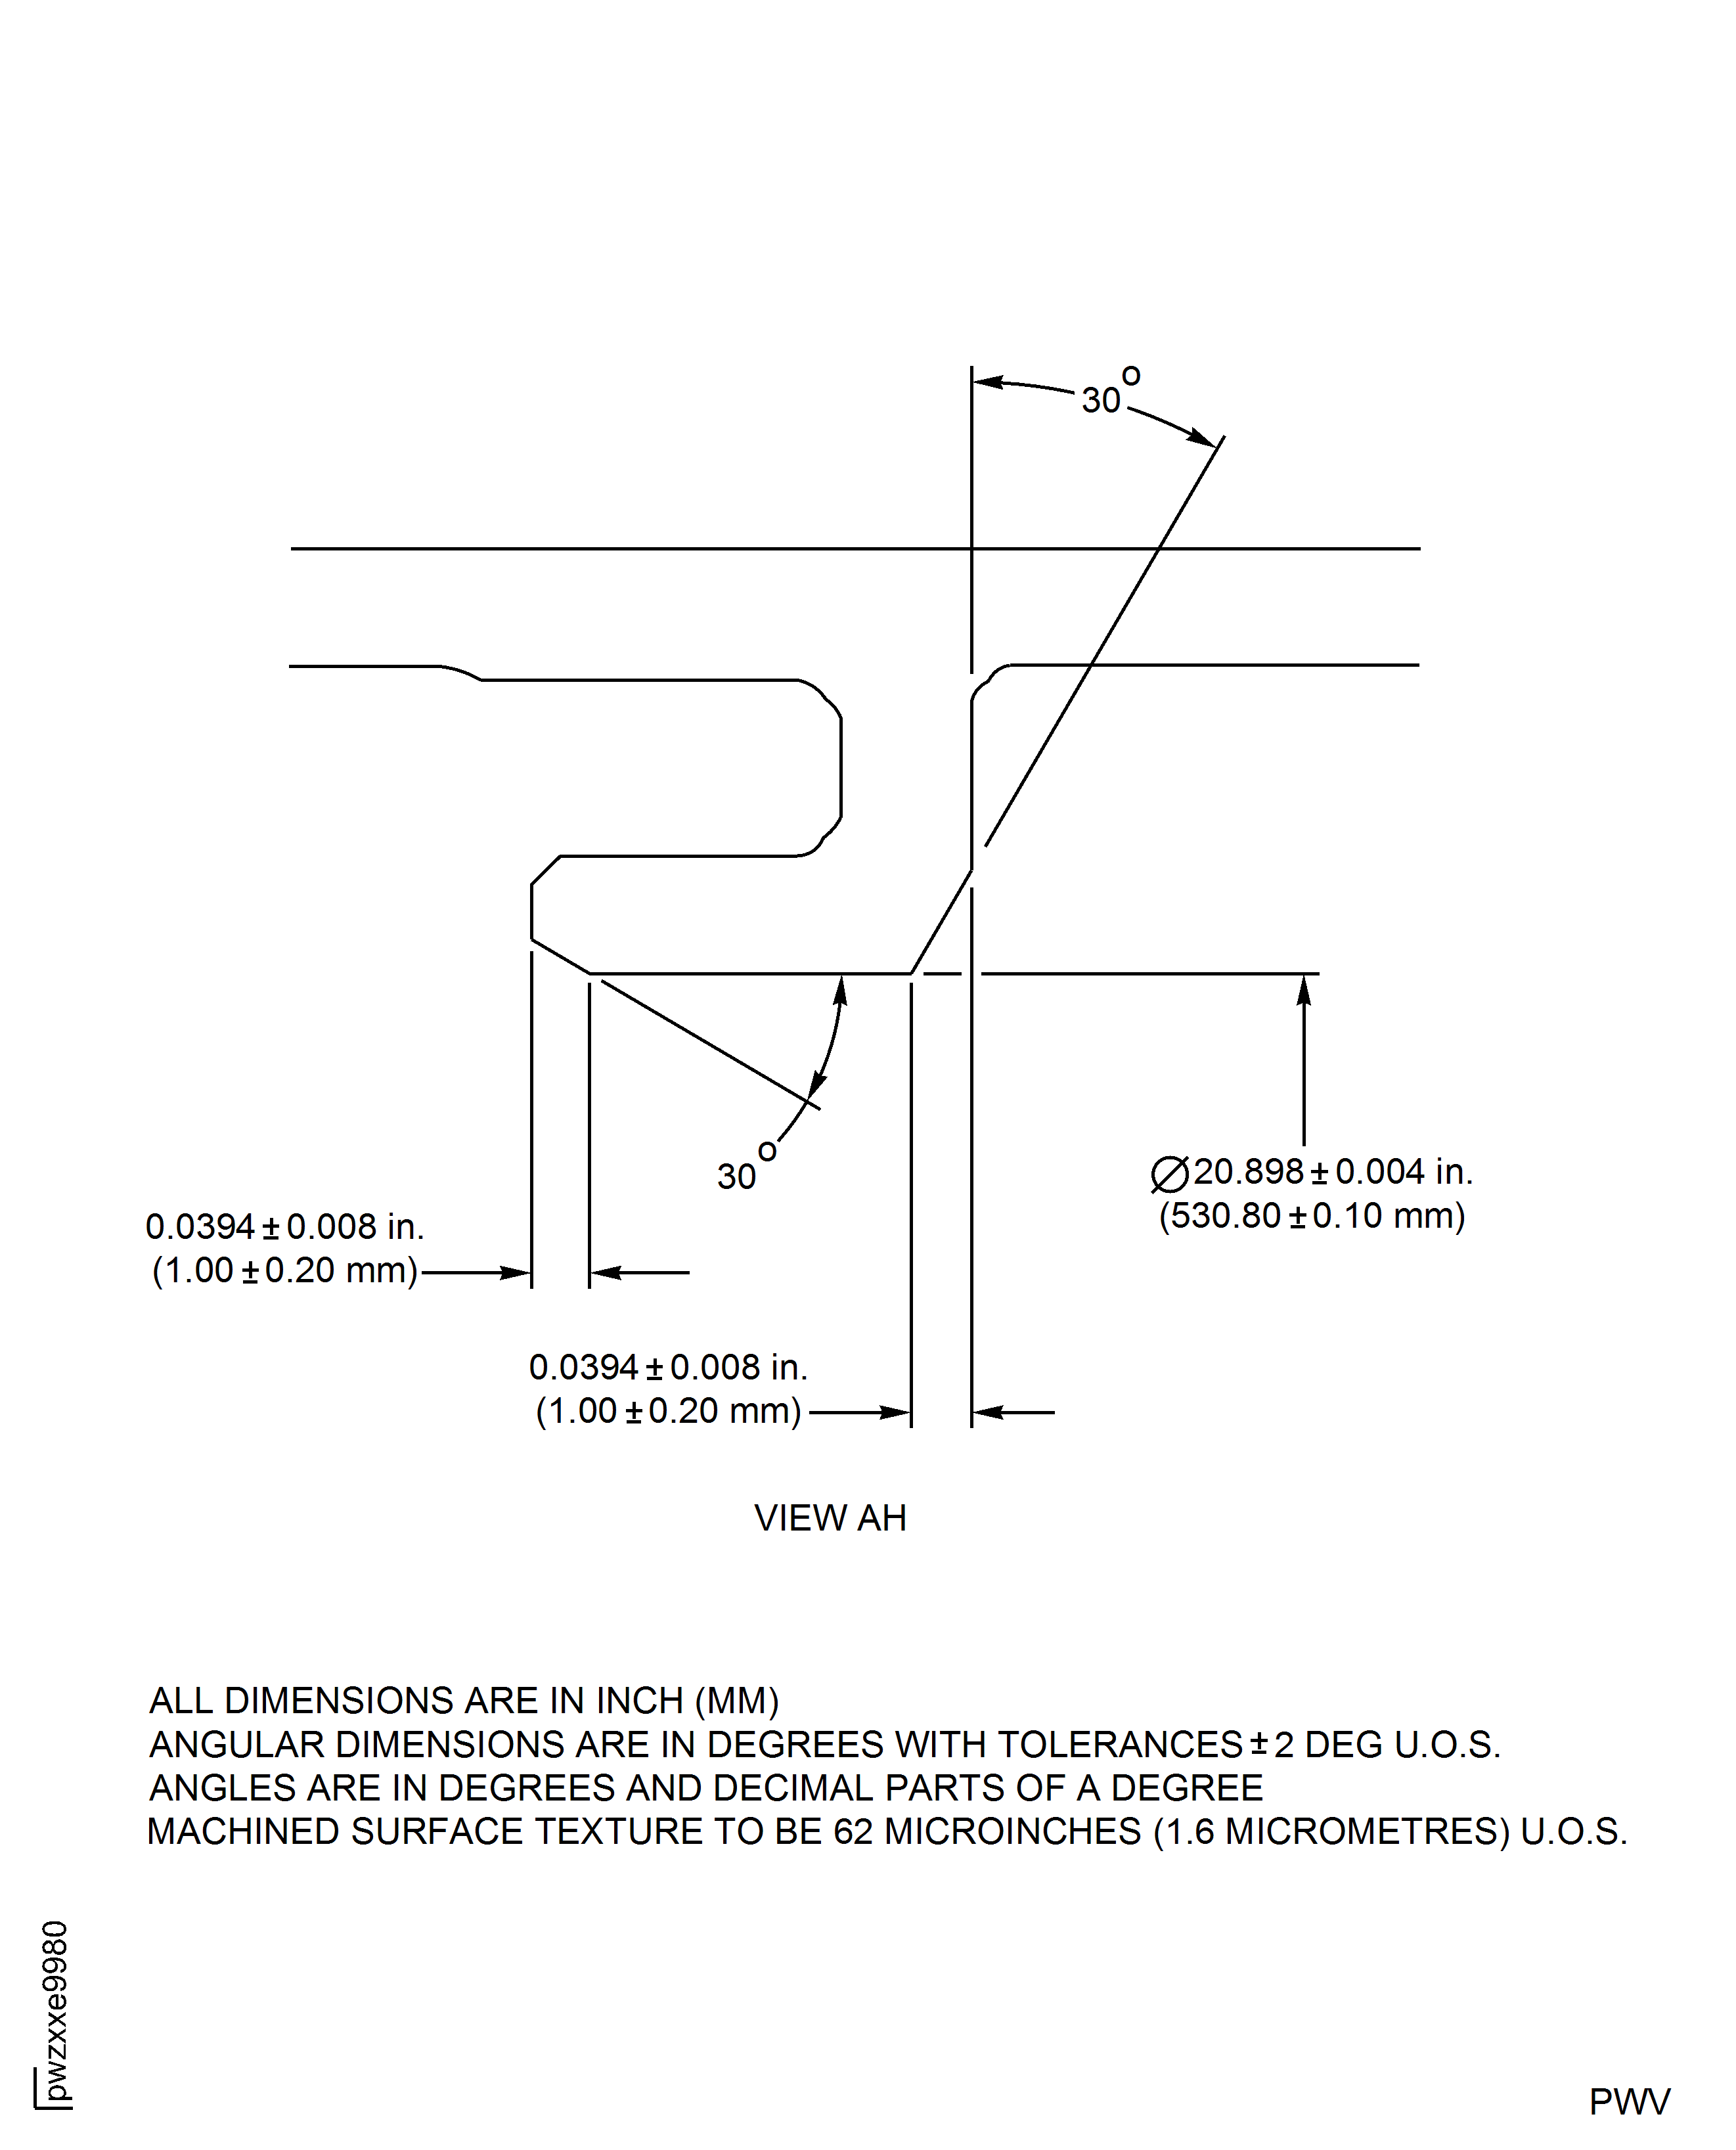
Figure: High Pressure (HP) Compressor Stage 8 Rotor Path Case Assembly - Repair Details and Dimensions - Assembly B, C, D and E
High Pressure (HP) Compressor Stage 8 Rotor Path Case Assembly - Repair Details and Dimensions - Assembly B, C, D and E
Requirements After Job Completion
Follow-On Conditions
| Action/Condition | Data Module/Technical Publication |
|---|---|
| Replace the surface protection of the HPC Stage 7 And Stage 8 Case | TASK 72-41-21-300-006 |
