Export Control
EAR Export Classification: Not subject to the EAR per 15 C.F.R. Chapter 1, Part 734.3(b)(3), except for the following Service Bulletins which are currently published as EAR Export Classification 9E991: SBE70-0992, SBE72-0483, SBE72-0580, SBE72-0588, SBE72-0640, SBE73-0209, SBE80-0024 and SBE80-0025.Copyright
© IAE International Aero Engines AG (2001, 2014 - 2021) The information contained in this document is the property of © IAE International Aero Engines AG and may not be copied or used for any purpose other than that for which it is supplied without the express written authority of © IAE International Aero Engines AG. (This does not preclude use by engine and aircraft operators for normal instructional, maintenance or overhaul purposes.).Applicability
All
Common Information
TASK 72-42-10-440-001 Diffuser Case Assembly And Fittings - Assemble The Diffuser Case Assembly, Assembly-001
General
Fig/item numbers in parentheses in the procedure agree with those used in the IPC. Only the primary Fig/item numbers are used. For the service bulletin alpha variants refer to the IPC.
For all parts identified in a different Chapter/Section/Subject, the applicable Chapter/Section/Subject comes before the Fig/item number.
For standard torque data and procedures, refer to SPM TASK 70-41-00-400-501 and SPM TASK 70-41-02-400-501.
Special torque data and assembly tolerances are included in the procedure.
Lubricate all threads and abutment faces of nuts and bolts with CoMat 10-077 APPROVED ENGINE OILS, unless other lubricants are referred to in the procedure.
To identify, lubricate and install seal rings, refer to the SPM TASK 70-44-01-400-501.
The number for each radial location must be identified in a clockwise direction. These start at the engine top position when you look from the rear of the engine, unless stated differently in the procedure.
For lockwire data and procedures, refer to TASK 70-42-05-400-501.
NOTE
NOTE
Preliminary Requirements
Pre-Conditions
NONESupport Equipment
| Name | Manufacturer | Part Number / Identification | Quantity | Remark |
|---|---|---|---|---|
| IAE 1P16004 Handling bracket | 0AM53 | IAE 1P16004 | 2 | |
| IAE 1P16005 Build stand | 0AM53 | IAE 1P16005 | 1 | |
| IAE 1P16173 Lift sling | 0AM53 | IAE 1P16173 | 1 |
Consumables, Materials and Expendables
| Name | Manufacturer | Part Number / Identification | Quantity | Remark |
|---|---|---|---|---|
| CoMat 02-141 LOCKWIRE | LOCAL | CoMat 02-141 | ||
| CoMat 10-077 APPROVED ENGINE OILS | LOCAL | CoMat 10-077 |
Spares
| Name | Manufacturer | Part Number / Identification | Quantity | Remark |
|---|---|---|---|---|
| Ring seal | 1 | |||
| Gasket | 1 | |||
| Thrust wire | 1 | |||
| Ring seal | 2 | |||
| Gasket | 1 | |||
| Gasket | 1 | |||
| Thrust wire | 1 | |||
| Gasket | 1 | |||
| Ring seal | 2 | |||
| Ring seal | 2 | |||
| Gasket | 1 | |||
| Thrust wire | 1 |
Safety Requirements
NONEProcedure
Refer to Figure.
Reference the clearance at location 2065. If required, use the data written as a note in TASK 72-42-20-200-000 (INSPECTION-000).
Table 1. Fits and Clearances (all dimensions are in inches) NEW PART
WORN PART
DIMENSIONS
DIMENSIONS
PART IDENT
Size
Clearance
Non-select
REJECT IF
MORE THAN
LOCATION 2065
Side Clearance No. 4 Bearing Seal Ring ENGINE-NO.4 BEARING COMPARTMENT TUBES (72-42-20, 01-010), Thickness
No. 4 Bearing Pressure Tube Assembly ENGINE-NO.4 BEARING COMPARTMENT TUBES (72-42-20, 01-060), Groove Width
Seal Ring Thickness
0.0615
Clear
0.0625
0.0015
Groove Width
0.064
0.0045
0.066
Clear
Table 2. Fits and Clearances (all dimensions are in millimeters) NEW PART
WORN PART
DIMENSIONS
DIMENSIONS
PART IDENT
Size
Clearance
Non-select
REJECT IF
MORE THAN
LOCATION 2065
Side Clearance No. 4 Bearing Seal Ring ENGINE-NO.4 BEARING COMPARTMENT TUBES (72-42-20, 01-010), Thickness
No. 4 Bearing Pressure Tube Assembly ENGINE-NO.4 BEARING COMPARTMENT TUBES (72-42-20, 01-060), Groove Width
Seal Ring Thickness
1.563
Clear
1.587
0.039
Groove Width
1.626
0.114
1.676
Clear
SUBTASK 72-42-10-220-055 Reference the Fits and Clearances of the Diffuser Case Assembly at Location 2065
Refer to Figure
Reference the clearance at location 2066. If required, use the data written as a note in TASK 72-42-20-200-000 (INSPECTION-000) and V2500-D5-72-42-1100-00A-307A-C (INSPECTION-000).
Table 3. Fits and Clearances (all dimensions are in inches) NEW PART
WORN PART
DIMENSIONS
DIMENSIONS
PART IDENT
Size
Clearance
Non-select
REJECT IF
MORE THAN
LOCATION 2066
No. 4 Bearing Pressure Tube Assembly ENGINE-NO.4 BEARING COMPARTMENT TUBES (72-42-20, 01-060), Location Diameter
Diffuser Case Assembly Diffuser Case (72-42-11, 01-010), Location Diameter
Seal Ring Holder Diameter
0.7415
Clear
0.7455
0.0005
Diffuser Case Diameter
0.746
0.0085
0.750
Clear
Table 4. Fits and Clearances (all dimensions are in millimeters) NEW PART
WORN PART
DIMENSIONS
DIMENSIONS
PART IDENT
Size
Clearance
Non-select
REJECT IF
MORE THAN
LOCATION 2066
No. 4 Bearing Pressure Tube Assembly ENGINE-NO.4 BEARING COMPARTMENT TUBES (72-42-20, 01-060) Location Diameter
Diffuser Case Assembly Diffuser Case (72-42-11, 01-010), Location Diameter
Seal Ring Holder Diameter
18.835
Clear
18.935
0.013
Diffuser Case Diameter
18.949
0.216
19.050
Clear
SUBTASK 72-42-10-220-056 Reference the Fits and Clearances of the Diffuser Case Assembly at Location 2066
Refer to Figure.
Reference the clearance at location 2067. If required, use the data written as a note in TASK 72-42-20-200-000 (INSPECTION-000) and V2500-D5-72-42-1100-00A-307A-C (INSPECTION-000).
Table 5. Fits and Clearances (all dimensions are in inches) NEW PART
WORN PART
DIMENSIONS
DIMENSIONS
PART IDENT
Size
Clearance
Non-select
REJECT IF
MORE THAN
LOCATION 2067
Gap No. 4 Bearing Metal Seal Ring ENGINE-NO.4 BEARING COMPARTMENT TUBES (72-42-20, 01-010), Gap At 0.746 Inch Gage
Diffuser Case Assembly Diffuser Case (72-42-11, 01-010), Location Diameter
Gap
0.005
Clear
0.015
0.005
Case Location Diameter
0.746
0.028
0.750
Clear
Table 6. Fits and Clearances (all dimensions are in millimeters) NEW PART
WORN PART
DIMENSIONS
DIMENSIONS
PART IDENT
Size
Clearance
Non-select
REJECT IF
MORE THAN
LOCATION 2067
Gap No. 4 Bearing Metal Seal Ring ENGINE-NO.4 BEARING COMPARTMENT TUBES (72-42-20, 01-010), Gap At 18.949 Millimeters Gage
Diffuser Case Assembly Diffuser Case (72-42-11, 01-010), Location Diameter
Gap
0.13
Clear
0.38
0.13
Case Location Diameter
18.949
0.71
19.050
Clear
SUBTASK 72-42-10-220-057 Reference the Fits and Clearances of the Diffuser Case Assembly at Location 2067
Refer to Figure
Reference the clearance at location 2070. If required, use the data written as a note in TASK 72-42-20-200-000 (INSPECTION-000).
Table 7. Fits and Clearances (all dimensions are in inches) NEW PART
WORN PART
DIMENSIONS
DIMENSIONS
PART IDENT
Size
Clearance
Non-select
REJECT IF
MORE THAN
LOCATION 2070
Side Clearance No. 4 Bearing Seal Ring No. 4 Bearing Compartment Tubes (72-42-20, 04-001),
No. 4 Bearing Cooling Duct Sensing Tube Assembly No. 4 Bearing Compartment Tubes (72-42-20, 04-040), Groove Width
Ring Thickness
0.0615
Clear
0.0625
0.002
Groove Width
0.0645
0.005
0.0665
Clear
Table 8. Fits and Clearances (all dimensions are in millimeters) NEW PART
WORN PART
DIMENSIONS
DIMENSIONS
PART IDENT
Size
Clearance
Non-select
REJECT IF
MORE THAN
LOCATION 2070
Side Clearance No. 4 Bearing Seal Ring No. 4 Bearing Compartment Tubes (72-42-20, 04-001),
No. 4 Bearing Cooling Duct Sensing Tube Assembly No. 4 Bearing Compartment Tubes (72-42-20, 04-040), Groove Width
Ring Thickness
1.563
Clear
1.587
0.051
Groove Width
1.639
0.127
1.689
Clear
SUBTASK 72-42-10-220-058 Reference the Fits and Clearances of the Diffuser Case Assembly at Location 2070 (Pre SBE 72-0166)
Refer to Figure.
Reference the clearance at location 2071. If required, use the data written as a note in TASK 72-42-20-200-000 (INSPECTION-000).
Table 9. Fits and Clearances (all dimensions are in inches) NEW PART
WORN PART
DIMENSIONS
DIMENSIONS
PART IDENT
Size
Clearance
Non-select
REJECT IF
MORE THAN
LOCATION 2071
No. 4 Bearing Cooling Duct Sensing Tube Assembly No. 4 Bearing Compartment Tubes (72-42-20, 04-040), Location Diameter
Sealing Sleeve No. 4 Bearing Compartment Tubes (72-42-20, 04-160), Location Diameter
Tube Location Diameter
0.6190
Clear
0.6225
0.0225
Sleeve Location Diameter
0.645
0.030
0.649
Clear
Table 10. Fits and Clearances (all dimensions are in millimeters) NEW PART
WORN PART
DIMENSIONS
DIMENSIONS
PART IDENT
Size
Clearance
Non-select
REJECT IF
MORE THAN
LOCATION 2071
No. 4 Bearing Cooling Duct Sensing Tube Assembly No. 4 Bearing Compartment Tubes (72-42-20, 04-040), Location Diameter
Sealing Sleeve No. 4 Bearing Compartment Tubes (72-42-20, 04-160), Location Diameter
Tube Location Diameter
15.723
Clear
15.811
0.572
Sleeve Location Diameter
16.383
0.762
16.484
Clear
SUBTASK 72-42-10-220-059 Reference the Fits and Clearances of the Diffuser Case Assembly at Location 2071 (Pre SBE 72-0166)
Refer to Figure.
Reference the clearance at location 2072. If required, use the data written as a note in TASK 72-42-20-200-000 (INSPECTION-000).
Table 11. Fits and Clearances (all dimensions are in inches) NEW PART
WORN PART
DIMENSIONS
DIMENSIONS
PART IDENT
Size
Clearance
Non-select
REJECT IF
MORE THAN
LOCATION 2072
Gap No. 4 Bearing Seal Ring No. 4 Bearing Compartment Tubes (72-42-20, 04-001), Gap At 0.645 Inch Gage
Sealing Sleeve No. 4 Bearing Compartment Tubes (72-42-20, 04-160), Inner Diameter
Gap
0.005
Clear
0.015
0.005
Sleeve Inner Diameter
0.645
0.028
0.649
Clear
Table 12. Fits and Clearances (all dimensions are in millimeters) NEW PART
WORN PART
DIMENSIONS
DIMENSIONS
PART IDENT
Size
Clearance
Non-select
REJECT IF
MORE THAN
LOCATION 2072
Gap No. 4 Bearing Seal Ring No. 4 Bearing Compartment Tubes (72-42-20, 04-001), Gap At 16.383 Millimeters Gage
Sealing Sleeve No. 4 Bearing Compartment Tubes (72-42-20, 04-160), Inner Diameter
Gap
0.13
Clear
0.38
0.13
Sleeve Inner Diameter
16.383
0.71
16.484
Clear
SUBTASK 72-42-10-220-060 Reference the Fits and Clearances of the Diffuser Case Assembly at Location 2072 (Pre SBE 72-0166)
Refer to Figure.
Reference the clearance at location 2073. If required, use the data written as a note in TASK 72-42-20-200-000 (INSPECTION-000).
Table 13. Fits and Clearances (all dimensions are in inches) NEW PART
WORN PART
DIMENSIONS
DIMENSIONS
PART IDENT
Size
Clearance
Non-select
REJECT IF
MORE THAN
LOCATION 2073
Side Clearance No. 4 Bearing Seal Ring No. 4 Bearing Compartment Tubes (72-42-20, 03-001), Thickness
No. 4 Bearing Weep Tube Assembly No. 4 Bearing Compartment Tubes (72-42-20, 03-040), Groove Width
Ring Thickness
0.0615
Clear
0.0625
0.002
Groove Width
0.0645
0.005
0.0665
Clear
Table 14. Fits and Clearances (all dimensions are in millimeters) NEW PART
WORN PART
DIMENSIONS
DIMENSIONS
PART IDENT
Size
Clearance
Non-select
REJECT IF
MORE THAN
LOCATION 2073
Side Clearance No. 4 Bearing Seal Ring No. 4 Bearing Compartment Tubes (72-42-20, 03-001), Thickness
No. 4 Bearing Airframe Tube Assembly No. 4 Bearing Compartment Tubes (72-42-20, 03-040), Groove Width
Ring Thickness
1.563
Clear
1.587
0.051
Groove Width
1.639
0.127
1.689
Clear
SUBTASK 72-42-10-220-061 Reference the Fits and Clearances of the Diffuser Case Assembly at Location 2073
Refer to Figure.
Reference the clearance at location 2074. If required, use the data written as a note in TASK 72-42-20-200-000 (INSPECTION-000).
Table 15. Fits and Clearances (all dimensions are in inches) NEW PART
WORN PART
DIMENSIONS
DIMENSIONS
PART IDENT
Size
Clearance
Non-select
REJECT IF
MORE THAN
LOCATION 2074
No. 4 Bearing Weep Tube Assembly No. 4 Bearing Compartment Tubes (72-42-20, 03-040), Location Diameter
Sealing Sleeve No. 4 Bearing Compartment Tubes (72-42-20, 03-140), Location Diameter
Tube Diameter
0.6190
Clear
0.6225
0.0225
Sleeve Diameter
0.645
0.030
0.649
Clear
Table 16. Fits and Clearances (all dimensions are in millimeters) NEW PART
WORN PART
DIMENSIONS
DIMENSIONS
PART IDENT
Size
Clearance
Non-select
REJECT IF
MORE THAN
LOCATION 2074
No. 4 Bearing Weep Tube Assembly No. 4 Bearing Compartment Tubes (72-42-20, 03-040), Location Diameter
Sealing Sleeve No. 4 Bearing Compartment Tubes (72-42-20, 03-140), Location Diameter
Tube Diameter
15.723
Clear
15.811
0.572
Sleeve Diameter
16.383
0.762
16.484
Clear
SUBTASK 72-42-10-220-062 Reference the Fits and Clearances of the Diffuser Case Assembly at Location 2074
Pre SB 72-0168
Refer to Figure.
Reference the clearance at location 2074. If required, use the data written as a note in TASK 72-42-20-200-000 (INSPECTION-000).
Table 17. Fits and Clearances (all dimensions are in inches) NEW PART
WORN PART
DIMENSIONS
DIMENSIONS
PART IDENT
Size
Clearance
Non-select
REJECT IF
MORE THAN
LOCATION 2074
No. 4 Bearing Weep Tube Assembly No. 4 Bearing Compartment Tubes (72-42-20, 03-040), Location Diameter
Sealing Sleeve No. 4 Bearing Compartment Tubes (72-42-20, 03-140), Location Diameter
Tube Diameter
0.639
Clear
0.641
0.004
Sleeve Diameter
0.645
0.010
0.649
Clear
Table 18. Fits and Clearances (all dimensions are in millimeters) NEW PART
WORN PART
DIMENSIONS
DIMENSIONS
PART IDENT
Size
Clearance
Non-select
REJECT IF
MORE THAN
LOCATION 2074
No. 4 Bearing Weep Tube Assembly No. 4 Bearing Compartment Tubes (72-42-20, 03-040), Location Diameter
Sealing Sleeve No. 4 Bearing Compartment Tubes (72-42-20, 03-140), Location Diameter
Tube Diameter
16.231
Clear
16.281
0.102
Sleeve Diameter
16.383
0.254
16.485
Clear
SUBTASK 72-42-10-220-067 Reference the Fits and Clearances of the Diffuser Case Assembly at Location 2074
SB 72-0168
Refer to Figure.
Reference the clearance at location 2075. If required, use the data written as a note in TASK 72-42-20-200-000 (INSPECTION-000).
Table 19. Fits and Clearances (all dimensions are in inches) NEW PART
WORN PART
DIMENSIONS
DIMENSIONS
PART IDENT
Size
Clearance
Non-select
REJECT IF
MORE THAN
LOCATION 2075
Gap No. 4 Bearing Seal Ring No. 4 Bearing Compartment Tubes (72-42-20, 03-001), Gap At 0.645 Inch Gage
Sealing Sleeve No. 4 Bearing Compartment Tubes (72-42-20, 03-140), Inside Diameter
Gap
0.005
Clear
0.015
0.005
Sleeve Inside Diameter
0.645
0.028
0.649
Clear
Table 20. Fits and Clearances (all dimensions are in millimeters) NEW PART
WORN PART
DIMENSIONS
DIMENSIONS
PART IDENT
Size
Clearance
Non-select
REJECT IF
MORE THAN
LOCATION 2075
Gap No. 4 Bearing Seal Ring No. 4 Bearing Compartment Tubes (72-42-20, 03-001), Gap At 16.383 Millimeters Gage
Sealing Sleeve No. 4 Bearing Compartment Tubes (72-42-20, 03-140), Inside Diameter
Gap
0.13
Clear
0.38
0.13
Sleeve Inside Diameter
16.383
0.71
16.484
Clear
SUBTASK 72-42-10-220-063 Reference the Fits and Clearances of the Diffuser Case Assembly at Location 2075
Refer to Figure.
Reference the clearance at location 2079. If required, use the data written as a note in TASK 72-42-20-200-000 (INSPECTION-000).
Table 21. Fits and Clearances (all dimensions are in inches) NEW PART
WORN PART
DIMENSIONS
DIMENSIONS
PART IDENT
Size
Clearance
Non-select
REJECT IF
MORE THAN
LOCATION 2079
Side Clearance No. 4 Bearing Seal Ring ENGINE-NO.4 BEARING COMPARTMENT TUBES (72-42-20, 01-020), Thickness
Oil Pressure Tube Connector ENGINE-NO.4 BEARING COMPARTMENT TUBES (72-42-20, 01-120), Groove Width
Seal Ring Thickness
0.0615
Clear
0.0625
0.002
Groove Width
0.0645
0.005
0.0665
Clear
Table 22. Fits and Clearances (all dimensions are in millimeters) NEW PART
WORN PART
DIMENSIONS
DIMENSIONS
PART IDENT
Size
Clearance
Non-select
REJECT IF
MORE THAN
LOCATION 2079
Side Clearance No. 4 Bearing Seal Ring ENGINE-NO.4 BEARING COMPARTMENT TUBES (72-42-20, 01-020), Thickness
Oil Pressure Tube Connector ENGINE-NO.4 BEARING COMPARTMENT TUBES (72-42-20, 01-120), Groove Width
Seal Ring Thickness
1.563
Clear
1.587
0.051
Groove Width
1.639
0.127
1.689
Clear
SUBTASK 72-42-10-220-064 Reference the Fits and Clearances of the Diffuser Case Assembly at Location 2079
Refer to Figure
Reference the clearance at location 2080. If required, use the data written as a note in TASK 72-42-20-200-000 (INSPECTION-000).
Table 23. Fits and Clearances (all dimensions are in inches) NEW PART
WORN PART
DIMENSIONS
DIMENSIONS
PART IDENT
Size
Clearance
Non-select
REJECT IF
MORE THAN
LOCATION 2080
No. 4 Bearing Oil Pressure Tube Assembly ENGINE-NO.4 BEARING COMPARTMENT TUBES (72-42-20, 01-060), Connector Location Diameter
Sealing Sleeve ENGINE-NO.4 BEARING COMPARTMENT TUBES (72-42-20, 01-280), Location Diameter
Connector Location Diameter
0.639
Clear
0.641
0.004
Sleeve Location Diameter
0.645
0.010
0.649
Clear
Table 24. Fits and Clearances (all dimensions are in millimeters) NEW PART
WORN PART
DIMENSIONS
DIMENSIONS
PART IDENT
Size
Clearance
Non-select
REJECT IF
MORE THAN
LOCATION 2080
No. 4 Bearing Oil Pressure Tube Assembly ENGINE-NO.4 BEARING COMPARTMENT TUBES (72-42-20, 01-060), Connector Location Diameter
Sealing SleeveENGINE-NO.4 BEARING COMPARTMENT TUBES (72-42-20, 01-280), Location Diameter
Connector Location Diameter
16.231
Clear
16.281
0.102
Sleeve Location Diameter
16.383
0.254
16.484
Clear
SUBTASK 72-42-10-220-065 Reference the Fits and Clearances of the Diffuser Case Assembly at Location 2080
Refer to Figure.
Reference the clearance at location 2081. If required, use the data written as a note in TASK 72-42-20-200-000 (INSPECTION-000).
Table 25. Fits and Clearances (all dimensions are in inches) NEW PART
WORN PART
DIMENSIONS
DIMENSIONS
PART IDENT
Size
Clearance
Non-select
REJECT IF
MORE THAN
LOCATION 2081
Gap No. 4 Bearing Seal Ring ENGINE-NO.4 BEARING COMPARTMENT TUBES (72-42-20, 01-020), Gap At 0.645 Inch Gage
Sleeve ENGINE-NO.4 BEARING COMPARTMENT TUBES (72-42-20, 01-280), Inside Diameter
Gap
0.005
Clear
0.015
0.005
Sleeve Inside Diameter
0.645
0.028
0.649
Clear
Table 26. Fits and Clearances (all dimensions are in millimeters) NEW PART
WORN PART
DIMENSIONS
DIMENSIONS
PART IDENT
Size
Clearance
Non-select
REJECT IF
MORE THAN
LOCATION 2081
Gap No. 4 Bearing Seal Ring ENGINE-NO.4 BEARING COMPARTMENT TUBES (72-42-20, 01-020), Gap At 16.383 Millimeters Gage
Sleeve ENGINE-NO.4 BEARING COMPARTMENT TUBES (72-42-20, 01-280), Inside Diameter
Gap
0.13
Clear
0.38
0.13
Sleeve Inside Diameter
16.383
0.71
16.484
Clear
SUBTASK 72-42-10-220-066 Reference the Fits and Clearances of the Diffuser Case Assembly at Location 2081
Refer to Figure
Attach a hoist to the IAE 1P16173 Lift sling 1 off.
Attach the IAE 1P16004 Handling bracket 2 off to the front flange of the diffuser case assembly 180 degrees apart with the five screws from the rear of the diffuser case front flange.
Position the diffuser case assembly in the IAE 1P16005 Build stand 1 off.
SUBTASK 72-42-10-440-051 Put the Diffuser Case Assembly in to the Build Stand
Refer to Figure.
Install two new seal rings No. 4 Bearing Compartment Tubes (72-42-20, 03-001) in to the outer end of the No. 4 bearing weep tube No. 4 Bearing Compartment Tubes (72-42-20, 03-040).
Install No. 4 Bearing Compartment Tubes (72-42-20, 03-020) gasket 1 off on the pad in the ID of the diffuser case for the No. 4 bearing outer airframe tube.
Install the No. 4 bearing weep tube No. 4 Bearing Compartment Tubes (72-42-20, 03-040) from the ID of the diffuser case.
NOTE
Gasket can be installed with the compressor feature in any direction.Install No. 4 Bearing Compartment Tubes (72-42-20, 03-120) gasket 1 off to the pad on the outer surface of the diffuser case over the outer weep tube.
Install the sealing sleeve No. 4 Bearing Compartment Tubes (72-42-20, 03-140) over the tube and against the gasket.
Install the retaining plate No. 4 Bearing Compartment Tubes (72-42-20, 03-160) over the tube and against the sealing sleeve.
Install the three bolts No. 4 Bearing Compartment Tubes (72-42-20, 03-180) to hold the gasket, the sleeve and the plate in position. Do not torque the bolts.
Install the coupling nut No. 4 Bearing Compartment Tubes (72-42-20, 03-200) to the outer end of the weep tube and lock in place with No. 4 Bearing Compartment Tubes (72-42-20, 03-220) thrust wire 1 off.
SUBTASK 72-42-10-440-052 Install the No. 4 Bearing Weep Tube Seal Rings
Refer to Figure
Install two new seal rings No. 4 Bearing Compartment Tubes (72-42-20, 04-001) in to the outer end of the turbine cooling air duct sensing tube No. 4 Bearing Compartment Tubes (72-42-20, 04-040).
NOTE
Gasket can be installed with the compression feature in either direction.Install No. 4 Bearing Compartment Tubes (72-42-20, 04-020) gasket 1 off on to the diffuser case ID mounting pad.
Install the outer sensing tube No. 4 Bearing Compartment Tubes (72-42-20, 04-040) from the inside of the diffuser case.
Attach the outer sensing tube to the diffuser case inner boss with the two bolts No. 4 Bearing Compartment Tubes (72-42-20, 04-060). Do not torque the bolts.
Install No. 4 Bearing Compartment Tubes (72-42-20, 04-140) gasket 1 off to the pad on the outer surface of the diffuser case over the outer sensing tube.
Install the sealing sleeve No. 4 Bearing Compartment Tubes (72-42-20, 04-160) over the tube and against the gasket.
Install the retaining plate No. 4 Bearing Compartment Tubes (72-42-20, 04-180) over the tube and against the sealing sleeve.
Install the three bolts No. 4 Bearing Compartment Tubes (72-42-20, 04-200) to hold the gasket, the sleeve and the plate in position. Do not torque the bolts.
Install the coupling nut No. 4 Bearing Compartment Tubes (72-42-20, 04-220) to the outer end of the sensing tube and lock in place with No. 4 Bearing Compartment Tubes (72-42-20, 04-240) thrust wire 1 off.
Install the tube union No. 4 Bearing Compartment Tubes (72-42-20, 04-320) to the coupling nut.
Install the nut assembly No. 4 Bearing Compartment Tubes (72-42-20, 04-340) to the tube union.
Safety the nut assembly with CoMat 02-141 LOCKWIRE.
SUBTASK 72-42-10-440-053-A00 Install the Turbine Cooling Air Duct Sensing Tube (Pre SBE 72-0166)
Refer to Figure.
SBE 72-0166: (Part 1) Remove the turbine cooling air duct sensing tubes.
Apply CoMat 10-077 APPROVED ENGINE OILS to the threads of the bolts No. 4 Bearing Compartment Tubes (72-42-20, 04-060) and No. 4 Bearing Compartment Tubes (72-42-20, 04-200).
NOTE
The gasket can be installed with the compression feature in either direction.Install the No. 4 Bearing Compartment Tubes (72-42-20, 04-020) gasket 1 off on the boss in the diffuser case inner diameter.
Install the No. 4 Bearing Compartment Tubes (72-42-20, 04-260) inner cover 1 off onto the diffuser case boss.
Attach the inner cover No. 4 Bearing Compartment Tubes (72-42-20, 04-260) to the diffuser case inner boss with the two bolts No. 4 Bearing Compartment Tubes (72-42-20, 04-060).
Safety the bolts with CoMat 02-141 LOCKWIRE.
NOTE
The gasket can be installed with the compression feature in either direction.Install the No. 4 Bearing Compartment Tubes (72-42-20, 04-140) gasket 1 off on the boss in the diffuser case outer diameter.
Install the No. 4 Bearing Compartment Tubes (72-42-20, 04-040) outer cover 1 off onto the diffuser case boss.
Attach the outer cover No. 4 Bearing Compartment Tubes (72-42-20, 04-040) to the diffuser case outer boss with the three bolts No. 4 Bearing Compartment Tubes (72-42-20, 04-200).
Safety the bolts with CoMat 02-141 LOCKWIRE.
SUBTASK 72-42-10-440-053-B00 Install the Sensing Tube Covers (SBE 72-0166)
Refer to Figure.
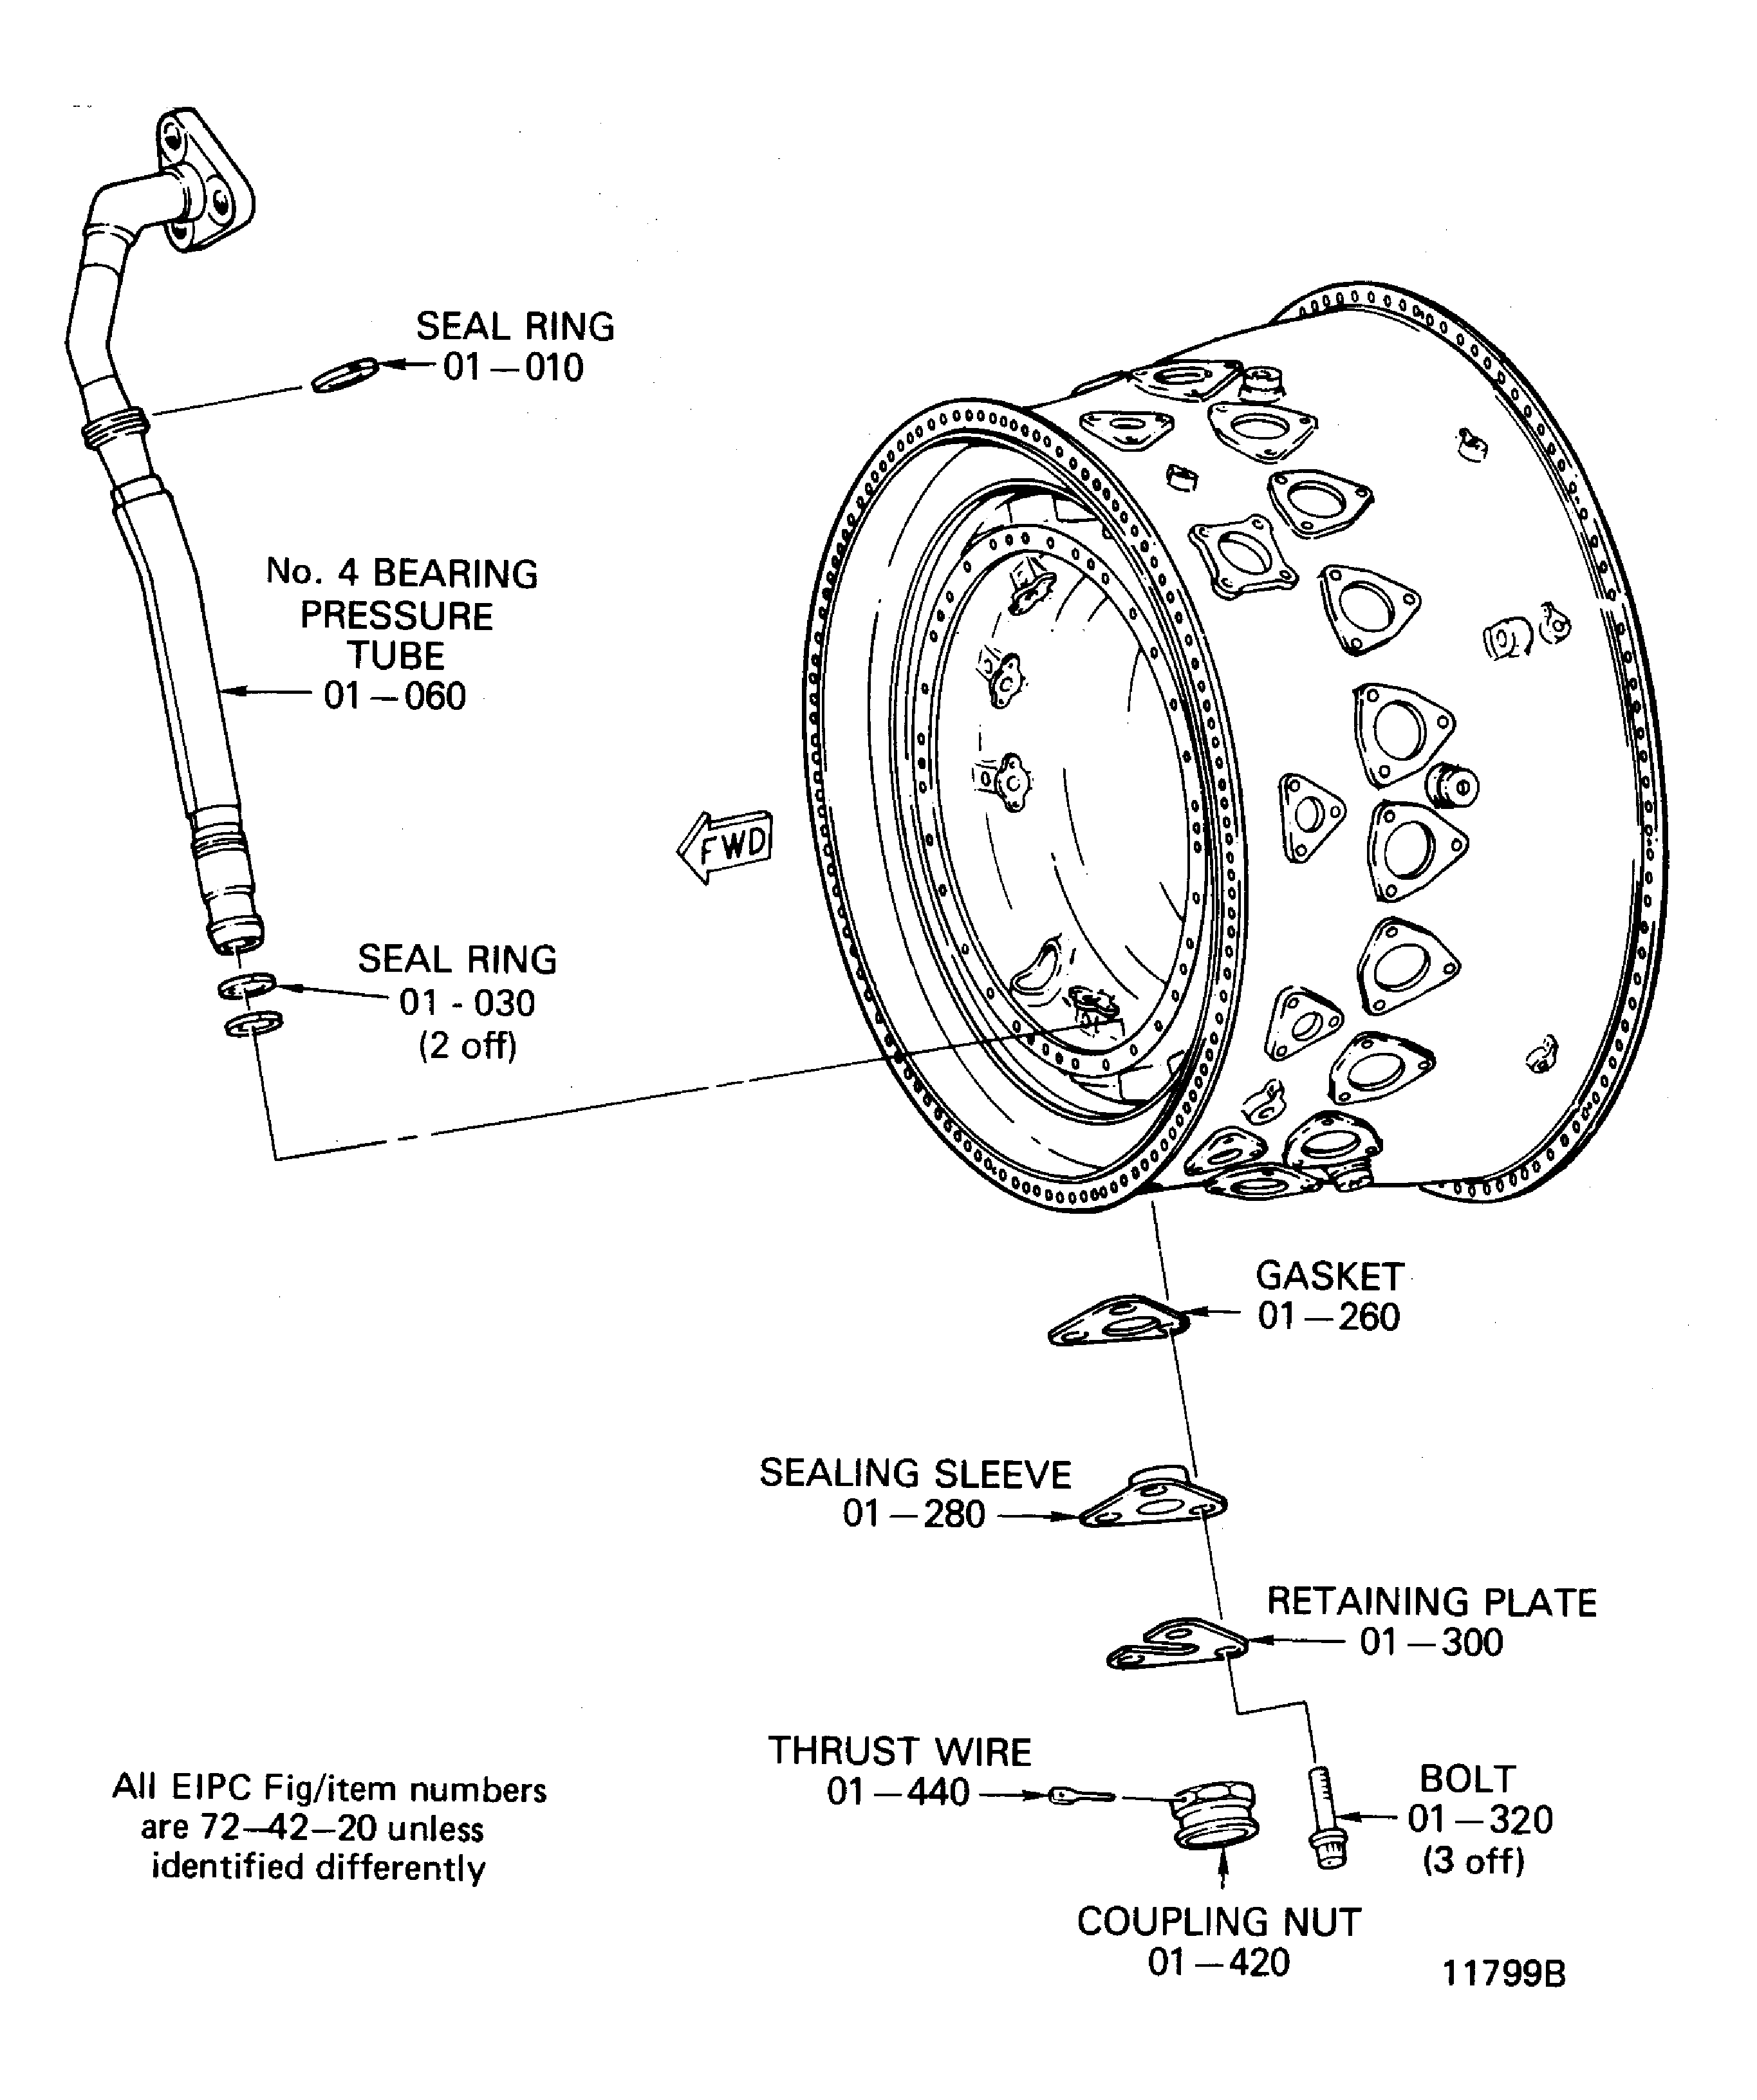
Install the new seal ring ENGINE-NO.4 BEARING COMPARTMENT TUBES (72-42-20, 01-010) to the No. 4 bearing pressure tube ENGINE-NO.4 BEARING COMPARTMENT TUBES (72-42-20, 01-060).
Install the two seal rings ENGINE-NO.4 BEARING COMPARTMENT TUBES (72-42-20, 01-030) to the outer end of the No. 4 bearing pressure tube.
Install the No. 4 bearing pressure tube ENGINE-NO.4 BEARING COMPARTMENT TUBES (72-42-20, 01-060) from the inside of the diffuser case.
NOTE
Gasket can be installed with the compression feature in either direction.Install ENGINE-NO.4 BEARING COMPARTMENT TUBES (72-42-20, 01-260) gasket 1 off to the pad on the outer surface of the diffuser case over the No. 4 bearing pressure tube.
Install the sealing sleeve ENGINE-NO.4 BEARING COMPARTMENT TUBES (72-42-20, 01-280) over the tube and against the gasket.
Install the retaining plate ENGINE-NO.4 BEARING COMPARTMENT TUBES (72-42-20, 01-300) over the tube and against the sealing sleeve.
Install the three bolts ENGINE-NO.4 BEARING COMPARTMENT TUBES (72-42-20, 01-320) to hold the gasket, the sleeve and the plate in position. Do not torque the bolts.
Install the coupling nut ENGINE-NO.4 BEARING COMPARTMENT TUBES (72-42-20, 01-420) to the outer end of the pressure tube and lock in place with ENGINE-NO.4 BEARING COMPARTMENT TUBES (72-42-20, 01-440) thrust wire 1 off.
SUBTASK 72-42-10-440-061 Install the No. 4 Bearing Pressure Tube
Refer to Figure.
Attach a hoist to the IAE 1P16173 Lift sling 1 off.
Remove the 10 bolts that attach the IAE 1P16004 Handling bracket 2 off to the diffuser case assembly.
SUBTASK 72-42-10-440-063 Remove the Diffuser Case Assembly from the Build Stand
Figure: Diffuser Case Assembly - Fits and Clearances
Sheet 1
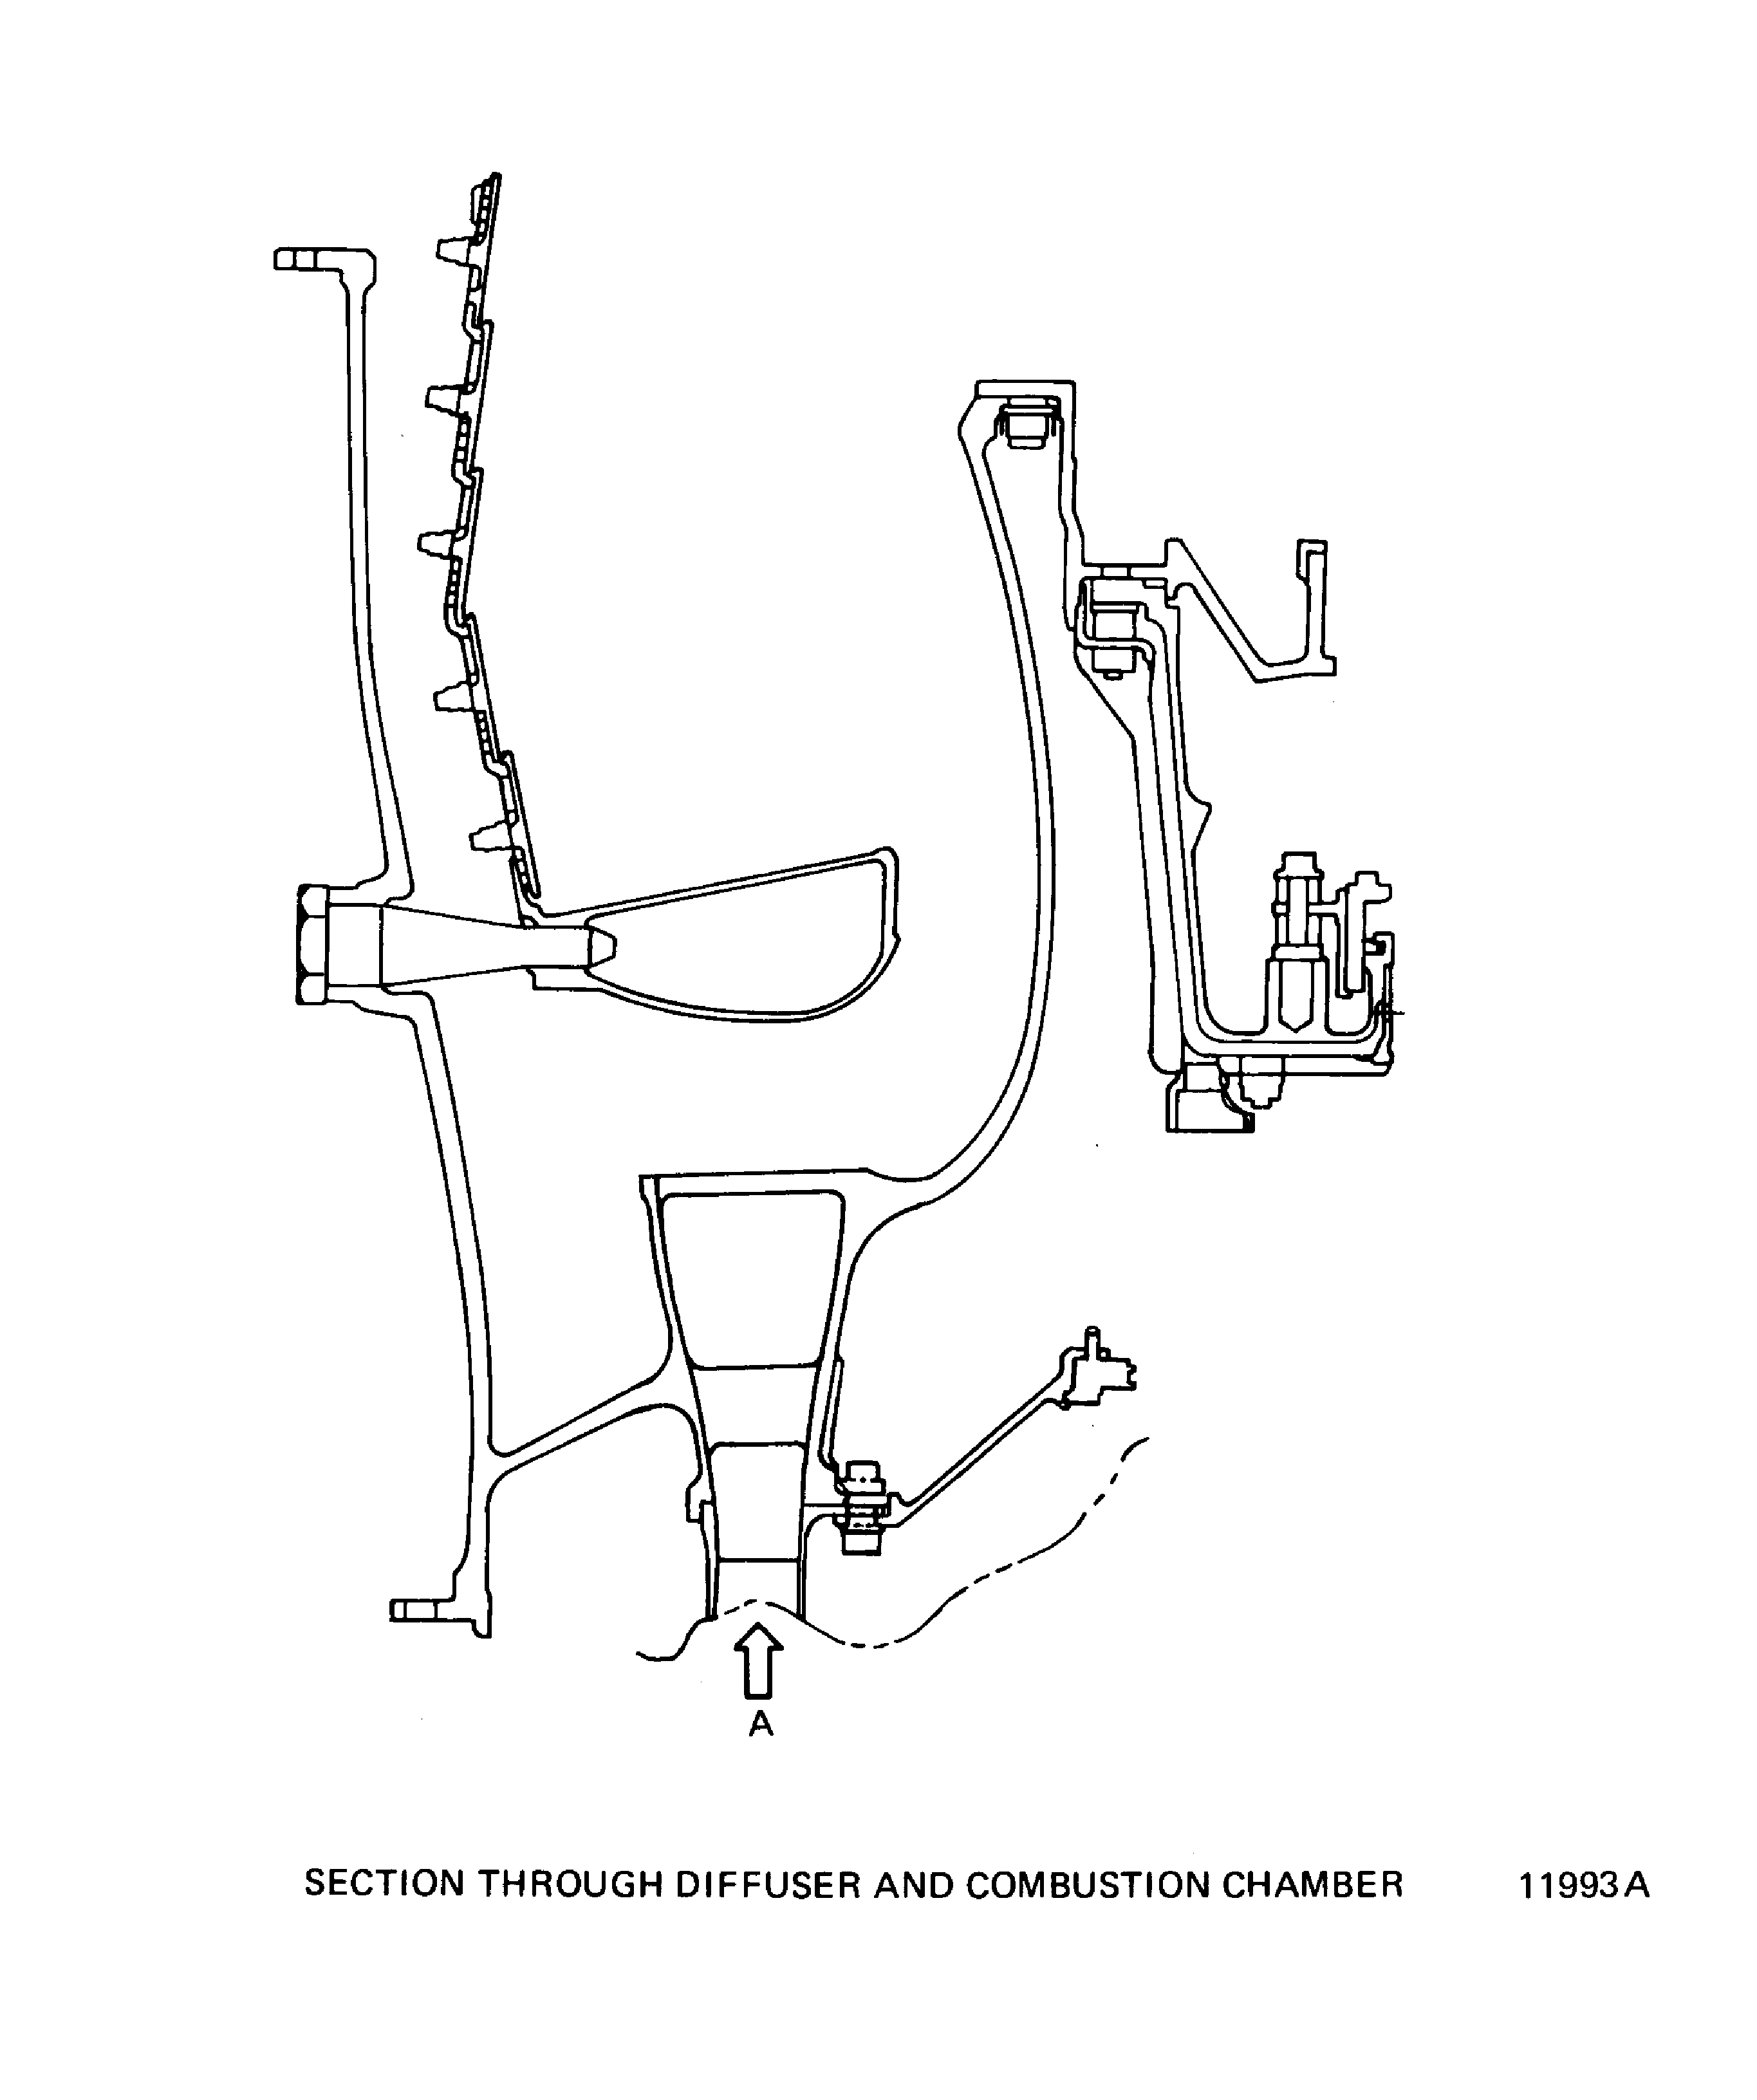
Figure: Diffuser Case Assembly - Fits and Clearances
Sheet 2
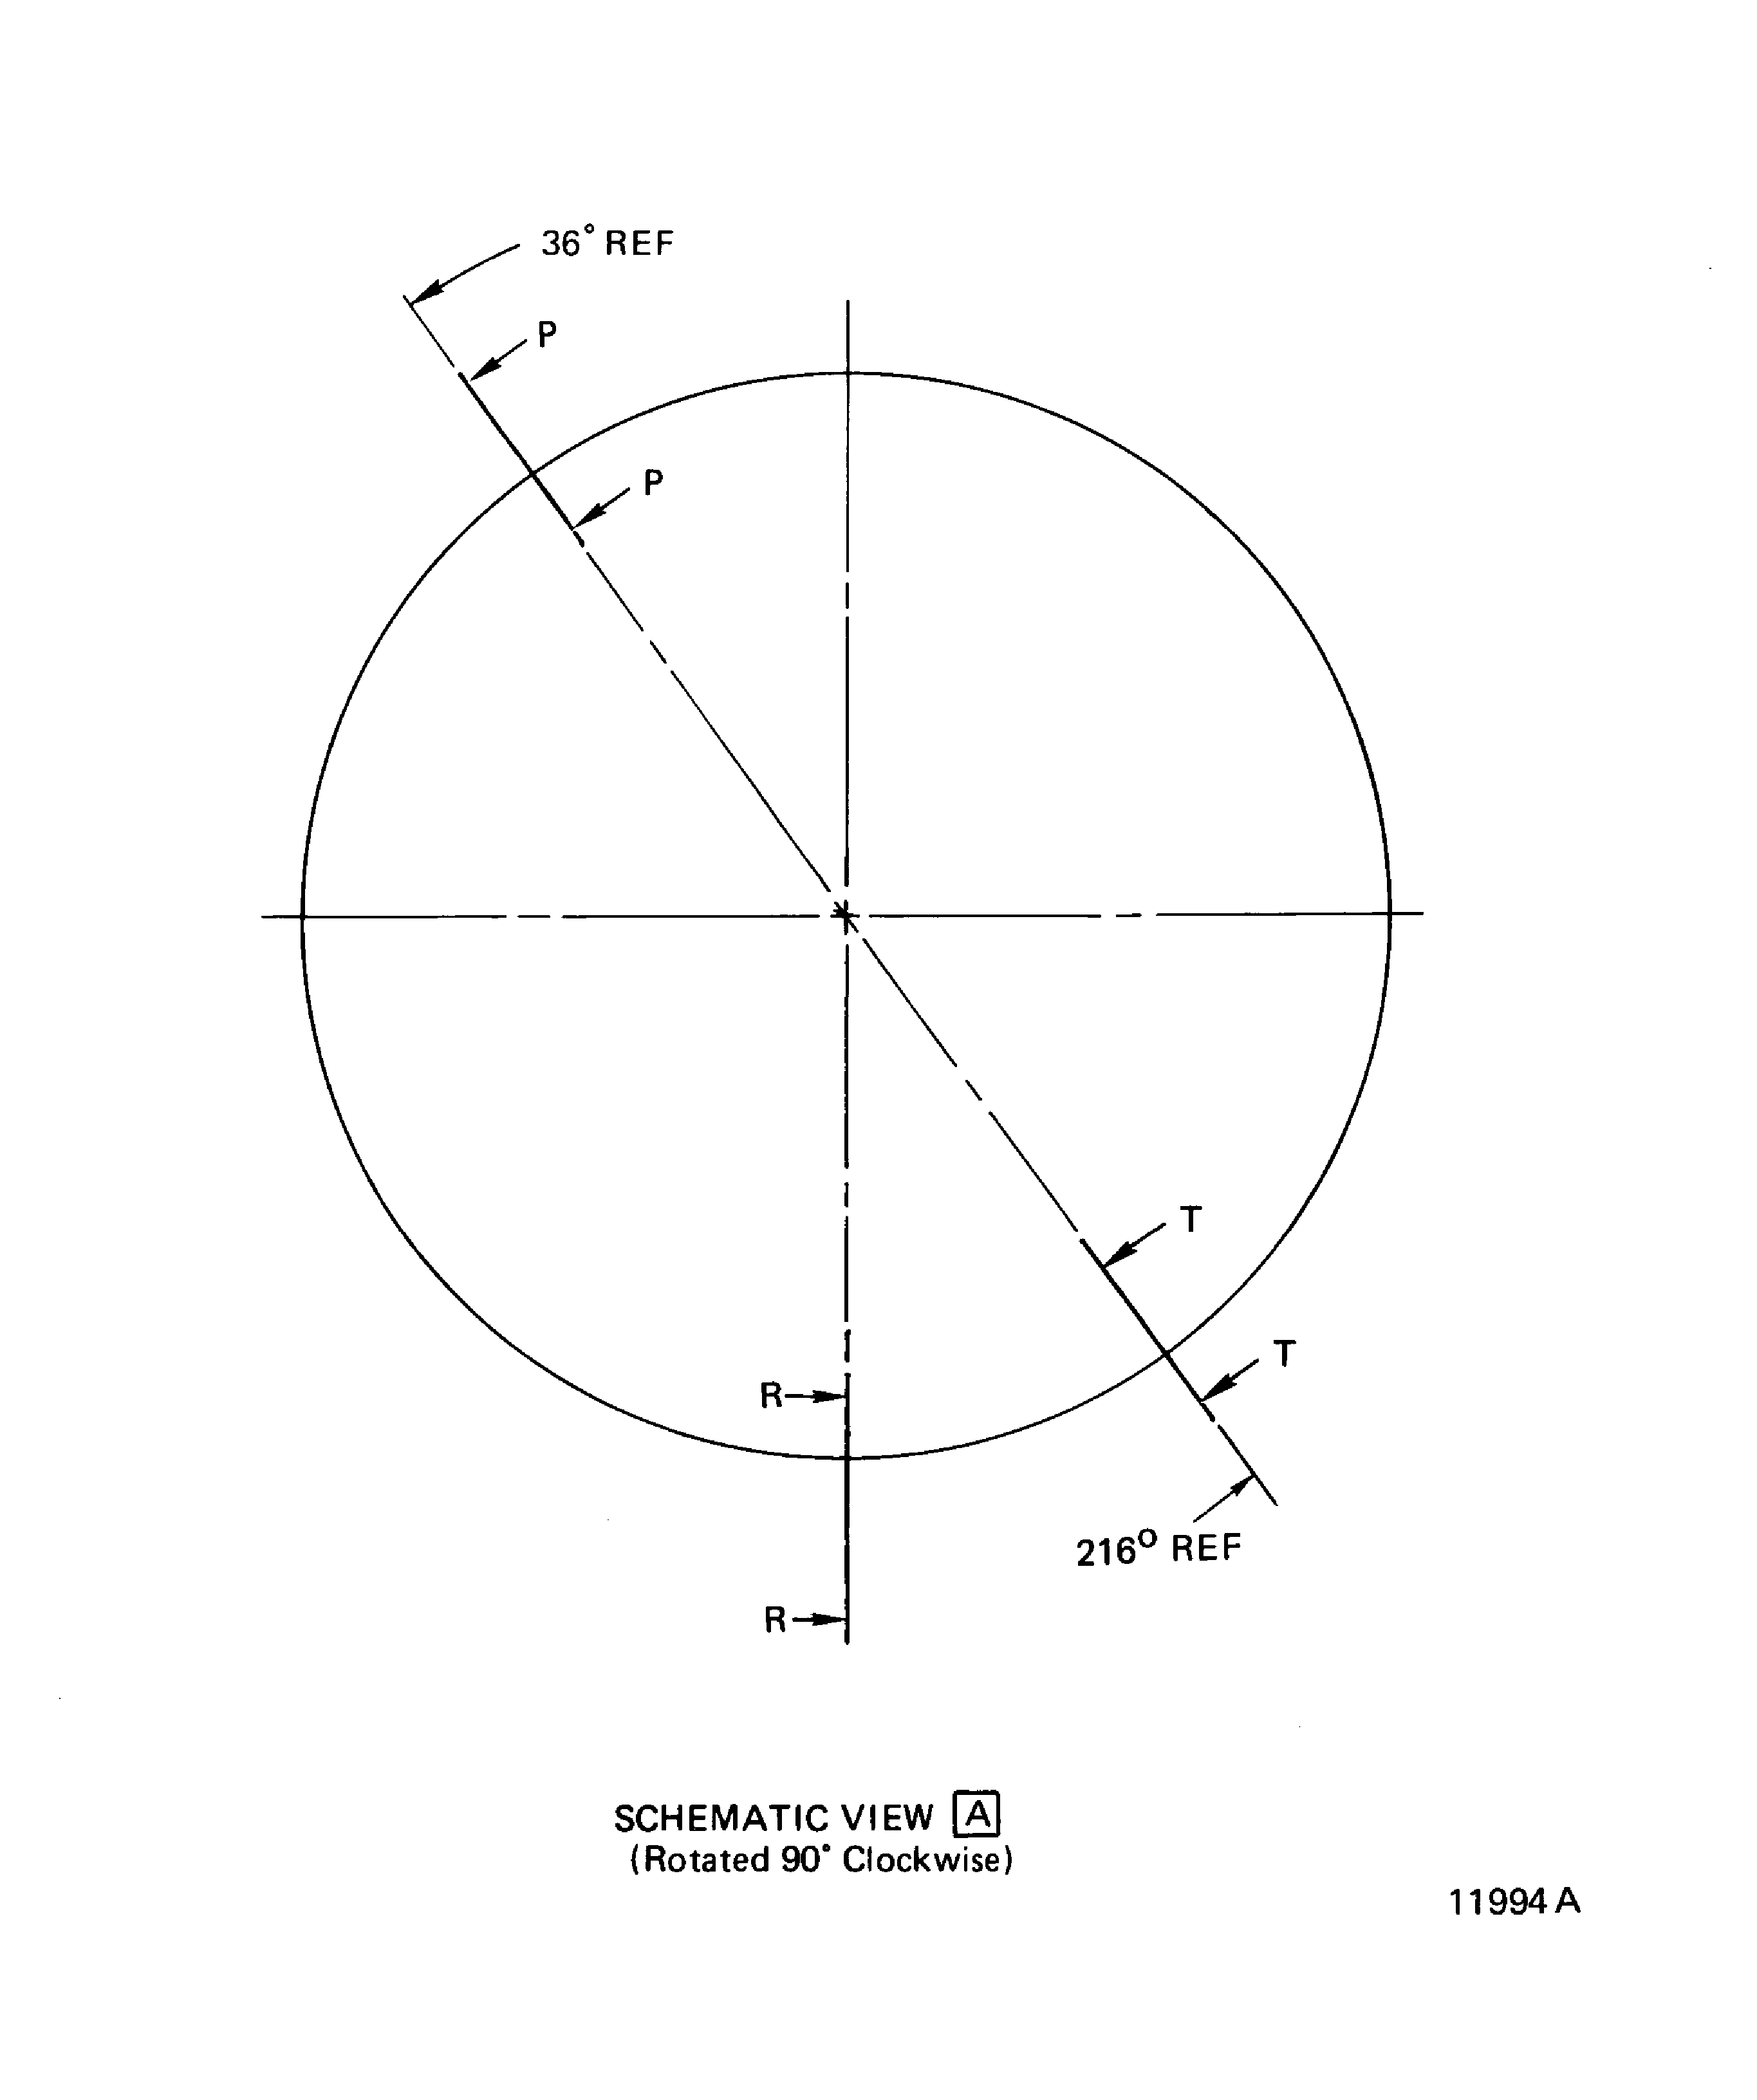
Figure: Diffuser Case Assembly - Fits and Clearances
Sheet 3
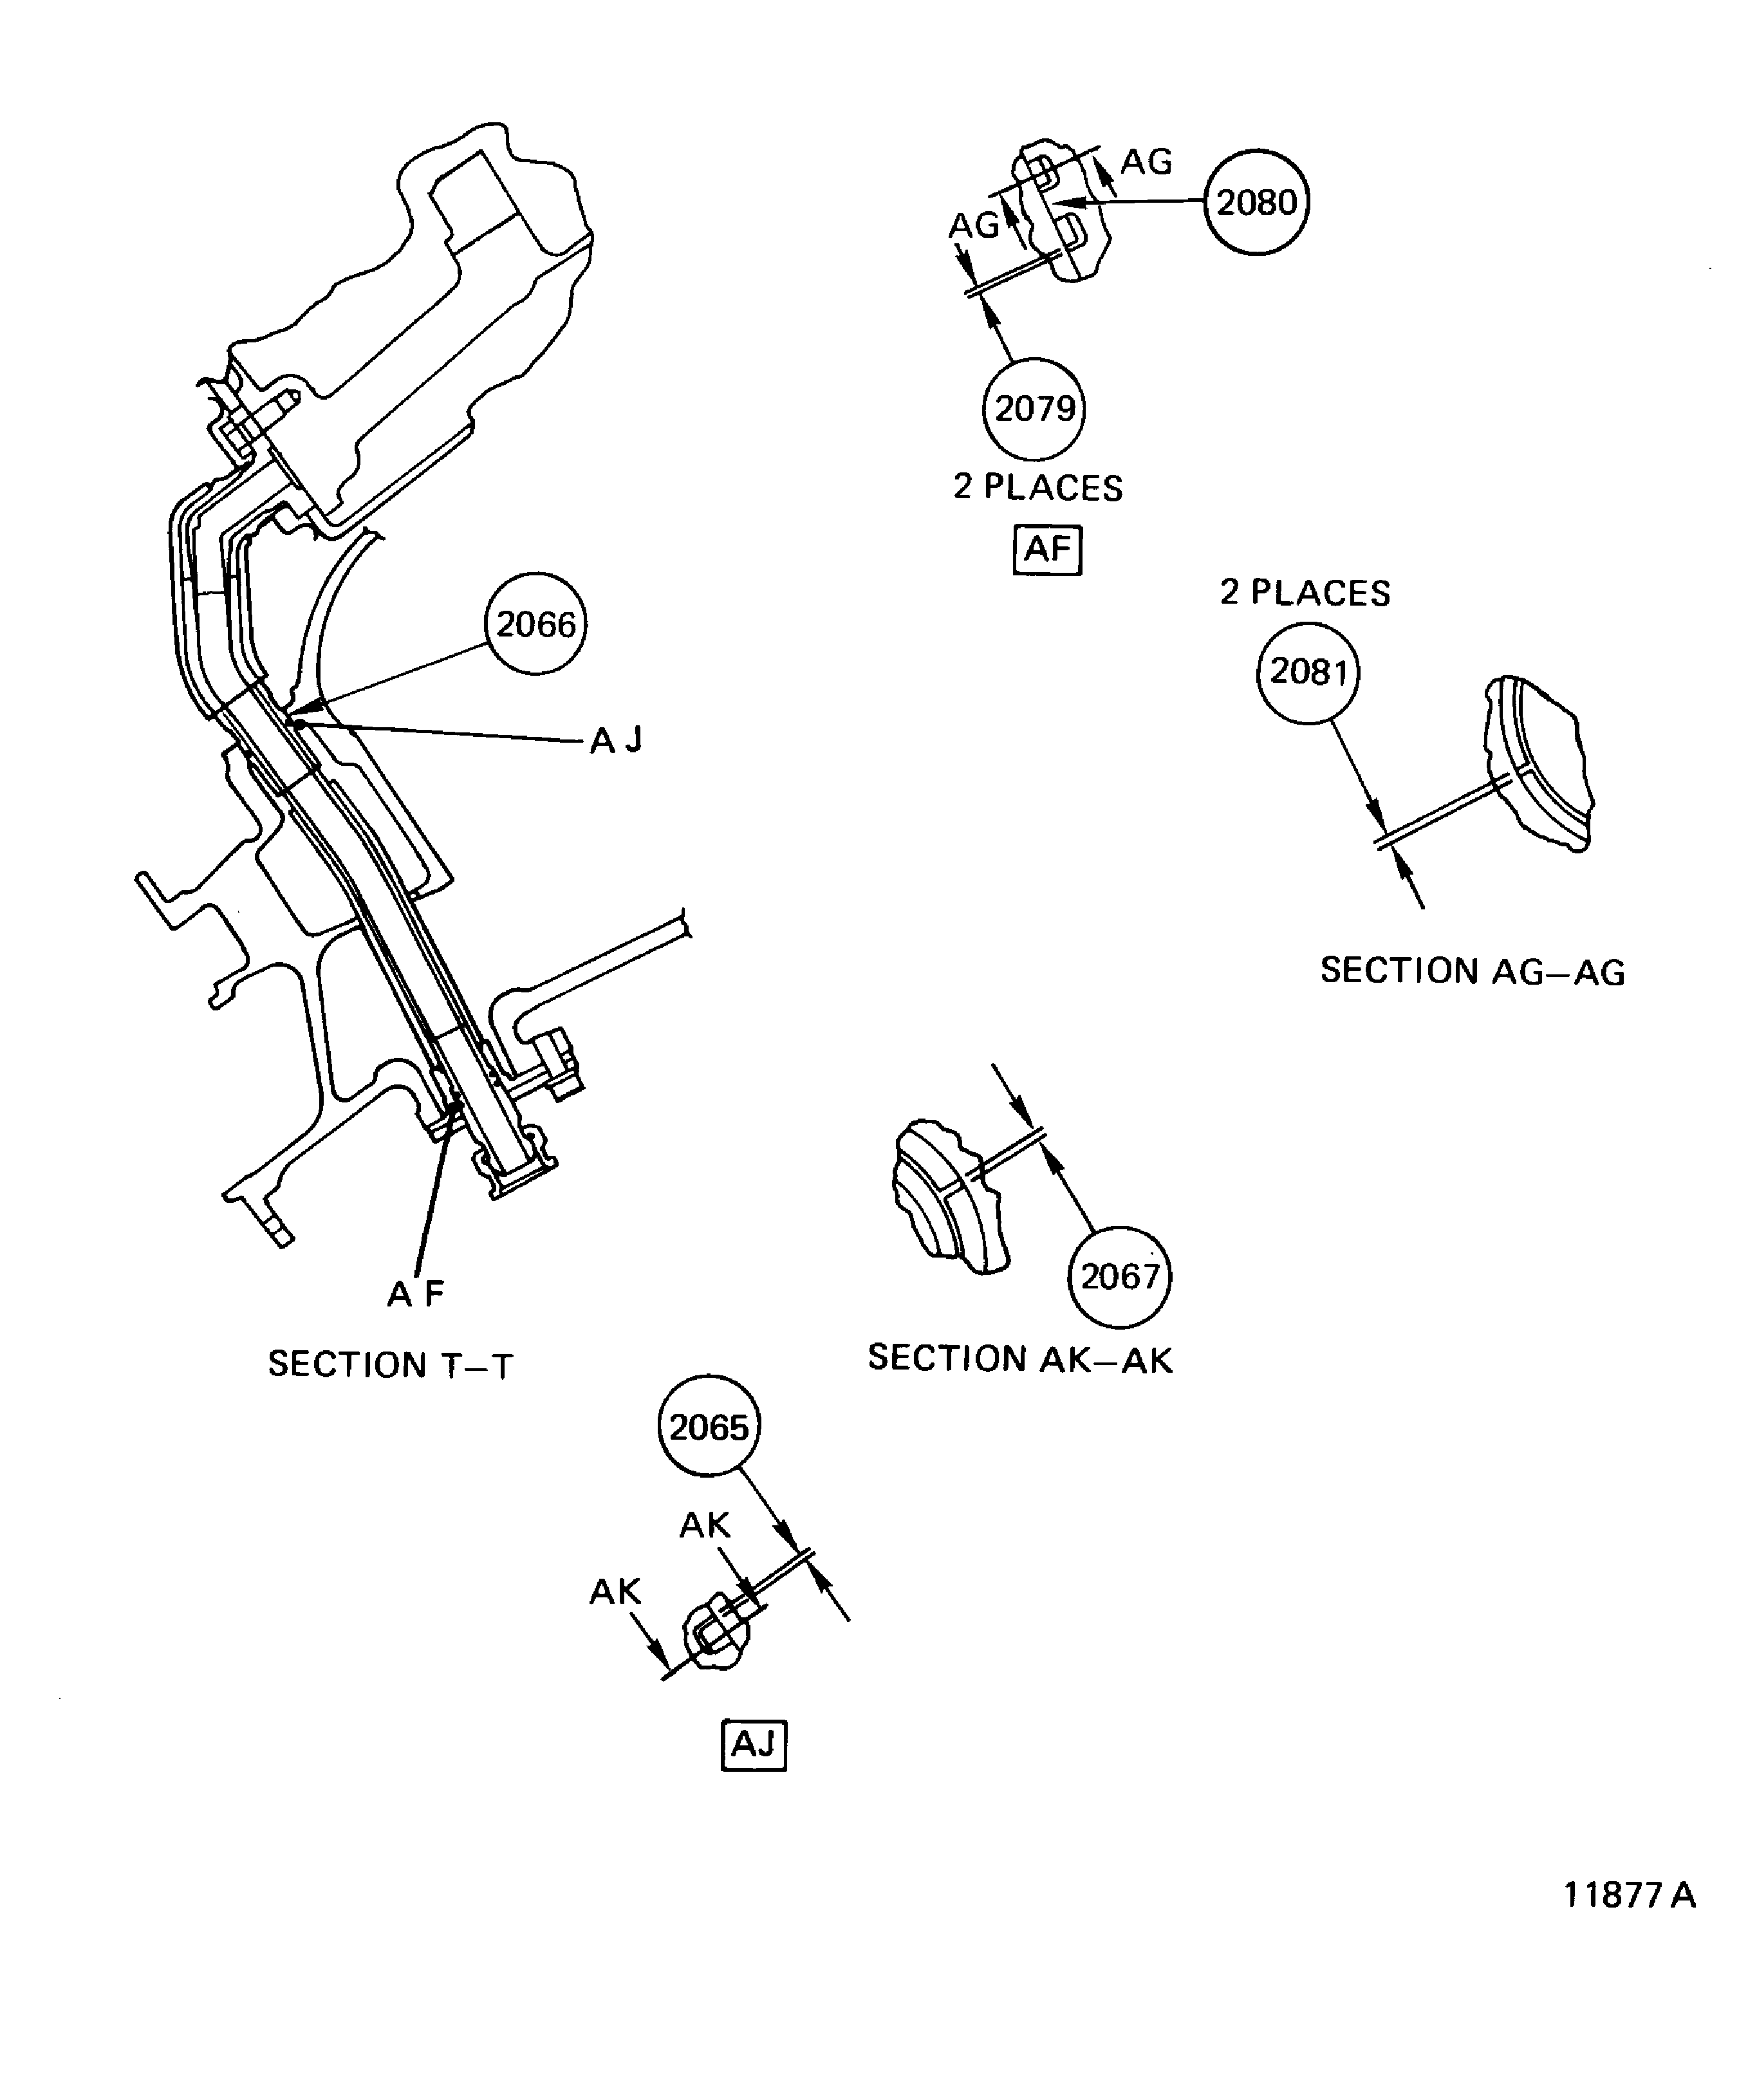
Figure: Pre SBE 72-0166: Diffuser Case Assembly - Fits and Clearances
Sheet 4
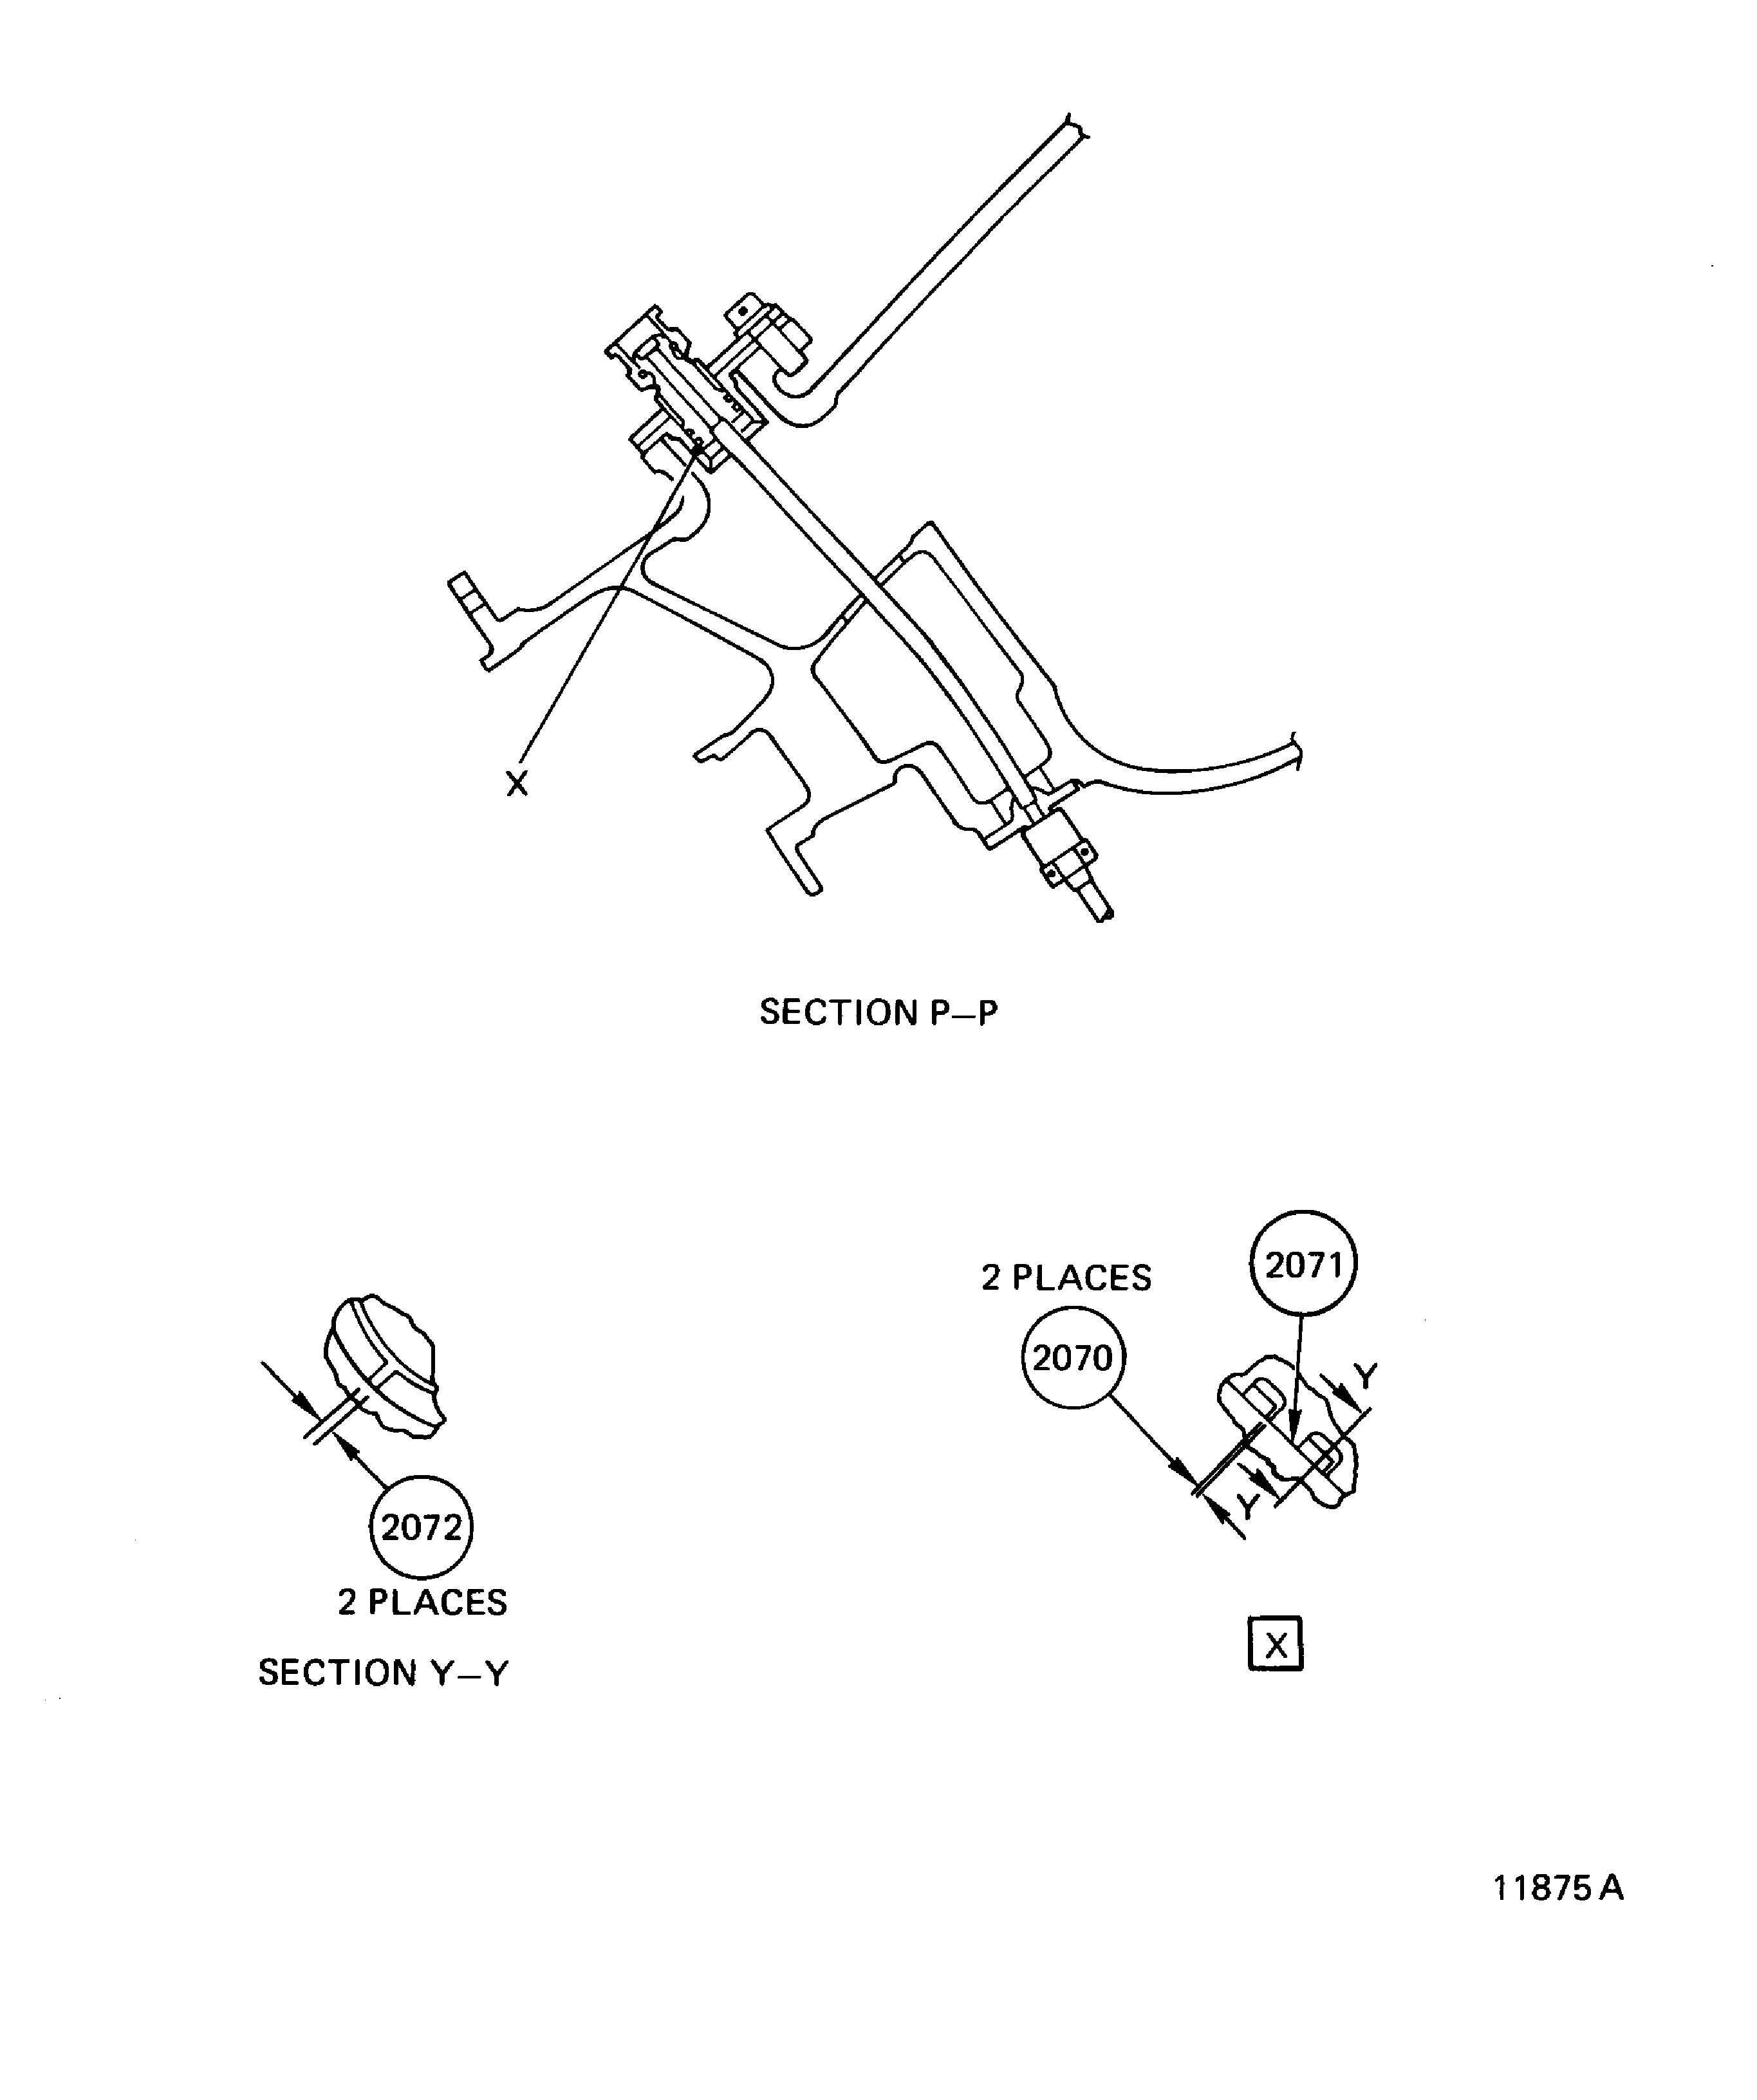
Figure: Diffuser Case Assembly - Fits and Clearances
Sheet 5
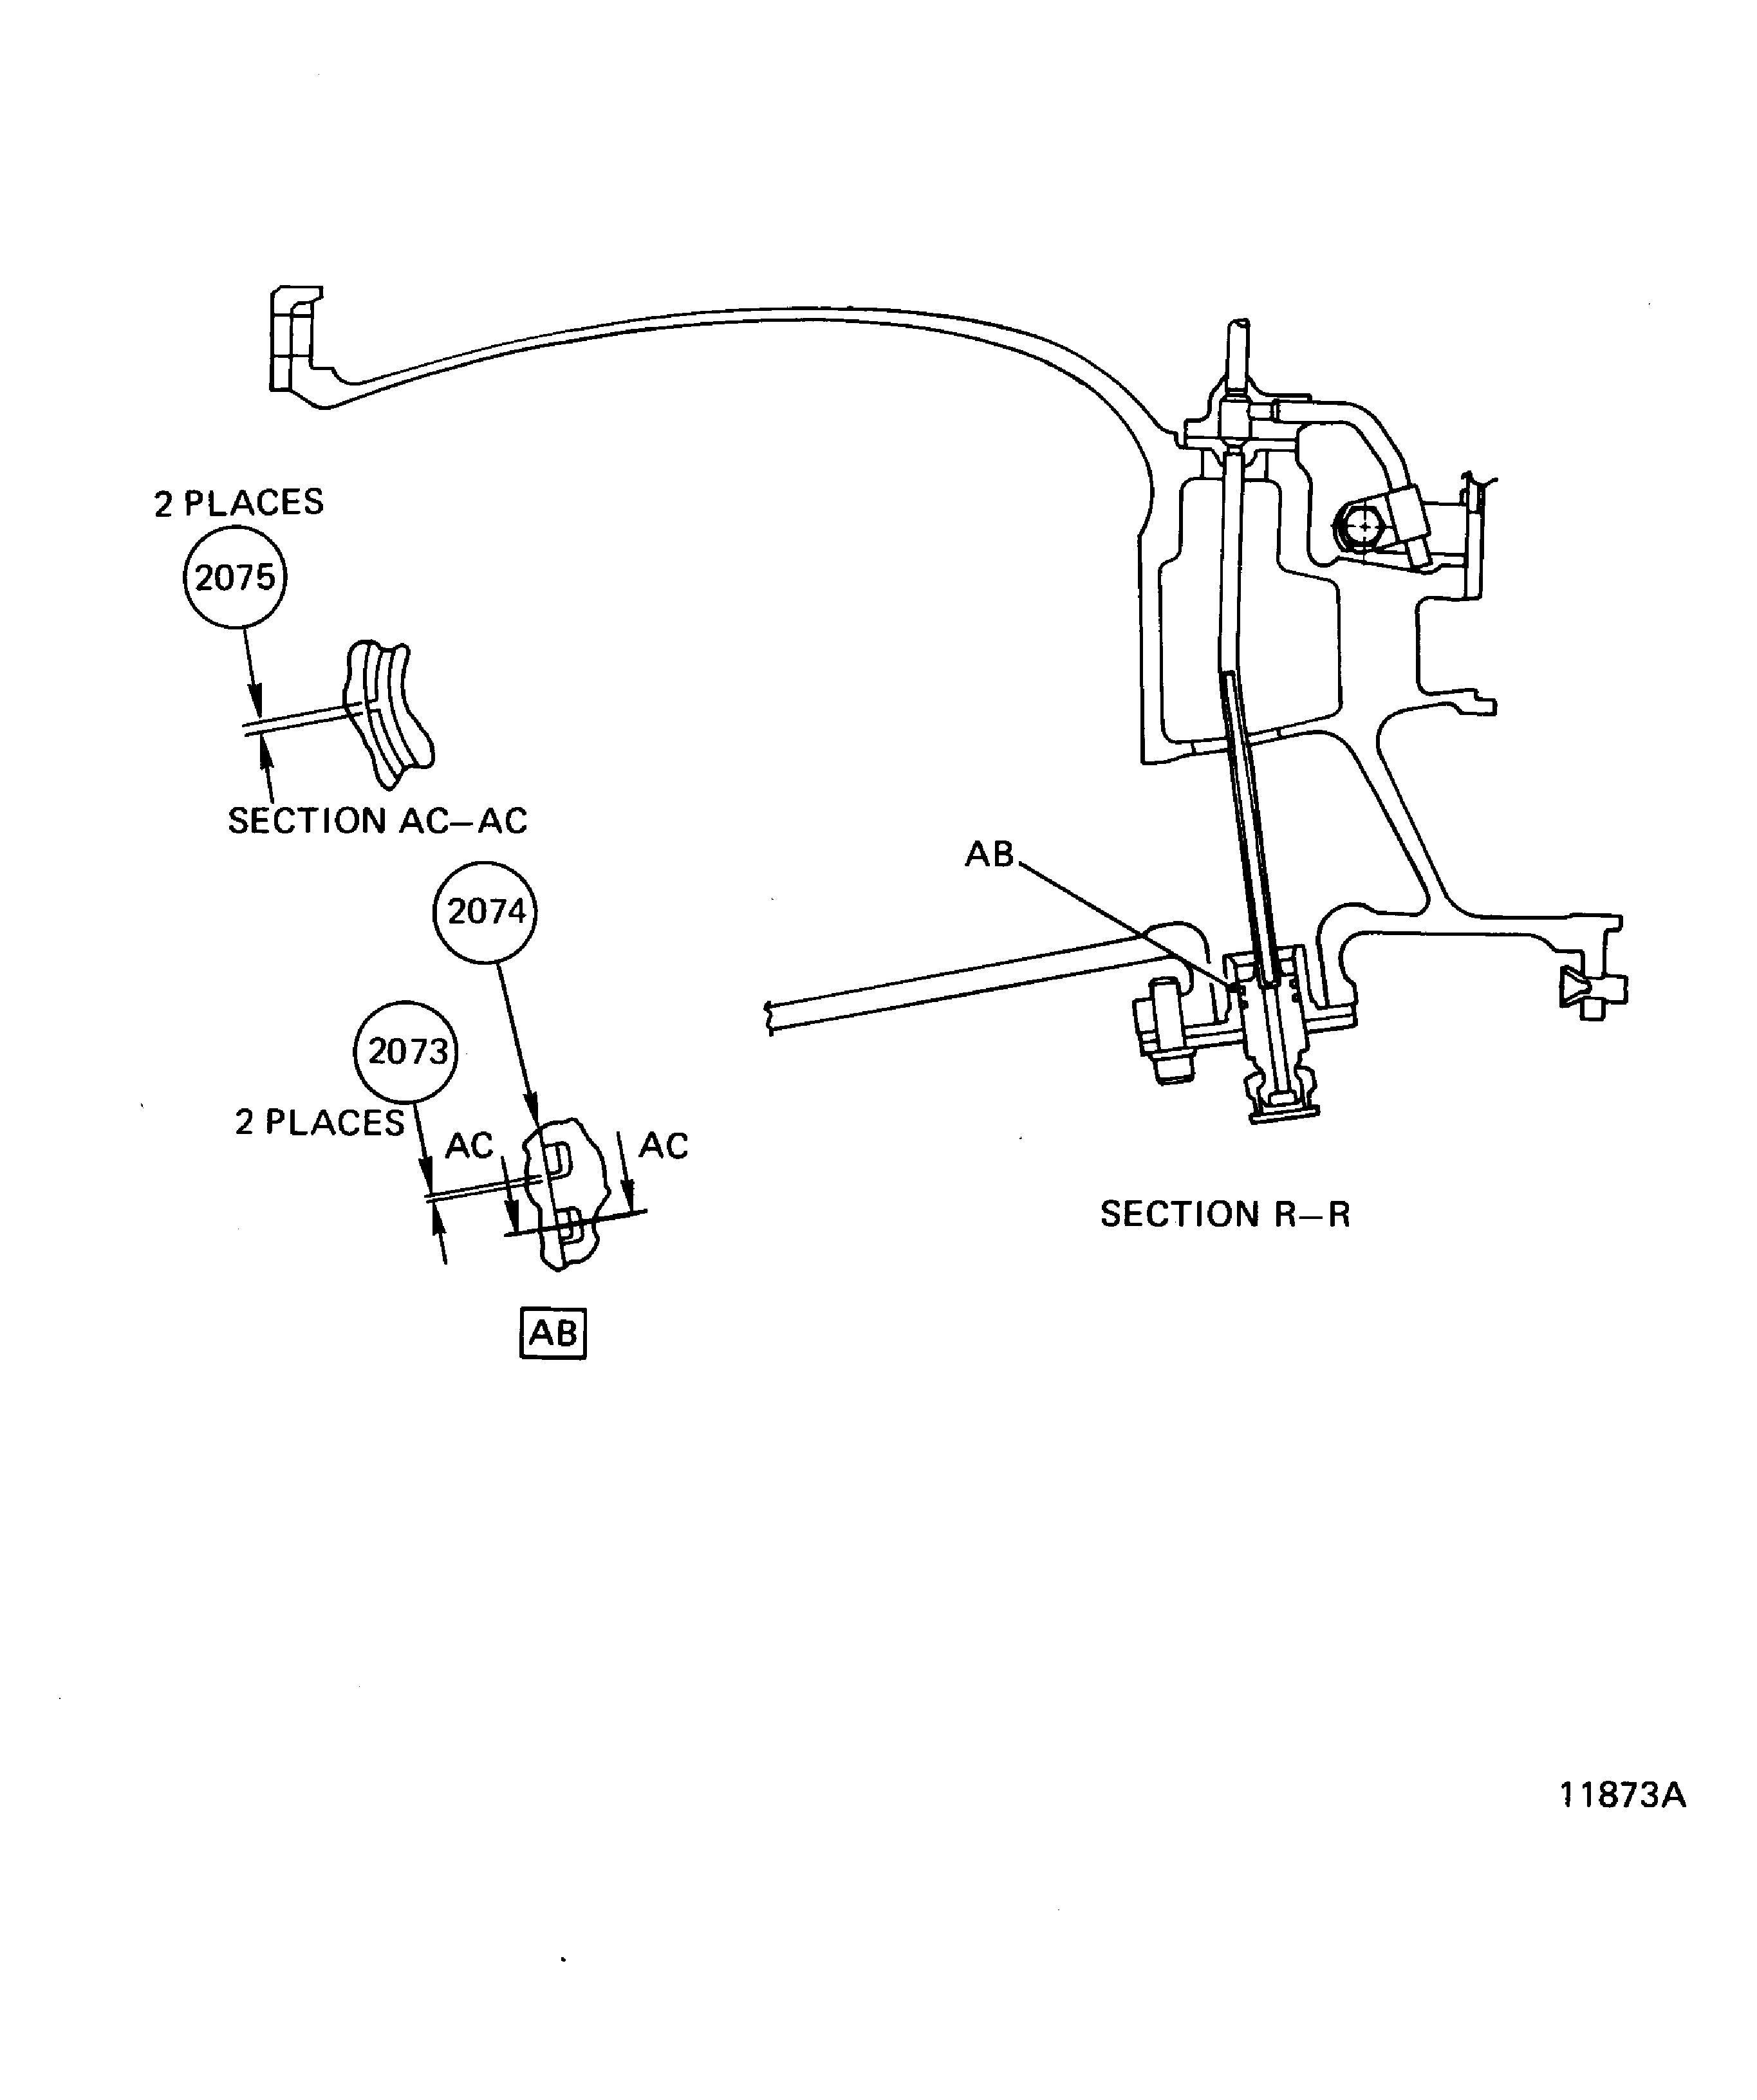
Figure: Install/Remove the Diffuser Case Assembly to/from the Build Stand
Install/Remove the Diffuser Case Assembly to/from the Build Stand
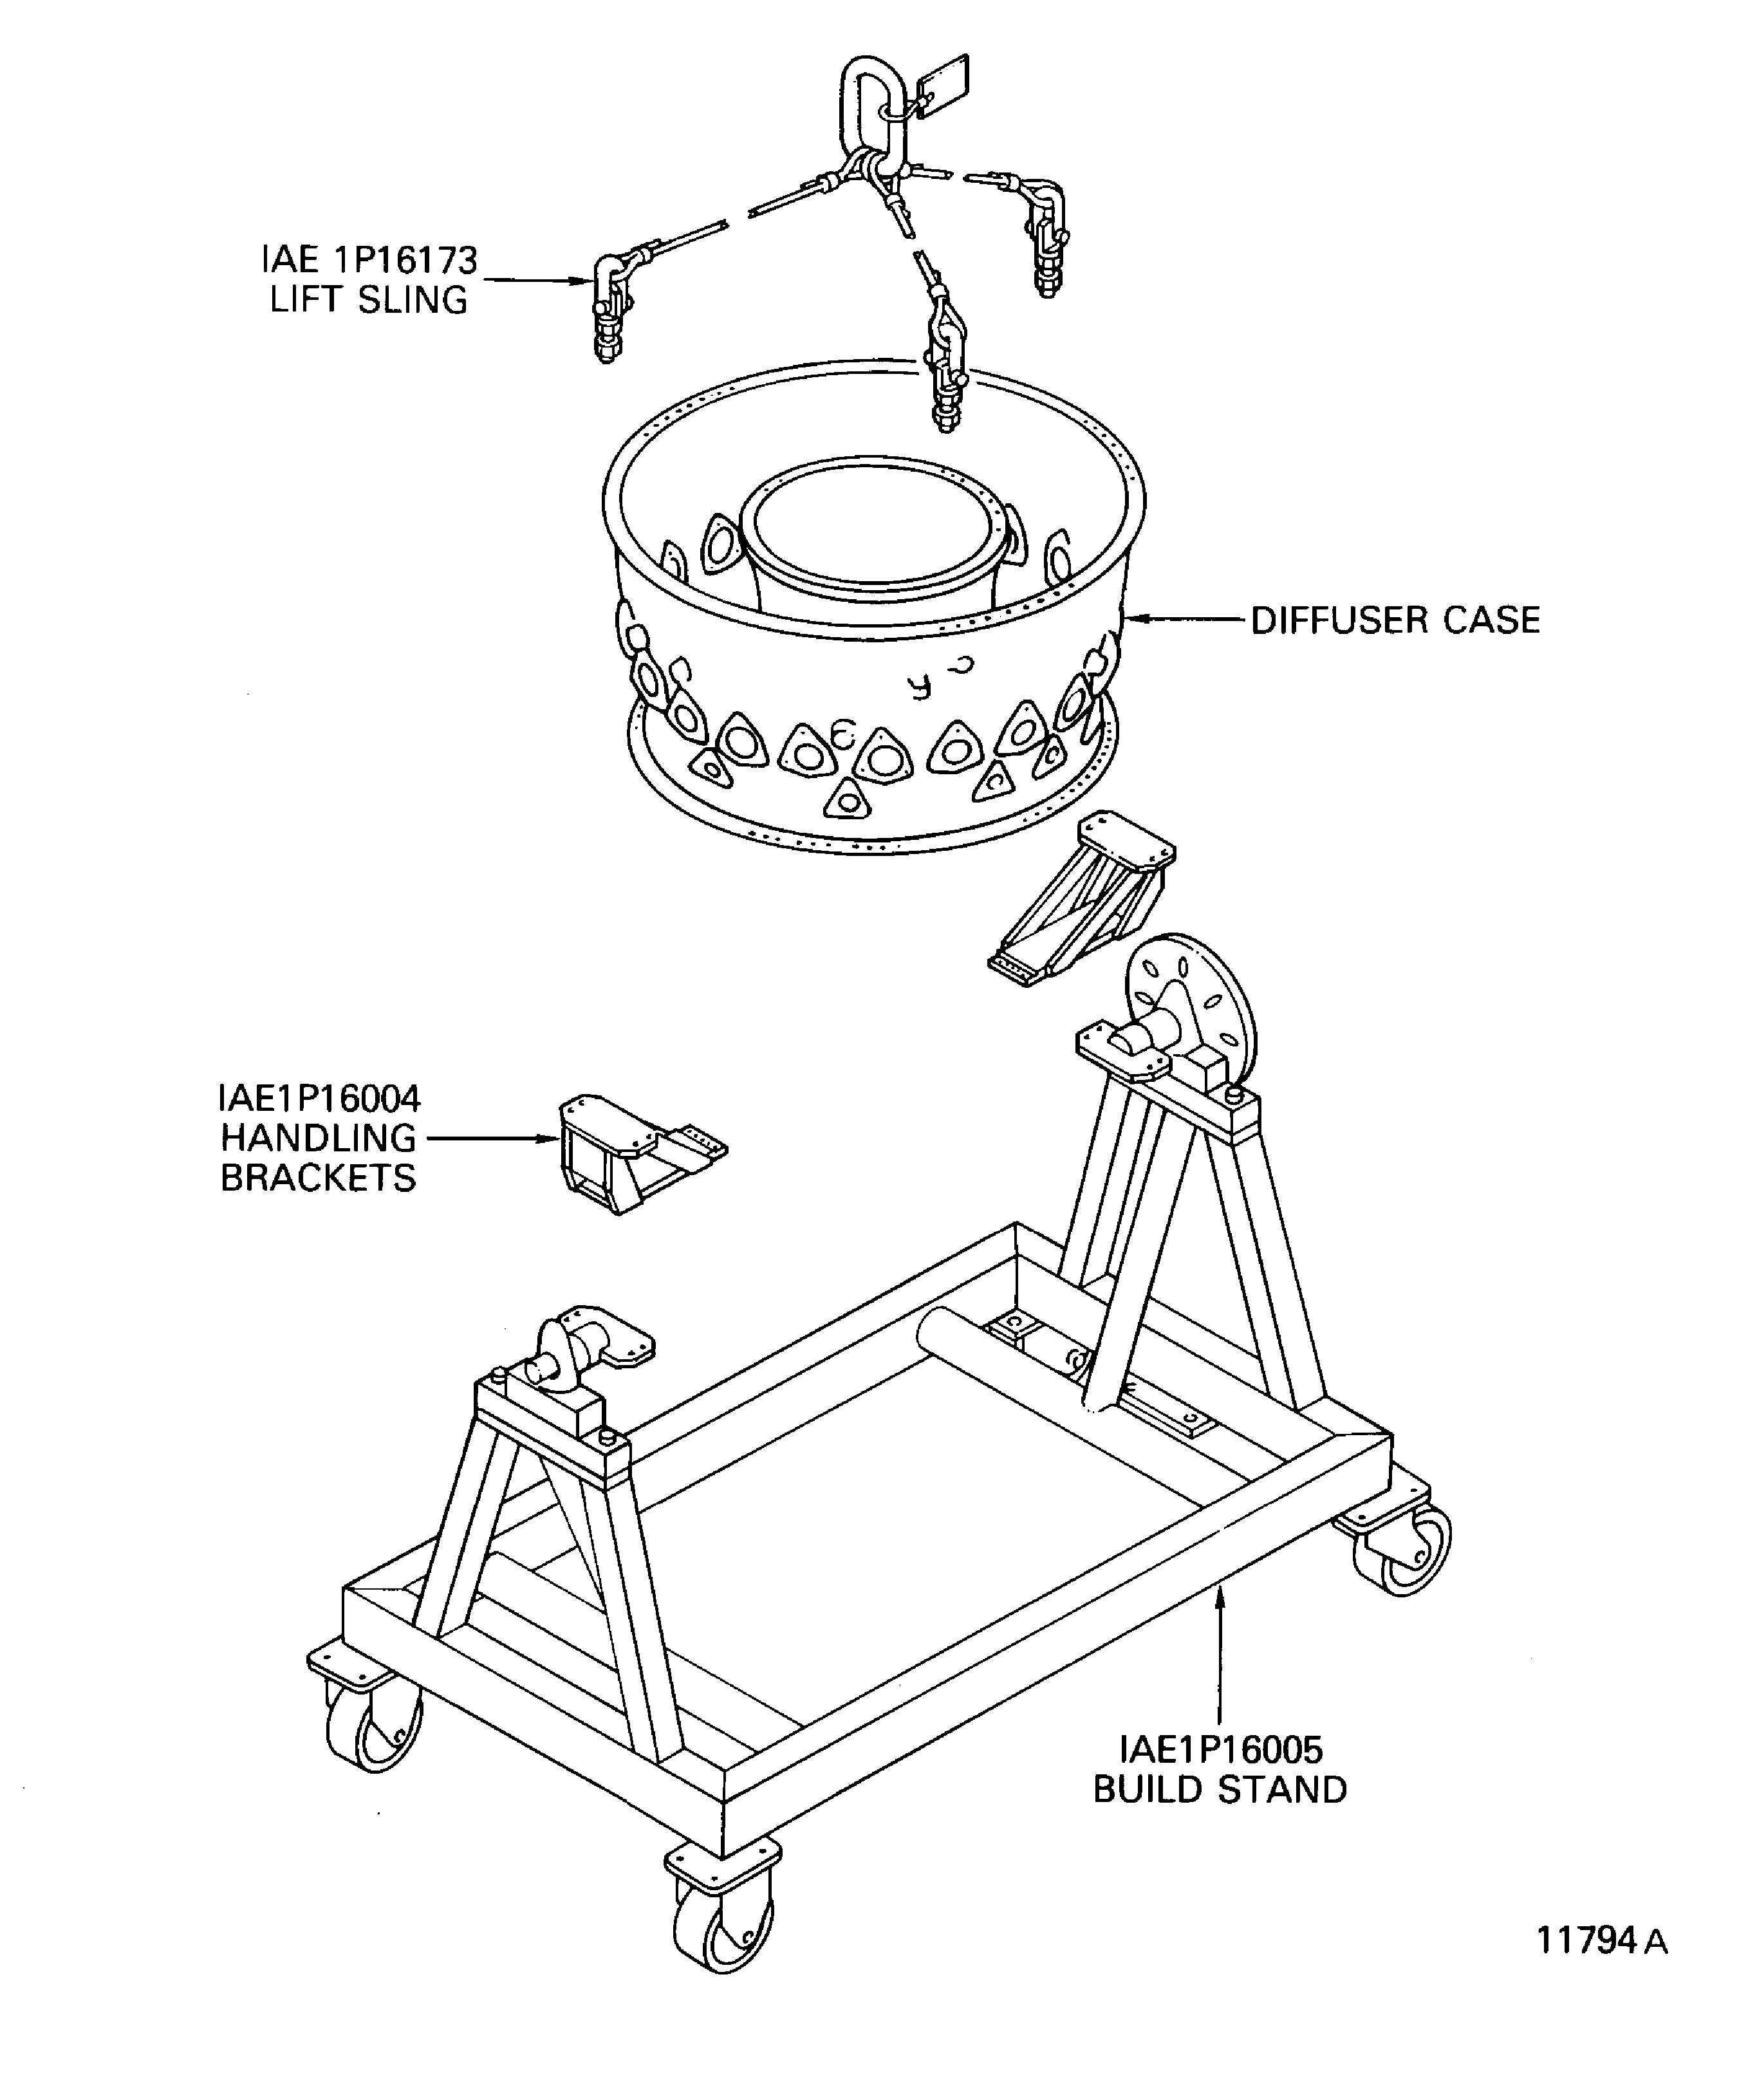
Figure: Install the No. 4 Bearing Weep Tube
Install the No. 4 Bearing Weep Tube
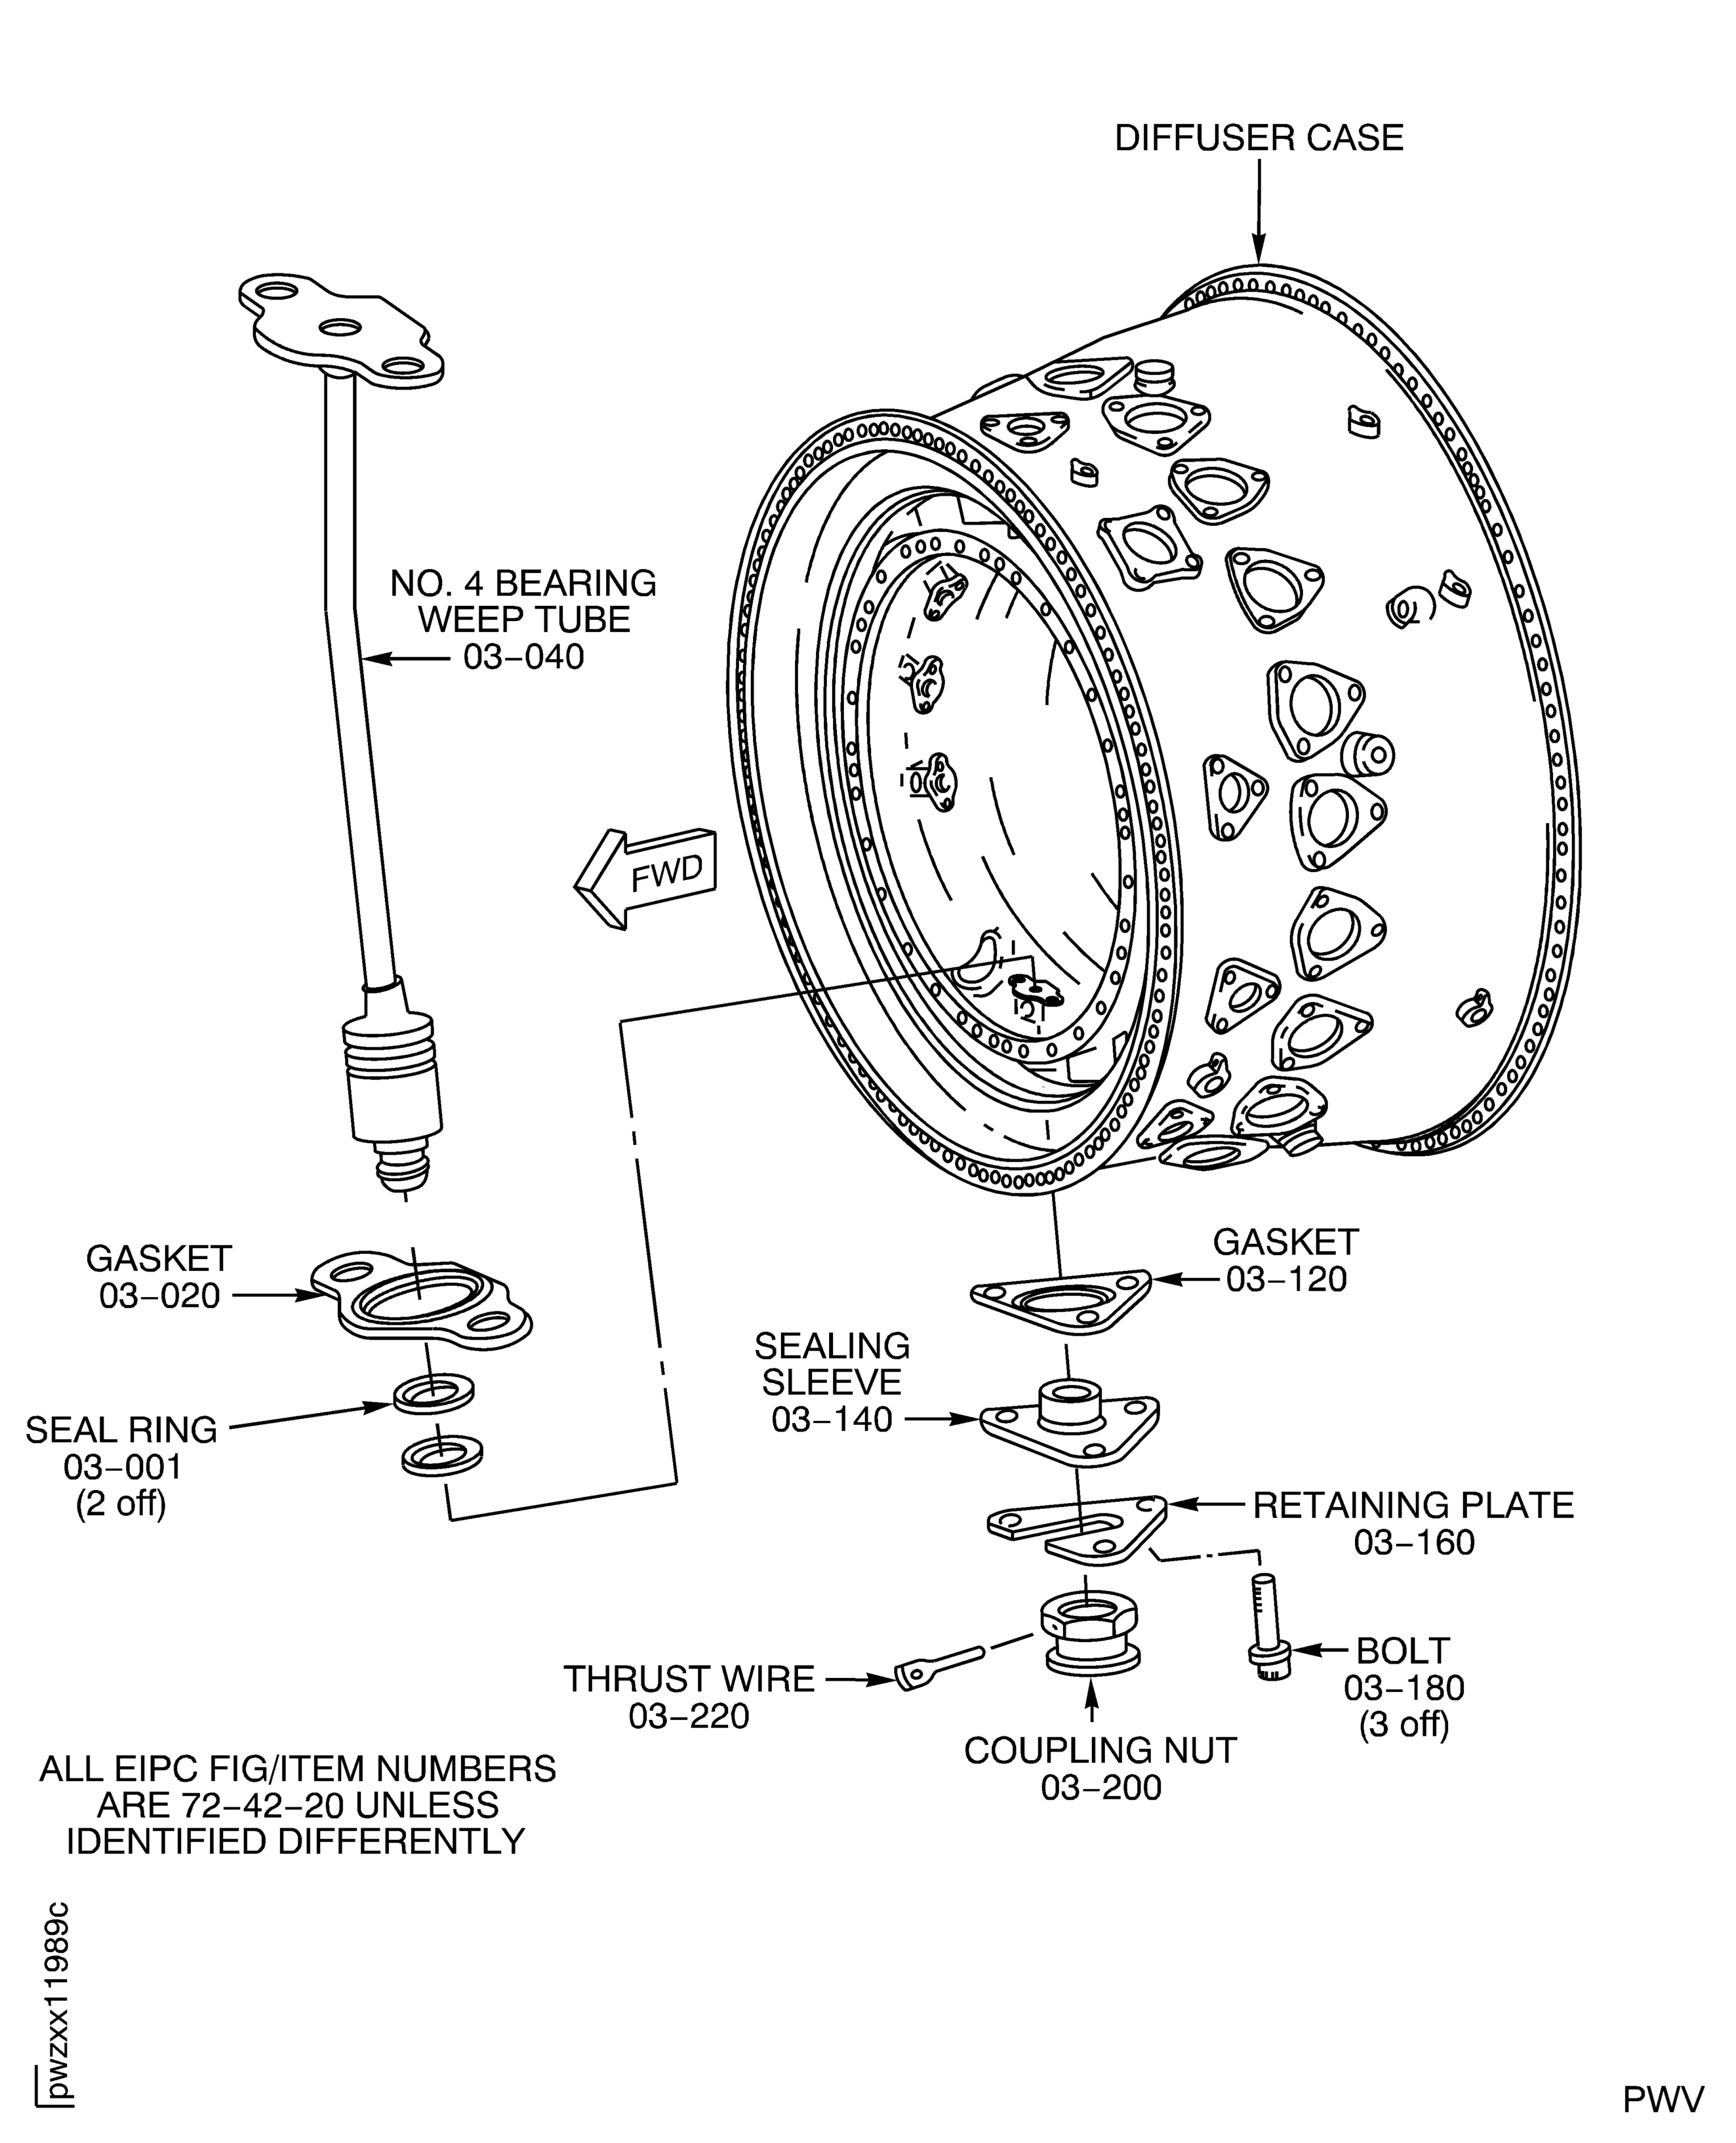
Figure: Pre SBE 72-0166: Install the Turbine Cooling Air Duct Sensing Tube
Pre SBE 72-0166: Install the Turbine Cooling Air Duct Sensing Tube
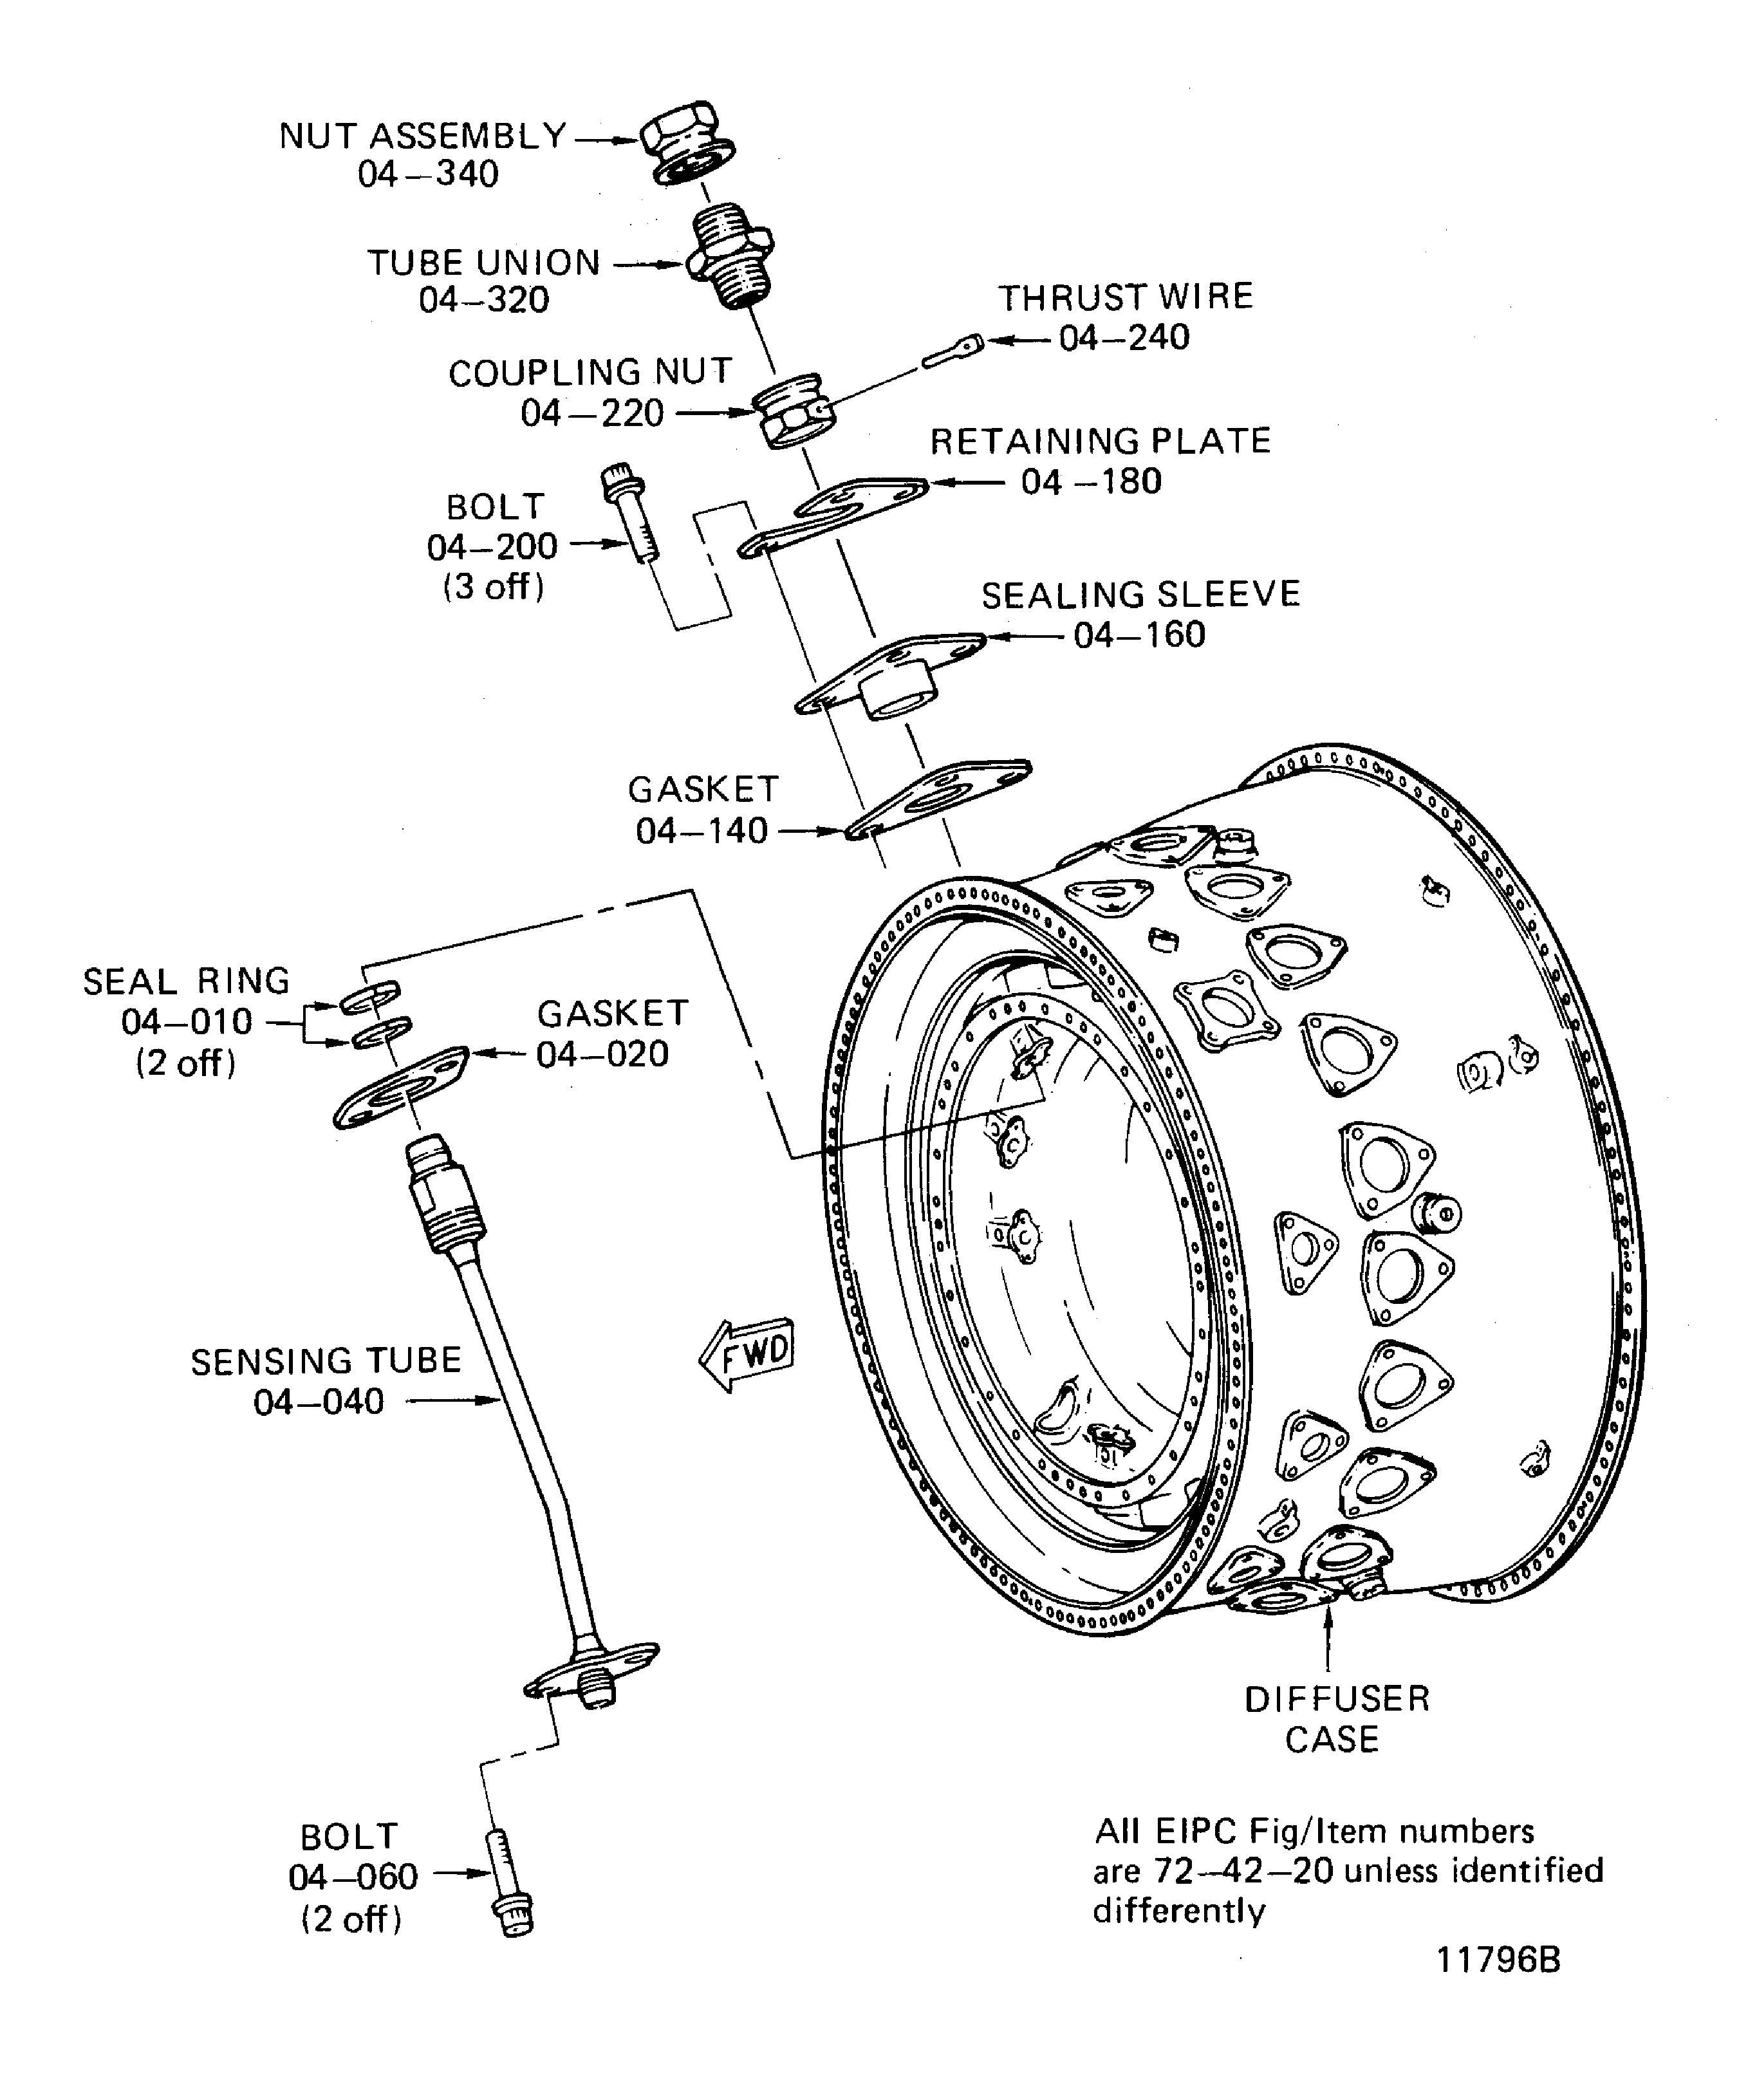
Figure: SBE 72-0166 Part 1: Install the Sensing Tube Covers
SBE 72-0166 Part 1: Install the Sensing Tube Covers
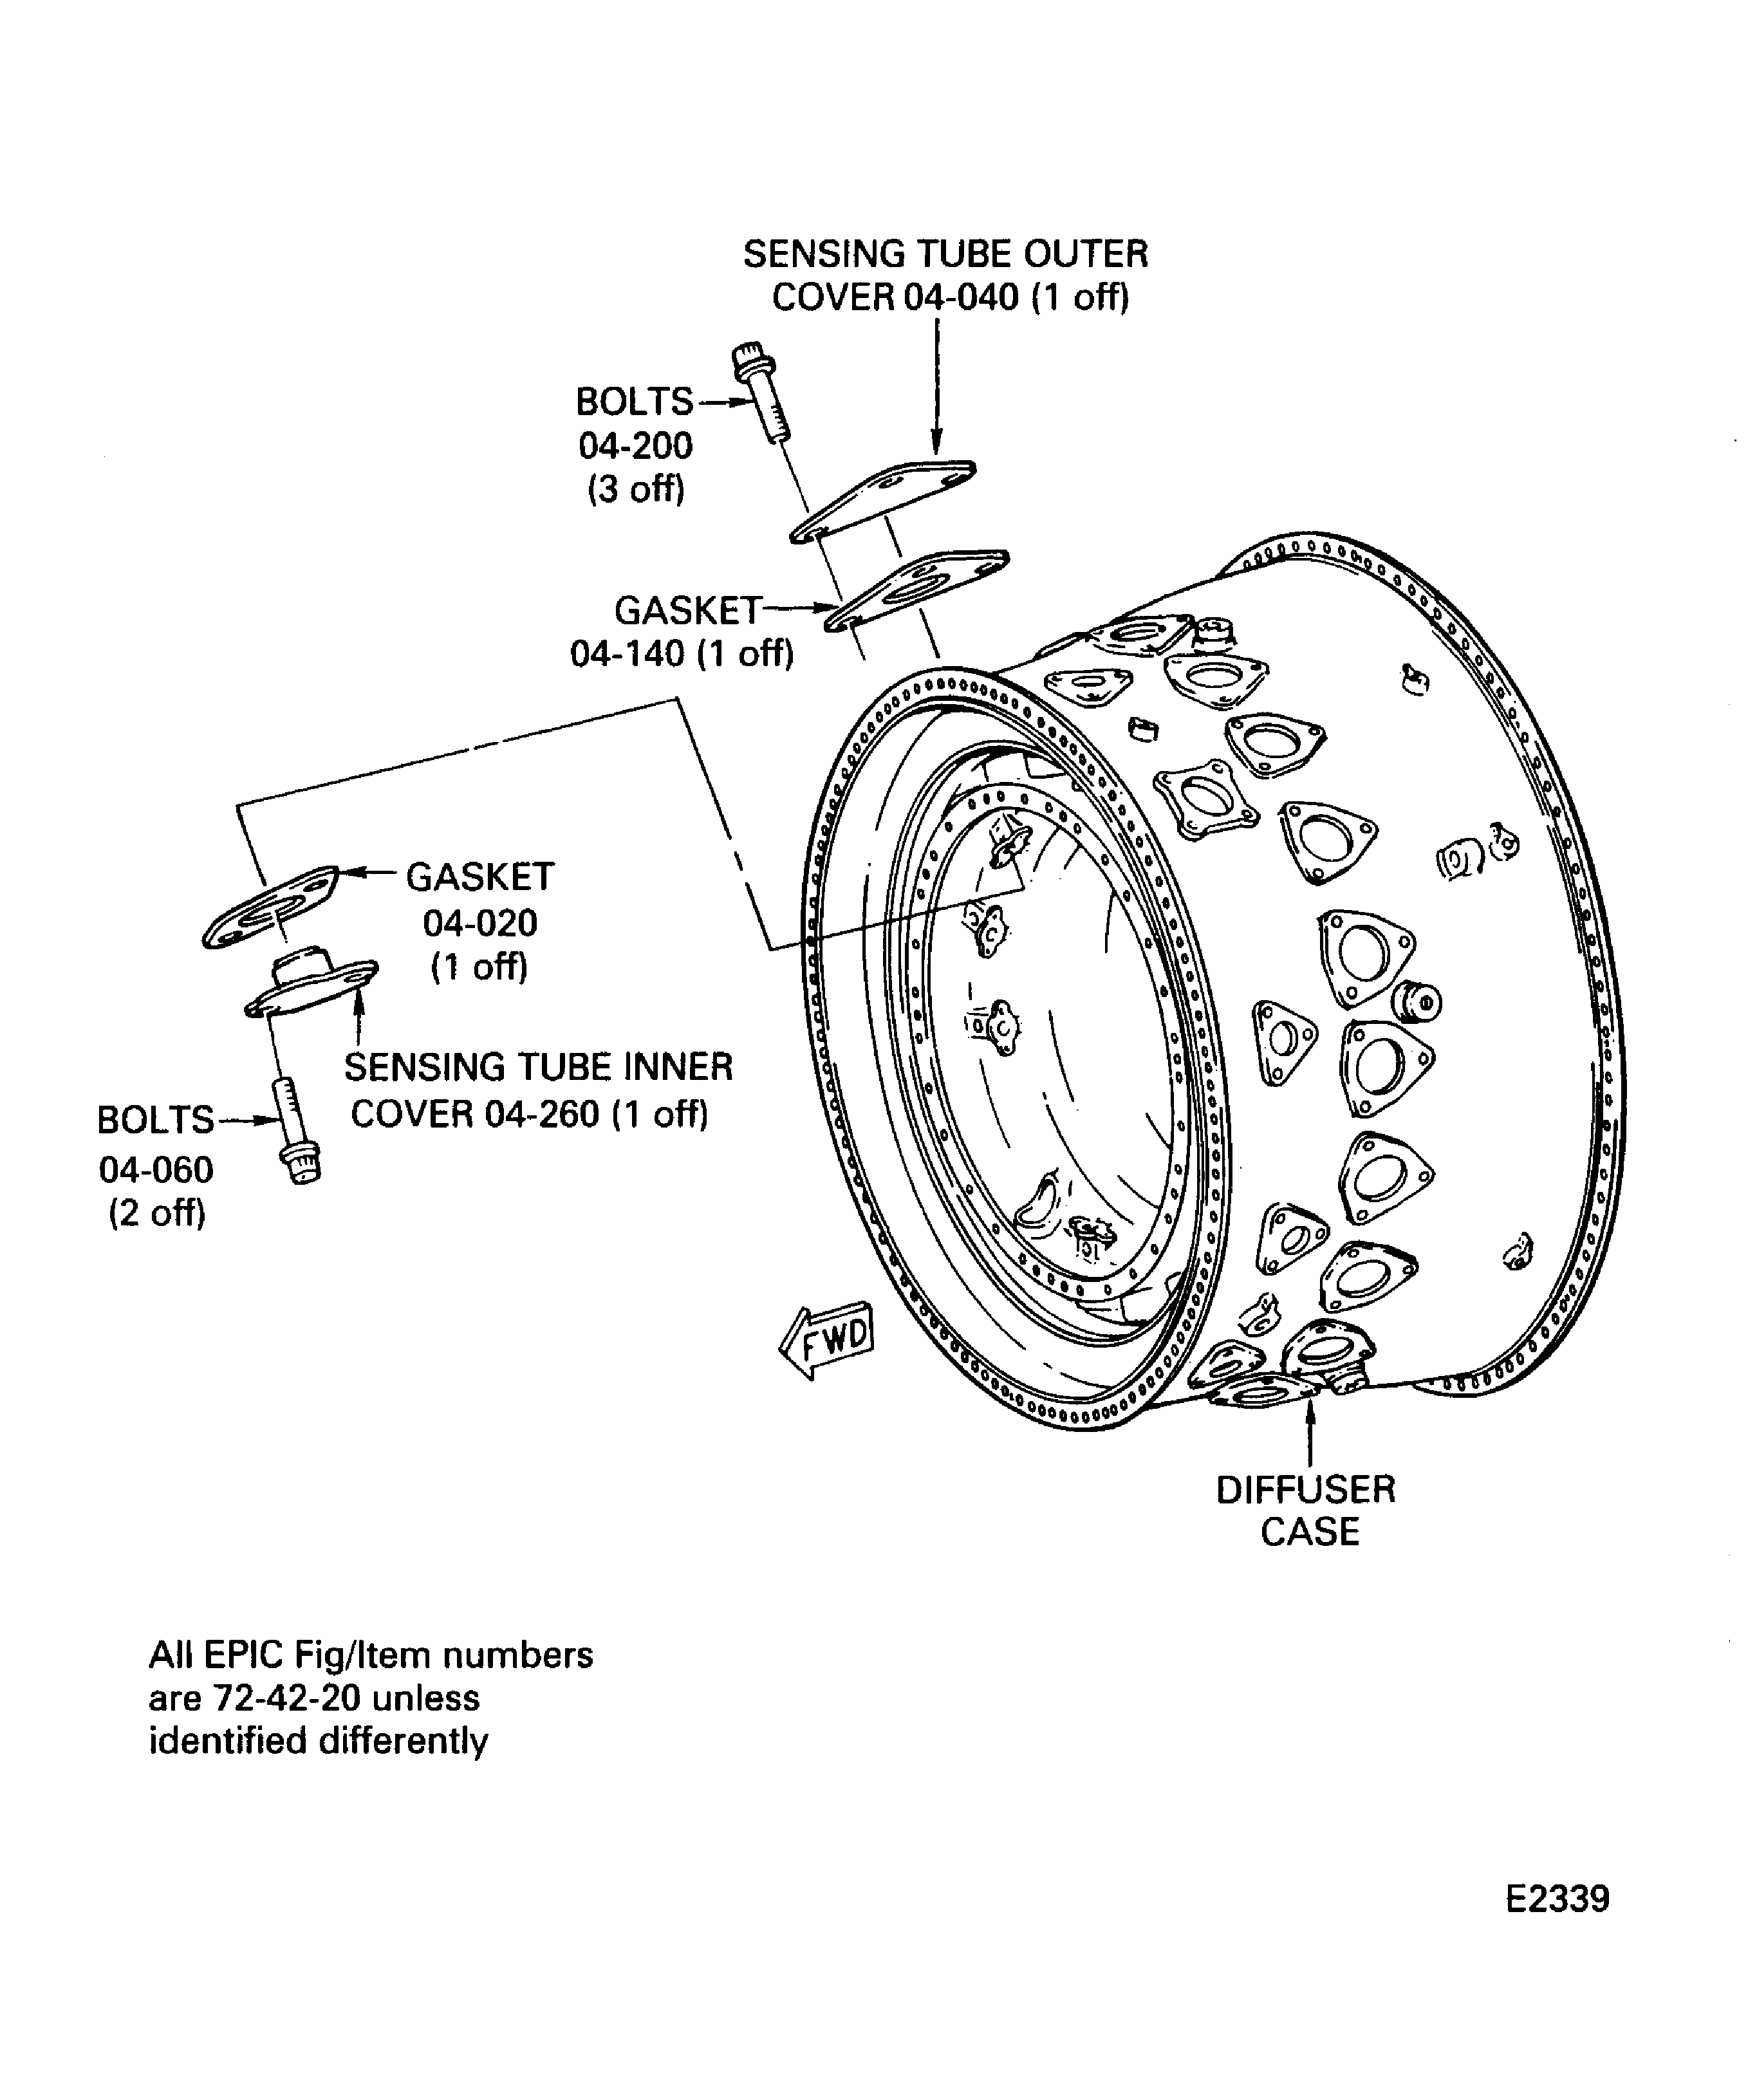
Figure: Install the No. 4 Baring Pressure Tube
Install the No. 4 Baring Pressure Tube
