Export Control
EAR Export Classification: Not subject to the EAR per 15 C.F.R. Chapter 1, Part 734.3(b)(3), except for the following Service Bulletins which are currently published as EAR Export Classification 9E991: SBE70-0992, SBE72-0483, SBE72-0580, SBE72-0588, SBE72-0640, SBE73-0209, SBE80-0024 and SBE80-0025.Copyright
© IAE International Aero Engines AG (2001, 2014 - 2021) The information contained in this document is the property of © IAE International Aero Engines AG and may not be copied or used for any purpose other than that for which it is supplied without the express written authority of © IAE International Aero Engines AG. (This does not preclude use by engine and aircraft operators for normal instructional, maintenance or overhaul purposes.).Applicability
All
Common Information
TASK 72-44-30-300-005 Inner Combustion Chamber Liner - Weld Repair, Repair-005 (VRS3174)
Effectivity
FIG/ITEM | PART NO. |
|---|---|
01-401 | 2A0549-01 |
01-401 | 2A1374 |
01-401 | 2A1398 |
01-401 | 2A1617 |
01-401 | 2A2034 |
01-401 | 2A2034-001 |
01-401 | 2A2722-01 |
01-401 | 2A2838-01 |
01-401 | 2A3344-01 |
01-401 | 2A3344-001 |
01-401 | 2A3344-002 |
01-401 | 2A3344-003 |
01-401 | 2A3344-004 |
01-401 | 2A3344-005 |
01-401 | 2A3344-006 |
01-401 | 2A3344-007 |
01-401 | 2A3351-01 |
01-401 | 2A3351-003 |
01-401 | 2A3351-004 |
01-401 | 2A4283-01 |
01-401 | 2A4311-01 |
01-401 | 2A4313-01 |
01-401 | 2A4315-01 |
01-401 | 2A4315-001 |
01-420 | 2A2718-01 |
Material of component
DESCRIPTION | SYMBOL | MATERIAL |
|---|---|---|
Combustion chamber inner liner | - | Hastelloy X/Inconel 625 |
General
Price and availability - refer to IAE
The practices and processes referred to in the procedure by the TASK number are in the SPM.
NOTE
Preliminary Requirements
Pre-Conditions
NONESupport Equipment
| Name | Manufacturer | Part Number / Identification | Quantity | Remark |
|---|---|---|---|---|
| Cut-off wheel | LOCAL | (hand-held) | ||
| Bore mill | LOCAL | (Optional) | ||
| Laserdyne 780 laser drill | LOCAL | |||
| Lathe | LOCAL | (6 inch minimum - Optional) | ||
| Omnimill Series 80 | LOCAL | (Optional) |
Consumables, Materials and Expendables
| Name | Manufacturer | Part Number / Identification | Quantity | Remark |
|---|---|---|---|---|
| CoMat 02-182 METAL FOIL TAPE | 76381 | CoMat 02-182 | ||
| CoMat 03-197 WELDING FILLER WIRE | LOCAL | CoMat 03-197 | ||
| CoMat 03-287 WELDING FILLER WIRE | LOCAL | CoMat 03-287 | ||
| CoMat 03-335 HASTELLOY X SHEET STOCK | LOCAL | CoMat 03-335 | ||
| CoMat 03-494 INCONEL 625 SHEET STOCK, 0.041 - 0.046 INCH THICK | LOCAL | CoMat 03-494 | ||
| CoMat 06-072 DYE | 0AM53 | CoMat 06-072 |
Spares
| Name | Manufacturer | Part Number / Identification | Quantity | Remark |
|---|---|---|---|---|
| NUT, OPTION - .190 DIA | 0AM53 | 4W0001 | AR | |
| RIVET - BLIND, COUNTERSUNK, 0.094-0.157 X 0.265 | 77445 | ST1209-03 | AR |
Safety Requirements
NONEProcedure
Refer to VRS3173 TASK 72-44-30-300-001 (REPAIR-001) and VRS3264 V2500-A0-72-44-3001-00A-920A-C (REPAIR-003).
Remove the liner segments and the gangnut channels.
SUBTASK 72-44-30-350-059 Remove the Detail Parts from the Combustion Chamber Inner Liner
Refer to Figure.
Refer to the SPM TASK 70-11-03-300-503, SPM TASK 70-11-01-300-503 or SPM TASK 70-12-01-120-501.
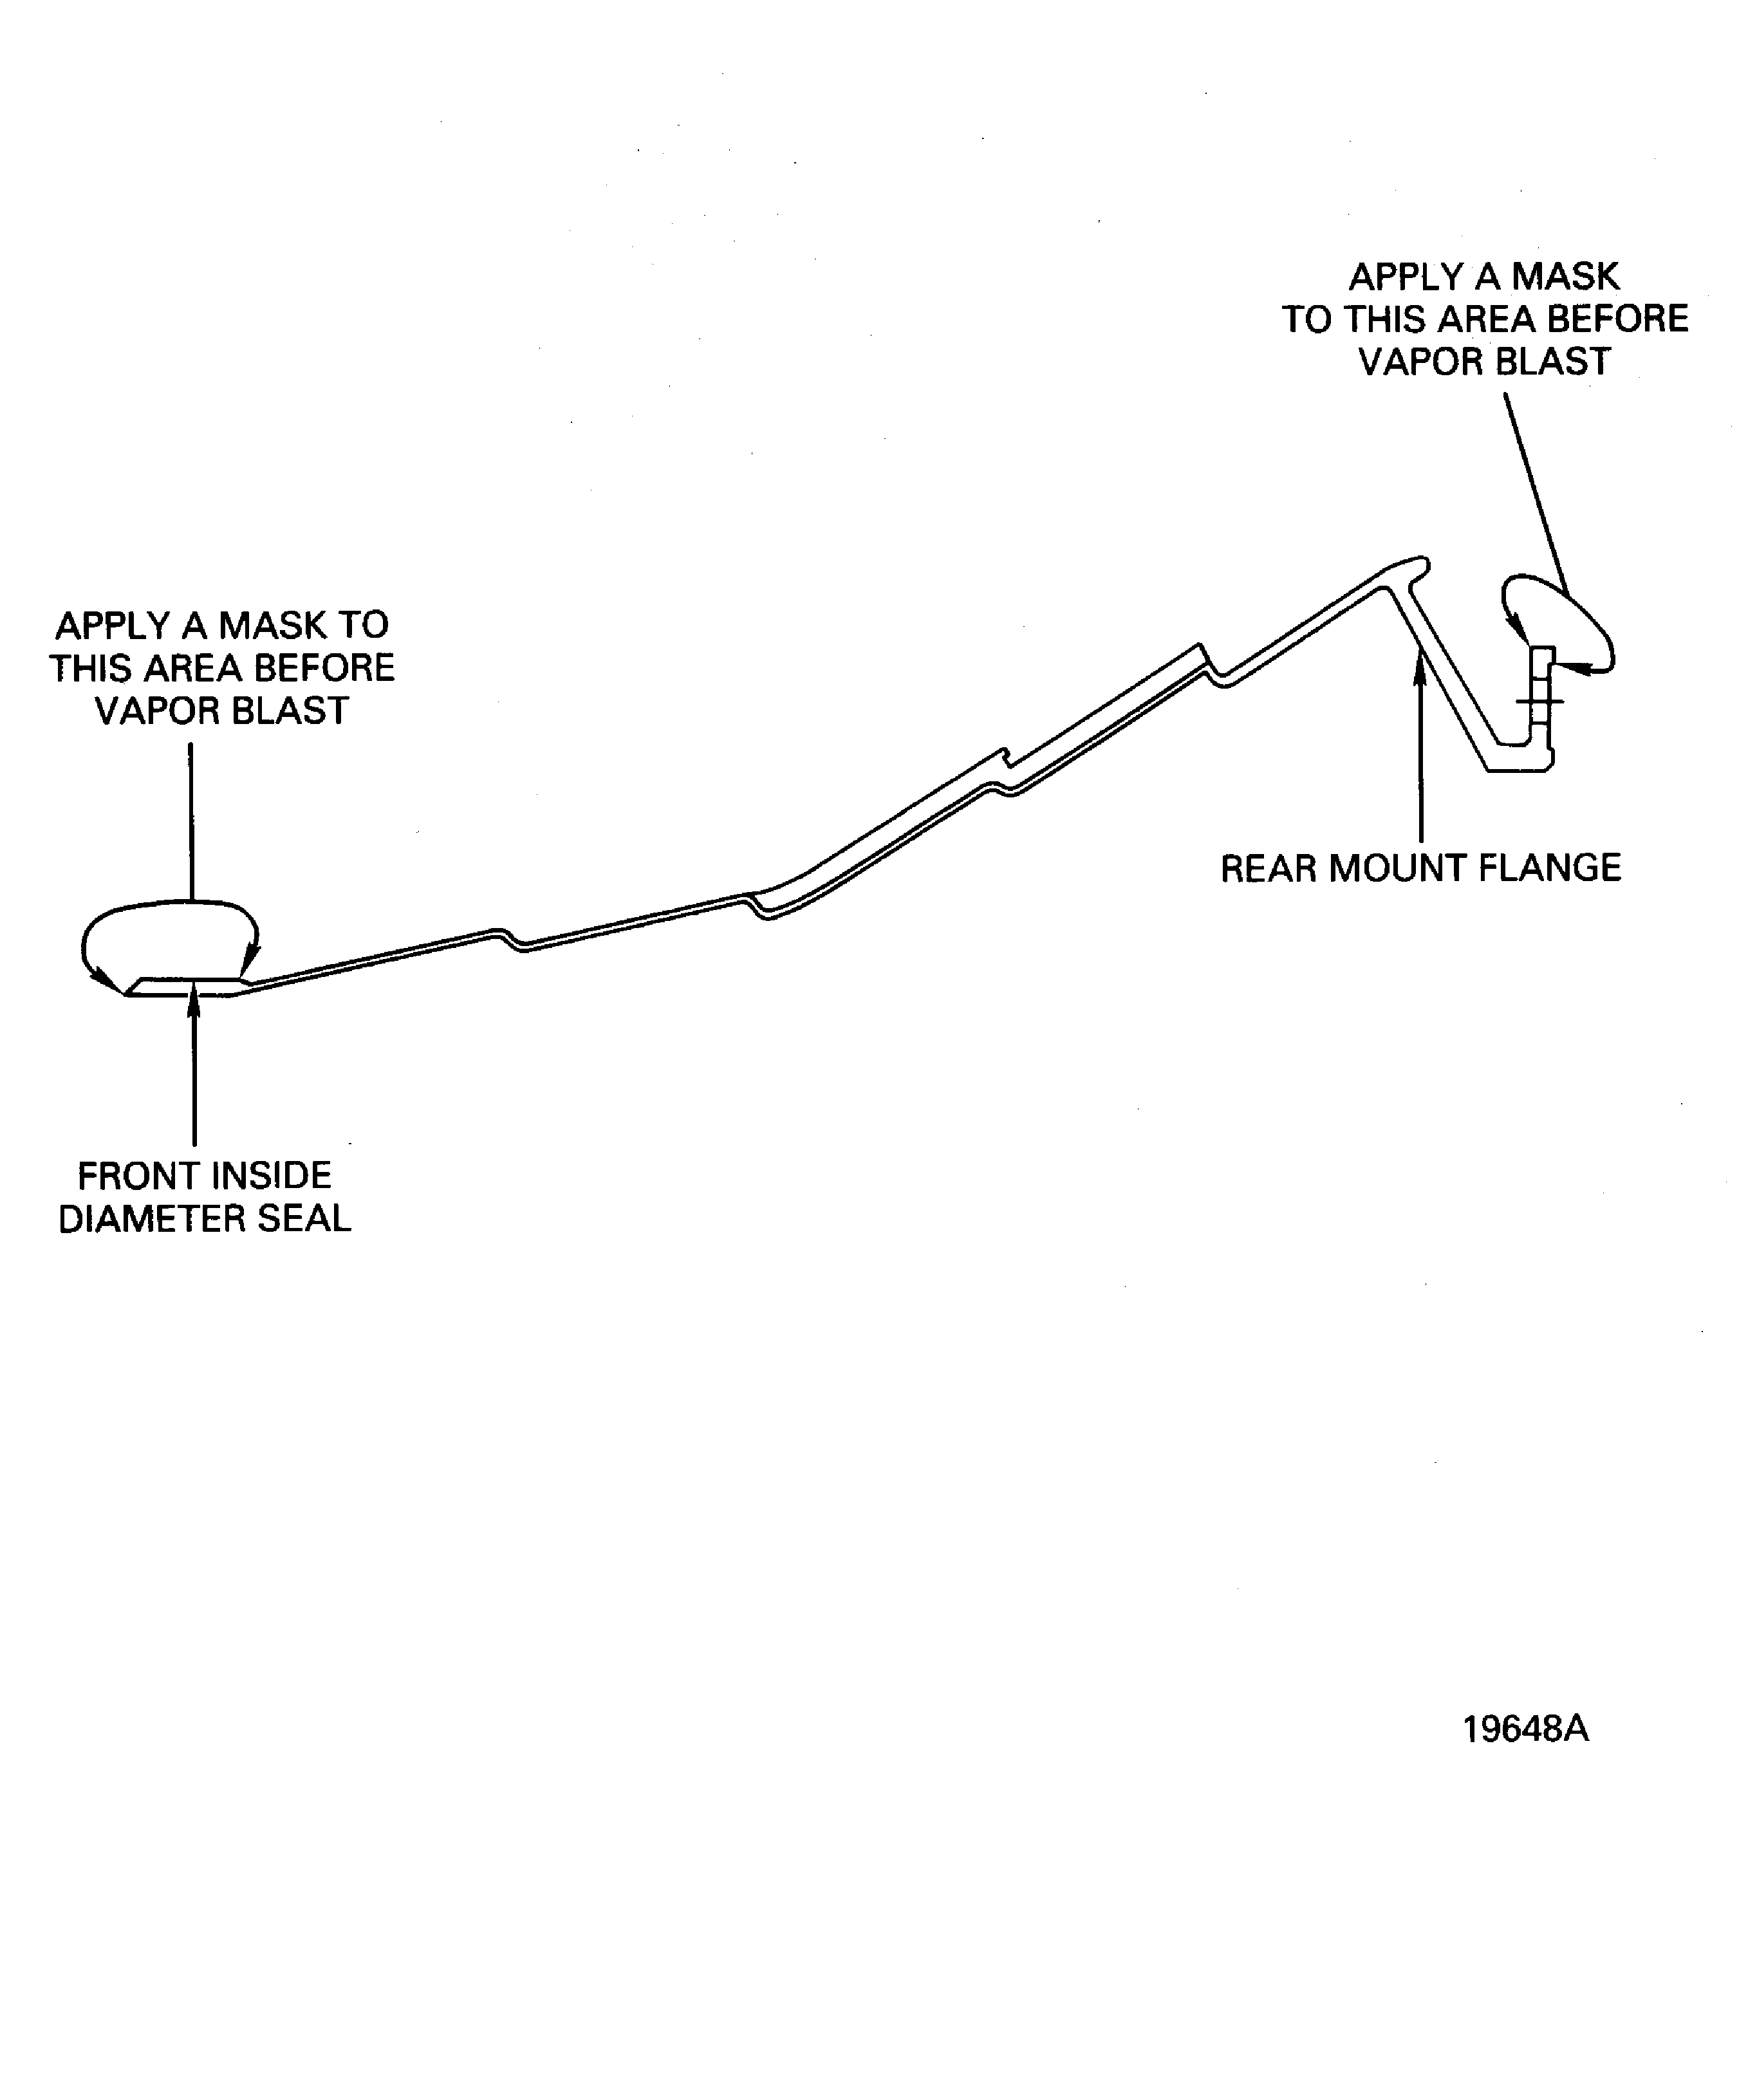
Moderately clean or vapor blast the liner to remove debris and fragments.
SUBTASK 72-44-30-110-053 Clean the Damaged Combustion Chamber Inner Liner
Make sure you examine all surfaces in addition to the damaged areas.
Refer to the SPM TASK 70-23-03-230-501 or SPM TASK 70-23-08-230-501 and SPM TASK 70-23-05-230-501.
Fluorescent penetrant inspect the liner.
If the areas are only in the shell and each area is less than 0.070 sq in. (45 sq mm), do the procedure in Step.
If the areas are only in the shell and one or more areas are more than 0.070 sq in. (45 sq mm), do the procedure in Step.
Examine for the locations and dimensions of the areas where you removed material.
SUBTASK 72-44-30-230-051 Examine the Damaged Combustion Chamber Inner Liner
Refer to the SPM TASK 70-37-24-370-501.
NOTE
A pre-weld heat treat enhances weldability.Solution heat treat of the combustion chamber liner at operator discretion.
SUBTASK 72-44-30-370-053 Optional - Solution Heat Treat of the Combustion Chamber Liner
Refer to Figure.
Refer to the SPM TASK 70-31-13-310-501, IAE 16-3.
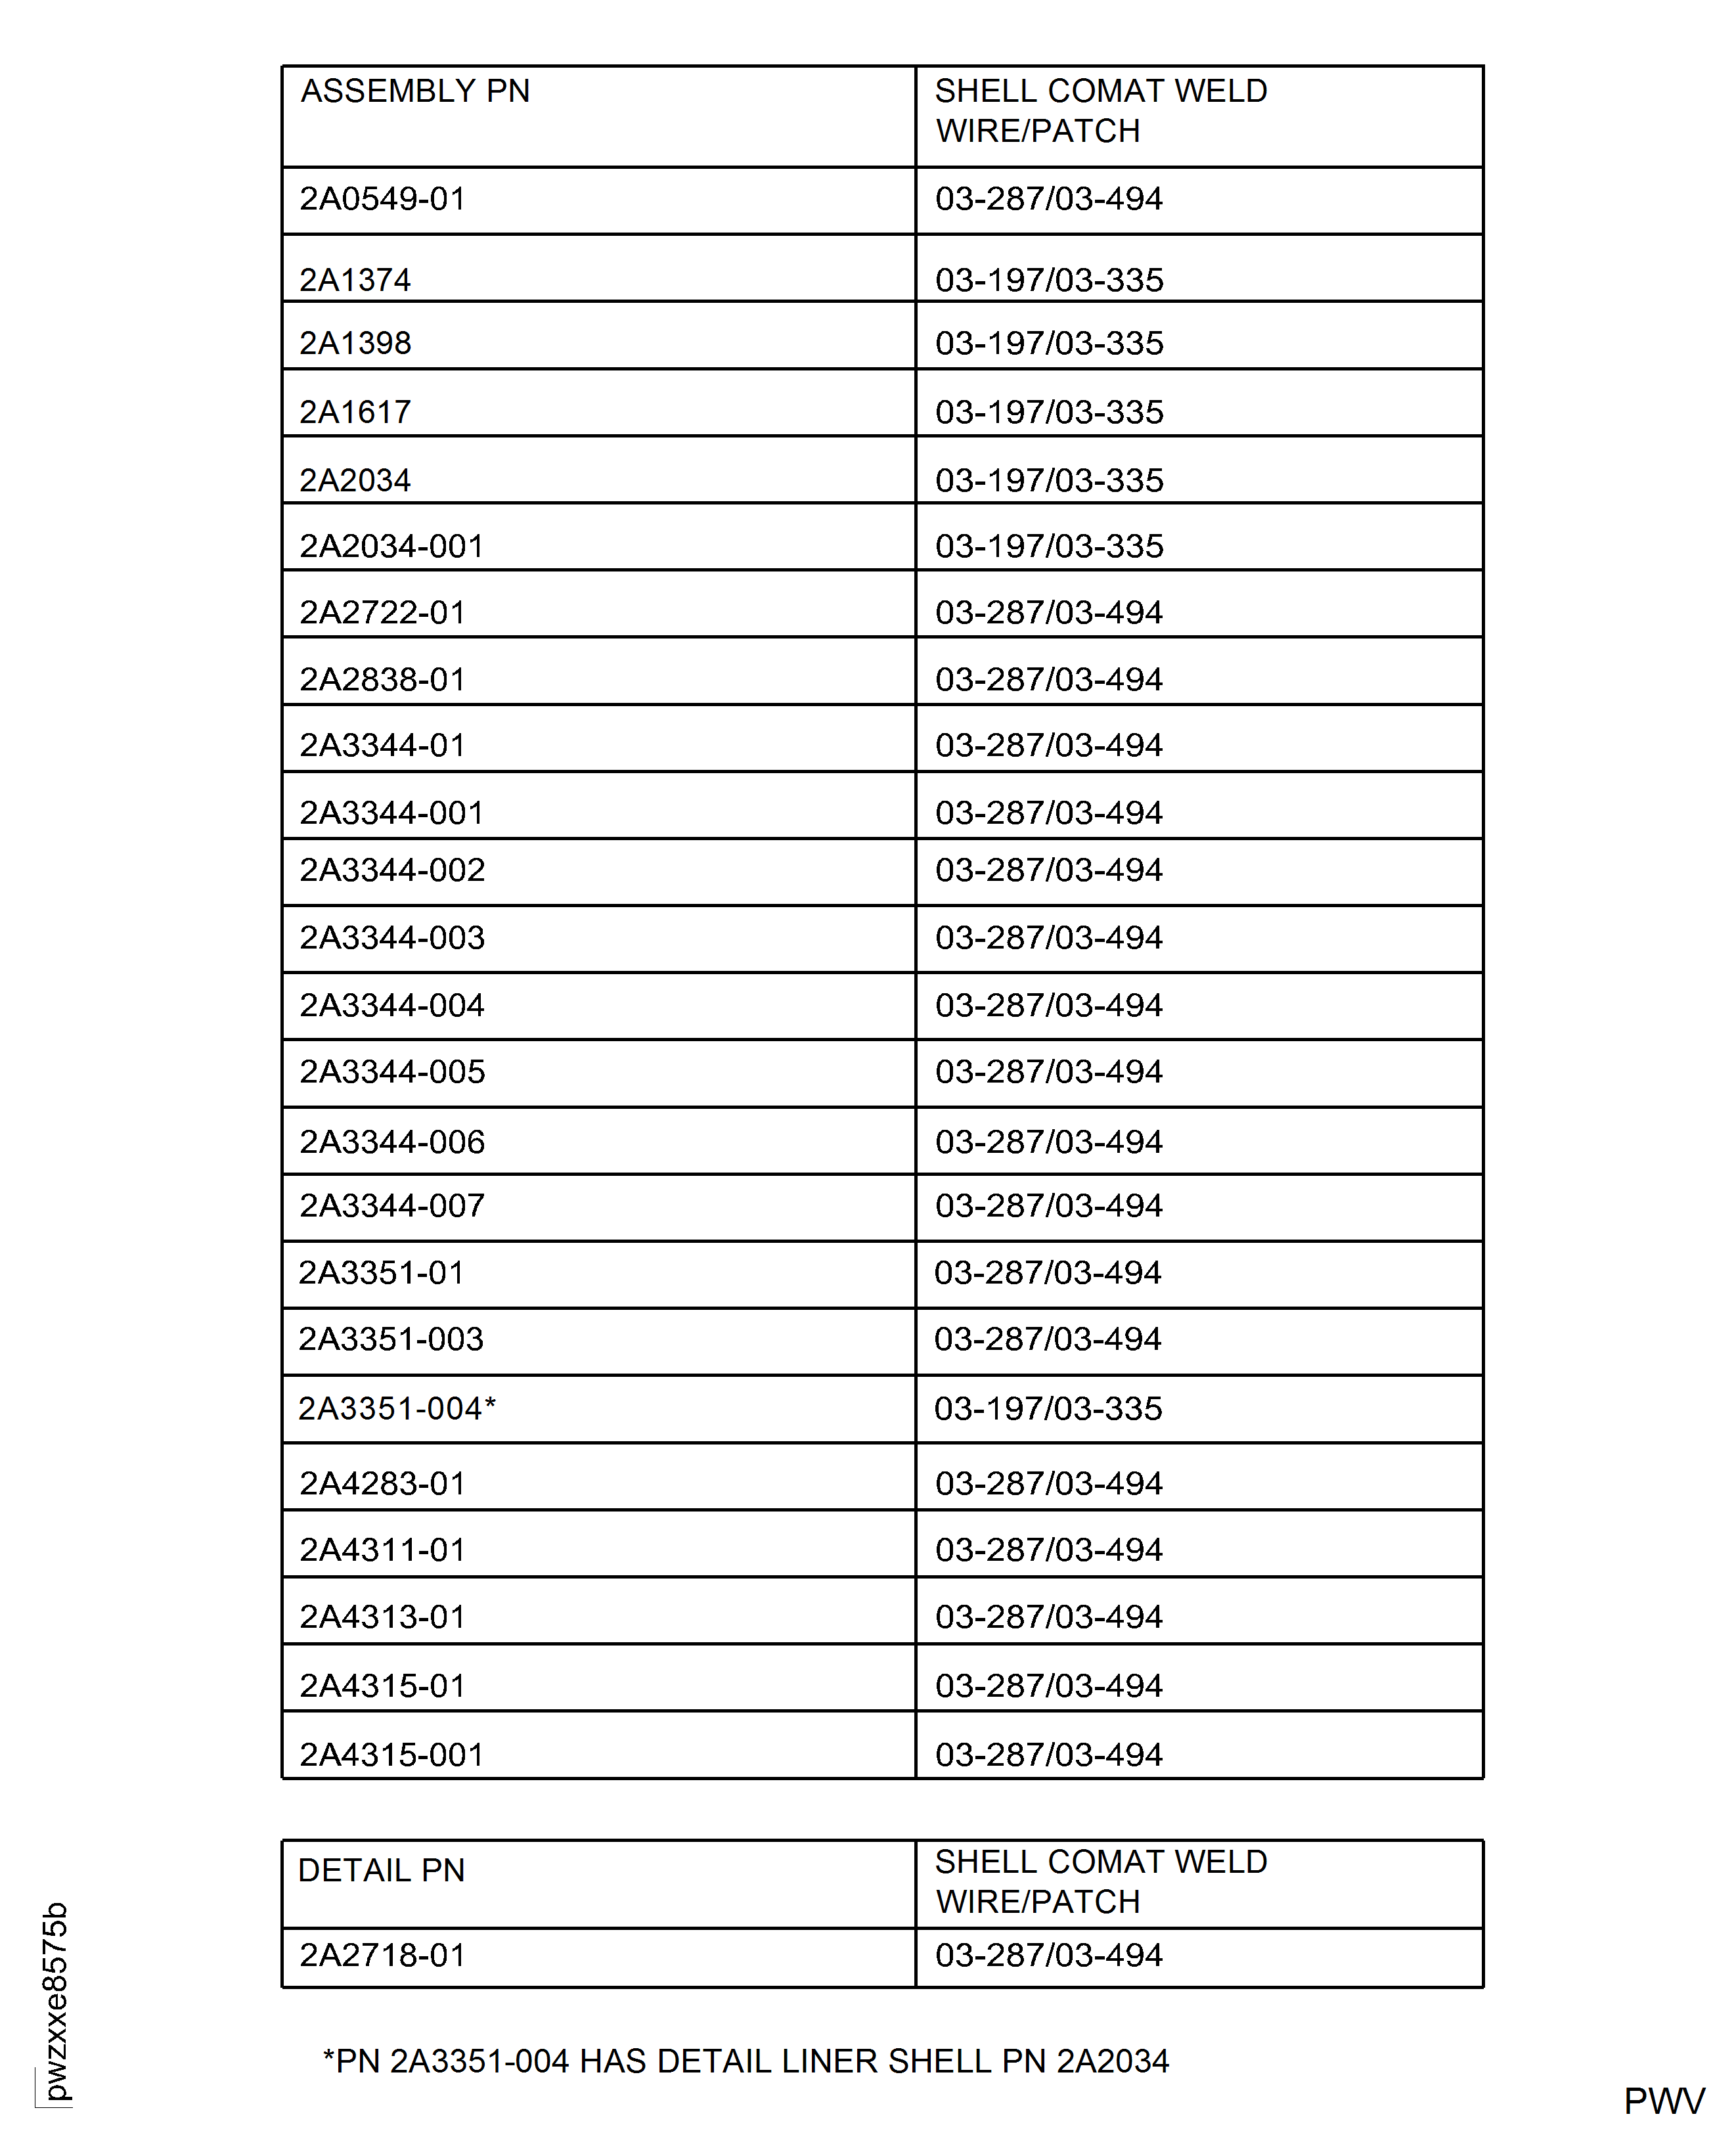
Use the applicable CoMat welding filler wire listed in Figure.
The total area of all weld repairs must not be more than 1.0 sq in. (645 sq mm).
The contour of the welded areas must be in 0.020 in. (0.508 mm) on both sides of perfect form.
Weld repair the prepared areas.
Refer to Figure.
Finish the weld on the inside in 0.010 in. (0.254 mm) above or 0.005 in. (0.127 mm) below the base material. Finish the weld on the outside in 0.010 in. (0.254 mm) above the base metal.
Refer to Step.
Locally stress-relieve the liner after weld repair.
It is recommended that the front seal and the rear seal be held in a fixture to prevent distortion.
Refer to Step.
Stress-relieve all of the liner again if you cold worked the liner.
Refer to VRS3306, TASK 72-44-30-300-009 (REPAIR-009).
Resize the front inside diameter seal if necessary.
SUBTASK 72-44-30-310-051 Weld Repair the Shell
Use the applicable CoMat welding filler wire listed in Figure.
Refer to the SPM TASK 70-31-13-310-501, IAE 16-3.
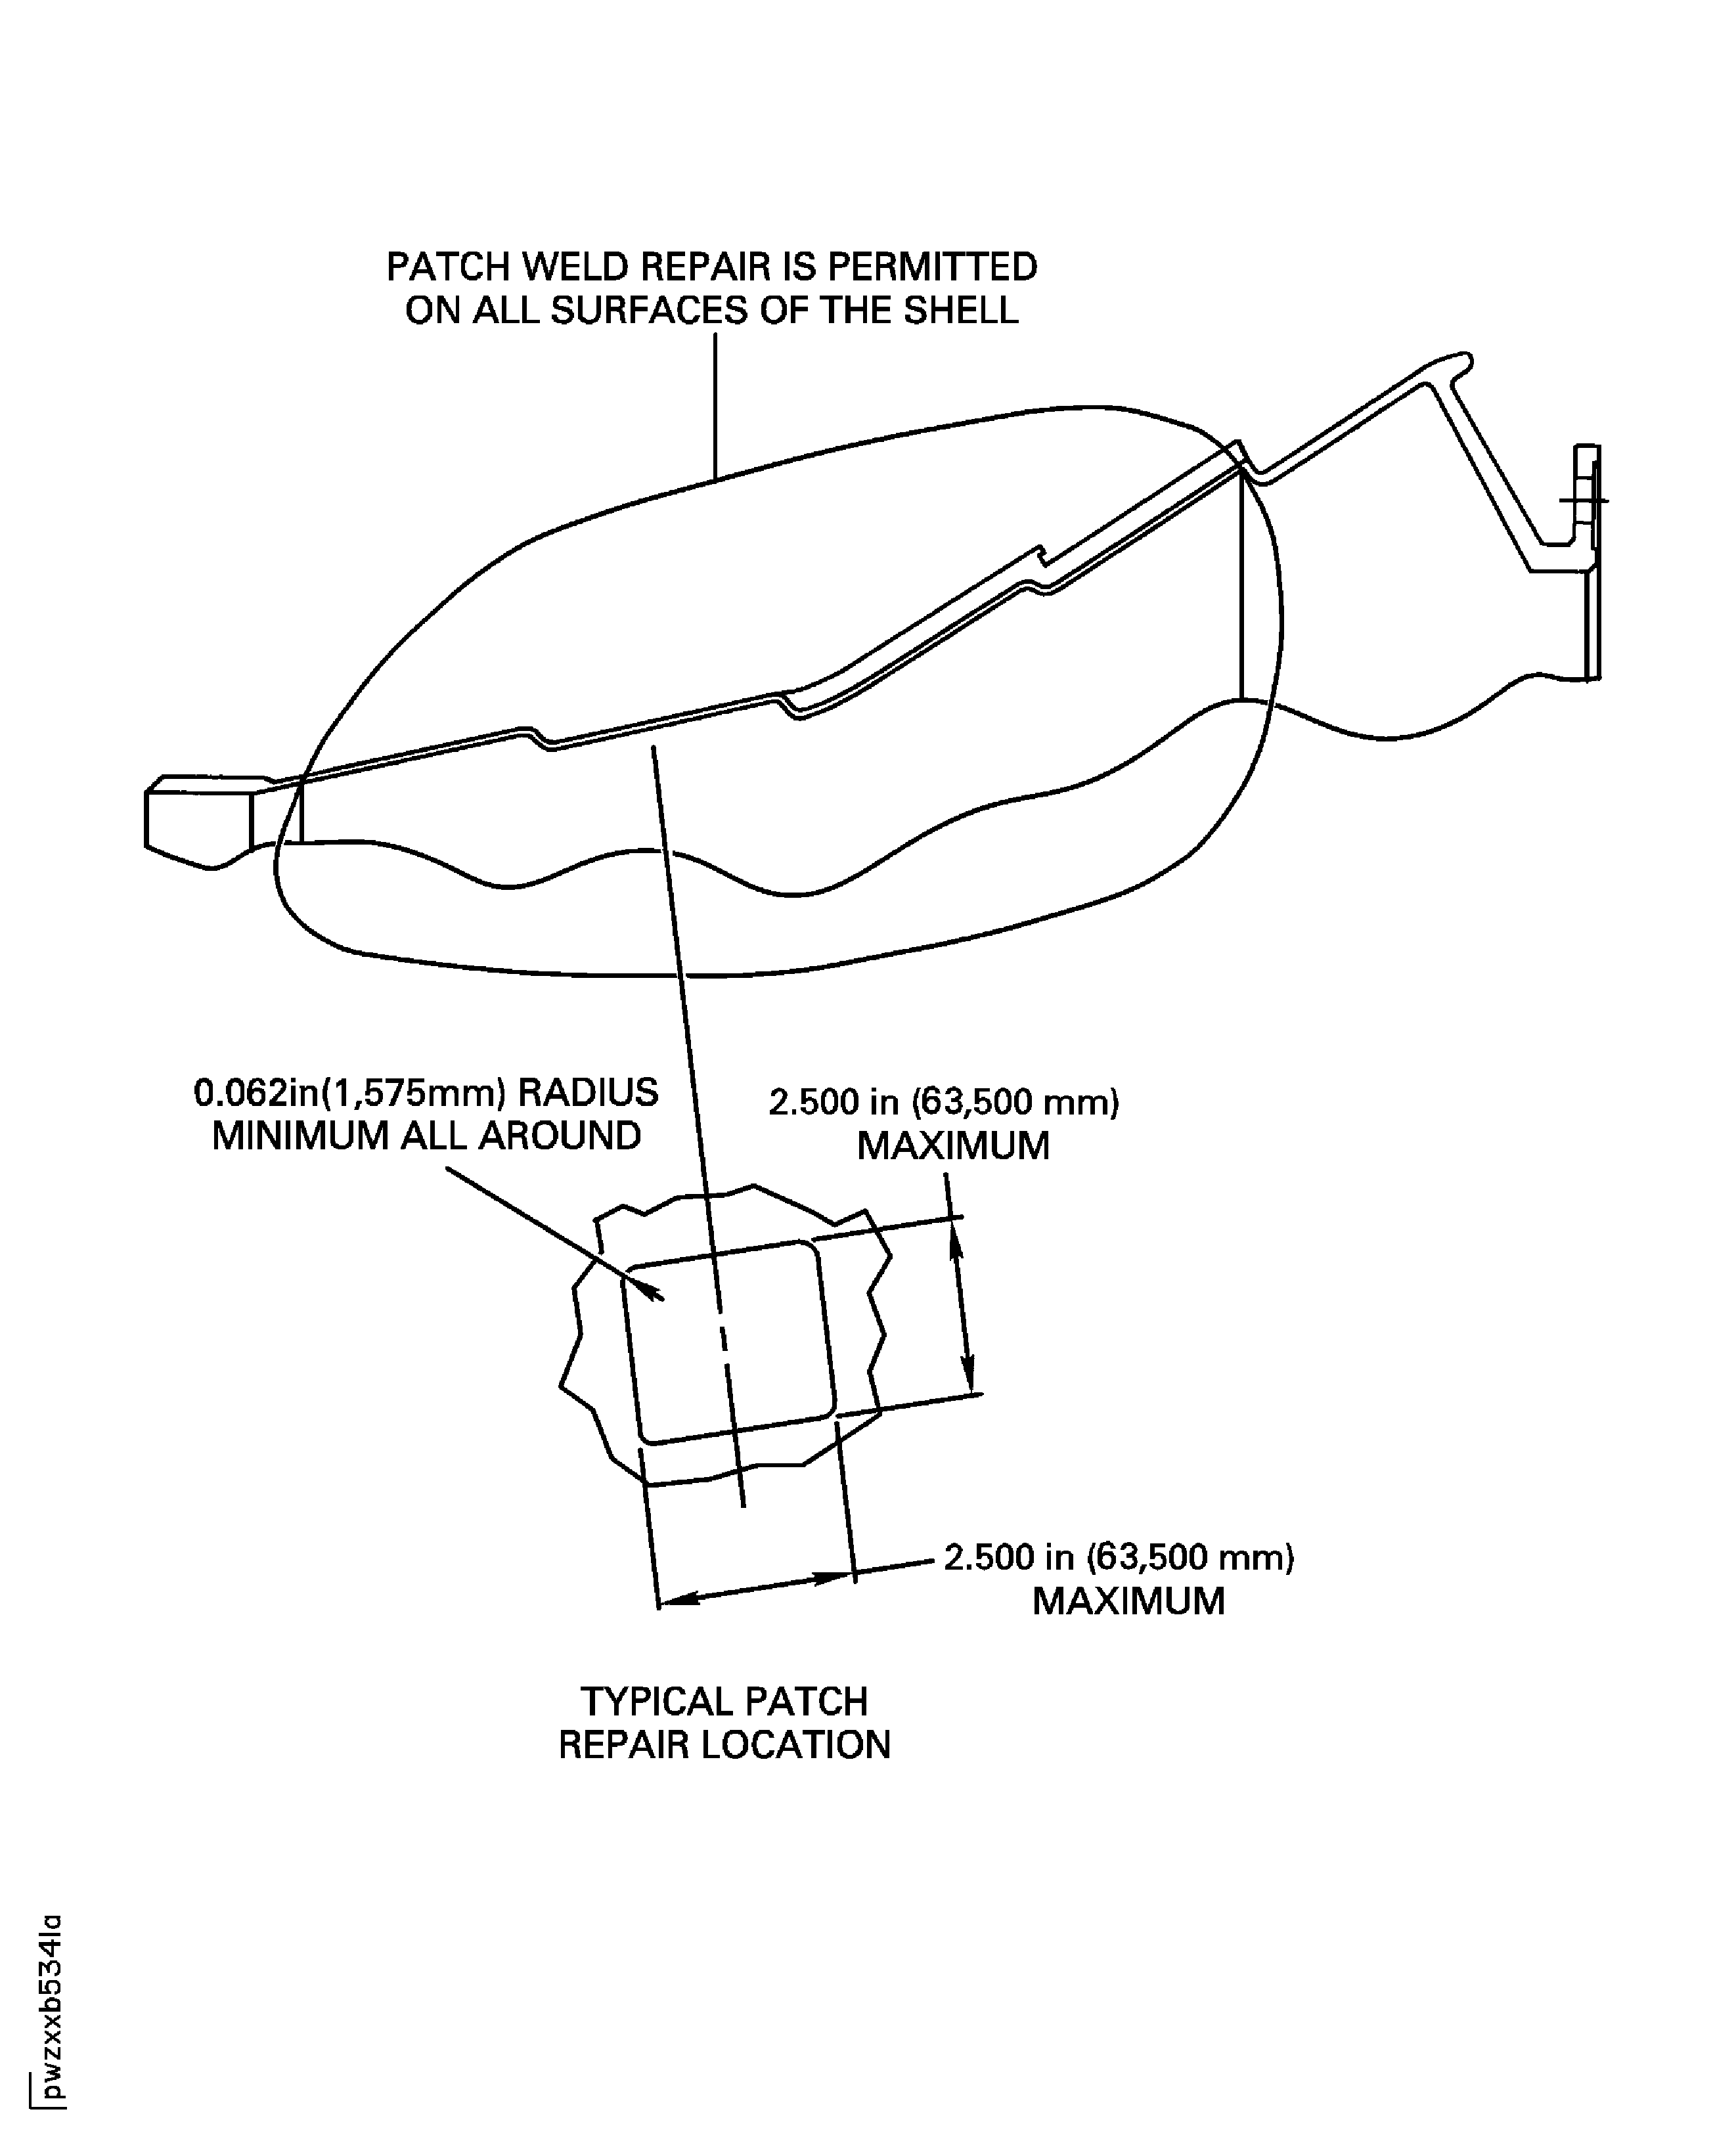
Refer to Figure.
Finish the weld on the inside in 0.010 in. (0.25 mm) above or 0.005 in. (0.13 mm) below the base material. Finish the weld on the outside in 0.010 in. (0.25 mm) above the base material.
Refer to Step.
Locally stress-relieve the liner after weld repair.
It is recommended that the front seal and the rear seal be held in a fixture to prevent distortion.
Refer to Step.
Make sure that all details are removed.
Refer to VRS3306, TASK 72-44-30-300-009 (REPAIR-009).
Resize the front inside diameter seal if necessary.
SUBTASK 72-44-30-310-052 Patch Weld the Shell
Refer to the SPM TASK 70-37-04-370-501 for the atmosphere.
NOTE
Stress-relief at temperatures higher than 1200 deg F (648.9 deg C) of finish machined steel, nickel and cobalt alloy parts must be done in a suitable protective atmosphere or must be followed by a suitable acid cleaning or descaling. Cooling rates must be selected to minimize distortion.Put the part in a cool, 500 deg F (260 deg C) maximum furnace.
Use the SPM TASK 70-37-24-370-501.
It is permitted to stress relieve the inner liner. This stress relief may be done instead of the stress relief requirements in steps 9.A. to 9.G.
SUBTASK 72-44-30-370-051 Stress-Relieve the Combustion Chamber Inner Liner
Use CoMat 06-072 DYE to mark the locations of the hole rows and the angular locations.
Use existing holes as a reference to locate the holes.
SUBTASK 72-44-30-350-076-001 Install Cooling and Segment Attachment Holes (Manual Method)
Refer to the SPM TASK 70-21-01-220-501.
Examine the areas that you welded.
Refer to TASK 72-44-30-200-000 (INSPECTION000).
Examine the dimensions of the inner liner.
SUBTASK 72-44-30-220-082 Examine the Combustion Chamber Inner Liner After Repair
Refer to the SPM TASK 70-23-03-230-501.
Fluorescent penetrant inspect the areas that you welded.
SUBTASK 72-44-30-230-053 Fluorescent Penetrant Inspect the Combustion Chamber Inner Liner
Refer to TASK 72-44-30-200-000 (INSPECTION-000).
Inspect the hardcoat of the front inside diameter seal.
Refer to TASK 72-44-30-200-000 (INSPECTION-000).
Inspect the hardcoat of the rear mounting flange.
SUBTASK 72-44-30-220-083 Examine the Hardcoat on the Front Inside Diameter Seal and the Rear Mounting Flange of the Combustion Chamber Inner Liner
Refer to VRS3173 TASK 72-44-30-300-001 (REPAIR-001) and VRS3264 V2500-A0-72-44-3001-00A-920A-C (REPAIR-003).
NOTE
If you patch repaired the shell, inspect for distortion between the segments after you install the segments. Refer to TASK 72-44-30-200-000.Install the liner segments and the gangnut channels.
SUBTASK 72-44-30-350-060 Install the Detail Parts to the Combustion Chamber Inner Liner
Figure: Repair Details and Dimensions
Repair Details and Dimensions

Figure: Repair Details and Dimensions
Repair Details and Dimensions

Figure: Repair Details and Dimensions
Repair Details and Dimensions

Figure: Repar Details and Dimensions
Repar Details and Dimensions

