Export Control
EAR Export Classification: Not subject to the EAR per 15 C.F.R. Chapter 1, Part 734.3(b)(3), except for the following Service Bulletins which are currently published as EAR Export Classification 9E991: SBE70-0992, SBE72-0483, SBE72-0580, SBE72-0588, SBE72-0640, SBE73-0209, SBE80-0024 and SBE80-0025.Copyright
© IAE International Aero Engines AG (2001, 2014 - 2021) The information contained in this document is the property of © IAE International Aero Engines AG and may not be copied or used for any purpose other than that for which it is supplied without the express written authority of © IAE International Aero Engines AG. (This does not preclude use by engine and aircraft operators for normal instructional, maintenance or overhaul purposes.).Applicability
All
Common Information
TASK 72-45-33-300-006 HPT Stage 2 Blade Retaining Plate - Dual Wire Electric Arc Coat Repair, Repair-006 (VRS3843)
Preliminary Requirements
Pre-Conditions
| Action/Condition | Data Module/Technical Publication |
|---|---|
| Make sure that the cleaning and inspection procedures are done before this repair. |
Support Equipment
NONEConsumables, Materials and Expendables
| Name | Manufacturer | Part Number / Identification | Quantity | Remark |
|---|---|---|---|---|
| CoMat 03-481 WIRE, DUAL ELECTRIC ARC, NICKEL-CHROMIUM/ ALUMINUM ALLOY | 26057 | CoMat 03-481 |
Spares
NONESafety Requirements
NONEProcedure
If the part is marked with VRS3843, machine or grind the existing coating from front face on Surface S to remove all the existing coating by SPM TASK 70-32-07-100-501. See Figure.
If the part is marked with VRS3515, grind the existing coating from front outer mating face on Surface S to remove all the existing coating by SPM TASK 70-32-07-100-501. See Figure.
Remove a minimum amount of parent material. All the coating must be removed.
SUBTASK 72-45-33-320-056-001 Removal of Existing Coat
Remove a minimum amount of parent material. See Figure.
SUBTASK 72-45-33-320-056-002 Machine or Grind the Front Outer Mating Face on Surface S to Remove All the Repairable Wear or Damage
Clean the part by SPM TASK 70-11-03-300-503. See Figure.
SUBTASK 72-45-33-110-058-001 Clean the Part
Cracks are not permitted.
Do the fluorescent penetrant inspection of the repaired areas by the applicable part number task given in TASK 72-45-33-200-000 (INSPECTION-000). See Figure.
SUBTASK 72-45-33-230-063 Do the Fluorescent Penetrant Inspection of the Repaired Area(s)
Do a dimensional inspection of the repair area before coating. See Figure.
SUBTASK 72-45-33-220-098-001 Do a Dimensional Inspection of the Repair Area
Prepare the repair areas for coat by SPM TASK 70-34-18-380-501. See Figure.
Grit blast outside of the repair area is not permitted.
Shot peen is not required on the repair area.
Use masks or maskants.
SUBTASK 72-45-33-380-053 Prepare the Repair Area(s) For Coat
Coat the front outer mating face by SPM TASK 70-34-03-340-501. See Figure.
Apply the coat to a sufficient thickness to allow for finish machining.
SUBTASK 72-45-33-340-053 Coat the Front Outer Mating Face
Remove the masks or maskants by SPM TASK 70-34-18-380-501. See Figure.
SUBTASK 72-45-33-320-056-003 Remove the Masks or Maskants
Finish machine the front outer mating face after coat by SPM TASK 70-32-07-100-501. See Figure.
Finish coating thickness must be 0.003 in. to 0.020 in. (0.076 mm to 0.508 mm).
Break the edges to 0.003 in. to 0.015 in. (0.08 mm to 0.38 mm).
SUBTASK 72-45-33-320-056-004 Finish Machine the Front Outer Mating Face after Coat
Clean the Part by SPM TASK 70-11-03-300-503. See Figure.
SUBTASK 72-45-33-110-058-002 Clean the Part
Do a visual inspection of the repaired area by SPM TASK 70-34-03-340-501. See Figure.
Do a dimensional inspection of the repaired area. See Figure.
SUBTASK 72-45-33-220-098-002 Do a Dimensional and Visual Inspection of the Repaired Area
Mark the part with VRS3843 adjacent to the part number by SPM TASK 70-09-00-400-501, Subtask 70-09-00-400-001, using the vibration peen, dot peen or electrolytic etch methods. Remove high spots caused by marking. See Figure.
Refer to Figure for the electrical contact area.
No burning, pitting or selective attach on the electrical contact area(s) is permitted.
If the part was already marked with VRS3843, remarking is not required.
SUBTASK 72-45-33-350-053 Mark the Part
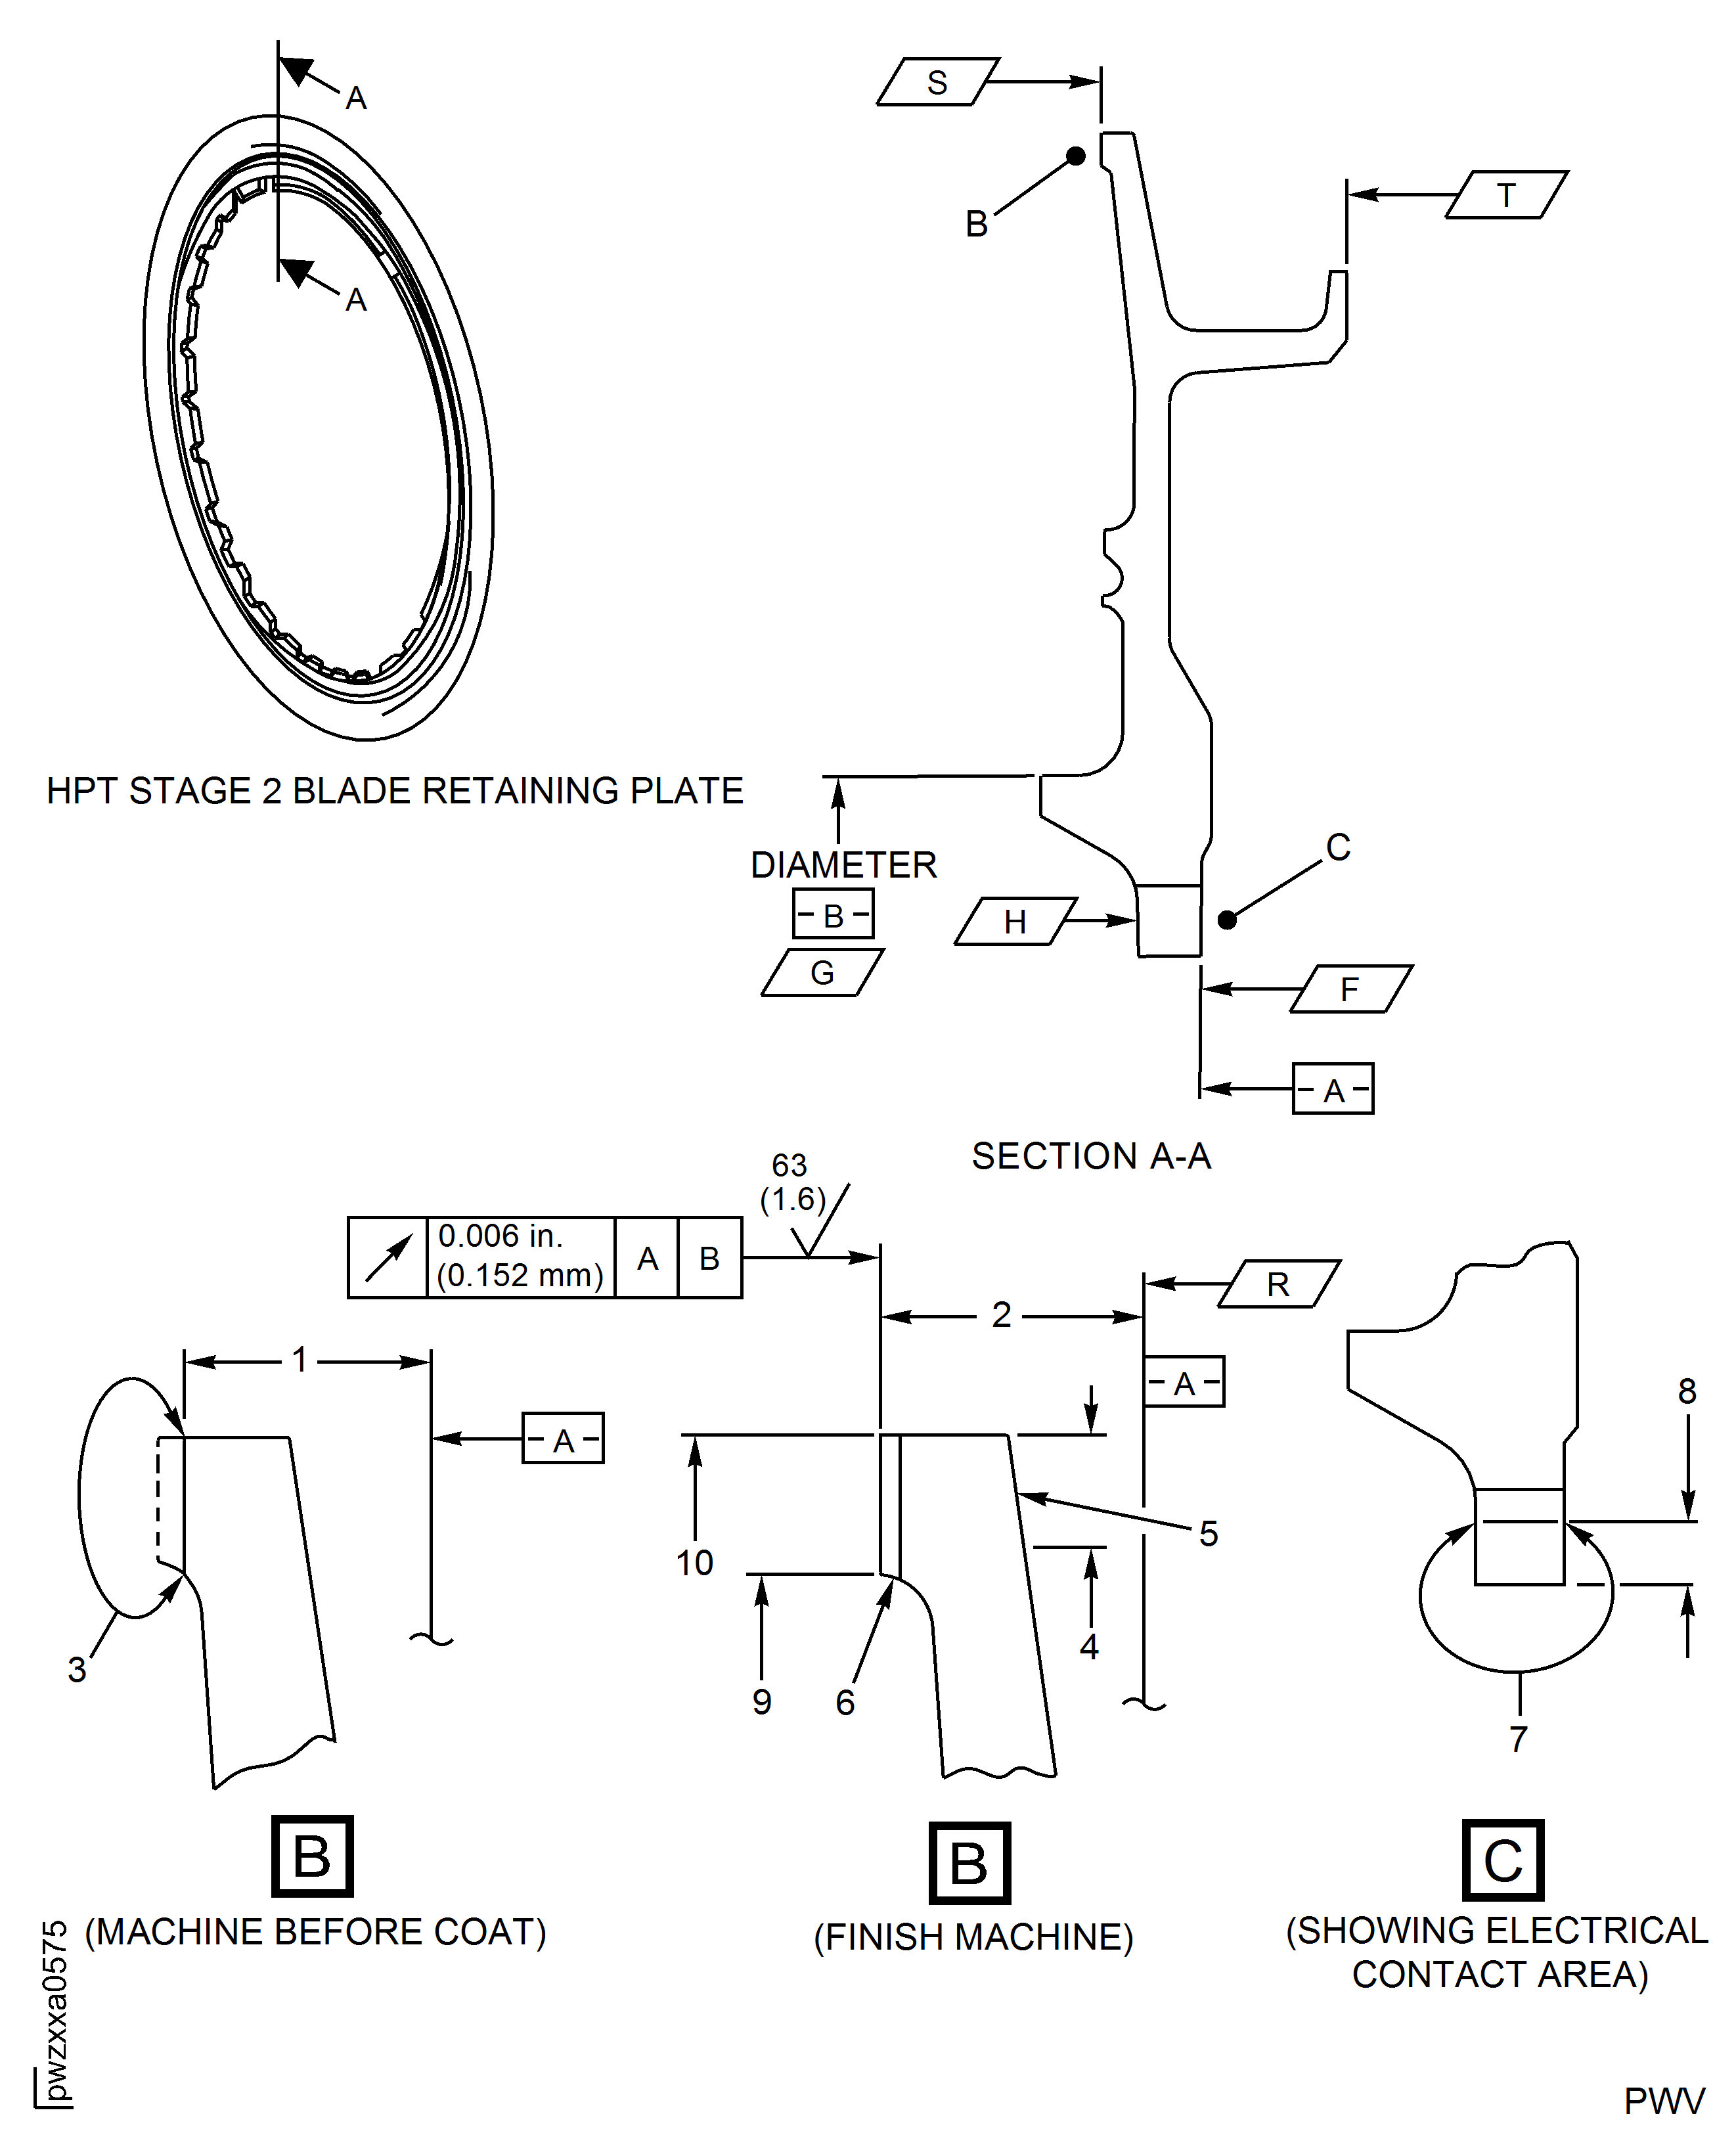
Figure: HPT Stage 2 Blade Retaining Plate - The Outside Diameter Mating Face, Dual Wire Electric Arc Coat Repair, Repair-006 (VRS3843)
HPT Stage 2 Blade Retaining Plate - The Outside Diameter Mating Face, Dual Wire Electric Arc Coat Repair, Repair-006 (VRS3843)

NOTEFor PN 2A3426, 2A3437 and 2A2097, all dimensions apply when Surface F is flat by 0.001 in. (0.025 mm) and Diameter G maintains a clearance envelope of 17.215 in. (437.261 mm) in a free or held condition. Hold the part only on Surface F, H, S, T and on Diameter G. Dimension R applies when the part is held only on Surface F, H and Diameter G. |
NOTEAll surface texture should be 63 micro-inches (1.6 micro-meters). |
Machine Before Coat | Finish Machine |
|---|---|
Axial Dimension | Axial Dimension |
If 0.222 - 0.232 Inch (5.639 - 5.893 mm) | 0.232 - 0.242 Inch (5.893 - 6.147 mm) |
If 0.221 Inch (5.614 mm) | 0.232 - 0.241 Inch (5.893 - 6.122 mm) |
If 0.220 Inch (5.588 mm) | 0.232 - 0.240 Inch (5.893 - 6.096 mm) |
If 0.219 Inch (5.563 mm) | 0.232 - 0.239 Inch (5.893 - 6.071 mm) |
If 0.218 Inch (5.538 mm) | 0.232 - 0.238 Inch (5.893 - 6.046 mm) |
If 0.217 Inch (5.512 mm) | 0.232 - 0.237 Inch (5.893- 6.020 mm) |
If 0.216 Inch (5.487 mm) | 0.232 - 0.236 Inch (5.893 - 5.995 mm) |
If 0.215 Inch (5.461 mm) | 0.232 - 0.235 Inch (5.893 - 5.969 mm) |
If 0.214 Inch (5.436 mm) | 0.232 - 0.234 Inch (5.893 - 5.944 mm) |
If 0.213 Inch (5.411 mm) | 0.232 - 0.233 Inch (5.893 - 5.918 mm) |
If 0.212 Inch (5.385 mm) | 0.232 Inch (5.893 mm) |
