Export Control
EAR Export Classification: Not subject to the EAR per 15 C.F.R. Chapter 1, Part 734.3(b)(3), except for the following Service Bulletins which are currently published as EAR Export Classification 9E991: SBE70-0992, SBE72-0483, SBE72-0580, SBE72-0588, SBE72-0640, SBE73-0209, SBE80-0024 and SBE80-0025.Copyright
© IAE International Aero Engines AG (2001, 2014 - 2021) The information contained in this document is the property of © IAE International Aero Engines AG and may not be copied or used for any purpose other than that for which it is supplied without the express written authority of © IAE International Aero Engines AG. (This does not preclude use by engine and aircraft operators for normal instructional, maintenance or overhaul purposes.).Applicability
All
Common Information
TASK 72-50-31-200-003-A00 LPT Stage 5 Disk - Examine, Inspection-003
General
This TASK gives the procedure for the inspection of the stage 5 turbine disk. For the other LP turbine disk parts, refer to TASK 72-50-31-200-000 (INSPECTION-000).
Fig/item numbers in parentheses in the procedure agree with those used in the IPC.
The policy that is necessary for inspection is given in the SPM TASK 70-20-00-200-501.
All the parts must be cleaned before any part is examined. Refer to TASK 72-50-31-100-000 (CLEANING-000).
All parts must be visually examined for damage, corrosion and wear. Any defects that are not identified in the procedure must be referred to IAE.
The procedure for those parts which must have a crack test is given in Step. Do the test before the part is visually examined.
Do not discard any part until you are sure there are no repairs available. Refer to the instructions in Repair before a discarded part is used again or oversize parts are installed.
Parts which should be discarded can be held although no repair is available. The repair of a discarded part could be shown to be necessary at a later date.
All parts must be examined to make sure that all the repairs have been completed satisfactorily.
The practices and processes referred to in the procedure by the TASK numbers are in the SPM.
References
Refer to the SPM for data on these items.
Definitions of Damage, SPM TASK 70-02-02-350-501
Record and Control of the Lives of Parts, SPM TASK 70-05-00-220-501
Inspection of Parts, SPM TASK 70-20-00-200-501
Some data on these items is contained in this TASK. For more data on these items refer to the SPM.
Method of testing for crack indications
Chemical processes
Surface protection
Preliminary Requirements
Pre-Conditions
NONESupport Equipment
| Name | Manufacturer | Part Number / Identification | Quantity | Remark |
|---|---|---|---|---|
| Dial gage | LOCAL | Dial gage | ||
| Dial indicator with needle insert | LOCAL | Dial indicator with needle insert | ||
| Horizontal rotating table | LOCAL | Horizontal rotating table | ||
| Vickers hardness tester | LOCAL | Vickers hardness tester |
Consumables, Materials and Expendables
NONESpares
NONESafety Requirements
NONEProcedure
SUBTASK 72-50-31-220-074 General Instructions for the Inspection of the Turbine Disk
NOTE
Examine the disk. If there are signs of overheating or the LPT module was reported for overheating do the hardness check. Refer to SUBTASK 72-50-31-220-077.
Dimension are given at temperature of 68 deg F (20 deg C).
Clean the parts. Refer to TASK 72-50-31-100-000 (CLEANING-000).
Reject
NOTE
Special attention areas for crack test, refer to TASK 72-50-31-200-006 (INSPECTION-006, CONFIG-001).
Cracked
Do the test for cracks on the parts that are given below. Use the applicable penetrant procedure.
PART IDENT
TASK/SUBTASK
Stage 5 Turbine Disk
SUBTASK 72-50-31-230-053 Examine the Stage 5 Turbine Disk for Cracks
Repair, VRS4544 TASK 72-50-31-300-040 (REPAIR-040).
Corrosion pitting
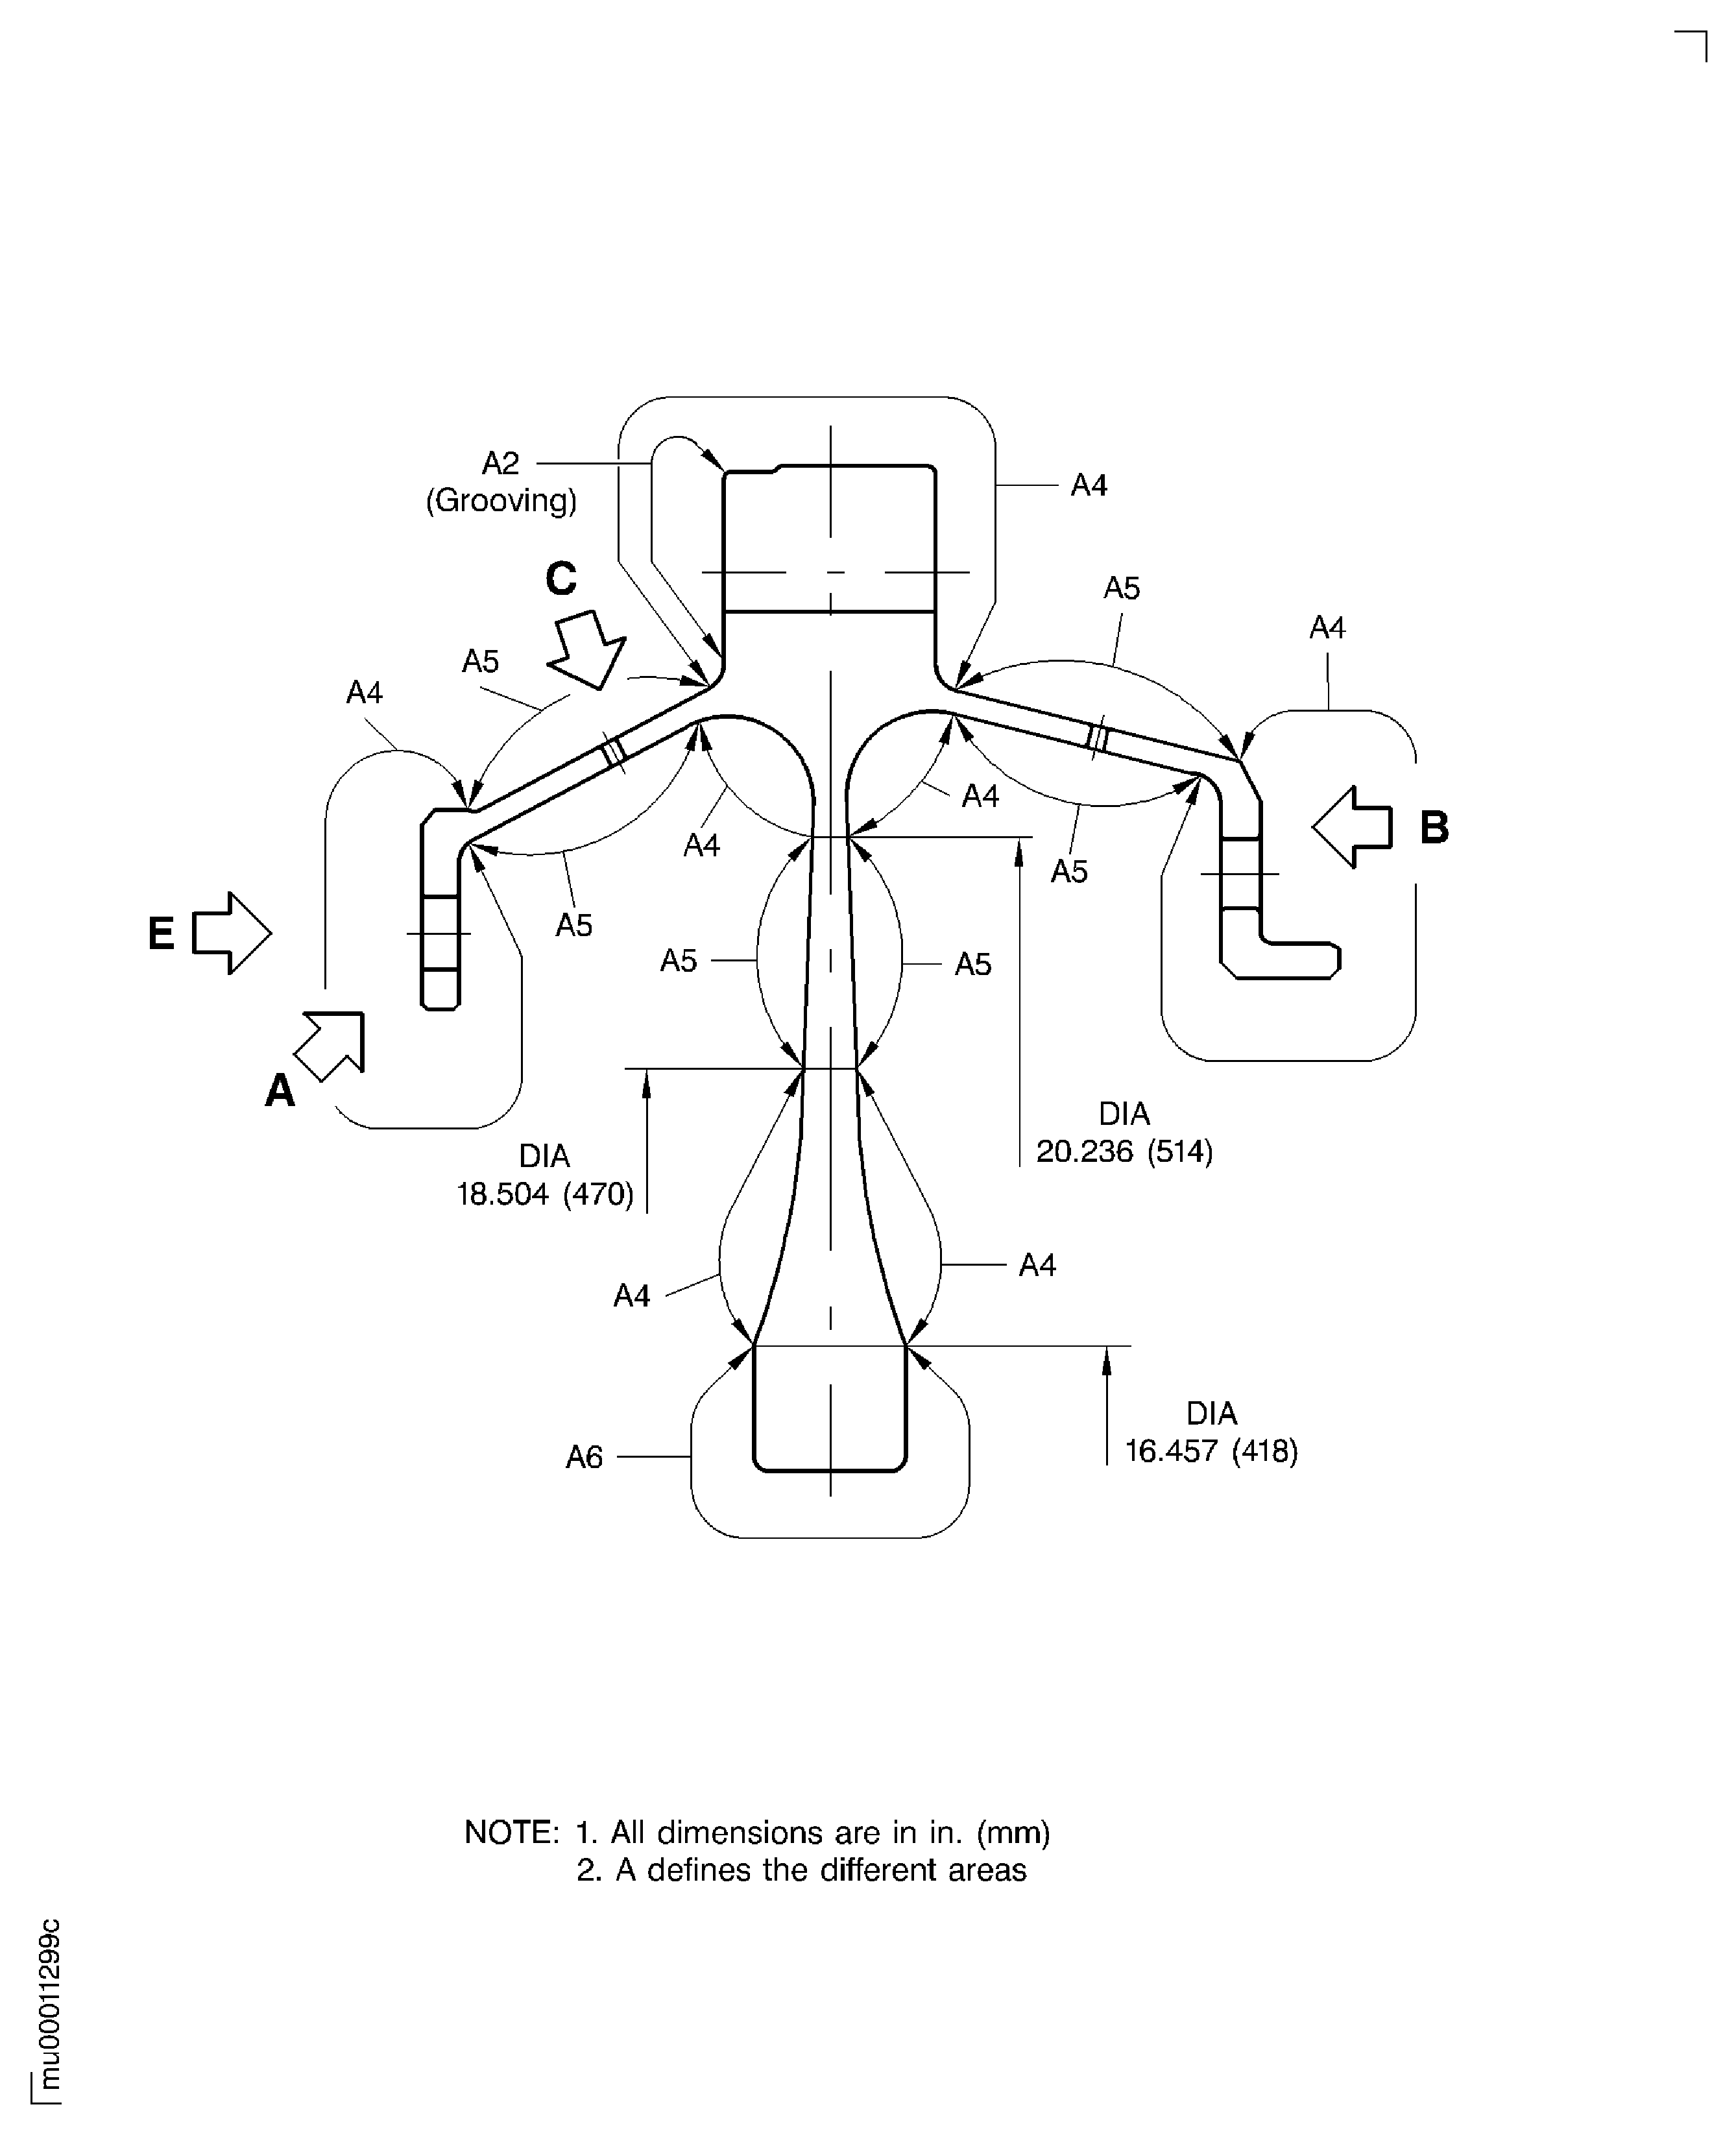
Visually examine the disk for corrosion pitting.
SUBTASK 72-50-31-220-075 Examine the Stage 5 Turbine Disk for Corrosion
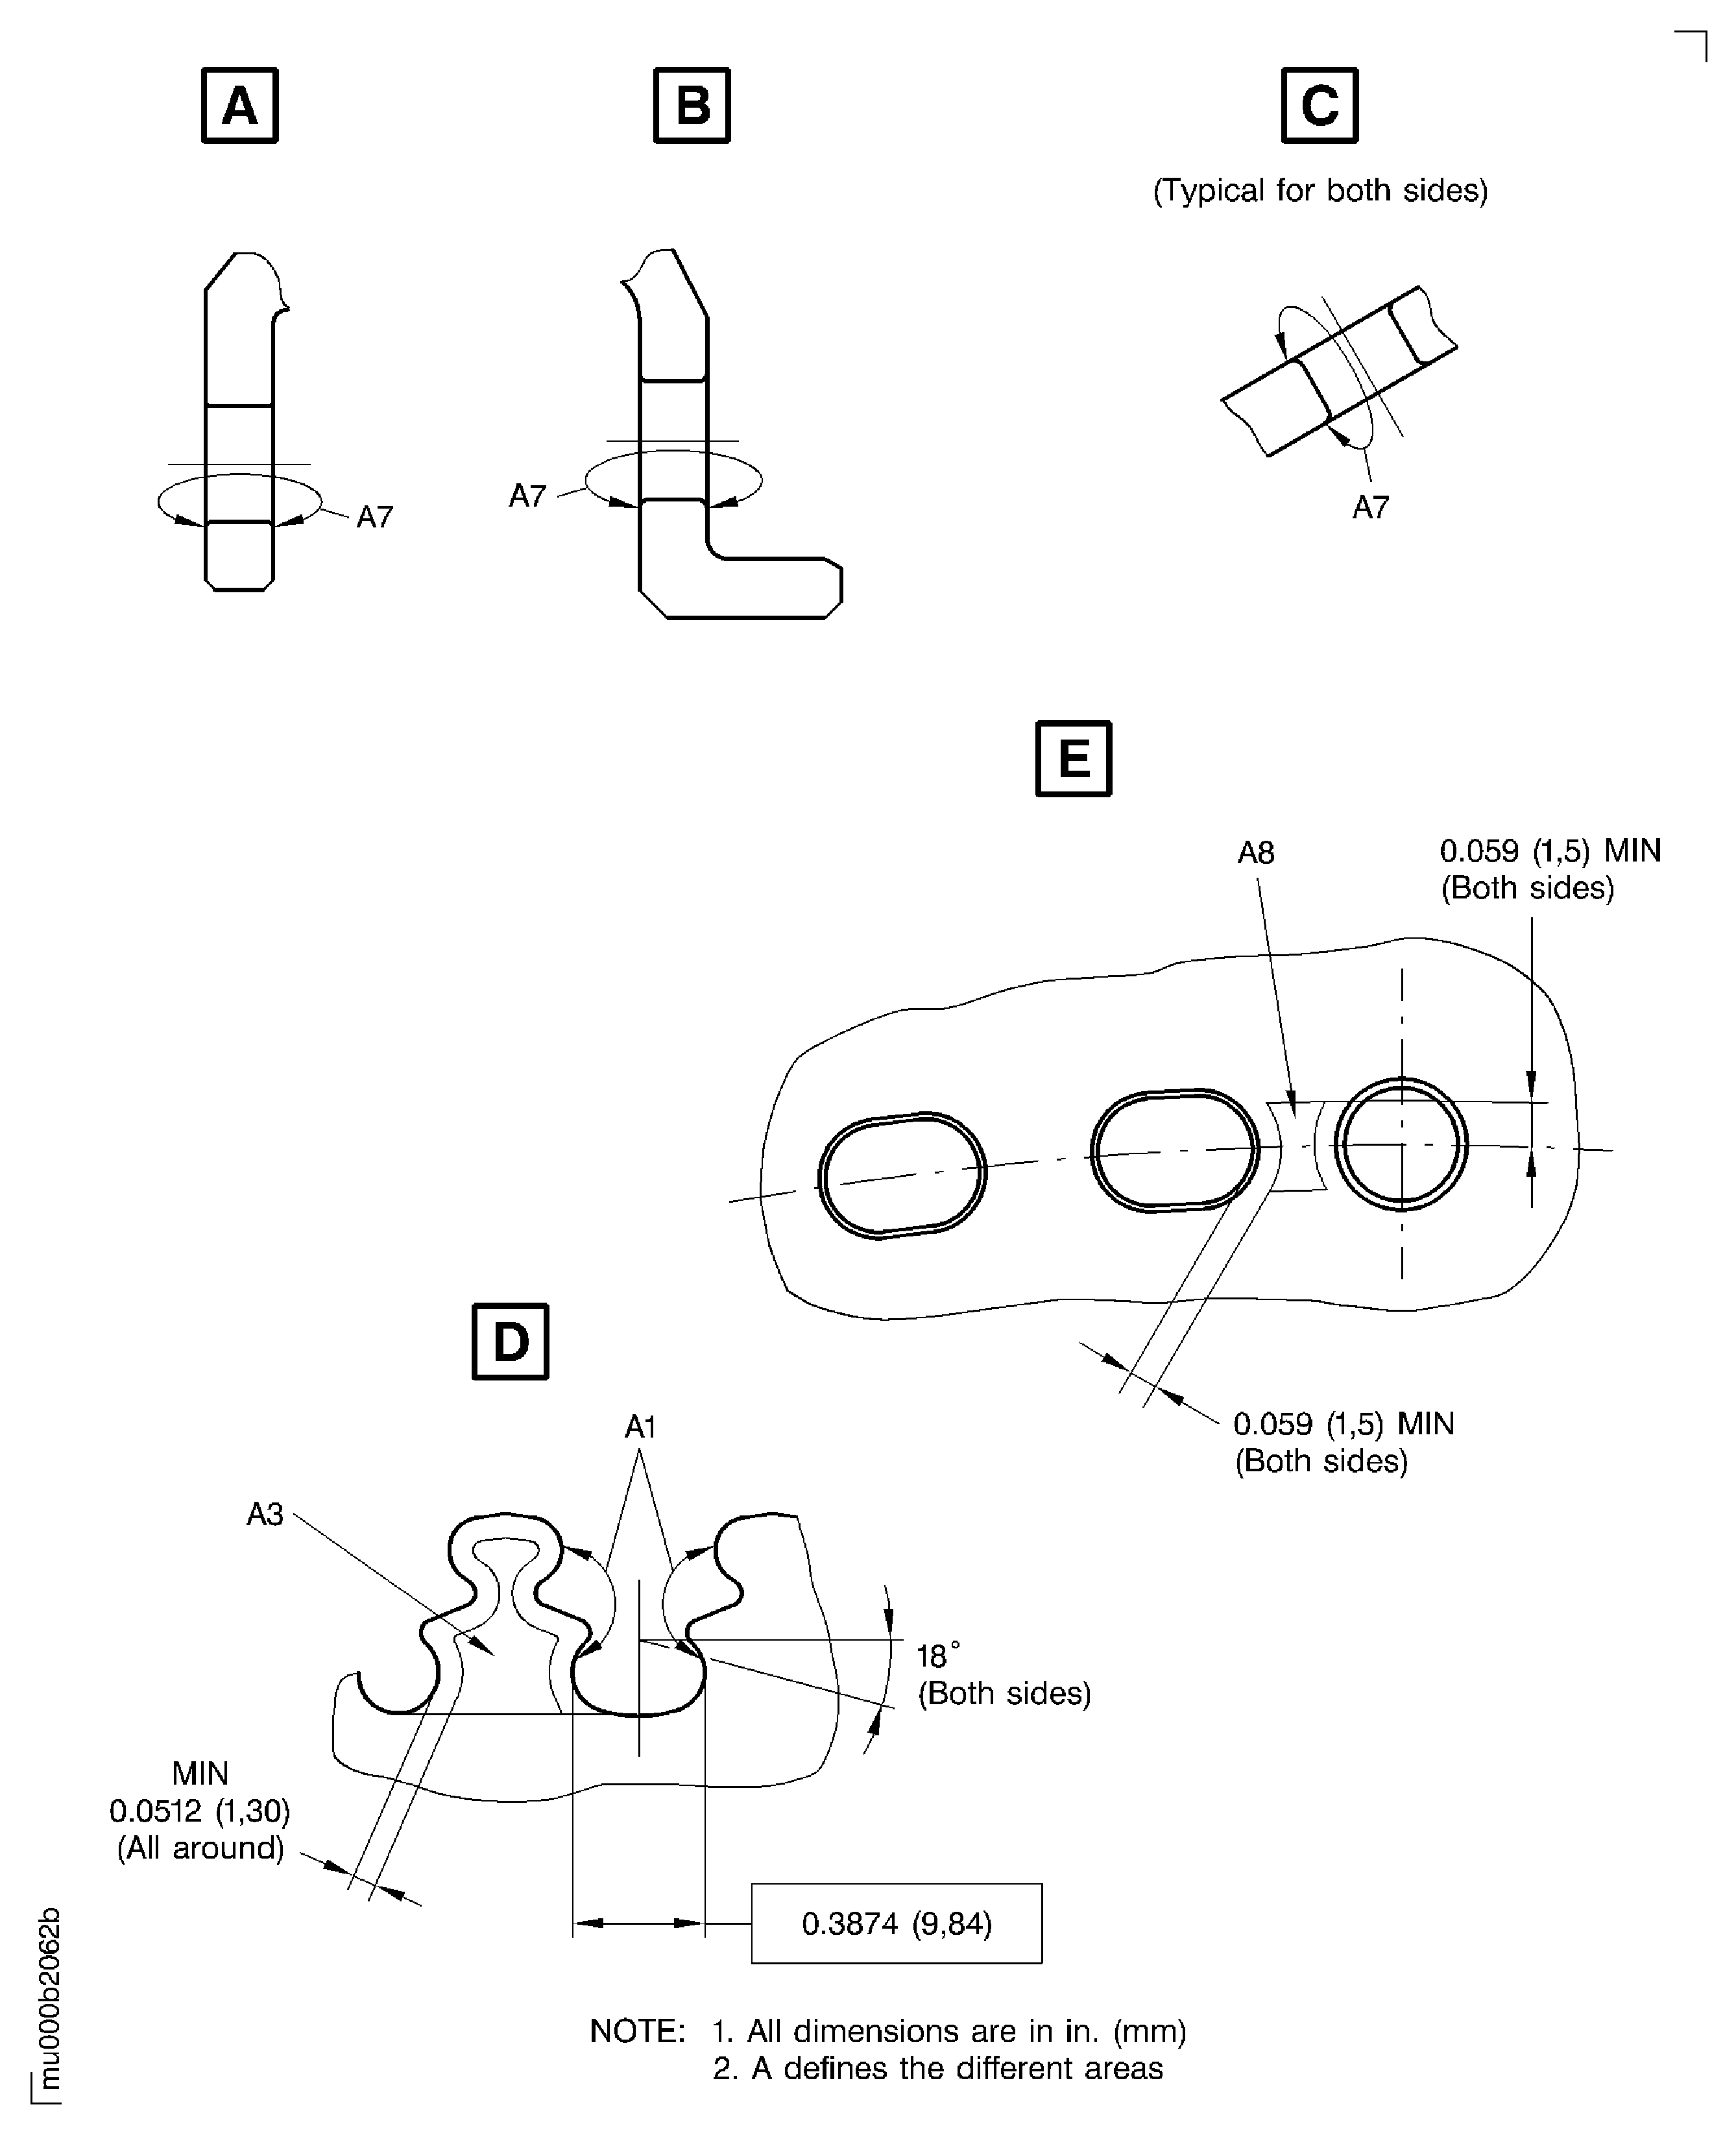
Refer to Figure.
Repair, VRS4164 TASK 72-50-31-300-009 (REPAIR-009)
If the depth of the grooves is between 0.003 in. and 0.006 in. (0.076 and 0.152 mm)
More than in Step
Grooved (due to seal ring contact).
Dimensionally examine the disk at location A2 for grooves. Use Dial gage, Dial indicator with needle insert, and Horizontal rotating table.
SUBTASK 72-50-31-220-076 Examine the Stage 5 Turbine Disk for Damage
Refer to Figure.
SUBTASK 72-50-31-220-077 Examine the Stage 5 Turbine Disk for Hardness
Refer to Figure.
Repair, VRS4164 TASK 72-50-31-300-009 (REPAIR-009)
More than in Step
Nicked and dented.
Repair, VRS4164 TASK 72-50-31-300-009 (REPAIR-009)
More than in Step
Scratched
Visually examine the disk surface for damage in area A4.
SUBTASK 72-50-31-220-078 Examine the Stage 5 Turbine Disk for Surface Damage
Refer to Figure.
Repair, VRS4164 TASK 72-50-31-300-009 (REPAIR-009)
More than in Step
Nicked.
Repair, VRS4164 TASK 72-50-31-300-009 (REPAIR-009)
More than in Step
Dented
Repair, VRS4164 TASK 72-50-31-300-009 (REPAIR-009)
More than in Step
Scratched
Visually examine the disk surface for damage in area A5.
SUBTASK 72-50-31-220-168 Examine Stage 5 Turbine Disk for Surface Damage
Refer to Figure.
Repair, VRS4164 TASK 72-50-31-300-009 (REPAIR-009)
Between 0.0004 in. and 0.0022 in. (0.010 and 0.055 mm)
Nicked and dented
Repair, VRS4164 TASK 72-50-31-300-009 (REPAIR-009)
Between permitted limit in Step and 0.0022 in. (0.055 mm) maximum depth
Scratched
Visually examine the disk surface for damage in area A6.
SUBTASK 72-50-31-220-169 Examine the Stage 5 Turbine Disk for Surface Damage
Refer to Figure.
More than in Step
Fretted
Repair, VRS4164 TASK 72-50-31-300-009 (REPAIR-009)
Other than in Step
Nicked, dented, and scratched
Examine the disk surface for damage in area A7.
SUBTASK 72-50-31-220-079 Examine the Stage 5 Turbine Disk for Damage
Refer to Figure.
SUBTASK 72-50-31-220-080 Examine the Stage 5 Turbine Disk for Surface Damage
Refer to Figure.
More than in Step
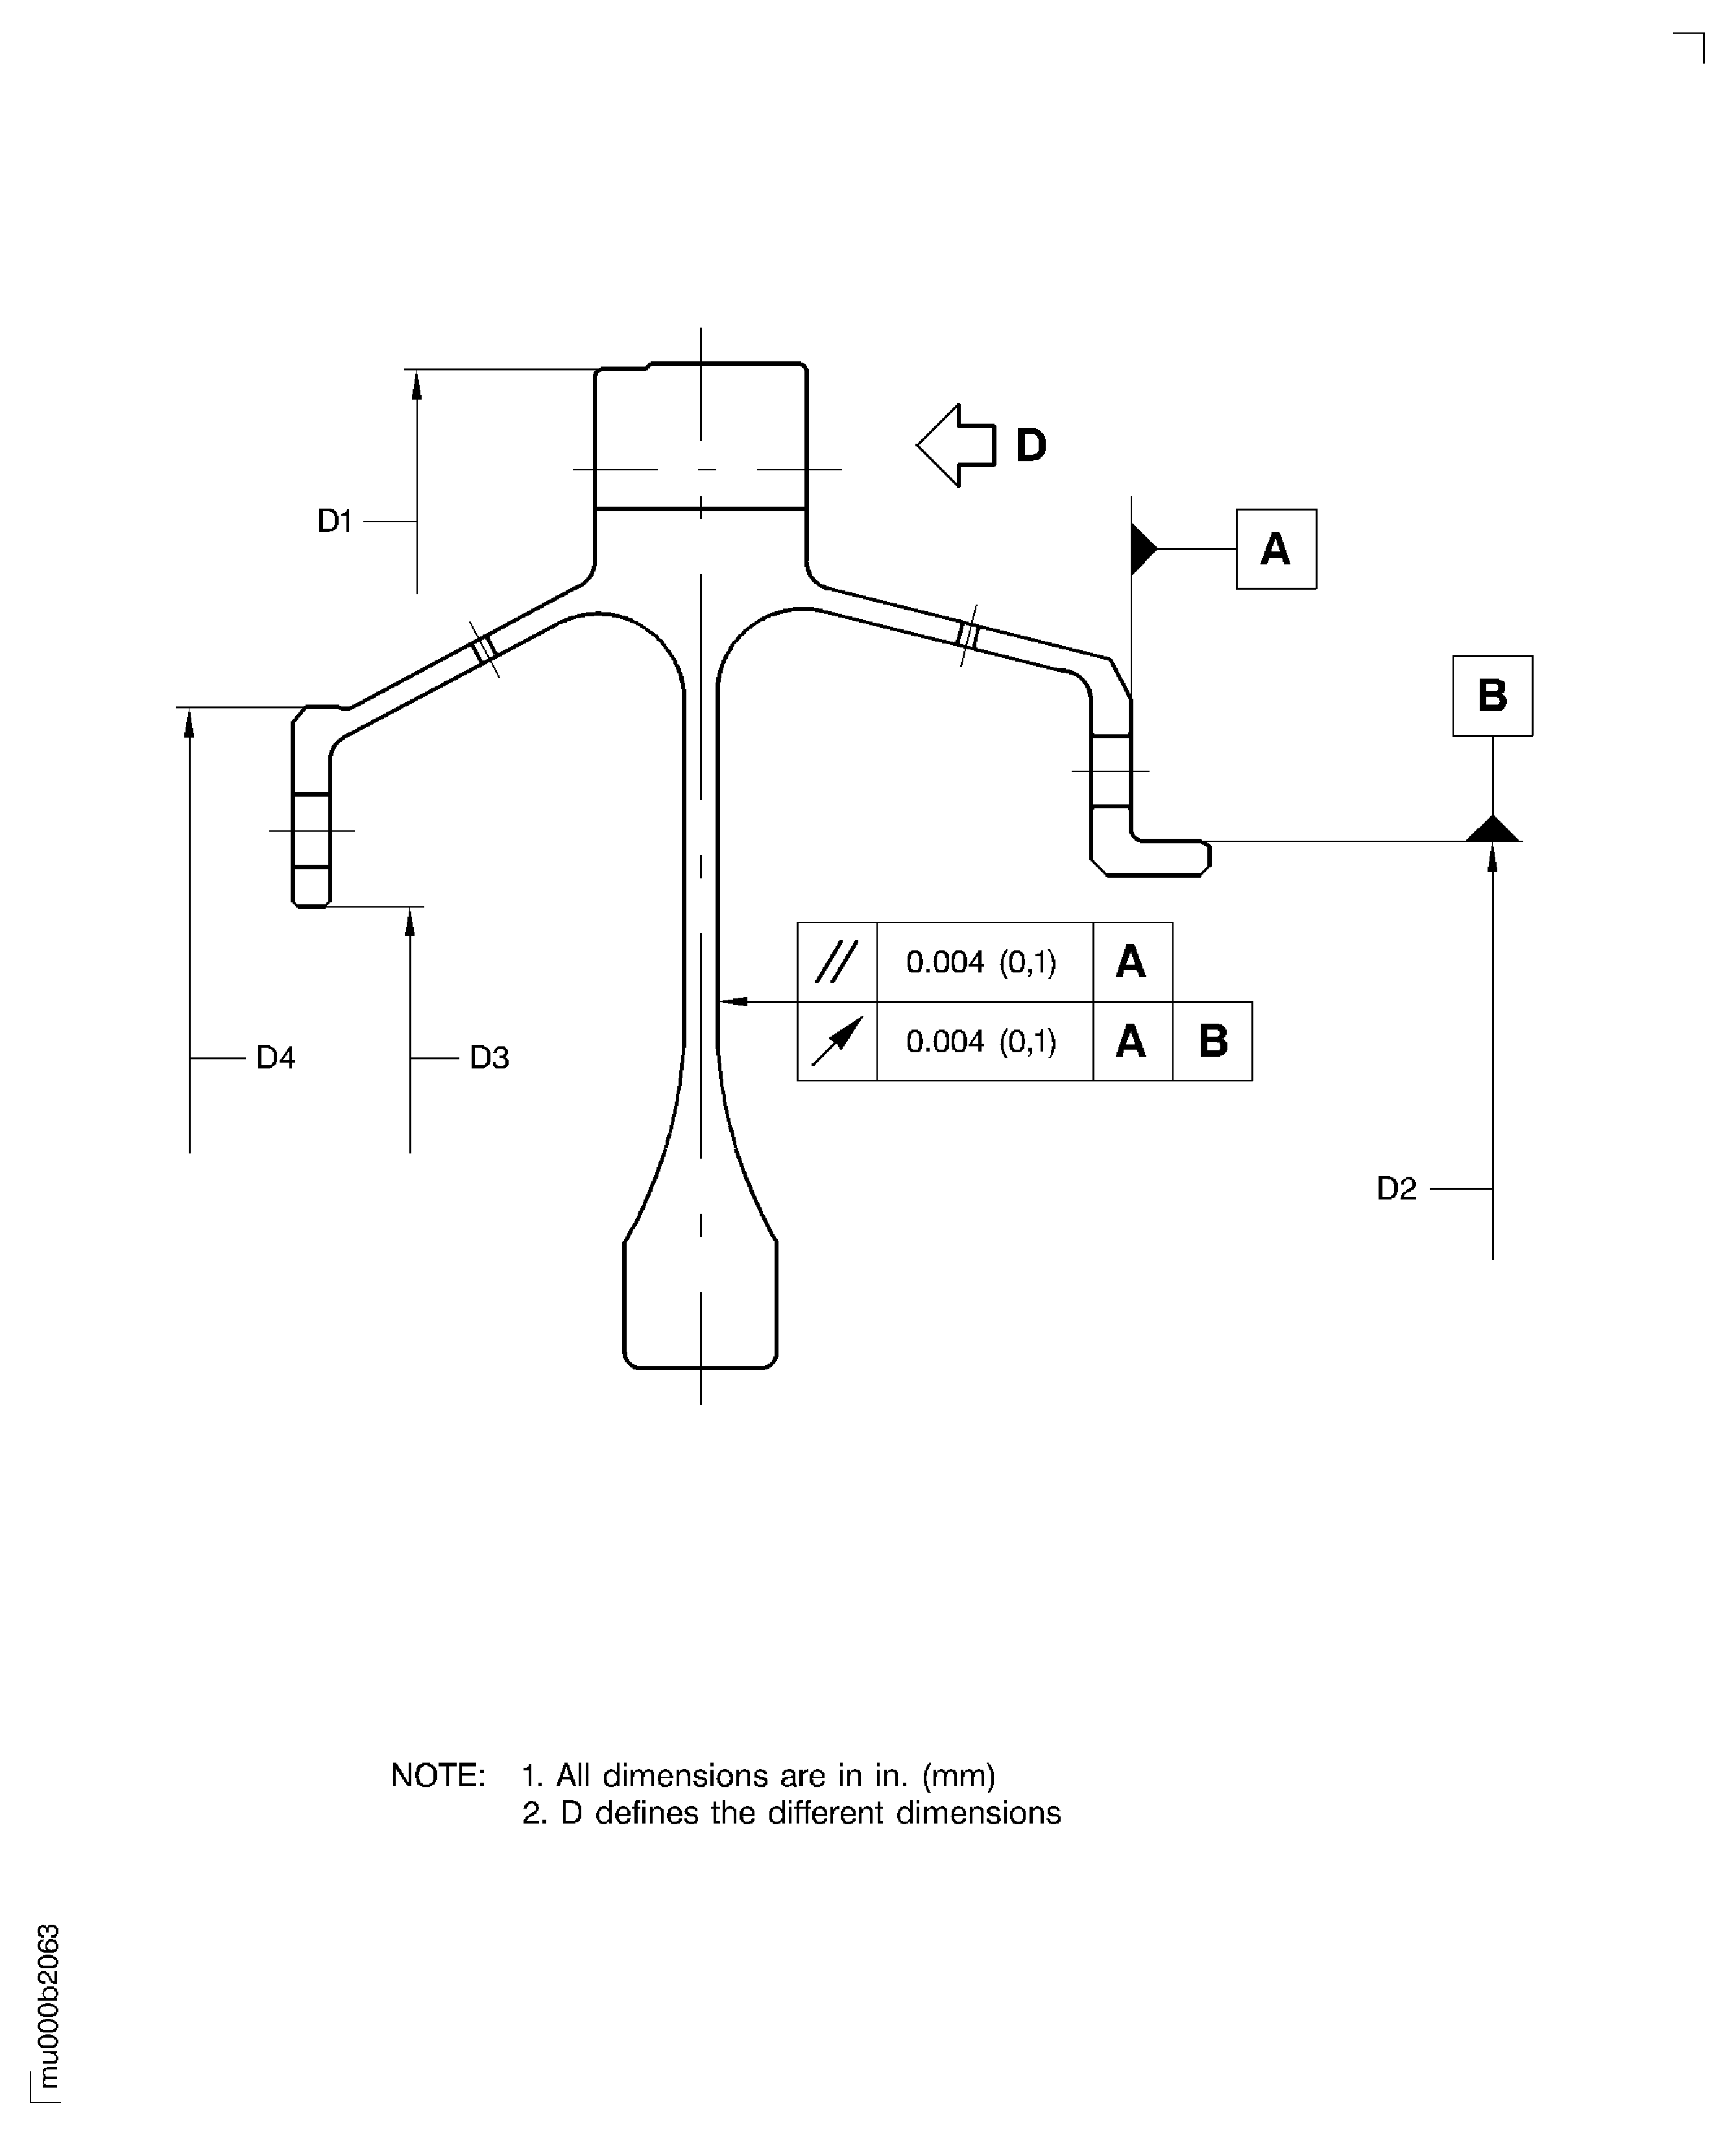
Measure the diameter D1 for growth at 120, 240 and 360 degrees. Get an average dimension.
More than in Step
Measure the diameter D1 for shrinkage at 120, 240 and 360 degrees. Get an average dimension.
SUBTASK 72-50-31-220-081 Examine the Stage 5 Turbine Disk Outer Diameter D1
Refer to Figure.
More than in Step
Do a check run-out of the inner flange to plane A and diameter B. Use Dial gage and Horizontal rotating table.
More than in Step
Do the check for parallelism of the inner flange to plane A. Use Dial gage and Horizontal rotating table.
SUBTASK 72-50-31-220-083 Examine the Stage 5 Turbine Disk for Excessive Deflection
Refer to Figure.
Repair, VRS4167 TASK 72-50-31-300-012 (REPAIR-012)
Less than in Step
Measure the diameter D2 for wear at 120, 240 and 360 degrees. Get an average dimension.
Accept the part for selected fit only
NOTE
This part can be used only if the mating part has a diameter that will result in a fit of reference 3359 or 3659. Refer to TASK 72-50-10-430-008.
Between 19.3209 in. and 19.3110 in. (490.75 and 490.50 mm)
Measure the diameter D2 for shrinkage and growth at 120, 240 and 360 degrees. Get an average dimension.
SUBTASK 72-50-31-220-084 Examine the Stage 5 Turbine Disk Snap Diameter D2
Refer to Figure.
Repair, VRS4165 TASK 72-50-31-300-010 (REPAIR-010)
More than in Step
Measure the diameter D3 for wear at 120, 240 and 360 degrees. Get an average dimension.
Accept the part for selected fit only.
NOTE
This part can be used only if the mating part has a diameter that will result in a fit of reference 3353 or 3653. Refer to TASK 72-50-10-430-006.
Between 18.9035 in. and 18.8917 in. (480.15 and 479.85 mm)
Measure the diameter D3 for shrinkage and growth at 120, 240 and 360 degrees. Get an average dimension.
SUBTASK 72-50-31-220-352 Examine the Stage 5 Turbine Disk Snap Diameter D3
Refer to Figure.
Repair, VRS4165 TASK 72-50-31-300-010 (REPAIR-010)
Less than in Step
Measure the diameter D4 for wear at 120, 240 and 360 degrees. Get an average dimension.
Accept the part for selected fit only.
NOTE
This part can be used only if the mating part has a diameter that will result in a fit of reference 3349 or 3649. Refer to TASK 72-50-30-440-003.
Between 20.3760 in. and 20.3642 in. (517.55 and 517.25 mm)
Measure the diameter D4 for shrinkage and growth at 120, 240 and 360 degrees. Get an average dimension.
SUBTASK 72-50-31-220-353 Examine the Stage 5 Turbine Disk Snap Diameter D4
Figure: Examine the Stage 5 Turbine Disk
Examine the Stage 5 Turbine Disk

Figure: Examine the Stage 5 Turbine Disk
Examine the Stage 5 Turbine Disk

Figure: Examine the Stage 5 Turbine Disk
Examine the Stage 5 Turbine Disk

